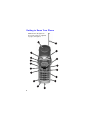
1
GH68-00755A
Series
S C H - 3 5 0 0
SCH-3500 SERIES USER GU IDE
samsung telecommunications america, inc.
1130 east arapaho road
richardson, texas 75081
phone: 972-761-7000 • fax: 972-761-7001
tech support: 888-987-help (4357)
web site: www.samsungtelecom.com
USER GUIDE
SCH-3500 Series
D U A L
B A N D
D U A L
M O D E
D I G I T A L
T E L E P H O N E
User Guide
Please read this manual before operating your
phone, and keep it for future reference.
+PVGNNGEVWCN2TQRGTV[
All Intellectual Property, as defined below, owned by or which is
otherwise the property of Samsung or its respective suppliers relating
to the SAMSUNG Phone, including but not limited to, accessories,
parts, or software relating thereto (the “Phone System”), is proprietary
to federal laws and state laws, and international treaty provisions.
Intellectual Property includes, but is not limited to, inventions
(patentable or unpatentable), patents, trade secrets, copyrights,
software, computer programs, and related documentation and other
works of authorship. You may not infringe or otherwise violate the
rights secured by the Intellectual Property. Moreover, you agree that
you will not (and will not attempt to) modify, prepare derivative works
of, reverse engineer, decompile, disassemble, or otherwise attempt to
create source code from the software. No title to or ownership in the
Intellectual Property is transferred to you. All applicable rights of the
Intellectual Property shall remain with SAMSUNG and its suppliers.
5COUWPI6GNGEQOOWPKECVKQPU#OGTKEC
56#+PE
Headquarters:
1130 E. Arapaho Road
Richardson, TX 75081
Tel: 972.761.7000
Fax: 972.761.7001
Customer Care Center:
1601 E. Plano Parkway, Suite 150
Plano, TX 75074
Toll Free Tel: 1.888.987.HELP (4357)
Fax: 972.761.7501
Internet Address: http://www.samsungwirelesscanada.com
An electronic version of this user guide can be downloaded at
www.samsungwirelesscanada.com
© 2000 Samsung Telecommunications America, Inc. All rights reserved.
No reproduction in whole or in part allowed without prior written
approval. Samsung Telecommunications America, Inc. is a trademark of
Samsung Electronics Corporation, Ltd.
Licensed by Qualcomm Incorporated under one or more of the
following patents: U.S. Patent No. 4, 901, 307; 5, 056, 109; 5, 099, 204;
5, 101, 501; 5, 103, 459; 5, 107, 225; 5, 109, 390.
Phone.com® is a registered Trademark of Phone.com, Inc.
RSA® is a registered Trademark RSA Security, Inc.
GH68-00820A
VERSION: 3510/3530 2.0
Printed in South Korea
+PVTQFWEVKQP6Q;QWT5COUWPI5GTKGU2JQPG
Congratulations on the purchase of your Samsung 3500 Series
Phone. Using the latest digital technology, the Samsung 3500
Series Phone operates similar to other wireless phones, while
providing superior resonance and tone quality. Your Samsung
3500 Phone operates in both 1900 MHz digital CDMA networks
and 800 MHz analog networks.
Your Samsung 3500 phone is packed with productive features
that are easy to use. Here are some of them:
♦
♦
♦
♦
♦
♦
♦
♦
♦
♦
♦
♦
♦
♦
♦
♦
♦
♦
♦
♦
♦
Voice Dialing – 20 Locations
Answer and hang up calls just by opening the flip
9 Ring Types, 4 Melody Tones, and Vibrator Alert
Distinctive ring types for voice, message, and alarm calls
Distinctive ring volumes for voice, message, and alarm calls
Phone Book Memory – 179 Locations
Call Logs – 9 Locations each for outgoing, incoming, and
missed calls
Short Message Services (SMS) and Voicemail
Web Browser
Pause Dialing for tele-services
Fast Ringer Mute during Incoming Call
Programmable Alarm
Redial – Last 9 Numbers
One-touch Turbo dialing – 9 Locations
Two-touch Turbo dialing – 90 Locations
Three-touch Turbo dialing - 80 locations
Mute Option during conversation
Security features including Call Restriction, Secret Number
capability, and Lock mode
Voice Memo recorder - up to five minutes
Fax and Data capability
Interactive manual available at samsungwirelesscanada.com
*QY6Q7UG6JKU/CPWCN
Your Samsung 3500 Series Phone user guide explains your
phone’s operations through easy-to-follow instructions. You’ll
find everything you need to know about using your new
Samsung 3500 Series Phone right here.
We’ve included some important safety information that you
should know before using your phone. You’ll find this
information in “Usage Guidelines: All about Performance and
Safety” on page 78.
If you still have questions, we’ll be happy to answer them. Just
call our Samsung Customer Care Center toll-free at
1.888.987.HELP (4357).
We hope you enjoy using your new Samsung 3500 Series
Phone, and thanks for choosing Samsung.
&+5%.#+/'41(9#44#06+'5
':%.75+101(.+#$+.+6;
EXCEPT AS SET FORTH IN THE EXPRESS WARRANTY CONTAINED ON
THE WARRANTY PAGE ENCLOSED WITH THE PRODUCT, THE
PURCHASER TAKES THE PRODUCT "AS IS", AND SAMSUNG MAKES NO
EXPRESS OR IMPLIED WARRANTY OF ANY KIND WHATSOEVER WITH
RESPECT TO THE PRODUCT, INCLUDING BUT NOT LIMITED TO THE
MERCHANTABILITY OF THE PRODUCT OR ITS FITNESS FOR ANY
PARTICULAR PURPOSE OR USE; THE DESIGN, CONDITION OR QUALITY
OF THE PRODUCT; THE PERFORMANCE OF THE PRODUCT; THE
WORKMANSHIP OF THE PRODUCT OR THE COMPONENTS CONTAINED
THEREIN; OR COMPLIANCE OF THE PRODUCT WITH THE
REQUIREMENTS OF ANY LAW, RULE, SPECIFICATION OR CONTRACT
PERTAINING THERETO. NOTHING CONTAINED IN THE INSTRUCTION
MANUAL SHALL BE CONSTRUED TO CREATE AN EXPRESS OR IMPLIED
WARRANTY OF ANY KIND WHATSOEVER WITH RESPECT TO THE
PRODUCT. IN ADDITION, SAMSUNG SHALL NOT BE LIABLE FOR ANY
DAMAGES OF ANY KIND RESULTING FROM THE PURCHASE OR USE OF
THE PRODUCT OR ARISING FROM THE BREACH OF THE EXPRESS
WARRANTY, INCLUDING INCIDENTAL, SPECIAL OR CONSEQUENTIAL
DAMAGES, OR LOSS OF ANTICIPATED PROFITS OR BENEFITS.
6CDNGQH%QPVGPVU
;QWT%QPUWOGT2CEMCIG
)GVVKPIVQ-PQY;QWT2JQPG
6WTPKPI[QWT2JQPG1PCPF1HH
To Turn It On 11
To Turn It Off 11
6JG6QR.KPGQHVJG&KURNC[
7UKPIVJG$CVVGT[
Installing the Battery 14
Removing the Battery 14
Charging the Battery 14
Charging with the Dual-Slot Desktop Charger 15
Charging with the Travel Charger 16
;QWT2JQPG U/QFGU
Standby Mode 17
Power Save Mode 17
Conversation Mode 17
$CUKE(WPEVKQPU
Making a Call 18
Ending a Call 18
Answering a Call 18
Correcting Dialing Mistakes 19
Prepend Dialing 19
Automatic Hyphenation 19
Setting your Phone’s Roaming Ability 20
Using Caller ID 21
Call Waiting 21
Answering a Call Waiting Call 22
Disabling Call Waiting 22
K
$CUKE(WPEVKQPU
EQPVKPWGF
Using Three-Way Calling 22
Using Call Forwarding 23
Redialing Calls 23
Displaying your own Phone Number 24
Adjusting Voice Volume 24
Adjusting Ringer Volume 24
To Silence the Ringer During an Incoming Call 25
Missed Call Alert 25
Dropped Call Alert 25
Failed Call Alert 25
Minute Beep 26
To Mute the Microphone During a Call 26
Key Beep Volume Setting 27
Tone Length Setting 27
Incoming Call Notification 28
Alerts Settings 29
Any Key Answer 29
&KURNC[1RVKQPU
Backlight Control 30
Personal Greeting 30
Setting the Language of the Display 31
#NCTO
Setting the Alarm 31
Setting the Alarm Ring Type (or Sound) 33
Setting the Alarm Ring Volume 33
4KPIGT1RVKQPU
Ring Tone Mute 34
Ring Type Setting for Voice Calls 34
Ring Volume Setting for Voice Calls 35
Ring Type Setting for Message Calls 35
Ring Volume Setting for Message Calls 36
Ring Type Setting for Roaming Calls 36
KK
8QKEG/GOQ
Recording a Voice Memo 37
Reviewing a Voice Memo 38
8QKEG#EVKXCVGF&KCNKPI
Tips on Recording Names 39
Program the Phone for Voice-Activated Dialing 40
Placing a Call using Voice Dialing 40
Voice Dialing Activation 41
Reviewing Voice Dialing Entries 42
Erasing Voice Dialing Entries 42
-G[IWCTF
'OGTIGPE[&KCNKPI
Calling 911 44
/GUUCIG5GTXKEGUCPF8QKEGOCKN
Message Memory Capacity 45
Message Ringing 45
Setting up your Voicemail Box 45
Reviewing Voicemail Messages 46
One-Touch Access to Your Voicemail Box 46
Reviewing Messages 47
Messages and Lock Mode 47
Reviewing Numeric Pages, Text Messages,
and MiniBrowser Messages 47
Erasing Messages 48
Message Options 48
6JG2JQPG$QQM
Viewing your Phone Book 49
Storing Phone Numbers Shortcut 49
Storing Phone Numbers and Names 49
Storing Phone Numbers at the End of a Call 50
Finding Phone Book Entries by Location 51
Finding Entries by Name 51
KKK
%JCPIKPI[QWT2JQPG$QQM
Editing Phone Book Numbers 52
Secret Phone Book Numbers 52
Erasing the Phone Book 52
&KCNKPIHTQO;QWT2JQPG$QQM
Dialing by Memory Location 53
Memory Dialing Shortcuts 53
#FXCPEGF2JQPG$QQM(GCVWTGU
Pause Dialing 54
Storing Pauses in a Phone Book Entry 55
Pause Dialing from a Stored Phone Book Entry 55
Manual Pause Dialing 56
Finding a Stored Number using Four Digits 56
Setting the SEND Key 57
;QWT2JQPG U5GEWTKV[(GCVWTGU
Lock Mode 58
Lock Code Setting 58
Locking the Phone 59
Dialing in Lock Mode 60
Call Limiting Options 60
Special Numbers 62
Storing Special Numbers 62
Dialing Special Numbers in Lock Mode 62
Resetting Your Phone 63
-GGRKPI6TCEMQH;QWT%CNNU7UKPI%CNN.QIU
Reviewing Call Logs 64
Reviewing Airtime 65
(CZCPF&CVC%CNNU
Receiving a Fax 66
Receiving a Data File 67
KX
6JG/KPK$TQYUGT
The MiniBrowser Start and End Prompts 68
Launching the MiniBrowser 69
To Exit the MiniBrowser 70
The MiniBrowser Soft Keys 70
Navigating the MiniBrowser 70
Entering Text, Numbers, or Symbols 72
Using Links 72
Initiating a Phone Call from the MiniBrowser 72
Using Bookmarks 73
To Create a Bookmark 73
Finding a Bookmark 73
&KCNKPI#DDTGXKCVGF2JQPG0WODGTU
/GPWU
Main Menu 75
In Use Menu 75
Menu Navigation 75
;QWT2JQPG U/CKP/GPW
7UCIG)WKFGNKPGU
#NNCDQWV2GTHQTOCPEGCPF5CHGV[
Understanding Signal Strength 78
Understanding Power Save Mode 78
Understanding how Your Phone Operates 78
Specifications Subject to Change 78
Radio Frequency Safety 79
Emergency Calls 80
Maintaining Your Phone’s Peak Performance 80
Protecting Your Battery 81
Battery Disposal and Recycling 82
Phone and Battery Specifications 82
Operating a Motor Vehicle 83
X
7UCIG)WKFGNKPGU
EQPVKPWGF
Following Safety Guidelines 83
Turn off Your Phone before Flying 83
Restricting Children’s access to Your Phone 84
Using Your Phone near other Electronic Devices 84
Cautions 85
FCC Notice 85
Liquefied Petroleum Gas 85
FCC Compliance Information 85
Storing Your Phone 85
Turn off Your Phone in Dangerous or Posted Areas 86
Your Phone's Voice Memo Feature 86
Information To User 87
+PFGZ
XK
;QWT%QPUWOGT2CEMCIG
Your consumer package contains the following items:
♦
♦
♦
♦
Samsung SCH-3500 Phone with Hand Strap
Standard Lithium-Ion Battery
Dual-Slot Desktop Charger or Travel Charger
User Guide, Quick Reference Card, and Accessory Card
)GVVKPIVQ-PQY;QWT2JQPG
NOTE: Items 1 through 16 in
the picture below are explained
on pages 3 through 10.
)GVVKPIVQ-PQY;QWT2JQPG
EQPVKPWGF
Active Flip: Just open the flip
to answer an incoming call,
and close the flip to end the
call. The flip also contains the
speaker.
You can also:
♦ Initiate a Voice-Activated
Dialing call by opening the
flip when you set this option
in the Main Menu.
♦ Set the flip to turn the
backlight on and off.
1.
2.
LED Indicator: Flashes to
indicate an incoming call or
message. Also lights up
(flashes) for a few seconds
when you turn on the phone.
)GVVKPIVQ-PQY;QWT2JQPG
EQPVKPWGF
3.
♦
♦
♦
♦
♦
4.
Volume/Scroll Key: This key
is actually two keys (one up
and one down) that are used
to set volume levels and help
you navigate through menus
and the Phone Book. Press
the volume/scroll key to:
Adjust voice volume during
conversation.
Adjust ringer volume in
Standby mode.
Mute the ringer during an
incoming call.
Scroll through menu options.
Scroll through your Phone
Book.
Backlit Display Screen: The
Display screen contains two
areas:
♦ The top line displays
indications about your
phone’s operating mode (see
“The Top Line of the Display”
on page 12).
♦ The lower area displays in-use
information such as the other
party’s number, the call timer,
the name and number of the
other party (if available),
Mute, Call Waiting, etc. Your
menus also display in the
lower area.
)GVVKPIVQ-PQY;QWT2JQPG
EQPVKPWGF
5.
♦
♦
♦
♦
♦
♦
6.
OK / Messages Key: This key
performs many functions:
During incoming calls, press
it to mute the ringer.
When the alarm goes off,
press it to silence the alarm.
From Standby mode, press it
briefly to access the Messages
Menu.
From Standby mode, press
and hold to access voicemail
(if setup - see “One-Touch
Access to Your Voicemail
Box” on page 46).
When entering a phone
number, press it once to save
the number to the Phone
Book.
When navigating a menu,
press it to select the
highlighted item.
Voice Memo Key: Press and
hold it to record up to 60
seconds of audio. A total of
five minutes of audio can be
recorded in five separate
Voice Memos. Each Voice
Memo can be stored indefinitely or erased. From
Standby mode, press briefly
to view the Voice Memo
menu.
)GVVKPIVQ-PQY;QWT2JQPG
EQPVKPWGF
7.
♦
♦
♦
♦
♦
♦
♦
8.
SEND Key: This key performs
several useful functions.
Press it to answer calls.
Dial a number and press it to
connect.
During a conversation, press
it to initiate Three-Way
calling.
During a conversation, press
it to answer a Call Waiting
call.
Press it once in Standby mode
to quickly access your Call
Logs.
Quickly press it twice to
redial the last outgoing
number.
Press and hold to use VoiceActivated Dialing (depending
on your Main Menu setting).
Scroll Keys: Use the scroll
keys to scan menu options,
Phone Book entries, Call Logs
or to move the cursor when
editing. As shown in the illustration, there are several keys
that can be used to scroll.
)GVVKPIVQ-PQY;QWT2JQPG
EQPVKPWGF
9.
Microphone: Your typical
voice microphone for conversation, but also accepts your
voice commands for VoiceActivating Dialing. You can
also mute the microphone
during conversation by
pressing
.
10. Accessories Connector: The
location where you connect
your charging device. It can
also be used to connect a
wireless data device or handsfree car kit (sold separately).
♦ Remove the rubber plug
before first use.
)GVVKPIVQ-PQY;QWT2JQPG
EQPVKPWGF
11. CLR Key: This key is used to
♦
♦
♦
♦
erase numbers or characters
you have entered incorrectly,
or to return to a previous
screen.
To erase one character from
the display screen, briefly
press it once.
To erase all of them, hold it
down for one second.
To back up one menu level,
press it once.
To return to Standby mode,
hold it down for one second.
12. END/ Power Key: Press this
key to disconnect a call or to
return to Standby mode from
any menu. Press and hold this
key to turn the phone on or
off.
♦ If the flip is already open, and
you receive an incoming call,
you can mute the ringer by
pressing
.
)GVVKPIVQ-PQY;QWT2JQPG
EQPVKPWGF
13. MENU Key: When in Standby
mode, press this key to access
Main Menu items, and continue pressing it to scan Main
Menu items. When you reach
the Main Menu item you
want, press
.
♦ Also, during an incoming call,
pressing this key mutes the
ringer.
14. Navigation Key: This key is
similar to the volume key in
that it functions as two keys
(one up and one down). Press
the upper portion to scroll
“up”, and press the lower portion to scroll “down”. When
in Standby or Conversation
mode:
♦ Press the upper portion to see
the memory locations in your
Phone Book (in numerical
order).
♦ Press the lower portion to see
the names in your Phone
Book (in alphabetical order).
)GVVKPIVQ-PQY;QWT2JQPG
EQPVKPWGF
15. Headset connector: This is
where you connect an
optional headset. The headset
includes an earpiece and
microphone in a convenient,
lightweight unit so you can
converse without using your
hands.
16. Antenna: Makes the call
sound clearest when it’s fully
extended.
6WTPKPI[QWT2JQPG1PCPF1HH
6Q6WTP+V1P
When you’re ready to turn your phone on, fully extend the
antenna for best reception. Press and hold
until the LED
comes on and the phone beeps. When the phone has found a
signal, the
icon appears. Once the phone is on, it enters
Standby mode, which is the phone’s idle state. You can make
and receive calls now.
6Q6WTP+V1HH
To turn your phone off, press and hold
until the display
goes blank. When the phone is turned off, nothing is displayed
on the screen.
Note: If
is pressed for less than one second, the phone
will not turn off. This helps keep your phone from being turned
off accidentally.
6JG6QR.KPGQHVJG&KURNC[
Display indicators (or icons) appear across the top of your
phone’s display screen. The signal strength and battery strength
icons will always appear, but other icons appear based on your
phone’s operating mode.
Signal
Strength
Roaming
No Service
Digital Mode
New
Message
Battery
Strength
Vibrator on
Signal strength: This icon always appears when your
phone is on, and shows your current signal strength.
More lines indicate more signal strength. Four lines
indicate maximum strength, and one line indicates
least strength.
Service indicator: This icon indicates a call is in
progress. If there is trouble with signal strength, this
indicator will have a diagonal line through it.
No service indicator: This icon indicates your phone
cannot find a signal because you’re outside a service
area. When this is displayed, you cannot make or
receive calls. Wait a little while for a signal or move
into an open area.
Note: The no service indicator will always appear
when you turn on your phone. This is not a problem;
as soon as service is found, the indicator disappears.
Roaming: This icon displays when the phone is
outside your carrier’s coverage area and receiving
service from another carrier’s network.
Message indicator: This icon indicates you have
message(s) waiting. The message(s) can be voicemail
notification (VMN), page, text, or MiniBrowser
message(s). Press
to see the Message Menu, or if
setup, you can press and hold
to be connected
to your voicemail service (see “One-Touch Access to
Your Voicemail Box” on page 46 for information on this
simple setup procedure).
Digital mode: This icon indicates that the phone is in
digital mode. When in analog mode no icon displays.
Your phone has some features that work only in a
digital service area; these services include Voice Memo,
Voice Dialing, the Web Browser, and certain message
services.
Vibrator on: This icon indicates that an incoming call
will vibrate the phone rather than ring it. This feature
can be used for quiet situations where you don’t want
your ringer to disturb others or for loud situations
where the ringer cannot be heard.
Battery strength: This icon is always displayed when
your phone is on, and shows the level of your battery
charge. The more black bars you see, the greater the
charge. When the battery becomes very low, an empty
box appears and the phone flashes an alert; this
indicates your phone is about to turn itself off.
7UKPIVJG$CVVGT[
Your Phone comes with a partially charged, rechargeable
Lithium Ion (LiIon) Battery so that you can use your phone
immediately after it is activated.
+PUVCNNKPIVJG$CVVGT[
To attach the battery to your Phone:
1.
Hold the battery so that the metal contacts on the base of
the battery line up with the metal contacts on the base of
the phone.
2.
Place the battery on the back of the phone with the top of
the battery about a quarter of an inch from the latch.
3.
Gently slide the battery toward the top of the phone until
it snaps into place.
4GOQXKPIVJG$CVVGT[
To remove the battery from your Phone:
1.
Turn the phone off.
2.
Press the battery release latch and slide the battery away
from the latch.
%JCTIKPIVJG$CVVGT[
Note: Your consumer package contains either the Samsung
Dual-slot Desktop Charger or the Samsung TC20 Travel Charger.
Use only Samsung-approved chargers and adapters with your
Phone. Use of any unauthorized accessories may be dangerous
and will invalidate the phone warranty if the accessories cause
damage or a defect to the phone.
You can tell whether or not your battery needs to be recharged
by checking the upper-right corner of your phone’s display.
When the battery charge level gets low, the battery sensor will
let you know by blinking the battery icon, sounding a tone and
displaying a message. If the battery level gets too low, the
phone will turn off automatically. Unfortunately, if this happens
you’ll lose whatever you were just doing, including dropping
your call. Watch the battery strength icon and make sure your
battery is adequately charged.
%JCTIKPIYKVJVJG&WCN5NQV&GUMVQR%JCTIGT
To charge the battery using the
Dual-Slot Desktop Charger:
1.
Plug the power cord of the
charger into a wall outlet.
2.
Select one of the following
options:
♦ Insert the entire phone
with battery attached into
the front compartment of the charger.
♦ Insert a single battery (alone, not attached to the phone)
into the rear compartment of the charger.
When two batteries are in the charger, the batteries charge
simultaneously. A green light on the charger denotes that the
battery has completed its charge cycle.
A completely discharged standard battery recharges fully in
approximately 2 hours. The extended battery recharges in
approximately 3 hours. Leaving your Phone powered on during
charging, or charging batteries simultaneously, increases
charging time. Leaving the battery in the charger once it is fully
charged does not harm the battery.
%JCTIKPIYKVJVJG6TCXGN%JCTIGT
The Travel Charger allows you to
charge your phone’s battery from a
standard wall outlet. Also, using the
travel charger allows you to make a
phone call while the battery is
charging. Here’s how to do it:
1.
Make sure the battery is installed
onto the phone.
2.
Plug the two-pronged connector on the Travel Charger
into the wall and the other end of the cable into the
accessory connector at the bottom of the phone. The
battery will begin charging. Easy, huh?
3.
Now all you need to know is how the LED on the travel
charger indicates the status of the battery charge. Here it
is:
♦ red indicates that the battery is charging.
♦ green indicates that the battery is fully charged.
♦ yellow indicates that the battery is operating at a
4.
5.
temperature that is too high or too low, or that the
charger is not plugged in correctly. Please check the
charger and battery.
Make a phone call anytime you’d like. The Travel Charger
will continue charging the battery even when you are
making phone calls !
For the absolute fastest charging time, turn the phone off
while the battery is charging. The battery charges fastest
when the phone is turned off.
;QWT2JQPG U/QFGU
5VCPFD[/QFG
Standby is the most basic state of your Phone. The phone goes
into Standby mode soon after you turn it on, or whenever you
briefly press
. When your phone is in Standby mode, you
will typically see the banner (that’s the message displayed when
you turn on your phone). If you enter a phone number, you can
press
to dial it, or press
to save it in the Internal
Phone Book.
Press
at any time to return to Standby mode. Be careful; if
you’re on a call when you press
, you’ll return to Standby
mode, but it also disconnects the call. While you are on a call,
press
once to display the date, time, and call timer.
2QYGT5CXG/QFG
Your Phone comes with a Power Save feature that will
automatically be activated if your phone is unable to find a
signal after 15 minutes of searching. While this feature is active,
the phone’s battery charge is conserved. The phone will
automatically recheck for a signal periodically. To manually
force the phone to recheck for a signal, press any key. A
message on the display will let you know when your phone is
operating in Power Save mode.
%QPXGTUCVKQP/QFG
You can place and answer calls only when your Phone is
powered on. During a call, the phone is in Conversation mode.
$CUKE(WPEVKQPU
/CMKPIC%CNN
To place a call:
1.
Press and hold
to power on your Phone. If you see
indicators on the display, this indicates your phone is on.
Note that you will not hear a dial tone.
2.
Enter the phone number (up to 32 digits) by pressing the
digit keys. The phone number displays from left to right.
3.
. The phone places the call to the entered
Press
phone number (if service is available).
You can also make calls;
♦ from your Internal Phone Book (see “The Phone Book”
♦
♦
on page 49).
from your Call Logs list (see “Keeping Track of Your
Calls Using Call Logs” on page 64).
by using One-, Two-, or Three-Touch Dialing (see
“Memory Dialing Shortcuts” on page 53).
'PFKPIC%CNN
To end a call, close the flip or press
. The call time
(length of the call) displays, along with the name and number
of the called party (if available). The phone returns to Standby
mode automatically.
#PUYGTKPIC%CNN
To answer an incoming call, open the flip or press
if the flip is already open. You can also press any key except
, when the Any Key Answer option is selected in the
Main Menu (see “Any Key Answer” on page 29).
%QTTGEVKPI&KCNKPI/KUVCMGU
To correct a misdialed digit:
♦ Press
to erase one digit at a time.
♦ You can erase all the digits at once by pressing
and holding it down for at least one second.
2TGRGPF&KCNKPI
The Prepend option lets you add digits such as area codes and
network feature activation codes to a phone number that is in
your Internal Phone Book or Call Logs. (The prepended phone
number cannot be more than 10 digits.)
To prepend existing phone numbers in the Internal Phone
Book or Call Logs:
1.
Access the phone number entry.
2.
Press
for more options.
3.
Press
for Prepend.
4.
Enter the area code or feature activation code by pressing
the digit keys. For feature calls, press
before dialing
the feature code.
5.
Press
to call the prepended number.
#WVQOCVKE*[RJGPCVKQP
Automatic hyphenation follows the North American
Numbering Plan, which hyphenates numbers as shown in the
following example:
♦ 123-456-7890
Digits following a pause are not hyphenated (see “Pause
Dialing” on page 54).
5GVVKPI[QWT2JQPG U4QCOKPI#DKNKV[
You can operate your Samsung 3500 phone in one of four
roaming modes: The
and
icons indicate your roaming
status and the type of network you are in. When you are not in
a digital network, the
icon does not display. The
icon
displays when you are roaming in digital or analog.
The four roaming modes are:
♦ Automatic: The phone adjusts automatically between
♦
♦
♦
Digital and Analog mode, and will roam on either type
of service. When this setting is used and you are in a
digital network, the
icon displays. When this setting
is used and you are roaming (in a digital or analog
network) the
icon displays.
Analog Home Only: The phone operates only in Analog
mode, and does not roam. The
and
icons do not
display when this setting is used.
Home Only: The phone operates in Digital mode, if
available, or Analog mode if Digital service is not
available. The phone will not roam outside of your
home service area when this setting is used. When this
setting is used and you are in a digital network, the
icon displays. When this setting is used and you are in
an analog network no icon displays.
Analog: The phone operates in Analog mode only, and
roams in Analog mode. When this setting is used and
you are not roaming, the
and
icons do not display.
When this setting is used and you are roaming, the
icon displays.
To set your phone’s roaming ability:
1.
Press
to display the Main Menu.
2.
Press
for Roaming.
3.
Press the scroll keys to scan options.When the desired
roaming method displays, press
to save the setting
or
to exit without saving.
7UKPI%CNNGT+&
Note: Please contact your service provider to setup the Caller
ID service. Your Samsung phone will support Caller ID as
explained below.
This feature tells you who is calling you by displaying the
caller’s number when the phone rings. If a caller’s name and
number are stored in your Internal Phone Book, the
corresponding name is also displayed. If you call someone who
has this feature, your phone number will be displayed on their
phone.
To block your phone number from being displayed for a
particular outgoing call, just follow these steps:
1.
Press
.
2.
Enter the phone number, and then press
.
To activate Block Own Number permanently, contact your
service provider.
To temporarily unblock the number:
1.
Press
,
,
.
2.
Enter the phone number, and then press
.
%CNN9CKVKPI
Note: Please contact your service provider to setup the Call
Waiting service. Your Samsung phone will support Call Waiting
as explained below.
Call Waiting lets you receive a second call during conversation.
When a Call Waiting call comes in, the incoming call alert
sounds, when set, and a text notification displays.
Your phone provides the option of turning the Call Waiting
feature on and off. Call Waiting is on by default. If you choose to
have an undisturbed conversation, simply turn off the feature
for the current call.
#PUYGTKPIC%CNN9CKVKPI%CNN
To answer a Call Waiting call:
1.
Press
. The phone connects the calling party and
places the current party on hold.
2.
Press
again to switch between the two parties.
Note: If you do not respond to a Call Waiting notification, the
phone logs the call in the Missed Calls Log.
&KUCDNKPI%CNN9CKVKPI
To disable Call Waiting on your next call:
♦ Press
♦
,
,
before dialing the number.
When you complete your call and hang up, the Call
Waiting feature is automatically turned back on.
To disable Call Waiting permanently, contact your
service provider.
7UKPI6JTGG9C[%CNNKPI
Note: Please contact your service provider to setup the
Three-Way Calling service. Your Samsung phone will support
Three-Way Calling as explained below.
Three-Way Calling lets you conduct conference calls with two
different parties at the same time. When you use this feature,
you will be charged normal airtime rates for each of the two
calls you make. The phone records each party into the
Outgoing Calls Log.
To place a three-way call:
1.
During a conversation, simply press
2.
Next, enter the number for the third party, and press
. The phone places the other party on hold.
3.
When you’re connected to the third party, press
again to begin your three-way call.
.
If one of the callers (not you) hangs up, you and the remaining
caller stay connected. If you initiated the call and you hang up
first, all three parties are disconnected.
7UKPI%CNN(QTYCTFKPI
Note: Please contact your service provider to setup the Call
Forwarding service. Your Samsung phone will support Call
Forwarding as explained below.
With Call Forwarding, you can have all of your incoming calls
forwarded to another phone number — even if your phone is
turned off. When Call Forwarding is activated, you can still
make calls from your phone.
To activate Call Forwarding:
1.
Press
2.
Enter the 10-digit phone number (area code and phone
number) to which your calls should be forwarded.
.
3.
Press
. You will hear a tone that confirms you’ve
activated Call Forwarding.
Press
to disable Call
Forwarding. Once again, you’ll hear a tone confirming the
deactivation.
4GFKCNKPI%CNNU
To redial the last call you made, press
twice quickly.
Note: This is the default setting for the SEND key. If you change
this setting, then pressing
twice won’t call your last
outgoing call (see “Setting the SEND Key” on page 57”).
You can also redial any of your last incoming, outgoing, or
missed calls by accessing the Call Logs listings (see “Keeping
Track of Your Calls Using Call Logs” on page 64).
&KURNC[KPI[QWTQYP2JQPG0WODGT
Your phone number displays every time you turn on your
phone. At other times, you can display your phone number
from the Main Menu.
To view your phone number from Standby mode:
1.
Press
to display the Main Menu.
2.
Press
for Phone Book.
3.
Press
for My Phone #.
4.
Press
to return to the previous screen.
To view your phone number while you are on a phone call:
1.
Press
to display the Main Menu.
2.
Press
for Phone Book menu.
3.
Press
for My Phone #.
#FLWUVKPI8QKEG8QNWOG
You can adjust the earpiece volume during a call using the
volume keys on the side of your phone. Briefly pressing the
volume key once displays your earpiece volume. Repeatedly
press the volume key to adjust to HIGH, MED, or LOW.
#FLWUVKPI4KPIGT8QNWOG
From Standby Mode you can quickly adjust the volume of the
ringer by using the volume keys on the side of the phone.
Press the volume key:
♦ once to display the current ringer volume setting.
♦ repeatedly to change your ringer volume setting. When
you reach the desired volume level, stop pushing and
your phone will save your new selection.
Your choices are HIGH, MED, LOW, OFF, VIBRATE, or 1-BEEP.
You can also store the settings for your phone’s ring volume
from the Main Menu (see “Ringer Options” on page 34).
6Q5KNGPEGVJG4KPIGT&WTKPICP+PEQOKPI%CNN
When your phone rings, you have several easy options to mute
the ringer. Simply press
or
or
or the volume
key to silence the ringer. You can also set the ringer to always
be off by using the Main Menu (see “Ring Volume Setting for
Voice Calls” on page 35).
/KUUGF%CNN#NGTV
Your phone keeps a list of calls that you do not answer when
the phone is on and service is available. The phone indicates a
missed call by displaying a text notification on the screen.
Additionally, if caller information is available, an Incoming Call
Log entry marked “Missed” is created, and the screen displays
the phone number of the most recent missed call.
To acknowledge a missed call notification, select one of the
following options:
♦ Press
to call the displayed number.
♦ Press
to save the number in the Internal Phone
Book.
&TQRRGF%CNN#NGTV
A dropped call can occur during conversation in response to a
signal fade. In this case, the call ends and “Call Dropped”
displays.
Press
to clear the message and return to Standby mode.
If the dropped call was an outgoing call from your phone, you
can redial the number automatically by pressing
twice.
(CKNGF%CNN#NGTV
A failed call can occur if your phone is out of calling range or
the network is temporarily busy. Your phone responds to a
failed call by displaying an appropriate text message: “Call
Failed. Out of Range.” or “Call Failed. Network Busy.”. To
acknowledge a failed call alert, cancel the call attempt and
return to Standby mode by pressing
or
, and then
try the call again later.
/KPWVG$GGR
You can set the Minute Beep option to sound an alert 10
seconds before each elapsed minute to remind you of the
length of the current call.
To turn Minute Beep on and off:
1.
Press
to display the Main Menu in Standby mode
before placing the call.
2.
Press
for Sounds.
3.
Press
for Alerts.
4.
Press
for Minute Beep.
5.
Press the scroll keys to toggle between On / Off.
6.
When the desired option displays, press
setting.
to save the
6Q/WVGVJG/KETQRJQPG&WTKPIC%CNN
You can mute the microphone during conversation by selecting
the Mute option from the In Use Menu. When Mute is active,
“MUTE” displays. The phone resets this condition to the default
Unmute setting at the end of your call.
To mute the microphone during a call:
1.
During conversation, press
Menu.
2.
Press
to mute the microphone. You will hear the
other party’s conversation, but they will not hear your
conversation. “MUTE” displays on the screen.
3.
To “unmute” the microphone during the same
conversation, repeat steps 1 and 2. Selecting the (Un)Mute
option toggles Mute on and off.
to display the In Use
-G[$GGR8QNWOG5GVVKPI
The keys on your phone beep when they are pressed. The
volume of the beeps can be easily set to one of three levels. If
you don’t want the keys to beep at all, you can turn them off.
To set the key beep volume:
1.
Press
to display the Main Menu.
2.
Press
for Sounds.
3.
Press
for Key Beep.
4.
Press the scroll keys to scan volume options: HIGH, MED,
LOW, or Off.
5.
When the desired option displays, press
setting.
to save the
6QPG.GPIVJ5GVVKPI
The tone length setting enables you to select short or long
DTMF (dual-tone multi-frequency) tones. DTMF tones are what
is sent by your phone to access tele-services (such as a bank
account). The system used by the bank or other service
determines if you need short or long DTMF. If the service is
digital (which most are these days) short DTMF tones will
almost always work. However, some new systems and almost all
older (analog) systems require you to use long DTMF tones.
To set tone length:
1.
Press
to display the Main Menu.
2.
Press
for Sounds.
3.
Press
for Tone Length.
4.
Press the scroll keys to toggle between Short and Long.
5.
When the desired option displays, press
setting.
to save the
+PEQOKPI%CNN0QVKHKECVKQP
Your phone signals an incoming call or message in the
following ways:
♦ The backlight illuminates.
♦ The red LED on the top of the handset flashes.
♦ The ringer sounds (unless set to Vibrate or Off).
Incoming call notification continues until one of the following
events occurs:
♦ You answer the call.
♦ You press
, or you press
♦
♦
to silence the
ringer before answering the call.
The calling party ends the call.
The call is sent to voicemail.
Your phone provides the following call notification features:
♦ Nine unique ring types and four melody tones.
♦ Six ring volume settings including Vibrate, Off, and
1-Beep.
♦ Name display with Caller ID (if the name is programmed
into your Internal Phone Book.
♦ Automatic storage of call information in the Call Logs
♦
(up to nine phone numbers each for outgoing,
incoming, and missed calls).
Three answer options: press
, use Any Key
Answer, or open the flip.
For information on these options, see the related section in this
user guide.
#NGTVU5GVVKPIU
The alerts settings allow you to turn the Minute Beep and
Service Alert Tones on and off.
The Minute Beep sounds an alert 10 seconds before every
elapsed minute during an incoming or outgoing call, when set.
Service alerts include audible alert tones that sound when:
♦ The phone experiences a dropped call or a failed call.
♦ The phone enters a new service area.
To select alert options:
1.
Press
to display the Main Menu.
2.
Press
for Sounds.
3.
Press
for Alerts.
4.
Press the associated digit key to select an option:
♦ Press
♦ Press
5.
6.
for Minute Beep.
for Service.
Press the scroll keys to toggle between On / Off.
When the desired option displays, press
setting.
to save the
#P[-G[#PUYGT
When the Any Key Answer feature is turned on, you can answer
incoming calls by pressing any key on the keypad, except
.
To activate Any Key Answer:
1.
Press
to display the Main Menu.
2.
Press
for Setup.
3.
Press
for AnyKey Ans.
4.
Use the scroll keys to toggle between On and Off.
5.
Press
to save the setting.
&KURNC[1RVKQPU
Your phone provides the following display options:
$CEMNKIJV%QPVTQN
When the phone is attached to the optional Hands-Free Car Kit,
the backlight remains on (when the phone is on). When
KeyGuard is active, the backlight remains off. At other times,
you can select backlight options, but remember that backlight
use drains your battery faster.
To select backlight options:
1.
Press
to display the Main Menu.
2.
Press
for Display.
3.
Press
for BackLight.
4.
Press the scroll keys to scan menu options: Flip Open, 10
or 30 Seconds (after last keypress), or Off.
5.
When the desired option displays, press
setting.
to save the
2GTUQPCN)TGGVKPI
You can create and display a 12-character personal greeting that
displays in Standby mode.
To create a personal greeting:
1.
Press
to display the Main Menu.
2.
Press
for Display.
3.
Press
for Greeting.
4.
Enter your personal greeting by pressing the alphanumeric
keys on the keypad.
5.
Press
to save the setting.
5GVVKPIVJG.CPIWCIGQHVJG&KURNC[
Your phone allows you to view menus, messages and prompts
in either English or French. It’s quick, easy, and very convenient
for bilingual families or friends. Here’s how to do it:
1.
Press
to display the Main Menu.
2.
Press
for Display.
3.
Press
for Language.
4.
Choose English or French and press
to save the
setting. The change is immediate and affects all menus,
messages, and display prompts.
#NCTO
When your phone is turned on, you can set the 24-hour alarm
to sound an alert at a set time. In addition to functioning as a
normal alarm clock, the alarm can also be used to remind you
to call a certain person or phone number. Keep in mind that if
your phone is off at the alarm set time, the alarm will not
sound.
Note: In order for the alarm to work, the phone must be on,
and you must be in your Home PCS network or another CDMA
provider’s service area.
5GVVKPIVJG#NCTO
1.
Press
to display the Main Menu.
2.
Press
for Sounds.
3.
Press
for Alarm.
Press
for Set.
4.
♦ If the alarm is already set, the screen displays the set
time and provides the option of overwriting the current
setting. Press
to overwrite the current setting.
♦ If the alarm is not set or if you are overwriting the
5.
current setting, the screen prompts for AM / PM. Press
the scroll keys to select AM / PM, and then press
to save the setting.
Enter the time (HH / MM) by pressing the digit keys. To
correct a digit entered incorrectly, press
to go back,
and then enter the correct digit.
6.
Press
to save the setting.
7.
Respond to the screen prompt by entering the phone
number. (You can also set the alarm without entering a
phone number.) If the entered number matches a Phone
Book entry, the party’s name displays. When there is no
Phone Book match, the entered phone number displays.
8.
Press
to save the setting. The entered phone
number, alarm set time, and a confirmation message
display.
9.
At the set time, the alert sounds, and the party’s
name / number displays, if available. Respond to the alarm
in one of the following ways:
♦ To call the displayed phone number, press
.
♦ To silence the alarm and return to Standby mode, press
.
10. To cancel the alarm at any time, access the Alarm option
(Steps 1 and 2), press
to cancel the setting,
and then press
to confirm the action.
5GVVKPIVJG#NCTO4KPI6[RG
QT5QWPF
This option enables you to set a unique ring type for the alarm.
To set the alarm ring type:
1.
Press
to display the Main Menu.
2.
Press
for Sounds.
3.
Press
for Ring Type.
4.
Press
for Alarm.
5.
Press the scroll keys to scan nine ring types and four
melody tones. Each tone sounds as you scan the options.
6.
When the desired ring type sounds, press
the setting.
to save
5GVVKPIVJG#NCTO4KPI8QNWOG
This feature enables you to select a unique ring volume for the
alarm.
To set the ring volume for the alarm:
1.
Press
to display the Main Menu.
2.
Press
for Sounds.
3.
Press
for Ring Volume.
4.
Press
for Alarm.
5.
Press the scroll keys to choose: HIGH, MED, LOW, or OFF.
6.
When the desired volume setting displays, press
save the setting.
to
4KPIGT 1RVKQPU
Your phone provides a variety of ringer options in the Sounds
menu. These ringer options allow you to customize your ring
and volume settings so that you can easily recognize when a
certain type of call is coming in.
4KPI6QPG/WVG
Mute the ringer during an incoming call by pressing
.
At the end of your call, the saved ring volume setting resets
automatically.
4KPI6[RG5GVVKPIHQT8QKEG%CNNU
This option enables you to set a unique ring type for incoming
voice calls. Also, by selecting different tones, incoming voice
calls which have caller identification can be distinguished from
those that do not.
To set the ring type for voice calls:
1.
Press
to display the Main Menu.
2.
Press
for Sounds.
3.
Press
for Ring Type.
4.
Press
for Calls.
5.
Press
or press
to set the ring for calls that have Caller ID info
for calls without Caller ID info.
6.
Press the scroll keys to scan nine ring types and four
melody tones. Each tone sounds as you scroll the options.
7.
When the desired ring type sounds, press
the setting.
to save
4KPI8QNWOG5GVVKPIHQT8QKEG%CNNU
There are two ways to set the ring volume for voice calls:
♦ From the Standby mode, press the volume keys until the
♦
desired volume is reached.
In the Main Menu:
1.
Press
to display the Main Menu.
2.
Press
for Sounds.
3.
Press
for Ring Volume.
4.
Press
for Calls.
5.
Press the scroll keys to HIGH, MED, LOW, OFF, VIBRATE,
or 1-BEEP.
6.
When the desired ring volume setting displays, press
to save the setting.
4KPI6[RG5GVVKPIHQT/GUUCIG%CNNU
This option enables you to set a unique ring type for incoming
message calls. This means you can have distinct ring types for
voicemail notifications, text messages and numeric pages.
To set the ring type for voice calls:
1.
Press
to display the Main Menu.
2.
Press
for Sounds.
3.
Press
for Ring Type.
4.
Press
for Messages.
5.
Press
6.
Press the scroll keys to scan nine ring types and four
melody tones. Each tone sounds as you scan the options.
7.
When the desired ring type sounds, press
the setting.
for Voice,
for MiniBrowser.
for Page,
for Text, or
to save
4KPI8QNWOG5GVVKPIHQT/GUUCIG%CNNU
This feature enables you to select a unique ring volume for
incoming message calls. This volume setting applies to
incoming voicemail notifications, text messages and numeric
pages.
To set the ring volume for message calls:
1.
Press
to display the Main Menu.
2.
Press
for Sounds.
3.
Press
for Ring Volume.
4.
Press
for Messages.
5.
Press the scroll keys to choose: HIGH, MED, LOW, OFF,
VIBRATE, or 1-BEEP.
6.
When the desired volume setting displays, press
save the setting.
to
4KPI6[RG5GVVKPIHQT4QCOKPI%CNNU
This option enables you to select a unique ring type for
incoming roaming calls.
To set ring type for incoming roaming calls:
1.
Press
2.
Press
for Sounds.
3.
Press
for Roam Ringer.
4.
Press the scroll keys to choose Distinctive or Normal. Each
tone sounds as you scan the options.
5.
When the desired ring type sounds, press
the setting.
to display the Main Menu.
to save
8QKEG/GOQ
Your phone can record five Voice Memos. Each Voice Memo
can be up to one minute in length. When recording, a 60second timer displays and an alert sounds to indicate when
recording time expires.
Note: The Voice Memo feature does not work when your
phone is in analog mode.
4GEQTFKPIC8QKEG/GOQ
1.
Press and hold
. The message “Recording” displays,
along with the timer.
2.
Record the Voice Memo by speaking into the microphone.
3.
To stop recording, release the
button. A menu for the
current Voice Memo becomes available.
4.
To save the Voice Memo with the default date / time stamp,
press
or do nothing. Your phone will automatically
save the voice memo stamped with the date and time after
about one minute. For other options on the Voice Memo
press:
♦
♦
♦
for Add Label. The screen labels the Voice Memo
with the date / time stamp. You can now create your
own label using the alphanumeric keys. Just start
entering the label and press
when you are ready
to save it.
for Continue. Press and hold
to continue
recording.
for Erase. Press and hold
to erase the Voice
Memo.
4GXKGYKPIC8QKEG/GOQ
To review a Voice Memo:
1.
Press
2.
Press
for Review. The phone displays the label for
Voice Memo 1, begins to play Voice Memo 1, and displays a
list of reviewing options. All Voice Memos will play in
order until you press
,
, or select one of the
following options:
♦ Press
♦ Press
♦ Press
♦ Press
3.
to display the Voice Memo menu.
to Replay the Voice Memo.
to Erase the Voice Memo.
to listen to the Next Voice Memo.
to listen to the Previous Voice Memo.
After reviewing the Voice Memos, press
to return to
Standby mode.
8QKEG#EVKXCVGF&KCNKPI
Your phone features Voice-Activated Dialing. When in a CDMA
network, you can call up to 20 stored entries by speaking the
name into the microphone. Using the Voice-Activated Dialing
option requires that you first train the phone to recognize the
name of the person you are calling.
Note: Voice-Activated Dialing does not work when your phone
is in analog mode.
6KRUQP4GEQTFKPI0COGU
♦ Avoid recording similar names phonetically. If you
record a similar name to one that is already in memory,
the phone requests another name.
♦ Avoid recording in a noisy place.
♦ Speak clearly and naturally.
♦ The person who will use the phone should record the
name.
♦ Avoid very long or very short names. Names with two to
five syllables are recommended.
♦ If a voice dial entry does not properly connect, you may
need to record the name and number again.
2TQITCOVJG2JQPGHQT8QKEG#EVKXCVGF&KCNKPI
Programming your phone for Voice-Activated Dialing is easy.
The phone provides voice prompts and screen displays to guide
you through the recording process. To program the phone for
Voice-Activated Dialing:
1.
Press
to display the Main Menu.
2.
Press
for Voice Dial.
3.
Press
for Record. The phone will prompt you to say
the name you want to program.
4.
Wait for the beep and then say the name. For best results,
use names with at least two syllables, or use both a first
and last name. The phone stores the name as a sample first,
and then prompts for the name again.
5.
Respond to the prompt by repeating the name after the
beep. The phone stores the name as a second sample and
then requests the phone number.
6.
Enter the phone number by pressing the digit keys.
7.
To store the phone number, press
. The name (if it is
already in the Internal Phone Book) and number display,
along with the notification “Recorded”. The screen then
returns to the Voice Dialing menu.
Note: For Voice-Activated Dialing in Hands-Free mode, refer to
the HFK350 Hands-Free Car Kit Manual.
2NCEKPIC%CNNWUKPI8QKEG&KCNKPI
To place a call using voice dialing:
1.
Press and hold
setting.
, or open the flip, depending on the
2.
At the voice prompt, say the name into the phone.
♦ The phone places the call if it recognizes the name.
♦ If the phone does not recognize the name, it prompts
♦
for the name again.
If the phone is unable to recognize the name after two
attempts, the following message displays: “Cannot
recognize name. Please check name.” The phone
returns to Standby mode automatically, and you can try
the call again later.
8QKEG&KCNKPI#EVKXCVKQP
Voice dialing is always active once you have programmed the
phone to accept voice dialing entries. Your phone is set from
the factory to place a voice dialing call when you press and
hold
. Then, just say the name into the phone after you
hear the voice prompt and the beep.
You can also initiate a voice dialing call by opening the flip,
when you select this option through the Main Menu.
To set this voice dialing option:
1.
Press
to display the Main Menu.
2.
Press
for Voice Dial.
3.
Press
for Set Active.
4.
Press the scroll keys to toggle between options:
♦ SEND Only: Enables voice dialing by pressing and
holding
.
♦ SEND / FLIP: Enables voice dialing by pressing and
5.
holding
, or by opening the flip.
When the desired option displays, press
setting.
to save the
4GXKGYKPI8QKEG&KCNKPI'PVTKGU
To review voice dialing entries:
1.
Press
to display the Main Menu.
2.
Press
for Voice Dial.
3.
Press
for Review. A list of entries displays.
4.
Press the digit key to select the desired entry, or press the
scroll keys to scan entries. The recorded names play
audibly as you scroll through the list.
5.
Press
to return to the previous screen.
'TCUKPI8QKEG&KCNKPI'PVTKGU
To erase an individual voice dialing entry:
1.
Press
to display the Main Menu.
2.
Press
for Voice Dial.
3.
Press
for Review. A list of entries displays.
4.
Press the digit key to select the desired entry, or press the
scroll keys to scan entries. The recorded names play
audibly as you scroll through the list.
5.
When the desired entry displays, press
entry.
To erase all Voice Dialing entries:
1.
Press
2.
Press
for Voice Dial.
3.
Press
for Erase All.
4.
Press
to erase all Voice Dialing entries.
to display the Main Menu.
to erase that
-G[IWCTF
To avoid accidental key presses, you can enable the KeyGuard
feature. However, you’ll still be able to receive incoming calls
and messages. This feature also prevents needless battery usage
because the phone does not respond to any keypresses and
turns off the backlight.
Note: If you have an incoming call, open the flip to answer it.
When you are done with the call, close the flip and KeyGuard is
automatically turned on.
To activate KeyGuard:
1.
Press
to display the Main Menu.
2.
Press
for KeyGuard. The keypad locks and
“KeyGuard” displays.
3.
Press and hold
to deactivate KeyGuard, or simply
open the flip to turn on the backlight and temporarily
disable KeyGuard.
Note: KeyGuard works only when the flip is closed.
'OGTIGPE[&KCNKPI
You can place calls to 911 even if your phone is locked or
outgoing calls are restricted (see “Lock Mode” on page 58).
As long as you’re within your Home PCS network, 911 can be
dialed.
+/2146#06016+%'2.'#5'4'#&
Because of various transmission methods, network parameters,
and user settings used to complete a call from your wireless
phone, a connection cannot always be guaranteed.
Therefore, emergency calling may not be available on all
wireless networks at all times.
DO NOT depend on this phone as a primary method of dialing
911 or any other essential or emergency communications.
Remember to always turn your phone on and check for
adequate signal strength before placing a call.
%CNNKPI
1.
Dial
2.
Press
.
.
Note: Even if your account is restricted, you can still dial 911
(as long as you’re within a service area), but no other
emergency numbers.
/GUUCIG5GTXKEGUCPF8QKEGOCKN
Your Phone receives four kinds of messages:
♦ voicemail notification (VMN) messages
♦ text messages
♦ MiniBrowser messages
♦ numeric pages (if supported by your service provider)
When your phone receives a message, an alert sounds, and the
screen displays (“New Voice”, “New Text”, “New Page” or
“BrowserMsg”). The message indicator (
) remains on the
screen until you listen to the new voicemail message, or read
the new text, numeric page, or MiniBrowser message.
/GUUCIG/GOQT[%CRCEKV[
Your Phone can store up to 50 messages, depending on the
length of the messages. When message memory reaches 75%
capacity, the screen displays “Memory is 75% full. Erase old
messages.” At 100% capacity, the screen displays a text
notification and rejects additional incoming messages until you
erase the stored messages.
/GUUCIG4KPIKPI
When you receive a message in Standby mode, an audible alert
sounds and the message header displays. When the phone is in
Conversation mode, it automatically mutes the incoming
message ringer (this is to avoid ringing in your ear while you are
trying to converse).
Your Phone allows you to set a unique ring type for each type
of incoming message; voicemail, text, numeric page, or
MiniBrowser (see “Ring Type Setting for Message Calls” on page
35).
5GVVKPIWR[QWT8QKEGOCKN$QZ
Setting up your Voicemail box provides access to voicemail
messages for review. Contact your service provider for
information on setting up your voicemail service.
4GXKGYKPI8QKEGOCKN/GUUCIGU
There are two easy ways to review your voicemail. You can use
the method described here, or you can choose to use the OneTouch Access feature which is explained below.
1.
Press
to display the Messages Menu.
2.
Press
for Voice. The screen displays “Voicemail”, the
time, date and the number of new messages.
3.
Press
for more options:
♦ Press
♦ Press
to Listen to voicemail messages.
to reset the counter for voicemail
messages, if desired. (The system resets the counter
automatically after you listen to all new messages.)
1PG6QWEJ#EEGUUVQ;QWT8QKEGOCKN$QZ
One-Touch Access to your voicemail box is done by pressing
and holding
. However, you must perform a simple setup
procedure in order for this feature to work. It’s easy, here it is:
1. From Standby mode, enter the number that will dial your
voicemail service. This number is determined by your
voicemail provider, but normally it is your phone number,
or your phone number with the “#” sign in front of it.
2.
Once you’ve typed in the correct number and it appears
on the screen, press
. The screen prompts with the
next available phone book location. IMPORTANT - type in
179. The screen should now display “Entry # 179 will be
used”.
3.
Press
. The screen prompts you for the name. Enter
“Voicemail” or whatever you like and press
.You’ve
now stored your voicemail access number into memory
location 179. From now on, when you press and hold the
key, your phone will connect to your voicemail box.
Note: Do not store any other number into memory location
179, or this feature will no longer work.
4GXKGYKPI/GUUCIGU
Your phone receives incoming messages in both Standby and
Conversation modes. When a new message arrives, the message
header includes the type of message (Voice, Numeric Page,
Text, or MiniBrowser) and the name / phone number of the
caller, if available. You can review the message upon
notification, or store the message for later review. The Messages
Menu provides options for reviewing the sender’s name /
phone number, time / date stamp and the message.
/GUUCIGUCPF.QEM/QFG
Incoming messages are received even when your phone is in
Lock mode. However, the screen will not display information
about the message. To access a message, or to return a call
other than an emergency or special number, unlock the phone
to proceed.
4GXKGYKPI0WOGTKE2CIGU6GZV/GUUCIGUCPF
/KPK$TQYUGT/GUUCIGU
To review a numeric page, text message, or MiniBrowser
message:
1.
Press
to display the Messages Menu. The number of
new messages displays next to the associated message type
in the menu.
2.
Press
for Page,
for Text, or
for
MiniBrowser. An indexed list of messages displays. An
exclamation point next to an entry indicates an urgent
message. A check mark next to an entry indicates that you
have read and stored the message.
Use the scroll keys to scan messages, or press the
associated digit key to select a message by its entry
number.
3.
4.
When the message displays, use the scroll keys to review
and re-review the message(s).
5.
Press
to return to the previous screen.
'TCUKPI/GUUCIGU
You can erase an individual text message or numeric page after
reviewing it, or erase all stored text messages and numeric
pages at one time.
To erase all text messages and numeric pages:
1.
Press
to display the Main Menu.
2.
Press
for Security and enter the lock code.
3.
Press
for Erase.
4.
Press
for Messages.
5.
Press
to erase all text messages and numeric
pages, or press
to return to the previous screen.
/GUUCIG1RVKQPU
The Messages menu provides a number of options while you
are reviewing text messages. You can return a call to the phone
number in the message, save or erase the message, and scroll to
the next or previous message.
1.
While reviewing a message, press
♦ Press
♦ Press
for options:
for Talk (to call the phone number).
to Save the number (if there is no Phone
Book match).
♦ Press
♦ Press
♦ Press
2.
Press
to Erase the message.
to review the Next message.
to review the Previous message.
to return to the previous screen.
Note: If the message you are reviewing contains a phone
number that is already stored in the Phone Book, the Save
option does not display, and the available menu options will be:
(1) Talk, (2) Erase, (3) Next Msg, (4) Previous Msg.
6JG2JQPG$QQM
Your phone lets you store up to 179 names and phone numbers
in the Phone Book. Each entry can contain up to 32 digits, with
an associated name of up to 12 characters.
8KGYKPI[QWT2JQPG$QQM
The
key allows you to view your entire Phone Book in two
different ways; by alphabetical order of the names (a-z), or by
numerical order (1-179).
To view alphabetically:
♦ Press the lower portion of the
key.
To view numerically:
♦ Press the upper portion of the
key.
5VQTKPI2JQPG0WODGTU5JQTVEWV
You can store a phone number quickly by entering the number,
and then pressing
. Then follow the prompts to
designate the memory location and to enter the associated
name.
5VQTKPI2JQPG0WODGTUCPF0COGU
To store phone numbers and names:
1.
Press
to display the Main Menu.
2.
Press
for Phone Book.
3.
Press
for Add Entry. The screen prompts for the
phone number. (You can enter up to 32 digits.)
4.
Enter the phone number by pressing the digit keys.
The number displays from left to right.
5.
To store the phone number, press
The first available location displays.
.
6.
To accept the displayed location, press
. To select
another location, press the scroll keys to scroll to the
desired location, or enter the location number by pressing
the digit keys, and then press
.
7.
To include a name with the phone number entry, enter the
name at the screen prompt.
8.
Press
to save the entry.
Note: If the desired memory location already contains an entry,
the phone displays a message asking if you want to replace the
current entry. To replace the entry, press
. To return to
the previous screen and select another location, press
.
5VQTKPI2JQPG0WODGTUCVVJG'PFQHC%CNN
To store a phone number after ending a call:
Note: If the call was incoming, and Caller ID information was
not available, then the store option will not be available.
1.
Press
to end the call. The screen displays the call
time (length of call), phone number of the party (if
available), and the “OK: Save” option.
2.
To store the phone number, press
available location displays.
3.
To accept the location, press
. To select another
location, press the scroll keys to scroll to the desired
location, or enter the location number by pressing the digit
keys, and then press
.
4.
To include a name with the phone number entry, enter the
name at the screen prompt.
5.
Press
to save the entry.
. The first
(KPFKPI2JQPG$QQM'PVTKGUD[.QECVKQP
To find a Phone Book entry by location:
1.
Press
to display the Main Menu.
2.
Press
for Phone Book.
3.
Press
location.
for Find Entry. The screen prompts for a
4.
Enter the location by pressing the associated digit key, or
press the scroll keys to scroll to the desired location.
5.
When the desired entry displays, press
call.
to place a
(KPFKPI'PVTKGUD[0COG
You can quickly locate Phone Book entries when your phone is
in Standby mode: Press
to access the Phone Book in one
step, and then press the scroll keys to scan entries.
To find Phone Book entries from the Main Menu:
1.
Press
to display the Main Menu.
2.
Press
for Phone Book.
3.
Press
name.
for Find Name. The screen prompts for the
4.
Begin entering the letters of the name you are searching by
pressing the alphanumeric keys (note that the search is
case sensitive). You can also press the scroll keys to scroll
to the desired name. Press
when you have
highlighted the name.
5.
When the desired entry displays, press
call.
to place a
%JCPIKPI[QWT2JQPG$QQM
'FKVKPI2JQPG$QQM0WODGTU
Once you have stored a number in the Phone Book you can
easily change it. To change a Phone Book entry:
1.
From Standby mode, find the number that you want to
change by pressing the
key and then scrolling to the
number.
2.
Press the
3.
Press the
4.
Press
♦ Press
♦ Press
♦ Press
♦ Press
key to display the name and number.
key for options.
for Edit. Your edit options display.
to change the number
to change the name.
to move the number to a different location.
to make the number secret.
5GETGV2JQPG$QQM0WODGTU
Your phone allows you to hide a confidential number so that
only a person with your phone’s lock code can view the
number and name. To make a number secret, see the previous
paragraph. When you have made the number secret, the phone
will not allow anyone to view information on the number
unless they enter your 4--digit lock code.
'TCUKPIVJG2JQPG$QQM
To erase the Phone Book:
1.
Press
to display the Main Menu.
2.
Press
for Security and enter the lock code.
3.
Press
for Erase. Additional options display.
4.
Press
for Phone Book.
5.
Press
to erase the entire Phone Book or
return to the previous screen.
to
&KCNKPIHTQO;QWT2JQPG$QQM
&KCNKPID[/GOQT[.QECVKQP
Dialing numbers from your Phone Book is quick and easy.
There are six methods explained below. They’re all easy.
/GOQT[&KCNKPI5JQTVEWVU
Scroll to the number: From Standby mode, press the
key
to enter your Phone Book list. Scroll until
you find the desired person or number,
and then press the
key.
1-Touch Turbo Dial: Press and hold the associated digit key
for the location (applies to memory
locations 1 through 9).
2-Touch Turbo Dial: Press and release the first associated digit
key, and then press and hold the second
digit key (applies to memory locations
10 through 99).
3-Touch Turbo Dial: Press and release the first associated digit
key, then press and release the second
digit key, then press and hold the third
digit key (applies to memory locations
100 through 179).
Speed Dialing:
From Standby mode, enter the number of
the memory location, and press
.
4-Digit Phone Book: From Standby mode, enter four
consecutive digits of a number that you
have stored in your phone book ( for
example, these digits could be the last
four digits of your office phone). Then
just press
. Note this is not the
same as Abbreviated Dialing”. For
information on abbreviated dialing, see
“Dialing Abbreviated Phone Numbers”
on page 74.
#FXCPEGF2JQPG$QQM(GCVWTGU
2CWUG&KCNKPI
When you call automated systems (like banking services), you
are often required to enter a password or account number.
Instead of entering the numbers manually each time, you can
store the numbers in your Phone Book, separated by special
characters called pauses.
There are two kinds of pauses that can be entered on your
phone:
♦ Hard pause - A hard pause stops the dialing sequence
until you press the
button.
♦ 2sec pause - A 2sec pause stops the dialing sequence for
2 seconds and then automatically sends the remaining
digits.
Your phone has two pause dialing methods: pause dialing from
the Phone Book (see “Pause Dialing from a Stored Phone Book
Entry” on page 55), and manual pause dialing (see “Manual
Pause Dialing” on page 56).
Note: Multiple 2 second pauses can be entered to extend the
length of a pause. For example, two consecutive 2 second
pauses cause a total pause time of four seconds. However, keep
in mind that pauses count as digits towards the 32 digit dialing
maximum.
5VQTKPI2CWUGUKPC2JQPG$QQM'PVT[
To store a number in your Phone Book that contains pauses:
1. Enter the phone number you want to connect to (such as
the bank’s teleservice phone number).
2.
Press
. More options display. Press
to enter the desired pause:
or
♦ Press
3.
to enter a Hard Pause. The letter “p”
displays in the number, meaning that a hard pause will
occur at that point in the dialing sequence. Enter the
digits that need to follow the pause (such as your
account number).
♦ Press
to enter a 2 second pause. The letter “T”
displays in the number, meaning that a “Timed” pause
will occur at that point in the dialing sequence. Enter
the digits that need to follow the pause (such as your
account number).
Store the number as you normally would by pressing the
key and entering a name.
2CWUG&KCNKPIHTQOC5VQTGF2JQPG$QQM'PVT[
Pause dialing from the Phone Book is easy:
1. If you stored the number using a 2 second pause(s), simply
dial the number as you normally would, and you are
finished. The phone transmits the number that follows the
“T” pause two seconds after connection. “Tpause” displays
when you dial the number.
2.
If you stored the number using a hard pause(s), then dial
the teleservice number and wait to be prompted by the
service for the number (credit card number, bank account
number, etc). When prompted, press
to send the
DTMF number that follows your pause. “SENDING DTMF”
flashes on the screen, and the transmitted tones are
audible.
/CPWCN2CWUG&KCNKPI
Pauses are entered manually using the Digit Entry Menu during
the dialing process.
To manually dial a number using a pause(s):
1.
Enter the phone number of the service you want to
connect to (such as the bank’s teleservice phone number).
For example, your bank’s teleservice phone number might
be a 1.800 number.
2.
Press
3.
Press the associated digit key to select an option:
to display digit dialing options.
♦ Press
for a Hard Pause. The screen displays a “p”
indicating a hard pause. Enter the number to be sent
after the pause by pressing the digit keys, and then
press
. After connecting, press
again to
transmit the additional number.
♦ Press
for a 2 Second Pause. The screen displays a
“T” indicating a timed pause. The screen prompts for
the number to be sent after the pause. Enter the number
to be sent after the pause by pressing the digit keys, and
then press
. The phone transmits the number
that follows the pause two seconds after connection.
(KPFKPIC5VQTGF0WODGTWUKPI(QWT&KIKVU
This feature allows you to enter any four consecutive digits of a
stored phone number, have your phone remember the rest, and
then dial the entire number for you.
To find the stored number and place a call using this method:
1.
Dial any four consecutive digits of a phone number that
you have stored in your Phone Book. The phone number
can be any length up to 32 digits.
2.
Press
to display the Digit Dial menu.
3.
Press
for 4-DigiDial. The phone dials the entire
phone number automatically.
Note: If more than one phone number saved in the Phone
Book contains the same four consecutive digits, “Wait” displays.
Press the scroll keys to scan the phone numbers and to display
your desired number, and then press
.
5GVVKPIVJG5'0&-G[
Your
key is factory set to provide one-touch access to
your Call Logs lists. You can change the function of the
key so that it will give you one-touch access to your Phone
Book.
Note: The
key also allows you to easily redial your last
call (by pressing it twice). If you change the
key to
one-touch Phone Book access, you will no longer have this
redial function.
To change the function of the
key:
1.
Press
to display the Main Menu.
2.
Press
for Setup.
3.
Press
for SEND key.
4.
Use the scroll keys to make your selection. The selections
are “Calls” and “PhoneBook”.
5.
Press
saving.
to save the setting or
to exit without
;QWT2JQPG U5GEWTKV[(GCVWTGU
Your phone provides many security options, including a userprogrammable lock code and call restriction features. To access
the Security menu in Standby mode, press
,
, and
then enter the four-digit lock code (normally the lock code is
the last four digits of your phone number). Press the associated
digit key to access one of the following Security options:
1.
Lock Phone
2.
Limit Use (Phone Book, Incoming / Outgoing, Roaming
calls)
3.
Lock Code
4.
Special #
5.
Erase
6.
Reset Phone
.QEM/QFG
Locking the phone limits all outgoing calls except calls to the
three hard-coded emergency numbers (911, *911, and #911),
the three user-programmable special numbers.
You can lock the phone manually during use, or set the phone
to lock automatically when it is turned on. When the phone is
in Lock mode, you can answer incoming calls, but you must
unlock the phone to place outgoing calls (except to emergency
and special numbers).
.QEM%QFG5GVVKPI
The default lock code for your phone is generally 0000 or the
last four digits of your phone number, depending on activation.
You can enter a personal lock code, and then change the lock
code as often as you like.
To enter a new lock code:
1.
Press
to display the Main Menu.
2.
Press
for Security and enter your current lock code.
3.
Press
for Lock Code. The current lock code displays.
4.
Enter a new, four-digit lock code by pressing the digit keys.
5.
Press
to save the new lock code or
to exit.
Note: Your phone does not allow viewing of the lock code
unless you know the lock code (this is for obvious security
reasons). So, if you change the lock code, be sure to write
down the new code and keep it for your reference.
.QEMKPIVJG2JQPG
The Security menu allows you to lock the phone manually,
automatically when powering on your phone, or to leave the
phone unlocked.
To lock the phone:
1.
Press
to display the Main Menu.
2.
Press
for Security and enter the lock code.
3.
Press
for Lock Phone.
4.
Press the scroll keys to select an option:
♦ Off: The phone remains unlocked.
♦ Now: The phone locks immediately and stays locked
5.
until the lock code is entered.
♦ On Power-Up: The phone locks automatically the next
time your phone is powered on and stays locked until
the lock code is entered.
Press
to save the setting.
&KCNKPIKP.QEM/QFG
You can place calls to emergency and special numbers in Lock
mode. To place normal outgoing calls in Lock mode, enter the
lock code to unlock the phone, and then dial the phone
number.
To place an outgoing call in Lock mode:
♦ To call an emergency or special number, enter the
number and then press
.
♦ To place normal outgoing calls, press
to display
the Lock Code screen, and then enter the lock code.
When the Standby screen displays, enter the phone
number, and then press
.
%CNN.KOKVKPI1RVKQPU
Your phone provides a wide variety of call limiting options in
the Security menu. These options give you powerful tools to
manage your phone. Descriptions of the call limiting options
are given on page 60.
♦ Outgoing Calls - You can set outgoing calls to:
♦ Phone Book - only Phone Book, Special, and
Emergency numbers can be dialed. Manual dialing
from the keypad is not allowed.
♦ Special and emergency numbers - outgoing calls are
limited to the three special and three emergency
numbers only (see “Special Numbers” on page 62 for a
description of these numbers).
♦ Unlimited - any outgoing call can be dialed.
♦ Incoming Calls - You can set your phone to receive all
incoming calls or to not receive incoming calls.
♦ Phone Book - Phone Book access can be limited:
♦ Full Access - User can place calls to any Phone Book
number, and can view, add, or erase Phone Book
entries.
♦ No Access - User cannot view the Phone Book entries.
However, note that manual keypad dialing is unlimited
(even to numbers stored in the Phone Book).
♦ Read-Only - User can view the entire Phone Book but
cannot add or erase entries.
♦ Roaming - You have several options for your phone’s
roaming abilities:
♦ No limit - All roaming calls are allowed.
♦ Incoming - Roaming calls are limited to those placed to
your phone. Outgoing roaming calls from your phone
are not allowed.
♦ Outgoing - Roaming calls are limited to those placed
from your phone. Incoming roaming calls to your
phone are not allowed.
♦ No Call - Roaming calls are not allowed to or from your
phone.
To set call limiting options:
1.
Press
to display the Main Menu.
2.
Press
for Security and enter the Lock Code.
3.
Press
for Limit Use.
4.
Press the associated digit key to select an option:
♦ Press
for Outgoing calls.
♦ Scroll to choose Phone Book, Special#, or No Limit.
♦ Press
for Incoming calls.
♦ Scroll to choose No Call or No Limit.
♦ Press
for Phone Book.
♦ Scroll to choose Full Access, No Access, or Read-Only.
♦ Press
for Roaming.
♦ Scroll to choose No Limit, Incoming, Outgoing, or No
5.
Call.
Press
saving.
to save the setting or
to exit without
5RGEKCN0WODGTU
Your phone provides the option of storing three special
numbers. Each special number can be up to ten digits long.
All three special numbers can be manually dialed at any time
even when your phone is locked or all outgoing calls are
limited. This can be a useful feature for controlling what
numbers can be dialed from your phone.
5VQTKPI5RGEKCN0WODGTU
To store special numbers:
1.
Press
to display the Main menu.
2.
Press
for Security and enter the four-digit lock code.
3.
Press
for Special #.
4.
Press
,
special number.
5.
Enter the special number by pressing the digit keys.
Special numbers can be up to ten digits long.
6.
Press
, or
to select a location for the
to save the number in the selected location.
&KCNKPI5RGEKCN0WODGTUKP.QEM/QFG
To dial special numbers in Lock mode:
1.
Enter the special number by dialing it as you normally
would using the digit keys.
2.
Press
to place the call.
4GUGVVKPI;QWT2JQPG
Resetting the phone erases all Phone Book entries, voicemail,
numeric pages, text messages, call logs, special numbers, and
returns all saved options to the default settings.
To reset the phone:
1.
Press
to display the Main Menu.
2.
Press
for Security and enter the Lock Code.
3.
Press
for Reset Phone. A confirmation displays
explaining that you will erase your phonebook.
4.
Press
to reset the phone, or press
the operation.
5.
To confirm resetting the phone, press
again. The
phone reboots (turns itself off then on), restores the
default settings, erases your messages, and then returns to
Standby mode. To cancel the operation before resetting
the phone, press
.
to cancel
-GGRKPI6TCEMQH;QWT%CNNU7UKPI
%CNN.QIU
When displaying a Call Log, press
to be immediately
connected.
Your phone maintains a list of the last calls made to or placed
from your phone. Each entry on the list is referred to as a Call
Log. This list of Call Logs contains:
♦ The last 9 calls placed to your phone
♦ The last 9 calls placed from your phone
♦ The last 9 calls placed to your phone that you did not
answer (missed calls)
Each log contains the name and phone number (if available),
and a time/date stamp. In case of duplicate entries back-toback, the phone consolidates those logs and stores only the
most recent call from or to the same number.
In addition to the Call Logs, your phone maintains several
Airtime Logs. See “Reviewing Airtime” on page 65 for
information on this useful feature.
4GXKGYKPI%CNN.QIU
1.
2.
Press
Press
3.
Press the associated digit key to select an option:
♦ Press
for Outgoing calls.
♦ Press
for Incoming calls.
♦ Press
for Missed calls.
♦ Press
for Airtime.
When the list of calls displays (Options 1, 2, or 3), press
the scroll keys to scan the logs. The time / date stamp
displays for each log. If there is a Phone Book match, the
name displays. If there is not a Phone Book match, only the
phone number displays. For option 4 (Airtime) see the
next paragraph.
4.
to display the Main Menu.
for Call Logs.
5.
Press
to exit Call Logs and return to the previous
screen or to talk to the other party, just highlight the log,
and press the
key.
4GXKGYKPI#KTVKOG
You can review the airtime in hours and minutes of;
♦ the most recent call
♦ the total airtime for all calls since the last reset action
♦ the entire time of all your phone’s calls combined (Life
Time)
A feature is also provided to erase the total airtime so that you
can begin a new total airtime measurement.
To review airtime:
1.
Press
to display the Main Menu.
2.
Press
for Call Logs.
3.
Press
for Airtime.
4.
Press the associated digit key to display airtime for the
selected calls:
♦ Press
♦
♦
♦
for Last Call. The screen displays the phone
number of the last call, along with the airtime and the
time / date stamp. Press
to return to the previous
screen.
Press
for Total. The screen displays the total
number of calls and the airtime for all calls since the last
reset action. Press
to return to the previous
screen.
Press
for Erase Total. Press
to erase total
airtime, or press
to cancel the operation and
return to the previous screen.
Press
for Life Time. The screen displays the
combined airtime of every phone call that has been
made on your phone. This measurement cannot be
erased.
(CZCPF&CVC%CNNU
Your phone can receive and send a fax or data file.
Note: The phone must be on a digital network to receive or
send faxes and data.
4GEGKXKPIC(CZ
1.
Ensure that your phone is connected to your PC and is
powered on.
2.
Press
to display the Main Menu.
3.
Press
for Setup.
4.
Press
for Data/Fax In.
5.
Use the scroll keys to select “Incoming Fax Only”.
6.
Press
to save the setting. The screen displays “No
incoming voice calls can be received”. Your phone then
returns to Standby mode and displays “Fax Only” above the
greeting.
Note: Once you have set your phone’s mode to “Incoming Fax
Only”, you cannot receive regular voice calls until you change
back to “Voice”.
7.
In the Fax program on your PC, setup the Answer mode.
Click on “Receive” and select one of the following:
♦ Automatic Receive (recommended)
♦ Manual Receive
Your phone is now ready to receive an incoming fax.
4GEGKXKPIC&CVC(KNG
1.
Ensure that your phone is connected to your PC and is
powered on.
2.
Press
to display the Main Menu.
3.
Press
for Setup.
4.
Press
for Data/Fax In.
5.
Use the scroll keys to select “Incoming Data Only”.
6.
Press
to save the setting. The screen displays “No
incoming voice calls can be received”. Your phone then
returns to Standby mode and displays “Data Only” above
the greeting.
Note: Once you have set your phone’s mode to “Incoming Data
Only”, you cannot receive regular voice calls until you change
back to “Voice”.
Your phone is now ready to receive an incoming data call.
6JG/KPK$TQYUGT
The MiniBrowser allows you to access certain information such
as stock quotes and weather via the Internet. Browsing the web
via the phone is not like using your home computer. Site
providers have selected only the critical aspects of their site to
present to wireless phone users, and have removed most
graphics.
Each time you start MiniBrowser, the phone will connect to the
network as necessary, and the service indicator icon (
) will
appear on the display. Any time the service indicator icon is
visible on the display, your phone is connected to the network
and you will be billed accordingly. Rates will vary according to
your billing plan.
The MiniBrowser will end the connection after a certain period
of network inactivity and will automatically re-connect as
necessary. For this reason, you may find that you are billed for
several network connections within a single MiniBrowser
session. This is normal and is designed to minimize your bill.
Note: The MiniBrowser features do not work when your phone
is in analog mode.
6JG/KPK$TQYUGT5VCTVCPF'PF2TQORVU
Your phone can prompt you when a MiniBrowser session starts
or ends. These prompts are easy to set.
Here’s how to do it:
1.
Press
to display the Main Menu.
2.
Press
for Setup.
3.
Press
for MiniBrowser.
4.
Use the scroll keys to select one of the four options:
♦ Prompt to start (You will see a prompt when you
enter the browser, but not when you exit it.)
♦ Prompt to end (You will see a prompt only when you
5.
exit the browser.)
♦ Prompt both (You will be prompted when you enter
or exit the browser.)
♦ Prompt none (This is the default setting. You will
never see either prompt.)
Press
to save your setting or
to cancel.
.CWPEJKPIVJG/KPK$TQYUGT
Note: The first time you use the MiniBrowser, you will go
through a security setup process that takes 3 to 5 minutes.
Please follow the on-screen prompts to complete the security
setup process. This initial setup process occurs only the first
time you access the service.
1.
Press
2.
Press
for MiniBrowser. Your phone will access the
MiniBrowser network.
3.
A reminder of the charge will appear. Using the soft keys,
simply answer yes (
) or no (
).
4.
Once connected, the Home page (or the last page visited)
will be displayed. To access the Home menu page from any
other menu in the MiniBrowser, press and hold
.
An example of a Home Page is shown below:
5.
to display the Main Menu.
Home Page
1 Phone.com
2 Yahoo !
3 Weather
4 Portfolio
5 More Internet
What appears on the display when accessing the
MiniBrowser is dependent on the service provider
content. To view additional text, use the scroll keys.
6Q'ZKVVJG/KPK$TQYUGT
Simply press
to exit the MiniBrowser. If the "Prompt to
end" or "Prompt both" option is set in the MiniBrowser Setup
(
) , you will be prompted whether you
want to end the browser call.
6JG/KPK$TQYUGT5QHV-G[U
At the bottom of the MiniBrowser display is a solid bar which
and
)
contains browser commands. “Soft” keys (
below the solid bar are used to execute the commands. These
two keys are called soft keys because their function changes
depending on where you are in the MiniBrowser software.
0CXKICVKPIVJG/KPK$TQYUGT
When you use the
MiniBrowser, some keys on
your phone operate
differently than on a normal
phone call. These keys are
explained below. The
MiniBrowser presents onscreen items in one of the
following ways:
♦ text or numeric input
♦ links (embedded in
content)
♦ numbered options
♦
(some options may
not be numbered)
simple text
You can act on the options or links by making use of the soft
keys. The soft keys (
and
) are located below the
bottom line of the display.
Here’s how the keys work in the MiniBrowser. Refer back to the
picture on the previous page if you need to.
1.
Up/Down Navigation Key: Use the navigation
key to scroll to and select browser options. The
currently selected option is indicated by “ ” .
You can also use the navigation key to move the
cursor when editing text.
2.
MENU Key: This is the right soft key. The right
soft key is used primarily for secondary options, or
a menu of secondary options. For more info, see
“The MiniBrowser Soft Keys” on page 70.
3.
END Key: Exits the MiniBrowser and returns the
phone to Standby mode.
4.
Numbered Keys 0 - 9: If the items on a page are
numbered, you can use these keys to select them.
5.
Right Cursor Key: Moves the cursor right in a
text entry.
6.
0 Key: enters a space in a text entry.
7.
Left Cursor Key: Moves the cursor left in a text
entry.
8.
CLR Key: This key performs two important
functions:
♦Backs you up in the browser. Pressing it once
backs you up one page. Pressing and holding it
backs you up to the Home page.
♦Clears out entered text or numbers. When
entering numbers or text, press
to clear
the last number, letter, or symbol. Press and hold
to completely clear the input field.
9.
OK / Messages Key: This is the left soft key.
The left soft key is used primarily for selecting the
highlighted item, but its function may change
depending on what you are doing (see “The MiniBrowser Soft Keys” on page 70).
10. Volume Key: This key performs several useful
functions:
♦Allows you to scroll up or down by a page.
♦Press and hold the up portion for one second to
back up one level in the browser.
♦Press and hold the down portion for one second
to go to your home page.
'PVGTKPI6GZV0WODGTUQT5[ODQNU
When you are prompted to enter text, the current text entry
method will appear on the right soft key as ALPHA, NUM or
SYM. To change the input mode, use the right soft key.
7UKPI.KPMU
Links have several purposes, including jumping to a different
page, jumping to a different site, or even initiating a phone call
from some sites. Links are shown inside of brackets ( [ ] ) , and
you can normally use the left soft key to select a link when it is
highlighted.
+PKVKCVKPIC2JQPG%CNNHTQOVJG/KPK$TQYUGT
You may initiate a phone call from the MiniBrowser if the site
you are using supports this feature (the phone number may be
highlighted and the left soft key will appear as "Call."). In most
cases, you can also use the
key to call the number. The
browser connection will be terminated when you initiate the
call. After you end the call, your phone will return to Standby
mode.
7UKPI$QQMOCTMU
You can bookmark many individual pages for easy access at a
later time. Bookmarks save you time by reducing the number of
steps it takes to access a desired page.
6Q%TGCVGC$QQMOCTM
1.
Go to the page that you want to mark.
2.
Press and hold
3.
Select Mark Site.
4.
If the page has a title, it will be automatically used for the
name of the bookmark. You can also change the bookmark
name. Selecting Save will save the name and add the page
to your list of bookmarks.
5.
A message will appear confirming that the bookmark was
added to the list. Select OK to return to the screen that you
marked to resume navigation within the MiniBrowser.
6.
The new bookmark is added to the bottom of your
bookmark list.
. A list of options appears.
(KPFKPIC$QQMOCTM
1.
From the Home Page, select Bookmarks.
2.
Select the bookmark you want and press
.
Or
1.
From the Home Page, press and hold the number
associated with the bookmark in the bookmark list.
&KCNKPI#DDTGXKCVGF2JQPG0WODGTU
From Standby mode, your phone allows you to dial a short digit
string (four digits for example) and be immediately connected
(if supported by your service provider).
Five and six digit strings will be immediately connected - simply
dial the digits and press
. To dial a smaller digit string
(that is, 1, 2, 3, or 4 digits) is also very easy - it just requires a
little extra button pushing. Here’s how to do it:
1.
Dial the desired digits (1, 2, 3, or 4 digits).
2.
Press
3.
Press
for Talk. The abbreviated number is
immediately dialed.
to display the Digit Dial menu.
/GPWU
Your phone includes both a Main Menu and an In Use Menu.
/CKP/GPW
The Main Menu in Standby mode contains 10 primary options,
most of which contain sub-menus with context- specific
options (see “Your Phone’s Main Menu” on page 76).
+P7UG/GPW
The In Use Menu options are available in Conversation mode:
1. Mute / (Un)mute
2.
Silent Key
3.
Phone Book
4.
Version
5.
Send Tel #
/GPW0CXKICVKQP
To access a menu option, press
, and then press the
scroll keys to scan menu options. Press the associated digit key
to select the desired option. If you know the number of the
option you want to select, simply press
, and then press
the associated digit key to select the desired option. (You do
not have to scroll through the list or display an option in order
to select it.)
Note: Closing the flip will return the phone to Standby mode
from any menu. Also, the phone will automatically return to
Standby mode from any menu if you don’t touch a key for 60
seconds.
;QWT2JQPG U/CKP/GPW
Main Menu
Menu Level 1
Menu Level 2 Menu Level 3
➪
➪
➪
➪
➪
➪
➪
➪
➪
➪
➪
➪
;QWT2JQPG U/CKP/GPW
EQPVKPWGF
Main Menu
Menu Level 1
Menu Level 2
Menu Level 3
➪
➪
➪
➪
➪
➪
➪
➪
7UCIG)WKFGNKPGU
#NNCDQWV2GTHQTOCPEGCPF5CHGV[
7PFGTUVCPFKPI5KIPCN5VTGPIVJ
The voice quality of your phone will always be at its best when
the antenna is fully raised. If you’re inside a building, reception
may be better near a window.
The quality of each call you make or receive depends on the
signal strength in your area. Your phone will inform you of the
current strength by displaying a number of bars next to the
signal strength icon. The more bars displayed, the stronger the
) displays in the upper
signal. The signal strength indicator (
left corner of your display.
7PFGTUVCPFKPI2QYGT5CXG/QFG
If you’re trying to use your phone in an area where the signal is
too weak, the Power Save feature will automatically activate to
conserve battery power when you’ve been unable to pick up a
signal for 15 minutes. If your phone is on, it will periodically
recheck service availability, or you can do so yourself manually
by pressing any key. A message will be displayed on the screen
any time Power Save has been activated.
7PFGTUVCPFKPIJQY;QWT2JQPG1RGTCVGU
Your phone is basically a radio transmitter and receiver. When
it’s turned on, it receives and transmits radio frequency (RF)
signals. When your phone is in use, the system handling your
call controls the power level. This product meets all FCC/
Industry Canada requirements for RF power output levels for
this handset type.
5RGEKHKECVKQPU5WDLGEVVQ%JCPIG
The information contained in this manual is believed to be
correct at the time of printing, however, Samsung reserves the
right to change or modify any of the specifications without
notice or obligation to update existing units.
4CFKQ(TGSWGPE[5CHGV[
In 1991—1992, the Institute of Electrical and Electronics
Engineers (IEEE) and the American National Standards Institute
(ANSI) joined in updating ANSI’s 1982 standard for safety levels
with respect to human exposure to RF signals. More than 120
scientists, engineers, and physicians from universities,
government health agencies, and industry developed this
updated standard after reviewing the available body of research.
In 1993, the Federal Communications Commission (FCC)
adopted this updated standard in a regulation. In August 1996,
the FCC adopted a hybrid standard consisting of the existing
ANSI/IEEE standard and the guidelines published by the
National Council of Radiation Protection and Measurements
(NCRP).
The design of the phone complies with these updated
standards. Of course, if you want to limit RF exposure even
further than the updated standard, you can choose to control
the duration of your calls and operate your phone in the most
power-efficient manner.
♦ You should not touch the antenna unnecessarily when
using the phone.
♦ Touching the antenna may affect the call quality and may
♦
♦
cause the unit to operate at higher power than it would
need otherwise.
When using the handset, hold the handset just as you
would hold any other telephone, and keep the antenna
pointed up and over your shoulder.
Use of hands-free devices will further limit RF exposure.
'OGTIGPE[%CNNU
+/2146#06016+%'2.'#5'4'#&
Because of various transmission methods, network parameters,
and user settings used to complete a call from your wireless
phone, a connection cannot always be guaranteed.
Therefore, emergency calling may not be available on all
wireless networks at all times.
DO NOT depend on this phone as a primary method of dialing
911 or any other essential or emergency communications.
Remember to always turn your phone on and check for
adequate signal strength before placing a call.
/CKPVCKPKPI;QWT2JQPG U2GCM2GTHQTOCPEG
To operate your phone properly — that is, to maintain safe and
satisfactory service — you should follow these rules:
♦ For best reception, extend the antenna fully.
♦ Hold the phone with the antenna up and over your
♦
♦
♦
♦
♦
♦
shoulder.
Do not hold, bend, or twist the phone antenna at any time.
Close the phone antenna when not on a call.
Do not use the phone with a damaged antenna.
Speak directly into the microphone.
Avoid exposing your phone and accessories to rain or
liquid.
Only Samsung authorized personnel should service your
phone and its accessories.
2TQVGEVKPI;QWT$CVVGT[
For best battery performance, you should follow these
guidelines:
♦ Use your battery for its intended purpose only.
♦ Only use Samsung-approved batteries and chargers. These
chargers are designed to maximize battery life. Using other
batteries or chargers will invalidate your warranty and may
cause damage as well.
♦ You must never use a battery charger that is damaged in
any way or worn out.
♦ To avoid damage, only charge the battery in temperatures
that range from 32° F to 104° F.
♦ Do not use the battery charger in direct sunlight or in high
humidity areas (such as a bathroom).
♦ When a battery charger is not in use, disconnect it from
the power source.
♦ Never dispose of the battery by incineration (fire).
♦ Keep the metal contacts at the battery base clean.
♦ Do not attempt to disassemble or short-circuit the battery,
as injuries or burns may result.
♦ You may need to recharge the battery if it has not been
used for a long period of time.
♦ Replace the battery when it no longer provides acceptable
performance. It can be charged hundreds of times before it
will need to be replaced.
♦ Do not allow metal objects or liquids to contact or shortcircuit the battery terminals, as injuries or burns may
result.
♦ To avoid damage, store the battery in temperatures ranging
from -4° F to 185° F, and avoid leaving the battery unused
for very long periods. Follow these storage rules:
♦Less than one month:
-4° F to 140° F (-20° C to 50° C)
♦ More than one month:
-4° F to 113° F (-20° C to 35° C)
$CVVGT[&KURQUCNCPF4GE[ENKPI
You must follow these instructions when disposing of or
recycling the battery:
♦ Do not dispose of the battery in a fire; the cell may
♦
♦
♦
explode. You must follow the regulations in your area
regarding disposal of batteries.
Do not open or puncture the battery; the released
electrolyte is corrosive and may cause damage to the eyes
and skin, and can be toxic if swallowed.
Charge the battery in accordance with the instructions
specified in this user guide.
Return unwanted Samsung Lithium Ion batteries to your
nearest Samsung Service Center. (Call toll free
1-888-987-HELP (4357) in the U.S.)
2JQPGCPF$CVVGT[5RGEKHKECVKQPU
Dual Band:
Display Screen:
CDMA 1.9 GHz / AMPS 800 MHz
5 Lines (4 Text Lines, 1 Icon Line)
Battery Type:
Standard: 1000 mAh Lithium-Ion
PCS Antenna:
1/4 Wave (down), 5/8 Wave (up)
Extended: 1600 mAh Lithium-Ion
2JQPGYKVJ
Dimensions (H x W x D):
Weight:
Volume:
Talk Time Digital:
Talk Time Analog:
Standby Time Digital:
Standby Time Analog:
5VCPFCTF$CVVGT[
'ZVGPFGF$CVVGT[
4.4 x 2.0 x 1 inches
4.4 x 2.0 x 1.2 inches
112 x 52 x 25 mm
112 x 52 x 30 mm
5.5 oz. (156 g)
145 cc
6.1 oz. (172 g)
174 cc
up to 2.5 hours
up to 45 mins
or
up to 130 hours
up to 15 hours
up to 5 hours
up to 1.5 hours
or
up to 230 hours
up to 25 hours
1RGTCVKPIC/QVQT8GJKENG
+/2146#06016+%'2.'#5'4'#&
(#+.74'61(1..196*'5'+05647%6+105/#;.'#&
615'4+1752'4510#.+0,74;#0&2412'46;
&#/#)'
You should never use a hand-held phone while operating a
motor vehicle. It may divert your attention away from driving
and may be illegal in some cities and states. You should park
your vehicle legally before using your hand-held phone.
Remember, safety comes first.
♦ Your hand-held phone should be stored in a secure place
so that, in the event of a sudden stop or collision with
another vehicle, the phone will not damage property or
injure anyone. For example, airbags inflate very quickly
and with great force. Serious injury may result if you have
placed your phone in the area of deployment of an air bag
and the bag inflates.
(QNNQYKPI5CHGV[)WKFGNKPGU
To operate your phone safely and efficiently, you should always
follow any special guidelines in a given area, and turn your
phone off in areas where use is forbidden or when it may cause
interference or danger.
6WTPQHH;QWT2JQPGDGHQTG(N[KPI
You should turn off your phone before boarding any aircraft. To
prevent possible interference with aircraft systems, U.S. Federal
Aviation Administration (FAA) regulations and Canadian
Department of Transport require you to have permission from a
crew member to use your phone while the plane is on the
ground. To prevent any risk of interference, FCC/Industry
Canada regulations prohibit using your phone while the plane
is in the air and require that your phone must be turned off.
4GUVTKEVKPI%JKNFTGP UCEEGUUVQ;QWT2JQPG
Your phone should not be played with by children. They could
hurt themselves and others, damage the phone, or make calls
that increase your bill.
7UKPI;QWT2JQPGPGCTQVJGT'NGEVTQPKE&GXKEGU
Most modern electronic equipment is shielded from radio
frequency (RF) signals. However, some electronic equipment
may not be shielded, or adequately shielded, from RF signals.
RF signals from wireless telephones may affect such equipment.
RF signals from your phone may affect systems in your vehicle,
including improperly installed or inadequately shielded
electronic operating and entertainment systems in motor
vehicles (such as electronic ignition systems, electronic speed
control systems, electronic anti-skid or anti-lock braking
systems, and air bag systems). You should check with the
manufacturer of your vehicle (and the manufacturers of any
equipment added to your vehicle) to determine whether its
systems are adequately shielded from external RF signals and to
determine appropriate safety precautions.
You must consult the manufacturer of any personal medical
devices (such as pacemakers and hearing aids) to determine if
they are adequately shielded from external RF signals and the
appropriate safety precautions to take with such devices. For
example, safety instructions for pacemakers may include
minimum distances that the phone should be kept from the
pacemaker, areas where the phone should not be kept (for
example, the breast pocket), use of the ear opposite the
pacemaker, and other such safety instructions. The advice from
the manufacturers may change from time to time. If at any time
you suspect any such interference, turn off your phone
immediately.
Turn off the phone in healthcare facilities and request
permission before using the phone near medical equipment.
%CWVKQPU
Any changes or modifications to your phone not expressly
approved in this document could void your warranty for this
equipment and void your authority to operate this equipment.
Only use approved batteries, antennas, and chargers. The use of
any unauthorized accessories may be dangerous and will
invalidate the phone warranty if said accessories cause damage
or a defect to the phone.
Although your phone is quite sturdy, it is a complex piece of
hardware and can be broken. Use common-sense guidelines to
avoid dropping, hitting, bending, or sitting on it.
(%%+PFWUVT[%CPCFC0QVKEG
The phone may cause TV or radio interference if used in close
proximity to receiving equipment. The FCC/Industry Canada
can require you to stop using the telephone if such interference
cannot be eliminated.
.KSWGHKGF2GVTQNGWO)CU
Vehicles using liquefied petroleum gas (such as propane or
butane) must comply with the National Fire Protection
Standard (NFPA-58). For a copy of this standard, contact the
National Fire Protection Association, One Batterymarch Park,
Quincy, MA 02269, Attn.: Publication Sales Division.
(%%%QORNKCPEG+PHQTOCVKQP
This device complies with part 15 of the FCC Rules. Operation
is subject to the condition that this device does not cause
harmful interference.
5VQTKPI;QWT2JQPG
You must not store or carry your phone, its parts, or accessories
in the same compartment or other area where there flammable
liquids, gases, or explosive or flammable materials.
6WTPQHH;QWT2JQPGKP&CPIGTQWUQT2QUVGF#TGCU
You must turn off your phone in dangerous areas or any area
where posted notices so require. For example, to avoid
interfering with blasting operations, you should turn off your
phone when in a blasting area or in other areas with signs
indicating that two-way radios should be turned off.
Construction crews use remote-controlled RF devices to set off
explosives.
Turn off your phone when you are in any area with a potentially
explosive atmosphere. It is rare, but your phone or its
accessories could generate sparks. Sparks could cause an
explosion or a fire resulting in bodily injury or even death.
Areas with a potentially explosive atmosphere are often, but
not always clearly marked. They include fueling areas such as
gas stations; below deck on boats; fuel or chemical transfer or
storage facilities; areas where the air contains chemical or
particles such as grain, dust, or metal powders; and any other
area where you would normally be advised to turn off your
vehicle engine.
;QWT2JQPGU8QKEG/GOQ(GCVWTG
The Voice Memo feature of your phone is intended to let you
record information when a pencil and paper may not be
available. Before using this feature to record any part of a
telephone conversation, you should make sure that the
recording will not be made or used for any wrongful or
unlawful purpose and that you have the consent of other
parties to the call if required by law or under your service
agreement. Under the laws of some states, for example,
recording any part of a telephone call taking place in the state is
illegal unless every person on the call consents to your making
of the recording. State and federal law may impose serious
criminal penalties, in addition to possible civil liability, for
unlawful recording of a telephone call or for disclosure of an
illegally recorded conversation. Check to be sure that your
intended use of this feature will comply with all applicable laws
before recording or playing back a telephone conversation.
+PHQTOCVKQP6Q7UGT
This equipment has been tested and found to comply with the
limits of a Class B digital device, pursuant to Part 15 of the FCC
Rules. These limits are designed to provide reasonable
protection against harmful interference in a residential
installation. This equipment generates, uses and can radiate
radio frequency energy and, if not installed and used in
accordance with the instructions, may cause harmful
interference to radio communications. However, there is no
guarantee that interference will not occur in a particular
installation; if this equipment does cause harmful interference
to radio or television reception, which can be determined by
turning the equipment off and on, the user is encouraged to try
to correct the interference by one or more of the following
measures:
♦ 1. Reorient / relocate the receiving antenna.
♦ 2. Increase the separation between the equipment and
♦
♦
receiver.
3. Connect the equipment into an outlet on a circuit
different from that to which the receiver is connected.
4. Consult the dealer or an experienced radio/TV
technician for help.
CAUTION: Changes or modifications not expressly approved by
the manufacturer responsible for compliance could void the
user’s authority to operate the equipment
+PFGZ
#
abbreviated numbers (dialing), 74
access a menu option, 75
accessories, 14, 80, 85, 86
Accessories, 7
Accessories Connector, 7
desktop charger, 81
Dual-Slot Desktop Charger,
4, 15
Extended Battery, 82
Hand Strap, 4
Hands-Free Car Kit, 30, 40
Headset, 10
Standard Battery, 82
Travel Charger, 4, 14, 16
accidental key presses, 43
Active Flip, 3, 8, 18, 28, 30, 40,
41, 43, 75, 77
add digits, 19
Airtime, 64, 65
life time, 65, 76
review airtime, 65
Reviewing Airtime, 65
Alarm, 31, 32, 33
alarm ring type, 32
alarm ring volume, 33
cancel the alarm, 32
silence the alarm, 5, 32
Alerts, 26, 29
select alert options, 29
Analog, 20, 82
Analog mode, 20
answer, 3, 6, 17, 18, 22, 25, 28,
29, 43, 58, 64, 69
answer options, 28
Answering a Call, 18, 22
Any Key Answer, 18, 28, 29
Antenna, 10, 82, 85, 87
reception, 11, 78, 80
Any Key Answer, 18, 28, 29
activate Any Key Answer, 29
area codes, 19
Automatic hyphenation, 19
Automatic Hyphenation, 19
Automatic storage, 28
$
back up one menu level, 8
Backlight, 30
Backlight Control, 30
Battery, 4, 13, 14-15, 81-82, 85
disposal and recycling, 82
battery performance, 81
Battery strength, 13
Charging the Battery, 14
Charging with the Dual-Slot
Desktop Charger, 15
Installing the Battery, 14
recharge the battery, 81
replace the battery, 81
Standard Battery, 82
store the battery, 81
Block Own Number, 21
browser commands, 70
%
call an emergency or special
number, 60
call automated systems, 54
Call Dropped, 25
Call Failed, 25
call forwarding
activate Call Forwarding, 23
Using Call Forwarding, 23
Call Forwarding, 23
call logs, 6, 18-19, 23, 28, 57, 6365
incoming, 23, 25, 28
missed, 22, 25, 28
0utgoing, 22, 28
call time, 4, 17, 18, 50
Call Waiting, 4, 6, 21, 22
C (continued)
caller ID
Name display with Caller ID, 28
Using Caller ID, 21
Caller ID, 21, 34, 50
Cautions, 85
Charging the Battery, 14
Charging with the Dual-Slot
Desktop Charger, 15
Clear Key
back up one menu level, 8
correct a misdialed digit, 19
erase one character, 8
erase one digit at a time, 19
return to Standby mode, 8, 17,
25, 32, 38, 72, 75
CLR Key, 8, 71
conference calls, 22
confidential number, 52
Conversation Mode, 17
In Use Menu, 26, 75
correct a misdialed digit, 19
customer service
Samsung Service Center, 82
customize, 34
&
Dangerous Areas, 86
data, 7, 66, 67
default, 21, 23, 26, 37, 58, 63, 68
desktop chargers, 81
Dialing, 6, 7, 19, 39, 40, 44, 53,
54, 60, 62
abbreviated numbers, 74
One-Touch, 53
pause, 56
Three-Touch, 18, 53
Two-Touch, 53
Digit Entry, 56
Dimensions, 82
direct sunlight, 81
Display, 4, 12, 30, 78, 82
indicators, 12
setting the language of, 31
Dual-Slot Desktop Charger, 4, 15
'
earpiece volume, 24
emergency, 44, 47, 58, 60
Emergency and Special Numbers
call an emergency or
special number, 60
END/ Power Key, 8
Ending a Call, 18
English, 31
entering a phone number, 5, 32
erase, 8, 19, 37, 42, 45, 48,
52, 60, 61, 63, 65
erase all, 8, 19, 42, 48
erase all the digits at once, 19
erase an individual text
message, 48
erase one character, 8
erase one digit at a time, 19
explosive atmosphere, 86
Extended Battery, 82
(
failed call, 25, 29
Fax, 66, 67
FCC Notice, 85
Find Entry, 51
Finding Entries by Name, 51
Flip, 3, 8, 18, 28, 30, 40-41,
43, 75, 77
Four, five, and six digit
abbreviated dialing, 74
French, 31
)
Greeting, 30
*
Hand Strap, 4
Hands-Free Car Kit, 30, 40
Headset, 10
Headset connector, 10
help, 4
high humidity areas, 81
+
In Use Menu, 26, 75
incoming call, 3-5, 8, 13, 18, 21,
23-24, 28-29, 34, 43, 58, 60
incoming message calls, 35, 36
incoming voice calls, 34, 66, 67
Industry Canada, 78, 83, 85
interference, 83, 85
Internet, 68, 69
KeyGuard, 30, 43
activate KeyGuard, 43
.
language (French or English), 31
LED Indicator, 3
life time, 65, 76
liquid spills, 80
Lithium Ion (LiIon) Battery, 14
Lithium Ion batteries, 82
lock code, 47, 52, 58-60, 62
default lock code, 58
Lock Code Setting, 58
lock the phone, 58, 59
new lock code, 59
Lock Mode, 44, 47, 58, 60, 62
place an outgoing call in Lock
mode, 60
/
make calls, 18, 23, 84
manually dial a number using a
pause(s), 56
melody tones, 28, 33-35
Memory, 18, 45, 53
Memory Dialing Shortcuts, 18, 53
Menu, 9, 13, 75
access a menu option, 75
back up one menu level, 8
digit entry menu, 56
In Use Menu, 26, 75
Main Menu, 3, 6, 9, 18, 24, 41,
75-77
navigating a menu, 5, 75
MENU Key, 9, 71
Messages, 5, 35, 36, 45-48, 72
erase all stored text messages,
48
erase all text messages and
numeric pages, 48
incoming message calls, 35, 36
kinds of messages, 45
Message indicator, 13
Message Memory Capacity, 45
Message Options, 48
Message Ringing, 45
Message Services, 45
Messages Key, 5, 72
Messages Menu, 5, 46-48
Reviewing Messages, 47
Microphone, 7, 26
Mute / (Un)mute, 75
mute the microphone during a
call, 7, 26
MiniBrowser, 13, 35, 45-47, 68-73
browser commands, 70
exit the MiniBrowser, 70
Minute Beep, 26, 29
Missed Call Alert, 25
Mode
Conversation Mode, 17
Standby Mode, 17
Mute Microphone
Mute / (Un)mute, 75
mute the microphone during a
call, 7, 26
Mute the ringer, 4, 34
0
Name display with Caller ID, 28
navigating a menu, 5
Navigation Key, 9, 71
Network Busy, 25
network feature activation
codes, 19
North American Numbering
Plan, 19
numeric pages, 35, 36, 45, 47, 63
1
One-Touch Dialing, 53, 83
operating a motor vehicle, 83
out of calling range, 25
Out of Range, 25
Outgoing Calls Log, 22
2
Pages, 47
numeric pages, 35-36, 45, 47, 63
Pause Dialing, 19, 54-56
pause dialing methods, 54
Personal Greeting, 30
Phone and Battery Specifications,
82
Phone Book, 4-6, 9, 17-19, 21,
24-25, 32, 40, 48-49,
51-58, 60, 61, 63, 64, 75
Find Entry, 51
Finding Entries by Name, 51
make a number secret, 52
phone number displays, 18, 24, 32,
64
Placing a call
place a three-way call, 22
place an outgoing call in Lock
mode, 60
using Voice Dialing, 40
Placing a Call, 40
Power Save Mode, 17, 78
Prepend Dialing, 19
prepend existing phone
numbers, 19
Prepend option, 19
4
radio frequency, see RF
rain, 80
reception, 11, 78, 80
recharge the battery, 81
Redialing calls
redial the last call, 23
return to Standby mode, 8, 17, 25,
32, 38, 72, 75
review
a Voice Memo, 38
airtime, 65
messages, 46
text messages, 48
voice dialing entries, 42
RF, 78, 79, 84, 86
RF exposure, 79
Ringer, 24, 34, 36
mute (or silence) the ringer,
4, 5, 8, 9, 25, 28, 34
Ring Tone Mute, 34
Ring Type Setting, 34-36, 45
roaming, 13, 20, 36, 58, 61
5
Safety Considerations
Cautions, 85
operating a motor vehicle, 83
explosive atmosphere, 86
Samsung Service Center, 82
Scroll Keys, 6
Secret phone book numbers
make a number secret, 52
Security, 48, 52, 58-63
Security menu, 58, 59, 60
Send Tel #, 75
Service, 12, 29
Service alerts, 29
Service indicator, 12
S (continued)
Signal strength, 12
Silent Key, 75
Special numbers, 62
call an emergency or
special number, 60
Speed Dialing, 53, 83
Standard Battery, 82
Standby Mode, 17
Standby or Conversation, 9
Standby Time, 82
store, 24, 40, 45, 46, 49, 50, 54,
55, 62
a phone number
after ending a call, 50
a phone number to memory
location 179, 46
phone numbers and names, 49
store special numbers, 62
storing your phone, 81, 83, 86
6
Talk Time, 82
temperatures, 81
temporarily unblock, 21
text messages, 35, 36, 45, 47, 63
reviewing text messages, 47
Three-Touch Dialing, 18, 53
Three-Way Calling, 22
Tone length setting
set tone length, 27
Tone Length Setting, 27
Travel Charger, 4, 14, 16
Turbo Dialing, 53
Turning your phone on and off,
11
Two-Touch Dialing, 53
8
Version, 75
vibrate, 13
Vibrator on, 13
Vibrate, 28
view alphabetically, 49
view numerically, 49
view your phone number from
Standby mode, 24
Voice Memo, 5, 37, 38, 86
record a Voice Memo, 37
reviewing a Voice Memo, 38
Voice Memo Key, 5
guidelines for use of, 86
Voice-Activated Dialing, 3, 39, 40
erase all Voice Dialing
entries, 42
Erasing Voice Dialing
Entries, 42
Reviewing Voice Dialing
Entries, 42
Voice Dialing, 40, 41, 42
Voice Dialing Activation, 41
voicemail box, 45-46
one-touch access, 46
volume key, 9, 24, 35
earpiece volume, 24
9
warranty, 14, 85
Weight, 82