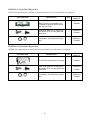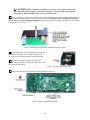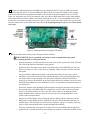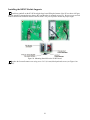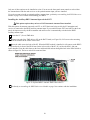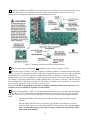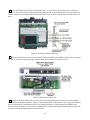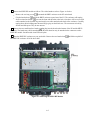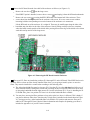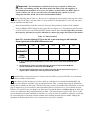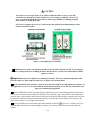
1
ELECRAFT K3 HIGH-PERFORMANCE 160 – 6 METER TRANSCEIVER KRX3 HIGH-PERFORMANCE SUBRECEIVER INSTALLATION AND OPERATION Rev. E, July 6, 2010 Copyright © 2010, Elecraft, Inc. All Rights Reserved Contents See Appendix A to install or change crystal filters in a previously assembled KRX3 Introduction............................................................................................................................................... 3 Customer Service and Support ............................................................................................................................ 4 Technical Assistance ....................................................................................................................................... 4 Repair / Alignment Service ............................................................................................................................. 4 Preventing Electrostatic Discharge Damage ............................................................................................ 5 How ESD Damage Occurs .................................................................................................................................. 5 Preventing ESD Damage ..................................................................................................................................... 5 Preparing for Installation .......................................................................................................................... 6 Tools and Supplies Required............................................................................................................................... 6 Parts Included ...................................................................................................................................................... 7 Circuit Boards and Enclosure .......................................................................................................................... 7 KRX3 Hardware Bag E850334 ....................................................................................................................... 8 E850344 TMP-BNC Cable Bag ...................................................................................................................... 9 E850249 I.F. Crystal Filter Bag (or Box)...................................................................................................... 10 E850249 I.F. Crystal Filter Bag (or Box)...................................................................................................... 10 Installation Procedure ............................................................................................................................. 11 Installing the Auxiliary DSP Board .................................................................................................................. 12 Checking and Modifying Resistor R91 and DAC Input Circuits ...................................................................... 21 Installing the KRX3 Module Supports .............................................................................................................. 22 Installing the Auxiliary KSYN3 Synthesizer .................................................................................................... 23 Auxiliary KRX3 Antenna Input (Optional)....................................................................................................... 25 Installing the Auxiliary KRX3 Antenna Input via the KAT3 ....................................................................... 26 Installing the Auxiliary KRX3 Antenna Input Via the Rear Panel BNC Connector .................................... 27 Assembling the KRX3 Subreceiver Module ..................................................................................................... 30 Installing the KRX3 Subreceiver Module ......................................................................................................... 35 Final Assembly.................................................................................................................................................. 41 Removing the KRX3 Module ................................................................................................................. 42 Operation ................................................................................................................................................ 43 Preparing for Operation ..................................................................................................................................... 43 Using the Sub Receiver ..................................................................................................................................... 44 Dedicated Sub Receiver Controls ................................................................................................................. 44 BSET: Additional Sub Receiver Controls ..................................................................................................... 44 Sub Receiver Antenna Selection ................................................................................................................... 44 Sub Receiver Band Independence ................................................................................................................. 44 Diversity Receive .......................................................................................................................................... 45 Sub Receiver Crystal Filter Considerations .................................................................................................. 45 SPLIT Mode with the Sub Receiver ............................................................................................................. 45 Appendix A: Installing Crystal Filters in the KRX3 Subreceiver………..……………………………A1 2 Introduction If your KRX3 is already installed in your K3, turn to Using the Sub Receiver on page 44 for operating instructions. The KRX3 subreceiver features specifications identical to the main K3 receiver including up to five roofing filters and an independent, dedicated DSP system. The subreceiver can tune the same range of frequencies as the main receiver, including frequencies outside of the Amateur bands when it is equipped with the optional KBPF3 general coverage filter board. The KRX3 has three major components as shown installed in a K3 in Figure 1. The shielded enclosure contains the main KRX3 board, mixer and noise blanker pony boards, optional KBPF3 general coverage filter board and roofing filters that you will assemble and mount in the enclosure. Only a few basic tools are required to assemble the components and install them in the K3 (see page 6). Figure 1. KRX3 Subreceiver Installed in K3. 3 Customer Service and Support Technical Assistance You can send e-mail to [email protected] and we will respond quickly - typically the same day Monday through Friday. Telephone assistance is available from 9 A.M. to 5 P.M. Pacific time (weekdays only) at 831662-8345. Please use e-mail rather than calling when possible since this gives us a written record of the details of your problem and allows us to handle a larger number of requests each day. Repair / Alignment Service (We want to make sure everyone succeeds!) If necessary, you may return your Elecraft product to us for repair or alignment. (Note: We offer unlimited email and phone support to get your kit running, so please try that route first as we can usually help you find the problem quickly.) IMPORTANT: You must contact Elecraft before mailing your product to obtain authorization for the return, what address to ship it to and current information on repair fees and turn-around times. (Frequently we can determine the cause of your problem and save you the trouble of shipping it back to us.) Our repair location is different from our factory location in Aptos. We will give you the address to ship your kit to at the time of repair authorization. Packages shipped to Aptos without authorization will incur an additional shipping charge for reshipment from Aptos to our repair depot. Elecraft 1-Year Limited Warranty This warranty is effective as of the date of first consumer purchase. It covers both our kits and fully assembled products. For kits, before requesting warranty service, you should fully complete the assembly, carefully following all instructions in the manual. What is covered: During the first year after date of purchase (or if shipped from factory, date product is shipped to customer), Elecraft will replace defective or missing parts free of charge (post-paid). We will also correct any malfunction to kits or assembled units caused by defective parts and materials. Purchaser pays inbound shipping to us for warranty repair, we pay shipping to return the repaired equipment to you by UPS ground service or equivalent to the continental USA and Canada. Alaska, Hawaii and outside U.S. and Canada actual return shipping cost paid by owner. What is not covered: This warranty does not cover correction of kit assembly errors. It also does not cover misalignment; repair of damage caused by misuse, negligence, or builder modifications; or any performance malfunctions involving non-Elecraft accessory equipment. The use of acid-core solder, water-soluble flux solder, or any corrosive or conductive flux or solvent will void this warranty in its entirety. Also not covered is reimbursement for loss of use, inconvenience, customer assembly or alignment time, or cost of unauthorized service. Limitation of incidental or consequential damages: This warranty does not extend to non-Elecraft equipment or components used in conjunction with our products. Any such repair or replacement is the responsibility of the customer. Elecraft will not be liable for any special, indirect, incidental or consequential damages, including but not limited to any loss of business or profits. 4 Preventing Electrostatic Discharge Damage There is no climate or work location where the components of your K3 are safe from Electrostatic Discharge (ESD) unless you take specific steps to prevent such damage. Many of the components in your K3 can be damaged by static discharges of only a few volts: far too little for you to notice. Those low-voltage but destructive discharges easily happen anywhere and in almost any environment. ESD damage may not be apparent at first. The damaged components may not fail completely. Instead, the damage may result in below-normal performance for an extended period of time before you experience a total failure. How ESD Damage Occurs Whenever an object containing a static charge touches a circuit in your K3, current will rush into the circuit until the components reach the same voltage as the source of the static charge. If the voltage or current that passes through a component during that brief period exceeds its normal operating specifications, it may be damaged or destroyed. Preventing ESD Damage ESD damage cannot occur if there is no voltage difference between the components in your K3 and any object that touches them. That is how anti-static packaging works. Anti-static bags allow the static charge to flow over their surface, so that any part of the bag that touches the components inside are all at the same potential at all times. Anti-static foam keeps the leads of sensitive components at the same potential. At your work bench, avoiding a dangerous voltage is achieved most easily by tying everything together and connecting them to a common mains safety ground. This includes your K3, individual boards or other sensitive components as well as everything they may touch at the work table. Inexpensive static dissipating work mats are readily-available that will steadily and safely drain off any charges built up on parts or circuit boards placed on them. They are supplied with a lead that connects the mat to the common workbench ground. Also, metal cabinets on test equipment used on the bench should be tied together and connected to the common ground. Most importantly, you must have a way of continuously draining off any static charges that occur on your body. Such charges are easy to create, even while sitting quietly at the work bench. Moving your feet on the floor, shifting position in your chair or even moving your arms so that clothing rubs against itself can produce destructive static charges. You can discharge yourself by touching an unpainted metal ground, but that will last only until you move in a way that produces a new static charge. The safest technique is to wear a grounded wrist strap with a series 1-megohm resistor that continuously drains off any charges. Such wrist straps are readilyavailable and inexpensive. WARNING DO NOT attach a ground directly to yourself without a current-limiting resistor as this poses a serious shock hazard. A wrist strap must include a 1-megohm resistor to limit the current flow. If you choose to touch an unpainted, metal ground to discharge yourself, do it only when you are not touching any live circuits with your other hand or any part of your body. 5 We strongly recommend you take the following anti-static precautions (listed in order of importance) to avoid trouble: Leave ESD-sensitive parts in their anti-static packaging until you install them. The packaging may be a special plastic bag or the component’s leads may be inserted in conductive foam. Parts which are especially ESD-sensitive are identified in the parts list and in the assembly procedures. Wear a conductive wrist strap with a series 1-megohm resistor. If you do not have a wrist strap, touch a ground briefly before touching any sensitive parts to discharge your body. Do this frequently while you are working. You can collect a destructive static charge on your body just sitting at the work bench. DO NOT attach a ground directly to yourself as this poses a serious shock hazard. Use a grounded anti-static mat on your work bench. If you choose to use a soldering iron to work on your K3 for any reason, be sure your iron has an ESDsafe grounded tip tied to the same common ground used by your mat or wrist strap. Preparing for Installation Tools and Supplies Required 1. #0 and #1 size Phillips screwdrivers. To avoid damaging screws and nuts, a power screwdriver is not recommended. Use the screwdriver that best fits the screw in each step. 2. Small pliers or a 1/4” nut driver. 3. Side (diagonal) cutters. 4. Long nose pliers. 5. Soft cloth or clean, soft static dissipating pad to lay cabinet panels on to avoid scratching. 6. Approximately 2.5” (6.4 cm) of transparent tape such as Scotch MagicTM mending tape (will be used as shown in Figure 44 on page 35). The following tools are strongly recommended: 1. ESD wrist strap. 2. Static dissipating work pad. You may need the following in order to install a single resistor on the main RF board (See Checking and Modifying Resistor R91 and DAC Input Circuits on page 21 to determine if you will need to install this part.) 1. Digital multimeter capable of measuring in resistance values. 2. Fine-tip temperature-controlled ESD-safe soldering station with 700 to 800F tip (370-430C). Recommend a spade tip approx. 0.05” (1.3 mm) wide. Do not use a high-wattage iron or soldering gun since this can damage pads, traces, or the parts themselves. 3. IC-grade, small-diameter (.031”) solder (Kester #44 or equivalent). i DO NOT use acid-core solder, water-soluble flux solder, additional flux or solvents of any kind. Use of any of these will void your warranty. 6 Parts Included The following parts should be included in your kit. Check to ensure you have them all. If any parts are damaged or missing, contact Elecraft for replacements (see page 4). Circuit Boards and Enclosure Note: Some pins on the male connectors may have been removed and some holes in the female connectors may have been plugged. This is intentional to help you align the connectors properly during assembly. ILLUSTRATION DESCRIPTION Auxiliary DSP Printed Circuit Board Assembly QTY. ELECRAFT PART NO. 1 E850234 1 E850260 1 E850276 1 E850257 1 E850280 ESD Sensitive. Follow ESD safe handling procedures. Keep in ESD-safe bag until installed. KSYN3 Printed Circuit Board Assembly ESD Sensitive. Follow ESD safe handling procedures. Keep in ESD-safe bag until installed. KRX3 Main Printed Circuit Board Assembly ESD Sensitive. Follow ESD safe handling procedures. Keep in ESD-safe bag until installed. K3 Mixer Board ESD Sensitive. KNB3 Noise Blanker Board ESD Sensitive. 7 QTY. ELECRAFT PART NO. 1 E850331 KNB3 SUBOUT Board 1 E850332 KRX3 Enclosure, Top (with tall standoffs) 1 E100334 KRX3 Enclosure, Bottom (with short standoffs) 1 E100334 QTY. ELECRAFT PART NO. TMP Cable 6” (15 cm) 2 E850337 TMP Cable 10” (25 cm) 1 E850338 TMP Cable 12” (30 cm) 1 E850339 Circular Foam Pad (Self-Adhesive: Do not remove protective backing until instructed to do so) 1 E700053 Battery Cover 1 E100343 Resistor, 27 ohm (red-violet-black) 1/8 watt 1 E500336 Standoff, Metal, 4-40 7/8” (22 mm) 2 E700156 Standoff, Metal, 4-40, 1/2” (13 mm) 2 E700061 Standoff, Metal, 4-40, 3/8” (9.5 mm) 2 E700153 Standoff, Metal, 4-40, 1/4” (6.4 mm) 4 E700152 Standoff, Nylon, 5/8” (15.9 mm) 1 E700163 ILLUSTRATION DESCRIPTION KNB3 SUBIN Board ESD Sensitive. KRX3 Hardware Bag E850334 ILLUSTRATION Typical Standoffs (May be round or hexagonal) DESCRIPTION 8 QTY. ELECRAFT PART NO. Standoff, Hex Male/Female, 7/16” (11mm) 3 E700017 Unthreaded Sleeve Spacer, 7/8” (22 mm) 2 E700161 Screw, Zinc, Pan Head 4-40 1/4” (6.8mm) 8 E700005 Screw, Zinc, Pan Head 4-40 1/2” (13 mm) 2 E700196 Screw, Black, Pan Head, 4-40, 1/2” (13 mm) 2 E700030 Screw, Black, Pan Head, 4-40, 3/16” (4.8 mm) 4 E700015 Screw, Zinc, Pan Head, 4-40, 1-1/2” (38 mm) 4 E700157 Note: 1/2” (13mm) long screws (E700022) may be supplied instead. 3 E700166 Lock Washer, 4-40, Split 33 E700004 Lock Washer, #4, Inside Tooth 4 E700010 Knurled Nut, 4-40 2 E700158 Keypin Insert Package 1 E850352 QTY ELECRAFT PART NO. TMP Cable 14” (36 cm) with BNC Connector with nut and lock washer 1 E850342 Screw, Black, Pan head 4-40, 3/8” (9.5 mm) 1 E700008 Lock Washer, #4, Inside Tooth 1 E700010 Nut, 4-40 1 E700011 ILLUSTRATION DESCRIPTION Screw, Nylon, Pan Head 4-40, 1/4” (6.8 mm) Envelope E850344 TMP-BNC Cable Bag ILLUSTRATION DESCRIPTION 9 E850249 I.F. Crystal Filter Bag (or Box) NOTE: If the optional 8-pole 2.8K filter is purchased instead (see next item) this filter is not supplied. ILLUSTRATION DESCRIPTION QTY ELECRAFT PART NO. 1 E850249 KFL3A-2.7K Filter Note: This filter is not supplied if you purchased the optional 8-pole 2.8 kHz filter with your K3 kit. or or Screw, 4-40, either 1/4” (6.4 mm) Zinc, Pan Head or 3/16” (4.8 mm) Black Pan Head screw. 1 Lock Washer, #4, Inside Tooth or Split Ring 1 E700005 or E700015 E700010 or E700004 E850249 I.F. Crystal Filter Bag (or Box) OPTION: Not supplied unless ordered. Otherwise the standard 5-pole filter (above) is supplied. DESCRIPTION QTY ELECRAFT PART NO. KFL3A-2.8K Filter (optional, see above) 1 E850249 Screw, 4-40, either 1/4” (6.4 mm) Zinc, Pan Head or 3/16” (4.8 mm), Black Pan Head screw. 1 Lock Washer, #4, Inside Tooth or Split Ring 1 ILLUSTRATION or or 10 E700005 or E700015 E700010 or E700004 Installation Procedure K3 KIT BUILDERS: If you were directed here to install the KRX3 Subreceiver as part of the initial K3 assembly, remove the top cover as shown below, and then go directly to Checking and Modifying Resistor R91 on page 21 since you have already installed the Auxiliary DSP board. Disconnect power and all cables from your K3. Remove the nine screws to free the top cover as shown in Figure 2. After the cover is open, lift it gently to reach the speaker wire connector. Unplug the speaker then set the top cover aside in a safe place. If you have the K144XV 2-meter option installed, slip the speaker wire under the chassis stiffener bar that runs across the top of the K3 along the depression in the top of the K144XV module. Figure 2. Removing K3 Top Cover. CAUTION: Touch an unpainted metal ground or wear a grounded wrist strap before touching components or circuit boards inside the K3. See Preventing ESD Damage on page 5 for more information. Remove the chassis stiffener bar that runs across the top of the K3 (see Figure 3) Figure 3. Removing the Chassis Stiffener Bar. 11 If your K3 has the K144XV 2-meter option installed, remove the three 6-32 black flat head screws holding it to the left side panel (see Figure 4). Unplug the cables going to the K144XV module. The red power wire plugs into the K3’s main RF board. Unplug it and set it aside with the module. Figure 4. Removing the K144XV Module. Installing the Auxiliary DSP Board If the auxiliary DSP board is already installed in your K3, skip the following steps and go directly to Checking and Modifying Resistor R91 and DAC Input Circuits on page 20. Stand the K3 on its side feet, remove the six screws shown in Figure 5 and lift the left side panel off. Set the side panel aside in a safe place to avoid scratches. Figure 5. Removing the Left Side Panel. 12 Remove the screw shown in Figure 6. It is located directly behind the front panel microphone connector. There may be a lock washer under the screw. If so, save it with the screw. Removing the screw ensures the pc boards on the front panel assembly will have adequate clearance when the front panel assembly is removed in a later step. Remove only the screw shown. Leave the other screw in place as shown in the figure. Figure 6. Removing the 2D Screw. Remove the three screws securing the top of the front panel assembly as shown in Figure 7. Figure 7. Removing Front Panel Mounting Screws. Turn the K3 upside down. Place it on a clean, soft surface to avoid scratching the top of the front or rear panels. Refer to Figure 8 and remove screws 1 through 7, then lift the forward section of the bottom cover off. Put it in a safe place to avoid scratches. Figure 8. Removing Bottom Cover and Front Panel Screws. Refer to Figure 8 and remove screws 8 and 9. 13 CAUTION: Before continuing on with the next step, be sure you have removed the three top Front Panel Assembly screws shown in Figure 7. You may bend and damage the front panel or shield assemblies if the screws are not removed! Use a screwdriver in the pry tool openings to press back against the circuit board while pushing the lip on the front panel assembly toward the front as shown in Figure 9. Do not insert the screwdriver any farther than necessary to avoid damaging components! When you have the front panel assembly free, set the main chassis aside in a safe place. Figure 9. Separating the Front Panel Assembly from the Chassis. On the front panel, remove the knurled nut from the PHONES jack directly above the MIC connector. Be very careful not to scratch the paint on the front panel. Place the front panel assembly face down on a smooth, clean soft surface to avoid scratches to the LCD cover or front panel paint Figure 10. Phones Jack Knurled Nut. Remove the three screws and split lock washers shown in Figure 11. Figure 11. Removing Main DSP Board. 14 With the three screws removed, the main DSP board is held on to the front panel board by two multi-pin connectors. Slip your finger tips between the boards and pull the main DSP board away from the front panel board to unplug it. A large, thick spacer washer should be lying on the front panel near the hole for the phones jack (see Figure 12). This spacer fits between the phones jack and the back of the front panel board to provide a solid mechanical ground connection when the boards are in place. Remove the washer and set it aside. If it’s lying on the inside of the front panel you can tip the panel so it will slide out at the end. If your kit was supplied with 1/4” 6.4mm) long nylon screws, skip this step. If you have 1/2” (13mm) nylon screws, cut all three of them to length as follows: Screw three 4-40 nuts onto the 1/2” (13 mm) 4-40 nylon screw as shown in Figure 13. Cut off the nylon screw flush with the last nut. Sharp diagonal cutters or a knife will cut the nylon. After cutting, remove all three nuts. (The nuts establish the correct length for the screw and “clean up” the thread where you cut the screw.) Figure 12. Phones Jack Washer. Figure 13. Cutting 1/2” (13mm) Nylon Screws. CAUTION: The boards are especially vulnerable to ESD damage when unplugged. Wear a wrist strap or touch an unpainted metal ground frequently when handling the boards to avoid ESD damage. See Preventing Electrostatic Discharge Damage on page 5 for more information. 15 Mount the three standoffs on the component side of the main DSP board as shown in Figure 14. Be sure that: The standoffs are on the component side of the board as shown. No lock washer is used between the standoff and the board. One lock washer is used between the nut and the board. Figure 14. Installing Standoffs on the main DSP Board. Check to see if the nylon standoff shown below near J51 is mounted on the main DSP board. If not, install the nylon standoff supplied with your KRX3 parts as shown below. Be sure you place it in the correct hole near the corner of the board. CAUTION: To avoid damaging a circuit trace very close to the metal ring around the screw hole, position the lock washer under the screw so the split faces away from the trace. Tighten the hardware by turning the standoff while holding the screw and lock washer stationary. Do not over-tighten the screw. It is easy to strip the threads in the nylon standoff. Figure 15. Installing Nylon Standoff on Main DSP Board. 16 Locate resistor R3 on the front panel board (the board still mounted on the front panel assembly). If R3 is positioned above the board on its leads as shown in Figure 16, push it over to one side of the outline as shown. Be sure you don’t push it so far its leads might touch the solder pads for other components on the board. Figure 16. Positioning R3 on the Front Panel Board. Check the VFO B encoder and trim the pins as shown below if they haven’t been trimmed already to ensure they cannot short against the main DSP board. If trimming is needed, remove the encoder to ensure clipped ends don’t get lost in the front panel assembly. To remove the encoder, loosen the set screws and remove the knob, then remove the felt washer and nut and lift the encoder out. You need trim only the five pins shown close to the back of the pc board. Replace the encoder by reversing the process. Be sure the spacer nut on the inside is tight against the shoulder of the ferrule. Figure 17. Checking and Trimming the VFO B Encoder Pins. 17 Plug the aux DSP board into the main DSP board by mating P52 and P53 on the aux DSP board (at the narrow end) with J52 and J53 on the main DSP board. When seated, the connectors should be fully engaged with the aux DSP board resting against the standoffs with the holes in the board aligned for the screws (See Figure 18). Note that a two-row 10-pin connector at the top of the aux DSP board does not mate with anything on the main DSP board. That is normal. Attach the boards with three 4-40 1/4” (6.4 mm) nylon screws or the nylon screws you trimmed to length earlier (see Figure 13). Place a split lock washer under each screw head. Do not place washers between the standoff and the pc board. Be careful tightening the nylon screws. Their threads strip easily! Figure 18. Mating the Main and Auxiliary DSP Boards. Mount the DSP board assembly on the front panel board as follows. ESD SENSITIVE: Wear a grounded wrist strap or touch an unpainted metal ground before touching the DSP or front panel boards. Place the front panel assembly face down on a soft, clean surface to protect the finish. The back side of the front panel board should be facing upward. Position the large flat washer on the inside of the front panel over the PHONES jack hole (see Figure 10 on page 14). This is easily done by sliding the washer into place from the end of the front panel. Gently position the DSP board assembly on the front panel board so that the large jack fits through the cutout in the front panel board with the threaded section passing through the large flat washer and the circular opening in the front panel. Adjust the position of the board as needed so you can see the standoffs on the front panel board lined up with the screw holes in the main DSP board. Note: The nylon standoff next to J51 rests against the front panel board, but is not attached to it. Pick up the assembly while holding the DSP assembly board in place and inspect the position of the two male plugs on the DSP board. They should mate with J31 and J32 on the front panel board. J31 is near the encoder for VFO A and J32 is between the two dual potentiometers. Adjust the DSP board’s position as needed so the pins enter the corresponding holes in the sockets on the front panel board. Squeeze the boards together while ensuring the pins are mating with the connectors until the DSP board is resting against the three standoffs on the back of the front panel board that you installed earlier. The two connectors will not mate completely. About 1/4” (6.4mm) of the pins may be visible when the DSP board is positioned against the standoffs. If R3 was positioned above the board on its leads, look between the DSP boards and the front panel board to verify that the leads are not touching any terminals on either the aux DSP or front 18 panel boards (see Figure 19). If necessary, unplug the DSP board assembly and adjust the position of R3 to ensure the leads are clear of other solder pads before proceeding. Figure 19. Checking Position of R3. Replace the three 4-40 1/4” (6.4 mm) zinc pan head screws you removed earlier with a split lock washer under each screw head (see Figure 11 on page 14). Replace the knurled nut on the PHONES jack (see Figure 10 on page 14). Turn the chassis upside down and position the front panel so the pins of P30 and P35 on the bottom of the RF board just begin to engage the connectors on the lower edge of the front panel assembly as shown in Figure 20). Do not fully mate them yet. Figure 20. Mounting Front Panel Assembly - Mating P30 and P35. 19 Hold the front panel in place against the chassis assembly and turn the unit over to look at the two multipin connectors on the top of the RF board. See if they are engaging the corresponding connectors on the front panel assembly (see Figure 21). Adjust the position of the RF board or the front panel assembly to ensure they are mating properly. Figure 21. Mounting Front Panel Assembly - Mating P50 and P51. With the pins of all four connectors started, press the front panel onto the RF board connectors. Press only from the bottom of the front panel to avoid flexing the RF board. You can use your fingers to press on the back side of each multi-pin connector on the top of the RF board while holding the front panel to engage them. There may be small areas of pins showing even after they are mated. You will know they are properly mated when the screw holes on the bottom lip of the front panel assembly line up with the screw holes in the 2D fasteners on the bottom of the RF board. Secure the front panel assembly at the bottom lip to the 2D fasteners at the forward edge of the RF board with the two 4-40 3/16” (4.8 mm) black pan head screws you removed earlier. No lock washers are used on the external case screws. Fasten the top of the front panel assembly with three 4-40 3/16” (4.8 mm) black flat head screws (see Figure 7 on page 13). Replace the 3/16” (4.8 mm) black pan head screw and, if used, lock washer in the 2D fastener (see Figure 6 on page 13). Replace the left side panel (with the handle) as follows: Start the six 4-40 3/16” (4.8 mm) black flat head screws through the panel: three along the bottom, one at the top rear, one at the top front, and one just below the front end of the handle. There will be one empty screw hole for the attachment to the chassis stiffener. That will be replaced later. It is normal to adjust the position of the panels slightly when assembling so the screw holes line up. The cabinet will become structurally sound and rigid when all the panels, including the top and bottom covers, are mounted. Tighten all six screws. Be sure all the screws are tight, including the screw near the forward end of the handle that threads into the front panel shield. Leave the bottom cover off for now. You will need access to that area of the RF board later. 20 Checking and Modifying Resistor R91 and DAC Input Circuits The value of resistor R91 must be 22 ohms. Perform the following procedure to check the value of the resistor and, if needed, reduce its value by adding a 27 ohm resistor in parallel with it. Two traces must be cut to ensure the Digital to Analog Converters (DACs) receive the proper signal levels. Turn the K3 upside down. Place it on a clean, soft surface to avoid scratching the case. If the forward section of the bottom cover is not already off, remove it as shown in Figure 8 on page 13. Locate R91. It is a small surface-mount resistor near the front center of the RF board (see Figure 22). Use your DMM to measure the resistance across R91 in the circuit. If the resistance is about 22 ohms, you do not need to add the leaded resistor. Go directly to the next step below. If the resistance is near 100 ohms, install the 27 ohm (red-violet-black) 1/8-watt resistor as shown in Figure 22. The pads shown were chosen to make installation easier than trying to solder directly to both ends of R91. Take care not to use more heat or solder than necessary to avoid damaging the board or forming solder bridges across R91 or to other pads. Figure 22. R91 Modification. Check to see if the traces shown below have been cut. They are on the bottom of the RF board in the area to the left of R91 with the front panel facing toward you (see Figure 22, above). If not, cut them as shown. This modification ensures the digital-to-analog converters (DACs) always receive the proper signal levels. It has been incorporated into all later K3s. Confirm the traces are cut using your DMM. It should indicate an open circuit, just as if your meter leads were not connected to anything. Figure 23. Cut Traces. 21 Installing the KRX3 Module Supports Install two standoffs on the K3 RF board (the large board filling the bottom of the K3) as shown in Figure 24. One standoff is mounted next to battery BT1 and the other is mounted next to FL1. Be sure to use two lock washers between the standoffs and the board as shown. They are required to obtain the proper height. Figure 24. Mounting Standoffs on the K3 RF Board. Replace the forward bottom cover using seven 3/16” (4.8 mm) black pan head screws (see Figure 8 on page 13). 22 Installing the Auxiliary KSYN3 Synthesizer The KSYN3 is supplied with a stiff metal plate covering the front of the pc board. This plate keeps the board from vibrating, especially if the K3 is operated with its internal speaker at high volumes. Do not attempt to remove the plate. It is attached to the board with adhesive. Remove the KSYN3 board from its ESD protective packaging and confirm that the screw, washer and nut are mounted on the bottom corner of the KSYN3 board as shown in Figure 25. Note that the nut is on the side with the stiffener plate. CAUTION Do not tighten the hardware beyond the point where it begins to compress the lock washer. Over-tightening may compress the thin adhesive between the stiffener plate and the pc board, causing short circuits under the stiffener plate. Figure 25. Stiffener Plate Fastener on KSYN3 Board. Inspect the bottom of the KSYN3 board to ensure no leads are higher than the chokes as shown below. The chokes are the highest of the black surface-mount components on the board. Use your diagonal cutters to trim any excessively long leads close to the board. CAUTION The objective is to be certain no bare leads touch the front panel shield when the board is installed in the next step. Do not add spacers or insulating material between the board and the front panel shield. It is important for proper shielding of the circuits that the board sit very close to the front panel shield. Figure 26. Checking Lead Lengths on Aux KSYN3 Board. 23 Install the Auxiliary KSYN3 board on the back of the front panel shield between the KREF3 board and the side panel. Use the hardware exactly as shown in Figure 27. This is most easily done as follows: Place an inside tooth lock washer over each 1/2” (13 mm) pan head screw, then place the screw in the hole in the KSYN3 board. While holding the screws in place, add a split lock washer to each screw on the back side of the board. Be sure you use split lock washers on the back of the board. Inside tooth lock washers may short out nearby circuit traces. Hold the board with the screws and washers in position by lightly pinching the corners of the board with your thumbs over the screw heads and index fingers holding the split lock washers in place on the back. Position the board to mate P73 on with J74 on the RF board. Be sure you have the connectors properly aligned and mate them fully so the screws line up with the PEM nuts on the front panel shield. Thread each screw into the PEM nut on the front panel shield. Be sure the split lock washer is still in place between the board and the PEM nut. Figure 27. Installing the Aux KSYN3 Board. 24 Locate the four coaxial TMP cables supplied and sort them by length. There are two 6” (15 cm) one 10” (25 cm) and one 12” (30 cm) cables. These are approximate measurements measured from the tip of one connector to the other. Check the cables as shown in Figure 28 to ensure there are no excess strands of the center conductor extending beyond the tip of the connector. . Figure 28. TMP Cable Connectors. Plug one end of the 10” (25 cm) cable into J84 near the bottom of the auxiliary KSYN3 synthesizer board installed earlier (see Figure 27). When inserting or removing the TMP connectors, always handle the cable by the grip as shown in Figure 28. Never pull on the black coaxial cable itself. Be sure you connect it to J84 of the auxiliary KSYN3 board (the one nearest the side of the K3 shown in the figure) and not the main KSYN3 board. The other end of the cable will be connected later. Auxiliary KRX3 Antenna Input (Optional) Normally, the KRX3 subreceiver will share whatever antenna is in use by the K3 main receiver. If you plan to use the KRX3 subreceiver to listen on one band while the main K3 receiver is on another band sharing the same antenna, there are limitations on the combinations of bands you can choose because of the effect of the bandpass filters used by the main K3 receiver. See Sub Receiver Antenna Selection on page 44 for details. The KRX3 has an Auxiliary Antenna input that you can use to have a separate antenna input to the KRX3 rather than share the common main receiver antenna. There are two ways to route a separate antenna input to the KRX3. 1. You may bring out the KRX3 Auxiliary Antenna input to a BNC connector on the K3 rear panel directly below the ANT2 connector. This is the preferred way to connect an isolated receive-only antenna to the sub receiver. 2. If you have the optional KAT3 installed, you may have the KRX3 subreceiver use the antenna connected to ANT1 or ANT2 that is not being used by the K3 transmitter and main receiver. A relay in the KAT3 switches the antenna. For example, if ANT1 is selected for the K3 transmitter and main receiver, the KRX3 Auxiliary Antenna input will be connected to ANT2. This arrangement requires well isolated antennas on all bands, otherwise the carrier-operated relay may switch during keying on some bands. This will compromise QSK operation and may inject noise into your transmitted signal. See Sub Receiver Antenna Selection on page 44for more information. 25 Only one of these options can be installed at a time. You can use the front panel menu controls to select either the antenna shared with the main receiver or the optional antenna input you have installed. If you do not want to install an optional auxiliary antenna input, go directly to Assembling the KRX3 Subreceiver Module on page 30 to continue with installing your KRX3. Installing the Auxiliary KRX3 Antenna Input via the KAT3 This option requires that you have a KAT3 Automatic Antenna Tuner installed. With this option, the antenna connected to ANT1 or ANT2 that is not being used by the K3 transmitter and receiver is connected to the KRX3 auxiliary antenna input. If you switch between ANT1 and ANT2 at the front panel, the input not used by the K3 transmitter and main receiver is automatically switched to the KRX3 auxiliary antenna input. Locate the 12” (30 cm) TMP cable. Connect one end of the TMP cable to J43 on the KAT3 board (see Figure 29). J43 is next to the mounting screw for the standoff in the corner of the board. Route the cable across the back of the K3. When the KRX3 module is installed, it will connect to the KRX3 at a point directly in front of the KIO3 board in the left rear side of the K3. If you have the KPA3 100 watt option installed, route the cable between the fans and heat shield and out through the hole in the KPA3 shield as shown in Figure 29. The loose end will be connected later. Figure 29. Optional KRX3 Antenna TMP Cable to KAT3. Go directly to Assembling the KRX3 Subreceiver Module on page 30 to continue with the installation. 26 Installing the Auxiliary KRX3 Antenna Input Via the Rear Panel BNC Connector With this option the KRX3 Auxiliary Antenna input is routed to a BNC connector on the K3 rear panel. Remove the hardware securing the heat sinks of U13 and U12 to the right side panel (see Figure 30). Be careful not to lose the lock washers inside the K3. Figure 30. U12 and U13 Hardware. Remove the screw holding the KANT3 (or, if installed, the optional KAT3) board to the standoff and the screw holding the 2D fastener to the rear panel near the SO239 antenna connector shown in Figure 31. Do not lose the lock washer inside the K3. It is easier to keep the hardware from falling inside if you set the K3 on its side feet and remove the screw and lock washer holding the KANT3 or KAT3 board first, then set it on its bottom feet and remove the flat head screw from the 2D fastener. Figure 31. Removing Side Panel Hardware, Part 1. Remove the five screws shown in Figure 32 from the right side panel to release it. Screw 5, which holds the end of the stiffener bar, already will be out if you’re performing the initial installation of the KRX3. The side panel will lift off with the 2D fastener and standoff shown in Figure 31 attached. 27 Figure 32. Removing Side Panel Hardware, Part 2. Remove the dummy plug from the AUX RF connector hole in the back panel directly below the SO-239 ANT2 connector. The plug is released by squeezing two tabs on opposite sides. Check the BNC-TMP cable assembly to see if the nut and lock washer are already threaded onto the BNC connector. If so, remove them completely, working carefully to slide them over the ground braid and lug. (Lay the lug attached to the ground braid along the cable to slide the parts over it.) The dense, highly scratch-resistant powder coating on the rear panel may interfere with the fit of the BNC connector through the hole. Remove the coating around the inside edge of hole using a hobby knife or other sharp tool (see Figure 33). Figure 33. Installing AUX RF Connector, Part 1. 28 If you have the KAT3 option installed, there will be an SO-239 connector in the ANT2 location. If so, remove the lower screw, lock washer and nut as shown in Figure 33A. Thread the BNC/TMP cable through the AUX RF connector hole in the back panel as shown in Figure 33A. Place the nut and lock washer over the cable as shown. Slide the lock washer and thread the nut onto the BNC as it comes through the rear panel hole as shown in Figure 33B. There is not enough clearance next to the circuit board to install them after pushing the connector all the way through the hole. Align the flat on the side of the BNC connector with the flat on the top of the hole. Mount the solder lug attached to the braid as shown in Figure 34, using a 4-40 3/8” (9.5 MM) black pan head screw, #4 inside tooth lock washer and 4-40 nut. If you do not have a KAT3 installed, there will be no connector in the ANT2 hole. In that case, the solder lug is directly against the unpainted inside surface of the rear panel. Figure 34. Installing AUX RF Connector, Part 2 Thread the coaxial cable between the edge of the KANT3 or KAT3 board and the rear panel as shown. If you have the KPA3 option installed, push the cable under the circuit breaker on the fan panel at an upward angle so it crosses the fans above the KAT3 amplifier module circuit board and out through the hole in the KPA3 shield as shown in Figure 35. 29 Figure 35. Routing TMP Cable to Rear Panel AUX RF Connector with KPA3 Installed. Replace the right side panel on the K3, installing the 4-40 3/16” flat head screws shown in Figure 32 except for screw number 5. It will be replaced later with the stiffener bar. Replace the 4-40 1/4” (6.4 mm) zinc pan head screw and washer that holds the KAT3 board to the standoff as shown in Figure 31. Replace the 4-40, 3/16” (4.8 mm) black flat head screw that secures the back panel to the 2D fastener as shown in Figure 31. Replace the two 4-40 3/8” (9.6 mm) black flat head screws, lock washers and nuts to secure the heat sinks of U13 and U12 to the side panel as shown in Figure 30. Assembling the KRX3 Subreceiver Module Install four standoffs on the bottom half of the KRX3 shield assembly as shown in Figure 36. The bottom of the shield has the shorter permanently mounted standoffs. The standoffs you install go on the same side of the shield as the permanent standoffs. There are extra holes in the shield. Be sure you put the standoffs in the correct locations and that the standoffs with the long screws are in the positions shown. Figure 36. Mounting Standoffs on Shield Bottom. 30 Install four standoffs on the KRX3 main circuit board as shown in Figure 37. Be careful to use the correct length standoff and the exact combination of washers shown in each location, and carefully follow the instructions for installing the standoff at E5 to avoid damaging the board. Figure 37. Installing Standoffs on the KRX3 Main PC Board. Check to ensure that you installed all four standoffs exactly as shown in Figure 37 above. Locate the crystal I.F. filters. Two types of filters are available: standard 5-pole filters and optional 8-pole filters (see Figure 38). One standard 5-pole 2.7 kHz filter is supplied. If you have elected to equip your K3 with the optional 8-pole 2.8 kHz filter, it has been supplied instead of the 2.7 kHz filter. If you have purchased additional filters, they may be installed now as well. If you plan to add filters later, spaces may be left for them. For example, if you plan to add the FM or a 6 kHz AM filter later, you can leave spaces FL1 and FL2 open for them and install the 2.8 kHz filter in position FL3. The filters are not hard to move about later, so if you aren’t sure, install the widest at FL1, the next widest at FL2 and so on. Note: You can add or change filters at any time. A complete, detailed procedure for doing so after you assemble your K3 is included in Appendix A of this manual. Enter the following data on Table 1. You will need this information to set up your filters after assembling your K3. Be sure you’re following the rule described in the step above about the proper order for the filters. Note that Table 1 is set up with FL1 to the right and FL5 to the left, just as they must be installed on the RF board. Enter the bandwidth of each filter in the row below the filter position in which it will be installed. Enter the FREQ OFFSET shown on each filter. The optional 8-pole filters have no offset marked on them. Enter a zero in the FREQ OFFSET column for those filters. For the 5-pole filters, note that the frequency offset may be negative, indicated by a minus sign (single dash) ahead of the number. 31 Table 1. Installing Crystal Filters. Note: FL1 is to the right and FL5 is to the left. In the next step you will install the filters right-toleft on the KRX3 RF board as well. POSITION FL5 FL4 FL3 FL2 FL11 BANDWIDTH2 FREQ OFFSET3 1. If you’re installing the K-FL3B FM filter, place it in FL1 position since it is the widest bandwidth filter available. 2. The bandwidth is shown in the label attached to the filters except the K-FL3B FM filter. Record a bandwidth of 13 kHz for the K-FL3B FM filter. 3. All of the optional 8-pole filters have an offset of zero. Note that the 5-pole filters may have a negative offset, indicated by a minus sign ahead of the number. Install the filters on the KRX3 board as shown in Figure 38. Use the screw and lock washer supplied with each filter. Refer to the list of filters you created in Table 1 to ensure each filter is installed in the proper position. Four of a possible five filters are shown installed on the KRX3 board in Figure 39. CAUTION 1) Do not use screws longer than 1/4” (6.4 mm) to mount the filters. Use your rule to measure the screws before installing them. Longer screws may extend into the optional 8-pole filter and destroy it. We strongly recommend you use a screw no longer than 1/4” (6.4mm) even when installing the 5-pole filters to reduce the possibility of damaging an 8-pole filter should you change them later. 2) Do not over-tighten the screws. Too much torque may pull the threaded bushing out of the bottom of the filter module. Figure 38. Installing Crystal I.F. Filters. Mount the Mixer and KNB3 boards on the main KRX3 board as shown in Figure 39. Be certain the connector on each board is properly aligned and mated with the connector on the main KRX3 board. The boards should be parallel to the KRX3 board. If they are tilted, check to ensure the correct number of washers were installed under the standoffs and that you used the correct standoffs as shown in Figure 37. 32 Figure 39, Main KRX3 Board Ready for Installation. Place the KRX3 main circuit board in the bottom shield so that the 1-1/2” screws extend through holes E7 and E13 on the KRX3 board. The two standoffs you mounted earlier should line up with holes E1 and E10 in the board. Press the KRX3 main circuit board down against the standoffs. The board will “snap” into position as the small bumps along the edges of the board slip into the holes in the sides of the shield. If some of the nubs do not align with the holes in the shield, carefully file them flush with the board so they don’t push the sides of the shield out of alignment. When properly positioned, the board will be against the standoffs in the shield. Secure the KRX3 main circuit board to the standoffs at E1 and E10 with 4-40 3/16” (4.8 mm) black pan head screws and #4 split lock washers as shown in Figure 40. Figure 40. Mounting KRX3 Main PC Board on Bottom Shield. If you have the KPBF3 option, install the board now with 4-40 1/4” (6.4 mm) pan head screws and #4 split lock washers as shown in Figure 41. These screws and washers are supplied with your KBPF3 option. Be sure all three connectors on the KPBF3 are properly mated with their counterparts on the KRX3 board. 33 Figure 41. Mounting the KPBF3 Board. Locate the subreceiver RF module top cover. It has a label with places to record the bandwidth (BW), and frequency offset (FRQ) of each filter. Copy the information from Table 1. Note that the filters read right to left on the label, just as they were installed on the pc board. Place a check mark by Sub (for subreceiver) on the label. Use pencil in case you change your filters later. The label also has a row for Gain. This is a value you can determine after your installation is finished. It is a value set in the K3’s MENU to adjust the overall gain for each roofing filter so the audio remains constant when switching from one filter to another. Making this adjustment is described under Filter Loss Compensation in your owner’s manual. Place a 7/8” (22 mm) unthreaded sleeve over each of the long screws so they rest against the top of the circuit board (see Figure 42), then place the top cover over the assembly and adjust its position so the edge of the top fits inside the bottom and rests against the KRX3 main board on all sides. The long screws will pass through holes in the top cover. Secure the top with knurled nuts tightened only enough to hold the cover in place so it isn’t loose. Figure 42. Installing the Shield Top. 34 Installing the KRX3 Subreceiver Module If you haven’t removed it already, remove the chassis stiffener bar. The stiffener is shown in Figure 7. The exposed rim of Battery BT1 on the K3 main RF board must be insulated to prevent shorting against the bottom of the KRX3 enclosure. A plastic battery cover is provided. Fold the battery cover as shown in Figure 43. Pinch the creases to set the bends to form a rectangular box with one open end, then wrap the cover with thin transparent tape such as Scotch MagicTM mending tape (see Figure 44). The tape ensures the cover holds its shape over time. Figure 43. Folding the Battery Cover. Place the battery cover on BT1 on the K3 RF board as shown in Figure 44. Hint: gently squeeze the narrow ends of the cover to make the sides bow outward to fit over the battery clip more easily. The cover is held in place by friction against the battery holder and will be trapped under the KRX3 enclosure. Figure 44. Installing the Battery Cover 35 Remove jumper W4 from connector J64A on the K3 RF board. J64A is near the KIO3 board as shown in Figure 45. On some older RF boards, W4 is a jumper soldered between two pads on the board itself. If your board has a hard-wired jumper, cut it with diagonal cutters and completely remove the ends so they cannot short to the ground plane or nearby pads. If you ever want to operate your K3 with the KRX3 subreceiver removed, make up a jumper and insert it in J64A as shown in the figure. Figure 45. Jumper W4 on the K3 RF Board. Plug the SUBIN interface board into J64A on the K3 RF board as shown in Figure 46. J64A is directly in front of the KIO3 board in the rear left corner of the K3. Be certain the connector on the SUBIN board is aligned with J64A so all pins are engaged. Figure 46. Mounting the SUBIN Interface Board. Locate J64B on the K3 RF board. It is between the crystal filters and the front panel shield that holds the KREF3 and KSYN3 boards. J64B should have a plug in the third hole matching a missing pin on the SUBOUT connector P1. The plug is shown on the Keying the KRX3 SUBOUT Connector instruction sheet provided with the kit. If it is not present, install it according to the instructions. 36 Plug the SUBOUT interface board in J64B on the K3 RF board as shown in Figure 47. J64B is between the K3 roofing filters and the front panel. Be certain the SUBOUT board is aligned so all pins of P1 are engaged with J64B. Figure 47. Mounting the SUBOUT Interface Board. Position the TMP cables so they will be out of the way when you install the KRX3 module. Figure 48 shows a suggested arrangement. The exact cable positions are not important as long as they are below the top of the SUBOUT board and so they will not interfere with installing the KRX3 module. Avoid kinking the cables. Arrange them with smooth bends. You may need to unplug one end of the cable and twist the coax slightly so it will lie in smooth curves where needed. Figure 48. Positioning the TMP Cables. 37 Connect a 6” (15 cm) TMP cable to J5 on the KREF3 board (see Figure 49). Connect a 6” (15 cm) TMP cable between J1 on the KREF3 board and J83 on the Aux KSYN3 board as shown in Figure 49. Check the position of both the SUBOUT and SUBIN interface boards to be sure they are still fully seated in their corresponding connectors on the K3 RF board. Check to ensure the battery cover is in place protecting the top of the battery from contact with the KRX3 enclosure (see Figure 44). The top edge of the battery is the positive terminal, and touching the enclosure during installation will short-circuit the battery. Hold the assembled KRX3 module directly over the K3 and attach the TMP cables to J82 and J85 on the module as shown in Figure 49. Figure 49. TMP Cable Connection Pictorial Diagram. 38 If installed, attach the antenna cable connected to either the KAT3 or to the AUX RF BNC jack on the rear panel to J92 at the end of the KRX3 as shown. This connector is angled upwards to provide clearance between the connector and the KIO3 board when the unit is installed. Be certain the TMP connector is fully inserted in J92. When the KRX3 module is installed the clearance between the connector and the nearby KIO3 board is very small. With all the TMP cables attached, lower the KRX3 module into the K3 so that the connectors on the KRX3 mate with the connectors on the SUBIN and SUBOUT interface boards (see Figure 50). The knurled nuts are provided as handles to make holding the assembly easier. You may need to adjust the cables near the SUBOUT board so they don’t interfere with mating the connectors. If the connection between J92 and the KAT3 is used, form the excess cable into a loop in front of the KIO3 board. Figure 50. Aligning the SUBIN and SUBOUT Connectors. 39 Secure the KRX3 module to the two standoffs using 1-1/2” (38 mm) 4-40 pan head screws as shown in Figure 51. The screws will pass through the internal standoffs and circuit board inside the enclosure and screw into the standoffs you mounted on the K3 RF board earlier. Place an inside tooth lock washer under each screw head. Figure 51. Installing the KRX3 Enclosure. Position the cable between J84 on the Aux KSYN3 board and J85 on the KRX3 module as shown in Figure 52. This is essential to ensure the proper signal isolation between the main and sub receivers. Figure 52. Routing the Cable to J85. Double check all the TMP cables to ensure none were dislodged from their connectors or kinked tightly while positioning the KRX3 module. The two cables attached to the K3 RF board are not visible, but should not have been disturbed by installing the KRX3. Pay particular attention to cables attached to the KREF3 and KSYN3 boards. If needed, you can replace a dislodged cable without removing the KRX3 module using needle nose pliers to hold the finger grip part of the connector. 40 Final Assembly Remove the covering over the self-adhesive side of the foam pad and press the adhesive side against the speaker magnetic shield (see Figure 53). The pad will compress between the loudspeaker and the top of the KRX3enclosure when the cover is installed. Figure 53. Attaching the Speaker Pad. If your k3 is equipped with the K144XV 2-meter option, refer to the K144XV manual to reconnect the cables and remount the module on the left side panel. Route the power wire as shown in the K144XV manual so it won’t be trapped between the speaker pad and the top of the KRX3 module. . Replace the chassis stiffener bar using two 4-40 3/16” (4.8 mm) black flat head screws at the ends. If the KPA3 is installed, attach the stiffener to the shield using two 4-40 1/4” (6.4 mm) screws with lock washers under the screws. (Some stiffener bars do not have threaded PEM nuts attached. In that case, secure the screws with 4-40 nuts and place the lock washers under the nuts). Hold the top cover above the K3, route the speaker wire under the stiffener bar and plug it into P25 on the KIO3 board at the left rear of the K3 as shown in Figure 54. If you have the K144XV 2-meter module installed, there is an indentation in the top of the module where you can pass the speaker wire connector under the chassis stiffener. Figure 54. Connecting Speaker Cable. 41 Position the top cover on the K3. Note that the tab on the back center goes under the rear lip of the K3 rear panel. Secure the top cover with the nine 4-40 3/16” (4.8 mm) black flat head screws you removed earlier. REPLACE ALL THE SCREWS! The K3's chassis has excellent rigidity despite its light weight. The screws that hold the top cover in place are an important part of the structural design. Please be sure to replace all the screws and verify they are tight whenever you replace the cover or other panels. If you installed the optional AUX IN antenna connector on the rear panel, check to be sure you replaced and tightened all the screws in the right side pane including the heat sink screws for U12 and U13 and the top screw on the rear panel above the ANT connectors. Turn to page 43 and perform the steps under Preparing for Operation. Your KRX3 subreceiver will not operate correctly until you complete all the steps. Removing the KRX3 Module You can remove the KRX3 Module by reversing the steps under Installing the KRX3 Subreceiver Module, above. It is not necessary to remove the Auxiliary DSP or the Auxiliary KSYN3 synthesizer boards to operate the K3 without the subreceiver module in place, however, leave the KRX3 enabled in the MENU even though you will see error messages relating to the missing KRX3 module when you switch POWER on. Tap D I S P L AY to clear the error messages. If you plan to apply power or operate the K3 with the Subreceiver Module removed, do the following. Remove all the TMP cables that connect to the KRX3 module so their metal connectors cannot create shorts by touching solder pads or other components inside the K3. If you have installed the AUX RF connector and cable (see Installing the Auxiliary KRX3 Antenna Input Via the Rear Panel BNC Connector, page 27) it cannot be easily removed. Carefully insulate the TMP connector, covering all of the metal parts with electrical tape or other suitable material that you can remove easily later. Recommend you coil and secure the cable to the rear panel or, if the KAT3 is installed, tape the cable to the KPA3 shield. Replace jumper W4 in the connector shown in Figure 45. Be sure to put the jumper on the pins shown. The main K3 receiver will not work until this jumper is installed. CAUTION Failure to remove the loose TMP cables as described above may result in short circuits and extensive damage to your K3 when power is applied. If you have the TMP cable connecting to the AUX RF connector on the rear panel, insulate the connector completely. Electrical tape is a good choice. Tape the fully insulated connector end to the back panel or, (if a KPA3 is installed) the KPA3 shield so it can’t bang around inside the K3. 42 Operation Preparing for Operation If you installed the KRX3 subreceiver yourself, you must complete the following before you can operate the subreceiver: If you have external speakers connected to your K3, disconnect them and use the internal speaker for the following procedure. Enter the CONFIG menu and verify SPKRS is set to 1. (You will not hear any audio from the subreceiver if SPKRS is set to 2 as is frequently done when listening to the main receiver with stereo headphones. After completing the following steps, refer to the K3 Owner’s manual for more details about listening to both main and sub receivers using line out, stereo phones or dual loudspeakers.) Enable the KRX3 module by entering the CONFIG menu, then under KRX3, selecting one of the following: ANT=BNC: Specifies that the KRX3’s auxiliary antenna source is the AUX RF BNC jack on the rear panel. Use this setting if you connected the KRX3’s AUX RF input to the AUX RF BNC jack, or if you did not connect anything to the KRX3’s AUX RF input. ANT=ATU: Specifies that the KRX3’s auxiliary antenna source is the ATU’s non-transmit antenna (1 or 2). Use this setting only if you connected the KRX3’s AUX RF input to the KAT3’s TMP jack. NOTES: 1. You must have K3 MCU firmware revision 2.11 or later and DSP firmware revision 1.81 or later installed for the above CONFIG menu options to be present. If you’ve not updated your K3’s firmware before, see Firmware Upgrades in your Owner’s manual for details. 2. When using the KRX3 auxiliary antenna source, you must have the correct TMP cable installed between the KRX3 auxiliary antenna input and either the KAT3 or AUX RF BNC connector. See Auxiliary KRX3 Antenna Input (Optional) on page 25 for details. Calibrate the auxiliary KSYN3 as described under Calibration Procedures / Synthesizer in the Owner’s Manual. Refer to the data you recorded in Table 1on page 32 and set up the filters you have installed as described under Configuration / Crystal Filter Setup in the Owner’s Manual. After exploring the operation of your KRX3 as described under in the next section, use the K3 Utility program to check for updates to the firmware. Be sure to check the box to load DSP2 for the KRX3 DSP board. There are other optional calibration procedures and setup choices you can make, such as calibrating the S-meter, that you can do at any time. These are also described in the Owner’s Manual. 43 Using the Sub Receiver The KRX3 option adds an independent, highperformance sub receiver to the K3. It allows you to monitor a second frequency, using different bandwidths or modes. Diversity receive is possible if the main and sub receivers use different antennas. The sub receiver’s band cannot be set independently unless CONFIG:VFO IND is set to YES. If it’s set to NO, you’ll see =MAIN when you tap BAND during BSET, and the sub receiver band will always be set the same as main. Sub Receiver Antenna Selection Dedicated Sub Receiver Controls The sub receiver gets its RF input either from the main receiver (sharing ANT 1-2 or RX ANT IN), or from its auxiliary antenna input (see Owner’s Manual, Main and Sub Receiver Antenna Routing). Tapping S U B turns on the sub receiver (and SUB icon). VFO B then controls the sub’s frequency, and also serves as the TX frequency during SPLIT. You should leave the sub turned off when not in use. This turns off the -3 dB passive splitter used when the sub receiver shares the main RX path. When using B S ET , you can tap AN T to switch the sub between MAIN (shared) and AU X (the sub’s AUX input). When MA IN is in effect, the 1 -2 and R X icons show which antenna the sub is sharing with the main receiver. When AU X is in effect, these icons will all be off (if CONFIG:KRX3 is set for ANT=BNC ) or will show the non-transmit ATU antenna, 1 or 2 (if KRX3 is set for AN T=ATU ). Holding S U B links the VFOs (whether the sub receiver is on or off). The kHz decimal point of VFO B flashes as a reminder. VFO A is the master, moving both VFOs in tandem. Holding S U B for 2 seconds or longer turns on diversity receive (see next page). The kHz decimal point of VFO A flashes as a reminder. VFO A controls both the main and sub frequencies in diversity receive, but VFO B remains independent so it can be used as the SPLIT transmit frequency. Shortcut: If you’re not in B S ET mode, you can quickly switch the sub between M A IN and AUX by holding R X AN T . (Tapping R X AN T turns RX ANT on/off for the main path.) The sub receiver’s AUX antenna must be well-isolated from the main (transmit) antenna to avoid activating the sub receiver’s carrieroperated relay. SUB AF gain normally sets the sub’s volume level. Alternatively, SUB AF can be used as a main/sub balance control (see CONFIG:SUB AF). With stereo headphones or dual speakers, you'll hear the sub on the right and main on the left. Otherwise main and sub receiver audio are merged. Using the AUX input for the sub receiver slightly improves sensitivity of both the main and sub receivers because the splitter is not used. CONFIG:SPKRS must be set to 2 if you use stereo speakers; otherwise, set it to 1. Sub Receiver Band Independence SUB RF gain normally sets the sub receiver’s RF GAIN level. If this knob is assigned to main/sub squelch (CONFIG:SQ MAIN), then both main and sub RF gain are controlled by MAIN. If CONFIG:VFO IND is set to YES , you can set the sub receiver to a different band from main. Hold B S E T , then tap B AN D up/down to select the sub receiver’s band. If you only use bandindependence for the sub occasionally, you may want to assign VFO IND to a programmable function switch (See Owner’s Manual, Basic Operation, Programmable Functions). BSET: Additional Sub Receiver Controls Normally, receive controls apply only to the main receiver. This includes SHIFT, WIDTH, P R E , AT T N , etc., as well as M O D E . To change these settings for the sub receiver, first hold B S E T . VFO A will show B S ET , and the S-meter will show the sub receiver's signal level. After you’ve made the desired sub receiver changes, tap A/ B or hold B S E T to exit B S ET . If the two receivers are sharing the main antenna path, putting the sub receiver on a higher-frequency band than main may result in signal loss in the sub. This is due to sharing of the main receiver’s low-pass filters. To avoid sub 44 You might use MAIN with diversity when comparing main/sub receiver gain, such as when adjusting crystal filter gain compensation (CONFIG:FLx GN). The built-in true-RMS voltmeter is ideal for this purpose. Entering diversity mode will allow you to tune both receivers with VFO A, while VFO B displays the voltage (see Owner’s Manual, VFO B Alternate Displays). receiver signal loss in this case, use the sub receiver’s AUX input. When the main and sub receivers are used on separate bands, some additional weak spurious carriers may be heard in either receiver at certain VFO A and B settings. (Both receivers have high dynamic range, and use high-level signal sources which cannot be perfectly shielded.) Such spurious signals should be heard very rarely. If you encounter one that is problematic, try using the notch filter on the affected receiver." Sub Receiver Crystal Filter Considerations Like the main receiver, the sub has slots for up to five crystal filters. For best dynamic range, we strongly recommend the use of the narrowest filter consistent with each operating mode. CW and DATA operators should have at least one narrow filter, e.g. 400 or 500 Hz, on each receiver. Diversity Receive Diversity receive can greatly improve signal copy during fading (QSB). True diversity requires a pair of identical receivers running from a common frequency reference and using two different antennas. The K3 is one of very few transceivers that offer this capability. Most offer only a lowperformance sub receiver, or “dual watch” (splitI.F.) circuitry, which doesn’t provide for separate main/sub antennas. For diversity receive, we recommend using identical crystal filter configurations for the two receivers. This will ensure that both receivers have the same characteristics when strong QRM is present. You should also use crystal filters with closely matched offsets (CONFIG:FLx FRQ). Otherwise, you may hear a slow phase modulation (similar to a beat note) between the two receivers on some signals. 8-pole filters are already matched (FLx FRQ = 0.00). Elecraft can provide pairs of 5-pole crystal filters with offsets within 40 Hz of each other on request. When setting up FLx FRQ, use the average of the filters’ marked offsets as the value entered for both filters (main and sub). If you enter different offsets, you’ll hear phase modulation, even if the offsets are very close. An antenna with different polarization, or at least different orientation, should be used for the sub receiver (via its AUX input). This ensures that the two receivers will not experience the same fading characteristics. To turn on diversity mode: Hold S U B for 2 seconds or longer. This sets the sub to the same frequency as main (VFO A), matches the sub’s filter bandwidth to main, and switches the sub receiver to its AUX antenna. The kHz decimal point of the VFO A display flashes as a reminder. VFO A sets the receive frequency for both main and sub in diversity mode. This leaves VFO B free for use as the transmit frequency in SPLIT mode (see details at right). SPLIT Mode with the Sub Receiver During split (S P L I T ), VFO A is always the receive frequency and VFO B is the transmit frequency. Holding R E V allows you to temporarily listen to your transmit frequency. Mode and filtering changes made to the main receiver will immediately be made at the sub, as well, to preserve diversity characteristics. However, P R E , AT T N and other receive controls remain independent for the sub. These must be changed using B S E T . Non-Diversity with SPLIT: If the sub receiver is on, but you’re not in diversity mode, you can listen to both your receive and transmit frequencies at the same time during SPLIT. You can set up the sub receiver’s mode and filtering independently using B S E T in this case. Cross-mode SPLIT is possible in supported modes, e.g. CW/SSB. You can change the sub receiver’s antenna selection by holding B S E T , then tapping AN T . When you’re not using BSET, holding R X AN T will accomplish the same thing, providing a convenient shortcut. Diversity with SPLIT: In diversity mode you can still use SPLIT, but both receivers will be set to the frequency of VFO A. Both receivers will always be in the same mode, and will use the same filter settings. The K3 saves the sub’s MAIN/AUX selection independently for diversity and non-diversity. AUX should be used for diversity, as explained above. 45 Appendix A: Installing Crystal Filters in the KRX3 Subreceiver The crystal (roofing) filters in the KRX3 subreceiver are contained in the L-shaped RF module mounted above the main K3 RF board (see Figure A-4). Installing or changing the filters involves removing the RF module and the circuit board inside. The filters plug into the circuit board and are held in place by screws. No soldering is required. If you plan to operate your K3 with the subreceiver RF module removed, see Removing the KRX3 Module in the main text for information about replacing essential jumpers. Tools Required You will need a Phillips screwdriver and long nose pliers. Normally a No. 1 Phillips is correct, but some find a No. 2 is a better fit. Always use the screwdriver that best fits the screws. A grounded wrist strap and ESD dissipating mat are recommended whenever you work inside your K3. If installed, your K144XV 2-meter Option Installation and Operation manual. Procedure If a screw seems very tight, try loosening the other screws first. Sometimes tightening other screws during assembly causes one already in place to bind. Loosening the others will usually free it. Remove the K3 top cover as shown in Figure A-1. As you lift the cover off unplug the speaker wire that connects to the KIO3 board in the left rear corner of the K3. If you have the K144XV 2-meter option installed, slip the speaker wire under the chassis stiffener bar that runs across the top of the K3 along the depression in the top of the K144XV module. Figure A-1. Removing the Top Cover. A-1 Observe ESD precautions when working inside your K3. Wear an ESD wrist strap or frequently touch an unpainted metal ground while working. Remove the chassis stiffener bar that runs across the top of the K3 (see Figure A-2. Removing the Chassis Stiffener Bar.) . Figure A-2. Removing the Chassis Stiffener Bar. If your K3 has the K144XV 2-meter option installed, remove the three 6-32 black flat head screws holding it to the left side panel (see Figure A-3). Unplug the cables going to the K144XV module. The red power wire plugs into the K3’s main RF board. Unplug it and set it aside with the module. Figure A-3. Removing the K144XV Module A-2 Remove the KRX3 RF module as follows. The circled numbers refer to Figure A-4 below. Remove the two long screws that attach the KRX3 enclosure to the K3 main board. Grip the knurled nuts and lift the KRX3 enclosure up and out of the K3. The enclosure will unplug , one near the front and the other at the back. Also there will be two coaxial from two interface boards cables attached to the forward edge and usually one cable attached at the back of the enclosure. Carefully unplug these cables holding onto the metal finger grip, not the black coax. The connectors are held by friction and slide apart. They do not unscrew. Remove the two small interface boards that plug into the board on the bottom of the K3 and the KRX3 enclosure. The boards may still be attached to the K3 main board or may be attached to the connectors on the KRX3 RF module. Set them aside in an ESD-safe place. Place the KRX3 RF enclosure on your work table. Remove the two knurled nuts the KRX3 RF enclosure off of the lower half Figure A-4. Removing the KRX3 RF Module. A-3 and lift the top half of Remove the RF board from the lower half of the enclosure as follows (see Figure A-5): Remove the two sleeves from the long screws. If the KBPF3 option is installed, remove the two screws and unplug it from the RF board underneath. Remove the two screws securing the KRX3 RF board to the bottom half of the enclosure. These screws thread into bushings attached to the enclosure with screws. If a screw seems to turn without loosening, hold the corresponding screw on the bottom of the enclosure so it cannot turn. Lift the RF board out of the enclosure. It is a tight fit. There may be small bumps along the sides of the board that snap into holes in the sides of the enclosure. Start by lifting carefully at the two extensions where the board extends outside of the shield while pressing down on the edge of the shield to free it then work the board up and off of the long screws. Figure A-5. Removing the RF Board from the Enclosure. The crystal I.F. filters are installed at positions FL1 thorough FL5 on the RF board. If the KRX3 has been in use there will be at least one filter already installed. Plan where you are going to install, replace or move the filters. They must be installed in a certain order according to the following rules: a) The widest bandwidth filter must be closest to FL1. Note that FL1 is at the right hand end of the row of filters when the board is arranged to read the silk screening on the pc board. The filters must be in order of decreasing bandwidth from the right (nearest FL1) to the left (nearest FL5). If you’re installing the KFL3B FM filter, place it in position FL1 since it is the widest bandwidth filter available. b) You may leave unoccupied filter positions as long as the order in a) above is followed. This is handy if you plan to add more filters later. Note that only a single filter is installed on the board shown in Figure A-5, leaving space for a wider bandwidth filter to be added in FL1 position and narrower filters to be added to FL3 through FL5 later if desired. More information and examples for planning your filters is included in Appendix A of your K3 Owner’s manual. A-4 Important: The information recorded in the next step is required to enable your filters after reassembling your K3. Record the data in the table clearly and completely. If the information is incomplete or incorrect, you will have to disassemble your KRX3 again to retrieve it before you can use your subreceiver. Recommend using a pencil so you can change the data later should you decide to install additional filters. Enter the following data on Table A-1. Be sure you’re following the rule described in the step above about the proper order for the filters. Note that Table 1 is set up with FL1 to the right and FL5 to the left, just as they must be installed on the RF board. Enter the bandwidth of each filter in the row below the filter position in which it will be installed. Enter the FREQ OFFSET shown on each 5-pole filter (see Figure A-6). The optional 8-pole filters have no offset. Enter a zero in the FREQ OFFSET column for those filters. For the 5-pole filters, note that the frequency offset may be negative, indicated by a minus sign (single dash) ahead of the number. Table A-1. Filters Installed. Note: FL1 is to the right and FL5 is to the left. In the next step you will install the filters right-to-left on the KRX3 RF board as well. POSITION FL5 FL4 FL3 FL2 FL11 BANDWIDTH2 FREQ OFFSET3 1. If you’re installing the K-FL3B FM filter, place it at FL1 since it is the widest bandwidth filter available. 2. The bandwidth is shown in the label attached to the filters except the K-FL3B FM filter. Record a bandwidth of 13 kHz for the K-FL3B FM filter. 3. All of the optional 8-pole filters have an offset of zero. Note that the 5-pole filters may have a negative offset, indicated by a minus sign ahead of the number. Install the filters as shown in Figure A-6. Refer to the list of filters you created in Table A-1 to determine which filter to install at each location. If the subreceiver RF module top cover has a label on it with places to record the bandwidth (BW), and frequency offset (FRQ) of each filter, copy the information from Table 1, erasing and moving the information already there to match your filter setup. The label will ensure you have the installed filter information in case this page is misplaced. (If you do not have a filter information label on your subreceiver, you can obtain one from Elecraft.) Use pencil in case you change your filters later. Note that the filters read right to left on the label, just as they were installed on the pc board and shown on Table 1. The label also has a row for Gain. This is a value you can determine later after installation is finished. It is a value set in the K3’s MENU to adjust the overall gain for each roofing filter so the audio remains constant when switching from one filter to another. Making this adjustment is described under Filter Loss Compensation in your owner’s manual. A-5 CAUTION 1) Do not use screws longer than 1/4” (6.4 mm) to mount the filters. Longer screws may extend into the optional 8-pole filter and destroy it. We strongly recommend you use a 1/4” screw even when installing the 5-pole filters to reduce the possibility of damaging an 8-pole filter should you change them later. 2) Do not over-tighten the screws. Too much torque may pull the threaded bushing out of the bottom of the filter module. Figure A-6. Installing the Crystal Filters. Double-check to ensure you installed each filter in the location you noted in Table 1. If you make a mistake recording the data or installing the filters and miss it now, you’ll need to disassemble the KRX3 again to correct it. Important: Do not over-tighten screws during reassembly. The screws should be tightened so that the lock washers are fully compressed but never as tight as you can make them. In the bottom half of the enclosure, check to ensure the four standoffs are tight against the enclosure. If not, tighten the screws. Two are short standoffs for the board mounting screws and two standoffs have the long screws threaded through them. Place the KRX3 RF board in the bottom shield so that the long screws extend through holes shown in Figure A-5. Press the circuit board down against the standoffs. The board may “snap” into position as the small bumps along the edges of the board slip into the holes in the sides of the shield. When properly positioned, the board will be against the standoffs in the bottom half of the enclosure. If needed, press down gently on the board near the long screws to ensure it is not caught on the threads. Secure the KRX3 main circuit board to the short standoffs at locations in Figure A-5 with the 4-40 3/16” (4.8 mm) black pan head screws and #4 split lock washers you removed earlier. Do not use inside tooth lock washers. A-6 If you removed the KBPF3 board, replace it. Be sure the three connectors are aligned so all the pins engage. The connectors are visible from the sides. Secure the board at locations in Figure A-5. Use the 4-40, 1/4” (6.4 mm) pan head screws and split lock washers you removed earlier. Do not use inside tooth lock washers. Replace the unthreaded sleeves over each of the long screws so they rest against the top of the circuit board in Figure A-5), then place the top shield over the assembly and adjust its position so the edge of the (locations top fits inside the bottom and rests against the KRX3 main board on all sides. The long screws will pass through holes in the top cover. Secure the top with the knurled nuts finger-tightened only enough to hold the cover in place so it isn’t loose. Lock washers are not used under the knurled nuts. Turn to your KRX3 Installation and Operation manual, and follow the procedures under Installing the KRX3 Subreceiver Module and Final Assembly to complete the installation and reassembly of your K3. Note that: a) You will not need to assemble the battery cover, but be sure it is in place on the battery as shown. The cover is essential to avoid shorting the battery to the bottom of the KRX3 enclosure. b) Jumper W4 already will have been removed since the KRX3 was previously installed. c) The speaker pad should already be in place. Important: When you have finished reassembling your K3, you must complete the filter setup in the next step or your subreceiver will not function correctly. Refer to the data you recorded in Table A-1 and set up the filters you have installed as described under Configuration / Crystal Filter Setup in your K3 Owner’s Manual. That completes the installation of crystal filters in your KRX3 subreceiver. A-7