1
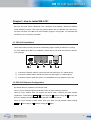
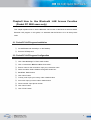
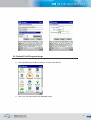
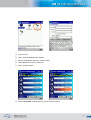
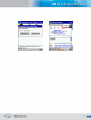
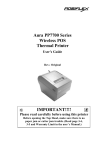
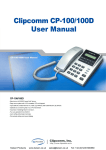
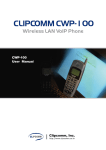
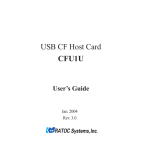
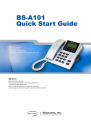
01 Quick Start Guide:
1
Contents
CHAPTER1. HOW TO INSTALL BS-A101 .............................................................................. 3
1.1. BS-A101 INSTALLATION.............................................................................................. 3
1.2. BS-A101 NETWORK CONFIGURATION ..................................................................... 3
CHAPTER2. HOW TO USE BLUETOOTH LAN ACCESS FUNCTION (POCKET PC 2000
USERS ONLY) ......................................................................................................................... 4
2.1. POCKETPC LAP PROGRAM INSTALLATION............................................................. 4
2.2. POCKETPC LAP PROGRAM CONFIGURATION ........................................................ 4
2.3. POCKETPC LAP PROGRAM USAGE ......................................................................... 5
CHAPTER3. HOW TO USE BLUETOOTH CTP GATEWAY FUNCTION ............................... 8
3.1. BS-A101 VOIP (H.323) SETTING................................................................................. 8
3.2. PHONIZER INSTALLATION.......................................................................................... 8
3.3. BS-A101 & PHONIZER OPERATION........................................................................... 9
3.3.1. Preparation ....................................................................................................................9
3.3.2. PSTN call .......................................................................................................................9
3.3.3. VoIP call .........................................................................................................................9
3.3.4. Ending phone calls .......................................................................................................9
CHAPTER4. HOW TO USE BLUETOOTH HEADSET AUDIO GATEWAY FUNCTION ....... 11
4.1. BS-A101 VOIP (H.323) SETTING............................................................................... 11
4.2. BS-A101 & HEADSET AUDIO GATEWAY.................................................................. 11
4.2.1. Registration of Your Headset to BS-A101............................................................... 11
4.2.2. Usage of Your Headset after Registration...............................................................12
2
Chapter1. How to Install BS-A101
BS-A101 has VoIP Phone / Bluetooth LAP / Bluetooth CTP Gateway / Bluetooth Headset
Audio Gateway functions. This quick start guide explains how to install BS-A101 and how to
use each functions of the BS-A101 with PocketPC program. In this guide, it is assumed that
the BS-A101 is in its factory-reset state.
1.1. BS-A101 Installation
Check the location of each port and do the following steps to install your BS-A101 correctly
For more details about BS-A101 installation, please refer to CP-101B user manual in the BSA101 package
① Connect the network cable to ‘LAN’ port at the rear panel (port ‘C’ in below figure).
② Connect the PSTN cable to PSTN port at the rear panel (port ‘E’ in below figure).
③ Connect the power cable and check if “CLIPCOMM A101” logo appears in the LCD.
1.2. BS-A101 Network Configuration
By default, BS-A101 operates in the DHCP mode.
Case 1) If your network supports the DHCP mode, no further setting is required.
Case 2) If your network does not support the DHCP mode, configure the static network
parameters : Press buttons: menu ¨3(Phone Mgmt) ¨ 1(Network Config) ¨ 2(Static IP) and
put in IP, Gateway, and DNS address and Netmask. Restart the phone.
Case 3) If your network is ADSL mode, enter your ADSL ID and password after entering
menu ¨ 3(Phone Mgmt) ¨ 1(Network Config) ¨ 4(ADSL)
3
Chapter2. How to Use Bluetooth LAN Access Function
(Pocket PC 2000 users only)
This chapter explains how to use the Bluetooth LAP function of the BS-A101 with PocketPC
Bluetooth LAP program. In this guide, it is assumed that the BS-A101 is in its factory-reset
state.
2.1. PocketPC LAP Program Installation
① PocketPC2000 with ActiveSync on the Desktop.
② Execute “BTSetup.exe”
2.2. PocketPC LAP Program Configuration
① Click “Start ¨Settings” in PDA’s main window
② Click “Connections ¨Modem ¨New Connection”
③ Enter a name for the connection: Input your connection name
④ Select a modem: Select “Modem through BT Serial Port”
⑤ BaudRate: Default value
⑥ Click “Next” button
⑦ Country code: Input your country code or default value
⑧ Area code: Input your area code or default value
⑨ Phone number: Input phone number
⑩ Click “Next” button
⑪ Click “Finish” button
4
2.3. PocketPC LAP Program Usage
① Click “Start ¨ Programs ¨ Connections” in PDA’s main window
② Click your connection name and “Connect” button
5
③ Try to connect
④ Open “Search NeighborHood” window
⑤ Search the Bluetooth device by “Inquiry” button
⑥ Select Bluetooth device by inquiry list
⑦ Click “Connect” button
⑧ When “Connected” window pops up, you can use the internet.
6
7
Chapter3. How to Use Bluetooth CTP Gateway Function
This chaper explains how to use the Bluetooth CTP Gateway function of the BS-A101. In this
guide, it is assumed that the BS-A101 is in its factory-reset state. For more details of VoIP
Phone function of the BS-A101, please refer to the CP-101B user manual.
3.1. BS-A101 VoIP (H.323) Setting
IP to IP call mode is supported as default. If you want to connect your BS-A101 to a
Gatekeeper, please refer to the CP-101B user’s guide for more detailed VoIP configuration.
3.2. Phonizer Installation
① Insert the CBT-CFA into your PocketPC.
② Excute ‘setup.exe’.
③ Find Phonizer icon in Start bar after installing.
④ Configure Phonizer in the configuration window at your first trial of Phonizer
iPAQ 36XX : COM4 / 115200
iPAQ 3850 : COM4 / 115200
iPAQ 3870 : COM5 / 115200
iPAQ 39XX : COM6 / 115200
iPAQ 54XX : COM4 / 115200
Pocket LOOX : COM5 / 115200
[NOTE] There are three versions of Phonizer for each PocketPC version:
① Phonizer_PPC2000_PCM_install.exe: Phonizer for CBT-CFA on PocketPC2000
② Phonizer_PPC2002_PCM_install.exe: Phonizer for CFA on PocketPC2002
③ Phonizer_PPC2002_HCI_install.exe: Phonizer for CBT-CFS on PocketPC2002
Check the appropriate Phonizer version before installation
8
3.3. BS-A101 & Phonizer Operation
Phonizer is a Bluetooth CTP terminal while BS-A101 is a Bluetooth CTP gateway. Phonizer
can make calls to (or accepts calls from) outer network through BS-A101.
3.3.1. Preparation
To make calls, Phonizer should find a BS-A101 and be in the connected state.
① Click ‘Inquiry’ button of Phonizer to find all the compatible devices
② Among the neighboring Bluetooth devices in inquiry window, select BS-A101 pushing
‘Connect’ button.
③ After successful connection to BS-A101, ‘Input phone number’ message will appear in
the main window of Phonizer.
[NOTE] To find Bluetooth address of BS-A101, push buttons menu ¨ 5(Bluetooth) ¨
1’(Current Config) ¨ 3 Bluetooth Addr (scroll down with ‘VOL d ’ button)
3.3.2. PSTN call
Input phone number (by click numeric buttons of Phonizer) and click ‘Send’ button.
For example, if destination phone number is 5419082, input ‘5419082’ to make PSTN call.
If your PSTN network is a PBX environment, input ‘9*5419082’ to make a call to outer PSTN
network.
3.3.3. VoIP call
By default, BS-A101 routes calls to PSTN interface. To make VoIP (H.323) call, input ‘*’ before
the destination address.
For example, if the destination IP address is 192.168.0.100, input ‘*192#168#0#100’ to make
a VoIP call. (*192.168.0.100 string will appear in the Phonizer window)
3.3.4. Ending phone calls
Click ‘End’ button to end a call.
Click ‘Disconnect’ button to close Bluetooth link between the Phonizer and BS-A101.
9
[Important Check Points before Phonizer-CFA evaluation]
The following items must be checked before starting Phonizer-CFA evaluation.
① Remove the power cable from your PDA and make it sure that the PDA is off the
cradle before the calling test.
② When the power is being fed to the PDA, the voice quality may be degraded due to
60Hz humming noise.
③ Ensure that the remained battery power level is over 80% during the call test.
④ Battery power level of 50% or below may cause the power failure of the Bluetooth
module.
⑤ When the remained battery power level is 50~80%, some noise may occur during the
call.
⑥ When you are using the PDAs, such as iPAQ3870, iPAQ3970, and iPAQ5450, with
built-in Bluetooth or wireless LAN modules, make it sure to disable the built-in
Bluetooth or wireless LAN module on the PDA. Otherwise the Phonizer-CFA software
will try to communicate with the built-in Bluetooth or wireless LAN module instead of
Clipcomm's Bluetooth CF card (CBT-CFA).
⑦ Insert CBT-CFA properly into the slot of expansion pack.
⑧ Please use only the earset provided by Clipcomm.
⑨ Insert the earset completely into the side hole of CBT-CFA card.
10
Chapter4. How to Use Bluetooth Headset Audio Gateway
Function
This chapter explains how to use the Bluetooth Headset Audio Gateway function of the BSA101. In this guide, it is assumed that the BS-A101 is in its factory-reset state. For more
details of the VoIP Phone function of the BS-A101, please refer to the CP-101B user’s manual.
4.1. BS-A101 VoIP (H.323) Setting
IP to IP call mode is supported as default. If you want to connect your BS-A101 to a
Gatekeeper, please refer to the CP-101B user’s guide for more detailed VoIP configuration.
4.2. BS-A101 & Headset Audio Gateway
BS-A101 has the Bluetooth Headset Audio Gateway Function. When an external call is
received, BS-A101 will deliver the call to the headset. You can also make a call to recently
placed number using the headset.
4.2.1. Registration of Your Headset to BS-A101
In order to use the headset audio gateway function, BS-A101 must have a registered headset.
① Set your headset at ‘registration ready state’ as explained in your headset manual
② Set your BS-A101’s PIN code to be the same as the one in your headset (which is
normally ‘0000’ but you should consult with the user manual of your headset for its
exact default PIN code)
③ Register your headset to your BS-A101 by pressing MENU ¨ 5 ¨ 5. Then, your BSA101 begins inquiry procedure. After successful inquiry, select your headset’s
BD_ADDRESS (Bluetooth Device Address) from the list of found devices.
④ When you select one, ‘pairing’ process will be automatically performed.
⑤ If you do pairing again manually, connect to your headset by pressing MENU ¨ 5 ¨ 6.
After this, ‘pairing’ process is performed and your headset sets the BS-A101 as its
audio gateway. After successful pairing, you should press END and then all the pairing
process completes.
11
4.2.2. Usage of Your Headset after Registration
1) Receiving Incoming Calls
When an incoming call arrives at your BS-A101, your headset also rings. You can receive the
call by pressing a relevant button on your headset.
2) Placing Outgoing Calls
When you want to place an outgoing call using your headset, you can only make a phone call
to the latest placed number by pressing a relevant button on your headset.
3) Release Calls
To release calls, you have only to press END button in your BS-A101 or headset’s button.
4) Audio Connection Transfer
If you want to make conversation using your BS-A101 instead of the headset while you are
using the headset, simply press SPEAKER button of your BS-A101. On the other hand, if you
want to make conversation using your headset instead of your BS-A101, simply press
headset’s button.
12
13