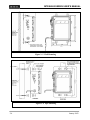
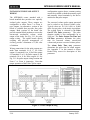
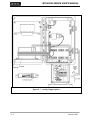
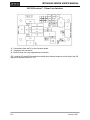
1
MTEK6000 SERIES USER'S MANUAL MTEK6000 SERIES Electronic Flow Corrector & Monitoring Devices Installation and Operating Instructions January 2002 Part # 900315 January 2002 MTEK6000 SERIES USER'S MANUAL TABLE OF CONTENTS Chapter 1: Overview Overview ....................................................................................................... Hazardous Locations .................................................................................... Compliance ………….................................................................................... Warranty ………………................................................................................. Security Options ………………..................................................................... Chapter 2: Installation Unpacking ..................................................................................................... Initial Check-Out ........................................................................................... Power for the MTEK6000.............................................................................. Optional Power Supplies .........................................................…................. Mounting the Instrument on the Meter ......................................................... Setting Up the Index Assembly .................................................................... Unit and Index Rotation ....................................................................…… . Counter Masking ………………………………………………………………… Pulse Input to the MTEK6000.....................................................................… Wall and Pipe Mounting ..............................……........................................... Transducers in the MTEK6000 ..................................................................... Connecting the Pressure Tubing .................................................................. Installing the Thermal (Temperature) Probe ................................................. Installing the Pulse Output Wiring ................................................................. Communications ........................................................................................... RS-232C Serial (Direct) Communications ...............................…............ Modem Communications ……………………........................................... Connecting the Telephone Line ……………............................................ Grounding ..................................................................................................... Chapter 3: Operating Modes Sleep / Wake-up Mode .................................................................................... Display Mode ................................................................................................. Alarm Mode ................................................................................................... Viewing and Clearing Alarms With the Magnet ....................................... Memory (History Logging) ....................………….......................................... Configuration Mode ....................................................................................... Virtual Keypad and External Keypad Operation ....................................... Editing Parameters ................................................................................... Assigning Function Keys .......................................................................... Audit Trail ................................................................................................. Wake-up On Pulse ................................................................................... January 2002 1-1 1-1 1-1 1-2 1-2 1-2 2-1 2-1 2-1 2-2 2-2 2-2 2-3 2-4 2-4 2-5 2-5 2-7 2-7 2-9 2-10 2-12 2-12 2-12 2-12 2-15 3-1 3-1 3-1 3-2 3-2 3-5 3-6 3-6 3-6 3-8 3-8 3-8 MTEK6000 SERIES USER'S MANUAL Analog Sampling ……..................................................................……..…. Special Key Combinations …………………............................................... Assigning The Number of Displayed Digits .............................................. Viewing and Clearing Alarms from the Keypad ....................................... Calibration Mode ........................................................................................... Calibrating the Pressure Transducer ....................................................... Calibrating the Temperature Transducer .................................................. Calibrating the Differential Pressure Transducer ...................................... Section 4: Optional Equipment 3-8 3-9 3-9 3-9 3-10 3-10 3-11 3-12 4-1 Analog Output …………............................................................................... 4-1 MTEK6000 Analog Output Specifications …...................................................... 4-3 Installing the Analog Output Loop …............................................................. 4-3 Calibrating the Analog Output …................................…............................... 4-3 Section 5: Maintenance and Software Packages Enclosure Maintenance ............................................................................... Changing the Battery ................................................................................... Calibration .................................................................................................... PcGas Meter Reader …................................................................................. PcGas Meter Utility ……................................................................................ PcGas Customer Monitor .............................................................................. MTEK Manager.................................................................................... ......... DC2000 ........................................................................................................ Appendix A : Process Configuration Standard Appendix B : Calculations Appendix C : Parameter Description Appendix D : Board Jumper Positions Appendix E : Certifications (CSA, UL, FCC drawings / statements) Appendix F : Warranty Information Appendix G : TII Telephone Circuit Surge Suppressor Appendix H : Hazardous Area Installation Control Drawings January 2002 5-1 5-1 5-1 5-1 5-2 5-2 5-2 5-2 5-3 A-1 B-1 C-1 D-1 E-1 F-1 G-1 H-1 MTEK6000 SERIES USER'S MANUAL List of Figures Figure 1-1, MTEK6000 Exterior View . . . . . . . . . . . . . . . . . . . . . . . . . . . . . . . . Figure 1-2, MTEK6000 Interior View . . . . . . . . . . . . . . . . . . . . . . . . . . . . . . . . Figure 2-1, Power Connection and Configuration . . . . . . . . . . . . . . . . . . . . . . . Figure 2-2, Index Box Assembly . . . . . . . . . . . . . . . . . . . . . . . . . . . . . . . . . . . . Figure 2-3, Base Plate showing unit and index rotation . . . . . . . . . . . . . . . . . . Figure 2-4, Uncorrected counter masking for 8-digit counter . . . . . . . . . . . . . . Figure 2-5, Wall Mounting . . . . . . . . . . . . . . . . . . . . . . . . . . . . . . . . . . . . . . . . . Figure 2-6, Pipe Mounting . . . . . . . . . . . . . . . . . . . . . . . . . . . . . . . . . . . . . . . . . Figure 2-7, Pressure Connections . . . . . . . . . . . . . . . . . . . . . . . . . . . . . . . . . . . Figure 2-8, Typical Installation for MTEK6000 EFC . . . . . . . . . . . . . . . . . . . . . . Figure 2-9, Typical Installation for MTEK6000 EFM . . . . . . . . . . . . . . . . . . . . . . Figure 2-10, Temperature Probe Connection . . . . . . . . . . . . . . . . . . . . . . . . . . . Figure 2-11, Pulse Output Wiring . . . . . . . . . . . . . . . . . . . . . . . . . . . . . . . . . . . . Figure 2-12, Corrector Board Connector and Jumper Configuration Diagram . . Figure 3-1, Optional Keypad and Display . . . . . . . . . . . . . . . . . . . . . . . . . . . . . . Figure 4-1, Analog Output Option . . . . . . . . . . . . . . . . . . . . . . . . . . . . . . . . . . . . 1-3 1-3 2-1 2-3 2-4 2-4 2-6 2-6 2-7 2-8 2-8 2-9 2-10 2-14 3-7 4-2 List of Tables Table 2-1, Thermowell Part Numbers . . . . . . . . . . . . . . . . . . . . . . . . . . . . . . . . . Table 2-2, Activity Indicator . . . . . . . . . . . . . . . . . . . . . . . . . . . . . . . . . . . . . . . . . Table A-1, Display mode and function keys for MTEK6000 EFC . . . . . . . . . . . Table A-2, Standard alarms for MTEK6000 EFC . . . . . . . . . . . . . . . . . . . . . . . . Table A-3, Historical data stored in MTEK6000 . . . . . . . . . . . . . . . . . . . . . . . . . Table A-4, Display mode and function keys with auxillary pressure . . . . . . . . . Table A-5, Standard alarms for MTEK6000 EFC w/ aux. pressure . . . . . . . . . . Table A-6, Historical data stored in MTEK6000 EFC w/ aux. pressure . . . . . . . Table A-7, Display mode and func. keys with 2 auxillary pressure . . . . . . . . . . . Table A-8, Standard alarms for MTEK6000 EFCV w/ 2 aux. pressure . . . . . . . . Table A-10, Standard display mode & func. keys for MTEK6000 EFC2 with 2 auxillary pressure . . . . . . . . . . . . . . . . . . . . . . . . . . . . . . . . . . . . . . . . . . . Table A-11, Standard alarms for MTEK6000 EFC2 w/ 2 aux. pressure . . . . . . . Tabel A-12, Historical data stored in MTEK6000 EFC2 with 2 aux. pressure . . . Table A-13, Display mode & func. keys for MTEK6000 EFM w/ aux. pressure . . Table A-14, Standard alarms for MTEK6000 EFM w/ aux. pressure . . . . . . . . . . Table A-15, Historical data stored in MTEK6000 EFM w/ aux. pressure . . . . . . . Table A-16, Display mode & func. keys for MTEK6000 EPR . . . . . . . . . . . . . . . . Table A-17, Standard alarms for MTEK6000 EPR . . . . . . . . . . . . . . . . . . . . . . . . Table A-18, Historical data stored in MTEK6000 EPR . . . . . . . . . . . . . . . . . . . . . Table A-19, Display mode & func. keys for MTEK6000 ETR . . . . . . . . . . . . . . . . Table A-20, Standard alarms for MTEK6000 ETR . . . . . . . . . . . . . . . . . . . . . . . . Table A-21, Historical data stored in MTEK6000 ETR . . . . . . . . . . . . . . . . . . . . . Table A-22, Display mode & func. keys for MTEK6000 EPTR . . . . . . . . . . . . . . . Table A-23, Standard alarms for MTEK6000 EPTR . . . . . . . . . . . . . . . . . . . . . . . Table A-24, Historical data stored in MTEK6000 EPTR . . . . . . . . . . . . . . . . . . . . January 2002 2-9 2-13 A-1 A-1 A-1 A-2 A-2 A-2 A-3 A-3 A-4 A-5 A-5 A-6 A-6 A-6 A-6 A-7 A-7 A-8 A-8 A-8 A-9 A-9 A-9 MTEK6000 SERIES USER'S MANUAL Metretek, Inc. is a registered trademark and MTEK6000, MTEKManager, pcGas, Meter Reader, Customer Monitor, AutoPoll, Label Changer, Site I.D. Changer, Units Changer and Virtual Keypad are trademarks of Metretek, Inc. All other trademarks are the property of organizations not connected with Metretek, Inc. and are used for reference purposes only. All contents and specifications in this manual are subject to change without notice. January 2002 MTEK6000 SERIES USER'S MANUAL January 2002 MTEK6000 SERIES USER'S MANUAL CHAPTER 1: OVERVIEW NOTE: The MTEK6000 is similar in many respects to the Metretek AE6000 but there are also differences. The information in this manual applies only to the MTEK6000. The MTEK6000 series products are lowcost microprocessor-controlled, electronic devices for measuring gas flow and volumes or monitoring pressure and temperature for a system. With integral pressure and temperature transducers, the MTEK6000 is designed for accuracy, reliability, and ease of maintenance. It can mount directly on a meter's index plate, on a wall or pipe. Low-power CMOS design and sophisticated power conservation circuitry allow the MTEK6000 to operate one to two years on battery power. Two pulse inputs, two status inputs, two pulse outputs, two external analog inputs (4-20 mA or 1-5V) and a tamper input are standard. A large 13-digit LCD display, with a magnetic scroll switch located on the enclosure exterior, permits data viewing without opening the enclosure. Station parameter display and alarm display can be performed with only external device. The standard internal 2400/1200/300 baud modem provides remote configuration, calibration, and retrieval of data. The operator can also use an industrystandard portable computer running Metretek software to configure parameters. See Chapter 5 for information on these packages. The MTEK6000 calculates corrected volume using AGA-7, AGA-3, AGA-5 and NX-9 or AGA-8 reports. Optional equipment includes an external keypad and display for configuration and calibration, analog output modules, two additional pulse outputs, serial port modules, and various security options. January 2002 The MTEK6000 product line consists of six models that cover a wide range of applications. • The MTEK6000 EFCV provides a live pressure and temperature reading in volume corrections for Positive Displacement meters (turbine, etc.) • The MTEK6000 EFCP provides a live pressure and a fixed temperature reading in volume corrections for Positive Displacement meters (turbine, etc.) • The MTEK6000 EFM provides a live pressure and temperature reading in volume corrections for Orifice meters. • The MTEK6000 EPR provides a live pressure reading for monitoring systems. • The MTEK6000 ETR provides a live temperature reading for monitoring systems. • The MTEK6000 EPTR provides a live pressure and temperature reading for monitoring systems. HAZARDOUS LOCATIONS The MTEK6000 is listed by Underwriter’s Laboratories to bear the UL/C-UL mark (US & Canadian Listing) for use in hazardous locations. The intrinsically safe version can be installed in a Class I, Division 1, Group D hazardous location when connected through the intrinsic safety barriers as listed in control drawing 401061. A copy of this drawing is shown in appendix E. The non-incendive version can be installed in a Class I, Division II, Group D hazardous location when installed in accordance with control drawing 401060. This drawing is also listed in Appendix E. 1-1 MTEK6000 SERIES USER'S MANUAL WARNING Substitution of components may impair suitability for Class 1, Division 1 and Class 1 Division 2 applications. COMPLIANCE The MTEK6000 device complies with Part 15 and Part 68 of the FCC Rule. See Appendix E for details. ONE-YEAR WARRANTY Metretek, Inc. warrants the products it manufactures to be totally free from any defects in materials and workmanship under normal operation and use. Metretek, Inc. agrees to repair or replace any instrument, which is defective due to faulty workmanship or material if returned to our factory with shipping charges prepaid, within one year of original purchase. See Appendix F in the back of the manual for full warranty details. SECURITY OPTIONS The MTEK6000 comes standard with wire seal screws for the enclosure. Various security options are available to prevent unauthorized entry into the enclosure: A. Tamper screws B. Padlock quick release latch C. Padlock quick release latch and door ajar switch D. Door ajar (tamper) alarm 1-2 January 2002 MTEK6000 SERIES USER'S MANUAL Figure 1-1 MTEK6000 exterior view January 2002 1-3 MTEK6000 SERIES USER'S MANUAL Figure 1-2 MTEK6000 interior view 1-4 January 2002 MTEK6000 SERIES USER'S MANUAL Chapter 2: Installation UNPACKING 1. Thoroughly examine the box to verify it was not damaged in shipping. If you find damage, immediately file a claim with the shipper. 5. If the unit is battery powered, verify that jumpers JP 19, 20 and 24 are in the A to B position. Load the battery pack with fresh batteries and connect it to the corrector at position J6. Repeat with the second battery pack connecting it at position J7 (see Fig. 2-1). Go to step 7. 2. Carefully unpack the MTEK6000 from the shipping container. Verify that the box contains every item listed on the shipping order. INITIAL CHECK OUT !!! CAUTION !!! This unit contains certain electronic components that are sensitive to electrostatic discharge (ESD); therefore, proper precautions should be taken during maintenance operations to avoid ESD. It is recommended that the operator first touch the shell of the MS connector (RS-232C port) on the left side of the unit to dissipate any accumulated static charge. Additional precautions may be taken in order to minimize the possibility of ESD, including the use of a grounding wrist strap (i.e., 3M part number 2214). 3. Examine the label on the left side of the enclosure. It indicates the serial number and pressure range for your unit. Verify that these parameters match your requirements. If they do not, please contact your sales representative. 4. Open the front door by loosening the upper and lower right hand corner screws or quick release latches of the enclosure and swinging the door out. See Fig. 1-1. January 2002 Figure 2- 1 Power connection and configuration 6. If the unit is powered via an external power source (UPS or SPS option), make sure that jumpers JP 19, 20 and 24 are in the B to C position and connect the DC power input to the DC input screw terminals 6 (V+) and 5 (GND) prior to power up. Refer to Fig. 2-1 for locating the connection points WARNING The operating voltage range from an external power source is 7-18 VDC. Do NOT exceed recommended input voltage of 18 VDC. 7. When you first apply power, the display will show the first two capital letters of the first label, followed by the value and then the units. For example, the label Corrected Volume MCF with a value of 00000000 would be displayed as CV 00000000 MCF. 2-1 MTEK6000 SERIES USER'S MANUAL NOTE The flashing LCD display indicates an alarm condition (e.g. First Time Power). See Chapter 3 for information on alarms. 8. You can now view selected parameter values on the display by using the scroll switch. The scroll switch is activated by the use of a magnet (one is shipped with the unit). See Display Mode, in Chapter 3, for information about this function. B. MTEK6000 UPS power supply - an uninterruptible 12 VDC power supply with battery back up. C. SPS 50 solar system - 10 to 64 W systems available with battery backup; while selected system size depends on geographic location, degree of sun exposure, equipment power consumption, and site obstructions, most MTEK6000 applications only require a 10W system. POWER FOR THE MTEK6000 Two 4.5V alkaline battery packs (part # 1011-0035C-001) supply operating power to the device for approximately two years of typical operation. Recommended operating temperature range for the MTEK6000 when powered with these packs is –4 F (-20 C) to 130 F (54 C). If this supply should fail, an on-board back-up battery will maintain the unit's memory and real time clock. Backup power can maintain history data for up to seven years. When back-up power is used, the unit discontinues normal operation until the main battery pack is replaced. Note that only one power source powers the MTEK6000; connection of battery packs to a unit configured for external power does not provide an additional source of backup power for the unit. MOUNTING THE INSTRUMENT ON THE METER 1. Check the meter's rotation direction. Standard setup is clockwise rotation of the meter output shaft, as viewed from the top. The rotation of the unit can be changed to counterclockwise. Also, the input drive value for the unit can be changed. 2. Align the instrument's index base plate holes with the corresponding holes in the meter's index base plate. Secure the unit by bolting it to the meter. Ensure that the drive dogs are correctly aligned and not binding. 3. Plug all unused holes in the index base plate with the caps provided in the accessory package. Optional Power Supplies Several optional supplies are available: A. Two Single-D Lithium battery packs (part # 1011-0039B-001) provides an approximate life expectancy of two years over the temperature range -220 F (-300 C) to 1580 F (70 0 C). Each 3.6V, 13.0 AH battery pack can be used individually (~ 1yr life) or as a pair. 2-2 January 2002 MTEK6000 SERIES USER'S MANUAL Output Shaft Rotation feet/revolution (ft3/rev) and 0.1, 1 and 10 cubic meters/revolution (m3/rev). To change the input drive value to 5 ft3/rev: To change the rotation of the output shaft to counterclockwise (figure 2-2): 1. Loosen set screw a on compound gear A. SETTING UP THE INDEX ASSEMBLY 1. Loosen set screw e on gear E. 2. Lower gear A until its upper teeth engage the upper teeth of compound gear B. 2. Disengage gear E from counter gear D. 3. Tighten set screw a. 3. Tighten set screw e. 4. Loosen set screw c on gear C. 5. Engage gear C with counter gear D. 6. Tighten set crew c. 7. Take care to align the gears properly, and verify that they turn freely and do not bind. 4. Take care to align the gears properly, and verify that they turn freely and do not bind. When changing a MTEK6000 in the field from a 10, 100, 1,000 or 10,000 ft3/rev drive meter with a 5 ft3/rev drive, the CF per Pulse In or Meter Drive parameter, must be changed to a value of 10 using software or the optional, external keypad / display. NOTE Electronic parameter CF per Pulse In or Meter Drive should always equal the meter drive value EXCEPT for 5 ft3/rev meters which should be set at 10. When switching to 5 ft3/rev, the gear ratio is adjusted so that two revolutions of the input drive gear result in one revolution of the magnet and hub assembly, which sends a pulse signal to the instrument that equals 10 ft3/rev. The value can be changed using software or the optional, external keypad / display (see Appendix A for addressing). Figure 2- 2 Index Box Assembly Input Drive Value To change the input drive value to 10, 100, 1,000 or 10,000 ft3/rev, return compound gear A to its original, factory-set position. Change the CF Per Pulse In or Meter Drive parameter using software or the optional, external keypad / display (see Appendix A for addressing). Fig. 2-2 above shows gearing in the correct position for 10, 100, 1,000 or 10,000 cubic January 2002 2-3 MTEK6000 SERIES USER'S MANUAL NOTE When you box haveassembly changed contains the inputa drive The index reed value, be sure to remove the switch (G) and a correspondingexisting magnetdrive (F). value label from the window and replace The magnet should be positioned so there isit with- a0.1" new label that states the 0.07" clearance between the current magnetinput and drive value. For your convenience, switch. To adjust this clearance, refer to Fig. Metretek, supplies extra labels with the 1-3 on pageInc. 9 and do the following: MTEK6000 EFC. Magnet Sensor Adjustment The index box assembly contains a reed switch (G) and a corresponding magnet (F). The magnet should be positioned so there is 0.07”-0.01” clearance between the magnet and switch (1.78mm-0.25mm). To adjust, refer to Figure 2-2 and do the following: 1. Loosen set screw h. 2. Move the magnet until clearance is correct. 3. Retighten set screw h. 4. Verify the clearance is still correct. If not, repeat the procedure. Figure 2- 3 Base Plate Showing Unit & Index Rotation UNIT AND INDEX ROTATION In general, the label side of the index base plate (front) should face the front of the meter. This allows the MTEK6000 EFC to also face the front of the meter. In certain applications, the MTEK6000 EFC and index can be installed 1800 from the standard position so that viewing of the MTEK6000 EFC is acceptable. To rotate the unit and index, refer to Fig. 2-3 and do the following: 1. Remove the 4 bolts at location A. 2. Rotate the base plate 1800 clockwise so that the front label side is now facing the rear of the unit. 3. Insert the 4 bolts into location B with the two lockwashers as shown. Fig. 2-3 shows the index orientation after the rotation is completed. (DO NOT OVERTIGHTEN). COUNTER MASKING Figure 2- 4 Uncorrected Counter Masking for Eight Digit Counter 2-4 January 2002 MTEK6000 SERIES USER'S MANUAL PULSE INPUT TO THE MTEK6000 Magnetically operated reed switches inside the meter drive assembly send electronic pulses as the drive turns. These pulses represent uncorrected meter volume to the instrument. To eliminate false counts that can result from the reed switch "bounce”, the MTEK6000 uses a set/reset, dual-reed switch configuration. An input pulse is generated only when the opening and closing of the first switch is followed by the opening and closing of the second switch. The main counter input is also monitored for fault conditions. When enabled, if any of the dualreed switches should be defective, the input pulses will automatically switch to the working counter input and the MTEK6000 will generate a Faulty Counter alarm. This function is enabled if the Counter Fault Monitoring parameter is set to 1 and disabled if set to 0. The default value is 0 for disable. See Appendix A for addressing. Software is used to configure the pulse input. The optional, external keypad / display can also be used to configure the pulse input and other parameters. See Appendix A for addressing. WALL AND PIPE MOUNTING The MTEK6000 can also mount directly on a wall or on a pipe. Mounting feet are provided for wall mounting. See Figure 2-5. For pipe mounting, approximately 10 feet of 2-inch rigid iron pipe or conduit is required. The pipe should be installed 18 to 24 inches in the ground in 6 inches wide concrete. The length of the 2-inch mounting pipe or conduit will vary according to the site, but typical installations place the MTEK6000 at about eye level for ease of operation. Mounting plates are provided for pipe mounting. Secure the MTEK6000 to the pipe with the provided U-bolts, washers and hex nuts. See Figure 2-6. For units supplied with indexes, the main counter input is terminated at the UNIT (BLK) MTA connector and the uncorrected pulse wiring at the FIELD (WHT) MTA connector at the lower right hand corner of the corrector printed circuit assembly. Metretek, Inc. can supply a remote index similar to the main index or a sandwich pulser for wall or pipe mount installations. When the sandwich or external pulser option (1, 10, 20, or 50 pulse per revolution) is supplied, connect the N.O., COM, and N.C. wiring to terminals 32 (SET1), 33 (GND) and 34 (RST1) respectively. The pulse input is software selectable for Form C (three-wire) or Form A (two-wire) connection. January 2002 2-5 MTEK6000 SERIES USER'S MANUAL Figure 2- 5 Wall Mounting Figure 2- 3 Wall Mounting Figure 2- 4 Pipe Mounting 2-6 January 2002 MTEK6000 SERIES USER'S MANUAL TRANSDUCERS IN THE MTEK6000 The MTEK6000 uses a precision strain gauge pressure transducer mounted inside the unit, combining maximum accuracy with low power consumption. To sense gas temperature, the MTEK6000 employs a highly linear and stable device, a platinum resistive temperature detector (RTD). Case temperature sensing is accomplished with an on-board precision reference integrated circuit (IC). CONNECTING THE PRESSURE TUBING WARNING You must DEPRESSURIZE THE METER and its associated piping before you make pressure piping connections. FAILURE to do so may result in EXPLOSION and FIRE, causing SERIOUS PERSONAL INJURY and PROPERTY DAMAGE. Do NOT attempt to connect any piping or fittings to a meter or pipe under pressure. Do NOT SMOKE while connecting gas or test pressure to the meter. Note Federal Standard 192.02 requires a shut-off valve between the pressure source and the instrument. A needle valve is supplied with the optional pressure piping kit for this purpose. Its rating is 1,500 PSIG MAOP. January 2002 Figure 2- 5 Pressure Connections As a minimum requirement, connect the pressure tubing as shown in Fig. 2-7. An optional pressure tubing connection kit (part # 2019-0009B-001) can be shipped with each instrument. Fig. 2-8 is the recommended pressure installation for ease of operation. Additional piping and valve are required for the installation and are not supplied. Use Teflon tape or pipe seal compound on all threaded connections. The tubing supplied in the kit may be longer than you need for your installation. You can cut or coil the tubing, but do not make any sharp bends in it (minimum radius is 3/4"). Tighten all the connections and perform a leak test once the meter and instrument are pressurized. 2-7 MTEK6000 SERIES USER'S MANUAL Figure 2- 7 Typical Installation for MTEK6000 EFC Figure 2- 6 Typical Installation for MTEK6000 EFM 2-8 January 2002 MTEK6000 SERIES USER'S MANUAL INSTALLING THE THERMAL PROBE A thermal (temperature) probe is connected to the MTEK6000 by a 6-foot (2-meter) cable. You should coil excess cable to prevent possible damage. The probe is designed to fit into standard Metretek, Inc. thermowells. Optional 15-foot (4.5 meter) and 30-foot (9-meter) cables are available. See Fig 2-10. To install the thermal probe, use the supplied temperature probe adapter. Refer to Table 2-1. Insert the probe into the thermowell and tighten the securing nut FINGER TIGHT only. The standard adapter is a ½” fitting. Users retrofitting instruments requiring the 5 /8” adapter can order the adapter from Metretek, Inc. Oil or ethylene glycol (antifreeze) should be used to improve heat transfer from the thermowell to the thermal probe. Be aware, however, that it is possible to cause hydraulic crushing of the probe. This can happen when there is little or no air in the thermowell above the probe. When the probe is fastened by tightening the securing nut, the space in the well decreases as the probe enters. As a result, hydraulic pressure may rise high enough to cause damage. If you use oil or antifreeze, make sure there is enough air in the thermowell above the fluid to prevent crushing the probe. It is recommended that the thermowell be installed in the meter outlet pipe one or two diameters from the meter outlet. The insertion length of the thermowell must be sufficient to extend at least to the pipe center, but no further than 75% of the pipe’s diameter. Thermowells should not be situated where they will be exposed to direct sunlight. A sunshield should be used for installations where this cannot be avoided. January 2002 Figure 2- 8 Temperature Probe Connection Table 2-1: Thermowell Part Numbers Pipe Size Insertion Length Thermowell Part Number 4 in. 2 ½ in. 5340-0373 ½” NPT 5340-0377 ¾” NPT 5340-0384 1” NPT 6 in. 8 in. 4 ½ in. 5340-0372 ½” NPT 5340-0376 ¾” NPT 5340-0383 1” NPT 12 in. 14 in. 7 ½ in. 5340-0371 ½” NPT 5340-0375 ¾” NPT 5340-0379 1” NPT 16 in. 20 in. 10 ½ in. 5340-0370 ½” NPT 5340-0374 ¾” NPT 5340-0378 1” NPT 2-9 MTEK6000 SERIES USER'S MANUAL INSTALLING THE PULSE OUTPUT WIRING The MTEK6000 comes standard with a board installed that provides two optically isolated pulse outputs. These outputs are configurable as either Form C or Form A type outputs. An alternative version of the board is available that provides four pulse outputs. Both versions of the board also provide terminal block positions to access the uncorrected mechanical volume switch output of the index. See Fig. 2-11 for pulse output wiring. The option boards optical coupling and physical arrangement of circuitry provide a minimum of 1,500 volts of isolation. Wiring connections for the pulse outputs are made from terminals 19 to 17 for Pulse output #1, terminals 16 to 14 for Pulse output #2, terminals 13 to 11 for Pulse output #3 and terminals 10 to 8 for Pulse output #4. See Fig. 2-11 for pulse output wiring location and Form C vs. Form A jumpering. Note that proper operation of the Form C pulse output configuration requires that a constant wetting current be available at both the normally open and normally closed terminals by the device attached to that pulse output. The corrected volume pulse output generated can be scaled to any desired volume value. Typical values are 10, 100, 1,000, or 10,000 cubic feet per pulse, or the metric equivalents. The scaling factor is selected by the Pulse Out CF Per Pulse parameters. The pulse duration (width) is also configurable up to 5,000 ms. The Pulse Output On-Time and Off-Time parameters determine the pulse time for corrected volume, uncorrected volume and pressure corrected volume pulses. The Alarm Pulse Time (ms) parameter determines the pulse time for alarm outputs. See Appendix C in this manual or Meter Reader Help screen for description of this parameter. Figure 2- 9 Pulse Output Wiring 2-10 January 2002 MTEK6000 SERIES USER'S MANUAL Volume and Alarm Pulse Specifications Uncorrected Pulse Output Specifications 1. All pulse outputs are isolated from ground and each other. Provides 1,500 volts between input and output and between contact sets. 2. Form C: DC load only, 125mWdc max, 50Vdc max Form A: AC or DC load 800mW max, 400V max., 100mA max, continuous 3. Configurable pulse width from 1 to 5,000 milliseconds (ms). 1. 2. 3. 4. Uncorrected Mechanical Pulse Output (Units with a Metretek Index) 3W contact rating (power dissipation). Maximum switching voltage up to 30V. Maximum switching current up to 200mA. Maximum continuous current @ 500 mA. NOTE All pulse outputs are disabled in the standard unit to conserve power. The Alarm pulse output is a one time pulse output signal. No other alarm pulse will be generated until the alarm is cleared and becomes active again. The uncorrected mechanical pulse output is derived from the Form C reed switch in the index assembly. As the magnet in the drive's assembly rotates past the Form C switch, a single uncorrected volume pulse output is generated. Volume per pulse is determined by the drive rate. Each uncorrected volume pulse is equal to the gas flow for one shaft revolution. The pulse output can be wired as a Form A or Form C switch output. Use terminals 25 (normally open), 24 (common) and 23 (normally closed) for Form C output. To wire as Form A, use terminals 25 (normally open) and 24 (common) and make no connection to terminal 23 (normally closed). The duration (width) of each pulse is equal to the length of time the reed switch is in its closed position (depends on the rate of the meter). No configuration is necessary to enable the uncorrected mechanical pulse output. January 2002 2-11 MTEK6000 SERIES USER'S MANUAL COMMUNICATIONS Modem Communications (2400 Baud) To communicate with the MTEK6000, the Site ID (RUID) in the device must be the same as the Site ID entered in the software package. The Site ID is a unique identification number (1 to 65,535) that allows the Metretek, Inc. software packages to communicate with the MTEK6000. The default Site ID number is 1. Software can be used to enter a number other than the default. Refer to the respective software User’s Manual for additional information on these and other functions. The optional external display and keypad can also be used to change the Site ID from its default value. NOTE This modem complies with Part 68 of the FCC Rules. See Appendix E for details. RS-232C Serial (Direct) Communications (9600 Baud) In its standard configuration, the MTEK6000 is equipped with one RS-232C serial port. An optional RS-232C serial cable (Part # 1002-0235C-001) is required for direct communications. The serial port allows an operator to configure and collect data with an industry-standard (IBM, Compaq, etc.) portable computer (software is required for this function). The MTEK6000 communicates at 9600 baud with portable or host computers connected directly to the serial port. When communicating with the MTEK6000, Busy will be displayed on the display. Table 2-2 shows the diagnostic features of the Activity indicator when the cable is connected. WARNING The MTEK6000 will not go to sleep if the RS-232C serial cable is left connected and battery life will be affected drastically. 2-12 The internal Hayes compatible modem offers automatic answering and dialing. The modem communicates at 2400/1200/300 baud. The modem by itself can only be used in areas classified as non-hazardous or Class I, Division 2. To maintain the MTEK6000’s intrinsic safety classification in more hazardous areas such as Class I, Division 1, an optional Phone Line Interface (PLI) must be used. This device removes the high voltage ring-detect circuitry from the device and brings low-level signals into the hazardous area through intrinsic safety barriers. Connecting the Telephone Line If the MTEK6000 is situated in a nonhazardous or Class I, Division 2 area, connect the tip and ring wires from the telephone company's terminal box to the TIP and RING terminals (1 and 2 respectively). If it is installed in a Class I, Division 1, Group D area, install the unit per the reference drawing shown Appendix E. Also see Appendix D for proper jumper settings. Installation of the phone line surge protection device provided with the MTEK6000 is strongly recommended when the MTEK6000s internal modem is connected to a telephone line. The device is a separate gas tube type phone line surge suppressor and is housed in its own enclosure suitable for mounting directly to a telephone pole or other structure. January 2002 MTEK6000 SERIES USER'S MANUAL Table 2-2 Activity Indicator MTEK6000 Function (RS232 cable connected) Activity Indicator RS-232C cable connected 1 long blink Set #1 Pulse received 1 short blink Reset #1 Pulse received 2 short blinks Set #2 Pulse received 3 short blinks Reset #2 Pulse received 4 short blinks RS-232C cable disconnected 3 long blinks after a few seconds delay January 2002 2-13 MTEK6000 SERIES USER'S MANUAL Figure 2- 10 Corrector Board connection and jumper configuration diagram 2-14 January 2002 MTEK6000 SERIES USER'S MANUAL GROUNDING The information presented here is merely a guideline to help customers avoid surge damage to the MTEK6000. None of these guidelines are to be construed as replacing or superseding rules and practices defined by the National Electrical Code (NEC), or the Classification of Gas Utility Areas for Electrical Installations guidelines, as published by the American Gas Association (AGA) or other regulatory agency. A sound understanding of Federal, State and Local laws is fundamental to proper and legal installation work. The MTEK6000 is configured so that the majority of the internal metal components within the device are connected (common) to the gas pipeline / meter to which the instrument is attached. Additionally, a large surge bypass MOV device has been provided inside the MTEK6000 that provides an alternate path (rather than through the correctors electronics!) for surge current to flow. One side of this device connects to the pipe through the index & meter. The other side is brought out through the enclosure to an external copper grounding lug. The separation of these two points allows for the existence of cathodic protection voltage levels on the pipe (typically about 1 volt below the surrounding soil) while still providing a path for surge current to safely bridge these points, find earth ground, and not damage the instrument. If the MTEK6000 is to be connected to a telephone line (either on-board or through a PLI mounted in a safe area) or connected to a UPS (AC power supply), then the external ground lug provided on the MTEK6000 should be connected to earth ground. If the unit is not making connection to the phone co. lines, power co. lines, or other external equipment, then connecting the unit to an earth ground simply introduces a path for surges that otherwise would not exist. In this January 2002 case it is of no benefit to earth ground the MTEK6000’s external lug. When the external ground lug of the MTEK6000 is to be used, it should be connected to a common ground rod (or "bed" of grounding equipment) to which is securely tied all other equipment chassis, metal cabinets, and intrinsic ground brackets. Solid copper ground wire or ground strapping of an approved size and type must be used to tie this equipment to the rod. If possible, it is far preferable that all external equipment be tied to a single site ground, that the distance between the MTEK6000 and external equipment is kept at a minimum (less than 20 feet is best), and the ground rod be located no farther than halfway between the MTEK6000 and the other equipment. If separate site grounds must be used, as when the MTEK6000 and UPS are separated by a distance greater than 20 feet, Metretek can provide an optional device, the SPM (Surge Protection Module). A pair of SPMs can properly protect both devices in this circumstance. Control drawings detailing proper wiring of SPMs (including hazardous areas) are included with the SPM. REFERENCES • • • National Electrical Code (NFPA): Article 250 – Grounding Articles 500 & 501- Hazardous (Classified) Locations Article 504 - Intrinsically Safe Systems The IAEI Soares' Book on Grounding (Available through the NFPA) PolyPhaser Corp. Catalog of Lightning / EMP & Grounding Solutions Minden, Nevada (800) 325-7170 2-15 MTEK6000 SERIES USER'S MANUAL 2-16 January 2002 MTEK6000 SERIES USER'S MANUAL Chapter 3 : Operating Modes • • The MTEK6000 operates in any of five modes: • Sleep • Display • Alarm • Configuration (requires Virtual keypad, Meter Reader 4.10 or later, or pcGas Host software, or the optional external keypad and display) • Calibration (requires Virtual keypad, Meter Reader 4.10 or later, software or the optional external keypad and display) • Calling the unit via modem. Waking up on a specified number of pulses set by the Wake Up On Pulse parameter. See Appendix A for the Wake Up On Pulse (event driven) parameter address and the Wake Up on Pulse (event driven) section later in this chapter for more details on this feature. Waking up on a limit violation set by analog minimum or maximum setpoints. This is only valid when analog sampling is enabled. See Analog Sampling later in this chapter for details. See the section on Alarm Mode later in this chapter for information on viewing and clearing alarms. SLEEP/WAKE-UP MODE In normal operation, the MTEK6000 maintains a powered-down state (sleep mode) to conserve battery life. In this state, the display will show the first label and the most recent value prior to the next wake-up interval. The unit will be updated depending upon the user's programmed wake-up interval. The default wake-up interval is 10 minutes. See Appendix A for a list of common MTEK6000 items including this parameter. Shorter intervals result in more frequent data; longer intervals provide for longer battery life. The scheduled wakeups result in immediate power-down after performing calculations. In addition to the scheduled wake-ups, the MTEK6000 can be brought up from its sleep mode by any one of the following: • • • • • Connecting a portable computer to the unit's serial communication port. Scrolling the external display with a magnet. Pressing any key on the optional keypad. Opening the enclosure door. (If tamper switch is installed) Change in state of the status inputs. January 2002 Once the unit is awake, it will automatically power-down in one minute after the operator stops interacting with it. NOTE The MTEK6000 will not go to sleep if the RS-232C serial cable is connected and battery life will be affected drastically. DISPLAY MODE In this mode, the display normally shows a two-character label and a value. You can view the next displayed label without having to open the front door by touching the scroll switch with a magnet. In display mode, only limited parameters with assigned labels can be viewed. See Appendix A for a list of display mode parameters for your device. 3 -1 MTEK6000 SERIES USER'S MANUAL ALARM MODE alarms using the magnet: The MTEK6000 can be configured to activate an alarm when certain conditions are met or when user defined limits are exceeded. You can display active alarm messages on the optional external keypad and display or alarm codes on the standard display. The unit can also automatically call a host computer running Metretek, Inc. software programs to report alarms. 1. Apply the magnet to the scroll switch until the outer display shows AL XXXXXX. (See Appendix A for a list of alarms and codes for your device). The alarms are described later in this chapter. A history log is kept in the device on each alarm condition consisting of: • • • • • • • • Current value Type of alarm (high, low etc.) Setpoint value (alarm limit) Time of alarm Date of alarm Time out of alarm Date out of alarm Extreme value alarm Appendix A shows the standard alarms and codes for your device. In addition to the standard alarms, you can program the MTEK6000 to monitor and report on almost any condition, such as meter tampering, liquid level, valve status, heater status, etc. NOTE Additional hardware equipment and configuration could be required for custom alarm monitoring. Viewing and clearing alarms using the magnet Alarms in the MTEK6000 can be recognized by the flashing outer display. This is an indication that one or more of the standard alarms were initiated (see Appendix A for a list of alarms and codes for your device). To view and clear the 3-2 2. To view another alarm, apply and remove the magnet briefly. The unit should advance to the next alarm code if other alarms are active. 3. To clear an alarm, hold the magnet on the scroll switch for approximately five seconds until the display flashes OK, indicating the alarm was cleared. 4. If more than one alarm is active, the display will show the next alarm code. Apply the magnet to the scroll switch for approximately five seconds and clear the alarm. 5. The user can now view the standard display parameters in Appendix A. NOTE The ability to clear alarms with a magnet is default in the MTEK6000. This function can be disabled using Metretek, Inc.’s software packages or the optional external keypad and display. If disabled, the user would not have access to clear alarms, only to view parameters. Current Day Flow Alarm (EFC & EFM) If the current day's total volume should exceed the Current Day High Volume Alarm Setpoint, a Current Day Flow alarm will be initiated. The alarm will remain active until the value for the current day volume is reset the next day at roll time. The setpoints are user configurable with default values of 100000 and 99990 respectively (see Appendix A for parameter addressing for your device). January 2002 MTEK6000 SERIES USER'S MANUAL For transport or interruptible customers, this parameter can be used to alarm when an account has exceeded a predetermined daily volume allocation. Faulty Counter Alarm (EFC) This alarm is only valid for EFC units with a Form C switch. If any of the dual-reed switches in the index assembly fail, pulses to the unit would automatically switch to a working counter input. When this happens, the unit generates a Faulty Counter alarm (see the section on Pulse Input to the MTEK6000 in chapter 2 for more details). First Time Power Alarm First Time Power alarm is defined as the reapplication of power after interruption of the power source. For example, whenever the battery is disconnected and then subsequently reconnected, the unit records the First Time Power event. High Flow Rate Alarm (EFC & EFM) If the flow rate should exceed the High Flow Rate Alarm Setpoint, a High Flow Rate alarm will be initiated. The alarm will remain active until the flow rate falls below the High Flow Rate Reset parameter value. The setpoints are user configurable with default values of 100000 and 99990 respectively (see Appendix A for parameter addressing for your device). High Differential Pressure Alarm (EFM) If the differential pressure should exceed the High Differential Pressure Alarm Setpoint, a High Differential Pressure alarm will be initiated. The alarm will remain active until the differential pressure falls below the High Differential Pressure Reset parameter value. The setpoints are user configurable with default values of 1500 and 1480 respectively (see Appendix A for parameter addressing for your device). January 2002 High Pressure Alarm If the gas pressure should exceed the High Pressure Alarm Setpoint, a High Pressure alarm will be initiated. The alarm will remain active until the pressure falls below the High Pressure Reset parameter value. The setpoints are user configurable with default values of 1500 and 1480 respectively (see Appendix A for parameter addressing for your device). High Temperature Alarm If the gas flow temperature should exceed the High Temperature Alarm Setpoint, a High Temperature alarm will be initiated. The alarm will remain active until the temperature falls below the High Temperature Reset parameter value. The setpoints are user configurable with default values of 200 and 180 respectively (see Appendix A for parameter addressing for your device). Low Differential Pressure Alarm (EFM) If the differential pressure should fall below the Low Differential Pressure Alarm Setpoint, a Low Differential Pressure alarm will be initiated. The alarm will remain active until the differential pressure rises above the Low Differential Pressure Reset parameter value. The setpoints are user configurable with default values of 100 and -80 respectively (see Appendix A for parameter addressing for your device). Low Flow Rate Alarm (EFC & EFM) If the flow rate should fall below the Low Flow Rate Alarm Setpoint, a Low Flow Rate alarm will be initiated. The alarm will remain active until the flow rate rises above the Low Flow Rate Reset parameter value. The setpoints are user configurable with default values of -100 and -80 respectively (see Appendix A for parameter addressing for your device). 3 -3 MTEK6000 SERIES USER'S MANUAL Low Pressure Alarm If the gas pressure should fall below the Low Pressure Alarm Setpoint, a Low Pressure alarm will be initiated. The alarm will remain active until the pressure rises above the Low Pressure Reset parameter value. The setpoints are user configurable with default values of -100 and -80 respectively (see Appendix A for parameter addressing for your device). Low Supply Volts Alarms If the supply voltage to the unit falls below the Low Supply Volts Alarm Setpoint value, a Low Supply Volts alarm will be initiated. The alarm will remain active until the supply voltage is greater than the Low Supply Volts Alarm Reset parameter. The setpoints are user configurable with default values of 2.9 and 3.1 volts respectively for battery powered units (see Appendix A for parameter addressing for your device). Low Temperature Alarm If the gas flow temperature should fall below the Low Temperature Alarm Setpoint, a Low Temperature alarm will be initiated. The alarm will remain active until the temperature rises above the Low Temperature Reset parameter value. The setpoints are user configurable with default values of -100 and -80 respectively (see Appendix A for parameter addressing for your device). Lost Differential Pressure Alarm (EFM) A Lost Differential Pressure alarm is generated when the differential pressure circuitry is over-ranged. This can occur if the differential pressure transmitter is defective, or disconnected from the analog board causing differential pressure readings to be above or below the range of the transducer. 3-4 Lost Pressure Alarm A Lost Pressure alarm is generated when the pressure circuitry is over-ranged. This can occur if the pressure transducer is defective, or disconnected from the analog board causing pressure readings to be above or below the range of the transducer. Lost Temperature Alarm A Lost Temperature alarm is generated when the temperature circuitry is overranged. This can occur if the thermal (temperature) probe is defective, or disconnected from the analog board causing temperature readings to be above or below the range of the probe. LowVolt Shutdown On battery powered units, if the battery voltage decreases to approximately 2.8 volts, an interrupt will be triggered and the unit will enter Low Voltage (Critical) Shutdown mode. Low batt will be displayed on the display. This is an indication that the supply voltage is absolutely too low to operate the unit properly. The battery must be changed at this point or adequate supply voltage applied. For units that are externally powered, this point will occur when the input voltage drops to approximately 6.0 volts. In this mode, all operations cease, and the unit operates in a protective mode. The on-board battery will continue to protect the unit's memory; therefore data prior to entering this mode will be maintained. The supply voltage is monitored constantly and the unit will reset itself should the supply voltage become greater than 6.0 volts. If the unit is left alone without applying adequate supply voltage, the battery will continue to drain and the outside display will eventually go blank. When sufficient supply voltage is applied and the unit powers-up, a LowVolt Shutdown alarm will be recorded. January 2002 MTEK6000 SERIES USER'S MANUAL # of Record = Open Door Alarm (optional) The Open Door (tamper) alarm is initiated when the door of the MTEK6000 opens. When this occurs, a full wake-up is triggered and the MTEK6000 executes its processes. The alarm is inactive when the door is closed. Software Error Alarm If there is a fault in the software, the Software Error alarm will initiate. MEMORY (HISTORY LOGGING) The MTEK6000 has a total of 96K (Main 64K bank and Auxiliary 32K bank) of RAM for database, audit trail, and history logging. With the large memory capacity, over 81,000 bytes of non-volatile memory is reserved for storing historical meter data. The non-editable history file provides the user with time-related data logged in any variation of selectable intervals: minute, daily, weekly, and monthly. An eventdriven history mode allows data logging when an event occurs (e.g., alarms). An experienced user with software can define the type of data and collection period. Since history data elements are stored in a memory block, the size has to be assigned at the time the history process is created in the device, typically when the database is downloaded at the factory. 81,000 . 4 x (# of items to log +1) NOTE Since there are two individual data banks, you may not be able to access all of the memory. The configuration must be optimized to utilize most or all of the memory. Data may be collected over the telephone lines via the modem, on-site through the enclosure side connector (RS-232C serial port), and/or optionally through the optical port (software required for collection). The collected data can then be used for: 1. Billing information 2. Measurement reports for utility and customer management. 3. System analysis using flow rate and pressure. 4. Support for estimating gas volume consumption in cases of meter or instrument malfunction. NOTE The size of the block CANNOT be changed once the history process has been created in the unit. A complete download would be required to reset the database and change the device's memory assignment. The total number of records (entries) the device can log depends on the number of items you wish to log: January 2002 3 -5 MTEK6000 SERIES USER'S MANUAL Configuration Mode Configuration mode allows you to set-up the MTEK6000's initial configuration; change any of the operating parameter values, and set alarm conditions and limits. MTEKManager version 1.x or the optional external keypad and display are required to perform configuration. See the MTEKManager on-line help for operating instructions. MTEKManager version 1.x is supplied, upon request, with your unit consisting of Virtual Keypad and other utilities. Virtual Keypad or Optional External Keypad and Display Operation To access any operating mode: 1. Wake-up the device. 2. Press the keypad key that corresponds to the mode you want (Fig. 3-1). conf for configuration mode alrm for alarm mode cal for calibration mode esc to go back to display mode While in Display Mode, pressing the ↑ and ↓ keys allow you to scroll through the parameter labels. You may use the jump key to directly view any of the assigned labels; press jump, then enter the label number, followed by pressing ent. You can use the function keys (F0 - F9) to view previously assigned parameters. (software lets you assign function keys and labels to any parameter.) To enter configuration mode, press conf. If configuration mode is password protected, the MTEK6000 will display ENTER PASSWORD?. Only a valid password entry would then be given access to this mode. 3-6 Configuration mode allows you to set-up the device's initial configuration, change any of the operating parameter values, set alarm conditions and limits, or assign function keys to a parameter. While in the configuration mode, the device continues to operate normally; it continues to collect pulses, sample live pressure and temperature values, calculate corrected volume, and collect historical data. Editing Parameters 1. Enter configuration mode by pressing conf (use the password if required). 2. Display the desired parameter: press jump followed by the address of the parameter, then press ent (see Appendix A for the addresses for your device). The function keys can also be used to view an assigned parameter. 3. With the desired parameter displayed, press edit; the unit will display the current parameter value and prompt for a new value. Use the keypad to enter the correct value and then press ent to execute the change. Pressing esc when the device prompts for the new value will abort the process. Pressing ent if nothing has been typed also leaves the parameter unchanged. January 2002 MTEK6000 SERIES USER'S MANUAL Figure 3 - 1 Optional Keypad and Display January 2002 3 -7 MTEK6000 SERIES USER'S MANUAL Assigning Function Keys In configuration mode, any parameter can be assigned to a function key. To assign a function key: 1. Enter configuration mode by pressing conf (use the password, if required). 2. Display the desired parameter. Press jump followed by the address of the parameter, and then press ent (see Appendix A for parameter addressing for your device). 3. Assign a function key to the parameter. Press jump, edit, and then the function key you wish to assign to the current item [F0 - F9]. NOTE There are pre-defined function keys for your device - see Appendix A. Audit Trail The MTEK6000 maintains an electronic audit trail file that records all parameter changes and calibrations performed on the unit. Each entry is identified with the date and time the event occurred. The contents of this file cannot be changed, providing a secure, non-editable audit trail. In the standard MTEK6000 configuration, the audit trail is disabled. You can enable audit trail logging using Metretek, Inc. software or editing the Audit Trail Enable/Disable parameter to 250 using the keypad and display. NOTE Once the audit trail is enabled, it cannot be disabled without downloading a new database with this feature disabled. Once enabled, the device maintains the audit trail file with a maximum of 250 records. You can upload the information from the unit to a portable or host computer using 3-8 Metretek software. Once the audit trail is full, the device will not allow any other changes to parameters; the audit trail must first be uploaded and reset by the host software. Wake-Up on Pulse (Event Driven) The MTEK6000 EFC employs a wake-up on pulse (event driven wake-up) mode in which the unit can be configured to wake-up on a specified number of pulses (meter revolutions). During wake-up, pressure, temperature, and the rest of the analog channels are sampled, and the unit executes the processes and run calculations. In this mode, the EFC should be configured to wake-up on the number of specified pulses along with an hourly wake-up to record history data. See Appendix A for the address of the Wake Up On Pulse (event driven) and Wake Up Interval (Seconds) parameters. Analog Sampling The MTEK6000 has the ability to sample the dynamic analog input variable channels at intervals from 1-99 seconds. Once enabled, the unit samples pressure, temperature, case temperature, and the external 1-5 volts or 4-20 ma channels once for each selected interval. NOTE Battery voltage is NOT sampled at this rate. The sample’s minimum and maximum values are then checked against their corresponding High and Low Setpoints. If the device determines these conditions were exceeded, it “wakes up” and finds the average of all samples accumulated since the last process execution, displays this analog mean, and applies it to any necessary calculations. To enable, set Analog Sampling Rate parameter to 1-99 seconds. January 2002 MTEK6000 SERIES USER'S MANUAL Example: A value of 1 will produce a 1 Hz (once per second) and a value of 10 a .10 Hz (once every 10 seconds) sampling rate. Set to 0 to disable. NOTE Analog sampling will impact battery life in battery-operated systems. It is only recommended for AC or properly sized Solar power systems. Special Key Combinations There are a number of special key combinations that allow the user to view system information and perform certain tasks very easily. They are: F0 and span Displays the MTEK6000 run (calculation) time. The unit must wake-up by itself at least once before a correct reading is displayed. • and cal System information (ROM version, unit S/N, calculated Checksum) → and edit Toggles keypad beeper on and off ent and zero Power-down as soon as possible. The unit will not power down if the RS-232 serial cable is connected. Assigning the number of displayed digits The number of displayed digits for the parameters listed in Appendix A is userconfigurable. The total number of digits before and after the decimal point can be from 0 to 8. PcGas Meter Reader Label Changer supplied with the Utility Software package, or pcGas Host are required to change the number of displayed digits. See Appendix F for operating instructions on the Label Changer. Viewing and Clearing Alarms To enter alarm mode, press alrm. In this mode, you can view and acknowledge any alarm. If alarms are active, the unit will display the first alarm message. If there are more alarms, you can view them by pressing ↓. Repeatedly pressing ↓ cycles through the active alarm list. Alarms can be acknowledged by pressing ent while a particular alarm message is displayed or by polling with Metretek, Inc. software. Unless the parameter's limits are violated again, the unit will not include acknowledged alarms in its list the next time the user enters alarm mode. To exit alarm mode without acknowledging the alarm, simply press esc. +/- and zero System Functions (requires password) January 2002 3 -9 MTEK6000 SERIES USER'S MANUAL CALIBRATION MODE Calibration mode allows the user to calibrate any of the analog signals, such as the pressure transducer or the temperature probe. While operating in the calibration mode, the MTEK6000 continues to store pulses and periodically updates volume, pressure, and temperature data using the values measured when calibration mode was initially entered. Once in calibration mode, the user can perform the following operations: 1. Calibrate zero only. 2. Calibrate span only. 3. Calibrate both zero and span. Of course, the option to change the calibration reference points is available at all times. Several other features make the software calibration routine attractive and more intuitive. In the MTEK6000, unit calibration is software-based; there is no need for laborious operator adjustments. Software calibration does away with the need for repetitive potentiometer adjustments, thereby simplifying field calibration procedures. In order to perform calibration, you will need a pressure source, temperature source, and accurate reference indicators. You will also need the Metretek, Inc. Virtual keypad or the optional external keypad and display. Calibrating the Pressure Transducer NOTE Pressing esc repeatedly from anywhere within the calibration procedure will back the operator out of calibration mode. 1. Display the line pressure by pressing F3 or jumping to 030302. 2. Press cal. Enter your password at the optional PASSWORD? prompt, if required. 3. The unit will enter calibration mode. The display will alternate between CALIBRATING and the parameter label (Pressure for example). 4. Close the shut-off valve between the pressure source and the pressure transducer. 5. Open the pressure sensing line on the unit to the atmosphere, and wait until the line is fully vented and the reading is stable. 6. Press zero. The display now shows: ZERO> NEW?> XX.XXX XX.XXX represents the unit's default zero value. If the current zero reference matches the unit's default, simply press ent to collect the new point. Otherwise, key in the value of the current reference before pressing ent. The unit should display Calculating . . . briefly, and then display the new point. Pressing esc instead of ent at this point aborts the operation and returns you to the calibration prompt. 7. Apply the span (full scale) reference to the pressure sensor and wait for the reading to stabilize 8. Press span. The unit now shows: SPAN> XX.XXX NEW?> 3-10 January 2002 MTEK6000 SERIES USER'S MANUAL As with the zero point, if the external reference matches the default span value, simply press ent. Otherwise, key in the current value of the external reference, then press ent. After pressing ent, the display reading should immediately adjust to reflect the new calibration point. Pressing esc instead of ent at this point aborts the operation and returns the operator to the calibration prompt. 9. Steps 4 - 8 are required only once. They may be repeated as often as necessary while in calibration, but only the most recent point will be saved on completion of calibration. 10. To permanently store the results of the calibration press ent, and the unit will prompt Enter to accept Calibration. Simply press ent again to save the calibration. Press esc to abort the calibration. Calibrating the Temperature Transducer NOTE Pressing esc repeatedly from anywhere within the calibration procedure will back the operator out of calibration mode. 1. Display the line temperature parameter by pressing F4 or jumping to 020304. 2. Press cal. Enter your password at the optional PASSWORD? prompt, if required. 3. The unit will enter calibration mode. (The display will alternate between CALIBRATING and the parameter label (Flow Temp for example). 4. Place the unit’s temperature probe into a bath of crushed ice. Stir the bath continuously and wait for the temperature reading to stabilize. 5. Press zero. The display now shows: January 2002 ZERO> NEW?> XX.XXX XX.XXX represents the unit's default zero value. If the current zero reference matches the unit's default, simply press ent to collect the new point. Otherwise, key in the value of the current reference before pressing ent. The unit should display Calculating . . . briefly, and then display the new point. Pressing esc instead of ent at this point aborts the operation and returns you to the calibration prompt. 6. Place the unit’s temperature probe and precision thermometer into a high temperature bath. Do not exceed the maximum temperature (1700 F). Wait for the bath reading to stabilize. 7. Press span. The unit now shows: SPAN> XX.XXX NEW?> As with the zero point, if the external reference matches the default span value, simply press ent. Otherwise, key in the current value of the external reference, then press ent. After pressing ent, the display reading should immediately adjust to reflect the new calibration point. Pressing esc instead of ent at this point aborts the operation and returns the operator to the calibration prompt. 8. Steps 4 - 7 are required only once. They may be repeated as often as necessary while in calibration, but only the most recent point will be saved on completion of calibration. 9. To permanently store the results of the calibration press ent, and the unit will prompt Enter to accept Calibration. Simply press ent again to save the calibration. Press esc to abort the calibration. 3 -11 MTEK6000 SERIES USER'S MANUAL Calibrating the Differential Transmitter (EFM Only) Pressure the differential pressure sensor and wait for the reading to stabilize NOTE Pressing esc repeatedly from anywhere within the calibration procedure will back the operator out of calibration mode. 9. Press span. The unit now shows: 1. Display the differential pressure by pressing F8 or jumping to 040302. As with the zero point, if the external reference matches the default span value, simply press ent. Otherwise, key in the current value of the external reference, then press ent. After pressing ent, the display reading should immediately adjust to reflect the new calibration point. Pressing esc instead of ent at this point aborts the operation and returns the operator to the calibration prompt. 2. Press cal. Enter your password at the optional PASSWORD? prompt, if required. 3. The unit will enter calibration mode. The display will alternate between CALIBRATING and the parameter label (Diff Press “H20 for example). 4. Open both pressure connection valves. 5. Open bypass valve and close both high pressure and low-pressure transmitter connection valves on manifold. 6. Slowly open the high-pressure transmitter connection valve and allow the transmitter’s output to stabilize. 7. Press zero. The display now shows: ZERO> NEW?> XX.XXX XX.XXX represents the unit's default zero value. If the current zero reference matches the unit's default, simply press ent to collect the new point. Otherwise, key in the value of the current reference before pressing ent. The unit should display Calculating . . . briefly, and then display the new point. Pressing esc instead of ent at this point aborts the operation and returns you to the calibration prompt. SPAN> XX.XXX NEW?> 10. Steps 5 - 9 are required only once. They may be repeated as often as necessary while in calibration, but only the most recent point will be saved on completion of calibration. 11. To permanently store the results of the calibration press ent, and the unit will prompt Enter to accept Calibration. Simply press ent again to save the calibration. Press esc to abort the calibration. 12. Confirm that the bypass valve is open. 13. Slowly open the high-pressure valve. 14. Open the low-pressure valve. 15. Close the bypass valve. 8. Apply the span (full scale) reference to 3-12 January 2002 MTEK6000 SERIES USER'S MANUAL CHAPTER 4: OPTIONAL EQUIPMENT ANALOG OUTPUT (AO) OPTION The Analog Output Module (part # 10210001B-001) and connecting cable (part # 1002-0245B-001) provides a two-wire, loop-powered, optically isolated, precision 4-20mA output. This module interfaces with the MTEK6000 series product line to provide a 4-20mA output for flow rate, pressure, or numerous other control and monitoring applications. Up to two modules can be installed in the MTEK6000 in place of the batteries by using the AO module adapter plate, (Metretek stk #1008-0011B001). Power for the digital interface section of the AO is selectable by using the DIPswitches, and can be supplied by Vcc of the MTEK6000 or from the main supply voltage. The AO module interfaces to an MTEK6000 series product via the standard I2C serial interface bus. The MTEK6000 unit requests the desired mA output from the AO module using this bus. An I2C digital I/O chip is used to send the information to the analog output section of the AO board. The analog output section of the board derives its power from the current loop, and is optically isolated from the digital control interface section. The analog output section receives commands from the digital I/O chip through opto-isolators. Commands are in the form of a serial data stream. The AO module provides 4-20mA output signals with a resolution of 1 part in 65536 (16 bit). The D/A also allows for over-ranging of the output to a minimum of 3.5mA and a maximum of 24mA. The field interface to the D/A is a simple two-wire connection. Reverse polarity protection is provided. January 2002 4-1 MTEK6000 SERIES USER'S MANUAL Figure 4 - 1 Analog Output Option 4-2 January 2002 MTEK6000 SERIES USER'S MANUAL MTEK6000 ANALOG OUTPUT SPECIFICATIONS Environmental Operating Temperature or Operating Humidity -30°C to + 70°C -22°F to 158°F 0 to 95% noncondensing Electrical Isolation 500 V DC or AC RMS (sine wave) between digital interface and 4-20 mA loop. Current Loop Output Maximum Output Current 24mA Minimum Output Current 3.5mA Maximum Supply Voltage 50V Minimum Supply Voltage 8V Resolution 16 bits, 0.00024 mA Full Scale %Error ±0.01% max (software calibrated at 4 and 20 mA and tested at room temperature) Temperature Drift ±0.00044 mA/°F max Error caused by RFI <1% of span shift with 2.8W 150MHz applied at 1.7’ Installing the Analog Output Loop A ribbon cable connects the AO module to the display / analog board. Commands are sent to the module via the cable by the MTEK6000 device. The 4-20mA current loop is a simple two-wire connection. +24 volts DC nominal is connected to the “+” terminal (pos. 1) and the “-”, or return terminal (pos. 2), is connected to the field instrument to which the 4-20mA signal is being sent. Calibrating the Analog Output Several features make the Analog Output software calibration routine attractive and more intuitive. In the MTEK6000 device, unit calibration can be software-based; there is no need for laborious operator adjustments. Software calibration does January 2002 away with the need for repetitive potentiometer adjustments, thereby simplifying field calibration procedures. The display / keypad or Meter Reader Virtual Keypad software are necessary to perform software calibration. NOTE Pressing esc repeatedly from anywhere within the calibration procedure will back the operator out of calibration mode. 1. Display the Analog Output parameter on the inside display. The common function key assignment for Analog Output #1 is F6, and F7 for Analog Output #2. 2. Press cal. Enter your password at the optional PASSWORD? prompt, if required. 3. The unit will enter calibration mode and the display will show the current value and mA representation of the analog output signal. For example, Eng: 48.000 mA: 11.680 where 48.000 is the analog output reading representing 11.680 mA. The top line will alternate between four different readouts Eng: 48.000, UP/DN TO CHANGE, CALIBRATING, and the parameter label (Analog Output #1 in this case), while the bottom line will always show the mA value. 4. Connect a multimeter in series with the loop to measure the current. The field instrument which the loop is driving can also be used to read the output if desired. 5. Pressing ↑ will increment the output current to represent 0%, 25%, 50%, 75%, & 100% of the analog output parameter to check the calibration. Pressing ↓ will decrement the output current. 4-3 MTEK6000 SERIES USER'S MANUAL Therefore, 0% = 4mA, 25% = 8mA, 50% = 12mA, 75% = 16mA, & 100% = 20mA. 6. If adjustments are needed, press zero. The display now shows: zero: x.xxx 04.000 +y.yyy mA x.xxx represents the default zero value (low scale) and y.yyy is the adjustment made to 4mA for the analog output signal. The adjustment can either be positive or negative shown by + or - respectively. The top line will alternate between zero: x.xxx and UP/DN TO ADJUST. This is the zero adjusted value to calibrate the analog output to 4mA. 7. Press ↑ or ↓ to increase or decrease the output until the meter reads 4mA or the current zero reference matches the field equipment. Press ent to collect the new point. 8. Press span. The display shows: span: x.xxx 20.0 +y.yyy mA 4-4 x.xxx represents the default span value (full scale) and y.yyy is the adjustment made to 20mA for the analog output signal. The adjustment can either be positive or negative shown by + or respectively. The top line will alternate between span: x.xxx and UP/DN TO ADJUST. This is the span adjusted value to calibrate the analog output to 20mA. 9. Press ↑ or ↓ to increase or decrease the output until the meter reads 20mA or the current span reference matches the field equipment. Press ent to collect the new point. 10. Steps 5 - 9 are required only once. They may be repeated as often as necessary while in calibration, but only the most recent point will be saved on completion of calibration. 11. To permanently store the results of the calibration press ent, and the unit will prompt Enter to accept Calibration. Simply press ent again to save the calibration. Press esc to abort the calibration. January 2002 MTEK6000 SERIES USER'S MANUAL Chapter 5 : MAINTENANCE and SOFTWARE PACKAGES Changing the Battery To replace the battery in the unit: As with any device based on solid-state electronics, actual maintenance of the MTEK6000 should be minimal. However, there are certain guidelines that, if followed, will minimize device failure and increase the product’s service life. 1. Open the front door by loosening the upper and lower right hand corner screws of the device enclosure and swinging the door out (see Fig 1-1 and 1-2 in Chapter 1). Enclosure Maintenance 2. Attach the new battery to connector J-6 or J-7 (see Fig. 2-1 in Chapter 2). Enclosure maintenance is a program of routine inspections to insure the integrity of the lid's seal and the various ports in the box's exterior. Excess moisture can ruin an MTEK6000 if allowed to accumulate within the enclosure. Although the circuit boards themselves are conformal coated to protect against humidity, the wiring interconnections and various exposed metal surfaces are susceptible to corrosion in extreme cases of interior humidity. Here are some checks you should periodically make of the enclosure: 1. Ensure the unit’s mounting arrangement is secure and provides a stable platform for termination of the pressure tubing. 3. Disconnect the old battery from the other connector in the unit. 4. Press any key to wake-up the unit and verify that it is fully operational. Calibration Calibration is a crucial element of any scheduled maintenance program. However, because of the unit’s design, software calibration does away with the need for laborious adjustments, simplifying field calibration. See the section on Calibration for more details. 2. Verify the integrity of the enclosure lid seal. Check the lid gasket for deterioration, chemical damage, tears, or compression. 3. Check for damaged cord grips and missing or damaged RS-232C port caps. Liquid must not be allowed to accumulate within the interior of the enclosure. 4. Examine the RS-232C port. Ensure the port's mounting screws are secure and provide firm support when attaching a serial cable. January 2002 5-1 MTEK6000 SERIES USER'S MANUAL Software Important Note: pcGas Meter Reader, pcGas Host and pcGas Customer Monitor applications are DOS based programs. They are available for a one-time charge but are sold ‘as is’ and are not being changed or upgraded in any way by Metretek. While these programs may be of value to certain users, Metretek makes no warranty as to their performance. Metretek strongly encourages the use of the MTEKManager and DC2000 32 bit Windowstm applications. pcGas Meter Reader Software pcGas Meter Reader is a flexible, yet simple software package that allows personnel responsible for site-specific configuration or data collection to conveniently interact with the unit. pcGas Meter Reader can be purchased to interface with the unit, but does not replace pcGas Host software; a user cannot use it to download processes to an MTEK6000 with blank system memory. However, it does allow a convenient method of viewing and/or modifying general sitespecific database information (most of which are shown in Appendix A). Trend Graphics, and AutoPoll are standard features with pcGas Meter Reader. Manuals for Meter Reader and Meter Reader Utilities are provided with each registered copy of the program. Refer to these manuals for additional information. pcGas Meter Utility Package The pcGas Meter Reader Utility Package is supplied, upon request, with your unit. See Appendix for installation and operating instructions. The utility package consists of the following: • • Label Changer - View and change label and function key definitions. • Virtual Keypad Emulates the keypad in the MTEK6000 products. Can be used for configuration and calibration. pcGas Customer Monitor pcGas Customer Monitor lets personnel responsible for collecting data to conveniently interact with the unit. No data can be modified in the unit with this software - it only provides a convenient method of viewing and reading history data stored in the unit. MTEK Manager The MTEK Manager software is an integrated group of utilities designed for configuration and management of the MTEK6000 corrector as well as the AE5000/6000 product lines. The software utilizes MS Access™ compatible databases for all of its data, and is suitable for managing small groups of correctors. Mtek Manager is licensed for end-use pursuant to Metretek’s standard licensing fees and terms. This package has all the features of the basic package, but adds the ability to retrieve, view, and print the historical data from the correctors. It also adds the ability to perform remote access using a dialup phone system. Included is an auto-polling application that can be used to schedule polls to the configured stations, as well as answer incoming calls. Data export to DC2000™ can also be automated after data is collected. Site I.D. Changer - View or change the Site I.D. stored in the device. 5-2 January 2002 MTEK6000 SERIES USER'S MANUAL DC2000 The MTEK6000 is fully compatible with Metretek’s DC2000. DC2000 is Metretek’s flagship collection and management software system for energy data. DC2000’s scaleability and flexibility enables users to choose from a wide range of functions and data throughput configurations. This protects your investment by letting you continuously adapt your system to operate in proportion to your business needs. See your authorized Metretek representative for complete details on DC2000 capabilities and licensing terms. January 2002 5-3 MTEK6000 SERIES USER'S MANUAL 5-4 January 2002 MTEK6000 SERIES USER'S MANUAL APPENDIX A: PROCESS CONFIGURATION STANDARD The MTEK6000 uses Process configuration for database organization and management. Table A-1: Standard display mode and function keys for MTEK6000 EFC Label I.D. Description F1 F2 F3 F4 Corr Volume MCF Uncor Volume MCF PRessure PSG Flow Temp F Flow Rate MCH Supply Volts VDC Case Temp F Flow Constant Prev Day vol MCF Curr Day vol MCF Cubic Unit/p CFP Press Scale PSG 1 2 3 4 5 F5 6 7 8 9 10 11 12 CV UV PR FT FR SV CT FL PD CD CU PS Address 051102 051108 030302 020304 050302 020309 020302 050601 050903 050905 050802 020402 Table A-2: Standard MTEK6000 EFC Alarms First Time Power Low Supply Volts High Flow Rate Low Flow Rate High Pressure Low Pressure Current Day Flow Faulty Counter *High Temperature *Low Temperature Lost Pressure *Lost Temperature LowVolt Shutdown Open Door Software Error Switch #1 Alarm Switch #2 Alarm *MTEK6000 alarms for Alarm Code 130401 130501 130601 130701 140401 140501 140601 140701 150401 150501 150601 150701 160401 160501 160601 160701 170401 EFCV only Table A-3: Standard history data stored in the MTEK6000 EFC and EFCP 40 days of daily corrected volume 40 days of daily uncorrected volume 40 days of daily maximum flow rate 40 days of daily minimum flow rate 40 days of daily average pressure 40 days of daily average temperature 40 days of hourly corrected volume 40 days of hourly uncorrected volume 40 days of hourly average pressure 40 days of hourly average temperature 40 days of hourly instantaneous supply voltage (snapshots). 40 days of hourly case temperature (snapshots) January 2002 A-1 MTEK6000 SERIES USER'S MANUAL Table A-4: Standard display mode and function keys for MTEK6000 EFC w/ Aux Pressure Label I.D. Description F1 F2 F3 F4 Corr Volume MCF Uncor Volume MCF PRessure PSG Flow Temp F Flow Rate MCH Aux Pressure PSG Supply Volts VDC Case Temp F Flow Constant Prev Day vol MCF Curr Day vol MCF Cubic Unit/p CFP Press Scale PSG Aux p Scale PSG 1 2 3 4 5 F6 6 F5 7 8 9 10 11 12 13 14 CV UV PR FT FR AP SV CT FL PD CD CU PS AS Address 051102 051108 030302 020304 050302 020305 020309 020302 050601 050903 050905 050802 020402 020404 Table A-5: Standard alarms MTEK6000 EFC w/ Aux Pressure Alarms First Time Power Low Supply Volts High Flow Rate Low Flow Rate High Pressure Low Pressure Current Day Flow High Temperature Low Temperature Lost Pressure Lost Temperature Faulty Counter LowVolt Shutdown Open Door Software Error High Aux Press Low Aux Press Lost Aux Press A-2 Table A-6: Standard history data stored in the MTEK6000 EFC w/ Aux Pressure 40 days of daily corrected volume 40 days of daily uncorrected volume 40 days of daily maximum flow rate 40 days of daily minimum flow rate 40 days of daily average pressure 40 days of daily average aux. pressure 1 40 days of hourly average aux. pressure 1 40 days of hourly uncorrected volume 40 days of hourly average pressure 40 days of hourly average temperature 40 days of hourly instantaneous supply voltage (snapshots). 40 days of hourly case temperature (snapshots) for Alarm Code 160401 160501 160601 160701 170401 170501 170601 180401 180501 180601 180701 170701 200401 200501 200601 190401 190501 190601 January 2002 MTEK6000 SERIES USER'S MANUAL Table A-7: Standard display mode and function keys for MTEK6000 EFC w/2 Aux Pressure Label I.D. Description Address F1 F2 F3 F4 F6 F7 F5 1 2 3 4 5 6 7 8 9 10 11 12 13 14 15 16 17 CV UV PR FT A1 A2 SV FR UF CT FC PD CD CU PS AS AS January 2002 Corr Volume MCF Uncor Volume MCF PRessure PSG Flow Temp deg F Aux 1 press PSG Aux 2 press PSG Supply Volts VDC Flow Rate MCH Uncorr Flow MCH Case Temp F Flow Constant Prev Day vol MCF Curr Day vol MCF Cubic Unit/p CFP Press Scale PSG Aux 1p Scale psg Aux 2p Scale psg 051102 051108 030302 020304 020305 020306 020309 050302 050306 020302 050601 050903 050905 050802 020402 020404 020405 Table A-8: Standard alarms for MTEK6000 EFCV w/2 Aux Pressure Alarms Alarm Code First Time Power Low Supply Volts High Flow Rate Low Flow Rate High Pressure Low Pressure Current Day Flow High Temperature Low Temperature Lost Pressure Lost Temperature Faulty Counter LowVolt Shutdown Open Door Software Error High Aux 1 Press Low Aux 1 Press Lost Aux 1 Press High Aux 2 Press Low Aux 2 Press Lost Aux 1 Press Switch #1 Alarm Switch #2 Alarm 190401 190501 190601 190701 200401 200501 200601 210401 210501 210601 210701 200701 230401 230501 230601 220401 220501 220601 240401 240501 240601 230701 240701 A-3 MTEK6000 SERIES USER'S MANUAL Table A-9: Standard history data stored in the MTEK6000 EFC w/ 2 Aux Pressure Table A-10: Standard display mode and function keys for MTEK6000 EFC2 w/2 40 days of daily corrected volume 40 days of daily uncorrected volume 40 days of daily maximum flow rate 40 days of daily minimum flow rate 40 days of daily average pressure 40 days of daily maximum pressure 40 days of daily minimum pressure 40 days of daily average aux. pressure 1 40 days of daily average aux. pressure 2 40 days of daily maximum aux. pressure 1 40 days of daily maximum aux. pressure 2 40 days of daily minimum aux. pressure 1 40 days of daily minimum aux. pressure 2 40 days of hourly average aux. pressure 1 40 days of hourly average aux. pressure 2 40 days of hourly uncorrected volume 40 days of hourly average pressure Label I.D. Description F1 F2 F3 F4 Corr Volume MCF Uncor Volume MCF PRessure PSG Flow Temp deg F Flow rate 1 MCH Uncorr Flow R1 Flow Constant 1 Prev Day Vol 1 Curr Day Vol 1 Cubic Unit/p 1 Corr vol 2 MCF Uncorr vol 2 MCF Flow rate 2 MCH Uncorr Flow R2 Flow Constant 2 Prev Day Vol 2 Curr Day Vol 2 Cubic Unit/p 2 Aux 1 press PSG Aux 2 press PSG Supply Volts VDC Case Temp F PRessure SCL Aux press 1 SCL Aux press 2 SCL Total Flow Rate A-4 Aux Pressure 1 2 3 4 5 6 7 8 9 10 11 12 13 14 15 16 17 18 19 20 21 22 23 24 25 37 CV UV PR FT F1 UF FC PD CD CU C2 U2 F2 UF FC PD CD CU A1 A2 SV CT PR A1 A2 TF Address 051102 051108 030302 020304 050302 050306 050601 050903 050905 050802 061102 061108 060302 060306 060601 060903 060905 060802 020305 020306 020309 020302 020402 020404 020405 370201 January 2002 MTEK6000 SERIES USER'S MANUAL Table A-11: Standard alarms MTEK6000 EFC2 w/2 Aux Press Alarms First Time Power Low Supply Volts LowVolt Shutdown Software Error Lost Pressure Lost Temperature Lost Aux 1 Press Lost Aux 2 Press High Flow Rate 1 Low Flow Rate 1 Curr Day Volume 1 Faulty Counter 1 High Flow Rate 2 Low Flow Rate 2 Cur Day Volume 2 Faulty Counter 2 High Pressure Low Pressure High Temperature Low Temperature High Aux 1 Press Low Aux 1 Press High Aux 2 Press Low Aux 2 Press Open Door Switch 1 Alarm Switch 2 Alarm January 2002 for Table A-12: Standard history data stored in the MTEK6000 EFC2 w/ 2 Aux Press Alarm Code 210401 210501 210601 210701 220401 220501 220601 220701 230401 230501 230601 230701 240401 240501 240601 240701 250401 250501 250601 250701 260401 260501 260601 260701 270401 270501 270601 40 days of daily corrected volume 1 40 days of daily corrected volume 2 40 days of daily uncorrected volume 1 40 days of daily uncorrected volume 2 40 days of daily maximum flow rate 1 40 days of daily maximum flow rate 2 40 days of daily minimum flow rate 1 40 days of daily minimum flow rate 2 40 days of daily average pressure 40 days of daily average aux. pressure 1 40 days of daily average aux. pressure 2 40 days of daily temperature 37 days of hourly corrected volume 1 37 days of hourly corrected volume 2 37 days of hourly uncorrected volume 1 37 days of hourly uncorrected volume 2 37 days of hourly average pressure 37 days of hourly aux. pressure 1 37 days of hourly aux. pressure 2 37 days of hourly temperature 37 days of hourly instantaneous supply voltage (snapshots). 37 days of hourly case temperature (snapshots) A-5 MTEK6000 SERIES USER'S MANUAL Table A-13: Standard display mode and function keys for MTEK6000 EFM w/ Aux Press Table A-14: Standard alarms MTEK6000 EFM w/ Aux Press Alarms Label I.D. Description F1 F8 F3 F4 Corr Volume MCF Diff Press “H20 PRessure PSG Flow Temp F Flow Rate MCH Aux Pressure PSG Orif Diameter IN Supply Volts DC Case Temp F Flow Constant Prev Day vol MCF Curr Day vol MCF Press Scale PSG Dp Scale H20 Aux p Scale PSG 1 2 3 4 5 F6 6 7 F5 8 9 10 11 12 13 14 15 CV DP PR FT FR AP OD SV CT FC PD CD PS DS AS for Alarm Code Address 051102 040302 030302 020304 050302 020306 050608 020309 020302 050601 050903 050905 020402 020404 020405 First Time Power Low Supply Volts High Flow Rate Low Flow Rate High Pressure Low Pressure High Diff Press Low Diff Press High Temperature Low Temperature Current Day Flow Lost Pressure Lost Temperature Lost Diff Press LowVolt Shutdown Open Door Software Error High Aux Press Low Aux Press Lost Aux Press 180401 180501 180601 180701 190401 190501 190601 190701 200401 200501 200601 210401 210501 210601 210701 220401 220501 220601 220701 200701 Table A-15: Standard history data stored in the MTEK6000 EFM w/ Aux Pressure 40 days of daily corrected volume 40 days of daily average temperature 40 days of daily maximum flow rate 40 days of daily minimum flow rate 40 days of daily average pressure 40 days of daily average aux. pressure 40 days of daily average differential pressure 40 days of hourly corrected volume 40 days of hourly average differential pressure 40 days of hourly average pressure 40 days of hourly average aux. pressure 40 days of hourly average temperature 40 days of hourly instantaneous supply voltage (snapshots). 40 days of hourly case temperature (snapshots) A-6 January 2002 MTEK6000 SERIES USER'S MANUAL Table A-16: Standard display mode and function keys for MTEK6000 EPR Table A-18: Standard history data stored in the MTEK6000 EPR Label I.D. Description F1 1 2 3 4 5 6 F6 7 F2 8 F3 9 F4 10 11 Pressure #1 Pressure Scale High press In al High press Out al Low press In al Low press Out al Supply Voltage Case Temperature DOOR 0=open 1=cl SWITCH 0=OPEN Alarm Wakeup INT 40 days of daily average pressure 40 days of daily maximum pressure 40 days of daily minimum pressure 40 days of hourly average pressure 40 days of hourly instantaneous supply voltage (snapshots). 40 days of hourly case temperature (snapshots) 15 days of 10-minute pressure (snapshots) P1 PS HI HO LI LO SV CT DO SO AW Address 030302 020402 080605 080606 080705 080706 020309 020302 070302 070402 170610 Table A-17: Standard MTEK6000 EPR alarms Alarms Alarm Code First Time Power Low Supply Volts High Pressure Low Pressure Lost Pressure LowVolt Shutdown Open Door Switch Alarm Reset Min. Hist January 2002 for 080401 080501 080601 080701 090401 090501 090601 090701 100401 A-7 MTEK6000 SERIES USER'S MANUAL Table A-19: Standard display mode and function keys for MTEK6000 ETR Table A-21: Standard history data stored in the MTEK6000 ETR Label I.D. Description F4 1 2 3 4 5 F5 6 7 F6 8 9 10 F7 11 12 13 14 15 16 Flow Temp F High temp In al High temp Out al Low temp In al Low temp Out al Supply Volts DC Case Temp F Analog Output #1 AOut Hi Scale #1 AOut Lo Scale #1 Analog Output #2 AOut Hi Scale #2 AOut Lo Scale #2 Open Door status Status input #1 Status input #2 40 days of daily average temperature 40 days of daily maximum temperature 40 days of daily minimum temperature 40 days of hourly average temperature 40 days of hourly instantaneous supply voltage (snapshots). 40 days of hourly case temperature (snapshots) 15 days of 10-minute temperature (snapshots) FT HI HO LI LO SV CT AO AO AO AO AO AO OD S1 S2 Table A-20: Standard MTEK6000 ETR Alarms First Time Power Low Supply Volts High Temperature Low Temperature Lost Temperature LowVolt Shutdown Open Door Software Error A-8 Address 020304 080605 080606 080705 080706 020309 020302 160302 160402 160403 170302 170402 170403 070302 070401 070402 alarms for Alarm Code 080401 080501 080601 080701 090401 090501 090601 090701 January 2002 MTEK6000 SERIES USER'S MANUAL Table A-22: Standard display mode and function keys for MTEK6000 EPTR Label I.D. Description F3 1 2 3 4 5 6 F4 7 8 9 10 11 F5 12 13 F6 14 15 16 F7 17 18 19 20 21 22 PRessure PSG Press Scale PSG High press In al High press Out al Low press In al Low press Out al Flow Temp F High temp In al High temp Out al Low temp In al Low temp Out al Supply Volts DC Case Temp F Analog Output #1 AOut Hi Scale #1 AOut Lo Scale #1 Analog Output #2 AOut Hi Scale #2 AOut Lo Scale #2 Open Door status Status input #1 Status input #2 PR PS HI HO LI LO FT HI HO LI LO SV CT AO AO AO AO AO AO OD S1 S2 January 2002 Address 030302 020402 140405 140406 140505 140506 020304 140605 140606 140705 140706 020309 020302 220302 220402 220403 230302 230402 230403 120302 120401 120402 Table A-23: Standard MTEK6000 EPTR Alarms First Time Power Low Supply Volts High Pressure Low Pressure High Temperature Low Temperature Lost Pressure Lost Temperature LowVolt Shutdown Open Door Software Error alarms for Alarm Code 130401 130501 130601 130701 140401 140501 140601 140701 150401 150501 150601 Table A-24: Standard history data stored in the MTEK6000 EPTR 40 days of daily average pressure 40 days of daily maximum pressure 40 days of daily minimum pressure 40 days of daily average temperature 40 days of daily maximum temperature 40 days of daily minimum temperature 40 days of hourly average pressure 40 days of hourly average temperature 40 days of hourly instantaneous supply voltage (snapshots). 40 days of hourly case temperature (snapshots) 15 days of 10-minute pressure (snapshots) A-9 MTEK6000 SERIES USER'S MANUAL A-10 January 2002 MTEK6000 SERIES USER'S MANUAL APPENDIX B: CALCULATIONS AGA-7 Volume Calculations The MTEK6000 EFC performs volume calculations based on the Ideal Gas Law. Boyle’s Law is used for pressure and Charles’s Law for temperature. These laws state that the volume of any definite weight of a perfect gas varies inversely with change in absolute pressure and directly with change in absolute temperature. The unit can perform such calculations for turbine, rotary, and diaphragm displacement meters. AGA-8 Supercompressibility Gross Method 1 The EFC is configured with values for BTU content, specific gravity and mol percent of CO2. AGA-8 Supercompressibility Gross Method 2 The EFC is configured with values for specific gravity and mol percent of N2 and CO2. Vc = Vu x (Pm + Pa) x Tb + 459.67 x (Fpv)2 Pb Tm + 459.67 Where: Vc = Volume corrected to base conditions Vu = Uncorrected line volume Pm = Measured line pressure (psig) Pa = Atmospheric pressure Pb = Base pressure Tb = Base temperature (0F) Tm = Measured line temperature (0F) Fpv = Supercompressibility factor The unit makes continuous correction for the specified gas composition based on actual sensed pressure and temperature. NOTE All of the AGA factors can be based on either flowing or constant values. The supercompressibility factor can be calculated from either NX-19 or AGA-8 Gross Methods 1 and 2 reports and applied to the volume equation. NX19 Supercompressibility Report The EFC is configured with values for specific gravity, mol percent of N2 and CO2. January 2002 B-1 MTEK6000 SERIES USER'S MANUAL B -2 January 2000 MTEK6000 SERIES USER'S MANUAL APPENDIX C: PARAMETER DESCRIPTION The parameters relative to the operation and configuration of the MTEK6000 are listed below (See Appendix A for the addresses of these parameters). Alarm Pulse Output Enable/Disable The EFC can generate a generic pulse output on any alarm condition. This parameter enables the pulse output through Relay #2. Enter 35.7 to enable or 0.0 to disable. The Default value is 0. Alarm Pulse Time (ms) This parameter sets the output band width in milliseconds (ms) for pulse outputs generated by an alarm condition. The user should take care in assigning a value for this parameter. The value should always be less than the Wakeup Interval Parameter; else the unit will stay awake for the duration of the pulse. Range 0 to 32,000 ms. The Default value is 70. Analog Sampling Rate (seconds) This parameter sets the rate at which the unit will sample its dynamic analog input variable channels. When enabled, the unit samples pressure, flow temperature, case temperature and the external analog transmitters values once for each selected interval. The sample’s minimum and maximum values are then checked against their corresponding High and Low Setpoints. If the unit determines that these conditions were exceeded, it “wakes up” and finds the average of all samples accumulated since the last process execution, displays this analog mean, and applies it to any necessary subsequent calculation. January 2002 To enable analog sampling, set this parameter to 1-99 seconds. Set to 0 to disable analog sampling. Atmospheric Pressure If the station is configured for ABSOLUTE pressure, enter 0. Enter the actual atmospheric pressure for GAUGE pressure. The default value is 14.4 PSI for gauge and 0 for absolute. Audit Trail Logging Enable This parameter enables Audit Trail logging in the MTEK6000. Examples of audit trail events include editing any item at the device, and logging the time it enters calibration mode. After the maximum number of events (250) has been logged, no more parameters can be changed in the unit until the audit trail is uploaded and reset by the software. This parameter is disabled at the factory. The user may enable Audit Trail logging by entering 250. Default value is 0 for disable. NOTE Once the audit trail is enabled, the user cannot disable it without reloading the database. Base Pressure The Base Pressure parameter appears as a factor in the Corrected Volume calculation. It is one of the factors used to correct the flowing volume, as registered by the meter itself, to the base volume used for calculating “Standard Volume”. The normal pressure ranges for this parameter are 11.000 to 16.000 PSI. The standard value for this parameter is 14.730 PSIA, 101.560 kPa, or 1.114 kg/cm2, depending upon the system of units chosen for the particular device. Default value is 14.73. C-1 MTEK6000 SERIES USER'S MANUAL Base Temperature The Base Temperature parameter appears as a factor in the Corrected Volume calculation. It is one of the factors used to correct the flowing volume, as registered by the meter itself, to the base volume used for calculating “Standard Volume”. The default value of this parameter is 60.000 degrees F. Calibrate Mode Time-out The fractional portion of this parameter is the Calibrate Mode Time-out. It controls how long the unit will remain powered up in the calibration mode if no key is being pressed. For example, a calibration time-out of 30 minutes would be entered as XX.30. The default value is 60.30. Calibration Password A password can be entered to prevent unauthorized users from accessing calibration mode. The value may be up to six digits long (including the decimal point and sign). The Default value is 0. Configuration Password A password can be entered to prevent unauthorized users from accessing configuration mode. The value may be up to six digits long (including the decimal point and sign). The Default value is 0. Corrected Pulse Output -Cubic Unit / Pulse This parameter should reflect the value of the corrected pulse output sent from the station to an external device. For example, if each output pulse represents 1000 cubic feet, then this parameter should be set to 1000. The Default value is 1000. Corrected Pulse Out Enable/Disable Corrected pulses can be sent to an external device by enabling the Pulse Output Channel. The rate at which pulses are generated is determined by the Corrected Pulse Out - CF per Pulse parameter. To enable Relay #1 for pulse output, enter a value of 35.8. Enter -1 to disable. The Default value is -1. C-2 Corrected Volume The corrected volume is calculated based upon AGA report #7 or #8 and reflects the corrected volumetric flow taking the base conditions into consideration. The Initial value is 0. Corrected Volume (Pressure Only) The corrected volume is calculated based upon AGA report #7 and reflects the corrected volumetric flow taking only the Pressure base conditions into consideration. The temperature factors have no effect. The Initial value is 0. Corrected Volume and Flow Multiplier This multiplier specifies the output value for corrected volume and flow. For example, if the device is to measure flow in thousands of cubic feet (MCF), select Thousands (1000's) of units from the pick list. The Default value is 1000. Ten Thousands (10,000's) of units Thousands (1000's) of units Hundreds (100's) of units Tens (10's) of units Single (1's) units 10000 1000 100 10 1 Counter Fault Monitoring (EFC Only) This parameter can be used to enable or disable fault monitoring on the main counter #1. Form C (3-wire) input is required for this function. In this mode, two working counters are monitored for discrepancies. A “Delta” value will be accumulated which reflects any discrepancies between the counters. If any of the dual-reed switches should be defective, and the “Delta” exceeds the Counter Fault Threshold parameter, the input pulses will automatically switch to either working singleended counter. The EFC will generate a Faulty Counter alarm. To enable, set this parameter to 1 and to disable set to 0. The default value is 0 for disable. January 2002 MTEK6000 SERIES USER'S MANUAL Cubic Unit/Pulse In or Meter Drive This parameter determines the volume unit represented by one input pulse, and is normally set to equal the drive (CF/Rev) of the meter. Standard indexes produce one pulse per revolution; therefore, the CF/Pulse will equal the drive rate of the meter. The Default value is 100. For instruments utilizing remote pulsing devices, this value can also be determined by dividing the CF/Rev of the meter by the number of pulses per revolution generated by the remote pulser. For example: Consider a 3GT meter with a 100 CF/Rev drive and a 50 Pulse/Rev Imac Pulsamatic Transmitter. The CF/Pulse is determined as follows: CF/Pulse = 100 CF/Rev * 1 Rev/50 Pulses = 2 CF/Pulse NOTE FOR METERS WITH 5 CF/REV DRIVE RATES: Re-position the input compound gear to the correct position, and set this parameter to a value of 10. Refer to Section Two or contact Metretek, Inc. for assistance in positioning the compound gear. Current Day High Volume Alarm Reset After the Current Day's Total is exceeded, the setpoint at which the unit exits this condition is entered in this location. The Default value is 99,990. Current Day High Volume Alarm Setpoint This parameter specifies the setpoint at which the unit determines whether the Current Day Flow Total is in an alarm condition. For transport or interruptible customers, this parameter can be used to alarm when an account has exceeded a predetermined daily volume allocation. The Default value is 100,000. January 2002 Date (Month, Day, Year) This is the current Date in the unit (MMDDYY). It is updated on each process scan. Flow Rate Update Interval (s) This parameter determines how often the flow rate gets updated in the EFC. However, it has no control over Volume updates. Volume is updated every time the unit wakes up from the sleep mode or every 3-4 seconds if the unit is always awake. The Flow Rate Update Interval parameter is of the form XXX.YY.M where the integer portion (XXX) is the time interval in seconds between Flow Rate updates. The digits after the decimal point (YY.M) represent the zeroflow period (i.e. the amount of time to wait without receiving pulses before generating a zero flow rate). The first two digits are minutes and the third digit (T) is a fraction of a minute. Thus, a two-minute zero-flow period would be entered as XXX.020, a ten minute period as XXX.10. The maximum allowed period is 27 minutes and the default is one minute (XXX.010). The user MUST specify a zero-flow period, which is larger than or equal to the Flow Rate Update Interval. Specifying a zero-flow period smaller than the Flow Rate Update Interval will result in a zero-flow rate being displayed even when there is an apparent flow. For example: A value of 600.11 would update flow rate every 10 minutes and display zero flow if 11 minutes passed without an input pulse. A value of 600.01 will not work properly. It would try to update flow rate every 10 minutes, but would zero the flow rate every minute, even if pulses come in faster than one per minute. C-3 MTEK6000 SERIES USER'S MANUAL Flow Units The flow units parameter reflects the time used to represent the flow rate. For example, if the flow rate represents cubic feet per hour, this parameter should be set to Hour. The Default value is 2. Minute Hour Day 1 2 3 Gas Day Roll Time HHMM (Hours, Minutes) This item is used in Daily and Monthly history modes to determine when the gas day ends. The time is entered in military time. For example, a standard roll time of 8:00AM is entered as 800.0. The Range is 0 to 2359. The default value is 800. High Differential Pressure Alarm Setpoint The setpoint at which the unit determines that there is a High Differential Pressure alarm condition. The Default value is 1500. High Differential Pressure Alarm Reset After a High Differential Pressure alarm occurs, the setpoint at which the unit exits this condition is entered in this location. The Default value is 1480. High Flow Rate Alarm Reset After a High Flow Rate alarm occurs, the setpoint at which the unit exits this condition is entered in this location. The Default value is 99,990. High Flow Rate Alarm Setpoint The setpoint at which the unit determines that there is a High Flow Rate alarm condition. The Default value is 100,000. High Pressure Alarm Setpoint The setpoint at which the unit determines that there is a High Pressure alarm condition. The Default value is 1500. C-4 High Pressure Alarm Reset After a High Pressure alarm occurs, the setpoint at which the unit exits this condition is entered in this location. The Default value is 1480. High Temperature Alarm Reset After a High Temperature alarm occurs, the setpoint at which the unit exits this condition is entered in this location. The Default value is 180. High Temperature Alarm Setpoint The setpoint at which the unit determines that there is a High Temperature alarm condition. The Default value is 200. Low Differential Pressure Alarm Reset After a Low Differential Pressure alarm occurs, the setpoint at which the unit exits this condition is entered in this location. The Default value is -80. Low Differential Pressure Alarm Setpoint The setpoint at which the unit determines that there is a Low Differential Pressure alarm condition. The Default value is -100. Low Flow Rate Alarm Reset After a Low Flow Rate alarm occurs, the setpoint at which the unit exits this condition is entered in this location. The Default value is -80. Low Flow Rate Alarm Setpoint The setpoint at which the unit determines that there is a Low Flow Rate alarm condition. The Default value is -100. Low Pressure Alarm Reset After a Low Pressure alarm occurs, the setpoint at which the unit exits this condition is entered in this location. The Default value is -80. January 2002 MTEK6000 SERIES USER'S MANUAL Low Pressure Alarm Setpoint The setpoint at which the unit determines that there is a Low Pressure alarm condition. The Default value is -100. Low Supply Voltage Alarm Reset After a Low Supply Voltage alarm occurs, the setpoint at which the unit exits this condition is entered in this location. The Default is 8.0. Low Supply Voltage Alarm Setpoint The setpoint at which the unit determines that there is a Low Supply Voltage alarm condition. The Default is 8.5. Low Temperature Alarm Reset After a Low Temperature alarm occurs, the setpoint at which the unit exits this condition is entered in this location. The Default is 80. Low Temperature Alarm Setpoint The setpoint at which the unit determines that there is a Low Temperature alarm condition. The Default is -100. Meter Correction Factor The Meter Correction Factor parameter will ordinarily be 1. The actual number is a ratio that indicates the measurement accuracy of the meter to which the device is attached. A setting of 1 indicates that the meter exhibits no measurement error. This parameter should not be changed from the default value of 1, unless the meter has been tested and its exact measurement error is known. The range is 0.95 to 1.05. The Default value is 1. Percent CO2 This parameter reflects the content of carbon dioxide (CO2) currently present in the gas. This number should be updated only after taking an analysis. If the content is unknown, a zero (0) should be entered. The Range is 0 to 0.15 (15%). The Default is 0. January 2002 Percent N2 This parameter reflects the content of nitrogen (N2) currently present in the gas. This number should be updated only after taking an analysis. If the content is unknown, a zero (0) should be entered. The Range is 0 to 0.15 (15%). The Default is 0. Percent O2 This parameter reflects the content of oxygen (O2) currently present in the gas. This number should be updated only after taking an analysis. If the content is unknown, a zero (0) should be entered. The Range is 0 to 0.15 (15%). The Default is 0. Pressure Corrected Pulse Enable/Disable Corrected (press only) pulses can be sent to an external device by enabling the Pulse Output Channel. The Press determines the rate at which pulses are generated. Corr. Pulse Output - CF per Pulse parameter. To enable Relay #3 for pulse output, enter a value of 35.3. An optional relay is required for the pulse output. Enter -1 to disable. The Default value is -1. Press. Corr. Pulse Output - CF per Pulse This parameter should reflect the value of the pressure (only) corrected pulse output sent from the station to an external device. For example, if each output pulse represents 1000 cubic feet, then this parameter should be set to 1000. The Default value is 1000. Site I.D. (RUID) The Site I.D. is unique to each device. It is the access code number that allows the user with a portable or Host computer to communicate with the unit. The Range is 1 to 65,535. The Factory Default value is 1. Specific Gravity Enter the specific gravity at the station. The Range is 0.554 and 2.000 inclusive. The Default value is 0.6. C-5 MTEK6000 SERIES USER'S MANUAL Supercompressibilty Calculated or Fixed This parameter is used to set the mode for supercompressibility calculations. If it is set to 0, then a new supercompressibility value will be calculated each time the process executes. If set to 1, the unit will use the value set in the Fixed Supercompressibility Value parameter for calculations. The Default value is 0. (Calculated) Fixed Supercompressibility Value If supercompressibility is Fixed, this parameter should be set to the desired fixed value. If supercompressibility is Calculated, any value entered will be ignored. The Default is 1. Time HHMMSS (Hours, Minutes, Seconds) This is the current military time in the unit. It is updated on each process scan. Uncorrected Pulse Out Enable/Disable Uncorrected pulses can be sent to an external device by enabling the Pulse Output Channel. The Uncorrected Pulse Output - CF per Pulse parameter, determines the rate at which pulses are generated. An optional relay is required for the pulse output. To enable Relay #4 for pulse output, enter a value of 35.2. Enter -1 to disable. The Default value is -1. (Disable) Uncorr Pulse Output - CF per Pulse This parameter should reflect the value of the uncorrected pulse output from the station to an external device. For example, if each output pulse represents 1000 cubic feet, then this parameter should be set to 1000. The Default is 1000. Uncorrected Volume The uncorrected index represents the total index volume registered by the station. When changing this number, you will normally enter the number that appears on the mechanical index attached to the station. The Default value is 0. C-6 Uncorrected Volume & Flow Multiplier This multiplier specifies the output value for uncorrected volume and flow. For example, if the device is to measure flow in thousands of cubic feet (MCF), select Thousands (1000's) of units from the pick list. The Default value is 1000. Ten Thousands (10,000's) of units Thousands (1000's) of units Hundreds (100's) of units Tens (10's) of units Single (1's) units 10000 1000 100 10 1 Wake Up Interval (seconds) This parameter specifies the time (in seconds) that the unit will wake up, execute the station processes and perform all calculations. Because the setting of this parameter directly affects battery life, care should be exercised to ensure that this item is set to the longest interval possible for satisfactory operation. The default values are as follow: Battery or Solar unit 600 seconds - (Use if the unit powers up and down and the Wake up on pulse parameter (EFC only) is set to 0). The unit will wake up every 10 minutes to execute the station processes and calculate a new flow rate. 3600 seconds - (Use if the Wake up on pulse parameter is not 0 to allow for history recording - EFC’s only). AC or Solar units 0 seconds - (Use if the unit is to be powered up at all times). Calculations will be performed on each process scan (approximately every 3.5 seconds). Wake Up On Pulse - event driven (EFC) If this parameter is greater than 0, the EFC will wake-up on the specified number of pulses (meter revolutions). During wake-up, pressure, temperature, and the rest of the analog channels are sampled, and the unit executes the processes and run calculations. January 2002 MTEK6000 SERIES USER'S MANUAL It is disabled if set to 0. In this mode, the EFC should be configured to wake up on the number of pulses entered along with an hourly scheduled wake-up to record history data. Therefore, the wake up interval (seconds) parameter should be set to 3600. The Default value is 0. Units of Measure The MTEK6000 can be configured to calculate volume and flow with English or Metric units. The database ca be setup for the following units of measure: Flow & Volume Accumulations ft3 (cubic feet) M3 (cubic meters) Static Pressure PSI (pounds per square inch) Kpa (Kilopascals) Kg / cm2 (kilograms per square centimeter) Bars MBars (millibars) Atmospheres mmHg (millimeters of mercury) mmH2O (millimeters of water) MH2O (meters of water) inH2O (inches of water) Temperature* °F °C Differential Pressure inH2O (inches of water) mmH2O (mm of water) Pipe & Orifice Diameter inches centimeters * The units for temperature are automatically set for °F or °C when the units for volume and flow are chosen. Choosing English units (cubic feet) will set the temperature to F, etc. January 2002 C-7 MTEK6000 SERIES USER'S MANUAL C-8 January 2002 MTEK6000 SERIES USER'S MANUAL APPENDIX D : BOARD JUMPER POSITIONS 61-SBC Revision A – Corrector Board January 2002 D-1 MTEK6000 SERIES USER'S MANUAL 61-OPT Revision A – Option Board Pulse Output 1: Use Terminal 19 (normally open contact) Terminal 18 (common 1) and Terminal 17 (normally closed contact) For form A output: put JP1 and JP1A both in position A to B. For form C output: put JP1 and JP1A both in position B to C (requires external wetting). Pulse Output 2: Use Pulse Output 3 : (optional) Use Pulse Output 4: (optional) Use Terminal 16 (normally open contact) Terminal 15 (common 2) and Terminal 14 (normally closed contact) For form A output: put JP2 and JP2A both in position A to B. For form C output: put JP2 and JP2A both in position B to C (requires external wetting). Terminal 13 (normally open contact) Terminal 12 (common 3) and Terminal 11 (normally closed contact) For form A output: put JP3 and JP3A both in position A to B. For form C output: put JP3 and JP3A both in position B to C (requires external wetting). Terminal 10 (normally open contact) Terminal 9 (common 4) and Terminal 8 (normally closed contact) For form A output: put JP4 and JP4A both in position A to B For form C output: put JP4 and JP4A both in position B to C (requires external wetting). JP5 can be used as a convenient means to connect pulse input 2 as follows: Description connect pulse input 2 to mechanical index secondary output otherwise D-2 Jumper position JP5 A, B, & C all in JP 5 A, B, & C all out (default) January 2002 MTEK6000 SERIES USER'S MANUAL JP6 selects a power source for external analog transducers at TB3-1 & TB6-1 as follows: Description use on board +12V dc supply ( 20 mA max ) use on-board +5V dc supply ( 20 mA max) Vin external supply (from Metretek UPS) Jumper position JP6 = A JP6 = B JP6 = C External Analog #2: Use Terminal 35 (transducer power) Terminal 36 (transducer output) Terminal 37 (transducer common) For a 4-to-20 mA type transducer put JP7 and JP8 in. For a 1-to-5 volt type transducer take JP7 and JP8 out. External Analog #1: Use Terminal 20 (transducer power) Terminal 21 (transducer output) Terminal 22 (transducer common) For a 4-to-20 mA type transducer put JP9 and JP10 in. For a 1-to-5 volt type transducer take JP9 and JP10 out. Pulse Input #1: Use Terminal 32 (set input) Terminal 33 (ground) Terminal 34 (reset input) Pulse Input #2: Use Terminal 29 (set input) Terminal 30 (ground) Terminal 31 (reset input) Status / Pulse Input #3: Use Terminal 26 (set input) Terminal 27 (ground) Terminal 28 (reset input) External Access to the Mechanical Index: (separate form C contacts) January 2002 Terminal 25 (normally open) Terminal 24 (common) Terminal 23 (normally closed) D-3 MTEK6000 SERIES USER'S MANUAL 50-PLI Revision C - Phone Line Interface J1: Connections from the PLI to the Corrector board J3: Telephone line connection J4: Earth Ground (for surge suppression) connection JP5: position 2-3 shorts R9 sometimes required when barriers cause too much drop in the OH signal level (default position is 1-2). D-4 January 2002 MTEK6000 SERIES USER'S MANUAL APPENDIX E : Certifications (CSA, UL and FCC Drawings and Statements CONSUMER INFORMATION AND FCC REQUIREMENTS 1. The Federal Communication commission (FCC) has established rules, which permits this device to be directly connected to the telephone network. Standardized jacks are used for these connections. This equipment should not be used on party lines or coin lines. 2. If this device is malfunctioning, it may also be causing harm to the telephone network; this device should be disconnected until the source of the problem can be determined and unit repair as been made. If this is not done, the telephone company may temporarily disconnect service. 3. The telephone company may make changes in its technical operations and procedures. If such changes affect the compatibility or use of this device, the telephone company is required to give adequate notice of the changes. 4. If the telephone company requests information on what equipment is connected to its lines, inform them of: many devices are attached, they may not ring properly. Service Requirement 5. In the event of equipment malfunction, all repairs should be performed by our Company or an authorized agent. It is the responsibility of users requiring services to report the need for service to our Company or to one of our authorized agents. Service can be obtained at: Metretek, Inc. 300 North Drive, Melbourne, Florida 32934 Telephone: (321)-259-9700 This device complies with Part 15 and Part 68 of the FCC Rules. Operation is subjected to the following two conditions: [1] This device may not cause harmful Interference, and [2] This device must accept any interference received, including interference that may cause undesired operations. (a) The telephone number that this unit is connected to (b) The ringer equivalence number [0.8B] (c) The USOC jack required [ RJ11C ] (d) The FCC Registration Number BK5 USA-35754-DT-T Items (b) and (d) are indicated on the label. The ringer equivalence number (REN) is used to determine how many devices can be connected to your telephone line. In most areas, the sum of the RENs of all devices on any line should not exceed five (5.0). If too January 2002 E-1 MTEK6000 SERIES USER'S MANUAL CANADIAN “INDUSTRY CANADA” NOTICE The Industry Canada label identifies certified equipment. This certification means that the equipment meets telecommunications network Protective, operational and safety requirements as prescribed in the appropriate Terminal Equipment Technical Requirements document(s). The Department does not guarantee the equipment will operate to the user’s satisfaction. Before installing this equipment, users should ensure that it is permissible to be connected to the facilities of the local telecommunications company. The equipment must also be installed using an acceptable method of connection. The customer should be aware that compliance with the above conditions may not prevent degradation of service in some situations. NOTICE The Ringer Equivalence Number (REN) assigned to each terminal device provides an indication of the maximum number of terminals allowed to be connected to a telephone interface. The termination on an interface may consist of any combination of devices subject only to the requirement that the sum of the Ringer Equivalence Numbers of all the devices does not exceed 5. Ringer Equivalence Number [0.8B] WARRANTY & REPAIR SERVICE Repair & Return Department Metretek, Inc. 300 North Drive Melbourne, Florida 32934 (800) 327-8559 Repairs to certified equipment should be coordinated by a representative designated by the supplier. Any repairs or alterations made by the user to this equipment, or equipment malfunctions, may give the telecommunications company cause to request the user to disconnect the equipment. Users should ensure for their own protection that the electrical ground connections of the power utility, telephone lines and internal metallic water pipe system, if present, are connected together. This precaution may be particularly important in rural areas. CAUTION Users should not attempt to make such connections themselves, but should contact the appropriate electric inspection authority, or an electrician, as appropriate. To be supplied when final Class 1, Div 1 & Div 2 approvals for this unit are received E-2 January 2002 MTEK6000 SERIES USER'S MANUAL EL0001 (Sheet 1 of 2) : Class I Division 2 Installation January 2002 E-3 MTEK6000 SERIES USER'S MANUAL EL0001 (Sheet 2 of 2) : Class I Division 2 Installation E-4 January 2002 MTEK6000 SERIES USER'S MANUAL APPENDIX F: Warranty Information WARRANTY INFORMATION The seller warrants its hardware to be free from defects in material and workmanship under normal and proper use for a period of one year from the date the hardware is shipped from Metretek, Incorporated. The seller’s sole liability and the buyer’s sole remedy for any breach of the foregoing provision is, at the seller’s option, the timely no-charge repair or replacement of any defective hardware or part that Metretek inspects and finds reasonable evidence that a defect in material or workmanship exists. The buyer shall provide the labor required to remove the defective hardware and install its replacement at no charge to the seller. The equipment will be shipped to the seller at the buyer’s expense. The replacement or repaired equipment will be shipped to the buyer at the seller’s expense. The seller makes no representation or warranty other than those set forth in this agreement. THE WARRANTY STATED HEREIN IS EXPRESSLY IN LIEU OF ALL WARRANTIES, EXPRESSED OR IMPLIED, INCLUDING BUT NOT LIMITED TO, ANY EXPRESSED OR IMPLIED WARRANTY OF MERCHANTABILITY OR FITNESS FOR A PARTICULAR PURPOSE. SUCH WARRANTY CONSTITUTES THE ONLY WARRANTY MADE BY THE SELLER WITH RESPECT TO THIS AGREEMENT, THE EQUIPMENT UNITS, OR THE SERVICES TO BE SUPPLIED HEREBY. THE SELLER SHALL NOT BE LIABLE FOR ANY INCIDENTAL OR CONSEQUENTIAL DAMAGES OF ANY KIND. The warranty will not extend to equipment subjected to accident, to misuse, or to alterations/repair not made and documented in writing by Metretek. Warranty claims to be honored under this warranty must be made promptly. Such claims shall specify the nature and details of the claim, the date that the cause of the claim was first observed, and the affected equipment’s unit serial number. Defective equipment shall not be returned to the seller’s factory without prior authorization from the seller. A copy of the claim’s documentation must be attached to the defective equipment and sent to the seller’s manufacturing facility. Defective components replaced under this warranty shall become the property of the seller. January 2002 F-1 MTEK6000 SERIES USER'S MANUAL F-2 January 2002 MTEK6000 SERIES USER'S MANUAL APPENDIX G: TII Station Protector January 2002 G-1 MTEK6000 SERIES USER'S MANUAL G-2 January 2002 MTEK6000 SERIES USER'S MANUAL APPENDIX H: Hazardous Area Installation Control Drawings October 2002 H-1 MTEK6000 SERIES USER'S MANUAL October 2002 H-2 MTEK6000 SERIES USER'S MANUAL October 2002 H-3