1
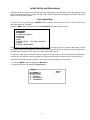
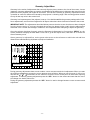
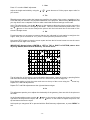
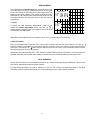
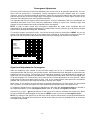
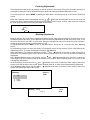
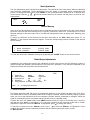
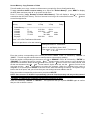
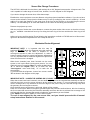
HD-700 SUPERDATA
PROJECTION MONITOR
Installation and Operating Instructions
Read these instructions completely before operating this unit.
Contents subject to change without notice or obligation.
Printed in USA
HD-700
Rev. 10
Table of Contents
Safety Information
___________3
Important Information for the User___________________4
Specifications
___________5
Introduction
___________6
Pre Installation Preparations________________________7
Signal Connections___________________________________7
Front Panel Connections
__________ ______8
Preparation for Adjustment___________________________9
Remote Control Operation
__________10
Initial Set Up and Adjustment_______________________11
Focus Adjust Menu
________________11
Geometry Adjust Menu
________________13
Convergence Adjustments
________________17
Gray Scale Adjustment
________________20
Brightness Adjustment
________________21
Contrast Adjustment
__________21
Center Convergence
__________21
Centering Adjustments
________________21
Blanking Adjustments
__________22
Size Adjustments
________________22
Source Memory Entry
__________22
Global Setup Adjustments
__________23
Power On Control
________________23
Menu Access
________________23
Menu time-out
__________24
White Balance Control
__________24
Scan Reversal
__________25
Screen Size Change Procedures
________________27
HD-700 Projector’s RS232 Control____________________28
Service & Warranty__________________________________29
WARNING
HAZARDOUS VOLTAGE
DO NOT OPEN
ATTENTION
COURANT ELECTRIQUE
NE PAS OUYRIR
!
CAN SHOCK, BURN OR CAUSE SEVERE INJURY OR DEATH. DO NOT
REMOVE COVER OR BACK PANEL. REFER SERVICING TO QUALIFIED PERSONNEL..
This manual and all information pertaining to circuit
designs, internal operating software and industrial
design are Copyright © by DWIN Electronics Inc.
All Rights Reserved.
Any reproduction or distribution is strictly prohibited.
DWIN Electronics, Inc.
710 N. Mariposa St.
Burbank, CA 91506
Tel: 818-239-1500
Fax: 818-239-1506
www.dwin.com
[email protected]
-2-
SAFETY INFORMATION
1. Read and apply all of the safety and operating instructions provided with your video
equipment.
2. Keep all safety and operating instruction for future reference.
3. Unplug this video equipment from the wall outlet before cleaning. Never use liquid or
aerosol cleaners. Use only a damp cloth for cleaning.
4. Do not use any attachments or accessories not recommended by the manufacturer as
they may cause hazards.
5. Do not use this video equipment near water. Avoid placing it near a bathtub, kitchen sink,
or laundry tub, in a wet basement, or near a swimming pool.
6. Do not place this video equipment on an unstable cart, stand, or table. The video
equipment may fall, causing serious injury to a child or adult and serious damage to the
appliance. Use only with a cart or stand recommended by the manufacturer. Wall or shelf
mounting should follow the manufacturer's instructions, and should use a mounting kit
approved by the manufacturer.
Move any appliance and cart combination with care. Quick stops, excessive force, and
uneven surfaces may cause the appliance and a cart to overturn.
7. Top and bottom openings in the cabinet are provided for ventilation, and to insure reliable
operation of the video equipment and protect it from overheating. These openings must
not be blocked or covered. Never place the video equipment on a bed, sofa, rug, or other
similar surface that may block ventilation openings. Never place this product near or over
a radiator or heat register. Do not place this product in a built-in installation such as a
bookcase or rack unless proper ventilation is provided.
8. Operate only from the type of power source indicated on the marking label. If you are not
sure of the type of power supply to your home, consult your appliance dealer or local
power company.
9. This unit is equipped with a three conductor polarized alternating-current line plug. This
plug will fit into the power outlet only one way. This is a safety feature. If you are unable
to insert the plug fully into the outlet, contact your electrician to replace your obsolete
outlet. Do not defeat the safety purpose of the polarized plug.
10. Route power-supply cords so that they will not be walked on or pinched by items placed
on or against them. Pay particular attention to cords at plugs, convenience receptacles,
and the points where they exit the products.
11. Protect your video equipment from lightning during a storm or when it is left unattended
and unused for long periods of time, unplug it from the wall outlet. This will prevent
damage to the unit due to lightning and power-line surges.
12. Do not overload wall outlets and extension cords as this can result in fire or electric
shock.
13. Never push objects of any kind into this video equipment through cabinet slots as they
may touch dangerous voltage points or short out parts that could result in a fire or electric
shock. Never spill liquid of any kind on the video equipment.
14. Do not attempt to service this unit yourself as opening or removing cover may expose you
to dangerous voltages or other hazards.
Refer all servicing to qualified service
personnel.
15. Unplug this video equipment from the wall outlet, and refer servicing to qualified service
personnel under the following conditions:
a. When the power cord or plug is damaged or frayed.
b. If liquid has been spilled into the video equipment.
c. If the video equipment has been exposed to rain or water.
d. If the video equipment does not operate normally by following the operating
instructions. Adjust only those controls that are covered by the operating instructions
as improper adjustment of other controls may result in damage and will often require
extensive work by a qualified technician to restore the video equipment to normal
operation.
e. If the video equipment has been dropped or the cabinet has been damaged.
f. When the video equipment exhibits a distinct change in performance.
16.When replacement parts are required, be sure the service technician has used
replacement parts specified by the manufacturer that have the same characteristics as
-3-
the original part. Unauthorized substitutions may result in fire, electric shock, or other
hazards.
17. Upon completion of any service or repairs to this video equipment, ask the service
technician to perform routine safety checks to determine that the system is in safe
operating condition.
18. Do not place anything on the video equipment. Heavy objects placed on any part of this
system will cause damage.
19. WARNING: To prevent fire or shock hazard, do not expose this appliance to rain
or moisture.
20. CAUTION: TO PREVENT ELECTRIC SHOCK DO NOT USE THIS (POLARIZED) PLUG WITH
AN EXTENSION CORD, RECEPTACLE OR OTHER OUTLET UNLESS THE BLADES CAN BE
FULLY INSERTED TO PREVENT BLADE EXPOSURE.
NOTE: This equipment is designed to operate in countries where the AC Mains
power is 117 volts. Use with other AC voltages will cause serious damage to the
unit and may present a safety hazard. If you are in doubt as to the line current in
your area, please check with your installer before operating the projector.
IMPORTANT INFORMATION FOR THE USER
Note: This equipment has been tested and found to comply with the limits for a Class B
digital device, pursuant to Part 15 of the FCC Rules. The limits are designed to provide
reasonable protection against harmful interference in a residential installation. This equipment
generates, uses and can radiate radio frequency energy and, if not installed and used in
accordance with the instructions, may cause harmful interference to radio communication.
However, there is no guarantee that harmful interference will not occur in a particular
installation. If this equipment does cause harmful interference to radio or television reception,
which can be determined by turning the equipment off and on, the user is encouraged to try
to correct the interference by one or more of the following measures:
•
•
•
•
Reorient or relocate the receiving antenna.
Increase the separation between the equipment and receiver.
Connect the equipment into an outlet on a circuit different from that to which the receiver
is connected.
Consult the dealer or an experienced radio/TV technician for help.
This device complies with Part 15 of the FCC Rules. Operation is subject to the following two
conditions: ( 1 ) this device may not cause harmful interference, and
( 2 ) this device must accept interference received, including interference that may cause
undesired operation.
Note: Changes or modifications may cause this unit to fail to comply with Part 15 of the FCC
Rules and may void the user’s authority to operate the equipment.
-4-
DWIN HD-700 DATA PROJECTION MONITOR
SPECIFICATIONS AND TECHNICAL DATA
System Description: Three CRT/three lens refractive projection system for line doubled and
HDTV video or computer graphics. Separate front or rear screen
required.
Optics:
USPL high resolution HD-145 data grade lenses. F1.03, hybrid design,
fully color corrected.
CRT’s:
7” liquid cooled, 36mm "large neck" design with anti-reflective coated
faceplates. 70 degree deflection angle. Over 5.6” active raster area.
Screen Size:
60" /153cm minimum / 150"/381cm maximum
Factory preset for 100"/253cm (All measurements diagonal)
Aspect Ratio Options: Compatible with 4:3, 16:9 or cinema aspect ratios.
Screen Configuration: Front or rear throw, floor or ceiling mounted.
Throw Distance:
1.25 x screen width plus 9" to the front lens.
Light Output:
1100 lumens (10% peak white)
Optical Resolution:
10 line pairs per mm, 1250 TV lines
Video Bandwidth:
75 MHz (±3 dB)
Resolution:
Compatible with HDTV formats and computer graphics up to XGA at
native rate.
Input:
RGB - 0.7V p-p, 75 ohm positive (BNC)
H/V Sync - 0.7 - 4.0 V p-p, 75 ohM negative (BNC)
Convergence System:12 bit digital system with 60 preset memory positions. Static and
dynamic wave convergence via wireless remote or RS-232C port.
Convergence Accuracy: Less than 0.2% of vertical height.
Test Patterns:
Cross Hatch, Cross Hair, Focus Dot, Window, Gray Scale, Flat Field,
Needle Pulse.
Scan Frequency:
Horizontal: 30 kHz - 65 kHz. Vertical: 50 Hz - 80 Hz
Retrace Time:
Horizontal - 3.5 uS
Vertical: 450 uS
Data Communication Port: RS-232C via DB-9 connector.
Power Input:
Factory preset: 90-130 VAC or 180 - 260 VAC, 50/60 Hz
Power Consumption: 220 watts max.
Dimensions: (WxH x D): 22" x 10.5" x 23.5”.
Weight: 65 lbs/29.5 kg
Environment: Operating Temperature: 0 C to 35 C Humidity: 0 - 90% non condensing
Storage: - 10 C to + 50 C.
Safety & Regulation: Certified to FCC Class B. Complies to DHHS regulations.
Supplied Accessories: Full function wireless remote, Ceiling Mount kit, Owner’s Manual.
-5-
Introduction
This manual contains the information required to properly install, configure, setup and operate the DWIN
HD-700 superdata projection monitor. Please make certain that you fully read and understand the
information in this manual before proceeding with any installation.
THIS MANUAL CONTAINS IMPORTANT INSTRUCTIONS THAT WILL ASSURE A SAFE AND SUCCESSFUL
INSTALLATION. INSTALLING THE UNIT OTHER THAN AS DESCRIBED IN THIS MANUAL MAY LEAD TO
UNSAFE OPERATION AND/OR CONDITIONS WHICH MAY RESULT IN UNSATISFACTORY OPERATION
OR SHORTENED LIFE SPAN OF KEY COMPONENTS. INSTALLATIONS NOT COMPLYING WITH THESE
INSTRUCTIONS MAY ALSO RESULT IN CONDITIONS THAT VOID THE PRODUCT’S WARRANTY.
The HD-700 is a totally new projector design, combining state of the art circuit components and
proprietary software that makes installation and operation easier than ever before. In order to take
advantage of this breakthrough product, it is helpful to consider the installation process as containing
five distinct steps. Carefully plan for each of them and your installation will proceed quickly and easily.
• Plan the physical aspects of the installation carefully. Use the DWIN’s HD-700 Projector installation
software to make certain that the projector to screen distance is correct for the size and aspect ratio of
the screen.
• Adjust the unit while it is easily accessible, BEFORE mounting it to a ceiling or placing it in the final
installation. Pre-setting the unit up to rough in adjustments for focus, screen size, geometry and
convergence will greatly speed your final installation. In addition, it is always easier to make mechanical
and electronic adjustments on the bench than it is on the ceiling! Don’t forget to make any needed
changes to set the unit for floor/ceiling or front/rear projection throw before the final installation!
• CAREFULLY AND SAFELY mount the unit. For ceiling mount installation, make certain that the mounting
hardware is properly secured to the structural frame. For floor or table mount installations, be certain
that the unit is mounted on a firm, level surface that can support the projector’s weight. Make certain
that all mounting surfaces are free from vibration and that adequate space is provided for ventilation
around the unit.
• Once the unit is set or installed in the actual viewing location, carefully follow the mechanical and
physical installation procedures.
• Finally, make certain that you explain all operating features of the projector to the owner and that any
possible compatibility issues with playback software and the chroma decoder, doubler or quadrupler, or
computer used with the projector are resolved.
-6-
Pre Installation Preparations
Planning a projection television installation is a critical part of the installation. Even with the extended range
of mechanical and electronic correction circuitry built into the HD-700, incorrect physical placement of the
projector may place it outside the range of the circuits.
Using the HD-700 Projector installation software provided by DWIN (see www.dwin.com), enter the width of
the screen, the aspect ratio and the mounting position of the projector (ceiling, center of screen or floor). The
program will automatically calculate the correct distance from the screen to the projector. Make certain that
you correctly plan the mounting position and that the information obtained from the planning software is
carefully transferred to the installation venue.
For Floor Mount Installations
Floor mount locations should be level and solid, with an unobstructed view of the screen. DO NOT place the
projector on carpeting or other materials that will interfere with the circulation of air into the ventilation holes at
the bottom of the unit. Also, be careful not to place the projector in a location that is in the direct flow of
heating or cooling vents or in a damp location.
For Center Screen Installations
Follow the same basic instructions as for Floor Mount locations. In addition, make certain that the mounting
location is capable of supporting the weight of the projector.
For Ceiling Mount Installations
Make certain that the ceiling mount bracket is carefully attached to structural beams capable of supporting
the weight of the projector. Then use the handles provided to mount the projector to the bracket. To access
the handles, remove the front portion of the top cover by loosening the two screws on either side of the
green lens and loosening the two screws on the top of the projector. It is not necessary to completely remove
the screws. While holding the cover, pull it upward to remove it from the unit. The handles are the black bars
on the outside of the red & blue lenses.
Plan for connections to the projector of AC power, RGBS connections from the signal source, and a DB-9
connection if the RS-232C port will be used for external control. A separate and properly grounded AC circuit
should be provided. Avoid the use of circuits connected to mechanical equipment, as they may induce noise
in the video system.
Pre Installation Adjustment and Set Up
We strongly recommend that these instructions be followed BEFORE final installation. However, if the
projector is already mounted in place, follow these steps to establish proper operating conditions.
Unpacking
When the unit is first received, verify that the carton does not show any signs that may indicate internal
damage. If damage is suspected, make a report to the freight carrier immediately, and follow their claim
procedures. In addition, please report any carrier damage to DWIN.
If there is no obvious sign of damage, carefully unpack the projector. Due to the weight of the unit two
people should lift the projector from the carton. Carefully place the unit in the location where it will be tested
and inspect it again for any signs of concealed damage that may have been incurred in shipping. Report any
interior damage to the freight carrier and to DWIN.
Before proceeding, you may wish to store the carton for future use should the unit require return to DWIN. If
you discard the carton and shipping material, please observe local recycling rules.
Signal Connections
The HD-700 is an RGB/Sync monitor, which means that it requires an external, video line multiplier
(TranScanner) for video playback. A computer interface may be required for display of computer images.
Connect your video and/or data sources to the external interface or processor, and then connect the RGBS
outputs of the processor, doubler, quadrupler or interface to the signal and sync connections on the HD700’s front panel.
If composite sync is used, connect it to the “H/C Sync” terminal. If separate horizontal and vertical sync are
used, make connections to the appropriate terminals. The HD-700 will not operate with “sync on green”.
Connect the AC power cord to the front panel and THEN to a wall mounted AC power outlet. The use of
extension cords is not recommended.
-7-
Front Panel Connections
Make the appropriate connections to the front panel, using the following descriptions as a guide.
10
7
HD-700
DWIN
8
RY 1
9
RY 2
RS232C
Input
IR Input
RED
GREEN
BLUE
1
6
2
3
H/C
SYNC
V
SYNC
120 VAC 50/60 Hz
220 Watts Max
6
4
5
1 - 3. Red, Green, Blue Inputs: Connect the RED, GREEN, BLUE signals from the external video
multipliers to this jack.
4. H/C Sync Input: When COMPOSITE SYNC is available, connect the feed from the external video
multipliers to this terminal. If separate horizontal and vertical synch are present, connect the
HORIZONTAL SYNC feed to this jack.
5. Vertical Sync Input: If separate sync feeds are being used, connect the VERTICAL SYNC feed to
this jack.
6. AC Power Input: Connect the supplied AC power cord to this receptacle.
7. The POWER LED is a multi-purpose indicator:
When the LED is dark the AC power to the unit is turned off.
When the LED is flashing on and off, power is connected to the unit, this indicates that the unit is
in the standby mode.
When the LED is on the unit is powered on.
NOTE: Depending on the configuration of the “Auto Power” the unit may be in a “Stand By”
mode, awaiting signal information. ALWAYS REMOVE THE AC POWER CORD TO POSITIVELY
TURN THE UNIT OFF BEFORE MAKING ANY INTERNAL ADJUSTMENTS.
8. IR Sensor: This window is the sensor for the HD-700’s remote control system. For best operation,
make certain that the sensor has a direct view of the screen so that remote commands made by pointing
the control at the screen will be bounced back to the sensor. If the sensor window is obstructed a
remote IR extension system should be used.
9. RS232C Port: This DB-9 plug is used to operate the HD-700 directly from a compatible central
controller.
NOTE: THIS IS A DATA PORT ONLY. DO NOT MAKE ANY VIDEO SIGNAL CONNECTIONS TO THIS INPUT!
10. RY1 and RY2: These are two pairs of relay contacts for triggering an electric screen. RY1 is
assigned to Power On/Off. RY2 may be assigned to any one of sixty scan memories in the Video
Memory Set Up.
-8-
Preparation for Adjustment
Before initial adjustments are made to the unit, locate the correct distance from the
screen. This distance should be obtained by using the HD-700 Projector installation
software. Make certain that the front rubber feet are set so that the unit is level and
parallel to the floor. You may wish to verify this with a standard carpenter’s level.
In order to make certain adjustments, it is necessary to remove the front portion of the
unit’s top cover.
Remove the front portion of the top cover by loosening the two screws on either side of
the green lens and loosening the two screws on the top of the projector. It is not
necessary to completely remove the screws. While holding the cover, pull it upward to
remove it from the unit.
-9-
Remote Control Operation
The HD-700 has no on board user controls. All operation is controlled through the wireless remote control or the
optional RS-232C link to a computer or control system.
The remote control supplied with the unit is factory programmed to operate the HD-700 when “TV” mode
selected.
SL-8000 remote furnished with the HD-700 is a universal remote control capable of controlling 8 different
devices. The operational instructions on this page refer to the remote buttons used with the HD-700 only.
Consult the SL-8000 operating manual for complete information on programming the remote and using it with
other devices.
To control the HD-700 select “TV” mode.
1. Press “TV” or “POWER” buttons to turn the HD-700 ON.
2. To turn the HD-700 OFF press the “POWER” button.
AUDIO
AUD
CD
TAPE
SAT
TV
VCR
CBL
VOL
CH
3. Press “MENU” button to view the Main Control Menu at
any time. Pressing the “MENU” button while a sub menu
is displayed on the screen will return back to the Main
Menu. Pressing the “MENU” button while the Main Menu
is displayed will cancel the menus.
AUX
POWER
4.
T/V
MUTE
CENTER
SUR
GUIDE
MENU
\
PAUSE
R
F
/a
F
SEL
PLAY
`E
W
Press “GUIDE” button to display the list of sources
entered into the HD-700’s memory. To select one of the
sources press the numeric buttons corresponding to the
desired source. The HD-700’s memory stores any set of
presets relating to scan frequencies and/or aspect ratios
as a “source”. This means that the same physical
source, such as a single line doubler, may have
numerous sources for different aspect ratios or screen
sizes.
5. Press “EXIT” to exit the menu and to clear the screen.
z
STOP
]
PRE.
CH
DELAY +
EXIT
DELAY --
1
2
6. When converging the HD-700, press “SEL” button to
toggle between cursor movement (a solid block cursor will
be shown) and the adjustment mode (an outline cursor
will be shown).
FAV
3
SLEEP
4
5
INFO
6
7. CURSOR/MOVEMENT CONTROLS / / / :
These buttons are used to move the cursor on the screen
or to control the left/right and up/down movement of
screen adjustments.
PRO.L
7
8
9
NEXT
+10
0
ENTER
SHIFT
ALT
3.CH
----------pip-------
TUNER
CD
TAPE1 TAPE2
TEST
8. NUMERIC BUTTONS: Use these buttons to select
specific function listed on a menu.
PHONO
The brand code for HD-700 is “177”.
VCR1 VCR2/SAT LDP
M1
M2
M3
AUX
TV
M4
LIGHT
HOME THEATER MASTER
SL-8000
- 10 -
Initial Set Up and Adjustment
At this point you are ready to proceed with the initial adjustment of the unit. Make certain that the power and
signal connections have been made, and that a high quality signal feed is supplied from either a laser disc
player or a test signal generator.
Focus Adjust Menu
Turn the unit on by pressing the “POWER” switch and note that the green LED on the HD-700’s front
connection panel will illuminate.
Press the “MENU” button and observe that the Main Menu will appear on the screen.
-Main Menu1. Brightness
2. Contrast
3. Center Convergence
4. Centering
5. Blanking
6. Size
7. Source: LD10
- 31.5 kHz - 60.00 Hz
8. Adjust
9. Set Up HD-700-50-FF
If the menu is not in clear focus, adjust the optical focus on the green lens. Loosen the back wing nut and
rotate the lens barrel by holding the lens with one hand and moving the nut with the other along the track
provided. When the picture is in sharp focus hand tighten the wing nut.
To adjust the edge focus, loosen the wing nut closest to the outer edge of the lens and focus by rotating the
outer barrel. You may find it easier to grasp the “wings” that protrude up from the barrel to aid in the focus.
Once this initial focus has been made you may proceed with the complete focus process.
1. Press the “MENU” button to display the Main Menu.
2. Press the “8” button to display the Adjust menu.
- Adjust 1.
2.
3.
4.
5.
Focus
Gray Scale
Geometry
Convergence
Test Patterns
- 11 -
Source
LD10
Press “1” to view the focus screen. Note that the screen will
display the Focus menu against a background of the focus
pattern.
Signal Level
Before adjusting focus you may wish to change the signal
level for the on screen test pattern. This adjustment DOES
NOT affect the actual signal level for picture displays, but it
does allow lower signal levels during adjustments so that
they are more precise. Low levels use less beam current.
This, in turn, means that the video spot size is as small as
possible and is not prone to the softening caused by an over
driven signal.
To change the signal level for focus adjustments, first reach
the Focus menu as outlined in the steps shown above. At
the Focus menu, press “5” to display the Signal Level
Menu.
-Focus1. Green
2. Red
3. Blue
4. Pattern
5. Signal level
5. Signal Level
C 25 D
Use the left or right adjustment buttons on the remote (
), increase or decrease the signal level. When you
have reached the desired signal level press “1” to display the Green Focus adjustment screen.
NOTE: Any change to the signal level in this menu will be effective only during focus adjustments. The signal
level will return to normal levels when you return to the Main Menu or cancel the focus adjustment.
Focus Adjustment
Once the signal level has been set, adjust the focus of each color channel using the following steps:
1. From the Focus menu press “1” to display the Green Focus adjustment screen.
2. Adjust the overall optical focus by loosening the wing nut at the rear of the green (center) lens so that it is
loose, but do not remove it. Rotate the lens barrel by holding the lens with one hand and moving the nut
post with the other along the provided track. When the picture is in sharp focus hand tighten the wing nut.
3. Adjust the edge focus by loosening the wing nut closest to the outer edge of the lens, but do not remove
it. Focus the lens by holding the back of the lens with one hand while you rotate the outer barrel with the
other. You may find it easier to grasp the “wings” that protrude up from the barrel to aid in the focus. Tighten
the wing nut when complete.
4. Press “2” on the remote to move to the Red Focus menu. Repeat the procedures in items 2 and 4 above,
adjusting the optical main focus and the optical edge focus for the Red channel.
6. When the Red focus is complete, press “3” to display the Blue Focus menu. Repeat the procedures in
items 2 and 3 above, adjusting the optical main focus and the optical edge focus for the Blue channel.
7. When these adjustments are complete press the “MENU” button to return to the Focus menu. At this point
you may wish to check the focus using different test patterns. To change the pattern, first press “4” on the
remote. Each subsequent press of the “4” button will change the pattern.
8. When all focus adjustments are complete press “MENU” twice to return to the Adjust menu, or “EXIT”
button on the remote to exit the menu system.
- 12 -
Geometry Adjust Menu
Geometry is the series of adjustments that correctly align the picture scans to the size of the screen. Just as
important, geometry adjustments are used to compensate for the differences in alignment that result from the
placement of the projector with regard to the screen. The HD-700’s flexibility of geometry adjustments makes
it possible to correct for differences caused by the projector’s “shooting angle” and mounting position as well
as any tilt that may exist in the screen itself.
Geometry is a important part of the projector’s set-up. You should establish the geometry settings after initial
focus adjustments, and check them again after all aspect ratios have been sized and centered to the screen.
IMPORTANT NOTE: The adjustments described below presume that the screen size has not been changed
from the factory setting. If you have changed the screen size please make certain that the adjustments
described in the “Screen Size Change Procedures” are completed before attempting to adjust the geometry.
Once the projector has been focused, select the Geometry Adjustments by first pressing “MENU” on the
remote, and then to display the Main Menu. Press “8” to go to the Adjust menu, and then “3” to reach the
Green Geometry menu.
Green geometry is adjusted first, as the green tube serves as the reference to which the red and blue
channels are matched during all phases of projector installation.
-GREEN Geometry1.
2.
3.
4.
Size
Tilt
Pin
Lin
85
50
50
50
85
50
50
50
7. Green
8. Red
9. Blue
Press "SEL" to select adjustment
or cursor movements.
During geometry adjustment there are two modes: cursor movement and circuit adjustment. When you start
the geometry adjustment process the cursor appears as a solid box. When you see this type of cursor you
can use the / / / arrow buttons on the remote to move the cursor to the point on the screen requiring
adjustment. To make a geometry adjustment press the “SEL” button on the remote and note that the cursor
will change to a double outline box.
During the geometry adjustment process the “SEL” button is used to change between cursor movement and
adjustment.
- 13 -
1. Size
Press “1” to select “Size” adjustment
Adjust the height and width by using the
your screen.
/ / /
arrow buttons to fill the proper aspect ratio for
2. Tilt
Tilt adjustments make certain that images are parallel to the edges of the screen, regardless of any
errors that may be induced in the physical installation of the projector. When making tilt adjustments
you may wish to use a carpenter’s level to make certain that the actual settings are accurate.
At the Tilt adjust screen, use the / buttons on the remote to adjust the picture until the vertical line
at the center of the screen is straight up and down. This line will be indicated by hash-marks. Use
the / buttons on the remote to adjust the picture until the horizontal line at the center of the
screen is straight across.
3. Pin
Pin adjustments are necessary to ensure that the line indicated by hash-marks is straight at the
edges. After you've corrected for TILT, press "3" and repeat the procedure for PIN.
Now press "SEL" button to close the cursor square and use the left cursor button to move the cursor
square to the left edge of the screen.
IMPORTANT: Always follow a CENTER to LEFT to TOP to RIGHT to BOTTOM pattern when
adjusting GREEN, RED and BLUE Geometry. As shown below:
Top
Center
Right
Left
Bottom
The left edge line of the screen is now indicated by hash-marks. Open the cursor by pressing Select
and make the necessary adjustments for both TILT and PIN to the far left edge line.
Press Select again to close the cursor and move to the top of the screen using the
Repeat TILT and PIN adjustments.
arrow key.
Repeat TILT and PIN adjustments at the right and bottom edges.
4. Lin
This adjustment permits you to adjust the relationship of the geometry from one side of the picture to
the other.
At the Linearity adjust screen, use the / buttons on the remote to adjust the picture until left and
right halves of the picture are equal, and use / buttons on the remote to adjust the picture until
top and bottom halves are equal.
At this point you may press “8” to proceed with the Red Geometry adjustments, or press “MENU” to
exit.
- 14 -
RED GEOMETRY
The adjustments for Red Geometry are similar to those used
to set the Green Geometry, except that instead of using the
screen as a physical reference you will be matching the red
channel to the green settings. The goal for all Red Geometry
adjustments is to match the red lines with hash-marks on the
test pattern directly over the green lines so that the result is
a yellow line.
-RED Geometry1. Center
2. Tilt
3. Pin
50
50
50
50
50
50
1. Center
To begin the Red Geometry adjustments, press “1” to
display the Center Adjustment screen. Use the /
/
arrow buttons to adjust center of the pattern, this is the most
critical part of this adjustment.
7. Green
8. Red
9. Blue
When Red Center adjustments are complete, press “2” to move directly to the next step.
2. Red Tilt and Pin
Here you will adjust the tilt and pin of the red channel so that it matches the green channel. Use the /
buttons until the red line that runs directly though the vertical center of the screen covers the underlying
green line. Then use the / buttons until the horizontal red line at center of the crosshatch pattern covers
the underlying green lines on the pattern.
Repeat this procedure at the LEFT, TOP, RIGHT and BOTTOM grid lines (remember, cursor position will
highlight each particular line with hash-marks) to ensure they are completely matched to the green lines.
BLUE GEOMETRY
As with the Red Geometry, these adjustments will be to a master setting previously established. This time the
blue will be adjusted to the green master channel.
The adjustment procedure for blue is identical to that for red. Follow the steps described in the Red
Geometry section, except that this time you will be adjusting the blue, rather than red channel.
- 15 -
Convergence Adjustments
Once the picture has been focused and adjusted to the screen size for all geometry parameters, the next
step in the set up process is convergence. During convergence the green channel used as a master
reference, since it is shooting straight at the screen, where the red and blue channels are offset from center
and thus must hit the screen at a slight angle. Convergence compensates for these angles, as well as the
electronic circuit drift that occurs in any projection television.
It is important that the convergence system be used as a “fine trim” adjustment, and not to compensate for
installation placement errors. That is why any adjustments relating to screen size, mounting angle and
projector to screen distance should be completed before convergence.
NOTE: In order to make certain that convergence adjustments are made under conditions that are
representative of actual operating temperatures it is always best to let the set warm up for at least 30 minutes
before critical convergence settings are established.
To reach the master convergence menu, first call up the main menu by pressing the “MENU” key on the
remote. From the Main Menu press “8” for the Adjust menu, and then “4” to reach the Convergence menu. At
this point you may first wish to adjust the signal level before proceeding with the actual convergence.
-Convergence1. Red
2. Blue
3. View
4. Start Over
5. Signal Level
Press 'SEL' to select adjustment or cursor
movement.
Signal Level Adjustment for Convergence
While the brightness and contrast for the HD-700’s images are set by a combination of the external
controller/decoder and the unit’s own internal controls, those adjustments are designed to present the best
possible picture for viewing. During some set up procedures, however, it may be desirable to change the
signal level only for the purpose of the adjustment. This adjustment DOES NOT affect the actual signal level
for picture displays, but it does permit you to lower the level so that adjustments are more precise. When
signal levels are lower less beam current is used. This, in turn, means that the video spot size is as small as
possible and is not prone to the softening caused by and over drive signal.
Better focus, in turn, deliver the most accurate convergence adjustments. For that reason, we recommend
that, if possible, you lower the signal level to the greatest degree possible when converging the set.
To change the signal level for convergence adjustments, first reach the Convergence menu as outlined in
the steps shown above. At the Convergence menu, press “5” to display the Signal Level menu.
Use the left
or right
adjustment buttons on the remote to increase or decrease the signal level. When
you have reached the desired signal level press the “MENU” button to return to the Convergence menu.
NOTE: Any change to the signal level in this menu will be effective only while the convergence adjustments
are being made. The signal level will return to normal levels when you return to the Adjust menu or cancel the
convergence adjustment.
- 16 -
Convergence Movement
During convergence there are two modes: cursor movement and circuit adjustment. When you start the
convergence process the cursor appears as a solid box. When you see this type of cursor you can use the
/ / / arrow buttons on the remote to move the cursor to the point on the screen requiring adjustment. To
make a convergence adjustment press the “SEL” button on the remote and note that the cursor will change
to a double outline box.
During the convergence process the “SEL” button is used to change between cursor movement and
convergence adjustment.
Red Convergence
Since the green channel is your master reference, the first step is to converge the red channel to the green.
Before starting, take a moment to look at the cross hatch display on the screen. A perfectly converged set
will show the cross hatch as totally white over a black background. Of course, since the set has not yet been
converged, you will see areas of the screen where red or blue lines will separate from the green reference.
Make a mental note of the areas where there is the greatest amount of divergence of red from green, as
these are areas where you will want to pay special attention to convergence.
To proceed to the next step follow the on screen message and press “ENTER” or "SEL" once to start the
process and a second time to confirm the operation.
Before moving the cursor first look at the screen note that you will see a mostly yellow crosshatch, but there
will be areas where you will see separate green or red lines. Those are the areas you will need to carefully
converge.
Blue Convergence
The process for blue convergence is similar to that for red convergence, except that in this case the blue
channel will be adjusted using the red as a reference.
The process for cursor movement and convergence adjustment for blue is identical to that for red. Press the
“ENTER” or "SEL" button on the remote to switch between the double outline box for adjustment and the
solid box for movement. Use the
/ / /
arrow buttons on the remote to make the convergence
adjustments or move the cursor location.
When all blue convergence adjustments have been made, press “MENU” to return to the master
Convergence menu, and press it one more time to go to the main Adjust menu.
- 17 -
Convergence Memory Purge
During some adjustments, particularly after other service adjustments, you may need to purge, or “dump” the
complete memory of the convergence system.
To empty the memory and start over, you must be at the main Convergence menu.
-Convergence1. Red
2. Blue
3. View
4. Start Over
5. Signal Level
Press 'SEL' to select adjustment or cursor
movement.
To Start convergence over
Type "YES" and then press "Enter"
At that menu press “4” on the remote to select “START OVER”.
The next screen will instruct you to type the word “YES”. Do this using the up and down / arrow buttons
on the remote as the letters change on the display. Use the left/right / arrow buttons to move the “typing”
position to the next letter.
When you have typed “YES”, press the “ENTER” button and the convergence memory will be emptied. You
may now start the convergence process over from the null settings.
IMPORTANT NOTE: To protect from unintended memory erasure, the word “YES” must be typed exactly as
shown, in upper case letters before the memory purge will take effect.
- 18 -
Gray Scale Adjustment
The HD-700 offers a wide range of gray scale adjustments. For best results we recommend first using the
internal test signals offered by the projector. Once those have been made you may wish to use incoming
video for additional gray scale adjustments. Note, however, that any adjustments made to incoming video will
be subject to the variations induced by the chroma decoder in use. It is also advisable to adjust the HD-700’s
internal settings and then make any final trims offered by the decoder, doubler or quadrupler WITHOUT
changing the HD-700’s settings. This will insure accurate control and tracking of all signals.
The steps outlined below are for adjustments that are made by eye, without the use of automated or external
test equipment. Your actual procedures may vary when color analyzers are used, based on the sequence of
the specific test gear. Consult the DWIN Technical Service Department for additional instructions for
calibration using external analyzers, or follow the appropriate DWIN Technical Bulletins.
NOTE: Since the eye reacts slowly to color changes it is strongly recommended that you proceed slowly with
these adjustments, and to make them in as dark an environment as possible.
To begin the Gray Scale Adjustments, start at the master Gray Scale menu. If you are not at that screen,
first call up the main menu by pressing the “MENU” key on the remote. At the Main menu press “8” to reach
the Adjust menu, and then “2” to reach the Gray menu.
The first step is to select the test pattern to be used. The
gray scale pattern is the factory default. To select either the
window pattern or incoming video from a test generator press
“7” from the Gray Scale menu and the display will toggle
from the gray scale pattern to a window pattern to the
external video feed and then back to the test pattern.
-Gray1. R Gain
2. G Gain
3. B Gain
4. R Level
5. G Level
6. B Level
7. Pattern
Two gray scale adjustments are available for each of the
three color channels, gain and level. Gain impacts the
lighter, or right side of the test pattern while level impacts the
black, or left side of the test pattern. The overall goal is to
obtain the “blackest” black while defining the highest white
level. At the same time, even step increments must be
maintained between the gray scale bars on the test pattern.
NOTE: When making gray scale adjustments with automated test equipment or color analyzers it is desirable
to turn off the on screen menu instructions so that the color of the graphical instructions does not cause the
instruments to register an incorrect reading. To turn the graphics off while making any of the gray scale gain
or level adjustments press the “ENTER” button on the remote. Press it again to toggle the graphic back on.
The easiest way to adjust the gray scale is to start by setting the Green Gain and Green Level to the mid
point of “50”. To do this, press “2” on the remote and use the / buttons until the reading of 50 appears on
the screen. Press “5” and repeat the setting procedure.
Next, set the Red and Blue levels until the bar on the far left side of the screen is as black as possible while
you are still able to see that there is a distinct gray, or slightly less black bar, next to it. Press “4” and then
use the / buttons to adjust the Red Level and ”6” and / to adjust the Blue Level.
Finally, set the Red and Blue gain controls so that the far right bar is as bright as possible while maintaining
an even step of gray from one bar to the next across the screen. The far right bar should not be so bright
that you cannot clearly distinguish eight separate bars on the screen.
Press “1” and then use the
/
buttons to adjust the Red Gain and ”2” and
/
to adjust the Blue Gain.
Note: The next three adjustments are available to consumers or end users even when the menu
controls are protected. You should still make them here as a final picture set .
- 19 -
Brightness Adjustment
The brightness setting should be adjusted so that the on screen video maintains proper contrast. The picture
should be adjusted so that black areas are truly black, not light gray or blue tinted.
To adjust brightness, press “MENU” to display the Main Menu, and then press “1”.
1. -Brightness50
Source
DVD
The Brightness screen will be displayed, with the input source also being noted in the upper right corner of
the screen. Use the and buttons on the remote to adjust the setting so that it is acceptable.
Contrast Adjustment
The Contrast setting should be adjusted until the video maintains proper overall brightness and contrast.
To adjust contrast, press “MENU” to display the Main Menu, and then press “2” if you are not already at the
correct display screen.
2. -Contrast50
Source
DVD
The Contrast screen will be displayed, with the input source also being noted in the upper right corner of the
screen. Use the and buttons on the remote to adjust the setting so that it is acceptable.
Center Convergence
Since the master point convergence has been established during the initial setup, there should be no need
to make a further adjustment at this time. However, it is good practice to check the setting at this point in the
installation. This will also familiarize you with the operation of this setting, as it is a part of the menu system
that will be available to the consumer when the projector is delivered.
Center Convergence is also referred to as “static convergence”, as it is based on a global X/Y axis setting
rather than the more exact point convergence available in the Adjust menu.
To access the Center Convergence, press “MENU” to display the Main Menu, and then press “3”.
The Center Convergence screen will now be displayed, with vertical and horizontal lines across the center of
the screen and a double box cursor in the middle.
Press “1” from the Center Convergence menu to adjust the Red Center. Use the / / / directional arrow
buttons on the remote to move the red lines so that they cover the green lines at the center of the picture to
show a yellow outline.
When the Red Center adjustment is complete, press “2” to adjust the Blue Center Convergence.
Line “3 Pattern” toggles between internal or external cross-hatch pattern.
-Center Convergence1. Red Center
2. Blue Center
3. Pattern
- 20 -
Centering Adjustments
These adjustments permit you to properly center the picture to the screen. They will not impact geometry or
convergence settings, but they will assure that the picture is properly positioned within the screen.
To center the picture, press “MENU” to display the Main Menu, and then press “4” to access the Centering
screen.
When the Centering screen is displayed, use the / / / directional arrow buttons on the remote until the
picture is properly centered both vertically and horizontally on the screen. If there is any overscan it should
be equal to the top/bottom and left/right edges of the screen.
4. -Centering-
Source
50
DVD
50
Blanking Adjustments
Blanking adjusts the video timing signals that determine the outer edge boundaries of the picture at the
top/bottom and left and right. This is different from the centering adjustments in that the picture, itself, is not
moved on the face of the CRT or the screen. Blanking adjustments may be likened to moving “blinders”
across the underlying picture to mask portions of it off.
To adjust blanking, press “Menu” to call up the Main Menu, and press “5” to access the main Blanking
screen.
At the Blanking screen you have the ability to individually select the top, bottom, left or right blanking for
adjustment. Press “1” to start the adjustment with the Top Blanking.
When the Blanking Top screen is displayed, use the
and
directional arrow keys to mask off the top of
the picture to the desired place on the screen. When finished, press “2” to move to the Bottom Blanking
adjustment.
At the Blanking Bottom screen you will also, use the
and
directional arrow keys, this time to place the
outer edge of the active picture area at the bottom of the screen. When finished, press “3” to move to the
Left Blanking adjustment.
At the Blanking Left screen use the
and
directional arrow keys, to place the outer edge of the active
picture are at the left side of the screen. When finished, press “4” to move to the Right Blanking adjustment.
At the Blanking Right screen use the
and
directional arrow keys, to place the outer edge of the active
picture area at the right side of the screen.
-Blanking1.
2.
3.
4.
Source
DVD
Top
Bottom
Left
Right
Blanking: 1. Top
X 20 Y
- 21 -
Source
DVD
Size Adjustments
The size adjustments are the final picture adjustment. They define the size of the picture within the blanking
area previously established. These adjustments have the impact of stretching and/or compressing the
picture. To change the picture size, press “MENU” to call up the Main Menu, and press “6” to access Size
control screen. Use the / / / directional arrow buttons on the remote until the picture is sized to your
requirements.
6. -Size-
Source
DVD
85
85
Source Memory
Once all of the adjustments have been made to establish the picture parameters, they are saved under a
particular name so that these settings may be quickly recalled at a later time. This allows you to create
different settings for the same input source, for different characteristics such as aspect ratio, blanking, gray
level, etc.
To switch to a different source memory for the same input start at the Main menu then press "7" for
"Source". A list of preset memories will appear. Press the corresponding number to switch to the desired
source memory.
-Video Source1. Name: Anamorphic
2. Name: Letterbox
31.5KHz 60Hz
31.5KHz 60Hz
You can also access the "Source" memory list by pressing the "GUIDE" button on the remote control.
Global Setup Adjustments
In addition to the settings that must be set individually for each input source, the HD-700 has a number of
global settings that address certain aspects of the projector’s operation. They should be adjusted to the
preferences of the end user before the set is delivered.
- Set Up 1.
2.
3.
4.
5.
Power On:
Menu Access:
Direct Source:
Mounting:
Copy, Rename, or
HD700-45-FF
Source
DVD
Auto
Manual
Enabled
Protected
On
Off
FF
FC
RF
RC
Delete Video Memory
Use Ω or ς to change preferences.
1. Power On Control
This setting permits the HD-700 to turn on automatically whenever a sync signal is present at the “H/C” input.
This means that it will be in a standby mode when no signal is present, and it will instantly display a picture
when you turn on the feed device such as a computer, decoder, doubler, quadrupler or multiplier. When the
signal is removed the picture will go dark and the unit will return to a standby mode.
To place the unit in the “Auto” mode, press “MENU” and then Press “9” to go to the Set Up menu. Check to
see that the word “Auto” is highlighted. If it is, the unit is already in the automatic mode and no further
adjustment is required. If the word “Manual” is highlighted, press to change the setting.
To move the unit back into the “Manual” mode, press
until the word “Manual” is highlighted. In this
condition the projector must be manually turned on with the remote control each time it is used.
2. Menu Access
- 22 -
Once the unit is delivered to an end user you may wish to lock out most of the major adjustment settings.
This will limit the amount of adjustments a user may make, protecting critical convergence and geometry
adjustments.
To lock the menus and enable menu access protection press “2” while the system is displaying the main -Set
Up- Menu.
This will bring the highlight down to item 2, “Menu Access”, where “Enabled” is normally highlighted on the
right side of the menu. This indicates that full access to all menus is allowed.
To “Protect” the menus press the
button, “Type the PASSWORD and then press ‘ENTER’ ”, message
will appear at the top of the screen. A single cursor block will also appear at the right side of the “Menu
Access” text line.
You should now enter the password that will enable access to the menus. It may be up to nine alphanumeric
characters, including upper and lower case letters. Use the
and
buttons on the remote
to scroll through the letters, and the and buttons to move across the nine letter field once a character is
entered. When the password is entered, press the “ENTER” button on the remote. The system will ask you to
press “ENTER” a second time to confirm the password.
Once the password is entered the only menu functions available will be Brightness, Contrast and Center
Convergence from the Main Menu. Power On setting, Menu Access, menu Time-out, White Balance and
Color Temperature adjustments will also be permitted from the Set Up Menu.
To return to full menu access, press “MENU”, and then “9” to reach the Set Up menu. Press “2” to access the
Menu Control System. Noting that “Protected” will be highlighted, press
to indicate that you wish to
enable the menu control system. Once you press ×, the message will appear at the top of the screen asking
you to enter the password established when the menus were restricted. Enter the password using the
and
buttons on the remote to scroll through the letters, and the and buttons to move across the nine letter
field once a character is entered. When the password is entered, press the “ENTER” button on the remote.
The system will ask you to press “ENTER” a second time to confirm the password.
Once the menus system is unlocked, the word “Enabled” will be highlighted, and the restricted menu
selections will once again be available.
NOTE: Remember that passwords for this system are case sensitive. Any password created using upper
and lower case letters must be repeated EXACTLY as it was originally entered in order to unlock the system.
NOTE: To overwrite any previously saved password enter the following code “A,A,A,A,A” (Capital Letter
A followed by a coma, etc…)
3. Direct Source
Direct Source feature allows the user to access the preset Source memories by pressing the corresponding
numbers 1 - 9 on the remote. When selected "ON" this feature eliminates the need to go through the Main
menu or any other submenus.
4. Mounting
Proper mounting position must be selected in order for adjustments to operate correctly.
Mounting option allows to choose from front floor (FF), front ceiling (FC), rear floor (RF) or rear ceiling (RC)
configurations.
From the Set up menu press "4", then highlight the desired position by pressing the
press "ENTER".
- 23 -
and
buttons and
Source Memory Copy, Rename or Delete
This will enable you to copy, rename or delete memory occupied by Source Configuration data.
To copy, rename or delete a source memory or to adjust the "Default Memory", press “MENU” to display
the Main Menu and then press “9” to go to the Set Up menu.
Press “5” to select “Copy, Rename or Delete Video Memory”. This will display a listing of all Sources
entered into the HD-700’s memory. The list of sources is too long to fit on the screen use the or
buttons
to scroll through the list.
Press number to select active video memory
Memory
0.
1.
2.
3.
4.
5.
Name
H. Freq
V.Freq
Relay
Default Memory------------------------------------------------------------------------------Video01
A
31.5 KHz
60 Hz
Video02
TS 4:3
43.5 KHz
60 Hz
Video03
TS 1.85
42.9 KHz
60 Hz
Video04
TS 2.35
34.4 KHz
60 Hz
Empty05
00.0 KHz
00 Hz
Press "+10" to Set TranScanner Memories
Press E for previous or F for next memories
Setting Memories for TranScanner
Use D C to set Display Lines: 0525
Then press "1" for 4:3 Screen as in TranScanner
Or "2" for 16:9
Enter the number corresponding to the source you wish to COPY. Press “7” followed by “ENTER” to
“COPY”. This will copy the selected source memory data to a new memory position.
Enter the number corresponding to the source you wish to RENAME. Press “8” followed by “ENTER” to
“RENAME”. To rename the source, use the
and
arrow buttons on the remote to cycle through the
alphanumeric characters. When the first character is set, use the button to move to the next position, and
set the next character using the
and
arrow buttons. Again, when set, use the
button to move to the
next spot and the
and
arrow buttons to select the character. When the complete input name or
designator is on screen, press “ENTER” to save the source name and settings to memory. The system will go
back to the list of inputs, and you will see that your new setting has been added to the list.
Enter the number corresponding to the source you wish to DELETE.
NOTE: Once a source is deleted it is permanently removed from the memory and may not be restored.
If you wish to re-enter the information for a specific source after it has been deleted you will have to
completely re-establish the parameters for that source and save it again.
Press “9” followed by “ENTER” to “DELETE”. The system will ask you to press “ENTER” again to confirm
that you wish to delete a source.
- 24 -
Default Memory
The HD-700 is programmed with a default memory. This is a 'base" memory that will maintain, geometry,
convergence and gray scale values at any scan frequency.
To make adjustments begin by applying a video signal. Press "MENU" to display the Main Menu and then
press "9" to go to the Set Up Menu.
Press "5" to select "Copy, Rename or Delete Video Memory". This will display a listing of all sources
entered into the HD-700 memory. Press "0" to highlight the "Default Memory" and then press "8" for
adjustments. Adjust the geometry and convergence to match your screen size and aspect ratio. After
adjustments are made, exit the system menus.
Now all other video memories can be copied onto Default Memory.
Setting Memories for TranScanner
The HD-700 enables the user to automatically set-up 3 TranScanner memories for all aspect ratios. Press
"+10" to set TranScanner memory. (Important: TranScanner memories are copied from the default memory,
if the default memory is not correctly configured the TranScanner memories will adopt those incorrect
configurations.) It will open a sub menu. Program the exact same number of lines in the sub menu as in the
TranScanner, and then select the proper physical screen, size ("1" for 4:3 or "2" for 16:9). Following the
instructions, press Enter, memories for 1:85, 4:3 and 2:35 are now automatically entered.
Preparation for installation
Once the unit has been configured for operation and all settings established, it may be taken to the
customer’s location for final installation. When installing the projector make certain that the projector to screen
distance is identical to the distance used in shop testing. If another distance is used the focus, geometry and
convergence adjustments will need to be fine tuned.
If the set is to be installed in a ceiling mount configuration, you will need to change the two jumpers inside
the set prior to installation.
To change the mounting position from floor to ceiling, or to projection throw direction from front to rear, follow
these instructions:
Scan Reversal
By changing the configuration of jumpers on the Main board and by selecting the mounting position in the
Set up menu, it is possible to set the unit for any combination of floor or ceiling operation from front or rear
projection. To change the projection direction or picture orientations follow these steps:
CAUTION: THE UNIT MUST BE DISCONNECTED FROM AC POWER WHILE THIS ADJUSTMENT IS MADE!
1.
2.
3.
4.
Turn the unit off by pressing the power button “ OFF-ON” on the remote control.
Unplug the AC line cord from the unit.
Remove the top cover.
Change the positions of H and V plugs on the Main board.
NOTE: Do not make any changes to the Red/Green/Blue plugs that separate the H2 and V2 plugs.
- 25 -
Table 1
Connector Settings Horizontal
Front Floor
Front Ceiling
Rear Floor
Rear Ceiling
Vertical
H2
H1
H1
H2
V2
V1
V2
V1
Main Board
H
V1
H1
H2
RED GREEN BLUE
V
V2
IMPORTANT NOTE:
CEILING MOUNT INSTALLATION SHOULD ONLY BE ATTEMPTED BY TRAINED PERSONNEL AND
LOCAL BUILDING CODES MUST BE FOLLOWED IN THE INSTALLATION OF THE PROJECTOR.
At the installation site, it is always a good idea to touch up all settings to compensate for any minor variations
in projection throw distance or the projector to screen angle.
After the projector is installed you should consider whether or not the menu system should be protected.
Protecting the menu system will restrict the user’s access to the setup menus so that your calibrations will not
be disturbed. Some users, however, will insist on the ability to change the internal settings. If the settings are
NOT protected, you should be certain to explain the care with which any modifications or corrections should
be made.
When the set is installed, you should explain the basic operational controls to the user: power on/off (using
either the remote or automatic operation with source sensing), Source selection, brightness, contrast and
center convergence adjustment, and the white balance and color temperature controls.
You should also explain the functions of the LED indicator on the front panel of the HD-700 as noted at the
beginning of this manual.
- 26 -
Screen Size Change Procedures
The HD-700 is delivered from the factory with settings for a 100” diagonal screen and a 4:3 aspect ratio. The
unit is capable of a wide range of screen sizes, however, from 60” diagonal to 300” diagonal.
If you wish to change the screen size, follow these steps:
Establish the correct projector to screen distance using the projector installation software. If you do not have
access to the software, the projection distance may be set by multiplying the screen’s width by 1.25 and
adding 9" to reach the distance to the green lens at the front of the projector or by multiplying the screen
width by 1.25 and adding 18" to reach the distance to the center of the ceiling mount bracket.
Remove the projector top cover.
With the projector fixed at the correct distance, connect the power and a video source so that the unit may
turn on, establish a mechanical focus by first using the back ring of the lens and then the front ring of the
lens.
Adjust red, green and blue optical Focus following the instructions outlined on FOCUS section of this manual.
Ignore the fact that the test patterns will not overlap at this time.
Mechanical Center Alignment:
IMPORTANT NOTE: It is important that this step be
performed DO NOT adjust for alignment using the centering
rings on the back of the tubes or depend on the
convergence system to make the adjustment. In order to
preserve memory space for normal convergence adjustments
it is very important that a echanical alignment be performed
when the screen size is changed.
When three channels have been focused use the menu
system to call up the Red Convergence pattern. You may
reach this menu by pressing “Menu” to reach the Main Menu,
“8” to reach the “Adjust” menu, “4” to reach the main
“Convergence” menu and finally, “1” to reach the red
convergence.
To proceed with the alignment, loosen four screws market
"R" as shown in the diagram on this page.
B
B
B
B
R
R
R
R
IMPORTANT NOTE: LOOSEN THE SCREWS ONLY, DO NOT REMOVE THEM.
When the screws have been loosened, use two hands to gently move the red tube/lens assembly so that the
red lines precisely cover the green reference at the center of the screen. IT is more important to achieve
center coverage here; any variations at the outer edges of the picture may be corrected during setup with
the geometry and convergence controls.
Once the best center convergence is achieved, tighten all four screws.
Press “2” to call up the Blue Convergence grid and repeat the procedure outlined above, this time loosening
the four screws that secure the blue tube/lens assembly and move the tube to achieve best coverage of the
red lines with the blue channel. Be certain to tighten the screws when you are finished.
Press “MENU” three times or “EXIT” to exit the menu system.
The unit is now aligned for the new screen size, and you should proceed with all normal
setup instructions detailed in this manual.
- 27 -
HD-700 projector’s RS232 Control
The RS232 interface for HD-700 can be operated from any terminal, such as a Windows 95, 98
PC running HyperTerminal.
COMMUNICATION PORT SET-UP
CONNECTOR PIN-OUT
Baud Rate :
Parity
:
Stop bits
:
Num. of bits :
Flow control :
2
3
5
9600
none
1
8 bits
none
Each command is enclosed in the < > character envelope.
The following table lists the commands available.
POWER CONTROL
<PON> power on
<POFF>
power off
<p>
power toggle
DUPLICATING REMOTE CONTROL BUTTONS
<L>
<R>
<U>
<D>
<0>
<1>
<2>
<3>
<4>
<5>
<6>
<7>
<8>
<9>
<+10>
<m>
<e>
<n>
<i>
left arrow
right arrow
up arrow
down arrow
0
1
2
3
4
5
6
7
8
9
+10
menu
exit
enter
guide
- 28 -
TX (Transmit Data)
RX (Receive Data)
GND (Signal Ground)
Limited Warranty
This warranty applies only to the first person or entity that purchases the HD-700 for personal or
business use and not for the purpose of distribution or resale. The warranty period is for one
(1) year from the date of purchase for labor and parts.
DWIN Electronics shall not be liable or in any way responsible for any incidental or consequential
damages of any kind.
This warranty covers all defects in material and workmanship when shipped in its original
container, with the following specific exceptions. These are:
•
•
•
•
•
•
•
•
damage to or deterioration of any accessory or decorative surface;
damage caused by improper installation or adjustment;
damage caused by accident, unreasonable use or neglect;
damage from failure to follow instructions contained in your operating instructions;
damage from the performance of repairs by someone not authorized by DWIN
Electronics;
any unit on which the serial number has been effaced, modified, or removed;
damage occurring during shipment;
units which have been altered or modified in design, appearance or construction.
This warranty covers only the actual defects within the PRODUCT itself, and DOES NOT cover
the costs of installation or removal from a fixed installation, normal set-up or adjustments, claims
based on any misrepresentation by the seller, or performance variations resulting from
installation related circumstance such as signal quality, AC power or incompatibilities with display
devices or computer software.
DWIN Electronics will, at its option, either repair or replace the defect, or replace the defective
product or part thereof at no charge to the owner for parts and labor covered by this warranty.
If a unit is examined which is not in need of repair, you will be charged for the examination.
You must pay shipping charges incurred in getting your product to the factory. We will pay the
return shipping charges if the repairs are covered by the warranty. Please save the original
shipping cartons. A charge will be made for additional cartons.
If your product needs service, you should notify us at:
SERVICE DEPARTMENT
DWIN Electronics, Inc.
710 North Mariposa St.
Burbank, CA 91506
Tel. ( 818 ) 239 - 1500
Fax ( 818 ) 239 - 1506
You'll need to present the original bill of sale to establish the date of purchase.
- 29 -