1
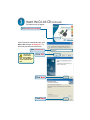
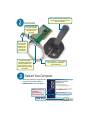
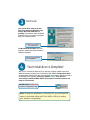
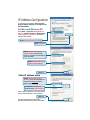
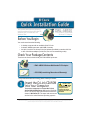
This product works with the following
operating system software: Windows XP,
Windows 2000, Windows Me, and
Windows 98se
DWL-AB520
D-Link AirPro Multimode
™
Wireless PCI Adapter
Before You Begin
You must have at least the following:
•
•
•
A desktop computer with an available 32-bit PCI slot
At least a 300MHz processor and 32MB of memory
An 802.11a or 802.11b Access Point (for Infrastructure Mode) or another 802.11a
or 802.11b wireless adapter (for Ad-Hoc; Peer-to-Peer networking mode).
Check Your Package Contents
These are the items included with your DWL-AB520 purchase:
• DWL-AB520 Wireless Multimode PCI Adapter
• CD-ROM (containing Manual and Warranty)
If any of the items above are missing, please contact your reseller.
Insert the D-Link CD-ROM
Into Your Computer
Turn on the computer and Insert the D-Link
AirPro DWL-AB520 Driver CD into the CD-ROM
drive. The step-by-step instructions that follow are
shown in Windows XP. The steps and screens are
similar for the other Windows operating systems.
Do NOT install
the DWL-AB520
PCI Adapter into your
computer before
installing the driver
software on the D-Link
CD-ROM!
©2002 D-Link Systems, Inc. All rights reserved. Trademarks or registered trademarks are the property of their respective holders.
Software and specifications subject to change without notice. DWL-AB520. 091902
Insert the D-Link CD continued
The Install Screen will appear.
Click Install Drivers & Utility
If the CD does not automatically start, go to
Start > Run and type “D:\Setup.exe”. If it
does start, proceed to the next screen.
Type “D:\Setup.exe”
The letter “D”
represents the
letter of the CD-ROM
drive. Your CD-ROM drive
may be a different drive
letter.
Click OK
Click Next
Click Next
Continued
Click Next
Click “No, I will restart
my computer later”
Finish
Shut down your computer and unplug it from its power source.
Install the DWL-AB520 Adapter Into
Your Desktop Computer
A. Make sure to turn off your computer and unplug the power cord before
you begin. Remove the back or side cover of the computer.
B. Carefully guide the DWL-AB520’s antenna through the PCI bracket
opening adjacent to the PCI slot you intend to use for the DWL-AB520.
Install the DWL-AB520 Adapter Into
Your Desktop Computer continued
C. Install the DWL-AB520 carefully, and
firmly set it into the available PCI slot
(which is typically white or creamcolored).
D. Secure the DWL-AB520’s back
panel bracket with its mounting
screw.
E. Replace the computer’s cover.
F. Gently connect the antenna to the
antenna stand.
Desk or Wall-mountable Antenna to
wirelessly connect to 802.11a and
802.11b networks
Continued
Back Panel/Bracket
— Properly installed,
this panel should be at
the back of your
computer
Screw Mount
The screw that
secures the
adapter to the
back of your
computer fits
into this slot.
Link/Activity LEDs
Indicates that the card is
properly installed when
the computer is on and
blinks when data is being
transmitted.
Antenna Cable — connects the
DWL-AB520 PCI board to the
external antenna
Restart Your Computer
When you restart your computer, this
Found New Hardware Wizard
(Windows XP) screen will appear:
Select Install the
software
automatically
(Recommended)
Click Next
Continued
(The D-Link driver software for this
device is undergoing Windows Logo
testing. Microsoft certification is
pending.) For Windows 2000, this Digital
Signature Not Found screen may appear
after your computer restarts.
Click Yes to finalize
the installation
For Windows Me and 98se, after your
computer restarts, this Systems Change
window may appear
Select Yes to finalize
the installation
Your Installation is Complete!
After you’ve continued in Windows XP (or after the computer restarts in the other
Windows operating systems), the D-Link AirPro DWL-AB520 Configuration Utility
will atuomaticaly start and the utility icon will appear in the bottom right hand corner of
the desktop screen (systray). If this icon appears GREEN, then you have
successfully installed the DWL-AB520, connected to a wireless network, and
ready to communicate!
Double-Click the utility icon
to use the configuration utility.
Note: During the installation in Windows XP, you will have the
option to load and utilize the D-Link AirPro Utility for setting
your wireless configuration.
Appendix
Using the Configuration Utility
A. Available WLANs: is a
list of all available
wireless 802.11a and
802.11b networks.
B. Preferred WLANs: is a list of
all available wireless 802.11a
and 802.11b networks that you
have connected to or are
currently connected to.
C. Add: If an Access
Point is not listed, click
the add button to add it.
B
A
E
C
D. New: Allows you to
add a Preferred WLAN
manually.
G
D
F
E. Properties: Allows you to
change IP Addresses and
Encryption settings for
highlighted Preferred WLANs.
F. Advanced: Allows you
to change the
connection type from
Infrastructure to Ad-Hoc.
H
I
G. Connection State:
Shows current settings
and signal strength
H. Hardware Information:
Shows MAC Address of your
DWL-AB520
I. Advanced State:
Shows current settings
for Turbo Mode and
Ratio State
IP Address Configuration
To connect to the network, make sure the
proper network settings are configured for
the DWL-AB520.
For Microsoft Windows XP:
Go to Start > right click on My Network
Places > select Properties > Double-click
on the Network Connection associated
with the DWL-AB520.
Select Internet Protocol (TCP/IP)
Click Properties
Select Obtain an IP address
automatically (if the Wireless
Router or Access Point has DHCP
server enabled).
Select Obtain DNS server
address automatically.
Click OK
Static IP address setup
Select Use the following IP
address (if the Wireless Router or
Access Point does not have a
DHCP server enabled).
IP address: 192.168.0.51
Subnet mask: 255.255.255.0
Input a static IP address in the same range
as the Wireless Router or Access Point
Click OK
Your Internet Service Provider (ISP)
provides preferred DNS server information
For Windows 2000 users:
Go to Start > Settings > Network and Dial-up
Connections > Double-click on the the Local
Area Connection associated with the DWLAB520 > select Properties.
Click Internet Protocol (TCP/IP)
Click Properties
Setup for wireless router or Access
Point using DHCP server.
Select Obtain an IP address
automatically (if the Wireless
Router or Access Point has DHCP
server enabled).
Select Obtain DNS server
address automatically.
Click OK
Static IP address setup
Select Use the following IP
address (if the Wireless Router or
Access Point does not have a
DHCP server enabled).
IP address: 192.168.0.51
Subnet mask: 255.255.255.0
Input a static IP address in the same range
as the Wireless Router or Access Point
Click OK
Your Internet Service Provider (ISP)
provides preferred DNS server information
For Windows Me and 98se users:
Click > Internet Protocol (TCP/IP) > Go to Start
> Settings > Control Panel > Double-click on the
Local Area Connection associated with the
DWL-AB520 > select Properties.
Click Internet Protocol (TCP/IP)
Click Properties
Setup for wireless router or Access
Point using DHCP server.
Select Obtain an IP address
automatically (if the Wireless
Router or Access Point has DHCP
server enabled).
Select Detect connection
to network media
Click OK
Static IP address setup
Select Use the following IP address
(if the Wireless Router or Access Point
does not have a DHCP server
enabled).
IP address: 192.168.0.51
Subnet mask: 255.255.255.0
Select Detect connection
to network media
Click OK
Your Internet Service Provider (ISP)
provides preferred DNS server information
Notes
Technical Support
Software updates and documentation are available on the
D-Link website.
D-Link provides free technical support for customers within
the United States for the duration of the warranty period on
this product.
U.S. customers can contact D-Link technical support
through our web site or by phone.
D-Link Technical Support over the Telephone:
(877) 453-5465
24 hours a day, seven days a week
D-Link Technical Support over the Internet:
http://support.dlink.com
email: [email protected]