1
MODEL N0:
2-DIN NAVICEIVER
15.5cm/6.1" LCD DISPLAY
USER MANUAL
English
TABLE OF CONTENTS
TABLE OF CONTENTS .............................................................................................................................................. 2
INTRODUCTION ........................................................................................................................................................ 3
WARNINGS................................................................................................................................................................. 4
PANEL CONTROLS ................................................................................................................................................... 6
REMOTE CONTROLS................................................................................................................................................ 7
BASIC OPERATION ................................................................................................................................................... 9
DISC OPERATION .................................................................................................................................................... 10
TUNER OPERATION................................................................................................................................................. 14
USB/SD CARD OPERATION .................................................................................................................................... 16
iPod OPERATION ...................................................................................................................................................... 17
BLUETOOTH OPERATION ....................................................................................................................................... 18
OTHER MODES ....................................................................................................................................................... 20
SYSTEM SETUP ...................................................................................................................................................... 21
DEVICE CONNECTIONS ......................................................................................................................................... 25
INSTALLATION ......................................................................................................................................................... 27
TROUBLESHOOTING .............................................................................................................................................. 28
SPECIFICATIONS ..................................................................................................................................................... 30
APPENDIX ..................................................................................................................................................................31
WARRANTY............................................................................................................................................................... 34
2
DEUTSCH
ZE-NC524
INTRODUCTION
Dear customer,
thank you for purchasing the ZE-NC524 naviceiver. You acquired a multifunctional car
multimedia center which is able to playback files from a huge number of formats and disc
structures. It can be extended with the DVB-T-receiver ZE-DVB 2000. You can directly
connect an iPod and play all formats the handheld can, when it is connected. The
navigation unit supports all up-to-date features like TMC and (with an additional license)
TMC Pro as well.
SUPPORTED FORMATS AND DISC STRUCTURES:
The unit has been tested with, but is not limited to, the following encoding standards:
DVD, DVD-R, DVD+R, DVD-RW, CD, CD-R, VCD, DVCD, CDDA, Picture-CD (JPG), MP3,
WMA, XVID, DivX.
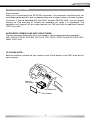
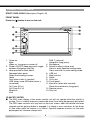
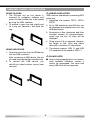
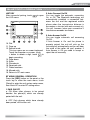
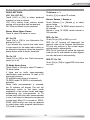
PLEASE NOTE:
Before installation remove the two screws on top of the device or the DVD drive will not
work properly..
Remove
two screws
Main Unit
Trim Frame
3
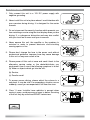
WARNINGS
1. Only connect this unit to a 12V DC power supply with
negative grounding.
2. Never install this unit at a place where it could interfere with
your overview during driving. It is designed for the center
console.
3. Do not circumvent the security function which prevents you
from watching a movie using the front display when you are
driving. It' s a dangerous distraction and may also conflict
with your local law or even void your insurance.
4. Never expose this unit, the amplifier or the speakers to
moisture or water to prevent electronic short-circuiting
causing sparks or fire.
5. Please don‘t change the fuse in the power cord without
professional guidance, improper fuse may cause damage
to this unit or may even cause a fire.
6. Please power off this unit at once and send it back to the
after-sales service center or the dealer/distributor you
purchased it from if one of the following symptoms is found:
(a) Water or objects which got into the unit;
(b) Smoke;
(c) Peculiar smell.
7. To ensure secure driving, please adjust the volume to a
safe level. It may be vital if an emergency situation occurs
suddenly, cause you are expected to still hear the siren.
8. Class 1 Laser: Invisible Laser radiation is present when
casing is open, avoid exposure of eyes to beam. Servicing
of the unit only by authorised ZENEC technicians.
4
DEUTSCH
ZE-NC524
WARNINGS
PRECAUTIONS
1. Never disassemble or adjust the unit without any professional guide. For details, please
consult an authorized ZENEC dealer.
2. lf the front panel or TFT monitor needs to be cleaned, please use a clean silicone cloth
and a neutral detergent. Using a rough cloth and non-neutral detergent or all solvents (i.e.
ethanol, benzene) for cleaning may result in damage or discoloration.
3. lf any abnormal behaviour of the unit is found, please refer to the trouble shooting guide.
In case you can't determine the cause of the failure , you can always try to press the
[RESET] key on the front panel to restore factory defaults. If that doesn't help either
contact your local authorized ZENEC dealer.
4. lf you park the car for a longer time period under extreme temperatures (both extreme hot
and cold), you should refrain from switching it on immediately. Rather wait until the cabin
temperature has reached a range between minus five and plus forty degrees Centigrade.
5. Using in-car heater in low temperature environment may result in condensation inside the
unit. DO NOT use the unit in this situation, eject the disc and wipe off the condensation
on the disc. lf the unit still doesn't work after a few hours, please contact with after-sales
service center.
6. To prevent damage to the screen, avoid touching it with sharp objects.
7. If the software version on your unit has been updated the icons used for this documentation
may differ from the actual images displayed on the screen.
8. Operate the unit according to this information to prevent unnecessary problems or
dangers. Be aware that you also risk your warranty if you don't use the unit in compliance
with this manual.
DECLARATION
This product incorporates copyright protection technology that is protected by U.S patents
and other intellectual property rights. Use of this copyright protection technology must be
authorized by Macrovision, and is intended for home and other limited viewing uses only
unless otherwise authorized by Macrovision.
Reverse engineering or disassembly is prohibited.
5
PANEL CONTROLS
START CODE: 012345 (Description: Page 9, 24)
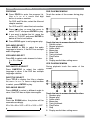
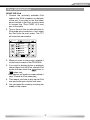
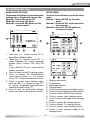
FRONT PANEL
Press the ( ) button to turn on the unit.
NAV
1. Power on
Mute
When on, long press to power off.
2. Screen ON/OFF. Keep pressed to toggle
between Navigation and Play.
3. Keep pressed for Main Menu.
Repeated short press:
Select the following sources
Radio
Disc (when a disc is inserted)
USB (when some USB data carrier is
connected)
AV1 (rear A/V In)
AV2 (front A/V In)
Bluetooth
iPod
DVB-T (optional)
Navigation (long press)
4. Microphone
5. Rotate to adjust volume level.
Press to enter Equalizer setting menu.
Press and hold it to enter setting mode.
6. USB slot
7. Map card slot
8. Reset
9. AV-In jack
10. Touch panel
11. Eject disc (when disc inserted)
Reset the mechanism (long press)
12. Remote sensor
13. Disc slot
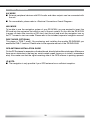
SAFETY NOTES:
■ The DVD video display of the center console unit will not operate while the vehicle is
moving. This is a safety feature to prevent the driver from being dangerously distracted.
The DVD video functions will only work on the front screen, when the vehicle has been
stopped and the parking brake is engaged. It is illegal in most countries for the driver
to view video while the vehicle is in motion. Optional headrest monitors for the back
passengers will, however, always work.
6
DEUTSCH
ZE-NC524
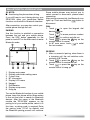
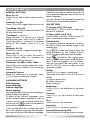
REMOTE CONTROLS
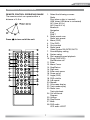
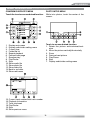
REMOTE CONTROL OPERATING RANGE
The remote control can operate within a
distance of 3~5 m.
1. Select the following sources:
Radio
Disc (when a disc is inserted)
USB (when USB drive is connected)
AV1 (rear A/V In)
AV2 (front A/V In)
Bluetooth
Navigation
iPod
DVB-T
2. Radio preset scan
Radio auto preset
3. Menu (DVD)
4. Title (DVD)
5. Go to search
6. Radio band
Video System PAL/NTSC/AUTO
7. Sound/display setting
8. System setup
9. Fast reverse/forward playback
10. Zoom (DVD/VCD)
Dial/Receive call
11. Enter
12. Menu Cursor
13. Stop/Return
14. Digit area
15. Enter main menu
16. Power on/off
17. Angle (DVD)
18. DVD subtitle
19. A-B repeat
20. Repeat
21. On-screen display
22. Track random play
23. Radio tune
Track skip/seek
24. Call off/cancel
Program
25. Volume
26. Play/Pause
27. Mute
28. DVD audio
VCD audio L/R/ST
Press ( ) to turn on/off the unit.
7
REMOTE CONTROLS (COnTinUED)
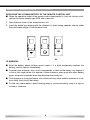
REPLACING THE LITHIUM BATTERY OF THE REMOTE CONTROL UNIT
■ When the operation range of the remote control deteriorates or it has no function at all,
replace the lithium battery type 2025 with a new one.
1. Open the back cover of the remote control unit.
2. Insert the button-type battery with the stamped (+) mark facing upwards, directly under
the small metal tongue. Close the back cover.
WARNING:
■ Store the battery where children cannot reach it. If a child accidentally swallows the
battery, consult a doctor immediately.
■ Do never ever recharge, short-circuit, disassemble or heat up the battery nor dispose it
in fire as this might cause it to explode. Lithium batteries, even more than other battery
types, are prone to explode when they become excessively hot.
■ Do not expose or bring the battery into contact with any other metallic material as it will,
most likely, short-circuit the battery.
■ For the very same reason, when throwing away or storing the battery, wrap it in tape or
insulate it somehow.
8
DEUTSCH
ZE-NC524
BASIC OPERATION
Method 2:
■ Open the 'Main menu' by keeping SRC
pressed at the top left corner of the TFT
or press MODE button on remote control,
and then touch the desired option or
select the option by moving the cursor
and then confirm. Touch / on the TFT
to show other options of the main menu.
PASSWORD
If you power-on the unit for the first time you
need to enter a password. You will also need
to re-enter it every time the unit has been
disconnected from the power supply or when
the battery has been removed or replaced.
Type "012345" (default), using the numeric
to erase
on-screen display. Touch
previous number. Touch
NOTES:
to confirm.
■ Devices which are not ready or not
connected cannot be chosen and the
icons will be grayed out.
TURN ON/OFF THE POWER
1. Press the ( ) button to switch on the unit.
■ When entering DVD mode allow the DVD
reader up to an entire minute to initialise.
It will auto-enter the DVD-menu if a DVD
is inserted.
■ The unit resumes with the status it had
before it was powered off.
2. When on, press the ( ) button at least
two seconds to switch off the unit.
PARKING BRAKE DETECTOR
1. The 'PRK SW' cable is connected to the
hand brake switch in order to blank the
DVD screen when the handbrake is not
engaged.
MUTE
Press the PWR button very briefly to toggle
the sound off and on.
NOTE:
■ MUTE will be displayed on-screen during
muting.
2. If you try to watch a video with the
handbrake released you will see
""WARNING!" Engage Parking Brake to
View Video" on-screen. No video will be
shown on the console screen. Optional
headrest monitors for the backseat
passengers will, however, function
normally.
ADJUST THE VOLUME
Rotate the VOL knob to increase or decrease
the volume level.
The adjustable range is 0 to 39.
PLAYING SOURCE SELECTION
WHEN REVERSE DRIVING
If the rear view video camera is connected,
the unit automatically switches to CAMERA
source during reverse driving. The unit
returns to it´s previous work after the reverse
driving is done.
Method 1:
■ Press SRC button on the panel or remote
control to cycle through all the available
sources.
9
DISC OPERATION
INSERT A DISC
Insert a disc into the slot, and the unit will
change automatically to disc mode.
NOTES:
■ Please check, if there is already a
disc in the unit before you try to insert
another one.
■ The unit will exit current playing source
and enter DVD mode when a disc is
inserted.
■ Some recorded discs, such as CD-R,
CD-RW, DVD-R, DVD + R, DVD-RW,
DVD+RW can only be played, when they
are closed after recording (i.e. “close
session and disc”).
EJECT THE DISC
Press button to eject the disc.
NOTES:
■ After ejecting the disc, the unit reverts
automatically to the previously used mode.
■ You can eject a disc even when the unit
is switched off. The unit remains switched
off after the disc is ejected.
■ If the disc is not removed from the unit
within 10 seconds, it will be reloaded to
prevent accidental damage.
USING THE TOUCH SCREEN CONTROLS
The touch key areas for CD/VCD/DVD
playback are outlined below:
2. ERROR will be displayed if a disc read
error occurs during disc operation.
3. The unit will auto-recognize the inserted
medium (CD, VCD, DVD, etc.) and display
the respective icon.
4. If you insert a DVD it advances to the
title screen. Now you can easily start it by
pressing [play].
FILE TYPES/SUPPORTED FORMATS
Audio file: MP3(*.mp3), WMA(wma)
Video file:
XVID
DivX
MPEG 2 (*.vob)
MPEG 1 (*.dat)
Picture file: JPEG (*.jpg)
Picture CD
MP3 file:
Supported sampling frequency for MP3 disc:
8KHz to 48KHz (44.1 KHz preferably).
Supported bit-rates of MP3 disc are: 32 - 320
kbps (128 kbps preferably).
DISC AND FILE TYPES WHICH ARE NOT
SUPPORTED
*.AAC, *.DLF, *.M3U, *.PLS, MP3 PRO files
and files with DRM. Discs with left open
sessions.
STOP PLAYBACK TEMPORARILY
■ During playback, press
to pause playback.
■ The sound will be muted and "PAUSE" is
displayed.
■ Press again to continue playback.
STOP PLAYBACK ENTIRELY
During DVD, VCD, CD, MP3 playback:
A - Turn to main menu
B - Display on screen control menu
DISC PLAYBACK
1. After a disc is inserted, the display will
show READ. For MP3 or discs with mixed
files, the initial reading time may even
exceed one minute. Just give it a little time.
1. Press ■ key on remote control once to
stop the playback including saving of the
to
relevant location on the disc, press
resume the playback from the saved disc
location.
2. Press ■ twice to cease the playback.
Press
to start the playback from the
very beginning, the title page of the DVD
or the first track of VCD / CD.
10
DEUTSCH
ZE-NC524
DISC OPERATION (COnTinUED)
SELECT DESIRED TRACK
■ Press or to skip to the next or the
previous track.
■ Use 1-9 and 0, 10+ buttons on the remote
control to select the desired track number.
FAST FORWARD/BACKWARD DURING
PLAYBACK
Press or for more than 2 seconds once
and repeat to select X2, X4, X8 or X20 speed
of fast backward or forward playback.
■ During the fast forward or backward
operation, press
briefly to playback
again.
into standby mode.
GOTO
Go directly to desired track/chapter or time
point of DVD video.
Press GOTO button on the remote control,
track or DVD title/chapter and time display on
top of the screen. Current item is highlighted.
Use / to select desired item. Use the
digit buttons to select number. Press ENTER
to confirm.
■ During the fast forward or backward
operation, the volume will be muted.
RANDOM TRACK PLAYBACK (FOR CD/
VCD/MP3 ONLY)
You can play all the tracks in random order.
once or
1. During playback, press
more to choose SHUFFLE, SHUFFLE
DIR or SHUFFLE OFF.
2. Press
playback.
again to select normal
REPEAT
During playback, press
once or more.
■ REP icon will appear on the display.
■ For VCD/CD: Display appears REP ONE
➞ REP ALL ➞ REP OFF
■ For DVD: Display appears REP
CHAPTER ➞ REP TITLE ➞ REP OFF
■ For File disc: Display appears REP ONE
➞ REP DIR ➞ REP ALL ➞ REP OFF
NOTE:
■ If you do not select RPT on, when
the entire disc or TITLE playback has
finished, the system will stop. After idling
more than five minutes the unit will go
11
DISC OPERATION (COnTinUED)
PROGRAM
■ Press PROG to enter the program list.
Use / or / cursor and digit
button to enter a number.
DVD PLAYBACK MENU
Touch the center of the screen during playback:
For DVD and File disc, select the title and
chapter number.
For VCD and CD, select the track number.
■ Press
to play, or move the cursor to
select "PLAY" and press ENTER to play.
■ If you want to delete the list, move the
cursor to "CLEAR" and press ENTER to
delete all the list set before.
■ Press PROG again to exit program play.
DVD AUDIO SELECT
Press AUDIO or R/L to select the audio
language to listen to, if the DVD has multiple
audio languages.
VCD AUDIO SELECT
Press R/L to select audio channel to listen.
L ➞ R ➞ Stereo
DVD SUBTITLE SELECT
Press SUBTITLE to select the subtitle
language to show, if the DVD has multiple
language subtitles.
Touch the icon to access desired function.
1. Subtitle select
2. Repeat playback
3. Audio select
4. Menu play
5. Select title
6. Track skip/seek
7. Play/Pause
8. Stop
9. Display audio/video setting menu
VCD PLAYBACK MENU
During playback touch the center of the
screen:
DVD TITLE SELECT
Press TITLE to display the title or chapter
list, use / or / cursor or digit number
to select, press ENTER to play.
DVD ANGLE SELECT
Press ANGLE to select a different angle to
view, if the DVD has multiple view-angles.
ZOOM
Press the ZOOM button, the picture will be
zoomed accordingly.
X2➞ X3➞ X4➞ X1/2 ➞ X1/3 ➞ X1/4 ➞ OFF
Touch the icon to access desired function.
1. Random play
2. Repeat play
3. Audio select
4. Menu play
5. Track skip/seek
6. Play/Pause
7. Stop
8. Display audio/video setting menu
12
DEUTSCH
ZE-NC524
DISC OPERATION (COnTinUED)
CD/MP3/MOVIE/PHOTO MENU
Touch the icon to access desired function.
1. Display main menu
2. Display audio/video setting menu
3. Current time
4. Folder/file list
5. Repeat playback
6. Previous/next page
7. Random play
8. Play/Pause
9. Stop
10. Show audio file
11. Show photo file
12. Show video file
13. Back to up folder
14. Show next menu
PHOTO INTRO MENU
While intro photos, touch the center of the
screen:
Touch to access desired function.
1. Rotate the picture anticiockwise/clockwise.
2. Mirror the picture vertically/horizontally
3. Zoom
4. Previous/next picture
5. Play/Pause
6. Stop
7. Display audio/video setting menu
15. Current track number/total track number
16. Playback Information
17. Track skip/seek
18. Play/Pause
19. Stop
20. Show previous menu
13
TUNER OPERATION
RADIO MENU
Touch to access desired function.
1.
2.
3.
4.
5.
Display main menu
Display audio/video setting menu
Current time
Tuner information
Touch to tune automatically
Press more than 2 seconds to tune
manually.
6. Select Previous/next preset station
7. Show radio list
8. Tuner information
9. Preset station
10. Touch to tune automatically.
Press more than 2 seconds to tune
manually.
11. Band switch
12. Auto search and store stations
13. Show previous menu
RDS BASICS
RDS service availability varies with areas.
Please understand if RDS service is not
available in your area, the following services
are not available.
AF MODE
AF(Alternative Frequency): When the radio
Signal strength is poor, enabling the AF
function will allow the unit to automatically
search another station with the same PI
(program identification) as the current station
but with stronger signal strength.
Main menu ➞ Setup menu ➞ Radio ➞ AF
On/Off
AF On: AF function is activated.
AF Off: AF function is disabled.
Remark: AF indicator on TFT will flash until
RDS information is received. If no RDS
service is available in your area, turn off the
AF mode.
TA MODE
Some RDS FM stations periodically provide
traffic information.
TP (Traffic Program Identification)
Broadcasting of traffic information
TA (Traffic Announcements Identification)
Radio announcements on traffic conditions
Main menu ➞ Setup menu ➞ Radio ➞ TA On/
Off.
When TA mode is turned on, the TA indicator
will blink.
When traffic announcement is received,
the TA indicator will display. The unit will
temporarily switch to the tuner mode
(regardless of the current mode) and begin
broadcasting the announcement at TA
volume level. After the traffic announcement
is over, it will return to the previous mode and
volume level. When TA is turned on, SEEK,
SCAN, AMS function can only be received
or saved when traffic program identification
(TP) code is received.
14
DEUTSCH
ZE-NC524
TUNER OPERATION (COnTinUED)
TA SEEK/TA ALARM
Main menu ➞ Setup menu ➞ Radio ➞ TA
Seek/Alarm.
If the TA (Traffic Announcements) is turned on
and there is no traffic program identification
code received in the specified time, no TA/TP
will display and either TA Alarm or TA Seek
will be activated.
TA Alarm mode: Alarm is turned on.
TA Seek mode: TA Seek is automatically
activated in non-radio mode.
TA VOL
Main menu ➞ Setup menu ➞ Radio ➞ TA
Volume
RETUNE MODE
Main menu ➞ Setup menu ➞ Radio ➞
Retune l/s
RETUNE-S or RETUNE-L is time length
selection of TA SEEK retune interval.
RETUNE-S: Short, TA SEEK retune interval is
45 seconds.
RETUNE-L: Long, TA SEEK retune interval is
180 seconds.
REMARK: RETUNE mode functions for TA
during TA SEEK mode only.
REG MODE
Main menu ➞ Setup menu ➞ Radio ➞ REG
On/Off
REG ON: AF function will implement
the regional code (of the PI) and only
stations in the current region can be tuned
automatically. REG OFF: AF function will
ignore the regional code (of the PI) and
stations in other regions can also be tuned
automatically.
15
USB/SD CARD OPERATION
USING SD-CARD
1. The SD-card slot on this device is
reserved for navigation software and
maps. All other content has to be loaded
by using the USB- interface.
USB/SD-CARD NOTES:
2. To remove it, press the card slightly and
let it pop out. Remove it and dose the
cap.
2. Up to 200 directories and 500 files can
be displayed and played back from the
USB-data carrier.
USB functions and features concerning MP3
music play.
1. Supported file systems FAT12, FAT16,
FAT32.
3. Descriptors of files, directories and titles
shouldn't exceed 32 characters/bytes,
cause only the first 32 chars will be
displayed.
4. ID tag version 2.0 is supported. However,
the length of title, artist and album
descriptor is limited to 32 chars/bytes.
USING USB DEVICE
1. Open the cover flap, insert a USB device
into the USB connector.
After connecting a USB device, the unit
will read and play the files automatically.
2. To remove the USB device, you
should first select another source (safe
removal).
5. The device supports USB 1.1 and USB
2.0 standards at the speed of USB 1.1.
PLEASE NOTE:
■ Due to varying specifications of commercially available USB-data carriers it
cannot be guaranteed, that each and
every USB-stick will be supported.
16
DEUTSCH
ZE-NC524
iPod OPERATION
USING THE iPod
1. Connect the optionally available iPod
cable to the "iPod" connector on the back
of the unit. If you want to use the video/
photo function of the iPod, you also need
to connect the "iPod CVBS" (3.5 mm)
part of the cable.
2. Turn on the unit, the unit should switch to
iPod mode upon connection, if not, select
the iPod from the main menu. The TFT
will show the menu below.
3. When you want to play songs, operate it
via the touch-screen of the ZE-NC524.
4. If you want to display photos or playback
some videos from the iPod, choose iPod
photo or
mode and then touch the
video icon.
Both choices will lead to a screen where it
says "Please let iPod video play".
5. That means you have to pick up the iPod
now and make your choice from here.
6. You can leave this mode by touching the
middle of the screen.
17
BLUETOOTH OPERATION
NOTE:
■ Avoid using the phone when driving.
If you still have to use it during driving, your
ZE-NC524 offers you hands-free device
functions via the built-in Bluetooth interface.
After connection, you may also control your
mobile phone through the unit.
PAIRING
Use this function to establish a connection
between the unit and your mobile phone.
Press the SRC button repeatedly on the
panel or touch BT on the Main menu to enter
Bluetooth mode.
Some mobile phones may instruct you to
select connect or disconnect, please select
connecting.
After pairing successfully, the Bluetooth icon
button to
lights up. Touch and hold the
disconnect.
DIAL
1. Touch
to open the keypad, dial
desired number.
Touch
to erase previous number.
Touch
to confirm and dial out.
2. Touch
or press the
key on the
remote control to cancel.
3. At BT main menu, touch
to redial
the last number.
RECEIVE
1. After a successful pairing, when there is
a incoming call, the unit switches automatically to BT mode.
2. Touch
or press the
key on the
remote control to receive the call.
3. Touch
or press the
key on the
remote control to hang up.
1.
2.
3.
4.
5.
6.
7.
8.
9.
Display main menu
Display audio/video setting menu
Current time
BT Information
Display LOG menu
Keypad
Dial/Receive
Display setup menu
Hang up
Turn on the Bluetooth function of your mobile
phone, keep the phone within three meters
to the unit and start to search for Bluetooth
devices. After the name of the Bluetooth
module the "ZE-NC524" appears on the
pairing list of your mobile phone, select it. At
this time, a pairing code is required. Enter
the pairing code ("1234" by default) and
the Bluetooth pairing process will continue.
18
DEUTSCH
ZE-NC524
BLUETOOTH OPERATION (COnTinUED)
HISTORY
After successful pairing, touch
the LOG menu.
to open
LO G
10. Dial
11. Page up
12. Search mode
This icon opens an on-screen keyboard.
Touch the character on-screen, touch
to
< button to delete a digit, touch
begin searching.
13. Page down
14. Enter
15. Phonebook
16. Received calls
17. Dialed numbers
18. Missed calls
19. Return to BT main menu
2. Auto Connect On/Off
You can toggle the automatic connection
On or Off. The Bluetooth technology will
automatically establish a connection between the unit and the registered mobile
phone when the transmission distance is
ten meters or shorter (with auto-connect on).
You will, however, loose your connection if
the distance exceeds ten meters.
3. Auto Answer On/Off
You can toggle automatic call answering
On/Off.
If Auto Answer is On and the phone is
properly paired, the unit will pick up the
incoming call automatically and you will hear
the voice of the caller via your speaker. If
Auto Answer is Off you need to accept or
reject the call manually.
BT MENU GENERAL OPERATION
Press the [SRC] button on the panel or the
touch key to enter the main menu, touch
[Setup] to enter the unit system setup menu,
then touch BT to enter BT setting menu.
1. PAIR ON/OFF
a. ON Allow other phones to be paired
besides the phone(s) which are already
paired with the unit.
b. OFF Only phones which have already
been paired, will find the unit.
19
OTHER MODES
A/V MODE
■ External peripheral devices with RCA audio and video outputs can be connected with
the unit.
■ For more details, please refer to <Electrical Connections Overall Diagram>.
NAV MODE
To be able to use the navigation system of your ZE-NC524, you are required to insert the
SD-card into the naviceiver first which is part of the set content. Do this with the ZE-NC524
in power off state. After insertion of SD card, start the unit and touch the navigation icon on
the TFT screen to start nav mode. Please refer to the included, separate “navigation manual”.
DVB-T MODE (OPTIONAL)
This player is "DVB-T ready". By purchasing and installing the module ZE-DVB2000 you
enable the DVB-T functions. Please refer to the separate manual of the ZE-DVB-2000.
GPS ANTENNA INSTALLATION GUIDE
Fix the GPS antenna for example on the dashboard, directly behind the windscreen. Make sure
there are no obstacles in the way (ex. metal coated screen forces you to install it somewhere
else). Also make sure that the signal receiving side of the GPS antenna is pointing upwards.
NOTE:
■ The navigation is only possible if your GPS antenna has a sufficient reception.
20
DEUTSCH
ZE-NC524
SYSTEM SETUP
AUDIO/VIDEO SETTING
Three ways will lead you to the audio/video
settings menu. Choose the one you like.
Method 1: Touch SEL on the TFT.
Method 2: Press the VOL knob.
Method 3: Press the SEL button on the
remote control.
SETUP MENU
You have three choices to reach the setup
menu:
Method 1: Select SETUP on the main
menu.
Method 2: Press the VOL knob more than
two seconds.
Method 3: Press the SETUP button on
the remote control.
12H
1. Touch the / buttons on the TFT to
adjust Bass/Middle/Treble.
2. Touch the / buttons on the TFT to
select between five preset equalizer
profiles (Rock, Classic, Flat, Pop, EQ
Off).
If you select EQ Off your sound will be
linearly amplified.
3. Touch to return to the EQ settings menu.
4. Touch to access the Fader/Balance
menu, then touch the /, / buttons
on the TFT to adjust the desired choice.
5. Touch to access Video settings menu,
then use the / buttons on the TFT
to adjust Brightness/Contrast/Colour
intensity/Dimmer of the TFT.
6. Touch to exit the audio/video settings
menu and return to the previous mode.
PIN Code
1.
2.
3.
4.
5.
6.
7.
8.
9.
24H
1234
Display main menu
Current time
Adjustable options
Page up/down
Touch to access general settings options
Touch to access language settings options
Touch to access DVD settings options
Touch to access radio settings options
Touch to show next page of the settings
menu
10. Touch to access BT settings options
11. Touch to access TV settings options
12. Touch to access other settings options
13. Touch to show previous page of the
settings menu
21
SYSTEM SETUP (COnTinUED)
GENERAL SETTINGS
Beep: On, Off
Touch [On] or [Off] to select beep sound on
or off.
Loudness: On, Off
Touch [On] or [Off] toggle loudness on or off.
Time Mode: 12H, 24H
Touch [12H] or [24H] to select between 12 or
24 hour time format.
Time Adjust: ,hh:mm,
Touch left side of [,hh:mm,] to activate
setting of the hours, touch []/[] to adjust.
Touch right side of [,hh:mm,] to activate
setting of the minutes, touch []/[] to
adjust.
Backlight: On, Off
Touch [On] or [Off] to toggle the back-light.
Mirror: On, Off
Touch [On] or [Off] to select mirrorred or
normal display. While it's activated the
camera output will be mirrored.
Subwoofer: Off, 80Hz, 120Hz, 160Hz
Touch [Off] to turn off the subwoofer, touch
[80Hz], [120Hz] or [160Hz] to set subwoofer
frequency.
Subwoofer Volume:
When the subwoofer is activated, touch
[]/[] to adjust subwoofer volume.
LANGUAGE SETTINGS
OSD Language
Audio Language
Subtitle Language
Menu Language
You may allocate more than one language to
different areas (see above).
To show all the optional languages, push
on the actual selected language to pop up
a menu choice of all available. Make your
to return to the previous
choice or touch
menu without any modification.
If the inserted DVD disc provides the audio
file in the selected language, the dialogues
you listen to will be in the selected language.
If the DVD disc does not deliver the audio file
in the selected language, they will be in the
default language.
You can change the language by pressing
[AUDIO] key of the remote controller.
DVD SETTINGS
TV System: NTSC, PAL, Auto
Touch [NTSC], [PAL] or [Auto] to select your
desired TV standard.
TV Type: 4:3PS, 4:3LB, 16:9
Touch [4:3PS], [4:3LB] or [16:9] to select TV
type to watch wide screen movies.
Password: Set
You need to enter this password in order to
be able to adjust the desired stage of the
parental lock.
to open the keypad, enter the
Touch
rating password by the number buttons.
Touch to erase a previously typed number.
to confirm. The original passTouch
word is “0000“. After you entered the password, [UNLOCK] appears on the screen,
now you can adjust the rating level. If you
want to [LOCK] it, enter a 4-digit password
using the keypad.
Rating:
Touch []/[] to select a rating level.
The rating of the disc is from 1 to 8 (kids to
adults):
(1) highest restricitions
(8) lowest restrictions
Default setting: 8
Brightness:
Touch []/[] to set brightness of the video
output.
Contrast:
Touch []/[] to set contrast of the video
output.
Hue:
Touch []/[] to set video hue.
Saturation:
Touch []/[] to set video saturation.
Default: Restore (only DVD)
Touch [Restore] to load the original settings.
22
DEUTSCH
ZE-NC524
SYSTEM SETUP (COnTinUED)
RADIO SETTINGS
LOC_DX: LOC, DX
Touch [LOC] or [DX] to select preferred
reception to local or distant.
LOC: Only (mainly local) stations broadcasting a strong signal can be received.
DX: Distant stations can be received.
Stereo_Mono: Mono, Stereo
Touch to select FM stereo or mono.
AF: On, Off
Touch [On] or [Off] to turn Alternative Frequency on or off.
If you activate this function the radio starts
to auto-search for the same radio station on
an alternative frequency when the reception
quality drops under a certain threshold.
TA: On, Off
Touch [On] or [Off] to turn Traffic Announcements on or off.
TA Mode: Seek, Alarm
Touch [Seek] or [Alarm] to select TA seek or
TA alarm mode.
If there are no traffic announcements
identification code received, TA seek or TA
alarm will be active.
TA ALARM mode: Alarm is turned on.
TA SEEK mode: TA SEEK is automatically
activated.
When traffic announcement is received,
the TA indicator will display. The unit will
temporarily switch to the tuner mode
(regardless of the current mode) and begin
broadcasting the announcement at TA
volume level. After the traffic announcement
is over, it will return to the previous mode and
volume level. When TA is turned on, SEEK,
SCAN, AMS function can only be received
or saved when traffic program identification
(TP) code is received.
TA Volume: /
Touch []/[] to adjust TA volume.
Retune: Retune_l, Retune_s
Touch [Retune_l] or [Retune_s] to select
retune mode.
Retune-s: Short, TA SEEK retune interval is
45 seconds.
Retune-l: Long, TA SEEK retune interval is
180 seconds.
REG: On, Off
Touch [On] or [Off] to REG on or off.
REG On: AF function will implement the
regional code (of the Program Identification
PI) and only stations in the current region
can be tuned in automatically.
REG Off: AF function will ignore the regional
code (of the PI) and stations in other regions
can also be tuned in automatically.
RDS CT: On, Off
Touch [On] or [Off] to toggle RDS clock time
on or off.
23
SYSTEM SETUP (COnTinUED)
BT SETTINGS
Pair: On, Off
Touch [On] or [Off] to toggle auto-pairing on
or off.
To reset the password, you should enter
the original password first, then input a new
to confirm it and input
password, touch
the password again to confirm it.
Auto Connect: On, Off
Touch [On] or [Off] to toggle auto-connect on
or off.
Auto Answer: On, Off
Touch [On] or [Off ] to toggle auto-answer on
or off.
PIN Code:
Touch to set the password to connect to
other Bluetooth devices.
MIC: Internal, External
Touch [Intern] or [External] to select internal
or external microphone. If no mic is connected
this is greyed out and can´t be used.
PC_BT Update
Enable an update of the Bluetooth software
(Bluetooth software write protection off/on).
Reset: On
Touch [On] to load default BT settings.
OTHER SETTINGS
TS: Adjust
Touch [Adjust] to calibrate the screen.
When the touch-screen operation is not
sensitive or exact enough, you should
calibrate the touch screen using the “TS
Calibrate” function.
SYS_Password: Set
Function to set the system password.
Touch [Set] to pop up the keypad, then set
the system password using the number
buttons.
Touch
to erase previous number.
to confirm. The original
Touch
password is “012345“.
24
DEUTSCH
ZE-NC524
DEVICE CONNECTIONS
NOTES OF CONNECTION
■ This unit is designed to be used in a vehicle with a 12-volt battery and negative
grounding. Before installing this unit to a mobile home, a bus, or a truck, make sure the
battery voltage is appropriate for this unit to be used, otherwise, install a transformer to
convert the output voltage to 12 V DC.
■ To avoid short circuits in the electrical system, ensure that the negative battery cable is
disconnected before installation.
■ To prevent short circuiting in the wiring which could lead to damage of this unit, secure
all wirings with cable ties and/or adhesive tape. Route the wirings in a secure manner,
stay away from hot or moving parts such as exhaust pipes, gear shift, handbrake, and
seat rails to prevent the wiring insulation being melted/wore off.
■ Never pass the yellow power cord through the installation hole into the engine
compartment and never ever connect it directly to the car battery. If that happens, it will
most likely produce some serious short-circuits which may permanently damage vital
parts of the electrical system.
■ Replacing a new fuse with 10 A rating when the old one is broken, using no fuse or
fuse with improper rating may cause damage to this unit or even fire. lf a proper fuse is
installed and electrical problems still occur, please contact your local ZENEC dealer.
■ Please make sure all the wiring connections and the cables of the speakers are wellinsulated. Otherwise, this unit may be damaged by short circuits.
■ lf there is no ACC available, please connect ACC lead to the power supply with a switch.
■ lf an external power amplifier is connected, please don't connect P.CONT lead to the
power lead of the external power amplifier, otherwise, electric sparks or some other
damage may be the result.
■ Never ground the speaker outputs to prevent damage to the built-in power amplifier.
■ The minimum rating of the speakers connected to this unit is 40 W with 4 to 8 Ω
impedance.
OPTION: CONNECTION TO THE ORIGINALLY EQUIPPED STEERING WHEEL REMOTE
CAN is the abbreviation for Controller Area Network. It is an vehicle specific Standard-BusProtocol of the car industry. Due to that protocol, the functions of the steering wheel builtin remote, as well as other vehicle functions, can be accessed and used. Simply connect
the CAN-BUS box option according to the included wiring-diagram. However, we cannot
guarantee that each and every used function will work, as a lot of vehicle use a lot of different
functions for their remote keys.
25
DEVICE CONNECTIONS (COnTinUED)
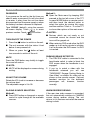
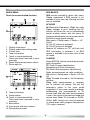
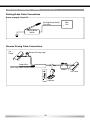
Parking Brake Cable Connections
Brake engaged: Signal 0V
Parking Brake Switch
Pink Wire
Main
Unit
Parking Brake
Switch
Reverse Driving Cable Connections
Car
Frame
Reverse Driving Light
Green Wire
Rear View Video Camera Lead
Battery
Car frame
Gearbox
26
DEUTSCH
ZE-NC524
INSTALLATION
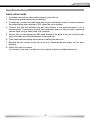
INSTALLATION GUIDE
1. If relevant, remove any other audio system(s) from the car.
2. Perform the required electrical connections:
3. If necessary, connect the hand brake wire to your hand brake contact in order to activate
the video display when playing a DVD (when the car is parked).
4. Connect the wire that activates the rear view camera to the reversing sensor or to a
reversing light. If necessary, connect your reversing camera to the car radio’s reversing
camera input using a video cable (not supplied).
5. Ensure that you now place the USB cable located at the back of the unit in such a way
that it protrudes out of the dashboard or the glove box.
6. Then check that everything works before installing the main unit.
7. Remove the two screws on the top of the unit, otherwise the disc player will not work
properly.
8. Attach the outer trim frame.
If you are not sure how to install this unit correctly, contact a qualified technician.
27
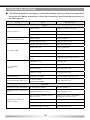
TROUBLESHOOTING
■ The following checklist can help you solve the problems which you may encounter when
using the unit. Before consulting it, check the connections and follow the instructions in
the user manual.
Problem
Cause
Corrective action
General
Unit can not power on.
Unit fuse blown.
lnstall new fuse with correct rating.
Car battery fuse blown.
lnstall new fuse with correct rating.
lllegal operation.
Reset the unit.
Battery depleted.
Change the Battery.
Battery installed incorrectly.
lnstall the battery correctly.
lmproper audio output connection.
Check wiring and correct.
Volume set too low.
lncrease volume level.
Speakers damaged.
Replace speakers.
Remote control does not work.
No/low audio output.
Heavily biased volume balance.
Adjust the channel balance to center position.
Speaker wiring is in contact with metal part
of car.
lnsulate all speaker wiring connections.
Pirated disc is in use.
Use original disc.
Speaker.
Replace speakers.
Wrong connections.
Check wiring and correct.
Speaker is shorted.
Check wiring and correct.
Tel-Mute malfunction.
MUTE wire is grounded.
Check the 'MUTE' wiring and correct.
Unit resets itself when engine is off.
lncorrect connection.
between ACC and BATT.
Check wiring and correct.
Poor sound quality
or distortion.
TFT monitor
Monitor does not open automatically.
TFT Auto Open is turned off.
Turn TFT Auto Open on.
Warning information is shown at all
times.
Parking break wiring is not correct.
Check wiring and correct.
The color system of DVD disc does not
match the monitor.
Adjust the color system of the DVD disc
playing back or the monitor in us.
Pirated disc is in use.
Use original disc.
Video cable damaged.
Replace cables.
lmproper video signal connections.
Check wiring and correct.
Flashing image or interference
appears on screen.
28
DEUTSCH
ZE-NC524
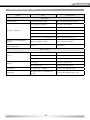
TROUBLESHOOTING (COnTinUED)
Problem
Cause
Corrective action
Disc playback
Cannot insert disc.
A disc inside the unit already.
Eject current disc and insert new one.
Disc is warped or scratched.
Use disc in good condition.
Disc is dirty or wet.
Clean disc with soft cloth.
lncompatible disc is used.
Use compatible disc.
Disc is inserted upside down.
lnsert disc with label side up.
Disc region code is not compatible with unit.
Use disc with proper region code.
PBC cannot be used during VCD
playback.
PBC is not available on the disc.
Use disc with PBC available.
Repeat or search function is invalid
during VCD playback.
PBC is on.
Turn PBC off.
Disc does not play back.
Error messages
Disc is dirty.
Clean disc with soft cloth.
Disc is upside down.
lnsert disc with label side up.
No disc inside.
lnsert disc.
Disc is dirty.
Clean disc with soft cloth.
Disc is upside down.
lnsert disc with label side up.
Unknown disc.
Disc format is not compatible.
Use disc with compatible format.
Region Error.
DVD region code is not compatible with
this unit.
Use disc with compatible region code.
No disc.
Bad disc.
29
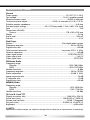
SPECIFICATIONS
General
Power supply ........................................................................................12 V DC (11 V–16 V)
Test voltage ...................................................................................... 14.4 V, negative ground
Maximum power output ........................................................................... 40 W x 4 channels
Continuous power output ............................................. 20 W x 4 channels (4 Ω 10% T.H.D.)
Suitable speaker impedance .................................................................................. 4–8 ohm
Pre-amp output voltage ................................. 4.0 V (CD play mode: 1 KHz, 0 dB, 10 K load)
Fuse ............................................................................................................................ 15 A
Dimensions (WxHxD)
Chassis ........................................................................................... 178 x 100 x 154 mm
Weight .........................................................................................................................2.5 kg
Aux-in level ................................................................................................................ 300 mV
Sub-out ......................................................................................................................... 4.0 V
Disk Player
System ........................................................................................... Disk digital audio system
Frequency response ...................................................................................... 20 Hz–20 KHz
Signal/noise ratio ....................................................................................................... >80 dB
Total harmonic distortion .............................................................. Less than 0.20% (1 KHz)
Channel separation ................................................................................................... >60 dB
Video signal output ....................................................................................NTSC/PAL/AUTO
Video output level ..................................................................................................... 1±0.2 V
Video signal input ................................................................................................ NTSC/PAL
FM Stereo Radio
Frequency range
(Europe) ................................................................................................. 87.5–108.0 MHz
(USA) .......................................................................................................87.5–107.9 MHz
Usable sensitivity ......................................................................................................... 8 dBμ
Frequency response ...................................................................................... 30 Hz–15 KHz
Stereo separation ...........................................................................................30 dB (1 KHz)
Image response ratio ................................................................................................... 50 dB
IF response ratio .......................................................................................................... 70 dB
Signal/noise ratio ....................................................................................................... >55 dB
AM(MW) Radio
Frequency range
(Europe) ...................................................................................................522–1620 KHz
(USA) ........................................................................................................ 530–1710 KHz
Usable sensitivity ....................................................................................................... 30 dBμ
15.5 cm /6.1 Inch TFT
Display resolution (dot) ........................................................................... 1440 (W) x 234 (H)
Active area (mm) .............................................................................136.08 (W) x 71.955 (H)
Screen size (cm/inch) ............................................................................. 15.5/6.1 (Diagonal)
Dot pitch (mm) ................................................................................. 0.0945 (H) x 0.3075 (V)
Brightness .......................................................................................................... ≥350 cd/m2
NOTE:
Specifications and the design are subject to change without notice due to improvements in technology.
30
DEUTSCH
ZE-NC524
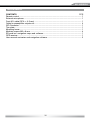
APPENDIX
CONTENTS
PCS
Remote control .................................................................................................................... 1
External microphone ........................................................................................................... 1
Front A/V cable (RCA -> 3.5 mm) ........................................................................................ 1
Cable for preamplifier outputs etc. ...................................................................................... 3
ISO-Connector ..................................................................................................................... 1
Trim plate ............................................................................................................................. 1
Mounting frame.................................................................................................................... 1
Machine screws M5 x 6 mm ................................................................................................ 4
SD-card incl. navigation maps and software ........................................................................ 1
GPS-receiver ....................................................................................................................... 1
User manual naviceiver and navigation software ................................................................ 2
31
APPENDIX (COnTinUED)
REGION CODE
According to DVD sale region, the whole world is divided into six regions. A DVD disc can be
played back only when its region code is compatible with that of the player in use.
Region 1:
Region 2:
Region 3:
Region 4:
Region 5:
Region 6:
USA, Canada, East Pacific Ocean lslands;
Japan, West Europe, North Europe, Egypt, South Africa,
Middle East;
Taiwan of China, Hong Kong of China, South Korea, Thailand,
lndonesia, South East Asia;
Australia, New Zealand, Mid & South America, South Pacific,
Ocean lslands/Oceania;
Russia, Mongolia, lndia, Middle Asia, East Europe,
North Korea, North Africa, North West Asia;
Chinese Mainland.
CAUTIONS OF DISC USING
1. DO NOT use any irregularly shaped disc.
2. Disc Cleaning
Use a dry, soft cloth to wipe the disc from center to edge, only neutral detergent can be
used.
3. When playing a new disc
New disc may have some rough spots around the inner and outer edges. If such a disc is
used, remove these rough spots with a pencil or ball-point pen, etc.
32
DEUTSCH
ZE-NC524
APPENDIX (COnTinUED)
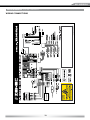
RECEIVER
GPS
WIRING CONNECTIONS
33
2 YEARS LIMITED WARRANTY
Dear customer
Thank you for purchasing this ZENEC product. It is advisable to keep the original packing material
for any future transporting of the product.
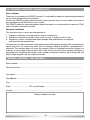
Should your ZENEC product require warranty service, please return it to the retailer from whom it
was purchased or the distributor in your country.
This ZENEC product is warranted against defective materials or workmanship for a period of TWO
years from date of purchase at retail.
Warranty Limitations
This warranty does not cover any damage due to:
1. Improper installation, incorrect audio or mains connection(s).
2. Exposure to excessive humidity, fluids, heat sun rays or excessive dirt or dust.
3. Accidents or abuse, unauthorized repair attempts and modifications not explicitly
authorized by the manufacturer.
This warranty is limited to the repair or the replacement of the defective product at the manufacturer’s
option and does not include any other form of damage, whether incidental, consequential or
otherwise. The warranty does not cover any transport costs or damages caused by transport or
shipment of the product. Warranty work will not be carried out unless this warranty certificate is
presented fully completed with model, serial number, purchaser’s address, purchasing date and
dealer stamp together with the original sales slip!
ZENEC MODEL: ZE-NC524
Serial number: ..............................................................................................................................
Date of purchase:..........................................................................................................................
Your name:....................................................................................................................................
Your address: ................................................................................................................................
City: ..............................................................................................................................................
State: ................................... ZIP or postal code .........................................................................
Country: .......................................................................................................................................
Dealer’s address & stamp
34
DEUTSCH
ZE-NC524
■
If at any time in the future you should need to dispose this product please note that waste electrical
products should not be disposed of with household waste. Please recycle where facilities exist.
Check with your Local Authority or retailer for recycling advice (Waste Electrical and Electronic
Equipment Directive).
This unit is manufactured under license from Dolby Laboratories. “Dolby” and the double-D symbol
are trademarks of Dolby Laboratories.
CAUTION
This product is a CLASS 1 LASER PRODUCT. Use of controls or adjustments or performance of
procedures other than those specifled herein may result in hazardous radiation exposure. Do not open
covers and do not repair it yourself. For servicing consult qualified personnel.
TWO LASER PRODUCTS
Wave length: CD: 780nm DVD: 650nm
Laser power: No hazardous radiation is emitted with safety protection. To reduce the risk of fire electric
shock, and annoying interference, use only the included components.
35
ZENEC by ACR AG · Bohrturmweg 1 · Bad Zurzach · Switzerland