1
MODELN0:
NO:
MODEL
ZE-DVBT1 0
1 CH DVB-T TUNER
1-DIN DVD-MONICEIVER WITH
MOTORIZED 7" LCD DISPLAY
INSTRUCTION MANUAL
English · French · German
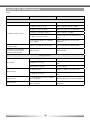
CONTENTS
Before using
START CODE............................................................................................................................................................. 06
Front Panel........................................................................................................................................................... 06
Auxiliary LCD..........................................................................................................................................................07
Remote Control.................................................................................................................................................. 08
Basic operations
Power on/off.........................................................................................................................................................10
NAV..............................................................................................................................................................................10
Volume adjustment........................................................................................................................................... 10
Open SOURCE MENU...............................................................................................................................................10
Playing source selection...............................................................................................................................10
Display system time.............................................................................................................................................11
Using the TFT monitor.......................................................................................................................................11
Reset the unit.......................................................................................................................................................11
Radio mode
Select radio as playing source...................................................................................................................12
Select one radio band..................................................................................................................................... 12
Auto tuning........................................................................................................................................................... 12
Manual tuning.......................................................................................................................................................12
Auto save . ..............................................................................................................................................................12
Manual save............................................................................................................................................................13
Preview scan.........................................................................................................................................................13
Recall the stored stations........................................................................................................................... 13
Local seeking....................................................................................................................................................... 13
RDS operations
AF function............................................................................................................................................................ 14
TA function.............................................................................................................................................................14
PTY function..........................................................................................................................................................15
Program Service (PS)........................................................................................................................................ 15
CT (Clock Time).......................................................................................................................................................15
RT (Radio Text).......................................................................................................................................................15
Disc mode
Insert a disc...........................................................................................................................................................16
Eject the disc........................................................................................................................................................16
Touch screen controls...................................................................................................................................16
Onscreen control buttons ..........................................................................................................................17
Suspend playback................................................................................................................................................18
Stop playback ......................................................................................................................................................18
Display file list.....................................................................................................................................................18
Fast playback....................................................................................................................................................... 18
Previous/Next........................................................................................................................................................18
Change folder......................................................................................................................................................18
Repeat playback...................................................................................................................................................19
Repeat A-B . .............................................................................................................................................................19
Random playback................................................................................................................................................ 19
Intro playback..................................................................................................................................................... 20
Direct search....................................................................................................................................................... 20
GOTO search.......................................................................................................................................................... 20
DVD MENU and TITLE..............................................................................................................................................21
Select subtitle language...............................................................................................................................21
Select multi-angle views.................................................................................................................................21
Select audio channel........................................................................................................................................21
PBC function .........................................................................................................................................................21
Zoom in/out............................................................................................................................................................ 22
Rotate picture..................................................................................................................................................... 22
Playback information....................................................................................................................................... 22
2
DEUTSCH
ENGL
ISH
USB mode
Select USB as playing source ......................................................................................................................24
Touch screen controls...................................................................................................................................24
Onscreen control buttons ..........................................................................................................................24
Suspend playback................................................................................................................................................24
Stop playback........................................................................................................................................................24
Display file list.....................................................................................................................................................24
Fast playback........................................................................................................................................................24
Previous/Next........................................................................................................................................................24
Change folder......................................................................................................................................................25
Repeat playback ..................................................................................................................................................25
Random playback.................................................................................................................................................25
Intro playback .....................................................................................................................................................25
Direct search........................................................................................................................................................25
GOTO search...........................................................................................................................................................25
Zoom in/out.............................................................................................................................................................25
Rotate picture .....................................................................................................................................................25
Playback information........................................................................................................................................25
iPod mode
Select iPod as playing source .....................................................................................................................26
Music playback......................................................................................................................................................26
Photo playback.....................................................................................................................................................26
Video playback......................................................................................................................................................27
Fast playback........................................................................................................................................................27
Direct search........................................................................................................................................................27
Other modes
AUX............................................................................................................................................................................. 29
Camera..................................................................................................................................................................... 29
NAV............................................................................................................................................................................. 29
Setup
Setup procedures ............................................................................................................................................ 30
General....................................................................................................................................................................31
Language.................................................................................................................................................................31
Audio......................................................................................................................................................................... 32
RDS............................................................................................................................................................................. 32
Rating . .................................................................................................................................................................... 32
Hardware.............................................................................................................................................................. 34
P.VOL........................................................................................................................................................................... 34
Method of changing passwort.................................................................................................................... 35
TS CAL....................................................................................................................................................................... 35
EQ............................................................................................................................................................................... 36
Troubleshooting............................................................................................................................................... 37
Device connection
Notes of connection ....................................................................................................................................... 39
Control Cables................................................................................................................................................... 40
Parking Brake Cable Connections ............................................................................................................ 41
Reverse Drive Cable Connections...............................................................................................................41
Installation and uninstall
Notes of installation .......................................................................................................................................42
Unit installation..................................................................................................................................................42
Trim Ring installation....................................................................................................................................... 44
Uninstall................................................................................................................................................................. 44
Specifications...................................................................................................................................................... 45
Appendix
Region Code...........................................................................................................................................................47
Cautions of disc using .................................................................................................................................... 48
Wiring Connections........................................................................................................................................... 49
WARRANTY............................................................................................................................................................... 49
3
WARNINGS
1. Only connect this unit to a 12V DC power supply with
negative grounding.
2. Never install this unit where the operation for safe driving is
restrained.
3. Never use the video display function in the front when
driving to prevent the violation of laws & regulations and
also to reduce the risk of traffic accident, except when using
the rear view video camera.
4. Never expose this unit, amplifier, speakers to moisture or
water to prevent electronic sparks or fires.
5. Please don‘t change the fuse in the power cord without
professional guidance, improper fuse may cause damage
to this unit or may even cause fire.
6. Please power off this unit at once and send it back to the
after-sales service center or the dealer/distributor you
purchased from if one of the following symptoms is found:
(a) No audio output;
(b) No image output;
(c) Water or other obstacle entered the unit;
(d) Smoke;
(e) Peculiar smell.
7. To ensure safe driving, please adjust the volume to a safe
and comfort level in case of emergency situations.
4
DEUTSCH
ENGL
ISH
PRECAUTIONS
1.Never disassemble or a djust the unit without any professional guide. For details, please
consult an authorized ZENEC dealer for inquiry.
2. lf the front panel or TFT monitor is squalid, please use a clean silicone cloth and neutral
detergent to wipe off the spot. Using a rough cloth and non-neutral detergent such as
alcohol for cleaning may result in scratching or discoloration.
3. lf any abnormal behavior of the unit is found, please refer to trouble shooting guide of this
manual. lf no relevant information is found, please press the [RESET] key on the front
panel to resume factory default.
4. lf you have parked the car in hot or cold weather for a long time, please wait until the
temperature in the car becomes normal before operating the unit.
5. Using in-car heater in low temperature environment may result in condensation inside the
unit. DO NOT use the unit in this situation, eject the disc and wipe off the condensation on
the disc. lf the unit still doesn't work after a few hours, please contact with after-sales service
center.
6. No fierce mechanical impact to the LCD monitor when it is in open position for preventing
the damage to any mechanisms inside.
7. To prevent damage to the screen, avoid touching it with sharp objects.
8. The monitor employs auto motorizing mechanism, please don't push, pull, or swivel the
monitor manually to prevent damage to the core mechanism.
9. To provide a clear demonstration and an alternative for easy understanding to the
operation of this unit, graphic illustrations are used. However, these illustrations may be
different from the actual images displayed on the screen.
10. During operating the unit, "
illegal.
" will display if the current operation is not available or
11. Operate the unit correctly according to this manual to prevent unnecessary problems. The
guarantee won't be valid if the problem is caused by inappropriate operation.
DECLARATION
This product incorporates copyright protection technology that is protected by U.S patents
and other intellectual property rights. Use of this copyright protection technology must be
authorized by Macrovision, and is intended for home and other limited viewing uses only
unless otherwise authorized by Macrovision.
Reverse engineering or disassembly is prohibited.
5
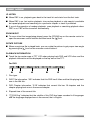
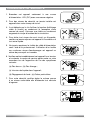
BEFORE USING
Start CODE: 012345 (Description: Page 35)
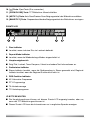
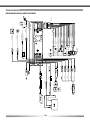
FRONT PANEL
AUX
1. [WIDE] Key: Change display mode
2. [
] Key: Next/Move cursor to the right
3. [
] Key: Previous/Move cursor to the left
4. [NAV] Key: Enter/exit NAV source
5. [VOL] Knob: Adjust volume/active/deactive mute function
6. [Reset] Button: Reset the unit
7. [ /SRC] Key: Unit power/Change operating mode/Open source menu
8.AUX IN jack
9.USB Slot
6
DEUTSCH
ENGL
ISH
BEFORE USING
10. [
] Key: Eject disc
11. [OPEN/CLOSE] Key: Open/Close the TFT monitor
12. [AS/TILT+] Key: Auto save/Preview scan/Increase display angle
13. [BAND/TILT-] Key: Change radio band/Decrease display angle
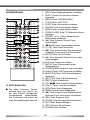
Auxiliary LCD
1.Disc indicator
■ Light up when one disc is inside; Light off when no disc is inside.
2. Repeat mode indicator
■ Light up when repeat mode is on; Light off when repeat mode is off.
3. Main display area
■ Display characters, playback time, tuning frequency, clock and other text information.
4. Radio status indicators
■ Stereo indicator lights up when the radio broadcast is in stereo. Local indicator lights up
when the local seeking function is activated.
5. RDS function indicators
■ AF: Alternative Frequency
■ PTY: Program Type
■ TA: Traffic Announcement
■ TP: Traffic Program
NOTES:
■ Most information can be displayed on this LCD only when the TFT monitor is closed.
■ Only English font support on this LCD.
7
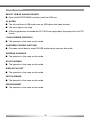
Before using
BEFORE USING
REMOTE
Remote CONTROL
Control
lntroduce
of key
Introduce
offunctions
key functions
1
2
17
18
3
4
5
6
7
8
19
20
21
22
MUSIC
PHOTOS
VIDEO
iPod
23
TILT
9
10
11
12
13
24
25
26
27
28
29
PRESET
14
15
30
SETUP
16
CLEAR
31
32
Note:
NOTE:
Your
remote control may differ slightly
from
the one
pictured
here.may
The above
■Your
remote
control
differ
only.
diagram
is for
illustrative
purpose
slightly
from
the one
pictured
here. The above diagram is for
illustrative purpose only.
03
1. [SRC] Key: Select
1.[SRC]Key:select
playingplaying
source source
2.[EJECT]Key:
Eject Eject
disc disc
2 [EJECT] Key:
3.[MENU]
Key: Key:
DVD MENU
/ PBC
3. [MENU]
DVD MENU/PBC
4.[TITLE]
Key: Key:
DVD TITLE
4. [TITLE]
DVD TITLE
5.[DISP] Key: Display information
5. [DISP] Key: Display information
6.[ANGLE] Key: Select view angle
6. [ANGLE] Key: Select view angle
7.[WIDE] Key: Change display mode
7. [WIDE] Key:Key:
Change
8.[OPEN/CLOSE]
Open /display
Close mode
8.
[OPEN/CLOSE]
Key:
Open/Close
the TFT monitor
the TFT/ monitor
9.[PRESET
] Key: Select preset
9.
[PRESET
/ ] Key: Select preset
radio
station
10.[ radio
] Key:station
Fast Forward /
Move
10.
[ cursor
] Key:up
Fast forward/Move cursor up
11.[■/BAND]
Key: Select
band
/ band/
11. [ /BAND]
Key: radio
Select
radio
Stop
Playback
stop
playback
12.[
/ Pause
/ Enter
/ Play
] Key:
Play/Pause/Enter
12. [ ] Key:
]
Key:
Auto
search
/
Previous /
13.[
13. [ ] Key: Auto search/Previous/Move
cursor
Move cursor to the left
to
the
left
14.[GOTO] Key: GOTO search
14. [GOTO]
Key:
GOTO search
15.[
] Key: Fast
Reverse/
Move
15.
[ cursor
] Key:down
Fast reverse/Move cursor down
16.[0~9]
Key:
Numeric
keys keys
16. [0-9]
Key:
Numeric
17.[MUTE] Key: Mute audio outputs
17. [MUTE] Key: Mute audio outputs
18.[POWER] Key: Unit power
18. [POWER] Key: Unit power
19.[AUDIO] Key: Select DVD dialogue
19.
[AUDIO] Key: Select DVD dialogue
language
languageKey: Select DVD
20.[SUBTITLE]
subtitle
languageKey: Select DVD subtitle
20.
[SUBTITLE]
21.[REPT
A-B] Key: A-B repeat
language
22.[REPT]
Key:
Repeat
21. [REPT
A-B]
Key:playback
A-B repeat
23.[TILT
/ ]Key:
Key: Repeat
Adjustingplayback
display
22. [REPT]
tilting angle
23. [TILT
] Key: Adjusting display tilting angle
24.[VOL+/-] Key: Adjust volume
24.
[VOL+/-]
Key:
Adjust volume
25.[SCN] Key: Scan playback
25.
[SCN]
Key:
Scan
playback
26.[RDM] Key: Random playback
27.[
] Key:Auto
/ Next
/
26. [RDM]
Key:search
Random
playback
Move
the right
27.
[ cursor
] Key:toAuto
search/Next/Move cursor to
28.[SEL] Key: EQ
the right
29.[ZOOM] Key: Image zoom in/out
28.
[SEL]
(EQ)
30.[PIC]
Key:Key:
Image
setting
29. [ZOOM]
Key:
lmage
31.[SETUP]
Key:
Setup
menuzoom in/out
30. [PIC] Key:
lmageinformation
setting
32.[CLEAR]
Key: Clear
31. [SETUP] Key: Setup menu
32. [CLEAR] Key: Clear information
8
DEUTSCH
ENGL
ISH
BEFORE USING
Notes FOR remote control usE
1. Aim the remote control at the remote sensor on the unit.
2. Remove the battery from the remote control or insert a battery insulator if the battery has
not been used for a month or longer.
3. DO NOT store the remote control under direct sunlight or in high temperature environment,
or it may not function properly.
4. The battery can work for 6 months under normal conditions. lf the remote control does not
work, please change the battery.
5.Use "button shaped" lithium battery "CR2025" (3 V) only.
6. DO NOT recharge, disassemble, heat or expose the battery in fire.
7. lnsert the battery in proper direction according to the (+) and (-) poles.
8. Store the battery in a place where children cannot reach to avoid the risk of accident.
Uninstall Battery
■ Slide out the battery compartment tray at the bottom on the back of the remote control.
Install Battery
■ Use button-shaped lithium battery "CR2025" (3V) only. Insert the battery to the battery
tray with proper direction according to the (+) and (-) poles.
PULL OUT
PULL IN
9
BASIC OPERATIONS
Power on/off
■ Press any key on the front panel or the [POWER] key on the remote control to turn on the
power under standby mode. The unit goes back to the last status after power on.
■ Press and hold the [SRC] key on the front panel or press the [POWER] key on the the
remote control to turn off the power under work mode.
NAV
■ Press the [NAV] key on the front panel to enter or exit navigation source. The current
audio channel will keep playing, except the navigation voice comes up when navigation
source is active.
Volume adjustment
■ Turn the volume knob on the front panel or press the [VOL] key on the remote control.
■ The adjustable range of volume is 0 to 40.
■ Press [VOL] key or mute key on remote to active or deactive [MUTE] function.
NOTES:
■ Doing the operation above again or adjusting volume wlll release muting.
■Mute icon blinks on the TFT during muting.
OPEN source MENU
■ Press the [SRC] key on the front panel or remote control or touch the top left corner of
the screen to open the SOURCE MENU. Do the above operation again to return to the
original source.
Playing source selection
■ Open the SOURCE MENU, and then touch the source you desired or select one source
by moving the cursor and then confirm.
NOTES:
■ Playing source selection means selecting work mode, such as DVD mode, Radio mode,
Camera mode, etc.
■When some devices are not ready or connected, they cannot be selected.
10
DEUTSCH
ENGL
ISH
BASIC OPERATIONS
Display system time
■ Press and hold the [DISP] key on the front panel to switch the display information
between system time and playing source when the TFT monitor is closed.
Using the TFT Monitor
Open/Close monitor
■ Press the [OPEN/CLOSE] key on the front panel or remote control to push the display
panel out or in.
Change the monitor tilt angle
■ Due to the inherent character of LCD panels, you will get different vision impressions
when you watch it from different angles. The display angle of this unit can be changed;
hence you can select the best angle where you can get the best vision impression.
■ Press the [TILT] key on the display panel or the remote control to adjust the tilt angle one
step at a time.
■ Press and hold the [TILT] key on the display panel or the remote control to adjust the tilt
angle continuously.
Change aspect ratio
■ Press the [WlDE] key on the display panel or remote control to adjust the aspect ratio.
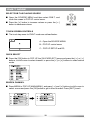
lmage setting
1. Enter image setting mode
■ Press the [PIC] key on the remote control.
2. Select one item to adjust
■ Press the []/[] keys on the remote control.
3. Adjust the value
■ Press the []/[] keys on the remote control.
4. Exit image setting mode
■ To exit image setting mode, repeat the first step or stop operation for some seconds.
Reset the unit
■ lf the unit can not work correctly, you should reset the unit by pressing the [RESET]
button on the front panel.
11
Radio MODE
Select radio as playing source
■ Open the SOURCE MENU and then touch the RADlO icon.
Select one radio band
■ Press the [BAND] key on the display panel or on the remote control or touch the
[BAND] icon on the user interface to select one radio band among FM1, FM2, FM3,
AM1 and AM2.
Auto tuning
■ Press the []/[] key on the display panel or on the remote control or touch the []/[]
icon on the user interface to seek a higher/lower station. To stop searching, repeat the
operation above or press other keys having radio functions.
NOTE:
■When a station is received, searching stops and the station is played. If the unit receives
a stereo broadcasting, the indicator light of stereo 'ST' on the TFT or on the LCD display
will be lighted.
Manual tuning
■ During manual tuning, the frequency will be changed in steps. Press the []/[] key on
remote control or touch the []/[] icon on the user interface to tune in a higher/lower
station.
S] and then touch the numeric buttons to input the
■ Touch the numeric keypad icon [
radio station frequency numbers.
Auto save
■ Only stations with sufficient signal strength will be detected and stored in the memory.
When the monitor is closed, press and hold the [AS/PS] key on the display panel.
■When the monitor is opened, touch the [AS] icon on the user interface.
■ To stop auto save, press other keys having radio functions.
NOTES:
■ After auto save, the previous saved stations will be overwritten.
■ The unit has 5 bands, such as FM1, FM2, FM3, AM1, AM2, and each band can store 6
stations; hence the unit can store 30 stations in total.
12
DEUTSCH
ENGL
ISH
Radio MODE
Manual save
When one expected radio station has been detected ...
1. Press the [MEM] icon on the user interface and the preset menu will be opened.
2. Press one preset button among P1~P6.
3. lf you want to abort, press the [Exit] button.
Preview scan
■ Preview scan searching is such a process that the searching pauses when a station is
received and then played for 5–10 seconds. After being played, the unit continues the
process until the whole band is detected.
■ When the monitor is closed, press the [AS/PS] key on the display panel.
■ When the monitor is opened, touch the [PS] icon on the user interface. To stop the
process, press other keys having radio functions.
Recall the stored stations
■ Press one numeric key among 1 to 6 on the remote control or touch an onscreen station
button to select the corresponding stored station.
Local seeking
■ When LOCAL seeking is on, only those radio stations with strong radio signal could be
received.
■ To open or close LOCAL function, press and hold the [NAV] key on the front panel.
NOTES:
■ When the local radio station searching is on, the indicator light 'LOC' lights up; where as
the light goes off.
■ The number of radio stations that can be received will decrease after the local seeking
mode is on.
13
RDS OPERATIONS
The unit provides basic functions of RDS, including Pl (Program ldentification), radio
station name, RT (Radio Text), CT (Clock Time), AF (Alternative Frequency), TA (Traffic
Announcement) and PTY (Program Type) selection.
AF function
■ Alternative frequencies lists are used for the same program service and used in
conjunction with the Pl code (Program ldentification code) to assist automatic tuning.
Using this information, a radio can automatically search another station that is playing
the same material. This is useful when the station you are listening to is fading out.
■ To activate AF function, touch the [AF] button on the user interface.
■ To cancel this function, do the operation above again.
NOTE:
■ During auto switching radio frequency, some interference may be heard. Turning off
AF function can settle this issue at the expense of AF switching.
TA function
■ The TA (Traffic Announcement flag) function lets the unit receive traffic announcements
automatically no matter what media source is playing back. The TA function can be
activated by a TP (Traffic Program) station broadcasting traffic information.
■ When TA is activated and a traffic announcement is received, the current playing source
will be overridden by the traffic announcement if the current radio band is FM and the
'TA' indicator lights up, indicating that the unit is waiting for traffic announcements.
■ The unit returns to the original source after the traffic announcement has ended.
■ To activate TA function, touch the [TA] button on the user interface.
■ To cancel this function, do the operation above again.
14
DEUTSCH
ENGL
ISH
RDS OPERATIONS
PTY function
■ PTY is the abbreviation for Program Type which is a code defining the type of program
being broadcasted (e.g. News or Rock).
■ Six PTY options will display on the screen. To view more PTY options, touch the scroll bar
and arrows on the screen.
■When one PTY option is touched (e.g. News), auto search for next available PTY by
increasing tuning frequency will take place, until the PTY of the next station matches
the current. lf no matched PTY has been found, the unit will return to the original radio
frequency.
Program Service (ps)
■Used for receiver displays of an 8 character alpha numeric Program Service name
which may use Upper or Lower case characters, e.g {BBC_4_FM}, {Classic_}.
CT (Clock Time)
■ Some stations broadcast the time and date within the encoded RDS signal. The clock
time is automatically adjusted when 'CT' is set to 'On'.
RT (Radio Text)
■When this function is activated, the unit will display short message data transmitted
from the provider, such as station information, the name of the current broadcasting
song and the artist name.
15
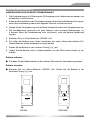
Insert a disc
Upon inserting a disc, the unit will switch to disc mode automatically.
Notes:
Disc MODE
① Please confirm whether there is a disc in the unit before you insert
another
one.
Insert
a disc
② Some recorded discs, such as CD-R, CD-RW, DVD-R, DVD+R,
■Upon
inserting a disc, the unit will switch to disc mode automatically.
DVD-RW, DVD+RW cannot be played back because of different
NOTES:
recording status. Otherwise, the discs without being closed could
■ Please confirm whether there is a disc in the unit before you insert another one.
not be played back.
■ Some recorded discs, such as CD-R, CD-RW, DVD-R, DVD+R, DVD-RW, DVD+RW
③ About the cautions of disc using, please refer to the appendix.
cannot be played back because of different recording status. Otherwise, the discs
without being "finalized" can not be played back.
Eject
the
■ About
the disc
cautions of disc using, please refer to the appendix.
Press the [EJECT] key on the front panel or remote control to eject the
Eject the disc
disc.
■ You
Press
the
[EJECT]
key
on the
or remote
control
eject
the disc.
can
eject
a disc
after
the front
unit panel
has been
powered
off.toThe
unit
■ remains
You can off
eject
a disc
after is
theejected.
unit has been powered off. The unit remains off after the
after
the disc
disc is ejected.
Touch
screen
controls
Touch screen
controls
DVD playback
playbackare
areoutlined
outlined
below:
■ The
Thetouch
touchkey
keyareas
areas for
for DVD
below.
A
B
C
AA- Open
– OpenSOURCE
SOURCEMENU
MENU
BB- –
Display
Displayplayback
playback information
information
C - Display onscreen control menu
C – Display onscreen control menu
11
16
DEUTSCH
ENGL
ISH
Disc ModE
ONSCREEN CONTROL BUTTONS
Disc type/
Icon
MP3/WMA
CD
VCD
DVD
MPEG
Picture
Numeric
keypad
Numeric
keypad
Numeric
keypad
Numeric
keypad
Numeric
keypad
Numeric
keypad
Setup
menu
Setup
menu
Setup
menu
Setup
menu
Setup
menu
Setup
menu
/
Fast forward
Fast forward
Fast forward
Fast forward
/
/
Fast rewind
Fast rewind
Fast rewind
Fast rewind
/
Previous
Previous
Previous
Previous
Previous
Previous
Next
Next
Next
Next
Next
Next
E
Play/
Pause
Play/
Pause
Play/
Pause
Play/
Pause
Play/
Pause
Play/
Pause
Stop
Stop
Stop
Stop
Stop
Stop
/
/
A second
menu
A second
menu
A second
menu
/
Repeat
Repeat
Repeat
Repeat
Repeat
Repeat
Random
Random
Random
Random
Random
/
/
/
/
/
/
Rotate
/
/
Zoom
/
/
Zoom
EQ
EQ setup
EQ setup
EQ setup
EQ setup
EQ setup
EQ setup
PBC
/
/
PBC
/
/
/
A-B
/
/
A-B repeat
A-B repeat
/
/
Back
/
/
Exit menu
Exit menu
Exit menu
Exit menu
AUDIO
/
/
Channel
switching
Dialog
language
Dialog
language
/
SUBTITLE
/
/
/
Subtitle
language
Subtitle
language
/
DISP
/
/
Display
information
Display
information
Display
information
Display
information
MENU
/
/
/
DVD menu
/
/
TITLE
/
/
/
DVD title
/
/
DIR+
Next folder
/
/
/
/
Next folder
DIR-
Previous
folder
/
/
/
/
Previous
folder
S
N
17
DISC MODE
Suspend playback
■ Press the [/] key on the front panel or remote control or open the onscreen control
buttons menu and then touch the [/] button. To resume normal playback, repeat the
above operation.
Stop playback
■ To stop playback, press the [] key on the remote control or open the onscreen control
buttons menu and then touch the [] button. When the above operation is executed for
the first time, the current playback is paused and the break point is memorized and the
playback will resume when you start playback again or switch back from other playing
sources. The current playback will cancel if the above operation is executed twice and
the playback will start over when you start playback again.
Display file LIst
■ To display the file list of a recorded disc, stop current playback.
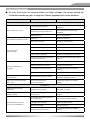
Fast playback
■ Press the []/[] key on the remote control repeatedly or open the onscreen control
buttons menu and then touch the []/[] button repeatedly, to change the rate of fast
forward/fast reverse.
Previous/next
■ Press the []/[] key on the display panel or remote control or open the onscreen
control buttons menu and then touch the []/[] button to play the next or previous file.
Change folder
■ Press the [DIR+]/[DIR-] icon on the user interface (you should stop playback first if a
video or picture file is played back) to change folder during the playback of a recorded
disc containing more than one folder.
18
DEUTSCH
ENGL
ISH
Disc MODE
Repeat playback
■ Press the [RPT] key on the remote control repeatedly or open the onscreen control
buttons menu and then touch the [ ] button repeatedly to alter repeat mode according to
the following table.
Disc type
Repeat mode
DVD
Repeat Chapter → Repeat Title → Repeat Off
VCD (PBC off)
Repeat Single → Repeat All →Repeat Off
CD
Repeat Single → Repeat Off
MP3/WMA
Repeat Single → Repeat Folder → Repeat Off
MPEG
Repeat Single → Repeat Folder → Repeat Off
Picture
Repeat Single → Repeat Folder → Repeat Off
NOTES:
■ When a VCD is played back, this function is prohibited if the PBC function is active.
■ Turning off the power or switching playing source to other modes and back will cancel this
function.
Repeat A-B
■ When a DVD, VCD or CD disc is played back, you can play back the contents between
the time points from A to B repeatedly.
■ Press the [RPT A-B] key on the remote control or open the onscreen control buttons menu
and then touch the [A-B] button to set the start point (A) of the repeated section.
Do the above operation again to set the end point of the repeated section. The selected
portion will repeat continuously.
■ Do the above operation for the third time to cancel this function.
Random playback
■ When this function is on, the contents in the disc will be played back randomly.
■ Press the [RDM] key on the remote control repeatedly or open the onscreen control
buttons menu and then touch the [ ] button repeatedly to alter random playback mode
among 'Random', 'Random repeat', 'Repeat Off'.
19
DISC MODE
Intro playback
■ When this function is on, the unit will play back the first 10 seconds of each track of a
VCD or CD disc. You can search the file you desired using this function.
■ Press the [SCN] key on the remote control to activate this function. Do the above
operation again to cancel this function.
Direct search
■ When a DVD, VCD or CD disc is played back, you can search for a particular chapter/
track by pressing the numeric keys of the remote control. For example, if you want to
select the 15th track, you should press numerical key [1] and [5].
GOTO search
1. Enter [GOTO] search mode
■ Press the [GOTO] key on the remote control to open search menu.
■ For DVD, you can search according to title, chapter and time.
■ For VCD, if PBC function is off, you can search according to time; if PBC function is on,
you can search according to track, time and disc time.
■ For CD, you can search according to track.
■ For MPEG files, you can search according to track and time.
■ For record discs containing MP3 and/or JPG files, you can search according to track (file
number).
2. Enter search information
■ Select items by pressing the direction keys on the remote control and enter search
information by pressing the numeric keys, such as title, chapter and time.
3. Confirm
■ Press the [Enter] key on the remote control to confirm.
4.Exit GOTO search mode
■ Repeat the above operation until the search menu disappeared or touch the [Exit] button
on the menu.
20
DEUTSCH
ENGL
ISH
Disc MODE
DVD MENU and TlTLE
■ This function is only available for the DVD discs having "MENU/TlTLE". Press the
[MENU] key on the remote control or open the onscreen control buttons menu and then
touch the [MENU] button to open DVD MENU. You can select audio language, subtitle
language and so on for playback. Press the [TITEL] key on the remote control or open
the onscreen control buttons menu and then touch the [TITEL] button to open DVD
TlTLE. You can select a different title for playback.
Select subtitle language
■ Press the [SUBTlTLE] key on the remote control repeatedly or open the onscreen
control buttons menu and then touch the [SUBTlTLE] button repeatedly to choose a
subtitle language.
Select multi-angle views
■ Press the [ANGLE] key on the remote control repeatedly to choose a shooting angle
during the playback of a DVD disc or video file containing multi-angle views.
Select audio channel
■ For DVD containing multi-language audio files, press the [AUDlO] key on the remote
control repeatedly or open the onscreen control buttons menu and then touch the
[AUDlO] button repeatedly to change dialogue language.
■ For VCD and CD, press the [AUDlO] key on the remote control repeatedly or open the
onscreen control buttons menu and then touch the [AUDlO] button repeatedly to alter
audio channel modes among Left vocal, Right vocal, Mono left, Mono right, Stereo.
NOTE:
■ Left channel and right channel cannot work properly if the audio files are not recorded
correctly.
PBC FunCtion
■ This function is available for the VCD discs with PBC function (Ver 2.0 or higher).
■ Press the [MENU] key on the remote control to activate this function.
■ Press again to cancel.
21
Disc MODE
NOTES:
■ When PBC is on, playback goes back to the track list and starts from the first track.
■ When PBC is on, fast motion playback, slow motion playback or skip search is available
but repeat playback and searching for a particular chapter or track is prohibited.
■ If you do the operation of random playback, scan playback or searching playback when
PBC is on, PBC will be turned off automatically.
ZOOM in/out
■ To zoom in/out the image being played, press the [ZOOM] key on the remote control or
open the onscreen control buttons and then touch the [ ] icon.
Rotate picture
■ When one picture file is played back, you can rotate the picture to get proper view angle
by pressing the [ ] icon on the onscreen control buttons.
Playback information
■ Touch the top center area of TFT LCD when playing back DVD and VCD discs and the
playback information will be displayed on the top area of the TFT.
For DVD
1. Disc type.
2. DVD Title information. "5/8" indicates that this DVD has 8 titles and the title playing back
now is the fifth title.
3. DVD Chapter information. "2/18" indicates that current title has 18 chapters and the
chapter playing back now is the second chapter.
4. Elapsed time of the current title.
2/6 Eng" indicates that the subtitle of this DVD has been recorded in 6 languages
5. "
and the language displayed now is the second, that is English.
22
DEUTSCH
ENGL
ISH
Disc ModE
For VCD
1. Disc type.
2. PBC function indicator. "PBC On" indicates that PBC function has been activated.
3. VCD Track information. "6/18" indicates that this VCD has 18 tracks and the track playing
back now is the sixth title.
4. Elapsed time of the current track.
23
USB Mode
Select USB as playing source
■ Open the SOURCE MENU and then touch the USB icon.
NOTES:
■ The unit switches to USB mode once an USB device has been inserted.
■ The unit supports hot swap.
■ USB storage devices formatted with FAT 16/32 are supported by this player, but not NTFS
format.
Touch screen controls
■ The operation is the same as disc mode.
Onscreen control buTtons
■ Onscreen control buttons under SD/USB mode are the same as disc mode.
Suspend playback
■ The operation is the same as disc mode.
Stop playback
■ The operation is the same as disc mode.
Display file list
■ The operation is the same as disc mode.
Fast playback
■ The operation is the same as disc mode.
Previous/next
■ The operation is the same as disc mode.
24
DEUTSCH
ENGL
ISH
USB MODE
Change folder
■ The operation is the same as disc mode.
Repeat playback
■ The operation is the same as disc mode.
Random playback
■ The operation is the same as disc mode.
Intro playback
■ The operation is the same as disc mode.
Direct search
■ The operation is the same as disc mode.
GOTO search
■ The operation is the same as disc mode.
Zoom in/out
■ The operation is the same as disc mode.
Rotate picture
■ The operation is the same as disc mode.
Playback information
■ The operation is the same as disc mode.
25
iPod ModE
Select iPod as playing source
■ The unit will switch to iPod mode automatically when an iPod player is plugged into the
unit.
■ To return to the iPod mode from any other sources, open the SOURCE MENU and then
touch iPod.
Music playback
1. Enter iPod music mode
■ Press the [TlTLE] key on the remote control or touch the music icon on the user interface.
2. Select one music file
■ Press the [Left]/[Right] key on the remote control.
3. Play back the music file
■ Press the [Down] key on the remote control or touch the [
] button on the user interface.
4. Return to the previous menu
■ Press the [UP] key on the remote control or touch the button [MENU] on the user interface.
NOTE:
■ In the Music mode, the buttons on the iPod are disabled.
Photo Playback
1. Enter iPod photo mode
■ Press the [MENU] key on the remote control or touch the picture icon on the user interface.
2. Control photo files playback
■ Use the keys on the iPod to control playback.
NOTES:
■ To exit PHOTO mode, press the [MENU] button on the iPod.
■ Pictures can be displayed on the screen just when the picture playback mode of iPod
player is set to "slide show".
26
DEUTSCH
ENGL
ISH
iPod Mode
Video Playback
1. Enter iPod video mode
■ Press the [AUDIO] key on the remote control or touch the video icon on the user interface.
2. Control video files playback
■ Use the keys on your iPod player to control playback.
NOTES:
■ To exit VIDEO mode, press the [MENU] button on the iPod.
■ To transmit the images (including videos and pictures) from your iPod to the TFT
screen, you must set the following options through the iPod video settings menu:
TV Out = On, TV Signal = NTSC.
Fast playback
■ To access fast forward or fast reverse playback, you should press and hold the [Left]/
[Right] key on the remote control or the []/[] button on the user interface for
1 second and continue to hold the corresponding key. To resume normal play, release
them.
Direct search
■ To select a file directly, touch the numeric button on the user interface to open the direct
entry menu. Enter the desired file using the number pad of this menu. Touch the [Enter]
button to confirm. To exit this menu, touch the [Exit] button.
■ To clear the numbers you have entered, touch the [Clear] button.
■ You can also use the numeric keys on the remote control to select files directly.
27
DVB-T ModE
Select DVB-T as playing source
■ Open the SOURGE MENU and then select DVB-T, and
touch the screen to POP UP control menu.
■ Press the [] button to increase volume or press the []
button to decrease volume.
Touch screen controls
■ The touch key areas for DVB-T mode are outlined below:
A – Open the SOURCE MENU
B – POP UP control menu
C – POP UP SETUP and EQ
QUICK SELECT
■ Press the [OK] button to POP UP the [QUICKSELECT] menu and press the [] or []
buttons, to shift cursor to select channel, or press the [] or [] buttons to select source
mode.
SEARCH CHANNEL
■ Press MENU to POP UP [MAlN MENU], and press [] and [] buttons to shift cursor to
select source and press the [OK] button to get in the sub menu. Press [EXIT] to exit.
28
DEUTSCH
ENGL
ISH
OTHER MODEs
AUX
■ External peripheral devices with RCA audio and video outputs can be connected with
the unit.
■ To enter AUX lN mode, open the SOURCE MENU and then touch AUX lN.
Camera
■ This player is "camera ready". Before accessing any camera features, you must
purchase and install a rear video camera. Once the rear camera is connected and
operating properly, the CAMERA source mode will become active. While the camera is
not installed, the CAMERA option appears gray, indicating the function is not available.
The playing source will change to 'CAMERA' mode automatically when you reverse
your car.
NAV
■ This player is "navigation ready". Before accessing any navigation features, you should
purchase and install the suited navigation module. Once the navigation module is
connected and operating properly, the NAV source mode will become active. While
the navigation module is not installed, the NAV option appears gray, indicating the
function is not available. All installation and operating instructions are included with
the navigation module.
29
Setup
Setup procedures
1.Enter setup mode
■ Press the [SETUP] key on the remote control or touch the setup icon [ ] on the user
interface.
■ The following menu appears after entering the setup mode.
■ The GENERAL sub-menu is highlighted by default.
2.Select one sub-menu
■ Press the direction keys on the remote control.
3.Select one item
■ Press the []/[] key on the remote control to select one item and then press the [
key to confirm.
]
4.Select one value
■ Press the []/[] key on the remote control to select one suitable value and then press
the [ ] key to confirm.
NOTE:
■ All following settings can be done by touching the option directly.
30
DEUTSCH
ENGL
ISH
Setup
General
■ Clock mode
12 Hr: the clock displays in the type of 12 hours such as 11:18 AM.
24 Hr: the clock displays in the type of 24 hours such as 20:18.
■ Clock
Adjust the clock displayed on the top right corner of the TFT screen.
■ Tuner Region
The unit supports several radio systems and you can select a correct radio system
according to your country.
■ Beep
On: Background sound of key-press is on.
Off: Background sound of key-press is off.
Language
■ OSD
Select one language of system menu display.
■ DVD Audio
Select one dialogue language of DVD disc.
NOTE:
■ If the DVD disc does not contain the selected language, the dialogues you listening to
will be in default language.
■ DVD Subtitle
Select one subtitle language of DVD disc.
NOTE:
■ If the DVD disc does not contain the selected language, the subtitle will be displayed in
default language.
■ Disc Menu
Select one language of DVD MENU display.
NOTE:
■If the DVD disc does not contain the selected language, the DVD MENU will be displayed
in default language.
31
Setup
Audio
■ DRC
Set the dynamic range of Dolby digital DVD discs.
On: Playback more dynamic audio with Bass.
Off: Normal output.
■ Loudness
On: Loud mode is on.
Off: Loud mode is off.
■ Subwoofer
On: Open the subwoofer speaker.
Off: Close the subwoofer speaker.
■ Sub Filter
You can get different bass effect when you set different cut off frequency of subfilter.
According to the acoustics surroundings of your car, select a proper frequency.
80Hz, 120Hz, 160Hz are available.
RDS
■ RDS
On: RDS function is active.
Off: RDS function is inactive.
■ CT
On: The clock time is on.
Off: The clock time is off.
■ TA VOL
Set the relative volume of Traffic Announcements.
Rating
■ Some DVD discs have built-in parental lock which prevents children to watch some
scenes containing violence or adult content especially.
■ Set Password
The original password of the unit is "0000".
32
DEUTSCH
ENGL
ISH
Setup
You should set a new password ASAP.
Method of changIng password:
1.Locate the cursor on the 'password' option, press the numeric keys on the remote control
or touch the 'Password' option directly to open the onscreen keypad, touch the numeric
buttons to enter your password (original password for the first time) and then confirm.
2. Repeat the operation above to enter a new 6-digit password and then confirm. The new
password becomes effective and the parental lock is closed.
Rating
The unit has some watching level as followings:
1.Kid safe: A movie rating that is condign to children.
2.G: A movie rating that allows admission to persons of all ages.
3. PG: A movie rating that allows admission of persons of all ages but suggests parental
guidance in the case of children.
4. PG-13: A movie rating that allows admission of persons of all ages but suggests parental
guidance in the case of children under the age of 13.
5. PG-R: PG-related.
6. R: A movie rating that allows admission only to persons of a certain age, usually 17,
unless accompanied by a parent or guardian.
7.NC-17: A movie rating that allows admission to no one under the age of 17.
8. Adult: A movie rating that is suitable to adult audiences only.
Procedures of changing the rating:
1. Enter password to unlock the parental lock
■ Locate the cursor on the 'password' option, press the numeric keys on the remote control
or touch the 'Password' option directly to open the onscreen keypad, touch the numeric
buttons to enter your password and then confirm.
2. Change the rating
■ Select an appropriate rating from the 'rating' list.
33
Setup
3. Close the parental lock
■ Repeat the operation of the first step to enter a 6-digit password (old or new) and then
confirm.
■ The parental lock is closed.
■ Load Factory
To restore the default settings relating with DVD playback (e.g.: DVD Audio, DVD Subtitle),
press the [RESET] option.
Hardware
■ Camera ln
Normal: Actual scenes shot by the camera display on the TFT monitor while reverse
driving (just like what you are watching).
Mirror: The mirror images of actual scenes display on the TFT monitor while reverse
driving (just like observing things over the rearview mirror).
■ TFT Auto Open
Auto: The TFT panel automatically opens when the unit is turned on.
Manual: When the ignition is turned off, the TFT panel remains open if it was opened
previously.
Off: The TFT panel opens only by pressing OPEN button when the unit is turned on.
■ Video input
NTSC: Set the color system of the TFT screen to NTSC.
PAL: Set the color system of the TFT screen to PAL.
AUTO: Set the color system of the TFT screen automatically by the unit according to the
input video formats.
■ Parking
On: Image displays only after your car has been parked.
Off: Image displays at all times.
P.VOL
■ P.VOL means Programmable Volume.
You can balance the volume among different audio sources using this function.
34
DEUTSCH
ENGL
ISH
Setup
■ Source
Select one playing source that you want to set relative volume.
■ Level
You can set relative volume level from 0 to 6.
Method of changing passwort
1.Locate the cursor on the “Anti-PSW” option, press the numeric keys on the remote control
or touch the “Anti-PSW” option directly to open the onscreen keypad. Touch the numeric
buttons to enter the factory default code “012345” to deactivate the anti theft function.
2. Repeat the operation above to enter a new 6 digit password and confirm by pressing the
enter button. Your new personal password becomes effective and the unit will be locked
when disconnected from power.
Please note:
■ Do use a code you can easily remember. Unlock the unit is not free of charge and can
only be done by an authorized ZENEC service center.
TS CAL
■ When the touch function is not sensitive or valid, you should calibrate the touch screen
by this function.
■ Calibrate the touch screen just following the screen introductions after entering the TS
CAL mode.
35
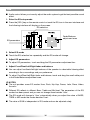
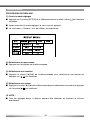
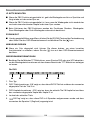
EQ
■ Audio control allows you to easily adjust the audio system to get the best possible sound
effect.
1.Enter the EQ setup mode
■ Press the [SEL] key on the remote control or touch the EQ icon in the user interface and
the following interface will display on the screen.
EQ selection
Fader/Balance
adjustment area
EQ parameters
2.Select EQ mode
■ Touch the EQ selection bar repeatedly and the EQ mode will change.
3.Adjust EQ parameters
■ To adjust EQ parameters, touch and drag the EQ parameters adjustment bar.
4. Adjust Front/Rear/Left/Right fader and balance
■ You can adjust front/back/left/right balance of the speaker to a desirable listening effect
according to the surroundings and your preference.
■ To adjust Front/Rear/Left/Right fader and balance, touch and drag the small white point
in the Fader/Balance adjustment area.
NOTES:
■ The unit provides some EQ modes: User, Rock, Hip Hop, Dance, Latin, Rave, Urban,
Acoustic.
■ Different EQ reflects in different Bass, Treble and Mid level. The parameters of the EQ
modes has been preset and you can not change them besides 'User'.
■ The EQ mode will change to 'User' automatically when you adjust the value of BASS,
TREB or MID under the modes besides 'User'.
■ The value of SUB is independent of EQ mode and can be adjusted solely.
36
DEUTSCH
ENGL
ISH
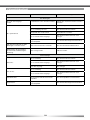
TROUBLESHOOTING
■ What appears to be trouble is not always serious. Please check the following points
before calling a service center.
Problem
Cause
Corrective action
General
Unit can not power on.
Unit fuse blown.
lnstall new fuse with correct rating.
Car battery fuse blown.
lnstall new fuse with correct rating.
lllegal operation.
Reset the unit.
Battery depleted.
Change the Battery.
Battery installed incorrectly.
lnstall the battery correctly.
lmproper audio output connection.
Check wiring and correct.
Volume set too low.
lncrease volume level.
Speakers damaged.
Replace speakers.
Remote control does not work.
No/low audio output.
Heavily biased volume balance.
Adjust the channel balance to center position.
Speaker wiring is in contact with metal part
of car.
lnsulate all speaker wiring connections.
Pirated disc is in use.
Use original disc.
Speaker.
Replace speakers.
Wrong connections.
Check wiring and correct.
Speaker is shorted.
Check wiring and correct.
Tel-Mute malfunction.
MUTE wire is grounded.
Check the 'MUTE' wiring and correct.
Unit resets itself when engine is off.
lncorrect connection.
between ACC and BATT.
Check wiring and correct.
Poor sound quality
or distortion.
TFT monitor
Monitor does not open automatically.
TFT Auto Open is turned off.
Turn TFT Auto Open on.
Warning information is shown at all
times.
Parking break wiring is not correct.
Check wiring and correct.
The color system of DVD disc does not match
the monitor.
Adjust the color system of the DVD disc playing
back or the monitor in us.
Pirated disc is in use.
Use original disc.
Video cable damaged.
Replace cables.
lmproper video signal connections.
Check wiring and correct.
Flashing image or interference appears
on screen.
37
TROUBLESHOOTING
(Continued)
Problem
Cause
Corrective action
Disc playback
Cannot insert disc.
Disc does not play back.
A disc inside the unit already.
Eject current disc and insert new one.
Disc is warped or scratched.
Use disc in good condition.
Disc is dirty or wet.
Clean disc with soft cloth.
lncompatible disc is used.
Use compatible disc.
Disc is inserted upside down.
lnsert disc with label side up.
Disc region code is not compatible with unit.
Use disc with proper region code.
PBC cannot be used during VCD
playback.
PBC is not available on the disc.
Use disc with PBC available.
Repeat or search function is invalid
during VCD playback.
PBC is on.
Turn PBC off.
Error messages
Disc is dirty.
Clean disc with soft cloth.
Disc is upside down.
lnsert disc with label side up.
No disc inside.
lnsert disc.
Disc is dirty.
Clean disc with soft cloth.
Disc is upside down.
lnsert disc with label side up.
Unknown disc.
Disc format is not compatible.
Use disc with compatible format.
Region Error.
DVD region code is not compatible with
this unit.
Use disc with compatible region code.
No disc.
Bad disc.
38
DEUTSCH
ENGL
ISH
DEVICE CONNECTIONS
Notes of connection
■ This unit is designed to be used in a vehicle with a 12-volt battery and negative
grounding. Before installing this unit to a mobile home, a bus, or a truck, make sure the
battery voltage is appropriate for this unit to be used, otherwise, install a transformer to
convert the output voltage to 12 V.
■ To avoid short circuit in the electrical system, ensure that the negative battery cable is
disconnected before installation.
■ To prevent short circuit in the wiring and damaging to this unit, secure all wirings with
cable ties or adhesive tape. Route the wirings in a secured, out of heating place without
touching any moving parts such as gear shift, handbrake, and seat rails to prevent the
wiring insulation being melted/wore off.
■ Never pass the yellow power cord through the installation hole into the engine
compartment and connect to the car battery. Otherwise, a high possibility of serious
short circuit to the electrical system may occur.
■ Replacing a new fuse with 10 A rating when the old one is broken, using no fuse or
fuse with improper rating may cause damage to this unit or even fires. lf a proper fuse
is installed and electrical problems still occur, please contact with any professional car
shops for inquiry.
■ Please make sure all the wiring connections and the cables of the speakers are wellinsulated. Otherwise, this unit may be damaged by short circuit.
■ lf there is no ACC available, please connect ACC lead to the power supply with a switch.
■ lf an external power amplifier is connected, please don't connect P.CONT lead to the
power lead of the external power amplifier, otherwise, electric spark or other damage
may be resulted.
■ Never ground the speaker output to prevent the damage to the built-in power amplifier.
■ The minimum rating of the speakers connected to this unit is 50 W with 4 to 8 Ω impedance.
39
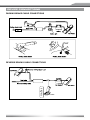
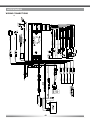
DEVICE CONNECTIONS
Control Cables
Auto Brightness Control
■ To avoid the display being too bright at night time, if the headlight cable is connected to
lLLUMl, turning on the head light will dim the backlight of the TFT LCD and vice versa.
Telephone Mute
■ lf the MUTE cable is connected to a car phone, other audio outputs mute when one call
is received by the car phone.
Reverse Driving
■ lf a rear view camera is connected with the unit, the playing source switches to CAMERA
automatically when you start reverse driving. With the reverse driving over, the playing
source switches to the previous source.
Parking Brake
1. lf "PRK SW" cable is connected to hand brake switch, video display on the TFT monitor
will be controlled by this function. Parking cable function ceases when the playing
source is CAMERA.
2. The monitor displays the blue screen with warning information to prevent the driver
watching video contents during driving, but the passengers at the rear seat can watch
video content normally, when headrest monitors are installed.
40
DEUTSCH
ENGL
ISH
DEVICE CONNECTIONS
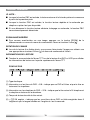
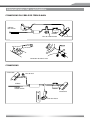
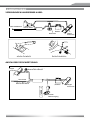
PARKING BRAKE CABLE CONNECTIONS
REVERSE DRIVING CABLE CONNECTIONS
Gearbox
41
INSTALLATION AND UNINSTALLATION
Notes of installation
1.Before installation, please make sure proper connections are conducted and the unit
operates normally. lmproper connection may result in damage to the unit.
2.Use only accessories designed and manufactured for this unit and other unauthorized
accessories may result in damage to the unit.
3.Before installation, please fasten all power cables.
4. DO NOT install the unit in the place where close to hot area to prevent damage to
electrical components such as the laser head.
5. lnstall the unit horizontally. lnstalling the unit more than 30 degree inclined may result in
worse performance.
6. To prevent electric spark, connect the positive pole first and then the negative pole.
7. DO NOT block the cooling fan exit to ensure sufficient heat dissipation of this unit, or it
may result in damage to this unit.
UNIT Installation
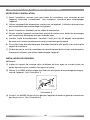
Method A
1. lnsert mounting bracket into dash board, choose appropriate mounting tab according to
the gap width, bending the mounting tab outwards with a screw driver to fix the mounting
bracket in place.
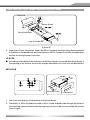
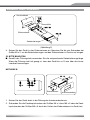
2.Use 2 pieces of M5 x 5 cone shaped screw to fix two assemble bars on both sides of the
unit (see picture 1).
(Picture 1)
3. Screw in 1 piece of M5 x 24 to the hole of the unit back and put on a rubber sheath over
the screw (see picture 2).
42
DEUTSCH
ENGL
ISH
INSTALLATION AND UNINSTALLATION
Dashboard
Rubber Sheath
Mounting Bracket
Long Assemble Bar
(Picture 2)
4. lnsert the unit into the bracket, fasten the M4 x 6 screw to the fireproofing board available
at the back of the dashboard, and use 4 pieces of M2 x 2 screw to lock the assemble bars
and the mounting bracket in position.
NOTE:
■ According to the depth of the opening, use different length of assemblebar accordingly. If
the opening is too shallow, the monitor may be extended out 10 mm from the dashboard.
Method B
Mounting Frame
Dashboard
1.Insert this unit directly to the opening of the dash board.
2. Place M4 x 3, M5 x 5 cylindrical screw or M5 x 5 cone shaped screw through the holes of
the mounting frame located inside the opening to holes of the unit and fasten the screws
to left & right.
43
INSTALLATION AND UNINSTALLATION
Trim Ring installation
■ Attach the trim ring around the front panel with two indentions on one side facing upwards.
Uninstall
Disassemble trim ring
1. Push the trim ring upward and pull out the upper part.
2. Push the trim ring downward and pull out the lower part.
Disassemble the unit
1.Unscrew the 4 pieces M2 x 2 screws.
2.Use a screw driver to bend straight the bended mounting tab and tip out the unit from the
mounting bracket.
Remove the rubber sheath
Unscrew 4
attached screws
3. Pull out the unit from the mounting bracket with both hands.
44
DEUTSCH
ENGL
ISH
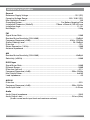
SpeCifiCationS
General
Reference Supply Voltage.........................................................................................12V (DC)
Operating Voltage Range.............................................................................10.5~15.8V (DC)
Max Operation Current..................................................................................................... 10A
Grounding System......................................................................... Car Battery Negative Pole
Installation Dimension (WxHxD)...........................................178mm x 50mm x (165+25) mm
Installation Angle......................................................................................................... 0°~30°
Net Weight......................................................................................................................2.3kg
FM
Signal Noise Ratio.......................................................................................................... 55dB
Residual Noise Sensitivity (S/N=30dB)......................................................................20dBµV
Frequency Response (±3dB).......................................................................... 40Hz~12.5KHz
Station Seeking Level.......................................................................................... 20~30dBµV
Distortion.........................................................................................................................1.5%
Stereo Separation (1 KHz)............................................................................................. 20dB
Antenna Impedance.........................................................................................................75Q
AM
Residual Noise Sensitivity (S/N=20dB)......................................................................40dBµV
Selectivity (±9KHz)......................................................................................................... 50dB
DVD Player
Signal/Noise Ratio.......................................................................................................... 90dB
Dynamic Range.............................................................................................................. 90dB
Distortion (line out)......................................................................................................... 0.1%
Frequency Response (±3dB)............................................................................. 20Hz~20KHz
Max Output Power....................................................................................................... 4x40W
Load Impedance.................................................................................................................4Ω
AUX IN
Distortion........................................................................................................................ 0.5%
Frequency Response (±3dB)............................................................................. 20Hz~20KHz
Audio Input Level....................................................................................................... 0.4Vrms
Audio
Audio Output Impedance................................................................................................200Ω
Audio Output Level.............................................................................................2Vrms (Max)
(Under normal audio input level and maximum volume)
45
SpeCifiCationS
Video
Normal Video Input Level (CVBS)............................................................................ 1.0±0.2V
Video Input Impedance.....................................................................................................75Ω
Video Output Impedance..................................................................................................75Ω
Video Output Level................................................................................................... 1.0±0.2V
TFT Monitor
Screen Diagonal........................................................................................................ 7 inches
Usable Display Area.................................................................................154.1(W) x 87.0 (H)
Resolution................................................................................................. 1440 (W) x 234 (H)
Brightness............................................................................................................... 400cd/m²
(Measure the centre brightness after 30 minutes)
Contrast...................................................................................................................300(TYP.)
Response Time
Rise...........................................................................................................................12ms
Fall............................................................................................................................18ms
Viewing Angle
From Top...................................................................................................................... 40°
From bottom................................................................................................................. 65°
Horizontally................................................................................................................±65°
LCD Life Cycle..................................................................................... 10000 hours (at 25°C)
Environment
Operating Temperature.................................................................................... -10°C~ + 60°C
Storing Temperature........................................................................................ -20°C~ + 70°C
Operating Humidity............................................................................................45%~80%RH
Storing Humidity................................................................................................30%~90%RH
■
Specifications are subject to possible modifications for improvement without further
notice.
■
If at any time in the future you should need to dispose this product please note that waste electrical
products should not be disposed of with household waste. Please recycle where facilities exist.
Check with your Local Authority or retailer for recycling advice (Waste Electrical and Electronic
Equipment Directive).
This unit is manufactured under license from Dolby Laboratories. “Dolby” and the double-D symbol
are trademarks of Dolby Laboratories.
46
DEUTSCH
ENGL
ISH
APPENDIX
Region Code
According to DVD sale region, the whole world is divided into six regions. A DVD disc can be
played back only when its region code is compatible with that of the player in use.
Region 1: USA, Canada, East Pacific Ocean lslands;
Region 2: Japan, West Europe, North Europe, Egypt, South Africa,
Middle East;
Region 3:
Taiwan of China, Hong Kong of China, South Korea, Thailand,
lndonesia, South East Asia;
Region 4:
Australia, New Zealand, Mid & South America, South Pacific,
Ocean lslands/Oceania;
Region 5:
Russia, Mongolia, lndia, Middle Asia, East Europe,
North Korea, North Africa, North West Asia;
Region 6:
Chinese Mainland.
Cautions of disc using
1.DO NOT use irregular shaped disc
2.Disc Cleaning
Use a dry, soft cloth to wipe the disc from center to edge, only neutral detergent can be
used.
3. When playing a new disc
New disc may have some rough spots around the inner and outer edges. lf such a disc is
used, remove these rough spots with a pencil or ball-point pen, etc.
47
NAV BOX
43
48
POWER AMPLIFIER
FRONT L
FRONT R
REAR L
WHITE
RED
WHITE
RED
R
N
D
2
L
P
AUTO-ANTENNA
POWER AMPLIFIER
CAR
GEAR
SIGNAL LIGHT
REVERSE DRIVING
GND
IGNITION SWITCH
HEAD LIGHT
GND
CAR TELEPHONE
GND
HEAD LIGHT SWITCH
BATTERY
VIOLETBLACK
WHITE
GREEN
WHITEBLACK
FRONT L+
REAR L+
FRONT L-
GREENBLACK
GRAYBLACK
REAR R-
REAR L-
VIOLET
FRONT R-
GRAY
REAR R+
FRONT R+
BLUE
PINK
ANT.CONT
BLUEWHITE
REVERSE
BROWN
RED
P.CONT
MUTE
ORANGE
ACC
BLACK
YELLOW
ILLUMI
GND (-)
BATTERY (+)
GND
PARKING BRAKE SWITCH
HAND BRAKE INDICATION
BATTERY
16 PIN
POWER
1
2
3
4
5
6
7
8
BLUE
DVB-T CVBS
PARKING
CAMERA
MONITOR
9
10
11
12
13
14
15
16
REAR R
SUB OUT
ANT
PINK
REM SWC
CAMERA
YELLOW
GRAY
VIDEO OUT
YELLOW
APPENDIX
Appendix
WIRING
WiringCONNECTIONS
Connections
DEUTSCH
ENGL
ISH
2 Years Limited Warranty
Dear customer
Thank you for purchasing this ZENEC product. It is advisable to keep the original packing material
for any future transporting of the product.
Should your ZENEC product require warranty service, please return it to the retailer from whom it
was purchased or the distributor in your country.
This ZENEC product is warranted against defective materials or workmanship for a period of TWO
years from date of purchase at retail.
Warranty Limitations
This warranty does not cover any damage due to:
1. Improper installation, incorrect audio or mains connection(s).
2. Exposure to excessive humidity, fluids, heat sun rays or excessive dirt or dust.
3. Accidents or abuse, unauthorized repair attempts and modifications not explicitly
authorized by the manufacturer.
This warranty is limited to the repair or the replacement of the defective product at the
manufacturer’s option and does not include any other form of damage, whether incidental,
consequential or otherwise. The warranty does not cover any transport costs or damages
caused by transport or shipment of the product. Warranty work will not be carried out unless
this warranty certificate is presented fully completed with model, serial number, purchaser’s
address, purchasing date and dealer stamp together with the original sales slip!
ZENEC Model: ZE-MC194
Serial number:...............................................................................................................................
Date of purchase:...........................................................................................................................
Your name:.....................................................................................................................................
Your address:.................................................................................................................................
City:...............................................................................................................................................
State: ................................... ZIP or postal code ..........................................................................
Country: ........................................................................................................................................
Dealer’s address & stamp
49
Contenu
Panneau de commandes
START CODE..................................................................................................................................................... 54
Panneau avant.............................................................................................................................................. 54
Affichage LCD auxiliaire.......................................................................................................................... 55
Télécommande ............................................................................................................................................ 56
Opérations de base
Sous /hors tension................................................................................................................................... 58
NAV..................................................................................................................................................................... 58
Réglage du volume ................................................................................................................................... 58
Menu Source ................................................................................................................................................ 58
Sélection de la source de lecture .................................................................................................. 58
Affichage de l’heure ................................................................................................................................ 59
Utilisation de l’écran TFT....................................................................................................................... 59
Réinitialisation de l'appareil ................................................................................................................ 59
Mode Radio
Sélectionner la radio comme source de lecture .................................................................... 60
Sélectionner une bande radio . .......................................................................................................... 60
Recherche automatique . ....................................................................................................................... 60
Recherche manuelle ............................................................................................................................... 60
Mémorisation automatique ................................................................................................................... 60
Mémorisation manuelle .......................................................................................................................... 61
Balayage ........................................................................................................................................................ 61
Indiquer les stations mémorisées . ................................................................................................... 61
Recherche locale ..................................................................................................................................... 61
Fonctionnement du RDS
Fonction AF .................................................................................................................................................. 62
Fonction TA . ................................................................................................................................................. 62
Fonction PTY ................................................................................................................................................ 63
Program Service (PS) ............................................................................................................................... 63
CT (Clock Time) . ........................................................................................................................................... 63
RT (Radio Text) . ........................................................................................................................................... 63
Mode disque
Insérer un disque . .................................................................................................................................... 64
Éjecter le disque ...................................................................................................................................... 64
Commandes de L'écran tactile ............................................................................................................. 64
Commandes du Menu à l'écran (OSD) .................................................................................................. 65
Suspendre la lecture ............................................................................................................................. 66
Arrêter la lecture .................................................................................................................................. 66
Afficher la liste des fichiers . ............................................................................................................ 66
Lecture accélérée ................................................................................................................................... 66
Précédent / Suivant .................................................................................................................................. 66
Sélectionner un dossier ....................................................................................................................... 66
Répéter la lecture .................................................................................................................................. 67
Répéter A-B ................................................................................................................................................... 67
Lecture aléatoire ..................................................................................................................................... 67
Lecture d'introduction . ........................................................................................................................ 68
Recherche directe ................................................................................................................................... 68
Recherche « GOTO » .................................................................................................................................. 68
DVD MENU et TITRE ...................................................................................................................................... 69
Sélectionner la langue des sous-titres ....................................................................................... 69
Sélectionner les prises de vues multi-angles . .......................................................................... 69
Sélectionner le canal audio . .............................................................................................................. 69
Fonction PBC . .............................................................................................................................................. 69
Zoom in/out ................................................................................................................................................... 70
Rotation de l’image . .................................................................................................................................. 70
Informations de lecture ....................................................................................................................... 70
50
DEUTSCH
FRENCH
Mode USB
Sélectionner l'USB comme source de lecture ............................................................................ 72
Commandes de l'écran tactile ............................................................................................................. 72
Commandes du Menu à l'écran (OSD) .................................................................................................. 72
Suspendre la lecture ............................................................................................................................. 72
Arrêter la lecture .................................................................................................................................. 72
Afficher la liste des fichiers . ............................................................................................................ 72
Lecture accélérée ................................................................................................................................... 72
Précédent / Suivant .................................................................................................................................. 72
Sélectionner un dossier ....................................................................................................................... 73
Répéter la lecture .................................................................................................................................. 73
Lecture aléatoire ..................................................................................................................................... 73
Lecture d’introduction . ........................................................................................................................ 73
Recherche directe ................................................................................................................................... 73
Recherche « GOTO » .................................................................................................................................. 73
Zoom in/out ................................................................................................................................................... 73
Rotation de l’image . .................................................................................................................................. 73
Informations de lecture ....................................................................................................................... 73
Mode iPod
Sélectionner l'iPod comme source de lecture ...........................................................................74
Lecture de musique ...................................................................................................................................74
Lecture de photo .......................................................................................................................................74
Lecture vidéo .............................................................................................................................................. 75
Lecture accélérée ................................................................................................................................... 75
Recherche directe ................................................................................................................................... 75
Autres modes
AUX. ................................................................................................................................................................... 77
Camera . .......................................................................................................................................................... 77
NAV..................................................................................................................................................................... 77
Réglages
Procédures de réglage . ....................................................................................................................... 78
Général .......................................................................................................................................................... 79
Langues .......................................................................................................................................................... 79
Audio ................................................................................................................................................................ 80
RDS . .................................................................................................................................................................. 80
Blocage parental ...................................................................................................................................... 80
Hardware ...................................................................................................................................................... 82
P.VOL ................................................................................................................................................................. 82
Méthode pour changer le mot de passe......................................................................................... 83
TS CAL . ............................................................................................................................................................. 83
Égaliseur (EQ) ............................................................................................................................................. 84
Guide de Dépannage ................................................................................................................................. 85
Connexion de l’appareil
Notes ............................................................................................................................................................... 87
Câblage principale ................................................................................................................................... 88
Connexion au frein à main ..................................................................................................................... 89
Connexion marche arrière ................................................................................................................... 89
Installation et désinstallation
Notes pour l'installation ...................................................................................................................... 90
Installation de l’appareil . ..................................................................................................................... 90
Installation du cadre de finition . ..................................................................................................... 92
Désinstallation .......................................................................................................................................... 92
Caractéristiques techniques ............................................................................................................. 93
Annexe
Codes région ............................................................................................................................................... 95
Consignes de sécurité pour l’utilisation des disques ............................................................ 95
Plan des Connexions ............................................................................................................................... 96
GARANTIE ........................................................................................................................................................ 97
51
Consignes de sécurité
1. Branchez cet appareil seulement à une source
d’alimentation +12V (DC) avec une masse négative.
2. Pour des raisons de sécurité, ne jamais installer cet
appareil dans votre champ de vision.
3. Il est défendu par la loi d’utiliser la fonction d'affichage
vidéo (à l’avant) en conduisant (à l’exception d’une
camera de recul). Visionner une vidéo en conduisant
augmente le risque d'accident de la circulation.
4. Pour éviter tout risque de court circuit ou d’incendie,
veuillez ne jamais exposer cet appareil à l'humidité ou à
tout autre liquide.
5.Ne jamais remplacer le fusible du câble d'alimentation
sans l’aide d’un professionnel. L’utilisation d’un fusible
non conforme risque d’endommager cet appareil ou
même de provoquer un incendie.
6. Veuillez mettre immédiatement cet appareil hors tension
et contacter le centre de service après-vente ou votre
revendeur lors de l’apparition de l’un des symptômes
suivants :
(a) Pas de son ; (b) Pas d'image ;
(c) Intrusion de liquide dans l’appareil ;
(d) Dégagement de fumé ; (e) Odeur particulière.
7. Pour votre sécurité, veuillez régler le volume sonore
à un niveau confortable afin d’entendre tout véhicule
d'urgence.
52
DEUTSCH
FRENCH
Précautions
1.Ne jamais désassembler cet appareil. Pour plus de détails, veuillez contacter le centre de
service après-vente ou votre revendeur.
2. Pour le nettoyage du panneau de commandes et de l’écran TFT, utilisez un chiffon doux et
propre avec un peu de détergent neutre. L’utilisation d’un tissu rugueux ou d’un détergent
non-neutre tel que l'alcool peut provoquer des éraflures ou la décoloration de l’écran.
3. En cas de comportement anormal de l'appareil, se rapporter au guide de dépannage de
ce manuel. Si aucune solution n'est trouvée, appuyez sur la touche [RESET] du panneau
de commandes pour réinitialiser l’appareil en chargeant les paramètres d'usine par
défaut.
4. Si votre véhicule est resté exposé pendant longtemps à une température chaude ou
froide, attendez jusqu'à ce que la température à l’intérieur du véhicule soit revenu à la
normale avant de mettre l'appareil en fonction.
5.L’utilisation du chauffage par temps froid peut provoquer la formation de buée à l'intérieur
de l'appareil. N’utilisez pas l'appareil dans cette situation. Si un disque se trouve à
l’intérieur, éjectez-le et séchez-le avec un chiffon doux et sec. Après quelques heures, si
l'appareil ne fonctionne toujours pas, contactez le centre de service après-vente ou votre
revendeur.
6.Un impact violent sur l’écran TFT, quand il est en position ouverte, peut l’endommager.
7. Pour éviter tout dommage, ne jamais toucher l’écran TFT avec des objets pointus.
8. Cet appareil utilise un mécanisme de motorisation automatique, ne jamais pousser, tirer
ou faire pivoter l’écran manuellement pour éviter tout dommage.
9. Pour une compréhension plus facile du fonctionnement de cet appareil, des illustrations
graphiques sont employées. Cependant, ces illustrations peuvent être différentes des
images réellement affichées à l'écran.
10. Pendant le fonctionnement de l'appareil, le sigle «
en cours n'est pas disponible ou non autorisée.
» s’affiche à l’écran si l'opération
11. Pour éviter tout problème inutile, utilisez cet appareil correctement en suivant les
indications de ce manuel. Tout problème dû à une mauvaise utilisation de l’appareil
entrainera la perte de la garantie
Déclaration
Ce produit intègre des technologies protégées par des brevets et autres droits de propriétés
intellectuelles aux États-Unis.
Toute utilisation de cette technologie doit être autorisée par Macrovision et est limitée à une
utilisation personnelle.
Le désassemblage ou le démontage est interdit.
53
Panneau de commandes
Start CODE: 012345 (voir page : 83)
Panneau de commandes
AUX
1.Touche [LARGE] : Changer le mode d'affichage
2.Touche [
] : Suivant / déplace le curseur vers la droite
3.Touche [
] : Précédent / déplace le curseur vers la gauche
4.Touche [NAV] : Entrée / sortie mode NAV
5.Molette [Vol.] : Régler le volume /activer / désactiver la fonction sourdine
6.Touche [Reset] : Réinitialisation de l'appareil
7.Touche [ /SRC] : Mise sous tension de l'appareil / ouvrir menu source
8.Jack d’entrée auxiliaire
9.Prise USB
54
DEUTSCH
FRENCH
Panneau de commandes
10.Touche [
] : Éjecter le disque
11.Touche [OPEN/Close] : Ouverture / fermeture de l’écran TFT
12.Touche [AS/TILT+] : Mémorisation automatique / balayage / augmentation de l’angle de
l’écran TFT
13.Touche [BAND/TILT-] : Sélectionner une bande radio / diminution de l’angle de l’écran
TFT
Affichage LCD auxiliaire
1. Indicateur de disque
■ Est allumé lorsqu’un disque est à l'intérieur ; Est éteint lorsqu’aucun disque n'est à
l'intérieur.
2. Indicateur du mode de répétition
■ Est allumé lorsque le mode de répétition est actif ; Est éteint lorsque le mode de répétition
est désactivé.
3. Zone de principale visualisation
■ Affiche les caractères, le temps de lecture, la fréquence radio, l’heure et tout autre texte
d’information.
4. Indicateurs du statut radio
■L’indicateur « stéréo » s’allume quand la diffusion radio est en stéréo ; L’indicateur « local
» s’allume quand la fonction recherche locale est active.
5. Indicateurs des fonctions RDS
■ AF : Fréquence alternative
■ PTY : Type de programme
■ TA : Annonce routière
■ TP : Programme d’annonce routière
Note :
■La plupart des informations peuvent être affichées sur cet écran LCD seulement quand
l’écran TFT est fermé.
■ Cet affichage LCD auxiliaire ne support que la langue anglaise.
55
Before using
Panneau de commandes
Télécommande
Remote Control
Introduce of key functions
1
2
17
18
3
4
5
6
7
8
19
20
21
22
MUSIC
PHOTOS
VIDEO
iPod
23
TILT
9
10
11
12
13
24
25
26
27
28
29
PRESET
14
15
30
SETUP
16
CLEAR
31
32
Note:
Fonctions
principales
Your remote control may differ slightly
from the one pictured here. The above
Note :
diagram is for illustrative purpose only.
■ Votre télécommande peut
légèrement différer de celle
décrit ici. Le dessin cidessus est uniquement pour
d'illustration.
1. Touche [SRC]playing
: Sélection
1.[SRC]Key:select
sourcede la source de lecture
2. Touche {EJECT]
2.[EJECT]Key:
Eject disc: Éjecter le disque
3.[MENU]
Key:[MENU]
DVD MENU
/ PBC DVD/PBC
3. Touche
: MENU
4.[TITLE]
Key:[TITRE]
DVD TITLE
4. Touche
: TITRE DVD
5.[DISP]
Key: Display
5. Touche
[DISP] information
: Affichage des informations
6.[ANGLE] Key: Select view angle
6. Touche (ANGLE] : Modifier l’angle d’affichage
7.[WIDE] Key: Change display mode
7. Touche [LARGE] : Modifier l’affichage
8.[OPEN/CLOSE] Key: Open / Close
8.
[OPEN/CLOSE] : Ouvrir/Fermer l’écran
the Touche
TFT monitor
TFT / ] Key: Select preset
9.[PRESET
9.
Touche
/ ] : Sélectionner les
radio
station [PRESET
deForward
radio mémorisées
10.[ Stations
] Key: Fast
/
Move
cursor
10.
Touche
[ up] : Avance rapide/déplace le curseur
11.[■/BAND]
vers leKey:
hautSelect radio band /
Stop Playback
11. Touche [ /BAND] : Sélectionner une bande
12.[ ] Key: Play / Pause / Enter
radio/arrêt de lecture
13.[ ] Key: Auto search / Previous /
12.
Touche
] : Lecture/pause/Entrée
Move
cursor[ to /the left
14.[GOTO]
Key:
search
13. Touche
[ GOTO
] touche
: Recherche automatique /
15.[ précédent
] Key: Fast Reverse/
/ déplace le curseur vers la gauche
Move cursor down
14.
Touche [GOTO] : Recherche « GOTO »
16.[0~9] Key: Numeric keys
15.
Touche [ ] touche : Retour rapide/déplace le
17.[MUTE] Key: Mute audio outputs
curseur vers le bas
18.[POWER] Key: Unit power
16. Touche
[0-9]
: Touches
numériques
19.[AUDIO]
Key:
Select
DVD dialogue
17.language
Touche [MUTE] : Mise en sourdine
20.[SUBTITLE]
Key: Select: Mise
DVD sous/hors tension
18. Touche [POWER]
subtitle language
19. Touche [AUDIO] : Sélectionner la langue de la
21.[REPT A-B] Key: A-B repeat
bande son du DVD
22.[REPT] Key: Repeat playback
20. Touche
Sélectionner la langue
23.[TILT
/ ] [SUBTITLE]
Key: Adjusting :display
desangle
sous-titres du DVD
tilting
24.[VOL+/-]
Key:
AdjustA-B]
volume
21. Touche
[REPT
: Répétition A-B
25.[SCN]
Key: [REPT]:
Scan playback
22. Touche
Répéter la lecture
26.[RDM] Key: Random playback
23. Touche (TILT
] : Réglage de l’inclinaison
27.[ ] Key:Auto search / Next /
de l’écran TFT
Move cursor to the right
24. Touche
[VOL+/-] : Réglage du volume
28.[SEL]
Key: EQ
25.
Touche
[SCN]
en mode balayage
29.[ZOOM] Key:
Image: Lecture
zoom in/out
30.[PIC]
Key: Image
26. Touche
[RDM]setting
: Lecture aléatoire
31.[SETUP]
menu
27. ToucheKey:
[ Setup
] : Recherche
automatique/suivant/
32.[CLEAR]
Key:
information
déplacer
leClear
curseur
vers la droite
03
28. Touche (SEL] : Égaliseur
29. Touche [ZOOM] : Zoom in/out
30. Touche [PIC] : Réglage de l’image
31. [SETUP] : Menu réglages
32. Touche [CLEAR] : Effacer
56
DEUTSCH
FRENCH
Panneau de commandes
Notes pour l’utilisation de la télécommande
1) Orientez la télécommande vers le capteur infrarouge de l'appareil.
2) Retirez la batterie de la télécommande ou insérez un isolant de batterie si vous ne
l’utilisez pas pendant plus d’un mois.
3)Ne pas exposer la télécommande en plein soleil ou dans un environnement sujet à de
hautes températures.
4)La batterie peut fonctionner pendant 6 mois dans des conditions normales. Si la
télécommande ne fonctionne pas, changez la batterie.
5)N’utilisez que des batteries au lithium « CR2025 (3V) ».
6)Ne pas recharger, désassembler, chauffer ou jeter la batterie dans le feu.
7)Insérer la batterie dans le sens approprié des pôles (+) et (-).
8)Gardez la batterie hors de portée des enfants pour éviter tout risque d'accident.
Désinstaller la batterie
■ Faire glisser le couvercle du compartiment batterie au dos de la télécommande vers le
bas.
Installer la batterie
■ N’utilisez que des batteries au lithium « CR2025 (3V) ». Insérez la batterie dans le sens
approprié des pôles (+) et (-).
TIRER
POUSSER
57
Opérations de base
Allumer/Éteindre l’appareil
■ Appuyez sur n'importe quelle touche du panneau de commandes ou sur la touche
[POWER] de la télécommande pour allumer l’appareil.
■ Appuyez et maintenez la touche [SRC] du panneau de commandes ou appuyez sur la
touche [POWER] de la télécommande pour éteindre l’appareil.
NAV
■ Appuyez sur la touche [NAV] du panneau de commandes pour entrer ou sortir de la
source de navigation. Le son de la source de lecture actuelle est maintenu sauf lors d’une
annonce de navigation.
Réglage du volume
■ Tournez la molette du volume du panneau de commandes ou appuyez sur la touche [vol.]
de la télécommande.
■ La plage de réglage du volume est de 0 à 40.
■ Appuyez sur la touche [vol.] ou la touche [MUTE] de la télécommande pour activer ou
désactiver la fonction sourdine.
Note :
■ Le réglage du volume désactive la fonction sourdine.
■ L’icône « MUTE » clignote sur l’écran TFT lorsque la fonction sourdine est active.
Ouvrir le Menu Source
■ Appuyez sur la touche [SRC] du panneau de commandes ou de la télécommande
ou touchez le coin supérieur gauche de l'écran pour ouvrir le menu source. Répétez
l’opération ci-dessus pour retourner à la source initiale.
Sélectionner une source de lecture source
■ Ouvrez le menu source et touchez l’icône de la source désirée, ou déplacez le curseur
sur l’icône et confirmez.
Note :
■ La sélection d’une source de lecture permet d’activer celle-ci comme par exemple le
mode DVD, le mode radio, le mode camera, …
■ Si une source n’est pas active, elle ne peut être sélectionnée.
58
DEUTSCH
FRENCH
Opérations de base
Afficher l’horloge
■ Appuyez et maintenez la touche [DISP] du panneau de commandes pour commuter
entre l’affichage de l’horloge et la source de lecture quand l’écran TFT est fermé.
Utilisation de l’écran TFT
Ouverture / Fermeture
■ Appuyez sur la touche [OPEN/CLOSE] du panneau de commandes ou de la
télécommande pour ouvrir ou fermer l’écran TFT.
Réglage de l'inclinaison de l’écran TFT
■ En raison du caractère inhérent de l'affichage TFT, vous obtiendrez une lisibilité différente
suivant l’angle de visionnage.
■L’inclinaison de l’écran TFT peut être changée. Par conséquent, vous pouvez modifier
l’angle pour une meilleure lisibilité.
■ Appuyez sur la touche [TILT] du panneau de commandes de l’écran ou de la télécommande
pour régler l’angle d'inclinaison par paliers.
■ Appuyez et maintenez la touche [TILT] du panneau de commandes de l’écran ou de la
télécommande pour régler l’angle d'inclinaison en continu.
Changer le format de l’image (rapport hauteur/largeur)
■ Appuyez sur la touche [WIDE] du panneau de commandes de l’écran ou de la
télécommande pour changer le format de l’image (rapport hauteur/largeur).
Réglage de l'image
(1) Entrer dans le mode de réglage d'image
Appuyez sur la touche [PIC] de la télécommande.
(2) Sélectionner le paramètre à régler
Appuyez sur la touche []/[] de la télécommande.
(3) Régler la valeur
Appuyez sur la touche []/[] de la télécommande.
(4) Sortir du mode de réglage d'image
Pour sortir du mode de réglage d'image, répéter la première opération ou patientez
quelques secondes sans rien faire.
Réinitialisation de l’appareil
■Une réinitialisation de l’appareil est possible si l’appareil ne fonctionne pas correctement.
Appuyez alors sur le bouton [RESET] du panneau de commandes.
59
Mode Radio
Sélectionner le mode radio en tant que source de lecture
■ Ouvrez le menu source et touchez l’icône RADIO.
Sélectionner une bande Radio
■ Appuyez sur la touche [BAND] du panneau de commandes ou de la télécommande, ou
touchez l’icône [BAND] de l'interface utilisateur pour sélectionner une bande radio parmi
celles proposées (FM1, FM2, FM3, AM1 et AM2).
Recherche automatique
■ Appuyez sur la touche []/[] du panneau de commandes ou de la télécommande ou
touchez l’icône []/[] de l'interface utilisateur pour rechercher une station suivante
ou précédente. Pour cesser la recherche, répétez l’opération ci-dessus ou appuyez sur
d'autres touches ayant des fonctions radio.
Note :
■ Quand une station est trouvée, la recherche s’arrête et la lecture commence. Si une
station radio est diffusée en stéréo, le voyant « ST » (stéréo) s’affiche sur l’écran TFT ou
l'écran LCD.
Recherche manuelle
■La recherche manuelle permet de trouver une station radio en balayant les fréquences
pas à pas.
■ Appuyez sur la touche []/[]de la télécommande ou touchez l’icône []/[] de
l'interface utilisateur pour passer à la fréquence suivante ou précédente. Touchez l’icône
du pavé numérique [
] puis les boutons numériques pour entrer la fréquence d’une
station radio.
S
Mémorisation automatique
■ Seul les stations avec un signal suffisamment puissant seront détectées et mémorisées.
Quand l’écran TFT est fermé, appuyez et maintenez la touche [AS/PS] du panneau de
commandes. Quand l’écran TFT est ouvert, touchez l’icône [AS] de l'interface utilisateur.
Pour arrêter la mémorisation automatique, appuyez sur une autre touche ayant des
fonctions radio.
Note :
■ A la fin de la mémorisation automatique, toutes les stations sauvegardées précédemment
seront remplacées.
■ Cet appareil dispose de 5 bandes radio (FM1, FM2, FM3, AM1, AM2). Chaque bande
peut mémoriser jusqu’ à 6 stations (30 stations en totalité).
60
DEUTSCH
FRENCH
Mode Radio
Mémorisation Manuelle
Pour mémoriser une station manuellement :
(1) Appuyez sur l’icône [MEM] de l'interface utilisateur afin d’ouvrir le menu de présélection.
(2) Appuyez sur l’une des touches de présélection (P1à P6).
(3) Pour sortir, appuyez sur la touche [EXIT].
Fonction de balayage
■ La fonction de balayage permet d’écouter 5 à 10 secondes de chaque station radio
trouvée. Après l’écoute, la recherche continue jusqu’au balayage complet de toute la
bande radio sélectionnée.
■ Quand l’écran TFT est fermé, appuyez et maintenez la touche [AS/PS] du panneau de
commandes.
■ Quand l’écran TFT est ouvert, touchez l’icône [PS] de l'interface utilisateur.
■ Pour arrêter le balayage, appuyez sur une autre touche ayant des fonctions radio.
Écoute des stations mémorisées
■ Appuyez sur une touche numérique de la télécommande (1 à 6) ou touchez le numéro de
la station désirée pour l’écouter.
Recherche locale
■ Quand la recherche locale est activée, seul les stations de radio locale avec un signal
radio puissant seront détectées.
■ Pour activer ou désactiver la fonction de recherche locale, appuyez et maintenez la
touche [NAV] du panneau de commandes.
NOTE :
■ Lorsque la recherche locale est activée, le voyant « LOC » s'affiche.
■ Lorsque la recherche locale est activée, le nombre de stations de radio pouvant être
détectées est diminué.
61
Fonction RDS
Cet appareil dispose des fonctions de base du RDS, incluant la fonction PI (Program
Identification), le nom de la station radio, RT (Radio Text), CT (Clock Time), AF (Alternative
Frequency), TA (Traffic Announcement) et PTY (Program Type).
Fonction AF
■ Les émetteurs diffusent la liste des fréquences des émetteurs voisins de la même station.
L’appareil cherchera la meilleure fréquence disponible. Ainsi, on peut écouter la même
station d'un bout à l'autre du pays sans changer de fréquence manuellement.
■ Pour activer la fonction AF, touchez le bouton [AF] sur l'interface utilisateur. Pour désactiver
cette fonction, répétez l’opération ci-dessus.
NOTE :
■ Certaines interférences peuvent être entendues pendant la commutation automatique
entre les fréquences radio. Désactiver la fonction AF permet de résoudre ce problème.
Fonction TA
■La fonction TA (indicateur d'annonce routière) indique que la station émet une annonce
routière (l’indicateur TA s’affiche). L’appareil commute alors automatiquement vers
l’annonce indépendamment de la source de lecture ou station de radio actuelle. A la fin
de l'annonce routière, l’appareil revient à sa source initiale.
■ La fonction TA peut être activée par une station TP (station émettant des annonces
routières).
■ Pour activer la fonction de TA, touchez l’icone [TA] de l'interface utilisateur.
■ Pour désactiver cette fonction, répétez l’opération ci-dessus.
62
DEUTSCH
FRENCH
RDS-Fonction PTY
■ PTY est l'abréviation pour le type de programme diffusé (par exemple infos ou Rock,
POP…).
■ Six options PTY sont affichées à l'écran. Pour accéder à davantage d'options, touchez la
barre de défilement et les flèches sur l'écran TFT.
■Lorsqu’une option PTY est sélectionnée (par exemple infos), l’appareil recherche
automatiquement la prochaine station radio diffusant ce type de programme. Si aucune
station radio ne diffuse ce type de programme, l’appareil reviendra alors à la station radio
initiale.
Program Service (PS)
■ Le nom de la station, composée de huit caractères alphanumériques, peut être affiché
sur l'écran (par exemple {BBC_4_FM}, {classique}).
CT (Clock Time)
■ Certaines stations radio diffusent la date et heure par le signal RDS. L’heure est
automatiquement réglée quand la fonction « CT » est placée sur "ON".
RT (Radio Text)
■ Lorsque cette fonction est activée, des textes peuvent être diffusés par l'intermédiaire
du RDS et affichés à l’écran, tel que le nom de la station, de la chanson actuelle et de
l'artiste.
63
Disc mode
Insert a disc
Mode
Disque
Upon inserting
a disc, the unit will switch to disc mode automatically.
Insérer un disque
■Notes:
Lors de l’insertion d’un disque, l'appareil commute automatiquement sur le mode disque.
① Please confirm whether there is a disc in the unit before you insert
NOTE :
another one.
■ Avant d’insérer un disque, veuillez vérifier qu’aucun disque ne se trouve dans l'appareil.
② Some recorded discs, such as CD-R, CD-RW, DVD-R, DVD+R,
■ Certains disques enregistrés tels que des CD-R, CD-RW, DVD-R, DVD+R, DVDDVD-RW, DVD+RW cannot be played back because of different
RW,
DVD+RW peuvent ne pas être lus en raison d’une différence dans le mode
recording
status.
Otherwise,
the pas
discs
closed
could
d'enregistrement
ou parce
qu’ils n’ont
étéwithout
finalisésbeing
lors de
la gravure.
not be played back.
■ Concernant
les consignes de sécurité, pour l’utilisation des disques, veuillez vous référer
③àAbout
the cautions of disc using, please refer to the appendix.
l'annexe.
Eject
the
Éjecter
ledisc
disque
the sur
[EJECT]
key[EJECT]
on the front
panel or
control
to eject
the
■ Press
Appuyez
la touche
du panneau
de remote
commandes
ou de
la télécommande
pour
disc.
éjecter le disque.
can
eject éjecter
a disc un
after
the unit
has
been
powered
off. The unit
■ You
Vous
pouvez
disque
après
que
l'appareil
soit éteint.
remains off after the disc is ejected.
Contrôles de l’écran tactile
Touch
screen controls
■ Pendant la lecture d’un DVD, plusieurs zones de contrôle de l’écran tactile sont disponibles
The
touch
key areas
for DVD
comme
indiqué
ci-dessous
: playback are outlined below:
A
B
C
Open SOURCE
MENU
AA–- Ouvrir
menu source
Display playback
information
BB–- Affichages
des informations
de lecture
C - Display onscreen control menu
C – Affichage du Menu de contrôle à l'écran (OSD)
11
64
DEUTSCH
FRENCH
Mode Disque
Boutons de commande à l'écran (OSD)
Disc type/
Icon
MP3/WMA
CD
VCD
DVD
MPEG
Illustration
Pavé
numérique
Pavé
numérique
Pavé
numérique
Pavé
numérique
Pavé
numérique
Pavé
numérique
Menu
Réglages
Menu
Réglages
Menu
Réglages
Menu
Réglages
Menu
Réglages
Menu
Réglages
/
Avance
rapide
Avance
rapide
Avance
rapide
Avance
rapide
/
/
Retour
rapide
Retour
rapide
Retour
rapide
Retour
rapide
/
Précédent
Précédent
Précédent
Précédent
Précédent
Précédent
S
N
Suivant
Suivant
Suivant
Suivant
Suivant
Suivant
E
Lecture/
Pause
Lecture/
Pause
Lecture/
Pause
Lecture/
Pause
Lecture/
Pause
Lecture/
Pause
Arrêt
Arrêt
Arrêt
Arrêt
Arrêt
Arrêt
/
/
deuxième
Menu
deuxième
Menu
deuxième
Menu
/
Lecture
Répétée
Lecture
Répétée
Lecture
Répétée
Lecture
Répétée
Lecture
Répétée
Lecture
Répétée
Lecture
Aléatoire
Lecture
Aléatoire
Lecture
Aléatoire
Lecture
Aléatoire
Lecture
Aléatoire
/
/
/
/
/
/
Rotation
/
/
Zoom
/
/
Zoom
EQ
Réglages
Égaliseur
Réglages
Égaliseur
Réglages
Égaliseur
Réglages
Égaliseur
Réglages
Égaliseur
Réglages
Égaliseur
PBC
/
/
PBC
/
/
/
Lecture
Répétée A-B
/
/
A-B
/
/
Lecture
Répétée A-B
BACK
/
/
Quitter le
menu
Quitter le
menu
Quitter le
menu
Quitter le
menu
AUDIO
/
/
Commutation
canaux
Langue de la
bande son
Langue de la
bande son
/
SOUSTITRE
/
/
/
Langues des
sous-titres
Langues des
sous-titres
/
DISP
/
/
Affichage
informations
Affichage
informations
Affichage
informations
Affichage
informations
MENU
/
/
/
Menu DVD
/
/
TITRE
/
/
/
Titre DVD
/
/
DIR+
Dossier
suivant
/
/
/
/
Dossier
suivant
DIR-
Fichier
suivant
/
/
/
/
Fichier
suivant
65
Mode Disque
Suspendre la lecture
■ Appuyez sur la touche [/] du panneau de commandes ou de la télécommande ou
ouvrez le menu de commande à l'écran et touchez l’icône [/] . Pour reprendre la
lecture, répétez l’opération ci-dessus.
Arrêter la lecture
■ Pour suspendre la lecture et mémoriser le point d’arrêt, appuyez une seule fois sur la
touche [] de la télécommande ou ouvrez le menu de commande à l’écran et touchez
une seule fois l’icône []. Lors de la reprise, la lecture reprend au même endroit.
■ Pour arrêter la lecture, appuyez deux fois sur la touche [] de la télécommande ou
ouvrez le menu de commande à l’écran et touchez deux fois l’icône []. Lors de la
reprise de la lecture, celle-ci reprendra du début.
Afficher la liste des fichiers
■ Pour afficher la liste des fichiers d’un disque gravé, arrêtez la lecture actuelle.
Lecture rapide
■ Appuyez plusieurs fois sur la touche []/[] de la télécommande ou ouvrez le menu de
commande à l’écran et touchez plusieurs fois l’icône []/[] afin de changer la vitesse
de lecture rapide avant/arrière.
Précédent/Suivant
■ Appuyez sur la touche []/[] du panneau de commandes ou de la télécommande ou
ouvrez le menu de commande à l’écran et touchez l’icône []/[] pour lire le fichier
précédent ou suivant.
Changer de dossier
■ Appuyez sur la touche [DIR+]/[DIR-] de l'interface utilisateur (si vous lisez une vidéo
ou un fichier image, arrêtez la lecture) pour changer de dossier pendant la lecture d'un
disque gravé contenant plus d'un dossier.
66
DEUTSCH
FRENCH
Mode de disque
Lecture Répétée
■ Appuyez plusieurs fois sur la touche [RPT] de la télécommande à ou ouvrez le menu de
commande à l’écran et touchez plusieurs fois l’icône [ ] pour modifier le mode de lecture
répétée selon le tableau suivant.
Type de disque
Mode de lecture répétée
DVD
Répéter Chapitre → Répéter Titre → Désactivé
VCD (PBC désactivé) Répéter 1 x → Répéter tout → Désactivé
CD
Répéter 1 x → désactivé
MP3/WMA
Répéter 1 x → Répéter Dossier → Désactivé
MPEG
Répéter 1 x → Répéter Dossier → Désactivé
PHOTO
Répéter 1 x → Répéter Dossier → Désactivé
Note :
■Lors de la lecture d’un VCD, cette fonction est inactive si le PBC est activé.
■ Cette fonction est désactivée si vous éteignez l’appareil ou commutez ver une autre
source.
Répéter A-B
■Lors de la lecture d’un DVD, VCD ou CD, vous pouvez répéter la section A à B d’un titre.
■ Appuyez sur la touche [RPT A-B) de la télécommande ou ouvrez le menu de commande
à l’écran et touchez l’icone [A-B] pour sélectionner le début (A) de la section à répéter.
Renouvelez l’opération pour sélectionner la fin (B) de la section à répéter.
■La section sélectionnée sera répétée en continue.
■ Pour annuler cette fonction, renouvelez une troisième fois l’opération.
Lecture Aléatoire
■Lorsque cette fonction est activée, le contenu du disque est lu de manière aléatoire.
■ Appuyez plusieurs fois sur la touche [RDM] de la télécommande ou ouvrez le menu de
commande à l’écran et touchez plusieurs fois l’icône [ ] pour commuter entre le mode «
Lecture aléatoire », « Lecture répétée aléatoire » et « Désactivé ».
67
Mode de disque
Balayage
■ Lorsque cette fonction est activée, l'appareil lit les 10 premières secondes de chaque
piste d'un disque VCD ou CD. Cette fonction vous permet de rechercher le titre désiré.
■ Pour activer cette fonction, appuyez sur la touche [SCN] de la télécommande. Répétez
l’opération pour la désactiver.
Recherche Directe
■ Lors de la lecture d’un DVD, VCD ou CD, vous pouvez rechercher un chapitre/piste
particulier en appuyant sur les touches numériques de la télécommande. Par exemple, si
vous souhaitez sélectionner la piste 15, appuyez sur la touche numérique [1] et [5] de la
télécommande.
Recherche GOTO
(1) Ouvrir le mode de recherche « GOTO »
■ Appuyez sur la touche [GOTO] de la télécommande pour ouvrir le menu de recherche.
■ Pour les DVD, vous pouvez rechercher selon le titre, chapitre et genre.
■ Pour les VCD, si la fonction de PBC est désactivée, vous pouvez rechercher selon la
durée ; si la fonction de PBC est activée, vous pouvez rechercher selon la piste, la durée
de la piste et la durée du disque.
■ Pour les CD, vous pouvez rechercher selon la piste.
■ Pour les fichiers MPEG, vous pouvez rechercher selon la piste et la durée.
■ Pour les disques gravés contenant des fichiers MP3 et/ou JPG, vous pouvez rechercher
selon la piste (numéro de fichier).
(2) Entrer l'information de recherche
■ Sélectionnez un objet en appuyant sur les flèches de la télécommande et écrivez
l'information de recherche en appuyant sur les touches numériques, telles que le titre, le
chapitre ou la durée.
(3) Confirmer
■ Appuyez sur la touche [ENTER] de la télécommande pour confirmer.
(4)Sortir du mode de recherche « GOTO »
■ Répéter l’opération ci-dessus jusqu'à ce que le menu de recherche ait disparu ou touchez
l’icône [EXIT] du menu.
68
DEUTSCH
FRENCH
Mode de disque
MENU DVD et TITRE
■ Cette fonction est seulement disponible pour les DVD ayant « MENU /TITLE ». Appuyez
sur la touche [MENU] de la télécommande ou ouvrez le menu de commande à l’écran et
touchez l’icône [MENU] pour ouvrir le MENU DVD. Vous pouvez Sélectionner la langue
de la bande son, des sous-titres et autres paramètres de lecture. Appuyez sur la touche
[TITLE] de la télécommande ou ouvrez le menu de commande à l’écran et touchez
l’icone [TITLE] pour ouvrir le Menu TITRE du DVD.
Vous pouvez sélectionner un titre différent pour la lecture.
Sélectionner le langage des sous-titres
■ Appuyer à plusieurs reprises sur la touche [SUBTITLE] de la télécommande ou ouvrez
le menu de commande à l’écran et touchez plusieurs fois l’icône [SUBTITLE] pour
sélectionner la langue des sous-titres.
Sélectionner une prise de vue « multi-angle »
■ Appuyez à plusieurs reprises sur la touche [ANGLE] de la télécommande pour
sélectionner une prise de vue différente pendant la lecture d'un DVD ou d'un fichier vidéo
contenant des prises de vues « multi-angle ».
Sélectionner la Bande sonore
■ Pour les DVD contenant des bandes sonores multilingues, appuyez à plusieurs reprises
sur la touche [AUDIO] de la télécommande ou ouvrez le menu de commande à l’écran et
touchez plusieurs fois l’icône [AUDIO] pour changer la langue de la bande sonore.
■ Pour les VCD et CD, appuyez à plusieurs reprises sur la touche [AUDIO] de la
télécommande ou ouvrez le menu de commande à l’écran et touchez plusieurs fois
l’icône [AUDIO] pour commuter entre les modes audio : gauche vocale, droite vocale,
gauche mono, droite mono et stéréo.
Note :
■ Le canal gauche et droit ne peut pas fonctionner correctement si les fichiers audio n’ont
pas été enregistrés correctement.
Fonction de PBC
■ Cette fonction est disponible pour les disques VCD avec la fonction PBC (Ver. 2.0 ou plus
haut).
■ Appuyez sur la touche [MENU] de la télécommande pour activer cette fonction.
■ Appuyez à nouveau pour désactiver.
69
Mode Disque
Note :
■ Lorsque la fonction PBC est activée, la lecture retourne à la liste des pistes et commence
à partir de la première piste.
■ Lorsque la fonction PBC est activée, la fonction lecture répétée et la recherche par
chapitre ou piste n’est pas disponible.
■ Si vous démarrez la fonction lecture aléatoire, balayage ou recherche, la fonction PBC
sera automatiquement désactivée.
Zoom avant/arrière
■ Pour zoomer avant/arrière sur une image, appuyez sur la touche [ZOOM] de la
télécommande ou ouvrez le menu de commande à l'écran et touchez l’icône [ ].
Rotation de l’image
■ Lors de la lecture d’un fichier photo, vous pouvez faire pivoter l'image pour obtenir une
vue appropriée en touchant l’icône [ ] du menu de commande à l'écran.
Informations de lecture
■ Touchez la zone centrale de l’écran TFT lors de la lecture d’un DVD ou VCD pour afficher
les informations de lecture sur la partie supérieure de l’écran TFT.
Pour le DVD
(1) Type de disque.
(2)Information sur les titres du DVD. « 5/8 » indique que ce DVD a 8 titres et que le titre en
lecture est le cinquième.
(3)Information sur les chapitres du DVD. « 2/16 » indique que le titre actuel a 16 chapitres et
le chapitre en lecture est le deuxième.
(4) Temps de lecture écoulé du titre actuel.
2/6 anglais » indique que les sous-titres de ce DVD ont été enregistrés dans 6
(5) «
langues et que la langue affichée est l’anglais et c’est la seconde.
70
DEUTSCH
FRENCH
Mode de disque
Pour le VCD
(1) Type de disque.
(2)Indicateur de fonction PBC. « PBC On » indique que la fonction de PBC est activée.
(3)Informations sur les pistes du VCD. « 6/18 » indique que ce VCD a 18 pistes et la piste en
lecture est la sixième.
(4) Temps de lecture écoulé de la piste actuelle.
71
Mode USB
Sélectionner l'USB comme source de lecture
■ Ouvrez le MENU SOURCE et touchez l’icône USB.
Note :
■ L’appareil commute automatiquement sur le mode USB lorsqu'un périphérique USB a été
inséré.
■ Cet appareil supporte la connexion et déconnexion à chaud.
■ Cet appareil supporte uniquement des périphériques de stockage USB formatés en
FAT16 ou 32. Format NTFS non supporté.
Commandes de l’écran tactile
■ Veuillez vous référer au chapitre « mode disque ».
Boutons de commande à l'écran (OSD)
■ Veuillez vous référer au chapitre « mode disque ».
Suspendre la lecture
■ Veuillez vous référer au chapitre « mode disque ».
Arrêter la lecture
■ Veuillez vous référer au chapitre « mode disque ».
Afficher la liste des fichiers
■ Veuillez vous référer au chapitre « mode disque ».
Lecture rapide
■ Veuillez vous référer au chapitre « mode disque ».
Précédent/Suivant
■ Veuillez vous référer au chapitre « mode disque ».
72
DEUTSCH
FRENCH
Mode USB
Changer de dossier
■ Veuillez vous référer au chapitre « mode disque ».
Lecture Répétée
■ Veuillez vous référer au chapitre « mode disque ».
Lecture Aléatoire
■ Veuillez vous référer au chapitre « mode disque ».
Balayage
■ Veuillez vous référer au chapitre « mode disque ».
Recherche Directe
■ Veuillez vous référer au chapitre « mode disque ».
Recherche GOTO
■ Veuillez vous référer au chapitre « mode disque ».
Zoom Avant / Arrière
■ Veuillez vous référer au chapitre « mode disque ».
Rotation de l’image
■ Veuillez vous référer au chapitre « mode disque ».
Information de Lecture
■ Veuillez vous référer au chapitre « mode disque ».
73
Mode iPod
Sélectionner l'iPod comme source de lecture
■ L'appareil commute automatiquement sur le mode iPod lorsque celui-ci est connecté.
■ Pour sélectionner le mode iPod d’une autre source, ouvrez le MENU SOURCE et touchez
l’icône de l’iPod.
Lecture de musique
(1) Ouvrir le mode musique de l’iPod
■ Appuyez sur la touche [TITLE] de la télécommande ou touchez l’icône « musique » sur
l'interface utilisateur.
(2) Sélection d’un fichier de musique
■ Appuyez la touche [Left]/[Right] de la télécommande.
(3) Lecture du fichier musique
■ Appuyez sur la touche [Down] de la télécommande ou touchez l’icône [
utilisateur.
] de l’interface
(4) Retour au menu précédent
■ Appuyer sur la touche [Up] de la télécommande ou touchez l’icone [MENU] de l’interface
utilisateur.
Note :
■ En mode musique, les touches de l'iPod sont inactives.
Lecture de photo
(1) Ouvrir le mode photo de l'iPod
■ Appuyez sur la touche [MENU] de la télécommande ou touchez l’icône « Photo » de
l'interface utilisateur.
(2) Commandes de lecture des fichiers photo
■ Utilisez les touches de l'iPod pour contrôler la lecture.
Note :
■ Pour sortir du mode PHOTO, appuyez sur l’icone [MENU] de l'iPod.
■ Pour afficher les photos sur l'écran TFT, la fonction « diaporama » doit être activée sur
l'iPod.
74
DEUTSCH
FRENCH
Mode iPod
Lecture vidéo
(1) Ouvrir le mode vidéo de l'iPod
■ Appuyez sur la touche [AUDIO] de la télécommande ou touchez l’icône « Vidéo » de
l'interface utilisateur.
(2) Commandes de la lecture des fichiers vidéo
Utilisez les touches de l'iPod pour contrôler la lecture.
Note :
■ Pour sortir du mode vidéo, appuyez sur la touche [MENU] de l'iPod.
■ Pour pouvoir transmettre les images (vidéos et photos) de votre iPod vers l'écran TFT,
vous devez régler les options suivantes dans le menu « réglages vidéo » de votre iPod :
Sortie TV = On, Signal TV = NTSC.
Lecture Rapide
■ Appuyez et maintenez la touche [Left]/[Right] de la télécommande ou touchez et
maintenez l’icône []/[]de l’interface utilisateur. Pour reprendre la lecture normale,
relâchez la touche.
Recherche Directe
■ Pour sélectionner un fichier directement, touchez l’icône numérique de l’interface
utilisateur afin d’ouvrir le menu d'entrée directe.
Sélectionnez le fichier désiré à l’aide du pavé numérique. Touchez l’icône [ENTER] pour
confirmer.
Pour quitter ce menu, touchez l’icone [EXIT].
■ Pour effacer les numéros que vous avez entrés, touchez l’icône [CLEAR].
■ Vous pouvez également utiliser les touches numériques de la télécommande pour
sélectionner un fichier directement.
75
Mode Tuner TV DVB-T (TNT)
Sélectionner Tuner TV DVB-T (TNT) comme source de lecture
■ Ouvrez le MENU SOURCE et sélectionnez DVB-T (TNT) et
touchez l’écran pour afficher le menu des commandes.
■ Appuyez pour augmenter le volume ou
appuyez pour diminuer le volume.
Commandes de l’écran tactile
■ Dans le mode Tuner TV DVB-T (TNT), plusieurs zones de contrôle de l’écran tactile sont
disponibles comme indiqué ci-dessous:
A – Ouvrir le MENU SOURCE
B – Afficher le menu des commandes
C – Afficher le menu Réglages et Égaliseur
Sélection Rapide
■ Appuyez sur [OK] pour afficher le menu [QUICK SELECT] (Sélection Rapide) et appuyez
ou pour déplacer le curseur et sélectionner la chaine, ou appuyez ou pour
sélectionner le mode source.
Rechercher une chaine
■ Appuyez sur MENU pour afficher [MAIN MENU] (Menu Principal), et appuyez ou
pour déplacer le curseur et sélectionner la source. Appuyez sur [OK] pour ouvrir le menu
secondaire. Appuyez [EXIT] pour quitter.
76
DEUTSCH
FRENCH
Autres Modes
AUX
■ Vous pouvez connecter à cet appareil tout périphérique externe disposant de sorties
RCA audio/vidéo.
■ Ouvrez le MENU SOURCE et touchez l’icône AUX IN pour ouvrir le mode AUX IN.
Camera
■ Cet appareil est préconfiguré pour une camera externe (« camera ready »). Avant
d'accéder aux fonctions camera, vous devez acheter et installer une caméra de recul.
Une fois la camera de recul correctement branchée et opérationnelle, le mode source
CAMERA sera actif. Si aucune camera de recul n'est installée, l’icône CAMERA reste
gris, indiquant que la source n'est pas disponible. La source de lecture commute
automatiquement vers le mode « CAMERA » lorsque vous engagez la marche arrière.
NAV
■ Cet appareil est préconfiguré pour un système de navigation (« navigation ready »).
Avant d'accéder aux fonctions de navigation, vous devez acheter et installer le module
de navigation adapté à cet appareil. Une fois le module de navigation correctement
branché et opérationnel, le mode source NAV sera actif. Si aucun module de navigation
n'est installé, l’icone NAV reste gris, indiquant que la fonction n'est pas disponible. Pour
l’installation et l'utilisation, reportez-vous aux notices livrées avec le module de navigation.
77
Réglages
Procédures de réglage
(1) Ouvrir le mode réglages
■ Appuyez sur la touche [SETUP] de la télécommande ou touchez l’icône [ ] de l'interface
utilisateur.
■ Après ouverture du mode réglages, le menu suivant apparaît.
■ Le sous-menu « General » est, par défaut, en surbrillance.
(2) Sélectionner un sous-menu
■ Appuyez sur les flèches de la télécommande.
(3) Sélectionner une fonction
■ Appuyez la touche []/[] de la télécommande pour sélectionner une fonction et
appuyez sur [ ] pour confirmer.
(4) Sélectionner une valeur
■ Appuyez la touche []/[] de la télécommande pour sélectionner une valeur et appuyez
sur la touche [ ] pour confirmer.
Note :
■ Tous les réglages décris ci dessus peuvent être effectués en touchant la fonction
directement.
78
DEUTSCH
FRENCH
Réglages
Général
■ Format Heure
12Hr : Affichage au format 12 heures, ex. 11h18 du matin.
24Hr : Affichage au format 24 heures, ex. 20h18.
■ Horloge
Règle l’heure de l'horloge affichée dans le coin supérieur droit de l'écran de TFT.
■ Région du Tuner
Règle le système radio correspondant à votre pays.
■ Bip
Activé : Le son des touches est activé.
Désactivé : Le son des touches est désactivé.
Langue
■ OSD
Sélectionner la langue du menu de commande à l’écran.
■ DVD Audio
Sélectionner la langue de la bande son d’un DVD.
Note :
■ La langue par défaut de la bande son sera lue si le DVD ne contient pas la langue
sélectionnée.
■ Sous-titre du DVD
Sélectionner la langue des sous-titres du DVD.
Note :
■ La langue par défaut des sous-titres sera affichée si le DVD ne contient pas la langue
sélectionnée.
■ Menu du disque
Sélectionner la langue du Menu du DVD.
Note :
■ La langue par défaut du Menu du DVD sera affichée si le DVD ne contient pas la langue
sélectionnée.
79
Réglages
Audio
■ DRC
Règle la dynamique des DVD « dolby digital ».
Activé : Une acoustique plus dynamique avec plus de graves.
Désactivé : Acoustique normale.
■ Loudness (correcteur physiologique)
Activé : Le mode est activé.
Désactivé : Le mode est désactivé.
■ Subwoofer
Activé : Sortie Subwoofer activée.
Désactivé : Sortie Subwoofer désactivée.
■ Sub Filter (Filtre passe-bas)
Vous pouvez obtenir des effets de graves différents lorsque vous sélectionnez
une fréquence de coupure du filtre passe-bas différente. Sélectionnez la fréquence
appropriée à l’environnement acoustique de votre véhicule.
Les fréquences disponibles sont : 80Hz, 120Hz, 160Hz.
RDS
■ RDS
Activé : La fonction du RDS est activée
Désactivé : La fonction du RDS est désactivée.
■ CT
Activé : La fonction « Clock Time » est activée.
Désactivé : La fonction « Clock Time » est désactivée.
■ TA VOL
Réglage du volume des annonces routières.
Blocage parental
■ Certains DVD intègrent un blocage parentale qui empêche les enfants de visionner des
scènes violentes ou à caractère sexuel.
■ Régler le mot de passe
Le mot de passe initial de l’appareil est « 0000 ».
80
DEUTSCH
FRENCH
Réglages
Choisissez un nouveau mot de passe DES QUE POSSIBLE.
Méthode pour changer le mot de passe :
(1) Déplacez le curseur sur l’option « mot de passe ». Appuyez sur les touches numériques
de la télécommande ou touchez l'option « mot de passe » directement pour ouvrir le
clavier numérique à l'écran. Touchez les touches numériques pour entrer votre mot de
passe (la première fois, veuillez taper le mot de passe initial) et confirmez.
(2) Répétez l’opération ci-dessus pour entrer un nouveau mot de passe à 4 chiffres et
confirmez. Le nouveau mot de passe devient effectif et le blocage parental est verrouillé.
Blocage Parental
Cet appareil dispose de différents niveaux de blocage parental comme suit :
(1)Kid safe : Peu être visionné par des enfants.
(2)G : Pour personnes de tout âge.
(3) PG : Pour personnes de tout âge et enfants sous contrôle des parents.
(4) PG-13 : Pour personnes de tout âge. Enfants de moins de 13 ans, contrôle des parents
exigé.
(5) PG-R : Idem à PG.
(6) R : Seulement pour personnes à partir d'un certain âge, habituellement âgé de plus de
17ans, à moins d’être accompagné d'un adulte.
(7)NC-17 : Pour personnes de plus de 17 ans.
(8) Adult : Uniquement pour personnes adultes.
Procédures pour changer le niveau de blocage :
(1) Entrez le mot de passe pour déverrouiller le blocage parental.
■ Déplacez le curseur sur l’option « mot de passe ». Appuyez sur les touches numériques
de la télécommande ou touchez l'option « mot de passe » directement pour ouvrir le
clavier numérique à l'écran. Touchez les touches numériques pour entrer votre mot de
passe et confirmez.
(2) Changer le niveau de blocage
■ Sélectionnez un niveau approprié à partir de la liste « Blocage Parental ».
81
Réglages
(3) Verrouiller le blocage parental
■ Répétez la première opération pour entrer un mot de passe à 6 chiffres (ancien ou
nouveau) et confirmez.
■ Le blocage parental est maintenant verrouillé.
■ Paramètres par défaut
Pour revenir aux paramètres par défaut de la lecture des DVD (ex.: Bande Son des
DVD, sous-titres des DVD), touchez l’icône [RESET].
Matériel
■ Camera In
Normale : Affichage normal.
Miroir : Affichage inversé.
■ TFT Auto Open (Ouverture automatique de l’écran)
Auto : L’écran TFT s'ouvre automatiquement lorsque vous allumez l’appareil et se ferme
lorsque vous l’éteignez.
Manuel : Lorsque vous coupez le contact du véhicule, l’écran TFT reste ouvert.
Désactivé : L’écran TFT s'ouvre seulement en appuyant sur la touche « OPEN » lorsque
celui-ci est allumé.
■ Format vidéo
NTSC : Règle le format vidéo de l'écran TFT sur NTSC.
PAL : Règle le format vidéo de l'écran TFT sur PAL.
Auto : Règle le format vidéo de l'écran TFT automatiquement.
■ Parking
Activé : Les vidéos ne peuvent être affichées que si le véhicule se trouve à l’arrêt, frein
à main tiré.
Désactivé : Les vidéos sont toujours affichées.
P.VOL
■ P.VOL signifie volume programmable.
Vous pouvez régler le volume de chaque source séparément.
82
DEUTSCH
FRENCH
Réglages
■ Source
Sélectionner la source de lecture pour laquelle vous souhaitez régler le volume.
■ Niveau
Vous pouvez régler le niveau du volume de 0 à 6.
Méthode pour changer le mot de passe :
1. Déplacez le curseur sur l’option «Anti-vol MdP». Appuyez sur les touches numériques
de la télécommande ou mieux, touchez l'option «Anti-vol MdP» directement pour ouvrir
le clavier numérique à l'écran. Touchez les touches numériques pour entrer “012345” et
confirmez avec touche Entrée.
2. Répétez l’opération ci-dessus pour entrer un nouveau mot de passe à 4 chiffres et
confirmez avec touche Entrée. Votre nouveau mot de passe devient effectif et le blocage
Anti-vol est actif.
Veuillez noter:
■ Employez un code que vous pouvez facilement se rappeler. Déverouillage n'est pas
gratuite et peut seulement être effectuée par un centre autorisé de ZENEC.
TS CAL
■ Si l’écran tactile n’est pas assez précis ou sensible, vous pouvez le calibrer avec cette
fonction.
■ Ouvrez le mode « TS CAL » et veuillez suivre les instructions présentes à l’écran.
83
Égaliseur (EQ)
■ L’égaliseur permet d’ajuster facilement l’acoustique afin de rendre le meilleur effet
sonore possible.
(1) Ouvrir le mode Égaliseur (EQ)
■ Appuyez sur la touche [SEL] de la télécommande ou touchez l’icône « EQ » de l'interface
utilisateur pour afficher le panneau de contrôle suivant.
Sélection EQ
Zone de réglage
Fader/Balance
Paramètres EQ
(2) Sélectionner le mode Égaliseur (EQ)
■ Touchez la barre de sélection EQ à plusieurs reprises pour changer le mode de
l’égaliseur (EQ).
(3) Régler les paramètres de l’égaliseur (EQ)
■ Pour régler les paramètres de l’égaliseur (EQ), touchez et déplacez la barre de réglages
de paramètres EQ.
(4)Régler le Fader et la Balance avant/arrière/gauche/droit
■ Vous pouvez régler le Fader et la Balance avant/arrière/gauche/droit du haut-parleur
pour obtenir un meilleur effet sonore.
■ Pour régler le Fader et la balance avant/arrière/gauche/droit, touchez et déplacez le
petit point blanc dans la zone de réglage Fader/Balance.
Note :
■ L’appareil dispose de plusieurs modes d’égaliseur prédéfinis : Utilisateur, Rock, Hip
Hop, Dance, Latin, Rave, Urban, Acoustic.
■ Chaque mode d’égaliseur a son propre réglage des graves, des mediums et des aigues.
■ Les paramètres des modes d’égaliseur sont prédéfinis et ne peuvent être changés sauf
dans le mode « utilisateur ».
■ Le mode d'égaliseur commutera automatiquement sur le mode « utilisateur » lorsque
vous réglez le niveau des graves, des mediums et des aigues.
■ Le niveau du SUB (Subwoofer) est indépendant du mode égaliseur et peut être réglé
séparément
84
DEUTSCH
FRENCH
Guide de dépannage
■ Veuillez contrôler les points suivants avant de contacter le centre de service aprèsvente.
Problème
Cause
Solution
Généralités
Fusible de l’appareil fondu.
Installer un nouveau fusible avec le bon
ampérage.
Fusible de la batterie du véhicule fondu.
Installer un nouveau fusible avec le bon
ampérage.
Mauvaise utilisation.
Réinitialiser l’appareil.
Batterie vide.
Changer la batterie.
Batterie installée incorrectement.
Installer la batterie correctement.
Connexion audio incorrecte
Contrôler le câblage et le rectifier.
Volume réglé trop bas.
Augmenter le niveau du volume.
Haut-parleurs endommagés.
Remplacer les haut-parleurs.
Volume mal équilibré.
Régler la balance sur la position centrale.
Le câblage des haut-parleurs est en contact
avec une pièce métallique du véhicule.
Isoler toutes les connexions du câblage des
haut-parleurs.
Lecture d’un disque piraté.
Utilisez un disque original.
Puissance des haut-parleurs non adapté
Remplacer les haut-parleurs.
Mauvaises connexions.
Contrôler le câblage et le rectifier.
Haut-parleur en court-circuit.
Contrôler le câblage et le rectifier.
Défaut de fonctionnement de la mise
en sourdine Téléphone
Fil TEL-MUTE (mise en sourdine) en courtcircuit.
Contrôler le câblage et le rectifier.
L’appareil se réinitialise après la
coupure du contact du véhicule
Fils +15 et +30 inversés.
Contrôler le câblage et le rectifier.
Le moniteur ne s'ouvre pas
automatiquement
La fonction ouverture automatique de
l’écran est désactivée.
L'information d'avertissement s’affiché
tout le temps
Le câblage du frein à main n'est pas correct. Contrôler le câblage et le rectifier.
L’appareil ne s’allume pas
La télécommande ne fonctionne pas.
Pas de son
ou trop bas
Mauvaise qualité sonore ou
déformation
Moniteur de TFT
clignotement de l'image ou
l'interférence
Activez la fonction ouverture automatique
de l’écran.
Le format vidéo de l’écran ne correspond
pas au format du DVD
Régler le format video de l’écran
Lecture d’un disque piraté.
Utilisez un disque original.
Câbles video endommagés.
Remplacer les câbles.
Connexion incorrecte du signal vidéo.
Contrôler le câblage et le rectifier.
85
Guide de dépannage
(Suite)
Problème
Cause
Solution
Playback de disque
Ne peut pas insérer le disque
Un disque est déjà à l'intérieur de l’appareil.
Éjecter le disque actuel et insérer le nouveau.
Le disque est faussé ou rayé.
Utiliser un disque en bonne condition.
Le disque est sale ou humide.
Nettoyer le disque avec un chiffon doux.
Un disque incompatible est utilisé.
Utiliser un disque compatible.
Le disque est inséré à l’ envers.
Insérer le disque avec le côté face vers le
haut.
Codes région du disque non compatible
avec l'appareil.
Utiliser un disque avec un code région
appropriés.
PBC ne peut pas être utilisé pendant
la lecture du VCD
PBC n'est pas disponible sur le disque.
Utiliser un disque avec PBC disponible.
La répétition ou la fonction de
recherche n’est pas disponible
pendant la lecture du VCD
PBC est activé.
Désactiver PBC.
Le disque ne peut pas être lu
Messages d'erreur
Le disque est sale.
Nettoyer le disque avec un chiffon doux.
Le disque est à l’ envers.
Insérer le disque avec le côté face vers le
haut.
Aucun disque à l'intérieur.
Insérer un disque.
Le disque est sale.
Nettoyer le disque avec un chiffon doux.
Le disque est à l’envers.
Insérer le disque avec le côté face vers le
haut.
Disque inconnu
Le format du disque n'est pas compatible
avec cet appareil.
Utiliser un disque avec un format compatible.
Erreur de région
Code région du DVD n’est pas compatible
avec cet appareil.
Utiliser un disque avec un code région
compatible.
Aucun disque
Mauvais disque
86
DEUTSCH
FRENCH
Connexion de l’appareil
Notes
■ Cet appareil est conçu pour un véhicule avec batterie de 12 volts et une masse négative.
Avant d'installer cet appareil dans un camping-car, un Bus ou un camion, assurez-vous
que le voltage de la batterie est approprié, dans le cas contraire faites installer par un
professionnel un transformateur pour convertir le voltage en 12 Volt.
■ Pour éviter tout court-circuit dans le système électrique, déconnectés la borne négative
de la batterie avant l’installation.
■ Pour éviter tout court-circuit dans le câblage et endommager cet appareil, fixez tous
les câbles avec un collier ou du ruban adhésif. Évitez de passer les câbles prés des
éléments de chauffage, de pièces mobiles telles que le levier de changement de vitesse,
frein à main et glissières des sièges pour ne pas endommager les câbles.
■ Ne jamais passer le fil jaune d'alimentation dans le compartiment moteur et le connecter
à la batterie de la voiture, pour éviter toute possibilité de court-circuit sérieux.
■ Remplacez le fusible défectueux par un fusible de 10A neuf. Brancher l’appareil
sans fusible ou avec un ampérage inadapté peut endommager l’appareil ou causer
un incendie. Si vous avez installé un fusible approprié et que le problème électrique
persiste, contactés un professionnel pour rechercher l’origine de la panne.
■ Pour éviter tout court circuit, assurer vous que toutes les connexions et câbles des hautparleurs soient bien isolés.
■ Si aucun +15 (plus après contact) n’est disponible, branchez le fil +15 à l’alimentation
avec un interrupteur.
■ Si un amplificateur audio externe est branché, ne connectes pas le fil P.CONT au
fil d’alimentation de l'amplificateur, pour éviter tout risque d’étincelle ou d'autres
dommages.
■ Ne jamais brancher la sortie de haut-parleur a la masse pour éviter des dommages à
l'amplificateur de puissance.
■ Branchez uniquement des haut-parleurs avec une puissance minimale de 50W et une
l’impédance entre 4 et 8Ω.
87
Connexion de l’appareil
Atténuation automatique de la luminosité
■ Pour éviter un éclairage trop lumineux de l’écran le soir, connectez le fil « ILLUMI » au fil
de l’allumage des feux pour atténuer automatiquement la luminosité de l’écran lorsque
vous allumes vos feux.
Telephone Mute (Mise en sourdine)
■ Lorsque le fil « MUTE » est connecté à un téléphone de voiture ou a un kit mains-libres,
l’appareil se met en sourdine quand vous recevez un appel téléphonique.
Marche-arrière
■ Lorsqu’une camera de recul est branché, l'appareil commute automatiquement sur la
vue arrière quand vous enclenchez la marche-arrière.
Frein à main
1)Lorsque le fil « PRK SW » est branché au contacteur de frein de main, l'affichage vidéo
sur l’écran de TFT sera contrôlé par cette fonction (sauf le mode camera de recul).
2) En mode vidéo l’appareil affiche un écran bleu avec une information d'avertissement
lorsque le véhicule est en mouvement pour éviter de distraire le conducteur. Les
passagers arrière peuvent continuer à visionner normalement le contenu vidéo sur des
écrans arrière.
88
DEUTSCH
FRENCH
Connexion de l’appareil
Connexions du câble de frein à main
Câblage
frein à main
Fil Vert
Batterie
Feu de stationnement
Carrosserie
Contacteur de frein à main
Connexions
Carrosserie
Feu de recul
Fil Rose
Câblage
marche-arriére
Batterie
Carrosserie
Levier de vitesse
89
Installation et désinstallation
Notes pour l'installation
1) Avant l’installation, assurez vous que toutes les connexions sont correctes et que
l'appareil fonctionne normalement. Une connexion incorrecte peut endommager
l’appareil.
2)Utilisez seulement des accessoires conçus pour cet appareil. L’utilisation d’accessoires
non compatibles peut endommager cet appareil.
3) Avant l’installation, attachez tous les câbles d'alimentation.
4)Ne pas installer l’appareil proche d’une source de chaleur pour éviter des dommages
aux composants électriques tels que la tête du laser.
5)Installer l'unité horizontalement. Installant l'unité plus de 30 degrés verticalement
peuvent avoir comme conséquence une plus mauvaise performance.
6) Pour éviter toute étincelle électrique, branchez d'abord le pôle positif et en suite le pôle
négatif de la batterie.
7) N’obstruez pas la sortie du ventilateur de refroidissement pour assurer une dissipation
thermique suffisante, pour éviter d’endommager l’appareil.
Installation de l’appareil
Méthode A
(1) Insérez le support de montage dans le tableau de bord, avec un tournevis pliez les
pattes de fixation pour maintenir le support en place.
(2)Utilisez 2 vis M5X5 à tête conique pour fixer les deux pattes d’assemblage de chaque
cote de l’appareil. (Voir l'illustration 1)
Pattes d'
assemblage
(Illustration 1)
(3) Vissez 1 vis de M5X 24 dans le trou derrière l’appareil et mettez la gaine en caoutchouc
par-dessus la vis. (Voir l'illustration 2)
90
DEUTSCH
FRENCH
Installation et désinstallation
Tableau
de bord
Gaine en caoutchouc
Support de montage
Pattes d' assemblage
(Illustration 2)
(4) Insérez l'appareil dans le support de montage, vissez les 4 vis M2X2 pour fixer l’appareil
au support de montage.
Note :
■ Selon la profondeur de l'ouverture du tableau de bord, utilisez des longueurs de pattes
d’assemblage différentes. Si l'ouverture du tableau de bord n’est pas assez profonde,
l’appareil peut être avancé jusque à 10mm.
Méthode B
Supports
Tableau
de bord
(1) Insérez cet appareil directement dans l'ouverture du tableau de bord.
(2) Fixes les supports de chaque cote de l’appareil avec les vis M4X 3, M5X 5 ou M5X5 a
tête conique.
91
Installation et désinstallation
Installation du cadre de finition
■ Fixez le cadre de finition autour du panneau avant avec les deux renfoncements vers le
haut.
Désinstaller
Démontage du cadre de finition
(1) Poussez le cadre de finition vers le bas et tirez la partie inférieure.
(2) Poussez le cadre de finition vers le haut et tirez la partie supérieure.
Désinstaller l’appareil
(1) Dévissez les 4 vis M2x2 et retirez l'appareil du support avec les deux mains
(2)Utilisez un tournevis pour déplier les pattes de fixation.
Enlever la gaine en
caoutchouc
Dévisser les
4 vis
(3) Tirez sur le support pour le sortir du tableau de bord.
92
DEUTSCH
FRENCH
Caractéristiques techniques
General
Reference Supply Voltage.........................................................................................12V (DC)
Operating Voltage Range.............................................................................10.5~15.8V (DC)
Max Operation Current..................................................................................................... 10A
Grounding System......................................................................... Car Battery Negative Pole
Installation Dimension (WxHxD)..............................................178mmx50mmx (165+25) mm
Installation Angle......................................................................................................... 0°~30°
Net Weight......................................................................................................................2.3kg
FM
Signal Noise Ratio.......................................................................................................... 55dB
Residual Noise Sensitivity......................................................................(S/N=30dB) 20dBuV
Frequency Response (±3dB).......................................................................... 40Hz~12.5KHz
Station Seeking Level...........................................................................................20~30dBuV
Distortion.........................................................................................................................1.5%
Stereo Separation (1 KHz)............................................................................................. 20dB
Antenna Impedance.........................................................................................................75Q
AM
Residual Noise Sensitivity (S/N=20dB)......................................................................40dBuV
Selectivity (±9KHz)......................................................................................................... 50dB
DVD Player
Signal/Noise Ratio.......................................................................................................... 90dB
Dynamic Range.............................................................................................................. 90dB
Distortion (line out)......................................................................................................... 0.1%
Frequency Response (±3dB)............................................................................. 20Hz~20KHz
Max Output Power....................................................................................................... 4x40W
Load Impedance.................................................................................................................4Ω
AUX IN
Distortion........................................................................................................................ 0.5%
Frequency Response (±3dB)............................................................................. 20Hz~20KHz
Audio Input Level....................................................................................................... 0.4Vrms
Audio
Audio Output Impedance................................................................................................200Ω
Audio Output Level.............................................................................................2Vrms (Max)
(Under normal audio input level and maximum volume)
93
Caractéristiques techniques
Video
Normal Video Input Level (CVBS)............................................................................ 1.0±0.2V
Video Input Impedance.....................................................................................................75Ω
Video Output Impedance..................................................................................................75Ω
Video Output Level................................................................................................... 1.0±0.2V
(Under normal video input level)
TFT Monitor
Screen Diagonal......................................................................................................... 7inches
Usable Display Area................................................................................. 154.1(W) * 87.0 (H)
Resolution................................................................................................. 1440 (W) * 234 (H)
Brightness...............................................................................................................400cd/m2
(Measure the centre brightness after 30 minutes)
Contrast...................................................................................................................300(TYP.)
Response Time
Rise...........................................................................................................................12ms
Fall............................................................................................................................18ms
Viewing Angle
From Top...................................................................................................................... 40°
From bottom................................................................................................................. 65"
Horizontally................................................................................................................±65°
LCD Life Cycle..................................................................................... 10000 hours (at 25°C)
Environment
Operating Temperature......................................................................................-10'C- + 60°C
Storing Temperature........................................................................................ -20°C- + 70oC
Operating Humidity.............................................................................................45%-80%RH
Storing Humidity.................................................................................................30%-90%RH
NOTE: Les spécifications et la présentation de ce modèle sont sujettes à modification
sans préavis.
■ Si vous devez vous débarrasser définitivement de ce produit, veuillez respecter totalement
les directives concernant les déchets en vigueur dans votre pays. Utilisez les procédures
de recyclage si elles existent. Veuillez consulter les services officiels de votre pays pour
de plus amples renseignements sur les procédures de recyclage. (Waste Electrical and
Electronic Equipment Directive)
Cet appareil est fabriqué sous licence des Dolby Laboratories. “Dolby” et le logo double-D
sont des marques déposées de Dolby Laboratories.
94
DEUTSCH
FRENCH
AnNEXE
Codes région
Le monde entier est divisé en six régions par rapport à la région de vente des DVD. Un DVD
ne peut être lu que si son code région
Est compatible avec celui de l’appareil.
Région 1 : Les États-Unis, Canada, îles de l'océan pacifique est ;
Région 2 : Le Japon, l'Europe occidentale, l'Europe du nord, Égypte, Afrique du
Sud, Moyen-Orient ;
Région 3 :
Taiwan de la Chine, Hong Kong de la Chine, Corée du Sud, Thaïlande, L'Indonésie, Asie du Sud-est ;
Région 4 : L'Australie, la Nouvelle Zélande, mi et l'Amérique du Sud,
South Pacific Îles d'océan/Océanie ;
Région 5 : La Russie, Mongolie, Inde, Asie moyenne, l'Europe est, La Corée du
Nord, Afrique du Nord, Asie du nord-ouest ;
Région 6 :
Continent chinois.
Consignes de sécurité pour l’utilisation des disques
1)Ne pas utiliser des disques avec une forme irrégulière
2)Nettoyage du disque
Utilisez un tissu sec et doux pour essuyer le disque du centre vers le bord. N’utilisez que
du détergent neutre.
3) Lecture d’un disque neuf
Des nouveaux disques peuvent avoir quelques endroits rugueux autour des bords
intérieurs et extérieurs. Si un tel disque doit être utilisé, retirez ces endroits rugueux avec
un stylo bille ou un crayon.
95
(TNT)
AMPLIFICATEUR
NOIR
96
ARRIÉRE G
ARRIÉRE D
ARRIÉRE G
ARRIÉRE D
SORTIE SUB
JAUNE
BLANC
ROUGE
BLANC
ROUGE
BLEU
ROSE
CAMERA
VERT-NOIR
BLANC-NOIR
VERT
BLANC
VIOLET-NOIR
GRIS-NOIR
VIOLET
GRIS
BLEU
ROSE
BLEU-BLANC
BRUN
ROUGE
ORANGE
NOIR
JAUNE
MASSE
BATTERIE
CONTACTEUR DE FREIN A MAIN
VOYANT FREIN A MAIN
COMMANDES DU VOLANT
INTERFACE VENDU
SÉPARÉMENT
CAMERA
JAUNE
GRIS
SORTIE VIDÉO
JAUNE
ANNEXE
Connexions de câblage
DEUTSCH
FRENCH
GARANTIE 2 ANS
Cher client,
Nous vous remercions pour l’achat de cet appareil ZENEC. Conservez si possible l’emballage
de ce produit pour tout envoi futur.
Si cet appareil ZENEC requiert la mise en oeuvre de sa garantie, veuillez le retourner au
revendeur qui vous l’a vendu, ou au distributeur agréé du pays d’achat.
Ce produit ZENEC est garanti contre tout défaut matériel, pièces et main d’oeuvre pour une
période de DEUX ANS après sa date d’achat.
Limitations de la garantie
Cette garantie ne couvre pas les dommages dus :
1. Mauvaise installation, branchements audio ou alimentation incorrects.
2. L’exposition à une humidité excessive, des liquides, la chaleur directe du soleil, des
conditions boueuses ou poussiéreuses anormales.
3. Des accidents ou utilisation non conforme, une réparation non conforme ou des
modifications non explicitement autorisées par le constructeur.
Cette garantie est limitée à la réparation ou au remplacement du produit défectueux, selon
le choix du constructeur, et ne peut inclure la réparation de tout dommage que ce soit, suite
à un accident, aux conséquences de la panne ou autre. La garantie ne couvre aucun frais
de transport du produit. Cette garantie ne peut s’appliquer que sur présentation du certificat
ci-dessous, dûment rempli indiquant notamment le modèle, son numéro de série, l’adresse
de l’acheteur, la date d’achat et le tampon du revendeur, avec facture d’achat originale
complémentaire.
ZENEC MODÈLE : ZE-MC194
Numéro de série :..........................................................................................................................
Date de l’achat :.............................................................................................................................
Votre nom :....................................................................................................................................
Votre adresse :...............................................................................................................................
Ville :..............................................................................................................................................
État/département : ................................... ZIP ou code postal .....................................................
Pays : ............................................................................................................................................
Adresse et cachet du revendeur
97
INHALTSVERZEICHNIS
Bedienelemente
STARTCODE.................................................................................................................................................... 102
Bedienteil..................................................................................................................................................... 102
Zusatz-LCD.................................................................................................................................................... 103
Fernbedienung........................................................................................................................................... 104
Allgemeine Bedienung
Gerät Ein- und Ausschalten................................................................................................................. 106
Navigation.................................................................................................................................................... 106
Lautstärkeeinstellung......................................................................................................................... 106
HAUPTMENÜ................................................................................................................................................... 106
Auswahl einer Wiedergabequelle.................................................................................................... 106
SystemZeit anzeigen................................................................................................................................ 107
BeDIENUNG des TFT BildschirmS.......................................................................................................... 107
Gerät zurücksetzen............................................................................................................................... 107
RADIO Modus
RADIO ALS WIEDERGABEQUELLE AUSWÄHLEN....................................................................................... 108
Frequenzband auswählen.................................................................................................................... 108
Automatischer Suchlauf...................................................................................................................... 108
Manueller Suchlauf............................................................................................................................... 108
Automatisches speichern von Sendern......................................................................................... 108
Manuelles speichern von Sendern.................................................................................................. 109
ANSPIELEN DER EMPFANGBAREN SENDER (PS)..................................................................................... 109
Auswahl eines Gespeicherten Senders.......................................................................................... 109
RegionalES SUCHEN (Local)................................................................................................................... 109
RDS-Funktion
AlternativE frequenzen (AF).................................................................................................................110
VerkehrsANsage (TA)................................................................................................................................110
Programmtyp (PTY)...................................................................................................................................111
Programm-Service (PS)............................................................................................................................111
UhrZeit (CT)...................................................................................................................................................111
Radiotext (RT)..............................................................................................................................................111
DISC-MODUS
DISC einsetzen.............................................................................................................................................112
DISC Auswerfen...........................................................................................................................................112
Touchscreen-Bedienung........................................................................................................................112
OSD-Steuertasten.....................................................................................................................................113
Wiedergabe (Play)......................................................................................................................................114
WIEDERGABE StopPEN................................................................................................................................114
Abspielliste anzeigen..............................................................................................................................114
Schneller Vor- und Rücklauf..............................................................................................................114
Vorheriges/Nächstes..............................................................................................................................114
Ordner wechseln......................................................................................................................................114
WIEDERGABE wiederholen.......................................................................................................................115
A-B WIEDERGABE............................................................................................................................................115
ZUFALLSBEDINGTE WIEDERGABE (Random)...........................................................................................115
Intro-Wiedergabe......................................................................................................................................116
Direkte Suche..............................................................................................................................................116
GOTO-Suche...................................................................................................................................................116
DVD-MENÜ und -Titel...................................................................................................................................116
Untertitelsprache auswählen...........................................................................................................117
Multiwinkel-Ansichten auswählen.....................................................................................................117
Audiokanal (DIALOGSPRACHE) auswählen.........................................................................................117
PBC-Funktion................................................................................................................................................117
Zoom IN/OUT...................................................................................................................................................118
Abbildung drehen......................................................................................................................................118
WiedergabeInformationen....................................................................................................................118
98
DEUTSCH
GERMAN
USB-Modus
USB ALS WiedergabeQUELLE auswählen........................................................................................... 120
Touchscreen-BEDIENUNG....................................................................................................................... 120
OSD-SteuertastenMENÜ.......................................................................................................................... 120
WIEDERGABE UNTERBRECHEN.................................................................................................................. 120
StopP.............................................................................................................................................................. 120
Abspielliste anzeigen............................................................................................................................. 120
Schneller Vor- und Rücklauf............................................................................................................. 120
Vorheriges/Nächstes............................................................................................................................. 120
Ordner Wechseln..................................................................................................................................... 121
WIEDERGABE wiederholen...................................................................................................................... 121
ZUFALLSBEDINGTE WIEDERGABE (Random).......................................................................................... 121
Intro-Wiedergabe..................................................................................................................................... 121
Direkte Suche............................................................................................................................................. 121
GOTO-Suche.................................................................................................................................................. 121
Zoom IN/OUT.................................................................................................................................................. 121
Abbildung drehen..................................................................................................................................... 121
WiedergabeInformationen................................................................................................................... 121
IPod-Modus
iPod ALS Wiedergabe auswählen........................................................................................................ 122
Musikwiedergabe...................................................................................................................................... 122
Fotowiedergabe........................................................................................................................................ 122
Videowiedergabe...................................................................................................................................... 123
Schneller Vor- und Rücklauf............................................................................................................. 123
Direkte Suche............................................................................................................................................. 123
Andere ModI
AUX................................................................................................................................................................... 125
Kamera........................................................................................................................................................... 125
Navigation.................................................................................................................................................... 125
Setup
EINSTELLUNGSMöglichkeiten................................................................................................................ 126
General (ALLGEMEIN)................................................................................................................................. 127
LANGUAGE (Sprache)................................................................................................................................. 127
Audio............................................................................................................................................................... 128
RDS................................................................................................................................................................... 128
RATING (Jugendschutz-SICHERUNG)..................................................................................................... 128
Hardware..................................................................................................................................................... 130
P.VOL................................................................................................................................................................. 130
Codeeingabe des Diebstahlschutzes...............................................................................................131
TS CAL (TOUCHSCREEN-KALIBRIERUNG)..................................................................................................131
(EQ) Equalizer............................................................................................................................................ 132
Fehlersuche............................................................................................................................................... 133
AnschlÜsse
Anmerkungen zum Anschluss............................................................................................................. 135
Steuerleitung............................................................................................................................................ 136
Handbremse-Kabel................................................................................................................................... 137
Anschlüsse Rückwärtsgang.............................................................................................................. 137
EinBAU und Ausbau
Anmerkungen zuR INSTALLATION.......................................................................................................... 138
INSTALLATION................................................................................................................................................. 138
ABDECKZIERRahmen................................................................................................................................... 140
GERÄT AusbauEN......................................................................................................................................... 140
Spezifikationen..........................................................................................................................................141
Anhang
RegionALCode ............................................................................................................................................ 143
VorsichtsmaSSnahmen zur BEnutzung DER DISCS1�������������������������������������������������������������������� 143
Verkabelungs-Anschlüsse.................................................................................................................. 144
GARANTIE....................................................................................................................................................... 145
99
SICHERHEITSHINWEISE
1. Dieses Gerät ist nur für den Betrieb an einem Bordnetz mit
+12V (DC) und Minus gegen Masse geeignet.
2. Aus Sicherheitsgründen darf dieses Gerät nicht im Sichtfeld
installiert werden. Wenn das nicht eingehalten wird, ist die
Sicht auf das Verkehrsgeschehen eingeschränkt.
3. Gemäß den in den verschiedenen Ländern der EU geltenden
Verkehrsvorschriften darf ein Bildschirm, der in Sichtweite
des Fahrers montiert ist, während der Fahrt nicht betrieben
werden, da er den Fahrer vom Verkehrsgeschehen ablenkt.
Beachten Sie unbedingt die geltenden Vorschriften in
Ihrem Land, da ansonsten Regressansprüche von der KfzVersicherung geltend gemacht werden können.
4. Schützen Sie das Gerät vor Wasser oder anderen
Flüssigkeiten, die in das Innere des Gerätes eindringen
können. Ein Kurzschluss mit Brandfolge könnte daraus
resultieren.
5.Bevor Sie eine defekte Sicherung austauschen, sollten
Sie erst einmal überprüfen, was der Grund für den Kurzschluss war. Achten Sie dabei besonders auf die Kabel
der Spannungsversorgung! Wenn der Kurzschluss nicht
aus einen Fehler in der Spannungsversorgung resultiert,
müssen Sie die defekte Sicherung gegen ein neues
Exemplar mit identischen Werten austauschen. Sollte der
Kurzschluss immer noch vorhanden sein, wenden Sie sich
bitte an Ihren ZENEC-Händler.
6.Wenn einer der unten genannten Fehler auftreten sollte,
sollten Sie das Gerät sofort ausschalten und sich mit einem
ZENEC-Händler oder dem Kundenservice in Verbindung
setzen.
(a) Kein Ton;
(b) Kein Bild;
(c) Wasser oder andere Flüssigkeiten oder Gegenstände,
die in das Gerät eingedrungen sind;
(d) Rauch;
(e) Eigenartiger Geruch.
7. Achten Sie darauf, dass die Lautstärke in Ihrem Fahrzeug
nur so hoch ist, dass Sie Außengeräusche, wie z.B. eine
Polizeisirene, noch klar wahrnehmen können.
100
DEUTSCH
GERMAN
VorsichtsmaSSnahmen
1. Dieses Gerät darf nie geöffnet werden. Wenn ein Defekt vorliegt, darf das Gerät nur von
dem Servicepersonal von ZENEC repariert werden. Bei einem nicht autorisierten Eingriff
erlischt der Garantieanspruch. Für weitere Informationen wenden Sie sich bitte an einen
autorisierten ZENEC-Händler.
2. Da sich auf dem Bildschirm mit der Zeit Staub und Schmutz ansammeln können, sollten
Sie das Gerät ab und zu mit einem weichen Tuch reinigen. Verwenden Sie dazu niemals
Reinigungsbenzin, Alkohol, Verdünner oder Ähnliches, da dies zu einer Beschädigung
des Bildschirms bzw. des Gehäuses führen kann.
3.Wenn eine fehlerhafte Funktion des Gerätes auftritt, lesen Sie bitte als Erstes das
Fehlersuche-Kapitel dieses Handbuches. Wenn keine Lösung gefunden wird, drücken
Sie die [RESET]-Taste auf dem Bedienteil, um die Werkseinstellungen zurückzusetzen.
4.Wenn Sie das Auto eine Zeit lang bei heißem oder kaltem Wetter geparkt haben, warten
Sie bitte, bis die Temperatur im Auto wieder normal ist, bevor Sie das Gerät einschalten.
5.Bei niedrigen Temperaturen kann sich bei der Benutzung der Heizung des Fahrzeuges,
um das Fahrzeug zu erwärmen, im Inneren des Gerätes Kondenswasser bilden.
Schalten Sie das Gerät in diesem Moment nicht an, um eine Beschädigung des Gerätes
zu vermeiden. Wenn sich eine CD/DVD im Gerät befindet, werfen Sie diese bitte aus und
wischen sie ab. Wenn das Gerät sich nach einigen Stunden noch nicht einschalten lässt,
dann setzen Sie sich bitte mit dem Kundendienst oder Händler in Verbindung.
6. Die Mechanik des Bildschirms ist vollautomatisch. Versuchen Sie niemals den Bildschirm
manuell zu bedienen, da dies zu einer dauerhaften Beschädigung des Gerätes führen
kann.
7. Setzen Sie den Bildschirm keinen harten Stößen aus. Eine mechanische und elektronische
Beschädigung des Gerätes könnte daraus resultieren.
8. Für eine klare und einfache Vorführung zur Bedienung dieses Gerätes werden graphische
Abbildungen benutzt. Jedoch können sich diese Abbildungen von den auf dem Bildschirm
angezeigten unterscheiden.
9.Während des Betriebs des Gerätes wird "
nicht vorhanden oder ungültig ist.
" angezeigt, wenn die aktuelle Operation
10.Bitte bedienen Sie dieses Gerät entsprechend diesem Handbuch, um unnötige Probleme
zu verhindern. Eine falsche Benutzung dieses Gerätes kann zu einem Verlust des
Garantieanspruchs führen.
Erklärung
Dieses Produkt enthält copyrightgeschützte Technologien, die durch US-Patente und andere
geistige Eigentumsrechte geschützt sind.
Die Verwendung dieser copyrightgeschützten Technologien muss durch Macrovision genehmigt
werden und ist für den Haus- und anderen begrenzten Betrachtungsgebrauch bestimmt.
Ein nicht autorisierter Eingriff in das Gerät ist verboten. Bei Nichtbeachten erlöschen jegliche
Garantieansprüche.
101
BEDIENELEMENTE
StartCODE: 012345 (s. Seite 131)
BEDIENTEIL
AUX
1. [WIDE]-Taste: Anzeigemodus ändern
2. [
]-Taste: Nächstes/Bewegt den Cursor nach rechts
3. [
]-Taste: Vorheriges/Bewegt den Cursor nach links
4. [NAV]-Taste: Enter/Exit Navigation
5. [VOL]-Drehknopf: Lautstärkeregelung/Stummschaltung aktivieren/deaktivieren
6. [Reset]-Taste: Gerät zurücksetzen
7. [ /SRC]-Taste: Wiedergabemodus auswählen/Gerät ein- bzw. ausschalten
8.AUX-Anschluss
9.USB-Port
102
DEUTSCH
GERMAN
10. [
]-Taste: Eject-Taste (Disc auswerfen)
11. [OPEN/CLOSE]-Taste: TFT-Bildschirm öffnen/schließen
12. [AS/TILT+]-Taste: Auto Save/Preview Scan/Neigungswinkel des Bildschirms erhöhen
13. [BAND/TILT-]-Taste: Frequenzband ändern/Neigungswinkel des Bildschirms verringern
Zusatz-LCD
1.Disc-Indikator
■ Leuchtet, wenn sich eine Disc im Laufwerk befindet.
2. Repeat-Mode-Indikator
■ Leuchtet, wenn der Wiederholungs-Modus eingeschaltet ist.
3. Hauptanzeigebereich
■ Zeigt Titel, Laufzeit, Tuner-Frequenz, Uhrzeit und andere Text-Informationen an.
4. Radiostatus-Indikator
■ Stereo-Indikator leuchtet, wenn die Radiosendung in Stereo gesendet wird; RegionalIndikator leuchtet, wenn die Regional-Suchfunktion aktiv ist.
5. RDS-Funktion-Indikator
■ AF: Alternative Frequenzen
■ PTY: Programmtyp
■ TA: Verkehrsansage
■ TP: Verkehrsprogramm
BITTE BEACHTEN
■ Die Hauptinformationen können auf diesem Zusatz-LCD angezeigt werden, aber nur,
wenn das TFT-Bildschirm geschlossen ist.
■ Dieses Zusatz-LCD kann die Informationen nur in englischer Sprache anzeigen.
103
Before using
BEDIENELEMENTE
Remote Control
Fernbedienung
Introduce of key functions
1
2
17
18
3
4
5
6
7
8
19
20
21
22
MUSIC
PHOTOS
VIDEO
iPod
23
TILT
9
10
11
12
13
24
25
26
27
28
29
PRESET
14
15
30
SETUP
16
CLEAR
31
32
Note:
BITTE
BEACHTEN
Your
remote
control may differ slightly
from
the one
pictured
here. The
above
■ Die
oben
illustrierte
Fernbeonly.
diagram
is forkann
illustrative
purposevon
dienung
sich optisch
der dem Zubehör beiliegenden
Fernbedienung
unterscheiden.
Die Funktionen sind jedoch bei
allen Fernbedienungen identisch.
03
1.[SRC]Key:select playing source
1. [SRC]-Taste: Wiedergabequelle auswählen.
2.[EJECT]Key: Eject disc
2
[EJECT]-Taste: Disc aus dem Laufwerk
3.[MENU] Key: DVD MENU / PBC
auswerfen.
4.[TITLE] Key: DVD TITLE
3. [MENU]-Taste: DVD MENU/PBC.
5.[DISP] Key: Display information
4. [TITLE]-Taste:
6.[ANGLE]
Key: SelectDVD
view TITLE.
angle
5. [DISP]-Taste:
Informationen
7.[WIDE]
Key: Change
display mode anzeigen.
8.[OPEN/CLOSE]
Key: Open
/ Close
6. [ANGLE]-Taste:
Ansichtswinkel
ändern.
TFT monitor
7.the [WIDE]-Taste:
Anzeige-Modus ändern.
9.[PRESET / ] Key: Select preset
8. [OPEN/CLOSE]-Taste: TFT-Bildschirm öffnen/
radio station
schließen.
10.[ ] Key: Fast Forward /
9. [PRESET
/ ]-Taste: Gespeicherten
Move cursor up
Radiosender
auswählen.
11.[■/BAND] Key: Select radio band /
10.
[ Playback
]-Taste: Schneller Vorlauf/Cursor
Stop
12.[ hochschieben.
] Key: Play / Pause / Enter
11. [ ] Key:
/BAND]-Taste:
Frequenzband
wählen.
Auto search / Previous
/
13.[
Move
to the left
12.
[ cursor
/ ]-Taste:
Play/Pause/Enter.
14.[GOTO] Key: GOTO search
13. [ ]-Taste: Automatischer Sendersuchlauf/
15.[ ] Key: Fast Reverse/
Vorheriges/Cursor nach links verschieben.
Move cursor down
14.
[GOTO]-Taste:
16.[0~9]
Key: Numeric GOTO-Suchen.
keys
15. [ ]-Taste:
Schneller
Rücklauf/Cursor nach
17.[MUTE]
Key: Mute
audio outputs
unten bewegen.
18.[POWER]
Key: Unit power
19.[AUDIO]
Key: Select
DVD dialogue
16. [0-9]-Taste:
Numerische
Tasten.
language
17. [MUTE]-Taste: Stummschaltung der
20.[SUBTITLE] Key: Select DVD
Audioausgänge.
subtitle language
18. [POWER]-Taste: Gerät ein- und ausschalten.
21.[REPT A-B] Key: A-B repeat
19. [AUDIO]-Taste:
auswählen.
22.[REPT]
Key: Repeat DVD-Tonspuren
playback
20.
[SUBTITLE]-Taste:
DVD-Untertitelsprache
23.[TILT / ] Key: Adjusting display
tilting
angle
auswählen.
24.[VOL+/-]
Adjust volume
21. [REPTKey:
A-B]-Taste:
A-B-Wiederholung.
25.[SCN]
Key:
Scan
22. [REPT]-Taste:playback
Wiederholen.
26.[RDM] Key: Random playback
23. [TILT
]-Taste: Bildschirmwinkel ändern.
27.[ ] Key:Auto search / Next /
24.
[VOL+/-]-Taste:
Lautstärke einstellen.
Move cursor to the right
25. [SCN]-Taste:
Scan-Wiedergabe.
28.[SEL]
Key: EQ
29.[ZOOM]
Key: Image
zoom in/out
26. [RDM]-Taste:
Random-Wiedergabe.
30.[PIC]
Image
setting
27. [ Key:
]-Taste:
Automatischer
Sendersuchlauf/
31.[SETUP]
Key: Setup menu
Nächstes/Cursor
nach rechts verschieben.
32.[CLEAR] Key: Clear information
28. [SEL]-Taste: Equalizer (EQ).
29. [ZOOM]-Taste: Bild vergrößern/verkleinern.
30. [PIC]-Taste: Bildeinstellungen.
31. [SETUP]-Taste: Einstellungen.
32. [CLEAR]-Taste: Löschen.
104
DEUTSCH
GERMAN
BEDIENELEMENTE
Anmerkungen zur Infrarot-Fernbedienung
1. Die Fernbedienung soll in Richtung des IR-Empfängers des Gerätes benutzt werden, um
einwandfrei zu funktionieren.
2. Entfernen Sie die Batterie der Fernbedienung oder setzen Sie eine Batterieisolierung ein,
wenn die Fernbedienung über einen längeren Zeitraum nicht benutzt wird.
3. Setzen Sie die Fernbedienung nicht direktem Sonnenlicht oder hohen Temperaturen aus.
4. Die Fernbedienung funktioniert mit einer Batterie, unter normalen Bedingungen, ca.
6 Monate. Wenn die Fernbedienung nicht funktioniert, sollte die Batterie gewechselt
werden.
5.Benutzen Sie nur Lithium-Batterien „CR2025“ (3V).
6. Sie sollten die Batterie unter keinen Umständen neu laden, öffnen oder erhitzen. Entladene Batterien sollten fachgerecht entsorgt werden.
7. Setzen Sie die Batterie in der korrekten Polung (+)/(-) ein.
8.Lagern Sie die Batterie nicht in Kinderreichweite, um das Risiko eines Unfalls zu vermeiden.
Batterie entfernen
■ Schieben Sie den Batteriedeckel an der unteren Rückseite der Fernbedienung heraus.
Batterie einsetzen
■ Benutzen Sie nur Lithium-Batterien „CR2025“ (3V). Setzen Sie die Batterie in der
korrekten Polung (+)/(-) ein.
ZIEHEN
DRÜCKEN
105
Allgemeine Bedienung
Gerät ein- und ausschalten
■Um das Gerät einzuschalten, drücken Sie die [SRC]-Taste auf dem Bedienteil oder die
[POWER]-Taste auf der Fernbedienung. Nach dem Einschalten geht das Gerät auf den
letzten Status zurück.
■Um das Gerät auszuschalten, halten Sie die [SRC]-Taste auf dem Bedienteil etwas
länger gedrückt oder drücken Sie die [POWER]-Taste auf der Fernbedienung.
NAVIGATION
■Betätigen Sie die [NAV]-Taste auf dem Bedienteil, um in den Navigations-Modus zu
gelangen. Die aktuelle Audiowiedergabe wird fortgesetzt, es sei denn, eine Navigationsansage kommt, wenn die Navigationsquelle aktiv ist.
Lautstärkeeinstellung
■ Drehen Sie den Lautstärkedrehknopf auf dem Bedienteil oder drücken Sie die [VOL]Taste auf der Fernbedienung.
■ Der Einstellbereich der Lautstärke reicht von 0 bis 40.
■Um die Stummschaltung ein- bzw. auszuschalten, drücken Sie die [VOL]-Taste oder die
[MUTE]-Taste auf der Fernbedienung.
BITTE BEACHTEN
■ Das Einstellen der Lautstärke schaltet die Stummschaltung aus.
■ Das MUTE-Icon blinkt auf dem TFT-Bildschirm während der Stummschaltung.
HAUPTMENÜ
■Um das HAUPTMENÜ zu öffnen, drücken Sie die [SRC]-Taste auf dem Bedienteil
oder auf der Fernbedienung oder berühren Sie die oberste linke Ecke des Bildschirms.
Wiederholen Sie diese Operation, um zur ursprünglichen Quelle zurückzugehen.
Auswahl einer Wiedergabequelle
■Um das HAUPTMENÜ zu öffnen, wählen Sie die Quelle, die Sie wünschen im Menü aus.
Wählen Sie mit dem Cursor die gewünschte Quelle und bestätigen Sie diese mit der
Fernbedienung.
BITTE BEACHTEN
■Wenn die Wiedergabequelle nicht betriebsbereit ist, kann diese nicht ausgewählt werden.
106
DEUTSCH
GERMAN
Allgemeine Bedienung
SystemZeit anzeigen
■ Bitte halten Sie die [DISP]-Taste länger gedrückt, um zwischen der Systemzeit und der
Anzeige der Wiedergabequelle zu wechseln. Diese Funktion ist nur beim ausgefahrenen
Monitor möglich.
Bedienung des TFT-Bildschirms
Bildschirm öffnen/schließen
■ Drücken Sie die [OPEN/CLOSE]-Taste, um den Bildschirm herauszufahren.
■ Drücken Sie die Taste erneut, um den Bildschirm wieder einzufahren.
Neigungswinkel des TFT-Bildschirms ändern
■ Drücken Sie die [TILT]-Tasten auf dem Bedienteil oder auf der Fernbedienung, um den
Neigungswinkel des Bildschirms schrittweise einzustellen.
■ Durch längeres Drücken der [TILT]-Tasten auf dem Bedienteil oder auf der Fernbedienung
können Sie den Neigungswinkel des Bildschirms stufenlos einstellen.
Bildformat ändern
■ Drücken Sie die [WIDE]-Taste auf dem Bedienteil oder auf der Fernbedienung, um das
Standby des Monitors zu aktivieren/deaktivieren.
Bildeinstellung
1. Drücken Sie die [PIC]-Taste auf der Fernbedienung, um in den Bildeinstellungs-Modus
zu gelangen.
2.Betätigen Sie die []/[]-Tasten auf der Fernbedienung, um ein Feld auszuwählen.
3.Betätigen Sie die []/[]-Tasten auf der Fernbedienung, um den Einstellungswert zu
ändern.
4. Drücken Sie die [PIC]-Taste auf der Fernbedienung, um den Bildeinstellungs-Modus zu
verlassen.
Werden nach einigen Sekunden keine Veränderungen vorgenommen, wird der Modus
automatisch verlassen.
Gerät zurücksetzen
■Wenn das Gerät nicht richtig funktioniert oder blockiert, drücken Sie die [RESET]-Taste
auf dem Bedienteil, um das Gerät zurückzusetzen.
107
Radio-Modus
Radio als Wiedergabequelle auswählen
■HAUPTMENÜ öffnen und RADIO-Icon auswählen.
Frequenzband auswählen
■Um ein Radioband unter FM1, FM2, FM3, AM1 oder AM2 auszuwählen, drücken Sie die
[BAND]-Taste auf dem Bedienteil oder auf der Fernbedienung oder berühren Sie das
[BAND]-Icon auf der Benutzerschnittstelle.
Automatischer Suchlauf
■ Drücken Sie die []/[]-Tasten auf dem Bedienteil oder auf der Fernbedienung oder
berühren Sie die []/[]-Icons auf der Benutzerschnittstelle, um den automatischen
Suchlauf zu starten. Durch Erhöhen bzw. Verringern der Empfangsfrequenz können Sie
nach dem nächsten empfangbaren Sender suchen. Drücken Sie die Taste bzw. berühren
Sie das Icon erneut, um den automatischen Suchlauf zu beenden.
BITTE BEACHTEN
■Wenn eine Station empfangen wird, wird das Suchen gestoppt. Wenn das Gerät eine
Stereosendung empfängt, leuchtet der Stereo-Indikator „ST“ auf dem TFT- oder LCDBildschirm.
Manueller Suchlauf
■ Drücken Sie die []/[]-Tasten auf dem Bedienteil oder auf der Fernbedienung oder
berühren Sie die []/[]-Icons auf der Benutzerschnittstelle, um durch Erhöhen bzw.
Verringern der Empfangsfrequenz manuell nach einem Sender zu suchen. Während
des manuellen Suchlaufs wird die Frequenz schrittweise geändert. Berühren Sie das
]-Icon des numerischen Tastaturblocks und dann die numerischen Tasten, um die
[
Empfangsfrequenz einzugeben.
S
Automatisches Speichern von Sendern (AS)
■Nur Stationen mit genügender Signalstärke werden gefunden und gespeichert.
Bei geschlossenem TFT-Bildschirm halten Sie die [AS/PS]-Taste auf dem Bedienteil
etwas länger gedrückt, um das automatische Speichern zu starten.
Bei geöffnetem Bildschirm, berühren Sie das [AS]-Icon auf der Benutzerschnittstelle, um
das automatische Speichern zu starten.
Um das automatische Speichern zu stoppen, drücken Sie eine andere Taste mit
Radiofunktion.
BITTE BEACHTEN
■Nach dem automatischen Speichern werden die vorherigen gespeicherten Sender
überschrieben.
■ Das Gerät hat 5 Bänder, z.B. FM1, FM2, FM3, AM1, AM2. Jedes Band kann 6 Sender
speichern. Insgesamt kann das Gerät 30 Sender speichern.
108
DEUTSCH
GERMAN
Radio-Modus
Manuelles Speichern von Sendern
Wenn Sie einen Radiosender gefunden haben und speichern wollen, verfahren Sie bitte
wie folgt:
1. Berühren Sie das [MEM]-Icon auf der Benutzerschnittstelle, um das Speicherplatz-Menü
zu öffnen.
2. Berühren Sie das entsprechende Icon (Speicherplatz) P1~P6, um den Sender auf einem
der 6 Speicherplätze zu speichern.
3. Wenn Sie abbrechen möchten, drücken Sie die [Exit]-Taste.
Anspielen der Empfangbaren Sender (PS)
■ Die empfangbaren Sender werden gesucht und für 5-10 Sekunden angespielt.
Nachdem die Sender angespielt wurden, läuft die Suche weiter, bis das vollständige
Band abgesucht ist.
■ Bei geschlossenem TFT-Bildschirm, drücken Sie die [AS/PS]-Taste auf dem Bedienteil.
■ Bei geöffnetem Bildschirm berühren Sie das [PS]-Icon auf der Benutzerschnittstelle. Um
den Prozess zu stoppen, drücken Sie eine andere Taste mit Radiofunktion.
Auswahl eines gespeicherten Senders
■ Drücken Sie eine Zifferntaste unter 1 bis 6 auf der Fernbedienung oder berühren Sie
eines des Icons für die Speicherplätze auf dem Bildschirm, um die entsprechenden
gespeicherten Sender auszuwählen.
Regionales Suchen (LOCAL)
■ Wenn die regionale Suche (LOCAL) eingeschaltet ist, werden nur Radiosender mit
starkem Funksignal empfangen.
■ Halten Sie die [NAV]-Taste auf dem Bedienteil etwas länger gedrückt, um die regionale
Suche (LOCAL) einzuschalten.
BITTE BEACHTEN
■ Wenn die regionale Suche (LOCAL) eingeschaltet ist, leuchtet der „LOC“-Indikator.
■ Die Zahl der empfangenen Sender ist geringer, solange die Regionale Suche (LOCAL)
eingeschaltet ist.
109
RDS-Funktion
Das Gerät hat grundlegende RDS-Funktionen wie: PI (Programmbezeichnung), Radiosendername, RT (Radiotext), CT (Uhrzeit), AF (Alternative Frequenzen), TA (VerkehrsAnsage) und PTY (Programmtyp).
Alternative Frequenzen (AF)
■ Bei aktivierter AF-Funktion wählt das Gerät automatisch die am besten zu empfangende
Frequenz des gehörten Radiosenders.
■ Berühren Sie die [AF]-Taste auf der Benutzerschnittstelle.
■ Um diese Funktion zu beenden, wiederholen Sie die Operation.
BITTE BEACHTEN
■ Während der automatischen Frequenzwechsel hören Sie unter Umständen Störungen.
Um dieses Problem zu lösen, schalten Sie die AF-Funktion aus.
VerkehrsAnsage (TA)
■ Bei aktivierter TA-Funktion schaltet das Gerät automatisch auf die Radiostation um,
welche die entsprechende Verkehrsdurchsage sendet. Dabei spielt es keine Rolle,
welche Wiedergabequelle gerade aktiv ist.
■ Wenn die TA-Funktion aktiv ist und eine Verkehrsansage ankommt, wird die Wiedergabequelle durch die Verkehrsansage ersetzt.
■ Das Gerät geht zur ursprünglichen Quelle zurück, wenn die Verkehrsansage beendet ist.
■ Berühren Sie die [TA]-Taste auf der Benutzerschnittstelle, um die TA-Funktion einzuschalten.
■ Um diese Funktion zu beenden, wiederholen Sie die Operation.
110
DEUTSCH
GERMAN
RDS-Funktion
ProgrammTyp (PTY)
■ Bei PTY handelt es sich um eine RDS-Funktion, die von immer mehr Rundfunkanstalten
unterstützt wird. Mit Hilfe der PTY-Funktion kann das Gerät gezielt nach Sendern mit
bestimmten Programminhalten suchen (z.B. Nachrichten oder Rock).
■ Sechs PTY-Optionen werden auf dem Bildschirm angezeigt. Um mehrere PTY-Optionen
anzusehen, berühren Sie den Scrollbalken auf dem Bildschirm.
■Wenn eine PTY-Option (z.B. Nachrichten) berührt wird, schaltet sich die automatische
Suche nach dem nächsten vorhandenen PTY ein. Wenn kein entsprechender PTY gefunden wurde, geht das Gerät zum ursprünglichen Sender zurück.
Programm-Service (PS)
■ Ermöglicht die Übertragung des Sendernamens in bis zu 8 alphanumerischen Zeichen
z.B. {BBC_4_FM}, {Classic_}.
Uhrzeit (CT)
■ Einige Sender senden die Uhrzeit und das Datum über das RDS-Signal. Die Uhrzeit wird
automatisch eingestellt, wenn „CT“ auf „ON" eingestellt wird.
RadioText (RT)
■Wenn die RT-Funktion eingeschaltet ist, zeigt das Gerät Zusatzinformationen, wie den
aktuellen Musiktitel, den Namen des Interpreten oder die Kontaktdaten der Station.
111
Insert a disc
Upon inserting a disc, the unit will switch to disc mode automatically.
Disc-Modus
Disc einsetzen
Notes:
■Nach
dem Einsetzen einer Disc schaltet das Gerät automatisch auf den Disc-Modus.
① Please confirm whether there is a disc in the unit before you insert
BITTE
BEACHTEN
another
one.
■ ②Überprüfen
Sie bitte,
ob sich
bereits
eine CD-RW,
Disc im Gerät
befindet,
bevor Sie eine andere
Some recorded
discs,
such
as CD-R,
DVD-R,
DVD+R,
Disc einsetzen.
DVD-RW, DVD+RW cannot be played back because of different
■ Manche
selbstgebrannten
Discs, the
wie discs
z.B. CD-R,
CD-RW,
DVD+R, DVD-RW,
recording
status. Otherwise,
without
being DVD-R,
closed could
DVD+RW, können nicht abgespielt werden, weil sie einen unterschiedlichen Aufnahmenot be played back.
status
haben oder nicht geschlossen sind.
③ About the cautions of disc using, please refer to the appendix.
Disc auswerfen
Eject the disc
■ Drücken Sie die [EJECT]-Taste auf dem Bedienteil oder auf der Fernbedienung, um die
Press
the [EJECT] key on the front panel or remote control to eject the
Disc auszuwerfen.
disc.
■ Sie können eine Disc auswerfen, nachdem das Gerät ausgeschaltet wurde. Das Gerät
You
can eject
a discaus,
afternachdem
the unit die
hasDisc
been
powered off.
The unit
schaltet
sich wieder
ausgeworfen
wurde.
remains off after the disc is ejected.
Touchscreen-Bedienung
Touch
screen controls
■ Der Bildschirm des Gerätes ist in verschiedene Bereiche aufgeteilt, um die Bedienung
The
key areas
for DVD playback are outlined below:
per touch
Touchscreen
zu erleichtern.
A
B
C
Open SOURCE
MENU
AA–- MENÜ
öffnen
Display playback information
BB–- Wiedergabeinformationen
anzeigen
C - Display onscreen control menu
C – OSD-Steuertastenmenü öffnen
11
112
DEUTSCH
GERMAN
Disc-Modus
OSD-STEUERTasten
Disc-Typ/
Icon
MP3/WMA
CD
VCD
DVD
MPEG
Foto
S
N
Numerischer
Tastaturblock
Numerischer
Tastaturblock
Numerischer
Tastaturblock
Numerischer
Tastaturblock
Numerischer
Tastaturblock
Numerischer
Tastaturblock
Einstellungsmenü
Einstellungsmenü
Einstellungsmenü
Einstellungsmenü
Einstellungsmenü
Einstellungsmenü
/
Schneller
Vorlauf
Schneller
Vorlauf
Schneller
Vorlauf
Schneller
Vorlauf
/
/
Schneller
Rücklauf
Schneller
Rücklauf
Schneller
Rücklauf
Schneller
Rücklauf
/
Vorheriges
Vorheriges
Vorheriges
Vorheriges
Vorheriges
Vorheriges
Nächstes
Nächstes
Nächstes
Nächstes
Nächstes
Nächstes
E
Abspielen/
Pause
Abspielen/
Pause
Abspielen/
Pause
Abspielen/
Pause
Abspielen/
Pause
Abspielen/
Pause
Stopp
Stopp
Stopp
Stopp
Stopp
Stopp
/
/
Zweites
Menü
Zweites
Menü
Zweites
Menü
/
Wiederholung
Wiederholung
Wiederholung
Wiederholung
Wiederholung
Wiederholung
Random
Random
Random
Random
Random
/
/
/
/
/
/
Drehen
/
/
Zoom
/
/
Zoom
EQ
EqualizerEinstellung
EqualizerEinstellung
EqualizerEinstellung
EqualizerEinstellung
EqualizerEinstellung
EqualizerEinstellung
PBC
/
/
PBC
/
/
/
A-B
/
/
A-B-Wiederholung
A-B-Wiederholung
/
/
Back
/
/
Menü
beenden
Menü
beenden
Menü
beenden
Menü
beenden
AUDIO
/
/
Kanal
wechseln
Dialogsprache
Dialogsprache
/
SUBTITLE
/
/
/
Untertitelsprache
Untertitelsprache
/
DISP
/
/
MENU
/
/
/
DVD-Menü
/
TITLE
/
/
/
DVD-Titel
/
/
DIR+
Nächster
Ordner
/
/
/
/
Nächster
Ordner
DIR-
Vorheriger
Ordner
/
/
/
/
Vorheriger
Ordner
Informationen Informationen Informationen Informationen
anzeigen
anzeigen
anzeigen
anzeigen
113
/
Disc-Modus
Wiedergabe UNTERBRECHEN
■ Drücken Sie die [/]-Taste auf dem Bedienteil oder auf der Fernbedienung oder öffnen
Sie das OSD-Steuertastenmenü und berühren Sie die [/]-Taste. Wiederholen Sie
diese Operation, um den Titel wieder abzuspielen.
Wiedergabe stoppen
■ Um die Wiedergabe zu stoppen, drücken Sie die []-Taste auf der Fernbedienung oder
öffnen Sie das OSD-Steuertastenmenü und berühren Sie die []-Taste. Nach einmaligem
Drücken der Stop-Taste, wird der Abspielzeitpunkt gespeichert. Beim Drücken der PlayTaste, wird die Wiedergabe ab diesem Abspielzeitpunkt fortgesetzt. Wenn Sie die StoppTaste zweimal betätigen, wird der Abspielzeitpunkt nicht gespeichert.
Abspielliste anzeigen
■ Um die Dateiliste von einer gebrannten Disc anzuzeigen, stoppen Sie die aktuelle
Wiedergabe.
SchnelleR Vor- UND RÜCKlauf
■ Drücken Sie mehrmals die []/[]-Tasten auf der Fernbedienung oder öffnen Sie
das OSD-Steuertastenmenü und berühren Sie mehrmals die []/[]-Tasten, um die
Geschwindigkeit des schnellen Vor- und Rücklaufs zu ändern.
VorherigeS/Nächstes
■ Drücken Sie die []/[]-Tasten auf dem Bedienteil oder auf der Fernbedienung oder
öffnen Sie das OSD-Steuertastenmenü und berühren Sie die []/[]-Tasten, um die
vorherigen oder nächsten Dateien abzuspielen.
Ordner wechseln
■ Wenn Sie zwischen den Ordnern blättern wollen, können Sie durch einmaliges Berühren
des Touchscreens das Bedienfeld aktivieren. Danach können Sie mit dem [DIR+]- und
[DIR-]-Icon die Ordner durchblättern. Bei der Wiedergabe von Videos und Fotos müssen
Sie die Wiedergabe durch das Betätigen des [Stopp]-Icons unterbrechen, um die
Ordnerliste anzeigen zu lassen.
114
DEUTSCH
GERMAN
Disc-Modus
Wiedergabe wiederholen
■ Drücken Sie mehrmals die [RPT]-Taste auf der Fernbedienung oder öffnen Sie das OSDSteuertastenmenü und berühren Sie mehrmals die [ ]-Taste, um den WiederholungsModus entsprechend der folgenden Tabelle zu ändern.
Disc-Typ
Wiederholungs-Modus
DVD
Kapitel wiederholen → Titel wiederholen → Wiederholen ausschalten
VCD (PBC aus)
Einzeln wiederholen → Alle wiederholen → Wiederholen ausschalten
CD
Einzeln wiederholen → Wiederholen ausschalten
MP3/WMA
Einzeln wiederholen → Ordner wiederholen → Wiederholen ausschalten
MPEG
Einzeln wiederholen → Ordner wiederholen → Wiederholen ausschalten
Foto
Einzeln wiederholen → Ordner wiederholen → Wiederholen ausschalten
BITTE BEACHTEN
■ Ist die PBC-Funktion bei der VCD-Wiedergabe aktiv, sind die Wiederholfunktionen nicht
möglich.
■ Wenn Sie das Gerät ausschalten oder eine andere Wiedergabequelle wählen, wird der
Wiederholungs-Modus beendet.
A-B wiederholen
■ Wenn eine DVD, eine VCD oder eine CD abgespielt werden, können Sie den Inhalt
zwischen dem Zeitpunkt A und B wiederholt abspielen.
■ Drücken Sie die [RPT A-B]-Taste auf der Fernbedienung oder öffnen Sie das OSDSteuertastenmenü und berühren Sie die [A-B]-Taste, um den Zeitpunkt A einzustellen.
Drücken Sie die Taste nochmals, um den Zeitpunkt B einzustellen. Der ausgewählte Teil
wird kontinuierlich wiederholt.
■ Drücken Sie die Taste nochmals, um die Wiederholung zu beenden.
Zufallsbedingte Wiedergabe (Random)
■ Wenn diese Funktion eingeschaltet ist, wird der Inhalt der Disc zufallsbedingt abgespielt.
■ Drücken Sie mehrmals die [RDM]-Taste auf der Fernbedienung oder öffnen Sie das
OSD-Steuertastenmenü und berühren Sie mehrmals die [ ]-Taste, um zwischen
„zufallsbedingter“, „wiederholter zufallsbedingter“ oder „ausgeschalteter zufallsbedingter“
Wiedergabe zu wählen.
115
Disc-Modus
Intro-Wiedergabe
■ Wenn diese Funktion eingeschaltet ist, spielt das Gerät die ersten 10 Sekunden jeder
Spur einer VCD oder einer CD an.
■ Drücken Sie die [SCN]-Taste auf der Fernbedienung, um diese Funktion einzuschalten.
Drücken Sie die Taste nochmals, um diese Funktion zu beenden.
Direkte suche
■ Wenn eine DVD, eine VCD oder eine CD abgespielt werden, können Sie nach einem
bestimmten Kapitel oder Titel suchen, indem Sie die Zifferntasten der Fernbedienung
drücken. Wenn Sie z.B. den Titel 15 auswählen möchten, drücken Sie die numerischen
Tasten [1] und [5].
GOTO-suche
1. GOTO-Suchmodus aufrufen
■ Drücken Sie die [GOTO]-Taste auf der Fernbedienung, um das Suchmenü zu öffnen.
■ Bei DVDs können Sie nach Titel, Kapitel und Zeit suchen.
■ Bei VCDs, wenn die PBC-Funktion ausgeschaltet ist, können Sie nach Zeit suchen;
wenn die PBC-Funktion eingeschaltet ist, können Sie nach Spur, Zeit und Disc-Laufzeit
suchen.
■ Bei CDs können Sie nach Spur suchen.
■ Bei MPEG-Dateien können Sie nach Spur und Zeit suchen.
■ Bei selbstgebrannten Discs, die MP3- und/oder JPG-Dateien enthalten, können Sie nach
der Spur (Dateien/Nummer) suchen.
2. Suchinformation eingeben
■ Wählen Sie ein Feld mit den Pfeiltasten auf der Fernbedienung und geben Sie mit den
Zifferntasten die Suchinformationen ein, wie z.B. Titel, Kapitel und Zeit.
3. Bestätigung
■ Drücken Sie die [Enter]-Taste auf der Fernbedienung, um diese Funktion zu bestätigen.
4. GOTO-Suchmodus verlassen
■ Wiederholen Sie die obengenannte Operation, bis das Suchmenü verschwindet, oder
drücken Sie die [Exit]-Taste im Menü.
116
DEUTSCH
GERMAN
Disc-Modus
DVD-MENÜ und -TITEL
■ Diese Funktion ist nur für DVDs vorhanden, die „MENÜ/TITEL“ haben. Drücken Sie die
[MENÜ]-Taste auf der Fernbedienung oder öffnen Sie das OSD-Steuertastenmenü und
berühren Sie die [MENÜ]-Taste, um das DVD-MENÜ zu öffnen. Sie können verschiedene
Einstellungen für die Wiedergabe vornehmen, wie z.B. die Dialogsprache oder die
Untertitelsprache. Drücken Sie die [TITEL]-Taste auf der Fernbedienung oder öffnen Sie
das OSD-Steuertastenmenü und berühren Sie die [TITEL]-Taste, um den DVD-TITEL zu
öffnen. Sie können dann einen anderen TITEL auswählen.
Untertitelsprache auswählen
■ Drücken Sie mehrmals die [UNTERTITEL]-Taste auf der Fernbedienung oder öffnen
Sie das OSD-Steuertastenmenü und berühren Sie die [UNTERTITEL]-Taste, um eine
Untertitelsprache auszuwählen.
Multiwinkel-Ansichten auswählen
■ Drücken Sie mehrmals die [WINKEL]-Taste auf der Fernbedienung, um während der
Wiedergabe einer DVD oder von Videodateien mit Multiwinkel-Ansichten einen anderen
Ansichtswinkel zu wählen.
Audiokanal (Dialogsprache) auswählen
■ Bei DVDs mit mehrsprachigen Audiotonspuren drücken Sie mehrmals die [AUDIO]-Taste
auf der Fernbedienung oder öffnen Sie das OSD Steuertastenmenü und berühren Sie
mehrmals die [AUDIO]-Taste, um die Dialogsprache zu ändern.
■ Bei VCDs und CDs drücken Sie mehrmals die [AUDIO]-Taste auf der Fernbedienung
oder öffnen Sie das OSD-Steuertastenmenü und berühren Sie mehrmals die [AUDIO]Taste, um den Audiokanal-Modus aus den Optionen "links vokal", "rechts vokal", "Mono
links", "Mono rechts" oder "Stereo" zu wählen.
BITTE BEACHTEN
■ Linker Kanal und rechter Kanal können nicht richtig funktionieren, wenn die Audiotonspuren nicht richtig aufgenommen wurden.
PBC-Funktion
■ Diese Funktion ist nur für VCDs, auf denen die PBC-Funktion vorhanden ist (Ver. 2.0 oder
höher).
■ Drücken Sie die [MENÜ]-Taste auf der Fernbedienung, um diese Funktion zu starten.
■ Drücken Sie die [MENÜ]-Taste erneut, um diese Funktion zu beenden.
117
Disc-Modus
BITTE BEACHTEN
■ Wenn die PBC-Funktion eingeschaltet ist, geht die Wiedergabe zurück zur Spurliste und
fängt wieder mit der ersten Spur an.
■ Wenn die PBC-Funktion eingeschaltet ist, kann man die Wiedergabe nicht wiederholen
und nach einem bestimmten Kapitel oder einer Spur suchen.
■ Beim Aktivieren der PBC-Funktionen werden die Funktionen Random, Wiedergabe,
Scan-Wiedergabe oder Such-Wiedergabe automatisch deaktiviert.
ZOOM in/out
■ Um das gespielte Bild zu vergrößern, drücken Sie die [ZOOM]-Taste auf der Fernbedienung
oder öffnen Sie das OSD-Steuertastenmenü und berühren Sie das [ ]-Icon.
Abbildung drehen
■ Wenn ein Foto abgespielt wird, können Sie dieses drehen, um einen korrekten
Ansichtswinkel zu erhalten, indem Sie das [ ]-Icon auf dem OSD-Steuertastenmenü
berühren.
WiedergabeInformationen
■ Berühren Sie die Mitte des TFT-Bildschirms, wenn Sie eine DVD oder eine VCD abspielen,
um die Wiedergabeinformationen auf dem oberen Bereich des TFT Bildschirms anzeigen
zu lassen.
Für DVD
1. Disc-Typ.
2. DVD-Titelinformationen. „5/8“ zeigt an, dass diese DVD 8 Titel hat und dass der momentan
abgespielte Titel der Titel 5 ist.
3. DVD-Kapitelinformationen. „2/18“ zeigt an, dass der aktuelle Titel 18 Kapitel hat und dass
das momentan abgespielte Kapitel das Kapitel 2 ist.
4.Laufzeit des aktuellen Titels.
2/6 Eng“ zeigt an, dass diese DVD in 6 Sprachen aufgenommen wurde und dass
5. „
momentan die Sprache 2 (Englisch) angezeigt wird.
118
DEUTSCH
GERMAN
Disc-Modus
Für VCD
1. Disc-Typ.
2. PBC-Funktionsanzeige. „PBC On“ zeigt an, dass die PBC-Funktion eingeschaltet ist.
3. VCD-Spurinformationen. „6/18“ zeigt an, dass dieses VCD 18 Titel hat und dass der
momentan abgespielte Titel der Titel 6 ist.
4.Laufzeit der aktuellen Spur.
119
USB-Modus
USB als Wiedergabequelle auswählen
■ Öffnen Sie das Wiedergabequellen-Menü und berühren Sie das USB-Icon.
BITTE BEACHTEN
■ Das Gerät schaltet automatisch in den USB-Modus, sobald ein USB-Speichermedium
eingesteckt wird.
■ Das Gerät unterstützt Hot Swap (USB-Einheit ein- und ausstecken bei eingeschaltetem
Gerät).
■ Nur USB-Speichermedien, die mit FAT16/32 formatiert wurden, können von diesem
Gerät unterstützt werden. Das NTFS-Format wird nicht unterstützt.
Touchscreen-Bedienung
■ Die Bedienung ist identisch, mit der im Disc-Modus beschriebenen.
OSD-Steuertastenmenü
■ Die Bedienung des OSD-Steuertastenmenüs im SD/USB-Modus ist identisch, mit der im
Disc-Modus beschriebenen.
Wiedergabe UNTERBRECHEN
■ Die Bedienung ist identisch, mit der im Disc-Modus beschriebenen.
Wiedergabe stoppen
■ Die Bedienung ist identisch, mit der im Disc-Modus beschriebenen.
ABSPIELliste anzeigen
■ Die Bedienung ist identisch, mit der im Disc-Modus beschriebenen.
SchnelleR Vor- UND RÜCKlauf
■ Die Bedienung ist identisch, mit der im Disc-Modus beschriebenen.
Vorheriges/Nächstes
■ Die Bedienung ist identisch, mit der im Disc-Modus beschriebenen.
120
DEUTSCH
GERMAN
USB-Modus
Ordner wechseln
■ Die Bedienung ist identisch, mit der im Disc-Modus beschriebenen.
Wiedergabe wiederholen
■ Die Bedienung ist identisch, mit der im Disc-Modus beschriebenen.
Zufallsbedingte Wiedergabe (Random)
■ Die Bedienung ist identisch, mit der im Disc-Modus beschriebenen.
Intro-Wiedergabe
■ Die Bedienung ist identisch, mit der im Disc-Modus beschriebenen.
Direkte Suche
■ Die Bedienung ist identisch, mit der im Disc-Modus beschriebenen.
GOTO-Suche
■ Die Bedienung ist identisch, mit der im Disc-Modus beschriebenen.
ZOOM in/out
■ Die Bedienung ist identisch, mit der im Disc-Modus beschriebenen.
Abbildung drehen
■ Die Bedienung ist identisch, mit der im Disc-Modus beschriebenen.
WiedergabeInformationen
■ Die Bedienung ist identisch, mit der im Disc-Modus beschriebenen.
121
iPod-Modus
iPod als Wiedergabequelle auswählen
■ Das Gerät schaltet automatisch in den iPod Modus, wenn ein iPod eingesteckt wird.
■ Um den iPod-Modus von einer anderen Wiedergabequelle auszuwählen, öffnen Sie das
HAUPTMENÜ. Wählen Sie anschließend das iPod-Icon.
MusikWiedergabe
1. iPod-Musik-Modus aufrufen.
■ Drücken Sie die [TITEL]-Taste auf der Fernbedienung oder berühren Sie das Musik-Icon
auf der Benutzerschnittstelle.
2. Eine Musikdatei auswählen.
■ Drücken Sie die [links]/[rechts]-Taste auf der Fernbedienung.
3.Musikdateien abspielen.
■ Drücken Sie die [unten]-Taste auf der Fernbedienung oder berühren Sie die [
auf der Benutzerschnittstelle.
]-Taste
4. Rückkehr zum vorhergehenden Menü.
■ Drücken Sie die [oben]-Taste auf der Fernbedienung oder berühren Sie die [MENÜ]Taste auf der Benutzerschnittstelle.
BITTE BEACHTEN
■ Im Musik-Modus funktionieren die Tasten auf dem iPod nicht.
FotoWiedergabe
1. iPod-Foto-Modus aufrufen.
■ Drücken Sie die [MENÜ]-Taste auf der Fernbedienung oder berühren Sie das Foto-Icon
auf der Benutzerschnittstelle.
2. Steuerung der Fotowiedergabe
■ Verwenden Sie die Tasten auf dem iPod, um die Wiedergabe zu steuern.
BITTE BEACHTEN
■ Um den Fotowiedergabe-Modus zu verlassen, drücken Sie die [MENÜ]-Taste auf dem
iPod.
■ Fotos können auf dem Bildschirm nur angezeigt werden, wenn der FotowiedergabeModus des iPod auf „Diavorführung“ eingestellt ist.
122
DEUTSCH
GERMAN
iPod-Modus
VideoWiedergabe
1. iPod-Video-Modus aufrufen
■ Drücken Sie die [AUDIO]-Taste auf der Fernbedienung oder berühren Sie das Video-Icon
auf der Benutzerschnittstelle.
2. Steuerung der Video Wiedergabe.
■ Verwenden Sie die Tasten auf Ihrem iPod, um die Wiedergabe zu steuern.
BITTE BEACHTEN
■ Um den Video-Modus zu verlassen, drücken Sie die [MENÜ]-Taste auf dem iPod.
■ Um Bilder (inklusive Videos und Fotos) von Ihrem iPod auf den TFT-Bildschirm zu
übertragen, müssen Sie zuerst die folgenden Optionen im Video-Einstellungsmenü des
iPod einstellen:
TV Out = On, TV Signal = NTSC.
SchnelleR Vor- UND RÜCKlauf
■ Um den schnellen Vor- oder Rücklauf zu benutzen, halten Sie die [links]/[rechts]Taste auf der Fernbedienung gedrückt oder halten Sie die []/[]-Taste auf der
Benutzerschnittstelle gedrückt. Um wieder in eine normale Wiedergabe zu wechseln,
lassen Sie die Taste los.
Direkte Suche
■ Um eine Videodatei direkt auszuwählen, berühren Sie den numerischen Tastaturblock
auf der Benutzerschnittstelle, um das direkte Eingabemenü zu öffnen. Geben Sie die
gewünschte Videodatei mit den numerischen Tasten ein und bestätigen Sie mit der
[Enter]-Taste. Um dieses Menü zu verlassen, berühren Sie die [Exit]-Taste.
■ Um die Zahlen zu löschen, die Sie eingegeben haben, berühren Sie die [Clear]-Taste.
■ Sie können auch die Zifferntasten der Fernbedienung verwenden, um die Videodateien
direkt auszuwählen.
123
DVB-T-Modus
DVB-T als Wiedergabequelle auswählen
■ Öffnen Sie das HAUPTMENÜ und wählen Sie DVB-T aus.
Berühren Sie den Bildschirm, um das STEUERMENÜ anzuzeigen.
■ Drücken Sie die []-Taste, um die Lautstärke zu erhöhen,
oder drücken Sie die []-Taste, um die Lautstärke zu verringern.
Touchscreen-Bedienung
■ Die Tastenbereiche des Bildschirms für den DVB-T-Modus sind wie nachfolgend aufgeteilt:
A – HAUPTMENU öffnen
B – STEUERMENÜ anzeigen
C – Einstellungs- und Equalizer-Menü anzeigen
SCHNELLES AUSWÄHLEN
■ Drücken Sie die [OK]-Taste, um das [QUICKSELECT]-Menü anzuzeigen. Betätigen Sie
anschließend die []- oder []-Taste, um den Cursor zu bewegen und den Kanal auszuwählen, oder betätigen Sie die []- oder []-Taste, um den Quellmodus auszuwählen.
KANAL-SUCHEN
■ Drücken Sie auf MENÜ, um das [HAUPTMENÜ] anzuzeigen. Drücken Sie die []- oder
[]-Taste, um den Cursor zu bewegen und die Quelle auszuwählen. Drücken Sie dann
die [OK]-Taste, um das Sub-Menü zu öffnen. Drücken Sie die [EXIT]-Taste, um das Menü
zu verlassen.
124
DEUTSCH
GERMAN
Andere ModI
AUX
■ Externe Einheiten mit RCA-Audio- und Videoausgänge können an das Gerät angeschlossen werden.
■ Um den AUX-Modus einzuschalten, öffnen Sie das HAUPTMENÜ und berühren Sie das
AUX-Icon.
Kamera
■ Dieses Gerät ist „Camera Ready“ (kamerafähig). Bevor Sie die Kamerafunktionen
benutzen, müssen Sie eine Video-Rückfahrkamera kaufen und installieren. Sobald
die Rückfahrkamera richtig angeschlossen und in Betrieb ist, muss die Funktion
"Reverse" im Setupmenü „Hardware“ aktiviert werden. Solange die Kamera nicht
installiert ist, wird der KAMERA-Modus in Grau angezeigt (Funktion nicht vorhanden).
Die Wiedergabequelle geht automatisch in den KAMERA-Modus, wenn Sie den
Rückwärtsgang einlegen.
Navigation
■ Dieses Gerät ist „Navigation Ready“ (navigationsfähig). Bevor Sie die Navigationsfunktionen benutzen, müssen Sie die entsprechende Navigationseinheit kaufen und
installieren. Sobald die Navigationseinheit richtig angeschlossen und in Betrieb ist, wird
der NAV-Modus aktiv. Solange die Navigationseinheit nicht installiert ist, wird der NAVModus in grau angezeigt (Funktion nicht vorhanden). Die Bedienungsanleitung und die
Installationsanleitung der optional erhältlichen ZE-NA2000N, liegen dem Navigationsmodul als Zubehör bei.
125
Setup
Einstellungsmöglichkeiten
1.Systemeinstellungsmenü aufrufen
■ Drücken Sie die [SETUP]-Taste auf der Fernbedienung oder berühren Sie das SetupIcon [ ] auf der Benutzerschnittstelle.
■ Das folgende Menü erscheint nach dem Aufrufen des Systemeinstellungsmenüs.
■ Das Unterprogramm "General" ist immer markiert.
2.Ein Unterprogramm auswählen
■ Drücken Sie die Pfeiltasten auf der Fernbedienung.
3.
Ein Feld auswählen
■ Drücken Sie die []/[]-Tasten auf der Fernbedienung, um ein Feld auszuwählen.
Drücken Sie anschließend die [ ]-Taste, um die Auswahl zu bestätigen.
4.Einen Wert auswählen
■ Drücken Sie die []/[]-Tasten auf der Fernbedienung, um einen Wert auszuwählen.
Drücken Sie anschließend die [ ]-Taste, um die Auswahl zu bestätigen.
BITTE BEACHTEN
■ Alle folgenden Einstellungen können Sie vornehmen, indem Sie direkt die Option
betätigen.
126
DEUTSCH
GERMAN
Setup
GENERAL (Allgemein)
■ Clock Mode (Zeitformat)
12Hr: Zeitanzeige im 12-Stunden-Format, z.B. 11:18 AM.
24Hr: Zeitanzeige im 24-Stunden-Format z.B. 20:18.
■ Clock (Uhrzeit)
Einstellung der Uhrzeit, die in der oberen rechten Ecke des TFT-Bildschirms angezeigt
wird.
■ Tuner Region
Das Gerät wird mit einigen vorprogrammierten Radiosystemen geliefert und Sie können
die Ihrem Land entsprechenden auswählen.
■ Beep (Signalton)
Ein: Tastenton ist eingeschaltet.
Aus: Tastenton ist ausgeschaltet.
Language (Sprache)
■ OSD
Sprache des OSD-Steuertastenmenüs auswählen.
■ DVD-Audio
Dialogsprache der DVD auswählen.
BITTE BEACHTEN
■ Wenn die DVD nicht die ausgewählte Sprache enthält, bleiben die Dialoge, die Sie
hören, in der Standardsprache.
■ DVD-Untertitel
Untertitelsprache der DVD auswählen.
BITTE BEACHTEN
■ Wenn die DVD nicht die ausgewählte Sprache enthält, bleiben die angezeigten Untertitel
in der Standardsprache.
■ Disc-Menü
Sprache der DVD-MENÜ-Anzeige auswählen.
BITTE BEACHTEN
■ Wenn die DVD nicht die ausgewählte Sprache enthält, wird das DVD-MENÜ in der
Standardsprache angezeigt.
127
Setup
Audio
■ DRC
Dynamikwerte der „Dolby Digital“-DVD-Discs einstellen.
Ein: Verbesserung der Dynamik bei leiseren Lautstärken.
Aus: Normale Audio-Ausgabe.
■ Loudness (Gehörrichtige Lautstärke)
Ein: Loudness-Modus ist eingeschaltet.
Aus: Loudness-Modus ist ausgeschaltet.
■ Subwoofer (Tiefbass-Lautsprecher)
Ein: Subwoofer einschalten.
Aus: Subwoofer ausschalten.
■ Sub Filter (Tiefpassfilter)
Sie können einen anderen Bass-Effekt erhalten, wenn Sie unterschiedliche Trennfrequenzen des Tiefpassfilters einstellen. Entsprechend der Akustik Ihres Autos wählen
Sie die beste Frequenz aus.
80Hz, 120Hz und 160Hz sind verfügbar.
RDS
■ RDS
Ein: RDS-Funktion ist eingeschaltet.
Aus: RDS-Funktion ist ausgeschaltet.
■ CT (Uhrzeit)
Ein: Uhrzeit ist eingeschaltet.
Aus: Uhrzeit ist ausgeschaltet.
■ TA VOL
Lautstärke der Verkehrsansagen einstellen.
Rating (Jugendschutz-SICHERUNG)
■ Das Gerät unterstützt die Jugendfreigabe beim Abspielen einer DVD, wenn die DVD diese
Funktion unterstützt. Diese Funktion kann, wenn sie aktiviert ist, Filme mit Altersfreigaben
abspielen oder sperren. Sie können die Altersfreigabe selbst einstellen. Verwenden Sie
die Freigabe bis 16 Jahre und legen Sie einen Film ein, der keine Jugendfreigabe besitzt,
dann wird die Wiedergabe des Films gesperrt.
■ Kennwort einstellen
Das ursprüngliche Kennwort des Gerätes ist "0000".
128
DEUTSCH
GERMAN
Setup
Sie sollten so schnell wie möglich ein neues Kennwort eingeben.
Kennwort Ändern
1.Bewegen Sie den Cursor auf die „Passwort“-Option, drücken Sie die Zifferntasten auf
der Fernbedienung oder berühren Sie die „Passwort“-Option direkt auf dem Bildschirm,
um den Bildschirmtastaturblock zu öffnen. Berühren Sie anschließend die numerischen
Tasten, um Ihr Kennwort einzugeben und zu bestätigen (ursprüngliches Kennwort beim
ersten Mal eingeben).
2.Wiederholen Sie den Vorgang, um ein neues Kennwort mit 4 Ziffern einzugeben und zu
bestätigen. Das neue Kennwort wird aktiv und der Jugendschutz-Sicherung ist aktiviert.
Rating
Das Gerät verfügt über verschiedene Jugendschutzstufen:
1.Kid Safe: für Kinder geeignet.
2.G: für alle Altersstufen geeignet.
3. PG: Begleitung eines Erwachsenen empfohlen.
4. PG-13: Begleitung eines Erwachsenen bei Kindern unter 13 Jahren empfohlen.
5. PG-R: wie PG.
6. R: unter 17 Jahren nur in Begleitung eines Erwachsenen.
7.NC-17: ab 18 Jahren.
8. Adult: nur für Erwachsene.
JugendschutzStufen Ändern
1.Kennwort eingeben, um die Jugendschutz-Sicherung zu deaktivieren
■ Bewegen Sie den Cursor auf die „Kennwort“-Option, drücken Sie die Zifferntasten auf
der Fernbedienung oder berühren Sie die „Kennwort“-Option direkt auf dem Bildschirm,
um den Bildschirmtastaturblock zu öffnen. Berühren Sie anschließend die numerischen
Tasten, um Ihr Kennwort einzugeben und zu bestätigen.
2.Jugendschutzstufe ändern
■ Wählen Sie eine passende Stufe aus der „Jugendschutzstufen“-Liste aus.
129
Setup
3.Jugendschutz-Sicherung aktivieren
■ Wiederholen Sie den ersten Schritt, um ein Kennwort mit 6 Ziffern einzugeben (alt oder
neu) und zu bestätigen.
■ Der Jugendschutz-Sicherung ist aktiviert.
■ Werkseinstellungen laden
Um die Standardeinstellungen für die DVD-Wiedergabe (z.B.: DVD-Audio, DVD-Untertitel) wiederherzustellen, betätigen Sie die [RESET]-Option.
Hardware
■ Kamera-Eingang
Normal: Das Kamerabild wird normal angezeigt.
Spiegel: Das Kamerabild wird spiegelverkehrt angezeigt.
■ TFT Auto öffnen
Auto: Der TFT-Bildschirm öffnet sich automatisch, wenn das Gerät eingeschaltet wird.
Manuell: Wenn die Zündung abgeschaltet wird, bleibt das TFT Bildschirm geöffnet,
wenn er vorher geöffnet war.
Aus: Der TFT-Bildschirm öffnet sich nur beim Drücken der OPEN-Taste, wenn das
Gerät eingeschaltet ist.
■ Video-Eingang
NTSC: Die Verarbeitung des Videosignals erfolgt in NTSC.
PAL: Die Verarbeitung des Videosignals erfolgt in PAL.
AUTO: Die Verarbeitung des Videosignals erfolgt automatisch je nach Videomaterial
(PAL oder NTSC).
■ Reverse aktivieren
Reverse aktivieren: Die Ansicht der Rückfahrkamera wird beim Einlegen des Rückwärtsgangs automatisch eingeblendet.
Reverse deaktivieren: Die Ansicht der Rückfahrkamera wird beim Einlegen des Rückwärtsgangs nicht eingeblendet.
P.VOL
■ P.VOL (Programmierbare Lautstärke)
Sie können die Lautstärke je nach Audioquelle anhand dieser Funktion anpassen.
130
DEUTSCH
GERMAN
Setup
■ Quelle
Hier können Sie die Wiedergabequelle für die Lautstärkeeinstellung auswählen.
■ Stufe
Sie können die Lautstärke von 0 bis 6 einstellen.
Codeeingabe des Diebstahlschutzes
1.Bewegen sie den Cursor auf die „Diebst.Code“-Option, drücken sie die Zifferntaste der
Fernbedienung oder berühren Sie die „Diebst.Code“-Option direkt auf den Bildschirm,
um den Bildschirmtastaturblock zu öffnen. Berühren sie anschliessend die numerischen
Tasten, um die Ziffernfolge „012345“ einzugeben und zu bestätigen. Der Diebstahlschutz
ist nun deaktiviert.
2.Wiederholen sie den Vorgang, um ein Kennwort mit 4 Ziffern einzugeben und zu
bestätigen. Der Diebstahlschutz ist jetzt mit Ihrem persönlichen Code aktiviert.
BITTE BEACHTEN
■ Merken Sie sich den Code gut, das Entsperren des Gerätes ist kostenpflichtig und kann
nur von einer autorisierten ZENEC-Servicestelle durchgeführt werden.
TS CAL (Touchscreen-Kalibrierung)
■ Wenn sich der Bildschirm [durch Berührung] nicht genau oder nur eingeschränkt bedienen lässt, sollten Sie den Touchscreen mit dieser Funktion kalibrieren.
■ Um den Touchscreen zu kalibrieren, folgen Sie den im Bildschirm angezeigten Einleitungen, nachdem Sie den TS CAL Modus aufgerufen haben.
131
EQ (Equalizer)
■ Diese Einstellungsmöglichkeiten ermöglichen den Klang nach eigenen Bedürfnissen
bestmöglich anzupassen.
1. EQ-Setup-Modus
■ Drücken Sie die [SEL]-Taste auf der Fernbedienung oder berühren Sie das EQIcon in der Benutzerschnittstelle, um die folgende Schnittstelle auf dem Bildschirm
anzuzeigen.
EQ-Auswahl
Fader-/BalanceEinstellungsbereich
EQ-Parameter
2.EQ-Modus auswählen
■ Berühren Sie den EQ-Auswahlstab wiederholt, um den EQ-Modus zu verändern.
3.EQ-Parameter einstellen
■ Berühren und verschieben Sie den EQ-Parameter-Einstellungsstab, um die EQParameter einzustellen.
4.Fader und Balance für Vorne/Hinten/Links/Rechts einstellen
■ Die Vorne/Hinten- und Links/Rechts-Balance der Lautsprecher-Wiedergabelautstärke
lässt sich im Hinblick auf einen guten raumfüllenden Effekt im Fahrzeug oder an Ihre
persönlichen Vorlieben anpassen.
■ Um Fader und Balance für Vorne/Hinten/Links/Rechts einzustellen, berühren und verschieben Sie den kleinen weißen Punkt im Fader/Balance-Bereich.
BITTE BEACHTEN
■ Das Gerät wird mit vorprogrammierten Equalizer-(EQ)-Einstellungen geliefert: User,
Rock, Hip Hop, Dance, Latin, Rave, Urban, Acoustic.
■ Die verschiedenen Equalizer-(EQ)-Einstellungen haben unterschiedliche Bass-, Trebleund Middle-Stufen.
■ Die Parameter des EQ-Modus sind voreingestellt und Sie können diese nur im „Benutzer“-(User)-Modus ändern.
■ Der Equalizer-(EQ)-Modus wechselt automatisch auf „Benutzer“ (User), wenn Sie die
Werte BASS, TREB oder MID ändern.
■ Der SUB-Wert ist unabhängig vom Equalizer-(EQ-Modus und kann separat eingestellt
werden.
132
DEUTSCH
GERMAN
Fehlersuche
■ Es muss nicht immer ein schwerer Defekt am Gerät vorliegen. Sie können anhand der
Problembeschreibungen das vorliegende Problem gegebenenfalls selber beheben.
Problem
Ursache
Lösung
Allgemein
Gerätsicherung durchgebrannt.
Neue Sicherung mit korrekten Wert
installieren.
Autobatteriesicherung durchgebrannt.
Neue Sicherung mit korrektem Wert
installieren.
Ungültige Operation.
Das Gerät zurücksetzen.
Batterie leer.
Die Batterie wechseln.
Batterie falsch eingelegt.
Die Batterie richtig einlegen.
Falscher Audioausgangsanschluss.
Verkabelung überprüfen und beheben.
Lautstärke zu niedrig.
Lautstärke erhöhen.
Lautsprecher beschädigt.
Lautsprecher austauschen.
Balance schlecht eingestellt.
Die Balance auf Mittelposition einstellen.
Lautsprecherverkabelung hat Kontakt mit
einem Metallteil des Autos.
Alle Lautsprecherverkabelungsanschlüsse
isolieren.
Wiedergabe einer Raubkopie.
Original-CD/DVD benutzen.
Lautsprecherleistung zu schwach.
Lautsprecher austauschen.
Beschädigung am Anschluss-Stecker.
Verkabelung überprüfen und Mangel
beheben.
Lautsprecher ist kurzgeschlossen.
Verkabelung überprüfen und beheben.
Störung in der TelefonStummschaltung.
Kabel für Stummschaltung ist geerdet.
Die „Stummschaltungs-“ Verkabelung
überprüfen und Mangel beheben.
Gerät setzt sich zurück, wenn der
Motor aus ist.
Falscher Anschluss/Klemme
+15 und +30 vertauscht.
Verkabelung überprüfen und Mangel
beheben.
Gerät schaltet sich nicht ein.
Die Fernbedienung funktioniert nicht.
Keine bzw. zu leise
Audiowiedergabe.
Schwache Tonqualität oder
Verzerrung.
TFT-Bildschirm
Bildschirm öffnet sich nicht
automatisch.
TFT AUTO ist ausgeschaltet.
TFT AUTO einschalten.
Warnende Informationen werden
ständig angezeigt.
Handbremsverkabelung ist nicht korrekt
angeschlossen.
Verkabelung überprüfen und Mangel
beheben.
Das TV-System der DVD entspricht nicht
dem des Bildschirms.
Das TV-System der DVD einstellen.
Wiedergabe einer Raubkopie.
Original-CD/DVD benutzen.
Videokabel beschädigt.
Kabel austauschen.
Schlechter Videosignalanschluss.
Verkabelung überprüfen und Mangel
beheben.
Blinkendes Bild oder Störung
erscheint auf dem Bildschirm.
133
Fehlersuche
Problem
Ursache
Lösung
Disc-Wiedergabe
Disc kann nicht eingelegt
werden.
Es befindet sich schon eine Disc im Gerät.
Aktuelle Disc auswerfen und eine neue Disc
einsetzen.
Disc ist verkratzt.
Nur Discs in gutem Zustand benutzen.
Disc ist schmutzig oder nass.
Disc mit weichem Tuch säubern.
Inkompatible Disc wurde benutzt.
Kompatible Disc benutzen.
Disc ist verkehrt herum eingelegt.
Disc mit beschrifteter Seite nach oben
einlegen.
Region Code der Discs ist nicht mit dem
Gerät kompatibel.
Disc mit korrektem Regionalcode benutzen.
PBC kann nicht während des VCDWiedergabe verwendet werden.
PBC ist nicht auf der Disc vorhanden.
Disc mit vorhandenem PBC benutzen.
Wiederholung oder Suchfunktion
ist während des VCD-Wiedergabe
unzulässig.
PBC ist eingeschaltet.
PBC ausschalten.
Disc spielt nicht ab.
Fehlermeldungen
Disc ist schmutzig.
Disc mit weichem Tuch säubern.
Disc ist verkehrt herum eingelegt.
Disc mit beschrifteter Seite nach oben
einlegen.
Keine Disc eingelegt.
Disc einlegen.
Disc ist schmutzig.
Disc mit weichem Tuch säubern.
Disc ist verkehrt herum eingelegt.
Disc mit beschrifteter Seite nach oben
einlegen.
Unbekannte Disc.
Disc-Format ist nicht mit diesem Gerät
kompatibel.
Disc mit kompatiblem Format benutzen.
Region-Fehler.
Regionalcode der Discs ist nicht mit dem
Gerät kompatibel.
Disc mit korrektem Regionalcode benutzen.
Keine Disc.
Falsche Disc.
134
DEUTSCH
GERMAN
Anschlüsse
Anmerkungen zum Anschluss
■ Dieses Gerät ist nur in Fahrzeugen, die mit einem Bordnetz mit +12V (DC) und Minus
gegen Masse geschaltet sind, zu benutzen. Bevor Sie dieses Gerät in einem PKW oder
in einem LKW installieren, stellen Sie sicher, dass die Batteriespannung korrekt ist,
sonst müssen Sie einen Spannungswandler durch einen Fachmann installieren lassen,
um die Ausgangsspannung in +12V zu konvertieren.
■ Um einen Kurzschluss in der elektrischen Anlage zu vermeiden, kontrollieren Sie, ob
das negative Batteriekabel vor der Installation getrennt ist.
■ Um einen Kurzschluss in der Verkabelung und Schaden an diesem Gerät zu vermeiden,
befestigen und sichern Sie alle Kabel mit einem Kabel- oder Isolierband. Verlegen Sie
die Kabel nicht in die Nähe der Heizung oder beweglicher Teile, wie z.B. Gangschaltung,
Handbremse und Sitzschienen, um das Beschädigen der Kabel zu vermeiden.
■ Führen Sie das gelbe Stromkabel nie durch das Installationsloch in den Motorraum, um
es direkt an die Autobatterie anzuschließen. Andernfalls kann es zu einem Kurzschluss
in der elektrischen Anlage kommen.
■ Ersetzen Sie eine defekte Sicherung durch eine neue 10-A-Sicherung. Wenn Sie keine
Sicherung oder Sicherungen mit falschem Wert einsetzen, kann dieses Gerät beschädigt werden oder sogar einen Brandschaden verursachen. Wenn eine korrekte
Sicherung installiert ist und das elektrische Problem wieder auftritt, dann setzen Sie
sich bitte mit einem Fachmann in Verbindung.
■ Stellen Sie bitte sicher, dass alle Verkabelungsanschlüsse und Lautsprecherkabel
gut isoliert sind. Andernfalls kann dieses Gerät durch einen Kurzschluss geschädigt
werden.
■ Wenn keine Klemme +15 vorhanden ist, dann schließen Sie das Gerät bitte mit einem
Schalter an die Klemme +30 an.
■ Wenn ein Verstärker angeschlossen ist, schließen Sie das P.CONT-Kabel bitte nicht
an das Stromkabel des Verstärkers an, andernfalls können elektrische Funken oder
andere Schäden entstehen.
■ Schliessen Sie Lautsprecheranschlüsse nicht an die Masse an, um Schäden an der
eingebauten Endstufe zu verhindern.
■ Die Leistung der Lautsprecher, sollte min. 50 W betragen (mit einer Impedanz zwischen
4 und 8 Ω).
135
Anschlüsse
Steuerleitung
Automatische Helligkeitseinstellung
■ Um eine zu helle Bildschirmanzeige während der Nacht zu vermeiden, schließen Sie das
„ILLUMI“-Kabel an das Scheinwerfersteuerungskabel an. Wenn Sie die Scheinwerfer
einschalten, verdunkelt sich die Hintergrundbeleuchtung des TFT-Bildschirms und
umgekehrt.
Telefon-Stummschaltung
■ Wenn das Stummschaltungskabel an einem Autotelefon oder einer Freisprechanlage
angeschlossen wird, schalten sich alle anderen Wiedergabequellen stumm, wenn ein
Anruf empfangen wird.
Rückfahrkamera
■ Wenn eine Rückfahrkamera an diesem Gerät angeschlossen ist, schaltet die gerade
abspielende Quelle automatisch auf das KAMERA-Bild der Rückfahrkamera, wenn
Sie den Rückwärtsgang einlegen. Wenn der Rückwärtsgang nicht mehr eingelegt ist,
schaltet das Gerät zur gerade abgespielten Quelle zurück.
Handbremse
1.Wenn der „PRK SW“-Kabel an dem Handbremsenschalter angeschlossen ist, wird
die Videodarstellung auf dem TFT-Bildschirm über diese Funktion gesteuert. Die
Handbremsfunktion hat keinen Einfluss auf den Rückfahrkamera-Modus.
2. Der TFT-Bildschirm zeigt ein blaues Bild mit warnenden Informationen an, um die
Wiedergabe von Videoinhalt während der Fahrt für den Fahrer zu verhindern. Passagiere
auf dem hinteren Sitz können Videoinhalte weiter auf einem Zusatzbildschirm betrachten.
136
DEUTSCH
GERMAN
Anschlüsse
Verbindungen Handbremse-Kabel
Kabel Handbremse
Grünes Kabel
Batterie
Bremslicht
Schalter Handbremse
Wagen
Karosserie
Schalter Handbremse
Anschlüsse Rückwärtsgang
Wagen
Karosserie
Rückfahrlicht-Indikator
Rosa Kabel
Rückfahrlicht-Kabel
Batterie
Schalter
Rückwärtsgang
137
Wagen
Karosserie
Einbau und Ausbau
Anmerkungen ZUR Installation
1. Vor dem Einbau stellen Sie bitte sicher, dass die Anschlüsse korrekt verlegt sind und dass
das Gerät einwandfrei funktioniert. Unkorrekte Anschlüsse können zu einem Schaden
des Gerätes führen.
2. Schließen Sie an dieses Gerät ausschließlich kompatible Zusatzgeräte an. Nicht
kompatible Zusatzgeräte können zum Schaden des Gerätes und zum Verlust der
Garantieansprüche führen.
3. Vor dem Einbau befestigen Sie bitte alle Stromkabel.
4. Das Gerät sollte NICHT in der Nähe von Hitzequellen eingebaut werden, um Schäden an
den elektrischen Bauteilen wie dem Laserkopf zu vermeiden.
5.Bauen Sie das Gerät horizontal ein. Sollte das Gerät in einem Vertikalwinkel von mehr als
30° eingebaut werden, kann dies zu einer schlechten Wiedergabe von DVDs/CDs führen.
6.Um elektrische Funken zu verhindern, schließen Sie den positiven Pol (+) zuerst und
dann den negativen Pol (-) an.
7. Decken Sie die Kühlungsventilatoröffnung NICHT zu, um eine gute und genügende
Wärmeabführung für dieses Gerät zu gewährleisten; ansonsten kann es zu Hitzeschäden oder zu lauten Luftgeräuschen kommen.
Installation
Methode A
1. Setzen Sie den Einbaurahmen des Gerätes in das Radiofach des Armaturenbrettes und
verbiegen Sie die Einhängeläppchen mit einem Schraubenzieher, um die Halterung an
der richtigen Stelle zu fixieren.
2.Benutzen Sie zwei Schrauben der Größe M5 x 5, um die Seitenhalterungen auf beiden
Seiten des Gerätes festzuschrauben (siehe Abbildung 1).
Seitenhalterungen
(Abbildung 1)
3. Schrauben Sie eine Schraube der Größe M5 x 24 am hinteren Teil des Gerätes an und
setzen Sie eine Gummihülle über die Schraube (siehe Abbildung 2).
138
DEUTSCH
GERMAN
Einbau und Ausbau
Armaturenbrett
Gummihülle
Einbaurahmen
Seitenhalterungen
(Abbildung 2)
4. Setzen Sie das Gerät in den Einbaurahmen ein. Benutzen Sie die vier Schrauben der
Größe M2 x 2, um die Seitenhalterungen und den Einbaurahmen in Position zu bringen.
BITTE BEACHTEN
■ Gemäß der Öffnungstiefe verwenden Sie die entsprechende Seitenhalterungslänge.
Wenn die Öffnung nicht tief genug ist, kann das Gerät bis zu 10 mm über das Armaturenbrett herausragen.
Methode B
Einbaurahmen
Armaturenbrett
1. Setzen Sie das Gerät direkt in die Öffnung des Armaturenbrettes ein.
2. Schrauben Sie die Flachkopfschrauben der Größen M4 x 3 bzw. M5 x 5 oder die Senkkopfschrauben der Größen M5 x 5 durch die Löcher des Einbaurahmens im Gerät fest.
139
EinBAU und Ausbau
Abdeckzierrahmen
■Bringen Sie den Abdeckzierrahmen um die Frontabdeckung mit den zwei Einrückungen
aufwärts an.
Den Abdeckzierrahmen entfernen.
1. Drücken Sie den Abdeckzierrahmen aufwärts und ziehen Sie das obere Teil zu sich hin.
2. Drücken Sie den Abdeckzierrahmen abwärts und ziehen Sie die das untere Teil zu sich hin.
Gerät ausbauen
1. Schrauben Sie die vier Schrauben der Größe M2 x 2 ab und ziehen Sie das Gerät aus
dem Einbaurahmen heraus.
2.Benutzen Sie einen Schraubenzieher, um die verbogenen Einhängeläppchen wieder
geradezubiegen.
Gummihülle abnehmen
Die 4 Schrauben
abschrauben
3. Ziehen Sie den Einbaurahmen mit beiden Händen heraus.
140
DEUTSCH
GERMAN
Spezifikationen
General
Reference Supply Voltage.........................................................................................12V (DC)
Operating Voltage Range.............................................................................10.5~15.8V (DC)
Max Operation Current..................................................................................................... 10A
Grounding System......................................................................... Car Battery Negative Pole
Installation Dimension (WxHxD)...........................................178mm x 50mm x (165+25) mm
Installation Angle......................................................................................................... 0°~30°
Net Weight......................................................................................................................2.3kg
FM
Signal Noise Ratio.......................................................................................................... 55dB
Residual Noise Sensitivity (S/N=30dB)......................................................................20dBµV
Frequency Response (±3dB).......................................................................... 40Hz~12.5KHz
Station Seeking Level.......................................................................................... 20~30dBµV
Distortion.........................................................................................................................1.5%
Stereo Separation (1 KHz)............................................................................................. 20dB
Antenna Impedance.........................................................................................................75Q
AM
Residual Noise Sensitivity (S/N=20dB)......................................................................40dBµV
Selectivity (±9KHz)......................................................................................................... 50dB
DVD Player
Signal/Noise Ratio.......................................................................................................... 90dB
Dynamic Range.............................................................................................................. 90dB
Distortion (line out)......................................................................................................... 0.1%
Frequency Response (±3dB)............................................................................. 20Hz~20KHz
Max Output Power....................................................................................................... 4x40W
Load Impedance.................................................................................................................4Ω
AUX IN
Distortion........................................................................................................................ 0.5%
Frequency Response (±3dB)............................................................................. 20Hz~20KHz
Audio Input Level....................................................................................................... 0.4Vrms
Audio
Audio Output Impedance................................................................................................200Ω
Audio Output Level.............................................................................................2Vrms (Max)
(Under normal audio input level and maximum volume)
141
Video
Normal Video Input Level (CVBS)............................................................................ 1.0±0.2V
Video Input Impedance.....................................................................................................75Ω
Video Output Impedance..................................................................................................75Ω
Video Output Level................................................................................................... 1.0±0.2V
TFT Monitor
Screen Diagonal........................................................................................................ 7 inches
Usable Display Area.................................................................................154.1(W) x 87.0 (H)
Resolution................................................................................................. 1440 (W) x 234 (H)
Brightness............................................................................................................... 400cd/m²
(Measure the centre brightness after 30 minutes)
Contrast...................................................................................................................300(TYP.)
Response Time
Rise...........................................................................................................................12ms
Fall............................................................................................................................18ms
Viewing Angle
From Top...................................................................................................................... 40°
From bottom................................................................................................................. 65°
Horizontally................................................................................................................±65°
LCD Life Cycle..................................................................................... 10000 hours (at 25°C)
Environment
Operating Temperature.................................................................................... -10°C~ + 60°C
Storing Temperature........................................................................................ -20°C~ + 70°C
Operating Humidity............................................................................................45%~80%RH
Storing Humidity................................................................................................30%~90%RH
■
Durch spätere Verbesserungen am Gerät können sich die technischen Daten und Designs
ändern.
■
Sollten Sie dieses Gerät eines Tages entsorgen müssen, beachten Sie bitte, dass elektrische Geräte
nicht mit dem Haushaltsmüll entsorgt werden sollten. Führen Sie das Gerät wenn möglich dem
Recycling zu. Ihre lokalen Behörden oder Ihr Händler können Sie dementsprechend informieren
(Richtlinie über die Entsorgung elektrischer und elektronischer Ausstattungen).
Dieses Gerät ist von Dolby Laboratories lizenziert. Die Symbole „Dolby“, „Prologic II“ und „DD“ sind
markengeschützte Symbole der Firma Dolby Laboratories.
142
DEUTSCH
GERMAN
Anhang
RegionALCode
Entsprechend der Verkaufsregion der DVD wird die ganze Welt in sechs Regionen unterteilt.
Eine DVD kann nur abgespielt werden, wenn ihr Regionalcode mit dem Regionalcode des
Gerätes kompatibel ist.
Region 1: USA, Kanada, US-Außenterritorien;
Region 2: Japan, Westeuropa, Nordeuropa, Ägypten, Südafrika,
Naher Osten;
Region 3:
Taiwan, Hongkong, Südkorea, Thailand,
Indonesien, Südostasien;
Region 4:
Australien, Neuseeland, Mittelamerika und Südamerika, Südpazifik,
Ozeanien;
Region 5:
Russland, Mongolei, Indien, Zentralasien, Osteuropa,
Nordkorea, Nordafrika, Nordwestasien;
Region 6:
Volksrepublik China.
VorsichtsmaSSnahmen zur Benutzung der Discs
1.Unregelmäßig geformte Discs NICHT benutzen
2.Disc-Reinigung
Benutzen Sie ein trockenes und weiches Tuch, um die Disc von der Mitte zum Rand hin
abzuwischen. Benutzen Sie nur neutrale Reinigungsmittel.
3.Neue Discs abspielen
Neue Discs können einige raue Punkte auf den inneren und äußeren Rändern haben.
Wenn Sie solche Discs benutzen, dann entfernen Sie diese rauen Punkte bitte mit einem
Bleistift oder Kugelschreiber.
143
ENDSTUFE
SCHWARZ
144
VORNE L
VORNE R
HINTEN L
HINTEN R
GELB
WEISS
ROT
WEISS
ROT
BLAU
ROSA
GRAU
GELB
GELB
AUTO
ENDSTUFE
AUTOTELEFON
RÜCKWÄRTSSCHALTER
RÜCKFAHRLICHTINDIKATOR
MASSE
ZÜNDSCHLOSS
SCHEINWERFER
MASSE
MASSE
SCHEINWERFERSCHALTER
BATTERIE
HANDBREMSE
BATTERIE (+30)
WEISS-SCHWARZ
GRÜN-SCHWARZ
GRÜN
HINTEN L-
WEISS
VORNE L-
VIOLETT-SCHWARZ
HINTEN L+
GRAU-SCHWARZ
VORNE L+
HINTEN R-
VIOLETT
GRAU
VORNE R-
HINTEN R+
BLAU
ROSA
ANTENNENSTEUERUNG
MASSE
BATTERIE
HANDBREMS-SCHALTER
HANDBREMSLICHT
BLAU-WEISS
BRAUN
ROT
ORANGE
SCHWARZ
GELB
VORNE R+
ENDSTUFENEINSCHALTUNG
RÜCKWÄRTSSCHALTUNG
STUMMSCHALTUNG
ACC +15
ILLUMI
MASSE (-)
KAMERA
LENKRADFERNBEDIENUNG
BENÖTIGT EINEN SPEZIELLEN ADAPTER.
SEPARAT ERHÄLTLICH
RÜCKFAHRKAMERA
VIDEO AUSGANG
STEUERLEITUNG
Anhang
Verkabelungs-Anschlüsse
DEUTSCH
GERMAN
2 Jahre Garantie
Sehr geehrter Kunde,
vielen Dank, dass Sie sich zum Kauf dieses Produktes von ZENEC entschlossen haben. Wir
bitten Sie, die Originalverpackung aufzuheben, z.B. für den Transport bei einem Garantiefall.
Wenn Sie Garantie-Leistungen für dieses ZENEC-Produkt beanspruchen, wenden Sie sich bitte
direkt an den Händler, bei dem das Gerät gekauft wurde.
Dieses ZENEC Produkt ist durch eine Werksgarantie von 2 Jahren ab Kaufdatum im Fachhandel
gegen Material- oder Herstellungsfehler geschützt.
Garantie-Einschränkungen
Nicht unter Garantie fallen Schäden infolge von:
1. unsachgemäßem Einbau oder inkorrektem Audio- oder Stromanschluss.
2. Einwirkung von übermäßiger Feuchtigkeit, Flüssigkeit, Hitze, Sonneneinstrahlung oder
starker Verschmutzung.
3. mechanischer Beschädigung durch Unfall, Fall oder Stoß; Schäden durch nicht autorisierte
Reparaturversuche und/oder Modifikationen.
Die Garantie dieses Produkts bleibt in jedem Fall auf die Reparatur bzw. den Ersatz (Entscheidung
beim Hersteller) des ZENEC-Produktes beschränkt. Transportschäden und die Kosten des Rücktransportes sind durch diese Garantie nicht abgedeckt. Jeder über diese Garantie-Erklärung
hinausgehende Anspruch und Haftung für direkte/indirekte Folgeschäden werden ausdrücklich
abgelehnt. Garantie-Ansprüche können nur mit einer korrekt und vollständig ausgefüllten GarantieKarte und dem Original-Kaufbeleg geltend gemacht werden.
ZENEC ModelL: ZE-MC194
Seriennummer:..............................................................................................................................
Kaufdatum:....................................................................................................................................
Vorname:.......................................................................................................................................
Name:............................................................................................................................................
Straße:...........................................................................................................................................
PLZ: ................................... Ort: ...................................................................................................
Land: . ...........................................................................................................................................
Händleradresse & Stempel
145
2 Years Limited Warranty (UK)
Dear customer
Thank you for purchasing this ZENEC product. It is advisable to keep the original packing material for any future
transporting of the product.
Should your ZENEC product require warranty service, please return it to the retailer from whom it was purchased or
the distributor in your country.
This ZENEC product is warranted against defective materials or workmanship for a period of TWO years from date of
purchase at retail.
Warranty Limitations
This warranty does not cover any damage due to:
1. Improper installation, incorrect audio or mains connection(s).
2. Exposure to excessive humidity, fluids, heat sun rays or excessive dirt or dust.
3. Accidents or abuse, unauthorized repair attempts and modifications not explicitly authorized by the manufacturer.
This warranty is limited to the repair or the replacement of the defective product at the manufacturer’s option and does
not include any other form of damage, whether incidental, consequential or otherwise. The warranty does not cover any
transport costs or damages caused by transport or shipment of the product. Warranty work will not be carried out unless
this warranty certificate is presented fully completed with model, serial number, purchaser’s address, purchasing date
and dealer stamp together with the original sales slip!
GARANTIE 2 ANS
(FR)
Cher client,
Nous vous remercions pour l’achat de cet appareil ZENEC. Conservez si possible l’emballage de ce produit pour tout
envoi futur.
Si cet appareil ZENEC requiert la mise en oeuvre de sa garantie, veuillez le retourner au revendeur qui vous l’a vendu,
ou au distributeur agréé du pays d’achat.
Ce produit ZENEC est garanti contre tout défaut matériel, pièces et main d’oeuvre pour une période de DEUX ANS
après sa date d’achat.
Limitations de la garantie
Cette garantie ne couvre pas les dommages dus :
1. Mauvaise installation, branchements audio ou alimentation incorrects.
2. L’exposition à une humidité excessive, des liquides, la chaleur directe du soleil, des conditions boueuses ou
poussiéreuses anormales.
3. Des accidents ou utilisation non conforme, une réparation non conforme ou des modifications non explicitement
autorisées par le constructeur.
Cette garantie est limitée à la réparation ou au remplacement du produit défectueux, selon le choix du constructeur,
et ne peut inclure la réparation de tout dommage que ce soit, suite à un accident, aux conséquences de la panne ou
autre. La garantie ne couvre aucun frais de transport du produit. Cette garantie ne peut s’appliquer que sur présentation
du certificat ci-dessous, dûment rempli indiquant notamment le modèle, son numéro de série, l’adresse de l’acheteur,
la date d’achat et le tampon du revendeur, avec facture d’achat originale complémentaire.
2 Jahre Garantie (DE)
Sehr geehrter Kunde,
vielen Dank, dass Sie sich zum Kauf dieses Produktes von ZENEC entschlossen haben. Wir bitten Sie, die Originalverpackung aufzuheben, z.B. für den Transport bei einem Garantiefall.
Wenn Sie Garantie-Leistungen für dieses ZENEC-Produkt beanspruchen, wenden Sie sich bitte direkt an den Händler,
bei dem das Gerät gekauft wurde.
Dieses ZENEC-Produkt ist durch eine Werksgarantie von 2 Jahren ab Kaufdatum im Fachhandel gegen Material- oder
Herstellungsfehler geschützt.
Garantie-Einschränkungen
Nicht unter Garantie fallen Schäden infolge von:
1. unsachgemäßem Einbau oder inkorrektem Audio- oder Stromanschluss.
2. Einwirkung von übermäßiger Feuchtigkeit, Flüssigkeit, Hitze, Sonneneinstrahlung oder starker Verschmutzung.
3. mechanischer Beschädigung durch Unfall, Fall oder Stoß; Schäden durch nicht autorisierte Reparaturversuche
und/oder Modifikationen.
Die Garantie dieses Produkts bleibt in jedem Fall auf die Reparatur bzw. den Ersatz (Entscheidung beim Hersteller)
des ZENEC-Produktes beschränkt. Transportschäden und die Kosten des Rücktransportes sind durch diese Garantie
nicht abgedeckt. Jeder über diese Garantie-Erklärung hinausgehende Anspruch und Haftung für direkte/indirekte
Folgeschäden werden ausdrücklich abgelehnt. Garantie-Ansprüche können nur mit einer korrekt und vollständig
ausgefüllten Garantie-Karte und dem Original-Kaufbeleg geltend gemacht werden.
146
DEUTSCH
WARRANTY
ZENEC Model: ZE-MC194
Serial number:...............................................................................................................................
Date of purchase:...........................................................................................................................
Your name:.....................................................................................................................................
Your address:.................................................................................................................................
City:...............................................................................................................................................
State: ................................... ZIP or postal code ..........................................................................
Country: ........................................................................................................................................
Dealer’s address & stamp
147
MODEL NO:
ZE-DVBT1 0
1 CH DVB-T TUNER
ZENEC by ACR AG · Bohrturmweg 1 · Bad Zurzach · Switzerland