1
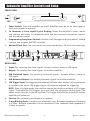
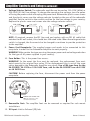
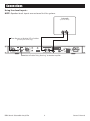
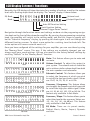
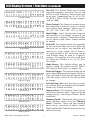
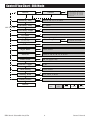
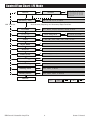
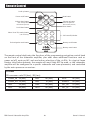
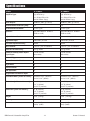
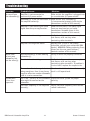
SA-250DSP & SA-500DSP
SUBWOOFER AMPLIFIERS
Owner ’s Manual
Important Safety Information
The lightning flash with the arrowhead symbol within an equilateral triangle, is intended
to alert the user to the presence of uninsulated “dangerous voltage” within the product
enclosure that may be of sufficient magnitude to constitute a risk of shock to persons.
The exclamation point within an equilateral triangle is intended to alert the user to
the presence of important operating and maintenance (servicing) instructions in the
literature accompanying the product.
CAUTION! DO NOT open the amplifier, attempt any modifications or repairs. There are
extremely high voltages present and any servicing must be referred to RBH Sound or an
authorized qualified technician.
ATTENTION! Opening the amplifier will void warranty.
WARNING! To prevent shock or fire hazard, never permit moisture or any liquid to get into the
amplifier. If an accidental spill occurs, immediately shut off the power, unplug its A/C power
cord and seek a qualified technician for repair.
CAUTION! To reduce the risk of electric shock, do not remove the cover (or back). No user
serviceable parts inside: refer servicing to qualified technician.
All safety instructions should be read before this subwoofer amplifier is operated. Please
retain these safety instructions for future reference. Adhere to all warnings on the amplifier
and in this manual.
Ventilation: The amplifier should be situated so that its location or position does not
interfere with its proper ventilation. The amplifier should not be situated on a bed, sofa,
rug or similar surface that may block the ventilation openings, nor should it be placed in a
built-in installation such as a bookcase or cabinet that may impede the flow of air through
the ventilation openings.
Power Source: The amplifier should only be connected to a power supply of the type described
in this instruction manual or as marked on the amplifier. Precautions should be taken so that
the grounding or polarization means of the amplifier are not defeated.
Power Cords: Power supply cords should be routed so that they are not likely to be walked on or
pinched by items placed upon or against them, paying particular attention to wall receptacles
and the point where they exit from the amplifier.
Object and Liquid Entry: The amplifier should not be exposed to dripping or splashing and
objects filled with liquids, such as vases or plants, should not be placed on top of or next to
the amplifier. Care should be taken so that objects do not fall and liquids are not spilled into
the enclosure through its ventilation openings.
Damage Requiring Service: This amplifier should be serviced by a qualified technician when:
• The power supply cord has been damaged; or
• Objects have fallen or liquid has been spilled into the amplifier; or
• The amplifier does not appear to function normally or exhibits a marked change in performance; or
• The amplifier has been dropped or the enclosure is damaged.
RBH Sound Subwoofer Amplifier
1
Owner’s Manual
Introduction
Congratulations on your purchase of an RBH Sound Subwoofer Amplifier! Your subwoofer
amplifier is the result of many years of research and development dedicated to producing
powerful, accurate bass in home audio systems. This manual contains operating procedures
and specifications. We recommend you thoroughly read through the material contained in
this manual before connecting your amplifier. This will ensure you have an understanding
of how to setup and operate your amplifier for optimum performance.
The RBH Sound SA-250DSP/SA-500DSP subwoofer amplifier is a high performance, class D
subwoofer amplifier capable of delivering a minimum of 250W/500W of clean power at 4
ohms. It uses sound processing technology which allows you to tailor the performance of the
subwoofer to better match the environment in which it is installed. Both amplifiers feature
a large LCD display as well as a turn-and-push controller for DSP configuration. On the front
panel there are indicators for power and standby, clipping and signal presence.
Installing Rack Mount Ears
If you plan to install your subwoofer amplifier into a standard 19-inch rack,
you must install the supplied rack ears.
1. Using the three screws, attach the supplied rack ears to the
subwoofer amplifier. If required, the 4 feet on the bottom
of the amplifier can also be removed at this time by
unscrewing the mounting screws located in the center
of each foot.
3. Due to the weight of the subwoofer amplifier,
it is recommended that rear supports be
secured to the rear rack rails. Hardware
to do this is not supplied with the
amplifier and is specific to the
type and depth of rack you
are using.
Installing Front Rack Ears
CAUTION! The subwoofer amplifier is convection cooled and does not use a fan. For this
reason, ensure there is adequate ventilation above and below the subwoofer amplifier
when rack mounted. Avoid placing heat generating equipment below it in the rack.
If the subwoofer amplifier does not receive enough ventilation, it may overheat and
switch to standby mode.
RBH Sound Subwoofer Amplifier
2
Owner’s Manual
Subwoofer Amplifier Controls and Setup
FRONT PANEL
ON
GREEN ON
POWER
DSP
CONTROL
RED STANDBY
OFF
1. Power Switch: Turns the amplifier on or off. Amplifier must be on for the trigger or
auto sense modes to operate.
2. 16 Character x 2-row Liquid Crystal Display: Shows the amplifier’s status, menus
and settings and works in conjunction with the turn and push navigation controls
and the remote control.
3. Programming Navigation Control: Used to scroll through the display menus, change
settings and program the DSP controller.
4. Optional Rack Ears: Two rack mount ears are provided for a 19-inch rack mounting.
INPUT
OUTPUT
SUBWOOFER OUTPUT 4-8 OHMS
110~120V,FUSE T5AL/250V
220~240V,FUSE T2.5AL/250V
CAUTION
110~120V
RISK OF ELECTRIC SHOCK
DO NOT OPEN
GROUND
TERMINAL
BALANCED
LINE
LINE
BALANCED
+12VDC
TRIGGER
220~240V
ATTENTION
IR INPUT
RISQUE DE CHOC ELECRIQUE
NE PAS OUVRIR
CONFORMS TO
ANSI/UL STD 60065
CERTIFIED TO
CAN/CSA STD
C22.2 No. 60065
SERVICE
110-120V–60Hz
220-240V–50Hz
330W
REAR PANEL
1. Input: For receiving line-level signals. Accepts either a mono or LFE signal.
2. Output: For sending line-level signals to another amplifier.
3. XLR Balanced Input: For receiving balanced signals. Accepts either a mono or
LFE signal.
4. XLR Balanced Output: For sending balanced signals to another amplifier.
5. 12V Trigger Input: For triggering the power on/off from other devices such as processors
or receivers that have a 12V trigger output. 6V minimum required for triggering.
NOTE: Once in trigger mode, the amplifier cannot be turned on without a 12V trigger
signal. To disable the 12V trigger, press and hold the navigation control knob. The
power switch must be in the ON position. The trigger mode will be turned off and the
amplifier will power on.
6. Service: For uploading new firmware or updates.
7. 5-way Binding Posts: Connect your subwoofer here. Minimum impedance of the load
is 4 Ohms. Multiple subwoofers can be connected if the combined load impedance is
4 Ohms or greater.
RBH Sound Subwoofer Amplifier
3
Owner’s Manual
Amplifier Controls and Setup (continued)
8. Voltage Selector Switch: The subwoofer amplifier can be used on 110~120V (60Hz) or
220~240V (50 Hz) line voltage. To change the operating line voltage, turn the power
off using the power switch and unplug the power cord. Remove the plastic cover screws
and the plastic cover over the voltage selector located on the rear of the subwoofer
amplifier. Set the switch to the correct position for the line voltage in your country.
Replace the plastic cover and screws over the voltage selector switch.
110~120V
110~120V
220~240V
220~240V
OR
NOTE: If required, remove the IEC line cord and replace with an IEC AC cable that
matches the AC wall socket, this should be a 10A rated cable. When the voltage selector
switch is changed, the fuse must also be changed to continue to provide protection
to the amplifier.
9. Power Cord Receptacle: The supplied power cord needs to be connected to this
receptacle in order for the Subwoofer Amplifier to work properly.
WARNING! Make certain that you are using the proper power cord and voltage selection
for the type of AC power supplied in your country.
10. Fuse Holder: This is the power fuse access.
WARNING! In the event the fuse must be replaced, the replacement fuse must
match exactly the original fuse value. If the replacement fuse is not of the same
value, damage to the Subwoofer Amplifier may result. Use a GDA type fuse for the
SA-250DSP: 5A 120V or 2.5A 240V fuse, and for the SA-500DSP use a 8A 120V
or 4A 240V fuse.
CAUTION! Before replacing the fuse, disconnect the power cord from the power
receptacle.
10MM 20MM
(±2.0) (±0.5)
5.2MM
(+0.1/-0.2)
REMOVE FUSE HOLDER HERE
NOTE: A spare fuse is also
located in this holder
11. Removable Feet: The amplifier feet can be removed as required for rack mount
installation.
12. IR Input: Link to Infrared (IR) hub
RBH Sound Subwoofer Amplifier
4
Owner’s Manual
Connections
Using line level inputs:
NOTE: Speaker-level inputs are not used in this system.
Subwoofer
(4 to 16 ohms)
From Pre-amp or Receiver LFE or Sub Out
(pre-amp line level only)
INPUT
OUTPUT
SUBWOOFER OUTPUT 4-8 OHMS
110~120V,FUSE T5AL/250V
220~240V,FUSE T2.5AL/250V
CAUTION
110~120V
RISK OF ELECTRIC SHOCK
DO NOT OPEN
GROUND
TERMINAL
BALANCED
LINE
LINE
BALANCED
+12VDC
TRIGGER
ATTENTION
IR INPUT
220~240V
RISQUE DE CHOC ELECRIQUE
NE PAS OUVRIR
CONFORMS TO
ANSI/UL STD 60065
CERTIFIED TO
CAN/CSA STD
C22.2 No. 60065
SERVICE
110-120V–60Hz
220-240V–50Hz
330W
Out to Enable “Daisy Chaining” to Another Amplifier
RBH Sound Subwoofer Amplifier
5
Owner’s Manual
LCD Display Screens / Functions
Normally, the LCD display will show the status for a number of settings as well as the volume
level and a flashing output level bar display. The “normal” display is shown below.
Music
SUB
EQ Mode
Mode
Volume Level
Output Signal Level
Auto Off Function Setting
Lock Function Setting
External Trigger Power Control
Navigation through the function menus and settings are done via the programing navigation knob on the front of the subwoofer amplifier. By pressing the programming navigation
knob, the amplifier will switch to the setting mode, and the first screen to appear will
be the “Subsonic Frequency” display, by pressing this knob again it will run through the
different function screens. To select a new option for a setting, turn the knob left. The
active option will have an asterisk next to it.
Once you have configured all the settings for your amplifier, you can save them by using
the “Memory Store” screen. This way, if the settings are accidently changed, you can
always recall your saved settings. You can also revert to the factory default settings by
recalling “Default” in the “Memory Recall” function.
Mute: This feature allows you to mute and
un-mute.
X
SUB
�
Volume Control: To adjust the output in
your system. The volume control should be
set to achieve similar volume level from both
the main speakers and subwoofer.
�
Subsonic Control: This feature allows you
to select the frequency at which you wish
to cut off the low-pass audio signal. Values
are: FLAT, 16, 20, 25, 31 or 40 Hz.
Mute
Volume
�
0dB
Volume Control
Subsonic
Freq.
�
16Hz
Subsonic Control
Crossover
Freq.
�
Crossover / Frequency: This feature allows
you to select the frequency at which you wish
to cut off the high-pass audio signal. Values
are: 40, 50, 63, 80, 100, 125 or 160 Hz. This
feature only available in Sub Mode.
24dB
100Hz
�
Crossover Frequency
Crossover
Slope
�
Crossover / Slope: This feature allows you to
select the slope for the crossover. Values are:
-12, -18, -24, -30, -36 dB/oct. This feature
only available in Sub Mode.
120Hz
24dB �
Crossover Slope
EQ
Mode
�
EQ Mode: There are six preset modes;
Defeat, Music, Movie, Impact, Dynamic
and User.
User
EQ Mode
RBH Sound Subwoofer Amplifier
6
Owner’s Manual
LCD Display Screens / Functions (continued)
User EQ: This feature allows you to setup
equalizer frequency and gain. Turn to the
left to set the frequency, turn to the right
to set gain . Frequencies are: 20, 25, 31, 40,
50, 63, 80, 100 or 125Hz, the gain range is
-6dB to +6dB.
EQ
Setup
�
User
User EQ (Setup)
User EQ
� 4 0 H z�
Phase Control: This feature is used to adjust
the subwoofer’s acoustic phase to match
that of your main speakers. Values are: 0°,
45°, 90°, 135°, 180°, 225°, 270° or 315°.
-3.0dB
User EQ (Frequencies)
Phase
Night Mode: Limits the dynamic range of
the amplifier so the louder context of the
source signal is reduced. The feature allows
you to select night mode. Choose enable
or disable.
�
0°
Phase Control
Night
Mode
D i s a b l e�
Auto Off: This feature allows the amplifier
to turn itself off when not in use. With the
function set to active, the amplifier will
monitor its input signal, and if there is
no signal present it will shut down and go
into standby mode. As soon as a signal is
present, the amplifier will turn itself back
on. Values are: Disable, 5, 10, 15, 20, 25 or
30 minutes.
Night Mode
Auto
off
�
15
min
�
Auto Off
Mode
select
SUB
�
Mode Select: This feature allows you to
select a mode. Set values contain: SUB or
LFE (refer to flow charts on pages 8-9).
Trigger
OFF
�
External Trigger: This feature allows you to
select the enable external trigger function.
Press and hold the Navigation control knob
with the power switch in the ON position
to change.
Mode Select
External
External Trigger
Lock
Lock Setting: When this function is active,
all settings will be protected until disabled.
Values are: Disable or Enable.
setting
D i s a b l e�
Memory Store: This feature allows you to
select the memory bank. There are three
memory banks, consisting of Mem1, Mem2
and Mem3.
Lock Setting
Memory
Store
Mem
1
�
Recall
Mem 1
�
Memory Recall: The feature allows you to
recall settings saved using the “Memory
Store” function. There are four memory
banks total, consisting of Mem1, Mem2,
Mem3 and Default. Default resets to factory
default settings.
�
Memory Store
Memory
�
Memory Recall
RBH Sound Subwoofer Amplifier
7
Owner’s Manual
Control Flow Chart–SUB Mode
0,-1,-2,-3,-5,-6,-7,-8,-10,-12,
-14,-16,-18,-20,-22,-24,-27,
-30,-33,-36,-39,-42,-45,-48,
-51,-54,-57,-60,-63,-66,-69,
-72,-75,-79
Volume
Normal
Subsonic/ Freq.
FLAT, 16, 20, 25, 31, or 40 Hz
Crossover/ Freq.
40 ~ 160 Hz
Crossover/ Slope
12, 18, 24, 30, or 36dB
OSD Time Out
EQ mode
User EQ
(User mode only)
Phase
Night Mode
Auto Off
Mode select
External Trigger
Flat, Music, Movie, Dynamic, Impact, or User
20, 25, 31, 40, 50, 63, 80,
100, 125 Hz -6 to +6 dB
User Freq/Gain
0°, 45°, 90°, 135°, 180°, 225°, 270°, or 315°
Disable, Enable
Disable, 5, 10, 15, 20, 25, or 30 min
SUB, LFE (bypass LPF)
Off, On
Lock Setting
Disable, Enable
Memory Store
Mem1, Mem2, or Mem3
Memory Recall
Mem1, Mem2, Mem3, or Default
Normal
RBH Sound Subwoofer Amplifier
Function
Name
8
Adjust
Value
Left Turn
Enter Key
Right Turn
Owner’s Manual
Control Flow Chart–LFE Mode
0,-1,-2,-3,-5,-6,-7,-8,-10,-12,
-14,-16,-18,-20,-22,-24,-27,
-30,-33,-36,-39,-42,-45,-48,
-51,-54,-57,-60,-63,-66,-69,
-72,-75,-79
Volume
Normal
Subsonic/ Freq.
FLAT, 16, 20, 25, 31, or 40 Hz
No Crossover/Frequency and Crossover/Slope Functions
OSD Time Out
EQ mode
User EQ
(User mode only)
Phase
Night Mode
Auto Off
Mode select
External Trigger
Music, Movie, Impact, Dynamic, Defeat, or User
20, 25, 31, 40, 50, 63, 80,
100, 125 Hz -6 to +6 dB
User Freq/Gain
0°, 45°, 90°, 135°, 180°, 225°, 270°, or 315°
Disable, Enable
Disable, 5, 10, 15, 20, 25, or 30 min
SUB, LFE (bypass LPF)
Off, On
Lock Setting
Disable, Enable
Memory Store
Mem1, Mem2, or Mem3
Memory Recall
Mem1, Mem2, Mem3, or Default
Normal
RBH Sound Subwoofer Amplifier
Function
Name
9
Adjust
Value
Left Turn
Enter Key
Right Turn
Owner’s Manual
Remote Control
Scroll up button
Power on/off button
Volume down button
(DSP left-right when
Menu button pressed)
POWER
UP
MUTE
LEFT
VOL -
ENTER
MENU
RIGHT
VOL +
Scroll down button
Select “User” EQ setting button
(sub mode only)
Exit navigation mode button
Mute button
Volume up button
(DSP left-right when
Menu button pressed)
Menu button
DOWN
USER
MOVIE
DYNAMIC
DEFEAT
MUSIC
IMPACT
EXIT
STORE
RECALL
Six Preset EQ Modes
Memory recall button
Memory store button
The remote control duplicates the functions of the programming navigation control knob
on the front of the subwoofer amplifier, plus adds some additional functions such as
power on/off, mute on/off, and one button selection of the six EQs. In a typical home
theater installation however, the remote will most likely NOT be used, as the subwoofer
amplifier will be configured to a specific subwoofer and room placement, and controlled
by the main processor or receiver.
IR CODES
IR2 consumer code 7D (hex), 2B (hex)
POWER_ON 48 (Hex)
PRE3
B8 (Hex)
MUTE
A0 (Hex)
POWER_OFF 28 (Hex)
PRE4
78 (Hex)
UNMUTE
08 (Hex)
PRE1
58 (Hex)
USER
A8 (Hex)
VOL_DN
C0 (Hex)
PRE2
88 (Hex)
DEFU
D8 (Hex)
VOL_UP
E0 (Hex)
RBH Sound Subwoofer Amplifier
10
Owner’s Manual
Specifications
Model:
SA-250DSP
SA-500DSP
Amplifier Type:
High-effeciency
Class D Amplifier with
Toroidal Power Suppy
High-effeciency
Class D Amplifier with
Toroidal Power Suppy
Power Output:
250 Watts (RMS @ 4 Ohms)
500 Watts (RMS @ 4 Ohms)
Total Harmonic Distortion (THD):
<1%
<1%
Customized Preset Modes:
Up to 4 Types
Up to 4 Types
Equalizer:
Adjustable Built-in 10-Band
(-6dB to +6dB)
Adjustable Built-in 10-Band
(-6dB to +6dB)
Adjustable Low Pass Crossover:
40Hz to 160Hz / 1Hz Increments
40Hz to 160Hz / 1Hz Increments
Adjustable Slope:
12dB-36dB / Octave
12dB-36dB / Octave
Line Level Input Sensitivity:
190 mV
190 mV
Phase Control:
0 to 315° / 45° Increments
0 to 315° / 45° Increments
Auto Turn-on Sensitivity:
3 mV @ 50 Hz
3 mV @ 50 Hz
Automatic Wakeup Power On/Off
Signal Input:
5 to 30 minutes
(selectable)
5 to 30 minutes
(selectable)
External Trigger:
12V
12V
Thermal Protection Circuit:
Yes
Yes
Night Mode:
Yes
Yes
Remote Control:
Yes
Yes
USB Updatable:
Yes
Yes
Single Ended and Balance Input:
Yes
Yes
Rack Mount Holes (Center to Center): Horizontal 18.3” (465mm)
Vertical 1.18” (30mm)
Horizontal 18.3” (465mm)
Vertical 1.18” (30mm)
Dimensions (without rack mounts):
17.125” W (435mm)
1.75” H (45mm)
10.375” D (264mm)
17.125” W (435mm)
1.75” H (45mm)
10.375” D (264mm)
Dimensions (with rack mounts):
19” W (483mm)
1.75” H (45mm)
10.375” D (264mm)
19” W (483mm)
1.75” H (45mm)
10.375” D (264mm)
Weight:
13 lbs. (5.9 kg)
16 lbs. (7.26 kg)
Warranty:
1 year
1 year
Fuse:
5 Amp (120V)
2.5Amp (240V)
8 Amp (120V)
4 Amp (240V)
RBH Sound Subwoofer Amplifier
11
Owner’s Manual
Troubleshooting
Situation:
Solution:
Probable Cause:
No sound from
Amplifier is not connected to
the subwoofer(s). constant A/C power outlet.
Make certain the amplifier is plugged into
an unswitchable A/C power outlet.
Subwoofer(s) is/are not connected to Make certain that subwoofer(s)
is/are connected properly (refer to the
the amplifier correctly.
connections section of this manual).
Amplifier is not receiving an audio
signal from the pre-amp/receiver.
Maker certain there is an audio signal
from pre-amp/receiver and audio
connections resemble those in the
connections section of this manual.
Electrical short in wiring.
Verify that all connections are complete
and secure, with no stray wires
contacting other terminals.
Amplifier fuse might be blown.
Replace fuse (if fuse is not readily
accessible, consult your authorized RBH
dealer). WARNING: Before replacing fuses,
please see the rear panel features/
controls section of this manual.
Sound from
Bad connection(s) to non-working
at least one
subwoofer(s).
subwoofer, but
Electrical short in wiring.
not the other(s).
Verify all wires are properly connected.
Verify that all connections are complete
and secure, with no stray wires
contacting other terminals. If problem is
in wire itself, replace the suspect wire.
If one subwoofer is damaged due to Check each individual subwoofer to verify
being overdriven, then it may have a each is still operational.
negative effect on another subwoofer
used in a series connection.
Performance
is less than
expected.
The + and – polarity of the subwoofer Check the entire system for proper
polarity.
wire might be reversed on the
subwoofer.
Crossover frequency is not adjusted
correctly.
RBH Sound Subwoofer Amplifier
12
Adjust crossover frequency until desired
sound is obtained.
Owner’s Manual
Warranty
Your RBH Sound SA-250DSP/SA-500DSP subwoofer amplifier is covered by a limited
warranty against defects in materials and workmanship for a period of 1 (one) year from
the original date of purchase. This warranty is provided by the authorized RBH Sound
dealer where the subwoofer amplifier was purchased. Warranty repair will be performed
only when your purchase receipt is presented as proof of ownership and date of purchase.
Defective parts will be repaired or replaced without charge by your dealer’s store or by
RBH Sound authorized locations to service RBH Sound products. Charges for unauthorized
service and transportation cost are not reimbursable under this warranty. This warranty
becomes void if the product has been damaged by alteration, misuse or neglect. RBH Sound
assumes no liability for property damage or any other incidental or consequential damage
whatsoever which may result from the failure of this product. Any and all warranties of
merchantability and fitness implied by law are limited to the duration of this express
warranty. Some states do not allow limitations on how long an implied warranty lasts,
so the above limitations may not apply to you. Some states do not allow the exclusion or
limitation of incidental or consequential damages, so the above limitation or exclusion
may not apply to you.
TM
Redefining The Way You Experience Sound.
382 Marshall Way, Layton, Utah • USA • 84041
Toll Free: (800) 543-2205 • Fax: (801) 543-3300
www.rbhsound.com
It is RBH Sound policy to continuously incorporate improvements into products; all specifications are subject to change without notice.
Copyright © 2013 RBH Sound. All Rights Reserved. 03152013