1
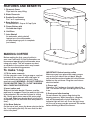
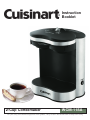
Instruction
Booklet
2-Cup Coffeemaker
WCM-11SA
For your safety and continued enjoyment of this product, always read the instruction book carefully before using.
Important
Safeguards
When using electrical appliances, basic safety
precautions should always be followed to reduce
the risk of fire, electric shock and/or injury to
persons, including the following:
1. READ ALL INSTRUCTIONS
2. Do not touch hot surfaces. Use handles
and knobs.
3.To protect against electric shock, do not
place cord, plug, or base unit in water or
other liquids.
4.Close supervision is necessary when any
appliance is used by or near children.
5. Always unplug appliance from outlet when
not in use and before cleaning. Allow to
cool before putting on or taking off parts
and before cleaning the appliance.
6.Do not operate any appliance with a
damaged cord or plug or after the appliance
malfunctions or has been dropped or
damaged in any manner. Return appliance
to the nearest Cuisinart Repair Center for
examination, repair, and electrical or
mechanical adjustment.
7.The use of accessory attachments not
recommended by Cuisinart may cause
injuries.
8. Do not use outdoors.
9. Do not let cord hang over edge of table or
counter, or touch hot surface.
10. Do not place on or near a hot gas or electric
burner, or in a heated oven.
11. Always fill water reservoir first, then plug
cord into the wall outlet. To disconnect,
remove plug from wall outlet.
12. Do not use appliance for other than
intended use.
13. WARNING: TO REDUCE THE RISK OF
FIRE OR ELECTRIC SHOCK, DO NOT
REMOVE THE BASE PANEL. NO USER
SERVICEABLE PARTS ARE INSIDE.
REPAIR SHOULD BE DONE ONLY BY
AUTHORIZED PERSONNEL.
14. Avoid contact with moving parts.
1
15. T
his appliance is not intended for use by
persons (including children) with reduced
physical, sensory or mental capabilities, or
lack of experience and knowledge, unless
they have been given supervision or instruction concerning use of the appliance by a
person responsible for their safety.
16. C
hildren should be supervised to ensure
that they do not play with the appliance.
SAVE THESE
INSTRUCTIONS
For
HOUSEHOLD Use
Only
WARNING:
RISK Of FIRE OR
ELECTRIC SHOCK
The lightning flash with arrowhead
symbol, within an equilateral triangle,
is intended to alert the user to the
presence of uninsulated dangerous
voltage within the product’s
enclosure that may be of sufficient
magnitude to constitute a risk of fire
or electric shock to persons.
The exclamation point within an
equilateral triangle is intended to
alert the user to the presence of
important operating and maintenance
(servicing) instructions in the literature accompanying the appliance.
SPECIAL CORD SET
INSTRUCTIONS
A short power-supply cord is provided to reduce
the risks resulting from becoming entangled in
or tripping over a longer cord.
Contents
Important Safeguards . . . . . . . . . . . . . . . . Page 1
Unpacking Instructions. . . . . . . . . . . . . . . Page 2
Features and Benefits. . . . . . . . . . . . . . . . Page 3
Making Coffee. . . . . . . . . . . . . . . . . . Pages 3 & 4
Longer extension cords are available and may
be used if care is exercised in their use.
Cleaning and Maintenance. . . . . . . . . . . . Page 4
If a long extension cord is used, the marked
electrical rating of the extension cord must be at
least as great as the electrical rating of the appliance, and the longer cord should be arranged
so that it will not drape over the countertop or
tabletop where it can be pulled on by children or
tripped over.
Warranty. . . . . . . . . . . . . . . . . . . . . . . . . . . Page 5
OPER ATING NOTICE
Clogging and backing up of water and/or coffee
in the filter basket can occur under any or a
combination of any of the following conditions:
The use of too finely ground coffee, using two
or more paper filters, using the gold tone filter
in conjunction with a paper filter or not properly
cleaning coffee grounds from the gold tone filter,
or allowing coffee grounds to spill over the filter.
Caution: Never open the filter basket during the
brewing cycle, even if no water is draining from
the filter basket, since extremely hot water/coffee can spill out from the filter basket and cause
injury. If water/coffee is not draining from the
filter basket during the brewing cycle, unplug
the unit and wait 10 minutes before opening and
checking the filter basket.
Decalcification of Metal Parts. . . . . . . . . . Page 4
Important
UNPACKING
INSTRUCTIONS
1. Lay the box on its side on a large, sturdy,
flat surface.
2. Remove the instruction book and any
other literature.
3. Slide the packaged unit out of the box.
4. Remove the cardboard insert.
5. Carefully lift the coffeemaker from the
remaining inserts.
We suggest you save all the packing materials in
the event that future shipping of the machine is
needed.
Keep all plastic bags away from children.
2
FEATURES AND BENEFITS
1. Reservoir Cover
Flips back for easy filling.
4
1
2. Water Reservoir
3. Double Brew Basket:
For 1 or 2 cup brewing
4. Brew Selector:
Choose either 1-Cup or 2-Cup Cycle
2
3
5.Power Button with
On Indicator Light
6. Unit Base
7. Auto Shutoff
An automatic safety shutoff
feature turns the coffeemaker
off after brewing cycle is complete.
(not shown)
5
MAKING COFFEE
6
Before making the first cups of coffee in
your new Cuisinart® 2-Cup Coffeemaker, we
recommend operating the coffeemaker once
using only water. This will remove any dust
or residues in the system which may remain
from the manufacturing process.
To make 1 cup
1. Fill the water reservoir
Lift the reservoir cover. Using a mug or cup (not
included) fill the reservoir with cold water to
1-cup marking on the reservoir wall. Close
reservoir cover. WARNING – DO NOT OVERFILL.
FILLING WATER TANK TO “2-CUP” MARKING
WILL CAUSE AN OVERFLOW.
2. Insert coffee pod
Slide out the brew basket. Remove a coffee
pod from its wrapper. Place the pod into left side
of brew basket. Be sure that the pod is sitting
flat. Gently push down around the outer edge
of the pod. Slide brew basket back into the unit
completely. (Do not use more than one pod at a
time.)
3. Set Brew Selector
On the top of unit, move the brew selector dial to
the 1-cup setting (far left). Be sure that the dial
clicks into place.
3
IMPORTANT: Before brewing coffee
Make sure you have placed an empty mug or
cup on the left side of the unit base. Mug or
cup should be centered under left side of brew
basket on the unit base. Plug the cord into an
electrical outlet.
4. Power unit
Press the “On” button on the right side of the
unit. The button will light indicating that the unit
is on.
5. During and after brewing
Do not remove the cup or mug during the
brewing process. When brewing is complete,
unit will automatically shut off and the On
indicator light will turn off. Once the light turns
off, the cup or mug may be removed. Stir coffee
before drinking to blend the flavors.
To make 2 cups
1. Fill the water reservoir
Lift the reservoir cover. Using a mug or cup
(not included) fill the reservoir with cold water
to 2-cup marking on the reservoir wall. Do not
overfill. Close reservoir cover.
2. Insert coffee pods
Slide out the brew basket. Remove 2 coffee
pods from their wrappers. Place one pod into
each side of brew basket. Be sure that the pods
are sitting flat. Gently push down around the
outer edge of the pods. Slide brew basket back
into the unit completely. (Do not use more than
one pod on the same side at a time.)
3. Set Brew Selector
On the top of unit, move the brew selector dial to
the 2-cup setting (far right). Be sure that the dial
clicks into place.
IMPORTANT: Before brewing coffee:
Make sure you have placed 2 empty mugs or
cups on the unit base. Plug the cord into an
electrical outlet.
4. Power unit
Press the “On” button on the right side of the
unit. The button will light, indicating that the unit
is on.
Never immerse base unit in water or other
liquid. To clean base, simply wipe with a clean,
damp cloth and dry before storing. Do not dry
the inside of the water reservoir with a cloth, as
lint may remain.
DECALCIFICATION
Decalcification refers to removing the calcium
deposits that form over time on the metal parts
of the coffeemaker.
For best performance from your Cuisinart®
2-Cup Coffeemaker, decalcify the base unit from
time to time. The frequency depends upon the
hardness of your tap water and how often you
use the coffeemaker.
To decalcify, fill the water reservoir to the 2-cup
level with a mixture of ⅓ white vinegar and ⅔
water. Follow steps 3-5 under the “To make 2
cups” section. One cycle should be sufficient
to adequately clean the coffeemaker. Run one
2-cup cycle of fresh cold water through the unit
before using the unit again to brew coffee.
5. During and after brewing
Do not remove the cups or mugs during the
brewing process. When brewing is complete,
unit will automatically shut off and the On indicator light will turn off. Once the light turns off,
the cups or mugs may be removed. Stir coffee
before drinking to blend the flavors.
CLEANING AND
MAINTENANCE
COMPLETELY CLEAN AND DRY
ALL PARTS AFTER EVERY USE.
Always make sure the coffeemaker is not “On”
and remove the plug from the electrical outlet
before cleaning.
Slide out the brew basket and discard the used
pod(s). The brew basket can be washed in warm
soapy water and rinsed thoroughly, or cleaned
in the upper rack of the dishwasher. Dry all parts
after use.
Do not use any scouring agents or harsh
cleansers on any part of the coffeemaker.
4
WARRANTY
LIMITED THREE-YEAR WARRANTY
This warranty is available to consumers only.You
are a consumer if you own a Cuisinart® Grind &
Brew Thermal Coffeemaker that was purchased
at retail for personal, family or household use.
Except as
otherwise required under applicable law, this
warranty is not available to retailers or other
commercial purchasers or owners.
We warrant that your Cuisinart® Grind & Brew
Thermal Coffeemaker will be free of defects
in materials and workmanship under normal
home use for 3 years from the date of original
purchase.
We suggest you complete and return the
enclosed product registration card promptly to
facilitate verification of the date of original purchase. However, return of the product registration card does not eliminate the need for
the consumer to maintain the original proof of
purchase in order to obtain the warranty benefits. In the event that you do not have proof
of purchase date, the purchase date for purposes of this warranty will be the date of
manufacture.
If your Cuisinart® Grind & Brew Thermal
Coffeemaker should prove to be defective within
the warranty period, we will repair it, or if we
think necessary, replace it. To obtain warranty
service, please register your warranty online at
www.cuisinart.com.au
or
Call toll-free
1800 808 971 (AUST), 0800 435 000 (NZ),
or
Write to
Cuisinart Australia
24 Salisbury Road
Asquith NSW 2077
or
Cuisinart New Zealand 44 Apollo Drive Mairangi Bay Auckland New Zealand
This warranty expressly excludes any defects or
damages caused by accessories, replacement
parts, or repair service other than those that
have been authorized by Cuisinart.
This warranty does not cover any damage
5
caused by accident, misuse, shipment or other
than ordinary household use.
NOTE: For added protection and secure handling of any Cuisinart® product that is being
returned, we recommend you use a traceable,
insured delivery service. Cuisinart cannot be
held responsible for in-transit damage or for
packages that are not delivered to us. Lost and/
or damaged products are not covered under
warranty. Please be sure to include your return
address, daytime phone number, description
of the product defect, product model number
(located on bottom of product), original date of
purchase, and any other information pertinent to
the product’s return.
Your Cuisinart® Grind & Brew Thermal
Coffeemaker has been manufactured to the
strictest specifications and has been designed
for use with the authorized accessories and
replacement parts.
BEFORE RETURNING YOUR CUISINART® PRODUCT
If you are experiencing problems with your
Cuisinart® product, we suggest that you call
our Cuisinart® Service Centre at 1800 808 971
(AUS) or 0800 435 000 (NZ) before returning
the product serviced. If servicing is needed, a
Representative can confirm whether the product
is under warranty and direct you to the nearest
service location.
Important: If the nonconforming product is to
be serviced by someone other than Cuisinart’s
Authorized Service Centre, please remind the
servicer to call our Consumer Service Centre
at 1800 808 971 (AUS) or 0800 435 000 (NZ) to
ensure that the problem is properly diagnosed,
the product is serviced with the correct parts,
and the product is still under warranty.
6
Coffeemakers
Food
Processors
Toaster Ovens
Blenders
Cookware
Ice Cream
Makers
Cuisinart offers an extensive assortment of top quality products to make life in the
kitchen easier than ever. Try some of our other countertop appliances and
cookware, and Savor the Good Life™.
www.cuisinart.com.au
©2009 Cuisinart
Cuisinart® is a registered trademark of Cuisinart
150 Milford Road
East Windsor, NJ 0850
1-800-726-0190
Cuisinart Australia
24 Salisbury Road
Asquith NSW 2077
Cuisinart New Zealand
44 Apollo Drive
Mairangi Bay
Auckland, New Zealand
Printed in China
IB-9/080