1
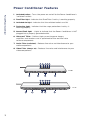
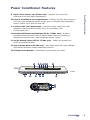
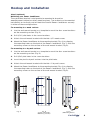
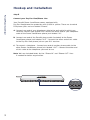
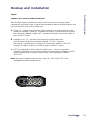
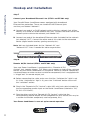
Home Theater Power Conditioner PF30L, PF31L, and PF40L User Manual AP11000-10 AP11200-12 AP11201-12 Table of Contents PureAV Power Conditioner Page Introduction ................................................................................................................ 2 Power Conditioner Features .................................................................................... 3 Safety Precautions ................................................................................................... 5 Hookup and Installation Step 1 (optional) Mounting your Power Conditioner ......................................................................... 6 Step 2 Connect Audio Components to the Audio Filter (switched) ......................................... 7 Step 3 Connect Video Components to the Video Filter (always on) ....................................... 7 Step 4 Connect Digital Components to the Digital Filter (always on) ..................................... 8 Step 5 Connect your Pay-Per-View/Phone Line ................................................ 9 Step 6 Connect your Coaxial Cables/DSS Lines ............................................................ 10 Step 7 Connect your Broadband Ethernet Line (PF31L and PF40L only) ........................................ 11 Step 8 Remote AC/DC Control (PF31L and PF40L only) .................................................. 11 Troubleshooting ....................................................................................................... 1 2 Belkin Warranty ........................................................................................................ 13 Introduction PureAV Power Conditioner Clear Picture – Clean Sound Congratulations and thank you for purchasing the PureAV Power Conditioner. Belkin’s PureAV development team started with one simple goal—to build well-designed, functional, and attractive AV power products that bring our customers the best possible performance from their audio, video, and home theater equipment. To achieve this goal, we enlisted some of the top engineers and industrial designers in the country. The result of our efforts is the PureAV Power Conditioner line of products. Packed with innovative features, PureAV Power Conditioners provide the highest level of AC line-noise filtering and protection from power disturbances. AC power is polluted with “noise” from many sources within your home, including digital components and household appliances. Optimized to remove electrical noise, Advanced PureFilter circuitry provides clean and clear power to all of your valuable digital, audio, and video home theater equipment. In addition, all PureAV Power Conditioner products contain Advanced Overvoltage Protection, which automatically disconnects power from your equipment when the input voltage reaches a dangerous level, and restores power automatically when the voltage returns to a safe level. Since your AC power source is not the only threat to the safety of your equipment, all PureAV Power Conditioner products offer at least three sets of coaxial connections and one pair of phoneline connections to safeguard your entire system. TM The goal to deliver the purest AV experience is the driving force behind the PureAV Power Conditioner, providing the clearest picture and cleanest sound from your components to you. 2 Power Conditioner Features PureAV Power Conditioner 1. Switched button – Turns the power on and off to the Power Conditioner’s “switched” outlets. 2. PureFilter light – Indicates that PureFilter Circuitry is working properly. 3. Switched On light – Indicates that the switched outlets are ON. 4. Protecting light – Indicates that the surge protection circuitry is working properly. 5. Ground Fault light – Lights to indicate that the Power Conditioner is NOT plugged into a properly grounded outlet. 6. HiCurrent Filter – Delivers high current to power-hungry amplifiers and receivers and is optimized to filter out line noise to these components. TM 7. Audio Filter (switched) – Reduces line noise and interference to your audio components. 8. Video Filter (always on) – Reduces line noise and interference to your video components. 2 3 1 4 5 PF30L 6 7 10 2 3 8 1 4 5 PF31L 6 3 7 10 12 8 Power Conditioner Features PureAV Power Conditioner 9. Digital Filter (always on) (PF40L only) – Reduces line noise and interference to your digital components. 10. Pay-Per-View/Phone-Line Input/Output – Protects Pay-Per-View, phone, or DSL lines from dangerous power surges that can damage your equipment. Built-in splitter turns one line into two. 11. Coaxial-Cable Line Input/Output – Protects coaxial-cable lines from dangerous electrical disturbances that can travel down your coaxial-cable lines. 12. Broadband Ethernet Input/Output (PF31L, PF40L only) – Protects broadband Ethernet lines used for digital media receivers, gaming, or broadband Internet access from dangerous power surges. 13. AC/DC Remote Outlet (PF31L, PF40L only) – Allows for remote turn on/off of switched outlets. 14. Volt and Amp Meters (PF40L only) – Volt meter measures input voltage; Amp meter measures output amperage (current). 15. 15-Amp Circuit Breaker – Resettable circuit breaker for safety. 2 3 14 1 4 5 14 PF40L 6 7 8 10 9 12 11 13 15 4 Safety Precautions PureAV Power Conditioner Warning – Grounding and Polarization This product must be plugged directly into a grounded AC power outlet (3prong). Do not use a 3-to-2-prong adapter to defeat the grounding pin. Do not plug or “daisy-chain” this product into other electrical products such as surge protectors, power strips, or UPSes. Do not plug this product into an extension cord. Failure to plug this product directly into a grounded outlet may result in personal injury or damage to your equipment. Call a licensed electrician if you are unsure that your AC outlets are properly grounded. Warning – Rooftop Antennas and Satellite Dishes If you use rooftop antennas, satellite dishes, or any other rooftop hardware that connects to your PureAV Power Conditioner, make sure the wires are properly grounded. This will protect against voltage surges from lightning strikes or static charges. Warning – Lightning Storm Protection Although your PureAV Power Conditioner is built to withstand large power surges, we cannot guarantee that it will protect all of your equipment in the event of a large lightning storm. In the event of a lightning storm, it is best to unplug your Power Conditioner from the wall. Once you have done this, there is no need to unplug any of the equipment that is connected to the Power Conditioner. Warning – Water and other Liquids Do not use this product with aquariums or other water-related products. Use indoors and in dry locations only. Do not operate the Power Conditioner if any liquid is spilled on or in the unit. Failure to follow these guidelines could result in serious bodily injury or death. Warning – Cleaning Always unplug the Power Conditioner before cleaning. It is only necessary to clean the Power Conditioner with a clean, dry cloth or duster. Do not use any cleaning solutions, sprays, or water. Warning – No User-Serviceable Parts Inside If, for any reason, your Power Conditioner is malfunctioning, do not attempt to repair or dismantle the unit in any way. Unplug the unit and consult this User Manual for warranty and service contact information. 5 Hookup and Installation PureAV Power Conditioner Step 1 (optional) Mounting your Power Conditioner The wall-mount bracket is designed to be mounted to drywall or wood/plywood (cabinet or other wood furniture). The bracket can be mounted horizontally or vertically and will hold the PureAV Power Conditioner securely in either of these configurations. For mounting to a wood surface: 1. Use the wall-mount bracket as a template to mark the four screw locations on the mounting surface (Fig. B). 2. Drill 3/32" pilot holes in the screw locations. 3. Attach the wall-mount bracket with the #6 x 1/2" wood screws. 4. Mount the Power Conditioner to the mounting bracket (Fig. A) by aligning the mounting holes on the back of the Power Conditioner (Fig. C) with the mounting screws on the surface of the wall-mount bracket (Fig. B). For mounting to a drywall surface: 1. Use the wall-mount bracket as a template to mark the four screw locations on the mounting surface (Fig. B). 2. Drill 3/16" pilot holes in the screw locations. 3. Insert the plastic drywall anchors into the pilot holes. 4. Attach the wall-mount bracket with the #6 x 1" drywall screws. Fig. A Fig. B (Screw Locations, Mounting Screws) Mounting Holes Mounting Screws Screw Locations 5. Mount the Power Conditioner to the mounting bracket (Fig. A) by aligning the mounting holes on the back of the Power Conditioner (Fig. C) with the mounting screws on the surface of the wall-mount bracket (Fig. B). Fig. C (Mounting Holes) 6 Hookup and Installation PureAV Power Conditioner Step 2 Connect Audio Components to the Audio Filter (switched) Certain components do not need to be, or should not be, powered on at all times. For this reason, the audio filter outlets are “switched” and can be controlled with the button situated on top of the Power Conditioner unit labeled “Switched”. When you depress and hold this button for approximately two seconds, the “Switched On” light will illuminate and power will flow to the switched outlets. To turn off the switched outlets, simply push and hold the “Switched” button again until the “Switched On” light is extinguished. Power will stop flowing to the switched outlets. A. Attach PureAV power cord labels to each component’s power cord before you plug the cord into the corresponding outlet on the Power Conditioner. B. Receiver (Preamp) – Connect your receiver or preamp power cord to the outlet labeled “Receiver”. C. Tape – Connect your tape player power cord to the outlet labeled “Tape”. D. CD – Connect your CD player power cord to the outlet labeled “CD”. (PF30L, PF31L only) E. Auxiliary 01 – This outlet can be used to connect any other audio equipment you may have. (PF30L, PF31L only) F. Amp – Connect your main amplifier power cord to the outlet labeled “High Current AMP”. This outlet is specifically designed to deliver high current to power-hungry amplifiers. (The PF40L has two high-current outlets for a secondary amp.) Step 3 Connect Video Components to the Video Filter (always on) Certain components should be powered at all times. For this reason, the video filter outlets are “always on” or un-switched, and constantly receive power as long as the Power Conditioner is plugged into an AC power source (wall outlet). A. Attach PureAV power cord labels to each component’s power cord before you plug the cord into the corresponding outlet on the Power Conditioner. B. Cable/Satellite – Connect your cable or satellite receiver power cord to the outlet labeled “Cable/SAT”. (PF30L, PF31L only) C. VCR – Connect your VCR power cord to the outlet labeled “VCR”. D. DVD – Connect your DVD power cord to the outlet labeled “DVD”. (PF30L, PF31L only) E. TV – Connect your TV or monitor power cord to the outlet labeled “TV/Monitor”. F. Digital Video Recorder – Connect your digital video recorder power cord to the outlet labeled “DVR”. (PF31L only) G. Auxiliary 02 – This outlet can be used to connect any other video equipment you may have. (PF30L, PF31L only) 7 Hookup and Installation Step 4 (PF40L only) PureAV Power Conditioner Connect Digital Components to the Digital Filter (always on) The PureAV Power Conditioner model PF40L contains a digital filter that is optimized to clean and condition the power to all of your digital components. Like the video filter, these outlets are “always on” or un-switched. A. Attach PureAV power cord labels to each component’s power cord before you plug the cord into the corresponding outlet on the Power Conditioner. B. Cable/Satellite – Connect your cable or satellite receiver power cord to the outlet labeled “Cable/SAT”. C. Digital Video Recorder – Connect your digital video recorder power cord to the outlet labeled “DVR”. D. DVD – Connect your DVD power cord to the outlet labeled “DVD”. E. CD – Connect your CD player power cord to the outlet labeled “CD”. F. Auxiliary 01 – This outlet can be used to connect any other digital equipment you may have. G. Auxiliary 02 – This outlet can be used to connect any other digital equipment you may have. 8 Hookup and Installation PureAV Power Conditioner Step 5 Connect your Pay-Per-View/Phone Line Your PureAV Power Conditioner comes equipped with Pay-Per-View/phone-line protection with a built-in splitter. These are standard RJ11 phone jacks and are labeled “Phone”. A. Connect one end of your telephone cable to the wall outlet to which you normally connect your phone line. Connect the other end of your telephone cable to the Power Conditioner phone jack labeled “IN”. B. Connect one end of the PureAV phone cable (included) to the Power Conditioner phone jack labeled “OUT”. Connect the other end of this cable to the Pay-Per-View phone jack on your DSS receiver. C. To connect a telephone – Connect one end of another phone cable to the other Power Conditioner phone jack labeled “OUT”. Connect the other end of this cable to the telephone you want to use. Note: We have included labels for the “Phone IN” and “Phone OUT” lines if needed for better organization. 9 Hookup and Installation PureAV Power Conditioner Step 6 Connect your Coaxial Cables/DSS Lines Your PureAV Power Conditioner comes with three pairs of coaxial-cable connections to protect your system from dangerous electrical disturbances that can travel down your coaxial-cable lines. A. Cable TV – Connect the incoming cable television coaxial-cable line to the connector labeled “Cable IN”. Connect one end of a second coaxial cable to the connector labeled “Cable OUT”. Connect the other end of this cable to your cable TV tuner. B. Satellite (DSS) TV – Connect the incoming satellite television coaxial-cable line to the connector labeled “SAT IN”. Connect one end of a second coaxial cable to the connector labeled “SAT OUT”. Connect the other end of this cable to your satellite TV tuner. C. HDTV, Broadband, or other Coaxial-Cable Lines – Connect any other incoming cable lines you want to protect to the connector labeled “AUX IN”. Connect one end of a second coaxial cable to the connector labeled “AUX OUT”. Note: We have included labels for the “Coax IN” and “Coax OUT” lines if needed for better organization. 10 Hookup and Installation PureAV Power Conditioner Step 7 Connect your Broadband Ethernet Line (PF31L and PF40L only) Your PureAV Power Conditioner comes equipped with broadband Ethernet-line protection. These are standard RJ45 Ethernet jacks and they are labeled “Network”. A. Connect one end of an RJ45 network patch cable to a network jack (either directly to a router or wired network wall jack). Connect the other end of the network patch cable to the network jack labeled “IN”. B. Connect one end of the broadband Ethernet cable (included) to the network jack labeled “OUT”. Connect the other end of this cable to the networked device (digital media receiver, gaming console, etc.). Note: We have included labels for the “Network IN” and “Network OUT” lines if needed for better organization. Step 8 Remote AC/DC Control (PF31L and PF40L only) Your new Power Conditioner is equipped with a “Remote AC/DC Control” jack (remote trigger). This allows you to power on and off the switched outlets on your Power Conditioner via the power switch on another component (receiver/preamp or other custom installation component) that is equipped with a “trigger out” or remote output jack. A. Before connecting the cable, make sure that the “Switched On” light is not lit. If the “Switched On” light is lit, press the “Switched” button to turn off the “switched” outlets. B. Plug in the “Remote AC/DC Control” cable (1/8" mini-jack cable included) to the corresponding remote input on the Power Conditioner (labeled as “AC/ DC IN 3~30V 10mA”). C. Plug the other end of the “Remote AC/DC Control” cable into the corresponding remote output on the component of your choice (this may be a custom installation component, receiver/preamp, etc.). Your Power Conditioner is now set up for remote operation. 11 Troubleshooting PureAV Power Conditioner Power Conditioner is not providing power. • Check to ensure that the Power Conditioner is plugged into a properly grounded AC wall outlet. Some outlets require a wall switch to be turned on in order to deliver power to the outlet. • Too many devices may be plugged into the Power Conditioner, overloading the unit and tripping the overload circuit breaker. The Power Conditioner is not designed to handle current loads larger than 15 Amps or 1800 watts. Try unplugging some devices and resetting the circuit breaker (see below) located on the end of the Power Conditioner. • To reset the circuit breaker: Wait at least 10 minutes after the circuit breaker was tripped before attempting to reset the breaker. Press in the button located next to the power cord on the end of the unit to reset. Power should be restored to the outlets on the Power Conditioner. • Your components may be plugged into a “Switched” outlet and the outlets are not switched on. Check to ensure that the green “Switched On” light on the top of the Power Conditioner is illuminated. If the light is not illuminated, press the “Switched” button on top of the Power Conditioner unit until the light is illuminated. You should now have power to all of the switched outlets. “Protecting” light is not lit. • Check to make sure that the Power Conditioner is plugged into a grounded AC wall outlet. The “PureFilter” light should be lit. • If the “Protecting” light is still not lit, the surge protection components in the Power Conditioner may be expired or damaged. Please call Belkin Corporation for a free replacement. “Ground Fault” light is lit. • If the red “Ground Fault” light is lit, this indicates that your Power Conditioner is not plugged into a properly grounded AC outlet. Check to make sure that the Power Conditioner is plugged into a grounded AC wall outlet (3-prong AC outlets only. Do not use 2–3-prong adapters). The “PureFilter” light and the “Protecting” light should be lit. • If the “Ground Fault” light is still lit, you have a ground-wiring problem and you should contact an electrician to properly ground the outlet. Connecting the PureAV Power Conditioner to an improperly grounded outlet is not safe and will void all Belkin Corporation warranties. If the outlet is properly grounded and the “Ground Fault” light is still lit, please call Belkin Corporation for assistance. For all other technical questions or troubleshooting issues, please contact Belkin Customer Service at 800-223-5546. 12 Belkin Warranty PureAV Power Conditioner 13 Belkin Corporation warrants to the original purchaser of any Belkin Power Conditioner for the life of the product, that the Power Conditioner shall be free of defects in design, assembly, material, or workmanship, and will repair or replace, at its option, any defective product free of charge. Belkin Corporation will repair or replace, at its option, any equipment which is damaged by a transient voltage surge/spike or lightning strike, (an “Occurrence”), while properly connected through a Belkin Power Conditioner to a properly wired AC power line with protective ground. If you are using an AC Power Conditioner that has phone, network, or coaxial protection, the telephone line, network line, and coaxial-cable line must be properly connected and installed, as determined by Belkin at its sole discretion. 14 www.pureav.com Belkin Corporation 501 West Walnut Street Los Angeles, CA 90220-5221, USA 310-898-1100 310-898-1111 fax Belkin Ltd. Express Business Park, Shipton Way Rushden, NN10 6GL, United Kingdom +44 (0) 1933 35 2000 +44 (0) 1933 31 2000 fax Belkin B.V. Boeing Avenue 333 1119 PH Schiphol-Rijk, The Netherlands +31 (0) 20 654 7300 +31 (0) 20 654 7349 fax Belkin Ltd. 7 Bowen Crescent, West Gosford NSW 2250, Australia +61 (0) 2 4372 8600 +61 (0) 2 4372 8603 fax © 2006 Belkin Corporation. All rights reserved. All trade names are registered trademarks of respective manufacturers listed. P74521-B