1
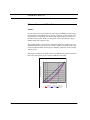
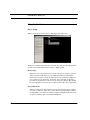
Profile Mechanic - Monitor 1.0
Written by Jonathan Sachs
Copyright © 1999-2004 Digital Light & Color
Profile Mechanic - Monitor 1.0
1
Profile Mechanic - Monitor 1.0
Introduction
Profile Mechanic - Monitor is a program for calibrating and profiling CRT and
LCD monitors.
Monitor calibration helps you adjust the various controls on your monitor and then
measures a series of color and gray areas on the screen. From these measurements,
Profile Mechanic determines your monitor’s primary colors and computes curves
that can be loaded into hardware lookup tables in your display adapter. These
curves in turn bring the output of your monitor into conformance with standard
white point and gamma settings.
A companion monitor profile is created at the same time as the calibration lookup
tables. This ICC profile communicates the standard to which your monitor has been
calibrated to the color management system so that images can be displayed correctly.
2
Profile Mechanic - Monitor 1.0
Using the Monitor Calibrator
Using the Monitor Calibrator
Profile Mechanic comes with a monitor calibration device specially designed to
measure both CRT and LCD monitors accurately. The calibrator box should include
the following items:
•
•
•
•
•
•
Calibrator with USB cable
CRT base with small suction cups
LCD base with felt pads
Black plastic cup for measuring dark current
Small lead weight for use with LCDs
Installation CD
Driver Installation
On Windows systems, drivers for the calibrator are included on the installation CD
and should be installed before plugging the calibrator into a USB port on your computer. On Macintosh systems, this is not necessary. For detailed installation instructions, please see Appendix A.
Attaching and Removing the Base
The calibrator comes with two bases—one with felt pads on the bottom for use with
LCD monitors and one with small suction cups for use with CRT monitors. To
remove the base, grasp the calibrator firmly in one hand and twist the base counterclockwise about 1/8 turn at which point it should slide off easily. To attach a base,
reverse the action. The fit may be tight and can require some force.
Attaching and Removing the Calibrator
For CRT monitors, first attach the base with suction cups on it to the calibrator and
then press it firmly against the face of the monitor. To remove the calibrator simply
pull it away from the glass.
You can damage an LCD monitor by attaching the calibrator via the suction cup
base, so make sure you first attach the base with felt pads on it. You also need to
press the lead weight supplied with the calibrator over the USB cable to act as a
Profile Mechanic - Monitor 1.0
3
Profile Mechanic - Monitor 1.0
counterweight for the calibrator. Position your LCD screen so it is mostly vertical
but tilts backward a little and hang the calibrator over the top of the screen positioning the cord weight in back of the screen to hold the calibrator in place.
Measuring Dark Current
The first step of the calibration involves measuring the dark current of the calibrator. The dark current is simply the signal produced by the calibrator when it is in
total darkness. Dark current is measured by placing the calibrator face down in the
black cup that comes in the package.
4
Profile Mechanic - Monitor 1.0
Preparation
Preparation
Before you calibrate your monitor, you should consider several issues:
Viewing Conditions
The conditions under which you view your monitor have a very significant effect on
what you see on the screen. It is very important that the lighting in the room in
which you are working be very subdued and that as little light as possible is reflecting off the screen into your eyes. When the room lights are too bright, shadow detail
is lost, overall contrast goes down, and colors look washed out.
Display Settings
You must be using at least 24-bit color to calibrate your monitor. This setting is
controlled by the operating system’s Display control panel. The driver for your display card may also support gamma and color control settings (nearly all newer
cards do). Before you calibrate, make sure that these are all returned to their neutral
positions.
Other Calibration Programs
When you install other calibration programs or certain Adobe products, programs
that load the color lookup tables in your display card are installed so as to run each
time you start up your computer. Adobe Gamma Loader is the most common program of this type. These programs must be uninstalled or disabled to prevent them
from competing with Profile Mechanic for control of the lookup tables.
On a PC, shortcuts to these programs are installed in your StartUp folder and
must be moved to a different folder to prevent them from being loaded. This
change will not go into effect until you restart your computer.
On the Mac, these programs are extensions that must be disabled. This change
will not go into effect until you restart your computer.
Prevent Interruptions
Once the calibration process starts, it is important that Profile Mechanic have exclusive control over the screen display. Disable any screen saver you may be running,
make sure your power settings will not dim or turn off the display, and try to disable
any popup windows, alerts, or messages that might interfere with displaying target
colors for the calibrator to measure.
Profile Mechanic - Monitor 1.0
5
Profile Mechanic - Monitor 1.0
It is equally important that you not try to use your computer for anything else while
the calibration is in progress, so try not to touch the mouse or keyboard.
Calibrator Installation
The calibrator hardware drivers must be installed and the calibrator connected
before you can calibrate your monitor. See Appendix A for installation instructions.
Degaussing (CRT only)
Some CRT monitors have a Degauss button. Press and hold this button for a few
seconds to remove residual magnetic fields that can build up in the picture tube and
distort the image. Degaussing does not apply to LCD displays.
Warm Up (CRT only)
CRT monitors can take as long as 60 minutes after being turned on for the display
characteristics to fully stabilize. In any case, try to wait at least 20 minutes after
powering on your CRT before calibrating. Warm-up is not usually required for
LCD displays.
Monitor Controls
If your monitor has a contrast control, normally you should turn it all the way up to
produce the brightest possible image with the greatest possible contrast ratio
between pure black and pure white. If you find viewing your monitor with this setting uncomfortable, you can reduce the contrast as necessary.
Proper setting of the brightness control is also very important, but this cannot easily
be done visually. When you run Profile Mechanic, the opening screen has a checkbox for you to indicate that your monitor has a brightness control — when you
check this box, the program will help you set the brightness by measuring the
screen with the calibrator during the calibration process.
Similarly, if your monitor has individual color controls for red, green and blue, you
can indicate this and Profile Mechanic will help you adjust these controls to
approximate the selected target white point.
6
Profile Mechanic - Monitor 1.0
Preparation
Cleaning
Make sure the surface of your screen is free from dirt and grease before you calibrate.
Profile Mechanic - Monitor 1.0
7
Profile Mechanic - Monitor 1.0
Monitor Gamma and White Point
Gamma
A set of gamma curves represent how the image data in an RGB image file translate
into measured screen brightness for each color. Commonly, an ideal gamma curve
is represented as an exponential relationship which approximates the response of
the human visual system. In this case, the gamma curve is described by a single
number which is the exponent value.
The standard gamma of 2.2 is the most commonly used value, and this is also the
standard used for the web, video, most monitors, and Photo CD. This gamma value
closely matches the human visual response and makes optimal use of the available
256 gray levels.
The prepress standard is 1.8 which is the historical Macintosh standard, based I am
told on the characteristics of the original LaserWriter laser printer
Monitor Gamma Curves
1
0.9
Measured Screen Brightness
0.8
0.7
0.6
0.5
0.4
0.3
0.2
0.1
0
0
0.1
0.2
0.3
0.4
0.5
0.6
0.7
0.8
0.9
Image Data Values
Gamma 2.2
8
Profile Mechanic - Monitor 1.0
Gamma 1.8
Gamma 1.0
1
Monitor Gamma and White Point
White Point
The white point of a monitor is the color you get when you display white on the
screen (white is defined as the color you get when you set R, G and B to their maximum values).
In order to achieve the maximum possible image brightness, uncorrected computer
monitors typically have a white point with a color temperature somewhere in the
range of 9000-9500°K. This is quite a bit more blue than most lighting and will
cause serious problems when you try to match images on your monitor to prints of
those images viewed under indoor lighting or sunlight.
To get as accurate as possible a match between your monitor and your printer, you
need to match the white point of the monitor to that of the light under which you
will be viewing prints. A D50 white point gives the best match for most indoor
lighting while D65 or 6500°K matches daylight. On the other hand, a D50 white
point makes on-screen images dull and yellow. A D75 white point may work best
when matching prints made on a very cool white paper or using north light for illumination. D65 is recommended for most purposes.
Color Temperature
Color temperature is a scale for measuring the color of light based on black body
radiation and is measured in degrees Kelvin (°K). Lower color temperatures are
more yellow/orange and higher temperatures more blue. The following list gives a
sampling of approximate color temperatures of different light sources:
Match Flame
Candle
Sunlight at Sunset
40-Watt Bulb
100-Watt Bulb
500-Watt Bulb
Photo floods
Quartz Halogen Bulbs
Sunlight 1 Hour Before Sunset
Moonlight
Late Afternoon Sunlight
Profile Mechanic - Monitor 1.0
1,700°K
1,800-1,950°K
2,000°K
2,650°K
2,850°K
2,950°K
3,200-3,400°K
3,250-4,200°K
3,500°K
4,000°K
4,300°K
9
Profile Mechanic - Monitor 1.0
Summer Noon Sunlight
Electronic Flash
Overcast Sky
Average Summer Daylight
Light Summer Shade
Full Summer Shade
Summer Skylight
5,400°K
5,500°K
6,000°K
6,500°K
7,100°K
8,000°K
8,000 - 30,000°K
Chromatic Adaptation
When you observe a scene, your visual system cleverly but effortlessly detects and
cancels out the effects of different lighting conditions—a process called chromatic
adaptation. This is why the blue cast of an uncorrected monitor is hardly noticeable
until you compare it side by side with a sheet of white paper illuminated by a incandescent or halogen lamp. Another clue that uncorrected monitors are really blue is
that when you are walking down a street at night and see a room lit by a television
set, it looks very blue.
Matching Monitor to Printer
When viewing prints, light from the light source illuminating the print is reflected
off the surface of the print and then enters your eye. Therefore the perceived colors
of a print depend on the viewing light. Different light sources (such as direct sunlight, indirect sunlight, incandescent light bulbs, fluorescent light bulbs and halogen
light bulbs) each have different spectral characteristics. For the purposes of color
management, these real world light sources are represented by idealized standard
illuminants.
To get a close match between colors on your monitor and prints, the white point of
your monitor must match the color of the light illuminating the print. The white
point of a print is the color of the viewing light reflected off of the white paper the
image is printed on. If the monitor white is significantly different from the print
viewing light there will be an apparent color shift between the monitor and the
print. If the monitor color temperature is higher (more blue) than the color temperature of the viewing light, an image viewed on the monitor will have a blue color cast
compared to a print made from the same image. If the monitor color temperature is
lower (more yellow), the image on the screen will look more yellow than the print.
10
Profile Mechanic - Monitor 1.0
Monitor Gamma and White Point
The most commonly used monitor white points are D65 and D50. D65 approximates sunlight and has a color temperature of around 6500°K—this is the standard
illuminant used in the sRGB color space (the Windows default color space), as it
looks quite a bit brighter on a monitor than D50. A D50 white point has a color
temperature of around 5000°K and is the prepress standard. While images displayed on a D50 monitor are less brilliant and more yellow than with D65, you may
achieve better color matching between your CRT and prints using a D50 white
point for your monitor, depending on the light you are using to illuminate the prints.
When comparing prints to images on your monitor, it is important to control the
color of the light used to illuminate the print and to avoid casting stray light onto
the monitor screen. One of the best ways to accomplish this is to use a commercial
viewing booth which is simply a box open in the front and illuminated by special
color-corrected fluorescent lights. Unfortunately, commercial viewing booths are
expensive and bulky. A less expensive alternative to a viewing booth is the OttLight TrueColor or VisionSaver. Available as a desk or floor lamp, it includes a
color-corrected bulb with a color temperature of around 5500°K. Just make sure
you keep the light from shining directly on your monitor and keep the room lights
dim so that stray light does not hit the face of the monitor.
Profile Mechanic - Monitor 1.0
11
Profile Mechanic - Monitor 1.0
Setting Your Monitor’s Brightness and Contrast
Most CRT monitors have separate brightness and contrast controls somewhere on
their front panel.
The contrast control acts like a multiplier (see diagram below). To obtain the greatest dynamic range between pure black and pure white, you should leave the contrast
control turned all the way up. If you find this uncomfortably bright, you can back
off the contrast a little.
The brightness control raises or lowers the brightness level across the entire tonal
range. Referring to the right hand curves in the diagram below, the ideal brightness
setting is the middle curve. Too high a setting makes the image washed out by turning black into gray; too low a setting causes a loss of shadow detail by turning an
entire range of dark grays to solid black.
Changing the Brightness Control
1.2
1.2
1.0
1.0
Scr e e n Br ig htn e s s
Scr e e n Br ig htn e s s
Changing the Contrast Control
0.8
0.6
0.4
0.8
0.6
0.4
0.2
0.2
0.0
0.0
0.0
0.2
0.4
0.6
Im ag e Data
0.8
1.0
0.0
0.2
0.4
0.6
0.8
1.0
Im ag e Data
While the contrast setting can be made according to personal preference, it is very
important for the brightness control to be set correctly. Any change to the brightness control will invalidate the monitor calibration and profile you have created, so
be careful to leave it unchanged once you have it set properly. The monitor calibrator can be used to help determine the correct setting by taking brightness readings
as you adjust the brightness control.
12
Profile Mechanic - Monitor 1.0
Setting Your Monitor’s Color Controls.
Setting Your Monitor’s Color Controls.
Some monitors provide front panel controls that let you independently adjust the
relative amounts of red, green and blue that make up pure white. The closer you get
your monitor to the target white point before you start the calibration process, the
more accurate the calibration. As with adjusting the brightness control, the calibrator can be used to help you adjust the red, green and blue controls to produce the
correct white point.
Profile Mechanic - Monitor 1.0
13
Profile Mechanic - Monitor 1.0
CLUT Loader 1.0 (Windows Only)
Most newer display cards from major manufacturers such as ATI, Matrox, or
NVidia have hardware color lookup tables, sometimes called LUTs or CLUTs. By
loading the correct curves into the CLUTs, everything you display subsequently
will be modified by applying the color curves to the image data.
During its calibration phase, Profile Mechanic displays a series of color patches on
the screen for the calibrator to measure. From these individual color measurements,
it automatically generates a set of lookup tables used to conform your monitor to
the specified target white point and gamma. This information is stored in the monitor profile.
If you are not sure whether or not your display card has CLUTs, you can download
a simple test program from our web site (http://www.profilemechanic.com). In
some cases, the CLUTs may be present but only work with the latest drivers, so it is
a good idea to check the manufacturer’s web site for new drivers if you are having
problems.
The CLUTs are loaded when your computer powers up by a program called CLUT
Loader 1.0 that is placed in your StartUp folder when Profile Mechanic is installed.
This program reads the stored monitor calibration curves from the monitor profile
and loads them into your display card’s CLUTs. If you have Adobe Gamma Loader
or some other calibration CLUT loader program installed in your StartUp folder, it
may interfere with CLUT Loader 1.0, so make sure you move these other programs
to a different folder.
After loading the CLUTs, the program normally closes its window after a 5 second
delay. However, if you click anywhere on the window before it closes, it will stay
open until you close it manually. You can also create a shortcut to CLUT Loader 1.0
that causes the window to stay open indefinitely by placing the keyword “manual”
on the command line after the program pathname. This shortcut is created automatically during the installation process and is stored in the same location as the Profile
Mechanic shortcut.
14
Profile Mechanic - Monitor 1.0
CLUT Loader 1.0 (Windows Only)
The program window looks like this:
To reset the CLUTs, click the Use Flat Lookup Tables radio button. This lets you
see what the monitor looks like uncalibrated. To restore the calibration curves, click
the Use Calibrated Lookup Tables radio button. The description and filename of the
default monitor profile from which the curves were extracted are also displayed for
reference purposes.
An image is also displayed to help you evaluate the monitor display. All the dark
and light gray squares to the right of the image should be neutral and readily distinguishable. The gray ramp to the right of the image should also be neutral and
should appear smooth. The skin tones in the image should appear natural and there
should be detail visible in the shadow areas.
If you change the profile associated with your monitor to one not created by Profile
Mechanic, CLUT Loader will give you an error message telling you that it cannot
locate the lookup tables in the default profile, and the CLUTs will not be set to their
calibrated values. Restoring the proper profile will fix the problem. To view or
change the profile associated with your monitor, use the Display control panel (Settings/Advanced/Color Management).
Profile Mechanic - Monitor 1.0
15
Profile Mechanic - Monitor 1.0
The Relationship between Monitor Profiles and
Monitor Calibration
The standard system for using monitor calibration and profiling defines their relationship as follows:
• Monitor calibration brings your monitor into conformance with a specified
standard. Since you cannot change the primary colors of the monitor phosphors
by calibration, calibration is limited to adjusting the monitor’s brightness, contrast and color controls and adjusting its gamma curves. A typical standard
might be gamma 2.2 with a D65 white point.
• The monitor profile tells the color management system what standard the monitor is calibrated to and what are the colors (in device-independent color coordinates) of its red, green and blue primaries.
The system only works correctly when the correct monitor profile and the correct
CLUT data are both in effect at the same time.
Windows: A small program that loads your video card’s CLUTs is normally
placed in your Startup folder so it can reload the lookup tables into your video
card each time you power up your computer. If you use more than one calibration system, make sure you remove the CLUT loaders used by all other monitor
calibration systems from your Startup folder as they will otherwise compete for
control of the CLUTs. If you use Photoshop this means you need to remove or
disable Adobe Gamma Loader. Apparently some display drivers may not correctly reload their CLUTs when the computer comes out of hibernation. If you
notice a color shift after hibernation, you may need to re-run the CLUT loader
program to restore the calibration data. If this occurs, you should probably
check the web site for your display card to see if more recent drivers are available for download.
Mac: The Mac OS automatically loads the CLUTs based on the current monitor
profile (set in the Monitors control panel). Make sure you disable any extensions
such as Adobe Gamma that load the CLUTs during system startup.
16
Profile Mechanic - Monitor 1.0
Should I get an LCD or a CRT Monitor?
Should I get an LCD or a CRT Monitor?
LCD flat panel displays are becoming increasingly popular, especially as they drop
in price and improve in quality. Using an LCD instead of a conventional CRT may
pose problems, however. Here are some issues you should consider when choosing
between LCDs and CRTs
Physical Characteristics
LCD displays are thinner, lighter, and use less power than CRTs of a comparable
size. This makes them very attractive when space, heat output or portability is
important.
Sharpness and Distortion
LCD displays are perfectly flat, distortion-free, sharp from edge to edge. CRT displays can usually be corrected for distortion using their front panel controls and can
be quite sharp, but with LCDs there is never any issue.
Flicker and Ghosting
LCD displays don’t flicker. Although CRT displays do flicker, newer models can
usually be set to a refresh frequency high enough (usually around 70Hz) to make
flicker invisible. On the other hand, some LCD displays may not rewrite quickly
enough to display moving images such as video clips well.
Some lower quality LCDs also exhibit ghosting—information displayed on one
part of the screen affecting other parts of the screen.
Brightness and Contrast Ratio
Images from LCDs are generally several times brighter than CRTs, making them
easier to use in situations with a lot of ambient light.
On the other hand, CRTs generally have higher contrast ratios than LCDs, mostly
due to the fact that a CRT’s blacks are much darker than for an LCD. A good CRT
might have a contrast ratio of 700:1 whereas LCDs rarely exceed 450:1 and some
go as low as 200:1. However, much of the greater contrast for CRTs is lost if the
CRT is not used in a darkened room, since ambient light washes out its enhanced
shadow detail.
Profile Mechanic - Monitor 1.0
17
Profile Mechanic - Monitor 1.0
Resolution
LCD displays operate at a fixed resolution based on their dimensions in pixels.
Using an LCD display at anything other than its native resolution is usually a bad
idea. CRT displays are analog and can support multiple resolutions.
For a given screen size, LCDs are capable of higher resolution than CRTs yielding
images that are sharp all the way out to the edges.
Off-Axis Viewing
LCDs, especially older models, usually exhibit gross hue, saturation and brightness
variations with viewing angle. This means colors change when you move your head
or adjust the screen angle, making it is nearly impossible to get consistent results. It
also makes LCD displays harder to calibrate. While our calibrator is especially
designed to work on LCD displays, most other monitor calibration hardware systems have a wide angle of acceptance that contaminates the true on-axis colors with
distorted off-axis colors. Even the best of the newer LCD models tend to have significant problems when viewed more than 20 degrees off-axis.
Non-Uniformity
Most LCD displays have variations in image brightness and contrast for different
parts of the screen, with the dimmest areas (usually around the edges) often emitting as little as 30-50% as much light as the lightest areas (usually near the center).
This can make for misleading comparisons between two images displayed side by
side. CRTs also suffer from the problem of being brighter in the center than at the
edges, although the effect is usually closer to 25%.
Color Rendition
While nearly all CRTs use the same P22 phosphors to generate red, green and blue
primaries, LCD displays do not all use the same technology and consequently their
color gamuts vary quite a bit. Unless you have an accurate monitor profile, this
results in color shifts when viewing images.
The total area of LCD color gamuts also varies from model to model—in some
cases the range of displayable colors is significantly less than that of a CRT.
18
Profile Mechanic - Monitor 1.0
Should I get an LCD or a CRT Monitor?
The diagram below compares the color gamuts of the sRGB color space and four
different LCD panels.
Comparison of CRT and LCD Color Gamuts
sRGB
Eizo L680
Apple Cinema Display
Sharp LL-T1820
Samsung 170MP
0.70
Green
0.60
0.50
0.40
y
Red
0.30
0.20
0.10
Blue
0.00
0.00
0.10
0.20
0.30
0.40
0.50
0.60
0.70
0.80
x
sRGB (red) is representative of the range of colors a conventional CRT can display.
The Eizo L680 (orange) and Sharp LL-T1820 (lavender) are relatively expensive
LCD displays whose color gamuts are close to that of sRGB.
The Samsung SyncMaster 170MP (blue) is a more typical consumer grade active
matrix LCD. All three of its primary colors fall well inside the sRGB color gamut
indicating that it cannot display the highly saturated colors a CRT can reproduce.
The Apple Cinema Display (green) is a high quality LCD display for the Macintosh
with a gamut quite close to sRGB, but is still a little weak in the reds and blues.
Profile Mechanic - Monitor 1.0
19
Profile Mechanic - Monitor 1.0
Using Profile Mechanic
Step 1 - Setup
When you start up Profile Mechanic, it will display the setup screen:
Instructions are displayed in the panel at the left. The controls in the right panel let
you select or enter the information necessary to build a profile.
Monitor Type
The Monitor Type drop down list lets you select the type of monitor you want to
calibrate (CRT or LCD). There are two additional checkboxes immediately
below that you can use to tell Profile Mechanic if your monitor has brightness or
color controls. If you check these, Profile Mechanic will walk you through a
procedure for settings these controls correctly using the calibrator. This should
be done if possible as it leads to more accurate profiles, but is not a requirement.
Target White Point
The Target White Point drop down list lets you select the white point standard
you want to calibrate to (D65, D75 or D50). For most general purposes, D65 is
recommended—some prepress workflows require a D50 white point. D75 is for
use with cool white papers or north light illumination.
20
Profile Mechanic - Monitor 1.0
Using Profile Mechanic
Target Monitor Gamma
The Target Monitor Gamma drop down list lets you select the monitor gamma
standard you want to calibrate to (2.2 or 1.8). For most general purposes,
gamma 2.2 is recommended—some prepress workflows require gamma 1.8.
Profile Description
The description you enter here will be embedded in the profile you create. Most
color management applications identify profiles by their description and not by
their pathname, so be sure to enter enough information in the description so you
can recognize your profile later. At a minimum you should include the make and
model number of your monitor. You might also want to include the target white
point, target monitor gamma, and date.
A profile description is required and the Next button remains grayed out until
you enter one.
Copyright Notice
A copyright notice is optional. You may choose to include a copyright notice if
you need to establish legal ownership of the profile you are creating or to limit
its redistribution rights.
When you have entered all the necessary information, click the Next button at
the top of the instructions panel to start the calibration and profiling process.
Step 2 - Prepare to Measure Dark Current
This step asks you to place the calibrator in the black saucer that it came with. If
you no longer have the saucer, place the calibrator in a dark place or against an
opaque surface so it can measure pure black.
Click Next to continue.
Step 3 - Measure Dark Current
This step proceeds to establish a connection with the calibrator and measure its dark
current. When the measurement is completed, it automatically continues to Step 4.
Profile Mechanic - Monitor 1.0
21
Profile Mechanic - Monitor 1.0
Step 4 - Attach calibrator to screen
This step asks you to attach the calibrator to the screen over the white target window.
If you are using a CRT, affix the suction cup attachment to the calibrator and simply
place it against the screen. For LCDs, use the attachment with the felt pad and position the weight on the USB cable to hold the calibrator on the screen.
If you are using multiple monitors (Mac Only), drag the target window to the monitor your want to calibrate before proceeding—it should not be moved after this
point.
Step 5 - Set Brightness Control
This step is only for monitors with an adjustable brightness control. For the most
part, this adjustment is for CRT monitors and not LCDs. Although LCDs may have
a control called Brightness that adjusts the brightness of the backlight, this differs
from the brightness control on a CRT. Changing the brightness of an LCD’s backlight simply makes the entire image lighter or darker—on a CRT, this function is
normally performed by the contrast control. In either case, this setting can be
adjusted according to your personal preference and has a minimal effect on the calibration.
Profile Mechanic measures the monitor’s response to a graduated series of dark
grays and displays measured and ideal brightness curves. If the two curves match
closely, click Next to continue to the next step. If the measured (red) curve lies
mostly above or below the ideal (white) curve, adjust your monitor’s brightness
control (increase it to raise the red curve; decrease it to lower the red curve) and
click Try Again to remeasure. The closer you can get to the ideal curve, the less
work will have to be done by the color lookup tables and the more accurate the
results. Even if it means a larger difference between the curves, try to avoid having
an extended flat section of the red curve in the lower left corner as this can lead to
loss of shadow detail.
Important Note:
Some monitors require that you press a button or take some other action to save
changes you make to the brightness and/or color controls. If you do not save the
settings, they will revert to their previous values the next time you turn your
monitor on, thereby invalidating the entire calibration.
22
Profile Mechanic - Monitor 1.0
Using Profile Mechanic
Step 6 - Set Color Controls
This step is only for monitors with adjustable color controls. It measures the white
point and displays an indicator showing whether the red, green and blue controls
are set too high or too low. If they are about right, click Next to continue to the next
step. If they are off, adjust the controls and click Try Again to remeasure.
Important Note:
Some monitors require that you press a button or take some other action to save
changes you make to the brightness and/or color controls. If you do not save the
settings, they will revert to their previous values the next time you turn your
monitor on, thereby invalidating the entire calibration.
Step 7 - Monitor Calibration
During this step Profile Mechanic does most of the measuring to determine the
white point, primaries, and calibration curves for your monitor. It will take several
minutes to display and measure a series of colors. When the sequence is complete,
it displays a message asking you to remove the calibrator from the screen.
Once you have removed the calibrator, click Next to continue.
Step 8 - Save Profile
If everything is OK, Profile Mechanic computes the profile and displays a Results
window. This window displays either the color gamut of the monitor or the gamma
curves, depending on which tab you click:
Gamut
Profile Mechanic - Monitor 1.0
Gamma Curves
23
Profile Mechanic - Monitor 1.0
Gamut
Profile Mechanic displays a diagram illustrating the color gamut of your monitor as a white triangle. For reference purposes, the sRGB color gamut is displayed as a dark gray triangle.
Gamma Curves
Gamma curves are the calibration curves that are applied to RGB image data on
its way from your computer to your display in order to conform your system to
the target white point and gamma values you selected. These curves are embedded in the monitor profile and reloaded into your display card on system startup.
Windows: For CLUT Loader to be able to locate the profile, it must be selected
as the default profile for your monitor (see the Windows Display control
panel—Settings/Advanced/Color Management). Profile Mechanic automatically
creates this association for you when you save your profile, and you should not
change it if you want your monitor calibration to work.
Mac: For the CLUTs to be loaded correctly, the profile created by Profile
Mechanic must be assigned as the profile for your monitor (via the Monitors
control panel). Profile Mechanic automatically does for you when you save your
profile, and you should not change it if you want your monitor calibration to
work.
Save Profile...
To save your profile, click the Save Profile... button and enter a file name for
your profile. When you save your profile, several things happen:
1.
The monitor profile is saved with your other profiles in the appropriate system folder.
2.
The associated gamma curves are recorded in the monitor profile so they can
be reloaded during system startup.
3.
The profile is set as the default profile for your monitor.
Save Profile Log...
To save a detailed report of the profile generation process as a text file, click the
Save Profile Log... button and navigate to the folder where you want to save the file
and enter a file name for your report. For information on the information stored in
profile logs, see Appendix B.
24
Profile Mechanic - Monitor 1.0
Using Profile Mechanic
Once you have saved your profile, click Next to return to the startup screen from
which you can build additional profiles if desired or click Exit to terminate Profile
Mechanic.
Profile Mechanic - Monitor 1.0
25
Profile Mechanic - Monitor 1.0
System Requirements
Operating System
Windows: Windows 98/2000 or later (this includes 98, 98/SE, ME, 2000 and XP) -Windows 95 and Windows NT are not supported.
Mac: OS 9.2 or later or OS/X 10.2 or later.
Display Card
Profile Mechanic requires a display card with hardware color lookup tables. While
most newer display cards meet this requirement. Your display card must also be
configured for at least 24-bit color and a resolution of at least 800x600 pixels.
Profile Mechanic does not support multiple monitors under Windows—at this time,
only the primary monitor can be profiled. Multiple monitors are supported on the
Macintosh.
Monitor
Profile Mechanic can calibrate and profile either CRT or LCD monitors. Some
older or laptop LCDs have severe problems with off-axis viewing or have limited
color gamuts and are unsuitable for critical color work.
USB
You need a free USB port available to connect the calibrator to your computer. A
USB cable in included with Profile Mechanic.
26
Profile Mechanic - Monitor 1.0
Appendix A -- Installing your Calibrator
Appendix A -- Installing your Calibrator
Windows
The calibrator connects to the computer via a USB port.
Step 1: Install Profile Mechanic
The USB drivers for the calibrator are located on the Profile Mechanic CDROM in a folder named USB Drivers. An extra copy is also placed in a folder
named USB Drivers located in the folder in which Profile Mechanic is installed
(usually C:\Program Files\Digital Light & Color\Profile Mechanic - Monitor).
Step 2: Connect the Calibrator
Plug the USB cable from the calibrator into a spare USB port on your computer.
Preferably it should be connected directly to your computer or into a powered
USB hub. When you connect the calibrator, Windows will detect it and ask you
if you want to install a driver.
Step 3: Specify Driver Location
Do not let Windows search automatically for a driver as it will not find one.
Instead click Install from a list of specific location. In the next screen, click
Don’t search. I will choose the driver to install. In the next screen select Show
All Drivers. Please be patient as there may be a significant delay at this point. In
the next screen click the Have Disk button. In the next screen click the Browse...
button and navigate to the USB Drivers folder on the Profile Mechanic CDROM and click Open. Click OK in the Install From Disk dialog box and you
should see Sequel Imaging USB Calibration Device listed in the Found New
Hardware Wizard dialog box. Click Next and then Finish to complete the installation.
Mac
The calibrator connects to the computer via a USB port. Under OS 9.x, a driver for
the calibrator is automatically installed in your Extensions folder. Under OS/X, no
driver is required.
Profile Mechanic - Monitor 1.0
27
Profile Mechanic - Monitor 1.0
Appendix B -- Interpreting the Profile Log
When you click the Save Profile Log... button, Profile Mechanic saves a text file
containing detailed information about the monitor profile you just created. This section describes the contents of the log file.
Date -- the date the log was created.
Description -- the profile description.
Copyright -- the profile copyright notice.
Monitor Type -- the type of monitor (CRT/LCD).
Target/Measured/Corrected White Point
The target white point you selected (D75/D65/D50).
The CIE xy color coordinates of the target white point.
The CIE xy color coordinates of the uncorrected white point.
The CIE xy color coordinates of the corrected white point.
Monitor Luminance
The brightness of full monitor white in nits (candelas/m2). This value can be
used to compare the brightness of different monitors. There is no correct value
for luminance as the eye automatically adjusts for brightness differences over a
fairly wide range; however a brighter monitor will work better in the presence of
ambient room light. Good quality LCD monitors tend to be several times
brighter than most CRTs.
Target/Uncorrected/Corrected Gamma
The target monitor gamma you selected (2.2/1.8).
The uncorrected monitor gamma.
The corrected monitor gamma.
Red, Green and Blue Primaries
The computed CIE XYZ and CIE xy values for the red, green and blue primaries are given. The CIE xy values define the vertices of the gamut triangle displayed in the chromaticity diagram in the Results window.
28
Profile Mechanic - Monitor 1.0
Appendix B -- Interpreting the Profile Log
Neutral Check
This tabulates the correct CIE xy and normalized luminance (CIE Y) for each of
the 33 measured gray levels. Ideally all the xy values should be close to the target white point, although there may be some variation for the darkest patches for
which color accuracy is less important. The last column lists the target luminance value based on the target monitor gamma. This target value should be
close to the measured luminance in the preceding column.
Profile Mechanic - Monitor 1.0
29