1
CDM8960
USER MANUAL
OM8960MV 5U000046C0A REV00
CDM8960
MANUAL DE USUARIO
CDM8960
TABLE OF CONTENTS
CHAPTER 1. BEFORE USING YOUR PHONE ...................... 5
INSIDE THE PACKAGE ................................................... 6
HANDSET DESCRIPTION ................................................ 7
THE FUNCTION KEYS ......................................................... 8
DISPLAY INDICATORS....................................................... 12
BATTERY USAGE.......................................................... 15
BATTERY INSTALLATION .................................................. 15
BATTERY REMOVAL ......................................................... 16
BATTERY CHARGING........................................................ 17
BATTERY HANDLING INFORMATION .......................... 18
DO’s................................................................................... 18
DON’Ts .............................................................................. 18
CHAPTER 2. BASIC OPERATION ..................................... 19
TURNING THE PHONE ON / OFF .................................. 20
TURNING THE PHONE ON ............................................... 20
TURNING THE PHONE OFF .............................................. 20
ACCESSING THE MENU ............................................... 21
MENU SUMMARY ....................................................... 22
BASIC FUNCTIONS ....................................................... 25
MAKING A CALL .............................................................. 25
ANSWERING CALLS .......................................................... 26
MISSED CALL NOTIFICATION ........................................... 26
2-SEC/HARD PAUSE FEATURE .......................................... 27
ANSWERING A CALL ........................................................ 27
3-WAY CALLING ............................................................... 28
CALL WAITING FUNCTION............................................... 28
CALLING A NUMBER FROM CONTACTS ......................... 29
ADJUSTING VOLUME ....................................................... 29
ADJUSTING THE CALL VOLUME ...................................... 29
CALLER ID FUNCTION ...................................................... 30
VIBRATE ON/OFF MODE .................................................. 30
SPEAKER PHONE .............................................................. 30
MUSIC PLAYER ................................................................. 31
DURING A CALL .......................................................... 31
AVAILABLE OPTIONS DURING A CALL ........................... 31
1
TABLE OF CONTENTS
MAKING AN EMERGENCY CALL ................................ 33
911 IN LOCK MODE ......................................................... 33
911 USING ANY AVAILABLE SYSTEM ............................. 33
USING THE microSD CARD ......................................... 34
USING THE microSD CARD .............................................. 34
CHAPTER 3. MEMORY FUNCTION .................................. 37
STORING A PHONE NUMBER ...................................... 38
ADDING A CONTACT THROUGH THE MENU ................. 38
ADDING A CONTACT IN IDLE MODE .............................. 39
ENTERING LETTERS, NUMBERS & SYMBOLS .............. 41
STANDARD INPUT MODE ................................................ 42
T9WORD INPUT MODE .................................................... 43
NUMERIC MODE .............................................................. 44
SYMBOL MODE ................................................................ 45
MAKING A CALL THROUGH THE CONTACT LIST ........ 45
ONE-TOUCH/TWO-TOUCH DIALING ............................... 45
CHAPTER 4. MENU FUNCTION ....................................... 47
RECENT CALLS ............................................................ 48
ALL CALLS ......................................................................... 48
MISSED CALLS .................................................................. 49
RECEIVED CALLS .............................................................. 50
DIALED CALLS .................................................................. 51
CALL TIMERS .................................................................... 52
PHONE BOOK .............................................................. 53
NEW ENTRY ...................................................................... 53
LIST ENTRIES ..................................................................... 54
MESSAGE GROUPS ........................................................... 55
GROUPS ............................................................................ 59
SPEED DIALS ..................................................................... 61
MEDIA GALLERY ......................................................... 62
SOUND BOX ..................................................................... 62
PICTURE BOX .................................................................... 62
VIDEO BOX ....................................................................... 63
MP3 BOX .......................................................................... 64
NEO APPLICATIONS .................................................... 65
2
TABLE OF CONTENTS
NEO NAVIGATION ....................................................... 68
STARTING NEO NAVIGATION .......................................... 68
MOBILE WEB MENU ........................................................ 68
SETTINGS ..................................................................... 71
SOUND SETTINGS ............................................................. 71
DISPLAY SETTINGS ........................................................... 76
PHONE SETTINGS ............................................................. 80
CALL SETTINGS ................................................................. 86
MEMORY .......................................................................... 89
BLUETOOTH ..................................................................... 90
BLUETOOTH MENU .......................................................... 95
PHONE INFO ..................................................................... 98
CAMERA ...................................................................... 99
TAKE PICTURE .................................................................. 99
TAKE VIDEO ................................................................... 102
PICTURE GALLERY .......................................................... 104
VIDEO GALLERY ............................................................. 105
VOICE TOOLS............................................................. 106
AVR (ADVANCED VOICE RECOGNITION) ...................... 106
CALL <NAME><LOC>..................................................... 107
SEND TEXT <NAME OR #> ............................................ 108
SEND PICTURE <NAME OR #> ....................................... 108
SEND VIDEO <NAME OR #> .......................................... 109
LOOKUP <NAME> .......................................................... 109
GO TO <MENU> ............................................................. 110
CHECK <ITEM> ............................................................... 111
SETTINGS ........................................................................ 112
INFO ................................................................................ 117
UTILITIES.................................................................... 118
ALARM CLOCK ............................................................... 118
CALENDAR...................................................................... 119
WORLD CLOCK ............................................................... 122
NOTEPAD ........................................................................ 123
CALCULATOR.................................................................. 125
STOP WATCH .................................................................. 126
MASS STORAGE ............................................................. 127
3
CHAPTER 6. SAFETY AND WARRANTY ....................... 149
SAFETY INFORMATION FOR
WIRELESS HANDHELD PHONES ................................ 150
SAFETY INFORMATION FOR FCC RF EXPOSURE ....... 155
SAR INFORMATION ................................................... 156
FCC HEARING-AID COMPATIBILITY (HAC)
REGULATIONS FOR WIRELESS DEVICES ................... 158
FDA CONSUMER UPDATE ......................................... 160
AVOID POTENTIAL HEARING LOSS........................... 166
CTIA USER INFORMATION REQUIREMENTS ............. 168
12 MONTH LIMITED WARRANTY .............................. 169
CHAPTER 1
BEFORE USING
YOUR PHONE
This chapter provides important information about using the
CDM-8960 including:
INSIDE THE PACKAGE
HANDSET DESCRIPTION
BATTERY USAGE
BATTERY HANDLING INFORMATION
“Licensed by QUALCOMM Incorporated under one or more of the following
Patents : U.S.Patent No.4,901,307 U.S.Patent No. 5,056,109 U.S.Patent No.
5,099,204 U.S. Patent No. 5,101,501 U.S. Patent No.5,103,459 U.S. Patent No.
5,107,225 U.S.Patent No. 5,109,390.”
4
BEFORE USING YOUR PHONE
CHAPTER 5. VOICE MAIL, TEXT, PICTURE, VIDEO
MESSAGING ............................................ 129
WHEN A NEW MESSAGE ARRIVES ........................... 130
NEW MESSAGE ......................................................... 130
SEND NEW TXT MESSAGE ............................................. 130
SEND NEW PICTURE MESSAGE ..................................... 132
SEND NEW VIDEO MESSAGE ......................................... 134
VOICEMAIL ................................................................ 136
INBOX ........................................................................ 138
SENT .......................................................................... 140
DRAFTS ...................................................................... 142
SETTINGS ................................................................... 143
ERASE ALL................................................................. 148
CHAPTER 1
TABLE OF CONTENTS
BEFORE USING
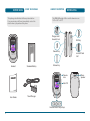
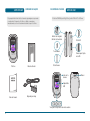
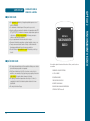
INSIDE THE PACKAGE
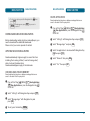
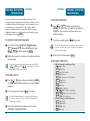
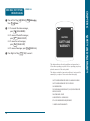
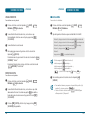
This package should include all items pictured below.
If any are missing or different, immediately contact the
retailer where you purchased the phone.
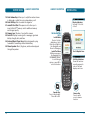
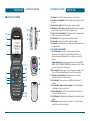
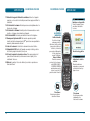
HANDSET DESCRIPTION
BEFORE USING
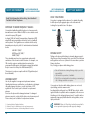
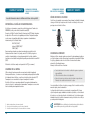
The CDM-8960 weighs 2.96oz. and the dimensions are
1.86" x 3.65" x 0.78".
Charger Jack/
Headset Jack
AVR Key
Camera Key
Handset
Standard Battery
microSD Card
Slot
Volume Key
Camera
Lens
Phone
Speaker
Sub LCD
User Guide
Travel Charger
External Music Player Keys
6
7
BEFORE USING
HANDSET DESCRIPTION
H THE FUNCTION KEYS
17
1
18
19
2
20
21
3
4
22
9
23
10
24
5
11
6
7
8
12
13
14
15
16
8
25
HANDSET DESCRIPTION
BEFORE USING
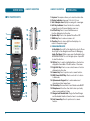
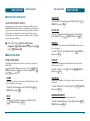
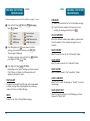
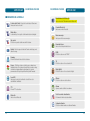
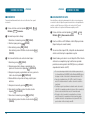
1. Earpiece: The earpiece allows you to hear the other caller.
2. Display Indicators: See page 12 for a list of icons.
3. Text & Graphic Area: Displays incoming calls or messages.
4. Soft Key Indicators: Shows the functions currently
assigned to each soft key and displays some icons.
5. Left Soft Key: Press to access the Main menu or
function displayed on bottom line.
6. Speaker Key: Press to turn Speaker Phone On or Off.
7. SEND Key: Press to make or receive a call.
8. Clear Key: Press to clear a digit from the display or to
return to the previous page.
9. THE NAVIGATION KEYS
In Idle Mode: Press Left for Neo Applications, Up for Phone
Book, Right for Neo Navigation and Down for Messaging.
Inside The Menu: Within a menu, press the Navigation Key
UP/DOWN/LEFT/RIGHT to scroll through options or press OK
to select the function.
10. OK Key: Press to select a highlighted item or the function
displayed in the middle of the bottom line of the screen.
11. Right Soft Key: Press to access contacts menu or function
displayed on bottom line.
12. Camera Key: Press for quick access to camera function.
13. END/ Power On/Off Key: Press to end a call or to return
to idle mode.
14. Alphanumeric Keypad: Use to enter numbers and
characters and select menu items.
15. Vibrate Key: Press and hold to turn Vibrate mode On/Off.
16. Microphone: Allows the other caller to hear you clearly
when you are speaking to them.
17. Charger Jack/ Headset Jack: Plug in the Travel Charger
and the Headset Interface Connector here to use a headset.
18. Side Camera Key: Press for quick access to camera
function.
9
BEFORE USING
HANDSET DESCRIPTION
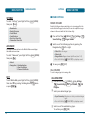
19. Side Volume Key: Allows you to adjust the master volume
in idle mode or adjust the voice volume during a call.
20. Side AVR Key: Press to enable VoiceSignalTM.
21. microSD Card Slot: This expansion slot allows you to
insert a MicroSDTM memory card for additional memory
and storage capacity.
22. Camera Lens: The lens of your built-in camera.
23. Sub LCD: Displays incoming calls or messages, signal and
battery strength, date, and time.
24. External Music Player Keys: Music play/pause/stop key,
forward/fast forward key, and back/rewind key.
25. Phone Speaker: Music, Ringtones, and Sounds are played
through the speaker.
HANDSET DESCRIPTION
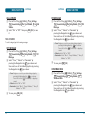
Display Indicators
See page 12 for a list
of icons.
THE NAVIGATION
KEYS
In Idle Mode
Press Left for Neo
Applications, Up for
Phone Book, Right for
Neo Navigation and
Down for Messaging.
Inside The Menu
Within a menu, press
the Navigation Key
UP/DOWN/LEFT/RIGHT
to scroll through
options or press OK to
select the function.
Speaker Key
Press to turn Speaker
Phone On or Off.
10
BEFORE USING
Text & Graphic Area
Soft Key Indicators
Shows the functions
currently assigned to
each soft key and
displays some icons.
Camera Key
Press for quick
access to camera
function.
11
BEFORE USING
HANDSET DESCRIPTION
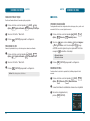
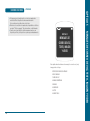
H DISPLAY INDICATORS
Signal Strength - Current signal strength: the
more lines, the stronger the signal.
Airplane Mode
Transmitting and receiving information is restricted.
No Service
Phone cannot receive a signal from the system.
Battery - Battery charging level: the more blocks,
the stronger the charge.
Roaming
Phone is out of home area.
Dormant - Phone is in a dormant state during a data
call. Phone reverts to Dormant mode when there
hasn’t been activity on a page for some time — the
connection is still active and you can make and receive
calls.
GPS Icon
Location Service of your phone is disabled/enabled.
TTY
TTY mode is active.
Bluetooth
Indicates Bluetooth mode.
HANDSET DESCRIPTION
BEFORE USING
Bluetooth Discovery
Indicates Bluetooth Discovery mode.
Bluetooth Conn
Indicates Bluetooth Connect.
New Messages
Indicates you have new message.
Voice Privacy
Indicates Voice Privacy mode.
EVDO
Phone is in “EVDO”mode.
1X
Phone is in the 1x service area.
Digital Mode
Phone is in the digital service area.
Speaker Phone
Phone is in Speaker Phone mode.
Alarm
Appears when an alarm is set.
All Sounds Off
Ringer volume is set to off.
Vibrate Only
Phone will vibrate when call is received.
12
13
BEFORE USING
HANDSET DESCRIPTION
Ringer Mode
Appears when the ringer is set as the ringer mode.
Voice Mail
Indicates you have voice mail messages.
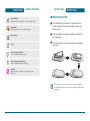
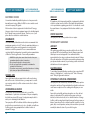
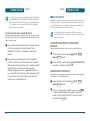
BATTERY USAGE
BEFORE USING
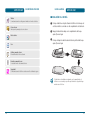
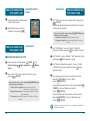
H BATTERY INSTALLATION
Place the battery on the back of the phone so the
metal contacts match up on the battery and in the
battery cavity.
Data Active
Push the battery down into the battery cavity until it
locks into place.
Voice
Place the battery cover over the battery and slide up
into place.
Voice Command Active
Voice Command mode is active.
Voice Command Listening
Voice Command mode is listening.
Security
Appears when the phone is accessing a secure
Web Site.
If the battery is not correctly placed in the compartment,
the handset will not turn on and/or the battery may detach
during use.
14
15
BEFORE USING
BATTERY USAGE
BATTERY USAGE
BEFORE USING
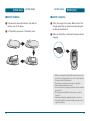
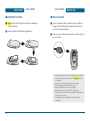
H BATTERY REMOVAL
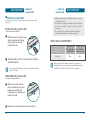
H BATTERY CHARGING
Push down the release latch button, then slide the
battery cover off the phone.
Attach the charger to the phone. Make sure that the
triangle symbol faces up when inserting the plug into
the Charger / Headset port.
Lift the battery up and out of the battery cavity.
Make sure the battery is attached to the phone before
charging.
• When you charge the battery with the phone power off,
you will see a charging status screen. You cannot operate
the phone until it is powered on.
• The battery is not charged at the time of purchase.
• Fully charge the battery before use.
• It is more efficient to charge the battery with the handset
powered off.
• The battery must installed in to the phone in order to
charge it.
• Battery operating time gradually decreases over time.
• If the battery fails to perform normally, you may need to
replace the battery.
16
17
BATTERY HANDLING
INFORMATION
CHAPTER 2
BEFORE USING
H DO’s
CHAPTER 2
BASIC
OPERATION
H DON’Ts
• Don’t attempt to disassemble the battery – it is a sealed
unit with no serviceable parts.
• Don’t accidentally short circuit the battery by carrying it
in your pocket or purse with other metallic objects such
as coins, clips and pens. This may critically damage the
battery.
• Don’t leave the battery in extremely hot or cold
temperatures. Otherwise, it could significantly reduce the
capacity and lifetime of the battery.
• Don’t dispose of the battery by placing into fire.
This chapter addresses and explains the basic features of your
phone including:
TURNING THE PHONE ON / OFF
ACCESSING THE MENU
MENU SUMMARY
BASIC FUNCTIONS
DURING A CALL
MAKING AN EMERGENCY CALL
USING THE microSD CARD
18
BASIC OPERATION
• Only use the battery and charger approved for use with
the CDM8960.
• Only use the battery for its original purpose.
• Try to keep batteries in a temperature between 41˚F (5˚C)
and 95˚F (35˚C). If the battery is stored in temperatures
above or below the recommended range, give it time to
warm up or cool down before using.
• Completely drain the battery before recharging.
• Store the discharged battery in a cool, dark, and dry place.
• Purchase a new battery when its operating time gradually
decreases after fully charging.
• Properly dispose of the battery according to local laws.
BASIC OPERATION
TURNING THE PHONE
ON / OFF
H TURNING THE PHONE ON
Press and hold the End Key END until your Power
On logo appears on your internal display and the tone
sounds.
• If “Enter Lock Code” appears on the display enter your
4-digit lock code to unlock your phone.
• Your default lock code is ”1234”.
H TURNING THE PHONE OFF
Press the End Key END until your Power Off logo
appears on the internal display.
• Immediately change or recharge the battery when
“BATTERY LOW” appears on the display. Memory may
possibly be damaged if the phone turns off due to the
battery completely draining.
• Turn the phone off before removing or replacing the
battery. If the phone is on, unsaved data may be lost.
20
ACCESSING THE MENU
BASIC OPERATION
Your phone can be customized via the menu. Each function can
or by
be accessed by scrolling with the Navigation Key
pressing the number that corresponds with the menu item.
To access the menu in idle mode,
[MENU].
press the Left Soft Key
To scroll through the menu, press the Navigation Key
up, down, left or right.
To return to the previous page, press the Clear Key
CLR . To exit the current menu and return to the
idle mode, press the End Key END .
Press OK to enter a function when its main page is
displayed or press its assigned number to have direct
access to the function.
21
BASIC OPERATION
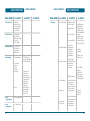
MAIN MENU
1. Recent Calls
2. Phone Book
3. Media Gallery
4. Messaging
2ND DEPTH
3RD DEPTH
4TH DEPTH
MENU SUMMARY
MAIN MENU
7. Settings
1. All Calls
2. Missed Calls
3. Received Calls
4. Dialed Calls
5. Call Timers
2ND DEPTH
3RD DEPTH
1. Ringer Volume
2. Call Sounds
3. Msg Sounds
4. Service Alerts
5. Power On/Off
1. Sound Box
2. Picture Box
3. Video Box
4. MP3 Box
1. New Message
7. Erase
5. Neo
Applications
1. Neo Applications
6. Neo
Navigation
1. Connect Web
BASIC OPERATION
1. Sound Settings
1. New Entry
2. List Entries
3. Message Groups
4. Groups
5. Speed Dials
2. Voicemail
3. Inbox
4. Sent
5. Drafts
6. Settings
22
MENU SUMMARY
2. Display Settings
1. TXT Message
2. Picture Message
3. Video Message
1. Entry Mode
2. Auto Save
3. Auto Erase
4. Text Auto View
5. Auto Receive
6. Quick Text
7. Callback #
8. Signature
1. Erase Inbox
2. Erase Drafts
3. Erase Sent
4. Erase All
3. Phone Settings
6. Key Tone
1. My Banner
2. Backlight
Duration
3. Contrast
4. Wallpaper
5. Menu Type
1. Airplane Mode
2. Language
3. Location
4. Security
5. NAM Selection
4. Call Settings
5. Memory
6. Bluetooth
7. Phone Info
4TH DEPTH
1. Call Ringtone
2. Call Vibrate
1. TXT Message
2. PIX Message
3. Voicemail MSG
1. Roam
2. Minute Beep
3. Call Connect
1. Power On Tone
2. Power Off Tone
1. Display
2. Keypad
1. Main Screen
2. Sub Screen
1. Lock Mode
2. Restrict
3. Edit Code
4. Reset Phone
1. Auto NAM
2. Change NAM
1. Answer Options
2. Auto Retry
3. TTY Mode
4. One Touch Dial
5. Voice Privacy
1. Save Options
1. Sounds
2. Pictures
3. Videos
2. Internal Memory
3. External Memory
1. New Device
1. My Number
2. SW Version
23
BASIC OPERATION
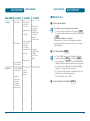
MAIN MENU
8. Camera
2ND DEPTH
1. Take Picture
2. Take Video
MENU SUMMARY
3RD DEPTH
1. Self Portrait
2. Self Timer
3. Fun Tools...
1. Color Effect
2. Fun Frame
4. Image Controls... 1. Brightness
2. White Balance
5. Settings...
1. Resolution
2. Quality
3. Shutter Sound
6. Camcorder Mode
1. Self Portrait
2. Self Timer
3. Color Effect
4. Image Controls... 1. Brightness
2. White Balance
5. Settings...
1. Quality
2. Cue Sound
3. Mute
6. Camera Mode
3. Picture Gallery
4. Video Gallery
9. Utilities
24
4TH DEPTH
1. Voice Commands
2. Alarm Clock
1. Alarm 1
2. Alarm 2
3. Alarm 3
3. Calendar
4. World Clock
5. Notepad
6. Calculator
7. Stop Watch
8. Mass Storage
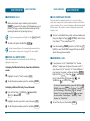
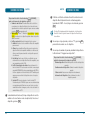
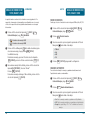
BASIC FUNCTIONS
BASIC OPERATION
H MAKING A CALL
Enter a phone number.
To modify the phone number you have entered:
• To erase one digit at a time press the Clear Key CLR .
• To erase the entire number, press and hold the Clear Key
CLR .
Phone number display in contact list
When you place or receive a call from phone numbers
stored in your contact list with a contact name, the name
will be displayed.
Press the Send Key SEND .
• If “CALL FAILED” appears on the display or the line is
busy, press End Key END or Send Key SEND .
• If you activate the “AUTO RETRY” function, the phone
will automatically re-dial the number. (Refer to page 87).
• You can also place calls using Voice-Activated Dialing.
Please refer to page 107 for more details.
• If “Enter Lock Code” appears on the display enter your
4-digit lock code to unlock your phone.
• Your default lock code is ”1234”.
To end a call, press the End Key END
.
25
BASIC OPERATION
BASIC FUNCTIONS
BASIC FUNCTIONS
H ANSWERING CALLS
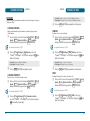
H 2-SEC/HARD PAUSE FEATURE
When your phone rings or vibrates, press Send Key
SEND to answer the incoming call. (Depending on your
phone’s settings, you may also answer incoming calls by
opening the phone or by pressing any key.)
To ignore incoming calls, press Right Soft Key
To end a call, press the End Key END
[IGNORE].
.
In Auto Answer Mode a call is automatically answered after a
preset number of ring tones. See page 86 for more details.
H MISSED CALL NOTIFICATION
When an incoming call is not answered, the Missed Call log is
displayed on your screen.
To display the Missed Call entry from the notification
screen:
Highlight the entry “View“ and press OK .
To dial the phone number, press the Send Key SEND .
To display a Missed Call entry from idle mode:
Press Left Soft Key
[MENU], 1
2 abc for Missed Calls.
BASIC OPERATION
Recent Calls,
Highlight the entry you wish to view, then press OK .
Pauses are used for automated systems (i.e., voice mail, calling
cards). Insert a pause after a phone number and then enter another
group of numbers. The second set of numbers is dialed automatically
after the pause. This feature is useful for dialing into systems that
require a code.
To insert a 2-Sec/Hard Pause, enter a phone number and
[OPTIONS]. Select either
then press Right Soft Key
2-Sec Pause (“T”) or a Hard Pause (“P”).
Press the Send Key SEND to dial or Left Soft Key
[SAVE] to save. Please refer to page 38 for more details
about storing a phone number.
H ANSWERING A CALL
If your phone is set to “Folder Open” for “Answer
Options,” simply open the phone to answer a call. If
your phone is set to “Any Key” for “Answer Options,”
press any key to answer a call except End Key END ,
, Clear Key CLR , Side Camera
Right Soft Key
Key , Side AVR Key , Speaker Key
, Side
or Left Soft Key
.
Volume Key
To select an answering option, press Left Soft Key
[MENU], then select 7 pqrs for “Settings”. Press 4 ghi
for “Call Settings,” then select 1 for “Answer
up or down
Options.” Press the Navigation Key
to select either “Folder Open,” “Any Key,” ”Auto
Answer” or “Send Only”.
To end the call, press the End Key END
.
To dial the phone number, press the Send Key SEND .
26
27
BASIC OPERATION
BASIC FUNCTIONS
H 3-WAY CALLING
With 3-Way Calling, you can talk to two people at the same time.
When using this feature, the normal airtime rates will be applied for
each of the two calls.
Enter the phone number you wish to call and then
press the Send Key SEND .
BASIC FUNCTIONS
BASIC OPERATION
H CALLING A NUMBER FROM CONTACTS
Press Right Soft Key
[CONTACTS] to access the
Contact List. Select the desired phone number and press
the Send Key SEND .
H ADJUSTING VOLUME
To adjust the master volume:
Once you have established the connection, enter the
second phone number you wish to call and then press the
Send Key SEND .
When you’re connected to the second party,
press 3 def , then Send Key SEND again to begin your
3-Way call.
If one of the people you called hangs up during your call, you
and the remaining caller stay connected. If you initiated the
call and are the first to hang up, all three calls are
disconnected.
H CALL WAITING FUNCTION
Notifies you of an incoming call when you are already on a call by
sounding a beep tone and displaying the caller’s phone number.
To answer another call while on the phone,
press the Send Key SEND . This places the first call on
hold. To switch back to the first caller, press the Send Key
SEND again.
28
In idle mode, press the Side Volume Key
down .
up or
Select one of the following options and press OK
[SET] to save it.
•
•
•
•
Silent
Vibrate On
Level 1 ~ Level 5
Press Left Soft Key
[PLAY/STOP] to play/stop sound.
H ADJUSTING THE CALL VOLUME
During a call, if you want to adjust the earpiece volume,
on the left side of the
press the Side Volume Key
phone.
Press the key up to increase the volume level and
down the key to decrease the level.
In Idle mode, you can also adjust the ringer volume using
these keys.
29
BASIC OPERATION
BASIC FUNCTIONS
BASIC FUNCTIONS
BASIC OPERATION
H CALLER ID FUNCTION
H MUSIC PLAYER
Identifies caller by displaying their phone number.
If the caller’s name and number are already stored in your
contact list, name will appear. The caller ID is stored in the
Recent Calls Menu.
The Music Player plays MP3 files saved on a microSD card.
To display the music list when the phone is closed, press
then select the file you want to play. Press
and hold
[PAUSE] to pause the music.
to [PLAY], and press
To stop the music player, open the phone and press the End
Key END .
H VIBRATE ON/OFF MODE
From the idle screen, press and hold the
.
To return to a previously set volume, from the idle
.
screen press and hold
• Movilnet shall not be responsible for any action or
liability as a result of any breach of copyright or
other misuse of music contents.
H SPEAKER PHONE
The Speaker Phone feature lets you hear audio through the speaker
and talk without holding the phone.
To activate the Speaker Phone in idle mode or while on a
. If you press the Speaker Key
call, press Speaker Key
when you are not on a call, speaker phone mode will
be active for one minute, then turn itself off automatically.
DURING A CALL
BASIC OPERATION
H AVAILABLE OPTIONS DURING A CALL
To display menu options during a call, press Right Soft Key
[OPTIONS].
END CALL
To end a call:
Press Right Soft Key
[OPTIONS], 1
End Call.
CONTACTS
To select a phone number in your Contacts:
Press Right Soft Key
30
[OPTIONS], 2 abc Contacts.
31
BASIC OPERATION
DURING A CALL
RECENT CALLS
MAKING AN
EMERGENCY CALL
BASIC OPERATION
To select a phone number in Recent Calls:
The 911 feature automatically places the phone in Emergency
Call Mode when you dial the preprogrammed emergency number,
911. It also operates in Lock Mode and out of the service area.
Press Right Soft Key
Calls.
H 911 IN LOCK MODE
[OPTIONS], 3 def Recent
The 911 call service is available even in Lock Mode.
MESSAGING
Enter “911” and then press the Send Key SEND .
To send a message during a call:
Press Right Soft Key
Messaging.
[OPTIONS], 4 ghi
The call connects.
The phone maintains the Emergency Mode for
5 minutes.
CONNECT BLUETOOTH
To access Bluetooth during a call:
Press Right Soft Key
Bluetooth.
[OPTIONS], 5 jkl Connect
Enter “911” and then press the Send Key SEND .
SPEAKER PHONE ON
The call connects.
Activates the speaker phone when you are on a call. The phone
returns to normal (speaker phone off) after ending or call or when
the phone is turned off and back on.
Press Right Soft Key
Phone On.
H 911 USING ANY AVAILABLE SYSTEM
[OPTIONS], 6 mno Speaker
The phone will stay in Emergency Mode for 5 minutes.
While the phone is in Emergency Mode for 5 minutes,
the phone can receive an incoming call from any
available system or you can make outgoing calls even in the
Emergency Callback Mode. In this case, making a call can
automatically end the Emergency Callback Mode.
The 911 call is not recorded in the recent call list.
32
33
BASIC OPERATION
USING THE
microSD CARD
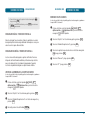
H USING THE microSD CARD
The microSD card stores sounds, images, photos and videos and
other files.
INSTALLING THE microSD CARD
To install your microSD card:
With the microSD card slot open,
and the gold contacts facing
down, insert the microSD
card into the slot.
USING THE
microSD CARD
• When you insert the microSD card, make sure contact
terminals face down.
• File names for storing each media in the microSD card
are “fotos” for pictures, “videos” for videos, “sonidos”
for sounds.
• Do not remove the microSD card while reading or
writing files. Otherwise it could be damaged.
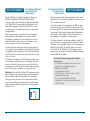
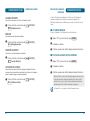
HOW IS MUSIC TRANSFERRED?
Transfer from
Transfer from
PC to Handset PC to Handset
via USB Cable via Memory card
MP3 Songs
Push the card in until it clicks into place. Close the
microSD card slot.
To prevent possible damages, please keep microSD card slot
closed at all times.
BASIC OPERATION
Yes
Yes
Music acquired from another online store as part of a
subscription service or purchased in another format other
than MP3 (e.g. AAC, AAC+) will not be recognized.
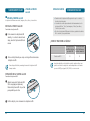
REMOVING THE microSD CARD
To remove the microSD card:
Open the microSD card slot.
Use your thumb to press and
release the microSD card.
It will pop-out to allow you to
remove the card.
Remove the card and close the microSD card slot.
34
35
CHAPTER 3
MEMO
This chapter addresses memory functions including:
STORING A PHONE NUMBER
ENTERING LETTERS, NUMBERS & SYMBOLS
MAKING A CALL THROUGH THE CONTACT LIST
36
MEMORY FUNCTION
CHAPTER 3
MEMORY
FUNCTION
MEMORY FUNCTION
STORING A
PHONE NUMBER
STORING A
PHONE NUMBER
MEMORY FUNCTION
The phone book stores up to 500 entries.
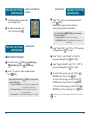
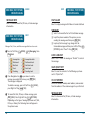
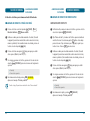
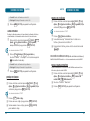
H ADDING A CONTACT IN IDLE MODE
H ADDING A CONTACT THROUGH THE MENU
ADD NEW CONTACT
Press Left Soft Key
1 New Entry.
In idle Mode, enter phone number and press Left Soft
Key
[SAVE].
[MENU], 2 abc Phone Book,
Enter a name for the entry using keypad.
(Please refer to page 41 for more details on
entering letters, numbers & symbols.) To change the
[Abc].
input mode, press Left Soft Key
Choose “New Entry” and the phone number will
up or
appear above a list. Press the Navigation Key
down to choose the type of number you’re adding, as
indicated by the icon. Press OK to select.
Press the Navigation Key
down to add or edit
other options (Mobile, E-mail1.2, etc...).
Enter a name for the entry using keypad.
(Please refer to page 41 for more details on
entering letters, numbers & symbols.) To change the
[Abc].
input mode, press Left Soft Key
If entering a phone number, press Right Soft Key
[OPTIONS] to select one of the following
options:
• Hard Pause
• 2-Sec Pause
To store the entry, press OK [SAVE].
“Entry saved” will be displayed.
Please refer to page 53 for more details on "New Entry".
Press the Navigation Key
down to add or edit
other options (Mobile, E-mail1.2, etc...).
If entering a phone number, press Right Soft Key
[OPTIONS] to select one of the following
options:
• Hard Pause
• 2-Sec Pause
To store the entry, press OK [SAVE].
“Entry saved” will be displayed.
38
39
MEMORY FUNCTION
STORING A
PHONE NUMBER
UPDATE EXISTING
In idle Mode, enter phone number and press Left Soft
Key
[SAVE].
Choose “Existing Entry” and your saved contact list is
displayed. Choose the entry to add the phone number
to, and then press OK . Press the Navigation Key
up or down to choose the type of number you’re
adding, as indicated by the icon. Press OK to select.
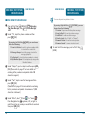
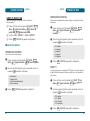
ENTERING LETTERS,
NUMBERS & SYMBOLS
MEMORY FUNCTION
The input mode (Alpha editor) will automatically be activated when
necessary to enter letters and numbers. As shown below, there are
5 available modes ; Standard input mode (Abc)/(ABC), Input mode
(T9Word), Numeric mode (123) and Symbol mode (Symbols).
The input mode indicator appears on the upper right of the display
when letters and numbers are entered. To select the desired input
[Abc],
mode among the 5 modes below, press Left Soft Key
and then enter letters and numbers.
Input mode indicator
•T9Word : Input mode
•Abc : Abc mode
•ABC : ABC mode
•123 : Numeric mode
•Symbols : Symbol mode
“Entry updated” will be displayed.
The following illustrates the function assigned to each key in
the Alpha Editor.
KEY
FUNCTION
Abc - Press to change mode.
[T9Word][Abc][ABC][123][Symbols]
0
Next - (In T9Word Mode) Press to view the next
matching word if the highlighted word is not the
word you intended.
Space - Press to accept a word and add a space.
Caps Lock - Press to select a letter case of the
standard text input or text input mode. [Abc],
[ABC] and [abc] indicate the standard text input.
[T9Word], [T9WORD] and [T9word] indicate the
predictive text input.
40
CLR
Clear - Press to delete a character to the left of
the cursor.
OK
OK - Confirm the letters and numbers you entered.
41
ENTERING LETTERS,
NUMBERS & SYMBOLS
MEMORY FUNCTION
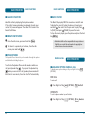
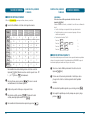
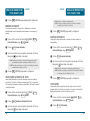
H STANDARD INPUT MODE
Use the digit keys to enter letters, numbers and characters.
Enter letters using the key pad as follows:
Repetitions Repetitions Repetitions Repetitions
2 times
3 times
4 times
5 times
Key Pad
1
Time
2 abc
A
B
C
2
A
3 def
D
E
F
3
D
4 ghi
5 jkl
G
H
I
4
G
J
K
L
5
J
6
mno
M
N
O
6
M
7 pqrs
P
Q
R
S
7
8 tuv
T
U
V
8
T
9 wxyz
W
X
Y
Z
9
FOR EXAMPLE:
Select Abc mode by pressing Left Soft Key
[Abc].
When you select this mode, the Abc icon appears as a visual
confirmation.
• Find the key that corresponds to the letter you want to
enter.
• Press it as many times as needed for the letter to appear
on the screen.
• To enter the name “John”:
Press [ 5 jkl ]
J
Press [ 6 mno , 6 mno , 6 mno ]
o
h
Press [ 4 ghi , 4 ghi ]
Press [ 6 mno , 6 mno ]
n
The input mode incorporates a built-in-dictionary to determine a
word based on the entered characters. A T9word can be entered
more quickly by pressing a key once per character.
Select the Word mode by pressing Left Soft Key
[Abc].
Press a digit key once to enter the character you want
and then enter all the characters to input the word
you want.
To enter a space, press
. The cursor will
automatically move to the next column.
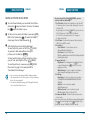
To view the next matching word, press 0
Repeat until letters are entered.
To delete one digit, press Clear Key CLR . To delete
the entire entry, press and hold the Clear Key CLR .
42
MEMORY FUNCTION
H T9WORD INPUT MODE
To change the input mode, press Left Soft Key
[Abc]. When entering special character such as
. @ ? ! - , & : ’ / 1, press 1 repeatedly.
To change from lowercase to uppercase, press
ENTERING LETTERS,
NUMBERS & SYMBOLS
.
To accept the matching word, enter a space and then
press
.
.
43
MEMORY FUNCTION
ENTERING LETTERS,
NUMBERS & SYMBOLS
To enter a compound word:
• Enter the first part of the word and then press the
right to accept it.
Navigation Key
• Enter the last part of the word and then press
enter the word.
Allows you to enter numbers.
Press Left Soft Key
[Abc], scroll down to “123”,
then press OK to change to Numeric Mode.
To enter a number, press a digit key.
MEMORY FUNCTION
H SYMBOL MODE
Allows you to enter symbols.
to
FOR EXAMPLE:
To enter “Hello bill” in the input mode.
• After you enter the 1st letter, press Left Soft Key
to choose the
[Abc] to select input mode and
lower case (T9Word).
• Press 4 ghi , 3 def , 5 jkl , 5 jkl , 6 mno and you
to select it.
will see “Hello” highlighted. Press
• Press 2 abc , 4 ghi , 5 jkl , 5 jkl until you see “bill”
highlighted.
H NUMERIC MODE
ENTERING LETTERS,
NUMBERS & SYMBOLS
Press Left Soft Key
[Abc], scroll down to
“Symbols”, then press OK to change to Symbol
Mode.
To display more symbols, press Navigation Key
or right.
left
To input a symbol, press the number for the symbol,
and the symbol appears in the input screen.
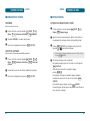
MAKING A CALL THROUGH
THE CONTACT LIST
MEMORY FUNCTION
H ONE-TOUCH/TWO-TOUCH DIALING
Ideal for frequently dialed numbers, this feature allows contact
entries to be dialed via the keypad with only one or two key
presses.
ONE-TOUCH DIALING:
1-9 : Press and hold the number you wish to connect for
more than 1 second.
TWO-TOUCH DIALING:
10-20 : Press the first digit and second digits of the memory
number short and long respectively.
44
45
CHAPTER 4
NOTE
MENU
FUNCTION
This chapter addresses accessing the menu and using its functions
and features to customize your phone.
RECENT CALLS
PHONE BOOK
MEDIA GALLERY
NEO APPLICATIONS
NEO NAVIGATION
SETTINGS
CAMERA
VOICE TOOLS
UTILITIES
46
MENU FUNCTION
CHAPTER 4
MENU FUNCTION
RECENT CALLS
H ALL CALLS
Displays information about the most recently received, dialed and
missed calls.
To see a list of the 270 most recently received, dialed
[MENU],
and missed calls, press Left Soft Key
1 Recent Calls, 1 All Calls.
If the number is already stored in your contacts, only
the name appears. If the number is not stored, only
the phone number appears.
To view details, press OK [OK].
Call details include date, time and phone number.
RECENT CALLS
MENU FUNCTION
H MISSED CALLS
Displays information about the 90 most recently missed calls.
Place a call to a missed call number by simply pressing the Send Key
SEND .
To see a list of the 90 most recently missed calls,
press Left Soft Key
[MENU], 1 Recent Calls,
2 abc Missed Calls.
If the number is already stored in your contacts, only
the name appears. If the number is not stored, only
the phone number appears.
To view missed call details, press OK [OK].
Call details include date, time and phone number.
Press Left Soft Key
[OPTIONS] and then select
[ERASE]
“Save” to save it or press Right Soft Key
to delete it.
• Save: To store the phone number in your phone book.
• Prepend: The user may add a desired number before
the number. It is useful when adding “1” for a
long distance call. You may save it in the phone
book after entering the Prepend.
• New Text Message: To send a Text Message to the
phone number.
• New Picture Msg: To send a Picture Message to the
phone number.
• New Video Msg: To send a Video Message to the phone
number.
• Erase All: To erase all calls listings.
After 270 received, dialed or missed calls, the oldest call will
automatically be erased from the history.
48
Press Left Soft Key
[OPTIONS] and then select
[ERASE]
“Save” to save it or press Right Soft Key
to delete it.
• Save: To store the phone number in your phone book.
• Prepend: The user may add a desired number before
the number. It is useful when adding “1” for a
long distance call. You may save it in the phone
book after entering the Prepend.
• New Text Message: To send a Text Message to the
phone number.
• New Picture Msg: To send a Picture Message to the
phone number.
• New Video Msg: To send a Video Message to the phone
number.
• Erase All: To erase all missed calls listings.
After 90 missed calls, the oldest call will automatically be
erased from the history.
49
MENU FUNCTION
RECENT CALLS
RECENT CALLS
MENU FUNCTION
H RECEIVED CALLS
H DIALED CALLS
To see a list of the 90 most recently received calls,
press Left Soft Key
[MENU], 1 Recent Calls,
3 def Received Calls.
If the number is already stored in your contacts, only
the name appears. If the number is not stored, only
the phone number appears.
To see a list of the 90 most recently dialed numbers,
press Left Soft Key
[MENU], 1 Recent Calls,
4 ghi Dialed Calls.
If the number is already stored in your contacts, only
the name appears. If the number is not stored, only
the phone number appears.
To view received call details, press OK [OK].
To view dialed call details, press OK [OK].
Displays information about the 90 most recently received calls.
Place a call to a received call by simply pressing the Send Key
SEND .
Call details include date, time and phone number.
Displays information about the 90 most recently dialed numbers.
Place a call to a dialed call by simply pressing the Send Key
SEND .
Call details include date, time and phone number.
Press Left Soft Key
[OPTIONS] and then select
[ERASE]
“Save” to save it or press Right Soft Key
to delete it.
Press Left Soft Key
[OPTIONS] and then select
[ERASE]
“Save” to save it or press Right Soft Key
to delete it.
• Save: To store the phone number in your phone book.
• Prepend: The user may add a desired number before
the number. It is useful when adding “1” for a
long distance call. You may save it in the phone
book after entering the Prepend.
• New Text Message: To send a Text Message to the
phone number.
• New Picture Msg: To send a Picture Message to the
phone number.
• New Video Msg: To send a Video Message to the phone
number.
• Erase All: To erase all received calls listings.
• Save: To store the phone number in your phone book.
• Prepend: The user may add a desired number before
the number. It is useful when adding “1” for a
long distance call. You may save it in the phone
book after entering the Prepend.
• New Text Message: To send a Text Message to the
phone number.
• New Picture Msg: To send a Picture Message to the
phone number.
• New Video Msg: To send a Video Message to the phone
number.
• Erase All: To erase all dialed calls listings.
After 90 received calls, the oldest call will automatically be
erased from the history.
After 90 dialed calls, the oldest call will automatically be
erased from the history.
50
51
MENU FUNCTION
RECENT CALLS
H CALL TIMERS
Checks the usage time and manages your calls within the limit you
set. The 11 timers include (Last Call, All Calls, Received Calls, Dialed
Calls, Home Calls, Roaming Calls, Transmit KB, Incoming KB, Total
KB, Lifetime Calls, Lifetime Data Counter):
Press Left Soft Key
5 jkl Call Timers.
[MENU], 1
Recent Calls,
Select “Last Call”, “All Calls”, “Received Calls”, “Dialed
Calls”, “Home Calls”, “Roaming Calls”, “Transmit KB”,
“Incoming KB”, “Total KB”.
To reset an individual, press Right Soft Key
[YES] to reset
[RESET], press the Right Soft Key
it.
To return to the previous page, press OK .
PHONE BOOK
MENU FUNCTION
Stores up to 500 entries, each of which can be assigned to a group.
Entries can be retrieved by name or group.
H NEW ENTRY
Adds a new entry.
Press Left Soft Key
1 New Entry.
[MENU], 2 abc Phone Book,
To enter a name or number, press the Navigation Key
up or down to select the contact field.
• PHONE BOOK FIELDS: Name/Mobile/Home/Work/Email 1/
Group/Picture/Ringtone/Pager/Fax/
Email 2.
• Under “Mobile”, “Home”, “Work”, “Pager” or “Fax”
input the phone number and then by pressing Right Soft
Key
[OPTIONS], you can choose from the following:
1. Hard Pause
2. 2-Sec Pause
Please refer to page 41 for more details on entering
letters, numbers & symbols.
To save the entry, press OK [SAVE].
To return to the previous page, press the Clear Key
CLR .
• For each new contact, at least one phone number or email
address needs to be saved with the contact. “Please enter
number or email address” will be displayed if neither have
been added.
• If the entry name is left empty and a phone number is
provided, the entry will be saved and only the phone
number will be displayed.
52
53
MENU FUNCTION
PHONE BOOK
H LIST ENTRIES
Retrieves an entry by name and calls by simply pressing the Send
Key SEND . You can review all the entries stored in your contact
list or quickly find an entry by entering a name or its character
string.
Press Left Soft Key
[MENU], 2 abc Phone Book,
2 abc List Entries. Or, from idle mode, press Right Soft
Key
[CONTACTS].
The list of names in your contacts is displayed
alphabetically.
Enter a name or its character string or scroll through
the list by pressing the Navigation Key
up or down.
Please refer to page 41 for more details on entering
letters, numbers & symbols.
To edit the entry, press Left Soft Key
[EDIT].
To show detail of the entry, press OK [VIEW].
To use and manage contacts, press Right Soft Key
[OPTIONS] then select:
1. New Entry: To add a New Entry.
2. Prepend: The user may add a desired number before
the number. It is useful when adding “1” for a
long distance call.
3. Erase: To delete a contact.
4. Text Message: To create a Text Message.
5. Picture Message: To create a Picture Message.
6. Video Message: To create a Video Message.
7. Erase All: To delete all contact list.
PHONE BOOK
MENU FUNCTION
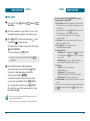
H MESSAGE GROUPS
Allows the user to group up to 10 phone numbers. The user can add,
change, and delete Message Groups.
MESSAGE GROUPS
Press Left Soft Key
[MENU], 2 abc Phone Book,
3 def Message Groups.
To select “New”, press Left Soft Key
[NEW].
Input a new group name.
To save it, press OK [SAVE].
ASSIGN PHONE NUMBER TO MESSAGE GROUPS
To add a new group, press Left Soft Key
[MENU],
2 abc Phone Book, 3 def Message Groups.
To assign phone numbers to a Group, press the Right
[OPTIONS], select “Add”. Press OK .
Soft Key
Select a location and then press Left Soft Key
[MARK/UNMARK]. Your contact entries will be displayed
in alphabetical order.
Select the contact for the group and then press OK .
“Entry added to message group” will be displayed.
Repeat for each location for the Group.
To call the selected number, press the Send Key
SEND .
54
55
MENU FUNCTION
PHONE BOOK
CHANGE MESSAGE GROUP NAME
Press Left Soft Key
[MENU], 2 abc Phone Book,
3 def Message Groups.
Press the Navigation Key
up or down to select the
existing group name that you want to change. The
default groups Family, Friends, Colleagues and Business
cannot be changed.
Press the Right Soft Key
[OPTIONS],
select “Rename”. Press OK .
Input a new group name.
To save it, press OK [SAVE].
SEND TEXT MESSAGE TO A GROUP
Press Left Soft Key
[MENU], 2 abc Phone Book,
3 def Message Groups.
Select an existing group name by pressing the
up or down.
Navigation Key
Press the Right Soft Key
[OPTIONS],
select “Text Message”. Press OK .
PHONE BOOK
MENU FUNCTION
To send the Text Message, press Left Soft Key
[OPTIONS], select “Send”. Press OK .
To save the Text Message, press Left Soft Key
[OPTIONS] and then select “Save As Draft” and then
press OK .
SEND PICTURE MESSAGE TO A GROUP
Press Left Soft Key
[MENU], 2 abc Phone Book,
3 def Message Groups.
Select an existing group name by pressing the
up or down.
Navigation Key
Press the Right Soft Key
[OPTIONS],
select “Picture Message”. Press OK .
Input a “Subject”, “Text”, and “More (Picture
Sound
)“.
or
To send the picture message, press Left Soft Key
[SEND].
To save the picture message, press Right Soft Key
[OPTIONS] and then select “Save As Draft” and then
press OK .
Input a “Text”, “Default CB#”, “Priority” and “Request
Deliv.ACK”.
56
57
MENU FUNCTION
PHONE BOOK
PHONE BOOK
H GROUPS
SEND VIDEO MESSAGE TO A GROUP
Press Left Soft Key
[MENU], 2 abc Phone Book,
3 def Message Groups.
Select an existing group name by pressing the
up or down.
Navigation Key
Press Left Soft Key
4 ghi Groups.
)”.
To send the video message, press Left Soft Key
[SEND].
To save the video message, press Right Soft Key
[OPTIONS] and then select “Save As Draft” and then
press OK .
Press Left Soft Key
[MENU], 2 abc Phone Book,
3 def Message Groups.
Select an existing group name by pressing the
up or down. The default groups
Navigation Key
Family, Friends, Colleagues and Business cannot be
erased.
Press the Right Soft Key
select “Erase”. Press OK .
[OPTIONS],
Press the Right Soft Key
[YES] to erase it.
[MENU], 2 abc Phone Book,
To select “New”, press Left Soft Key
[NEW].
Input a new group name.
To save it, press OK [SAVE].
CHANGE GROUP NAME
Press Left Soft Key
4 ghi Groups.
ERASE MESSAGE GROUPS
58
Groups allows you to classify phone entries into groups with up to 10
numbers in each group. The existing groups include Family, Friends,
Colleagues, Business and No Group and they cannot be erased or
renamed. You can add up to 26 more groups which can be changed
or erased.
ADD NEW GROUP
Press the Right Soft Key
[OPTIONS],
select “Video Message”. Press OK .
Input a “Subject”, “Text”, and “More (Video
MENU FUNCTION
[MENU], 2 abc Phone Book,
Press the Navigation Key
up or down to select the
existing group name that you want to change.
Press the Right Soft Key
[OPTIONS],
select “Rename”. Press OK .
Input a new group name.
To save it, press OK [SAVE].
59
MENU FUNCTION
PHONE BOOK
ERASE GROUP
Press Left Soft Key
4 ghi Groups.
MENU FUNCTION
H SPEED DIALS
[MENU], 2 abc Phone Book,
Select an existing group name by pressing the
up or down.
Navigation Key
Press the Right Soft Key
[OPTIONS],
select “Erase”. Press OK [OK].
Press the Right Soft Key
PHONE BOOK
[YES] to erase it.
When using Erase Group, the entries that were stored in the
erased group are moved to the “No Group” folder.
In idle mode, calls can be placed to numbers stored in speed dial
by pressing & holding the location number on the key pad. For a
2-digit location number, press the first number and then press and
hold the second number.
Press Left Soft Key
5 jkl Speed Dials.
[MENU], 2 abc Phone Book,
To assign a phone number to a location, select the
location and then press OK [SET].
Select the contact by pressing the Navigation Key
up or down. Then press OK [OK].
Select the phone number by pressing the Navigation
Key
up or down. Then press OK [OK].
• “Unassigned location” appears if the location is available.
• To call an assigned number, press & hold the last digit of
the speed dial #.
Press the Right Soft Key
[YES].
“Speed dial set” will be displayed.
60
61
MENU FUNCTION
MEDIA GALLERY
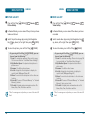
H SOUND BOX
This menu displays the list of downloaded ringtones or saved voice
memos.
Press Left Soft Key
1 Sound Box.
Press Right Soft Key
the following:
[MENU], 3 def Media Gallery,
[OPTIONS] to choose from
1. Send, 2. Rename, 3. Set As, 4. Move, 5. Erase,
6. Erase All, 7. File Info.
Scroll through the downloaded sounds to display the
sound you want to send. Press Right Soft Key
[OPTIONS], then select “1. Send”. Press OK .
H PICTURE BOX
MEDIA GALLERY
MENU FUNCTION
H VIDEO BOX
This menu displays the list of videos taken with the camera and
downloaded video clips.
Press Left Soft Key
3 def Video Box.
[MENU], 3 def Media Gallery,
To erase video, press Left Soft Key
Press Right Soft Key
the following:
[ERASE].
[OPTIONS] to choose from
1. Send, 2. My Movilnet Space, 3. Rename, 4. Set As,
5. Erase All, 6. File Info.
Scroll through the downloaded videos to display the
video you want to send. Press Right Soft Key
[OPTIONS], then select “1. Send”. Press OK .
This menu displays the list of pictures taken with the Camera.
Press Left Soft Key
2 abc Picture Box.
[MENU], 3 def Media Gallery,
To erase picture, press Left Soft Key
Press Right Soft Key
the following:
[ERASE].
[OPTIONS] to choose from
1. Send, 2. My Movilnet Space, 3. Rename, 4. Set As,
5. Erase All, 6. File Info.
Scroll through the downloaded images to display the
image you want to send. Press Right Soft Key
[OPTIONS], then select “1. Send”. Press OK .
62
63
MENU FUNCTION
MEDIA GALLERY
H MP3 BOX
This menu appears when using a micro SD card. To play music
through your phone, copy downloaded music from your PC to the
card then insert the card into your phone.
Press Left Soft Key
4 ghi MP3 Box.
Press Right Soft Key
the following:
[MENU], 3 def Media Gallery,
[OPTIONS] to choose from
1. Setting: To select music file playback options.
(1. Normal, 2. Repeat 1, 3. Repeat All, 4. Shuffle)
2. Set As, 3. Mark All, 4. Unmark All, 5. Erase,
6. Erase All, 7. File Info
When setting an MP3 file from a microSD card as a ringtone
(Options ™ Set As ™ Ringtone), the MP3 file will be moved
to the internal memory and will not appear on the MP3 Box
list any more. You can see the saved MP3 file on the
ringtone list (Settings ™ Call Sounds ™ Call Ringtone).
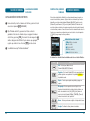
NEO APPLICATIONS
MENU FUNCTION
Your phone provides a unique feature -Neo Applications- that
enables you to download melody ringtones, wallpapers, games and
more from your network to your phone. Please contact your service
provider for the availability of these services.
STARTING NEO APPLICATIONS
To launch “Neo Aplicaciones
” from the idle mode,
press Left Soft Key
[MENU], 5 jkl Neo Applications,
1 Neo Applications or press the Navigation Key
to the left.
When three or more icons appear on the screen, select
.
an application with the Navigation Key
To start the application, press OK .
To end the application, press the End Key END
The phone will return to the idle mode.
.
DOWNLOADING APPLICATIONS
Press Left Soft Key
[MENU], 5 jkl Neo Applications,
1 Neo Applications or press the Navigation Key
to the left.
Select “Neo Aplicaciones
then press OK .
” with the Navigation Key
The phone will access your service provider’s server.
Follow the prompt to download applications.
64
65
MENU FUNCTION
NEO APPLICATIONS
• To select an option, press the Navigation Key
then
press OK .
• When a prompt appears, press OK to proceed or
CLR to cancel.
DOWNLOADING MELODIES/WALLPAPERS
NEO APPLICATIONS
MENU FUNCTION
DELETE APPLICATION
Downloaded melody ringtones, wallpapers and applications are
saved to the data folder in your phone.
Press Left Soft Key
[MENU], 5 jkl Neo Applications,
1 Neo Applications or press the Navigation Key
to the left.
Before downloading melody ringtones and wallpapers, you
need to download the dedicated downloader.
Please contact your service provider for details.
Select “Settings” with Navigation Key and press OK .
APPLYING MELODIES/WALLPAPERS
Select the application to be erased with Navigation Key
then press OK .
Downloaded melody ringtones apply to several functions
including the incoming call alert, new text message alert,
alarm clock and scheduler alarm.
Downloaded wallpapers apply to the idle mode.
Select “Manage Apps” and press OK .
Select “Remove” then press OK .
Select “Yes” then press OK .
CHECKING DATA FOLDER MEMORY
Downloaded melody ringtones, wallpapers and applications are
saved to the data folder in your phone.
Press Left Soft Key
[MENU], 5 jkl Neo Applications,
1 Neo Applications or press the Navigation Key
to the left.
Select “Settings” with Navigation Key and press OK .
Select “Manage Apps” with Navigation Key and
press OK .
To exit, press the End Key END
66
.
67
MENU FUNCTION
NEO NAVIGATION
NEO NAVIGATION
MENU FUNCTION
H STARTING NEO NAVIGATION
FORWARD
LAUNCHING MOBILE WEB 2.0
To forward to the next page, press Right Soft Key
[MENU] then press 3 def .
Now you can access news, sports, weather, and e-mail from your
CDM-8960. Mobile Web 2.0 keeps you updated by providing access
to up-to-date information such as news, sports, weather and stock
quotes when you subscribe to Internet service with your service
provider. Please contact your service provider for a list of available
websites and service details.
Press Left Soft Key
[MENU], 6 mno Neo
Navigation, 1 Connect Web or Navigation Key
right, 1 Connect Web.
GO TO URL
To access the Web site directly by entering the address,
press Right Soft Key
[MENU] then press 4 ghi .
REFRESH
Selecting the refresh item from the Mobile Web menu refreshes
the current page.
H MOBILE WEB MENU
To select “Refresh”, press Right Soft Key
then press 5 jkl .
MOBILE WEB MENU
HISTORY
The Mobile Web menu lists the actions necessary to operate the
Mobile Web.
[MENU],
To access the Mobile Web menu, press Left Soft Key
6 mno Neo Navigation, 1 Connect Web or Navigation Key
right, 1 Connect Web.
[MENU]
To view a list of Web pages and Web addresses that you have
visited or tried to visit.
To select “History”, press Right Soft Key
then press 6 mno .
[MENU]
HOME
SHOW URL
When the home item is selected from the Mobile Web menu, the
phone displays the home page.
Displays the URL address of the page to which you are currently
connected.
To display the homepage, press Right Soft Key
[MENU] then press 1 .
To select “Show URL”, press Right Soft Key
then press 7 pqrs .
BACK
MANAGE MEMORY
To return to the previous page, press Right Soft Key
[MENU] then press 2 abc .
68
[MENU]
Set this option to manage the browser memory.
To select “Manage Memory”, press Right Soft Key
[MENU] then press 8 tuv .
69
MENU FUNCTION
NEO NAVIGATION
SETTINGS
To select “Settings”, press Right Soft Key
then press 9 wxyz .
•
•
•
•
•
•
MENU FUNCTION
H SOUND SETTINGS
[MENU]
RINGER VOLUME
Controls the Ringer volume and alerts you to incoming calls in the
modes listed in the gray box below (You can also adjust the ringer
volume in idle mode with the Side Volume Key):
Downloads
Restart Browser
Scroll Mode
Send Referrer
Key Press Time Out
Connection Time Out
Press Left Soft Key
Sound Settings, 1
ADVANCED
Selecting the advanced item in the Mobile Web menu displays
the advanced menu items.
To select “Advanced”, press Right Soft Key
then press 0 .
SETTINGS
[MENU]
• About
• Encryption: 1. Authentication
2. Root Certificate
3. Current Certificate
[MENU], 7 pqrs Settings, 1
Ringer Volume.
Select one of the following options by pressing the
left or right.
Navigation Key
•
•
•
•
Silent: Mute the ringer.
Vibrate On
Ringer Mode: Ringer volume Up & Down (Level 1~5)
Press Left Soft Key
[PLAY/STOP] to play/stop sound.
To save, press OK [SET].
CALL SOUNDS
To select a ringer type for incoming calls:
EXIT
To exit Mobile Web, press Right Soft Key
[MENU]
then select � by pressing the Navigation Key
down
or press END .
CALL RINGTONE
Press Left Soft Key
[MENU], 7 pqrs Settings,
1 Sound Settings, 2 abc Call Sounds, 1 Call
Ringtone.
Select your desired ringer type.
• Up or Down key: Ringtones or select your desired ringer
type.
• Press Left Soft Key
[PLAY/STOP] to play/stop sound.
Select one of the available ring types.
To confirm, press OK [OK].
70
71
MENU FUNCTION
SETTINGS
SETTINGS
MENU FUNCTION
CALL VIBRATE
PIX MESSAGE
Press Left Soft Key
[MENU], 7 pqrs Settings,
1 Sound Settings, 2 abc Call Sounds, 2 abc Call
Vibrate.
Select “On” or “Off”. Then press OK [OK] to save
it.
Press Left Soft Key
[MENU], 7 pqrs Settings,
1 Sound Settings, 3 def Msg Sounds, 2 abc PIX
Message.
Select “Tone”, “Vibrate” or “Reminder” by
pressing the Navigation Key
up or down and
then select one of the following options by pressing
up or down:
the Navigation Key
MSG SOUNDS
To select a ringer type for Incoming message:
TXT MESSAGE
Press Left Soft Key
[MENU], 7 pqrs Settings,
1 Sound Settings, 3 def Msg Sounds, 1 TXT
Message.
Select “Tone”, “Vibrate” or “Reminder” by
up or down and
pressing the Navigation Key
then select one of the following options by pressing
up or down:
the Navigation Key
• Tone: Ringtones or select your desired ringer type by
up or down.
pressing the Navigation Key
Press Left Soft Key
[PLAY/STOP] to play/stop
sound.
• Vibrate: Select “On” or “Off”.
• Reminder: Select “Once”, “Every 2 Minutes”, “Every 15
Minutes” or “Off”.
• Tone: Ringtones or select your desired ringer type by
up or down.
pressing the Navigation Key
Press Left Soft Key
[PLAY/STOP] to play/stop
sound.
• Vibrate: Select “On” or “Off”.
• Reminder: Select “Once”, “Every 2 Minutes”, “Every 15
Minutes” or “Off”.
To save, press OK [OK].
VOICEMAIL MSG
Press Left Soft Key
[MENU], 7 pqrs Settings,
1 Sound Settings, 3 def Msg Sounds, 3 def
Voicemail MSG.
Select “Tone”, “Vibrate” or “Reminder” by
up or down and
pressing the Navigation Key
then select one of the following options by pressing
up or down:
the Navigation Key
To save, press OK [OK].
72
73
MENU FUNCTION
SETTINGS
• Tone: Ringtones or select your desired ringer type by
up or down.
pressing the Navigation Key
Press Left Soft Key
[PLAY/STOP] to play/stop
sound.
• Vibrate: Select “On” or “Off”.
• Reminder: Select “Once”, “Every 2 Minutes”, “Every 15
Minutes” or “Off”.
SETTINGS
MENU FUNCTION
CALL CONNECT
Notifies you that a call has been successfully placed.
Press Left Soft Key
[MENU], 7 pqrs Settings,
1 Sound Settings, 4 ghi Service Alerts, 3 def
Call Connect.
Select “On” or “Off”. Then press OK [OK] to save
it.
To save, press OK [OK].
SERVICE ALERTS
ROAM
Sounds an alert when leaving a service area and entering a
roaming service area.
Press Left Soft Key
[MENU], 7 pqrs Settings,
1 Sound Settings, 4 ghi Service Alerts, 1
Roam.
Select “On” or “Off”. Then press OK [OK] to save
it.
MINUTE BEEP
Sounds an alert every minute during a call.
Press Left Soft Key
[MENU], 7 pqrs Settings,
1 Sound Settings, 4 ghi Service Alerts, 2 abc
Minute Beep.
Select “On” or “Off”. Then press OK [OK] to save
it.
74
POWER ON/OFF
POWER ON TONE
Allows you to activate/deactivate the power on tones.
Press Left Soft Key
[MENU], 7 pqrs Settings,
1 Sound Settings, 5 jkl Power On/Off,
1 Power On Tone.
Select “On” or “Off”. Then press OK [OK] to save
it.
POWER OFF TONE
Allows you to activate/deactivate the power off tones.
Press Left Soft Key
[MENU], 7 pqrs Settings,
1 Sound Settings, 5 jkl Power On/Off,
2 abc Power Off Tone.
Select “On” or “Off”. Then press OK [OK] to save
it.
75
MENU FUNCTION
SETTINGS
MENU FUNCTION
BACKLIGHT DURATION
KEY TONE
Backlights the display and key pad and activates dimming for easy
viewing in dark places.
To adjust key pad tone:
Press Left Soft Key
[MENU], 7 pqrs Settings, 1
Sound Settings, 6 mno Key Tone.
Select one of the following options by pressing the
left or right:
Navigation Key
• Key Tone: Tone volume Up & Down (Level 1 ~ Level 5)
• Silent
To save, press OK [OK].
H DISPLAY SETTINGS
Allows you to customize the display.
DISPLAY
Press Left Soft Key
[MENU], 7 pqrs Settings,
2 abc Display Settings, 2 abc Backlight Duration,
1 Display.
Select one of the following options by pressing the
up or down:
Navigation Key
•
•
•
•
•
5 Seconds
10 Seconds
30 Seconds
Always On
Always Off
Press OK [OK] to save it.
MY BANNER
The text greeting can be up to 16 characters and is displayed on your
phone’s screen in idle mode.
Press Left Soft Key
Display Settings, 1
SETTINGS
[MENU], 7 pqrs Settings, 2 abc
My Banner.
Enter a new personal greeting.
To change the input mode, press Left Soft Key
[Abc].
Press OK [OK] to save it.
KEYPAD
Press Left Soft Key
[MENU], 7 pqrs Settings,
2 abc Display Settings, 2 abc Backlight Duration,
2 abc Keypad.
Select one of the following options by pressing the
up or down:
Navigation Key
•
•
•
•
•
5 Seconds
10 Seconds
30 Seconds
Always On
Always Off
Press OK [OK] to save it.
76
77
MENU FUNCTION
SETTINGS
CONTRAST
To adjust the display contrast:
Press Left Soft Key
[MENU], 7 pqrs Settings,
2 abc Display Settings, 3 def Contrast.
Select one of the following options by pressing the
up or down:
Navigation Key
•
•
•
•
•
Level 5
Level 4
Level 3
Level 2
Level 1
Press OK [OK] to save it.
WALLPAPER
MAIN SCREEN
Press Left Soft Key
[MENU], 7 pqrs Settings,
2 abc Display Settings, 4 ghi Wallpaper, 1
Main Screen.
Select “Picture” or “Video”.
Select Default to choose a pre-installed display or
Downloads, Picture # or Video # to choose a display
you have downloaded to your phone. To expand
selected image or play video, press Left Soft Key
[VIEW/PLAY].
Select a display from the Animation and the Graphic
up or down.
list by pressing the Navigation Key
Then press OK [OK] to save it.
78
SETTINGS
MENU FUNCTION
SUB SCREEN
Press Left Soft Key
[MENU], 7 pqrs Settings,
2 abc Display Settings, 4 ghi Wallpaper, 2 abc
Sub Screen.
Select Default to choose a pre-installed display.
To expand selected image, press Left Soft Key
[VIEW].
Select a display from the Graphic list by pressing the
up or down.
Navigation Key
Then press OK [OK] to save it.
MENU TYPE
To select a display menu style:
Press Left Soft Key
[MENU], 7 pqrs Settings,
2 abc Display Settings, 5 jkl Menu Type.
Select one of the following options by pressing the
up or down:
Navigation Key
• Graphic Type
• List Type
Press OK [OK] to save it.
79
MENU FUNCTION
SETTINGS
H PHONE SETTINGS
AIRPLANE MODE
Airplane Mode allows you to use many of your phone’s features,
such as Games, Voice Memos, etc., when you are in an airplane or
in any other area where making or receiving calls or data is prohibited. When your phone is in Airplane Mode, it cannot send or
receive any calls or access online information.
Press Left Soft Key
[MENU], 7 pqrs Settings,
3 def Phone Settings, 1 Airplane Mode.
Select “On” or “Off”.
SETTINGS
MENU FUNCTION
Select “E911 Only” or “Location On”.
• E911 Only: Your location will be hidden from network &
application except 911.
• Location On: Your location is now available to the
network.
Press OK [OK] to save it.
SECURITY
Prevents others from using the phone without permission and
allows access to security features only after inputting a password.
LOCK MODE
LANGUAGE
Press Left Soft Key
[MENU], 7 pqrs Settings,
3 def Phone Settings, 4 ghi Security, then enter
“Password”, and then press OK [OK].
Press Left Soft Key
[MENU], 7 pqrs Settings,
3 def Phone Settings, 2 abc Language.
Press 1 Lock Mode, then select “Lock Now”,
“Unlock” or “On Power Up”.
Press OK [OK] to save it.
Selects the language in which letters are displayed on the screen.
Select “English” or “Español”.
Press OK [OK] to save it.
LOCATION
The default password is “1234”.
• Lock Now: Lock the phone.
• Unlock: Do not lock the phone.
• On Power Up: Do not lock the phone now, but automatically lock phone when power is recycled.
Press OK to save it.
To determine whether or not the network system can detect your
position:
Press Left Soft Key
[MENU], 7 pqrs Settings,
3 def Phone Settings, 3 def Location.
80
81
MENU FUNCTION
SETTINGS
RESTRICT
When you attempt to make a restricted call, “Please Enter your
code” appears on the screen.
DIALED
MENU FUNCTION
• Allow: Allows access to the Recent Calls list.
• Restrict: Restricts access to the Recent Calls list.
Press OK [OK] to save it.
Blocks all dialed calls – except emergency calls – but allows an
incoming call to be placed.
CAMERA
Press Left Soft Key
[MENU], 7 pqrs Settings,
3 def Phone Settings, 4 ghi Security, then enter
“Password”, and then press OK [OK].
Press Left Soft Key
[MENU], 7 pqrs Settings,
3 def Phone Settings, 4 ghi Security, then enter
“Password”, and then press OK [OK].
The default password is “1234”.
Press 2 abc Restrict, 1 Dialed, and select
“Allow” or “Restrict” with the Navigation Key
up or down.
• Allow: Allows a dialed call.
• Restrict: Restricts a dialed call.
Press OK [OK] to save it.
RECENT CALLS
Blocks access to the Recent Calls List.
Press Left Soft Key
[MENU], 7 pqrs Settings,
3 def Phone Settings, 4 ghi Security, then enter
“Password”, and then press OK [OK].
The default password is “1234”.
Press 2 abc Restrict, 2 abc Recent Calls, and select
“Allow” or “Restrict” with the Navigation Key
up or down.
82
SETTINGS
Restricts access to the camera mode.
The default password is “1234”.
Press 2 abc Restrict, 3 def Camera, and select
“Allow” or “Restrict” with the Navigation Key
up or down.
• Allow: Allows access to the camera.
• Restrict: Restricts access to the camera.
Press OK [OK] to save it.
900#S
Restricts calling 900 dial service numbers.
Press Left Soft Key
[MENU], 7 pqrs Settings,
3 def Phone Settings, 4 ghi Security, then enter
“Password”, and then press OK [OK].
The default password is “1234”.
Press 2 abc Restrict, 4 ghi 900#s, and select
“Allow” or “Restrict” with the Navigation Key
up or down.
83
MENU FUNCTION
SETTINGS
• Allow: Allows calls to a 900-dial service.
• Restrict: Restricts calls to a 900-dial service.
Press OK [OK] to save it.
LONG DISTANCE
Restricts calling long distance numbers – the phone is limited to
calling numbers within the area.
Press Left Soft Key
[MENU], 7 pqrs Settings,
3 def Phone Settings, 4 ghi Security, then enter
“Password”, and then press OK [OK].
SETTINGS
MENU FUNCTION
RESET PHONE
Press Left Soft Key
[MENU], 7 pqrs Settings,
3 def Phone Settings, 4 ghi Security, then enter
“Password”, and then press OK [OK].
The default password is “1234”.
Press 4 ghi Reset Phone.
“It will erase all data on your Phone. Reset Phone?”
will be displayed.
To reset the phone, press Right Soft Key
[YES].
The default password is “1234”.
Press 2 abc Restrict, 5 jkl Long Distance, and
select “Allow” or “Restrict” with the Navigation
Key
up or down.
• Allow: Allows a long distance call.
• Restrict: Restricts a long distance call.
Press OK [OK] to save it.
EDIT CODE
To change your password:
Press Left Soft Key
[MENU], 7 pqrs Settings,
3 def Phone Settings, 4 ghi Security, then enter
“Password”, and then press OK [OK].
NAM SELECTION
Enables Auto NAM (Number Assignment Modules) or manually
selects a NAM.
AUTO NAM
Automatically switches phone to proper NAM when you have
multiple NAM registrations.
Press Left Soft Key
[MENU], 7 pqrs Settings,
3 def Phone Settings, 5 jkl NAM Selection, 1
Auto NAM.
Select “On” or “Off”.
Press OK [OK] to save it.
The default password is “1234”.
Press 3 def Edit Code.
Enter a new code then press OK [OK].
Enter the new code again and press OK [OK] to
change code.
84
85
MENU FUNCTION
SETTINGS
SETTINGS
MENU FUNCTION
CHANGE NAM
AUTO RETRY
Press Left Soft Key
[MENU], 7 pqrs Settings,
3 def Phone Settings, 5 jkl NAM Selection, 2 abc
Change NAM.
Select “NAM 1 - MOVILNET” or “NAM 2 - MOVILNET”.
Press Left Soft Key
[MENU], 7 pqrs Settings,
4 ghi Call Settings, 2 abc Auto Retry.
Changes the NAM used by the phone when you have multiple
registrations.
Press OK [OK] to save it.
H CALL SETTINGS
ANSWER OPTIONS
To select an answer mode:
Press Left Soft Key
[MENU], 7 pqrs Settings,
4 ghi Call Settings, 1 Answer Options.
Select one of the following options by pressing the
up or down:
Navigation Key
•
•
•
•
Folder Open
Any Key
Auto Answer
Send Only
Press OK [OK] to save it.
Automatically redials after a set time interval.
Select one of the following options by pressing the
up or down:
Navigation Key
•
•
•
•
•
Off
3 Seconds
5 Seconds
7 Seconds
10 Seconds
Press OK [OK] to save it.
TTY MODE
Your phone is able to operate with a TTY (Teletypewriter) device in
both analog and digital modes. This feature is system dependent
and may not be available in all areas.
Press Left Soft Key
[MENU], 7 pqrs Settings,
4 ghi Call Settings, 3 def TTY Mode.
Select one of the following options by pressing the
up or down:
Navigation Key
•
•
•
•
TTY Full
TTY + Talk
TTY + Hear
TTY Off
Press OK [OK] to save it.
86
87
MENU FUNCTION
SETTINGS
ONE TOUCH DIAL
Make a call using the preset speed dial.
Press Left Soft Key
[MENU], 7 pqrs Settings,
4 ghi Call Settings, 4 ghi One Touch Dial.
Select “On” or “Off”.
Press OK [OK] to save it.
VOICE PRIVACY
Enhances voice privacy and avoids tapping during a call.
Press Left Soft Key
[MENU], 7 pqrs Settings,
4 ghi Call Settings, 5 jkl Voice Privacy.
SETTINGS
MENU FUNCTION
H MEMORY
SAVE OPTIONS
You can save various data including Image, Video and Sound files
on either the phone’s memory or memory card.
Press Left Soft Key
5 jkl Memory, 1
[MENU], 7 pqrs Settings,
Save Options.
Select 1 for Sounds, 2 abc for Pictures or 3 def
for Videos with the Navigation Key
and then
select one of the following options by pressing the
up or down:
Navigation Key
• Internal Memory
• External Memory
Select “On” or “Off”.
Press OK [OK] to save it.
Press OK [OK] to save it.
INTERNAL MEMORY
On: Makes it more difficult to wire tap.
You can view the Total, Used, Available memory status.
Press Left Soft Key
[MENU], 7 pqrs Settings,
5 jkl Memory, 2 abc Internal Memory.
The current memory information appears on the
display screen.
To return to the previous page,
press OK [OK] .
88
89
MENU FUNCTION
SETTINGS
EXTERNAL MEMORY
You can view the Total, Used, Available memory status.
Press Left Soft Key
[MENU], 7 pqrs Settings,
5 jkl Memory, 3 def External Memory.
The current memory information appears on the
display screen.
To return to the previous page, press OK [OK] .
H BLUETOOTH
Bluetooth technology connectivity enables wireless connections
between electronic devices. If connected with a Bluetooth
Handsfree device, you can use your phone more freely. With DUN,
you can also use the phone as a wireless modem. It can also be used
to connect wirelessly to products that use Bluetooth wireless technology, such as computers. You can synchronize your phone and
your PC using Bluetooth connectivity. Since devices with Bluetooth
connectivity communicate using radio waves, your phone and the
other device do not need to be in direct line-of-sight. The two
devices only need to be within 10 meters (30 feet) of each other.
The connection can be subject to interference from obstructions
such as walls or other electronic devices. This device is compliant
with Bluetooth specification 1.1, supporting the following profiles:
HSP V1.1 (headset profile), HFP V1.0 (handsfree car kit profile), DUN
V1.1 (dial-upnetworking), GAP (general access profile), SPP V1.1
(serial port profile) and FTP V1.1(file transfer profile).
To ensure interoperability between other devices supporting
Bluetooth technology, use UTStarcom approved enhancements for
this model. Check with the manufacturers of other devices to
determine their compatibility with this phone. There may be
restrictions on using Bluetooth technology in some locations. Check
with your local authorities. If you want more information on this
function, visit the Bluetooth Technology organization Web site:
https://www.bluetooth.org/.
90
SETTINGS
MENU FUNCTION
To access the Bluetooth menu, press Left Soft Key
[MENU], 7 pqrs Settings, 6 mno Bluetooth.
Select from the following options:
Add New Device—To set up a pairing between your phone and
another device with Bluetooth technology. With Bluetooth
activated, place the device you are connecting to in discoverable
mode and select OK.
Off or On—To activate or deactivate Bluetooth connectivity. An
active Bluetooth connection is indicated by
at the top of the
display.
Options—To define how your phone is shown to other devices with
Bluetooth connectivity. To change the name of your phone that is
seen by other users, select My Phone Name, enter the new name,
and select OK. To display your phone to other devices for one
minute or to hide your phone from other users, select Discovery
Mode > On or Off.
Important: Features using Bluetooth technology, or allowing
such features to run in the background while using other
features, increase the demand on battery power and reduce
the battery life.
Bluetooth pairing from phone to PC
Bluetooth pairing between your phone and PC or laptop is
initialized from your phone or from your PC or laptop. To connect
from your phone, do the following:
To enable Bluetooth on your phone, press Left Soft Key
[MENU], 7 pqrs Settings, 6 mno Bluetooth.
[ON]. The Bluetooth icon
is
Press Left Soft Key
displayed in the upper right corner of the main display.
91
MENU FUNCTION
SETTINGS
To pair your phone to your PC or laptop, select Add
New Device. Place the PC you are connecting to in
discoverable mode and select OK. The phone searches
for Bluetooth devices in range and lists all devices
found.
Scroll to your PC or laptop name in the list and select
OK. Enter your lock code on your phone, then enter
the same lock code on your PC or laptop.
Select ”Ask always” or ”Always connect on your
phone”, and select OK. The message Port enabled is
displayed on the phone confirming the pairing.
Bluetooth pairing from PC to phone
To initialize a Bluetooth connection from your PC or laptop to your
phone, do the following:
To enable Bluetooth on your phone, press Left Soft Key
[MENU], 7 pqrs Settings, 6 mno Bluetooth.
. The Bluetooth
To select On, press Left Soft Key
icon
is displayed in the upper right corner of the
main display.
In the Bluetooth menu, press Right Soft Key
[OPTIONS].
Press 2 abc for Discovery Mode. If your phone is not
Set On, “Please, turn on Bluetooth power” will be
displayed and you will be returned to the Bluetooth
[ON].
menu. Press Left Soft Key
92
SETTINGS
MENU FUNCTION
Select “On” then press OK . Your phone is in
discoverable mode by other Bluetooth devices for one
minute.
Press END to return to idle mode. In idle mode
your phone is not performing any functions. Your wallpaper, the time and date will be displayed.
The phone must be in the idle mode to pair with another
device.
From your PC, search for Bluetooth devices. A list of
devices shows the CDM-8960 or the name you selected
for your phone.
Select your phone from the list of found devices and
enter the lock code.
Your phone displays a message asking to pair with your
PC or laptop. Select OK and enter the same lock code
entered on your PC.
Select “Ask always“ or “Always connect on your
phone“, and select OK. The message Port enabled is
displayed on the phone confirming the pairing. All
services such as Dial up Networking (DUN) are available
on the phone.
Available services are also listed on your PC or laptop.
Select services you want to use with your phone.
93
MENU FUNCTION
SETTINGS
If your phone is connected to a laptop or PC using
Bluetooth, you cannot use the USB cable.
To use the USB cable, go to the Bluetooth menu, select the
laptop or PC connected to your phone and then disable the
port using the applicable softkey.
Unpairing a Bluetooth connection
To successfully unpair a Bluetooth connection, you must unpair
both the phone and the PC or laptop. To unpair the connection,
do the following:
To unpair the connection from the phone, scroll to
the name of the PC and select OK. The message “Port
disabled“ is displayed on the phone confirming the
unpairing.
Follow the Bluetooth instructions on you PC or laptop,
or the Bluetooth dongle instructions for unpairing the
PC or laptop from the phone. A dongle is a small USB
device added to a PC or laptop that does not have a
built-in Bluetooth connection. PC, laptop, and dongle
products have website support for Bluetooth
connectivity.
SETTINGS
MENU FUNCTION
H BLUETOOTH MENU
The CDM-8960 is compatible with devices that support the
Bluetooth headset and hands-free profile(s)*. You may create and
store 30 pairings within the CDM-8960 and connect to one device at
a time. The approximate communication range for Bluetooth
wireless technology is up to 30 feet (10 meters).
Read the user guide of each Bluetooth accessory that you
are trying to pair your phone with because the instructions
may vary from device to device.
BLUETOOTH ON/OFF
The Power feature allows you to turn the Bluetooth function on
and off.
Press Left Soft Key
6 mno Bluetooth.
[MENU], 7 pqrs Settings,
Press Left Soft Key
Bluetooth mode.
[ON/OFF] to activate/deactivate
ADD NEW DEVICE
Pairing is the process that allows the handset to locate, establish
and register 1-to-1 connection with the target device.
Press Left Soft Key
6 mno Bluetooth.
[MENU], 7 pqrs Settings,
Select “1. New Device”, then press OK .
If Bluetooth is set to off, “Turn Bluetooth power on?”
[Yes].
will appear. Select Right Soft Key
94
95
MENU FUNCTION
SETTINGS
By pressing Right Soft Key
[OPTIONS], you can
choose from the following:
• My Phone Name: Your phone’s Bluetooth name will
appear to other in-range Bluetooth devices, depending
on your discovery mode. Enter a new name and press
OK to save and exit.
• Discovery Mode: Turns Discovery Mode “on” or
“off.” If Discovery Mode is turned on, other devices
will be able to find your device for one minute.
• Supported Profiles: Displays the following list of
options.
1. Headset: Supports use of a compatible Bluetooth
headset for mono voice.
2. Handsfree: Supports Bluetooth headsets, and may
also support other installed compatible Bluetooth
devices with speaker phone capabilities, such as car
kits or a conference room device.
3. Dial Up Networking: Allows the phone to be
used as a data modem with a compatible Bluetooth
device, such as a laptop or PDA.
4. File Transfer Profile: It supports the FTP server
function only. You can access a file in a shared
folder (CDM-8960) from a laptop, PDA or a phone
equipped with the Bluetooth FTP function. You can
also add a new file from the external device to the
shared folder.
5. Server FTP: It supports the server FTP service only.
Since CDM-8960 works as a server while your
laptop works as a client, you can send/receive
image, sound, or video files by connecting to the
Bluetooth FTP.
SETTINGS
MENU FUNCTION
The handset will prompt you for the passkey.
Consult the Bluetooth accessory instructions for the
appropriate passkey (typically “0000” - 4 zeroes).
Enter the passkey and press OK .
The default PIN code may differ depending on Bluetooth
devices. Please refer to the user guide of the Bluetooth
device that you wish to use.
Once pairing is successful, select “Yes” and press OK
to connect with the device.
Once paired, you will see the device listed in the
“1. New Device” menu.
By pressing Right Soft Key
[OPTIONS], you can
choose from the following:
Remove Device: Removing a device from the paired list.
Rename Device: Renaming the paired device.
Service Find: To search for a new device again.
Device Info: Reviewing information about the paired
device.
Instructions (Place device you are connecting to in
discoverable mode) will be displayed. Highlight the
device and press OK .
96
97
MENU FUNCTION
SETTINGS
CAMERA
MENU FUNCTION
H PHONE INFO
H TAKE PICTURE
MY NUMBER
TAKING A PICTURE FROM THE MENU
Displays your phone number.
Press Left Soft Key
[MENU], 7 pqrs Settings,
7 pqrs Phone Info, 1 My Number.
You will see the MDN/MIN and provider name.
To return to the previous page, press OK [OK].
SW VERSION
Displays the (Software/Hardware/PRL/Browser/Neo) version.
Press Left Soft Key
[MENU], 7 pqrs Settings,
7 pqrs Phone Info, 2 abc SW Version.
The software, hardware and browser versions appear.
To return to the previous page, press OK [OK].
Press Left Soft Key
Take Picture.
[MENU], 8 tuv Camera, 1
Point the camera lens at your subject. You can check
the picture framing through the main display screen.
Press OK [OK], the Left Side Camera Key
to take the picture.
, or
• To view captured images, press Right Soft Key
[GALLERY].
After taking the picture it will be displayed.
[SAVE].
To save the picture, press Left Soft Key
To go back to idle mode without saving the
picture, press the End Key END .
To take another picture without saving the picture
[ERASE].
you just took, press Right Soft Key
To send the picture to someone, press OK [SEND].
Please refer to page 132 for more details on
“Send New Picture Message”.
98
99
MENU FUNCTION
CAMERA
TAKING A PICTURE IN IDLE MODE
To active Camera Mode, press and hold the Left Side
Camera Key when the folder is closed or the Camera
Key
when the folder is open.
To take a picture, when the folder is open press OK
[OK] or the Camera Key
. Or when the folder is
closed, press the Left Side Camera Key .
After taking the picture it will be displayed.
[SAVE].
To save the picture, press Left Soft Key
To go back to idle mode without saving the
picture, press the End Key END .
To take another picture without saving the picture
[ERASE].
you just took, press Right Soft Key
To send the picture to someone, press OK [SEND].
Please refer to page 132 for more details on
“Send New Picture Message”.
• If you receive an incoming call while taking a picture,
the camera will turn off. You may not receive a warning
before the incoming call.
• You cannot change the image size (Settings-Resolution)
once a Fun Frame has been set.
100
CAMERA
MENU FUNCTION
• By pressing Left Soft Key
[MENU], you can
choose from the following:
1. Self Portrait: Switch the viewfinder to the Sub LCD.
To take a picture of yourself by checking the view on
the Sub LCD.
[MENU], you can choose
By pressing Left Soft Key
Sub LCD options: 1. Main LCD/2. Self Timer/
3. Fun Tools.../4. Image Controls.../5. Settings.../
6. Camcorder Mode.
2. Self Timer: To activate the camera’s timer function.
(Off/5 Seconds/10 Seconds)
3. Fun Tools...:
Color Effects: To select picture effects.
(Normal/Gray/Sepia/Negative)
Fun Frame: To select Fun Frame.
(Off/Flower/Mask/Sweet Heart/Fist Punch/Sports/Stars/
Candle/Lips/Sea/Sky.)
4. Image Controls...:
Brightness: Press Navigation Key
right (0~+2)
left (0~-2) to select
or press Navigation Key
brightness control.
White Balance: To select a white tone balance.
(Auto/Sunny/Cloudy/Tungsten/Fluorescent)
5. Settings...:
Resolution: To select a resolution for a picture.
(1280x960/1024x768/640x480/320x240/176x144/
160x120)
Quality: To select a picture quality.
(High/Medium/Low)
Shutter Sound: To select a shutter sound.
(Off/Default/Say “Cheese”/Ready! 123)
6. Camcorder Mode: To switch from camera mode to
video mode.
• User can control zoom directly by pressing the Navigation
Key
. Press the Navigation Key
left/right: Zoom
Down/Up. (Except 1280X960, 1024X768 mode).
101
MENU FUNCTION
CAMERA
CAMERA
H TAKE VIDEO
Press Left Soft Key
Take Video.
[MENU], 8 tuv Camera, 2 abc
Point the camera lens at your subject. You can check
the video framing through the main display screen.
Press OK [REC], the Left Side Camera Key
to take the video.
Camera Key
, or the
To pause/resume the video record, press Left Soft Key
[PAUSE/RESUME].
To stop recording, press OK [STOP].
• To view recorded videos, press Right Soft Key
[GALLERY].
After taking the video it will be displayed.
[SAVE].
To save the video, press Left Soft Key
To go back to idle mode without saving the
video, press the End Key END .
To take another video without saving the video
[ERASE].
you just took, press Right Soft Key
To send the video to someone, press OK [SEND].
Please refer to page 134 for more details on “Send
New Video Message”.
MENU FUNCTION
• By pressing Left Soft Key
[MENU], you can
choose from the following:
1. Self Portrait: Switch the viewfinder to the Sub LCD.
To take a picture of yourself by checking the view on
the Sub LCD.
[MENU], you can choose
By pressing Left Soft Key
Sub LCD options: 1. Main LCD/2. Self Timer/
3. Color Effect/4. Image Controls.../5. Settings.../
6. Camera Mode.
2. Self Timer: To activate the camera’s timer function.
(Off/5 Seconds/10 Seconds)
3. Color Effects: To select picture effects.
(Normal/Gray/Sepia/Negative)
4. Image Controls...:
Brightness: Press Navigation Key
right (0~+2) or
left (0~-2) to select brightpress Navigation Key
ness control.
White Balance: To select a white tone balance.
(Auto/Sunny/Cloudy/Tungsten/Fluorescent)
5. Settings...:
Quality: To select a video quality.
(High/Medium/Low)
Cue Sound: To select a cue sound.
(Off/Default/{“Action”/”Cut”}/{”Ready”/”Stop”})
Mute/Unmute: To select a mute/unmute.
6. Camera Mode: To switch from video mode to camera
mode.
• User can control zoom directly by pressing the Navigation
Key
. Press the Navigation Key
left/right: Zoom
Down/Up.
If you receive an incoming call while taking a video, the
camera mode will turn off.
You may not receive a warning before the incoming call.
102
103
MENU FUNCTION
CAMERA
CAMERA
H PICTURE GALLERY
Press Left Soft Key
Picture Gallery.
MENU FUNCTION
H VIDEO GALLERY
[MENU], 8 tuv Camera, 3 def
Press Left Soft Key
Video Gallery.
[MENU], 8 tuv Camera, 4 ghi
In Review Mode, you can view all the pictures you have
taken and stored.
In Review Mode, you can view all the videos you have
recorded.
Select the picture image by pressing the Navigation
Key
up, down, left or right then press OK [VIEW].
Select record video by pressing the Navigation Key
up, down, left or right then press OK [PLAY].
To erase the picture, press Left Soft Key
To erase the video, press Left Soft Key
104
[ERASE].
[ERASE].
• By pressing Left Soft Key
[OPTIONS], you can
choose from the following:
1. Send: To send picture message. Please refer to page
132 for more details on “Send New Picture Message”.
2. My Movilnet Space: To upload selected picture to
picture server.
3. Rename: To edit the picture’s name.
4. Set As: Assigns the selected picture to display for
specific tasks. (Wallpaper/Picture ID)
5. Move: To move the selected picture to the other save
location.
6. Erase All: To erase all “External Memory” or “Internal
Memory” pictures.
7. File Info: To display picture information such as File
Name, Date, Time, Resolution and Size.
• By pressing Left Soft Key
[OPTIONS], you can
choose from the following:
1. Send: To send video message. Please refer to page 134
for more details on “Send New Video Message”.
2. My Movilnet Space: To upload selected video to
video server.
3. Rename: To edit the video’s name.
4. Set As: Assigns the selected video to display for
specific tasks. (Wallpaper/Ringer ID)
5. Move: To move the selected videos to the other save
location.
6. Erase All: To erase all “External Memory” or “Internal
Memory” video you just took.
7. File Info: To display video information such as File
Name, Date, Time, Resolution and Size.
“Move” menu appears only when you connect the microSD
Card
“Move” menu appears only when you connect the microSD
Card
105
MENU FUNCTION
VOICE TOOLS
Your phone is equipped with an AVR (Advanced Voice Recognition)
feature. This feature allows you to make calls or use the phone’s
functions by simply using your voice. All you have to do is talk into
the phone, and the phone will recognize your voice and complete
tasks by itself.
H AVR (ADVANCED VOICE RECOGNITION)
Press Side AVR Key
.
The phone displays the Command menu and prompts
you to say the name of the command you want to
use. To complete your task, simply follow the voice
prompts. You can speak the name of the command
after you hear a beep.
•
•
•
•
•
•
•
Call <Name><Loc>
Send Text <Name or #>
Send Picture <Name or #>
Send Video <Name or #>
Lookup <Name>
Go To <Menu>
Check <Item>
VOICE TOOLS
MENU FUNCTION
H CALL <NAME><LOC>
Use the Call command to voice dial a name from your contact list
or a phone number. When dialing a number, pronounce each digit,
but do not pause noticeably between the digits. If you experience
problems dialing by number, you can adapt digit dialing to your
voice with Settings -> Digit Dialing -> Adapt Digits.
Press Side AVR Key . You will hear “Please say a
command” and the Voice Commands menu will be
displayed.
If calling a contact from your list, say Call <Name>.
Your phone will ask you to confirm the name you said.
Say Yes if it was repeated correctly. That phone
number will be dialed. If there is more than one
number saved for that contact, you will be asked to
confirm which number to dial.
Examples: - Call Tom Smith, - Call 617 555-1212, - Call
Bob Carson’s mobile, - Call Dee Harper at Home.
When it recognizes one of these commands, the phone
launches the associated application. If the phone does not
hear a command within approximately eight seconds, AVR
mode will turn itself off.
106
107
MENU FUNCTION
VOICE TOOLS
VOICE TOOLS
MENU FUNCTION
H SEND TEXT <NAME OR #>
H SEND VIDEO <NAME OR #>
Press Side AVR Key . You will hear “Please say a
command” and the Voice Commands menu will be
displayed.
Press Side AVR Key . You will hear “Please say a command” and the Voice Commands menu will be displayed.
Use the Send command to send a text message to a specified name
or number.
Use the Send command to send a video message to a specified name
or number.
Say “Send Video <Name or #>”.
Say “Send Text <Name or #>”.
Examples: - “Send Text to Dee Harper’s Mobile“.
- “Send Text Tom Smith“.
- “Send Text to Tom Smith’s Mobile”.
- “Send Text to 617 555-1212”.
Follow instructions for sending a new message on page
130.
H SEND PICTURE <NAME OR #>
Use the Send command to send a picture message to a specified
name or number.
Press Side AVR Key . You will hear “Please say a
command” and the Voice Commands menu will be
displayed.
Say “Send Picture <Name or #>”.
Examples: - “Send Picture to Dee Harper’s Mobile“.
- “Send Picture Tom Smith“.
- “Send Picture to Tom Smith’s Mobile”.
- “Send Picture to 617 555-1212”.
Examples: - “Send Video to Dee Harper’s Mobile“.
- “Send Video Tom Smith“.
- “Send Video to Tom Smith’s Mobile”.
- “Send Video to 617 555-1212”.
Follow instructions for sending a new message on page
130.
H LOOKUP <NAME>
Use the Lookup command to retrieve and display information for any
name stored in your contact list.
Press Side AVR Key . You will hear “Please say a command” and the Voice Commands menu will be displayed.
Say “Lookup <Name>”.
Examples: - Lookup Tom Jones.
The View Contact page will be displayed for that
contact name.
Follow instructions for sending a new message on page
132.
108
109
MENU FUNCTION
VOICE TOOLS
H GO TO <MENU>
Use the Go To command to open an application on your phone.
You can say ”Go To” by itself and be prompted to say the
application name, or you can skip the prompt by saying ”Go To”
followed by the application name.
Press Side AVR Key . You will hear “Please say a
command” and the Voice Commands menu will be
displayed.
Say “Go To” followed immediately by one of the
following items:
•
•
•
•
•
•
110
Contacts
Recent Calls
Messaging
Neo Applications
Setting & Tools
News & Info
VOICE TOOLS
MENU FUNCTION
H CHECK <ITEM>
The Check command lets you check status information for your
phone. You can say “Check“ or “Check Status“ to see and hear all
status information.
Press Side AVR Key . You will hear “Please say a
command” and the Voice Commands menu will be
displayed.
Say “Check” followed immediately by one of the
following items:
•
•
•
•
•
Status
Battery
Signal Strength
Network
My Phone #
111
MENU FUNCTION
VOICE TOOLS
CHOICE LISTS
When voice recognition is not confident it has recognized a name
or number correctly, it will show you a list of up to three choices.
You can control when choice lists appear.
.
Press Right Soft Key
Choice Lists.
[SETTINGS], then 1
Select “Automatic”, “Always On” or “Always Off”.
To save, press OK [OK].
SENSITIVITY
The Sensitivity setting controls how the voice recognition software
determines when a spoken word is a match. If you frequently
experience the messages “Please Repeat...“ or “No Match Found,“
adjust the sensitivity toward Reject Less. If you frequently
experience false activations (when the phone recognizes a name
you didn't say), adjust the sensitivity toward Reject More.
Press Side AVR Key
.
Press Right Soft Key
Sensitivity.
[SETTINGS], then 2 abc
Scroll to “Reject More”, “Recommended” or “Reject
Less”.
To save, press OK [OK].
112
MENU FUNCTION
DIGIT DIALING
H SETTINGS
Press Side AVR Key
VOICE TOOLS
ADAPT DIGITS
Digit Dialing is speaker independent, which means that no
training or adaptation is required. Some users with heavy accents
or unusual voice characteristics may find difficulty in achieving
high accuracy with speaker independent Digit Dialing, so the
Adapt Digits feature allows users to dramatically improve the
digit accuracy through adaptation. Users who get acceptable
digit recognition accuracy will find no additional benefit to
performing the Adapt Digit adaptation.
Press Side AVR Key .
Press Right Soft Key
Digit Dialing.
[SETTINGS], then 3 def
Select 1 for Adapt Digits, press OK [OK].
Wait for the beep, and then repeat the digits using
a normal tone of voice. (The phone plays back your
recording and asks you if the recording sounds
“OK.”)
If the recording sounds OK (no mistakes and no
background noises), say Yes. If you need to re-record
the digits to fix any problems, say No. (The phone
then prompts you to say the digits again.)
Wait for the beep, and then record the digits again.
(Repeat this step until you are satisfied with the
recording.)
After confirming that the recording sounds OK,
repeat the recording process with the next set of
digits. (After six sets of digits, the phone will ask you
whether you want to do more adaptation. Answer
Yes.)
113
MENU FUNCTION
VOICE TOOLS
Repeat steps 4-7 for another nine sets of digits.
(After the ninth set of digits, you will be half-way
through the session and the phone will ask
“More Adaptation?”)
Select OK to continue for six more sets of digits, or
press END for partial adaptation. When you are
finished with a full session, you will reach a screen
that reads, “Adaptation Complete.”
RESET DIGITS
To reset digit adaptation to factory default settings:
Press Side AVR Key .
Press Right Soft Key
for Digit Dialing.
[SETTINGS], then 3 def
Select 2 abc for Reset Digits, press OK [OK].
Read “Reset digit adaptation to factory default
settings?“ and press OK [OK].
VOICE TOOLS
MENU FUNCTION
SOUND
PROMPTS
You can turn audio prompts such as, “Please say a command.”
on or off.
Press Side AVR Key .
Press Right Soft Key
for Sound.
[SETTINGS], then 4 ghi
Select 1 for Prompts, press OK [OK].
Press the Navigation Key
up or down to select
“On” or “Off”, then press OK [OK].
DIGITS
You can turn audio digit playback on or off during digit dialing.
Press Side AVR Key .
Press Right Soft Key
for Sound.
[SETTINGS], then 4 ghi
Select 2 abc for Digits, press OK [OK].
Press the Navigation Key
up or down to select
“On” or “Off”, then press OK [OK].
NAMES
You can turn name playback on or off in the Call, Lookup, and
Send features.
Press Side AVR Key .
Press Right Soft Key
for Sound.
[SETTINGS], then 4 ghi
Select 3 def for Names, press OK [OK].
Press the Navigation Key
up or down to select
“On” or “Off”, then press OK [OK].
114
115
MENU FUNCTION
VOICE TOOLS
VOICE TOOLS
ABOUT
NAME SETTINGS
SPEED
Press Side AVR Key
You can change the speed of name playback.
Press Side AVR Key .
Press Right Soft Key
Sound.
[SETTINGS], then 4
ghi
Press Right Soft Key
About.
[SETTINGS], then 5 jkl
To return to the previous page, press OK [OK].
To save, press OK [OK].
H INFO
VOLUME
Press Side AVR Key
You can change the volume of name playback.
[SETTINGS], then 4
.
The VoiceSignal version appears.
Select 4 ghi Name Settings, 1 Speed, then
press OK [OK].
Scroll “Faster”, “Recommended” or “Slower”.
Press Side AVR Key .
Press Right Soft Key
Sound.
MENU FUNCTION
ghi
Select 4 ghi Name Settings, 2 abc Volume, then
press OK [OK].
Scroll “Louder”, “Recommended” or “Softer”.
.
Select the command menu by pressing the Navigation
Key
up or down, then press Left Soft Key
[INFO].
Command menu information appears.
To return to the previous page, press OK [OK].
To save, press OK [OK].
116
117
MENU FUNCTION
UTILITIES
H ALARM CLOCK
Press Left Soft Key
2 abc Alarm Clock.
MENU FUNCTION
H CALENDAR
Sets an event and reminds you of that event.
[MENU], 9 wxyz Utilities,
Select one of the entries by pressing the Navigation
Key
up or down. To set a new alarm, choose alarm
1, 2 or 3. To edit an existing alarm, select that alarm.
Press OK [OK].
The setting field will be highlighted. Press the
down to select alarm options.
Navigation Key
ALARM
Press the Navigation Key
or Off.
UTILITIES
left or right to select On
TIME
Use the keypad to set a time for the alarm and press
to select “am” or “pm”.
Left Soft Key
FREQUENCY
Press the Navigation Key
left or right to select a
setting for the alarm (Once, Daily, Mon - Fri, Weekends).
RINGER
Press Left Soft Key
[SET], then press the Navigation
Key
up or down to select a Sound Box ringtone and
press OK [OK].
Press Left Soft Key
3 def Calendar.
[MENU], 9 wxyz Utilities,
Press Right Soft Key
[OPTIONS] to manage your
calendar. Press 1 Weekly View, 2 abc Go To Date,
3 def Erase, 4 ghi Erase Passed and 5 jkl Erase All.
ADD NEW
Press the Navigation Key
up, down, left or right to
choose a date in the calendar. Press Left Soft Key
[NEW] to enter a new event.
The Schedule field is highlighted. Enter the name of
down to set
the event. Press the Navigation Key
the other fields for the event:
START TIME
Use the keypad to set a start time and press Left Soft Key
to select “am” or “pm”.
END TIME
Use the keypad to set an end time and press Left Soft
Key
to select “am” or “pm”.
To save an alarm setting, press OK [SAVE].
118
119
MENU FUNCTION
UTILITIES
UTILITIES
MENU FUNCTION
REMINDER
ALERT
Press the Navigation Key
left or right to select a
reminder alert time interval option (0 Minutes,
5 Minutes, 10 Minutes, 15 Minutes).
Press Left Soft Key
[SET], then press the Navigation
Key
up or down to select a Sound Box ringtone and
press OK [OK].
START DATE
VIBRATE
Use the keypad to change or enter the start date.
Press the Navigation Key
Off.
RECURRENCE
Press the Navigation Key
left or right to set the
recurrence of the event (Daily, Weekly, Monthly, Yearly).
For each recurrence setting, press the Navigation Key
down to set the By Count. For Daily, set the number
of days. For Weekly, you can press the Navigation Key
left or right to select By Count or By Day. Then press
down again to make the setting
the Navigation Key
- for By Count, enter the number of weeks, for By Day,
left or right to select a day
press the Navigation Key
of the week. For Monthly, set By Count the number of
right to set By
months, or press the Navigation Key
Day/Month. For Yearly, set By Day/Month.
left or right to set On or
Press OK [SAVE] to save it or CLR [CLR] to return
to the calendar.
The date of the event will be marked on your calendar.
VIEW PLAN LIST
Press Left Soft Key
3 def Calendar.
[MENU], 9 wxyz Utilities,
To view the Calendar List:
Press the Navigation Key
up, down, left or right to
choose an event, then press OK [VIEW].
END DATE
Use the keypad to change or enter the end date.
TIME ZONES
If the Time Zone needs to be adjusted, press Left Soft Key
[SET]. Press the Navigation Key
up or down to
select a new time zone, then press OK .
120
121
MENU FUNCTION
UTILITIES
UTILITIES
H WORLD CLOCK
To display the time and date in pre-programmed cities:
Press Left Soft Key
4 ghi World Clock.
[MENU], 9
wxyz
Utilities,
Press Left Soft Key
[CITIES] to access the Cities List.
up or down to select the
Press the Navigation Key
city, then press OK . Or, press the Navigation Key
up, down, left, or right to select your city using the
world map.
The world map appears with the city, its date and time.
DST (Daylight Saving Time)
Press Right Soft Key
[DST] to set the DST
options. The city you selected will appear in the City
field.
Press the Navigation Key
down.
MENU FUNCTION
START TIME
Use the keypad to set a start time and press Left Soft Key
to select “am” or “pm”.
END DATE
Use the keypad to change or enter the end date.
END TIME
Use the keypad to set an end time and press Left Soft
Key
to select “am” or “pm”.
To save an DST setting, press OK [SAVE].
To return to the previous page, press OK .
H NOTEPAD
Your phone includes an internal notepad that can be used to
compose and store reminders and notes.
Press the Navigation Key
left or right to turn DST
(Daylight Savings Time) On or Off.
Press the Navigation Key
down if you have
selected DST On, or press OK [SAVE] if you have
selected DST Off.
ADD MEMO
START DATE
To add a new memo, press Left Soft Key
[NEW].
Input a new text memo. (Please refer to page 41 for
more details on entering letters, numbers & symbols.)
Use the keypad to change or enter the start date.
To compose a memo (there is an 80-letter limit):
Press Left Soft Key
5 jkl Notepad.
[MENU], 9 wxyz Utilities,
To save memo, press OK [SAVE].
122
123
MENU FUNCTION
UTILITIES
UTILITIES
VIEW MEMO
H CALCULATOR
To access the calculator:
To view a saved memo:
Press Left Soft Key
5 jkl Notepad.
[MENU], 9 wxyz Utilities,
The list of all memos, in saved order, is displayed.
Select a memo and then press OK [VIEW].
The selected memo will appear.
To add a new memo, press Left Soft Key
[NEW].
To erase a memo, press Right Soft Key
[OPTIONS] “Erase”.
To erase all memos, press Right Soft Key
[OPTIONS] “Erase All”.
EDIT MEMO
To edit a memo you have saved:
Press Left Soft Key
5 jkl Notepad.
MENU FUNCTION
[MENU], 9 wxyz Utilities,
The list of all memos, in saved order, is displayed.
up or down to select a
Press the Navigation Key
memo, then press OK [VIEW].
Press Left Soft Key
6 mno Calculator.
[MENU], 9 wxyz Utilities,
Follow the instructions below to calculate
8×6÷4-2.5=9.50
Input 8 and then press the Navigation Key
right.
Input 6 and then press the Navigation Key
Left.
Input 4 and then press the Navigation Key
down.
Input 2 and then press the
to input (.).
Press 5.
Then press OK and you will see the answer.
Navigation Key
right : X, Navigation Key
down : -,
Navigation Key
left : ÷, Navigation Key
up : +,
: ., Left Soft Key
: Clear, OK : =.
To reset, press Left Soft Key
[CLEAR].
• To change the displayed number from positive (+) to
[ ].
negative (-) and vice versa, press
• Press Right Soft Key
[OPERATOR] to use
parenthesis and “Exponent”.
Press OK [EDIT], edit the memo, then
press OK [SAVE] to save it.
124
125
MENU FUNCTION
UTILITIES
UTILITIES
H STOP WATCH
Simultaneously times up to eight different events. To operate the
stop watch:
Press Left Soft Key
7 pqrs Stop Watch.
[MENU], 9 wxyz Utilities,
1. To start the stop watch, press OK [START].
2. To pause it, press OK [STOP].
3. To resume it, press OK [START].
To reset it, press Right Soft Key
[RESET].
To time up to eight events at once:
1. To start, press OK [START].
2. To stop a time period and continue measuring
[CONT].
another one, press Left Soft Key
3. To stop the second and continue measuring a third
[CONT].
one, press Left Soft Key
4. To measure up to eight time periods, repeat the
above steps.
5. To stop the stop watch, press OK [STOP].
6. To review the results, press Left Soft Key
[VIEW].
7. To return to the stop watch, press OK [OK].
8. To reset it, press Right Soft Key
126
H MASS STORAGE
Before using mass storage capabilities, you need to prepare your
device’s data services to synchronize with your desktop or laptop
computer. Once the phone is connected to the PC, you can transfer
your data in the microSD card quickly and easily.
Press Left Soft Key
8 tuv Mass Storage.
To measure a time period:
[RESET].
MENU FUNCTION
[MENU], 9 wxyz Utilities,
Connect your phone to the PC by using the included
USB cable. (Wait until the connection is completed.)
Once plugged into the USB port, the Mass Storage
Device is detected by the host computer.
When you have finished, click on the USB device icon
on your computer’s task bar and follow the instructions
provided to safely unplug the USB cable. (The process
may vary depending on the PC.)
• No driver installation is required for Windows 2000/ME/
XP users. If you use Windows 98/98SE, you have to
download and install the USB Mass Storage Driver.
• To avoid loss of data, DO NOT remove the USB cable, the
microSD card or the battery while files are being accessed
or transferred.
• Make sure to follow the proper procedure when you
disconnect the USB cable. Your computer may no longer
detect your handset when you disconnect it several times
improperly.
• DO NOT change or edit the folder/file name in the
microSD card via the computer or attempt to transfer
large amounts of data from the computer to the microSD
card. It may result in microSD card failure.
127
UTILITIES
CHAPTER 5
MENU FUNCTION
CHAPTER 5
VOICE MAIL, TEXT,
PICTURE, VIDEO
MESSAGING
This chapter addresses Voice Mail, Text, Picture, Video Messaging
functions including:
WHEN A NEW MESSAGE ARRIVES
NEW MESSAGE
VOICEMAIL
INBOX
SENT
DRAFTS
SETTINGS
ERASE ALL
128
VOICE MAIL, TEXT, PICTURE, VIDEO MESSAGING
• DO NOT turn off, put into idle mode or restart your
computer while using the Mass Storage Device. It will
result in loss or damage of data.
• While you are connected to the computer, your phone’s
screen will display “Phone Off.” You cannot make or
receive calls.
• When you connect a Mass Storage device to a peripheral
device, your device may not work properly.
VOICE MAIL, TEXT, PICTURE,
VIDEO MESSAGING
WHEN A NEW MESSAGE
ARRIVES
The following display appears when
a new message arrives.
To display the message, select
“View” and then press OK .
VOICE MAIL, TEXT, PICTURE,
VIDEO MESSAGING
VOICE MAIL, TEXT, PICTURE,
VIDEO MESSAGING
Under “Text”, input a new Text message and then
press OK [OK].
(Please refer to page 41 for more details on
entering letters, numbers and symbols.)
Press Left Soft Key
[OPTIONS], you can choose
from the following:
1. Save As Draft: To save the Text message.
2. Add Quick Text: Inserts already written sentences in
Text message.
NEW MESSAGE
H SEND NEW TXT MESSAGE
Press Left Soft Key
[MENU], 4 ghi Messaging,
1 New Message, then 1 TXT Message.
Under “To”, input the phone number and then
press OK [OK].
By pressing Left Soft Key
[ADD], you can choose
from the following:
1. From List Entries: Search for a phone number which
is stored in the contacts list.
2. Message Groups: Search the groups stored in the
message groups list.
3. To Contacts: To store the phone number in contacts.
130
NEW MESSAGE
Under “Default CB#”, select “On” or “Off” by pressing
left or right.
the Navigation Key
Under “Priority”, select “Normal” or “High” by
left or right.
pressing the Navigation Key
Under “Request Deliv.ACK”, select “On” or “Off” by
left or right.
pressing the Navigation Key
To send the Text message, press Left Soft Key
[OPTIONS], select “Send”. Press OK [OK].
To save the Text message, press Left Soft Key
[OPTIONS], select “Save As Draft”. Press OK [OK].
To cancel the Text message, press Left Soft Key
[OPTIONS], select “Cancel Message”. Press OK [OK].
Input at least one Text message field to save in the draft
box.
131
VOICE MAIL, TEXT, PICTURE,
VIDEO MESSAGING
NEW MESSAGE
NEW MESSAGE
VOICE MAIL, TEXT, PICTURE,
VIDEO MESSAGING
H SEND NEW PICTURE MESSAGE
You can only send one picture at a time.
Press Left Soft Key
[MENU], 4 ghi Messaging,
1 New Message, then 2 abc Picture Message.
By pressing Right Soft Key
[OPTIONS], you can
choose from the following:
1. Preview: To preview a written picture message.
2. Save As Draft: To save the picture message.
3. Add Slide: To add a another message.
4. Priority Level: Select “High“ or “Normal“.
5. Remove Picture: To remove inserted picture.
6. Remove Sound: To remove inserted sound.
Under “To”, input the phone number and then
press OK [OK].
By pressing Left Soft Key
[ADD], you can choose
from the following:
1. From List Entries: Search for a phone number which
is stored in the contacts list.
2. Message Groups: Search the groups stored in the
message groups list.
3. To Contacts: To store the phone number in contacts.
4. My Movilnet Space: To send pictures by using online
Movilnet Address.
To send the Picture message, press Left Soft Key
[SEND].
Under “Subject”, input a subject and then press OK
[OK].(Please refer to page 41 for more details on
entering letters, numbers and symbols. Max 100
characters support.)
Under “Text”, input a new Text message and then
press OK [OK].
(Please refer to page 41 for more details on entering
letters, numbers and symbols. A maximum of 1,000
characters is allowed.)
Under “More”, select “Picture
”or “Sound
”.
up, down, left, or right to
Press Navigation Key
select the picture or sound you would like to send and
then press OK [OK].
132
133
VOICE MAIL, TEXT, PICTURE,
VIDEO MESSAGING
NEW MESSAGE
NEW MESSAGE
VOICE MAIL, TEXT, PICTURE,
VIDEO MESSAGING
H SEND NEW VIDEO MESSAGE
You can only send one video at a time.
Press Left Soft Key
[MENU], 4 ghi Messaging,
1 New Message, then 3 def Video Message.
By pressing Right Soft Key
[OPTIONS], you can
choose from the following:
1. Preview: To preview a written video message.
2. Save As Draft: To save the video message.
3. Priority Level: Select “High“ or “Normal“.
4. Remove Video: To remove inserted video.
Under “To”, input the phone number and then
press OK .
By pressing Left Soft Key
[ADD], you can choose
from the following:
1. From List Entries: Search for a phone number which
is stored in the contacts list.
2. Message Groups: Search the groups stored in the
message groups list.
3. To Contacts: To store the phone number in contacts.
4. My Movilnet Space: To send videos by using online
Movilnet Address.
To send the video message, press Left Soft Key
[SEND].
Under “Subject”, input a subject and then press OK
[OK].(Please refer to page 41 for more details on entering letters, numbers and symbols. Max 100 characters
support.)
Under “Text”, input a new Text message and then
press OK [OK].
(Please refer to page 41 for more details on entering
letters, numbers and symbols. A maximum of 1,000
characters is allowed.)
Under “More”, select “Video
”. Press Navigation
Key
up, down, left, or right to select the video you
would like to send and then press OK [OK].
134
135
VOICE MAIL, TEXT, PICTURE,
VIDEO MESSAGING
VOICEMAIL
VOICEMAIL
VOICE MAIL, TEXT, PICTURE,
VIDEO MESSAGING
New voicemail alerts are sent via an SMS text message. These
messages indicate how many new and urgent voicemails are in your
voicemail box. Open the text message to view the number of new
voice messages in your voicemail. If a caller leaves a callback
number, this number will also be sent via an SMS text message.
Displays the number of voice mails and accesses them by pressing
and holding the Send Key SEND .
VOICE MAIL RETRIEVAL
TO ACCESS YOUR VOICE MAILBOX
If you hear a greeting, press
Press Left Soft Key
[MENU], 4 ghi Messaging,
2 abc Voicemail. Or, To dial voice mail directly, press
, 9 wxyz and then Send Key SEND .
Follow the prompts to enter your lock code and retrieve
your messages.
If you hear your own system greeting when you dial *VM
(
, 9 wxyz ), press
to interrupt it and follow
the prompts to enter your lock code.
VOICE MAIL SETUP
Press
, 9 wxyz and then press Send Key SEND .
(If calling from a touch-tone phone, enter your wireless
number.)
If you hear a greeting, press
to preceed.
You will be charged airtime for using your wireless phone
to set-up or retrieve voice mail. Toll and/or long distance
charges may also apply.
Follow the prompts to personalize your lock code,
GREETING, & MAILBOX OPTIONS.
136
Press
, 9 wxyz and then press Send Key
SEND . (To access your voice mail from outside the
network or from a touch-tone phone, enter your
wireless number.)
to preceed.
You will be charged airtime for using your wireless phone
to set-up or retrieve voice mail. Toll and/or long distance
charges may also apply.
Enter your lock code and press
.
VOICE MAIL SHORTCUTS
• While Listening to a Message Press:
1 Key: Rewind
2 abc Key: Pause
3 def Key: Fast Forward
4 ghi Key: Slower
5 jkl Key: Envelope Info (date/time)
6 mno Key: Faster
Key: Cancel
0 Key: Help
Key: Finish/Skip
1
1 Key: Rewind to Beginning
3 def 3 def Key: Fast Forward to End
7 pqrs Key: Delete Message
• After Listening to a Message Press:
4 ghi Key: Replay
7 pqrs Key: Delete
9 wxyz Key: Save
0 Key: Help
137
VOICE MAIL, TEXT, PICTURE,
VIDEO MESSAGING
INBOX
INBOX
VOICE MAIL, TEXT, PICTURE,
VIDEO MESSAGING
The Inbox manages received Text, Picture/Video messages. To access:
FORWARD
Press Left Soft Key
then 3 def Inbox.
Select to forward the Text or Picture/Video message.
Input the phone number of the person you are
sending the message and then press OK .
•
•
•
•
: Unread
: Read
: MMS Unread
: MMS Read
[MENU], 4 ghi Messaging,
•
•
•
•
: Unread Lock
: Read Lock
: MMS Unread Lock
: MMS Read Lock
Press Navigation Key
up or down to select a
message you would like to view, press OK [OK].
The message is displayed.
To delete a message, press Left Soft Key
press Right Soft Key
[YES].
[ERASE],
TO LIST ENTRIES
Stores the callback number, email address, and numbers
from the address of the received message into your
Contacts.
SAVE PICTURE
Select to save a picture to the “Picture Box” folder.
SAVE VIDEO
Select to save a video to the “Video Box” folder.
Press Right Soft Key
[OPTIONS].
Depending on the type of message you have received
(Text, Picture, or Video), the following items will
appear in the options menu:
PLAY AGAIN
To replay a received Picture Message with sound added
or Video message. Play Again appears only when you
receive a Picture or a Video Message.
REPLY
Replies to the Text or Picture/Video message.
138
SAVE SOUND
Select to save a sound to the “Sound Box” folder.
LOCK & UNLOCK
Select “Lock” to lock the message or “Unlock” to unlock
the message.
SAVE QUICK TEXT
Select to save the content of a Text Message you have
received to “Quick Text”.
139
VOICE MAIL, TEXT, PICTURE,
VIDEO MESSAGING
INBOX
SENT
VOICE MAIL, TEXT, PICTURE,
VIDEO MESSAGING
MESSAGE INFO
PLAY AGAIN
Select to show received Text, Picture, or Video message
information.
Select to replay messages with Video or Sounds attached.
FORWARD
VOICE MAIL, TEXT, PICTURE,
VIDEO MESSAGING
SENT
Manages Text, Picture, and Video messages that have been sent.
Press Left Soft Key
4 ghi Sent.
•
•
•
•
•
: Incomplete
: Delivered
: Not Sent
: Sent
: Pending
[MENU], 4 ghi Messaging, then
LOCK & UNLOCK
•
•
•
•
•
: Incomplete Lock
: Delivered Lock
: Not Sent Lock
: Sent Lock
: Pending Lock
Press Navigation Key
up or down to select a
message you would like to view, press OK [OK].
The message is displayed.
To delete a message, press Left Soft Key
press Right Soft Key
[YES].
[ERASE],
To resend the Text, Picture, or Video message, press
[OPTIONS].
OK [SEND]. Press Right Soft Key
Depending on the type of message you have sent (Text,
Picture, or Video), the following items will appear in
the options menu:
140
Select to forward the Text or Picture/Video message.
Input the phone number of the person you are
sending the message and then press OK [OK].
Input any Text message to go along with the
forwarded message and then press Left Soft Key
[OPTIONS], select “Send”. Press OK [OK].
Select “Lock” to lock the message or “Unlock” to unlock
the message.
SAVE QUICK TEXT
Select to save the content of a Text Message you have
sent to “Quick Text”.
TO LIST ENTRIES
Stores the callback number, email address, and numbers
from the address of the send message into your Contacts.
MESSAGE INFO
Select to show send Text, Picture, or Video message
information.
141
VOICE MAIL, TEXT, PICTURE,
VIDEO MESSAGING
DRAFTS
SETTINGS
Draft Folder contains any draft messages or saved messages.
If message composition is interrupted by a voice call or other
interrupting event, the text of the current composition is
automatically saved in the drafts folder.
Press Left Soft Key
then 5 jkl Drafts.
•
: SMS Draft
[MENU], 4 ghi Messaging,
•
Press Navigation Key
up or down to select a
message and then press OK [EDIT]. The message is
displayed.
To delete a message, press Left Soft Key
press Right Soft Key
[YES].
ENTRY MODE
Allows you to select the default input method including T9Word,
Abc, ABC, 123.
Press Left Soft Key
[MENU], 4 ghi Messaging,
then 6 mno Settings.
Press 1
: MMS Draft
[ERASE],
To send a edited TXT message, press Left Soft Key
[OPTIONS], select “Send”. Press OK [OK].
To send a edited Picture/Video message, press Left Soft
Key
[SEND].
VOICE MAIL, TEXT, PICTURE,
VIDEO MESSAGING
Entry Mode.
Select one of the following options by pressing the
up or down:
Navigation Key
•
•
•
•
T9Word
Abc
ABC
123
Press OK [OK] to save it.
AUTO SAVE
With this feature on, Messages are automatically saved in the
Sent Folder when transmitted.
Press Left Soft Key
[MENU], 4 ghi Messaging,
then 6 mno Settings.
Press 2 abc Auto Save.
Select one of the following options by pressing the
up or down:
Navigation Key
• On: All sent messages saved in the Sent box.
• Off: All sent messages not saved in the Sent box.
• Prompt: “Yes”, “No” dialogue box displayed after sent
message.
142
143
VOICE MAIL, TEXT, PICTURE,
VIDEO MESSAGING
SETTINGS
Press OK [OK] to save it.
AUTO ERASE
With this feature on, read/unlocked messages are automatically
deleted when you exceed the storage limit.
Press Left Soft Key
[MENU], 4 ghi Messaging,
then 6 mno Settings.
Press 3 def Auto Erase.
Select one of the following options by pressing the
up or down:
Navigation Key
• On: Oldest message erased from inbox automatically
when Inbox is full.
• Off: Oldest message not erased from inbox automatically
when Inbox is full.
Press OK [OK] to save it.
TEXT AUTO VIEW
Allows you to directly display the content when receiving a
message in Idle mode. If the “Text Auto View” is set to off, the user
can view the message by entering Messaging Menu -> Inbox.
Press Left Soft Key
[MENU], 4 ghi Messaging,
then 6 mno Settings.
SETTINGS
VOICE MAIL, TEXT, PICTURE,
VIDEO MESSAGING
• On: Text message displayed automatically.
• Off: Text message displayed by going to the inbox or
responding to interactive notification.
Press OK [OK] to save it.
AUTO RECEIVE
Allows you to directly download the content when receiving a
Pictures/Videos message.
Press Left Soft Key
[MENU], 4 ghi Messaging,
then 6 mno Settings.
Press 5 jkl Auto Receive.
Select one of the following options by pressing the
up or down:
Navigation Key
• On: Picture message downloaded automatically.
• Off: Picture message must be retrieved from the Inbox or
at new Text message prompt.
Press OK [OK] to save it.
QUICK TEXT
Allows you to display, edit, and add text phrases. These text strings
allow you to reduce manual text input into messages. Quick Text
can be saved up to 100 characters per phrase.
Press 4 ghi Text Auto View.
Press Left Soft Key
[MENU], 4 ghi Messaging,
then 6 mno Settings.
Select one of the following options by pressing the
up or down:
Navigation Key
Press 6 mno Quick Text.
144
145
VOICE MAIL, TEXT, PICTURE,
VIDEO MESSAGING
SETTINGS
SETTINGS
3.1. Select a Quick Text message from the list.
Press OK [OK].
3.2. To add a new Quick Text message,
[OPTIONS], then select
press Right Soft key
“New“. Enter text, press OK [OK] to save it.
3.3. To erase the saved Quick Text message, press Left
[ERASE]. Press Right Soft Key
Soft Key
[YES] to erase it.
Pre-defined Quick Text as below.
What’s up?/Let’s meet./Check this out!/Whacha doing?/
Thanks/What do you think?/You’ve gotta be here to enjoy
this./Would you like to join me for a date tonight?/
On my way./Yes/You’re the best!/Call me.
CALLBACK #
Allows you to automatically send a designated callback number
when you send a Text Message.
VOICE MAIL, TEXT, PICTURE,
VIDEO MESSAGING
SIGNATURE
Allows you make/edit a signature to automatically send with
your Messages.
Press Left Soft Key
[MENU], 4 ghi Messaging,
then 6 mno Settings.
Press 8 tuv Signature.
To activate Signature function, select “Custom” by
up or down.
pressing the Navigation Key
To deactivate Signature function, select “None”.
Enter the Signature Edit window pressing the
up or down.
Navigation Key
Press OK [OK] to save it.
Press Left Soft Key
[MENU], 4 ghi Messaging,
then 6 mno Settings.
Press 7 pqrs Callback #.
Select “Off” or “On” by pressing the Navigation Key
up or down.
If “On” selected, input a new callback number,
press OK [OK] to save it.
146
147
Press Left Soft Key
then 7 pqrs Erase.
ERASE ALL
CHAPTER 6
VOICE MAIL, TEXT, PICTURE,
VIDEO MESSAGING
[MENU], 4 ghi Messaging,
2.1. To erase all the inbox messages,
press 1 [ERASE INBOX].
2.3. To erase the sent messages,
press 3 def [ERASE SENT].
2.4. To erase all messages, press 4 ghi [ERASE ALL].
Press Right Soft Key
CHAPTER 6
SAFETY AND
WARRANTY
[YES] to erase it.
This chapter addresses the safety guidelines and precautions to
follow when operating your phone. Before operating your phone,
please be aware of all the safety details.
This chapter contains the terms and conditions of services and the
warranty for your phone. Please review them thoroughly.
SAFETY INFORMATION FOR WIRELESS HANDHELD PHONES
SAFETY INFORMATION FOR FCC RF EXPOSURE
SAR INFORMATION
FCC HEARING-AID COMPATIBILITY (HAC) REGULATIONS FOR
WIRELESS DEVICES
FDA CONSUMER UPDATE
AVOID POTENTIAL HEARING LOSS.
CTIA USER INFORMATION REQUIREMENTS
12 MONTH LIMITED WARRANTY
148
SAFETY AND WARRANTY
2.2. To erase all the drafts messages,
press 2 abc [ERASE DRAFTS].
SAFETY AND WARRANTY
SAFETY INFORMATION FOR
WIRELESS HANDHELD PHONES
Read This Information Before Using Your Handheld
Portable Cellular Telephone
EXPOSURE TO RADIO FREQUENCY SIGNALS
Your wireless handheld portable telephone is a low power radio
transmitter and receiver. When it is ON, it receives and also sends
out radio frequency (RF) signals.
SAFETY INFORMATION FOR
WIRELESS HANDHELD PHONES
SAFETY AND WARRANTY
HOLD YOUR PHONE
Your phone is equipped with an intenna. For optimal call quality,
hold the phone by the gripped edges on the side and avoid
touching the top and bottom of the phone.
Correct
Incorrect
In August 1996, the Federal Communications Commissions (FCC)
adopted RF exposure guidelines with safety levels for handheld
wireless phones. Those guidelines are consistent with the safety
standards previously set by both U.S. and international standards
bodies:
ANSI C95.1 (1992) *
NCRP Report 86 (1986) *
ICNIRP (1996) *
Those standards were based on comprehensive and periodic
evaluations of the relevant scientific literature. For example, over
120 scientists, engineers, and physicians from universities,
government health agencies, and industry reviewed the available
body of research to develop the ANSI Standard (C951).
The design of your phone complies with the FCC guidelines (and
those standards).
ANTENNA SAFETY
Use only the supplied or an approved replacement antenna.
Unauthorized antennas, modifications, or attachments could impair
call quality, damage the phone, or result in violation of FCC
regulations. Please contact your local dealer for replacement
antenna.
Do not use the phone with a damaged antenna. If a damaged
antenna comes into contact with the skin, a minor burn may result.
Please contact your local dealer for replacement antenna.
1* : American National Standards Institute.
2* : National Council on Radiation protection and measurements.
3* : International Commission on Nonionizing Radiation Protection.
150
DRIVING SAFETY
Talking on the phone while driving is extremely dangerous and is
illegal in some states. Remember, safety comes first. Check the laws
and regulations on the use of phones in the areas where you drive.
Always obey them.
Also, if using your phone while driving, please:
• Give full attention to driving. Driving safely is your first
responsibility.
• Use hands-free operation, if available.
• Pull off the road and park before making or answering a
call, if driving conditions so require.
If you must use the phone while driving, please use one-touch,
speed dialing, and auto answer modes.
An airbag inflates with great force. DO NOT place objects, including both installed or portable wireless equipment, in the area over
the airbag or in the air bag deployment area. If in-vehicle wireless
equipment is improperly installed and the air bag inflates, serious
injury could result.
WARNING: Failure to follow these instructions may lead to
serious personal injury and possible property damage.
151
SAFETY AND WARRANTY
SAFETY INFORMATION FOR
WIRELESS HANDHELD PHONES
SAFETY INFORMATION FOR
WIRELESS HANDHELD PHONES
SAFETY AND WARRANTY
ELECTRONIC DEVICES
VEHICLES
Your wireless handheld portable telephone is a low power radio
transmitter and receiver. When it is ON, it receives and also sends
out radio frequency (RF) signals.
RF signals may affect improperly installed or inadequately shielded
electronic systems in motor vehicles. Check with the manufacturer
or its representative regarding your vehicle. You should also consult
the manufacturer of any equipment that has been added to your
vehicle.
Most modern electronic equipment is shielded from RF energy.
However, certain electronic equipment may not be shielded against
the RF signals from your wireless phone. Therefore, use of your
phone must be restricted in certain situations.
PACEMAKERS
The Health Industry Manufacturers Association recommends that
a minimum separation of six (6”) inches be maintained between a
handheld wireless phone and a pacemaker to avoid potential
interference with the pacemaker. These recommendations are
consistent with the independent research by and recommendations
of Wireless Technology Research. Persons with pacemakers :
• ALWAYS keep the phone more than six inches from your
pacemaker when the phone is turned on.
• Do not carry the phone in a breast pocket.
• Use the ear opposite the pacemaker to minimize the
potential for interference.
• If you have any reason to suspect that interference is taking
place, turn your phone OFF immediately.
HEARING AIDS
Some digital wireless phones may interfere with some hearing
aids. In the event of such interference, you may want to consult
your service provider (or call the customer service line to discuss
alternatives).
OTHER MEDICAL DEVICES
If you use any other personal medical device, consult the
manufacturer of your device to determine if they are adequately
shielded from external RF energy. Your physician may be able to
assist you in obtaining this information.
Turn your phone OFF in healthcare facilities when any regulations
posted in these areas instruct you to do so. Hospitals or healthcare
facilities may be using equipment that could be sensitive to
external RF energy.
152
POSTED FACILITIES
Turn your phone OFF where posted notices so require.
OTHER SAFETY GUIDELINES
AIRCRAFT
FCC regulations prohibit using your phone while in the air. Turn
your phone OFF before boarding an aircraft. Always request and
obtain prior consent and approval of an authorized airline
representative before using your phone aboard an aircraft. Always
follow the instructions of the airline representative whenever using
your phone aboard an aircraft, to prevent any possible interference
with airborne electronic equipment.
BLASTING AREAS
To avoid interfering with blasting operations, turn your phone OFF
when in a “blasting area” or in areas posted: “Turn off two-way
radio.” Obey all signs and instructions.
POTENTIALLY EXPLOSIVE ATMOSPHERES
Turn your phone OFF when in any area with a potentially explosive
atmosphere and obey all signs and instructions. Sparks in such areas
could cause an explosion or fire resulting in bodily injury or even
death.
Areas with a potentially explosive atmosphere are often, but not
always, clearly marked. They include fueling areas such as gas
stations; below deck on boats; fuel or chemical transfer or storage
facilities; vehicles using liquefied petroleum gas (such as propane or
butane); areas where the air contains chemicals or particles, such as
grain, dust, or metal powders; and any other area where you would
normally be advised to turn off your vehicle’s engine.
153
SAFETY AND WARRANTY
SAFETY INFORMATION FOR
WIRELESS HANDHELD PHONES
PRECAUTIONS
Your Handheld Portable Telephone is a high quality piece of
equipment. Before operating, read all instructions and
cautionary markings on (1) AC/DC Travel Adaptor (2) Battery and
(3) Product Using Battery.
Failure to follow the directions below could result in serious bodily
injury and/or property damage due to battery liquid leakage, fire
or rupture.
• DO NOT use this equipment in an extreme environment
where high temperature or high humidity exists.
• DO NOT abuse the equipment. Avoid striking, shaking
or shocking. When not using, lay down the unit to avoid
possible damage due to instability.
• DO NOT expose this equipment to rain or spilled
beverages.
• DO NOT use unauthorized accessories.
• DO NOT disassemble the phone or its accessories. If
service or repair is required, return unit to an authorized
UTStarcom cellular service center. If unit is disassembled,
the risk of electric shock or fire may result.
• DO NOT short-circuit the battery terminals with metal
items etc.
WARNING
• This product contains a chemical known to the State of
California to cause cancer.
• This product contains a chemical known to the State of
California to cause birth defects or other reproductive
harm.
154
SAFETY INFORMATION FOR
FCC RF EXPOSURE
SAFETY AND WARRANTY
WARNING! READ THIS INFORMATION BEFORE USING
CAUTIONS
In August 1996 the Federal Communications Commission (FCC) of the
United States with its action in Report and Order FCC 96-326 adopted
an updated safety standard for human exposure to radio frequency
electromagnetic energy emitted by FCC regulated transmitters. Those
guidelines are consistent with the safety standard previously set by
both U.S. and international standards bodies.
The design of this phone complies with the FCC guidelines and these
international standards.
BODY-WORN OPERATION
This device was tested for typical body-worn operations with the
back of the phone kept 2.2 cm. from the body. To maintain
compliance with FCC RF exposure requirements, use only belt-clips,
holsters or similar accessories that maintain a 2.2 cm. separation
distance between the user’s body and the back of the phone,
including the antenna. The use of belt-clips, holsters and similar
accessories should not contain metallic components in its assembly.
The use of accessories that do not satisfy these requirements may not
comply with FCC RF exposure requirements, and should be avoided.
For more information about RF exposure, please visit the
FCC website at www.fcc.gov.
155
SAFETY AND WARRANTY
SAR INFORMATION
THIS MODEL PHONE MEETS THE GOVERNMENT’S
REQUIREMENTS FOR EXPOSURE TO RADIO WAVES.
Your wireless phone is a radio transmitter and receiver. It is
designed and manufactured not to exceed the emission limits
for exposure to radiofrequency (RF) energy set by the Federal
Communications Commission of the U.S. Government. These limits
are part of comprehensive guidelines and establish permitted levels
of RF energy for the general population. The guidelines are based
on standards that were developed by independent scientific
organizations through periodic and thorough evaluation of scientific studies. The standards include a substantial safety margin
designed to assure the safety of all persons, regardless of age and
health.
The exposure standard for wireless mobile phones employs a unit
of measurement known as the Specific Absorption Rate, or SAR.
The SAR limit set by the FCC is 1.6 W/kg. * Tests for SAR are
conducted with the phone transmitting at its highest certified
power level in all tested frequency bands. Although the SAR is
determined at the highest certified power level, the actual SAR
level of the phone while operating can be well below the maximum
value. This is because the phone is designed to operate at multiple
power levels so as to use only the power required to reach the
network. In general, the closer you are to a wireless base station
antenna, the lower the power output.
SAR INFORMATION
SAFETY AND WARRANTY
The SAR testing for Body-worn operation was performed with a
belt clip that provided a 22mm separation. The User’s Manual
indicates that any holsters/clips used with this device should contain
no metallic components.
The FCC has granted an Equipment Authorization for this model
phone with all reported SAR levels evaluated as in compliance with
the FCC RF exposure guidelines. SAR information on this model
phone is on file with the FCC and can be found under the Display
Grant section of http://www.fcc.gov/oet/ea after searching on
PP4OVAL.
Additional information on Specific Absorption Rates (SAR) can be
found on the Cellular Telecommunications Industry Association
(CTIA) web-site at http://www.ctia.org.
* In the United States and Canada, the SAR limit for mobile phones
used by the public is 1.6 watts/kg (W/kg) averaged over one gram
of tissue. The standard incorporates a sub-stantial margin of safety
to give additional protection for the public and to account for any
variations in measurements.
Before a phone model is available for sale to the public, it must
be tested and certified to the FCC that it does not exceed the limit
established by the government adopted requirement for safe
exposure. The tests are performed in positions and locations (e.g.,
at the ear and worn on the body) as required by the FCC for each
model. The highest SAR value for this model phone when tested
for use at the ear is 1.38 W/Kg and when worn on the body, as
described in this user guide, is 0.442 W/Kg. (Body-worn measurements differ among phone models, depending upon available
accessories and FCC requirements). While there may be differences
between the SAR levels of various phones and at various positions,
they all meet the government requirement for safe exposure.
156
157
SAFETY AND WARRANTY
FCC HEARING-AID COMPATIBILITY
(HAC) REGULATIONS FOR
WIRELESS DEVICES
On July 10, 2003, the U.S. Federal Communications Commission
(FCC) Report and Order in WT Docket 01-309 modified the
exception of wireless phones under the Hearing Aid Compatibility
Act of 1988 (HAC Act) to require digital wireless phones be compatible with hearing-aids. The intent of the HAC Act is to ensure
reasonable access to telecommunications services for persons with
hearing disabilities.
While some wireless phones are used near some hearing devices
(hearing aids and cochlear implants), users may detect a buzzing, humming, or whining noise. Some hearing devices are more
immune than others to this interference noise, and phones also
vary in the amount of interference they generate.
The wireless telephone industry has developed a rating system for
wireless phones, to assist hearing device users find phones that may
be compatible with their hearing devices. Not all phones have been
rated. Phones that are rated have the rating on their box or a label
located on the box.
The ratings are not guarantees. Results will vary depending on the
user’s hearing device and hearing loss. If your hearing device happens to be vulnerable to interference, you may not be able to use
a rated phone successfully. Trying out the phone with your hearing
device is the best way to evaluate it for your personal needs.
M-Ratings: Phones rated M3 or M4 meet FCC requirements and are
likely to generate less interference to hearing devices than phones
that are not labeled. M4 is the better/higher of the two ratings.
Hearing devices may also be rated. Your hearing device manufacturer or hearing health professional may help you find this rating.
Higher ratings mean that the hearing device is relatively immune to
interference noise.
158
FCC HEARING-AID COMPATIBILITY
(HAC) REGULATIONS FOR
WIRELESS DEVICES
SAFETY AND WARRANTY
The hearing aid and wireless phone rating values are then added
together. A sum of 5 is considered acceptable for normal use. A sum
of 6 is considered for best use.
In the above example, if a hearing aid meets the M2 level rating
and the wireless phone meets the M3 level rating, the sum of the
two values equal M5. This should provide the hearing aid user with
“normal usage” while using their hearing aid with the particular
wireless phone. “Normal usage” in this context is defined as a
signal quality that is acceptable for normal operation.
The M mark is intended to be synonymous with the U mark. The T
mark is intended to be synonymous with the UT mark. The M and
T marks are recommended by the Alliance for Telecommunications
Industries Solutions (ATIS). The U and UT marks are referenced
in Section 20.19 of the FCC Rules. The HAC rating and measurement procedure are described in the American National Standards
Institute (ANSI) C63.19 standard.
For information about hearing aids and digital
wireless phone
• Fcc Hearing Aid Compatibility and Volume Control
http://www.fcc.gov/cgb/dro/hearing.html
• Gallaudet University, RERC
http://tap.gallaudet.edu/voice
• Self Help for Hard of Hearing People Inc. [SHHH]
http://www.hearingloss.org
• The Hearing Aid Compatibility FCC Order
http://hraunfoss.fcc.gov/edocs_public/attachmatch/
FCC-03-168A1.pdf
159
SAFETY AND WARRANTY
FDA CONSUMER UPDATE
U.S. Food and Drug Administration Center for Devices and Radiological Health
Consumer Update on Wireless Phones
1. Do wireless phones pose a health hazard?
The available scientific evidence does not show that any health problems
are associated with using wireless phones. There is no proof, however,
that wireless phones are absolutely safe. Wireless phones emit low levels
of radiofrequency energy (RF) in the microwave range while being
used. They also emit very low levels of RF when in the stand-by mode.
Whereas high levels of RF can produce health effects (by heating tissue),
exposure to low level RF that does not produce heating effects causes
no known adverse health effects. Many studies of low level RF exposures
have not found any biological effects. Some studies have suggested that
some biological effects may occur, but such findings have not been confirmed by additional research. In some cases, other researchers have had
difficulty in reproducing those studies, or in determining the reasons for
inconsistent results.
2. What is FDA’s role concerning the safety of wireless phones?
Under the law, FDA does not review the safety of radiation-emitting
consumer products such as wireless phones before they can be sold, as
it does with new drugs or medical devices. However, the agency has
authority to take action if wireless phones are shown to emit radiofrequency energy (RF) at a level that is hazardous to the user. In such a case,
FDA could require the manufacturers of wireless phones to notify users
of the health hazard and to repair, replace or recall the phones so that
the hazard no longer exists. Although the existing scientific data do not
justify FDA regulatory actions, FDA has urged the wireless phone industry to take a number of steps, including the following:
• Support needed research into possible biological effects of RF of the
type emitted by wireless phones;
• Design wireless phones in a way that minimizes any RF exposure to the
user that is not necessary for device function;
and
• Cooperate in providing users of wireless phones with the best possible
information on possible effects of wireless phone use on human health.
FDA belongs to an interagency working group of the federal agencies
that have responsibility for different aspects of RF safety to ensure
coordinated efforts at the federal level. The following agencies belong
to this working group:
160
FDA CONSUMER UPDATE
SAFETY AND WARRANTY
• National Institute for Occupational Safety and Health
• Environmental Protection Agency
• Federal Communications Commission
• Occupational Safety and Health Administration
• National Telecommunications and Information Administration
The National Institutes of Health participates in some inter-agency working group activities, as well. FDA shares regulatory responsibilities for
wireless phones with the Federal Communications Commission (FCC). All
phones that are sold in the United States must comply with FCC safety
guidelines that limit RF exposure. FCC relies on FDA and other health
agencies for safety questions about wireless phones. FCC also
regulates the base stations that the wireless phone networks rely upon.
While these base stations operate at higher power than do the wireless
phones themselves, the RF exposures that people get from these base
stations are typically thousands of times lower than those they can get
from wireless phones. Base stations are thus not the subject of the safety
questions discussed in this document.
3. What kinds of phones are the subject of this update?
The term “wireless phone” refers here to hand-held wireless phones
with built-in antennas, often called “cell,” “mobile,” or “PCS” phones.
These types of wireless phones can expose the user to measurable
radiofrequency energy (RF) because of the short distance between the
phone and the user’s head. These RF exposures are limited by Federal
Communications Commission safety guidelines that were developed with
the advice of FDA and other federal health and safety agencies. When
the phone is located at greater distances from the user, the exposure
to RF is drastically lower because a person’s RF exposure decreases
rapidly with increasing distance from the source. The so-called “cordless
phones,” which have a base unit connected to the telephone wiring in a
house, typically operate at far lower power levels, and thus produce RF
exposures far below the FCC safety limits.
4. What are the results of the research done already?
The research done thus far has produced conflicting results, and many
studies have suffered from flaws in their research methods. Animal
experiments investigating the effects of radiofrequency energy (RF)
exposures characteristic of wireless phones have yielded conflicting
results that often cannot be repeated in other laboratories. A few animal
studies, however, have suggested that low levels of RF could accelerate
the development of cancer in laboratory animals.
161
SAFETY AND WARRANTY
FDA CONSUMER UPDATE
However, many of the studies that showed increased tumor development used animals that had been genetically engineered or treated
with cancer-causing chemicals so as to be predisposed to develop cancer
in the absence of RF exposure. Other studies exposed the animals to
RF for up to 22 hours per day. These conditions are not similar to the
conditions under which people use wireless phones, so we don’t know
with certainty what the results of such studies mean for human health.
Three large epidemiology studies have been published since December
2000. Between them, the studies investigated any possible association
between the use of wireless phones and primary brain cancer, glioma,
meningioma, or acoustic neu-roma, tumors of the brain or salivary gland,
leukemia, or other cancers. None of the studies demonstrated the existence of any harmful health effects from wireless phone RF exposures.
However, none of the studies can answer questions about long-term
exposures, since the average period of phone use in these studies was
around three years.
5. What research is needed to decide whether RF exposure from
wireless phones poses a health risk?
A combination of laboratory studies and epidemiological studies of
people actually using wireless phones would provide some of the data
that are needed. Lifetime animal exposure studies could be completed in
a few years. However, very large numbers of animals would be needed
to provide reliable proof of a cancer promoting effect if one exists.
Epidemiological studies can provide data that is directly applicable to
human populations, but 10 or more years’ follow-up may be needed
to provide answers about some health effects, such as cancer. This is
because the interval between the time of exposure to a cancer-causing
agent and the time tumors develop - if they do -may be many, many
years. The interpretation of epidemiological studies is hampered by difficulties in measuring actual RF exposure during day-to-day use of wireless phones. Many factors affect this measurement, such as the angle at
which the phone is held, or which model of phone is used.
6. What is FDA doing to find out more about the possible health
effects of wireless phone RF?
FDA is working with the U.S. National Toxicology Program and with
groups of investigators around the world to ensure that high priority
animal studies are conducted to address important questions about
the effects of exposure to radiofrequency energy (RF). FDA has been
a leading participant in the World Health Organization International
Electromagnetic Fields (EMF) Project since its inception in 1996. An influ-
162
FDA CONSUMER UPDATE
SAFETY AND WARRANTY
ential result of this work has been the development of a detailed agenda
of research needs that has driven the establishment of new research
programs around the world. The Project has also helped develop a
series of public information documents on EMF issues. FDA and the
Cellular Telecommunications & Internet Association (CTIA) have a formal
Cooperative Research and Development Agreement (CRADA) to do
research on wireless phone safety. FDA provides the scientific oversight,
obtaining input from experts in government, industry, and academic
organizations. CTIA-funded research is conducted through contracts to
independent investigators. The initial research will include both laboratory studies and studies of wireless phone users. The CRADA will also
include a broad assessment of additional research needs in the context
of the latest research developments around the world.
7. How can I find out how much radiofrequency energy exposure
I can get by using my wireless phone?
All phones sold in the United States must comply with Federal
Communications Commission (FCC) guidelines that limit radiofrequency
energy (RF) exposures. FCC established these guidelines in consultation
with FDA and the other federal health and safety agencies. The FCC limit
for RF exposure from wireless telephones is set at a Specific Absorption
Rate (SAR) of 1.6 watts per kilogram (1.6 W/kg). The FCC limit is consistent with the safety standards developed by the Institute of Electrical
and Electronic Engineering (IEEE) and the National Council on Radiation
Protection and Measurement. The exposure limit takes into consideration
the body’s ability to remove heat from the tissues that absorb energy
from the wireless phone and is set well below levels known to have
effects. Manufacturers of wireless phones must report the RF exposure
level for each model of phone to the FCC. The FCC website (http://www.
fcc.gov/oet/rfsafety) gives directions for locating the FCC identification
number on your phone so you can find your phone’s RF exposure level in
the online listing.
8. What has FDA done to measure the radiofrequency energy
coming from wireless phones ?
The Institute of Electrical and Electronic Engineers (IEEE) is developing a technical standard for measuring the radiofrequency energy
(RF) exposure from wireless phones and other wireless handsets with
the participation and leadership of FDA scientists and engineers. The
standard, “Recommended Practice for Determining the Spatial-Peak
Specific Absorption Rate (SAR) in the Human Body Due to Wireless
Communications Devices: Experimental Techniques,” sets forth the
163
SAFETY AND WARRANTY
FDA CONSUMER UPDATE
first consistent test methodology for measuring the rate at which RF is
deposited in the heads of wireless phone users. The test method uses
a tissue-simulating model of the human head. Standardized SAR test
methodology is expected to greatly improve the consistency of
measurements made at different laboratories on the same phone. SAR is
the measurement of the amount of energy absorbed in tissue, either by
the whole body or a small part of the body. It is measured in watts/kg (or
milliwatts/g) of matter. This measurement is used to determine whether
a wireless phone complies with safety guidelines.
9. What steps can I take to reduce my exposure to
radiofrequency energy from my wireless phone?
If there is a risk from these products—and at this point we do not know
that there is—it is probably very small. But if you are concerned about
avoiding even potential risks, you can take a few simple steps to minimize your exposure to radiofrequency energy (RF). Since time is a key
factor in how much exposure a person receives, reducing the amount of
time spent using a wireless phone will reduce RF exposure.
• If you must conduct extended conversations by wireless phone every
day, you could place more distance between your body and the source
of the RF, since the exposure level drops off dramatically with distance.
For example, you could use a headset and carry the wireless phone
away from your body or use a wireless phone connected to a remote
antenna. Again, the scientific data do not demonstrate that wireless
phones are harmful. But if you are concerned about the RF exposure
from these products, you can use measures like those described above to
reduce your RF exposure from wireless phone use.
10. What about children using wireless phones?
The scientific evidence does not show a danger to users of wireless
phones, including children and teenagers. If you want to take steps to
lower exposure to radiofrequency energy (RF), the measures described
above would apply to children and teenagers using wireless phones.
Reducing the time of wireless phone use and increasing the distance
between the user and the RF source will reduce RF exposure. Some
groups sponsored by other national governments have advised that
children be discouraged from using wireless phones at all. For example,
the government in the United Kingdom distributed leaflets containing
such a recommendation in December 2000. They noted that no evidence
exists that using a wireless phone causes brain tumors or other ill effects.
Their recommendation to limit wireless phone use by children was strictly
precautionary; it was not based on scientific evidence that any health
hazard exists.
164
FDA CONSUMER UPDATE
SAFETY AND WARRANTY
11. What about wireless phone interference with medical
equipment?
Radiofrequency energy (RF) from wireless phones can interact with some
electronic devices. For this reason, FDA helped develop a detailed test
method to measure electromagnetic interference (EMI) of implanted
cardiac pacemakers and defibrillators from wireless telephones. This test
method is now part of a standard sponsored by the Association for the
Advancement of Medical instrumentation (AAMI). The final draft, a joint
effort by FDA, medical device manufacturers, and many other groups,
was completed in late 2000. This standard will allow manufacturers to
ensure that cardiac pacemakers and defibrillators are safe from wireless
phone EMI.
FDA has tested hearing aids for interference from handheld wireless
phones and helped develop a voluntary standard sponsored by the
Institute of Electrical and Electronic Engineers (IEEE). This standard
specifies test methods and performance requirements for hearing aids
and wireless phones so that that no interference occurs when a person
uses a “compatible” phone and a “compatible” hearing aid at the same
time. This standard was approved by the IEEE in 2000. FDA continues to
monitor the use of wireless phones for possible interactions with other
medical devices. Should harmful interference be found to occur, FDA
will conduct testing to assess the interference and work to resolve the
problem.
12. Where can I find additional information?
For additional information, please refer to the following resources:
• FDA web page on wireless phones
(http://www.fda.gov/cdrh/phones/index.html)
• Federal Communications Commission (FCC) RF Safety Program
(http://www.fcc.gov/oet/rfsafety)
• International Commission on Non-Ionizing Radiation Protection
(http://www.icnirp.de)
• World Health Organization (WHO) International EMF Project
(http://www.who.int/emf)
• National Radiological Protection Board (UK) (http://www.nrpb.org.uk/)
165
SAFETY AND WARRANTY
AVOID POTENTIAL
HEARING LOSS.
Prolonged exposure to loud sounds (including music) is the most
common cause of preventable hearing loss. Some scientific research
suggests that using portable audio devices, such as portable music
players and cellular telephones, at high volume settings for long
durations may lead to
permanent noise-induced hearing loss. This includes the use of
headphones (including headsets, earbuds and Bluetooth® or other
wireless devices). Exposure to very loud sound has also been associated in some studies with tinnitus (a ringing in the ear), hypersensitivity to sound and distorted hearing. Individual susceptibility to noiseinduced hearing loss and other potential hearing problems varies.
The amount of sound produced by a portable audio device varies
depending on the nature of the sound, the device, the device settings and the headphones. You should follow some commonsense
recommendations when using any portable audio device:
• Set the volume in a quiet environment and select the lowest volume at which you can hear adequately.
• When using headphones, turn the volume down if you cannot
hear the people speaking near you or if the person sitting next to
you can hear what you are listening to.
• Do not turn the volume up to block out noisy surroundings. If you
choose to listen to your portable device in a noisy environment,
use noise-cancelling headphones to block out background environmental noise.
AVOID POTENTIAL
HEARING LOSS.
SAFETY AND WARRANTY
You can obtain additional information on this subject from
the following sources:
American Academy of Audiology
11730 Plaza American Drive, Suite 300
Reston, VA 20190
Voice: (800) 222-2336
Email: [email protected]
Internet: www.audiology.org
National Institute on Deafness and Other
Communication Disorders
National Institutes of Health
31 Center Drive, MSC 2320
Bethesda, MD USA 20892-2320
Voice: (301) 496-7243
Email: [email protected]
Internet: http://www.nidcd.nih.gov/health/hearing
National Institute for Occupational Safety and Health
Hubert H. Humphrey Bldg.
200 Independence Ave., SW
Washington, DC 20201
Voice: 1-800-35-NIOSH (1-800-356-4674)
Internet: http://www.cdc.gov/niosh/topics/noise/default.html
• Limit the amount of time you listen. As the volume increases, less
time is required before your hearing could be affected.
• Avoid using headphones after exposure to extremely loud noises,
such as rock concerts, that might cause temporary hearing loss.
Temporary hearing loss might cause unsafe volumes to sound
normal.
• Do not listen at any volume that causes you discomfort. If you
experience ringing in your ears, hear muffled speech or experience
any temporary hearing difficulty after listening to your portable
audio device, discontinue use and consult your doctor.
166
167
SAFETY AND WARRANTY
CTIA USER INFORMATION
REQUIREMENTS
• Do not disassemble or open crush, bend or deform, puncture or
shred
• Do not modify or remanufacture, attempt to insert foreign objects
into the battery, immerse or expose to water or other liquids,
expose to fire, explosion or other hazard.
• Only use the battery for the system for which it is specified
• Only use the battery with a charging system that has been qualified with the system per this standard. Use of an unqualified
battery or charger may present a risk of fire, explosion, leakage,
or other hazard.
• Do not short circuit a battery or allow metallic conductive objects
to contact battery terminals.
• Replace the battery only with another battery that has been qualified with the system per this standard, IEEE-Std-1725-2006. Use of
an unqualified battery may present a risk of fire, explosion, leakage or other hazard.
• Promptly dispose of used batteries in accordance with local regulations
• Battery usage by children should be supervised.
• Avoid dropping the phone or battery. If the phone or battery is
dropped, especially on a hard surface, and the user suspects damage, take it to a severe center for inspection.
• Improper battery use may result in a fire, explosion or other
hazard.
12 MONTH LIMITED
WARRANTY
SAFETY AND WARRANTY
UTStarcom Personal Communications (the Company) warrants to
the original retail purchaser of this UTStarcom handheld portable
cellular telephone, that should this product or any part thereof
during normal consumer usage and conditions, be proven defective
in material or workmanship that results in product failure within
the first twelve (12) month period from the date of purchase, such
defect(s) will be repaired or replaced (with new or rebuilt parts) at
the Company’s option, without charge for parts or labor directly
related to the defect(s).
The antenna, keypad, display, rechargeable battery and battery
charger, if included, are similarly warranted for twelve (12) months
from date of purchase.
This Warranty extends only to consumers who purchase the product
in the United States or Canada and it is not transferable or assignable.
This Warranty does not apply to:
(a) Product subjected to abnormal use or conditions, accident,
mishandling, neglect, unauthorized alteration, misuse, improper
installation or repair or improper storage;
(b) Product whose mechanical serial number or electronic serial
number has been removed, altered or defaced.
(c) Damage from exposure to moisture, humidity, excessive temperatures or extreme environmental conditions;
(d) Damage resulting from connection to, or use of any accessory or
other product not approved or authorized by the Company;
(e) Defects in appearance, cosmetic, decorative or structural items
such as framing and non-operative parts;
(f) Product damaged from external causes such as fire, flooding,
dirt, sand, weather conditions, battery leakage, blown fuse,
theft or improper usage of any electrical source.
The Company disclaims liability for removal or reinstallation of the
product, for geographic coverage, for inadequate signal reception
by the antenna or for communications range or operation of the
cellular system as a whole.
168
169
SAFETY AND WARRANTY
12 MONTH LIMITED
WARRANTY
When sending your wireless device to UTStarcom Personal
Communications for repair or service, please note that any personal data or software stored on the device may be inadvertently
erased or altered. Therefore, we strongly recommend you make
a back up copy of all data and software contained on your device
before submitting it for repair or service. This includes all contact
lists, downloads (i.e. third-party software applications, ringtones,
games and graphics) and any other data added to your device. In
addition, if your wireless device utilizes a SIM or Multimedia card,
please remove the card before submitting the device and store
for later use when your device is returned, UTStarcom Personal
Communications is not responsible for and does not guarantee
restoration of any third-party software, personal information or
memory data contained in, stored on, or integrated with any wireless device, whether under warranty or not, returned to UTStarcom
Personal Communications for repair or service.
To obtain repairs or replacement within the terms of this Warranty,
the product should be delivered with proof of Warranty coverage
(e.g. dated bill of sale), the consumer’s return address, daytime
phone number and/or fax number and complete description of the
problem, transportation prepaid, to the Company at the address
shown below or to the place of purchase for repair or replacement
processing. In addition, for reference to an authorized Warranty
station in your area, you may telephone in the United States (800)
229-1235, and in Canada (800) 465-9672 (in Ontario call 416-6953060).
THE EXTENT OF THE COMPANY’S LIABILITY UNDER THIS WARRANTY
IS LIMITED TO THE REPAIR OR REPLACEMENT PROVIDED ABOVE
AND, IN NO EVENT, SHALL THE COMPANY’S LAIBILITY EXCEED THE
PURCHASE PRICE PAID BY PURCHASER FOR THE PRODUCT.
ANY IMPLIED WARRANTIES, INCLUDING ANY IMPLIED WARRANTY
OF MERCHANTABILITY OR FITNESS FOR A PARTICULAR PURPOSE,
SHALL BE LIMITED TO THE DURATION OF THIS WRITTEN
WARRANTY. ANY ACTION FOR BREACH OF ANY WARRANTY MUST
BE BROUGHT WITHIN A PERIOD OF 18 MONTHS FROM DATE OF
ORIGINAL PURCHASE. IN NO CASE SHALL THE COMPANY BE LIABLE
FOR AN SPECIAL CONSEQUENTIAL OR INCIDENTAL DAMAGES FOR
BREACH OF THIS OR ANY OTHER WARRANTY, EXPRESS OR IMPLIED,
WHATSOEVER.
170
12 MONTH LIMITED
WARRANTY
SAFETY AND WARRANTY
THE COMPANY SHALL NOT BE LIABLE FOR THE DELAY IN
RENDERING SERVICE UNDER THIS WARRANTY OR LOSS OF USE
DURING THE TIME THE PRODUCT IS BEING REPAIRED OR REPLACED.
No person or representative is authorized to assume for the
Company any liability other than expressed herein in connection
with the sale of this product.
Some states or provinces do not allow limitations on how long an
implied warranty lasts or the exclusion or limitation of incidental
or consequential damage so the above limitation or exclusions may
not apply to you. This Warranty gives you specific legal rights, and
you may also have other rights, which vary from state to state or
province to province.
IN USA:
UTStarcom Personal Communications
555 Wireless Blvd.
Hauppauge, NY 11788
(800) 229-1235
IN CANADA: UTStarcom Canada Company
5535 Eglinton Avenue West
Suite# 234
Toronto, ON M9C 5K5
(800) 465-9672
171
ÍNDICE
CAPÍTULO 1. ANTES DE USAR EL TELÉFONO ........................................5
CONTENIDO DEL PAQUETE.................................................................6
DESCRIPCIÓN DEL TELÉFONO ............................................................7
LAS TECLAS DE FUNCIÓN.........................................................................8
INDICADORES EN LA PANTALLA ...........................................................12
USO DE LA BATERÍA .........................................................................15
INSTALACIÓN DE LA BATERÍA ...............................................................15
EXTRACCIÓN DE LA BATERÍA ................................................................16
CARGA DE LA BATERÍA ..........................................................................17
INFORMACIÓN SOBRE EL MANEJO DE LA BATERÍA .......................18
QUÉ DEBE HACER ...................................................................................18
QUÉ NO DEBE HACER ............................................................................18
CAPÍTULO 2. FUNCIONAMIENTO BÁSICO ...........................................19
ENCENDER / APAGAR EL TELÉFONO ................................................20
ENCENDER EL TELÉFONO .......................................................................20
APAGAR EL TELÉFONO ..........................................................................20
ACCESO AL MENÚ ............................................................................21
RESUMEN DEL MENÚ .......................................................................22
FUNCIONES BÁSICASBÁSICAS .........................................................25
REALIZAR UNA LLAMADA .....................................................................25
RESPONDER LLAMADAS ........................................................................26
NOTIFICACION DE LLAMADA PERDIDA ................................................26
FUNCION DE PAUSA DE 2 SEGUNDOS/PAUSA FIJA ..............................27
RESPONDER UNA LLAMADA .................................................................27
LLAMADA TRIPARTITA ...........................................................................28
FUNCIÓN DE LLAMADA EN ESPERA......................................................28
CÓMO REALIZAR UNA LLAMADA DESDE LA LISTA DE
CONTACTOS ............................................................................................29
AJUSTE DEL VOLUMEN ..........................................................................29
AJUSTE DEL VOLUMEN DE LAS LLAMADAS .........................................29
FUNCIÓN DE IDENTIFICACIÓN DEL LLAMADOR...................................30
ACTIVACIÓN / DESACTIVACIÓN DEL VIBRADOR ..................................30
ALTAVOZ .................................................................................................30
REPRODUCTOR DE MÚSICA ...................................................................31
DURANTE UNA LLAMADA ...............................................................31
1
ÍNDICE
OPCIONES DISPONIBLES DURANTE UNA LLAMADA ............................31
REALIZAR UNA LLAMADA DE EMERGENCIA ..................................33
911 EN MODO BLOQUEO ......................................................................33
911 UTILIZAR CUALQUIER SISTEMA DISPONIBLE .................................33
UTILIZAR LA TARJETA microSD .......................................................34
UTILIZAR LA TARJETA microSD..............................................................34
CAPÍTULO 3. FUNCIÓN DE MEMORIA .................................................37
ALMACENAR UN NÚMERO DE TELÉFONO.......................................38
AGREGAR UN CONTACTO A TRAVÉS DEL MENÚ.................................38
AGREGAR UN CONTACTO EN MODO INACTIVO .................................39
INSERTAR LETRAS, NÚMEROS Y SÍMBOLOS ...................................41
MODO DE ENTRADA ESTANDAR ..........................................................42
MODO DE ENTRADA PALABRA T9........................................................43
MODO NUMÉRICO .................................................................................44
MODO DE SÍMBOLO ..............................................................................45
REALIZAR UNA LLAMADA DESDE LA LISTA DE CONTACTOS ........45
MARCADO POR UN TOQUE / DOS TOQUES .........................................45
CAPÍTULO 4. FUNCIONES DEL MENÚ ..................................................47
LLAMADAS RECIENTES ....................................................................48
TODAS LAS LLAMADAS .........................................................................48
LLAMADAS PERDIDAS............................................................................49
LLAMADAS RECIBIDAS ...........................................................................50
LLAMADAS MARCADAS ........................................................................51
TEMPORIZADORES DE LLAMADAS .......................................................52
AGENDA TELEFÓNICA ......................................................................53
NUEVO REGISTRO...................................................................................53
LISTA DE REGISTROS ..............................................................................54
GRUPOS DE MENSAJES ..........................................................................55
GRUPOS...................................................................................................59
MARCADOS RÁPIDOS ............................................................................61
GALERÍA DE MEDIOS .......................................................................62
CUADRO DE SONIDOS ...........................................................................62
CUADRO DE IMÁGENES .........................................................................62
CUADRO DE VIDEOS ..............................................................................63
CUADRO DE MP3 ...................................................................................64
2
ÍNDICE
APLICACIONES NEO .........................................................................65
NAVEGACIÓN NEO ...........................................................................68
COMENZAR NAVEGACIÓN NEO ............................................................68
MENÚ DE INTERNET DEL TELÉFONO ....................................................68
AJUSTES ............................................................................................71
AJUSTES DE SONIDO ..............................................................................71
AJUSTES DE LA PANTALLA.....................................................................76
AJUSTES DEL TELÉFONO ........................................................................80
AJUSTES DE LLAMADAS ........................................................................86
MEMORIA ...............................................................................................89
BLUETOOTH ............................................................................................90
MENÚ DE BLUETOOTH ..........................................................................95
INFORMACIÓN DEL TELÉFONO .............................................................98
CÁMARA ...........................................................................................99
CAPTURAR IMÁGENES ...........................................................................99
CAPTURAR VÍDEOS...............................................................................102
GALERÍA DE IMÁGENES .......................................................................104
GALERÍA DE VIDEOS ............................................................................105
HERRAMIENTAS DE VOZ ................................................................106
AVR (RECONOCIMIENTO AVANZADO DE VOZ)..................................106
LLAMADA <NOMBRE>< LOC> ............................................................107
ENVIAR TEXTO <NOMBRE O Nº> ........................................................108
ENVIAR IMAGEN <NOMBRE O Nº> .....................................................108
ENVIAR VIDEO <NOMBRE O Nº> ........................................................109
VISUALIZAR <NOMBRE> ......................................................................109
ACCEDER AL <MENÚ> .........................................................................110
VERIFICAR <ELEMENTO> .....................................................................111
AJUSTES ................................................................................................112
INFORMACIÓN ......................................................................................117
UTILIDADES ....................................................................................118
RELOJ CON ALARMA ...........................................................................118
CALENDARIO ........................................................................................119
RELOJ MUNDIAL ...................................................................................122
BLOC DE NOTAS ...................................................................................123
CALCULADORA .....................................................................................125
CRONÓMETRO ......................................................................................126
3
CAPÍTULO 1
ÍNDICE
ALMACENAMIENTO DE DATOS ...........................................................127
CAPÍTULO 6. SEGURIDAD Y GARANTÍA ............................................149
INFORMACIÓN DE SEGURIDAD PARA DISPOSITIVOS
INALÁMBRICOS MÓVILES ..............................................................150
INFORMACIÓN DE SEGURIDAD SOBRE EXPOSICION DE
RADIOFRECUENCIA DE FCC ...........................................................155
INFORMACIÓN SOBRE LA TASA DE ABSORCION
ESPECIFICA (SAR) ...........................................................................156
REGLAMENTACIONES DE FCC SOBRE COMPATIBILIDAD
CON PROTESIS AUDITIVAS (HAC) PARA DISPOSITIVOS
INALAMBRICOS ..............................................................................158
ACTUALIZACION AL CONSUMIDOR DE LA FDA ............................160
PARA EVITAR PERDIDA POTENCIAL DE AUDICION .......................166
REQUISITOS DE INFORMACIÓN DEL USUARIO CTIA .....................168
GARANTÍA LIMITADA A 12 MESES ...............................................169
“Autorizado por QUALCOMM Incorporated bajo una o más de las siguientes patentes:
Patente de EE. UU. Nº 4.901.307, Patente de EE. UU. Nº 5.056.109, Patente de EE. UU. Nº 5.099.204,
Patente de EE. UU. Nº 5.101.501, Patente de EE. UU. Nº 5.103.459, Patente de EE. UU. Nº 5.107.225,
Patente de EE. UU. Nº 5.109.390.”
4
CAPÍTULO 1
ANTES DE USAR
EL TELÉFONO
Este capítulo contiene información importante acerca del teléfono UTStarcom,
por ejemplo:
CONTENIDO DEL PAQUETE
DESCRIPCIÓN DEL TELÉFONO
USO DE LA BATERÍA
INFORMACIÓN SOBRE EL MANEJO DE LA BATERÍA
ANTES DE USAR EL TELÉFONO
CAPÍTULO 5. MENSAJES DE CORREO DE VOZ, TEXTO,
IMAGEN Y VIDEO ........................................................129
RECEPCIÓN DE UN NUEVO MENSAJE ............................................130
NUEVO MENSAJE ...........................................................................130
ENVIAR NUEVO MENSAJE DE TEXTO .................................................130
ENVIAR UN NUEVO MENSAJE CON IMAGEN .....................................132
ENVIAR UN NUEVO MENSAJE CON VIDEO.........................................134
CORREO DE VOZ .............................................................................136
BANDEJA DE ENTRADA .................................................................138
ENVIADOS ......................................................................................140
BORRADORES .................................................................................142
AJUSTES ..........................................................................................143
BORRAR TODOS..............................................................................148
ANTES DE USAR
CONTENIDO DEL PAQUETE
Este paquete debe incluir todos los elementos cuyas imágenes se presentan
a continuación. Si alguno de ellos falta o es distinto, comuníquese
inmediatamente con con la tienda minorista donde compró el teléfono.
DESCRIPCIÓN DEL TELÉFONO
ANTES DE USAR
El teléfono CDM-8960 pesa 84 g (2.96 oz.) y mide 47.24 x 92.71 x 19.81 mm
Enchufe del cargador
/Enchufe del auricular
Tecla AVR
Tecla Cámara
Teléfono
Batería estándar
Ranura para tarjeta
microSD
Tecla Volumen
Lente de la
cámara
Altavoz
Subpantalla
LCD
Guía del usuario
Cargador para viaje
Teclas para el reproductor de música externo
6
7
ANTES DE USAR
DESCRIPCIÓN DEL TELÉFONO
H LAS TECLAS DE FUNCIÓN
17
1
18
19
2
20
21
3
4
22
9
23
10
24
5
11
6
7
8
12
13
14
15
16
8
25
DESCRIPCIÓN DEL TELÉFONO
ANTES DE USAR
1. Auricular: El auricular le permite que escuchar a otro interlocutor.
2. Indicadores de la pantalla: Consulte la página 12 para obtener una lista
de íconos.
3. Área de texto gráficos: Muestra llamadas o mensajes recibidos.
4. Indicadores de las teclas de selección: Muestra las funciones asignadas
en ese momento a cada tecla de selección y algunos íconos.
5. Tecla de selección izquierda: Presiónela para acceder el menú principal o
la función que aparece en la línea inferior.
6. Tecla altavoz: Presiónela para activar y desactivar el altavoz.
7. Tecla enviar: Presiónela para realizar o recibir una llamada.
8. Tecla borrar: Presiónela para borrar un dígito de la pantalla o para volver
a la página anterior.
9. LAS TECLAS DE NAVEGACIÓN
En el Modo inactivo: Presiónela la izquierda para acceder la las
Aplicaciones de Neo, arriba para acceder al directorio telefónico, la
derecha para acceder la Navegación de Neo y abajo para acceder a los
Mensajes.
Dentro del menú: Dentro de un menú, presione la tecla de navegación
ARRIBA / ABAJO / IZQUIERDA / DERECHA para desplazarse por las opciones
o presione OK para seleccionar la función.
10. Tecla aceptar: Presiónela para seleccionar un elemento resaltado o una
función en la parte intermediaria de la línea inferior de la pantalla.
11. Tecla de selección derecha: Presionónela para acceder el menú
Contactos o la función en la línea inferior.
12. Tecla cámara: Presione para un acceso rápido a las funciones de la
cámara.
13. Tecla finalizar / Power encender / apagar: Presiónela para finalizar
una llamada o volver al modo inactivo.
14. Teclado alfanumérico: Utilícelo para insertar números y caracteres y
seleccionar elementos del menú.
15. Tecla Vibrador: Manténgala presionada para activar / desactivar el modo
Vibrate.
16. Micrófono: Permite que óigale otro interlocutor lo escuche claramente
cuando esté en modo de conversación.
9
ANTES DE USAR
DESCRIPCIÓN DEL TELÉFONO
17. Enchufe del cargador / Enchufe de auriculares: Conecte el cargador
para viaje y el conector de la interfaz para auriculares aquí para utilizar los
auriculares.
18. Tecla lateral de la cámara: Presiónela para un acceder rápidamente a las
funciones de la cámara.
19. Tecla Lateral de Volumen: Permite ajustar el volumen maestro en modo
inactivo o el volumen de voz durante una llamada.
20. Tecla lateral AVR: Presiónela para habilitar la función VoiceSignalTM.
21. Ranura para tarjeta microSD: Esta ranura de expansión permite
insertar una tarjeta de memoria microSDTM para obtener una capacidad de
memoria y almacenamiento adicional.
22. Lente de la cámara: Es la lente de la cámara interna de su teléfono.
23. Subpantallav LCD: Muestra las llamadas o mensajes recibidos, potencia
de la señal y carga de la batería, fecha y hora.
24. Teclas del reproductor de música externo: Tecla para reproducción /
pausa / detención de música, tecla de avance / avance rápido y tecla
rebobinado / retroceso.
25. Altavoz: Las música, los tonos de timbre y los sonidos se reproducen a
través del altavoz.
DESCRIPCIÓN DEL TELÉFONO
Indicadores en la pantalla
Consulte la página 12 para
una obtener una lista de
los íconos
LAS TECLAS DE
NAVEGACIÓN
En Modo Inactivo
Presiónela a la izquierda para acceder las
Aplicaciones de Neo, arriba
para acceder al directorio
telefónico, a la derecha
para acceder la Navegación
de Neo y abajo para
acceder los Mensajes.
Dentro del Menú
Dentro de un menú,
presione la tecla de navegación ARRIBA / ABAJO /
IZQUIERDA / DERECHA
para desplazarse por las
opciones o presione OK
para seleccionar la función.
Tecla altavoz
Presiónela para activar o
desactivar el altavoz.
10
ANTES DE USAR
Área de texto y gráficos
Indicadores de tecla de
selección
Muestra las funciones
asignadas en ese momento
a cada tecla de función y
algunos íconos.
Tecla cámara
Presiónela para acceder
rápidamente a las
funciones de la cámara.
11
ANTES DE USAR
DESCRIPCIÓN DEL TELÉFONO
H INDICADORES EN LA PANTALLA
Potencia de la Señal - Potencia de la señal actual: Cuanto más
líneas, más fuerte es la señal.
Modo Avión
La transmisión y la recepción de información están restringidas.
Sin servicio
El teléfono no puede recibir una señal del sistema.
Batería - Nivel de carga de la batería: Cuanto más bloques, más
dutará la carga.
Roaming
El móvil está fuera del área local de cobertura.
Reposo - El teléfono estará en estado de reposo durante una
llamada de datos. El se ajustará al modo Reposo cuando no haya
actividad en la página durante algún tiempo; la conexión
permanecerá activa y usted podrá realizar y recibir llamadas.
DESCRIPCIÓN DEL TELÉFONO
ANTES DE USAR
Descubrimiento del Bluetooth
Indica el modo del “Descubrimiento del Bluetooth”.
Conexión Bluetooth
Indica una conexión Bluetooth.
Nuevos mensajes
Indica que recibió nuevos mensajes.
Privacidad de voz
Indica el modo de privacidad de voz.
EVDO
El teléfono está en modo “EVDO”.
1X
El teléfono está en el área de servicio 1x.
Modo Digital
El teléfono está en el área de servicio digital.
Ícono GPS
Indica que el servicio de localización de su teléfono está
deshabilitado / habilitado.
Altavoz
El teléfono está en modo de altavoz.
TTY
El modo TTY está activao.
Alarma
Aparece cuando estableció una alarma.
Bluetooth
Indica el modo Bluetooth.
Todos los sonidos desactivados
El volumen del timbre está desactivado.
Solamente vibrador
El teléfono vibrará cuando se reciba una llamada.
12
13
ANTES DE USAR
DESCRIPCIÓN DEL TELÉFONO
Timbre
Se mostrará cuando se configure un timbre con el modo de alerta.
Correo de voz
Indica que hay mensajes de correo de voz.
Datos activos
Voz
USO DE LA BATERÍA
ANTES DE USAR
H INSTALACIÓN DE LA BATERÍA
Coloque la batería en la parte trasera del teléfono de forma que los
contactos metálicos coincidan con del compartimiento de la batería.
Empuje la batería hacia abajo en el compartimiento hasta que
quede fija en su lugar.
Coloque la tapa de la batería sobre la batería y deslícela hasta que
quede fija en su lugar.
Activar comando de voz
El modo Mando de Voz se activará.
Escuchar comando de voz
Se escucha el modo de comando de voz.
Seguridad
Se mostrará cuando el teléfono acceda a un sitio de Internet seguro.
Si la batería no está ubicada correctamente en el compartimiento, el
teléfono no se encenderá y es posible que la batería se salga de su lugar
mientras usa el teléfono.
14
15
ANTES DE USAR
USO DE LA BATERÍA
USO DE LA BATERÍA
ANTES DE USAR
H EXTRACCIÓN DE LA BATERÍA
H CARGA DE LA BATERÍA
Empuje el seguro hacia y luego deslice la tapa de la batería para
retirarla del teléfono.
Conecte el cargador al teléfono. Asegúrese de que el símbolo de
triángulo esté hacia arriba cuando vaya insertar el enchufe en el
puerto de los auriculares/cargador.
Levante la batería hasta retirarla del compartimiento.
Cerciórese de que la batería esté conectada en el teléfono antes del
proceso de carga.
• Cuando cargue la batería con el teléfono apagado, verá una pantalla
de estado de carga. No podrá utilizar operar el teléfono hasta que no
esté encendido.
• La batería no estará cargada en el momento de la compra.
• Cargue completamente la batería antes de usarla.
• Es mejor cargar la batería con el teléfono apagado.
• La batería debe estar conectada al teléfono para cargarla.
• El tiempo de funcionamiento de la batería disminuye gradualmente a
medida que pasa el tiempo.
• Si la batería no funciona normalmente, es posible que deba
reemplazarla.
16
17
INFORMACIÓN SOBRE EL
MANEJO DE LA BATERÍA
CAPÍTULO 2
ANTES DE USAR
H QUÉ DEBE HACER
CAPÍTULO 2
FUNCIONAMIENTO
BÁSICO
H QUÉ NO DEBE HACER
• No intente desarmar la batería. Es una unidad sellada que no contiene
piezas internas que puedan ser reparadas.
• Evite llevar la batería en el bolsillo o la cartera con otros objetos
metálicos, como monedas, clips y lapiceras, porque puede provocar un
corto circuito. Esto puede dañar seriamente la batería.
• No exponga la batería a temperaturas alta o bajas. Si lo hace, la
capacidad y la vida útil de la batería podrían reducirse de forma
significativa.
• No arroje la batería al fuego.
Este capítulo explica las funciones básicas de su teléfono, entre las cuales se
encuentran:
ENCENDER / APAGAR EL TELÉFONO
ACCESO AL MENÚ
RESUMEN DEL MENÚ
FUNCIONES BÁSICASBÁSICAS
DURANTE UNA LLAMADA
REALIZAR UNA LLAMADA DE EMERGENCIA
UTILIZAR LA TARJETA microSD
18
FUNCIONAMIENTO BÁSICO
• Use únicamente la batería y el cargador aprobados para uso con el
teléfono CDM8960.
• Use únicamente la batería para los fines para los que se creó.
• Haga lo posible por mantener las baterías a la temperatura entre 45°F
(5°C) y 95°F (35°C). Si la batería se almacena a temperaturas superiores
o inferiores a los límites recomendados, déle tiempo para que se
caliente o enfríe antes de utilizarla.
• Agote completamente la batería antes de la recarga.
• Almacene la batería descargada en un lugar templado, oscuro y seco.
• Compre una nueva batería cuando el tiempo de funcionamiento
disminuya gradualmente luego de una carga completa.
• Deseche la batería adecuadamente según lo dispuesto por las leyes
locales.
FUNCIONAMIENTO BÁSICO
ENCENDER / APAGAR EL
TELÉFONO
H ENCENDER EL TELÉFONO
Mantenga presionada la Tecla finalizar END hasta que
aparezca la animación del logotipo de activación en la pantalla
interna y suene un tono.
• Si el mensaje ”Ingresar Código de Bloqueo” aparece en la pantalla,
ingrese su contraseña de 4 dígitos para desbloquear el teléfono.
• El código de bloqueo predeterminado es “1234”.
H APAGAR EL TELÉFONO
Mantenga presionada la Tecla finalizar END hasta que
aparezca la animación del logotipo de apagado en la pantalla
interna.
• Cambie o vuelva a cargar inmediatamente la batería cuando aparezca
el mensaje ”BATERIA BAJA”. Es posible que se dañe la memoria si el
teléfono se apaga debido al agotamiento total de la batería.
• Apague el teléfono antes de extraer o volver a colocar la batería.
20
ACCESO AL MENÚ
FUNCIONAMIENTO BÁSICO
Puede personalizar su teléfono mediante el menú. Se puede acceder a cada
o presionando el
función desplazándose con la tecla de navegación
número correspondiente al elemento del menú.
Para acceder el menú desde el modo inactivo, presione la tecla de
[MENÚ].
selección izquierda
Para desplazarse por el menú, presione la tecla de navegación
arriba, abajo, izquierda o derecha.
Para volver a la página anterior, presione la tecla borrar CLR .
Para salir del menú actual y volver al modo inactivo, presione la
tecla finalizar END .
Presione OK para activar una función cuando aparezca en su
página principal o presione su número asignado para acceder
directamente a la función.
21
FUNCIONAMIENTO BÁSICO
MENÚ PRINCIPAL
2º. NIVEL
1. Llamadas recientes
1. Todas las llamadas
2. Llamadas perdidas
3. Llamadas recibidas
4. Llamadas realizadas
5. Cronómetros de llamada
RESUMEN DEL MENÚ
3º. NIVEL
4º. NIVEL
RESUMEN DEL MENÚ
MENU PRINCIPAL
7. Configuración
2º. NIVEL
1. Configuración del
sonido
4. Mensajes
2. Correo de voz
3. Bandeja de entrada
4. Enviados
5. Borradores
6. Configuración
7. Borrar
5. Aplicaciones de Neo 1. Aplicaciones de Neo
6. Navegación de Neo
22
4. Aertas de servicio
5. Encender/Apagar
1. Cuadro de sonidos
2. Cuadro de imágenes
3. Cuadro de videos
4. Cuadro de MP3
1. Nuevo mensaje
1. Conexión Web
3º. NIVEL
1. Volumen del timbre
2. Sonidos de llamadas
3. Sonidos de mensajes
2. Directorio telefónico 1. Nueva entrada
2. Listar entradas
3. Grupos de mensajes
4. Grupos
5. Marcados rápidos
3. Galería de medios
FUNCIONAMIENTO BÁSICO
2. Configuración de la
pantalla
1. Mensaje de texto
2. Mensaje de imagen
3. Mensaje de video
1. Modo de entrada
2. Guardar
automáticamente
3. Borrar
automáticamente
4. Visualización automática del texto
5. Recepción automática
6. Texto rápido
7. Devolver llamada al
número
8. Firma
1. Borrar mensajes de la
Bandeja de entrada
2. Borrar Borradores
3. Borrar Enviados
4. Borrar Todos
3. Configuración del
teléfono
6. Tono de la tecla
1. Mi saludo
2. Duración de la luz
de fondo
3. Contraste
4. Fondo de pantalla
5. Tipo de Menú
1. Modo Avión
2. Iioma
3. Ubicación
4. Seguridad
5. Selección de los
módulos NAM
4. Configuración de
llamadas
5. Memoria
6. Bluetooth
7. Información del
teléfono
4º. NIVEL
1. Timbre de la llamada
2. Llamada por vibración
1. Mensaje de texto
2. Mensaje PIX
3. Mensaje de correo
de voz
1. Roaming
2. Aviso de minuto
3. Conexión de la llamada
1. Tono de encendido
2. Tono de apagado
1. Pantalla
2. Teclado
1. Pantalla principal
2. Subpantalla
1. Modo de bloqueo
2. Restringir
3. Editar códigos
4. Reiniciar el teléfono
1. Módulo NAM
automático
2. Cambiar módulo NAM
1. Opciones de respuesta
2. Remarcado automático
3. Modo TTY
4. Marcado con una tecla
5. Pivacidad de voz
1. Opciones de guardado 1. Sonidos
2. Imágenes
3. Videos
2. Memoria Interna
3. Memoria externa
1. Nuevo dispositivo
1. Mi número
2. Versión del software
23
FUNCIONAMIENTO BÁSICO
MENU PRINCIPAL
8. Cámara
2º. NIVEL
1. Tomar una foto
RESUMEN DEL MENÚ
3º. NIVEL
1. Autorretrato
2. Cronómetro
automático
3. Herramientas de
entretenimiento...
4. Controles de
imágenes...
5. Configuración...
2. Capturar video
3. Galería de imágenes
4. Galería de videos
9. Utilidades
1. Comandos de voz
2. Reloj despertador
3. Calendario
4. Reloj mundial
5. Cuaderno
6. Calculadora
7. Cronómetro
8. Almacenamiento
24
6. Modo Cámara de
video
1. Autorreetrato
2. Cronómetro
automático
3. Efecto de colores
4. Controles de
imágenes...
5. Configuración...
6. Modo Cámara
1. Alarma 1
2. Alarma 2
3. Alarma 3
4º. NIVEL
FUNCIONES BÁSICASBÁSICAS
FUNCIONAMIENTO BÁSICO
H REALIZAR UNA LLAMADA
Marque un número de teléfono.
1. Efecto de colores
2. Cuadro de
entretenimiento
1. Brillo
2. Balance de blancos
1. Resolución
2. Calidad
3. Sonido del obturador
Para modificar el número de teléfono que marcó:
• Para borrar un dígito por vez, presione la tecla borrar CLR .
• Para borrar todo el número, mantenga presionada la tecla borrar
CLR .
Visualización del número del teléfono en la lista de contactos
Cuando realice o reciba una llamada de números de teléfono
almacenados en su lista de contactos con un nombre de contacto,
se mostrará este nombre.
Presione la Tecla enviar SEND .
1. Brillo
2. Balance de blancos
1. Calidad
2. Sonido - avance
3. Silencio
• Si aparece en la pantalla el mensaje “No se pudo realizar la llamada”
o la línea está ocupada, presione la tecla enviar END o la tecla
finalizar SEND .
• Si activa la función “Remarcado automático”, el teléfono volverá a
marcar automáticamente el número que haya seleccionado. (Consulte
la página 87).
• También puede realizar llamadas utilizando el Marcado activado por
voz. Consulte la página 107 para obtener más detalles.
• Si el mensaje “Enter Lock Code” (ingresar código de bloqueo) aparece
en la pantalla, ingrese su contraseña de 4 dígitos para desbloquear
el teléfono.
• El código de bloqueo predeterminado es “1234”.
Para finalizar la llamada, presione la Tecla finalizar END
.
25
FUNCIONAMIENTO BÁSICO
FUNCIONES BÁSICASBÁSICAS
H RESPONDER LLAMADAS
Para ignorar las llamadas entrantes, presione la tecla de selección derecha
[IGNORAR].
Para finalizar una llamada, presione la Tecla finalizar END .
En “Modo de respuesta automática”, la llamada se responde automáticamente
después de que el timbre suena durante el tiempo preestablecido. Consulte la
página 86 para obtener más detalles.
Las pausas se utilizan para sistemas automatizados (por ejemplo, correo de voz, tarjetas
de llamadas telefónicas). Inserte una pausa tras un número de teléfono y marque otro
grupo de números. El segundo grupo de números se marcará automáticamente tras la
pausa. Esta función es útil para marcar para sistemas que exigen un código.
Para insertar una función de pausa de 2 segundos/pausa fija, marque
el número de teléfono y presione la tecla de selección derecha
[OPCIONES]. Seleccione Pausa de 2 segundos (“T”) o Pausa fija (“P”).
Presione la tecla enviar SEND para marcar o la tecla de función
izquierda
[GUARDAR] para grabar. Por favor, refiérase a la
página 38 para más detalles sobre el almacenamiento de un número
de teléfono.
H RESPONDER UNA LLAMADA
H NOTIFICACION DE LLAMADA PERDIDA
Cuando se recibe un mensaje de llamada perdida, aparecerá el registro llamada perdida.
Para ver el registro de la Llamada perdida desde la pantalla de notificación:
Resalte la entrada “Visualizar” y presione OK .
Para marcar el número de teléfono, presione la Tecla enviar SEND .
Para ver una llamada perdida desde el modo inactivo:
Llamadas
Resalte la entrada que desea visualizar y presione OK .
Para marcar el número del teléfono, presione la tecla enviar SEND .
26
FUNCIONAMIENTO BÁSICO
H FUNCION DE PAUSA DE 2 SEGUNDOS/PAUSA FIJA
Cuando su teléfono suene o vibre, presione la tecla enviar SEND
para responder la llamada entrante. (según la configuración del
teléfono, también podrá responder llamadas al abrir el teléfono o
presionar cualquier tecla.)
Presione la Tecla de selección izquierda
[MENÚ], 1
recientes, 2 abc para Llamadas perdidas.
FUNCIONES BÁSICAS
Si su teléfono se configura en “Tabierta” en “Opciones de respuesta”,
simplemente abra el teléfono para responder una llamada.
Si se configura en “Cualquier tecla” en “Opciones de respuesta”,
presione cualquier tecla para responder una llamada excepto la
, tecla
tecla finalizar END , tecla de selección derecha
borrar CLR , tecla lateral de la cámara , tecla lateral AVR ,
, Tecla lateral del volumen
o la tecla de
tecla altavoz
.
selección izquierda
Para seleccionar una opción de respuesta, presionepresione la
[MENÚ] seleccione 7 pqrs para
tecla de sección izquierda
“Configuración”. Presione 4 ghi para “Configuración de
llamadas” y seleccione 1 para “opciones de respuesta”.
arriba o abajo para
Presione la tecla de navegación
seleccionar “Tapa abierta”, “Cualquier tecla”, “Responder
automáticamente” o “Responder con Enviar”.
Para finalizar la llamada, presione la tecla finalizar END
.
27
FUNCIONAMIENTO BÁSICO
FUNCIONES BÁSICAS
H LLAMADA TRIPARTITA
Con la función de llamada tripartita puede hablar con dos personas al mismo
tiempo. Cuando esta función esté en uso, se aplicará la tarifa normal de aire para
cada una de las llamadas.
Ingrese el número al que desea llamar y, a continuación, presione la
Tecla enviar SEND .
Una vez establecida la conexión, marque el segundo número de
teléfono deseado y presione la tecla enviar SEND .
Cuando está conectado al segundo llamador, presione 3 def y
luego la tecla enviar SEND nuevamente para iniciar su llamada
tripartita.
Si una de las personas involucradas en la llamada termina la llamada
durante la conversación, usted y el otro interlocutor permanecerán
conectados. Si usted inició la llamada y es el primero en terminarla, las
tres llamadas se desconectarán.
H FUNCIÓN DE LLAMADA EN ESPERA
Esta función le avisará sobre una llamada recibida cuando usted esté en otra
llamada al emitir un tono de señal audible y mostrar el número de teléfono del
llamador.
Para responder la otra llamada mientras está en una llamada por
teléfono, presione la tecla enviar SEND . Esto colocará la
primera llamada en el modo de espera. Para volver a la primera
llamada, presione la tecla enviar SEND nuevamente.
28
FUNCIONES BÁSICAS
FUNCIONAMIENTO BÁSICO
H �CÓMO REALIZAR UNA LLAMADA DESDE LA LISTA DE
CONTACTOS
Presione la tecla de función derecha
[CONTACTOS] para acceder
la Lista de contactos. Seleccione el número de teléfono deseado y
presione la tecla enviar SEND .
H AJUSTE DEL VOLUMEN
Para ajustar el volumen maestro:
En modo inactivo, presione la tecla lateral de volumen
o abajo.
arriba
Seleccione una de las opciones siguientes y presione OK
[CONFIGURAR] para guardarla.
•
•
•
•
Silencio
Vibrador activado
Nivel 1 – Nivel 5
Presione la tecla de selección izquierda
[REPRODUCIR/DETENER]
para reproducir/detener la reproducción del sonido.
H AJUSTE DEL VOLUMEN DE LAS LLAMADAS
Durante una llamada, si desea ajustar el volumen del auricular, presione
lateral a la izquierda del teléfono.
la tecla de volumen
Presione la tecla arriba para incrementar el nivel de volumen y
abajo para reducirlo.
En modo inactivo, también puede ajustar el volumen del timbre mediante
estas teclas.
29
FUNCIONAMIENTO BÁSICO
FUNCIONES BÁSICAS
FUNCIONES BÁSICAS
FUNCIONAMIENTO BÁSICO
H FUNCIÓN DE IDENTIFICACIÓN DEL LLAMADOR
H REPRODUCTOR DE MÚSICA
Identifica el llamador al mostrar su número de teléfono. Si el nombre y
el número del llamador ya están almacenados en su lista de contactos, se
mostrará el nombre. La Identificación (ID) del interlocutor se almacenará
en el menú Llamadas recientes.
La función Reproductor de música reproduce archivos MP3 guardados en
una tarjeta microSD. Para ver la lista de música cuando el teléfoo esté
y seleccione el archivo que
cerrado, mantenga presionada la tecla
para [REPRODUCIR] y
[PAUSA] para
desea reproducir. Presione
detener la música. Para detener la función del Reproductor de música,
abra el teléfono y presione la tecla finalizar END .
H ACTIVACIÓN / DESACTIVACIÓN DEL VIBRADOR
En la pantalla inactiva mantenga presionada la tecla
.
Para volver a un volumen ajustado anteriormente, en la pantalla
.
inactiva mantenga presionada la tecla
• Movilnet no se responsabiliza por ninguna acción o
reivindicación como resultado de alguna infracción de derechos
de autor u otro uso incorrecto de contenido musical.
H ALTAVOZ
Esta función le permite escuchar el audio a través del altavoz y permite hablar sin
sujetar el teléfono.
Para activar esta función en modo inactivo, o durante una llamada,
. Si presiona la tecla
cuando no esté
presione la tecla altavoz
en una llamada, el modo altavoz se activará durante un minuto y se
desactivará automáticamente.
DURANTE UNA LLAMADA
FUNCIONAMIENTO BÁSICO
H OPCIONES DISPONIBLES DURANTE UNA LLAMADA
Para ver las opciones del menú durante una llamada, presione la tecla de selección
derecha
[OPCIONES].
FINALIZAR LA LLAMADA
Para finalizar una llamada:
Presione la tecla de selección derecha
1 Finalizar llamada.
[OPCIONES],
CONTACTOS
Para seleccionar un número de teléfono en sus Contactos:
Presione la tecla de de selección derecha
2 abc Contactos.
30
[OPCIONES],
31
FUNCIONAMIENTO BÁSICO
DURANTE UNA LLAMADA
LLAMADAS RECIENTES
Para seleccionar un número de teléfono en Llamadas recientes:
Presione la tecla de selección derecha
3 def Llamadas recientes.
[OPCIONES],
Marque “911” y presione la tecla enviar SEND .
[OPCIONES],
La llamada se realizará.
El teléfono permanecerá en Modo Emergencia durante 5 minutos.
CONEXIÓN BLUETOOTH
Para acceder a esta función durante una llamada:
[OPCIONES],
H 911 UTILIZAR CUALQUIER SISTEMA DISPONIBLE
Marque “911” y presione la tecla enviar SEND .
ACTIVACIÓN DEL ALTAVOZ
La llamada se realizará.
Activa la función de altavoz del teléfono durante una llamada. El teléfono
retornará al modo normal (altavoz desactivado) tras el término de la llamada o
cuando la unidad se apague y encienda nuevamente.
Presione la tecla de selección derecha
6 mno A altavoz activado.
La función 911 ajustará automáticamente el teléfono en Modo Llamada de
emergencia cuando marque el número de emergencia programado, 911.
Esta función también operará en Modo bloqueo y cuando esté fuera del área de
servicio.
El servicio de llamada 911 está disponible aún en Modo bloqueo.
Para enviar un mensaje durante una llamada:
Presione la tecla de selección derecha
5 jkl Conexión Bluetooth.
FUNCIONAMIENTO BÁSICO
H 911 EN MODO BLOQUEO
MENSAJES
Presione la tecla de selección derecha
4 ghi Messaging mensajes.
REALIZAR UNA LLAMADA DE
EMERGENCIA
[OPCIONES],
El teléfono permanecerá en Modo Emergencia durante 5 minutos.
Mientras el teléfono esté en Modo Emergency durante 5 minutos, podrá
recibir una llamada de cualquier sistema disponible o incluso realizar
llamadas. En este caso, la realización de una llamada podrá desactivar
automáticamente el Modo Devolver llamada de emergencia.
La llamada 911 no se registra en la lista de llamadas recientes.
32
33
FUNCIONAMIENTO BÁSICO
UTILIZAR LA TARJETA
microSD
H UTILIZAR LA TARJETA microSD
La tarjeta microSD almacena sonidos, imágenes, fotos, videos y otros archivos.
INSTALAR LA TARJETA microSD
Para instalar su tarjeta microSD:
Con la ranura de la tarjeta microSD
abierta, y los contactos dorados hacia
abajo, inserte la tarjeta microSD en la
ranura.
UTILIZAR LA TARJETA
FUNCIONAMIENTO BÁSICO
• Cuando inserte la tarjeta microSD, asegúrese de que los contactos
dorados estén hacia abajo.
• Los nombres de archivo para cada medio de almacenamiento en la
tarjeta microSD son “fotos” para imágenes, “videos” para videos,
“sonidos” para sonidos.
• No retire la tarjeta microSD durante la lectura o grabación de archivos.
De lo contrario, ésta se puede dañar.
¿COMO SE TRANSFIERE LA MÚSICA?
Transferencia des- Transferencia desde
dela PC al teléfono la PC al teléfono por
por cable USB
tarjeta de memoria
Presione la tarjeta hasta que encaje en el lugar. Cierre la ranura de
Cancione en MP3
Sí
Sí
la tarjeta microSD.
Para evitar posibles daños, mantenga la ranura de la tarjeta microSD
siempre cerrada.
La música adquirida en otra tienda de ventas de música en línea como
parte de un servicio de suscripción o música adquirida en otro formato
que no sea MP3 (por ejemplo, AAC, AAC+) no se reconocerán.
EXTRACCIÓN DE LA TARJETA microSD
Para retirar la tarjeta microSD:
Abra la ranura de la tarjeta microSD.
Utilice su pulgar para presionar y
liberar la tarjeta microSD. Se eyectará
para permitir que la retire.
Retire la tarjeta y cierre la ranura de la tarjeta microSD.
34
35
CAPÍTULO 3
NOTAS
Este capítulo contiene información acerca de las funciones de la memoria e
incluye:
ALMACENAR UN NÚMERO DE TELÉFONO
INSERTAR LETRAS, NÚMEROS Y SÍMBOLOS
REALIZAR UNA LLAMADA DESDE LA LISTA DE CONTACTOS
36
FUNCIÓN DE MEMORIA
CAPÍTULO 3
FUNCIÓN DE
MEMORIA
FUNCIÓN DE MEMORIA
ALMACENAR UN NÚMERO
DE TELÉFONO
ALMACENAR UN NÚMERO
DE TELÉFONO
FUNCIÓN DE MEMORIA
El directorio telefónico puede almacenar hasta 500 entradas.
H AGREGAR UN CONTACTO EN MODO INACTIVO
H AGREGAR UN CONTACTO A TRAVÉS DEL MENÚ
AGREGAR NUEVO CONTACTO
Presione la tecla de selección izquierda
[MENÚ], 2 abc
Directorio telefónico, 1 Nuevo contacto.
En Modo inactivo, marque el número de teléfono y presione la tecla
[GUARDAR].
de selección izquierda
Escriba un nombre para la entrada mediante el teclado. (Consulte
la página 41 para obtener más detalles sobre la inserción de letras,
números y símbolos). Para cambiar el modo de entrada, presione la
[Abc].
tecla de selección izquierda
Elija “Nueva entrada” y el número del teléfono aparecerá arriba de
arriba o hacia abajo
una lista. Presione la tecla de navegación
para seleccionar el tipo del número que se agregará, según lo que
indica el ícono. Presione OK para seleccionar.
Presione la tecla de navegación
abajo para agregar o editar
otras opciones (Mobile, E-mail1.2, etc...).
Escriba un nombre para la entrada mediante el teclado. (Consulte
la página 41 para obtener más detalles sobre la inserción de letras,
números y símbolos.) Para cambiar el modo de entrada, presione la
[Abc].
tecla de selección izquierda
Si se ingresa un número de teléfono, presione la tecla de selección
derecha
[OPCIONES] para seleccionar una de las siguientes
opciones:
• Pausa fija
• Pausa de dos segundos
Para almacenar la entrada, presione OK [GUARDAR].
Aparecerá el mensaje “Rntrada guardada”.
Consulte la pág. 53 para obtener más detalles sobre “Nueva entrada”.
Presione la tecla de navegación
abajo para agregar o editar
otras opciones (Mobile, E-mail1.2, etc...).
Si se ingresa un número de teléfono, presione la tecla de selección
derecha
[OPCIONES] para seleccionar una de las siguientes
opciones:
• Pausa fija
• Pausa de dos segundos
Para almacenar el registro, presione OK [GRABAR].
Aparecerá el mensaje “Entrada guardada”.
38
39
FUNCIÓN DE MEMORIA
ALMACENAR UN NÚMERO
DE TELÉFON
ACTUALIZACIÓN DE DATOS EXISTENTES
En modo inactivo, inserte el número de teléfono y presione la tecla
[GUARDAR].
de selección izquierda
Elija “Entrada existente” y aparecerá su lista de contactos
guardados. Seleccione la entrada a la que se agregará el número
de teléfono y presione OK . Presione la tecla de navegación
arriba o abajo para seleccionar el tipo de número que agregará,
según lo que indica el ícono. Presione OK para seleccionar.
INSERTAR LETRAS, NÚMEROS
Y SÍMBOLOS
FUNCIÓN DE MEMORIA
El modo de entrada (editor alfabético) se activará automáticamente cuando sea
necesario insertar letras y números. Según se indica a continuación, hay 5 modos
disponibles: modo de entrada Standard (Estándar) (Abc)/(ABC), modo Inserción
(Palabra T9), modo Numérico (123) y modo Symbol (Símbolos). El indicador del
modo de entrada se visualiza en la esquina superior derecha de la pantalla cuando
se insertan letras y números. Para seleccionar el modo de entrada deseado entre los
5 modos que se muestran a continuación, presione la tecla de selección izquierda
[Abc] y luego marque las letras y números.
Indicador del modo de entrada
•T9Word : Modo de entrada
•Abc : Modo Abc
•ABC : Modo ABC
•123 : Modo numérico
•Symbols : Modo de símbolos
Se exhibirá el mensaje “Entrada actualizada”.
A continuación se describe la función atribuida a cada tecla en el editor Alfabético.
TECLA
FUNCIÓN
Abc - Presione para cambiar el modo.
[Palabra T9][Abc][ABC][123][Símbolos]
0
Siguiente - (En el modo Palabra T9) Presione para visualizar la
palabra siguiente correspondiente si la palabra resaltada no es
la palabra deseada.
Espacio - Presione para aceptar una palabra y agregar un
espacio.
Bloq mayús - Presione para seleccionar el tipo de letra
(mayúscula / minúscula) de la entrada de texto estándar o en
modo de entrada de texto. [Abc], [ABC] y [abc], indican la
inserción de texto Estándar. [T9Word], [T9WORD] y [T9word]
indican la inserción de texto predictivo.
40
CLR
Borrar - Presione para borrar un dígito a la izquierda del cursor.
OK
Aceptar - Confirma las letras y números insertados.
41
INSERTAR LETRAS, NÚMEROS
Y SIMBOLOS
FUNCIÓN DE MEMORIA
H MODO DE ENTRADA ESTANDAR
Utilice las teclas numéricas para ingresar letras, números y caracteres.
Inserte letras utilizando el teclado de la siguiente manera:
Teclado
Repeticiones Repeticiones Repeticiones Repeticiones Repeticiones
2 veces
3 veces
4 veces
1 Vez
5 veces
2 abc
A
B
C
2
A
3 def
D
E
F
3
D
4 ghi
5 jkl
G
H
I
4
G
J
K
L
5
J
6
mno
M
N
O
6
M
7 pqrs
P
Q
R
S
7
8 tuv
T
U
V
8
T
9 wxyz
W
X
Y
Z
9
POR EJEMPLO:
Seleccione el modo Abc presionando la tecla de selección
[Abc].
izquierda
Cuando selecciona este modo, se visualiza el icono Abc como confirmación
visual.
• Localice la tecla que corresponda a la letra que desea insertar.
• Presiónela tantas veces como sea necesario para que la letra se
visualice en la pantalla.
• Para insertar el nombre “John”:
Presione [ 5 jkl ]
J
Presione [ 6 mno , 6 mno , 6 mno ]
o
h
Presione [ 4 ghi , 4 ghi ]
Presione [ 6 mno , 6 mno ]
n
El modo de entrada incorpora un diccionario interno para determinar una palabra
en base a los caracteres insertados. Una palabra del modo PALABRAT9 se puede
insertar más rápido presionando una tecla por cada carácter.
Para insertar un espacio, presione
. El cursor se moverá
automáticamente a la columna siguiente.
Seleccione el modo Palabra presionando la tecla de selección
izquierda
[Abc].
Presione una tecla una vez para insertar el carácter que desea
y luego inserte todos los caracteres para introducir la palabra
deseada.
Para visualizar la palabra siguiente que coincida, presione 0
Repita esta operación hasta que se ingresen las letras.
.
Para aceptar la palabra que coincide, marque un espacio y luego
presione
.
Para borrar un dígito, presione CLR . Para borrar toda la
entrada, mantenga presionada la tecla CLR .
42
FUNCIÓN DE MEMORIA
H MODO DE ENTRADA PALABRA T9
Para cambiar el modo de entrada, presione la tecla de selección
izquierda
[Abc]. Cuando inserte un carácter especial como . @ ?
! - , & : ’ / 1, presione 1 reiteradamente.
Para cambiar de letras minúsculas a mayúsculas, presione
INSERTAR LETRAS, NÚMEROS
Y SIMBOLOS
.
43
FUNCIÓN DE MEMORIA
INSERTAR LETRAS, NÚMEROS
Y SIMBOLOS
Para insertar una palabra compuesta:
• Escriba la primera parte de la palabra y luego presione la tecla de
navegación
hacia la derecha para aceptarla.
• Escriba la última parte de la palabra y luego presione
para
confirmar la palabra.
POR EJEMPLO:
Para insertar “Hello bill” en modo Entrada.
• Después de insertar la primera letra, presione la tecla de selección
izquierda
[Abc] para seleccionar el modo de entrada y
para seleccionar letras minúsculas (Palabra T9).
• Presione 4 ghi , 3 def , 5 jkl , 5 jkl , 6 mno y visualizará
para seleccionarla.
la palabra “Hello” resaltada. Presione
• Presione 2 abc , 4 ghi , 5 jkl , 5 jkl hasta que visualice la
palabra “bill” resaltada.
H MODO NUMÉRICO
Permite insertar números.
Presione la tecla de selección izquierda
[Abc], desplácese
hacia abajo hasta “123” y presione OK para cambiar al modo
numérico.
Para insertar un número, presione una tecla numérica.
INSERTAR LETRAS, NÚMEROS
Y SIMBOLOS
FUNCIÓN DE MEMORIA
H MODO DE SÍMBOLO
Permite insertar símbolos.
Presione la tecla de selección izquierda
[Abc], desplácese hacia
abajo hasta “Símbolos” y luego presione OK para cambiar a
modo de símbolo.
Para visualizar más símbolos, presione la tecla de navegación
hacia la izquierda o hacia la derecha.
Para insertar un símbolo, presione el número correspondiente al
símbolo y el símbolo aparecerá en la pantalla de entrada.
REALIZAR UNA LLAMADA
DESDE LA LISTA DE
CONTACTOS
FUNCIÓN DE MEMORIA
H MARCADO POR UN TOQUE / DOS TOQUES
Ideal para números a los que llama con frecuencia, esta función permite que los
números de contacto se marquen presionando sólo una o dos teclas.
MARCADO POR UN TOQUE:
1-9: Mantenga presionada la tecla numérica que desea conectar durante
más de 1 segundo.
MARCADO POR DOS TOQUES:
10-20: Presione brevemente el primer dígito y luego presione el segundo
dígito más tiempo.
44
45
CAPÍTULO 4
NOTAS
Este capítulo abarca el acceso al menú y el uso de las siguientes funciones y
características para personalizar su móvil.
LLAMADAS RECIENTES
AGENDA TELEFÓNICA
GALERÍA DE MEDIOS
APLICACIONES NEO
NAVEGACIÓN NEO
AJUSTES
CÁMARA
HERRAMIENTAS DE VOZ
UTILIDADES
46
FUNCIONES DEL MENÚ
CAPÍTULO 4
FUNCIONES DEL
MENÚ
FUNCIONES DEL MENÚ
LLAMADAS RECIENTES
H TODAS LAS LLAMADAS
Muestra información sobre las llamadas recibidas, marcadas y perdidas más recientes.
Para visualizar una lista de las 270 llamadas recibidas, marcadas y
perdidas más recientes, presione la tecla de selección izquierda
[MENÚ], 1 Llamadas recientes, 1 Todas las llamadas.
Si el número ya está almacenado en sus contactos, se muestra sólo el
nombre. Si el número no está almacenado, se muestra sólo el número
de teléfono.
Para visualizar los detalles, presione OK [ACEPTAR].
Los detalles de la llamada incluyen tipo de llamada, fecha, hora y número
de teléfono.
LLAMADAS RECIENTES
FUNCIONES DEL MENÚ
H LLAMADAS PERDIDAS
Muestra información sobre las 90 llamadas perdidas más recientes. Realice una
llamada al número de una llamada perdida simplemente presionando la tecla Enviar
SEND .
Para visualizar una lista de las 90 llamadas perdidas más recientes,
[MENÚ], 1
presione la tecla de selección izquierda
Llamadas recientes, 2 abc Llamadas perdidas. Si el número ya
está almacenado en sus contactos, se muestra sólo el nombre. Si el
número no está almacenado, se muestra sólo el número de teléfono.
Para visualizar detalles de la llamada perdida, presione OK
[ACEPTAR].
Los detalles de la llamada incluyen fecha, hora y número de teléfono.
Presione la tecla de selección izquierda
[OPCIONES] y luego
seleccione “Guardar” para guardarla o presione la tecla de seleción
derecha
[BORRAR] para borrarla.
• Guardar: Le permite almacenar el número de teléfono en su agenda
telefónica.
• Prefijo: El usuario puede agregar un número deseado antes del
número. Esta característica es útil al agregar, por ejemplo, “1” para
una llamada de larga distancia. Puede guadar esta información en la
agenda telefónica después de insertar el prefijo.
• Nuevo mensaje de texto: Le permite enviar un mensaje de texto al
número de teléfono.
• Nuevo mensaje con imagen: Le permite enviar un mensaje con
imagen al número de teléfono.
• Nuevo mensaje con video: Le permite enviar un mensaje con video
al número de teléfono.
• Borrar todo: Le permite borrar todas las listas de llamadas.
Después de 270 llamadas recibidas, marcadas o perdidas, la llamada más
antigua se borra automáticamente del historial de llamadas.
48
Presione la tecla de selección izquierda
[OPCIONES] y luego
seleccione “Guardar” para guardarla o la tecla de selección derecha
[BORRAR] para borrarla.
• Guardar: Le permite almacenar el número de teléfono en su agenda
telefónica.
• Prefijo: El usuario puede agregar un número deseado antes del
número. Esta característica es útil al agregar, por ejemplo, “1” para
una llamada de larga distancia. Puede guardar esta información en la
agenda telefónica después de insertar el prefijo.
• Nuevo mensaje de texto: Le permite enviar un mensaje de texto al
número de teléfono.
• Nuevo mensaje con imagen: Le permite enviar un mensaje con
imagen al número de teléfono.
• Nuevo mensaje con video: Le permite enviar un mensaje con video
al número de teléfono.
• Borrar todo: Le permite borrar todas las listas de llamadas perdidas.
Después de 90 llamadas perdidas, la llamada más antigua se borra
automáticamente del historial de llamadas.
49
FUNCIONES DEL MENÚ
LLAMADAS RECIENTES
LLAMADAS RECIENTES
FUNCIONES DEL MENÚ
H LLAMADAS RECIBIDAS
H LLAMADAS MARCADAS
Para visualizar una lista de las 90 llamadas recibidas más recientes,
[MENÚ], 1
presione la tecla de selección izquierda
Llamadas recientes, 3 def Llamadas recibidas.
Si el número ya está almacenado en su lista de contactos, se muestra
sólo el nombre. Si el número no está almacenado, se muestra sólo el
número de teléfono.
Para visualizar una lista de los 90 números marcados más recientes,
[MENÚ], 1 Llamadas
presione la tecla de selección izquierda
recientes, 4 ghi Llamadas marcadas.
Si el número ya está almacenado en su lista de contactos, se muestra
sólo el nombre. Si el número no está almacenado, se muestra sólo el
número de teléfono.
Para visualizar detalles de la llamada recibida, presione OK
[ACEPTAR].
Para visualizar detalles de la llamada marcada, presione OK
[ACEPTAR].
Muestra información sobre las 90 llamadas recibidas más recientes. Realice una
llamada a un número recibido simplemente presionando la tecla Enviar SEND .
Los detalles de la llamada incluyen fecha, hora y número de teléfono.
Presione la tecla de selección izquierda
[OPCIONES] y luego
seleccione “Guardar” para guardarla o presione la tecla de selección
derecha
[BORRAR] para borrarla.
50
Muestra información sobre las 90 llamadas marcadas más recientes. Realice una
llamada a un número marcado simplemente presionando la tecla Enviar SEND .
Los detalles de la llamada incluyen fecha, hora y número de teléfono.
Presione la tecla de selección izquierda
[OPCIONES] y luego
seleccione “Guardar” para guardarla o la tecla de selección derecha
[BORRAR] para borrarla.
• Guardar: Le permite almacenar el número de teléfono en su agenda
telefónica.
• Prefijo: El usuario puede agregar un número deseado antes del
número. Esta característica es útil al agregar, por ejemplo, “1” para
una llamada de larga distancia. Puede guardar esta información en la
agenda telefónica después de insertar el prefijo.
• Nuevo mensaje de texto: Le permite enviar un mensaje de texto al
número de teléfono.
• Nuevo mensaje con imagen: Le permite enviar un mensaje con
imagen al número de teléfono.
• Nuevo mensaje con video: Le permite enviar un mensaje con video
al número de teléfono.
• Borrar todo: Le permite borrar todas las listas de llamadas recibidas.
• Guardar: Le permite almacenar el número de teléfono en su agenda
telefónica.
• Prefijo: El usuario puede agregar un número deseado antes del
número. Esta característica es útil al agregar, por ejemplo, “1” para
una llamada de larga distancia. Puede guardar esta información en la
agenda telefónica después de insertar el prefijo.
• Nuevo mensaje de texto: Le permite enviar un mensaje de texto al
número de teléfono.
• Nuevo Mensaje con Imagen: Para enviar un Mensaje con Imagen al
número de teléfono.
• Nuevo Mensaje con Vídeo: Para enviar un Mensaje con Vídeo al
número de teléfono.
• Borrar Todo: Para borrar todas las listas de llamadas marcadas.
Después de 90 llamadas recibidas, la llamada más antigua se borra
automáticamente del historial de llamadas.
Después de 90 llamadas marcadas, la llamada más antigua será borrada
automáticamente del historial de llamadas.
51
FUNCIONES DEL MENÚ
LLAMADAS RECIENTES
H TEMPORIZADORES DE LLAMADAS
Verifica el tiempo de uso y administra sus llamadas dentro del límite establecido.
Los 11 temporizadores incluyen (Última llamada, Todas las llamadas, Llamadas recibidas, Llamadas marcadas, Llamadas locales, Llamadas en roaming, KB transmitidos,
KB recibidos, KB totales, Total de llamadas, Contador de datos totales):
AGENDA TELEFÓNICA
FUNCIONES DEL MENÚ
Permite almacenar hasta 500 registros; cada uno de ellos se puede atribuir a un
grupo. Los registros pueden recuperarse por nombre o por grupo.
H NUEVO REGISTRO
Permite agregar un nuevo registro.
Presione la tecla de selección izquierda
[MENÚ], 1
Llamadas recientes, 5 jkl Temporizadores de llamadas.
Presione la tecla de selección izquierda
[MENÚ], 2 abc
Agenda telefónica, 1 Nuevo registro.
Seleccione ”Última llamada”, ”Todas las llamadas”, ”Llamadas
recibidas”, ”Llamadas marcadas”, ”Llamadas locales”, ”Llamadas en
roaming”, ”KB transmitidos”, ”KB recibidos”, ”KB totales”.
Para insertar un nombre o un número, presione la tecla de
navegación
hacia arriba o abajo para seleccionar el campo de
contactos.
Para reiniciar un temporizador, presione la tecla de selección
derecha
[REINICIAR], presione la tecla de selección derecha
[SÍ] para reiniciarlo.
Para volver a la página anterior, presione OK .
• CAMPOS DE LA AGENDA TELEFÓNICA: Nombre/Móvil/Casa/Trabajo/
Correo electrónico 1/Grupo/Imagen/Tono de timbre/Localizador/Fax/
Correo electrónico 2.
• En los campos ”Móvil”, ”Casa”, ”Trabajo”, ”Localizador” o “Fax”,
ingrese el número de teléfono y luego presione la tecla de selección
derecha
[OPCIONES] para seleccionar una de las siguientes
opciones:
1. Pausa rápida
2. Pausa de 2 segundos
Consulte la página 41 para obtener más detalles sobre el ingreso de
letras, números y símbolos.
Para guardar el registro, presione OK [GUARDAR].
Para volver a la página anterior, presione la tecla Borrar CLR .
• Se debe guardar al menos un número de teléfono o dirección de
correo electrónico para cada contacto. Aparecerá el mensaje ”Ingrese
un número o dirección de correo electrónico” si los mismos no se han
insertado.
• Si el campo Nombre permanece vacío y se ingresa un número de
teléfono, el registro se guardará y sólo se mostrará el número de
teléfono.
52
53
FUNCIONES DEL MENÚ
AGENDA TELEFÓNICA
H LISTA DE REGISTROS
Recupera un registro por nombre y llamadas simplemente presionando la tecla
Enviar SEND . Puede revisar todos los registros almacenados en su lista de
contactos o localizar rápidamente un registro insertando un nombre o su secuencia
de caracteres.
Presione la tecla de selección izquierda
[MENÚ], 2 abc
Agenda telefónica, 2 abc Lista de registros. O en modo inactivo,
[CONTACTOS].
presione la tecla de selección derecha
La lista de los nombres de sus contactos se mostrará en orden
alfabético.
Inserte un nombre o su secuencia de caracteres o recorra la lista
hacia arriba o hacia abajo.
presionando la tecla de navegación
Consulte la página 41 para obtener más detalles sobre la inserción
de letras, números y símbolos.
Para editar el registro, presione la tecla de selección
[EDITAR]. Para visualizar los detalles del registro, presione OK
[VISUALIZAR].
Para utilizar y administrar contactos, presione la tecla de selección derecha
[OPCIONES] y luego seleccione:
1. Nuevo registro: Le permite agregar un nuevo registro.
2. Prefijo: El usuario puede agregar un número deseado antes del
número. Esta característica es útil al agregar, por ejemplo, “1” para una
llamada de larga distancia.
3. Borrar: Le permite borrar un contacto.
4. Mensaje de texto: Le permite crear un mensaje de texto.
5. Mensaje con imagen: Le permite crear un mensaje con imagen.
6. Mensaje de video: Le permite crear un mensaje con video.
7. Borrar todo: Le permite borrar toda la lista de contactos.
Para llamar al número seleccionado, presione la tecla Enviar
SEND .
54
AGENDA TELEFÓNICA
FUNCIONES DEL MENÚ
H GRUPOS DE MENSAJES
Permite agrupar hasta 10 números de teléfono. El usuario puede agregar, cambiar y
borrar grupos de mensajes.
GRUPOS DE MENSAJES
Presione la tecla de selección izquierda
[MENÚ], 2 abc
Agenda telefónica, 3 def Grupos de mensajes.
Para seleccionar ”Nuevo”, presione la tecla de selección izquierda
[NUEVO].
Inserte un nuevo nombre de grupo.
Para guardarlo, presione OK [GUARDAR].
ATRIBUCIÓN DEL NUMERO DE TELÉFONO A LOS GRUPOS DE
MENSAJES
Para agregar un nuevo grupo, presione la tecla de selección
izquierda
[MENÚ], 2 abc Agenda telefónica, 3 def Grupos
de mensajes.
Para atribuir números de teléfono a un grupo, presione la tecla
[OPCIONES] y seleccione “Agregar“.
de selección derecha
Presione OK .
Seleccione una ubicación y luego presione la tecla de selección
izquierda
[MARCAR/DESMARCAR]. Se mostrarán sus registros
de contactos en orden alfabético.
Seleccione el contacto para el grupo y luego presione OK .
Se muestra el mensaje “Registro agregado al grupo de mensajes“.
Repita esta operación para cada ubicación para el grupo.
55
FUNCIONES DEL MENÚ
AGENDA TELEFÓNICA
CAMBIAR EL NOMBRE DEL GRUPO DE MENSAJES
Presione la tecla de selección izquierda
[MENÚ], 2 abc
Agenda telefónica, 3 def Grupos de mensajes.
Presione la tecla de navegación
hacia arriba o hacia abajo para
seleccionar el nombre del grupo existente que desea cambiar. Los
nombres de los grupos estándar Familia, Amigos, Compañeros y
Negocios no pueden alterarse.
Presione la tecla de selección derecha
[OPCIONES] y
seleccione “Cambiar nombre”. Presione OK .
Inserte un nuevo nombre de grupo.
AGENDA TELEFÓNICA
FUNCIONES DEL MENÚ
Para enviar el mensaje de texto, presione la tecla de selección
izquierda
[OPCIONES] y seleccione “Enviar“. Presione OK .
Para guardar el mensaje de texto, presione la tecla de selección
izquierda
[OPCIONES], luego seleccione “Guardar como
borrador“ y luego presione OK .
ENVÍO DE UN MENSAJE CON IMAGEN A UN GRUPO
Presione la tecla de selección izquierda
[MENÚ], 2 abc
Agenda telefónica, 3 def Grupos de mensajes.
Seleccione un nombre de grupo existente presionando la tecla de
navegación
hacia arriba o hacia abajo.
Para guardarlo, presione OK [GUARDAR].
Presione la tecla de selección derecha
[OPCIONES] y
seleccione “Mensaje con imagen“. Presione OK .
ENVÍO DE UN MENSAJE DE TEXTO A UN GRUPO
Inserte un ”Asunto”, ”Texto” y ”Más (Imagen
Presione la tecla de selección izquierda
[MENÚ], 2 abc
Agenda telefónica, 3 def Grupos de mensajes.
Para enviar el mensaje con imagen, presione la tecla de selección
izquierda
[ENVIAR].
Seleccione un nombre de grupo existente presionando la tecla de
navegación
hacia arriba o hacia abajo.
o Sonido
)“.
Para grabar el mensaje con imagen, presione la tecla de selección
derecha
[OPCIONES] y luego seleccione “Guardar como
borrador“, luego presione OK .
Presione la tecla de selección derecha
[OPCIONES] y
seleccione “Mensaje de texto“. Presione OK .
Inserte un ”Texto”, ”Nº. CB Estándar”, ”Prioridad” y ”Solicitud de
confirmación de recepción”.
56
57
FUNCIONES DEL MENÚ
AGENDA TELEFÓNICA
ENVÍO DE UN MENSAJE CON VIDEO A UN GRUPO
AGENDA TELEFÓNICA
FUNCIONES DEL MENÚ
H GRUPOS
Presione la tecla de selección izquierda
[MENÚ], 2 abc
Agenda telefónica, 3 def Grupos de mensajes.
La función Grupos le permite clasificar los registros de teléfono en grupos de
hasta 10 números en cada grupo. Los grupos existentes incluyen Familia, Amigos,
Compañeros, Negocios y Ningún grupo y no se pueden borrar o renombrar. Puede
agregar hasta 26 grupos nuevos que se pueden modificar o borrar.
Seleccione un nombre de grupo existente presionando la tecla de
navegación
hacia arriba o hacia abajo.
AGREGAR UN NUEVO GRUPO
Presione la tecla de selección derecha
[OPCIONES] y
seleccione “Mensaje con video“. Presione OK .
Presione la tecla de selección izquierda
Agenda telefónica, 4 ghi Grupos.
Inserte un “Asunto“, “Texto“ y “Más (Vídeo
Para seleccionar “Nuevo“, presione la Tecla de selección izquierda
[NUEVO].
)”.
Para enviar el mensaje con video, presione la tecla de selección
izquierda
[ENVIAR].
Para grabar el mensaje con vídeo, presione la tecla de selección
derecha
[OPCIONES], seleccione “Guardar como borrador“ y
luego presione OK .
BORRADO DE GRUPOS DE MENSAJES
Presione la tecla de selección izquierda
[MENÚ], 2 abc
Agenda telefónica, 3 def Grupos de mensajes.
Seleccione un nombre de grupo existente presionando la tecla de
navegación
hacia arriba o hacia abajo. Los nombres de grupos
estándar Familia, Amigos, Compañeros y Negocios no se pueden
borrar.
Presione la tecla de selección derecha
seleccione “Borrar”. Presione OK .
[OPCIONES] y
Presione la tecla de selección derech
[SÍ] para borrarlo.
58
[MENÚ], 2 abc
Inserte un nuevo nombre de grupo.
Para guardarlo, presione OK [GUARDAR].
CAMBIAR EL NOMBRE DEL GRUPO
Presione la tecla de selección izquierda
Agenda telefónica, 4 ghi Grupos.
[MENÚ], 2 abc
Presione la tecla de navegación
hacia arriba o hacia abajo para
seleccionar el nombre del grupo existente que desea cambiar.
Presione la tecla de selección derecha
[OPCIONES] y
seleccione “Cambiar nombre“. Presione OK .
Inserte un nuevo nombre de grupo.
Para guardarlo, presione OK [GUARDAR].
59
FUNCIONES DEL MENÚ
AGENDA TELEFÓNICA
BORRADO DE GRUPOS
Presione la tecla de selección izquierda
Agenda telefónica, 4 ghi Grupos.
FUNCIONES DEL MENÚ
H MARCADOS RÁPIDOS
[MENÚ], 2 abc
Seleccione un nombre de grupo existente presionando la tecla de
navegación
hacia arriba o hacia abajo.
Presione la tecla de selección derecha
[OPCIONES] y
seleccione “Borrar“. Presione OK [ACEPTAR].
Presione la tecla de selección derecha
AGENDA TELEFÓNICA
[SÍ] para borrarlo.
Cuando se usa la función Borrar grupo, los registros almacenados en el
grupo borrado se moverán hacia la carpeta “Ningún grupo”.
En modo inactivo, las llamadas se podrán realizar hacia números almacenados en
el grupo Marcado rápido manteniendo presionado el número de ubicación en el
teclado. Para un número de ubicación de 2 dígitos, presione el primer número y
enseguida mantenga presionada la tecla numérica del segundo número.
Presione la tecla de selección izquierda
[MENÚ], 2 abc
Agenda telefónica, 5 jkl Marcados rápidos.
Para atribuir un número de teléfono a una ubicación, seleccione la
ubicación y luego presione OK [CONFIGURAR].
Seleccione el contacto presionando la tecla de navegación
hacia arriba o hacia abajo. Luego presione OK [ACEPTAR].
Seleccione el número de teléfono presionando la tecla de
navegación
hacia arriba o hacia abajo. Presione OK
[ACEPTAR].
• Se exhibirá el mensaje “No atribuido” si la ubicación está disponible.
• Para llamar a un número atribuido, presione y mantenga presionado el
último dígito del número de marcado rápido.
Presione la tecla de selección derecha
[SÍ].
Se mostrará el mensaje “Marcado rápido configurado“.
60
61
FUNCIONES DEL MENÚ
GALERÍA DE MEDIOS
H CUADRO DE SONIDOS
Este menú muestra la lista de tonos descargados o notas de voz guardadas.
Presione la tecla de selección izquierda
[MENÚ], 3 def
Galería de medios, 1 Cuadro de sonidos.
Presione la tecla de selección derecha
seleccionar una de las siguientes opciones:
[OPCIONES] para
1. Enviar, 2. Renombrar, 3. Ajustar como, 4. Mover, 5. Borrar,
6. Borrar todo, 7. Información del archivo.
Recorra la lista de los sonidos descargados para ver el sonido
que desea enviar. Presione la tecla de selección derecha
[OPCIONES] y luego seleccione “1. Enviar”. Presione OK .
H CUADRO DE IMÁGENES
Este menú muestra la lista de imágenes capturadas con la cámara.
GALERÍA DE MEDIOS
FUNCIONES DEL MENÚ
H CUADRO DE VIDEOS
Este menú muestra la lista de videos capturados con la cámara y videoclips
descargados.
Presione la tecla de selección izquierda
[MENÚ], 3 def
Galería de medios, 3 def Cuadro de videos.
Para borrar el video, presione la tecla de selección izquierda
[BORRAR].
Presione la tecla de selección
una de las siguientes opciones:
[OPCIONES] para seleccionar
1. Enviar, 2. Mi espacio Movilnet, 3. Cambiar nombre, 4. Ajustar
como, 5. Borrar todo, 6. Información del archivo.
Recorra los videos descargados para visualizar el video que desea
[OPCIONES] y
enviar. Presione la tecla de selección derecha
luego seleccione “1. Enviar”. Presione OK .
Presione la tecla de selección izquierda
[MENÚ], 3 def
Galería de medios, 2 abc Cuadro de imágenes.
Para borrar la imagen, presione la tecla de selección izquierda
[BORRAR].
Presione la tecla de selección derecha
seleccionar una de las siguientes opciones:
[OPCIONES] para
1. Enviar, 2. Mi espacio Movilnet, 3. Cambiar nombre, 4. Ajustar
como, 5. Borrar todo, 6. Información del archivo.
Recorra la lista de imágenes descargadas para visualizar la imagen
que desea enviar. Presione la tecla de selección derecha
[OPCIONES] y luego seleccione “1. Enviar”. Presione OK .
62
63
FUNCIONES DEL MENÚ
GALERÍA DE MEDIOS
APLICACIONES NEO
FUNCIONES DEL MENÚ
H CUADRO DE MP3
Su móvil ofrece una función exclusiva – Aplicaciones Neo – que le permite descargar
tonos de melodías, fondos de pantalla, juegos y otras aplicaciones de su red a su
móvil. Comuníquese con su proveedor de servicios para obtener información sobre la
disponibilidad de estos servicios.
Presione la tecla de selección izquierda
[MENÚ], 3 def
Galería de medios, 4 ghi Cuadro de MP3.
INICIAR LAS APLICACIONES NEO
Se mostrará este menú cuando se use una tarjeta microSD. Para reproducir música
con su móvil, copie la música descargada de su PC a la tarjeta y luego inserte la
tarjeta en su móvil.
Presione la tecla de selección derecha
seleccionar una de las siguientes opciones:
[OPCIONES], para
1. Ajuste: Le permite seleccionar entre las opciones de reproducción de
archivos de música. (1. Normal, 2. Repetir 1, 3. Repetir todas,
4. Aleatoria)
2. Ajustar como, 3. Marcar todas, 4. Desmarcar todas, 5. Borrar,
6. Borrar todo, 7. Información del archivo
Cuando un archivo MP3 de una tarjeta microSD se ajusta como tono
(Opciones ™ Ajustar como ™ Tono de timbre), el archivo MP3 se moverá
a la memoria interna y ya no se visualizará en Cuadro de MP3. Puede
visualizar el archivo MP3 grabado en la lista de Tonos (Ajustes ™ Sonidos
de llamada ™ Tonos de timbre de llamada).
Para activar “Aplicaciones Neo
” a partir del modo inactivo,
[MENÚ], 5 jkl
presione la tecla de selección izquierda
Aplicaciones Neo, 1 Aplicaciones Neo o presione la tecla de
navegación
hacia la izquierda.
Cuando se visualizan tres o más iconos en la pantalla, seleccione una
.
aplicación con la tecla de navegación
Para iniciar la aplicación, presione OK .
Para terminar la aplicación, presione la tecla Fin END
El móvil volverá al modo inactivo.
.
DDESCARGAR APLICACIONES
Presione la tecla de selección izquierda
[MENÚ], 5 jkl
Aplicaciones Neo, 1 Aplicaciones Neo o presione la tecla de
navegación
hacia la izquierda.
Seleccione “Aplicaciones Neo
luego presione OK .
” con la tecla de navegación y
El móvil accederá su proveedor de servicios. Siga las indicaciones para
descargar las aplicaciones.
64
65
FUNCIONES DEL MENÚ
APLICACIONES NEO
• Para seleccionar una opción, presione la tecla de navegación
y
luego presione OK .
• Cuando se muestra una indicación, presione OK para continuar o
CLR para cancelar.
DESCARGAR MÚSICA / FONDOS DE PANTALLA
APLICACIONES NEO
FUNCIONES DEL MENÚ
BORRADO DE APLICACIONES
Los tonos de melodías, fondos de pantalla y aplicaciones descargados se guardan en
la carpeta DATOS de su móvil.
Presione la tecla de selección izquierda
[MENÚ], 5 jkl
Aplicaciones Neo, 1 Aplicaciones Neo o presione la tecla de
navegación
hacia la izquierda.
Antes de descargar tonos de música y fondos de pantalla, es necesario
descargar la aplicación de descarga dedicada. Comuníquese con su proveedor de servicios para obtener detalles.
Seleccione “Ajustes“ con la tecla de navegación y presione OK .
DESCARGAR MELODÍAS / FONDOS DE PANTALLA
Seleccione la aplicación que desea borrar con la tecla de navegación
y luego presione OK .
Los tonos de melodías descargados se aplican a diferentes funciones
incluyendo alertas de llamadas recibidas, alertas de mensajes de texto
nuevos, la alarma del reloj y la alarma del programador (agenda).
Los fondos de pantalla descargados se aplican al modo inactivo.
Seleccione “Administrar aplicaciones“ y presione OK .
Seleccione “Remover“ y luego presione OK .
Seleccione “Sí“ y luego presione OK .
VERIFICAR LA MEMORIA DE LA CARPETA DE DATOS
Los tonos de melodías, fondos de pantalla y aplicaciones descargados se guardan en
la carpeta DATOS de su móvil.
Presione la tecla de selección izquierda
[MENÚ], 5 jkl
Aplicaciones Neo, 1 Aplicaciones Neo o presione la tecla de
navegación
hacia la izquierda.
Seleccione ”Ajustes” con la tecla de navegación y presione OK .
Seleccione ”Administrar aplicaciones” con la tecla de navegación y
presione OK .
Para salir, presione la tecla Finalizar END
66
.
67
FUNCIONES DEL MENÚ
NAVEGACIÓN NEO
NAVEGACIÓN DE NEO
FUNCIONES DEL MENÚ
H COMENZAR NAVEGACIÓN NEO
AVANZAR
ACTIVAR MOBILE WEB 2.0
Para pasar a la página siguiente, presione la tecla de selección derecha
[MENÚ] y luego presione 3 def .
Ahora puede acceder a noticias, deportes, el clima y su correo electrónico desde
su teléfono CDM-8960. La aplicación Mobile Web 2.0 lo mantendrá actualizado
brindándole acceso a información actualizada como noticias, deportes, el clima
y la bolsa al suscribirse al servicio de Internet con su proveedor de servicios.
Comuníquese con su proveedor de servicios para obtener una lista de los sitios de
Internet disponibles y los detalles del servicio.
ACCEDER A DIRECCIÓN URL
Para acceder a un sitio de Internet directamente ingresando la
[MENÚ] y
dirección, presione la tecla de selección derecha
luego presione 4 ghi .
Presione la tecla de selección izquierda
[MENÚ], 6 mno
Navegación Neo, 1 Conexión a Internet o presione la tecla de
navegación
hacia la derecha, 1 Conexión a Internet.
ACTUALIZAR
H MENÚ DE INTERNET DEL TELÉFONO
Para seleccionar “Actualizar“, presione la tecla de selección derecha
[MENÚ] y luego presione 5 jkl .
MENÚ DE INTERNET DEL TELÉFONO
El menú Mobile Web contiene una lista de las acciones necesarias para usar la
aplicación Mobile Web. Para acceder al menú Mobile Web, presione la tecla de
[MENÚ], 6 mno Navegación Neo, 1 Conexión a
selección izquierda
Internet o presione la tecla de navegación
hacia la derecha, 1 Conexión a
Internet.
LOCAL
Cuando se selecciona el elemento Local en el menú Mobile Web, el móvil
muestra la página de inicio.
Al seleccionar el elemento Actualizar en el menú Mobile Web, se actualizará la
página actual.
HISTORIAL
Le permite ver una lista de sitios de Internet y direcciones de Internet accedidos
que ha visitado o intentado visitar.
Para seleccionar ”Historial”, presione la tecla de selección derecha
[MENÚ] y luego presione 6 mno .
MOSTRAR DIRECCIÓN URL
Muestra la dirección de URL del sitio al que está conectado actualmente.
Para visualizar la página de inicio, presione la tecla de selección
derecha
[MENÚ] y luego presione 1 .
Para seleccionar ”Mostrar dirección URL”, presione la tecla de selección
derecha
[MENÚ] y luego presione 7 pqrs .
VOLVER
ADMINISTRACIÓN DE MEMORIA
Para volver a la página anterior, presione la tecla de selección derecha
[MENÚ] y luego presione 2 abc .
68
Ajuste esta opción para administrar la memoria del navegador.
Para seleccionar “Administración de memoria“, presione la tecla de
[MENÚ] y luego presione 8 tuv .
selección derecha
69
FUNCIONES DEL MENÚ
NAVEGACIÓN NEO
AJUSTES
AJUSTES
H AJUSTES DE SONIDO
Para seleccionar “Ajustes“, presione la tecla de selección derecha
[MENÚ] y luego presione 9 wxyz .
VOLUMEN DEL TIMBRE
•
•
•
•
•
•
Descargas
Reiniciar navegador
Modo de desplazamiento
Enviar referencia
Tiempo de presionado de tecla agotado
Tiempo de conexión agotado
OPCIONES AVANZADAS
Al seleccionar el elemento Opciones avanzadas en el menú Mobile Web, se
visualizarán los elementos del menú Opciones avanzadas.
Para seleccionar ”Opciones avanzadas” presione la tecla de selección
derecha
[MENÚ] y luego presione 0 .
• Acerca de
• Codificación: 1. Autenticación
2. Certificado raíz
3. Certificado actual
SALIR
Para salir de la aplicación Mobile Web, presione la tecla de selección
derecha
[MENÚ] y luego seleccione � presionando la tecla de
navegación
hacia abajo o presione END .
FUNCIONES DEL MENÚ
Controla el volumen del timbre y alerta sobre llamadas recibidas en los modos que se
encuentran a continuación en el cuadro gris (también puede ajustar el volumen del
timbre en modo inactivo con la de volumen lateral):
Presione la tecla de selección izquierda
Ajustes, 1 Ajustes de sonidos, 1
[MENÚ], 7 pqrs
Volumen del timbre.
Seleccione una de las siguientes opciones presionando la tecla de
navegación
hacia la izquierda o hacia la derecha.
•
•
•
•
Silencio: Silencia el timbre.
Activar vibración
Modo de timbre: Sube y baja el volumen del timbre (nivel 1 – 5).
Presione la Tecla de selección izquierdaTecla de selección izquierda
[REPRODUCIR/DETENER] para reproducir o detener el sonido.
Para guardar, presione OK [CONFIGURAR].
SONIDOS DE LLAMADAS
Para seleccionar un tipo de timbre para las llamadas recibidas:
TONO DE TIMBRE
Presione la tecla de selección izquierda
[MENÚ], 7 pqrs
Ajustes, 1 Ajustes de sonido, 2 abc Sonidos de llamada,
1 Tono de timbre de llamada.
Seleccione el tipo de timbre deseado.
• Tecla hacia arriba o hacia abajo: Tonos de timbre o seleccione el
tipo de timbre deseado.
• Presione la tecla de selección izquierda
[REPRODUCIR/DETENER]
para reproducir o detener el sonido.
70
71
FUNCIONES DEL MENÚ
AJUSTES
Seleccione uno de los tipos de timbre disponibles. Para confirmar,
presione OK [ACEPTAR].
VIBRAR AL LLAMAR
Presione la tecla de selección izquierda
[MENÚ], 7 pqrs
Ajustes, 1 Ajustes de sonido, 2 abc Sonidos de llamada,
2 abc Vibrar al llamar.
Seleccione ”Activar” u ”Desactivar”. Luego presione OK
[ACEPTAR] para confirmar la función de vibración.
TONOS DE MENSAJES
Para seleccionar un tipo de tono para mensajes recibidos:
MENSAJE DE TEXTO
Presione la tecla de selección izquierda
[MENÚ], 7 pqrs
Ajustes, 1 Ajustes de sonido, 3 def Tonos de mensajes,
1 Mensaje de texto.
Seleccione ”Tono”, ”Vibrar” o ”Recordatorio” presionando la
hacia arriba o hacia abajo y luego
tecla de navegación
seleccione una de las opciones a continuación, presionando la
hacia arriba o hacia abajo:
tecla de navegación
• Tono: Tonos de timbre o seleccione el tipo de timbre deseado
hacia arriba o
presionando la tecla de navegación
hacia abajo. Presione la tecla de selección izquierda
[REPRODUCIR/DETENER] para reproducir o detener el sonido.
• Vibrar: Seleccione “Activar“ u “Desactivar“.
• Membrete: Seleccione “Una vez“, “Cada 2 minutos“, “Cada 15
minutos“ u “Desactivar“.
AJUSTES
FUNCIONES DEL MENÚ
MENSAJE PIX
Presione la tecla de selección izquierda
[MENÚ], 7 pqrs
Ajustes, 1 Ajustes de sonido, 3 def Tonos de mensajes,
2 abc Mensaje PIX.
Seleccione ”Tono”, ”Vibrar” o ”Recordatorio” presionando la
hacia arriba o hacia abajo y luego
tecla de navegación
seleccione una de las opciones a continuación, presionando la
hacia arriba o hacia abajo:
tecla de navegación
• Tono: Tonos de timbre o seleccione el tipo de tono deseado
hacia arriba o
presionando la tecla de navegación
hacia abajo. Presione la tecla de selección izquierda
[REPRODUCIR/DETENER] para reproducir o detener el sonido.
• Vibrar: Seleccione ”Activar” u ”Desactivar”.
• Membrete: Seleccione ”Una vez”, ”Cada 2 minutos”, ”Cada 15
minutos” u ”Desactivar”.
Para guardar, presione OK [ACEPTAR].
MENSAJE DE CORREO DE VOZ
Presione la tecla de selección izquierda
[MENÚ], 7 pqrs
Ajustes, 1 Ajustes de sonido, 3 def Tonos de mensajes,
3 def Mensaje de correo de voz.
Seleccione “Tono“, “Vibrar“ o “Recordatorio“ presionando la
hacia arriba o hacia abajo y luego
tecla de navegación
seleccione una de las opciones a continuación, presionando la
hacia arriba o hacia abajo:
tecla de navegación
Para guardar, presione OK [ACEPTAR].
72
73
FUNCIONES DEL MENÚ
AJUSTES
• Tono: Tonos de timbre o seleccione el tipo de tono deseado
hacia arriba o
presionando la tecla de navegación
hacia abajo. Presione la tecla de selección izquierda
[REPRODUCIR/DETENER] para reproducir o detener el sonido.
• Vibrar: Seleccione “Activar“ u “Desactivar“.
• Membrete: Seleccione “Una vez“, “Cada 2 minutos“, “Cada 15
minutos“ u “Desactivar“.
AJUSTES
FUNCIONES DEL MENÚ
CONEXIÓN DE LA LLAMADA
Notifica al usuario que una llamada fue realizada con éxito.
Presione la tecla de selección izquierda
[MENÚ], 7 pqrs
Ajustes, 1 Ajustes de sonido, 4 ghi Alertas de servicio,
3 def Conexión de la llamada.
Seleccione “Activar“ u “Desactivar“. Luego presione OK
[ACEPTAR] para guardar la configuración.
Para guardar, presione OK [ACEPTAR].
ALERTAS DE SERVICIO
ROAMING
Emite una alerta cuando sale del área de servicio y entra en un área de servicio
de roaming.
Presione la tecla de selección izquierda
[MENÚ], 7 pqrs
Ajustes, 1 Ajustes de sonido, 4 ghi Alertas de servicio,
1 Roaming.
Seleccione ”Activar” u ”Desactivar”. Luego presione OK
[ACEPTAR] para guardar la configuración.
AVISO DE MINUTO
Emite una alerta a cada minuto durante una llamada.
Presione la tecla de selección izquierda
[MENÚ], 7 pqrs
Ajustes, 1 Ajustes de sonido, 4 ghi Alertas de servicio,
2 abc Aviso de minuto.
Seleccione ”Activar” u ”Desactivar”. Luego presione OK
[ACEPTAR] para guardar la configuración.
74
ENCENDIDO/APAGADO (ON/OFF)
TONO AL ENCENDER
Permite activar/desactivar los tonos al encender el teléfono.
Presione la tecla de selección izquierda
[MENÚ], 7 pqrs
Ajustes, 1 Ajustes de sonido, 5 jkl Encendido/Apagado,
1 Tono al encender.
Seleccione “Activar“ u “Desactivar“. Luego presione la tecla
OK [ACEPTAR] para guardar la configuración.
TONO AL APAGAR
Permite activar/desactivar los tonos al apagar el teléfono.
Presione la tecla de selección izquierda
[MENÚ], 7 pqrs
Ajustes, 1 Ajustes de sonido, 5 jkl Enciendido/Apagado,
2 abc Tono al apagar.
Seleccione ”Activar” u ”Desactivar”. Luego presione OK
[ACEPTAR] para guardar la configuración.
75
FUNCIONES DEL MENÚ
AJUSTES
TONO DEL TECLADO
Para ajustar el tono del teclado:
Presione la tecla de selección izquierda
[MENÚ], 7 pqrs
Ajustes, 1 Ajustes de sonido, 6 mno Tono del teclado.
Seleccione una de las siguientes opciones presionando la tecla de
navegación
hacia la izquierda o hacia la derecha:
• Tono del teclado: Sube y baja el volumen del tono (Nivel 1 – Nivel 5)
• Silencio
Para guardar, presione OK [ACEPTAR].
H AJUSTES DE LA PANTALLA
Permite personailzar el modo de visualización del teléfono.
MI SALUDO
El texto de saludo puede contener hasta 16 caracteres y se muestra en la pantalla de
su teléfono en modo inactivo.
Presione la tecla de selección izquierda
[MENÚ], 7 pqrs
Ajustes, 2 abc Ajustes de la pantalla, 1 Mi saludo.
Escriba un nuevo mensaje de saludo personal.
Para cambiar el modo de entrada, presione la tecla de selección
izquierda
[Abc].
Presione OK [ACEPTAR] para guardar la configuración.
AJUSTES
FUNCIONES DEL MENÚ
DURACIÓN DE LA LUZ DE FONDO
Ilumina la pantalla y el teclado y activa el nivel de oscurecimiento para visualizar
con facilidad en lugares oscuros.
PANTALLA
Presione la tecla de selección izquierda
[MENÚ], 7 pqrs
Ajustes, 2 abc Ajustes de la pantalla, 2 abc Duración de la
luz de fondo, 1 Pantalla.
Seleccione una de las siguientes opciones presionando la tecla de
navegación
hacia arriba o hacia abajo:
•
•
•
•
•
5 segundos
10 segundos
30 segundos
Siempre activo
Siempre desactivado
Presione OK [ACEPTAR] para guardar la configuración.
TECLADO
Presione la tecla de selección izquierda
[MENÚ], 7 pqrs
Ajustes, 2 abc Ajustes de la pantalla, 2 abc Duración de la
luz de fondo, 2 abc Teclado.
Seleccione una de las siguientes opciones presionando la tecla de
navegación
hacia arriba o hacia abajo:
•
•
•
•
•
5 segundos
10 segundos
30 segundos
Siempre activo
Siempre desactivado
Presione OK [ACEPTAR] para guardar la configuración.
76
77
FUNCIONES DEL MENÚ
AJUSTES
CONTRASTE
Para ajustar el contraste del visor:
Presione la tecla de selección izquierda
[MENÚ], 7 pqrs
Ajustes, 2 abc Ajustes de la pantalla, 3 def Contraste.
Seleccione una de las siguientes opciones presionando la tecla de
navegación
hacia arriba o hacia abajo:
•
•
•
•
•
Nivel 5
Nivel 4
Nivel 3
Nivel 2
Nivel 1
Presione OK [ACEPTAR] para grabar el ajuste.
FONDO DE PANTALLA
PANTALLA PRINCIPAL
Presione la tecla de selección izquierda
[MENÚ], 7 pqrs
Ajustes, 2 abc Ajustes de la pantalla, 4 ghi Fondo de
pantalla, 1 Pantalla principal.
Seleccione “Imagen“ o “Video“.
Seleccione Predeterminado para seleccionar una pantalla
predefinida o Descargas, Nº. de la imagen o Nº. del video para
seleccionar una pantalla descargada en su teléfono. Para
agrandar la imagen seleccionada o reproducir el video, presione
[VISUALIZAR/REPRODUCIR].
la tecla de selección izquierda
Seleccione una pantalla (modo de visualización) de la lista
Animation Animación y Gráfico presionando la tecla de
navegación
hacia arriba o hacia abajo. Luego presione OK
[ACEPTAR] para guardar la configuración.
78
AJUSTES
FUNCIONES DEL MENÚ
PANTALLA SECUNDARIA
Presione la tecla de selección izquierda
[MENÚ], 7 pqrs
Ajustes, 2 abc Ajustes de la pantalla, 4 ghi Fondo de
pantalla, 2 abc Pantalla secundaria.
Seleccione Predeterminado para seleccionar una pantalla
predefinida. Para agrandar la imagen seleccionada presione la
[VISUALIZAR].
tecla de selección izquierda
Seleccione una pantalla de la lista Gráficos presionando la tecla
hacia arriba o hacia abajo. Luego presione
de navegación
OK [ACEPTAR] para guardar la configuración.
TIPO DE MENÚ
Para seleccionar un estilo de visualización del menú:
Presione la tecla de selección izquierda
[MENÚ], 7 pqrs
Ajustes, 2 abc Ajustes de la pantalla, 5 jkl Tipo de menú.
Seleccione una de las siguientes opciones presionando la tecla de
navegación
hacia arriba o hacia abajo:
• Tipo Gráficos
• Tipo Lista
Presione OK [ACEPTAR] para guardar la configuración.
79
FUNCIONES DEL MENÚ
AJUSTES
H AJUSTES DEL TELÉFONO
FUNCIONES DEL MENÚ
Seleccione “Sólo E911“ o “Activar ubicación“.
MODO DE AVIÓN
Este modo permite usar una serie de recursos de su teléfono, como juegos, notas
de voz, etc. cuando está dentro de un avión o en cualquier otra área donde está
prohibido realizar y recibir llamadas o datos. Cuando su teléfono esté en modo de
avión, no puede enviar ni recibir llamadas o acceder a información en línea.
Presione la tecla de selección izquierda
Ajustes, 3 def Ajustes del teléfono, 1
AJUSTES
[MENÚ], 7 pqrs
Modo de avión.
Seleccione ”Activado” u ”Desactivado”.
Presione OK [ACEPTAR] para guardar la configuración.
IDIOMA
Seleccione el idioma para la visualización del texto en la pantalla.
Presione la tecla de selección izquierda
[MENÚ], 7 pqrs
Ajustes, 3 def Ajustes del teléfono, 2 abc Idioma.
Seleccione ”Inglés” o ”Español”.
Presione OK [ACEPTAR] para guardar la configuración.
UBICACIÓN
Para determinar si el sistema de red podrá detectar su posición:
• Sólo E911: Su ubicación se ocultará de la red y de las aplicaciones,
excepto el número 911.
• Activar ubicación: Su ubicación ahora está disponible para la red.
Presione OK [ACEPTAR] para guardar la configuración.
SEGURIDAD
Impide que otras personas utilicen el teléfono sin su permiso y permite el acceso a
las funciones de seguridad únicamente ingresando una contraseña.
MODO DE BLOQUEO
Presione la tecla de selección izquierda
[MENÚ], 7 pqrs
Ajustes, 3 def Ajustes del teléfono, 4 ghi Seguridad, luego
marque la constraseña y luego presione OK [ACEPTAR].
La contraseña estándar es “1234”.
Presione 1 Modo de bloqueo y luego seleccione “Bloquear
ahora“, “Desbloquear“ u “Al encender el teléfono“.
• Bloquear ahora: Bloquea el teléfono.
• No bloquear: No bloquea el teléfono.
• Al encender el teléfono: No bloquea el teléfono ahora, pero lo
bloquea automáticamente cuando se
vuelve a encender el teléfono.
Presione OK [ACEPTAR] para guardar la configuración.
Presione la tecla de selección izquierda
[MENÚ], 7 pqrs
Ajustes, 3 def Ajustes del teléfono, 3 def Ubicación.
80
81
FUNCIONES DEL MENÚ
AJUSTES
RESTRINGIR
Cuando intenta hacer una llamada restringida, en la pantalla aparece el mensaje
”Ingrese su código”.
LLAMADA MARCADA
FUNCIONES DEL MENÚ
• Permitir: Permite el acceso a la lista de llamadas recientes.
• Restringir: Restringe el acceso a la lista de llamadas recientes.
Presione OK [ACEPTAR] para guardar la configuración.
Impide realizar llamadas (excepto llamadas de emergencia) pero permite
recibir llamadas.
CÁMARA
Presione la tecla de selección izquierda
[MENÚ], 7 pqrs
Ajustes, 3 def Ajustes del teléfono, 4 ghi Seguridad,
marque contraseña y luego presione OK [ACEPTAR].
Presione la tecla de selección izquierda
[MENÚ], 7 pqrs
Ajustes, 3 def Ajustes del teléfono, 4 ghi Seguridad,
marque contraseña y luego presione OK [ACEPTAR].
La contraseña estándar es “1234”.
Presione 2 abc Restringir, 1 Marcada y seleccione
hacia
“Permitir” o “Restringir” con la tecla de navegación
arriba o hacia abajo.
• Permitir: Permite realizar una llamada.
• Restringir: Restringe las llamadas.
Presione OK [ACEPTAR] para grabar el ajuste.
LLAMADAS RECIENTES
Bloquea el acceso a la lista de llamadas recientes.
Presione la tecla de selección izquierda
[MENÚ], 7 pqrs
Ajustes, 3 def Ajustes del teléfono, 4 ghi Seguridad,
marque contraseña y luego presione OK [ACEPTAR].
La contraseña estándar es “1234”.
Presione 2 abc Restringir, 2 abc Llamadas recientes y
seleccione ”Permitir” o ”Restringir” con la tecla de navegación
hacia arriba o hacia abajo.
82
AJUSTES
Restringe el acceso al modo Cámara.
La contraseña estándar es “1234”.
Presione 2 abc Restringir, 3 def Cámara y seleccione
”Permitir” o ”Restringir” con la tecla de navegación
hacia
arriba o hacia abajo.
• Permitir: Permite el acceso a la cámara.
• Restringir: Restringe el acceso a la cámara.
Presione OK [ACEPTAR] para guardar la configuración.
900#S
Restringe la llamada a los números de servicios 900.
Presione la tecla de selección izquierda
[MENÚ], 7 pqrs
Ajustes, 3 def Ajustes del teléfono, 4 ghi Seguridad,
marque contraseña y luego presione OK [ACEPTAR].
La contraseña estándar es “1234”.
Presione 2 abc Restringir, 4 ghi 900#s y seleccione
hacia
“Permitir” o “Restringir” con la tecla de navegación
arriba o hacia abajo.
83
FUNCIONES DEL MENÚ
AJUSTES
• Permitir: Permite las llamadas a servicios 900.
• Restringir: Restringe las llamadas a servicios 900.
Presione OK [ACEPTAR] para guardar la configuración.
LARGA DISTANCIA
Restringe las llamadas a números de larga distancia; las llamadas telefónicas
estarán limitadas a las llamadas de números dentro del área del usuario.
Presione la tecla de selección izquierda
[MENÚ], 7 pqrs
Ajustes, 3 def Ajustes del teléfono, 4 ghi Seguridad,
marque contraseña y luego presione OK [ACEPTAR].
La contraseña estándar es “1234”.
Presione 2 abc Restringir, 5 jkl Larga distancia y
seleccione “Permitir” o “Restringir” con la tecla de navegación
hacia arriba o hacia abajo.
• Permitir: Permite las llamadas de larga distancia.
• Restringir: Restringe las llamadas de larga distancia.
Presione OK [ACEPTAR] para guardar la configuración.
EDICIÓN DE CÓDIGOS
Para cambiar su contraseña:
Presione la tecla de selección izquierda
[MENÚ], 7 pqrs
Ajustes, 3 def Ajustes del teléfono, 4 ghi Seguridad, marque
contraseña y luego presione OK [ACEPTAR].
AJUSTES
FUNCIONES DEL MENÚ
REINICIO DEL TELÉFONO
Presione la tecla de selección izquierda
[MENÚ], 7 pqrs
Ajustes, 3 def Ajustes del teléfono, 4 ghi Seguridad, marque
contraseña y luego presione OK [ACEPTAR].
La contraseña estándar es “1234”.
Presione 4 ghi Reiniciar el teléfono.
Se mostará el mensaje ”Se borrarán todos los datos en su
teléfono. ¿Desea reiniciar el teléfono?”.
Para reiniciar el teléfono, presione la tecla de selección derecha
[SÍ].
SELECCIÓN DEL MÓDULO NAM [Módulo de Atribución de Números]
Habilita Módulo NAM Automático o selecciona manualmente un módulo NAM.
MODULO NAM AUTOMÁTICO
Ajusta automáticamente el teléfono al módulo NAM adecuado cuando tiene
diferentes registros de módulos NAM.
Presione la tecla de selección izquierda
[MENÚ], 7 pqrs
Ajustes, 3 def Ajustes del teléfono, 5 jkl Selección del
módulo NAM, 1 NAM automático.
Seleccione “Activar“ u “Desactivar“.
Presione OK [ACEPTAR] para guardar la configuración.
La contraseña estándar es “1234”.
Presione 3 def Editar código.
Presione un nuevo código y luego presione OK [ACEPTAR].
Vuelva a marcar el nuevo código y presione OK [ACEPTAR]
para cambiar el código.
84
85
FUNCIONES DEL MENÚ
AJUSTES
AJUSTES
FUNCIONES DEL MENÚ
CAMBIO DEL MODULO NAM
REMARCACIÓN AUTOMATICA
Presione la tecla de selección izquierda
[MENÚ], 7 pqrs
Ajustes, 3 def Ajustes del teléfono, 5 jkl Selección del
módulo NAM, 2 abc Cambiar módulo NAM.
Seleccione “NAM - MOVILNET” o “NAM 2 – MOVILNET”.
Presione la tecla de selección izquierda
[MENÚ], 7 pqrs
Ajustes, 4 ghi Ajustes de llamada, 2 abc Remarcación
automática.
Cambia el módulo NAM utilizado para el teléfono cuando tiene
diferentesregistros.
Presione OK [ACEPTAR] para guardar la configuración.
H AJUSTES DE LLAMADAS
Para seleccionar un modo de respuesta:
[MENÚ], 7 pqrs
Opciones de respuesta.
Seleccione una de las siguientes opciones presionando la tecla de
navegación
hacia arriba o hacia abajo:
•
•
•
•
Seleccione una de las siguientes opciones presionando la tecla de
navegación
hacia arriba o hacia abajo:
•
•
•
•
•
OPCIONES PARA RESPONDER
Presione la tecla de selección izquierda
Ajustes, 4 ghi Ajustes de llamada, 1
Vuelve a marcar automáticamente el número después de un intervalo de tiempo
determinado.
Abrir carpeta
Cualquier tecla
Contestar automáticamente
Enviar solamente
Presione OK [ACEPTAR] para guardar la configuración.
Desactivado
3 segundos
5 segundos
7 segundos
10 segundos
Presione OK [ACEPTAR] para guardar la configuración.
MODO TTY
Su teléfono puede operar con un dispositivo TTY (Teletipo) en los modos analógico
y digital. Esta función depende del sistema y es posible que no esté disponible en
todas las áreas.
Presione la tecla de selección izquierda
[MENÚ], 7 pqrs
Ajustes, 4 ghi Ajustes de llamada, 3 def Modo TTY.
Seleccione una de las siguientes opciones presionando la tecla de
navegación
hacia arriba o hacia abajo:
•
•
•
•
TTY completo
TTY + Hablar
TTY + Escuchar
TTY desactivado
Presione OK [ACEPTAR] para guardar la configuración.
86
87
FUNCIONES DEL MENÚ
AJUSTES
MARCADO POR UN TOQUE
Realice una llamada utilizando el marcado rápido preajustado.
Presione la tecla de selección izquierda
[MENÚ], 7 pqrs
Ajustes, 4 ghi Ajustes de llamada, 4 ghi Marcado por un toque.
Seleccione “Activar“ u “Desactivar“.
Presione OK [ACEPTAR] para guardar la configuración.
PRIVACIDAD DE VOZ
Aumenta la privacidad de voz y evita intercepciones durante una llamada.
Presione la tecla de selección izquierda
[MENÚ], 7 pqrs
Ajustes, 4 ghi Ajustes de llamada, 5 jkl Privacidad de voz.
AJUSTES
FUNCIONES DEL MENÚ
H MEMORIA
OPCIONES DE GRABACIÓN
Puede grabar diferentes datos incluyendo archivos de imagen, video y sonido en la
memoria del teléfono o en una tarjeta de memoria.
Presione la tecla de selección izquierda
[MENÚ], 7 pqrs
Ajustes, 5 jkl Memoria, 1 Guardar opciones.
Seleccione 1 para acceder a Sonidos, 2 abc para Imágenes
o 3 def para Videos con la tecla de navegación
y luego
seleccione una de las siguientes opciones presionando la tecla de
navegación
hacia arriba o hacia abajo:
• Memoria interna
• Memoria externa
Seleccione “Activar“ u “Desactivar“.
Presione OK [ACEPTAR] para guardar la configuración.
Presione OK [ACEPTAR] para guardar la configuración.
MEMORIA INTERNA
Activar: Evita intercepciones telefónicas.
Puede visualizar el estado de la capacidad total, utilizada y disponible de la
memoria.
Presione la tecla de selección izquierda
[MENÚ], 7 pqrs
Ajustes, 5 jkl Memoria, 2 abc Memoria interna.
Se muestra información actualizada de la memoria en la pantalla.
Para volver a la página anterior,
presione OK [ACEPTAR] .
88
89
FUNCIONES DEL MENÚ
AJUSTES
MEMORIA EXTERNA
Puede visualizar el estado de la memoria total, utilizada y disponible.
Presione la tecla de selección izquierda
[MENÚ], 7 pqrs
Ajustes, 5 jkl Memoria, 3 def Memoria externa.
AJUSTES
FUNCIONES DEL MENÚ
Para acceder al menú Bluetooth, presione la tecla de selección izquierda
[MENÚ], 7 pqrs Ajustes, 6 mno Bluetooth.
Seleccione una de las siguientes opciones:
La información actual de la memoria se muestra en la pantalla.
Agregar nuevo dispositivo — Configura un pareado entre su teléfono y otro
dispositivo con tecnología Bluetooth. Con la función Bluetooth activada, ajuste el
dispositivo al cual esta unidad se conectará para el modo de explotación y
seleccione Aceptar.
Para volver a la página anterior, presione OK [ACEPTAR] .
Activar o desactivar — Activa o desactiva la conectividad Bluetooth. Una conexión
en la parte superior de la pantalla.
Bluetooth activa se indicará con el icono
H BLUETOOTH
La conectividad con tecnología Bluetooth habilita conexiones inalámbricas entre
dispositivos electrónicos. Si se conecta con un dispositivo de altavoz Bluetooth,
podrá utilizar su teléfono con mayor libertad. Con la función DUN, también se
puede utilizar el teléfono como un módem inalámbrico. Éste también puede
utilizarse para realizar una conexión inalámbrica con productos que utilizan la
tecnología inalámbrica Bluetooth, como por ejemplo, computadoras. Se pueden
sincronizar el teléfono y la PC utilizando la conectividad Bluetooth. Considerando
que los dispositivos con conectividad Bluetooth se comunican utilizando ondas
de radio, el teléfono y el otro dispositivo no necesitan estar en la misma línea de
visión. Los dos dispositivos solamente necesitan estar dentro de un diámetro de
10 metros entre sí. La conexión puede estar sujeta a interferencia de obstáculos
como paredes u otros dispositivos electrónicos. Este dispositivo cumple con la
especificación Bluetooth 1.1 y es compatible con los siguientes perfiles: HSP V1.1
(perfil del audífono), HFP V1.0 (perfil del kit de altavoz para automóviles), DUN
V1.1 (conexión a la red dial-up), GAP (Perfil de Acceso General), SPP V1.1 (Perfil
de puerto serial) y FTP V1.1 (Perfil de Transferencia de Carpetas). Para asegurar la
interfunción entre otros dispositivos compatibles con la tecnología Bluetooth, se
deben utilizar los recursos aprobados por UTStarcom para este modelo. Consulte
con los fabricantes de los otros dispositivos para determinar la compatibilidad
con este teléfono. Puede haber restricciones al uso de la tecnología Bluetooth en
algunas ubicaciones. Consulte con los organismos locales apropiados. Para obtener
más información sobre esta función, visite el sitio de la organización Bluetooth
Technology: https://www.bluetooth.org/.
90
Opciones — Define cómo su teléfono se mostrará en otros dispositivos con
conectividad Bluetooth. Para cambiar el nombre de su teléfono que se visualizará
a otros usuarios, seleccione Nombre de mi teléfono, ingrese el nuevo nombre y
seleccione OK (Aceptar). Para visualizar su teléfono en otros dispositivos durante un
minuto u ocultar su teléfono de otros usuarios, seleccione Modo de explotación >
Activar o desactivar.
Importante: las funciones que usan tecnología Bluetooth o que permiten
que tales funciones sean ejecutadas como fondo mientras utiliza otras
funciones aumentan el consumo de energía de la batería y reducen la vida
útil de la batería.
Pareado de la función Bluetooth del teléfono a la PC
El pareado de la conectividad Bluetooth entre su teléfono y la PC o computadora
portátil se iniciará desde su teléfono o desde su PC o computadora portátil. Para
conectarse desde su teléfono, proceda como se indica a continuación:
Para habilitar la conectividad Bluetooth en su teléfono, presione
[MENÚ], 7 pqrs Ajustes,
la tecla de selección izquierda
6 mno Bluetooth. Presione la tecla de selección izquierda
[ACTIVAR]. El icono Bluetooth se visualizará en la parte superior
derecha de la pantalla principal.
91
FUNCIONES DEL MENÚ
AJUSTES
Para parear su teléfono a su PC o computadora portátil, seleccione
Agregar nuevo dispositivo. Ajuste la PC que se conectará en el
modo de explotación y seleccione Aceptar. El teléfono buscará los
dispositivos Bluetooth en el rango de alcance y enumerará todos los
dispositivos encontrados.
Acceda al nombre de su PC o computadora portátil en la lista y
seleccione Aceptar. Ingrese su código de bloqueo en su teléfono y
luego el mismo código de bloqueo en su PC o computadora portátil.
Seleccione ”Preguntar siempre” o ”Siempre conectar a su teléfono”
y seleccione Aceptar. La puerta de mensajes habilitada se visualizará
en el teléfono para confirmar el pareado.
Pareado Bluetooth de la PC al teléfono
Para iniciar una conexión Bluetooth desde su PC o computadora portátil a su
teléfono, siga los siguientes pasos:
Para habilitar la conectividad Bluetooth en su teléfono, presione
[MENÚ], 7 pqrs Ajustes,
la tecla de selección izquierda
6 mno Bluetooth. Para seleccionar Activar, presione la tecla de
. El icono Bluetooth se visualizará en el
selección izquierda
lado superior derecho de la pantalla principal.
En el menú Bluetooth, presione la tecla de selección derecha
[OPCIONES].
Presione 2 abc para acceder a Modo de explotación. Si su
teléfono no está activado, se mostrará el mensaje “Activar recurso
Bluetooth” y el sistema volverá al menú Bluetooth. Presione la tecla
[Activar].
de selección izquierda
92
AJUSTES
FUNCIONES DEL MENÚ
Seleccione “Activar“ y luego presione OK . Su teléfono estará
ajustado para el modo de explotación para los otros dispositivos
Bluetooth durante un minuto.
Presione END para volver al modo inactivo. En este modo,
su teléfono ejecutará cualquier función. Se mostrarán el fondo de
pantalla, la hora y la fecha.
El teléfono debe estar en modo inactivo para o parearse con el otro
dispositivo.
Desde su PC, busque los dispositivos Bluetooth. Una lista de los dispositivos mostrará el modelo CDM-8960 o el nombre seleccionado
para el teléfono.
Seleccione su teléfono de la lista de dispositivos localizados e
inserte el código de bloqueo.
Su teléfono mostrará un mensaje solicitando un pareado con la
PC o computadora portátil. Seleccione Aceptar e ingrese el mismo
código de bloqueo insertado en la PC.
Seleccione “Preguntar siempre“ o “Siempre conectar a su teléfono“
y seleccione Aceptar. Se mostrará el mensaje “Puerto habilitado“
en el teléfono confirmando el pareado. Todos los servicios como la
conexión a la red Dial-up (DUN) estarán disponibles en el teléfono.
Los servicios disponibles también serán colocados en lista en su PC
o computadora portátil. Seleccione los servicios que desea utilizar
con su teléfono.
93
FUNCIONES DEL MENÚ
AJUSTES
Si su teléfono está conectado a una computadora portátil o PC utilizando
la conectividad Bluetooth, no podrá utilizar el cable USB. Para utilizar el
cable USB, acceda al menú Bluetooth, seleccione la computadora portátil
o PC conectada a su teléfono y luego deshabilite el puerto utilizando la
tecla de selección correspondiente.
Cancelar el pareado de una conexión Bluetooth
Para desactivar el pareado de una conexión Bluetooth, se debe cancelar el pareado
tanto del teléfono como de la PC o computadora portátil. Para ejecutar esa acción,
realice los siguientes pasos:
Para cancelar el pareado a partir del teléfono, acceda al nombre de
la PC y seleccione Aceptar. Se mostrará el mensaje “Puerto
deshabilitado” en el teléfono, confirmando el cancelación del
pareado.
Siga las instrucciones sobre Bluetooth en su PC o computadora
portátil o las instrucciones con la llave electrónica de su dispositivo
Bluetooth para cancelar el pareado de su PC o computadora portátil
a partir del teléfono. Una llave electrónica es un pequeño
dispositivo USB agregado a una PC o computadora portátil que no
posee conexión Bluetooth incorporada. La PC, computadora portátil
y los productos de llaves electrónicas tienen soporte a través de
Internet para la conectividad Bluetooth.
AJUSTES
FUNCIONES DEL MENÚ
H MENÚ DE BLUETOOTH
Esta unidad es compatible con dispositivos que soportan el audífono Bluetooth y los
perfiles de manos libres*. Se puede crear y almacenar 30 pareados en esta unidad
y conectar a un dispositivo a la vez. El rango de comunicación aproximado para la
tecnología inalámbrica Bluetooth es de hasta 10 metros.
Lea el manual del usuario de cada accesorio Bluetooth que intenta
conectar (parear) al teléfono, dado que las instrucciones pueden variar de
dispositivo a dispositivo.
ACTIVAR/DESACTIVAR (ON/OFF) LA CONECTIVIDAD
BLUETOOTH
La función Encendido permite que se active y desactive la función Bluetooth.
Presione la tecla de selección izquierda
Ajustes, 6 mno Bluetooth.
[MENÚ], 7 pqrs
Presione la tecla de selección izquierda
[ACTIVAR/DESACTIVAR]
para activar o desactivar el modo Bluetooth.
AGREGAR UN NUEVO DISPOSITIVO
El pareado es el proceso que permite que el teléfono localice, establezca y registre
una conexión 1-a-1 con el dispositivo objetivo.
Presione la tecla de selección izquierda
Ajustes, 6 mno Bluetooth.
[MENÚ], 7 pqrs
Seleccione “1. Agregar nuevo dispositivo” y luego presione OK .
Si el Bluetooth está configurado en desactivado, se mostrará el
mensaje “¿Activar la función Bluetooth?”. Seleccione la tecla de
[SÍ].
selección derecha
94
95
FUNCIONES DEL MENÚ
AJUSTES
Al presionar la tecla de selección derecha
[OPCIONES],
puede seleccionar entre las siguientes opciones:
• Nombre de mi teléfono: El nombre Bluetooth de su teléfono
se mostrará a otros dispositivos Bluetooth en el área de alcance,
dependiendo de su modo de explotación. Ingrese un nuevo nombre
y presione OK para guardar y salir.
• Modo visible: “Activa“ o “Desactiva“ el modo Visible. Si el modo
Visible está activado, otros dispositivos podrán ubicar su dispositivo
durante un minuto.
• Perfiles soportados: Muestra la siguiente lista de opciones:
1. Audífono: Soporta el uso de un audífono Bluetooth compatible
para voz mono.
2. Altavoz: Soporta audífonos Bluetooth y puede soportar otros
dispositivos Bluetooth compatibles instalados con funciones de
altavoz, como kits para automóviles o un dispositivo para sala
de conferencia.
3. Red dial-up: Permite que el teléfono sea utilizado como un
módem de datos con un dispositivo Bluetooth compatible, como
una computadora portátil o PDA.
4. Perfil de transferencia de archivos: Soporta solamente la
función Servidor FTP. Puede acceder a un archivo en una carpeta
compartida (CDM-8960) desde una computadora portátil, PDA o
teléfono equipado con la función Bluetooth FTP. También puede
agregar un nuevo archivo del dispositivo externo a la carpeta
compartida.
5. Servidor FTP: Soporta solamente el servicio Servidor FTP.
Considerando que el CDM-8960 opera como un servidor mientras
su computadora portátil funciona como un cliente, se pueden
enviar/recibir archivos de imagen, sonido o video conectando la
unidad al Bluetooth FTP.
AJUSTES
FUNCIONES DEL MENÚ
El teléfono solicitará la contraseña. Consulte las instrucciones del
dispositivo Bluetooth para obtener la contraseña apropiada
(generalmente “0000” – 4 ceros). Ingrese la contraseña y presione
OK .
El código PIN estándar puede diferir dependiendo de los dispositivos
Bluetooth. Consulte la guía del usuario del dispositivo Bluetooth que
desea utilizar.
Una vez que se logre el pareado, seleccione “Sí” y presione OK
para realizar la conexión con otro dispositivo.
Una vez que esta unidad esté pareada, visualizará el dispositivo de
la lista del menú “1. Agregar nuevo dispositivo”.
Al presionar la tecla de selección derecha
[OPCIONES],
podrá seleccionar una de las siguientes opciones:
Eliminar dispositivo: Elimina un dispositivo de la lista de dispositivos
pareados.
Cambiar nombre de dispositivo: Cambia el nombre del dispositivo
pareado.
Ubicar servicio: Busca un nuevo dispositivo reiteradamente.
Información del dispositivo: Revisa la información sobre el
dispositivo pareado.
Se visualizarán las instrucciones (Coloque el dispositivo al cual esta
unidad se está conectando en modo de explotación). Seleccione el
dispositivo y presione OK .
96
97
FUNCIONES DEL MENÚ
AJUSTES
CÁMARA
FUNCIONES DEL MENÚ
H INFORMACIÓN DEL TELÉFONO
H CAPTURAR IMÁGENES
MI NÚMERO
CAPTURAR UNA IMAGEN DESDE EL MENÚ
Muestra su número de teléfono.
Presione la tecla de selección izquierda
[MENÚ], 7 pqrs
Ajustes, 7 pqrs Información del teléfono, 1 Mi número.
Visualizará MDN/MIN y el nombre del proveedor.
Para volver a la página anterior, presione OK [ACEPTAR].
VERSIÓN DEL SOFTWARE
Muestra la versión (Software/Hardware/PRL/Navegador/Neo).
Presione la tecla de selección izquierda
[MENÚ], 7 pqrs
Ajustes, 7 pqrs Información del teléfono, 2 abc Versión del
software.
Se muestran las versiones del software, hardware y navegador.
Para volver a la página anterior, presione OK [ACEPTAR].
Presione la tecla de selección izquierda
Cámara, 1 Capturar imagen.
[MENÚ], 8 tuv
Apunte la lente de la cámara hacia el objetivo. Puede verificar el
encuadramiento de la imagen a través de la pantalla principal.
Presione OK [ACEPTAR], la tecla Cámara en la parte lateral
izquierda o
para capturar la imagen.
• Para visualizar las imágenes capturadas, presione la tecla de selección
derecha
[GALERÍA].
Tras capturar la imagen, ésta se visualizará.
Para guardar la imagen, presione la tecla de selección izquierda
[GUARDAR].
Para volver al modo inactivo sin guardar la imagen,
presione END .
Para capturar otra imagen sin guardar la imagen capturada
anteriormente, presione la tecla de selección derecha
[BORRAR].
Para enviar la imagen a alguien, presione OK [ENVIAR].
Consulte la página 132 para obtener más detalles sobre “Enviar un
nuevo mensaje con Imagen”.
98
99
FUNCIONES DEL MENÚ
CÁMARA
CAPTURAR UNA IMAGEN EN MODO INACTIVO
Para activar el modo Cámara, mantenga presionada la tecla Cámara
en la parte lateral izquierda con la tapa cerrada o la tecla
Cámara
con la tapa abierta.
Para capturar una imagen, cuando la tapa esté abierta presione
. O cuando la tapa esté
OK [ACEPTAR] o la tecla Cámara
cerrada, presione la tecla Cámara en la parte lateral izquierda .
Tras capturar la imagen, ésta se visualizará.
Para guardar la imagen, presione la tecla de selección izquierda
[GUARDAR].
Para volver al modo inactivo sin guardar la imagen, presione
END .
Para capturar otra imagen sin guardar la imagen recientemente
[BORRAR].
capturada, presione la tecla de selección derecha
Para enviar la imagen a alguien, presione OK [ENVIAR].
Consulte la página 132 para obtener más detalles sobre “Enviar un
nuevo mensaje con imagen”.
• Si recibe una llamada mientras captura una imagen, la cámara se
apagará. Es posible que no reciba un mensaje de advertencia antes de
recibir la llamada.
• No puede cambiar el tamaño de la imagen (Ajustes – Resolución) con
el modo Cuadro divertido activado.
100
CÁMARA
FUNCIONES DEL MENÚ
• Al presionar la tecla de selección izquierda
[MENÚ], puede
seleccionar una de las siguientes funciones:
1. Autorretrato: Ajuste el visor para LCD secundario. Para
capturar una imagen de sí mismo, mire hacia el LCD secundario.
[MENÚ], puede
Al presionar la tecla de selección izquierda
seleccionar las opciones del LCD secundario: 1. LCD principal /
2. Temporizador automático / 3. Herramientas de entretenimiento.../
4. Controles de imagen... / 5. Ajustes... / 6. Modo cámara de video.
2. Temporizador automático: Activa la función de temporizador de
la cámara. (Desactivado / 5 segundos / 10 segundos)
3. Herramientas de entretenimiento...:
Efectos de colores: Selecciona efectos en la imagen.
(Normal / Gris / Sepia / Negativo).
Cuadro divertido: Selecciona un cuadro divertido.
(Desactivado / Flor / Máscara / Querido / Primer golpe / Deportes /
Estrellas / Vela / Labios / Mar / Cielo)
4. Controles de la imagen...:
Brillo: Presione la tecla de navegación
hacia la derecha
hacia la izquierda
(0 a +2) o presione la tecla de navegación
(0 a -2) para seleccionar el control de brillo.
Balance de blanco: Selecciona el balance del tono de blanco.
(Auto/Soleado/Nublado/Tungsteno/Fluorescente)
5. Ajustes...:
Resolución: Selecciona la resolución para una imagen.
(1280x960 / 1024x768 / 640x480 / 320x240 / 176x144 / 160x120)
Calidad: Selecciona la calidad de la imagen.
(Alta / Mediana / Baja)
Sonido del obturador: Selecciona el sonido del obturador.
(Off / Estándar / Diga “Equis” / ¡Listo! 123)
6. Modo cámara: Ajusta la cámara al modo de video.
• El usuario puede controlar directamente el zoom presionando la tecla
de Navegación
. Presione la tecla de navegación
hacia la
izquierda/derecha: Zoom Hacia abajo/Hacia arriba. (Excepto en los
ajustes 1280x960, 1024x768).
101
FUNCIONES DEL MENÚ
CÁMARA
H CAPTURAR VÍDEOS
Presione la tecla de selección izquierda
Cámara, 2 abc Capturar video.
[MENÚ], 8 tuv
Apunte la lente de la cámara hacia su objectivo. Puede verificar el
encuadramiento del video a través de la pantalla principal.
Presione OK [GRABACIÓN], la tecla Cámara en la parte lateral
izquierda , o la tecla Cámara
para capturar el video.
Para pausar/reiniciar la grabación de video, presione la tecla de
[PAUSAR/REINICIAR].
selección izquierda
Para detener la grabación, presione OK [DETENER].
• Para visualizar los vídeos grabados, presione la Tecla de Función
Derecha
[GALERIA].
Tras capturar el vídeo, éste se visualizará.
Para guardar el video, presione la tecla de selección izquierda
[GUARDAR].
Para volver al modo inactivo sin guardar el video, presione
END .
Para capturar otro video sin guardar el video capturado
anteriormente, presione la tecla de selección derecha
[BORRAR].
Para enviar el video a alguien, presione OK [ENVIAR].
Consulte la página 134 para obtener más detalles sobre “Enviar un
nuevo mensaje con video”.
CÁMARA
FUNCIONES DEL MENÚ
• Al presionar la tecla de selección izquierda
[MENÚ], puede
seleccionar una de las siguientes funciones:
1. Autorretrato: Ajuste la pantalla para LCD secundario. Para
capturar una imagen de sí mismo, mire hacia el LCD secundario.
[MENÚ], puede
Al presionar la tecla de selección izquierda
seleccionar las opciones del LCD secundario: 1. LCD principal /
2. emporizador automático / 3. Herramientas de entretenimiento... /
4. Controles de imagen... / 5. Ajustes... / 6. Modo cámara.
2. Temporizador automático: Activa la función de temporizador de
la cámara. (Desactivado / 5 segundos / 10 segundos).
3. Efectos de color: selecciona efectos en la imagen.
(Normal / Gris / Sepia / Negativo)
4. Controles de la imagen...:
Brillo: Presione la tecla de navegación
hacia la derecha
(0 a +2) o
hacia la izquierda (0 a -2) para seleccionar el
control de brillo.
Balance de blanco: Selecciona el balance del tono de blanco.
(Auto / Soleado / Nublado / Tungsteno / Fluorescente)
5. Ajustes...:
Calidad: Selecciona la calidad de la imagen.
(Alta / Media / Baja)
Sonido de avance: selecciona el sonido de avance.
(Desactivado / Estándar / {”¡Acción!”/”¡Corta!”} / {”Listo”/
”Detener”})
Silencio/Cancelar silencio: Selecciona entre silencio/cancelar
silencio.
6. Modo cámara: Ajusta la cámara al modo Cámara.
• El usuario puede controlar directamente el zoom presionando la tecla
de navegación
. Presione la tecla de navegación
hacia la
izquierda/derecha: Zoom hacia abajo/Hacia arriba.
Si recibe una llamada mientras captura un video, el modo cámara se
desactivará. Es posible que no reciba un mensaje de advertencia antes de
recibir la llamada.
102
103
FUNCIONES DEL MENÚ
CÁMARA
H GALERÍA DE IMÁGENES
Presione la tecla de selección izquierda
Cámara, 3 def Galería de imágenes.
CÁMARA
FUNCIONES DEL MENÚ
H GALERÍA DE VIDEOS
[MENÚ], 8 tuv
En modo Revisión, puede visualizar todas las imágenes capturadas
y almacenadas.
Seleccione la imagen presionando la tecla de navegación
hacia
arriba, hacia abajo, a la izquierda o a la derecha y luego presione
OK [VISUALIZAR].
Para borrar la imagen, presione la tecla de selección izquierda
[BORRAR].
• Al presionar la tecla de selección izquierda
[OPCIONES],
puede seleccionar una de las siguientes opciones:
1. Enviar: Envía un mensaje con imagen. Consulte la página 132 para
obtener más detalles sobre “Enviar un nuevo mensaje con imagen”.
2. Mi espacio Movilnet: Carga la imagen seleccionada en el servidor
de imágenes.
3. Cambiar nombre: Edita el nombre de la imagen.
4. Definir como: Atribuye la imagen seleccionada para mostrar tareas
específicas. (Fondo de pantalla / Identificación de la imagen).
5. Mover: Mueve la imagen seleccionada a otra ubicación de
imágenes.
6. Borrar todo: Le permite borrar todas las imágenes de “Memoria
externa“ o “Memoria interna“ recién capturadas.
7. Información del archivo: Muestra información de la imagen como
el nombre del archivo, la fechala hora, la resolución y el tamaño.
Presione la tecla de selección izquierda
Cámara, 4 ghi Galería de videos.
[MENÚ], 8 tuv
En modo Revisión, puede visualizar todos los videos grabados.
Seleccione el video grabado presionando la tecla de navegación
hacia arriba, hacia abajo, a la izquierda o a la derecha y luego
presione OK [REPRODUCIR].
Para borrar el vídeo, presione la tecla de selección izquierda
[BORRAR].
• Al presionar la tecla de selección izquierda
[OPCIONES],
puede seleccionar una de las siguientes opciones:
1. Enviar: Envía un mensaje con video. Consulte la página 132 para
obtener más detalles sobre “Enviar un nuevo mensaje con video”.
2. Mi espacio Movilnet: Carga el video seleccionado en el servidor
de imágenes.
3. Cambiar nombre: Edita el nombre del video.
4. Definir como: Atribuye el video seleccionado para mostrar tareas
específicas. (Fondo de pantalla / Identificación de la imagen).
5. Mover: Mueve el video seleccionado a otra ubicación de videos.
6. Borrar todo: le permite borrar todos los videos de “Memoria
externa“ o “Memoria interna“ recién capturados.
7. Información del archivo: Muestra información del video como el
nombre del archivo, la fecha, la hora, la resolución y el tamaño.
Sólo se muestra el menú ”Mover” cuando conecta la tarjeta microSD.
Sólo se muestra el menú ”Mover” cuando conecta la tarjeta microSD.
104
105
FUNCIONES DEL MENÚ
HERRAMIENTAS DE VOZ
Su teléfono está equipado con una función AVR (Reconocimiento Avanzado de
Voz). Esta función le permite realizar llamadas o utilizar las funciones del teléfono
utilizando su voz. Todo que tiene que hacer es hablar en el teléfono y éste
reconocerá su voz y completará las tareas automáticamente.
H AVR (RECONOCIMIENTO AVANZADO DE VOZ)
Presione la tecla lateral AVR
.
El teléfono mostrará el menú Comando y solicitará que pronuncie
el nombre del comando que desea utilizar. Para completar la tarea,
simplemente siga las indicaciones de voz. Puede pronunciar el
nombre del comando tras oír una señal audible.
•
•
•
•
•
•
•
Llamada<Nombre>< Loc>
Enviar texto <Nombre o nº>
Enviar imagen <Nombre o nº>
Enviar video <Nombre o nº>
Visualizar <Nombre>
Acceder a <Menú>
Verificar <Elemento>
HERRAMIENTAS DE VOZ
FUNCIONES DEL MENÚ
H LLAMADA <NOMBRE>< LOC>
Utilice el comando Llamada para marcar un nombre utilizando la voz desde su lista
de contactos o un número de teléfono. Cuando marque un número, pronuncie
cada dígito, pero no haga pausas largas entre los dígitos. Si nota problemas al
marcar el número, podrá adaptar el marcado de los dígitos a su voz con Ajustes ->
Marcado de dígitos -> Adaptar dígitos.
Presione la tecla lateral AVR . Oirá el mensaje “Pronuncie un
comando” y se mostrará el menú Comandos de voz.
Si desea realizar una llamada a un contacto desde su lista,
pronuncie Llamada <Nombre>
Su teléfono solicitará que confirme el nombre pronunciado.
Pronuncie ”Sí” si se ha repetido correctamente. Se marcará el
número de teléfono. Si hay más de un número guardado para este
contacto, se le solicitará que confirmequé número desea marcar.
Ejemplos: - Llamar a Tom Smith – Llamar al 617 555-1212, - Llamar
al móvil de Bob Carson, – Llamar a Dee Harper en Casa.
Cuando la unidad reconoce uno de estos comandos, el teléfono habilita
la aplicación asociada. Si el teléfono no oye un comando dentro de
aproximadamente ocho segundos, el modo AVR se desactiva
automáticamente.
106
107
FUNCIONES DEL MENÚ
HERRAMIENTAS DE VOZ
HERRAMIENTAS DE VOZ
FUNCIONES DEL MENÚ
H ENVIAR TEXTO <NOMBRE O Nº>
H ENVIAR VIDEO <NOMBRE O Nº>
Presione la tecla AVR lateral . Oirá el mensaje “Pronuncie un
comando” y se mostrará el menú Comandos de voz.
Presione la tecla AVR lateral . Oirá el mensaje “Pronuncie un
comando” y se mostrará el menú Comandos de voz.
Pronuncie “Enviar Texto <Nombre o nº>”.
Pronuncie “Enviar video <Nombre o nº>”.
Utilice el comando Enviar para enviar un mensaje de texto a un nombre o número
específico.
Ejemplos: - “Enviar texto al móvil de Dee Harper“.
- “Enviar texto a Tom Smith“.
- “Enviar texto al móvil de Tom Smith”.
- “Enviar texto al 617 555-1212”.
Utilice el comando Enviar para enviar un mensaje de video a un nombre o número
específico.
Ejemplos: - “Enviar video al móvil de Dee Harper“.
- “Enviar video a Tom Smith“.
- “Enviar video al móvil de Tom Smith”.
- “Enviar video al 617 555-1212”.
Siga las instrucciones para el envío de un nuevo mensaje en la
página 130.
Siga las instrucciones para el envío de un nuevo mensaje en la página
130.
H ENVIAR IMAGEN <NOMBRE O Nº>
H VISUALIZAR <NOMBRE>
Presione la tecla AVR lateral . Oirá el mensaje “Pronuncie un
comando” y se mostrará el menú Comandos de voz.
Presione la tecla AVR lateral . Oirá el mensaje “Pronuncie un
comando” y se mostrará el menú Comandos de voz.
Pronuncie “Enviar imagen <Nombre o nº>”.
Pronuncie “Visualizar <Nombre>”.
Utilice el comando Enviar para enviar un mensaje de imagen a un nombre o
número específico.
Ejemplos: - “Enviar imagen al móvil de Dee Harper“.
- “Enviar imagen a Tom Smith“.
- “Enviar imagen al móvil de Tom Smith”.
- “Enviar imagen al 617 555-1212”.
Utilice el mando Visualizar para recuperar y visualizar información de cualquier
nombre almacenado en su lista de contactos.
Ejemplos: - Visualizar datos de Tom Jones.
Se mostrará la página Visualizar contacto para este nombre de
contacto.
Siga las instrucciones para el envío de un nuevo mensaje en la
página 132.
108
109
FUNCIONES DEL MENÚ
HERRAMIENTAS DE VOZ
H ACCEDER AL <MENÚ>
Utilice el mando Acceder a para abrir una aplicación en su teléfono. Puede
pronunciar “Acceder” y se le solicitará que pronuncie el nombre de la aplicación
o puede saltar la indicación para pronunciar “Acceder a” seguido del nombre de
la aplicación.
Presione la tecla AVR lateral . Oirá el mensaje “Pronuncie un
comando” y se mostrará el menú Comandos de voz.
Pronuncie “Acceder a” seguido inmediatamente de uno de los
siguientes elementos:
•
•
•
•
•
•
110
Contactos
Llamadas recientes
Envío de mensajes
Aplicaciones Neo
Ajustes y herramientas
Noticias e información
HERRAMIENTAS DE VOZ
FUNCIONES DEL MENÚ
H VERIFICAR <ELEMENTO>
El comando Verificar le permite verificar la información en su teléfono. Podrá
pronunciar ”Verificar” o ”Verificar estado” para visualizar y oír toda la información
de estado.
Presione la tecla AVR lateral . Oirá el mensaje “Pronuncie un
comando” y se mostrará el menú Comandos de voz.
Pronuncie ”Verificar” seguido inmediatamente de uno de los
siguientes elementos:
•
•
•
•
•
Estado
Batería
Potencia de la señal
Red
Mi número de teléfono
111
FUNCIONES DEL MENÚ
HERRAMIENTAS DE VOZ
LISTAS DE ELECCIÓN
Cuando el reconocimiento de voz no combina exactamente con los registros de
los nombres y números guardados, se muestra una lista de hasta tres elecciones
posibles. Puede controlar cuándo mostrar la lista de elecciones.
.
Presione la tecla de selección derecha
1 Listas de elección.
[AJUSTES] y luego
Seleccione ”Automática”, ”Siempre activa” o ”Siempre
desactivada”.
Para guardar la configuración presione OK [ACEPTAR].
SENSIBILIDAD
El ajuste Sensibilidad controla la forma en que el software de reconocimiento de
voz determina cuándo una palabra hablada es una combinación. Si oye los
mensajes “Repita ...” o “Ninguna combinación encontrada” con frecuencia, ajuste
la sensibilidad en Rechazar menos. Si recibe activaciones incorrectas (cuando el
teléfono reconoce un nombre que no pronunció) con frecuencia, ajuste la
sensibilidad en Rechazar más.
Presione la tecla AVR lateral
FUNCIONES DEL MENÚ
MARCADO DE DÍGITOS
H AJUSTES
Presione la tecla AVR lateral
HERRAMIENTAS DE VOZ
.
Presione la tecla de selección derecha
2 abc Sensibilidad.
[AJUSTES] y luego
Desplácese hasta ”Rechazar más”, ”Recomendado” o ”Rechazar
menos”.
ADAPTAR DÍGITOS
El marcado de dígitos es independiente del parlante, lo que significa que ningún
entrenamiento o adaptación es necesario. Algunos usuarios con acento cargado
o no usual pueden encontrar dificultades para lograr una alta precisión con el
marcado de dígitos independiente del parlante; por lo tanto, la función Adaptar
dígitos permite que los usuarios mejoren la precisión de los dígitos de manera
significativa a través de la adaptación. Los usuarios que adquieren una precisión
de reconocimiento de dígitos aceptable no necesitan realizar la adaptación
explicada en este punto.
Presione la tecla lateral AVR .
Presione la tecla de selección derecha
3 def Marcado por dígitos.
[Ajustes] y luego
Seleccione 1 para acceder a Adaptar dígitos y presione
OK [ACEPTAR].
Espere que suene la señal audible y luego repita los dígitos
utilizando un tono normal de voz. (El teléfono reproducirá su
grabación y preguntará si los sonidos grabados son correctos).
Si los sonidos grabados son correctos (ningún error o ruido de
fondo), pronuncie “Sí”. Si necesita grabar nuevamente los dígitos
para solucionar algún problema, pronuncie “No”. (El teléfono
solicitará que vuelva a pronunciar los dígitos.)
Espere que suene la señal audible y luego vuelva a grabarlos
dígitos. (Repita este paso hasta que esté satisfecho con la
grabación.)
Tras confirmar que los sonidos grabados son correctos, repita el
proceso de grabación con el siguiente conjunto de dígitos.
(Tras seis conjuntos de dígitos, el teléfono preguntará si desea
más adaptaciones. Responda Sí.)
Para guardar, presione OK [ACEPTAR].
112
113
FUNCIONES DEL MENÚ
HERRAMIENTAS DE VOZ
Repita los pasos 4-7 para otros nueve conjuntos de dígitos. (Tras
el noveno conjunto de dígitos, estará en la mitad de la sesión y el
teléfono preguntará “¿Más adaptación?”)
Seleccione Aceptar para seguir con los seis conjuntos de dígitos
restantes o presione END para obtener una adaptación
parcial. Cuando haya terminado una sesión completa, visualizará
una pantalla que informará “Adaptación completa”.
REINICIAR DÍGITOS
Reinicia la adaptación de los dígitos para los ajustes estándar de fábrica.
Presione la tecla lateral AVR .
Presione la tecla de selección derecha
[Ajustes] y luego
3 def para acceder a Marcado por dígitos.
Seleccione 2 abc para acceder Reiniciar los dígitos y presione
OK [ACEPTAR].
Se mostrará el mensaje “¿Reiniciar la adaptación de dígitos a los
ajustes de fábrica?”. Presione OK [ACEPTAR].
SONIDO
INDICACIONES
Puede activar o desactivar las indicaciones de audio como “Pronuncie un
comando”.
Presione la tecla lateral AVR .
Presione la tecla de selección derecha
la tecla 4 ghi para acceder a Sonido.
HERRAMIENTAS DE VOZ
FUNCIONES DEL MENÚ
DÍGITOS
Puede activar o desactivar la reproducción de los dígitos durante el marcado de
dígitos.
Presione la tecla lateral AVR .
Presione la tecla de selección derecha
tecla 4 ghi para acceder a Sonido.
[AJUSTES] y luego la
Seleccione 2 abc para acceder Dígitos y presione OK
[ACEPTAR].
Presione la tecla de navegación
hacia arriba o hacia abajo
para seleccionar “Activar” u “Desactivar” y luego presione OK
[ACEPTAR].
NOMBRES
Puede activar o desactivar la reproducción del nombre en las funciones Llamada,
Visualizar y Enviar.
Presione la tecla lateral AVR .
Presione la tecla de selección derecha
tecla 4 ghi para acceder a Sonido.
[AJUSTES] y luego la
Seleccione 3 def para acceder a Nombres y presione OK
[ACEPTAR].
Presione la tecla de navegación
hacia arriba o hacia abajo
para seleccionar “Activar” u “Desactivar” y luego presione OK
[ACEPTAR].
[AJUSTES] y luego
Seleccione 1 para acceder a Indicaciones y presione OK
[ACEPTAR].
Presione la tecla de navegación
hacia arriba o hacia abajo
para seleccionar “Activar” u “Desactivar” y luego presione OK
[ACEPTAR].
114
115
FUNCIONES DEL MENÚ
HERRAMIENTAS DE VOZ
VELOCIDAD
Puede cambiar la velocidad de la reproducción del nombre.
[AJUSTES] y
Seleccione 4 ghi Ajustes del nombre, 1 Velocidad y
luego presione OK [ACEPTAR].
Desplácese hacia “Más rápido“,“Recomendado“ o “Más lento“.
Presione la tecla lateral AVR
.
Presione la tecla de selección derecha
presione 5 jkl Acerca de.
[AJUSTES] y luego
Se mostrará la versión de la aplicación Señal de voz.
Para volver a la página anterior, presione OK [ACEPTAR].
Para guardar, presione OK [ACEPTAR].
H INFORMACIÓN
VOLUMEN
Presione la tecla lateral AVR
Presione la tecla lateral AVR .
Presione la tecla de selección derecha
luego 4 ghi Sonido.
Seleccione el menú Comando presionando la tecla de navegación
hacia arriba o hacia abajo y luego presione la tecla de selección
izquierda
[INFORMACIÓN].
Puede cambiar el volumen de la reproducción del nombre.
[AJUSTES] y
Seleccione 4 ghi Ajustes del nombre, 2 abc Volumen y
luego presione OK [ACEPTAR].
Desplácese hacia ”Más fuerte”, ”Recomendado” o ”Más
suave”.
Para guardar, presione OK [ACEPTAR].
116
FUNCIONES DEL MENÚ
ACERCA DE
AJUSTES DEL NOMBRE
Presione la tecla lateral AVR .
Presione la tecla de selección derecha
luego 4 ghi Sonido.
HERRAMIENTAS DE VOZ
.
Se mostrará la información del menú Comando.
Para volver a la página anterior, presione OK [ACEPTAR].
117
FUNCIONES DEL MENÚ
UTILIDADES
H RELOJ CON ALARMA
[MENÚ], 9 wxyz
Seleccione uno de los registros presionando la tecla de navegación
hacia arriba o hacia abajo. Para ajustar una nueva alarma,
seleccione alarma 1, 2 ó 3. Para editar una alarma existente,
seleccione la alarma. Presione OK [ACEPTAR].
Se seleccionará el campo de ajuste. Presione la tecla de navegación
hacia abajo para seleccionar opciones de alarma.
ALARMA
hacia la izquierda o derecha para
HORARIO
Utilice el teclado para ajustar un horario para activar la alarma y
para seleccionar “a.m.”
presione la tecla de selección izquierda
o “p.m.”.
FRECUENCIA
Presione la tecla de navegación
hacia la izquierda o derecha para
seleccionar un ajuste para la alarma (Una vez, Diariamente, Lunes a
viernes, Fines de semana).
TIMBRE
Presione la tecla de selección izquierda
[CONFIGURAR], luego
hacia arriba o hacia abajo para
presione la tecla de navegación
seleccionar un tono de timbre del cuadro de sonido y presione OK
[ACEPTAR].
118
FUNCIONES DEL MENÚ
Para guardar un ajuste de alarma, presione OK [GRABAR].
Presione la tecla de selección izquierda
Utilidades, 2 abc Reloj con alarma.
Presione la tecla de navegación
seleccionar Activar u Desactivar.
UTILIDADES
H CALENDARIO
Permite ajustar un evento y le recuerda acerca del mismo.
Presione la tecla de selección izquierda
Utilidades, 3 def Calendario.
[MENÚ], 9 wxyz
Presione la tecla de selección derecha
[OPCIONES] para
administrar su calendario. Presione 1 Visualizar por semana,
2 abc Ir a la fecha, 3 def Borrar, 4 ghi Borrar fechas pasadas
y 5 jkl Borrar todo.
AGREGAR NUEVO
Presione la tecla de navegación
hacia arriba, hacia abajo, a
la izquierda o a la derecha para elegir una fecha en el calendario.
[NUEVO] para insertar
Presione la tecla de selección izquierda
un nuevo evento.
El campo Programación será seleccionado. Marque el nombre del
hacia abajo para
evento. Presione la tecla de navegación
ajustar otros campos para el evento:
HORA DE INICIO
Utilice el teclado para ajustar la hora dtecla de selección izquierda
para seleccionar “a.m.” o “p.m.”.
HORA DE TERMINO
Utilice el teclado para ajustar una hora de finalización y presione la
para seleccionar “a.m.” o “p.m.”.
tecla de selección izquierda
119
FUNCIONES DEL MENÚ
UTILIDADES
UTILIDADES
FUNCIONES DEL MENÚ
RECORDATORIO
ALERTA
Presione la tecla de navegación
hacia la izquierda o derecha para
seleccionar una opción de intervalo de tiempo de alerta (0 minutos,
5 minutos, 10 minutos, 15 minutos).
Presione la tecla de selección izquierda
[CONFIGURAR], luego
hacia arriba o hacia abajo para
presione la tecla de navegación
seleccionar un tono de timbre del cuadro de sonido y presione OK
[ACEPTAR].
FECHA DE INICIO
Utilice el teclado para cambiar o insertar la fecha de inicio.
VIBRACIÓN
FRECUENCIA
Presione la tecla de navegación
ajustar On Activar u Desactivar.
Presione la tecla de navegación
hacia la izquierda o derecha
para ajustar la frecuencia del evento (Diariamente, Semanalmente,
Mensualmente, Anualmente). Para cada ajuste de frecuencia, presione
hacia abajo para ajustar Por recuento. Para
la tecla de navegación
Diariamente, ajuste el número de días. Para Semanalmente, puede
hacia la izquierda o derecha para
presionar la tecla de navegación
seleccionar Por recuento o Por día. Luego vuelva a presionar la tecla de
navegación
hacia abajo para realizar el ajuste; para Por recuento,
marque el número de semanas, para Por día presione la tecla de
navegación
hacia la izquierda o derecha para seleccionar un día de
la semana. Para Mensualmente, ajuste Por recuento el número de meses
hacia la derecha para ajustar Por
o presione la tecla de navegación
día/mes. Para Anualmente, ajuste Por día/mes.
FECHA DE FINALIZACIÓN
hacia la izquierda o derecha para
Presione OK [GUARDA] para guardar la configuración o CLR
[BORRAR] para volver al calendario.
La fecha del evento se indicará en su calendario.
VISUALIZAR LISTA DE PLANIFICACION
Presione la tecla de selección izquierda
Utilidades, 3 def Calendario.
[MENÚ], 9 wxyz
Para visualizar la lista Calendario
hacia arriba, hacia abajo,
Presione la tecla de navegación
a la izquierda o a la derecha para seleccionar un evento y luego
presione OK [VISUALIZAR].
Utilice el teclado para cambiar o insertar la fecha de finalización.
ZONAS HORARIAS
Si necesita ajustar la zona horaria, presione la tecla de selección
[CONFIGURAR]. Presione la tecla de navegación
izquierda
hacia arriba o hacia abajo para seleccionar una nueva zona horaria y
luego presione OK .
120
121
FUNCIONES DEL MENÚ
UTILIDADES
UTILIDADES
H RELOJ MUNDIAL
HORA DE INICIO
Para visualizar la hora y la fecha de las ciudades preprogramadas:
Presione la tecla de selección izquierda
Utilidades, 4 ghi Reloj mundial.
[MENÚ], 9
wxyz
Presione la tecla de selección izquierda
[CIUDADES] para
acceder la lista de ciudades. Presione la tecla de navegación
hacia arriba o hacia abajo para seleccionar la ciudad y luego
presione OK . O presione la tecla de navegación
hacia
arriba, hacia abajo, a la izquierda o a la derecha para seleccionar su
ciudad utilizando el mapa mundial.
Se mostrará el mapa mundial con la ciudad, hora y fecha.
DST (HORARIO DE VERANO)
Presione la tecla de selección derecha
[HORARIO DE
VERANO] para ajustar las opciones DST (Horario de verano).
La ciudad seleccionada se mostrará en el campo Ciudad.
Presione la tecla de navegación
hacia abajo.
Presione la tecla de navegación
hacia la izquierda o derecha
para activar o desactivar (On/Off) DST (Horario de verano).
Presione la tecla de navegación
hacia abajo si ha ajustado
DST en Activado o presione OK [GUARDAR] si ha ajustado DST
en Desactivado.
FECHA DE INICIO
Utilice el teclado para cambiar o ingresar la fecha de inicio.
FUNCIONES DEL MENÚ
Utilice el teclado para ajustar una hora de inicio y presione la tecla de
para seleccionar “a.m.” o “p.m.”.
selección izquierda
FECHA DE FINALIZACIÓN
Utilice el teclado para cambiar o insertar la fecha de finalización.
HORA DE TERMINO
Utilice el teclado para ajustar una hora de finalización y presione la
para seleccionar para seleccionar
tecla de selección izquierda
“a.m.” o “p.m.”.
Para guardar un ajuste DST, presione OK [GUARDAR].
Para volver a la página anterior, presione OK .
H BLOC DE NOTAS
Su teléfono incluye un bloc de notas interno que puede utilizarse para componer y
almacenar recordatorios y notas.
AGREGAR NOTA
Para componer una nota (el límite es de 80 caracteres):
Presione la tecla de selección izquierda
Utilidades, 5 jkl Bloc de notas.
[MENÚ], 9 wxyz
Para agregar una nueva nota, presione la tecla de selección
izquierda
[NUEVA]. Inserte una nueva nota de texto. (Consulte
la página 41 para obtener más detalles sobre la inserción de letras,
números y símbolos.)
Para guardar la nota, presione OK [GUARDAR].
122
123
FUNCIONES DEL MENÚ
UTILIDADES
VISUALIZAR NOTAS
Para acceder a la calculadora:
[MENÚ], 9 wxyz
Se mostrará la lista de todas las notas, en el orden en que
fueron grabadas. Seleccione una nota y luego presione OK
[VISUALIZAR].
Se mostrará la nota seleccionada.
Para agregar una nueva nota, presione la tecla de selección
izquierda
[NUEVA].
Para borrar una nota, presione la tecla de selección derecha
[OPCIONES] “Borrar”.
Para borrar todas las notas, presione la tecla de selección derecha
[OPCIONES] “Borrar todo”.
EDITAR UNA NOTA
Para editar una nota grabada:
Presione la tecla de selección izquierda
Utilidades, 5 jkl Bloc de notas.
FUNCIONES DEL MENÚ
H CALCULADORA
Para visualizar una nota grabada:
Presione la tecla de selección izquierda
Utilidades, 5 jkl Bloc de notas.
UTILIDADES
[MENÚ], 9 wxyz
Se mostrará la lista de todas las notas, en el orden en que están
hacia arriba o
almacenadas. Presione la tecla de navegación
hacia abajo para seleccionar una nota y presione la tecla OK
[VISUALIZAR].
Presione la tecla de selección izquierda
Utilidades, 6 mno Calculadora.
[MENÚ], 9 wxyz
Siga las siguientes instrucciones para calcular 8x6 ÷ 4-2.5=9.50
Presione 8 y luego presione la tecla de navegación
hacia la derecha.
Presione 6 y luego presione la tecla de navegación
hacia la izquierda.
Presione 4 y luego presione la tecla de navegación
hacia abajo.
Presione 2 y luego presione
para ingresar (.).
Presione 5.
Luego presione OK y se mostrará la respuesta.
Tecla de navegación
hacia la derecha : X,
tecla de navegación
hacia abajo : -,
tecla de navegación
hacia la izquierda : ÷,
tecla de navegación
hacia arriba : +,
: ., tecla de selección izquierda
: Borrar, OK : =.
Para reiniciar, presione la tecla de selección izquierda
[BORRAR].
• Para cambiar el número que aparece en la pantalla de positivo (+) a
[ ].
negativo (-) y viceversa, presione
[OPERADOR] para
• Presione la tecla de selección derecha
utilizar paréntesis y “Exponente”.
Presione OK [EDITAR], edite la nota y luego presione OK
[GUARDAR] para guardarla.
124
125
FUNCIONES DEL MENÚ
UTILIDADES
H CRONÓMETRO
Cronometra simultáneamente hasta ocho eventos diferentes. Para operar el
cronómetro:
Presione la tecla de selección izquierda
Utilidades, 7 pqrs Cronómetro.
[MENÚ], 9 wxyz
Para medir un período de tiempo:
1. Para iniciar el cronómetro, presione OK [INICIAR].
FUNCIONES DEL MENÚ
H ALMACENAMIENTO DE DATOS
Antes de utilizar esa función de almacenamiento de datos es necesario preparar
sus servicios de datos del dispositivo para la sincronización con la computadora de
escritorio o portátil. Una vez que el teléfono esté conectado a la PC, puede
transferir sus datos en la tarjeta microSD de manera rápida y sencilla.
Presione la tecla de selección izquierda
[MENÚ], 9 wxyz
Utilidades, 8 tuv Almacenamiento de datos.
2. Para hacer pausa, presione OK [DETENER].
Conecte su teléfono a la PC utilizando el cable USB proporcionado.
(Espere hasta que la conexión termine.)
3. Para reiniciarlo, presione OK [INICIAR].
Para reiniciarlo, presione la tecla de selección derecha
[REINICIAR].
Una vez conectado al puerto USB, el dispositivo de almacenamiento
de datos se detectará por la computadora receptora.
Para cronometrar hasta ocho eventos al mismo tiempo:
1. Para iniciar, presione OK [INICIAR].
2. Para parar un período de tiempo y seguir midiendo otro,
[CONTINUAR].
presione la tecla de selección izquierda
3. Para parar el segundo y seguir midiendo un tercero, presione la
[CONTINUAR].
tecla de selección izquierda
4. Para medir hasta ocho períodos de tiempo, repita los pasos
anteriores.
5. Para parar el cronómetro, presione OK [PARAR].
6. Para revisar los resultados, presione la tecla de selección
izquierda
[VISUALIZAR].
7. Para volver al cronómetro, presione OK [ACEPTAR].
8. Para reiniciarlo, presione la tecla de selección derecha
[REINICIAR].
126
UTILIDADES
Cuando termine, pulse sobre el icono del dispositivo USB en la barra
de tareas de su computadora y siga las instrucciones proveídas
para la desconexión segura del cable USB. (El proceso podrá variar
dependiendo del modelo de la PC.)
• No es necesaria ninguna instalación de controlador para usuarios de
los sistemas Windows 2000/ME/XP. Si utiliza Windows 98/98SE, deberá
descargar e instalar el controlador de almacenamiento masivo USB.
• Para evitar la pérdida de datos, NO QUITE el cable USB, la tarjeta
microSD o la batería mientras los archivos estén siendo accedidos o
transferidos.
• Certifíquese seguir el procedimiento adecuado cuando desconecte el
cable USB. Su computadora podrá no detectar su teléfono cuando éste
último sea desconectado diversas veces de forma inadecuada.
• NO cambie o edite el nombre de la carpeta/archivo en la tarjeta
microSD a través de la computadora ni intente transferir grandes
cantidades de datos de la computadora a la tarjeta microSD. Esto
puede resultar en falla de la tarjeta microSD.
127
UTILIDADES
CAPÍTULO 5
FUNCIONES DEL MENÚ
CAPÍTULO 5
MENSAJES DE
CORREO DE VOZ,
TEXTO, IMAGEN
Y VIDEO
Este capítulo abarca las funciones de mensajes de correo de voz, texto,
imagen y video e incluye:
RECEPCIÓN DE UN NUEVO MENSAJE
NUEVO MENSAJE
CORREO DE VOZ
BANDEJA DE ENTRADA
ENVIADOS
BORRADORES
AJUSTES
BORRAR TODOS
128
MENSAJES DE CORREO DE VOZ, TEXTO, IMAGEN Y VIDEO
• NO apague, ajuste al modo inactivo o reinicie su computadora
mientras utiliza el dispositivo de almacenamiento masivo.
Esto resultará en la pérdida o daño de los datos.
• Mientras esté conectado a la computadora, la pantalla de su teléfono
mostrará “Teléfono apagado”. No podrá realizar o recibir llamadas.
• Cuando conecte un dispositivo de almacenamiento masivo a un
dispositivo periférico, su dispositivo no podrá operar adecuadamente.
MENSAJES DE CORREO DE VOZ,
TEXTO, IMAGEN Y VIDEO
RECEPCIÓN DE UN NUEVO
MENSAJE
La siguiente pantalla se visualiza cuando se
recibe un nuevo mensaje.
Para visualizar el mensaje, seleccione
“Visualizar” y luego presione OK .
MENSAJES DE CORREO DE VOZ,
TEXTO, IMAGEN Y VIDEO
NUEVO MENSAJE
MENSAJES DE CORREO DE VOZ,
TEXTO, IMAGEN Y VIDEO
Bajo “Texto”, ingrese un nuevo mensaje de texto y luego presione
OK [ACEPTAR].
(Consulte la página 41 para obtener más detalles sobre la inserción
de letras, números y símbolos.)
Al presionar la tecla de selección izquierda
[OPCIONES], puede
seleccionar entre las siguientes:
1. Guardar como borrador: Guarda el mensaje de texto.
2. Agregar texto rápido: Ingresa frases ya grabadas en el mensaje
de texto.
NUEVO MENSAJE
H ENVIAR NUEVO MENSAJE DE TEXTO
Presione la tecla de selección izquierda
[MENÚ], 4 ghi
Centro de mensajes, 1 Nuevo mensaje y luego 1 Mensaje
de texto.
Bajo el campo “Para”, ingrese el número del teléfono y luego
presione OK [ACEPTAR].
Al presionar la tecla de selección izquierda
[AGREGAR], puede
seleccionar entre las siguientes:
1. Desde la lista de registros: Busca un número de teléfono
almacenado en la lista de contactos.
2. Grupos de mensajes: Busca los grupos almacenados en la lista de
grupos de mensajes.
3. Para contactos: Almacena los números de teléfono en la lista de
contactos.
Bajo “Nº. CB Estándar”, seleccione “Activar“ u “Desactivar“
hacia izquierda o derecha.
presionando la tecla de navegación
Bajo “Prioridad“, seleccione “Normal” o “Alta“ presionando la tecla
hacia la izquierda o derecha.
de navegación
Bajo “Solicitar confirmación de recepción“, seleccione “Activar“
u “Desactivar“ presionando la tecla de navegación
hacia la
izquierda o derecha.
Para enviar el mensaje de texto, presione la tecla de selección
izquierda
[OPCIONES] y seleccione “Enviar“.
Presione OK [ACEPTAR].
Para guardar el mensaje de texto, tecla de selección izquierda
[OPCIONES] y seleccione “Guardar como borrador“.
Presione OK [ACEPTAR].
Para cancelar el mensaje de texto, presione la tecla de selección
izquierda
[OPCIONES] y seleccione “Cancelar mensaje“.
Presione OK [ACEPTAR].
Ingrese por lo menos un mensaje de texto en el campo para guardarlo en
la bandeja de borradores.
130
131
MENSAJES DE CORREO DE VOZ,
TEXTO, IMAGEN Y VIDEO
NUEVO MENSAJE
NUEVO MENSAJE
MENSAJES DE CORREO DE VOZ,
TEXTO, IMAGEN Y VIDEO
H ENVIAR UN NUEVO MENSAJE CON IMAGEN
Puede enviar solamente una imagen a la vez.
Presione la tecla de selección izquierda
[MENÚ], 4 ghi
Centro de mensajes, 1 Nuevo mensaje, luego 2 abc Mensaje
con imagen.
Al presionar la tecla de selección derecha
[OPCIONES],
puede seleccionar entre las siguientes:
1. Previsualizar: Previsualiza un mensaje de imagen grabada.
2. Guardar como borrador: Graba el mensaje de imagen.
3. Agregar diapositiva: Agrega otro mensaje.
4. Nivel de prioridad: Seleccione ”Alta” o “Normal”.
5. Quitar imagen: Quita la imagen insertada.
6. Quitar sonido: Quita el sonido insertado.
Bajo ”Para”, ingrese el número del teléfono y luego presione OK
[ACEPTAR].
Al presionar la tecla de selección izquierda
[AGREGAR], puede
seleccionar entre las siguientes:
1. Desde la lista de registros: Busca por un número de teléfono
almacenado en la lista de contactos.
2. Grupos de mensajes: Busca los grupos almacenados en la lista de
grupos de mensajes.
3. Para contactos: Almacena el número de teléfono en la lista de
contactos.
4. Mi espacio Movilnet: Envía imágenes utilizando Dirección
Movilnet en línea.
Para enviar el mensaje con imagen, presione la tecla de selección
izquierda
[ENVIAR].
Bajo ”Asunto”, ingrese un asunto y luego presione OK
[ACEPTAR]. (Consulte la página 41 para obtener más detalles
sobre la inserción de letras, números y símbolos. Soporta hasta 100
caracteres.)
Bajo ”Texto”, ingrese un nuevo mensaje de Texto y luego presione
OK [ACEPTAR]. (Consulte la página 41 para obtener más detalles
sobre la inserción de letras, números y símbolos. Pueden insertarse
hasta 1.000 caracteres.)
Bajo ”Más”, seleccione “Imagen
”o “Sonido
”. Presione
hacia arriba, hacia abajo, a la izquierda
la tecla de navegación
o a la derecha para seleccionar la imagen o el sonido a enviar y
luego presione OK [ACEPTAR].
132
133
MENSAJES DE CORREO DE VOZ,
TEXTO, IMAGEN Y VIDEO
NUEVO MENSAJE
NUEVO MENSAJE
MENSAJES DE CORREO DE VOZ,
TEXTO, IMAGEN Y VIDEO
H ENVIAR UN NUEVO MENSAJE CON VIDEO
Puede enviar solamente un video a la vez.
Presione la tecla de selección izquierda
[MENÚ], 4 ghi
Centro de mensajes, 1 Nuevo mensaje, luego 3 def Mensaje
con imagen.
Al presionar la tecla de selección derecha
[OPCIONES],
puede seleccionar entre las siguientes:
1. Previsualizar: Previsualiza un mensaje de video guardado.
2. Guardar como borrador: Guarda el mensaje de video.
3. Nivel de prioridad: Seleccione ”Alta” o “Normal”.
4. Quitar video: Quita el video insertado.
Bajo ”Para”, ingrese el número del teléfono y luego presione
OK .
Al presionar la tecla de selección izquierda
[AGREGAR],
puede seleccionar entre las siguientes:
1. Desde la lista de registros: Busca por un número de teléfono
almacenado en la lista de contactos.
2. Grupos de mensajes: Busca los grupos almacenados en la lista de
grupos de mensajes.
3. Para contactos: Almacena el número de teléfono en la lista de
contactos.
4. Mi espacio Movilnet: Envía videos utilizando Dirección Movilnet
en línea.
Para enviar el mensaje con video, presione la tecla de selección
izquierda
[ENVIAR].
Bajo ”Asunto”, ingrese un asunto y luego presione OK
[ACEPTAR]. (Consulte la página 41 para obtener más detalles
sobre la inserción de letras, números y símbolos. Soporta hasta 100
caracteres.)
Bajo ”Texto”, ingrese un nuevo mensaje de texto y luego presione
OK [ACEPTAR]. (Consulte la página 41 para obtener más detalles
sobre la inserción de letras, números y símbolos. Pueden insertarse
hasta 1.000 caracteres.)
Bajo ”Más”, Seleccione “Video
”. Presione la tecla de
navegación
hacia arriba, hacia abajo, a la izquierda o a la
derecha para seleccionar el video a enviar y luego presione OK
[ACEPTAR].
134
135
MENSAJES DE CORREO DE VOZ,
TEXTO, IMAGEN Y VIDEO
CORREO DE VOZ
CORREO DE VOZ
MENSAJES DE CORREO DE VOZ,
TEXTO, IMAGEN Y VIDEO
Nuevas alertas de mensajes de correo de voz son enviados a través de un mensaje
de texto SMS. Estos mensajes indican cuántos mensajes de correo de voz nuevos y
urgentes hay en su buzón. Abra el mensaje de texto para visualizar el número de
mensajes de voz nuevos almacenados en su buzón. Si alguien deja un número de
llamada de retorno, este número también se enviará a través de un mensaje de texto
SMS. Acceda al número de mensajes de correo de voz manteniendo presionada la
tecla Enviar SEND .
RECUPERACION DE LOS MENSAJES DEL BUZON
PARA ACCEDER A SU BUZON
Si oye un mensaje de saludo, presione
Presione la tecla de selección izquierda
[MENÚ], 4 ghi Centro
de mensajes, 2 abc Correo de voz. O para llamar directamente a
través del correo de voz, presione
, 9 wxyz y luego la tecla
Enviar SEND .
Siga las indicaciones para insertar su clave de bloqueo y recuperar
sus mensajes.
Si oye su propio mensaje de saludo del sistema cuando marca *VM
(
, 9 wxyz ), presione
para interrumpir la operación y
siga las indicaciones para insertar su clave de bloqueo.
CONFIGURACION DE LOS MENSAJES DE CORREO DE VOZ
Presione
, 9 wxyz y luego presione la tecla Enviar
SEND . (Si llama desde un teléfono multifrecuencial (tono),
ingrese su número de teléfono inalámbrico.)
Si oye un mensaje de saludo, presione
para seguir.
Se aplican tarifas de tiempo de conexión para la utilización de su teléfono
inalámbrico para configurar o recuperar mensajes del buzón. También se
pueden aplicar tarifas de servicio y/o larga distancia.
Siga las indicaciones para personalizar su clave de bloqueo,
OPCIONES, SALUDO y BUZON.
136
Presione
, 9 wxyz y luego presione la tecla Enviar
SEND . (Para acceder sus mensajes de su correo de voz no
estando conectado a la red, o desde un teléfono multifrecuencial
(tono), ingrese su número de teléfono inalámbrico.)
para seguir.
Se aplican tarifas de tiempo de conexión para la utilización de su
teléfono inalámbrico para configurar o recuperar mensajes del buzón.
También se pueden aplicar tarifas de servicio y/o larga distancia.
Ingrese su clave de bloqueo y presione
.
ACCESOS RÁPIDOS DEL CORREO DE VOZ
• Mientras oye un mensaje presione:
Tecla 1 : Retroceso
Tecla 2 abc : Pausa
Tecla 3 def : Avance rápido
Tecla 4 ghi : Más lento
Tecla 5 jkl : Información del sobre (fecha / hora)
Tecla 6 mno : Más rápido
Tecla
: Cancelar
Tecla 0 : Ayuda
Tecla
: Terminar / Saltar
Tecla 1
1 : Retroceso al inicio
Tecla 3 def 3 def : Avance rápido hasta el final
Tecla 7 pqrs : Borrar mensaje
• Tras oír un mensaje presione:
Tecla 4 ghi : Responder
Tecla 7 pqrs : Borrar
Tecla 9 wxyz : Guardar
Tecla 0 : Ayuda
137
MENSAJES DE CORREO DE VOZ,
TEXTO, IMAGEN Y VIDEO
BANDEJA DE ENTRADA
Bandeja de entrada) administra los mensajes de texto, imagen y video recibidos.
Para acceder:
Presione la tecla de selección izquierda
[MENÚ], 4 ghi
Centro de mensajes, luego 3 def Bandeja de entrada.
•
•
•
•
: No leído
: Leído
: MMS No leído
: MMS Leído
•
•
•
•
: Bloqueado no leído
: Bloqueado leído
: MMS bloqueado no leído
: MMS bloqueado leído
Presione la tecla de navegación
hacia arriba o hacia abajo
para seleccionar un mensaje que desea visualizar, presione OK
[ACEPTAR]. Se mostrará el mensaje.
Para borrar un mensaje, presione la tecla de selección izquierda
[BORRAR], presione la tecla de selección derecha
[SÍ].
Presione la tecla de selección derecha
[OPCIONES].
Dependiendo del tipo de mensaje recibido (texto, imagen o video),
aparecerán los sigiuentes elementos en el menú de opciones:
REPRODUCIR NUEVAMENTE
Reproduce un Mensaje con Imagen recibido con sonido agregado o
un mensaje con Video. La opción Reproducir Nuevamente se mostrará
solamente cuando reciba una Imagen o un Mensaje con Video.
RESPONDER
Responde el mensaje de Texto o Imagen / Video.
138
BANDEJA DE ENTRADA
MENSAJES DE CORREO DE VOZ,
TEXTO, IMAGEN Y VIDEO
ENCAMINAR
Seleccione para encaminar el mensaje de Texto o Imagen/Video.
Ingrese el número de teléfono de la persona a la cual está siendo
enviado el mensaje y presione OK .
PARA LA LISTA DE REGISTROS
Almacena el número de la llamada de retorno, dirección de correo
electrónico y números de la dirección del mensaje recibido en su lista
de Contactos.
GUARDAR IMAGEN
Seleccione para guardar una imagen en la carpeta ”Cuadro de
Imágenes”.
GUARDAR VIDEO
Seleccione para guardar un video en la carpeta ”Cuadro de Video”.
GUARDAR SONIDO
Seleccione para guardar un sonido en la carpeta ”Cuadro de Sonidos”.
BLOQUEAR Y DESBLOQUEAR
Seleccione ”Bloquear” para bloquear el mensaje o ”Desbloquear” para
desbloquear el mensaje.
GUARDAR TEXTO RÁPIDO
Seleccione para guardar el contenido de un Mensaje de Texto recibido
en ”Texto Rápido”.
139
MENSAJES DE CORREO DE VOZ,
TEXTO, IMAGEN Y VIDEO
BANDEJA DE ENTRADA
ENVIADOS
MENSAJES DE CORREO DE VOZ,
TEXTO, IMAGEN Y VIDEO
INFORMACIÓN DE MENSAJES
REPRODUCIR NUEVAMENTE
Seleccione se exhibirá si la información recibida de los mensajes de Texto,
Imagen o Video.
Seleccione la reproducción de mensajes con Video o Sonidos Anexados.
ENCAMINAR
MENSAJES DE CORREO DE VOZ,
TEXTO, IMAGEN Y VIDEO
ENVIADOS
Administra los mensajes de Texto, Imagen y Video enviados.
Presione la Tecla de selección izquierda
[MENÚ], 4 ghi
Centro de Mensajes y luego 4 ghi Enviados.
•
•
•
•
•
: Incompleto
: Entregado
: No Enviado
: Enviado
: Pendiente
•
•
•
•
•
: Bloqueado, Incompleto
: Bloqueado, Entregado
: Bloqueado, No Enviado
: Bloqueado, Enviado
: Bloqueado, Pendiente
Presione la Tecla de Navegación
hacia arriba o hacia abajo
para seleccionar un mensaje que desea visualizar, presione OK
[ACEPTAR]. Se exhibirá el mensaje.
Para borrar un mensaje, presione la Tecla de selección izquierda
[BORRAR], presione la Tecla de selección derecha
[SÍ].
Para reenviar mensajes de Texto, Imagen o Video, presione
OK [ENVIAR]. Presione la Tecla de selección derecha
[OPCIONES]. Dependiendo del tipo de mensaje enviado (Texto,
Imagen o Video), los ítems siguientes se exhibirán en el menú de
opciones:
140
Seleccione para encaminar los mensajes de Texto o Imagen / Video.
Ingrese el número de teléfono de la persona a la cual se enviará el
mensaje y luego presione OK [ACEPTAR].
Ingrese cualquier mensaje de Texto para que se envíe junto con
el mensaje encaminado y luego presione la Tecla de selección
izquierda
[OPCIONES], Seleccione “Enviar”. Presione OK
[ACEPTAR].
BLOQUEAR Y DESBLOQUEAR
Seleccione ”Bloquear” para bloquear el mensaje o ”Desbloquear” para
desbloquear el mensaje.
GUARDAR TEXTO RÁPIDO
Seleccione para guardar el contenido de un Mensaje de Texto enviado
a ”Texto Rápido”.
GUARDAR EN LA LISTA DE REGISTROS
Almacena el número de la llamada de retorno, dirección de correo
electrónico y números de la dirección del mensaje enviado en la lista
de Contactos.
INFORMACIÓN DEL MENSAJE
Seleccione para exhibir la información de los mensajes de Texto,
Imagen o Video.
141
MENSAJES DE CORREO DE VOZ,
TEXTO, IMAGEN Y VIDEO
BORRADORES
La carpeta Borradores contiene todos los borradores o mensajes grabados. Si la
composición de un mensaje es interrumpido por una llamada de voz u otro evento,
el texto de la composición actual será grabado automáticamente en esta carpeta
de borradores.
Presione la Tecla de selección izquierda
[MENÚ], 4 ghi
Centro de Mensajes, luego 5 jkl Borradores.
•
•
: Borradores de mensajes SMS
: Borradores de mensajes MMS
Presione la Tecla de Navegación
hacia arriba o hacia abajo para
seleccionar un mensaje y luego presione OK [EDITAR].
Se exhibirá el mensaje.
Para borrar un mensaje, presione la Tecla de selección izquierda
[BORRAR], presione la Tecla de selección derecha
[SÍ].
Para enviar un mensaje Texto editado, presione la Tecla de selección
izquierda
[OPCIONES], Seleccione “Enviar”.
Presione OK [ACEPTAR].
Para enviar un mensaje de Imagen / Video editado, presione la tecla
[ENVIAR].
de selección izquierda
AJUSTES
MENSAJES DE CORREO DE VOZ,
TEXTO, IMAGEN Y VIDEO
MODO DE INSERCION
Permite que seleccione el método de inserción incluyendo T9Word, Abc, ABC, 123.
Presione la Tecla de selección izquierda
[MENÚ], 4 ghi
Centro de Mensajes y luego 6 mno Ajustes.
Presione 1
Modo de Inserción.
Seleccione una de las opciones siguientes presionando la Tecla de
Navegación
hacia arriba o hacia abajo:
•
•
•
•
T9Word
Abc
ABC
123
Presione OK [ACEPTAR] para guardar la configuración.
GRABADO AUTOMATICO
Con esta función activada, los mensajes se grabarán automáticamente en la
Carpeta Enviados cuando sean transmitidos.
Presione la Tecla de selección izquierda
[MENÚ], 4 ghi
Centro de Mensajes y luego 6 mno Ajustes.
Presione 2 abc Guardar Automáticamente.
Seleccione una de las opciones siguientes presionando la Tecla de
Navegación
hacia arriba o hacia abajo:
• On: Todos los mensajes enviados se grabarán en la Caja Enviados.
• Off: Todos los mensajes enviados no se guardarán en la caja Enviados.
• Prompt: La caja de diálogo “Sí” o “No” se exhibirá tras el envío del
mensaje.
142
143
MENSAJES DE CORREO DE VOZ,
TEXTO, IMAGEN Y VIDEO
AJUSTES
Presione OK [ACEPTAR] para guardarguardar la configuración.
BORRADO AUTOMATICO
Con esta función activada, los mensajes leídos / desbloqueados se borrarán
automáticamente cuando la capacidad de almacenamiento en la memoria esté
agotado.
Presione la Tecla de selección izquierda
[MENÚ], 4 ghi
Centro de Mensajes y luego 6 mno Ajustes.
Presione 3 def Borrado Automático.
Seleccione una de las opciones siguientes presionando la Tecla de
Navegación
hacia arriba o hacia abajo:
• On: El mensaje más antiguo se borrará de la bandeja de entrada
automáticamente cuando la Bandeja de Entrada esté llena.
• Off: El mensaje más antiguo no se borrará de la bandeja de entrada
automáticamente cuando esté llena.
Presione OK [ACEPTAR] para guardar la configuración.
VISUALIZACION AUTOMATICA DEL TEXTO
Permite exhibir directamente el contenido del mensaje cuando sea recibido en
modo Inactivo. Si la función “Visualización Automática del Texto“ es ajustada en
off, el usuario podrá visualizar el mensaje accediendo Menú del Centro de Mensajes
-> Bandeja de Entrada.
Presione la Tecla de selección izquierda
[MENÚ], 4 ghi
Centro de Mensajes y luego 6 mno Ajustes.
Presione 4 ghi Visualización Automática del Texto.
Seleccione una de las opciones siguientes presionando la Tecla de
Navegación
hacia arriba o hacia abajo:
144
AJUSTES
MENSAJES DE CORREO DE VOZ,
TEXTO, IMAGEN Y VIDEO
• On: El mensaje se exhibirá automáticamente.
• Off: El mensaje se exhibirá accediendo la bandeja de entrada o
contestando la notificación interactiva.
Presione OK [ACEPTAR] para guardar la configuración.
RECEPCION AUTOMATICA
Permite que descargue directamente el contenido al recibir un mensaje con
Imágenes/Videos.
Presione la Tecla de selección izquierda
[MENÚ], 4 ghi
Centro de Mensajes y luego 6 mno Ajustes.
Presione 5 jkl Recepción Automática.
Seleccione una de las opciones siguientes presionando la Tecla de
Navegación
hacia arriba o hacia abajo:
• On: El mensaje con imagen se descargará automáticamente.
• Off: El mensaje con imagen se recuperará de la Bandeja de Entrada o
en el prompt del nuevo Mensaje de Texto.
Presione OK [ACEPTAR] para guardar la configuración.
TEXTO RÁPIDO
Permite exhibir, editar y agregar frases de texto. Estas secuencias de texto le
permiten reducir la inserción de texto manual en los mensajes. La función Texto
Rápido puede guardarse con hasta 100 caracteres por frase.
Presione la tecla de selección izquierda
[MENÚ], 4 ghi
Centro de Mensajes y luego 6 mno Ajustes.
Presione 6 mno Texto Rápido.
145
MENSAJES DE CORREO DE VOZ,
TEXTO, IMAGEN Y VIDEO
AJUSTES
3.1. Seleccione un mensaje Texto Rápido de la lista.
Presione OK [ACEPTAR].
3.2. Para agregar un nuevo mensaje Texto Rápido, presione la Tecla
[OPCIONES] y luego seleccione
de selección derecha
“Nuevo”. Escriba el texto y presione OK [ACEPTAR] para
guardarlo.
3.3. Para borrar el mensaje Texto Rápido grabado, presione la Tecla
[BORRAR]. Presione la Tecla de
de selección izquierda
[SÍ] para borrarlo.
selección derecha
Textos rápidos predefinidos.
¿Cómo estás? / Vamos a juntarnos / ¡Tienes que verlo! / ¿Qué estás
haciendo? / Gracias / ¿Qué crees? / Deberías estar aquí para ver esto /
¿Te gustaría juntarte conmigo hoy a la noche? / En camino / Sí / ¡Eres el
mejor! / Llámeme.
NÚMERO DE RETORNO DE LLAMADA
Permite que envíe directamente un número de retorno de llamada determinado en
el momento del envío de un Mensaje de Texto.
AJUSTES
MENSAJES DE CORREO DE VOZ,
TEXTO, IMAGEN Y VIDEO
FIRMA
Permite que cree / edite una firma para enviar automáticamente junto con sus
mensajes.
Presione la tecla de selección izquierda
[MENÚ], 4 ghi
Centro de mensajes y luego 6 mno Ajustes.
Presione 8 tuv Firma.
Para activar la función Firma, Seleccione ”Personalizar” presionando
hacia arriba o hacia abajo.
la tecla de navegación
Para desactivar la función Firma, seleccione ”Ninguna”.
Acceda la ventana Editar firma presionando la tecla de navegación
hacia arriba o hacia abajo.
Presione OK [ACEPTAR] para guardar la configuración.
Presione la Tecla de selección izquierda
[MENÚ], 4 ghi
Centro de Mensajes y luego 6 mno Ajustes.
Presione 7 pqrs Número de Retorno de Llamada.
Seleccione “Off” u “On” presionando la Tecla de Navegación
hacia arriba o hacia abajo.
Si se selecciona “On”, ingrese un nuevo número de llamada de
retorno, presione OK [ACEPTAR] para guardar la configuración.
146
147
BORRAR TODOS
CAPÍTULO 6
MENSAJES DE CORREO DE VOZ,
TEXTO, IMAGEN Y VIDEO
Presione la Tecla de selección izquierda
[MENÚ], 4 ghi
Centro de Mensajes y luego 7 pqrs Borrar.
2.2. Para borrar todos los mensajes de borrador, presione 2 abc
[BORRAR BORRADORES].
2.3. Para borrar los mensajes enviados, presione 3 def
[BORRAR ENVIADOS].
2.4. Para borrar todos los mensajes, presione 4 ghi
[BORRAR TODO].
Presione la Tecla de selección derecha
CAPÍTULO 6
SEGURIDAD
Y GARANTÍA
[SÍ] para borrarlo.
Este capítulo abarca y explica las directrices y precauciones por seguir cuando
opere su teléfono. Antes de operar su teléfono, por favor, lea todos los detalles
de seguridad.
Este capítulo contiene los términos y condiciones de los servicios y la garantía
de su teléfono. Por favor, lea con atención.
INFORMACIÓN DE SEGURIDAD PARA DISPOSITIVOS
INALÁMBRICOS MÓVILES
INFORMACIÓN DE SEGURIDAD SOBRE EXPOSICION DE
RADIOFRECUENCIA DE FCC
INFORMACIÓN SOBRE LA TASA DE ABSORCION ESPECIFICA (SAR)
REGLAMENTACIONES DE FCC SOBRE COMPATIBILIDAD CON
PROTESIS AUDITIVAS (HAC) PARA DISPOSITIVOS INALAMBRICOS
ACTUALIZACION AL CONSUMIDOR DE LA FDA
PARA EVITAR PERDIDA POTENCIAL DE AUDICION
REQUISITOS DE INFORMACIÓN DEL USUARIO CTIA
GARANTÍA LIMITADA A 12 MESES
148
SEGURIDAD Y GARANTÍA
2.1. Para borrar todos los mensajes de la bandeja de entrada,
presione 1 [BORRAR TODA LA BANDEJA DE ENTRADA].
SEGURIDAD Y GARANTÍA
INFORMACIÓN DE SEGURIDAD
PARA DISPOSITIVOS INALÁMBRICOS
MÓVILES
Lea esta información antes de utilizar su teléfono celular portátil.
EXPOSICIÓN A LAS SEÑALES DE RADIOFRECUENCIA
Su teléfono es un transmisor y receptor de radio de baja potencia. Cuando está
ENCENDIDO, recibe y envía señales de radiofrecuencia (RF).
INFORMACIÓN DE SEGURIDAD
PARA DISPOSITIVOS INALÁMBRICOS
MÓVILES
SEGURIDAD Y GARANTÍA
CÓMO SOSTENER SU TELEFONO
Su teléfono está equipado con una antena. Para optimizar la calidad de la llamada,
sostenga el teléfono por las junciones de los bordes en la lateral y evite tocar la
parte superior e inferior del teléfono.
Correcto
Incorrecto
En agosto de 1996, la Comisión Federal de Comunicaciones (FCC) adoptó las pautas
de exposición a RF con niveles de seguridad para teléfonos. Esas pautas cumplen
con las normas de seguridad establecidas por organismos estandarizadores
internacionales y de los Estados Unidos:
ANSI C95.1 (1992) *
Informe 86 NCRP (1986) *
ICNIRP (1996) *
Esas normas fueron basadas en evaluaciones abarcadoras y periódicas de la
literatura científica relevante. Por ejemplo, más de 120 científicos, ingenieros
y médicos de universidades, sectores gubernamentales de la salud e industria
consultaron a la entidad de investigación disponible para desarrollar la norma ANSI
(C951).
El diseño de su teléfono cumple con las pautas de la FCC (y sus normas).
SEGURIDAD DE LA ANTENA
Utilice solamente la antena proveída o una antena de sustitución aprobada.
Antenas, modificaciones, o conexiones no autorizadas pueden perjudicar la calidad
de la llamada, dañar el teléfono o resultar en la violación de las reglas de la FCC.
Comuníquese con su revendedor local para el reemplazo de la antena.
No utilice el teléfono con una antena dañada. Si una antena dañada mantiene
contacto con la piel, se pueden producir quemaduras. Comuníquese con un servicio
técnico autrizado para reemplazar la antena.
1* : Instituto estadounidense de normas nacionales.
2* : Consejo nacional de medidas y protección contra la radiación.
3* : Comisión internacional de protección contra radiación no-ionizante.
150
SEGURIDAD AL CONDUCIR
Hablar por teléfono mientras conduce un automóvil es extremadamente peligroso
y es ilegal en algunos estados. Recuerde que la seguridad es la prioridad. Verifique
las leyes y reglamentos sobre el uso de teléfonos en áreas donde conduce
automóviles. Obedézcalas siempre.
Además, si utiliza su teléfono al conducir:
• Preste toda la atención al volante. La dirección segura es su primera
responsabilidad.
• Utilice la función de altavoz si está disponible.
• Salga de la carretera y estacione antes de realizar o responder una
llamada, si las condiciones de dirección lo exijen.
Si necesita utilizar el teléfono al conducir, se ruega, utilice los modos de un botón,
marcado rápido y atención automática.
Los dispositivos de bolsas de aire son accionados con gran fuerza. NO coloque
objetos incluyendo equipos inalámbricos instalados o portátiles, en el área sobre la
bolsa de aire o en el área de activación de la bolsa de aire. Si se instala un equipo
inalámbrico dentro del vehículo de manera incorrecta y la bolsa de aire se infla, se
poueden producir heridas graves.
ADVERTENCIA: La no obediencia a estas instrucciones podrá conducir a
graves heridas personales y posibles daños a la propiedad.
151
SEGURIDAD Y GARANTÍA
INFORMACIÓN DE SEGURIDAD
PARA DISPOSITIVOS INALÁMBRICOS
MÓVILES
INFORMACIÓN DE SEGURIDAD
PARA DISPOSITIVOS INALÁMBRICOS
MÓVILES
SEGURIDAD Y GARANTÍA
DISPOSITIVOS ELECTRÓNICOS
VEHICULOS
Su teléfono móvil es un radio transmisor y receptor de baja potencia. Cuando está
encendido (ON), recibe y envía señales de radio frecuencia (RF).
Las señales de RF pueden afectar sistemas electrónicos indebidamente protegidos
en vehículos de motor. Verifique con su fabricante o representante respecto a su
vehículo. También debe consultar al fabricante de cualquier equipo que ha sido
agregado a su vehículo.
La mayoría de los equipos electrónicos modernos están protegidos contra la
energía de RF. Sin embargo, es posible que algunos equipos electrónicos no están
protegidos contra las señales de RF de su teléfono. Por lo tanto su teléfono debe
restringirse a ciertas situaciones.
MARCA PASOS
La Asociación de la Industria de la Salud Manufacturera recomienda que se deba
mantener una separación mínima entre un teléfono y un marcapasos de por lo
menos 15 centímetros para evitar una potencial interferencia con el marcapasos.
Estas recomendaciones son consistentes con el estudio independiente y por las
recomendaciones de la Investigación de Tecnología Inalámbrica.
A las personas con marcapasos
• SIEMPRE mantengan el teléfono a más de 15 centímetros de su
marcapasos cuando el teléfono esté encendido.
• No porten el teléfono en una bolsa frontal del pecho.
• Utilicen el oído opuesto al marcapasos para minimizar el
potencial de interferencia.
• Si tiene sospechas de una posible interferencia, apague
inmediatamente su teléfono.
DISPOSITIVOS PARA LA SORDERA
Algunos teléfonos digitales pueden interferir con algunos dispositivos para la
sordera. En caso de tal interferencia, tal vez debe consultar con su proveedor de
servicio (o comunicarse con la línea de servicio al cliente para discutir otras
alternativas).
OTROS DISPOSITIVOS MEDICOS
Si utiliza otro dispositivo médico personal, consulte al fabricante de su dispositivo
para determinar si están debidamente protegidos de energía de RF externa. Su
médico también puede asistirlo en obtener esta información.
APAGUE (OFF) su teléfono en instalaciones de salud cuando así lo indiquen las
normas anunciadas en éstas áreas. Los hospitales o centros de salud pueden estar
utilizando equipo que puede ser sensible a la energía de RF externa.
152
DISPOSICIONES EN INSTALACIONES
APAGUE (OFF) su teléfono en lugares donde por medio de anuncios así lo dispone.
OTROS LINEAMIENTOS DE SEGURIDAD
AERONAVES
Las regulaciones de la FCC prohíben utilizar el teléfono cuando se está en el aire.
APAGUE (OFF) su teléfono antes de abordar una aeronave. Siempre solicita y
obtenga consentimiento previo y aprobación del representante autorizado de
la aerolínea antes de utilizar su teléfono a bordo de una aeronave. Siempre siga
las instrucciones del representante de la aerolínea cuando utilice su teléfono a
bordo de una aeronave pare prevenir cualquier posible interferencia con equipo
electrónico aéreo.
ÁREAS DE FUNDICION
Para evitar la interferencia con operaciones de fundición, APAGUE (OFF) su
teléfono cuando se encuentre en una fundidora o en áreas con la disposición
“Apagar la radio de dos vías.” Obedezca las señales e instrucciones.
ATMOSFERAS POTENCIALMENTE EXPLOSIVAS
APAGUE (OFF) su teléfono cuando se encuentre en un área de atmósfera
potencialmente explosiva y obedezca todas las señales e instrucciones. Las chispas
en tales áreas pueden causar una explosión o incendio provocando daño corporal o
inclusive la muerte.
En las áreas con una atmósfera potencialmente explosiva, por lo regular, pero no
siempre se indica esto claramente. Estas incluyen áreas de carga de combustible,
tales como gasolinera, bajo cubierta en los barcos, en instalaciones de transferencia
o almacenamiento, vehículos que utilizan gas petróleo líquido (como el butano
o propano) áreas donde el aire contiene químicos o partículas, tales como grano,
polvo o talco de metal y cualquier otra área donde a normalmente se le indique
que apague el motor de su vehículo.
153
SEGURIDAD Y GARANTÍA
INFORMACIÓN DE SEGURIDAD
PARA DISPOSITIVOS INALÁMBRICOS
MÓVILES
PRECAUCIONES
Su teléfono es una pieza de equipo de alta calidad. Antes de operar, lea todas las
instrucciones y advertencias de precaución en el adaptador de viaje AC/DC (1) la
batería (2) y el producto utilizando la batería (3).
El incumplimiento de las indicaciones siguientes puede resultar en daño corporal
y/o daño al aparato como consecuencia del vaciado, incendio o ruptura de las
baterías.
• NO utilice este equipo en ambientes extremos, donde la alta
temperatura o alta humedad son predominantes.
• NO maltrate el equipo. Evite golpes, agitaciones o colisiones. Cuando
no esté utilizándolo, deje la unidad en posición plana para evitar
posibles daños causados por la instabilidad.
• NO exponga este aparato a lluvia o al derrame de bebidas.
• NO utilice accesorios no autorizados.
• NO desarme el teléfono ni sus accesorios. En el caso que sean
necesarios asistencia técnica o reparación, encamine la unidad a un
centro de asistencia técnica de teléfonos autorizado por UTStarcom.
Si esta unidad fuere desarmada, podrá generar el riesgo de choque
eléctrico o incendio.
• NO provoque cortocircuito en los terminales de la batería con objetos
metálicos, etc.
ADVERTENCIA
• Según el estado de California, este producto contiene química que
puede provocar cáncer.
• Según el estado de California, este producto contiene química que
puede deficiencia en el desarrollo del feto u otros daños
reproductivos.
154
INFORMACIÓN DE SEGURIDAD
SOBRE EXPOSICION DE
RADIOFRECUENCIA DE FCC
SEGURIDAD Y GARANTÍA
¡ADVERTENCIA! LEA ESTA INFORMACIÓN ANTES DE UTILIZAR LA
UNIDAD
CUIDADOS
En Agosto de 1996 a Federal Communications Commission (FCC) de Estados Unidos,
con su acción en el Informe y Orden FCC 96-326 adoptaron y actualizaron la norma de
seguridad para exposición humana a la radiofrecuencia electromagnética emitida por
los transmisores reglamentados por FCC. Aquellas directrices son consistentes con el
estándar de seguridad anteriormente establecido tanto por Estados Unidos como por
los organismos de normas internacionales.
El proyecto de este teléfono atiende las directrices FCC y las normas internacionales.
FUNCIONAMIENTO DE LA UNIDAD CERCA DEL CUERPO
Este dispositivo fue probado en cuanto al funcionamiento de la unidad cerca del
cuerpo con la parte trasera del teléfono, mantenga distancia de 2.2 cm del cuerpo.
Para mantener la conformidad con los requisitos de FCC sobre la exposición a la
Radiofrecuencia, solamente utilice prendedores de cinturón, coldres o accesorios
similares que mantienen una distancia de 2.2 cm entre el cuerpo del usuario y la
parte trasera del teléfono, incluyendo la antena. La utilización de prendedores de
cinturón, coldres y accesorios similares no deben contener componentes metálicos
en su conjunto. La utilización de accesorios que no satisfacen estos requisitos puede
que no atienda los requisitos de FCC en cuanto a la exposición a la radiofrecuencia y
deben evitarse.
Para más información sobre la exposición a la RF, se ruega acceder el sitio
de FCC en www.fcc.gov.
155
SEGURIDAD Y GARANTÍA
INFORMACIÓN SOBRE LA TASA DE
ABSORCION ESPECIFICA (SAR)
INFORMACIÓN SOBRE LA TASA DE
ABSORCION ESPECIFICA (SAR)
SEGURIDAD Y GARANTÍA
EL MODELO DE ESTE TELEFONO CUMPLE LOS REQUERIMIENTOS
DEL GOBIERNO REFERENTES A LA EXPOSICION DE ONDAS DE
RADIOFRECUENCIA.
Las pruebas SAR para el funcionamiento junto al cuerpo fueron ejecutadas con un
prendedor de cinturón que posibilitaba una separación de 22 mm. El Manual del
Usuario indica que cualesquier holsters/prendedores utilizados con este dispositivo
no deben contener cualesquier componentes metálicos.
Su teléfono inalámbrico es un radio transmisor y receptor. Está diseñado y fabricado
para no exceder los límites de exposición de radiofrecuencia (RF) por la Comisión
Federal de Comunicaciones del Gobierno de los EEUU. Estos límites son parte de
extensas normas que establecer los límites permitidos de energía de RF para la
población en general. Estas normas están basadas en estándares que fueron
desarrollados por organizaciones científicas independientes a través de la
evaluación periódica y a fondo de los estudios científicos. Los estándares incluye un
margen de seguridad substancial diseñado para asegurar la seguridad de todas las
personas, sin importar la edad y su salud.
La FCC ha otorgado una Autorización de Equipo para este modelo de teléfono
con todos los niveles de SAR reportados como en cumplimiento con los normas de
exposición de RF de la FCC. La información de SAR en este modelo de teléfono se
encuentra archivada en la página de Búsqueda de ID de la FCC http://www. fcc.
gov/oet/ea al ingresar en PP4OVAL.
La exposición estándar para los teléfonos móviles emplea una unidad de medida
conocida como tasa de absorción específica o SAR. El límite SAR definido por la FCC
es de 1.6W/kg.* Las pruebas de SAR se conducen cuando el teléfono transmite a su
mayor nivel de energía certificado en todas las bandas de frecuencia donde se ha
probado. Aunque la SAR se determina por el más alto nivel de energía certificado,
el nivel actual de SAR mientras se opera puede estar muy por debajo del nivel
máximo. Esto es porque el teléfono está diseñado para operar en múltiples niveles
de energía como para sólo requerir la energía necesaria para alcanzar la red. En
general, entre más cerca se encuentre de una estación de base de antena inalámbrica, menor será la salida de energía.
Es posible encontrar más información sobre tasas de absorción específicas (SAR)
en el sitio de la Asociación de la Industria de Telecomunicación Celular (CTIA) en
http://www.ctia.org.
* En Estados Unidos y en Canadá, el límite de SAR para teléfonos utilizados por
el público es de 1.6 vatios/kg (W/kg) en media un gramo más de tejido. La norma
incorpora una margen sustancial de seguridad para dar protección adicional al
público y para aclarar cualquier variación en las mediciones.
Antes de que un modelo de teléfono esté disponible para su venta al público,
se le deben efectuar pruebas y debe certificarse por la FCC de que no exceda el
límite establecido y adoptado por el gobierno referente a la exposición segura.
Las pruebas se llevan a cabo en posiciones y ubicaciones (ej., en el oído y portado
en el cuerpo) tal como lo requiere la FCC para cada modelo. El valor más alto de
SAR para este modelo de teléfono cuando se utiliza cerca del oído es de 1.38 W/kg
y cuando es portado en el cuerpo tal y como se describe en esta guía de usuario
es de 0.442W/kg. (Las medidas cuando se porta en el cuerpo pueden diferir entre
modelos de teléfono dependiendo de los accesorios disponibles y los
requerimientos de la FCC). Aunque pueden existir diferencias de los niveles de
SAR entre varios teléfonos y varias posiciones, todos ellos cumplen con las normas
gubernamentales referentes a la exposición segura.
156
157
SEGURIDAD Y GARANTÍA
REGLAMENTACIONES DE FCC SOBRE
COMPATIBILIDAD CON PROTESIS
AUDITIVAS (HAC) PARA DISPOSITIVOS
INALAMBRICOS
En 10 de julio de 2003, el informe y orden en WT Docket 01-309 de la Comisión
Federal de Comunicaciones de Estados Unidos (FCC) modificaron la excepción de
teléfonos bajo la Ley de compatibilidad con prótesis auditivas de 1988 (Ley HAC)
para exigir que tales aparatos sean compatibles con prótesis auditivas. La finalidad
de la Ley HAC es garantizar acceso razonable a servicios de telecomunicaciones
para personas con deficiencia auditiva.
Mientras algunos teléfonos son utilizados cerca de algunos dispositivos auditivos
(prótesis auditivas e implantes de cóclea), los usuarios pueden detectar silbido,
zumbido o ruido incómodo. Algunos dispositivos son más inmunes que otros a
ese ruido de interferencia la cantidad de interferencia generada por los teléfonos
también varían.
La industria de telefonía inalámbrica desarrolló un sistema de evaluación para
teléfonos, para auxiliar usuarios de dispositivos auditivos a encontrar teléfonos que
sean compatibles con sus dispositivos. No todos los teléfonos fueron evaluados. Los
teléfonos evaluados tienen la clasificación en su embalaje o una etiqueta localizada
en la caja.
Las evaluaciones no sirven como garantía. Los resultados variarán según el
dispositivo auditivo y la pérdida de audición del usuario. Si su dispositivo auditivo
se revela vulnerable a la interferencia, no podrá utilizar un teléfono evaluado
con éxito. Hacer una prueba del teléfono con su dispositivo es la mejor forma de
evaluar si está de acuerdo con sus necesidades personales.
Clasificaciones M: Los teléfonos con clasificación M3 ó M4 están de acuerdo con las
exigencias de FCC y están sujetos a generar menos interferencia en los dispositivos
para uso con prótesis auditivas que los teléfonos no evaluados. M4 es el mejor /
más alto resultado de las dos clasificaciones.
REGLAMENTACIONES DE FCC SOBRE
COMPATIBILIDAD CON PROTESIS
AUDITIVAS (HAC) PARA DISPOSITIVOS
INALAMBRICOS
SEGURIDAD Y GARANTÍA
Luego, son sumados los valores de la clasificación de la prótesis auditiva y del
teléfono. La suma que resulta en 5 está considerada aceptable para el uso normal.
La suma que resulta en 6 está considerada para el mejor uso.
En el ejemplo anterior, si el equipo de auxilio a la audición atiende la clasificación
del nivel M2 y el teléfono atiende la clasificación del nivel M3, la suma de los dos
valores resultará en M5. Esto deberá proporcionar al usuario del equipo de auxilio
a la audición el “uso normal” mientras utiliza su equipo de auxilio para la audición
con el teléfono en particular. El “uso normal” en este contexto está definido como
la calidad de la señal que es aceptable para el funcionamiento normal.
La letra M se destina a ser el sinónimo de la marca U. La marca T se destina a ser
sinónimo de la marca UT. Las marcas M y T son recomendadas por Alliance para
Soluciones de las Industrias de Telecomunicaciones (ATIS). Las marcas U y UT son
mencionadas en la Sección 20.19 de las Reglas FCC. La clasificación HAC y los
procedimientos de medición son descritos en la norma American National
Standards Institute (ANSI) C63.19.
Para información sobre teléfonos digitales y audífonos
• Compatibilidad y control de volumen de audífonos según FCC
http://www.fcc.gov/cgb/dro/hearing.html.
• Gallaudet University, RERC
http://tap.gallaudet.edu/voice
• Self Help for Hard of Hearing People Inc. [SHHH]
http://www.hearingloss.org
• The hearing Aid Compatibility FCC Order
http://hraunfoss.fcc.gov/edocs_public/attachmatch/FCC-03-168A1.pdf
Los dispositivos para uso con prótesis auditivas también pueden clasificarse. El
fabricante de su dispositivo auditivo o su médico podrá ayudarlo a descubrir esa
clasificación. Las clasificaciones de valor más alto indican que el dispositivo auditivo
es relativamente inmune a ruidos de interferencia.
158
159
SEGURIDAD Y GARANTÍA
ACTUALIZACION AL
CONSUMIDOR DE LA FDA
U.S. Food and Drug Administration – Centro de
Dispositivos y Reportes Actualizados de Salud
Radiológica acerca de Teléfonos Móviles
1. ¿Acaso es verdad que los teléfonos presentan un problema de salud?
La evidencia científica disponible no muestra que cualquier problema de salud esté
asociado con la utilización de teléfonos inalámbricos. Sin embargo, no existen pruebas
de que los teléfonos inalámbricos son absolutamente seguros. Los teléfonos inalámbricos
emiten bajos niveles de energía de radiofrecuencia (RF) en el rango de las microondas
cuando se utiliza. También emiten niveles muy bajos de RF en modo inactivo. Aunque
los niveles altos de RF pueden ocasionar repercusiones en la salud (al calentar tejido), la
exposición de bajos niveles de RF no produce efectos de calentamiento que ocasionen
repercusiones adversas para la salud. Muchos estudios de exposición a niveles bajos de
RF no han encontrado repercusión biológica alguna. Algunos estudios sugieren que
estos a biológicos pueden ocurrir, pero tales conclusiones no han sido confirmadas por
investigación adicional. En algunos casos, otros investigadores han tenido dificultades en
reproducir tales estudios o en determinar las razones de los resultados tan inconsistentes.
2. ¿Cuál es el papel de la FDA en lo que concierne la seguridad de los teléfonos
inalámbricos
Bajo ley, la FDA no revisa la seguridad de productos del consumidor de emisión de
radiación antes de ponerlos a la venta, tal como lo hace con nuevas medicinas o dispositivos médicos. Sin embargo, la agencia tiene autoridad de tomar medidas de acción
si es que los teléfonos inalámbricos muestran la emisión de energía (RF) en un nivel
que es peligroso para el usuario. En tal caso, la FDA puede exigir a los fabricantes de
teléfonos inalámbricos que notifiquen a los usuarios del peligro a la salud y de reparar o
reemplazar o requisar los teléfonos para que el peligro ya no exista. Aunque la existencia
de datos científicos no justifiquen las acciones normativas de la FDA, está le ha insistido
a la industria de telefonía inalámbrica a tomar un número de precauciones que incluyen
lo siguiente:
• Apoyar la investigación necesaria de las posibles repercusiones biológicas de RF del tipo
que emiten los teléfonos inalámbricos.;
• Diseñar teléfonos inalámbricos de manera que minimicen cualquier exposición a RF al
usuario que no es necesaria para la función del dispositivo.
y
• Cooperar con los usuarios de teléfonos inalámbricos con la mejor información posible
acerca de los efectos secundarios del uso del teléfono inalámbrico en la salud humana.
La FDA pertenece a un grupo de trabajo entre agencias federales que son responsables de
diferentes aspectos de seguridad de RF para asegurarse de los esfuerzos conjuntos a nivel
federal. Las siguientes agencias pertenecen a este grupo de trabajo:
160
ACTUALIZACION AL
CONSUMIDOR DE LA FDA
SEGURIDAD Y GARANTÍA
• El Instituto Nacional de Salud y Seguridad Ocupacional.
• La Agencia de Protección del Medioambiente
• La Comisión Federal de Comunicaciones
• La Administración de Salud y Seguridad Ocupacional
• La Administración Nacional de Telecomunicaciones e Información
Los Institutos Nacionales de Salud también participan en actividades de algunas actividades
de grupos de trabajo a nivel inter agencia. La FDA comparte responsabilidades normativas
sobre teléfonos inalámbricos con la Comisión Federal de Comunicaciones (FCC). Todos los
teléfonos que se venden en los Estados Unidos, primero deben cumplir con las normas de
seguridad de la FCC que limitan la exposición a RF. La FCC también regula las estaciones
de base de que dependen los proveedores de servicio de telefonía inalámbrica. Aunque
tales estaciones operan a un nivel mayor de energía que los teléfonos inalámbricos mismos,
las exposiciones de RF a que la gente está expuesta en estas estaciones de base son por lo
general, miles de veces menos que las que pueden recibir de teléfonos inalámbricos. Por
lo tanto, las estaciones de base no están sujetas a las dudas de seguridad que se discuten
en este documento.
3. ¿Qué tipos de teléfono están sujetos a este reporte actualizado?
El término “teléfono inalámbrico” se refiere a teléfonos inalámbricos portátiles con antena
incluida, a menudo llamados teléfonos “cel,” “móvil,” o “PCS.” Este tipo de teléfonos
inalámbricos pueden exponer al usuario a energía de radiofrecuencia cuantificable (RF) por
la corta distancia entre el teléfono y la cabeza del usuario. Estas exposiciones de RF están
delimitadas por los normas de la Comisión Federal de Comunicaciones que fueron
desarrolladas con el consejo de la FDA y otras normas de agencias de salud y seguridad.
Cuando el teléfono se encuentra a distancias más alejadas del usuario, la exposición de RF
es drásticamente menos ya que la exposición de RF de una persona se reduce rápidamente
al incrementar la distancia de la fuente. Los llamados teléfonos “sin cables,” los cuales
tienen una unidad de base conectada al cable del teléfono en una casa, operan por lo
general a niveles de energía mucho menores, y por lo tanto producen exposiciones de RF
muy por debajo de los límites de seguridad de la FCC.
4. ¿Cuáles son los resultados de la investigación ya realizada?
La investigación realizada ha producido resultados conflictivos, y muchos estudios han
sufrido por fallas en sus métodos de investigación. Los experimentos en animales que
investigan los efectos de exposición de energía de radiofrecuencia (RF) características de
los teléfonos inalámbricos han producido resultados conflictivos que a menudo no pueden
repetirse en otros laboratorios. Sin embargo, algunos estudios realizados en animales
sugieren que los niveles bajos de RF pueden acelerar el desarrollo de cáncer en animales de
laboratorio.
161
SEGURIDAD Y GARANTÍA
ACTUALIZACION AL
CONSUMIDOR DE LA FDA
Sin embargo, muchos de los estudios que muestran un incremento en el crecimiento
de tumores, utilizaron animales que habían sido genéticamente modificados o tratados
con químicos causantes de cáncer como para predisponer al desarrollo de cáncer en
ausencia de exposición a la RF. Otros estudios expusieron a los animales a RF por hasta
22 horas al día. Estas condiciones no son similares a las condiciones en las que la gente
utiliza los teléfonos inalámbricos, así que no sabemos con certeza el significado de lo
que estos estudios tienen para la salud humana. Se han publicado tres amplios estudios
epidemiológicos desde diciembre del 2000. Entre ellos, los estudios investigaron cualquier
posible asociación entre el uso de teléfonos inalámbricos y cáncer cerebral primario,
glioma meningioma, o neuroma acústico, tumores cerebrales o de las glándulas salivales,
leucemia, u otros canceres. Ninguno de los estudios demostraron la existencia de ningún
efecto dañino para la salud por la exposición de de RF de los teléfonos inalámbricos. Sin
embargo, ninguno de los estudios puede responder dudas sobre los efectos a largo plazo,
ya que el período promedio de uso del teléfono en estos estudios fue de tres años.
ACTUALIZACION AL
CONSUMIDOR DE LA FDA
SEGURIDAD Y GARANTÍA
Un resultado influyente de este trabajo ha sido el desarrollo de una agenda de
investigación detallada que ha dirigido el establecimiento de nuevos programas de
investigación alrededor del mundo. El proyecto también ha ayudado a desarrollar una
serie de documentos de información pública sobre asuntos de EMF. La FDA y la Asociación
de Telecomunicaciones Celulares e Internet (CTIA) tienen un Acuerdo de Investigación y
Desarrollo Cooperativo (CRADA) para investigar la seguridad inalámbrica. La FDA ofrece
la supervisión científica, obteniendo aportaciones de los expertos en organizaciones
gubernamentales, industriales y académicas. El estudio patrocinado por la CTIA es
conducido a través de contratistas de los investigadores independientes. La investigación
inicial incluirá tanto estudios de laboratorio como estudios de usuarios de teléfonos
inalámbricos. El CRADA también incluirá una amplia evaluación de lo que la investigación
adicional necesita en el contexto del desarrollo de investigación reciente alrededor del
mundo.
5. ¿Qué investigación se necesita para decidir si la exposición de RF de teléfonos
inalámbricos representa un riesgo de salud?
Una combinación de estudios de laboratorio y epidemiológicos en personas que
efectivamente utilizan teléfonos inalámbricos debe ofrecer algo de la información
necesaria. La exposición animal de por vida a la RF de teléfonos inalámbricos puede
completarse en unos pocos años. Sin embargo, se necesitarían grandes números de
animales para ofrecer una prueba confiable del efecto de promoción de cáncer, si es que
lo existe. Los estudios epidemiológicos pueden ofrecer datos que aplican directamente
a poblaciones humana, pero en 10 o más años, un seguimiento se hará necesario para
ofrecer respuestas sobre algunos repercusiones de salud, tales como el cáncer. Esto es
porque el intervalo entre el tiempo de exposición a un agente causante de cáncer y el
tiempo en que se desarrolla el tumor –en caso de que sea el caso- pueden pasar muchos,
muchos años. La interpretación de los estudios epidemiológicos está obstaculizada por
dificultades en la medición real de exposición a RF durante el uso diario de teléfonos
inalámbricos. Muchos factores afectan esta medición, tales como el ángulo en el cual el
teléfono se sostiene, o que modelo de teléfono se utiliza.
7. ¿Cómo puedo investigar a qué tanta energía de radiofrecuencia estoy
expuesto al utilizar mi teléfono inalámbrico?
Todos los teléfonos que se venden en los Estados Unidos deben cumplir con las normas
de la Comisión Federal de Comunicaciones (FFC) que limitan la exposición a la energía de
radiofrecuencia (RF). La FCC establece estas normas al consultar con la FDA y otras
agencias de salud y seguridad federales. El límite de la FCC de exposición a RF de
teléfonos inalámbricos está definido a una Tasa de Absorción Específica SAR de 1.6
vatios por kilogramo (1.6W/kg). El límite de la FCC es consistente con los estándares de
seguridad desarrollados por el Instituto de Ingeniería Eléctrica y Electrónica (IEEE) y el
Consejo Nacional de Protección y Medición de Radiación. La exposición límite toma en
consideración la habilidad del cuerpo para eliminar calor del tejido que absorbe energía
del teléfono inalámbrico y que está definida muy por debajo de los niveles conocidos que
puedan causar repercusiones. Los fabricantes de teléfonos inalámbricos deben reportar el
nivel de exposición de RF para cada modelo de teléfono a la FCC. El sitio Web de la FCC
(http://www.fcc. gov/oet/rfsafety) da indicaciones para localizar el número de
identificación en su teléfono para buscar el nivel de exposición de RF de su teléfono del
listado en línea.
6. ¿Qué esta haciendo la FDA para encontrar más información sobre los posibles
efectos salud del la RF de teléfonos inalámbricos?
La FDA está trabajando conjuntamente con al Programa Nacional de Toxicología de
los EEUU y con grupos de todo el mundo para asegurarse de que estudios de prioridad
animal se llevan a cabo para tratar preguntas importantes sobre los efectos de la
exposición a energía de radiofrecuencia (RF). La FDA ha sido un participante líder del
Proyecto de Campos Electromagnéticos de la Organización Mundial de Salud (EMF) desde
su inauguración en 1996.
8. ¿Qué ha hecho la FDA para medir la energía de radiofrecuencia proveniente
de teléfonos inalámbricos?
El Instituto de Ingeniería Eléctrica y Electrónica (IEEE) está desarrollando un estándar
técnico para medir la exposición de radiofrecuencia (RF) de teléfonos inalámbricos y
otros aparatos inalámbricos con la participación y liderazgo de científicos e ingenieros
de la FDA. El estándar de la “Práctica Recomendada para Determinar la Punta-Espacio
de la Tasa de Absorción Especifica (SAR) en el Cuerpo Humano por Dispositivos de
Comunicaciones Inalámbricos:
162
163
SEGURIDAD Y GARANTÍA
ACTUALIZACION AL
CONSUMIDOR DE LA FDA
Técnicas Experimentales,” pone enfrente la primera prueba consistente de metodología
para medir la tasa en la cual la RF se deposita en la cabeza de los usuarios de teléfono. El
método de prueba utiliza un modelo de tejido simulado de la cabeza humana. Se espera
que la prueba de metodología estandarizada de SAR mejore notablemente la consistencia
de las mediciones realizadas en diferentes laboratorios sobre el mismo teléfono. La TAE
es la medida de la cantidad de energía que absorbe el tejido, ya sea por todo el cuerpo o
sólo una parte del cuerpo. Se mide en vatios/kg (o millivatios/g) de materia. Esta medida
se utiliza para determinar si un teléfono inalámbrico cumple con las normas de seguridad.
9. ¿Qué precauciones se pueden tomar para reducir mi exposición a la energía
de radiofrecuencia de mi teléfono inalámbrico?
Si existe un riesgo proveniente de estos productos –y en este punto no sabemos que lo
haya- es probablemente muy pequeño. Pero si le preocupa el evitar aún riesgos
potenciales, usted puede tomar unos cuantos pasos sencillos para minimizar su exposición
a la energía de radiofrecuencia (RF). Ya que el tiempo es un factor clave en cuánta
exposición recibe una persona, el reducir el tiempo de uso del teléfono inalámbrico
reducirá la exposición a RF.
• Si usted debe conducir conversaciones extensas por teléfono inalámbrico todos los días,
puede usted poner más distancia entre su cuerpo y la fuente de RF, ya que nivel de
exposición baja dramáticamente con la distancia. Por ejemplo, puede utilizar una
diadema y cargar el teléfono inalámbrico lejos de su cuerpo o utilizar un teléfono
inalámbrico conectado a una antena remota. Una vez más, los datos científicos no
demuestran que los teléfonos inalámbricos son perjudiciales. Pero si le preocupa la
exposición de RF de estos productos, puede tomar medidas como las descritas
anteriormente para reducir su exposición a RF del uso del teléfono inalámbrico.
10. ¿Y qué pasa con los niños que utilizan teléfonos inalámbricos?
La evidencia científica no muestra un peligro a usuarios de teléfonos inalámbricos,
incluyendo a niños y adolescentes. Si quiere tomar precauciones para reducir la exposición
a la energía de radiofrecuencia (RF), las medidas descritas arriban también aplican a
niños y adolescentes que utilizan teléfonos inalámbricos. El reducir el tiempo de uso
del teléfono inalámbrico e incrementando la distancia entre el use y la fuente de RF
reducirá la exposición a RF. Algunos grupos patrocinados por otros gobiernos nacionales,
desalientan el uso de teléfonos inalámbricos del todo. Por ejemplo, el gobierno del Reino
Unido distribuye panfletos que contienen tal recomendación en diciembre del 2000. Ellos
observaron que no existe evidencia de que el uso de un teléfono inalámbrico sea la causa
de tumores cerebrales y otras causas de enfermedad. Su recomendación de limitar el uso
a niños fue estrictamente precautoria, no estaba basada en evidencia científica de que
existe algún peligro a la salud.
164
ACTUALIZACION AL
CONSUMIDOR DE LA FDA
SEGURIDAD Y GARANTÍA
11. ¿Qué hay acerca de la interferencia del teléfono inalámbrico con equipo
médico?
La energía de radiofrecuencia (RF) de teléfonos inalámbricos puede interactuar con
algunos dispositivos electrónicos. Por tal razón, la FDA ayudó a desarrollar un método
de prueba detallado para medir la interferencia electromagnética (EMI) en implantes
de marcapasos cardiacos y desfibriladores de teléfonos inalámbricos. Este método de
prueba es ahora parte de un estándar patrocinado por la Asociación del Avance de
Instrumentación Médica (AAMI). El borrador final, un esfuerzo conjunto con la FDA,
fabricantes de aparatos médicos y muchos otros grupos, se completó a finales del 2000.
Este estándar les permitirá a los fabricantes asegurarse que los pacientes cardiacos y los
desfibriladores estén a salvo de EMI del teléfono inalámbrico. La FDA ha probado
aparatos para la sordera y medir la interferencia de teléfonos inalámbricos portátiles y
ayudó a desarrollar un estándar voluntario patrocinado por el Instituto de Ingeniería
Eléctrica y Electrónica (IEEE). Este estándar especifica métodos de prueba y requerimientos
de desempeño de aparatos auditivos y de teléfonos inalámbricos de manera que no
ocasionen interferencia cuando una persona utiliza un teléfono o un aparato auditivo
“compatibles” al mismo tiempo. Este estándar fue aprobado por el (IEEE) en el 2000. La
FDA continúa monitoreando el uso de teléfonos inalámbricos por posibles interacciones
con otros dispositivos médicos. Si llegara ocurrir una interferencia perjudicial, la FDA
conducirá una investigación para evaluar la interferencia y trabajar sobre cómo resolver el
problema.
12. ¿Dónde puedo encontrar información adicional?
Para obtener información adicional, consulte los siguientes recursos:
• En la página Web de la FDA sobre teléfonos inalámbricos:
(http://www.fda.gov/cdrh/phones/index.html)
• En el Programa de Seguridad de RF de la Comisión Federal de Comunicaciones (FCC)
(http://www.fcc.gov/oet/rfsafety)
• En la Comisión Internacional de Protección contra Radiación No Iónica.:
(http://www.icnirp.de)
• En el Proyecto EMF Internacional de la Organización Mundial de la Salud
(http://www.who.int/emf)
• Junta Nacional de Protección Radiológica (UK):
(http://www.nrpb.org.uk/)
165
SEGURIDAD Y GARANTÍA
PARA EVITAR PERDIDA
POTENCIAL DE AUDICION
La exposición prolongada a sonidos altos (incluyendo música) es la causa más común de
la pérdida de audición pasible de prevención. Algunas investigaciones científicas sugieren
que la utilización de dispositivos portátiles de audio como por ejemplo, Music Players
portátiles y móviles, en altos volúmenes durante largos períodos de tiempo puede
conducir a la pérdida de audición permanente inducida por ruido. Esto incluye la
utilización de audífonos (incluyendo audífonos, audífonos de encaje auricular y
Bluetooth® u otros dispositivos inalámbricos). La exposición a sonidos muy altos también
fue asociada, en algunos estudios, a zumbidos (un sonido continuo de campanas en el
oído), hipersensibilidad al sonido y audición distorsionada. La susceptibilidad individual
a la pérdida de audición inducida por ruidos y otros problemas potenciales de audición
varía.
La cantidad de sonidos producidos por un dispositivo de audio portátil varía
dependiendo de la naturaleza del sonido, del dispositivo, de los ajustes del
dispositivo y de los audífonos. Deberá seguir algunas recomendaciones de sentido
común al utilizar cualquier dispositivo portátil de audio:
• Ajuste el volumen en un entorno silencioso y seleccione el volumen más bajo que
pueda oír satisfactoriamente.
• Cuando utilice los audífonos, gire el volumen hacia abajo si usted no puede oír
las personas hablando alrededor o si la persona sentada cerca suyo puede oír lo
que usted está oyendo.
• No suba el volumen para bloquear los ruidos alrededor. Si usted oye su dispositivo
portátil en un entorno ruidoso, utilice audífonos con cancelación de ruidos para
bloquear el ruido ambiental alrededor.
• Limite el período de tiempo de escucha. Según el volumen aumenta, menos
tiempo es necesario para que su audición pueda afectarse.
PARA EVITAR PERDIDA
POTENCIAL DE AUDICION
SEGURIDAD Y GARANTÍA
Puede obtener información adicional sobre este asunto junto a las
siguientes fuentes:
American Academy of Audiology
11730 Plaza American Drive, Suite 300
Reston, VA 20190
Voz: (800) 222-2336
E-mail: [email protected]
Internet: www.audiology.org
National Institute on Deafness and Other
Communication Disorders
National Institutes of Health
31 Center Drive, SC 2320
Bethesda, MD USA 20892-2320
Voz: (301) 496-7243
E-mail: [email protected]
Internet: http://www.nidcd.nih.gov/health/hearing
National Institute for Occupational Safety and Health
Hubert H. Humphrey Bldg.
200 Independence Ave., SW
Washington, DC 20201
Voz: 1-800-35-NIOSH (1-800-356-4674)
Internet: http://www.cdc.gov/niosh/topics/noise/default.html
• Evite utilizar los audífonos tras la exposición a ruidos extremamente fuertes
como por ejemplo, conciertos de rock, que pueden causar pérdida temporal de
audición. La pérdida de audición temporal puede causar volúmenes no seguros
para el sonido normal.
• No oiga a cualquier volumen que cause le cause incomodidad. Si oye zumbidos,
voces bajas o experimenta dificultades temporales de audición tras oír su
dispositivo de audio portátil, interrumpa el uso y consulte a un médico.
166
167
SEGURIDAD Y GARANTÍA
REQUISITOS DE INFORMACIÓN
DEL USUARIO CTIA
• No desarme ni abra, aplaste, doble o deforme, perfore o quiebre la unidad.
• No modifique o rearme, ni intente insertar objetos extraños en la batería, sumerja
o exponga la unidad en el agua u otros líquidos, ni exponga al fuego, explosión u
otros elementos peligrosos.
• Solamente utilice la batería en el sistema para el cual fue especificada.
• Solamente utilice la batería con un sistema de cargamento que haya sido calificado con el sistema, según su estándar. La utilización de una batería o cargador
no calificado puede presentar un riesgo de incendio, explosión, vaciamiento u
otros peligros.
• No aplique cortocircuito y una batería o permita que objetos conductores entren
en contacto con los terminales de la batería.
• Reemplace la batería solamente por otra batería calificada con el sistema, según
su estándar, IEEE-Std-1725-2006. La utilización de una batería no calificada puede
representar un riesgo de incendio, explosión, vaciamiento u otros riesgos.
• Deseche inmediatamente las baterías usadas, según los reglamentos locales.
• El uso de la batería por niños debe supervisarse.
• Evite dejar caer el teléfono o la batería. Si el teléfono o la batería se caen,
especialmente en una superficie rígida, y el usuario sospecha de daños, llévelo a la
Asistencia Técnica Autorizada para inspección.
• La utilización de una batería inadecuada puede resultar en incendio, explosión u
otros peligros.
168
GARANTÍA LIMITADA A
12 MESES
SEGURIDAD Y GARANTÍA
UTStarcom Personal Communications (la Compañía) garantiza al comprador original
de este teléfono celular portátil UTStarcom, que en el caso de que este producto
o cualquiera de sus partes durante el uso y condiciones normales del consumidor
probara ser defectuosa en material, mano de obra que resultara en mal
funcionamiento del producto durante los primeros doce (12) meses del periodo de
fecha de compra, tal(es) defecto(s) serán reparados o reemplazados según la opción
de la Compañía (con refacciones nuevas o reconstruidas) sin cargo de refacciones,
mano de obra directamente relacionados con los defecto(s).
La antena, teclado, visor, batería recargable y el cargador, si lo incluye, están
igualmente garantizados por doce (12) meses de la fecha de compra.
Esta garantía se extiende solamente para consumidores que adquieran el producto
en los Estados Unidos y Canadá y no es intransferible o asignable.
Esta garantía no aplica a:
(a) Si el producto ha sido sujeto a uso y condiciones anormales, accidentes, mal
manejo, descuido, alteraciones no autorizadas, mal uso, instalación inadecuada,
reparación o almacenamiento inapropiado.
(b) Producto cuyo número de serie mecánico o electrónico ha sido removido,
alterado o borrado.
(c) Daño por exposición a la humedad, temperaturas excesivas o condiciones medioambientales extremas;
(d) Daño resultante de la utilización o conexión de otros productos y accesorios no
autorizados por la compañía.
(e) Defectos en elementos cosméticos, decorativos, estructurales o de apariencia
tales como las cubiertas y partes no operativas.
(f) Producto dañado por causas externas como un incendio, inundación, suciedad,
arena, condiciones del clima, fuga de baterías, quema de fusible, robo o uso
inapropiado de cualquier fuente de electricidad.
La Compañía no asume responsabilidad en la remoción o reinstalación del producto
para cobertura geográfica, por recepción de señal inadecuada de la antena o por
rango de comunicaciones u operaciones del sistema celular como un todo.
169
SEGURIDAD Y GARANTÍA
GARANTÍA LIMITADA A
12 MESES
Cuando envíe su dispositivo inalámbrico a UTStarcom Personal Communications
para reparación o servicio, por favor observe que cualquier información personal
o software instalado en el dispositivo puede ser alterado o borrado inadvertidamente. Por lo tanto, recomendamos rotundamente que realice un respaldo de
toda la información y del software contenido en su dispositivo antes de enviarlo a
servicio o reparación. Esto incluye todas listas de contacto, descargas (aplicaciones
de software de terceros, tonos de timbre, juegos y gráficas) y cualquier otra información agregada a su dispositivo. Adicionalmente, si dispositivo inalámbrico utiliza
una tarjeta SIM o Multimedia, favor de remover la tarjeta antes de enviar el dispositivo y almacenar para uso posterior cuando se le regrese su dispositivo. UTStarcom
Personal Communications no se hace responsable ni garantiza la reinstauración
de software de terceros, información personal o datos de memoria contenidos,
almacenados o integrados con cualquier dispositivo inalámbrico, ya sea que esté
dentro de garantía o no cuando se regresa a UTStarcom Personal Communications
para reparación o servicio.
Para obtener reparaciones o reemplazo dentro de los términos de esta garantía, el
producto debe ser entregado con prueba de la cobertura de la Garantía con (ej., el
recibo fechado de venta), la dirección del consumidor remitente, número de teléfono y/o fax en horas y días hábiles y una descripción completa del problema, el envío
prepagado, en la Compañía a la dirección en la parte inferior o al lugar donde se
adquirió para realizar el proceso de reparación o reemplazo. Adicionalmente, para
dirigirse a una estación de servicio de Garantía en su área, puede llamar en los
Estados Unidos al (800) 229-1235, y en Canadá al (800) 465-9672 (en Ontario llame
al 416-695- 3060).
LA EXTENSION DE LA RESPONSABILIDAD DE LA COMPANIA DENTRO DE ESTA
GARANTÍA SE LIMITA A LA REPARACION O REPOSICION PROVISTAS Y EN NINGUNO
MOMENTO, DEBE LA RESPONSABILIDAD DE LA COMPANIA EXCEDER EL PRECIO DE
COMPRA POR EL PRODUCTO PAGADO POR EL COMPRADOR.
CUALQUIERA DE LAS GARANTÍAS IMPLICADAS, INCLUYENDO GARANTÍA DE
MERCABILIDAD O ADAPTACION CON UN PROPOSITO PARTICULAR, DEBE LIMITARSE
A LA DURACION DE ESTA GARANTÍA ESCRITA. CUALQUIER ACCION REFERENTE
AL INCUMPLIMIENTO DE ESTA GARANTÍA DEBE SER MENCIONADA DENTRO DE
UN PERIODO DE 18 MESES DE LA FECHA DE COMPRA ORIGINAL. DE NINGUNA
MANERA ES LA COMPANIA RESPONSABLE POR DANOS CONSECUENCIALES O
INCIDENTALES ESPECIALES POR EL INCUMPLIMIENTO DE ESTA U OTRA GARANTÍA,
EXPRESA O IMPLICITA. SIN EMBARGO.
170
GARANTÍA LIMITADA A
12 MESES
SEGURIDAD Y GARANTÍA
LA COMPANIA NO ES RESPONSABLE DE LA TARDANZA DE LA PROVISION DE
SERVICIOS BAJO ESTA GARANTÍA O LA PERDIDA DE USO DURANTE EL TIEMPO QUE
EL PRODUCTO ESTE EN REPARACION O ESTE SIENDO REEMPLAZADO.
Ninguna persona o representante está autorizado para asumir, de parte de la
Compañía, responsabilidad alguna más que la expresada aquí en conexión con la
venta de este producto.
Algunos estados o provincias no permiten limitaciones en relación a cuánto tiempo
dura una garantía implicada, o de cómo no aplican a usted las exclusiones o limitaciones de daño consecuencial o incidental de modo que la limitación anterior o
las exclusiones puede ser que no se apliquen a su persona. Esta garantía le ofrece a
usted derechos legales específicos y usted también puede tener otros derechos, que
varían de estado a estado o de provincia a provincia.
EN ESTADOS UNIDOS:
UTStarcom Personal Communications
555 Wireless Blvd.
Hauppauge, NY 11788
(800) 229-1235
EN CANADA:
UTStarcom Canada Company
5535 Eglinton Avenue West
Suite# 234
Toronto, ON M9C 5K5
(800)465-9672
171