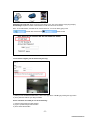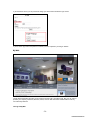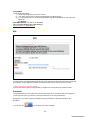
1
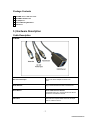
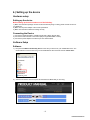
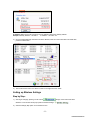
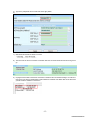
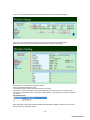
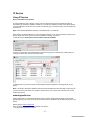
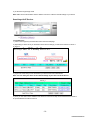
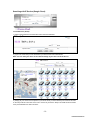
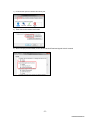
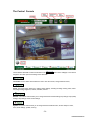
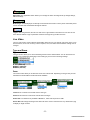
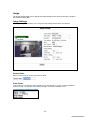
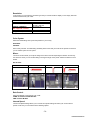
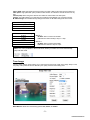
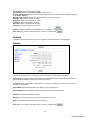
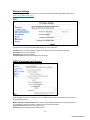
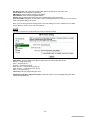
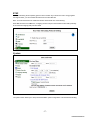
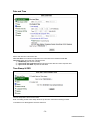
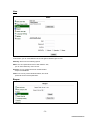
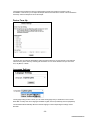
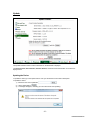
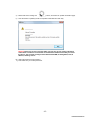
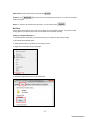
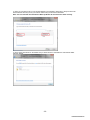
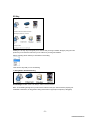
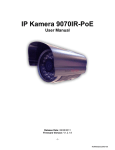
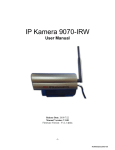
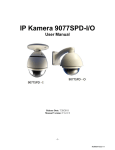
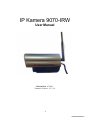
IP Kamera 9070-IRW
User Manual
Release Date: 8/2/2011
Firmware Version : V1.2.1.9
- 1Ref#90020326K0709
Warning: Any changes made to this equipment without permission may cause damages to the
device!
IMPORTANT NOTICE
1. IP Kamera 9070-IRW was designed for outdoor/ indoor.
2. Please use the power adapter provided by the dealer, the manufacturer is not responsibility for
the possible damage from using power adapters.
4. Do not shake the IP Kamera 9070-IRW in any fashion
5. Please contact the dealer If IP Kamera 9070-IRW is not working properly.
Copyright © 2011 All rights reserved. No part of this publication may be reproduced, stored in a
retrieval system, or transmitted in any form or by any means, electronic, mechanical,
photocopying, recording or otherwise, without the prior written consent of us.
All trademarks and products mentioned in this document are the properties of us.
- 2Ref#90020326K0709
Table of Content
1.) WELCOME ........................................................................................................................................... 5
INTRODUCTION .............................................................................................................................................. 5
MINIMUM SYSTEM REQUIREMENTS ................................................................................................................... 6
2.) PRODUCT OVERVIEW .......................................................................................................................... 6
FEATURES...................................................................................................................................................... 6
SPECIFICATION ............................................................................................................................................... 6
PACKAGE CONTENTS ....................................................................................................................................... 7
3.) HARDWARE DESCRIPTION................................................................................................................... 7
CABLE DESCRIPTION ........................................................................................................................................ 7
4.) SETTING UP THE DEVICE ...................................................................................................................... 8
HARDWARE SETUP .......................................................................................................................................... 8
Setting up the device Before setting up the device make sure of the following: .................................. 8
Connecting the Device........................................................................................................................... 8
SOFTWARE SETUP ........................................................................................................................................... 8
Software ................................................................................................................................................ 8
Installing VLC Codec .............................................................................................................................. 9
IP EDIT ......................................................................................................................................................... 9
Easy Setup (DHCP activated) ................................................................................................................. 9
Custom Setup (Manual Setup) ............................................................................................................ 10
SETTING UP WIRELESS SETTINGS ...................................................................................................................... 11
Step by Step: ....................................................................................................................................... 11
Advance Setup: ................................................................................................................................... 14
IP SERVICE .................................................................................................................................................. 17
Using IP Service ................................................................................................................................... 17
www.myipedit.com ............................................................................................................................. 17
5.) INTERNET ACCESS (PORT FORWARDING) .......................................................................................... 20
ROUTER / FIREWALL SETUP ............................................................................................................................ 20
Using a Router/Firewall to connect each device to the internet ......................................................... 20
STATIC IP SETUP ........................................................................................................................................... 21
Static IP Address provided by the ISP .................................................................................................. 21
6.) WEB INTERFACE ................................................................................................................................ 21
CONNECTING TO THE 9070-IRW .................................................................................................................... 21
THE CONTROL CONSOLE ................................................................................................................................ 24
LIVE VIDEO .................................................................................................................................................. 25
Type and Zoom Type: .......................................................................................................................... 25
Motion Detection ................................................................................................................................ 26
Active Record ...................................................................................................................................... 26
Snapshot ............................................................................................................................................. 26
Record ................................................................................................................................................. 27
Mouse EPTZ ......................................................................................................................................... 28
IMAGE ........................................................................................................................................................ 29
Image Settings .................................................................................................................................... 29
Tune Image ......................................................................................................................................... 31
NETWORK ................................................................................................................................................... 32
- 3Ref#90020326K0709
Network .............................................................................................................................................. 32
Wireless Settings ................................................................................................................................. 33
FTP ...................................................................................................................................................... 33
SMTP (Outgoing E-mail Server) ........................................................................................................... 33
SNTP .................................................................................................................................................... 34
IP Service ............................................................................................................................................. 35
DDNS ................................................................................................................................................... 36
RTSP .................................................................................................................................................... 37
SYSTEM ...................................................................................................................................................... 37
Date and Time ..................................................................................................................................... 38
Time Stamp & OSD .............................................................................................................................. 38
User ..................................................................................................................................................... 39
Beeper ................................................................................................................................................. 39
Device Tune Up ................................................................................................................................... 40
Language Settings ............................................................................................................................... 40
Update ................................................................................................................................................ 41
Event Log............................................................................................................................................. 43
APPLICATION ............................................................................................................................................... 43
Setting ................................................................................................................................................. 44
Schedule Record .................................................................................................................................. 57
Alarm................................................................................................................................................... 58
MEDIA PLAYER ............................................................................................................................................. 60
LOGOUT...................................................................................................................................................... 61
7.) CONTROLLING THE DEVICE................................................................................................................ 62
CGI HTTP COMMANDS ................................................................................................................................. 62
Snapshot Command: ........................................................................................................................... 62
Change Name:..................................................................................................................................... 62
Change IP Address:.............................................................................................................................. 62
Change Port: ....................................................................................................................................... 62
Change Subnet Mask: ......................................................................................................................... 62
Change Gateway: ................................................................................................................................ 63
Change DNS: ....................................................................................................................................... 63
MJPEG Streaming ................................................................................................................................ 63
8.) USING RTSP WITH VLC ...................................................................................................................... 63
9.) USING CNT WITH SURF16 CH ............................................................................................................ 66
MAC ADDRESS ............................................................................................................................................ 66
ADD DEVICE USING CNT ................................................................................................................................ 66
10.) FREQUENTLY ASKED QUESTIONS (F.A.Q)......................................................................................... 67
11.) CUSTOMER FEEDBACK .................................................................................................................... 68
- 4Ref#90020326K0709
1.) Welcome
Introduction
The IP Kamera 9070-IRW provides reliable, high quality solution to IP Kameras. Its distinctive 802.11N ,
720P HD quality picture, Tri-mode video capability, built in SD memory storage, RTSP broadcasting
capability, internal microphone and many more functions makes this small device very powerful and unique.
The built in web server of the IP Kamera 9070-IRW will allow the IP Kamera to be viewed from any remote
locations around the world while bringing ease of mind. Furthermore, with CNT technology the 9070-IR is
easy to setup & use, simply just plug and play.
- 5Ref#90020326K0709
Minimum System Requirements
CPU Minimum Requirements
•
•
•
•
•
•
•
•
•
Intel(R), Pentium(R), DUAL Core (D),CPU 3.0GHz or equivalent
Operating Systems: WINDOWS Operating Systems (IE5.0+SPI)
512 MB system memory or above
Video Card: 3D hardware accelerator card required – 100% DirectX 9.0c compatible
10/100 Ethernet switch/hub
Sound Card: DirectX 9.0c compatible sound card
Ethernet network port/card
Network cable
Internet (For remote access) or Ethernet Network (Internal Network use)
Software
•
•
VLC media player 0.8.6b or above.
Windows XP Service Pack 2 or above.
2.) Product Overview
Features
1. Tri-Mode Camera (MPG4-1/MPEG4-2/M-Jpeg)
2. Advance Motion detection trigger AVI /Jpeg save on FTP / SD card or Email
3. 3 layers (Admin, Operator, and User) Password protected
4. Resolution from CIF 352x192 up to HD 1280x720P
5. Supports NTP protocol to get correct time schedule.
6. 1/2.5” Advance CMOS sensor, with highly sensibility for quick response insufficient lighting.
7. Infrared for Indoor / Outdoor use
8. Water Resistant Design
9. Supports HTTP CGI command set. Easy for system integration
10. IP Service Search utility, to find the IP Kamera on internet with ease
11. Adjustable frame-rate, bit-rate, rate-control type, quality factor for best image quality and speed.
12. Supports date and time marking on the captured video, and also inserted streamed data.
13. Measured End-to-End latency is less than 150ms
14. Supports adjustable backlight, brightness, contrast, saturation & sharpness
15. TV Output capabilities
16. Automatic alarm recording buffer
17. CNT Technology – Just Plug and Play no need to port forward
18. EPTZ – Electronic Pan, Tilt, and Zoom
19. 2BG SD Memory Storage – Add convenience and storage
20. Scheduler recording capabilities
21. Email Capabilities (Supports Gmail, Yahoo, & Hotmail)
22. Alarm Recording Buffer
23. Supports: HTTP Web Server (HTTP), SSL, FTP client, SMTP client, NTP client, DHCP client,
UPnP client, RTSP over UDP, RTP
24. RSS Notification
25. Net drive Capabilities - For storage to local network computer
26. Time Stamp and OSD features
Specification
Casing: Reinforced Aluminum
Case Color: Midnight Grey
Weight with outer case: 743.0 g
Dimensions (W x L x H): 8.5cm x 13cm x 10cm
Dimensions with outer case (W x L x H): 8.6cm x 17.5cm x11cm
Operating Conditions: Temperature: 0-80°C Humidity 20 – 80% RH
Power: AC Adaptor Input: 100-250Vac /47-63Hz,
Output: 12Vdc/1A Max: 12W
- 6Ref#90020326K0709
Package Contents
9070IRW Unit x 1 with sun cover
9070IRW Installation CD
AC Adaptor x 1
Camera Mounting Bracket x 1
Antenna x 1
3.) Hardware Description
Cable Description
Cables:
DC 12 V Power Input:
Plugs in the Power Adapter to the DC 12V
Card
RJ45 Ethernet:
Plug in the RJ45 Ethernet cable to the Ethernet
Reset Button:
Reset to Manufacturer Default:
Hold Reset button for 5-10 Seconds and the device
will reset to manufacturer default.
Video Out:
The Video out requires a BNC connector to output
video to a different source.
- 7Ref#90020326K0709
4.) Setting up the device
Hardware setup
Setting up the device
Before setting up the device make sure of the following:
1.) Make sure that all the package contents are all included if anything is missing please contact the store or
your distributor.
2.) Make sure the power adaptor is the correct specification.
3.) Make sure that all the cables are working correctly
Connecting the Device
1.) Connect the IP Kamera 9070 to a HUB or Router with a RJ45 network cable.
2.) Connect the HUB or Router to the internet (May through ADSL/XDSL modem).
3.) Connect the power adapter to the DC 5V port of IP Kamera 9070.
Software Setup
Software
1.) First place the Media Link-IP Family CD that came with your device into your CD/DVD Rom drive. The
CD should auto run but if it does not go to the CD/DVD Rom drive and select the file “autorun.html”.
2.) Select the IP Kamera section and pick the IP Kamera and Model that you are using.
- 8Ref#90020326K0709
3.) Download the following software and save them to the appropriate locations.
a.
IP Edit - Device search tool which allows you to modify IP settings, find your on the local
network and IP Service.
b.
Surf 16 CH – 16 Channel DVR, Monitoring, & Recording Software. Views up to 16
channels on one screen.
c.
Surf Pop – Surf Pop is a new interactive IP Kamera monitoring software
4.) Once installation is complete please double click the IP Edit to configure and search for your device.
Installing VLC Codec
The files that are recorded by the 9070-IRW requires this codec so that you are able to view the view.
Download the latest version of the VLC codec and install it into your computer. You can find the latest
version of the codec from here
http://www.videolan.org/
H
IP Edit
IP Edit is a tool designed to search for Aviosys products that are on the network. With this tool you can edit
some specified fields which allow the device to be found and accessed.
IP Service allows users to find their device on the internet without having to remember long IP Addresses.
With IP Service all you need to simply remember the name of your device and search for it on IP Service.
For example, you can type “Jerry’s IP Cam and IP service will do the rest. It also acts like a DYNDNS server
in that if you have a dynamic IP Address IP service will continually update the new IP.
Easy Setup (DHCP activated)
1.) Check that the hardware has been properly connected and powered on.
Note: Please allow the IP Kamera 9070IRW 1 minute to load before using IP Edit.
2.) Double click the IP Edit icon to start the program. The 9070IRW will automatically receive an IP Address
from the DHCP server or Router. You will automatically find the device under the local device section of
IP Edit
- 9Ref#90020326K0709
3.) Simply double click on your device in the local device section and a internet explorer window will appear,
and start connecting to your device.
All devices will need to be on the same network if not the device cannot be accessed and will not be
detected.
Custom Setup (Manual Setup)
Note: If no DHCP is found on the device, the 9070IRW will be given a static IP Address.
Default IP: 192.168.1.168 (When 9070IRW is connected to PC directly)
Default Login: admin
Default Password: 12345678
1.) Highlight the 9070IRW device in the local devices section of IP Edit. On the right side of IP Edit all
network information of the device will be displayed.
Red Exclamation mark
network
will appear in the IP Network information section iff the device is not on the same
2.) To setup the device, you will need type in the correct Gateway and IP Address.
The Gateway Address: The gateway address can be obtained in Windows under the network
connections page
- 10Ref#90020326K0709
IP Address: Make sure the first 3 sections of the IP Address matches the gateway address.
Example: Gateway Address – 192.168.1.1
IP Address – 192.168.1.xxx
3.) Once the Default Gateway information has been obtained, enter the correct information into IP Edit then
press the submit button.
4.) Then hit the rescan button on IP Edit to confirm the changes have been made.
Setting up Wireless Settings
Step by Step:
1.) After log in web page, please go to the network
Wireless. A new window should pop up with the wireless settings
settings on the bottom and select
.
2.) Select the Step by Step option on the wireless screen.
- 11Ref#90020326K0709
3.) Click on the
for more information on how to setup the device.
4.) Pick the router that you are using, then hit the add profile button
- 12Ref#90020326K0709
5.) Type in the passphrase for the router and hit the apply button.
6.)
7.) Wait about 60 seconds for device to connect.
8.) Then check to see for the connection successful under the connection status and the device is good to
go.
9.) Unplug the RJ45 cable of the device and search on IPEdit for the new wireless settings. You will see a
(W) next to your device in IPEdit which means wireless is activated. If the RJ45 cable is not disconnect
you will see two IP Address on the device.
- 13Ref#90020326K0709
Advance Setup:
Click on the On Link under advance section
Click on the Site Survey Link then select the wireless internet network that you would like to connect to and
hit the add profile button to add a new profile
A new window pop and you will be required to enter the necessary network information including the
passphrase or password for the wireless internet.
- 14Ref#90020326K0709
Then hit apply to save all settings and wait about 60 seconds for device to connect.
Then go back to the Main Wireless page and click on the on link under Advance for more options.
Select the Profile link to see the profiles that you have added to the device.
- 15Ref#90020326K0709
Click on your newly added profile and hit the activate button to start up the Wireless settings.
Then click on Link Status to make sure that your device is connected to the wireless network.
Note: If the device is connected it will show some information in the Link Status page.
Now the device is connected to the wireless network.
Unplug the Ethernet cable to the device.
Then unplug the power cable to the device for about 15 seconds.
Then plug in the power to the device and give the device about 1 minute to start up. Then with IP Edit
search for the new wireless device. If the device is using wireless, you should see a (w) next to the name of
your device.
See example below:
Note: Remember to Port forward the device with the New Wireless IP Address so that you can connect to
the device from via outside the network.
- 16Ref#90020326K0709
IP Service
Using IP Service
How to use IP Service on IP Edit:
IP service allows the user to directly connect to his / her device through the internet without having to
remember long confusing IP Address. Instead you only need to remember the name of the device that the
you have selected. Then the user can connect to IP Service, type in the device name, and connect directly
to the device.
Note: The IP Kamera 9070IRW requires you to select Server 2 on IP Service
Open IP Edit , the device will show up in the Local Device Section. If you have not selected a name for the
device, please refer to the section on the manual labeled: “Naming your device”.
To start IP Service, Hit the green connect button on the top of IP Edit .
3.) Once you have been connected search for your device by typing in at least the first 3 letters that you
named your device with. Then hit the search button.
4.) Double click on your device and an Internet Explorer window will appear connecting directly to your
device.
Note: It is crucial to have the IP Address of the device port forwarded from the router that you are using so
you can connect to your device from anywhere. Please refer to your routers user manual on how to port
forward your device.
www.myipedit.com
www.myipedit.com is a new feature that allows Aviosys users to easily find there device on the internet .
Simply by typing in the name of your device you will not have to remember long IP addresses to get to your
device.
Start by going to www.myipedit.com
Here you will be able to select from 2 methods of IP Service
1.) IP Service through Aviosys servers
- 17Ref#90020326K0709
2.) IP Service through Google cloud
Note: Make sure that the enable IP Service feature is turned on under the network settings of your device.
Searching with IP Service:
To use IP Service:
1.) Click on the image and you will be taken to the IP Service webpage.
2.) Depending on which server you selected in the IP Service settings, you will need to select from server 1
or server 2.
3.) Type in the name that you have selected for your device and hit the submit button.
Note: You can name your device in the network settings of your device under IP Service.
4.) Then you can click on the IP Address of the device to connect to it. Keep in mind that the device needs to
be port forwarded to be able to access it.
- 18Ref#90020326K0709
Searching with IP Service (Google Cloud):
To use IP Service (Cloud):
1.) Click on the image and you will be taken to the IP Service webpage.
2.) Type in the name that you have selected for your device and hit the submit button.
Note: You can name your device in the network settings of your device under IP Service.
3.) Simply put your mouse over the picture of your device and if you have selected your location it will show
on the map in the left. Then click on the Icon to connect to your device. Keep in mind that the device needs
to be port forwarded to be able to access it.
- 19Ref#90020326K0709
5.) Internet Access (Port Forwarding)
The internet connection can be setup in two main ways so that the 9070IRW can be accessed through the
internet
Router / Firewall Setup
Using a Router/Firewall to connect each device to the internet
Note: The device needs to be port forwarded on the router so that it can be accessed by the internet.
For example
9070IRW IP Address: 192.168.1.882
9070IRW Port: 9070
On the router that is being used port forwarded (port triggered) IP Address 192.168.1.882 and port 9070. For
this section you may be required to refer the user manual for the router due to the fact that each router has a
different way of setting up the device.
- 20Ref#90020326K0709
Static IP Setup
Static IP Address provided by the ISP
In this case, the 9070IRW is being connected to the internet through a hub, which is different from
a router. The hub does not provide DHCP, and therefore would require that this setup have a
static IP Address that is provided by the ISP.
Contact the ISP to find out the static IP address so that your device can be accessed through the
internet. Once a Static IP has been assigned the device will be able to automatically go onto the
internet.
6.) Web Interface
Connecting to the 9070-IRW
Once the 9070-IRW has been setup correctly, connect to the login page.
An Internet Explorer browser screen pop up with the login screen.
Default IP: 192.168.1.168 (When 9070-IRW is connected to PC directly)
Default Login: Admin
Default Password: 12345678
- 21Ref#90020326K0709
1.) Once you have logged into the device you will be required to install active x controls.
2.) Right click on yellow bar and install the activeX controls.
3.) Then click the install button and install the active controls.
4.) Once active X controls have been installed the video feed will show on the screen
Note: If there is no active X controls that are showing up, please go to internet explorer and enable active X
controls.
- 22Ref#90020326K0709
1.) Under internet options in IE select the security tab.
2.) Then click on the custom level button
3.) Select Prompt (recommended) for the section labeled Download signed ActiveX controls
- 23Ref#90020326K0709
The Control Console
The IP Kamera 9070-IRW Control Console starts in the
navigate to the other options and settings of the 9070-IRW
Section of the webpage. In this section
Live Video: The Live Video section allows the user to view the camera, change resolution views,
Image: The Image section allows you to edit the image settings, including recording / viewing codec, frame
rate, image tuning, brightness, contrast, saturation, and etc.
Network: The network section allows you to change the devices network settings, ftp settings, smtp (email)
settings, sntp settings, and IP service settings.
System: The system section allows you to change the devices date and time, set time stamp for video,
users, audio settings, update, event log.
- 24Ref#90020326K0709
Application: The application section allows you to change the video recording format, ftp storage settings,
SD Card settings,
Media Player: The Media player can directly access the files in the built in memory. Each video file & picture
can be accessed here and streamed through the internet.
Logout: After using the 9070, the user can click on the Logout feature to ensure that no one else can see
the IP Kamera without a login or password. Please do not forget to log out after each use.
Live Video
The Live video section of the IP Kamera 9070-IRW is where the user can view the video of the device. From
here resolution, record onto current pc, take a snapshot, zoom, and detect motion detection settings can be
changed.
Type and Zoom
Type:
The type function allows you to set the streaming format for the IP Kamera 9070. You can select from the
following type of resolutions depending on the format type you have set in the image settings.
M-JPEG (640x 352)
MPEG4-1 (1280x720)
MPEG4-2 (352x192)
Zoom:
The zoom function allows you to select the screen size of the stream. Depending on the type that you have
selected there will be different zooms that will be available.
1X zoom: The 1X zoom is the normal view for each type.
2X zoom: This 2X zoom is 2 times the normal view for that type.
Scaled 720: Is a resolution only available in MPEG-4-1, which sets the picture at 720P.
Screen Size: Will enlarge the image to the whole size of the screen. This function is very useful when trying
to display on larger monitors.
- 25Ref#90020326K0709
Motion Detection
Motion Detection: The motion detection icon will display when motion has been detected. This setting must
be activated in the application section
Motion Inactive - When motion detection is inactive
Motion Activated - When motion detection is activated, the icon will turn blue
Active Record
Active Record: Active record will show up when the device is actively recording. Active recording functions
like motion detection, scheduler, or an alarm will set off this automatic recording.
Active Record Inactive - When active recording is not activated it will look like the picture below
Active Record Activated - When the active recording function is activated it will light up in red.
Snapshot
Snapshot: The snapshot function, creates a easy way take pictures of the current view in the IP Kamera
9070IRW.
To setup the snapshot destination folder:
1.) Click on the Application link on the bottom menu
2.) Then select Snapshot path
3.) In here browse for the location where snapshot pictures will be stored. By default the snapshot path
will be in C:\9070-IRW\
- 26Ref#90020326K0709
To use the snapshot function:
1.) Click on the snapshot button, and you will see the screen flicker black.
2.) In explorer go to the selected path and the files will be created there.
Record
Record: The record button on the 9070IRW when pressed will record the live video feed and save the video
into the computer viewing.
To record follow the following steps:
1.) Select the recording path that you would like to store the file under in the
snapshot path.
under
2.) Click on the record button to start recording
- 27Ref#90020326K0709
3.) Once the folder has been selected the device will start to record.
To stop recording click on the red icon and it will return to the original state.
Note: Remember you need VLC codec to play the video files that are recorded
Mouse EPTZ
Mouse EPTZ
On the live video screen move the mouse cursor to the video and click left or right click to use the Mouse
ETPZ functionality. Here you can easily Zoom in, Zoom Out, Quick Zoom, Quick Zoom Out.
The instructions will be displayed on the screen when the mouse if moved over the
icon.
To Zoom In: To Zoom into the picture move the mouse cursor over the picture and click and hold the left
mouse.
To Zoom Out: To Zoom out of the picture move the mouse cursor over the picture and click and hold the
right mouse.
Quick Zoom In: Quick zoom in is used to quickly zoom into the maximum zoom of the picture. To use this
function on the picture double click the left mouse.
Quick Zoom Out: Quick zoom out is used to quickly zoom into the maximum zoom of the picture. To use
this function on the picture double click the right mouse.
- 28Ref#90020326K0709
Image
The image section allows you to change the Image settings for the device and tune the image of
the IP Kamera 9070-IRW
Image Settings
The Image settings section allows you to change the video settings and the Name of the Kamera.
Camera Name:
Select a camera name for the device and then hit submit
Video Codec:
In this section you can select the codec formats that you want allowed on your live mode and available for
other functionality. The selected codec will affect the types of resolutions available as well.
- 29Ref#90020326K0709
Resolution:
In this section you can select the resolution type that you need to be able to display or use. Simply select the
resolution that best fits your needs
Resolution
(MPEG4+MPEG4+JPEG):
M4:720P,M4:CIF,JPG:352
(MPEG4+M-JPEG):
M4:VGA,JPEG:VGA
M4:720P, JPG:720
(MPEG4-1+MPEG4-2)
M4:720,M4:CIF
Not supported in Firefox:
(Single MPEG4):
M4:720
(Single MJPEG):
M4:720
Color System:
Select the broadcasting color system that pertains to your country.
NTSC/60Hz
PAL/50Hz
Each country has their TV broadcasting standard, please check with your local service provider to find out if
you us a NSTC system or PAL system.
Mirror:
The mirror function allows you to flip the image of the device around. Depending the direction and the way
the camera is mount you can use this setting to change the angle of the picture. Please see below for more
details.
Normal View:
Normal View
Horizontal View
Vertical
Both
Rate Control:
Select the Bit Rate Control that fits your needs.
CVBR: Constrained Variable Bit Rate
CBR: Constant Bit Rate
Internet Speed:
The Internet Speed settings allows you to choose some preset settings to best fit your current internet
speeds. From here you can select from the following options:
- 30Ref#90020326K0709
Cable / ADSL: Most high speed internet users today use Cable / ADSL as the main internet provider line.
Fiber Optics: High speed fiber optics provides the best solution for outside the network because it is very
fast.
Intranet (LAN): When using the IP Kamera from within the network this is the best option.
Custom: This setting allows you to manually input a setting for the Bit Rate, FPS, and picture quality.
M-JPEG Settings: The available Quality settings and FPS for the M-JPEG settings are shown below
M-JPEG Quality Settings
High
Medium
Low
M-JPEG Frame Rate Settings
30 FPS
15 FPS
MPEG4-1
Bit Rate: Select a value from 64~8000.
FPS: Select a FPS from 30fps, 15fps, or 7.5fps
7.5 FPS
3 FPS
1 FPS
MPEG4-2
Bit Rate: Select a value from 64~8000.
FPS: Select a FPS from 15fps or 7.5fps
Note: PTZ is only available in the mode below. When you enable PTZ it will automatically
jump into that mode.
Tune Image
The tune image settings section allows you to control and tune the picture quality of the image. Keep in mind,
the quality of the picture will also be affected by the quality of the lens that is being used.
White Balance: Select from the following options auto, indoor, or outdoor
- 31Ref#90020326K0709
Day and Night: Select the mode Day or Night
TV Output: Select the mode enable or disable to output to a T.V
Binning / Skipping mode: Binning enables low light-light performance. Select Binning, Skipping, 4x Binning
mode (default is Binning)
BLC (Backlight control): Select from one of the options on or off to control the
Backlight: Select a value between (0~100%)
Brightness: Select a value between (0~100%)
Contrast: Select a value between (0~100%)
Saturation: Select a value between (0~100%)
Sharpness: Select a value between (0~100%)
Default: To Return all values to normal default click on this button.
Note: Make sure you click on the Apply button to save any changes made
Network
The Network settings section allows the user to setup their network information for the IP Kamera.
Network
The network section allows you to setup the network information for the IP Kamera 9070-IRW.
Enable DHCP: This function will enable the DHCP for the 9070-IRW. If this is enabled the IP Address of the
device will be automatically provided by the router of the device.
IP Address: The IP Address will be displayed here. To change the IP Address of the device simply change
the values and hit submit.
Subnet Mask: Subnet Mask information. By default it is set to 255.255.255.0
Default Gateway: The default gateway address is the address to connect to the router.
DNS Server: Domain Name System Address
Http Port: Enter the port that you would like the 9070-IRW to connect on.
MAC: The Mac Address or physical address of the device
Note: Make sure you click on the Apply button to save any changes made
- 32Ref#90020326K0709
Wireless Settings
The wireless settings section will allow you to setup the wireless feature of the 9070-IRW. Please refer to
Setting up wireless settings page 11
FTP
The FTP section of the IP Kamera 9070-IRW allows you to save video clips
FTP Server: The FTP server address is where the IP Address of the FTP server will be entered.
User Name: Enter the FTP Username
Password: Enter the FTP Password
File Upload Path: Enter the upload path of the FTP Server
SMTP (Outgoing E-mail Server)
Enter the SMTP E-mail server information here. The SMTP section allows the 9070-IRW to send emails out
using the SMTP settings.
My Server Requires Authentication: Some servers require SMTP Authentication for security purposes. If
your email server requires this option, make sure to have this section checked.
Account Name: Enter then login of the mail account
Password: Enter the password of the E-mail account
- 33Ref#90020326K0709
Use SSL Connect: If the email server requires SSL (Secure Sockets Layer) this option need
Sender Email: Enter the Sender Email Address
SMTP Server: Enter the SMTP Outgoing mail address
Email Address: Enter the Receiving Email address
Submit: After all settings have been made. Hit the submit button to save all changes.
Send Test E-Mail: This button will send a test e-mail to the designated account. This way, you can check to
make sure that the settings are correct.
Note: If you are having problems sending emails out and the settings are correct. Please check your DNS
Server address to make sure you can send email out.
SNTP
The SNTP is a protocol for synchronizing the clocks of computer systems.
SNTP Server: Enter the SNTP server address. Below are a list of free public NTP servers.
Europe — europe.pool.ntp.org
Asia — asia.pool.ntp.org
Oceania — oceania.pool.ntp.org
North America — north-america.pool.ntp.org
South America — south-america.pool.ntp.org
Africa — africa.pool.ntp.org
Time Zone: Enter the corresponding time zone
Automatically adjust for daylight saving time: Check this section if you want daylight saving time to be
implemented automatically.
- 34Ref#90020326K0709
IP Service
IP service is a added service that provides you a platform so you do not remember a long IP Address. Just
enter the name of your device into IP Service and you can find your device.
Note: Port forwarding will be required on your router to connect to the device
In this section you can to turn off/on this service as well as select which server you would like your device
on. .
Note: IP Service is set to ON by default. To close this feature, uncheck the enable button.
IP Service Server:
There are 3 IP Service Servers that can be selected from:
Power and Video Server: This is the server where most IP Power products and IP Video server products can
be found.
Kamera Server: This is the IP server where most IP Kamera products from Aviosys will be found on.
CNT Server: Cross Network Technology Sever. CNT allows user to connect to their IP Kamera without
having to Port Forward to the device.
- 35Ref#90020326K0709
Camera Title: This is the name of the device.
Country: The country where the device is located.
City: The city where the device is located.
MAC: Physical address or MAC of the device.
GAE Start: Will setup the device load information to the Google cloud so that your device can be accessed
on the cloud. See the section on www.myipedit.com for more information.
CNT Sharing of Account and Password: Cross Network Technology allows for your device to be reached
without having to port forward. Here you can setup a guest CNT account which can be used in surf pop to
access your device. To turn off this feature simply just uncheck the CNT box.
Once you have setup IP Service you can connect to IP Service through software IP Edit Search tool or
through www.myIPEdit.com
Enable Share:
Check this feature to enable video sharing on guest accounts only. Make sure that the guest account has
already been created in the user section. Once this section has been made you can come here to verify that
Note: This function is for IP Surf Pop software.
Please refer to the IP Surf Pop manual for more information at www.Aviosys.com
DDNS
The DYNDNS feature allows you to use dyndns with the 9070-IRW. All you need to do is sign up with a free
account with www.dyndns.com and enter the appropriate information.
The update button will allow you to update the information.
DDNS Host Name: The name of the DNS address will be entered here.
DDNS Account: The login name you use for DYNDNS
DDNS Password: Password for the account.
Once the information has been entered hit the submit button to start using dyndns.
- 36Ref#90020326K0709
RTSP
Real Time Streaming Protocol (RTSP) gives the device another way to stream live video. Using programs
that support RTSP, you can broadcast the videos from the 9070-IRW live.
Note: To access the device from outside the network. Please make sure of the following:
9070-IRW should be set to DMZ host, or mapping router's TCP ports 554 and 8554 to 9070-IRW, preferably
at the same time mapping UDP port 6970-9999
System
The system section allows you to setup the IP 9070-IRW’s system configurations. This includes the following
- 37Ref#90020326K0709
Date and Time
Set the date and Time of the device here.
The Local Time: The local time corresponds to the current time of the IP Kamera 9070-IRW.
Time Setup: Setup the current time of the device here
1.) Set Manually: Set the time manually
2.) Synchronize with Computer Time: Synchronize the time with the current computers time
3.) Synchronize with SNTP: Synchronize with SNTP
Time Stamp & OSD
The time stamp adds a time to the live video.
When a recording is made a time stamp will show up with in the video file that is being recorded.
To enable the Time Stamp please check the enable box.
- 38Ref#90020326K0709
User
In this section, you can create different user access rights for different types of users.
Authority: Select one of the following options:
Admin: You can operate all functions in Web interface. Also,
you can add or delete any user’s account.
Operator: You can operate all functions in Web interface
except user Add/Delete.
Viewer: You can only monitor the Web interface, but cannot
operate all function and set parameters.
Beeper
- 39Ref#90020326K0709
The beeper function allows the device to make beeping sounds when network connection is lost or
unavailable. In this section you can adjust the beeper interval which will set the number of seconds between
each beep. Press the beeper test to test the beeper.
Device Tune Up
The device tune up resets the 9070-IRW to make sure that the device is running smoothly. This resets the
internal memory of the device by restarting the 9070-IRW. You can set the Device tune up to reset each
hour, day Month, or Week
Language Settings
The language setting section is where you can select the language that you would like to use to use the
9070-IRW. Currently there are 3 languages available: English, Chinese (Traditional), Chinese (Simplified).
The 9070-IRW will automatically detect the favored language of choice depending the settings used in
Windows.
- 40Ref#90020326K0709
Update
The Update Firmware section is where information on the 9070-IRW is displayed.
The Kernel Version, Uboot Version, Firmware Version, and other technical information on the device is
displayed here.
Updating the Device
To update the device go to the update section. Here you will find the Current Version description.
To update the device:
1.) Browse for the correct update file.
2.) Hit the update button.
3.) A message will appear, reminding you not to disconnect when updating.
- 41Ref#90020326K0709
4.) Please wait for the loading circle
to finish, and wait for an update confirmation page.
5.) Once the device is updated you will see a update confirmation and click okay.
Warning: Before you go to the next step make sure you have all your setting information
written down. The device will reset back to manufacturers default values after you restart
the device. You will need reconfigure the IP Kamera 9070-IRW, including Email, FTP, IP
Address, Gateway, and etc.
6.) Unplug the device then plug it back in.
Then make sure you re-setup the device.
7.)
- 42Ref#90020326K0709
Event Log
In the Events Log section you can find the log for the IP Camera. This section will notify you any events that
have taken place with the IP Kamera.
Application
The Application Section setups the Video File information, FTP, SD Card, SMTP
- 43Ref#90020326K0709
Setting
Snapshot Path
The snapshot path section allows you to configure where you would like your live snapshot and recording
files are stored on your local computer. Simply, click on the
folder to where you want to save the files.
button and choose a
PC Split File Size: Allows you to select the segment size of the files that will be recorded onto your
computer.
File Settings
The file settings page allows you to configure certain settings for files that are sent to E-mail, FTP, or SD
card.
- 44Ref#90020326K0709
File Configuration: Under this section you can select a prefix name for your recorded files. Here you can
also add a date stamp to your files by checking the box that says Add Date Stamp
File Format Settings: In this section you can select the file that type that you would like to record in.
Depending on the resolution and video codec selected you can choose from various format types.
Select the Video File format that the device will record in.
1.) Avi Format:MPEG4 (720) & MPEG4 (CIF)
2.) Avi Duration: From the drop-down list, select the length of an AVI file, then press submit
3.) Jpeg Format: The attached number of files is where you can select the number of pictures you would
like the device to take. FTP
The FTP application settings page, is where information on the device's FTP can be found. If not FTP
information was entered the section would be blank. By simply clicking on the
you to the page where the FTP information can be entered.
it will take
Note: Also make note that if the SD card is mounted to the device, the 9070-IRW will only be able to record
in M-Jpeg mode. The SD card can be unmounted in the SD card section by clicking on
- 45Ref#90020326K0709
SD Card
The SD card section is where settings to setup the SD card recording is located. In this section you can
configure
Enable Auto Overwrite: Auto Overwrite allows the device to automatically replace the oldest file on the SD
card when it is full.
Split Filename Type: Allows you to sort the file into two different methods.
section is selected the 9070-IRW will sort the
Name by Time: If add date stamp in the
device by time.
Name by Index: If add date stamp is not selected, the 9070-IRW will sort by Index.
File Format: Here is where the file format for the recordings can e selected.
Split File Size: Select the size of each file that will be saved into the SD.
You can select from:
10mb, 25mb, 50mb, 100mb, 200mb, 512mb, 1024mb
- 46Ref#90020326K0709
SD Format: SD format will format the entire SD card
Unmount: The
unless remounted.
feature will unmount the SD card from the device, so it cannot be accessed
Reset: To mount the SD card back onto the device, you can use the button
Net Drive
The net drive function allows you to save your recordings to a local network computer. This provides a extra
storage place for pictures and videos from motion detection and schedule recording.
Setting up Computer (Windows 7)
To use the Net Drive functionality you will need to setup your computer to allow network sharing.
To do that follow the following steps:
1.) Select the drive that you would like to use to store your files.
2.) Right click on the folder and go to properties.
3.) Select the sharing tab and click on the share button.
- 47Ref#90020326K0709
4.) Here you can select a user in your windows OS that you would like to share with or Everyone which will
share this drive with everyone on your network. Select everyone and hit the add button.
Note: The user selected must have Read / Write capabilities for this function to work correctly.
5.) Then hit the share button on the bottom and you should receive a confirmation to show that the folder
has been shared.
- 48Ref#90020326K0709
6.) Click the done button and it will take you back to the folders properties. Under the sharing tab you will
find a section that says network path. Copy that information and put it into the 9070-IRW webpage in the net
drive section.
Setting up Net Drive
After the computer has been setup. Now you will need to setup the net drive in the 9070-IRW
1.) For the login and password since we have selected everyone as the sharing user, simply type in any
login or password.
In the case where you have selected a specific user to use here you will need to use the login and password
of the specified user.
Under the connect mode, you can select from Format 1(SMBFS) or Format2(CIFS) depending on your
computers setup. Hit the submit button when finished.
2.) Next under Net Drive status click on the Connect button to make sure that the net drive has been setup
correctly. When the Net Drive is connected successfully it will say Connect OK
In this section you will find a button to disconnect the Net Drive as well as restart the net drive.
- 49Ref#90020326K0709
3.) Now select the split size to select how big you want the files to be. Then hit the submit button and the
net drive will start to work.
E-mail SMTP
The SMTP application settings is where the file format uploaded by email can be selected. From here you
can choose the files to be in either Jpeg (picture) format or Mpeg.
Note: To use the device in Mpeg format make sure to unmount the SD card of the device first.
- 50Ref#90020326K0709
EZ-Blog
EZ Blog is a an easy way to integrate your IP camera with your blog or website. Simply by using the code
produced you can have live video from your IP camera on your blog and websites.
Start by selecting which method you would like to use EZ blog.
There are two ways that you can use EZ blog.
1.) Using OCX to broadcast EZ blog
Advantages of using OCX: Instant Response
Disadvantages: Router needs to be setup in order to use this method.
Note: To use EZ blog through OCX you will need to make sure that your device has been properly port
forwarded. Furthermore, the blog platform being used needs to support java script like (i.e. Blogspot)
- 51Ref#90020326K0709
User List: The user list shows the available users you can use to setup EZ Blog. We highly recommend to
use guest accounts and if a guest account is needed you can easily do so by accessing the
menu.
Once the user is selected, now you can easily create the embed code:
1.) Type in the password for the selected user.
2.) Select the dimensions you would like the image to be
3.) Select the create code button to create the embed code
4.) Press the copy button to copy the code that you would like to use. You can highlight the embed
code from inside the box and then copying (ctrl + C) or you can just hit the copy button to copy the
code.
5.) Once the code has been copied, place that code somewhere in the body of your blog or website
and a video will be displayed on the screen.
2.) EZ blog through CNT
- 52Ref#90020326K0709
Advantages of using CNT: Does not require router setup to use. Can cross network, simply plug and play.
Disadvantage: Requires constant communication to make sure device is connected.
Note: To use CNT feature, the GAE server must be turned on. You can do this by going to the
network tab, and click on the
IP Service link
To use CNT to integrate your IP camera with your blog:
1.) After you have enabled the GAE feature, click on the copy button of EZ Blog by pressing the copy button.
2.) Then paste the code into your blog or website.
If user verification is needed you can do the following:
1.) Check in the box that says start verified.
2.) Type in a preferred login and username.
3.) Then hit the submit button.
- 53Ref#90020326K0709
4.) On the bottom where you can preview the image you will see that it will show a login screen.
5.) Then hit the copy button and paste the code that you have copied into your blog or website.
My Web
The My-Web functionality will make your IP Kamera more than just a surveillance tool. Now you can use it to
promote your company, restaurant, business, school, and etc. With some basic website skills or tools any
can make a My Web site.
Turning On My Web
- 54Ref#90020326K0709
Enable my web button:
The enable My Web button will activate the My Web functionality. Once enabled every time the device is
accessed it will be set to the My Web Page.
Login Required:
The login required will require your My Web users to login to the device before being able to use it. This is a
way to keep unwanted viewers from entering the My Web
How to use my WEB
1. Download sample.
2. Save the zip file to the location .
Press browse, and select the zip file you download.
3.
4. Press upload and send the zip file to 9070-IRW web.
5. Confirm setting .
*** If familiar with webpage langrage, you can change the webpage in zip file to your own webpage. ***
Setting up My Web
To setup My Web you can download the My Web file from the 9070-IRW.
1.) Click on the Download Default Page.
2.) Save the Zip file to a location where you can edit it
3.) Extract the file functions.js
4.) Start creating a My Web and be sure to include the functions.js into your code. (Note: Do not
include folders within the webpage.
5.) After you have created the webpage, make sure to create a Zip file. Zip up the file and
Returning to default My Web page
If you would like to return your 9070-IRW to the default My Web page click the default My Web Page button.
This will reset the current My Web to the original manufacturer default.
- 55Ref#90020326K0709
Using My Web
To use the My Web feature:
1.) Use IP Edit and directly log into the IP camera.
2.) The device will open the root page of the 9070-IRW to the My Web page.
3.) If you would like to return to the normal administrator page for the 9070-IRW you can login to the
admin site.
For Example:
9070-IRW IP Address: 192.168.12.111 Port:8080
Then on the web browser type in the following
http://192.168.12.111:8080/index.htm
RSS
The RSS feature of the 9070-IRW will allow the user to be constantly informed about the device. Using RSS
any snapshot, motion detection, scheduled recording will notify the user and can also be accessed
***Notice: User need to register in DDNS ***
In the Dyndns section, type in the Dyndns that you register from www.dyndns.com and add a /rss20.
Guestbook
The guestbook feature is new feature to IP camera which allows the you to interact with other people who
you have gave access to your device. Currently this feature is just for surf pop interaction
Simply type in your name, email and message then hit the post button to send the message on the
guestbook.
IF you click on the
you can see the log of the messages.
- 56Ref#90020326K0709
Schedule Record
Schedule
The schedule allows you to select days and times that you would like to schedule automatic recording. You
can pick a day from (Sunday – Saturday) and also a option for Everyday.
To schedule automatic recording:
1.) Select the day that you would want to start recording.
2.) Select the From time and the To time.
3.) Once the schedule has been created hit the submit button to apply the new settings.
- 57Ref#90020326K0709
Schedule Recording
Schedule Record allows you to select where the schedule will record the video files to.
Schedule Record – Upload Via FTP: Saves schedule recordings into FTP
Schedule Record – Save into SD Card: Saves schedule recordings into SD Card
Schedule Record – Upload via E-mail SMTP: schedule recordings into e-mail
Alarm
Motion Detection
To enable motion detection:
1.) Select Enable in the motion detection option.
- 58Ref#90020326K0709
2.) The Mode: Can be set for indoors or outdoors. Indoors will have a more sensitive motion detection
setting while outdoor will be less sensitive.
3.) Select the sensitivity of your choice
a. You can pick from Lowest, Low, Medium, High, Highest
b. You can also customize your own threshold from (1-99)
4.) Once you have set your settings on the window screen click on the picture where you want the
motion to be detected. Double click on the selected areas to remove the choice.
5.) You can right click on the window screen for more options
6.) Once your settings have been set hit the submit button to save all changes.
Enable Alarm
- 59Ref#90020326K0709
Enable Alarm – Lost Ethernet Connection: Save into
SD Card:
When Ethernet connection is lost the device will automatically save into the SD card. Saving a backup.
FTP
Enable Alarm - Upload
When motion is detected, the IP Kamera 9070-IRW will upload files to the selected FTP server.
SD Card
Enable Alarm - Save Into
When motion is detected, the IP Kamera 9070-IRW will upload files to the SD card.
Enable Alarm – Save
When motion is detected, the IP Kamera 9070-IRW will upload files onto the Network Drive
Enable Alarm – Save
SMTP
When motion is detected, the IP Kamera 9070-IRW will send files to E-mail.
Recording Time: Set the duration of time you would like the IP Kamera 9070-IRW to record when alarm is
set off.
Enable Alarm Recording Buffer: The alarm recording buffer allows the camera to the selected amount of
buffer time before an alarm has been detected. This allows the IP Kamera 9070-IRW to start recording
before and after motion has been detected.
You can select the amount of buffer time you would like the 9070-IRW to save for these pre-recorded videos.
Media Player
- 60Ref#90020326K0709
The media player allows you to view your recordings on the SD card directly through the internet without
requiring downloading the file first. This feature makes it very convenient for live streaming.
View in Full Screen
To view the IP Kamera in full screen model you will need to press the Full Screen mode.
Logout
When you are done use the IP Kamera 9070IRW the logout function allows you to easily logout of your
device. This ensures that anyone who uses the device after you will need to re-login to the IP Kamera.
Simply just click on the logout button on the bottom corner.
- 61Ref#90020326K0709
7.) Controlling the Device
CGI HTTP Commands
Http commands allow you to control the device with commands. The basic commands are provided below.
There are two ways to input http commands with authorization required
Password in http:
http://login:password@ipaddress:port/command
Password not in http:
http://ipaddress:port/command
Note: If you use the password not in http: command you will need to enter it when the browser asks
for the password.
Snapshot Command:
The snapshot command takes a snapshot of the camera in the current view.
http://ipaddress:port/snapshot.cgi
Ex. http command:
http://192.168.100.50:85/snapshot.cgi
Change Name:
This command allows you to change the name of the IP Kamera 9070-IRW
http://ipaddress:port/vb.htm?cameratitle=name
Ex. http command:
http://192.168.1.192/vb.htm?cameratitle=test_907011
Change IP Address:
This command allows you to change the IP Address of the IP Kamera 9070-IRW
http://ipaddress:port/vb.htm?internetip=ipaddress
Ex. http command:
http://192.168.1.192/vb.htm?internetip=192.168.1.191
Change Port:
This command allows you to change the Port of the IP Kamera 9070-IRW
http://ipaddress:port/vb.htm?httpport=portnumber
Ex. http command:
http://192.168.1.192/vb.htm?httpport=1025
Change Subnet Mask:
This command allows you to change the Subnet Mask of the IP Kamera 9070-IRW
- 62Ref#90020326K0709
http://ipaddress:port/vb.htm?subnetmask=subnetmask
Ex. http command
http://192.168.1.192/vb.htm?subnetmask=255.255.0.0
Note: Default subnet mask is 255.255.0.0
Change Gateway:
This command allows you to change the gateway the IP Kamera 9070-IRW.
http://ipaddress:port/vb.htm?gateway=gatewayaddress
Ex. http command
http://192.168.1.192/vb.htm?gateway=192.168.1.1
Change DNS:
This command allows you to change the gateway the IP Kamera 9070-IRW.
http://ipaddress:port/vb.htm?dnsip=dnsipaddress
Ex. http command
http://192.168.1.192/vb.htm?dnsip=168.95.1.1
MJPEG Streaming
This command allows you to integrate streaming data into a software, website, or any other application.
http://ipaddress:port/ipcam/mjpeg.cgi
Ex. http command
http://192.168.1.192/ipcam/mjpeg.cgi
8.) Using RTSP with VLC
Before Setting up VLC: Make sure that the 9070-IRW is set to be the DMZ host on the router that you are
using, please refer to the routers manual on how to accomplish this.
How to setup VLC media player & Open a network stream
Real Time Streaming Protocol (RTSP) gives the device another way to stream live video. Using programs
that support RTSP, you can broadcast the videos from the 9070 live.
Note: To access the device from outside the network. Please make sure of the following:
9070-IRW should be set to DMZ host,
or mapping router's TCP ports 554 and 8554 to 9070-IRW, preferably at the same time mapping UDP
port 6970-9999
1.) Open VLC media Player
2.) Click on Tools > Preference
- 63Ref#90020326K0709
3.) On the bottom of the screen click the Reset preference button.
4.) On the bottom left hand side of VLC select the all under the show settings area.
5.) Then in the left panel select Input / Codecs > Demuxers > RTP/RTSPl and type in the RTSP user
name and RTSP password.
6.) Check the Cache value. For low latency, it should be 70~80 based on PC’s performance.
Note: If the video is not smooth, set the caching value from 150~1200. This problem could be due to too
much congestion, busy pc, and etc.
7.) Save the new settings
8.) Then go back to the VLC media player and go to Media > Advance Open File
9.) Next select the network tab and under the protocol select RTSP.
- 64Ref#90020326K0709
10.) Type in the RTSP address of your device
For Mpeg4 Stream1 : rtsp://<IP Address>/mpeg4
For Mpeg4 Stream2 : rtsp://<IP Address>:8554/mpeg4
Example: rtsp://122.116.137.123/mpeg4
11.) Hit the play button and wait a few seconds for the program to start streaming.
- 65Ref#90020326K0709
9.) Using CNT with Surf16 CH
CNT makes connecting to the IP Kamera 9070-IRW a very simple task. Using Surf 16 CH and multi device
DVR monitoring software, you can easily view your 9070-IRW.
Follow these simple steps:
MAC Address
There are two ways to find the MAC address in IP Edit .
*Note: IP Server must be enabled on your device’s webpage. By default IP Server is enabled.
Find MAC Address in LAN Using IP Edit
1.) In IP Edit , highlight the device that you are using. On the right side of IP Edit you will find the MAC
Address that you will need to use CNT.
*Note: Make sure when you are typing in the MAC address to leave out the “:”
Find MAC Address in WAN Using IPService on IP Edit
1.) To find your MAC Address through the internet, Open IP Edit and hit the connect button on IP
Service.
2.) Then Type in the name of your device in this case it is “Sample Name”, then hit the search button.
3.) Your device should be listed and the MAC address should be displayed on the screen. Copy down
the MAC address and use it to connect via CNT.
Add device using CNT
1.) On Surf 16 Ch DVR software, right click on the screen on one of the windows and select Add
Camera
2.) Then under the section labeled MAC: Type in the MAC address.
- 66Ref#90020326K0709
3.) Do not forget to enter the password and login.
10.) Frequently Asked Questions (F.A.Q)
For More updated FAQ please visit the FAQ section of website at:
http://sites.google.com/site/aviosysfaq/
Q1: Why can’t I view the video files that I have recorded, nothing is playing?
Ans: VLC Codec, you can download VLC Codec from their website at:
Q2: How do I reset the device to manufacturers default values
Ans: On the back of the device there is a reset button, hold down the reset button for more than 7 seconds.
Then give the 9070-IRW a 1 minute to restart. Once the device has restarted it will be set back to
manufacturer default settings.
Default Values
Default IP: 192.168.1.168 (When 9070-IRW is connected to PC directly)
Default Login: admin
Default Password: 12345678
Q3: Why does the device on EPTZ change my video mode?
Ans: When EPTZ is activated Video Codec mode will be switched to MPEG4 & M-Jpeg when disabled the
codec will be set on Mpeg1, Mpeg2, & M-Jpeg.
Q4: How do I take snapshots using the EPTZ function?
Ans: When using EPTZ function remember that only the snapshot functions works with the EPTZ controller.
If you are just using the mouse to Pan Tilt and Zoom into your picture you the snapshot button will not
capture the screen correctly. A way you can take a picture of the screen using the EPTZ with the mouse is
to click on the print screen button on your computer.
Q5: Why is the RTSP not connecting to my VLC player or Quick time Player?
Ans: To use the RTSP functionality it is necessary to first set your 9070-IRW to be the DMZ host in your
network. Also be sure to port forward your device at the following ports.
Port 554 for 1280 x 720P
Port 8554 for CIF format
Please refer to the routers manual on how this is setup
Q6: How do I improve the image quality on this device?
Ans: The Image quality of the 9070-IRW is dependent on the bit rate of the device. With a larger bit rate the
device will naturally create higher quality image, but this will affect the smoothness of the streaming when
accessed through the internet. To find the most optimal settings for image quality and streaming
smoothness, try different bit rate settings to achieve the best fit settings. .
- 67Ref#90020326K0709
11.) Customer Feedback
Your Feedback is definitely important for us to continue providing the great quality products and service that
Aviosys has to offer. We definitely would like to know what you think about our products and how we can we
can make your Aviosys experience even better.
Please email us at our service department at [email protected] or visit customer feedback form at:
http://spreadsheets.google.com/viewform?hl=en&formkey=dGowalg3UndrdTJHNUIxdlljQXI3Q2c6MA..#gid=
0
We are happy to serve you to the best of our ability and to provide an ongoing positive experience with
Aviosys. Thank you for your support.
- 68Ref#90020326K0709