1
Important Safety
When using your video equipment, basic safety precautions should always be followed, including the following:
1. Read and understand all instructions before using.
2. Position the cord so that it will not be tripped over, pulled,
or contact hot surfaces.
3. If an extension cord is necessary, a cord with a current rating
at least equal to that of the appliance should be used. Cords
rated for less amperage than the appliance may overheat.
4. To reduce the risk of electric shock, do not disassemble this
appliance. Contact an authorized service dealer when repair
work is required. Incorrect reassembly can cause electric
shock when the appliance is used subsequently.
5. The use of an accessory attachment not recommended
by the manufacturer may cause a risk of fire, electric shock,
or injury to persons.
Save These Instructions
Mounting The Frame
Professional mounting techniques should be adhered to. Da-Lite Screen Company cannot be liable for substandard
or faulty installations.
Frame Assembly
Unpacking and Unrolling the Screen
Assembly of the screen should be in a clean environment.
The viewing side of the screen surface is rolled to the inside.
The screen surface is rolled lengthwise.
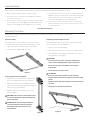
1. Connect the four frame pieces by matching the colored
tapes on the ends of the frame pieces. See Figure 1.
2. Secure with the supplied 5/16" setscrews.
1. Remove screen from packaging.
2. On a clean floor, unroll the screen surface viewing side up.
3. Allow the paper to unroll between backside of the screen
surface and floor. See Figure 3.
CAUTION:
• Be careful not to touch or scratch the viewing side
of the surface with fingernails and any sharp tools.
• Do not use any tools to fasten the screen surface
to the frame.
• Do not fold or crease the screen.
Figure 1
ATTENTION:
• Prenez soin de ne pas toucher ou rayer la face de
projection de l'écran avec les ongles ou tout autre objet
pointu.
Positioning the Frame on the Wall
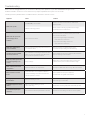
1. Without the screen fabric attached, position the
frame on the wall at the location you desired.
• N'utilisez aucun outil pour attacher la surface de l'écran
au cadre.
2. Make sure the unit is level and plumb. (You may
need to use shims between the brackets and the
wall to achieve vertical plumb.)
• Ne pliez pas ou ne froissez pas l'écran
3. Mark the position of the bracket holes on the
wall. See Figure 2.
CAUTION: If the screen is not mounted so that
it is level and plumb, horizontal masking may
jam on retraction.
ATTENTION: Si l'écran n'est pas installé de
sorte qu'il soit droit et plat, le masquage
horizontal risque de se coincer lors de
l'enroulement.
Figure 2
2
Figure 3