1
Mounting The Frame
Electrical Wiring
Attaching the Screen Surface to Frame
Electrical wiring is required for each mask roller motor. The
vertical masking systems have one motor at the frame top.
Horizontal masking systems have one motor at the frame top
and one at the bottom.
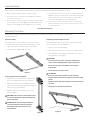
1. Place the frame over the screen surface.
2. While lifting the frame with one hand, snap the screen surface
onto the frame. Gently allow the screen to stretch onto snaps.
See Figure 4. Attach the snaps on the top corners and top
horizontal first, lift the frame to a vertical position to finish
attaching the rest of the snaps.
A motor requires standard 120V/220V input. All connections are
made to the electrical box on the audience left side of the unit.
Horizontal
Mask
Connection
Vertical Mask
Connection
Figure 4
Horizontal
Mask
Connection
Tensioning the Bottom Masking Panel
1. Carefully remove all tape strips securing surfaces around
rollers. Slats should move freely. See Figure 5.
2. Locate the spring tension cables on either side of the unit.
Figure 6
3. Connect the eye snap to the eyelet on the bottom masking
panel bar. See Figure 5. You will need to pull the cable slightly.
4. Repeat for the other side.
Surface
Slat
Tape Strip
Spring Tension Cable
Eye
Snap
Eyelet
Slat
Figure 5
3