1
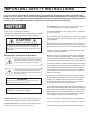
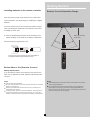
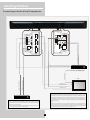
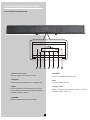
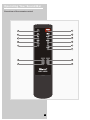
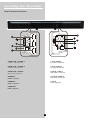
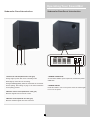
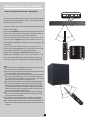
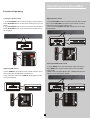
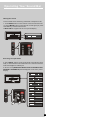
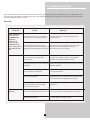
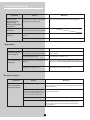
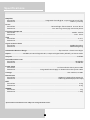
WSB11 Professional Sound Bar
User's Manual
IMPORTANT SAFETY INSTRUCTIONS
Your sound bar is designed and manufactured to operate within defined design limits, and misuse may
result in electric shock or fire. To prevent your Sound Bar from being damaged,the following rules should
be observed for its installation,use,and maintenance.Please read the following safety instructions before
operating your Sound Bar. Keep these instructions in a safe place for future reference.
NOTICE! !
Thank you for purchasing our product.
To assure the finest performance, please read this manual
carefully. Keep it in a safe place for future reference.
CAUTION
RISK OF SHOCK
CAUTION: To reduce the risk of electric shock, do
not remove cover (or back). No user-serviceable
parts inside. Only refer servicing to qualified service
personnel.
Explanation of Graphical Symbols
The lightning flash & arrowhead symbol,
within an equilateral triangle, is intended
to alert you to the presence of danger.
The exclamation point within an equilateral triangle is intended to alert you to the
presence of important operating and servicing instructions.
WARNING
To reduce the risk of fire or electric shock, do not
expose this unit to rain or moisture.
Voltage:
Voltages are 100-240V AC,50/60Hz.
1. Read Instructions - All the safety and operating instructions should be read before the soundbar is operated.
3. Heed Warnings - All warnings on the sound bar and in
the operating instructions should be adhered to.
4 . Follow Instructions - All operating and use instructions
should be followed.
5 .To reduce the risk of electric shock or component damage,
switch off the power before connecting other components to
your Sound Bar.
6. Unplug the power cord before cleaning your sound bar. A
damp cloth is sufficient for cleaning.Do not use a liquid or a
spray cleaner on your sound bar.Do not use abrasive cleaner.
7. Always use the accessories recommended by the manufacturer to insure compatibility.
8.When moving your sound bar from an area of low temperature to an area of high temperature, condensation may
form in the housing.Wait before turning on your sound bar
to avoid causing fire,electric shock, or component damage.
7. Slots and openings in the back and bottom of the cabinet
are provided for ventilation. To ensure reliable operation of
your sound bar and to protect it from overheating, be sure
these openings are not blocked or covered. Do not place
your sound bar in a bookcase or cabinet unless proper ventilation is provided.
8. A distance of at least 3 feet should be maintained between your sound bar and any heat source,such as a radiator,
heater,oven, amplifier etc.Do not install your sound bar
close to smoke.Operating your sound bar close to smoke
or moisture may cause fire or electric shock.
9. Your sound bar AC/DC Adapters are equipped with a threepronged grounded plug(a plug with a third grounding pin).
This plug will fit only into a grounded power outlet. This is a
safety feature.If your outlet does not accommodate the threepronged, have an electrician install the correct outlet,or
use an adapter to ground your sound bar safely.
10. Do not defeat the safety purpose of the grounded plug.
11. Protect the power cord from being walked on or pinched.
2. Retain Instructions - The safety and operating instructions should be retained for future reference.
12. Never push any object into the slots and openings on
IMPORTANT SAFETY INSTRUCTIONS
Your sound bar enclosure. Do not place any objects on the
top of your sound bar. Doing so could short circuit parts
causing a fire or electric shock. Never spill liquids on your
sound bar.
13. Your sound bar should be operated only from the type
of power source indicated on the label on the AC/DC Adapters. If you are not sure of the type of power supplied to
your home, consult your dealer or local power company.
14. Only power of the marked voltage can be used for your
sound bar. Any other voltage than the specified voltage
may cause fire or electric shock
15.The power cord must be replaced when using different
voltage than the voltage specified. For more information,
contact your dealer.
15.When connected to a power outlet, power is always
flowing into your sound bar. To totally disconnect power,
unplug the power cord.
qualified service personnel.
23. Keep your sound bar away from moisture.Do not expose your sound bar to rain or moisture. If water penetrates
into your sound bar, unplug the power cord and contact
your dealer. Continuous use in this case may result in fire
or electric shock.
24. Do not use your sound bar if any abnormality occurs. If
any smoke or odor becomes apparent, unplug the power
cord and contact your dealer immediately. Do not try to repair your sound bar yourself.
25. Avoid using dropped or damaged appliances. If your
sound bar is dropped and the housing is damaged, the internal components may function abnormally. Unplug the
power cord immediately and contact your dealer for repair.
Continued use of your sound bar may cause fire or electric
shock.
15.Do not overload power strips and extension cords.
Overloading can result in fire or electric shock.
26. Do not install your sound bar in an area with heavy dust
or high humidity.Operating your sound bar in environments
with heavy dust or high humidity may cause fire or electric
shock.
18.The wall socket should be located near your sound bar
and be easily accessible.
27. Ensure that the power cord and any other cables are unplugged before moving your sound bar.
19.Do not touch the power cord during lightning. To avoid
electric shock, avoid handling the power cord during electrical storms.
28. When unplugging your sound bar, hold the power plug,
not the cord. Pulling on the power cord may damage the
wires inside the cord and cause fire or electric shock.When
your sound bar will not be used for an extended period of
time, unplug the power cord.
20. Use only with the cart, stand, tripod,
bracket, or table specified by the manufacturer, or sold with the sound bar.
When a cart is used, use caution when
moving the cart/apparatus combination
to avoid injury from tip-over.
21. Unplug your sound bar during a lightning storm or when
it will not be used for long periods of time.This will protect
your sound bar from damage due to power surges.
22.Refer all servicing to qualified service personnel. Servicing is required when the apparatus has been damaged in
any way, such as power-supply cord or plug damage, liquid
has been spilled or objects have fallen into the apparatus,
the apparatus has been exposed to rain or moisture, or the
apparatus does not operate normally or has been dropped.
22. Do not attempt to repair or service sound bar yourself.
Opening or removing the front cover may expose you to
high voltages, electric shock, and other hazards. If repair
is required, contact your dealer and refer all servicing to
29. To reduce risk of electric shock, do not touch the connector with wet hands.
30 . Insert the remote control battery in accordance with instructions. Incorrect polarity may cause the battery to leak
which can damage the remote control or injure the operator.
31 . If any of the following occurs, contact the dealer:
The power cord fails or frays.
Liquid sprays or any object drops into your sound bar.
Sound bar is exposed to rain or other moisture.
Sound bar is dropped or damaged in any way.
The performance of your sound bar changes substantially. .
Table of Contents
TImportant Safety Instructions
2
Table of Contents
4
Getting Started
5
Features
Opening the Package
Installing batteries in the remote control
Notes About the Remote Control
Remote control operation range
Connecting to Audio-Visual Components
5
6
7
7
7
8
Operating Your Sound Bar
9
Front Panel introduction
Overview of the Remote Control
Remote Control Function
Rear Panel Introduction
Subwoofer Panel Introduction
Subwoofer Rear Panel Introduction
Connecting the wireless subwoofer
Functions Operating
Turning the power on/off
Adjusting SW volume
Adjusting the volume
Turning the SRS mode on/off
Muting the sound
Selecting the input mode
9
10
11
12
13
13
14
15
15
15
15
15
16
16
Troubleshooting
17
General
Subwoofer
Remote Control
17
18
18
Specifications
19
4
Getting Started
Features
100w Power Amplifier
HDMI
Total 100 watts power(20Wx2+60W) for powerful sound.
20WX2 for sound bar, 60W for subwoofer.
Enjoy high defi nition performance from HDMI (High Defi nition Multimedia Interface) devices such as Blu-ray Disc players, digital receivers, game consoles etc.
Active Speaker System
Wireless Subwoofer
This unit features an Active Speaker System that provides
high sound quality in a single slim unit.This unit does not
require any satellite loudspeakers or speaker cabling, which
are normally associated with conventional surround sound
systems.
Wintal ' s wireless module does away with cables running
between the main unit and the subwoofer.Instead, the
subwoofer connects to a compact wireless module that
communicates with the main unit.
Dolby Digital
Touch Button
This is the standard audio signal format used on DVDs and
other purely digital media.This surround technology delivers
high-quality digital audio of up to 5.1 discrete channels to
produce a directional and more realistic effect.
Touch sensitive capacitive front panel buttons.
Ergonomic optical switches require no physical pressure
to operate, eliminating the hand stress that can lead to
repetitive-motion injuries.
R
Manufactured under license from Dolby Laboratories.
HDMI,and HDMI logo and High-Definition Multimedia Interface
"Dolby", and the double-D symbol are trademarks of Dolby
are trademarks or registered trademarks of HDMI licensing LLC.
Laboratories.
5
Getting Started
Opening the Package
Your Sound Bar,Subwoofer and their accompanying accessories are carefully packed in two carton that has been designed to
protect it from transportation damage. Once you have opened the carton, check that your Sound Bar is in good condition and
that all of the contents are included.
IMPORTANT: Save the carton and packing material for future shipping.
Sound bar main unit
Warranty Card
AA,LR6,UM-3 batteries
AA,LR6,UM-3 battery
AA,LR6,UM-3 battery
Adapter(with power cord)
One User's Manual
One Remote Control
User's Manual
Wireless Subwoofer(in the subwoofer box)
6
Power cord (in the subwoofer box)
Getting Started
Installing batteries in the remote controller
Remote Control Operation Range
Since the remote control will be used for many of this unit's
control operations, you should begin by installing the supplied
batteries.
1.Turn the remote control over and open the battery compartment py pressing the release tab in the direction of the arrow
and lifting the cover open.
2. Insert the batteries(AA,LR6,UM-3 TYPE) according to the
Within approximately
polarity markings on the inside of the battery compartment.
6m(19.7feet)
30
3.Close the battery compartment cover.
30
This remote control must use non chargable or
chargable alkaline type batteries only.
Notes About the Remote Control
Battery Replacement
If you find that the remote control must be used closer to the
main unit, the batteries are weak. Replace both batteries with
new ones.
Notes
Notes
The area between the remote control and the main unit must be
clear of large obstacles.
Do not expose the remote control sensor to strong lighting,in
particular an inverter type fluorescent lamp.Otherwise,the
remote control may not work properly. If necessary, position the
main unit away from direct lighting.
Use AA,LR6,UM-3 batteries.
Be sure the polarities are correct.(See the illustration inside the
battery compartment.)
Remove the batteries if the remote control is not used for an
extended period of time.
If batteries leak, dispose of them immediately. Avoid touching
the leaked material and contact with clothing, etc. Clean the
battery compartment thoroughly before installing new batteries.
7
Getting Started
AUDIO OUT(DVD PLAYER or BLUE RAY DVD PLAYER)
Connecting to Audio-Visual Components
HDMI OUT (DVD PLAYER or BLUE RAY DVD PLAYER)
COAXIAL OUT (DVD PLAYER or BLUE RAY DVD PLAYER)
OPTICAL OUT(CD PLAYER)
COAXIAL OUT(CDPLAYER)
To VIDEO OUT(TV)
DVD Player or
blue ray DVD player
TV
To HDMI IN (TV)
To AUDIO OUT (TV)
To HDMI OUT (TV)
If you have a Blue ray DVD player,DVD player or CD player with a digital output, you can make use of an
optical digital connecting cord(not supplied) or coaxial digital connecting cord (not supplied) to carry the
audio portion of the signal and enjoy Dolby Digital sound quality. One optical or coaxial cable is needed
for each Blue ray DVD player, DVD player or CD player.This sound bar provides one optical and two coaxial digital inputs for the connection of your components. Please connect your components(e.g. Blue
CD Player
ray DVD player, DVD player or CD player) to the appropriate digital inputs and press the INPUT button to
If your CD player is equipped with digital optical jacks, the use of optical cable is preferred.
match your connection.
What you need is just one more optical digital connecting cord(not supplied). Plug it in the
Note:
digital input jack of the sound bar and select OPTICAL.You can enjoy better sound quality
HDMI can carry audio and video signal, But optical and coaxial cables carry only the audio portion of the
brought to you by the optical cable.
signal. A video connection must also be established for an Blue ray DVD player and DVD player. Compo-
Note: This sound bar has one digital optical jack only. Be sure that this connection does
site video (yellow RCA connector) can also be used. It is important that the same type of cable (composi-
not prevent optical cable connection of other components.
te) that is connected from Blue ray DVD player and DVD player to the TV .
8
Operating Your Sound Bar
Front Panel Introduction
1
2
3
4
5
6
7
1.Remote control sensor
5.VOLUME +
Receives signals from the remote control.
Press to turn the sound bar volume up.
2.STANDBY
6.SRS
Press to turn your sound Bar on or standby mode.
Press to turn SRS on or off.
3.INPUT
7.Display window
Press repeatedly to step through the input sources
Displays a variety of information.(e.g. Sound bar volume,
in the following sequence:DVD,TV,OPTIC,COAXIAL1,
Subwoofer volume, source etc.)
COAXIAL 2,HDMI 1,HDMI 2.
4.VOLUME Press to turn the sound bar volume down.
9
Operating Your Sound Bar
Overview of the remote control
1
8
2
9
3
10
4
11
5
12
13
6
14
7
15
10
Operating Your Sound Bar
Remote Control Function
1.DVD
14.VOLUME +
Select DVD audio input source.
Press to turn the sound bar volume up.
2. TV
7.VOLUME -
Select TV audio input source.
Press to turn the sound bar volume down.
3. OPT
Select Optical audio input source.
4. HDMI 1
Select an HDMI 1 audio input source.
5. HDMI 2
Select an HDMI 2 audio input source.
6. SUB VOL +
Press to turn the subwoofer volume up.
7.SUB VOL Press to turn the subwoofer volume down.
8.POWER
Press to turn your Sound Bar on or standby mode.
9. MUTE
Press this button to mute the sound. Press again to restore the
audio to the previous volume level.
10.COAX1
Select Coaxial 1 audio input source.
11. COAX2
Select Coaxial 2 audio input source.
12. SRS
Press to turn SRS on or off.
13. Trigger
Press this button to pair (or link) to your Sound Bar. Your
sound Bar and subwoofer are not paired from the factory.
11
Operating Your Sound Bar
Rear Panel Introduction
1.DIGITAL IN - COAXIAL 1
7.TV IN , AUDIO L
Coaxial 1 audio input jack.
TV AUDIO L input jack.
2.DIGITAL IN - COAXIAL 2
8.TV IN , AUDIO R
Coaxial 2 audio input jack.
TV AUDIO R input jack.
3.DIGITAL IN - OPTICAL
9.DVD IN , AUDIO L
Optical audio input jack.
DVD AUDIO L input jack.
4.HDMI IN 1
HDMI 1 input jack.
10.DVD IN , AUDIO R
5.HDMI IN 2
HDMI 2 input jack.
11. DC IN .
DVD AUDIO R input jack.
Power supply jack.
6.HDMI OUT
HDMI output jack.
12
Operating Your Sound Bar
Subwoofer Rear Panel Introduction
Subwoofer Panel Introduction
WSB11 Subwoofer
1
2
3
1
2
1.Power/Link indicator(behind the cloth grill)
1.POWER CONNECTOR
Orange light up when this unit is in standby mode.
AC 100-240V 50/60Hz power input inlet, Connect the power
Green light up when this unit is working.
cable here.
Orange is blinking quickly when the subwoofer the sound bar
and are pairing. See Pairing on page 14 for more information
2.POWER SWITCH
on the pairing process.
Press this switch to turn on the power. Press the switch again
to turn off the power.
2.Remote control sensor(behind the cloth grill)
Receives signals from the remote control.
3.Wireless antenna(behind the cloth grill)
Receives wireless signals from the sound bar.
13
Operating Your Sound Bar
Connecting the wireless subwoofer
The Subwoofer's linking ID is not preset at the factory,So the
sound bar and subwoofer must be link. Please set the ID by
following the process below:
1.Plug the power codes of the sound bar and subwoofer into
the AC power supply.
2.Press the STANDBY button(on the panel of the sound bar)
to turn on the sound bar.Press the power switch(on the rear
panel of the subwoofer) to turn on the subwoofer.
30
30
3.The remote control aim at the r emote control sensor of the
sound bar, press Trigger button on the remote control for 2
seconds. SyQc:subwoof is displayed on the the display of the
sound bar.
4.The remote control aim at the r emote control sensor of
Subwoofer, press Trigger button on the remote control until
to the LINK indicator ( Orange LED) blinks quickly.
5.After 30 seconds,SyQc:subwoofer disappears on the
display of the sound bar, green light on the subwoofer. The
sound bar and the subwoofer are now linked (connected).
Notes
Before moving or installing the product, be sure to turn off
the power and disconnect the power cord.
If the sound bar is powered off, the wireless subwoofer will
be in the standby mode after 15 minutes.
If you use a device such as a wireless LAN Card,microwave
oven, Bluetooth equipment, or any other device that uses
the same frequency (2.4GHz) near the system,some sound
interruption may be heard due to interference.
The transmission distance of the wireless signal between
the main unit and sub is about 32 feet, but may vary depending on your operating environment. If a steel-concrete
or metallic wall is between main unit and the wireless subwoofer, the system may not operate at all, because the wireless signal cannot penetrate metal.
If the main unit doesn't make wireless connection, follow
steps 1-4 above to retry the connection between the main
unit and wireless subwoofer.
The wireless receiving antenna is built into the wireless
subwoofer. Keep the unit away from water and moisture.
For optimal listening performance,make sure that the area
around the wireless subwoofer location is clear of any obstructions.
14
30
6.You can enjoy better sound from the wireless subwoofer.
30
Operating Your Sound Bar
Functions Operating
Turning the power on/off
Adjusting the volume
1. Touch STANDBY button on the front panel of sound bar.or
Press STANDBY button on the remote control to turn on the
power.
2. Touch STANDBY button on the front panel of sound bar.or
Press STANDBY button on the remote control again to turn
off the power.
1.Touch VOLUME+/- buttons on the front panel of the sound
bar.or Press VOLUME +/- buttons on the remote control to
increase or decrease the volume level.
2.The volume level(Music Vol 20) will appears in the front
panel display.
Turning the SRS mode on/off
1. Touch SRS button on the front panel of the sound bar.or
Press SRS button on the remote control to turn the SRS
mode on/off.
2.SRS mode state (SRS Mode:OFF or SRS Mode:ON) will
appears in the front panel display.
Adjusting SW volume
1.Press SUB VOL +/- buttons on the remote control to increase or decrease the subwoofer volume level.
2.The subwoofer volume level(SW Vol +01) appears in the
front panel display.
15
Operating Your Sound Bar
Muting the sound
This is useful when answering a doorbell or telephone call.
1. Press MUTE button on the remote control to mute the sound. Press MUTE button on the remote control again (or press
VOLUME+/-) to restore the sound.
2.Mute:ON will appears in the front panel display.
Selecting the input mode
1.Touch INPUT button on the front panel of sound bar repeatedly .or Press direct source buttons on the remote control to
select the Digital or Audio input.
2.Source name(DVD IN/TV IN/OPTIC IN/ COAX1IN/COAX2
IN/HDMI 1 IN/HDMI 2 IN) selected appear in the front panel
display.
16
Troubleshooting
Refer to the chart below If this unit does not function properly. If the problem you are experiencing is not listed below or if
the instruction below does not help,set this unit to the standby mode,disconnect the power cord, and contact the nearest
authorised dealer or service centre.
General
Problem
This unit fails to
turn on when
STANDBY/ON
button is
pressed, or
enters in the
standby mode
soon after power
has been turned
on.
Cause
Remedy
The power cord is not connected or
the plug is not completely inserted.
Connect the power cord plug firmly into the
power socket.
This unit has been exposed to a
Set this unit in the standby mode. disconnect
strong external electric shock(such as the power cord, plug it back in after 30
lightning and strong static electricity.) seconds, then use it normally.
No sound.
Incorrect input or output cable
connections.
Connect the cables properly. If the problem
persists, the cables may be defective.
No appropriate input source has been Select an appropriate input source with the input
selected.
selector buttons.
The sound suddenly
goes off.
The volume is turned down.
Turn up the volume.
The sound is muted.
Press MUTE or any operation buttons of this unit
to cancel the mute and adjust the volume.
The input signals this unit is receiving
from a source such as CD-ROM
cannot be reproduced.
Play a source with signals that this unit can
reproduce.
The sleep timer has turned the unit off.
Turn on the power, and play the source again.
The sound is muted.
Press MUTE to cancel a mute.
17
Troubleshooting
Problem
Cause
Remedy
There is noise
interference from
digital or highfrequency equipment,
or this unit.
This unit is too close to the digital or
high-frequency equipment.
Move this unit further away from this equipment.
The picture is
disturbed.
The video source uses scrambled or
encoded signals to prevent dubbing.
No picture to
monitor,
Video signal is not inputed in correct
source.
Change the cable
Video cable is faulty
Change a connecting cable.
Subwoofer
Problem
Power/Link indicator
does not light up
NO sound from the
subwoofer.
Remedy
Cause
The power cord is not connected or
the plug is not completely inserted.
Connect the power cord plug firmly into the
power socket.
The power switch is off
Turn the power switch to on
Tthe sound bar and subwoofer are not Link the sound bar and the Subwoofer.See Pairing
linked.
on page 14 ' Cconnecting the wireless subwoofer'
Adjusting the subwoofer volume
Subwoofer volume is 00
Remote Control
Problem
The remote control
does not work nor
function properly.
Remedy
Cause
Wrong distance angle.
The remote control will function within a maximum range
of 6 m(20 feet) and no more than 30 degrees offaxis from
the front panel.
Direct sunlight or lighting (from
an inverter type of fluorescent
Reposition this unit.
lamp, etc.) is striking the remote control sensor of this unit.
The batteries are weak.
Replace all batteries.
No batteries installed.
Install the batteries before attempting to operate the
remote. Be sure to match the + and - ends of each
battery to the symbols shown in the remote battery
compartment.
18
Specifications
Amplifier
Sound Bar ............................................................ Integrated Class D @ 22 x 2 per channel w/1% THD
Subwoofer.............................................................................................................. 60W x 1(4 Ohms)
Driver
Sound Bar ....................................................................... Left and Right: Each channel one2.5" driver
Subwoofer.......................................................................... One 6.5' long throw (high excursion) driver
Frequency Response
Sound Bar..................................................................................................................200Hz - 20KHz
Subwoofer..................................................................................................................... 35Hz - 200Hz
THD
Sound Bar .............................................................................................................................0.07%
Subwoofer............................................................................................................................... 0.1%
Signal to Noise Ratio
Sound Bar .............................................................................................................8 0dB A Weighting
Subwoofer.............................................................................................................8 0dB A Weighting
Subwoofer Wireless Range................................................................Up to 32 feet - Clear Line of Sight
Inputs ........................2xHDMI,2xCoaxial Digital Audio,1x Optical Digital Audio (S/PDIF),2x Stereo Audio
Outputs .................................................................................................................................1xHDMI
Sound Pressure Level
Sound Bar ...................................................................................... ................................100 dB SPL
Subwoofer........................................................................................................................ 95 dB SPL
Power Input
Sound Bar .................................................................................... AC Power Brick with 6' power cable
Subwoofer.................................................. Integrated Power Supply on Subwoofer with 6' power cable
Voltage............................................................................................................... 100-240VAC, 50-60H
Dimensions
Sound Bar......................................................................................1000mm(L)x65mm(D)x105mm(H)
Subwoofer......................................................................................290mm(w)x290mm(D)x375mm(H)
NET
Sound Bar ............................................................................................................................. 2.5kg
Subwoofer.............................................................................................................................. 6.7kg
GROSS
Sound Bar ................................................................................................................................ 4kg
Subwoofer..............................................................................................................................7.8Kg
Specifications and features are subject to change without notice.
19
WSB11
Professional Sound Bar