1
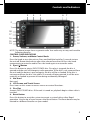
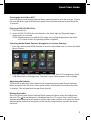
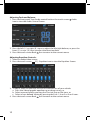
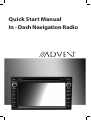
Quick Start Manual
In - Dash Navigation Radio
Introduction
Congratulations on your purchase of the In-Dash Navigation Radio. Please read
the instruction manual for this product before using. The documentation provided
will allow you to fully enjoy all the features this unit has to offer. Please save this
manual for future reference.
iPod® Control “iPod” is a trademark of Apple Computer, Inc., registered in the
U.S. and other countries. Expanding Systems iPodVTR etc. Expanding audio
features Expanding visual features.
Bluetooth® is a trade mark of Bluetooth Special Interest Group (SIG) Inc.
WARNING!
Never install this unit where
operation and viewing could interfere
with safe driving conditions.
WARNING!
To reduce the risk of a traffic accident
(except when using for rear view video
camera) never use the video display
function while driving the vehicle.
This is a violation of federal law.
WARNING!
To prevent injury from shock or
fire, never expose this unit to
moisture or water.
2
WARNING!
Never disassemble the unit.
WARNING!
Never use irregular discs.
WARNING!
To prevent damage to the mechanism
inside this unit, avoid impact
to the unit’s monitor.
WARNING!
Using an improper fuse may cause
damage to the unit and result in a fire.
Features
General
• B
luetooth - Bluetooth hands-free profile for safety / convenience
and A2DP profile for streaming music from a PDA / PMP
• Built-in navigation
• Composite video outputs for additional screens
• Audio /Video auxiliary input
• Rotary encoder audio control
• Nine-Band EQ with three preset and three user-defined EQ curves
• Subwoofer control
• Rear camera input
DVD
• Aspect ratio - 16 : 9 or 4 : 3
• Fast forward, fast reverse
• Play, pause, stop, next chapter, and previous chapter
CD / MP3 / WMA
• Direct track access
• Forward / Reverse track search
• Random, repeat, and intro
• Play, pause, stop, next track, and previous track
AM-FM
• Station presets (12 FM, 6 AM, 18 XM)
• Auto stereo/mono
• Seek and scan
3
Satellite Radio Ready
• Compatible with XM Tuner (sold separately)
• Satellite channel name, artist, song and categories displayed
on monitor
iPod/iPhone
• Access iPod/iPhone playlists, artists, albums, songs, and video (requires video
iPod), and shows album art
• Power management charges iPod/iPhone while connected
Media
• USB - Supports most hard drives and flash memory drives
• 3.5 mm audio/video input
Navigation
• The mobile multimedia receiver provides turn-by-turn guidance with
a large map and points-of-interest database.
Rear Camera
• The in-dash navigation radio is “camera ready.”
4
Controls and Indicators
3
4
5
6 7
2
1
18
17
16
15
14
8
9
10
11
12
13
NOTE: The above image shows a generic radio. Your radio may or may not have the
following features.
CONTROLS AND INDICATORS
1. Power, Volume, and Mute Control Knob
Press the knob to turn the unit on. Press and hold the knob for 2 seconds to turn
the unit off. Rotate the knob to adjust the volume from 0 to 60. Press the knob
momentarity to mute the audio. Press the knob again to restore the audio.
2. Eject ( ) Button
Press this button to eject a DVD/CD/MP3 disc. Disc play is stopped, the disc is
ejected and the unit will change to radio operation. If the disc is not removed from
the unit and the button is pressed again, the disc will be re-loaded. If the disc is
not removed from the disc slot within 10 seconds of being ejected, it will be automatically re-loaded to prevent it from being accidentally damaged.
3. Not Used
Not used.
4. LCD Screen and Touch Screen
Press icons on this screen to access menus or control functions.
5. Disc Slot
Accepts DVD/CD/MP3 discs. If the unit is turned on, playback begins when a disc is
inserted.
6. Reset Button
Press this button to reset the system to correct a system halt or other illegal
operation. Use the tip of a pen to press the Reset button. The Reset button may be
located in a different location on your model.
5
7. MAP Cover
Covers the Micro SD card slot. The Micro SD card slot is used for the Navigation
Map only, not for music or other files. This may be used for firmware updates if
required.
8. Tune/Audio Control Knob
When the unit is set to Radio mode, rotate this knob to acquire the next or
previous available frequency. When the unit is set to MP3/USB player mode, rotate
this knob to select a song. When the unit is set to the XM Satellite radio mode,
rotate this knob to select a channel. When the unit is set to the DVD mode, rotate
this knob to select the next or previous chapter.
Press this knob to access the Audio Controls Screen. Press this knob again to exit.
9. PHONE Button
Press this button to access the Bluetooth touch screen menu.
10.SETUP Button
Press this button to access the Settings touch screen menu.
11.MENU Button
Press this button to access the Main touch screen menu.
12.SRC Button
Press this button to switch between the available audio/video sources applied to
the unit.
13.XM Button
Press this button to access the XM Satellite Radio touch screen menu (if equipped).
14.Dimmer ( ) Button
Press this button to adjust the LCD screen brightness as follows: Screen Off, Dark,
Soft or Bright.
15.SEEK + Button
When the unit is set to Radio mode, press this button to acquire the next available
frequency. When the unit is set to iPod/iPhone/MP3/USB player mode, press this
button to select the next song. When the unit is set to XM Satellite Radio mode (if
equipped), press this button to select the next channel.
16. SEEK - Button
When the unit is set to Radio mode, press this button to acquire the previous
available frequency. When the unit is set to iPod/iPhone/MP3/USB player mode,
press this button to select the previous song. When the unit is set to XM Satellite
Radio mode (if equipped), press this button to select the previous channel.
17.DEST Button
Press this button to access the Navigation mode and enter a desired destination.
18.NAV Button
Press this button to switch between the Navigation mode and the current source
being played. For example, you may switch from the radio to navigation and then
back to the radio.
6
Controls and Indicators
NOTE: I f your vehicle is equipped with steering wheel controls for the audio
system, the controls may function differently than described in the vehicle
owners manual. The Advent In-Dash Navigation Radio system may function
differently than the OEM radio due to added features and functions that the
OEM radio did not support. This is normal operation.
MEDIA LINK
The unit is supplied with a Media Link which can accept signals from various
audio/video devices. The Media Link is installed and routed to an accessible
vehicle location during installation.
The media link will accept a USB device, a 3.5 mm jack, or an iPod/iPhone.
NOTE: F or basic connectivity, your iPod/iPhone must be connected to the Media
Link using the iPod/iPhone adapter cable that comes with your iPod/
iPhone or is available separately. For iPod/iPhone video playback, you must
purchase the Jensen JLINK-USB cable or equivalent.
HANDS FREE MICROPHONE
The hands-free microphone is installed in your vehicle in an accessible location
that provides optimum voice reception. For best reception, speak loudly and
clearly.
7
DVD/CD BASICS
To get the optimum use out of your CD/DVD player, please read this section.
Types of Discs Your System Will Play
Your system will play the following types of discs:
• DVD disc - DVD discs that contain audio and/or video.
• Audio discs - Audio CDs that contain musical or sound content only.
• MP3 discs - A
disc that contains audio files (for example, a CD-R with
downloaded MP3 files). MP3 discs can hold a maximum of 500
songs/folders per disc.
This unit is capable of playing most recordable DVD formats. However, due to the
variety of disc manufacturers and software, playback can not be guaranteed for
every disc.
DVD Region Code
The DVD player is preset to a region code at the factory depending on where the
unit is sold. DVDs are also coded by region. These region codes must match in
order for the disc to play. If the region codes do not match, the disc will not play.
This DVD player is set to Region 1 (USA) and will not play discs that have a region
code different from Region 1.
8
Quick Start Guide
Turning the Unit ON or OFF:
Press the front panel Power/Volume/Mute control knob to turn the unit on. To turn
the unit off, press and hold the front panel Power/Volume/Mute control knob for
2 seconds.
Playing a DVD/CD/MP3 Disc:
1. Turn the unit on.
2. Insert a DVD/CD/MP3 disc into the disc slot, label side up. Playback begins
when a disc is inserted.
NOTE: When properly installed, DVD video can not be displayed on the front
LCD screen unless the parking brake is applied.
Selecting Audio/Video Sources, Navigation or System Settings:
1. Press the front panel MENU button or touch screen Menu icon to view the Main
Menu Screen.
2. P
ress the touch screen Disc, Radio, XM Radio, iPod, Rear LCD, Navigation, AV IN,
USB, Bluetooth or Settings icon. The icon is gray if the source is not available.
Adjusting the Volume:
To increase or decrease the volume level, rotate the front panel Power/Volume/
Mute control knob. The unit’s front panel screen will display the volume level for
3 seconds. The volume level ranges from 0 to 60.
Muting the Audio:
Press the front panel Power/Volume/Mute control knob to mute the audio from
the unit. The Mute Indicator is displayed on the LCD screen. Press the Power/
Volume/Mute control knob again to restore the audio volume to its previous level.
Adjusting the volume or using any of the audio setup features cancels the mute
function.
9
Adjusting Fade and Balance:
1. Press the front panel Tune/Audio control knob or the touch screen
icon to view the Audio Control Screen.
Audio
2. P
ress the left ( L ) or right ( R ) icons to adjust the left/right balance, or press the
front ( F ) or rear ( R ) icons to adjust the front/rear fade.
3. Press the touch screen Back icon to return to the current source.
Adjusting Equalizer Controls:
1. Select an audio/video source.
2. Press the touch screen
EQ - Equalizer icon to view the Equalizer Screen.
3. T o adjust audio to meet the acoustical characteristics of your vehicle:
a. Press the 9-band graphic equalizer up or down cursors, or
b. Select a preset level by pressing the Classical, Pop or Flat icons, or
c. Select a user-defined setting by pressing the User 1, User 2 or User 3 icons.
4. Press the touch screen Back icon to return to the current source.
10
Quick Start Guide
Setting System Time:
1. Press the front panel SETUP button or front panel Settings icon. A Settings
Screen appears.
2. Press the Next icon. A second Settings Screen appears.
3. Press the Time Set icon to view the Set System Time Screen.
4. P
ress the Increase (p) icon or Decrease (q) icon to set the desired year, month,
day, hour, minute or seconds value.
5. Press the Back Icon to return to the previous screen.
Resetting the System:
To correct a system halt or other illegal operation, use the tip of a pen to press the
reset button located on the front of your unit or press the System Reset icon on
the Settings Screen.
11
If technical support is required, please contact
Advent Technical Support at 1-800-323-4815.
128-8924a