1
METTLER TOLEDO
MX5-S and UMX2-S automated
Microbalances for Cylindrical Weighing Samples
Supplement to the operating instructions for MX and UMX balances
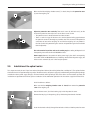
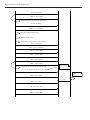
Overview of MX5-S automated and UMX2-S automated
1
4
Control unit (for details see operating
instructions for AX and MX/UMX
1
balances)
2
2
Metal protective cover (the weighing cell
is under the protective cover)
3
3
AC adapter with country-specific power
cable
4
control unit and weighing cell
5
7
Connection cable for connecting the
8
6
5
Weighing cell
6
Positioning plate
7
Weighing chamber cover
8
Locking rocker for the weighing chamber
cover
9
10
11
9
Weighing sample holder
10
Weighing pan
11
Drip tray
Contents
Contents
1
Introduction..................................................................................................................................................... 4
1.1
1.2
What you should know about these instructions............................................................................................................. 4
Safety and disposal....................................................................................................................................................... 4
2
Unpacking and setting up the balance............................................................................................................... 5
2.1
2.2
2.3
2.4
2.5
2.6
Unpacking the balance................................................................................................................................................. 5
Checking the scope of delivery...................................................................................................................................... 5
Selecting a location...................................................................................................................................................... 5
Assembly of the balance and connection to the power supply......................................................................................... 6
Installation of the optical ionizer.................................................................................................................................... 7
Instructions for transporting the balance........................................................................................................................ 8
3
Loading mechanism of the weighing cell........................................................................................................... 9
3.1
3.2
3.3
Operating principle of the loading mechanism............................................................................................................... 9
Controlling the loading mechanism via the terminal....................................................................................................... 9
Controlling the loading mechanism using MT-SICS commands..................................................................................... 10
4
Cleaning and maintenance............................................................................................................................. 14
5
Technical data and accessories...................................................................................................................... 15
5.1
5.2
5.3
Specific data for MX5/UM2 automated balances........................................................................................................... 15
Accessories and spare parts........................................................................................................................................ 15
Dimensional drawings................................................................................................................................................. 16
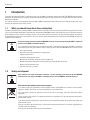
Introduction
1
Introduction
Thank you for choosing the MX5-S automated balance or the UMX2-S automated balance from METTLER TOLEDO. These balances
enable the weight of cylindrical weighing samples to be determined precisely. They provide the full range of functions of the MX and
UMX balance software.
This chapter contains basic information about your MX5-S/UMX2-S automated balance. Please read this chapter carefully, even if you
already have experience with similar systems.
1.1
What you should know about these instructions
The MX5-S automated balance and the UMX2-S automated balance have the same structure, but only differ with regard to the maximum
capacity and resolution. Both models differ from the corresponding MX5/UMX2 models with regard to the special loading mechanism
of the weighing cell for cylindrical weighing samples and the metal protective cover they are supplied with. However, the software
and operation of the balance via the terminal is the same. For this reason, the operating instructions for AX and MX/UMX balances are
supplied with your balance.
Use the operating instructions for AX and MX/UMX balances as a basis for operating the MX5-S automated
balance or the UMX2-S automated balance.
This supplement to the operating instructions for the MX5-S automated balance and the UMX2-S automated
balance only covers the special features of these balances, which differ from MX/UMX balances. These include:
– The scope of delivery
– Unpacking and packing the balance (shipping lock)
– Setting up the balance
– Installation of the optional ionizer
– Operation of the loading mechanism of the weighing cell
– Control of the loading mechanism of the weighing cell using MT-SCIS commands
– Cleaning and maintenance tasks
– Technical data and accessories
1.2
Safety and disposal
Please observe all safety instructions in Chapter 1 of the operating instructions for AX and MX/UMX
balances, they also apply to the MX5-S automated balance and the UMX2-S automated balance.
Please observe the following instructions on disposal:
In accordance with the requirements of the European directive 2002/96/EC on old electrical and electronic
appliances (WEEE), this device must not be disposed of as household refuse.
This also applies equally for countries outside of the EU in accordance with their applicable national
regulations.
Please dispose of this product in accordance with the local regulations in a separate container for electrical
and electronic devices.
If you have questions regarding this, please contact your responsible authority or the dealer from which you
purchased the device.
If you pass the device on to a third-party (e.g. for private or commercial/industrial use), then this regulation must
also be passed on accordingly.
Thank you for contributing to the care of the environment.
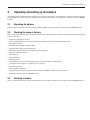
Unpacking and setting up the balance
2
Unpacking and setting up the balance
This chapter provides information about unpacking and setting up your balance. This information is limited to the special features
of MX5‑S/UMX2-S automated balances, therefore please note the cross-references to the operating instructions for AX and MX/UMX
balances.
2.1
Unpacking the balance
Carefully unpack your balance. Note: The packaging of MX5-S/UMX2-S automated balances differs from that of MX/UMX balances.
2.2
Checking the scope of delivery
Please check that the following items have been provided (please also refer to the illustrations in the device overview at the beginning
of these instructions):
– Control unit with terminal installed
– Fully assembled weighing cell (drip tray, weighing pan, weighing sample holder, weighing chamber cover)
– Metal protective cover
– Positioning plate (without assembly material)
– AC adapter with country-specific power cable
– Connection cable for connecting the control unit and weighing cell
– Protective cover for the terminal
– Cleaning brush
– Cleaning tweezers
– Weighing tweezers
– Special tool for inserting and removing the weighing pan and the weighing sample holder
– 1 weighing sample holder and 1 weighing pan as spare parts
– Production certificates
– CE declaration of conformity
– Supplementary operating instructions for MX5S automated and UMX2-S automated (this document)
– Operating instructions for AX and MX/UMX balances
2.3
Selecting a location
Select a suitable location for the balance. Please observe the instructions in the operating instructions for AX and MX/UMX balances.
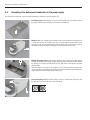
Unpacking and setting up the balance
2.4
Assembly of the balance and connection to the power supply
Use the supplied connection cable to connect together the control unit and the weighing cell.
Positioning plate of the weighing cell in the desired location and secure (with screws or
by gluing). The foot of the weighing cell should be in the hole (A).
A
Weighing cell in the positioning plate. Make sure that the front foot of the weighing cell
is in the circular hole. The weighing cell must sit firmly between the two white plastic
bushings (B). For precise positioning, unfasten the fixing screws of the plastic bushings,
move both bushings towards the weighing cell and tighten the screws again.
B
Remove the shipping lock: Tilt the locking rocker (C) of the weighing chamber cover to
the right and remove the weighing chamber cover by pulling it forwards. Carefully remove
the shipping lock (foam pad with adhesive tape), then replace the weighing chamber
cover and lock.
Note: The shipping lock protects the weighing cell and ensures that the weighing pan
and the weighing sample holder remain fixed in the desired position. Therefore retain the
shipping lock for future transport of the weighing cell.
C
Level the weighing cell: Turn the two leveling screws (D) at the back of the housing until
the air bubble is in the center of the level indicator (E).
E
D
Unpacking and setting up the balance
Make sure that the weighing chamber cover (F) is closed, then place the protective cover
(G) over the weighing cell.
F
G
Adjust the protective cover vertically: There are 4 screws (H) with lock nuts (I) on the
inside of the protective cover. Adjust and secure these screws so that:
H
– The protective cover is totally horizontal and does not rock.
– There is a vertical air gap the thickness of a standard sheet of writing paper between
the protective cover and the weighing chamber cover. This ensures that the protective
cover does not rest on the weighing cell and that the weighing cell can perform its
function (draft shield, protection against contact and protection against heat radiation
from the operator).
I
Place the terminal in position and set the reading angle according to Chapter 2.6 of
the operating instructions for AX and MX/UMX balances.
Power supply: Connect the control unit to the power supply (for details see operating
instructions for AX and MX/UMX balances). Following connection to the power supply, the
balance starts automatically and is then ready to operate.
2.5
Installation of the optical ionizer
This chapter must only be read if you have ordered the optional ionizer (for ordering information, see Chapter 5). The optional ionizer
eliminates the static charge from weighing samples.The ionizer consists of a power supply unit (transformer for generating the high voltage,
available for various power supply voltages) and two electrodes with high-voltage cable. These items must be ordered separately. For
installation and operation of the ionizer, please also observe all the information provided in the instructions supplied with the device.
Install the ionizer as follows:
Make sure that the weighing chamber cover is closed, then remove the protective
cover of the weighing cell.
Loosen the two screws (A) of the fastening strip inside the protective cover.
Remove the two plugs in the openings (B) by withdrawing them towards the front.
A
A
B
B
Insert the electrode cable (C) through the two holes at the back into the protective cover.
Unpacking and setting up the balance
Insert the electrodes as far as they will go into the fastening strip (D) and tighten the two
screws (E).
E
C
D
C
E
Place the protective cover over the weighing cell.
Connect the electrodes to the power supply unit and the power supply unit to the power
supply (see instructions for the power supply unit).
2.6
Instructions for transporting the balance
When transporting your balance, please observe the corresponding instructions in Chapter 2.7 of the operating instructions for AX and
MX/UMX balances.
When transporting the balance make sure that the weighing sample holder is in the weighing position (lowest position, see Chapter 3).
Then insert the shipping lock (foam pad) in the weighing chamber and close the weighing chamber cover. The shipping lock protects
the weighing cell and ensures that the items in the weighing chamber (weighing pan and weighing sample holder) remain fixed in the
desired position. Secure the weighing chamber cover with a piece of adhesive tape.
Loading mechanism of the weighing cell
3
Loading mechanism of the weighing cell
The loading mechanism of the weighing cell for your MX5-S/UMX2-S automated balance has been specially developed for use in
automated environments. The loading mechanism is controlled by a host computer using MT-SICS commands and loading is carried
out automatically (e.g. using a robot). However, the loading mechanism can also be controlled manually using the «K» door keys on
the terminal. This chapter provides basic information about the loading mechanism and manual and automatic control.
3.1
Operating principle of the loading mechanism
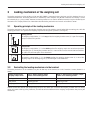
The loading mechanism consists of the weighing chamber cover and the weighing sample holder. Both are moving parts, while the
weighing pan remains in its position. The weighing sample holder recognizes 3 positions (see diagram):
Loading position:
2
The weighing sample holder (1) is in its top position, the weighing chamber cover (2) is open. The weighing
sample is loaded in this position.
1
3
2
1
The weighing sample holder (1) is in the middle position. The weighing sample has not yet been placed on
the weighing pan (3).The weighing chamber cover (2) is closed and thus ensures that the ambient conditions
are stable so that the zero point can be determined.
3
2
1
3.2
Zero position:
3
Weighing position:
The weighing sample holder (1) is in the bottom position, the weighing chamber cover (2) is closed. The
weighing sample is on the weighing pan (3) and the weight can be determined.
Controlling the loading mechanism via the terminal
The loading mechanism can be controlled using the «K» door keys on the terminal (or via the “SmartSens” sensors). Control is as
follows:
Starting position of the
weighing sample holder
Left «K» moves weighing sample
holder to the following position
Right «K» door key moves weighing sample
‑holder to the following position
Loading position
Zero position
Zero position
Zero position
Loading position
Weighing position
Weighing position
Zero position
Zero position
In order to familiarize yourself with the operating principle of key control, you can remove the weighing chamber cover (tilt locking
rocker and remove cover by pulling it forwards) and then observe the movement of the weighing sample holder after pressing the
relevant keys.
Loading mechanism of the weighing cell
10
3.3
Controlling the loading mechanism using MT-SICS commands
The “WS” MT-SICS command can be used to directly control each position of the weighing sample holder. Note: For standard MX/UMX
balances the “WS” command is used to control the glass draft shield (see “MT-SICS for AX/MX/UMX balances 11780417” reference
manual). For MX5/UMX2 automated balances the parameters of the command have a different function:
Command
Response (confirmation of
command execution)
Weighing sample moving to the following position
WS/1
WS/A
Loading position
WS/0
WS/A
Zero position
WS/2
WS/A
Weighing position
The “WS” command (without parameters) can be used to request the current position of the weighing sample.
The response is “WS/A/x” where “x” represents one of the following values:
0
1
2
8
9
Zero position
Loading position
Weighing position
Error
Intermediate position
Important: Acknowledgment of the current position of the weighing sample is specified by the coding disk in the
balance. On each run command, the disk rotates to a specific position. If, however, the weighing sample holder
is blocked (e.g. by residue in the weighing chamber), the coding disk still rotates to the corresponding position
on a run command, but the weighing sample holder itself does not move and acknowledgment of the current
position is therefore incorrect. The user is therefore responsible for checking the plausibility of the weight in the
relevant position. Preferably, this is carried out by means of appropriate routines in the relevant control program.
In addition, it is recommended that the balance is checked and maintained regularly by an authorized service
engineer.
Please observe the instructions for the MT-SICS commands in the operating instructions for AX and MX/UMX balances. The “WS”
command can be used directly on the host computer via a terminal program or integrated in custom applications and used to automate
weighing.
Below is an example for an application in which the “WS” command is used to control the loading mechanism (for instructions for other
MT-SICS commands used and additional information about the “WS” command, please refer to the “MT-SICS for AX/MX/UMX balances
11780417” reference manual). In this example, the user is guided through the weighing process and can only press the keys on the
terminal that are required for the relevant step (the other keys are blocked).
Loading mechanism of the weighing cell
11
Program example:
PC / Software
UMX/MX Automated
User
Start test
Open comport
Send SI (SI<CRLF>)
Answer (e.g. "0.00003 g"<CRLF>)
Flush answer (only for communication check)
If communication ready then go forward, else stop program
Loop start
Send "WS 1" (WS 1<CRLF>)
Answer: e.g. WS A<CRLF>
Send D "load & print" (D "load & print"<CRLF>)
Answer: e.g. D A<CRLF>
Send K 3 (K 3<CRLF>)
Put weight on
pan and press
print key
Answer: e.g. K A (K A<CRLF>)
Print key
Event: e.g. K 7<CRLF>
Send K 2 (K 2<CRLF>)
Answer: e.g. K A<CRLF>
Send DW (DW<CRLF>)
Answer: e.g. DW A<CRLF>
Send WS 0 (WS 0<CRLF>)
Answer: e.g. WS A<CRLF>
Send WS (WS<CRLF>)
Answer: e.g. WS A 0<CRLF>
If answer=WS A 0 then go forward, else send WS again
Send SU (SU<CRLF>)
Answer: e.g. S S 0.00 mg<CRLF>
Create FirstWeight (empty pan)
Send WS 2 (WS 2<CRLF>)
Answer: e.g. WS A<CRLF>
Send WS (WS<CRLF>)
Answer: e.g. WS A 2<CRLF>
If answer=WS A 2 then go forward, else send WS again
Create FirstWeight (empty pan)
Loading mechanism of the weighing cell
Send WS 2 (WS 2<CRLF>)
12
Answer: e.g. WS A<CRLF>
Send WS (WS<CRLF>)
Answer: e.g. WS A 2<CRLF>
If answer=WS A 2 then go forward, else send WS again
Send SU (SU<CRLF>)
Answer: e.g. 10.12 mg<CRLF>
Create SecondWeight (weight on pan)
Create and display results
If last probe then go forward, else go back to loop start
Send K 3 (K 3<CRLF>)
Answer: e.g. K A (K A<CRLF>)
Send "WS 1" (WS 1<CRLF>)
Answer: e.g. WS A<CRLF>
Send WS (WS<CRLF>)
Answer: e.g. WS A 1<CRLF>
{unlo. = unload}
If answer=WS A 1 then go forward, else send WS again
Send D "unload & print" (D "unlo. & print"<CRLF>)
remove weight
and press
print key
Answer: e.g. D A<CRLF>
Print key
Event: e.g. K 7<CRLF>
Send "WS 0" (WS 0<CRLF>)
Answer: e.g. WS A<CRLF>
Send WS (WS<CRLF>)
Answer: e.g. WS A 0<CRLF>
If answer=WS 0 then go forward, else send WS again
Send D "end & print" (D "end & print"<CRLF>)
Press
print key
Answer: e.g. D A<CRLF>
Print key
Event: e.g. K 7<CRLF>
Send "WS 0" (WS 0<CRLF>)
Loading mechanism of the weighing cell
13
Answer: e.g. WS A<CRLF>
Send WS (WS<CRLF>)
Answer: e.g. WS A 0<CRLF>
If answer=WS 0 then go forward, else send WS again
Send D "end & print" (D "end & print"<CRLF>)
Press
print key
Answer: e.g. D A<CRLF>
Print key
Event: e.g. K 7<CRLF>
Send K 1 (K 1<CRLF>)
Answer: e.g. K A<CRLF>
Send DW (DW<CRLF>)
Answer: e.g. DW A<CRLF>
Cleaning and maintenance
14
4
Cleaning and maintenance
Your MX2/UMX5 automated balance does not require laborious maintenance. For correct operation and to ensure correct results simply
carry out the cleaning and maintenance tasks described below. For information about general cleaning tasks for the balance, please
refer to Chapter 13 of the operating instructions for AX and MX/UMX balances.
Clean the components of the weighing chamber as follows:
Switch off the balance.
Tilt the locking rocker (A) of the weighing chamber cover to the right and remove the
weighing chamber cover by pulling it forwards.
A
First carefully remove the weighing sample holder (B) and then the weighing pan (C) by
lifting it out of its guide. We recommend using the special tool supplied with the balance
for this (special tweezers).
B
D
Then remove the drip tray (D) by lifting it out of the weighing chamber.
C
Clean the items (they are made from stainless steel X2CrNiMo17-12-2/1.4404).
In particular, handle the weighing sample holder and the weighing pan with the greatest
care and ensure that the fine holding prongs for the weighing sample are not bent.
We recommend cleaning all items in an ultrasonic bath.
Replace the items in the weighing chamber in reverse order. When inserting the weighing
pan, make sure that it is in the correct position: the fine holding prongs for the weighing
sample must be towards the back, positioned towards the weighing sample holder.
In addition, when inserting the weighing pan and the weighing sample holder make sure
that the items are positioned correctly in the slot in the relevant guide. Do not forget to
lock the weighing chamber cover (tilt rocking locker to the left).
Technical data and accessories
15
5
Technical data and accessories
In general the technical data for MX5/UMX2 automated balances and the available accessories correspond to those of standard
MX5/UMX2 models (see Chapter 14 of the operating instructions for AX and MX/UMX balances). Data that differs from the above is
provided in the following chapters.
5.1
Specific data for MX5/UM2 automated balances
Weighing sample:
Cylindrical weighing samples, max. diameter: 8 mm, max. length: 50 mm
Length of the weighing chamber:
60 mm
Material of the weighing chamber
components
Weighing chamber cover, drip tray, weighing sample holder and weighing pan:
Stainless steel X2CrNiMo17-12-2 (1.4404)
Dimensions of the weighing cell
See dimensional drawing in Chapter 5.3
5.2
Accessories and spare parts
The following special accessories and spare parts are available for MX5/UMX2 automated balances:
Description
Article No.
Weighing chamber cover
11122018
Drip tray
11122005
Weighing sample holder and weighing pan (5-piece set in plastic box)
11122038
Cylindrical adjustment weight 5mg E2 with certificate
11122181
Cylindrical adjustment weight 50mg with certificate
11122183
Cylindrical adjustment weight 100mg with certificate
11122185
Cylindrical adjustment weight 200mg with certificate
11122187
Cylindrical adjustment weight 500mg with certificate
11122163
Cylindrical adjustment weight 1.0g E2 with certificate
11122165
Cylindrical adjustment weight 1.5g with certificate
11122189
Cylindrical adjustment weight 2.0g E2 with certificate
11122167
Cylindrical adjustment weight 5.0g E2 with certificate
11122169
AC adapter for ionizer (transformer) 230V
11107758
AC adapter for ionizer (transformer) 115V
11107759
AC adapter for ionizer (transformer) 100V
11107760
Electrode with high-voltage cable for ionizer (note: 2 electrodes required)
11107757
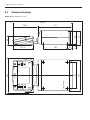
Technical data and accessories
16
5.3
Dimensional drawings
Control unit (all dimensions in mm)
365.5
127.5
150
30
5.8
60
94
210
88
155.5
202
162
O/T
224
On
Off
METTLER TOLEDO
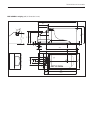
Technical data and accessories
17
MX5-S/UMX2-S weighing cell (all dimensions in mm)
310
86.5
5
3
2
100
9
245
4.5
2
132
73
29
35
226.5
61
107
88
22
232
35
225.5
147
131
81
To protect your METTLER TOLEDO product’s future:
METTLER TOLEDO Service assures the quality, measuring accuracy
and preservation of value of all METTLER TOLEDO products for years
to come.
Please send for full details about our attractive terms of service.
Thank you.
*P11781130*
Subject to technical changes and to changes in
the accessories supplied with the instruments.
© Mettler-Toledo AG 2007
11781130 Printed in Switzerland 0708/31.12
Mettler-Toledo AG, Laboratory & Weighing Technologies, CH-8606 Greifensee, Switzerland
Phone +41-44-944 22 11, Fax +41-44-944 30 60, Internet: http://www.mt.com