1
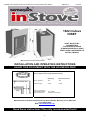
Installation and Operating Instructions Reference: 1622 Rectella Instove INSET
BQ2104-1d
Oct 2011
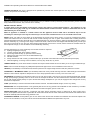
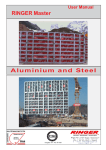
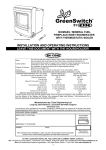
1622 Instove
INSET
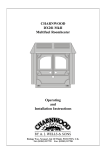
INSET SOLID FUEL
ROOMHEATER
FOR INSTALLATION IN
STANDARD BRITISH or IRISH
FIREPLACES CONFORMING TO
BS1251 & BS8303
(Measurements include decorative frame)
INSTALLATION AND OPERATING INSTRUCTIONS
LEAVE THIS DOCUMENT WITH THE HOUSEHOLDER!
Intermittent burning solid fuel room heater for installation in
masonry fireplace with a single dedicated chimney.
EN 13229
Wood logs
Mineral fuel (Ancit)
Approx. efficiency
78%
76%
Nominal Output
4.9Kw
3.0kW
Minimum clearance to
combustible materials
Must be maintained
Top: 400mm
All other faces: 250mm
Manufactured for Rectella International Ltd, Bancroft Road, Burnley, Lancs, BB10 2TP
Tel: 01282 478200
Web: www.barbequick.com
Read these instructions! Use only recommended fuels!
1
Installation and Operating Instructions Reference: 1622 Rectella Instove INSET
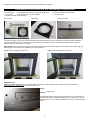
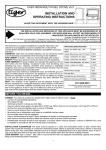
Contained in this box are the following components
1 x Sealing rope
1 x Double sided sticky tape for fixing the sealing rope
1 x Flue collar
2 x Flue collar bolts, nuts and washers
1 x Primary air slider and slider knob
Box contents
4 x Stove securing bolts and washers
1 x Operating tool
Flue collar
Primary air slider
Fixing Kit comprises a sealing rope and double sided sticky tape for fixing the rope to the rear face of the inset before installation
(See fixing drawing page 4), four securing bolts and washers for securing the stove to your chimney breast and a flue collar to
attach the stove to your flue liner if required.
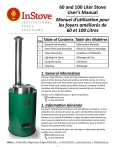
IMPORTANT: Remove all the packaging from around the upturned grate and turn the grate over from the packed position (Fig 3) to
stand upright on the four legs (Fig 4) before using for the first time.
(Fig 3) Grate as packaged upside down.
(Fig 4) Grate as it should be at first use.
DEFRA Approval
Note! in a smoke control zone to comply with DEFRA regulations, when burning wood the appliance must be fixed with a
mechanical stop to ensure the top air wash remains open.
(Fig 5)
Locking screw
An additional screw is fixed to the body to lock the top air control open for
burning wood when installed in a smokeless zone. (See Fig 5). This may
be removed if you are not within a smokeless zone or do not intend to burn
wood.
2
Installation and Operating Instructions Reference: 1622 Rectella Instove INSET
IMPORTANT
Co2 DETECTOR
It is the responsibility of the installer to fit a fully operational Co2 detector in the same room as this appliance.
INSTALLATION
THIS APPLIANCE CAN PRODUCE POISONOUS GASES IF NOT FITTED CORRECTLY.
THE STOVE AND ITS SURROUND CAN BECOME EXTREMELY HOT
A fire-guard should be used if children or infirm persons are present.
The installer is required to EXACTLY follow these instructions and to completely comply with all local, national and
international standards.
INSTALLING a stove is a 'controlled service', the law expects that it is either supervised by a qualified installer or that the building
inspector is informed. Check with your local authority.
ASBESTOS: Your stove does not contain any asbestos, but take care to avoid disturbing asbestos in an old installation.
WEIGHT: Your stove is heavy - take great care when moving it and ensure that the intended fireplace can support the weight- consider
fitting a load distributing plate.
YOUR CHIMNEY: by becoming warm, makes the gas inside it rise, pulling fresh air into the stove to make it work. It must:
Generate a draught in use of at least 12Pa (0.05ins wg)
Be capable of withstanding the temperatures generated.
Be incapable of leaking fumes into the dwelling
This will commonly be achieved by it:
Being at least 5m high.
Terminating at least 1m above any roof ridge.
Having an internal cross-section not less than 0.018m² (e.g. 150mm diameter) and never more than 0.14m² (e.g. 375 x 375mm)
Being free from even the slightest crack or source of leakage.
Having no bends sharper than 45º.
Being entirely free of obstructions and swept by a qualified chimney sweep.
Being connected only to this one appliance.
Being of thick masonry or otherwise adequately insulated.
Conforming to local building regulations.
Special rules apply where the flue passes through timber, thatch or other vulnerable materials- take specialist advice.
Although it is possible to access the chimney through the fire with the throat plate removed, fit hatches to provide access if needed.
AIR SUPPLY: Your stove needs air to breathe - there must be a permanent fresh air supply into the room in which it is installed equal
to about 550mm² (e.g. 23mm square). This can often be provided by air naturally leaking into the building (it is commonly accepted
that this alone can suffice for appliances <5kW) but in any case of doubt, fit a purpose-made air vent. An extractor fan, or another fuelusing appliance, even in a different room, can remove this air.
LOCATION:
To prevent the risk of fire, the location into which your 1622 is fitted must always:
Have no combustible materials (such as a wooden surround) within 250mm of the stove sides or 400mm above
Be made of materials able to continuously withstand 250ºC
Even outside these distances take care in locating vulnerable materials such soft furnishings, decorations and other
flammable materials.
CHIMNEY SWEEPING:
Although it is often possible to sweep the chimney through the fire with the baffle plate removed, consider fitting cleaning hatches to
provide access if needed.
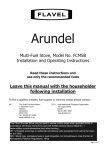
PRE-FITTING:
The 1622 can fit straight into a standard fireplace (Fig 9 on page 4) conforming to BS1251 & BS8303, which will:
Have an opening width (A) of between 400 and 420mm.
An opening height (B) of between 550mm and 570mm.
A flat area (C) extending 70mm around the opening.
Have a heat-resistant hearth extending at least 300mm (D), without obstructions to prevent the door opening.
Have the chair brick removed.
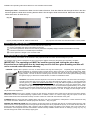
Where thin slabs of mineral material (marble, limestone etc.) are used to face a fireplace, we recommend using separate panels, as
shown, to allow for differential expansion.)
3
Installation and Operating Instructions Reference: 1622 Rectella Instove INSET
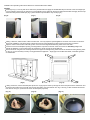
FITTING:
Referring to Fig 6, 7 and 8, peel off one side of the protective film and apply the double sided tape to the rear of the stove edges (as
in Fig 6) pressing down firmly to make sure of good adhesion, then peel away the second side protective film and apply the soft rope
seal to the sticky double sided tape (Fig 7) with a finished rope seal all the way round (Fig 8).
(Fig 6)
(Fig 7)
(Fig 8)
If fitting a flue liner, attach the flue collar to the flue liner. You may require a special appliance connector from the liner to the stove.
These are available to suit various sizes of flue liners and may need self tapping screws and fire cement to fix in position.
Align the collar so that the flue collar fixing holes on the stove are aligned with the fixing holes on the flue collar.
Push the stove into the fireplace opening, ensuring that the rope seal on the rear of the stove forms an absolutely airtight seal
against the fireplace. In some cases it may be necessary to knock-out part of the old fireback.
Secure the stove using the stove securing bolts into the upper left and right fixing holes and into the bottom left and right fixing holes
(F) Fig 10. It is not necessary to fill any small gap behind the appliance – larger gaps can be filled with rubble, vermiculite granules
or mineral fibre.
F
F
(Fig 9)
F
(Fig 10)
F
If fitting a flue liner, remove the baffle plate (as shown on page 8) and reach up through the stove and pull the stove collar down and
secure the flue collar to the stove with the two flue collar bolts, nuts and washers as in Fig 11 and Fig 12 with a finished and secure
flue collar as in Fig 13. (Flue liner not shown for description purposes).
(Fig 11)
(Fig 12)
(Fig 13)
4
Installation and Operating Instructions Reference: 1622 Rectella Instove INSET
Primary air slider – Assemble the slider from the inside of the door. Push the slider bar bolt through the hole in the door
and then tighten the slider knob ensuring that the slider is free enough to slide back and forth. Make sure that the slider
slides and that the air holes line up.
(Fig 18)
(Fig 19)
(Fig 18) Primary air slider kit. Slider and slider knob
(Fig 19) View from inside door with slider fixed in correct position.
CHECK THE INSTALLATION !
Once installed, light the fire, demonstrate it to the householder and check that:
It burns controllably and does not emit fumes to the room
The route for gases from the stove to the chimney terminal is completely airtight, unobstructed and able to be swept.
The entire construction is of durable fireproof materials.
The flue presents a draught in use of at least 12Pa
LIVING WITH YOUR STOVE
Every fuel, chimney and condition of use is different. Only experience will show which the best settings for you are.
The operating tool is used for opening the fire door, removing the ashpan and moving the primary and secondary air sliders.
IMPORTANT: The operating tool MUST be used for opening and closing the stove door.
Excessive force closing the door by hand may result in the door glass breaking and this will
not be covered under the stoves warranty.
LIGHTING If lighting after a period of non-use, do check that the flue ways and chimney are completely clear. Empty the ashes.
Place firelighters or screwed-up paper covered with dry sticks at the back of the grate and light them. When
they are burning well gently fill the fire with dry fuel, close the door and set the air control slides to the 'high'
(right) position. As soon as the fire is burning well, move the controls to the lowest practical setting. During
the ignition stage you should not overload the fire, it is better to load little and often.
CONTROL How fast the fire burns depends on how much air reaches the fuel. The stove when not burning in
a smoke control zone has two air controls, one above the window ('air wash control' ) and one below the
window ('primary' ). Note! in a smoke control zone to comply with DEFRA regulations the appliance must
be fixed with a mechanical stop to ensure the top air wash (secondary air control (1)) remains open. Move
the slides to the right for highest output, to the left for 'low'. Our tests indicate highest efficiency on wood with
the primary control all but closed and the air wash 2/3 open. Anthracite works best with the air wash closed
and the primary 1/3 open. But the best settings will depend on your fuel, air supply and flue draught and can
only be found from experience.
EMPTYING ASHES use the tool or handle or a glove to open the door. Stir the fire with a poker and use the tool to lift out the ashpan.
Remember to let ash cool before disposing in plastic sacks or dustbins. There is no need to empty every last speck, but ash from
mineral fuels should never be allowed to build up so that it comes into contact with the underside of the grate.
CLEANING Wipe the stove body with a slightly damp cloth when cool, don't use abrasives, metal polish or 'cream' cleansers as they
can scratch the surface. NEVER use aerosol sprays near the hot fire – they can ignite.
KEEPING THE WINDOW CLEAN With most fuels the window will require no cleaning other than an occasional wipe with a dry cloth
when the stove is cold. Operating the stove at high output will usually burn-off any deposits left by tarry or wet fuels. Severe stains can
be removed with a proprietary cleaner. After a period of use tiny hairline cracks may appear on the window, this is not a fault, but is
characteristic of the toughest and most heat-resistant material currently available. Reduce the risk of staining by using only very dry
fuel and having the air wash control always slightly open.
5
Installation and Operating Instructions Reference: 1622 Rectella Instove INSET
OPENING THE DOOR This stove is designed to be operated only with the door closed. Open the door very slowly to minimise fume
emission and prevent hot fuel falling out.
FUELS
There is no 'perfect' fuel, so we strongly recommend that you try a selection of fuels (or mixtures) to find which suits you best. Do avoid
dusty materials like sawdust; they can burn far too violently.
SMOKE CONTROL AREAS:
In certain areas of the UK (Smoke Control Areas) special rules apply to reduce smoke nuisance. This appliance is only
exempt when burning dry wood logs of suitable size detailed below or authorised fuels. Details of authorised fuels can be
obtained from your local authority.
When an appliance is installed in a smoke control area the appliance must be fitted with a mechanical stop to fix the
secondary air control open. This may be removed if you are not within a smokeless zone or do not intend to burn wood.
WOOD: Wood only emits as much carbon to the atmosphere as the tree took in when growing, so wood is considered the 'carbon
neutral' fuel. When wood is cut down its cells are full of water. Burning such wet or 'green' wood wastes heat in making steam and
produces flammable acidic tars which will cling to and rapidly damage your stove and chimney. Split logs will typically take two years to
become reasonably dry, round logs much longer. Cracks in the ends, a hollow sound when tapped and bark falling away are all signs
that a log may be ready for use. The fine, white residue produced when wood burns is not ash, but the remains of cell walls which can
burn if kept hot enough, so don't de-ash the fire until absolutely necessary.
For best performance on wood, and always if low smoke emission is expected:
Split logs lengthways for drying
Use logs no bigger than about 100mm x 250mm
Ensure logs are absolutely dry (less than 20% moisture)
Fill the stove criss-cross, so air can circulate between logs.
Fill 'little and often'
Always have the air wash control (1) at least a little open. (in Smoke control areas this must be permanently fixed open)
When first lighting, or reviving a fire from embers, use only very small, thin, dry, sticks.
JOINERY WASTE: Dry wood offcuts will burn well, but don't expect softwood waste to burn as cleanly or for as long as hardwood logs.
PEAT: Sod turf must be thoroughly dry. BNM peat briquettes are approved for use in Smokeless Zones in the RoI.
LIGNITE: (not smokeless) is a natural mineral, between peat and coal. It lights easily and burns well, but produces much ash
HOUSECOAL or BITUMINOUS COAL: (not smokeless) makes lots of tarry smoke and large volumes of flammable gas which make it
difficult to control and risk explosions. Despite its low cost, it rarely represents value for money. Don't use house coal.
ANTHRACITE: (Smokeless) is a natural hard, shiny form of coal. Slow to light, it can burn for very long periods with great heat. Despite
its high price-per-bag it generally works out to be one of the cheapest of all fuels. Use the 'small nuts' size. Anthracite works best with
the air wash closed and the primary 1/3 open. But the best settings will depend on your fuel, air supply and flue draught and can only
be found from experience.
COKE: (Smokeless) is coal from which the smoke has been removed. Sometimes difficult to light, it burns very cleanly.
BRIQUETTES: Are compressed blocks of fuel, generally able to burn for long periods and remarkable for their consistency. 'Homefire'
and 'Phurnacite' are smokeless types while other brands are made from lignite, peat or house coal.
PETROLEUM COKE: sold as 'Petcoke', 'Longbeach' and under various proprietary names, is made from oil. Easy to light and to
control, its exceptional heat and lack of protective ash mean that it MUST NOT be used unless mixed with another fuel. Grate and liner
life will be drastically reduced when using petroleum coke
HOUSEHOLD WASTES: Some plastics give off toxic fumes when burned and remember that batteries and aerosols explode! The
stove is not an incinerator, so only ever use the recommended fuels and NEVER use liquid fuels in any form.
6
Installation and Operating Instructions Reference: 1622 Rectella Instove INSET
Operation to Avoid Smoke Emission when Loading and Re-lighting
To prevent the likelihood of smoke emission it is advised that:
The appliance is not overloaded
Fuel should be added to fill the stove criss-cross, so air can circulate between logs.
Fuel should be added 'little and often'
Always have the air wash control (1) at least a little open.
Kindling is used to relight from a low fire-bed
use only very small, thin, dry, sticks
only when alight larger fuel should be added
PROBLEMS?
Problems like those listed here are usually due to some difficulty with the installation, chimney or fuels, so please check back through
this leaflet carefully. If necessary seek specialist advice.
POOR HEAT OUTPUT: A stove can heat a typical room of about 12m³ volume for each kW of output, so a 5kW model can heat up to
(12 x 5) 63m³, a room of about 5m square. The actual size depends on the insulation and air-change ratio of the room. To attempt to
heat a larger room will result in excessive fuel consumption and damaging overheating. Use the recommended very dry fuels.
LACK OF CONTROLLABILITY: Wood and some other fuels may burn excessively until the gases in them have been used up. You
can reduce this effect by making sure that the fire is set to 'low' for a while before refuelling and checking that the door seals fully. For
stoves with a Smoke Stop - adjust the heat output by how much fuel you put on, as well as by using the controls. Check that the door
seals are sound.
DIFFICULTY BURNING FOR EXTENDED PERIODS If the fire goes out with fuel still in the firebox, then this is probably because too
little air has been reaching it, try leaving the air controls open a little more. Check that the door seals are sound and that there are no
cracks or gaps anywhere in the flue. For longest burning, we recommend hard fuels such as anthracite.
CONDENSATION: Condensation onto cool stove surfaces can be severe if fuel is in any way damp. Even an apparently dry 1 kg log
can hold 200 ml, a cupful, of water. Use only very dry fuel.
OVER-FIRING: It is possible to leave the fire too long with the controls set too high leading to 'over firing', seen as glowing metal parts,
excessive chimney temperature and risk of parts failing or chimney fires. Always set controls to the lowest practical setting.
SMOKE COMING INTO ROOM: Fumes are poisonous- smoke emission must NEVER be tolerated, causes might be:
INADEQUATE SEALS: Are all flue pipes and connectors absolutely gas-tight? Check that an inset appliance is fully sealed against the
fireplace. Even the tiniest crack or gap can spoil the draught.
BLOCKED BAFFLE PLATE: Has soot and ash can collect on the 'throat plate' above the inner back part of the firebox? See the
'maintenance' section.
UNSUITABLE, BLOCKED OR UN-SWEPT CHIMNEY: The first requirement for correct operation is a sound chimney. Check the
requirements earlier in this document and in any case of doubt have the chimney professionally swept.
POOR AIR SUPPLY: Is there enough air? Lack of air to the fire is a common cause of smoking and poor performance. Air supply
problems may be worse in certain wind conditions (often incorrectly ascribed to 'downdraught', which is in fact very rare), where air can
be sucked out of the room. The answer is to fit an air vent, as near to the fire as possible, facing into the usual wind direction.
DOWNDRAUGHT: Wind can blow down a chimney if there is something higher nearby such as a tree, hill or high building. Fitting an
anti-downdraught cowl to the chimney top can cure this. Types which cannot be swept through are not recommended.
POOR CHIMNEY DRAUGHT- Chimney draught in use MUST beat least 12Pa.
CHIMNEY FIRE: In the rare event of deposits inside the chimney igniting (roaring sound + dense smoke and sparks from the chimney)
immediately close the door, shut all air controls and call the fire brigade. Prevent fires by using very dry fuel and having your chimney
swept regularly.
7
Installation and Operating Instructions Reference: 1622 Rectella Instove INSET
MAINTENANCE
ANNUALLY- SWEEP THE CHIMNEY The entire length of the chimney from stove to outlet should be swept annually or more often if
smoky fuels are used.
SUMMER SHUT DOWN: Before a long period of non-use, empty fuel and ash, remove the throat plate and leave all the air controls
open to allow ventilation to reduce condensation.
NEW PARTS - Your stove has been extensively tested for safety - please don't try to modify it and always make sure to obtain genuine
spare parts.
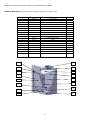
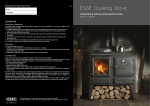
Your stove generates VERY high temperatures. Eventually the internal parts will require replacement. Fig 14 shows the internal layout
of your stove. A full list of replacement parts can be found on page 9 of the instruction booklet.
Help parts to last by:
Using only recommend, very dry, fuels.
Emptying the ash very regularly when using mineral fuel -never allow it to touch the underside of the grate.
Cleaning the throat plate regularly.
Avoiding 'over-firing'
BAFFLE PLATE
BASE BRICK
TOP BRICK
SIDE BRICKS
(Fig 15) Operating tool
BACK BRICKS
(Fig 14)
The operating tool is used for opening the fire door, removing the ashpan and moving the primary and secondary air sliders.
IMPORTANT: The operating tool MUST be used for opening and closing the stove door.
Excessive force closing the door by hand may result in the door glass breaking and this will
not be covered under the stoves warranty.
Baffle plate removal - Should you wish to sweep the chimney then remove the baffle plate by taking out the two support pins in the
side bricks in the top of the stove that hold the baffle plate in place (Fig 16 and 17)
(Fig 16)
(Fig 17)
8
Installation and Operating Instructions Reference: 1622 Rectella Instove INSET
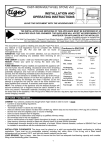
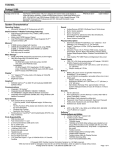
ORDERING NEW PARTS – Please use the item list below whenever you need to order.
ITEM NO.
PART NUMBER
DESCRIPTION
QTY
1
1622-015
TOP FLUE RING
1
2
INTEGRA-002
DOOR FRAME
1
3
2040-280
DOOR LATCH A
1
4
1622-006
DOOR GLASS
1
5
1622-021
PRIMARY DOOR AIR SLIDER
1
6
1622-014
TOP AIR WASH SLIDER
2
7
1622-004
BACK VERMICULITE BRICK
2
8
1622-002
TOP VERMICULITE BRICK
1
9
1622-001
SIDE VERMICULITE BRICK
2
10
1622-001a
LOWER SIDE VERMICULITE BRICK
2
11
1622-003
BASE VERMICULITE BRICK
1
12
1622-010
BAFFLE
1
13
2040-290
DOOR CATCH B
1
14
1622-020
MAGNET
4
15
1622-024
CAST IRON KNOB
1
16
1622-025
CAST IRON GRATE
1
17
1622-023
ASHPAN
1
18
1622-026
HINGE
2
19
1622-027
DOOR HINGE PIN
2
6
1
19
8
18
12
2
7
4
9
10
16
17
15
11
5
9
Installation and Operating Instructions Reference: 1622 Rectella Instove INSET
TO FIND A QUALIFIED INSTALLER, FUEL SUPPLIER or CHIMNEY SWEEP, CONTACT:
UK: The Solid Fuel Association, 7 Swanwick Court, Alfreton, Derbyshire DE55 7AS Tel:0845-601-4406 www.solidfuel.co.uk
RoI: Irish Nationwide Fireplace Organisation, 162 Chapel Street, Dublin 1 Tel:01-801-5959 www.fireplace.ie
Read these instructions! Use only recommended fuels!
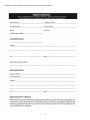
This document, when completed by the installer, constitutes a 'Hearth Notice' for purposes of the England and Wales
Building Regulations 2000. It must be left with the householder and placed where it can easily be found.
APPLIANCE SERIAL NUMBER:
INSTALLED AT LOCATION:
Flue Draught measured
on commissioning:
BY:
Pa
ins.wg
EMERGENCY TELEPHONE:
SIGNED:
Fuel used on
commissioning
DATE:
Who certifies that this installation is safe, has been demonstrated to the householder,
conforms with current building regulations and with these instructions
10
Installation and Operating Instructions Reference: 1622 Rectella Instove INSET
11
Installation and Operating Instructions Reference: 1622 Rectella Instove INSET
12