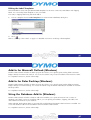
1
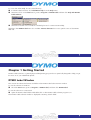
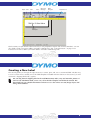
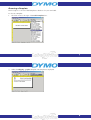
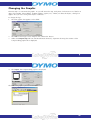
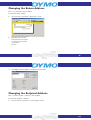
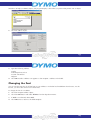
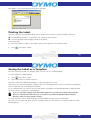
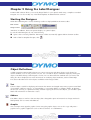
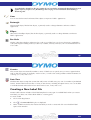
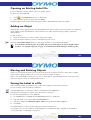
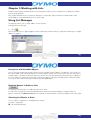
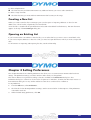
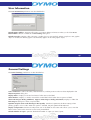
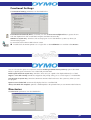
Contents Introduction .......................................................................................................................... 1 Features .................................................................................................................................... 1 Installing the LabelWriter .......................................................................................................... 2 Getting Help ............................................................................................................................. 2 Chapter 1 Getting Started ..................................................................................................... 4 DYMO Label Window .............................................................................................................. 4 Creating a New Label ............................................................................................................... 6 Chapter 2 Using the Label Designer .................................................................................... 17 Starting the Designer ............................................................................................................... Object Definitions .................................................................................................................. Creating a New Label File ....................................................................................................... Opening an Existing Label File ............................................................................................... Adding an Object ................................................................................................................... Moving and Resizing Objects ................................................................................................. Saving the Label to a File ........................................................................................................ 17 18 20 21 21 22 22 i Chapter 3 Working with Lists .............................................................................................. 23 Using List Manager ................................................................................................................. 23 Creating a New List ................................................................................................................. 25 Opening an Existing List ......................................................................................................... 25 Chapter 4 Setting Preferences ............................................................................................. 26 User Information ..................................................................................................................... General Settings ...................................................................................................................... Functional Settings .................................................................................................................. Directories .............................................................................................................................. 27 28 29 30 Chapter 5 Using the LabelWriter with Other Applications ................................................. 32 Add-In for Microsoft Word ...................................................................................................... Add-In for Microsoft Outlook (Windows) ................................................................................ Add-In for Palm Desktop (Windows) ....................................................................................... Using the Database Add-In (Windows) ................................................................................... Printing Directly from Other Applications ............................................................................... 32 36 36 36 37 Chapter 6 Maintenance and Troubleshooting ..................................................................... 38 Technical Support ................................................................................................................... 40 ii Appendix A Technical Specifications ................................................................................... 42 Hardware Specifications ......................................................................................................... 42 LabelWriter Developer Information ........................................................................................ 43 iii iv Introduction This User Guide provides step-by-step instructions for the Windows and Macintosh platforms. Any differences in procedures or commands are noted in the text. Features Software The DYMO Label Software includes many features that make it flexible and easy to use. The LabelWriter has been integrated into Microsoft ® Word allowing you to print labels quickly and easily from within Word. For Windows, the LabelWriter has also been integrated with Microsoft Outlook ® and Palm ™ Desktop. Hardware The LabelWriter uses advanced thermal printing technology to print on specially treated labels. This means you will never have to replace toner, ink cartridges, or a ribbon to print labels. 1 Labels The only supplies you will ever need for this printer are the labels. We recommend you only use DYMO-brand labels. Using labels other than DYMO-brand labels may void your warranty. When not in use, keep the labels stored in a cool dry place and in the black bag in which they were shipped to prolong label life. Installing the LabelWriter Follow the instructions in the Quick Start Card that was shipped with your LabelWriter to install the LabelWriter hardware and software. Getting Help Before making labels you should be aware of the various help resources available to you. DYMO Label Software comes with extensive online Help. At times in this manual you will be directed to the online Help for more detailed discussion or instructions on various topics. 2 To access the online Help, do one of the following: n In DYMO Label Software, click LabelWriter Help from the Help menu. n (Windows) Click on the Start button, point to Programs > DYMO Label and then click Help with DYMO Label Software. n (Windows) Press F1 in most windows and dialog boxes for context-sensitive help. (Windows) The DYMO Label menu also includes Internet Shortcuts that access specific areas of the DYMO Web site. 3 Chapter 1 Getting Started DYMO Label Software is a general-purpose label printing program that is specifically designed to help you get the most out of your LabelWriter printer. DYMO Label Window This section introduces the features available on the DYMO Label Software main window. To start the software in Windows n Click the Start button, point to Programs > DYMO Label, and then click DYMO Label. To start the software on a Macintosh n Open the DYMO Label folder and double-click on the DYMO Label Software program icon. The DYMO Label Software window is displayed containing a blank label. 4 Open Save Print Paste Open List Manager Open Designer Template List Label Workspace Rulers The first time you open DYMO Label Software you are prompted to register the software (Windows). You are also asked to enter your return address and select a default logo. See „User Information“ on page 27 for instructions on how to define your return address and select a default logo file. 5 Creating a New Label This tutorial guides you through the steps necessary to create, print, and save a customized label. The best way to start is to learn how to modify one of the label templates included with the software. In this tutorial, you will customize a shipping label with a graphic. You can only print the shipping label on the LabelWriter EL60, Turbo, 320, and 330 Turbo printers. If you have the LabelWriter EL40, 310 or 315, select this label template and follow the tutorial. This tutorial will give you valuable information on how to access the various text and, design objects and change their attributes. 6 Choosing a Template The first step is to choose a label template as the basis for your new label. To choose a template 1. Click the arrow to the right of the Label Templates box. 7 2. Select the Shipping - graphic template. The template is displayed. 8 Changing the Graphic The next step is to customize the graphic. As you will see in this step, each piece of information on a label is an object (for example, return address, recipient address, graphic, etc.). When you select the object, a dialog box appears that you use to change the object’s attributes. To change the logo 1. Click the graphic that appears on the label. 2. Click File as the image source and press the 'Select File' button. 3. Select the Comput1.bmp file from the Miscellaneous directory. A preview showing the contents of the Comput1.bmp graphic file is displayed. 9 4. Click Open. The Comput1.bmp graphic is displayed. Click OK. The graphic is placed on the label. 10 Changing the Return Address Next, you change the return address. To enter the return address 1. Click the text in the label’s upper-right corner. 2. Type the following text: Computer Service Center 25 Avenue de Tourville 75007 Paris France 11 3. Click OK. The new address is displayed on the label. Changing the Recipient Address Next, you enter Esselte’s address as the recipient. To enter the recipient’s address 1. Position the arrow pointer over the address object. 12 (Windows) To help you identify objects, the program displays a hint when you position the pointer over an object. 2. Click the address object. 13 3. Type the following address: Esselte Industriepark-Noord 30 B-9100 Sint-Niklaas Belgium 4. Click OK. Esselte’s address now appears as the recipient’s address on the label. Changing the Font You can use the same font for all the lines in your address or make the first line different from the rest. For this tutorial, you’ll use the same font for all the lines. To change the font for an address 1. Click the recipient address object. 2. Click the Font button and select All Lines from the drop-down menu. 3. If Arial is not selected, select Arial . 4. Click OK twice to return to the label template. 14 The address is now formatted with Arial type on the label. Printing the Label Now that you have customized the label, you are ready to print. Before you print the label, make sure: The LabelWriter printer is connected to your computer and turned on. You have properly loaded shipping labels in the printer. To print the label 1. Enter the number of copies of this label to print in the Copies box on the Main toolbar. 2. Click on the Main toolbar. 15 Saving the Label as a Template Now that you have created your shipping label, you can save it as a label template. To save the label as a label template 1. Click 2. Type a new name for the file and save it. on the Main toolbar. (Windows) Select the LabelWriter Templates (*.LWT) file type before saving. Notice that your new label template is added to the top of the templates list as the most recently used template and also alphabetically in the template list below. To use a template file you created, choose it from the list of templates and the label template is displayed with all the information you placed on the template. To access your label templates from the Label Templates list, you must store them in the Label Files directory. A default Label Files directory is created for you, under the DYMO Label installation directory, when you first install the software. For more information about label templates and the Template Manager, see the online Help. Now that you can open, edit, print, and save a shipping label, you are ready to use and/or modify most other label templates. 16 Chapter 2 Using the Label Designer DYMO Label Software allows you to easily design labels for your specific needs using a simple-to-use Label Designer. You can also modify any of the label templates included with the software. Starting the Designer When the Label Designer is active, the Design toolbar is displayed below the Main toolbar. Main Toolbar Design Toolbar (Windows) In addition, the mouse pointer displays as a pencil object. To start the Label Designer, do one of the following n Open a new or existing label file. The Design toolbar automatically appears below the Main toolbar. n With a label or template file open, click . 17 Object Definitions A label created in DYMO Label Software can contain various text and design objects. Each object has certain attributes, such as size, position, font, etc. You can edit an object’s attributes simply by clicking the object (or double-clicking if the Designer is active). You can then select the attributes that you want in the dialog box that is displayed. For more information on modifying object attributes, see the online Help. This section describes each of the objects available on the Design toolbar. Text The text object is useful for displaying information that remains unchanged every time you print a new label (for example, “Hello my name is” on name badges or your return address on shipping labels). By defining the text you are using as a preference setting and then copying the text into text objects, you are able to print labels with information on them that is static. Address The address object is similar to the text object, but is designed to print information that changes with each label printed, such as names and addresses. Graphic You can import many popular graphic formats using the graphic object. You can also copy and paste a graphic from a graphics application (such as Microsoft Paint® or CorelDRAW® ). 18 If you defined a default logo file, the graphic file you specified is automatically displayed in any new graphic objects you place. See „Default Logo File“ on page 27 for information about defining a default logo file. Lines You can use the horizontal and vertical line objects to improve a label’s appearance. Rectangle The rectangle object, like the line objects, is primarily used as a design element to enhance a label’s appearance. Ellipse (Macintosh) The ellipse object, like the line objects, is primarily used as a design element to enhance a label’s appearance. Bar Code The bar code object displays and prints a bar code on your label. You can choose from many standard bar code symbologies including Code 39, Code 128, Codabar, UPC A/E, EAN 8/13, ITF-14 and Interleaved 2 of 5 bar codes. 19 Counter The counter object automatically numbers a series of labels.You can specify text you want to appear before and/ or after the counter (for example, “Disk # of ten”), as well as the starting number and the increments for counting (1, 10, 100, and so on). Date-Time The date-time object stamps the current date and/or time on labels using any one of a number of pre-defined formats. DYMO Label Software offers a variety of date formats, including European formats. You can include or exclude the time and use the 24-hour time format (13:00, 22:00, and so on). Creating a New Label File DYMO Label Software includes a blank label template for every type of available label. When you create a new label, you select one of these blank labels as a starting point. To create a label 1. Click on the deign button 2. Click 3. Select a label from the list that matches the label you wish to create and click O.K. The blank label opens in the Window. . The New Label dialog box is displayed. 20 Opening an Existing Label File To use a label file you have saved to disk, you simply open it. To open an existing label file 1. Click . The Open File dialog box is displayed. 2. Select the file you wish to open and click Open. The label opens in the window and the Design toolbar is displayed below the Main toolbar. Adding an Object Although the various types of objects are quite different, the steps for placing all of the objects on a label are nearly identical. The only difference is the tool button you select from the Design toolbar to place the desired object. To add an object 1. Click the object that you wish to add on the Design toolbar. 2. Place the object where you want it on the label using the cursor. Click the Cancel/Select Object button on the Design toolbar to cancel object placement. If you defined a default logo file, the graphic file you specified appears in all new graphic objects you place. See „Default Logo File“ on page 27 for information about defining a default logo file. 21 Moving and Resizing Objects When you activate the Designer, you can use the mouse to drag objects where you want them to appear, and increase or decrease their size. You can also rotate most types of objects. Refer to the online Help for information on how to align objects, resize multiple objects at the same time, and move objects in front of or behind other objects. Saving the Label to a File After you design a label, you should save it to a file on the computers hard disk for future use. To save changes you have made to a label file Click the Save button on the Main toolbar or click Save from the File menu. The program overwrites the contents of the file with your changes. To save the changed label as a new label file 1. On the File menu, click Save As. The Save File dialog box is displayed. 2. Type the name of your new label in the File name box. 3. (Windows) Select the LabelWriter Labels (.LWL) file type from the Save as type list. 4. Click Save. Your label design is saved as the new file name with the .lwl extension. If you prefer, you can save a label as a label template or a LabelWriter add-in template as described in „Saving the Label as a Template“ on page 16. 22 Chapter 3 Working with Lists DYMO Label Software includes a built-in List Manager that allows you to maintain lists of addresses routinely used to generate labels. This chapter describes how to use the List Manager to create, edit, and print entries on labels. Refer to the online Help for more detailed information on this topic. Using List Manager List Manager allows you to create address or data list files. To display the List Manager 1. Click . The last list file that was opened appears in the List Manager. The first time you open the List Manager, a sample address list appears. 23 Using Lists with Variable Objects You can use the List Manager to enter information into variable objects (address, variable text, or bar code) on the current label. If the current label does not contain address objects, but contains more than one other type of variable object, you need to select the object into which you want the selected List Manager entry to appear. In this case, when you open the List Manager, a dialog box appears listing the available objects. Select the object you want to link to the List Manager and then click the Close button. Rotating Names in Address Lists List Manager automatically sorts addresses by the last name. In some cases, List Manager incorrectly identifies the last name or incorrectly identifies a company name as a person’s name. Click theRotate Name button to rotate the words in the entry’s first line to display in the correct order. Selecting List Entries to Print You can select a single entry or multiple entries to print. To select a single entry n Click the desired entry. 24 To select multiple entries n Click the first entry and then CTRL+CLICK any additional entries you want to select (Windows). To select a range of entries n Click the first entry you want and then SHIFT+CLICK the last entry in the range. Creating a New List When you create a new list file, List Manager gives you the option of importing addresses or data (for new address lists or data list files, respectively) into the new file. A new list file is created with the specified name and stored in the default list file directory. The new file name appears at the top of the List Manager dialog box. Opening an Existing List If you have more than one address or data list file, you can select the list you want to use to create labels. Also, if you want to import addresses or data into a file, you must first open the file into which you want to import the data. For information on importing and exporting list data, see the online Help. 25 Chapter 4 Setting Preferences This chapter describes how to define preferences that allow you to customize certain DYMO Label Software settings. The preference settings you select remain in effect until you change them. The sections below are organized according to the tabs available in the Preferences dialog box. The Preferences dialog box screen shots shown in this chapter are for Windows; however, the Macintosh version of the Preferences dialog box is very similar and these screen shots can be used as a reference. To set preferences 1. From the Edit menu, select Preferences. 2. Click the tab for the desired preference settings. See the sections below for descriptions of the preferences contained in each tab. 3. When finished setting preferences, click OK. 26 User Information The User Information preferences are described below. Default Return Address. Automatically inserts your return address information when you click the Insert Return Address button available in the Text Settings dialog box. Default Logo File. Specifies a file containing a graphic that you use regularly. When you place a new graphic object on a label, this default graphic automatically appears in the new graphic object. 27 General Settings The General Settings preferences are described below. Units of Measure. Used for the rulers, label dimensions, and the position and size values displayed in the Object Properties dialog box. Display Rulers. Displays horizontal and vertical rulers next to the label. Show Shadows. Displays a shadow around the current label. The shadow does not print on labels. Show Print Progress Dialog (Windows). Suppress Print Progress Dialog (Macintosh). Displays or hides the Print Progress dialog box when you print labels. Optimize Graphic & Bar Code Printing for Best Quality. (Windows) Optimizes the driver settings when printing graphics or bar codes. When this option is selected, the print speed will be reduced. Display Compensation. (Macintosh) Adjusts the size of the label on the screen. This allows you to view the label on the screen at the same size as the actual printed label. Default Number of Copies. Specifies the default number of copies you want to print. 28 Functional Settings The Functional Settings preferences are described below. Paste Button Automatically Prints. Each time you click the Paste From Clipboard button, pastes the text from the clipboard into the current label and prints the label automatically. Minimize to System Tray. (Windows) Places the program icon in the Windows system tray when you minimize the program. To restore the main DYMO Label Software screen: n Double-click the DYMO printer icon or right-click on the LabelWriter icon and then select Restore. 29 You can also use this option in conjunction with the Enable Quick Print from System Tray option (described below) to quickly paste information into a label and print the label. Enable Quick Print from System Tray. (Windows) Prints text you copied to the clipboard directly to a label. Suppress “Save File“ Prompt. (Windows) Suppresses the prompt asking you to save changes to a modified file. Start Program in System Tray. (Windows) Minimizes DYMO Label Software to the system tray when you start the program. Open Last Saved Label File. Automatically displays the last saved label file. Always Start With This Template. Specifies a label template to be opened when you start DYMO Label Software. Directories The Directories preferences are described below: 30 Label File Directory. Specifies the directory in which you want to store label files, label templates, and add-in templates. List File Directory. Specifies the directory in which you want to store List Manager address and data lists. Clipart Directory. Specifies the directory in which you want to store graphics. Add-Ins Folder. (Macintosh) Specifies the folder in which you want to store add-in scripts. 31 Chapter 5 Using the LabelWriter with Other Applications This chapter describes how to use your LabelWriter with other application programs. Add-In for Microsoft Word DYMO Label Software includes an add-in program that enables you to quickly print mailing labels from a Microsoft Word document. You access the add-in using a tool the LabelWriter software installs on the Word toolbar. The add-in works with Microsoft Word 97, 2000, and XP for Windows and Microsoft Word 98 and 2001 for Macintosh. Installing the Word Add-In When you select Add-In for Microsoft Word during installation of DYMO Label Software, the Word Add-in is automatically installed as well. You will see a small LabelWriter button in the main toolbar of Microsoft Word. If you don’t see this button, you will need to reinstall the DYMO Label Software making sure that the Add-In for Microsoft Word box is checked. 32 Using the Word Add-In When the Word Add-in is properly installed, you will see the LabelWriter button in the main toolbar of Microsoft Word. To start using the Word Add-in 1. Open Microsoft Word and type an address. 2. Click on the Word toolbar or select the DYMO LabelWriter command from the Tools menu. The DYMO LabelWriter dialog box appears on the screen with the address from your document automatically placed in the Recipient Address field. If your letter contains more than one address and you want to make sure the Word Add-In uses the correct one, select the address in your Word document before you click . 33 Printing the Address Once the DYMO LabelWriter dialog box appears, you can select from a number of different address and shipping label templates, depending on how you want the label to look. To print the label 1. Select the desired label template from the Label Template box. (Windows) Only the templates saved with the *.LWA extension will appear in the Label Template list. 2. To change the address, edit the address in the dialog box. 3. Click the Print Label button to print the label. If you are printing a shipping label template, it will include the return address that’s already been defined for the template. 34 Editing the Label Templates The Word Add-In comes with pre-defined label templates for the most commonly used address and shipping labels. You can modify these templates to suit your needs. To modify a shipping label using the Word Add-in 1. Choose a template from the Label Templates box in the DYMO LabelWriter dialog box. 2. Click . Refer to „Creating a New Label“ on page 6 for detailed instructions on editing a label template. 35 Add-In for Microsoft Outlook (Windows) DYMO Label Software includes an add-in program that allows you to quickly print mailing labels and name badges directly from Microsoft Outlook. You access the add-in using a button installed on the Outlook toolbar. For complete instructions, see the online Help. Add-In for Palm Desktop (Windows) DYMO Label Software includes an add-in program that allows you to quickly print mailing labels and name badges directly from Palm Desktop. You access the add-in using the DYMO Label button installed on the Palm Desktop toolbar. For complete instructions, see the online Help. Using the Database Add-In (Windows) DYMO Label Software includes a database add-in that enables you to print information from a variety of databases onto labels. Once you install the add-in, you can quickly print address, shipping, file folder, and other labels from the data in your database. When selected, the database add-in is automatically installed when the DYMO Label Software is installed. You access the database add-in from the Add-Ins menu in DYMO Label Software. For complete instructions, see the online Help. 36 Printing Directly from Other Applications At times you may want to print labels directly from another program to your LabelWriter, without using DYMO Label Software or the LabelWriter add-ins. One example could be if you maintain address lists within Microsoft Word or Access and want to print them all on labels without importing the list to the DYMO Label Software List Manager. Printing labels directly from applications like these is quite easy because the LabelWriter printers come with standard printer drivers that work with virtually any application. Detailed instructions on printing directly from Microsoft Word and Access can be found in the online Help. Even if you are using a different application program than Word or Access, reading the instructions in the online Help will give you an understanding of how to use the LabelWriter printer driver with your favorite program. 37 Chapter 6 Maintenance and Troubleshooting This chapter describes how to take care of your LabelWriter and offers suggestions for identifying problems that can occur when you use the LabelWriter printers. If you can’t solve the problem, this chapter also describes how to contact DYMO for technical support. Caring for the LabelWriter The LabelWriter printer is designed to give you long and trouble-free service, while requiring very little maintenance. You’ll get the best possible performance from your LabelWriter if you follow the setup instructions that appear in the Quick Start and the procedures described in this section. You can easily clean your LabelWriter using a lint free cloth, isopropyl alcohol, and a small, soft brush. You can also use the LabelWriter cleaning card included in your printer package. Performing a Printer Self-Test If you experience problems with broken characters or other print quality issues, you should perform a printer self-test. The self-test verifies that all elements of the print head are in working condition. 38 LabelWriter EL40, EL60, Turbo, and 330 Turbo To perform a self test for the LabelWriter EL40, EL60, Turbo, and 330 Turbo 1. Turn off the printer using the switch on the back. 2. Press and hold down the form-feed button. 3. Turn on the printer and then release the form-feed button. Your LabelWriter will print vertical lines along the width of the printer. To change the test pattern being printed, press the form-feed button. 4. To stop the self test, turn the printer off. LabelWriter 310, 315 and 320 To perform a self-test for the LabelWriter 310, 315 and 320 1. Press and hold down the multi-function button on the front of the LabelWriter for 10 seconds. The LED light begins flashing red and green, and starts printing vertical lines along the width of the printer. The test pattern automatically changes every 3/4 inch (1.9 cm). 2. To stop the self test, press and release the multi-function button. 39 Technical Support Refer to the table below to determine the customer support telephone number for your country. Country Telephone Support Fax Support België/Belgique 02/ 713 38 08 +31/ 20/ 581 93 80 Ceska Republika 02/619 12 720 +31/ 20/ 581 93 80 Danmark 35 25 65 08 +31/ 20/ 581 93 80 Deutschland 069/ 66 56 85 29 +31/ 20/ 581 93 80 España/Portugal 91/662 31 49 +31/ 20/ 581 93 80 France 01/69 32 49 32 +31/ 20/ 581 93 80 Hong Kong +852 2527 1928 Hungaria 424-6600 +31/ 20/ 581 93 80 40 Country Telephone Support Fax Support Italia 02/ 45 28 13 08 +31/ 20/ 581 93 80 Nederland 020/581 93 86 020/ 581 93 80 Norge 22 97 17 10 +31/ 20/ 581 93 80 Österreich 01/ 599 14 20 12 02/627-400-160 Polska 00800/311 12 50 +31/ 20/ 581 93 80 Schweiz/Suisse 01/342 04 66 +31/ 20/ 581 93 80 Slovakia (+420) 2/619 12 720 +31/ 20/ 581 93 80 Suomi 09 229 07 04 +31/ 20/ 581 93 80 Sverige 08/ 632 00 57 +31/ 20/ 581 93 80 Turkey 212/ 286 26 30 Pbx +31/ 20/ 581 93 80 United Kingdom (+44) 020/ 7341 55 29 +31/ 20/ 581 93 80 41 Appendix A Technical Specifications Hardware Specifications This section gives the printer specifications for all the LabelWriter printers. EL40 EL60 Print Method Direct Thermal Print Resolution 203 dots per inch (80 dots per mm) Turbo 330 Turbo 310 315 320 8 16 300 dots per inch (118 dots per mm) Print Speed (labels/min for 4line address label in text mode) 12 12 2.25" (56 mm) 32 2.25" (56 mm) 32 Maximum Print Width 1.57" (40 mm) 2.25" (56 mm) Maximum Media Width 2.44" (62 mm) in all printers Maximum Label Length User-definable Paper Handling Maximum 300 feet (91 meters) of thermal paper; 1200" (30 meters) of labels Interface USB (USB Spec 1.1 protocol) and Serial (Bi-directional, serial RS232) 8 1.57" (40 mm) 1.57" (40 mm) 2.25" (56 mm) USB (USB Spec 1.1 protocol) 42 EL40 EL60 Turbo 330 Turbo 115,200 baud, 8 data bits, no parity, hardware handshaking 310 315 320 N/A N/A N/A 24 VDC 0.63 A 24 VDC 1.0 A Serial Printer Settings 19,200 baud, 8 data bits, no parity, hardware handshaking Dimensions 4 7/8" (12.4 cm) x 5 ¾" (14.6 cm) x 7 ¼" (18.4 cm) (WHD) Weight 1 1/2 pounds (.68 kg) Average Print Head Life 2,000,000 linear inches 50800 linear meters Printer Power Requirements 100-240 V ~ 850 mA 47-63 Hz, Class II The LabelWriter printer' s internal power supply allows you to use it Worldwide with an appropriate adapter. Regulatory Approvals CE, FCC, cTUVus, GS and C-Tick Warranty One Year Limited 24 VDC 0.63 A LabelWriter Developer Information DYMO provides various types of information designed to help developers create products that work with the LabelWriter printers and DYMO Label Software. For more information, visit www.dymo.com/developers. 43 Declaration of Conformity DYMO Corporation 44 Commerce Road Stamford, CT 06902-4561 Phone: (203) 355-9000 Fax: (203) 355-9090 Equipment Information Description: Direct Thermal Printer Models: LabelWriter 310, 315, 320, 330 Turbo, EL40, EL60, Turbo This equipment has been tested and found to comply with the limits for a Class B digital device, pursuant to Part 15 of the FCC (Federal Communications Committee) rules. These limits are designed to provide reasonable protection against harmful interference in a residential installation. This equipment generates, uses, and can radiate radio frequency energy, and, if not installed and used in accordance with the instructions, may cause harmful interference to radio communications. However, there is no guarantee that interference will not occur in a particular installation. If this equipment does cause harmful interference to radio or television reception, which can be determined by turning the equipment off and on, the user is encouraged to try correcting the interference by one or more of the following measures: 44 n n n n n Reorient the receiving antenna. Increase the separation between the equipment and the receiver. Connect the equipment to an outlet on a circuit different from that to which the receiver is connected. Use shielded cables to connect this device to computers. Consult the dealer or an experienced radio/TV technician for help. WARNING: Changes or modifications to this unit not expressly approved by the party responsible for compliance could void the user’s authority to operate the equipment and void the manufacturer’s warranty. Certification This device has been tested and complies with the requirements of: UL 1950 EN60950: Low Voltage Directive Product Safety FCC Part 15 Class B EN55022: Radiated and Conducted Emissions B EN50082-1: Generic Immunity ESD, RF, and Transient Susceptibility 45 Copyright Copyright © 2002 DYMO Corporation. All rights reserved. Revised 4/02 Trademarks LabelWriter is a registered trademark of DYMO Corporation. DYMO is a registered trademark of Esselte Corporation. All other trademarks are properties of their respective holders. 46 Index A Add-Ins Folder 31 address objects 18 Always Start With This Template 30 B bar code objects 19 C Clipart Directory 31 Codabar 19 Code 128 19 Code 39 19 D Database Add-In 36 date-time objects 20 default clipart directory 31 label file directory 31 list file directory 31 logo file 27 return address 27 Default Logo File 5, 27 Default Return Address 5, 27 design toolbar 17 designer 17 developer information 43 DYMO Label Software starting 4 using with other programs 32 using with Outlook 36 using with Palm Desktop 36 E EAN 8/13 19 ellipse objects 19 Enable Quick Print from System Tray 30 English (units) 28 H horizontal line objects 19 47 I inches 28 installation Outlook Add-In 36 Interleaved 2 of 5 19 ITF-14 19 L Label Designer 17 starting 17 Label File Directory 31 label templates 17 opening 5 saving 16 labels 17 opening 21 printing 15 saving 16 storage 2 LabelWriter taking care of 38 line objects 19 List File Directory 31 List Manager displaying 23 opening files 25 printing entries 24 M main toolbar 17 Metric 28 Microsoft Outlook 36 Word 33 Minimize to System Tray 29 48 O objects about 17 address 18 bar code 19 date-time 20 ellipse 19 horizontal line 19 rectangle 19 text 18 vertical line 19 Open Last Saved File 30 opening label files 21 label templates 7 List Manager files 25 Outlook Add-In 36 P Palm Desktop Add-In 36 Paste Button Automatically Prints 29 printer maintenance 38 self-test 38 specifications 42 testing 38 printing automatically after pasting 29 from List Manager 24 labels 15 R rectangle objects 19 return address 5, 27 Rotate Name 24 rulers 28 S save file prompt 30 saving label files 22 label templates 16 self-test 38 Show Print Progress Dialog 28 49 V Show Rulers 28 Show Shadows 28 start-up label file 30 storing labels 2 Suppress "Save File" Prompt 30 T templates opening 5 saving 16 text objects 18 thermal printing 1 variable objects 24 text objects 24 vertical line objects 19 W Word Add-in 32 U units of measure 28 UPC A/E 19 User Information 27 50