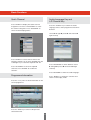
1
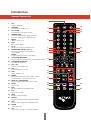
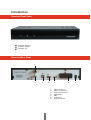
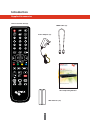
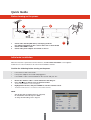
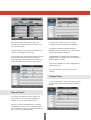
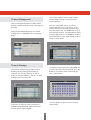
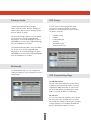
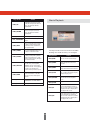
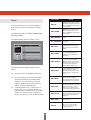
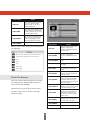
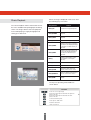
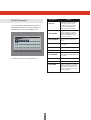
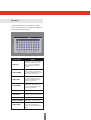
TR 112 Saorview HD TV Receiver Part no. 305107 Operating Manual SAORVIEW offers the best Irish television – free for everyone. 1 Operating Manual • The illustrations and the OSD in this operation manual are for explanation and guidance purposes only. • The examples used throughout this manual are based on the TR112 Digital Terrestrial Receiver model. Dear Triax customer Thank you for purchasing the TRIAX TR112 (Saorview HD TV Receiver). To ensure safety and many years of trouble-free operation, please read the Important Safety Precautions carefully before using this product. Contents Introduction Important safety precautions Remote control unit Receiver (front view) Receiver (rear view) Supplied accessories 3 3 4 5 5 6 Preparation Inserting the batteries Using the remote control unit 7 7 7 Quick guide Initial installation overview Before turning on the power Initial auto installation 8 8 9 9 Watching TV Basic Functions Electronic Programme Guide (EPG) Digital Text Subtitles Record & Time Shift 10 11 12 13 13 13 Installation Auto Search Manual Search Channel Filter Channel Management Channel Manager Favourites List 15 15 16 16 17 17 18 Preference Settings OSD Language Preferred Subtitle Hard Hearing Preferred Audio Multimedia PVR Config 19 19 19 19 20 20 20 System Settings Menu System Settings Menu Timers Child Lock Date & Time Active Antenna Factory Reset Upgrade Version Auto Standby 22 22 22 23 23 24 24 24 24 24 2 AV Settings Contrast Brightness & Stauration SPDIF Aspect Ratio Video Output Video Resolution HDMI Colour Space HDMI Deep Colour 25 25 25 25 25 26 26 26 26 Multimedia Filter Selection Mode Movie File Browser Movie Playback Go To Menu Music Photo File Browser Photo Playback Photo Thumbnail Recorder Manager Rename 27 27 27 28 29 30 31 32 33 34 35 Disk Manager Disk Manager Browser Rename Move / Copy E-Book Browser E-Book Menu 36 36 36 36 37 37 Software Upgrade USB Upgrade 38 38 Triax TR112 Specification 39 PIN Code Reminder 41 Appendix Trademarks Troubleshooting End of Life Disposal 42 42 43 44 Terms of Guarantee 45 Declaration of Conformity 46 Introduction Important Safety Precautions • Cleaning - Unplug the AC power adapter from the AC outlet before cleaning the product. Use a damp cloth to clean the product. Do not use liquid cleaners or aerosol cleaners. • Use a soft damp cloth to gently wipe the product when it is dirty. To protect the product, do not use a chemical cloth to clean it. Chemicals may cause damage or cracks in the casing of the product. • Water and moisture - Do not expose the unit to wet or damp conditions. • Do not place vases or any other water-filled containers on this product. The water may spill onto the product causing fire or electric shock. • Ventilation - The vents and other openings in the casing are designed for ventilation. Do not cover or block these vents and openings since insufficient ventilation can cause overheating and/or shorten the life of the product. Do not place the product on a bed, sofa, rug or other similar surface, since they can block ventilation openings. This product is not designed for built-in installation; do not place the product in an enclosed place such as a bookcase or rack, unless proper ventilation is provided or the manufacturer’s instructions are followed. • Heat sources - Keep the product away from heat sources such as direct sunlight, radiators, heaters, stoves and other heat-generating products (including amplifiers). • To prevent fire, never place any type of candle or naked flames on the top or near the product. • The product uses power even in Standby. Unplug the product from the AC outlet when you are not using it. • Servicing - Do not attempt to service the product yourself. Removing covers can expose you to electric shock and other dangerous conditions. Maintenance should be performed by a suitably qualified person. 3 Introduction Remote Control Unit 1 1 TXT 2 STANDBY 2 16 3 TV / RADIO 3 17 18 4 NUMBER PAD 5 MENU 6 EXIT 7 Go To Displays digital text Switch between standby and on Select between TV and radio channels Select the channel number directly by entering its number. Set the page in digital text mode Exit on-screen display NAVIGATION (Cursor) ENTER 9 5 Displays Go To menu in multimedia mode 8 4 “MENU” screen on/off 19 6 Move up/down/left/right in menus and on screen displays 7 20 Confirm selection in menu/on-screen display COLOURED BUTTONS For interactive use, navigating menus and multimedia functions 8 10 PLAYBACK CONTROLS For multimedia functions 11 CH+ / CH 9 Select the channel (Up/Down) 12 VOL + / Increase/decrease the volume 10 13 SUB Switch subtitles on/off 14 MEDIA 11 Enter multimedia functions when a USB or external Hard Disk Drive is connected to the receiver 12 15 PAGE UP / PAGE DOWN Move one page at a time when in menu screens 16 MUTE Volume on/off 17 EPG Display the Electronic Programme Guide 18 FAV Display favourite lists 19 INFO Displays channel information 20 RECALL Displays last channel and for multimedia functions 21 REC Use to record a programme in multimedia mode 22 AUDIO 23 AD Select audio mode Switch audio description on/off where applicable 4 21 13 14 22 15 23 Introduction Receiver (Front View) STANDBY BUTTON CHANNEL DOWN CHANNEL UP Receiver (Rear View) 1 2 3 4 5 1 2 3 4 5 6 7 5 DVB-T Antenna In DVB-T Loopthrough SPDIF Optical Output HDMI Output USB TV (SCART) DC Power Socket 6 7 Introduction Supplied Accessories Remote Control Unit (x1) HDMI Cable (x1) Power Adaptor (x1) + + TR112 Operating Manual AAA Batteries (x2) - - 6 Preparation Inserting the batteries Before using the Receiver for the first time, insert the two supplied “AAA” size zinc-carbon batteries. When the batteries become depleted and the remote control unit fails to operate, replace the batteries with new “AAA” size batteries. 3 Close the battery cover. • + + Open the battery cover. Insert the two supplied “AAA” size zinc-carbon batteries. - 1 2 - Place batteries with their terminals corresponding to the (+) and (-) indications in the battery compartment. CAUTION Improper use of batteries can result in chemical leakage or explosion. Be sure to follow the instructions below. • • • • • Do not mix batteries of different types. Different types of batteries have different characteristics. Do not mix old and new batteries. Mixing old and new batteries can shorten the life of new batteries or cause chemical leakage in old batteries. Remove batteries as soon as they have worn out. Chemicals that leak from batteries can cause skin irritation. If you find any chemical leakage, wipe thoroughly with a cloth. If you will not be using the remote control unit for an extended period of time, remove the batteries from it. When replacing the batteries, use zinc-carbon batteries instead of alkaline ones. Note on disposing batteries: The batteries provided contain no harmful materials such as cadmium, lead or mercury. Regulations concerning used batteries stipulate that batteries may no longer be thrown out with the household rubbish Deposit any used batteries free of charge into the designated collection containers set up at your local recycling centre. Using the remote control unit Use the remote control unit by pointing it towards the front of the Receiver. Objects between the remote control unit and sensor may prevent proper operation. Cautions regarding the remote control unit • Do not expose the remote control unit to shock. In addition, do not expose the remote control unit to liquids and do not place in an area with high humidity. • Do not place the remote control unit under direct sunlight. The heat may cause deformation of the unit. • The remote control unit may not work properly if the remotecontrol sensor of the Receiver is under direct sunlight or strong lighting. In such cases, change the angle of the lighting or the Receiver, or operate the remote control unit closer to the remote control sensor. 7 Quick Guide Initial installation overview Follow the steps below one by one when using the Receiver for the first time 1 2 Preparation Run the RF in 1 Turn on the standy button on the Receiver (Page 10) 1 Congratulations! You can now watch TV 2 Run the first time installation (Page 9) 2 Ensure the antenna is connected RF out Connect the Receiver to your TV using the supplied HDMI cable (Page 9) USB OPTICAL SPDIF HDMI Highlight Start Search Press ENTER to continue L HDMI 3 Watch TV Initial Settings 1 Connect the antenna cable to the RF IN terminal (Page 9) 2 3 R 2-CH AUDIO OUT CO Start Searching Channels Connect the power adapter to the Receiver and switch socket on. (Page 9) 8 If neccessary, adjust the antenna to attain maximum signal reception Quick Guide Before turning on the power 2 1 1 2 3 Connect the antenna (IEC 169-2) coaxial plug to RF IN. Use CAI Benchmarked 75 ohm coaxial cable such as Triax TX100 Connect the HDMI™ cable Connect the power adaptor and switch socket on 3 Initial auto installation When the Receiver is powered on for the first time, the First Time Installation screen appears. Follow the on-screen instructions to search for all available channels. Confirm the following before turning on the power • • • Is the antenna cable connected? Is the power adapter connected and plugged in? Is the HDMI™ cable connected between the receiver and your TV? 1 2 Ensure the antenna cable is connected before switching on. Press the key on the Receiver or Remote Control. • The First Time Installation screen is displayed. 3 • The Receiver will search for, sort and store all receivable channels. Highlight Start Search, and press ENTER to start the channel search. NOTE • After the First Time Installation has been completed, the default PIN is automatically set to ‘0000’. To change the PIN setting, refer to Page 23. 9 Watching TV The user can select the OSD Language, Country, Time Zone, Active Antenna and LCN from this menu. Press “Start Search” to search channels as shown below: Getting Started Connect the Aerial to RF In and connect the External Power Supply to the DC Input. Connect the HDMI or SCART output to the TV. Initial Power Up - Power On/Off When in “Standby” mode, press the key on the remote control to switch on the receiver. Pressing the key again will put the receiver back in to “standby” mode. First Time Installation On initial power up, the screen below will be displayed indicating there are no channels stored. Volume Adjustment and Mute Press “Vol +/-” to adjust the volume when the system is in normal playing mode; A volume bar is displayed Press “Mute” to disable the sound, pressing “Mute” again will enable the sound. Changing Channels Press “CH+/-” to switch to the previous or next programme in the channel list. Alternatively press the number keys to input the programme number directly. The initial installation screen shows several basic set-up parameters, as shown below 10 Basic Functions Quick Channel Audio Language Key and L/R Channel Key Press “ENTER” to display the Quick Channel Programme List. Press “LEFT/RIGHT” to select the channel categories. Press “UP/DOWN” to select the desired programme. Press the “AUDIO” key to switch the audio language of the current programme and switch between stereo left right (stereo left channel right channel) Press “ENTER” to select channel. If there are favourite channels set up, press ‘ENTER’ then the ‘Left/Right’ key to select the required ‘FAV’ list. Press LEFT/RIGHT to switch between stereo left right (stereo left channel right channel). Press “UP/DOWN” to select the required channels, Press “ENTER” to confirm the selection. Press UP/DOWN to switch the audio language. Programme Information Press “ENTER” to confirm the selection and return to normal play mode. Press the “i” key twice to show information on the current programme. Press the “EXIT”key to return to the previous selected channel. 11 Electronic Programme Guide Entering the EPG You can press the “EPG” key on the remote control to enter into the EPG page. As shown below: 1 3 2 6 5 4 Press the “YELLOW” & “BLUE” key to switch between days in Tab 3 7 Press “UP/DOWN” key to move upward and downwards to switch between the different programmes in Tab 5 Press “LEFT/RIGHT” key to view the programme information in different time ranges in Tab 6. Enter the EPG menu, “Weekly” mode, (7 Day EPG), is the default setting, this menu has 7 parts: Tab 1 Tab 2 Tab 3 Tab 4 Tab 5 Tab 6 Tab 7 When a programme is selected, press the “i” key to select the detailed information corresponding to the current program, as shown below. shows the title shows the time and date shows selected date shows programme list, press “UP/ DOWN” to switch between programmes shows the time range and programme information shows detailed programme information from Tab 5 shows information for keys, corresponding to the coloured keys on the remote control Press “LEFT/RIGHT” to switch between programmes in the list When a programme is selected in Tab 5, press the green key to set a timer to book the programme, as shown in the diagram overleaf: Press the “RED” key to enter into DAILY/ WEEKLY” mode which displays the channels and programme information in different time ranges, as shown in the picture. 12 Subtitles Default subtitle setting is off. To switch on subtitles, press the “SUB” key on the remote control to enter the subtitle menu of the current programme, as shown in the picture below: Press “EXIT” to leave the EPG Digital Text Some channels are broadcast with digital text which contains pages of information and entertainment. News, weather, sports information, stock exchange prices and programme previews are among the many services. Press the “UP/DOWN” key to choose the required language. Press ‘ENTER’ to leave the menu. Record & Time Shift* Accessing digital text 1 2 Select a channel which broadcasts digital text. Press or the button. • • Not all channels broadcast digital text. You may not be able to receive digital text if you have a poor quality signal. At playback screen press “REC” key to start recording, the system will take approximately 3 seconds to initialise. This is shown below: Buttons for digital text operation Buttons Description /// Navigate the digital text index page and menu system Coloured Buttons Access digital text shortcuts. These are often displayed on the bottom of the page Numeric Buttons 0-9 Directly select a page EXIT / TEXT Exit digital text *In order to use these features an external USB memory device must be connected. 13 When a recording has been initialised, the LED on the front panel will flash slowly between red and blue. This shows the current programme is being recorded. Pressing “i” displays the information on the current recording. If there is insufficient memory space while recording, the system will show a prompt message, stop recording and resume normal playback mode. If a recording fails due to memory storage problems, the system will show a prompt message and try again. Pressing the stop key while recording, will prompt a ‘Confirm Stop Rec’ message and resume normal playback. During recording, you can also operate the Menu, EPG, TTX, Subtitle and so on, as if in normal playback mode. Time Shift Mode Time Shift Mode is only available when an external memory device is connected to the receiver. When recording, you can also use the “REC” key to set a timer to stop recording, pressing “REC” again allows you to reset the timer. (1) In time shift mode, you can pause a live programme. 14 Installation (2) Pressing the “PAUSE” key will start the time shift mode. The “Time Shift” icon will be shown on the screen this operation is available: Installation There are two kinds of Installation modes these are outlined below: (a) In normal playback mode, when time shift is set to Auto or Pause within the PVR Config Menu. (1) Auto Search (b) In recording mode. (2) Manual Search (3) Pressing the “<<” key when in time shift mode, will fast rewind the programme. This operation is available : You select the “Installation menu” from the “Main Menu”. A PIN Number is required. (default PIN is 0000) (a) In normal playback mode, when time shift is set to Auto or Pause within the PVR Config Menu. (b) In recording mode. (4) In time shift mode, when the “STOP” key is pressed, it will exit time shift mode and return to playing the live programme. Any recording will continue to record as normal. (5) In time shift mode, Fast Forward will catch up with the live programme, when the time shift catches up with the live programme, it automatically exits time shift mode, and returns to the current program. Any recording being made will carry on as normal. Auto Search Auto Search is an intelligent and convenient mode of programs searching. It searches all frequencies within countries of region. Countries include Ireland/UK/Germany/Italy/ France/Spain/Holland/Taiwan/China/Norway/ Finland, etc. Select “Auto Search”, then press the “ENTER” key to start the “Auto Search”. 15 After selecting the “Auto Search” page, the receiver will scan all frequencies one by one for the selected country. To carry out a manual search, you need to configure the relevant parameters including: (1) Frequency (kHz): The default frequency depends on the selected country, you can input relevant information to modify it. During scanning, you can press the “EXIT” key to stop the scanning process and exit. If any programmes are detected and the scanning process has finished the system will exit the scanning page, save the programmes and return to the “installation menu”, this is shown below: (2) Bandwidth: The default value of bandwidth depends on the selected country. It can be set to 6 MHz,7 MHz, or 8 MHz. (3) Press the “ENTER” key after configuration to start manual scan. (4) Press the ‘EXIT’ key to return to normal viewing. Channel Filter A scan of all channels or free to air only channels can be selected, this is illustrated in the picture below: Manual Search If you know the frequency of the channels, or if you want to scan a channel at a particular frequency, you can select manual search. Move the cursor to “Manual Search” using the “UP/DOWN” key when in the “installation menu”, press “ENTER” to select the manual search page, this is shown in the picture below: 16 The channel organiser menu includes: Delete Channel, Skip Channel, Lock Channel and Channel Rename. Channel Management Channel management features include channel deleting, marking, moving, locking, renaming and grouping. Press the “UP/DOWN” key to choose the channel, then press the 4-colour keys on the remote control. Press the RED key to Set and Cancel Channel Lock. The GREEN key to Set or Cancel Delete Channel. The YELLOW key to Set or Cancel Skip Channel. The BLUE key to Set or Cancel Rename Channel; After setting, A typical screen is shown below. There are two independant pages for channel management, TV and RADIO, this is illustrated below: Channel Manager To rename a channel, press the “UP/DOWN” key to choose the channel to be renamed. Press the BLUE key to enter the channel rename page. This is shown below: The channel manager page includes channel deleting, moving, locking and renaming of channels. You can enter the page as shown below, by using the “MENU > channel > channel manager on the remote control. Press the BLUE key again to exit the channel rename page. If there are no channels saved a channel not available will be displayed, and it will not enter into the channel organiser page. 17 When the Favourite Lists have been set up, they are accessed by pressing the ‘FAV’ key on the Remote Control. Once a Favourite List is displayed, use the ‘Left and Right’ keys on the Remote Control to select the desired list. To Set or Cancel Lock Program, the system will prompt you to input your password (default “0000”). You will be asked to confirm the change, press ‘ENTER’. To Delete a programme, the system will show a dialogue box “Delete Selected Channels?”, press the ‘LEFT/RIGHT’ keys and select “YES” to confirm delete of the chosen channel select “NO” to Cancel. Press the “EXIT” key to exit the Channel Manager menu and save the edited results. Favourites List Enter the page as shown in the figure below via “Main Menu > Channel > Favourite List If there are no channels saved a dialogue box prompting favourite channel not available will be displayed and it will not enter into the channel grouping page. Press UP/DOWN key to choose the channel to be grouped, then press the coloured keys on the remote control to set different channel grouping. After a channel is edited, the EXIT key is pressed to exit from the menu, if any channels have been edited, the system will carry out favourite list update, displaying “Data Saving” message on the screen. 18 Preference Settings The receiver can be configured according to the user preferences, by pressing MAIN MENU > PREFERENCE. (3) Press the ENTER key to confirm the selected language, the setting is then activated and the OSD language changes to the chosen language. This is shown below: Preferred Subtitle (1) You can set the subtitle language to your preferred language type. These include English, French, German, Italian, Spanish, Portuguese, Danish, Czech, Dutch, Finnish, Swedish, Greek, Russian, Welsh, or Gaelic. OSD Language OSD Language option: The user interface supports several languages, you can set the language via the OSD language option. (1) Move the cursor onto the language option, press RIGHT key to enter the OSD language list. is shown below: (2) When the preferred subtitle has been selected, it will display the selected subtitles automatically while the stream has the suited subtitle. (3) The user can set another subtitle language in the 2nd preferred subtitle field Hard Hearing Enables/Disables the “Hearing Impaired Feature”. (2) Press the UP/DOWN key to choose the required language 19 Preferred Audio PVR Config (1) Sets the preferred audio to “English, French, German, Italian, Spanish, Portuguese, Danish,Czech, Dutch, Finnish, Swedish, Greek, Russian, Welsh, or Gaelic”. You can enter the PVR Configuration page (as shown in the picture below) via “Menu > Preference > PVR Config”, this menu contains six options as follows: (2) 1st preferred audio option: Press the RIGHT key to enter the currently supported audio language list. In the audio language list, press UP/DOWN key to choose the required language, press the ENTER key to confirm. • • • • • • PVR File Format File Size Preferred Storage Timeshift Time Shift Length Timeshift to Record (3) 2nd preferred audio option: Press the RIGHT key to enter the currently supported audio language list. In the audio language list, press UP/DOWN key to choose the required language, press the ENTER key to confirm. Multimedia If used in Media mode, you can configure the setting according to your own preference, This is shown below: PVR Config Setting Page (1) PVR File Format: You can select either, TS/PS, to set the format of the file to be stored; if TS mode is selected, related psi/si table information in code stream can be recorded during the programme, if PS mode is selected, AV data is recorded only. (2) File Size: You can select from 4G/3G/2G/1G. This sets the size of the file to be recorded; if the size of the file exceeds the setting size during the recording of the programme, the recording will divide the file into separate files with the set sizes. 20 (3) Preferred Storage: Sets the USB as storage. (4) Timeshift: Any of options, AUTO/OFF/ PAUSE, can be selected to set the status of the current timeshift, if AUTO is selected, the timeshift operation will perform automatically in the background, the user can change channel but this discards the previous timeshift buffer and restarts a new one; if OFF is selected, the timeshift operation will stop; if PAUSE is selected, the timeshift operation will manually start by pressing the Pause key. The screen freezes at once, it can be resumed by pressing the Play key. During timeshift you can only select another channel within the same multiplex. The timeshift buffer only records the first channel; and if the preceding three options are changed when AUTO is selected, timeshift will restart. (5) Timeshift Length: The options, AUTO/30min/1h/2h, can be selected to set the duration of the timeshift; if AUTO is selected, the duration of the timeshift is dependant on the available size of the USB memory. If any of the options, 30min/1h/2h, are selected, the usable duration of the timeshift is 30min/1h/2h provided that the USB memory is big enough, where by, the usable duration of the timeshift is dependant on the available USB memory. (6) Timeshift to Record: Either of options, ON/OFF, can be selected. If ON is selected, timeshift operation will stop and the recorded file buffered by the timeshift will be stored in USB memory; if OFF is selected, timeshift will operate continuously and the recorded file buffered by the timeshift will not be stored in USB memory. 21 System Settings Menu In the Timer Edit menu, the system can support up to 10 events. Date:Specifies the timer date System Settings Menu Programme Name: Specifies the channel for which the timer is set The following options can be accessed in the “System Settings Menu”. To enter this menu press Main Menu > Settings, then press ‘Enter’ see below: Start Time: Specifies the start time of the timer End Time: Specifies the end time of the timer Duration: Specifies the duration time of the timer Mode: Specifies the frequency of the timer, the duration can be any of the following: • • • • Timers If you want to watch a channel at a certain time or record programmes, reminders can be set in the Timers menu, This is shown below in the picture. • • • Once-timer will be triggered only once. Daily -timer will be triggered daily at the specified time. Weekly -timer will be triggered every week at the specified time. Monthly- timer will be triggered every Month at the specified time. Type: Specifies the channel type for which the timer is set. The user can select the channel, Recorder, VCR, On and Standby in this option. The user selects Recorder type, you can Enable or Disable the following options such as AD Record. Provides a list where timers can be added, viewed, edited, or deleted “Timer Mode” shall list all the timers that are added via the “EPG” as well as the timers that are manually added by the user through the “Timer Menu” A Maximum of 10 timers can be set. 22 Pressing the ENTER key will return the system to the previous menu. As shown overleaf in the picture. Press EXIT’ to resume normal viewing. Child Lock The Child Lock Menu allows selected channels to be locked, as shown below: (1) Press the 0 - 9 numerical keys on the remote control to input the Old Password, the system default password is “0 0 0 0”. (2) If the password is input correctly, the cursor will move to Input “New Password” option, press the 0 - 9 numerical keys on the remote control to input the new 4-digit password. (3) You will then be asked to Confirm the New Password. Date & Time (1) Here you can Enable or Disable the system lock, the parental rating age from 0 - 18 years can also be set. The “Time Menu” contains different time settings. The following menu layout shows the Time Settings Page: (2) You can also enter a new password of your choice, this process is achieved by entering the old password,and then entering a new one of your choice. It is recommended that you keep this password in a safe place. This is shown below. 23 If the Time Mode is set to Auto then, Time Zone and DST shall be active for editing. If the Mode is Manual these options shall be disabled. Version Displays the Receiver Information. This is shown below. If the Time Mode is set to Manual then, Date and Time shall be active for editing. If the Mode is “Auto” these options shall be disabled. Active Antenna In ‘MAIN MENU > INSTALLATION’, the Active Antenna option allows the 5V antenna powering on the RF Input to be Enabled or Disabled. Factory Reset This will restore all “Default Settings” The system will prompt the user to input a password (default “0 0 0 0 “) to activate “Factory Reset”. This shows the system information, including the H/W Version, S/W Version, F/W Version, Build Date and Time. Press the BACK key to return to the previous menu. Auto Standby Enables/Disables the “Auto Standby”. The user can select 1 Hr, 2Hrs or 3 Hrs, (Default setting is 3 Hrs). If the receiver receives no commands, either from the Remote Control or Front Panel buttons, for the set time, the receiver will automatically enter standby. This feature can be disabled, in the menu, if required. Upgrade Refer to SOFTWARE UPGRADE Section on page 41 for details. 24 AV Settings To enter this menu, press ‘MAIN MENU > AV’, then press ‘ENTER’. Brightness & Saturation The AV setup menu is shown in the picture below To adjust the Brightness and Saturation settings, follow the same process as for the Contrast setting above. SPDIF This setting is used to select AVC Mode - Mute, PCM and Bitstream. Aspect Ratio The Aspect Ratio settings are used to select the video output mode in order to match the receiving equipment. Contrast Select the Aspect Ratio option, press ENTER to select. Press the UP/DOWN key to toggle between options; Aspect Ratio can be set as 16: 9, 4: 3 PanScan, 4: 3 LetterBox,16:9 PanScan You can set the system Contrast by using the Contrast option. (1) To select the Contrast option, press the RIGHT key to move the cursor into the properties list, press “ENTER” to select contrast menu. Press LEFT/RIGHT to adjust the contrast. As shown below: Press ENTER to save the setting (2) The Contrast can be set from 0 to 24. (3) The default Contrast setting is 12. 25 Video Output HDMI Colour Space This allows the user to change the video output mode. You can adjust the settings to suit the receiving equipment. HDMI Colour Space changes the HDMI Output Mode. You can adjust the settings to suit the receiving equipment. Select Video Output, press the ENTER key to select. Press the UP/DOWN key to toggle between options; Video Output can be set as RGB, YUV, S-Video; Default: Scart RGB Press ENTER to save the setting; Select the HDMI Colour Space, press the ENTER key to select, Press the UP/DOWN key to toggle between settings. The Output mode can be set as YCbCr 4:4:4, xvColor, RGB, YCbCr 4:2:2. Default: RGB; Video Resolution Press ENTER to save the setting; Video Resolution mode changes the Resolution of the video output. You can adjust the settings to suit the receiving equipment. HDMI Deep Colour HDMI Deep Colour changes the HDMI Output mode. You can adjust the settings to suit the receiving equipment. Select the Video Resolution, press the ENTER key to select. Press the UP/DOWN key to toggle between settings. The Video Resolution can be set as: Select HDMI Deep Colour, press the ENTER key to select. 576i_25,720p_50,1080i_25,1080p_50,576p_50; Press the UP/DOWN key to toggle between settings. Default: 720p_50. Press ENTER to save the setting. The Output can be set as 12 Bits, 8 Bits or 10 Bits. Default: 8 Bits. Press ENTER to save the settings. 26 Multi Media Multimedia - Filter Selection Mode Icons The Triax TR 112 has a USB Interface. This can be used to connect external equipment such as Memory Devices, Media Players and can also be used for system software upgrades. This product supports MP3, JPEG and MPEG. To enter the Multimedia Mode press the ‘MEDIA’ key on the Remote Control. Please note a USB or external hard disk drive needs to be connected to access the options on this menu. Filter Selection Mode This allows the Filter Mode to be changed from movie to music or from music to photo etc. For example if the current filter selection is movie, the image below shows the Filter Selection Menu. Changes from filter selection mode to file list. KEY_LEFT Changes the filter selection mode, for instance from movie to music, from music to photo etc. KEY_RIGHT The Same as KEY_LEFT Filter selection mode is”Music” Filter selection mode is “Photo” Filter selection mode is ”Recorder Manager” Filter selection mode is “Disk Manager” Filter selection mode is”E-book” This menu helps the user to select and play a movie from a list that is stored in the USB device. Supported file formats are MPG, AVI, VOB, DAT, ASF, MKV, RM, WMV, TSF, QT. The following menu shows the “Movie Menu”. Action KEY_DOWN Filter selection mode is “Movie” Movie File Browser There are three keys used in this menu. The following table shows the keys. Key Stroke The following table shows all the available filter selection modes and their corresponding icons. Press ‘RECALL’ to return to Filter Selection Mode. 27 Key Stroke Action KEY_UP Highlights the previous Item in file list. If it passes the first item, the last item will be highlighted. KEY_DOWN Highlights the next Item in the file list. If it passes the last item, the first item will be highlighted. KEY_PAGEUP Moves up the list by one page. KEY_PAGEDOWN Moves down the list by one page. KEY_LEFT If the current file has a parent folder, pressing this key will return from the current list to the parent folder. KEY_RIGHT If current highlighted item is a folder, it enters the folder. KEY_ENTER If the highlighted item is a folder, pressing KEY_ENTER enters the folder. If it is a file then pressing the key will play the selected video. Movie Playback The keys for this menu are shown in the table. Settings are saved when they are changed. Key Stroke Action KEY_RED Zooms in and out the image. KEY_PREV Stops the current movie and plays the previous movie in the list. KEY_RECALL If the highlighted item is in the file list, pressing KEY_ RECALL returns to the filter selection mode. If it is playing a video, pressing the key returns to the previous layout . KEY_NEXT Stops the current movie and plays the next movie in the list. KEY_PLAY KEY_NUM If the input number is larger than the number on the file list, an incorrect message is shown. If the movie is paused, FF, FB, SF or SB, it will change to play and show play icon. KEY_PAUSE If playing, this key will pause the movie and show pause icon. KEY_STOP Stops the movie. KEY_FF Fast forwards the movie. It cycles through the sequence 2x->4x->8x->16x->1x, and the playback mode is displayed in the upper left corner. KEY_FR Fast reverses the movie. It can cycle through the sequence 2x->4x->8x->16x->1x, and the playback mode is displayed in the upper left corner. KEY_MENU Toggles between the FILE BROWSER and MAIN MENU. KEY_MEDIA Changes the source to DVB. 28 Key Stroke Action KEY_SLOW Slow Replay. KEY_RECALL The same as KEY_STOP KEY_MUTE Activates the MUTE function Audio goes off. KEY_VOLUME Adjusts the volume KEY_i Displays information on the current movie. KEY_GOTO The Go To menu is displayed when this key is pressed. Go To Menu The keys in this menu are shown below. When the video is playing, the following information is displayed on the OSD: (a) (b) (c) (d) (e) (f) File name. Total time and the current time for the file. Play state of this video. Progress bar. File size and resolution of this video. Repeat mode such as off/one/dir. Key Stroke The information icons shown while video playing are shown below: Zooms in and out of the image Stops the current movie and plays the previous movie in the list. Stops the current movie and plays the next movie in the list. Play Pause Stop Fast Reverse, (1x, 2x, 4x, 8x, 16x). Fast Forward, (1x, 2x, 4x, 8x, 16x). Slow replay Fast replay. 29 Action KEY_UP Switches between Time edit mode and time move mode. KEY_DOWN The same as KEY_UP. KEY_LEFT In time edit mode moves the highlighted curser or in move control mode moves the mark. KEY_RIGHT The same as KEY_LEFT. KEY_ENTER Moves the currently playing movie to the selected time. KEY_RECALL Exits the Go To menu. KEY_GOTO Exit from the Go To menu. Key Stroke Music This menu allows the user to select and play a track from a list of music stored in the storage device. KEY_UP KEY_DOWN Highlights the next Item in the file list. If it passes the last item, it highlights the first item in the file list. KEY_PAGEUP Moves up the file list by one page. KEY_PAGEDOWN Moves down the file list by one page. KEY_LEFT If the highlighted file has a parent folder, it returns from the current list to the parent folder. KEY_RIGHT If the highlighted file and the current highlighted item is a folder, it can be entered into the folder. KEY_RECALL If the highlighted file is in a file list, pressing KEY_ RECALL returns from the file list to the filter selection mode. If a music track is playing, KEY_RECALL willl stop it. KEY_PREV If the highlighted file is music and the music is playing, pressing this key stops this track and plays the previous track. KEY_NEXT If the highlighted file is music and the music is playing, pressing this key will stop this track and plays the next track. KEY_PLAY If the music is paused, FF, FB, SF, SB or stopped, it will start playing the track and show play icon. The name of the current track will be displayed. KEY_PAUSE If the music is playing, pressing this key will pause the music and the pause icon is displayed. KEY_STOP Stops the music and shows the stop icon. KEY_FF Fast forwards the music. The FF icon is shown and the speed, (1x 2x, 4x, 8x, 16x) shall be displayed. The following formats are supported WMA, WAV, DTS, RA and MP3. The following table shows the Music menu. The following points explain the Music menu above. (1) The file list is the list of folders and music. (2) (3) On the left of the file list shows the Folder information and files, for example if filter selection is in music mode, it shows the equaliser, progress, play state, total time and file size of the selected track. It is background music, so when music is playing, the user can change directory or make changes in the filter list to select other modes such as movie, photo, e-book etc. The keys used in this menu are shown below. 30 Action Highlights the previous Item in the file list. If it passes the first item, it highlights the last item in the file list. Key Stroke Action KEY_FR Fast reverses the music. The FR icon is shown and the speed, (1x 2x, 4x, 8x, 16x) shall be displayed. KEY_NUM Enter the number directly. If the input number is larger than the number of file list, an incorrect message will be shown. KEY_MENU File browser menu disappears and shows the main menu or main menu disappears and shows the file browser again. KEY_MEDIA Change the source to DVB Key Stroke When a music track is playing, the following icons are displayed: Stops this track and plays the previous track in the list KEY_UP KEY_DOWN Highlights the next item in the file list. If it passes the last item, it highlights the first item. KEY_PAGEUP Moves up the file list by one page. KEY_PAGEDOWN Moves down the file list by one page. KEY_LEFT Pressing this key moves from the current list to the parent folder. KEY_RIGHT If the current highlighted item is a folder, then pressing this key enters the folder. KEY_ENTER If the highlighted item is a folder, pressing KEY_ENTER enters the folder. If it is a file then pressing the key will show the selected photo. KEY_RECALL In the file list, pressing KEY_ RECALL returns from the file list to the filter selection mode. KEY_NUM Allows a number to be entered directly. If the input number is larger than the number in the file list an incorrect message will be shown KEY_MENU The file browser menu disappears and the main menu is shown, OR, vice-versa. KEY_MEDIA Changes the media. KEY_YELLOW Shows the thumbnail menu. Stops this track and plays the next track in the list Play Pause Stop Fast Reverse Fast Forward Photo File Browser This menu contains the Photos that are stored in the storage device. Supported file formats are JPG, TIF, PNG, GIF and BMP. Following menu layout shows the Photo menu. The keys in this menu are shown in the table below the image. 31 Action Highlights the previous item in file list. If it passes the first item, it highlights the last item in file list. When an image is displayed in full screen then the following keys are active: Photo Playback Key Stroke The Photo Playback Menu shown below shows the menu available while photographs are being shown. The images below shows the playback menu for displaying a single photograph and setting up a slide show. KEY_UP Action Rotates the image 0 degrees. KEY_DOWN Rotates the image 180 degrees. KEY_LEFT Rotates the image 270 degrees. KEY_RIGHT Rotates the image 90 degrees. KEY_PREV Displays the previous image in the List. If the displayed image is the first one then the key is ignored. KEY_NEXT Displays the next image in the List. If the displayed image is the last one then the key is ignored. KEY_i Displays information on the photograph, (see images above). KEY_PAUSE Pauses the slide show. KEY_PLAY Plays the slide show. KEY_STOP Stops the slide show and returns to the Photo menu KEY_RECALL Exits the displayed image and returns to the Photo menu. KEY_RED Zooms in and out of the image. The keys for operating Photo Mode are shown below Zoom-in / out of a photo (x4) Closes the current photo and shows the previous photo in the list Closes the current photo and shows the next photo in the list Selects and shows photo Pause photo / Slide show Return to the file list 32 Key Stroke Photo Thumbnail KEY_UP This menu displays the thumbnail view for the photographs stored in the selected folder. The following table shows the thumbnail menu. The keys in this menu are shown below: 33 Action Highlights the previous item in the same column. If the top KEY_UP of the column is reached, it highlights the bottom item in the column. KEY_DOWN Highlights the next item in the same column. If the bottom of KEY_DOWN the column is reached, it highlights the top item in the column KEY_PAGEUP Moves up the column by one page. KEY_PAGEDOWN Moves down the column by one page. KEY_LEFT Highlights the item to the left. KEY_RIGHT Highlights the item to the right. KEY_ENTER If the selected item is a folder. pressing KEY_ENTER will enter the folder. KEY_RECALL Shows the Photo menu. KEY_MEDIA Changes the source to DVB. KEY_NUM Allows a number to be entered directly. If the input number is larger than the number in the file list, an incorrect message will be displayed. Key Stroke Recorder Manager KEY_UP The picture below shows the Recorder Manager menu. All recorded programms will appear in this menu. KEY_DOWN Highlights the next item in the file list. If the last item is reached, it highlights the first item. KEY_PAGEUP This key works in the file list only, It moves Up the list by one page. KEY_PAGEDOWN The same as KEY_PAGEUP, it only works in the file list. It moves Down the list by one page. KEY_LEFT Returns from current list to the parent folder. KEY_RIGHT Allows you to enter a folder. KEY_ENTER If a folder is selected, pressing KEY_ENTER enters into the folder. If it is a file then pressing the key will play the selected recorded program. KEY_RECALL When in the file list, pressing KEY_RECALL returns from file list to the filter selection mode. If it is playing a recorded program, pressing the key returns to “Recorder Manager Menu. KEY_RED If in the root directory, pressing this key sets a partition. If in the sub directory pressing it will delete the selected item. KEY_GREEN If in the root directory, pressing this key formats the card to FAT32, If in the sub directory pressing it will rename the selected item. KEY_YELLOW 34 Action Highlights the previous item in the file list. If the first item is reached, it highlights the last item in the file list. If in the root directory, pressing this key formats the card to NTFS. KEY_NUM Enter a number directly. If the input number is larger than the number of file list, incorrect message will be shown. KEY_MENU The File browser menu disappears and shows the main menu, or main menu disappears and shows the file browser again. KEY_MEDIA Change the media to DVB Rename The picture below shows the Rename Menu In this menu the user can change the program’s name to their own preference. Key Stroke Action KEY_UP Highlights the previous item in the same column. If the first item is reached, it highlights the last item in the same column. KEY_DOWN Highlights the next item in the same column. If the last item is reached, it highlights the first item in the same column. KEY_LEFT Highlights the next item in the same row. If the last item is reached, it highlights the first item in the same row. KEY_RIGHT Highlights the last item in the same row. If the first item is reached, it highlights the last item in the same row. KEY_MEDIA Change the media to DVB KEY_RED Changes the characters between capital and lowercase KEY_GREEN Enters a space KEY_YELLOW Deletes the current character KEY_BLUE Confirms the modification to the name and the menu returns to Recorder manager Menu. 35 Disk Manager Key Stroke Disk Manager Browser The Disk Manager Menu is like the file browser menu, the keys work as in the same way but the function of the four colour keys are different. The following table shows the functions of the four coloured keys. The other keys are the same as those in the file browser menus. Key Stroke Action KEY_RED Show move/copy menu. KEY_GREEN Show rename menu. KEY_YELLOW Delete the selected item. Rename The Rename Menu is same Layout and functionality as discussed earlier in this manual. Move / Copy The Menu shown in the picture below is the Move/copy Menu. In this menu the user can move files or folders from one side to the other. It can also copy the content from one side to the other. 36 Action KEY_UP Highlights the previous item in the file list. If the first item is reached, it highlights the last item in file list. KEY_DOWN Highlights the next item in the file list. If the last item is reached, it highlights the first item. KEY_PAGEUP Moves up the list by one page. KEY_PAGEDOWN Moves down the list by one page. KEY_LEFT Change the selected file from one side to the other side. KEY_RIGHT The same as KEY_LEFT. KEY_ENTER If the selected item is a folder, press KEY_ENTER to enter the folder. KEY_RECALL Return to parent folder. KEY_EXIT Return to disk manager menu. KEY_GREEN Select the highlighted item and move to the other side. KEY_YELLOW Copy the content of the selected item to the other side KEY_BLUE Move the selected item to the other side KEY_MENU The file browser menu disappears and shows the main menu, or the main menu disappears and shows the file browser again KEY_MEDIA Changes the source to DVB Key Stroke E-Book Browser The e-book menu is like the file browser menu, the keys work as in the file browser menu. The four coloured keys have no function. Other keys are the same as the keys in the other file browser menus. For instance, KEY_UP/KEY_DOWN can move the selected file and KEY_ENTER plays the selected e-book etc. KEY_PAGEUP KEY_PAGEDOWN Move to next page, if it is already the last page, it will not move. KEY_PREV The same as KEY_PAGEUP KEY_NEXT The same as KEY_PAGEDOWN KEY_NUM User can input number key to select the required page. KEY_ENTER When a page number has been entered, then pressing this key will go to the corresponding page. KEY_RECALL Return to file browser menu of e-book. KEY_EXIT The same as KEY_RECALL. KEY_MENU The E-book menu disappears and shows the Main Menu or Main Menu disappears and shows the E-book again. KEY_MEDIA Changes the media to DVB E-Book Menu The picture below shows the E-Book Menu. In this menu the user can read text files, the menu also shows the name of the current file, the total number of pages and the current page. 37 Action Move to previous page, if it is already the first page, it will not move. Software Upgrade The receiver software can be upgraded. The software upgrade menu can be accessed through Menu > Settings > Upgrade. This is shown below: - Select the upgrade file and press the “enter” key to start the upgrade. Enter the upgrade page to show information and prompt the user on the upgrade process: USB Upgrade The USB upgrade is a fast and convenient way to upgrade the system software, You simply copy the upgrade file onto a USB memory stick, and plug the USB device into the system USB interface. You can then upgrade the software as follows: • Before a USB upgrade, you must prepare the upgrade file. The file name is usually a *.bin (not case sensitive), Otherwise the system can not enter the upgrade mode. • The size of the USB upgrade file must be less than or equal to 4M bytes, if not it may result in a failure to upgrade. • USB upgrade: - Enter the USB upgrade menu press(menu -> setting -> upgrade -> USB upgrade) Enter the USB directory list page, as shown below: • • • 38 The whole USB upgrade process may take a couple of minutes. DO NOT switch off the power during the upgrade process. When the upgrade has finished, the system will automatically restart with the new firmware. Triax TR112 Specification Tuner / Demodulator Standard Input Frequency* Channel Bandwidth* Power for Active Antenna COFDM System Demodulation Type Guard Interval FEC DVB-T VHF/UHF Band 7 MHz/8 MHz Switchable 5V@30mA with overload Protection through Coaxial Cable 2K, 8K Carrier, Hierarchical Supported QPSK, 16QAM, 64QAM, 256QAM 1/32, 1/16, 1/8, 1/4 Active Symbol Duration 1/2, 2/3, 3/4, 5/6, 7/8 System CPU / Clock Transport Flash Memory System Memory Sunplus 1500 DVB Demultiplexer 4Mbytes SPI 512MBits X 2 DDR2 Video CPU Core Video Standards Field / Frame Rate Aspect Ratio Video Input / Output Output Modes 667Mhz 32bit MPEG-1 ISO/IEC 11172-2 MPEG-2 MP@ML and MP@HL, ISO/IEC 13818-2 MPEG-4 AVC MP@L4 and [email protected] 60/30 Hz for NTSC or 50/25 Hz for PAL 4:3, 16:9 & Letter Box Digital Video HDMI with HDCP supported CVBS, R/G/B for TV SCART OUT HD 1080p / 1080i / 720p / 576p Output format changed by specific hot-key (software switchable) SD 576i Teletext / Subtitle Decoding and display for supporting Closed Captions & Teletext Audio CPU Core Audio Standards Audio Input / Output Digital Audio SPDIF Output Format Sampling Rate 667Mhz 32bit MPEG-1 layer I & layer II, MP3 MPEG-2 layer II , Dolby Digital MPEG-2 AAC/AAC+ AL/AR for TV SCART OUT (Volume adjustable) Optical Digital Audio SPDIF IEC-60958 for PCM data IEC-61937 for Encoded Bitstream Data 32, 44.1, 48, and 96 KHz Connectivity USB Port Software Upgrade and Diagnostic (Reserved Internally) Support external H.D.D. (with 1A current protection) Software Upgrade Over Air Download RS-232 or USB Port No Yes Front Panel Keypad IR Sensor 3 Keypads: Power/ standby, CH Up/Down, Yes 39 Rear Panel RF Input Connector* Loop Through Output Connector Stereo (left & right) Audio CVBS, R/G/B video output IEC type, Female (for PAL), 75 Ohm Digital Video & Audio Output Optical Digital Audio SPDIF HDMI Connector TosLink Interface Power Interface Input Voltage Power Consumption 100~240 VAC, 50/60 Hz (2A adaptor , T.B.D. ) Normal Operation: TBD, Standby Mode: Less than 1W Others Power indicator, 2 colours, Blue/Red, FP:type Q8 Accessory EMC / Safety ATC Dolby IEC type, Male, 75 Ohm Single SCART for TV For TV SCART: w/ OSD and Volume adjustable As same FP as TR105 Remote Controller & Batteries User Manual HDMI Cable (1.5m) Compliant to CE (standard) HDMI 1.3, HDCP Compliant to DD+ Triax reserves the right to change the specifications without prior notification. 40 PIN CODE Reminder NOTE You need to insert the PIN code here and refer it to the pages in the manual where this is covered. IMPORTANT Removal of a lost PIN code could be subject to a service charge. 41 Appendix Trademarks The Saorview word and logos are trademarks of RTÉ and are used under licence. This product is capable of receiving and decoding Dolby Digital Plus. Manufactured under licence from Dolby Laboratories. Dolby and the double-D symbol are trademarks of Dolby Laboratories. ® This product has a HDMI connector so that you can watch high definition TV with a HDMI lead when connected to a HD Ready TV. HDMI, the HDMI logo and High-Definition Multimedia Interface are trademarks or registered trademarks of HDMI Licensing LLC. Information on the software license for this product Software composition The software included in this product is comprised of various software components whose individual copyrights are held by TRIAX UK Ltd or by third parties. Software developed by TRIAX and open source software The copyrights for the software components and various relevant documents included with this product that were developed or written by TRIAX are owned by TRIAX UK LTD and are protected by the Copyright Act, international treaties, and other relevant laws. This product also makes use of freely distributed software and software components whose copyrights are held by third parties. These include software components covered by a GNU General Public License (hereafter GPL), a GNU Lesser General Public License (hereafter LGPL) or other license agreement. Obtaining source code We are unable to answer any questions about the source code for the open source software. The source code for the software components whose copyrights are held by TRIAX are not distributed. 42 Appendix Troubleshooting The following conditions in the table below do not always indicate a problem. Please perform the checks described below before calling for service. If the problem cannot be corrected by the use of this manual, remove the mains plug from the power socket and contact the Helpline on 00 44 1443 778910 to obtain service or advice (Normal operator charges apply). Alternatively you can email us at: [email protected]. In the unlikely event of this equipment requiring repair during the guarantee period, you will need to provide proof of purchase to your point of sale. Please keep your purchase invoice or receipt in a safe place. WARNING Under no circumstances should you try and repair this product yourself. This will invalidate the guarantee. Do not open the unit as there is risk of electric shock. Problem Possible Solution No power • • • Check if you pressed on the remote control unit Is the AC power adapter disconnected? Check if you pressed on the receiver The receiver cannot be operated • Turn off receiver at AC adaptor, leave for two minutes and switch back on Remote control unit does not operate • • • • Are batteries inserted with polarity (+, -) aligned? Are batteries worn out? (Replace with new batteries.) Are you using it under strong or fluorescent lighting? Is a fluorescent light illuminating the remote control sensor? Picture format incorrect • Refer to page 25. Power is suddenly turned off • Is auto standby activated? (Page 24) No picture • • • • Are connections to external equipment correct? (Page 9) Is the input signal type selected correctly after connection? (Page 9) Is the correct output source selected? (Page 26) Is the antenna connected properly? (Page 9) • • • Is the volume too low? Check if you pressed mute on the remote control unit. Check SCART lead is inserted correctly if used. • • Check reception information as shown on the cover of this manual. Refer to page 9 to perform the First Time Installation. No sound Freezing / Blocking 43 Appendix End of life disposal A. Information on Disposal for Users (private households) 1. In the European Union Attention: If you want to dispose of this equipment, please recycle. Attention: Your product is marked with this symbol. It means that used electrical and electronic products should not be mixed with general household waste. There is a separate collection system for these products. Used electrical and electronic equipment must be treated separately and in accordance with legislation that requires proper treatment, recovery and recycling of used electrical and electronic equipment. Following the implementation by member states, private households within the EU states may return their used electrical and electronic equipment to designated collection facilities free of charge*. In some countries your local retailer may also take back your old product free of charge if you purchase a similar new one. * Please contact your local authority for further details. If your used electrical or electronic equipment has batteries or accumulators, please dispose of these separately beforehand according to local requirements. By disposing of this product correctly you will help ensure that the waste undergoes the necessary treatment, recovery and recycling and thus prevent potential negative effects on the environment and human health which could otherwise arise due to inappropriate waste handling. The battery supplied with this product contains traces of Lead. For EU: The crossed-out wheeled bin implies that used batteries should not be put to the general household waste! There is a separate collection system for used batteries, to allow proper treatment and recycling in accordance with legislation. Please contact your local authority for details on the collection and recycling schemes. 44 Terms of Guarantee This product is supplied with a 12 month manufacturers guarantee from date of original purchase. In the unlikely event of an issue occurring within this period, please contact your point of sale. Proof of purchase will need to be supplied. 1 This guarantee only applies to defects due to faulty workmanship or materials. It does not cover faults or damage caused by (but not limited to) accident, misuse, fair wear and tear, signal related issues, neglect, tampering with the product or repair other than by a facility appointed by Triax UK Ltd. 2 This product is intended for private domestic use only. The guarantee will not apply if the product is used in the course of a business, trade or profession. 3 The product must be correctly installed and operated in accordance with the instructions contained in this operating manual. 4 Triax UK Ltd disclaims any liability for incidental or consequential damages. 5 This guarantee is in addition to, and does not diminish your statutory or legal rights. 45 Declaration of Conformity Company Name: Triax UK Ltd Company Address: Abergorki Industrial Estate, Treorchy, Rhondda-Cynon-Taff CF42 6DL, UK Object of the Declaration: Triax TR 112, Part Number 305107. The object of the declaration described above is in conformity with the requirements of the following documents: Low voltage directive 2006/95/EC EMC Directive 2004/108/EC WEEE Directive 2002/96/EC Batteries and Accumulators Directive 2006/66/EC RoHS Directive 2002/95/EC REACH Regulation 1907/2006/EC CE Marking Directive 93/68/EEC Packaging Directive 94/62/EC The product identified above complies with the relevant EC Directives by meeting the following standards: BS EN55013:2001+A1:2003+A2:2006 Test Limits for STB Receivers Disturbance Characteristics BS EN55020:2007 Test Limits for STB Receivers Immunity Characteristics BS EN60065:2002:A1:2006+A11:2008 Audio and Video Equipment Safety Requirements BS EN 61000-3-2:2006 Test Limits for EMC Harmonic Currents BS EN61000-3-3:2008 Test Limits for EMC Voltage Changes and fluctuations The Declaration of Conformity is made in relation to the associated tests carried out and verified by our suppliers and their authorised test facilities. Signed for and on behalf of: TRIAX UK LTD KEVIN EDWARDS…………………………………………………………………QUALITY MANAGER. 30th November 2010 46 Issue 2 48