1
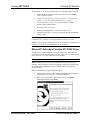
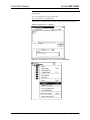
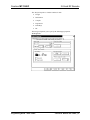
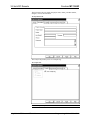
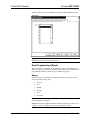
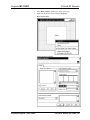
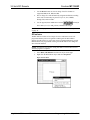
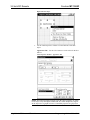
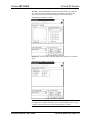
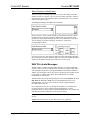
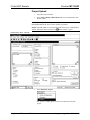
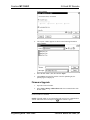
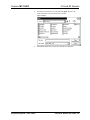
Crestron MT-1000C
3.8 Inch RF Remote
Programming Guide
This document was prepared and written by the Technical Documentation department at:
Crestron Electronics, Inc.
15 Volvo Drive
Rockleigh, NJ 07647
1-888-CRESTRON
All brand names, product names and trademarks are the property of their respective owners.
©2005 Crestron Electronics, Inc.
Crestron MT-1000C
3.8 Inch RF Remote
Contents
3.8 Inch RF Remote: MT-1000C
1
Introduction ..........................................................................................................1
Programmable Buttons...........................................................................1
USB Programming Port .........................................................................2
Configuration Software ........................................................................................2
Earliest Version Software Requirements for the PC ..............................2
Microsoft® ActiveSync® and the MT-1000C Driver ..............................3
Programming with SIMPL Windows.....................................................4
Programming with VisionTools® Pro-e .................................................9
New Programming Objects ..................................................................14
WAV File Audio Messages..................................................................22
Project Upload and Firmware Upgrade ..............................................................23
Project Upload......................................................................................24
Firmware Upgrade ...............................................................................25
Problem Solving .................................................................................................28
Further Inquiries...................................................................................29
Firmware Upgrades..............................................................................29
Future Updates .....................................................................................29
Return and Warranty Policies.............................................................................30
Merchandise Returns / Repair Service .................................................30
CRESTRON Limited Warranty ...........................................................30
Programming Guide – DOC. 6330A
Contents • i
Crestron MT-1000C
3.8 Inch RF Remote
3.8 Inch RF Remote: MT-1000C
Introduction
This guide contains programming and configuration information for the
MT-1000C 3.8 inch RF remote. For detailed operation information, refer to the
latest version of the MT-1000C Operations Guide (Doc. 6322), available from
the Crestron® website (http://www.crestron.com/manuals).
Programmable Buttons
The MT-1000C has 16 hard key programmable buttons.
● VOL Up/Down (Join numbers 1 and 2)
● MENU (Join number 12)
● CH Up/Down (Join numbers 3 and 4)
● EXIT (Join number 13)
● MUTE (Join number 5)
● Page Back (Join number 14)
● INFO (Join number 6)
● Page Forward (Join number 15)
● Thumb pad with UP (Join number 7),
RIGHT (Join number 8), DOWN (Join
number 9), LEFT (Join number 10),
and SELECT (Join number 11)
● MAIN (Join number 16)
NOTE: To program hard buttons 14, 15 and 16, the MT-1000C must contain
firmware version 2.22.1.50420, and you must use VisionTools® Pro-e version
3.3.3.6 or later. To view the firmware version, press and hold the MAIN button
for five seconds. Then select System.
Programming Guide – DOC. 6330A
3.8 Inch RF Remote: MT-1000C • 1
3.8 Inch RF Remote
Crestron MT-1000C
NOTE: When using firmware 2.22, the hard buttons do not work when the low
battery warning is displayed.
USB Programming Port
Located on the rear side, this port connects to a computer with a USB cable
(included with the MT-1000C) for loading operation programming.
MT-1000C Rear View
Configuration Software
Have a question or comment about Crestron software?
Answers to frequently asked questions (FAQs) can be viewed in the Online Help
section of the Crestron website. To post a question or view questions you have
submitted to Crestron’s True Blue Support, log in at http://support.crestron.com.
First-time users will need to establish a user account.
The MT-1000C provides a wireless RF user interface in a Cresnet® 2-Series
control system, and also works with X-Series using a CNRFGWA-418 gateway.
NOTE: Crestron recommends using gateway CNRFGWA-418 or control
system MC2W units that shipped after February 15, 2005. Earlier units are not
compatible with the MT-1000C. If you have an earlier unit, it may be returned
for an upgrade. Contact Crestron customer support for more information.
You can create a program that allows you to set up the MT-1000C to operate a
Crestron control system using the Crestron programming tool SIMPL Windows.
Earliest Version Software Requirements for the
PC
NOTE: Crestron recommends that you use the latest software to take advantage
of the most recently released features. The latest software is available from the
Crestron website.
NOTE: Crestron software and any files on the website are for Authorized
Crestron dealers and Crestron Authorized Independent Programmers (CAIP)
only. New users are required to register to obtain access to certain areas of the
site (including the FTP site).
2 • 3.8 Inch RF Remote: MT-1000C
Programming Guide - DOC. 6330A
Crestron MT-1000C
3.8 Inch RF Remote
The following are the earliest useable software version requirements for the PC:
•
SIMPL Windows version 2.05.22 or later, Library 321 and SIMPL+
Cross Compiler version 1.1.
•
Crestron VisionTools® Pro-e (VT Pro-e) version 3.3.3.5 or later. Use
version 3.3.3.6 or later to program hard keys 14, 15 and 16.
•
Crestron Database version 17.1.0 or later. Required by SIMPL
Windows and VisionTools Pro-e.
•
Crestron Toolbox 1.0.7 or later.
•
Control system upgrade file (CUZ) version 3.008 or later.
•
Microsoft® ActiveSync® version 3.8 or later (On the CD included with
the MT-1000C).
NOTE: To upgrade the MT-1000C firmware version 2.22.1.50520 in order to
use hard keys 14, 15 and 16, use Crestron Toolbox version 1.0.7 or later.
NOTE: If you are using a CNRFGWA-418 or an MC2W that was shipped prior
to February 15, 2005 you must upgrade the unit at the factory.
Microsoft® ActiveSync® and the MT-1000C Driver
The MT-1000C requires Microsoft ActiveSync and the MT-1000C driver for
communication with Crestron Toolbox. The MT-1000C driver is included in VT
Pro-e version 3.3.3.5 or later and with Crestron Toolbox.
NOTE: Begin the installation process with the equipment disconnected.
When you install VT Pro-e, the software searches for ActiveSync on your
computer. If it is not found, you will be prompted to install ActiveSync. Restart
the computer after installing the VT Pro-e and MT-1000C components or
Crestron Toolbox.
Please use the following steps to install ActiveSync.
1.
Your MT-1000C comes with a CD that contains Microsoft ActiveSync.
Find and run “ActiveSync.exe” from the included CD.
2.
When a new setup window opens for ActiveSync, click NEXT.
“Microsoft ActiveSync” Setup Window
Programming Guide – DOC. 6330A
3.8 Inch RF Remote: MT-1000C • 3
3.8 Inch RF Remote
Crestron MT-1000C
3.
A new window opens to select the installation folder, simply click
NEXT to accept the defaults.
4.
If a new window titled “Get Connected” opens, do not click any button
in this window. The “Get Connected” window will automatically
update. Do not click NEXT.
“Get Connected” Window
5.
After both Microsoft ActiveSync and VT Pro-e version 3.3.3.5 or later,
which contains the MT-1000C driver, are installed, you can use
VT Pro-e to create a program and use Crestron Toolbox to upload the
program to the MT-1000C.
6.
Plug the USB cable into your computer and then into the MT-1000C.
The hardware wizard will recognize the new addition.
NOTE: Remember which USB port was used in the Active Sync installation.
Other USB ports on your PC may not be setup for the MT-1000C, and may
display a “New Equipment Detected” or similar message, or an error message. If
the “New Equipment Detected” message is encountered, you can follow the
default prompts to apply the drivers already present to that USB port.
NOTE: Although keyed, the USB connector can be inserted up side down. This
will generate an error message.
Programming with SIMPL Windows
NOTE: The following are acceptable file extensions for programs that include
an MT-1000C, developed for specific control system types:
.smw: projectname.smw (SIMPL Windows source file)
.spz: projectname.spz (compiled file for 2-series)
.bin: projectname.bin (compiled file for CNX generation)
.csz: projectname.csz (compiled file for CNX generation with SIMPL+)
.ush: projectname.ush (compiled file for CNX generation w/ SIMPL+ header
file)
.usp: projectname.usp (source code module for SIMPL+)
.umc: projectname.umc (user macro for SIMPL)
4 • 3.8 Inch RF Remote: MT-1000C
Programming Guide - DOC. 6330A
Crestron MT-1000C
3.8 Inch RF Remote
SIMPL Windows is the Crestron graphical, Windows®-based development tool
for programming control systems. The SIMPL Windows interface provides two
workspaces: the Configuration Manager, for configuring the control system,
touchpanels, and controlled network devices; and Program Manager, for
designing the logic and functionality of the control system.
In addition, you can use the powerful Crestron Toolbox utility to accomplish
multiple system tasks, such as uploading the program to the control system and
performing diagnostic functions. Together with the Crestron Database, these
tools provide you with the essential components you need to program the
MT-1000C.
NOTE: The MT-1000C is shipped with a CD that contains ActiveSync. This
must be installed, and your computer rebooted, before running Toolbox. Refer to
page 2.
NOTE: The information in this section assumes that the reader has knowledge
of SIMPL Windows. If not, refer to the extensive help information provided
with the software.
This section describes a sample SIMPL Windows program that includes an
MT-1000C remote control.
NOTE: In the following programming example, a PRO2 2-Series processor is
used as the control system.
Configuration Manager is where programmers “build” a Crestron control system
by selecting hardware from the Device Library. In Configuration Manager, drag
the PRO2 from the Control Systems folder of the Device Library and drop it in
the upper pane of the System Views. The PRO2 with its associated
communication ports is displayed in the System Views upper pane.
Pro2 System View
The System Views lower pane displays the PRO2 system tree. This tree can be
expanded to display and configure the communications ports.
Expanded PRO2 System Tree
Programming Guide – DOC. 6330A
3.8 Inch RF Remote: MT-1000C • 5
3.8 Inch RF Remote
Crestron MT-1000C
C2Net-Device Slot in Configuration Manager
An RF gateway device is required to incorporate an MT-1000C into a system.
The C2Net-Device Slot can accept a gateway such as the CNRFGWA-418.
Once a gateway is configured in a C2Net-Device Slot, the slot allows Cresnet
communication between the MT-1000C and the control system.
NOTE: An MC2W control system can be programmed to operate at 418 MHz
without the need for a CNRFGWA-418.
To incorporate the CNRFGWA-418 into the system, drag the CNRFGWA-418
from the Wireless Receivers | Wireless Receivers (RF) folder of the Device
Library and drop it in the System Views. The PRO2 system tree displays the RF
gateway in slot 9 with a default Net ID of 24 as shown in the following
illustration.
NOTE: The first CNRFGWA-418 in a system is preset with a Net ID of 24,
when its symbol is dragged into the upper pane of System Views. Additional
CNRFGWA-418 units are assigned different Net ID numbers as they are added.
C2Net Device, Slot 9
Right-click on the CNRFGWA-418 in the System Views tree.
NOTE: The RFID in SIMPL Windows and in VT Pro-e must be the same.
6 • 3.8 Inch RF Remote: MT-1000C
Programming Guide - DOC. 6330A
Crestron MT-1000C
3.8 Inch RF Remote
Select Add item to: “CNRFGWA-418” and choose an MT-1000C from the
“Select New Device” window as shown in the following diagram and click OK.
Alternatively, the MT-1000C device can be dragged from the Wireless Remotes
(RF) folder of the Device Library to the CNRFGWA-418 device in the
C2Net-Device slot.
NOTE: The MT-1000C at RF ID 00 may return an error when compiling
SIMPL program for X-Generation processors.
NOTE: If the MT-1000C is not a selectable device, check that Device Library
version 321 or later is installed, and that the device you are adding the
MT-1000C to is a CNRFGWA-418 gateway.
Adding an MT-1000C
Setting the RF ID in Device Settings
Double-click the MT-1000C icon to open the “Device Settings” window. This
window displays the MT-1000C device information. If necessary, select the
RF/IR ID tab to change the RF ID, as shown in the following figure. The RF ID
range is 00 through F0.
“Device Settings” Window for the MT-1000C
Programming Guide – DOC. 6330A
3.8 Inch RF Remote: MT-1000C • 7
3.8 Inch RF Remote
Crestron MT-1000C
NOTE: The hardware and software settings of the RF ID must match. The RF
ID setting for the hardware is limited to numbers in increments of the most
significant digit (i.e., 00, 10, 20). The RF ID must also be set in VT Pro-e.
MT-1000C Symbol in Programming Manager
Programming Manager is where programmers “program” a Creston control
system by assigning signals to symbols. The following describes the MT-1000C
symbol in the SIMPL Windows Programming Manager.
Detail View of the MT-1000C in SIMPL Windows’ Programming Manager
The MT-1000C can transmit up to 999 unique signal joins to a control system.
Every button can be programmed with multiple functions.
8 • 3.8 Inch RF Remote: MT-1000C
Programming Guide - DOC. 6330A
Crestron MT-1000C
3.8 Inch RF Remote
The pushbuttons and thumbpad hard keys have fixed join numbers
corresponding to the <press1> to <press16> outputs of the touchpanel symbol.
NOTE: A hard key button continuously sends signal pulses as long as the
button is held (except the MAIN button, join 16 is a momentary pulse).
NOTE: If a hard key is not defined, the button will have no function when
pressed.
Example Program
An example program for the MT-1000C is available from the “Example
Program” section of the Crestron website
(www.crestron.com/exampleprograms). Search for the file named
MT-1000C.ZIP.
Programming with VisionTools® Pro-e
VisionTools Pro-e (VT Pro-e), a design and programming Windows-based
software, permits the creation of unlimited control screen variations
incorporating two and three-dimensional graphics, text and sounds (recorded as
WAV files). A set of pages, which make up a project, can be designed for each
MT-1000C touchscreen application. Each page contains objects such as custom
control graphics, two and three-dimensional buttons which allow the user to
interface with the control system via join numbers.
NOTE: Shaded buttons are not supported in this application.
NOTE: The Clock/Date object does not have a frame, is always rectangular, has
a limited font set, and does not have a selectable text style.
NOTE: Transparency is not supported for object face or graphic resources.
NOTE: The MT-1000C does not support sub-pages.
Unjoined objects are not interfaced with the system and thus cannot initiate any
control system functions. The completed and compiled project is uploaded to the
touchscreen via the File | Upload Project command. The MT-1000C uses the
programmed project until another project is uploaded from the PC. Programs
cannot be extracted from the touchscreen. The PC may be disconnected from the
control system or panel except during programming upload.
Crestron’s Synapse™ image-rendering algorithm supports advanced antialiasing for crisper, sharper images for all objects, new frame styles (neon and
raised), and new text styles (embossed, raised, and shadow). Shaded style is not
supported for the MT-1000C. The Synapse algorithm allows the touchpanel to
process these styles internally, without the use of large bitmap files that increase
project size and upload time. Synapse delivers high impact touchpanel graphics
more efficiently than ever. To utilize Synapse graphics, you must use VT Pro-e
version 3.4.x or later.
For additional software information, refer to the help file provided with the
software. The latest version of VT Pro-e can be obtained from the Crestron
website.
The RF ID is used for communicating with the RF receiver. VT Pro-e can also
be used to program page jumps for soft key presses or hard buttons.
Programming Guide – DOC. 6330A
3.8 Inch RF Remote: MT-1000C • 9
3.8 Inch RF Remote
Crestron MT-1000C
NOTE: The following are acceptable file extensions for programs that include
an MT-1000C.
.vtp projectname.vtp (VT Pro-e source file)
.hex projectname.hex (compiled file).
Open VT Pro-e and select the MT-1000C from the Panel Type pull down list.
“Name New Project File As…” Window
Right-click on MT1000C in Project View and select Properties.
10 • 3.8 Inch RF Remote: MT-1000C
Programming Guide - DOC. 6330A
Crestron MT-1000C
3.8 Inch RF Remote
The “Project Properties” window contains six tabs.
•
Design
•
Information
•
Compile
•
Page Resize
•
Hard Keys
•
RF
The Design tab permits you to specify the default page properties.
The Design Tab
Programming Guide – DOC. 6330A
3.8 Inch RF Remote: MT-1000C • 11
3.8 Inch RF Remote
Crestron MT-1000C
The Information tab can contain the project name, dealer, job/order number,
designer, version, and comments.
The Information Tab
The Compile tab permits you to see a compile log.
The Compile Tab
NOTE: Grayed-out options are not available.
12 • 3.8 Inch RF Remote: MT-1000C
Programming Guide - DOC. 6330A
Crestron MT-1000C
3.8 Inch RF Remote
The Page Resize tab enables you to reposition, crop or scale an object.
The Page Resize Tab
The Hard Keys tab allows you to set page flips to hard key operation. Unjoined
keys have no function.
The Hard Keys Tab
Programming Guide – DOC. 6330A
3.8 Inch RF Remote: MT-1000C • 13
3.8 Inch RF Remote
Crestron MT-1000C
The RF tab allows you to set the RF ID to match the SIMPL Windows project.
The RF Tab
NOTE: The MT-1000C at RF ID 00 may return an error when compiling
SIMPL program for X-Generation processors.
New Programming Objects
Three new objects are available for the MT-1000C, Battery, RF Indicator and
Date. One instance of the Battery and RF indicator objects may be added to each
page. Multiple instances of the date may be added to any page(s).
Battery
The battery object is essentially an animation consisting of six pictures. Each
picture represents a battery state:
1.
Very low
2.
Low
3.
Middle
4.
Enough
5.
Full
6.
On cradle
NOTE: You must use all six pictures. Using less than six will result in an error
when the program is compiled.
NOTE: The VT Pro-e graphics subfolder contains pictures that you may use. In
VT Pro-e version 3.4, the pictures will be preloaded into the object.
14 • 3.8 Inch RF Remote: MT-1000C
Programming Guide - DOC. 6330A
Crestron MT-1000C
3.8 Inch RF Remote
1.
Select Draw | Battery and draw the object on the page.
2.
Right-click the battery object and select Properties.
Right-click Sub Menu
“Battery Properties” Window
Programming Guide – DOC. 6330A
3.8 Inch RF Remote: MT-1000C • 15
3.8 Inch RF Remote
Crestron MT-1000C
3.
Use the Browse button to select an image. Four file formats are
supported, BMP, PCX, DIB, and JPG.
4.
The six images are each automatically assigned a definition according
to the order in which they are placed: Very Low, Low, Middle,
Enough, Full, and On Cradle.
5.
Use the Append, Insert and Remove buttons
located just
above Battery Level, to add, position, and delete the images.
NOTE: Additional properties may be modified, refer to “Modified Properties”
on page 20.
RF Indicator
The RF indicator consists of two images for active and inactive states. All
programmed button presses will generate an RF signal. The RF indicator
changes from the inactive to active state when a programmed button is pressed.
Buttons that are not programmed will not generate RF and will not change the
state of the RF indicator.
NOTE: You must use two pictures. Using less than two will result in an error
when the program is compiled.
1.
Select Draw | RF Indicator and draw the object on the page.
2.
Right-click the RF Indicator object and select Properties.
Right-click Sub Menu
16 • 3.8 Inch RF Remote: MT-1000C
Programming Guide - DOC. 6330A
Crestron MT-1000C
3.8 Inch RF Remote
“RF Indicator Properties” Window
3.
Use the Browse button to select an image. Four file formats are
supported, BMP, PCX, DIB, and JPG.
4.
The two images are each automatically assigned an RF State definition,
inactive and active, based on their order.
5.
Use the Append, Insert and Remove buttons
to add,
position, and delete the images.
NOTE: The VT Pro-e graphics subfolder contains pictures that you may use. In
VT Pro-e version 3.4, the pictures will be preloaded into the object.
NOTE: Additional properties may be modified, refer to “Modified Properties”
on page 20.
Date
The date object permits you to include a date display on any or all pages in your
project. Multiple instances of the date may appear on a page.
1.
Select Draw | Date and draw the object on the page.
2.
Right-click on the date object and select Properties.
Programming Guide – DOC. 6330A
3.8 Inch RF Remote: MT-1000C • 17
3.8 Inch RF Remote
Crestron MT-1000C
Right-Click Date Object
3.
Use the “Date Properties” window to set the attributes of the date
object.
Appearance Tab – Use the Color buttons to set the colors for the face
and text.
“Date Properties” Window – Appearance Tab
NOTE: The following limitations apply to the date object properties. No frame,
no text style, always rectangular, limited font sets, and no transparency support
for the object face or graphic resources. Unavailable properties are grayed-out.
18 • 3.8 Inch RF Remote: MT-1000C
Programming Guide - DOC. 6330A
Crestron MT-1000C
3.8 Inch RF Remote
Text Tab – Click the Font button and select the desired font, style and point
size. A preview of the resulting text object is displayed in the Sample area.
Select the position location for the date display within the date object.
“Date Properties” Window – Text Tab
Design Tab – Set the format of the date display from among the six available
styles.
“Date Properties” Window – Design Tab
NOTE: Template data (only available for the clock) is a free text area for
recording project template information, and is located under the Select Property
to Modify selection at the bottom of the “Date Properties” window.
Programming Guide – DOC. 6330A
3.8 Inch RF Remote: MT-1000C • 19
3.8 Inch RF Remote
Crestron MT-1000C
NOTE: Additional properties may be modified, refer to “Select Property to
Modify Area” on page 22.
Modified Properties
In addition to selecting and positioning the graphics for the battery animation
and RF indicator animation, you may choose to modify the image dithering,
drawing proportions, and browse and select additional images. Use the pull
down Select Property to Modify list in the upper right side of the Properties
window. Each of these properties is described in the following sections.
Select Property to Modify Pull Down List
Modified Properties – Dithering
Dithering is used when the full color range of an image cannot be displayed. It is
a method of reducing the color range while maintaining a usable graphic. The
MT-1000C uses 16 bit non-palette graphics, up to 65,536 colors. Select
Dithering from the Select Property to Modify pull down list. Click the Enable
check box. The dithering property selection permits you to choose from a
variety of dithering methods from the pull-down Type list. Adjust your dithering
choice for the best possible results on the display. You may also select 8-bits or
16-bits per pixel.
Select Property to Modify - Dithering
20 • 3.8 Inch RF Remote: MT-1000C
Programming Guide - DOC. 6330A
Crestron MT-1000C
3.8 Inch RF Remote
Modified Properties – Drawing
By default, VT Pro-e retains the original size of the graphic. You can adjust the
size of the graphic in relation to the image area by choosing the drawing
property form the Select Property to Modify pull down list. Click Stretch to Fit
to fill the image area, and click Keep aspect ratio to retain the original
proportions of the image as it is resized.
Select Property to Modify - Drawing
NOTE: If the image area becomes smaller than the original size of the graphic,
VT Pro-e will crop the graphic.
Modified Properties – Project Graphic Resources
This window lists all the graphics available for the animation. Click the file
name on the right to preview the image in the Image: True Colors area on the
left. Press Confirm File Selection to select the image for use in the animation.
You may also choose Browse to select additional images.
Select Property to Modify – Project Graphic Resources
NOTE: Compress (image compression) is not available.
Programming Guide – DOC. 6330A
3.8 Inch RF Remote: MT-1000C • 21
3.8 Inch RF Remote
Crestron MT-1000C
Select Property to Modify Area
The Select Property to Modify area in the lower left of the “Battery Properties”
window provides two options: a free text area for writing comments, which are
included in any project documentation that is generated, and a Position and Size
control for the battery object.
Select Property to Modify – Description (Free Text Area)
Position and Size: The Top and Left fields give the distance in pixels from the
top and left sides of the object to the top and left sides of the margins of the
touchscreen. Height and Width fields give the current dimensions of the object.
You can change any of these settings by entering new values in the
corresponding text boxes.
Lock Position and Size: The check box makes the object immovable (this dims
the position and size fields). When this option is selected, the handles around the
object become padlocks and the object cannot be moved or sized.
WAV File Audio Messages
The MT-1000C is capable of playing audio messages as system prompts and
responses. These files are recorded as WAV files on a PC using an audio utility
such as Sound Recorder that is packaged with Microsoft Windows 98/XP/NT/
2000™. Files from other sources may also be converted to an acceptable format
by using this or a similar utility. Many other audio utilities are available
commercially or as shareware.
The MT-1000C only accepts the following WAV file format: PCM, 8, 11, or 22
kHz, mono or stereo, 8 or 16 bit. For more information about how to use
Sound Recorder, refer to its User’s Guide and extensive help information
provided with the software.
Pre-recorded WAV files for voice prompts and responses are available from
Crestron. These files can be stored into and programmed for use in the
touchpanel directly or may be edited with the Sound Recorder. For example, the
individual files can be combined to create custom messages.
NOTE: WAV files will affect the amount of available space for touchpanel
screens.
NOTE: In the initial release, 16 kHz WAV files are not supported.
22 • 3.8 Inch RF Remote: MT-1000C
Programming Guide - DOC. 6330A
Crestron MT-1000C
3.8 Inch RF Remote
Project Upload and Firmware Upgrade
Before loading a compiled VT Pro-e project or upgrading the device firmware,
the USB cable supplied with the MT-1000C must be connected to the USB
interface port on the rear of the MT-1000C and the USB port of the PC as shown
in the following diagram.
NOTE: You cannot operate the MT-1000C while a file is loading.
NOTE: All of the communication parameters are automatically set when
uploading to the MT-1000C.
NOTE: An error message will appear on the PC if you have installed the USB
connector up side down.
Typical Connection Diagram when Uploading and Upgrading
NOTE: The Crestron Toolbox (replacement for Crestron Viewport) is a broadbased software package that accomplishes multiple system tasks, primarily using
an RS-232 or TCP/IP connection between a PC and one or more Crestron
control systems. You can use the Crestron Toolbox to:
● Observe system processes
● Upload operating systems and firmware
● Upload programs and touchpanel projects
● Set or change device Network IDs
● Change serial numbers
● Run scripts to automate tasks
● Perform system diagnostics, and much more
The Crestron Toolbox allows you to perform these functions using simple
graphical views and click and drag methods.
Programming Guide – DOC. 6330A
3.8 Inch RF Remote: MT-1000C • 23
3.8 Inch RF Remote
Crestron MT-1000C
Project Upload
1.
Open the Crestron Toolbox.
2.
Select Tools | Manage Address Book and select communication with
the MT-1000C.
NOTE: This entry (MT-1000) is provided to you in the
DefaultAddressBook.adr when Crestron Toolbox is installed.
NOTE: If the MT-1000C is not synchronized with ActiveSync, communication
on the task bar is green.
will fail. Ensure that the ActiveSync icon
Toolbox Address Book – MT-1000
3.
Select Functions | Project.
The “Project” window opens. Use the browse button to locate the
project.
24 • 3.8 Inch RF Remote: MT-1000C
Programming Guide - DOC. 6330A
Crestron MT-1000C
3.8 Inch RF Remote
“Project” Window
4.
The “Open” window appears as shown in the following illustration.
“Open” Window
5.
Select the MT-1000C (.hex) file and click Open.
6.
Click Send to begin the file transfer. Once the upload begins, the
upload progress is displayed.
Firmware Upgrade
1.
Open the Crestron Toolbox.
2.
Select Tools | Manage Address Book and select communication with
the MT-1000C.
NOTE: This entry is provided to you in the DefaultAddressBook.adr when
Crestron Toolbox is installed.
NOTE: If the MT-1000C is not synchronized with ActiveSync, communication
on the task bar is green.
will fail. Ensure that the ActiveSync icon
Programming Guide – DOC. 6330A
3.8 Inch RF Remote: MT-1000C • 25
3.8 Inch RF Remote
Crestron MT-1000C
Toolbox Address Book – MT-1000
3.
Select Functions | Firmware
4.
Click Upload New Firmware…
“Firmware” Window
26 • 3.8 Inch RF Remote: MT-1000C
Programming Guide - DOC. 6330A
Crestron MT-1000C
3.8 Inch RF Remote
5.
Locate the new firmware (.csz) file and click Open. The file will
extract and return you to the “Firmware” window.
“Open” Window
6.
Programming Guide – DOC. 6330A
Click Close and the device will reboot with the new firmware.
3.8 Inch RF Remote: MT-1000C • 27
3.8 Inch RF Remote
Crestron MT-1000C
Problem Solving
The following table provides corrective action for possible trouble situations. If
further assistance is required, please contact a Crestron customer service
representative.
MT-1000C Troubleshooting
TROUBLE
The display is
black
POSSIBLE
CAUSE(S)
CORRECTIVE ACTION
The battery pack is not
properly installed
The battery pack is not
charged
Refer to "Battery Installation
and Replacement" in the
Operations Guide for battery
instructions
The brightness
too low or too
high
Adjust the brightness
Refer to "User Configuration
Menus" in the Operations Guide
for brightness adjustment
instructions
The touchscreen
buttons do not
respond properly
The touchscreen is out of Refer to "User Configuration
Menus" in the Operations Guide
calibration
for touchscreen calibration
instructions
The devices do
not respond
The devices are not
powered up
Check power to devices Check
that devices are on
The battery charge is low Recharge battery
The RF Gateway is not
functioning
The MT-1000C is MT-1000C not syncing
not recognized
up with Active Sync
or is not
communicating
with the PC
Check power to RF Gateway
Try unplugging and
reconnecting the USB
connection
Right-click the USB icon on the
task bar and check the
connection settings
The USB cable is
plugged into a different
port.
Plug the USB cable into the
port that was used when
ActiveSync was installed
The “Found New
Hardware” message
appears
Follow the hardware wizard to
install the drivers for this port
An error message
appears
The USB cable may be
connected up side down
Unable to
connect
USB drivers not installed
or MT-1000C not
recognized as a new
hardware device
Disconnect and reconnect the
battery. Connect the USB
cable. Locate the USB drivers
on the PC. Default location is
Program Files | Common
Files | URC Shared | MT-1000
The battery pack
will not charge
The battery pack not
properly installed
Refer to " Battery Installation
and Replacement " in the
Operations Guide for proper
installation instructions
28 • 3.8 Inch RF Remote: MT-1000C
Programming Guide - DOC. 6330A
Crestron MT-1000C
3.8 Inch RF Remote
Further Inquiries
If you cannot locate specific information or have questions after reviewing this
guide, please take advantage of Crestron's award winning customer service team
by calling the Crestron corporate headquarters at 1-888-CRESTRON
[1-888-273-7876]. For assistance in your local time zone, refer to the Crestron
website (www.crestron.com) for a listing of Crestron worldwide offices.
You can also log onto the online help section of the Crestron website to ask
questions about Crestron products. First-time users will need to establish a user
account to fully benefit from all available features.
Firmware Upgrades
To take advantage of all the available features, it is important that the unit
contains the latest firmware. Please check the Crestron website for the latest
version of firmware. Not every product has a firmware upgrade, but as Crestron
improves functions, adds new features, and extends the capabilities of its
products, firmware upgrades are posted.
Future Updates
As Crestron improves functions, adds new features, and extends the capabilities
of the MT-1000C, additional information may be made available as manual
updates. These updates are solely electronic and serve as intermediary
supplements prior to the release of a complete technical documentation revision.
Check the Crestron website periodically for manual update availability and its
relevance. Updates are identified as an “Addendum” in the Download column.
Programming Guide – DOC. 6330A
3.8 Inch RF Remote: MT-1000C • 29
3.8 Inch RF Remote
Crestron MT-1000C
Return and Warranty Policies
Merchandise Returns / Repair Service
1.
No merchandise may be returned for credit, exchange, or service without prior
authorization from CRESTRON. To obtain warranty service for CRESTRON products,
contact the factory and request an RMA (Return Merchandise Authorization) number.
Enclose a note specifying the nature of the problem, name and phone number of contact
person, RMA number, and return address.
2.
Products may be returned for credit, exchange, or service with a CRESTRON Return
Merchandise Authorization (RMA) number. Authorized returns must be shipped freight
prepaid to CRESTRON, 6 Volvo Drive, Rockleigh, N.J. 07647, or its authorized
subsidiaries, with RMA number clearly marked on the outside of all cartons. Shipments
arriving freight collect or without an RMA number shall be subject to refusal.
CRESTRON reserves the right in its sole and absolute discretion to charge a 15%
restocking fee, plus shipping costs, on any products returned with an RMA.
3.
Return freight charges following repair of items under warranty shall be paid by
CRESTRON, shipping by standard ground carrier. In the event repairs are found to be
non-warranty, return freight costs shall be paid by the purchaser.
CRESTRON Limited Warranty
CRESTRON ELECTRONICS, Inc. warrants its products to be free from manufacturing defects in
materials and workmanship under normal use for a period of three (3) years from the date of
purchase from CRESTRON, with the following exceptions: disk drives and any other moving or
rotating mechanical parts, pan/tilt heads and power supplies are covered for a period of one (1)
year; touchscreen display and overlay components are covered for 90 days; batteries and
incandescent lamps are not covered.
This warranty extends to products purchased directly from CRESTRON or an authorized
CRESTRON dealer. Purchasers should inquire of the dealer regarding the nature and extent of the
dealer's warranty, if any.
CRESTRON shall not be liable to honor the terms of this warranty if the product has been used in
any application other than that for which it was intended, or if it has been subjected to misuse,
accidental damage, modification, or improper installation procedures. Furthermore, this warranty
does not cover any product that has had the serial number altered, defaced, or removed.
This warranty shall be the sole and exclusive remedy to the original purchaser. In no event shall
CRESTRON be liable for incidental or consequential damages of any kind (property or economic
damages inclusive) arising from the sale or use of this equipment. CRESTRON is not liable for
any claim made by a third party or made by the purchaser for a third party.
CRESTRON shall, at its option, repair or replace any product found defective, without charge for
parts or labor. Repaired or replaced equipment and parts supplied under this warranty shall be
covered only by the unexpired portion of the warranty.
Except as expressly set forth in this warranty, CRESTRON makes no other warranties, expressed
or implied, nor authorizes any other party to offer any warranty, including any implied warranties
of merchantability or fitness for a particular purpose. Any implied warranties that may be imposed
by law are limited to the terms of this limited warranty. This warranty statement supercedes all
previous warranties.
Trademark Information
All brand names, product names, and trademarks are the sole property of their respective owners. Windows is a registered
trademark of Microsoft Corporation. Windows95/98/Me/XP and WindowsNT/2000 are trademarks of Microsoft
Corporation.
30 • 3.8 Inch RF Remote: MT-1000C
Programming Guide - DOC. 6330A
Crestron MT-1000C
3.8 Inch RF Remote
This page intentionally left blank.
Programming Guide – DOC. 6330A
3.8 Inch RF Remote: MT-1000C • 31
Crestron Electronics, Inc.
15 Volvo Drive Rockleigh, NJ 07647
Tel: 888.CRESTRON
Fax: 201.767.7576
www.crestron.com
Programming Guide – DOC. 6330A
(2012170)
06.05
Specifications subject to
change without notice.