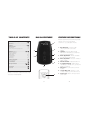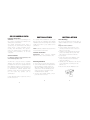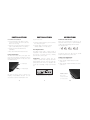
1
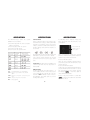
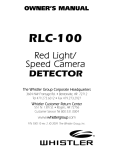
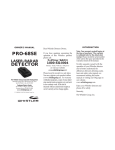
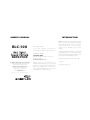
OWNER’S MANUAL
RLC-100
Red Light/
Sp eed Came ra
DETECTOR
The Whistler Group Corporate Headquarters
3604 NW Frontage Rd. • Bentonville, AR 72712
Tel 479.273.6012 • Fax 479.273.2927
Whistler Customer Return Center
551 N. 13th St. • Rogers, AR 72756
Customer Service Tel 800.531.0004
www.whistlergroup.com
P/N 300110 rev. 2, © 2009 The Whistler Group, Inc.
INTRODUCTION
Dear Whistler Owner,
If you have questions concerning the
operation of this Whistler product please call:
Customer Service
1-800-531-0004
Monday - Friday • 8:00 am - 5:00 pm CT
or visit our website
www.whistlergroup.com
Please keep the receipt in a safe place. For
warranty verification purposes, a copy of your
dated store receipt must accompany any unit
sent in for warranty work. If the unit is
returned without a dated store receipt, an out
of warranty service charge applies.
Note: Your warranty period begins at the
time of purchase. The warranty is validated
only by the dated store receipt. Record the
serial number of the unit in the space
provided in the warranty section of this
manual.
To fully acquaint yourself with the operation of
your Whistler unit, we recommend reading
this entire manual or visiting our FAQ page on
our website www.whistlergroup.com
Enjoy your Whistler and please drive safely.
Sincerely,
The Whistler Group, Inc.
TABLE OF CONTENTS
RLC-100 FEATURES
3-4
Model Features Summary . . . . . . . . . . . . . . . .3
GPS/Camera . . . . . . . . . . . . . . . . . . . . . . . . . . . .5
FEATURE DESCRIPTIONS
1
Whistler’s ergonomic and user-friendly design
provides a new level of operating
convenience. Special features include:
6-8
Installation . . . . . . . . . . . . . . . . . . . . . . . . . . .6
•Software Information
•Mounting Guidelines
•Dash Mounting
•Power Connection And Fuse Replacement
6
6
7-8
8-9
10 - 17
Operation . . . . . . . . . . . . . . . . . . . . . . . . .1
•Power On And Self-Test
•Audio Level Adjustment
•Getting a Satellite Lock
•Feature Settings
•Changing Settings
•Camera Alerts
•Manual Entry
10
10
11
12-13
13-14
15
15-16
4
7
9
5
8
16
Troubleshooting Guide . . . . . . . . . . . . . . . . . . .1
•Care & Maintenance
17
18
FCC Information . . . . . . . . . . . . . . . . . . . . . . . .1
3
22 - 24
Warranty Information . . . . . . . . . . . . . . . .2
25
Specifications . . . . . . . . . . . . . . . . . . . . . . . . . .2
6
26
Accessories . . . . . . . . . . . . . . . . . . . . . . . . . . . .2
IMPORTANT: The RLC-100 is a red
light/speed camera locator and does not
detect laser or radar signals.
2
3
1. GPS Antenna – Compact, high
efficiency antenna receives GPS
signals.
2. Speaker – Provides distinct audio
warnings for Red Light, Speed Camera
and user entered locations.
3. Menu (M) Button - Allows changing
the unit’s options and settings.
4. Enter (E) Button- Selects the changed
feature setting.
5. Volume Control – Adjusts audio level.
6. 7 Segment Display - Offers easy-toread display to indicate time, speed, and
distance to camera.
7. USB Port- For connection to a PC for
updates.
8. 12 Volt Out Jack - Provides 12 volt
1.5 amp output to power other devices.
9. Power Jack - allows connection to the
power cable.
4
GPS/CAMERA INFO
Important Information
WARNING: It is the user’s responsibility to use
this product prudently and maintain safe
driving practices at all times.
The Global Positioning System (GPS) is
operated by the government of the United
States, which is solely responsible for its
accuracy and maintenance. The system is
subject to changes which could affect the
accuracy and performance of all GPS
equipment.
Camera Database
For database updates and registration, visit
www.whistlerupdates.com.
The RLC-100 is shipped with the Verilight™
database (Red Light and Speed Cameras)
preloaded. This unit can be updated with the
latest database anytime by connecting to a
PC. In order to update the unit, you will need
to download the Software program from
Whistler’s website first. You must also register
the unit before any updates can be
downloaded.
INSTALLATION
INSTALLATION
Free updates will be available for up to 1 year
from the date of registration and software
installation (other models may have a longer
update time). After 1 year, updates can be
purchased.
Dash Mounting
The unit can be installed one of two ways: 1)
using the Magnetic Puck or 2) non-skid dash
pad.
Magnetic Puck Installation:
• Select a location on the dash or center
console (remember the unit needs to be
able to “see” the sky).
• Clean the selected area with an isopropyl
pad to clean off any wax or polish. This
will prepare the area for the adhesive
to properly stick.
• Locate the bottom of the Magnetic Puck
and peel off the protective backing to
expose the adhesive.
• Carefully place the Magnetic Puck onto the
selected area and press firmly to let the
adhesive set.
• Place the unit onto the Magnetic Puck.
NOTE: Software program’s instructions will be
included with the download.
Software Information
IMPORTANT: Please read the Software
Agreement notice enclosed with the unit!
Mounting Guidelines
• Unit needs a clear view of the sky above.
• Some windshields have an Instaclear™ or
Electriclear™ type coating, which can
affect GPS signals. Consult your vehicle’s
dealer or the owner’s manual supplied
with your vehicle to determine if your
windshield has this coating.
• To reduce the possibility of theft, conceal
your unit when not in use.
A mini USB cable will be required to connect
the RLC-100 to a PC.
6
5
7
INSTALLATION
Non-Skid Pad Installation:
• Select a location on the dash or center
console (remember the unit needs to be
able to “see” the sky).
• Clean the selected area with an isopropyl
pad to clean off any waxes or polishes.
• Remove the Non-Skid Pad from its
packaging.
• Place the Non-Skid Pad onto this area.
Power Connection
The RLC-100 includes two power jacks. One
jack is for powering the unit and the other to
share power with another 12 volt device such
as a radar detector.
12 Volt Input
INSTALLATION
To power the unit:
• Plug the small end of the power cord into
the unit’s power jack.
• Plug the large end into the vehicle’s
cigarette lighter or 12 volt outlet.
Fuse Replacement
The lighter socket plug is equipped with a
replaceable 2 amp 3AG fuse located behind
the silver tip. To replace the fuse, carefully
unscrew the tip of the plug.
IMPORTANT: Unscrew slowly. The tip
contains a spring which may fly out when
disassembling. Insert the new fuse with the
spring and screw on the tip. Retighten the
screw cap occasionally, it may loosen during
use.
OPERATION
Power On and Self Test
Each time your RLC-100 is turned on, an
automatic self-test sequence confirms that the
speaker and visual displays are functional.
The display shows:
To turn the unit on or off, press the on/off
button located on the power cord.
Audio Level Adjustment
To change the audio level:
• Move Volume button back to increase
audio level.
• Move Volume button forward to decrease
audio level.
12 Volt Output
Volume control:
We offer a power cord to connect to a
majority of Laser-Radar detectors. See the
accessories section for ordering this cord.
8
Unscrew the tip of the lighter socket plug
carefully when replacing the 2 amp fuse.
9
Move in the
direction of arrow
to increase audio
10
OPERATION
OPERATION
OPERATION
Getting a Satellite Lock
Powering up, the unit will begin its search for
satellites. During this time, the unit will flash
the middle segments of the display.
Feature Settings
This section explains the many features of this
model and how to select them in the menu.
The unit stores Max Speed, Elapsed Time, and
total mileage (odo) until unit is powered off.
- Selects “top of the hour”
announcement. When the time reaches a
new hour, the unit will announce; “GPS time
check – 6 o’clock” for example.
Please allow several minutes for the unit to
lock onto the satellites. This delay is normal
when the unit is turned on at least 500 miles
from when the unit last received a satellite
lock.
NOTE: The unit locks onto satellites faster
when not moving. Acquiring satellites takes
much longer the first time.
The unit displays either time or speed.
Clock:
Speed:
(Displays when not moving)
(Displays while moving)
The default units are MPH and Yards.
Optionally, KPH and Meters can be selected.
11
- Displays the Month and Day. This is set
by the GPS and the local setting to provide the
correct date.
- Displays the Max Speed.
- Displays elapsed trip time.
- Displays trip mileage.
- Select MPH or. KPH. Switches from
Standard to Metric units.
- Selects Stay Alert warning. After 2
hours of movement a “get rest”
announcement will be heard.
Change settings
Press the menu button (M) to enter the feature
selection mode. Press Menu again to advance
to the next feature. Repeated presses of Menu
button will cycle through all the available
features.
Some features are informational only, others
have multiple options.
- Select the speed warning threshold.
Change the speed that the unit will announce
“Attention reduce speed now”.
- Selects the proper time (GMT). North
America is generally a minus (-) number.
Atlantic = -04
East = -05
Central = -06
Mountain = -07
Pacific = -08
Alaska = -09
Hawaii = -10.
12
13
OPERATION
OPERATION
OPERATION
The following steps outline the options
available for select features.
Camera Alerts
When a camera location is approached, the
unit will announce the type of alert (Red Light
Camera, Speed Camera, or User Selected), for
example, “Caution red light camera detected”
and the display counts down the distance to
the camera.
To manually enter a location, simply press
Enter (E) and the unit will announce “user
point logged”.
Two alert LEDs on either side of the display will
flash faster as you get closer to the camera.
Once past the camera location, the unit will
provide an “all clear” beep-beep type audio
tone.
When detecting this position, the unit will
announce “warning user position ahead” the
next time it approaches this location..
1) Press Menu (M) untill one of the selectable
features is displayed.
2) Press Enter (E) to show one option.
3) Press M to view all options.
4) Press Er to save the option shown.
IMPORTANT: The RLC-100 is a red light/speed
camera locator and does not detect laser or
radar signals.
NOTE:
SPD = SP 1= MPH/Yards, SP 2 = KPH/Meters
LSPD = Select the speed at which the unit will
alarm
LOCA = Select the correct time- correction for your
area
ALAR = Select the “Top of the Hour” alert
REST = Select stay alert
14
Manual Entry
The RLC-100 will save a special location (i.e., a
new red light camera or even a “trap”) if you
enter it manually. The unit will store 100 user
locations. NOTE: Manual enteries must be
approximately 100 yards apart to prevent
overlapping locations.
15
Press the Enter (E)
button to save a
new location.
To delete manual locations:
When the unit is alerting a manual location,
press Enter (E) and unit will announce “user
position deleted”.
To delete all manual locations:
1) When the unit is alerting a manual location,
press and hold Enter for more than 2 seconds.
The unit announces “user position deleted”
ADEL” . Press Enter again to
and displays “A
delete all manual locations.
If Enter is not pressed within 5 seconds after
ADEL” is shown, the locations are saved and
“A
the mode is exited.
16
TROUBLESHOOTING GUIDE
CARE & MAINTENANCE
Your unit is expertly engineered and designed
to exacting quality standards to provide you
with reliable, trouble-free operation. If your unit
has been correctly installed following the
guidelines in this manual, but is not operating
optimally, please refer to the troubleshooting
guide below.
During the summer months, avoid
prolonged exposure to direct sunlight by
removing your unit from the dash when your
vehicle is parked for an extended
period of time. Do not spray water,
cleaners, or polishes directly onto the unit.
The spray may penetrate through the
openings and damage the unit. Also, do not
use any abrasive cleaners on the unit’s
exterior.
PROBLEM: No display or audio.
Check fuse in Whistler plug; replace if
necessary with a 2 amp, 3AG type. Check fuse
for lighter socket; replace if necessary. Make sure
lighter socket is clean.
PROBLEM: Audio alerts are not loud
enough. Check audio level setting (see
pg.10).
PROBLEM: Unit resets when vehicle hits
bumps. Check for loose lighter socket; tighten
and clean. Check connections at both ends of
power cord. Substitute another cord to
determine if cord is defective. Return
defective cord to the factory.
FCC INFORMATION
This device complies with part 15 of the FCC
Rules. Operation is subject to the following two
conditions:
(1) This device may not cause harmful interference.
(2) This device must accept any interference
received, including interference that may
cause undesired operation.
This equipment has been tested and found to
comply with the limits for a Class B digital device,
pursuant to part 15 of the FCC Rules. These limits are
designed to provide reasonable protection against
harmful interference in a residential installation. This
equipment generates, uses and can radiate radio
frequency energy and, if not installed and used in
accordance with the instructions, may cause
harmful interference to radio communications.
However, there is no guarantee that interference
will not occur in a particular installation. If this
equipment does cause harmful interference to radio
or television reception, which can be determined by
turning the equipment off and on, the user is
encouraged to try to correct the interference by one
or more of the following measures:
If difficulties occur which cannot be solved by
information in this Troubleshooting Guide, please
call Whistler Customer Service at
1-800-531-0004 or visit our FAQ page at
www.whistlergroup.com before returning your
unit for service.
• Reorient or relocate the receiving antenna.
• Increase the separation between the equipment
and receiver.
IMPORTANT: FCC requirements state that
changes or modifications not expressly approved
by The Whistler Group could void the user’s
authority to operate the equipment.
18
19
20
WARRANTY INFORMATION
WARRANTY INFORMATION
WARRANTY INFORMATION
Consumer Warranty
This Whistler product is warranted to the original
purchaser for a period of one year from the date
of original purchase against all defects in
materials and workmanship.
Service Under Warranty
During the warranty period, defective units will
be repaired without charge to the purchaser
when returned with a dated store receipt to the
address below. Units returned without dated
store receipt will be handled as described in
section “Service Out Of Warranty.”
2. Include with your unit the following
information, clearly printed:
This limited warranty is void if the unit is
abused, modified, installed improperly, if the
housing has been removed, or if the serial
number is missing.
There are no express warranties covering this
product other than those set forth in this
warranty. All express or implied warranties for
this product are limited to one year. Whistler is
not liable for damages arising from the use,
misuse, or operation of this product.
Service Out of Warranty
Units will be repaired at “out of warranty” service
rates when:
• The units original warranty has expired.
• A dated store receipt is not supplied.
• The unit has been returned without its serial
number.
• The unit has been abused, modified, installed
improperly, or had its housing removed.
21
Due to the specialized equipment necessary for
testing this product, there are no authorized
service stations for Whistler products other than
Whistler.
When returning a unit for service, please follow
these instructions:
1. Ship the unit in the original carton or in a
suitable sturdy equivalent, fully insured, with
return receipt requested to:
Whistler Repair Dept.
551 N. 13th St.
Rogers, AR. 72756
Please allow 3 weeks turn around time.
• Your name and street address (for shipping via
UPS), a daytime telephone number and an email address, if applicable.
• A detailed description of the problem
(e.g.,“Unit only flashes bars”).
• A copy of your dated store receipt or bill of sale.
3. Be certain your unit is returned with its serial
number. For reference, please write your unit serial
number in the following space: _____________.
Units without serial numbers are not covered under
warranty.
IMPORTANT: To validate that your unit is
within the warranty period, make sure you
keep a copy of your dated store receipt. You
may have registered your unit at
www.whistlergroup.com, however, for
warranty verification purposes, a copy of your
dated store receipt must accompany any unit
sent in for warranty work.
IMPORTANT: Whistler will not assume
responsibility for loss or damage incurred in
shipping. Therefore, please ship your unit insured
with return receipt requested. COD’s will not be
accepted!
22
23
WARRANTY INFORMATION
Service Out of Warranty (Continued)
The minimum out of warranty service fee for
your Whistler product is $40.00 (U.S.). If you
require out of warranty service, please return
your unit as outlined in the section “Service
Under Warranty” along with a certified check
or money order for $40.00. Payment may also
be made by MasterCard, VISA or American
Express; personal checks are not accepted.
In the event repairs cannot be covered by the
minimum $40.00 service fee, you will be
contacted by a Whistler technical service
specialist who will outline options available to
you. If you elect not to have your unit
repaired, it will be returned to you along with
your certified check or money order.
IMPORTANT: When returning your unit for
service, be certain to include a daytime
telephone number, and an email address
(if applicable).
Customer Service
If you have questions concerning the
operation of your Whistler unit, or require
service during or after the warranty period,
please call Customer Service at:
ACCESSORIES
SPECIFICATIONS
Integrated GPS Receiver:
50 channel, L1 frequency, C/A code
Sensitivity:
Tracking :-160dBm
Acquisition & Reacquisition : -160dBm
Cold starts :-144dBm
These and other accessories can be ordered
directly from Whistler by calling
1-800-531-0004 or visit our online store at
www.whistlergroup.com
Order #
Description
500501
Zipped Travel Case
$ 9.95
300112
Straight Power Cord (5’)
w/on-off switch
$14.95
206880
Hardwire Kit (10' )
(for wiring to fuse box)
$ 9.95
Accuracy:
Position :2.5m CEP, DGPS/SBAS : 2.0m CEP
Velocity: 0.1 m/s
300114
Non Skid Dash Pad
300116
Interface Cable
300117
USB cable
$ 5.95
300115
Magnetic Puck
$ 5.95
CEP = circular error probability
DGPS = differential GPS
SBAS = space based augmentation system
Operating Temperature Range:
-10C to +70C (14F to +158F)
Power Requirements:
Input: Operational 12 to 15 volts DC, 250mA
nominal
Ouput: 12 volt 1.5 amp limit.
Specifications are subject to change without notice.
www.whistlergroup.com
24
25
$ 6.95
$ 12.95
Shipping and handling (per order) $5.00 Prices are
subject to change without notice.
1-800-531-0004.
Representatives are available to answer your questions
Monday - Friday from 8:00 a.m. to 5:00 p.m. (CT).
Price
Acquisition Time:
Reacquisition : <1 sec.
Hot start : <1 sec.
Warm start : 29 sec.
Cold start : 29 sec.
26