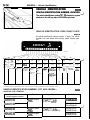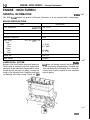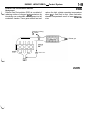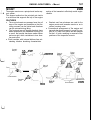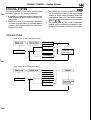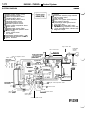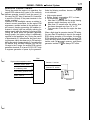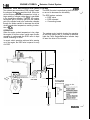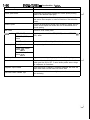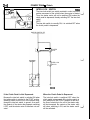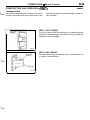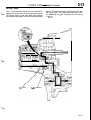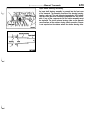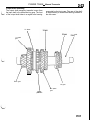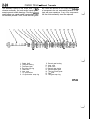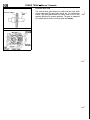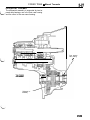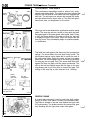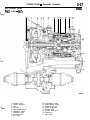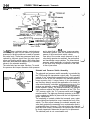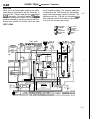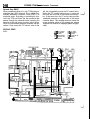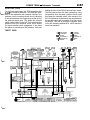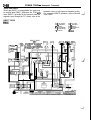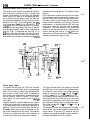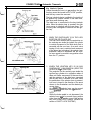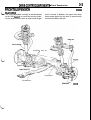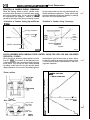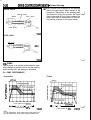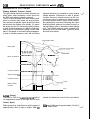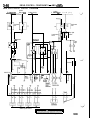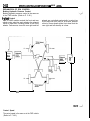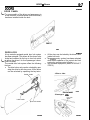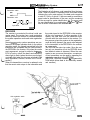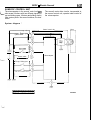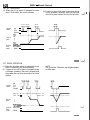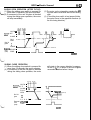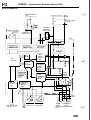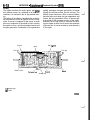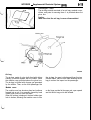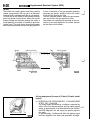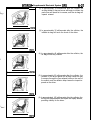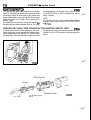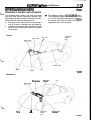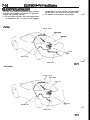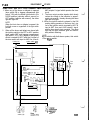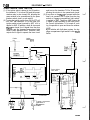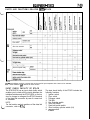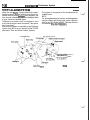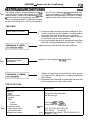
1
I
ECLIPSE
GROUP INDEX
TECHNICAL
INFORMATION
MANUAL
GENERAL . . . . . . . . . . . . . . . . . . . . . . . . . . .. . . . .
0
0
ENGINE . . . . . . . . . . . . . . . . . . . . . . . . . . . . . . . . . . . . . . . . . .
I
FOREWORD
This manual has been prepared as an introduction
to the specifications, features, construction and functions of the newly developed ECLIPSE.
Please read this manual carefully as it will be of
assistance for service and sales activities.
Please note that the service manuals are also available and should be used in conjunction with this
manual.
All information, illustrations and product descriptions
contained in this manual are current as at the time
of publication. We, however, reserve the right to
‘make changes at any time without prior notice or
obligation.
POWER-TRAIN . . . . . . . . . . . . . . . . . . . . . . . . . . . . . . .
m
DRIVE-CONTROL COMPONENTS ...
m
BODY . . . . . . . . . . . . . . . . . . . . . . . . . . . . . . . . . . . . . . . . . . . . .
EXTERIOR . . . . . . . . . . . . . . . . . . . . . . . . . . . . . . . . . . . . . .
INTERIOR . . . . . . . . . . . . . . . . . . . . . . . . . . . . . . . . . . . . . . .
EQUIPMENT . . . . . . . . . ..........................
Mitsubishi Motors Corporation reserves the right to make
changes in design or to make additions to or improvements in its
products without imposing any obligations upon itself to install
them on its products previously manufactured.
0 1994 Mitsubishi Motors Corporation
Printed in U.S.A.
A
0
MODEL INDICATIONS
The following
M/T:
A/T:
MFI:
DOHC:
Turbo:
Non-Turbo:
FWD:
AWD:
abbreviations are used in this manual for classification of model types.
Indicates the manual transaxle, or models equipped with the manual transaxle.
Indicates the automatic transaxle, or models equipped with the automatic transaxle.
Indicates the multiport fuel injection, or engines equipped with the multi-point injection.
Indicates an engine with the double overhead camshaft, or a model equipped with such
an engine.
Indicates an engine with turbocharger, or a model equipped with such an engine.
Indicates an engine without turbocharger, or a model equipped with such and engine.
Indicates the front wheel-drive vehicles.
Indicates the all wheel-drive vehicles.
HOW TO READ A CIRCUIT DIAGRAM
Circuit diagrams are prepared as follows using these
symbols:
N7OZBOOAA
NOTE
For specific details concerning the interpretation
of circuit diagrams, refer to the separately bound
Service Manual.
Indicates input/output to/from
Indicates power take out.
I
Ilp~x+connector.
:
\
I\
I output
I
‘Y-.W
A broken line indicates that
these connectors are the same :’ e j;/
intermediate connectors.
The connector symbol
indicates the device
side connector (for an
intermediate connector, the male side connector) as seen from
the terminal front (the
connector’s connec-
Output Input/
Input , ,
:, *
Indicates terminal No.
j
t ,._
Indicates current flow downward or
upward as controlled by the control
unit.
I
Indicates harness junction where
ii
o-1
GENERAL
CONTENTS
DESIGN FEATURES . . . . . . . . . . . . . . . . . . . . . . . . 3
GENERAL DATA AND SPECIFICATIONS . . . 17
TARGETS OF DEVELOPMENT . . . . . . . . . . . . . . 2
TECHNICAL FEATURES . . . . . . . . . . . . . . . . . . . . 4
Aerodynamic Characteristics . . . . . . . . . . . . . . . . . . . 5
Body Dimensions . . . . . . . . . . . . . . . . . . . . . . . . . . . . . 4
L
Engine . . . . . . . . . . . . . . . . . . . . . . . . . . . . . . . . . . . . . . . .
Environmental Considerations . . . . . . . . . . . . . . . . . 12
Heater and Air Conditioning . . . . . . . . . . . . . . . . . . 12
Passive Safety . . . . . . . . . . . . . . . . . . . . . . . . . . . . . . . 10
Steering Stability, Ride Comfort and
Active Safety . . . . . . . . . . . . . . . . . . . . . . . . . . . . . . . . . 8
Theft-alarm System . . . . . . . . . . . . . . . . . . . . . . . . . . 11
VEHICLE IDENTIFICATION . . . . . . . . . . . . . . . . . 14
Engine Model Stamping . . . . . . . . . . . . . . . . . . . . . . 16
Vehicle Identification Code Chart Plate . . . . . . . . 14
Vehicle Identification Number List . . . . . . . . . . . . . 14
Vehicle Identification Number Location . . . . . . . . . 14
Vehicle Information Code Plate . . . . . . . . . . . . . . . . 15
Vehicle Safety Certification Label . . . . . . . . . . . . . . 15
o-2
GENERAL - Targets of Development
TARGETS OF DEVELOPMENT
While the ECLIPSE has been finding wide acceptance as a compact sporty vehicle since its introduction early in 1989, Mitsubishi Motors Corporation
has introduced further improvements with major accent on the following points to meet the market
needs and make the ECLIPSE a top car in its class.
l Styling
1. Organic and aerodynamic.
2. Wide and low proportions.
N70ABOOAA
Fun to drive
1. Quick acceleration and powerful response ’d
(All models equipped with DOHC engine)
2. Outstanding straight ahead stability and linear steering response (4-wheel multi-link
suspension adopted)
3. Outstanding braking performance
0 Value for money
1. Rich array of features at low price
2. Low fuel consumption and low repair cost
l
A02A020
B21B027
*
GENERAL - Design Features
DESIGN FEATURES
L
b
Unique styling
l
l
l
w
New techniques
Higher safety
id
Aerodynamic
characteristics
D
t
+
l
Forward extended cabin for roomy cabin and sporty styling
Wide and low proportion body
Aerodynamic oriented styling
Chrysler-manufactured 2.0 lit. DOHC engine (420A engine)
l
Multi-link suspension for both front and rear
l
Motor-driven outer slide type glass sunroof
0 Passive safety features
SRS (for driver and front passenger), side door beams,
8 km/h (5 mph) resin bumper beams, flame-retardant
upholstery, etc.
l Active safetv features
l
World’s top level Cd = 0.29
GENERAL - Technical Features
TECHNICAL FEATURES
BODY DIMENSIONS
N70ADO2AA
LJ
External Dimensions
5, 6
*
Internal Dimensions
00X0081
mm (in.)
External
dimensions
Items
No.
New model
Difference between
previous and
new models
Overall Length
1
4,375 (172.2)
-15 (-59)
Overall Width
2
1,735 (68.3)
1,745 (68.7)*’
+40 (+1.57)
+50 (+1.97)“’
Overall Height
3
1,295 (51.0)
1,310 (51 .6)*2
-11 (-.43)
-4 (-. 15)*2
Wheelbase
4
2,510 (98.8)
+40 (+1.57)
Tread (front)
5
1,515 (59.6)
Tread (rear)
8
1,510 (59.4)
+60 (+2.36)
Overhang (front)
7
930 (36.6)
-45 (-1.77)
935 (38.8)
-10 (-.39)
Overhang (rear)
NOTES
*l denotes a vehicles with side air dam.
*2 denotes AWD.
8
+50
(+1.97)
J
o-5
GENERAL - Technical Features
No.
New model
Difference between
previous and
new models
Head Room 8 (front)
9
860 (33.9)
0
Head Room 8 (rear)
10
785 (30.1)
0
Brake Pedal Room
11
940 (37.0)
+15 (+.59)
Hip Point Couple
12
635 (25.0)
0
Front Hat Room
13
1,080 (41.7)
0
Front Hip Point Couple
14
714 (28.1)
0
Items
Internal
dimensions
AERODYNAMIC CHARACTERISTICS
N70ADOUA
Many Cd reduction design features, including tapering at body corners, has raised ECLIPSE’s aerody-
namic characteristics to the top level of the class
(Cd = 0.29).
@ Tapered front side corners
@I Tapered rear pillar area
0 Tapered rear side corners
@ S$;ted and rounded engine hood
0 Smaller rear window inclination
angle for smoother air flow
0 Venturi skirt
0 Smoother and more flush underfloor surface
$3 Raised rear floor plane
Greater contribution to fuel econo\
0
\
0
/
6
18X0646
O-6
GENERAL - Technical Features
ENGINE
N70AEOOAA
Two basic DOHC engines are available.
‘L)
420A Engine
On non-turbocharged models, the Chryslermanufactured 2.0 lit. DOHC 16-valve engine increases domestic parts content. The engine and
transaxle unit, unlike the conventional MMC engine,
is arranged with the engine on the passenger side
and the transaxle on the driver’s side.
4G63 Engine
N70AEOlAA
On turbocharged models, new techniques and improvements have been embodied in the 4G63 en-
gine to provide better performance and lower fuel
consumption.
NEW TECHNIQUES AND IMPROVEMENTS
Aims
Higher
Smaller size
performance
Less noise
and lighter
and
weight
efficiency
Resource
and energy
saving
Higher compression ratio
X
X
Better turbocharger performance
X
Items
Small-size pressure type Karman air
flow sensor adopted
X
X
Higher intercooler efficiency
X
X
Cylinder head intake port is tumbletype
2-spray injector adopted
Higher dependability
and easier
maintenance
Tighter exhaust emission control
and better
driveability
X
X
X
X
X
X
Optimized injector direction and timing
X
X
X
Engine coolant temperature inlet
control system
X
48 Kbyte computer adopted
X
Resonance type knock sensor
adopted
X
Stainless steel exhaust manifold
adopted
X
X
X
X
X
Dual oxygen sensor system
adopted
X
Oxygen sensor mounted to front exhaust pipe
X
Piston top land height reduced
X
ECM-controlled EGR adopted
X
ECM-controlled fuel vapor control
system adopted
X
Generator control improved
NOTE:
x : Applicable
J
X
J
T
o-7
GENERAL - Technical Features
id
Items
1
Aims
Smaller size
and lighter
weight
Cooling fan controlled by ECM
(Total Control System)
Higher performance
and
efficiency
Higher dependability
and easier
maintenance
Resource
and energy
saving
Less noise
X
Integrated control of A/T
X
Higher accuracy coolant temperature sensor
X
Crank angle sensor using Hall IC
directly mounted to crankshaft
X
Cylinder block reinforced
X
Dual mode damper
Air bypass valve position optimized
Power steering belt changed to V
ribbed style
I,
Oil level gauge grip changed to
resin
Scan tool (MUT-II) compatible
IVOTE:
x : Applicable
X
X
X
X
Turbocharger piping revised
Small-size and light-weight air
cleaner made of resin which allows
the air to pass with less resistance
Tighter exhaust emission control
and better
driveability
X
X
X
X
X
r
X
I
I
I
O-8
GENERAL - Technical Features
STEERING STABILITY, RIDE COMFORT AND ACTIVE SAFETY
N70AFOOAA
Multi-link Suspension for Four Wheels
A multi-link suspension similar to the 1994 Galant’s,
has been adopted for both the front and rear wheels.
As a result, the straight line running characteristics
and stability have significantly improved, assuring d
outstanding directional stability without penalty on
riding comfort.
i
18X0621
dY
Upper arm
Coil spring - ‘r
0
%ti
Shock absorber
Toe control
arm
\
Shock absorber
Lower arm 5 \yg&!!
Lateral lowe; arm
\
Trailing arm
’
O-9
GENERAL - Technical Features
ABS
ii
N7OAFOlAA
ABS is an option for all models to improve braking
stability and safety.
For the FWD vehicles, the 4-sensor, 3-channel configuration is adopted for independent control of the
front right and left wheels and integrated control
<FWD>
Electronic
control unit (ECU)
\
ABS warning
light
(Select Low control) of the rear wheels. For AWD
vehicles, the 4-sensor, 2-channel configuration is
adopted for Select Low control of all the front and
rear wheels.
Data link
connector
Wheel speed sensor (RR)
\
\
Aheel speed
2:;’ sensor (F.L.)
14X0269
i
ABS
Data
link connector
14x0266
14X0266
unit 0-U
relay
O-IO
GENERAL - Technical Features
PASSIVE SAFETY
N70AGOOAA
Supplemental Restraint System (SRS)
An airbag module has been provided for both the
driver’s and front passenger’s seats for safety of
the driver and front passenger. The driver’s seat
airbag module is mounted at the center of the steer-
ing wheel, whereas the front passenger’s seat airbag ‘d
module is mounted in the instrument panel above
the glove compartment. As soon as a frontal collision
over a design G-force is detected, the airbags inflate.
Air bag module
(Passenger’s side)
Data link connector
Left front impact
Air baa module
(Drive& side)
\
L-d--1~x0564
Plastic fuel tank
The AWD models are equipped with a plastic fuel tank which
is highly resistant to shocks and offers good space efficiency.
The fuel tank is installed under the floor for higher safety.
Flame-retardant upholstery
Flame-retardant materials have been used for interior upholstery wherever possible.
P
O-II
GENERAL - Technical Features
THEFT-ALARM SYSTEM
N70AHOOAA
For theft protection, this system is so designed that
L the headlights go on and off and the horn is sounded
intermittently for about three minutes when a locked
door, hood or liftgate has been forced open without
using a key.
sr D
Furthermore, the starter circuit is interrupted so that
the engine may not be operated.
About 20 seconds after all doors are closed and
locked, the liftgate is closed, and the hood is
closed + SYSTEM ARMED
ligtgate or hood is broken to
Engine is disabled and will not start.
Driver opens door with the key
I
SYSTEM DISARMED
t
-!a- Normal starting -1
ti D
Driver unlocks a door or liftgate with the key.
ALARM DEACTIVATED
(SYSTEM DISARMED)
00X0088
o-12
GENERAL - Technical Features
HEATER AND AIR CONDITIONING
The heater system uses a two-way-flow full-air-mix
system that features high performance and low operating noise, and includes an independent face air
blowing function and a cool air bypass function.
Side defrosters have been provided in the door section to improve demister performance.
For the rear seat, a semi rear heater duct has been
provided for better heating.
N7OAIOOAA
The air conditioning system is essentially the same
>
as the conventional one, but it incorporates a new d
CFC-free refrigerant (R134a) system that uses hydro fluorocarbon (HFC) containing hydrogen atoms
as the refrigerant gas to meet the CFC control regulations that call for protection of the ozone layer.
Side defroster
M~~~~~
A. ,,,.:.4... -:r
Wrao cooler
II40
FACE independent air flow
c3
Inside air
0
c3
nter outlet
Blowe; assembly
Shut dar;?per
e-
Semi rear heater
00X0082
ENVIRONMENTAL CONSIDERATIONS
To meet the growing world-wide demands for saving
resources and protecting global environment, special considerations have been incorporated to make
the ECLIPSE friendly to driver and passengers and
to the earth.
Considerations for recycling
(1) Recyclable thermo-plastic material has been
extensively used.
(2) The names of the material have been marked
on the plastic parts to facilitate recycling.
(3) Recycled materials (regenerated materials)
have been used wherever possible.
N7OAJOOAA
Protection of global environment
(1) Use of non-asbestos material for gaskets and
pads
(2) Non-Freon parts
l
Use of Freon has been limited to the necessary minimum in the processes for manufacture of seats, steering wheels, etc.
(3) Extending material life expectancies for less
waste
l
Anti-rust steel sheets have been used for
about 80% of the outer panels and major
members of the body.
l
Longer-life brake fluid and coolant additives
are used
(4) Better fuel economy by reducing friction and
weight in various areas
‘d
GENERAL - Technical Features
o-13
Use of maintenance-free parts
i
(1) Auto-lash adjusters have eliminated the need
for adjustment of valve clearance.
(2) An auto-tensioner has been adopted to eliminate the need for adjustment of the timing belt
tension.
(3) The improved mounting accuracies of the camshaft position sensor and crank angle sensor
have eliminated the need for adjustment of ignition timing.
(4) The plastic region angle method has been
adopted for tightening the cylinder head bolts.
Increased diagnostic items
The diagnostic functions for the following system
have been added so that the diagnostic trouble
codes and service data for them can be read and
actuator tests performed by use of the Scan tool
(MUT-II).
MFI
*Auto-cruise control
. ELCQAIT
. ABS
. SRS
l
l
Better serviceability and easier handling
(1) The engine oil and ATF level gauge grips have
been changed to resin ones for easier handling.
The name has been marked on each grip for
identification.
(2) The fuel gauge unit and related parts have been
made demountable and remountable through
the service hole under the rear seat cushion.
(3) Both the front and rear hubs have been bolted
to the knuckles for easier demounting and remounting.
L-J (4) When an ABS wheel speed sensor is mounted,
there is no need for adjustment of the clearance
between the sensor and rotor.
(5) Headlight aiming adjustment can be easily performed from above the light, using a crosspointed screwdriver.
(6) An electric type speedometer has been adopted
for easier demounting and remounting of the
speedometer, instrument panel, transaxle, etc.
(7) The luggage compartment floor board can be
held raised so that the spare wheel, tools, etc.
can be conveniently taken out and stored.
GENERAL - Vehicle Identification
I\\
1
VEHICLE IDENTIFICATION
NOOACOOAB
NWACWAB
VEHICLE IDENTIFICATION NUMBER LOCATION ;L)
The vehicle identification number (V.1.N) is located on a plate
attached to the left top side of the instrument panel.
VEHICLE IDENTIFICATION CODE CHART PLATE
NOOACOlAB
All vehicle identification numbers contain 17 digits. The vehicle
number is a code which tells country, make, vehicle type,
erc.
i
Mitsubishi
3rd
Digit
4th
Digit
5th
Digit
6th
Digit
7th
Digit
8th
Digit
9th
Digit
Vehicle type
Others
Line
Price class
Body
Engine
‘Check
digits
3Passenger
car
ADriver and
Passenger
Air Bags
KECLIPSE
FWD
LECLIPSE
AWD
3Medium
4High
5Premium
I3-door
Hatchback
Y2.0 dms
(122.0cu.in.)
[DOHC-MFI]
F2.0 dms
(122.0cu.in.)
[DOHC-MFITurbo]
I
-T-10th
Digit
11th
Digit
12th to
17th Digits
Model
year
Plant
Serial
number
S1995
Year
EDSM Plant
d
000001
99~99
L
NOTE
“Check digit” means a single number or letter X used to verify the accuracy of transcription of vehicle identification number.
l
VEHICLE IDENTIFICATION NUMBER LIST 4995 MODEL>
NWAC02AI
VEHICLES FOR FEDERAL
V.I.N.
(except sequence number)
4A3AK34YOSE
Brand
Mitsubishi Eclipse
cFWD>
Engine Displacement
2.0 dm3 (122.0 cu.in.)
[DOHC-MFI (420A)]
4A3AK44YUSE
Model Code
D31AMNJML4M
D31AMRJML4M
D31 AMNHML4M
D31AMRHML4M
4A3AK54SDSE
Mitsubishi Eclipse
<FWD>
4A3AL54SOSE
Mitsubishi Eclipse
<AWD>
2.0 dm3 (122.0 cu.in.)
[DOHC-MFI-Turbo (4G63)]
D32AMNGFL4M
D32AMRGFL4M
D33AMNGFL4M
D33AMRGFL4M
J
o-15
GENERAL - Vehicle Identification
VEHICLES FOR CALIFORNIA
Mitsubishi Eclipse
<FWD>
4A3AK34YOSE
Model Code
Engine Displacement
Brand
V.I.N.
(except sequence number)
2.0 dm3 (122.0 cu.in.)
[DOHC-MFI (420A)]
l-----l
D31 AMNJMLSM
D31 AMRJMLSM
D31 AMNHMLSM
D31AMRHMLSM
4A3KF44YOSE
i
4A3AK54SCiSE
Mitsubishi Eclipse
<FWD>
4A3AL54SOSE
Mitsubishi Eclipse
<AWD>
2.0 dm3 (122.0 cu.in.)
[DOHC-MFI-Turbo (4G63)]
D32AMNGFLSM
D32AMRGFLSM
D33AMNGFLSM
D33AMRGFLSM
I
VEHICLE INFORMATION CODE PLATE
I
NoohC03A0
Vehicle information code plate is riveted onto the bulkhead
in the engine compartment.
The place shows model code, engine model, transaxle model,
and body color code.
1. MODEL
D32AM RGFL4M
2. ENGINE
L !$$z,edsel
4G63
L Engine model
00x0048
3. E X T
CAGA
( Exterior code
F4A33
4. TRANS
I Transaxle model
5. COLOR TRIM R25 67V 03V
OPT
-p=~~~~~~
VEHICLE SAFETY CERTIFICATION LABEL
NOOACOSAB
1. The vehicle safety certification label is attached to face
of left door pillar.
2. This label indicates Gross Vehicle Weight Rating
(G.V.W.R.), Gross Axle Weight Rating (G.A.W.R.) front,
rear and Vehicle Identification Number (V.I.N.).
O-16
GENERAL - Vehicle Identification
:
ENGINE MODEL ST2 PING
NOOACO6AB
1. The engine model numbe
M’ris stamped at the front side
on the top edge of the cylinder block as shown in the LJ
following.
I
Engine model
I
Engine displacement
420A
II
2.0 dm3 (122.0 cu.in.)
I
4G63
2.0 dm3 (122.0 cu.in.)
2. The 4G63 engine serial number is stamped near the engine
model number, and the serial number cycles, as shown
below.
Engine serial number
Number cycling
AA0201 to YY9999
BAOOOl - - -w YY9999
3. The 420A engine serial number and identification number
are stamped near the engine model number.
o-17
GENERAL - General Data and SDecifications
GENERAL DATA AND SPECIFICATIONS
NOOAHQOAB
i/
11
-I
6
L
1;; z;,
GENERAL SPECIFICATIONS
OOXQO73
<FWD>
D31A
Model code
MNJML4M
MNJMLSM
Vehicle dimensions mm (in.)
Overall length
MNHML4M MRHML4M MNGFL4M
MNHMLSM MRHMLSM MNGFLSM
1,745 (68.7)
2
Overall height (Unladen)
3
1,295 (51 .O)
Wheel base
4
2,510 (98.8)
Front
5
1,515 (59.6)
Rear
6
1,510 (59.4)
Front
7
930 (36.6)
Rear
8
935 (36.8)
Minimum running ground
clearance
9
145 (5.7)
Angle of approach degrees
10
11.5
Angle of departure degrees
11
15.8
Overhang
Vehicle weight
Curb weights
MNGFL4M
MNGFLSM
4,375 (172.2)
1
Overall width
Tread
L
MRJML4M
MRJMLSM
D32A
1,735 (68.3), 1,745 (68.7)*3
kg (Ibs.)
Gross vehicle weight rating
1,235
1,270
(2,800)
(2,722)
1,690 (3,726)
Gross axle weight rating
Front
Rear
4
Engine
Model No.
Piston displacement cm3 (cu.in.)
4G63 (DOHC)
1,997 (121.9)
420A (DOHC)
1,996 (121.8)
F5MCl
5-speed
manual
F4ACl
4-speed
automatic
F5MCl
5-speed
manual
F4ACl
4-speed
automatic
F5M33
5-speed
manual
Fuel system
Fuel supply system
NOTE
l 3 denotes a vehicles with side air dam.
1,340
(2,954)
1,025 (2,260)
775 (1,709)
1 ,010 (2,227)
800 (1,764)
Seating capacity
Transaxle
Model No.
Type
1,315
1,305
(2,877)
(2,899)
1,750 (3,858)
1,280
(2,822)
Electronic control multiport fuel injection
F4A33
4-speed
automatic
GENERAL - General Data and Specifications
<:AWD>
Model code
MNGFL4M
MNGFLSM
Items
Vehicle dimensions
Overall length
D33A
MRGFL4M
MRGFLSM
mm (in.)
1
4,375 (172.2)
Overall width
2
1,745 (68.7)
Overall height (Unladen)
3
1,310 (51.6)
Wheel base
4
2,510 (98.8)
Front
5
1,515 (59.6)
Rear
6
1,510 (59.4)
Front
7
930 (36.6)
Rear
8
935 (36.8)
9
145 (5.7)
degrees
10
12.2
degrees
11
16.2
Tread
Overhang
Minimum running ground clearance
Angle of approach
Angle of departure
Vehicle weight
Curb weights
Gross vehicle weight rating
kg (Ibs.)
1,850 (4,079)
Gross axle weight rating
Front
Rear
Seating capacity
Engine
Model No.
Piston displacement
Transaxle
Model No.
Type
Fuel system
Fuel supply system
1,450 (3,197)
1,415 (3,120)
1,050 (2,315)
850 (1,874)
4
4G63 (DOHC)
1,997 (121.9)
cm3 (cu.in.1
W5M33
5-speed
manual
W4A33
4-speed
automatic
Electronic control multiport fuel injection
1-I
id
ENGINE
CONTENTS
ENGINE <NON-TURBO> . . . . . . . . . . . . . . . . . . . . 2
ACCELERATION SYSTEM . . . . . . . . . . . . . . . . . . . . . . . . . . . 62
Accelerator Pedal and Accelerator Cable .................. 62
Auto-cruise Control System ............................... 63
BASE ENGINE . . . . . . . . . . . . . . . . . . . . . . . . . . . . . . . . . . . . . . . 3
Automatic Tensioner ......................................5
Camshaft ................................................4
Connecting Rods .........................................4
Crankshaft.. .............................................4
Crankshaft and Camshaft Timing .......................... 5
Cylinder Block and Bed-plate .............................. 3
Cylinder Head ............................................3
Oil Pan ..................................................7
Oil Pump ................................................7
Piston ...................................................3
CONTROL SYSTEM . . . . . . . . . . . . . . . . . . . . . . . . . . . . . . . . . 13
Actuators and Control ....................................26
Data Transmission System.. .............................. 52
Diagnostic System .......................................31
General Information ......................................13
Sensors ................................................ 16
COOLING SYSTEM . . . . . . . . . . . . . . . . . . . . . . . . . . . . . . . . . . . 6
Coolant Flow .............................................8
Specifications ............................................9
EMISSION CONTROL SYSTEM . . . . . . . . . . . . . . . . . . . . . . . 57
Evaporative Emission Control System ...................... 59
Exhaust Gas Recirculation (EGR) System ................. 60
General Information ...................................... 57
Positive Crankcase Ventilation System ..................... 58
Pulsed Secondary Air Injection System .................... 59
ENGINE ELECTRICAL . . . . . . . . . . . . . . . . . . . . . . . . . . . . . . . 56
Generator ...............................................56
Ignition System..........................................5 6
Starter Motor............................................5 6
FUEL SYSTEM . . . . . . . . . . . . . . . . . . . . . . . . . . . . . . . . . . . . . . 11
Configuration Diagram ................................... 11
Fuel Flow Diagram ...................................... 11
L
N7lZAOOM
Fuel Tank...............................................12
GENERAL INFORMATION . . . . . . . . . . . . . . . . . . . . . . . . . . . . 2
Lubrication System ....................................... 2
Major Specifications ...................................... 2
INTAKE, AND EXHAUST . . . . . . . . . . . . . . . . . . . . . . . . . . . . . 10
Exhaust Pipe ...........................................10
Intake Manifold and Exhaust Manifold ..................... 10
MOUNT . . . . . . . . . . . . . . . . . . . . . . . . . . . . . . . . . . . . . . . . . . . . . 61
Features.. ..............................................
61
ENGINE <TURBO> . . . . . . . . . . . . . . . . . . . . . . . . 64
ACCELERATION SYSTEM . . . . . . . . . . . . . . . . . . . . . . . . . . . 68
Accelerator Pedal and Accelerator Cable .................. 88
Auto-cruise Control System ............................... 88
CONTROL SYSTEM . . . . . . . . . . . . . . . . . . . . . . . . . . . . . . . . . 70
Actuators and Control ..................................... 74
Diagnostic System ....................................... 78
General Information ...................................... 70
Main monitors...........................................83
Sensors ..............................................
..7 3
COOLING SYSTEM . . . . . . . . . . . . . . . . . . . . . . . . . . . . . . . . . . 65
Coolant FLOW............................................
5
Specifications ......................................... ..6 6
EMISSION CONTROL SYSTEM . . . . . . . . . . . . . . . . . . . . . . 85
Exhaust Gas Recirculation (EGR) System ................. 86
General Information ........................... : ........... 85
..
ENGINE ELECTRICAL . . . . . . . . . . . . . . . . . . . . . . . . . . . . . . . 85
. . . . . . . . . . . . . . . . . . . . . . . . . . . . . . . . . . . . . . . 68
F U E L SYSTEM
Configuration Diagram ................................... 68
Fuel Flow Diagram ...................................... 68
Fuel Tank...............................................6 9
GENERAL INFORMATION . . . . . . . . . . . . . . . . . . . . . . . . . . . 64
Major Specifications ..................................... 84
INTAKE AND EXHAUST . . . . . . . . . . . . . . . . . . . . . . . . . . . . . 67
Exhaust Pipe ........................................... 67
Intake Manifold and Exhaust Manifold ..................... 67
MOUNT . . . . . . . . . . . . . . . . . . . . . . . . . . . . . . . . . . . . . . . . . . . . . 87
ENGINE <NON-TURBO> - General Information
ENGINE <NON-TURBO>
GENERAL INFORMATION
N7MAO1M
This 420A 2.0-liter engine is a product of Chrysler Corporation. It is not equipped with a turbocharger.
MAJOR SPECIFICATIONS
Specifications
Items
Total displacement
Bore x Stroke
cm3 (cu.in.)
mm (in.)
1,996 (121.8)
87.5 (3.45) x 83.0 (3.27)
Compression ratio
9.6
Camshaft arrangement
DOHC
Valve timing
Intake
Open
Close
Exhaust
Open
Close
At 0.5 mm (.0197 in.) lift
1.3” BTDC
39.7” ABDC
36” BBDC
1.1” ATDC
Rocker arm
Roller type
Lash adjuster
Equipped
LUBRICATION SYSTEM
System is full flow filtration, pressure feed type.
The oil pump is mounted in the front engine cover
and driven by the crankshaft. Pressurized oil is then
routed through the main oil gallery, running the
length of the cylinder block, supplying main and
rod bearings with further routing. Pistons are lubri-
WI MOPAA
cated from rod bearing throw-off and slinger slots
on the connecting rod assemblies. Camshaft and
valve mechanisms are lubricated from a full-length
cylinder head oil gallery supplied from the crankcase
main oil gallery.
d
ENGINE <NON-TURBO> - Base Engine
l-3
BASE ENGINE
L
CYLINDER HEAD
N71ABOlAA
der metal valve guides and seats. Integral oil galleys
within the cylinder head supplies oil to the hydraulic
lash adjusters, camshaft and valve mechanisms.
Features a Dual Over Head Camshaft (DOHC)
4-valves per cylinder cross flow design. The valves
are arranged in two inline banks. Incorporated pow-
CYLINDER BLOCK AND BED-PLATE
N7lAB02AA
plate design makes for a much stronger lower end
because it ties all of the main caps together to substantially improve block stiffness. The block is a
two-piece assembly, encompassing the bed-plate
and the cylinder block. The bed-plate is made of
cast iron and is totally separable from the block.
When installed, it becomes part of the block and
strengthens the lower end considerably. The bedplate and block are cast separately, then machined
together. Once machined, the bed-plate and block
are drilled and doweled together to become a mated
unit. This ensures that the bed-plate and block are
in perfect alignment even after assembly and disassembly.
Five different engine designs were considered, the
only engine design that met all the criteria was one
that utilized a bed-plate. There are several forces
at work in the lower end of an engine block.
These are:
l Vertical bending
l
Horizontal bending - 90 degrees to the cylinder
bore
l Torsional bending along the crankshaft axis
l
Individual main cap flutter co-inciding to individual cylinder firing
All these factors contribute to noise, vibration and
harshness. Because this is a four cylinder engine,
design criteria becomes even more important. Bed-
PISTON
N7lAB03AA
is used for additional cylinder compression control.
Both compression rings are 1.2 mm (.0472 in.) thick.
The oil ring is a three piece design using chrome
faced fails and a separate center expander. Use
the running clearance notches and is identifiable
by a slight dish at the top of the piston.
This engine is pressed-in piston pins to attach forged
powder metal connecting rods. Incorporate hex head
cap screw threaded into the connecting rod. Piston
and Rods are serviced as an assembly.
The piston has an oval shape (elliptical) that expands
as the engine warms-up. This reduces cold engine
piston noise, helps the piston fit into the bore better
id and avoids piston scuffing.
The piston pin has a 1 mm (.0394 in.) offset toward
the thrust side of the piston for improved noise characteristics. The top ring is a steel unit with a plasma
sprayed molybdenum faced center section for reliable compression sealing. The upper ring is not
directional. The black coating as a rust preventative.
A taper faced cast iron second compression ring
No. 1 piston ring
I
N
J o
/
. 12 1 p i \
s t o n
r i n g
Side
rail
L
extender
Oil ring
CENO066
ENGINE <NON-TURBO> - Base Engine
CONNECTING RODS
The connecting rods are different from past designs
because the manufacturing process has changed.
The connecting rod is forged as one piece from
powdered metal. The powdered metal is placed
in a form that is slightly oversized and then sent
to sintering furnace. It melts the powdered metal
in the mold. The mold travels to a forging press
where the rod is forged to the final shape. This
is done while the rod is still warm, but not molten.
After the forging process, the inside diameter of
the crankshaft end of the rod is scribed with a laser
and is fractured in a fixture. This creates a rod cap
and rod that only fit together one way. The final
step in the process is shot peening which increases
CAMSHAFT
The camshafts have six bearing journals and 2 cam
lobes per cylinder. Flanges at the rear journals control camshaft end play. Provision for cam position
CRANKSHAFT
The engine has 5 main bearings, with number 3
flanged to control thrust. The 52 mm (2.0472 in.)
diameter main and 48 mm (1.8898 in.) diameter
crank pin journals (all) have undercut fillets that
are deep rolled for added strength. To evenly distribute bearing loads and minimize internal stress, 8
counterweights are used. Hydrodynamic seals pro-
N71ABO4AA
the surface hardness slightly. This design process
eliminates the need for several machining operations that are required for cast iron, connecting rod
assemblies. Other designs required machining the
connecting rod and connecting rod cap individually,
then finish machining, honing, and balancing are
performed as an assembly.
Note
The new process and the different metal does not
prohibit the use of standard tools. If the connecting
rods require removal from the engine a center punch
can be used to identify the correct position of the
connecting rod and cap.
N71ABOSAA
sensor on the exhaust camshaft at the rear of cylinder head. A hydrodynamic oil seal is used for oil
control at the front of the camshaft.
N71ABOGAA
vide end sealing, where the crankshaft exits the
block. Anaerobic gasket material is used for parting
line sealing in the block. A sintered powder metal
timing belt sprocket is mounted on the crankshaft
nose. This sprocket provides motive power; via timing belt to the camshaft sprockets (providing timed
valve actuation) and to the water pump.
I-5
ENGINE <NON-TURBO> - Base Engine
CRANKSHAFT AND CAMSHAFT TIMING
L
This engine does not have broken-belt valve clearance. The reason for this design is to improve hydrocarbon emissions by eliminating valve pockets cut
into the pistons that would normally provide this
clearance. If the engine is rotated with the timing
belt removed or the cam timing is set improperly,
the valves will hit the pistons. However, if the cam-
N7lAB07AA
shafts are out of time on engines, the valves can
strike each other as well as the pistons. This is
due to the intake and exhaust valve-to-valve interference design. Therefore, it is necessary to time the
camshafts and crankshaft simultaneously to prevent
damage to pistons, exhaust valves, and intake
valves.
AUTOMATIC TENSIONER
N71ABOBAA
This engine uses a timing-belt cover, crankshaft
sprocket, timing belt, “automatic” belt tensioner, two
camshafts, and camshaft sprockets. The belt tensioner is spring activated, hydraulically dampened,
and self contained. The tensioner consists of a free
piston, orifice, silicone fluid, a spring, check ball,
and a plunger rod. The check ball is seated as
the plunger rod is depressed, trapping the fluid and
creating a high pressure area. The area below the
plunger rod is the high pressure area for hydraulic
dampening. The area between the free piston and
the plunger rod is a low pressure area. And, the
area above the free piston provides a place to contain aerated fluid. The spring below the plunger
rod holds a constant pressure for the belt tensioner
pivot bracket.
Aerated
Dust seal
Low pressure
fluid area
Free piston inner seal
Compression ring
‘W
CEN0099
I-6
ENGINE <NON-TURBO> - Base Engine
Prior to installing tensioner on the engine, it is necessary to preload the tensioner plunger. This accomplished by installing the tensioner in a vise and
slowly compressing the plunger. A tensioner plunger
pin is installed through the body of the tensioner
and plunger. When the tensioner is installed on the
engine, it is necessary to preload the tensioner pivot
bracket assembly with a torque wrench prior to securing the retaining bolts. The automatic tensioner
makes up for fluctuations in temperature through
cylinder head expansion and contraction and for
timing belt stretch over the life of the belt. If the
tensioner fails, it is not serviceable and should be
replaced.
Timing belt guides are cast into the oil pump and
molded into the timing belt cover on engines. The
purpose of the guides is to help with installation
of the timing belt. They prevent the belt from falling
off the sprockets.
Exhaust cam
sprocket
Intake cam
sprocket
Timing belt 1 Ir
tensioner F
d
ENGINE <NON-TURBO> - Base Engine
OIL PAN
I-7
NTlABO9AA
The oil pan is a single-plane design, and is
L constructed of stamped antiphon steel.
comes equipped with the special sleeve that it used
to prevent seal rollover.
The rear main oil seal is a one-piece lip seal that
requires a special sleeve for installation. A new seal
Rear hain
oil seal
Bed plate
CENOlOO
OIL PUMP
The oil pump is located at the front of the engine
block, and is driven by the crankshaft. The pump
housing is made of cast aluminum, provides a guide
N71ABlOAA
for the timing belt, and includes the crankshaft front
seal.
I-8
ENGINE <NON-TURBO> - Cooling System
COOLING SYSTEM
N7lAWOAA
The cooling system is of the water-cooled, forced
circulation type with the following features:
l
The water pump is mounted onto the front of
the cylinder block, and is driven by the cogged
side of the timing belt. The drive sprocket is
sintered metal. The pump body is made of die
cast aluminum; and a stamped-steel impeller
is used to pump coolant through the engine.
l
The thermostat housing is located on the left
front side of the engine. The thermostat is
mounted under the thermostat housing, and
the center element is offset from the center
of its diameter. Therefore, it can only be installed
one way. The thermostat has an air bleed (jiggle
pin) located in the flange, and an O-ring with
a locating dimple. the bleed faces upward. The
thermostat temperature rating is 90.5%
(195°F).
0
0
0
0
Coolant enters the water pump, where it is
routed through the engine block and into the
cylinder head. Then, the coolant is routed from
cylinder head to both heater core and the radiator (engine hot) or through bypass (engine cold)
to the water pump where the cycle starts over
again.
A small-size, high-performance radiator has
been adopted for better cooling efficiency and
less weight.
Reduction in size of the automatic transaxle
oil cooler had resulted in a lowered radiator
position, which has permitted the “slant nose”
design of the body.
The cooling fan control has been integrated
into the centralized control by the engine control
module for better cooling efficiency, better fuel
consumption, less noise, and better acceleration.
COOLANT FLOW
8
Radiator [
Block
1
r
q
Water pump
CEN0102
d
ENGINE <NON-TURBO> - Cooling System
L
SPECIFICATIONS
Specifications
Items
Water-cooled pressurized, forced circulation
with electrical fan
Cooling method
Radiator
Type
Thermostat
Water pump
Type
Drive method
Pressurized corrugated fin type
Wax pellet type with jiggle valve
Centrifugal impeller
Timing belt
CONSTRUCTION
Radiator
Reserve tank
NT oil cooler
(Dual pipe type)
Radiator
AtT oil cooler hose and pipe
+=
,-
I-10
ENGINE <NON-TURBO> - Intake and Exhaust
INTAKE AND EXHAUST
tmAEooAA
INTAKE MANIFOLD AND EXHAUST MANIFOLD
The intake manifold is a two-piece aluminum casting,
attached to the cylinder head with six bolts and
two studs. This long branch fan design enhances
low and midspeed torque.
The exhaust manifold is made of nodular cast iron
for strength and high temperatures.
I
EXHAUST PIPE
N71AEOlAA
The exhaust pipe consists of three parts: a front
pipe, a center pipe, and a main muffler. It is mounted
on the body via rubber hangers to minimize vibration
transmission from the exhaust system to the body.
A large main muffler, sub muffler and pre-muff ler
ensure reduced exhaust noise.
CONSTRUCTION
Flexible pipe
Pre-muff ler
Sub muffler
ted oxygen sensor
Heated oxygen sensor
Heated oxygen sensor
i/i:
1-11
/
ENGINE <NON-TURBO> - Fuel System
FUEL SYSTEM
N?lAFOOAA
The fuel system for 420A engine consists of electromagnetic fuel injectors, a fuel rail, a fuel pressure
regulator, an electric motor-driven fuel pump, fuel
filter and fuel tank.
FUEL FLOW DIAGRAM
/I\ I \
LJ
I\
CONFIGURATION DIAGRAM
Fuel cut-off
valve assembly
Fuel pressure regulator
\
Evaporative
emission
canister
Fuel tank
Fuel pump assembly
A03X0149
Fuel rail
w
\
Fuel filter
I-12
ENGINE <NON-TURBO> - Fuel System
FUEL TANK
The fuel tank is made of steel and is arranged under
the rear seat floor for higher safety. The fuel tank
has an internally mounted fuel pump assembly and
fuel gauge unit. In addition, a fuel cut-off valve as-
WlAFOlAA
sembly is standard equipment on all vehicles. The
fuel cut-off valve assembly prevents outflow of fuel
even when the vehicle rolls over, assuring a higher
measure of safety.
Fuel
A03X0131
I
!L)
ENGINE <NON-TURBO> - Control System
I-13
CONTROL SYSTEM
L
GENERAL INFORMATION
The fuel system for the 2.0 liter DOHC engine utilizes
sequential multi-port fuel injection to deliver precise
amounts of fuel to the intake manifold.
Basic injector duration is controlled by a combination
of signals from the front oxygen sensor and an air
density signal from a MAP sensor.
This vehicle uses a direct ignition system, eliminating
the need for a distributor. Ignition and fuel injector
operation are controlled by a new power-train control
module (PCM) which reviews inputs from a number
of sensors. The PCM provides outputs to fuel and
ignition system components to promote the most
efficient operation possible. The vehicle includes
a catalytic converter and sophisticated emissions
system diagnostic process (OBD II) to ensure that
emissions meet clean air regulations.
Major differences from the 1994 4G63 2.0 liter DOHC engine are as follows:
Major difference
Fast idle air valve is not equipped.
Remarks
On Mitsubishi manufactured engines, a fast idle air valve
is equipped in the throttle body.
Closed throttle position switch is not equipped.
L
Speed adjusting screw is not equipped.
Basic idle speed is not adjustable.
Fixed SAS is fixed at the production line.
Fixed SAS is not equipped.
Throttle position sensor is fixed to the throttle body at
the production line.
Throttle position sensor is not adjustable.
Camshaft position sensor waveform is different from the
current one.
A hall effect sensor is used, however, the construction of
the sensor is different.
Crankshaft position sensor waveform and its detection
method are different from those current ones.
A same Hall effect sensor is used, however, the
construction of the sensor is different.
On vehicles with automatic transaxle, vehicle speed
sensor signal is input from TCM.
Ignition switch-ST (cranking) signal input is not provided .
PCM judges as engine cranking when the engine speed
is low.
MFI relay (ASD relay) and fuel pump relay are separately provided.
Currently, these two are combined into one relay.
Generator generating voltage is controlled by PCM.
Currently, it is controlled by the voltage regulator built in
the generator.
Tachometer is controlled by PCM.
Charging system indicator lamp is controlled by PCM.
Control of the indicator/warning lamps (just after turning
ON the ignition switch) is performed by PCM.
Pulsed secondary air injection is controlled by PCM.
L
Data transmission system between PCM and TCM is
different from the current one.
Battery temperature sensor is built in PCM.
PCM is mounted in the engine compartment.
ENGINE <NON-TURBO> - Control System
SYSTEM BLOCK DIAGRAM
N71AKOOAB
Power-train control module (PCM)
Sensors
MAP Sensor
Actuators
b No. 1 injector
-b Fuel injection control
---b No. 2 injector
b
b No. 3 injector
Engine coolant temperature sensor
-b
b No. 4 injector
Throttle position sensor
Idle air control motor
(stepper motor)
- Idle air control
Crankshaft position sensor
+ Ignition timing control
-. Ignition coil
MFI relay (ASD relay)
MFI relay control (Power supply)
I
,-b Fuel pump relay
Fuel pump control
I
Air conditioning compressor
clutch relay control
I
Air conditioning compressor
l-4 clutch relay
I
Radiator fan motor relay and air
Fan relay control
I
Power steering pressure switch
Generator generating voltage
control
Generator
Tachometer control
Tachometer
b
Park/Neutral position switch <A/T>
---b Charging system indicator lamp
control
Ignition switch-IG (J2 SENSE)
C h e c k,
Knock sensor
-b Control of indicator/warning
lamps in the instrument panel
Break switch
+ Diagnostic output
Power supply
+ RAM data transmission
Charging system indicator lamp
engine/malfunction
indicator lamp control
Indicator/warning lamps in the
E
i
Diagnostic output terminal
Diagnostic output terminal (MUT)
I
MFI relay operating voltage
(ASD SENSE)
I
I-I
EVAP purge solenoid
I
I - - +(
EGR solenoid
I
I
EGR control
b
1 ’
4
Pulsed secondary air injection .-b Pulsed secondary air injection
control
i
I solenoid
t/’ Battery temperature sensor 1 1
I-15
ENGINE <NON-TURBO> - Control System
MULTIPORT FUEL INJECTION (MFI) SYSTEM DIAGRAM
*l
*2
*3
~4
+5
*6
*7
~8
*9
l
l
l
l
l
l
l
l
Heated oxygen sensor (Front)
Manifold absolute pressure sensor
intake air temperature sensor
Throttle position sensor
Camshaft position sensor
Crankshaft position sensor
Engine coolant temperature sensor
Knock sensor
Heated oxygen sensor (Rear)
Power supply
Vehicle speed sensor
A/C switch
Park/Neutral position switch
Power steering pressure switch
Ignition switch-IG (J2 sense)
Brake switch
MFI relay (ASD relay)
c3 Powertrain control ti
module (PCM)
I
I
al injector
a2 Evaporative emission purge solenoid
a3 Idle air control motor
a4 EET solenoid
a5 Ignition coil
ti Pulsed secondary air injection solenoid
l Fuel pump relay
0 Multiport fuel injection (MFI) relay
(ASD relay)
l
Air conditioning compressor clutch relay
l
Check engine/Malfunction indicator lamp
l Diagnostic output
l Fan motor relay
l Generator
l Engine speed meter
l Changing warning light
l
Indicator/warning lamps in the instrument
panel
Throttle oosition
Evaporative emission
purge solenoid
Air cleaner
Air inl
. . ..et
Manifold absolute
pressure sensor *2
II,
transducer
solenoid
-
-
-
Intake air temperature sensor *3
,, ,,r
$$kS
@-i!$ion
’
valve
From fuel pump - -
[email protected]
1
arr mjectron
A5 Camshaft position sensor 1
Heated oxygen
sensor (Front)
Engine coolant temperature sensor *7
I
Knock sensor
Crankshaft position sensor A6
I I
MTToniy
s~y+a.v
w;ectron
id
solenoid
He:ted oxygen
Sensor (rear)
I
I
I
I
AFu0001
ENGINE <NON-TURBO> - Control Svstem
SENSORS
N’HAKQ1AA
MANIFOLD ABSOLUTE PRESSURE (MAP) SENSOR
The powertrain control module (PCM) supplies 5
volts direct current to the MAP sensor. The MAP
sensor converts intake manifold pressure into voltage. The PCM monitors the MAP sensor output
voltage. As vacuum increases, MAP sensor voltage
decreases proportionately. Also, as vacuum decreases, MAP sensor voltage increases proportionately.
At wide-open-throttle and during cranking, before
the engine starts running, the PCM determines at-
mospheric air pressure from the MAP sensor voltage. While the engine operates, the PCM determines intake manifold pressure from the MAP sensor voltage. Based on MAP sensor voltage and
inputs from other sensors, the PCM adjusts spark
advance and the air/fuel mixture.
The MAP sensor mounts to the intake manifold.
INTAKE AIR TEMPERATURE SENSOR
The intake air temperature sensor measures the
temperature of the air as it enters the engine. The
sensor supplies one of the inputs the PCM uses
to determine injector pulse width and spark advance.
=
Intake
N71AKQZAA
The intake air temperature sensor threads into the
intake manifold.
_ - -- - -. ---.---- Intake air
ENGINE <NON-TURBO> - Control System
ENGINE COOLANT TEMPERATURE SENSOR
The coolant temperature sensor provides an input
i voltage to the power-train control module (PCM).
The PCM determines engine coolant temperature
from the engine coolant temperature sensor.
As coolant temperature varies, the coolant temperature sensor’s resistance changes, resulting in a different input voltage to the PCM.
Thermostat
housing
\
1-17
N71AKQ3AA
When the engine is cold, the PCM will demand
slightly richer air-fuel mixtures and higher idle
speeds until normal operating temperatures are
reached.
The engine coolant sensor threads into the water
jacket below the thermostat housing. New sensors
have sealant applied to the threads.
Engine coolant
temperature
\ AFUO066
THROlTLE POSITION SENSOR
The throttle position sensor mounts to the side of the throttle body.
id
N71AKO4AA
l-18
ENGINE <NON-TURBO> - Control System
The throttle position sensor (TPS) connects to the
throttle blade shaft. The TPS is a variable resistor
that provides the powertrain control module (PCM)
with an input signal (voltage). The signal represents
throttle blade position. As the position of the throttle
blade changes, the resistance of the TPS changes.
The PCM supplies approximately 5 volts to the TPS.
The TPS output voltage (input signal to the powertrain control module) represents throttle blade posi-
tion. The TPS output voltage to the PCM varies
from approximately 0.40 volt at minimum throttle
opening (idle) to a maximum of 3.80 volts at wide
open throttle.
Along with inputs from other sensors, the PCM uses
the TPS input to determine current engine operating
conditions. The PCM also adjusts fuel injector pulse
width and ignition timing based on these inputs.
CAMSHAFT POSITION SENSOR
The PCM determines ignition and fuel injection synchronization and cylinder identification from inputs
provided by the camshaft position sensor and crank-
N71AKOSAA
shaft position sensor. From the two inputs, the PCM
determines crankshaft position and cylinder cycle.
’ Camshaft
- .
y$gd$ heat
1-19
ENGINE <NON-TURBO> - Control System
L
The camshaft position sensor attaches to the rear
of the cylinder head. A target magnet attaches to
the rear of the camshaft and indexes to the correct
position. The target magnet has four different poles
arranged in an asymmetrical pattern. As the target
magnet rotates, the camshaft position sensor
senses the change in polarity. The sensor output
\ Rear of
f3Ainder
7
/
id
switch switches from high (5.0 volts) to low (0.30
volts) as the target magnet rotates. When the north
pole of the target magnet passes under the sensor,
the output switches high. The sensor output switches
low when the south pole of the target magnet passes
underneath.
Target
magnet
/A
AF UOO70
m AFU0069
The camshaft position sensor is mounted to the
rear of the cylinder head. The sensor also acts as
a thrust plate to control camshaft endplay.
CRANKSHAFT POSITION SENSOR
The PCM determines what ignition coil to energize
from the crankshaft position sensor input and the
camshaft position sensor input. The second crankshaft counterweight has machined into it two sets
N71AKOGAA
of four timing reference notches and a 60 degree
signature notch. From the crankshaft position sensor
input the PCM determines engine speed and crankshaft angle (position).
Crankshaft 1
position
sensor
AFU0071
l-20
ENGINE <NON-TURBO> - Control System
The notches generate pulses from high to low in
the crankshaft position sensor output voltage. When
a metal portion of the counterweight aligns with
the crankshaft position sensor, the sensor output
voltage goes low (less than 0.3 volts). When a notch
aligns with the sensor, voltage spikes high (5.0 volts).
As a group of notches pass under the sensor, the
output voltage switches from low (metal) to high
(notch) then back to low.
If available, an oscilloscope can display the square
wave patterns of each voltage pulse. From the width
of the output voltage pulses, the PCM calculates
engine speed. The width of the pulses represent
the amount of time the output voltage stays high
before switching back to low. The period of time
the sensor output voltage stays high before switching back to low is referred to as pulse width. The
faster the engine is operating, the smaller the pulse
width on the oscilloscope.
By counting the pulses and referencing the pulse
from the 60 degree signature notch, the PMC calcu-
210”
lates crankshaft angle (position). In each group of
timing reference notches, the first notch represents
69 degrees before top dead center (BTDC). The
second notch represents 49 degrees BTDC. The
third notch represents 29 degrees. The last notch
in each set represents 9 degrees before top dead
center (TDC).
The timing reference notches are machined to a
uniform width representing 13.6 degrees of crankshaft rotation. From the voltage pulse width the PCM
tells the difference between the timing reference
notches and the 60 degree signature notch. The
60 degree signature notch produces a longer pulse
width than the smaller timing reference notches.
If the camshaft position sensor input switches from
high to low when the 60 degree signature notch
passes under the crankshaft position sensor, the
PCM knows cylinder number one is the next cylinder
at TDC.
piiq 2 1 0 ”
150”
I
I
1
T D C
TDC
TDC
TDC
3
69” 49”29” 9”l
Crank
signal
+
+
Crank
angle 0
360 400
440
480
520
I
560
600
640
600 720
0 40 80 120 160 200 240 280 320 0 40 80 120 160 200 240 280 320 0
AFU0072
ENGINE <NON-TURBO> - Control System
I-21
The crankshaft position sensor mounts to the engine block behind the generator, just above the oil filter.
AFU0073
HEATED OXYGEN SENSORS
As vehicles accumulate mileage, the catalytic convertor deteriorates. The deterioration results in a
i less efficient catalyst. To monitor catalytic convertor
deterioration, the fuel injection system uses two
heated oxygen sensors. One sensor upstream of
the catalytic convertor, one downstream of the convertor. The powertrain control module (PCM)
compares the reading from the sensors to calculate
the catalytic convertor oxygen storage capacity and
efficiency. Also, the PCM uses the upstream heated
oxygen sensor input when adjusting injector pulse
width.
WIAKWAA
When a deteriorating catalyst’s efficiency drops below emission standards, the PCM stores a diagnostic
trouble code and illuminates the malfunction indicator lamp (MIL).
The MFI relay (automatic shut down relay) supplies
battery voltage to both the upstream and downstream heated oxygen sensors. The oxygen sensors
are equipped with a heating element. The heating
element keeps the sensors at proper operating temperature during all operating modes.
I-22
ENGINE <NON-TURBO> - Control System
-Upstream
The input from the upstream heated oxygen sensor
tells the PCM the oxygen content of the exhaust
gas. Based on this input, the PCM fine tunes the
air-fuel ratio by adjusting injector pulse width.
The sensor produces from 0 to 1 volt, depending
upon the oxygen content of the exhaust gas in the
exhaust manifold. When a large amount of oxygen
is present (caused by a lean air-fuel mixture), the
sensor produces voltage as low as 0.1 volt. When
there is a lesser amount of oxygen present (rich
air-fuel mixture) the sensor produces a voltage as
high as 1.0 volt. By monitoring the oxygen content
and converting it to electrical voltage, the sensor
acts as a rich-lean switch.
The heating element in the sensor maintains correct
oxygen sensor temperature. Maintaining correct
sensor temperature at all times allows the system
to enter into Closed Loop operation sooner. Also,
it allows the system to remain in Closed Loop operation during periods extended’ idle.
In Closed Loop operation the PCM monitors the
inputs from the heated oxygen sensors (along with
other inputs). In Closed Loop, the PCM adjusts injector pulse width based on the upstream heated oxygen sensor input. During Open Loop operation the
PCM ignores the inputs from both the upstream
and downstream heated oxygen sensors. In Open
Loop, the PCM adjusts injector pulse width based
on preprogrammed (fixed) values and inputs from
other sensors.
The upstream oxygen sensor threads into the outlet
flange of the exhaust manifold.
Downstream
The downstream heated oxygen sensor threads
into the exhaust pipe at the rear of the catalytic
convertor. The downstream heated oxygen sensor
input is used to detect catalytic convertor deterioration. As the convertor deteriorates, the input from
_ Downstream heated
= oxygen sensor
2
convertor
the downstream sensor begins to match the upstream sensor input except for a slight time delay.
By comparing the downstream heated oxygen sensor input to the input from the upstream sensor,
the PCM calculates catalytic convertor efficiency.
ENGINE <NON-TURBO> - Control System
VEHICLE SPEED SENSOR
i
L
Vehicles with manual transaxle use a vehicle speed
sensor. The sensor is located in the transaxle extension housing. The power-train control module (PCM)
determines vehicle speed from the sensor input.
The vehicle speed sensor generates 8 pulses per
sensor revolution. These signals are interpreted
along with a closed throttle signal from the throttle
position sensor by the PCM. The inputs are used
to determine if a closed throttle deceleration or a
normal idle (vehicle stopped) condition exists. Under
I-23
N7iAKOBAA
deceleration conditions, the PCM adjusts the idle
air control motor to maintain a desired MAP value.
Under idle conditions, the PCM adjusts the idle air
control motor maintain a desired engine speed.
On vehicles with automatic transaxles, the PCM
receives the vehicle speed input from the transaxle
control module (TCM). The TCM calculates vehicle
speed from its output speed sensor and turbine
speed sensor.
w
’ w/l’d
F
(
/1° \TIzi// AllkJ~,qf(
iI “---7xle
I
c
\ bracket F
Vehicle
speed
sensor
AIR CONDITIONING SWITCH
When air conditioning or defrost is selected the PCM
receives an input signal that allows it to ground
the A/C clutch relay. This provides power to the
NTIAKOMA
A/C clutch. In addition, the PCM adjusts the idle
air controller motor to compensate for the increased
engine load and maintain target idle.
I-24
ENGINE <NON-TURBO> - Control System
POWER STEERING PRESSURE SWITCH
WIAKIOAA
A pressure switch is located on the power steering
unit’s body to signal periods of high pump load and
pressure, such as those which occur during parking
maneuvers. This allows the PCM to maintain target
idle speed. To compensate for the additional engine
load, the PCM increases airflow by adjusting the ‘i/i
idle air control motor.
PARK/NEUTRAL SWITCH
N71AKllAA
The park/neutral switch is located on the automatic
transxale housing. Manual transaxles do not use
park neutral switches. The switch provides an input
to the PCM. The input indicates whether the automatic transaxle is in Park, Neutral, or a drive gear
selection. This input is used to determine idle speed
(varying with gear selection), fuel injector pulse
width, and ignition timing advance. The park neutral
switch is sometimes referred to as the neutral safety
switch.
~/~:F/f
am , , 0~;~;; speed
.““.I
.
.
{itch
IGNITION SWITCH-IG (J2 SENSE)
The ignition sense input informs the power-train control module (PCM) that the ignition switch is in the
Crank or Run position.
AFlJOO77
N71AK12AA
ENGINE <NON-TURBO> - Control System
KNOCK SENSOR
The knock sensor threads into the side of the cylinder
j block below the intake manifold. When the knock
sensor detects a knock in one of the cylinders, it
sends an input signal to the PCM. In response,
the PCM retards ignition timing for all cylinders by
a scheduled amount.
I-25
N7lAK13AA
Knock sensors contain a piezoelectric material
which constantly detects engine knock vibration and
sends an input voltage (signal) to the PCM while
the engine operates. As the intensity of the engine
knock increases, the knock sensor output voltage
also increases.
Knock
BRAKE SWITCH
When the brake switch is activated, the power-train
control module (PCM) receives an input indicating
that the brakes are being applied. After receiving
this input the PCM maintains idle speed to scheduled
BATTERY VOLTAGE
The power-train control module (PCM) monitors the
battery voltage input to determine fuel injector pulse
width and generator field control. If battery voltage
N71AKl4AA
RPM through control of the idle air control motor.
The brake switch is mounted on the brake pedal
support bracket.
N71AK15AA
is low the PCM will increase injector pulse width
(period of time that the injector is energized).
1-26
ENGINE <NON-TURBO> - Control System
ACTUATORS AND CONTROL
FUEL INJECTORS
The 2.0L engine uses electrically operated top feed
fuel injectors. The MFI relay (automatic shut down
relay) supplies battery voltage to the fuel injectors.
The PCM controls the ground path for each injector
in sequence. By switching the ground paths on and
off, the PCM fine-tunes injector pulse width. Injector
pulse width refers to the amount of time an injector
operates.
The PCM determines injector synchronization from
the camshaft position sensor and crankshaft position
sensor inputs. The PCM grounds the MFI and fuel
pump relays after receiving the camshaft position
sensor and crankshaft position sensor inputs.
The PCM energizes the injectors in a sequential
order during all engine operating conditions except
start-up. For the first injector pulse width during
start-up, all injectors are energized at the same
time. Once the PCM determines crankshaft position,
it beings energizing the injectors in sequence.
IDLE AIR CONTROL MOTOR
The idle air control (IAC) motor is mounted on the
throttle body. The PCM operates the idle air control
motor. The PCM adjusts engine idle speed through
the idle air control motor to compensate for engine
load or ambient conditions.
The throttle body has an air bypass passage that
provides air for the engine during closed throttle
idle. The idle air control motor pintle protrudes into
the air bypass passage and regulates air flow
through it.
N71AK21AA
The PCM adjusts engine idle speed by moving the
IAC motor pintle in and out of the bypass passage.
The adjustments are based on inputs the PCM receives. The inputs include the throttle position sensor, crankshaft position sensor, coolant temperature
sensor, vehicle speed sensor and various switch
operations (brake, park/neutral, air conditioning,
power steering).
AFU0079
I/
ENGINE <NON-TURBO> - Control Svstem
IGNITION COIL
/
I-27
N71AK22AA
The coil assembly consists of 2 coils molded togeth-
LI er. The coil assembly is mounted on the cylinder
head cover. High tension leads route to each cylinder
from the coil. The coil fires two spark plugs every
power stroke. One plug is the cylinder under compression, the other cylinder fires on the exhaust
stroke. Coil number one fires cylinders 1 and 4.
Coil number two fires cylinders 2 and 3. The powertrain control module (PCM) determines which of
the coils to charge and fire at the correct time.
The MFI relay (automatic shut down relay) provides
battery voltage to the ignition coil. The PCM provides
a ground contact (circuit) for energizing the coil.
When the PCM breaks the contact, the energy in
the coil primary transfers to the secondary causing
the spark. The PCM will de-energize the MFI relay
if it does not receive the crankshaft position sensor
and camshaft position sensor inputs. Refer to MFI
Relay PCM Output in this section for relay operation.
MFI RELAY (Automatic Shut Down)
The MFI relay (automatic shut down relay) supplies
battery voltage to the fuel injectors, electronic ignition coil, generator, and the heating elements in
the oxygen sensors.
The PCM controls the relay by switching the ground
path for the solenoid side of the relay on and off.
The PCM turns the ground path off when the ignition
switch is in the Off position. When the ignition switch
is in the On or Crank position, the PCM monitors
N71AK47AA
the crankshaft position sensor and camshaft position
sensor signals to determine engine speed and ignition timing (coil dwell). If the PCM does not receive
the crankshaft position sensor and camshaft position
sensor signals when the ignition switch is in the
Run position, it will de-energize the MFI relay.
Along with the fuel pump relay, the MFI relay attaches to a bracket on the drivers side of the dash
panel.
\
e Fuel Dump
MFI relay 1 0
Strut
tower
I AFUOo81
ENGINE <NON-TURBO> - Control System
FUEL PUMP RELAY
The fuel pump relay supplies battery voltage to the
fuel pump. The PCM controls the fuel pump relay
by switching the ground path for the solenoid side
of the relay on and off. The PCM turns the ground
path off when the ignition switch is in the Off position.
When the ignition switch is in the On position, the
PCM energizes the fuel pump. If the crankshaft
N71AK23AA
position sensor does not
the PCM de-energizes the
one second.
Along with the MFI relay,
taches to a bracket on the
panel.
detect engine rotation,
relay after’approximately
the fuel pump relay atdrivers side of the dash
AIR CONDITIONING CLUTCH RELAY
The PCM provides the ground path for the relay
coil. Relay operation is based on inputs the PCM
receives from the air conditioning switch. The PCM
deactivates the relay at vehicle start-up and also
N7lAK24AA
if it senses a part throttle/wide open throttle launch
condition. This temporarily reduces the accessory
load on the engine.
RADIATOR FAN RELAY AND AIR CONDlTIONING CONDENSER FAN RELAY (High, LOW)
The PCM operates the relay based on inputs from
the engine coolant temperature sensor, vehicle
speed sensor and A/C system.
N71AK26AA
The PCM also supplies the ground circuit for the
lamp circuit for 3 seconds after the ignition switch
is turned to the ON position and illuminates the
indicator lamp.
TACHOMETER
The PCM operates the tachometer on the instrument
panel. The PCM calculates engine RPM from the
GENERATOR
The PCM controls the generator field current to
regulate the generator output voltage to the target
N71AK25AA
The PCM supplies the ground circuit for the High/
Low relay coil to operate the fan motor in high/low
speeds.
CHARGING SYSTEM INDICATOR LAMP
The PCM controls operation of the charging system
indicator lamp located in the vehicle’s instrument
cluster. The PCM provides a ground to complete
the lamp circuit if the charging output falls below
a specified threshold.
d
N71AK27AA
crankshaft position sensor input.
N71AK2BAA
voltages in accordance with the battery temperatures.
d
ENGINE <NON-TURBO> - Control System
DUTY CYCLE EVAP PURGE SOLENOID
The duty cycle EVAP purge solenoid regulates the
i rate of vapor flow from the EVAP canister to the
throttle body. The power-train control module operates the solenoid.
During the cold start warm-up period and the hot
start time delay, the PCM does not energize the
solenoid. When de-energized, no vapors are purged.
The PCM de-energizes the solenoid during Open
Loop operation.
The engine enters Closed Loop operation after it
reaches a specified temperature and the pro-
1-29
N71 AU29AA
grammed time delay ends. During Closed Loop operation, the PCM energizes and de-energizes the
solenoid 5 to 10 times per second, depending upon
operating conditions. The PCM varies the vapor
flow rate by changing solenoid pulse width. Pulse
width is the amount of time the solenoid is de-energized.
The solenoid attaches to a bracket next to the EVAP
canister. The canister is located ahead of the passenger’s front wheel well.
I-30
ENGINE <NON-TURBO> - Control System
ELECTRIC EGR TRANSDUCER
The Electronic EGR Transducer (EET) contains an
electrically operated solenoid and a back-pressure
controlled vacuum transducer. The PCM operates
the solenoid based on inputs from the multi-port
fuel injection system. The EET and EGR valve are
serviced as an assembly.
When the PCM de-energizes the solenoid, vacuum
does not reach the transducer. Vacuum flows to
the transducer when the PCM energizes the solenoid.
When exhaust system back-pressure becomes high
enough, it fully closes a bleed valve in the vacuum
transducer. When the PCM energizes the solenoid
N71AK30AA
and back-pressure closes the transducer bleed
valve, vacuum flows through the transducer to operd
ate the EGR valve.
Energizing the solenoid, but not fully closing the
transducer bleed hole (because of low back-pressure), varies the strength of the vacuum signal applied to the EGR valve. Varying the strength of the
vacuum signal changes the amount of EGR supplied
to the engine. This provides the correct amount
of exhaust gas recirculation for different operating
conditions.
The EET and EGR valve mount to the rear of the
cylinder head.
ENGINE <NON-TURBO> - Control Svstem
1-31
DIAGNOSTIC SYSTEM
MALFUNCTION INDICATOR LAMP (MIL)
id The PCM provides the ground path for the malfunction indicator lamp (Check Engine light in the gauge
cluster on the instrument panel). The lamp comes
on each time the ignition key is turned ON and
stays on for a 3 seconds bulb test.
The MIL lamp stays on continuously, when the PCM
has entered a Limp-in mode or identified a failed
emission component. During Limp-in Mode, the
PCM attempts to keep the system operational. The
malfunction indicator lamp signals the need for immediate service. In limp-in mode, the PCM compensates for the failure of certain components that send
incorrect signals by substituting inputs from other
sensors.
WlAK31AA
If the PCM detects active engine misfire severe
enough to cause catalyst damage, it flashes the
malfunction indicator lamp (Check Engine light). ,At
the same time the PCM also sets a diagnostic trouble
code. <vehicles with manual transaxle>
The malfunction indicator lamp can also display
diagnostic trouble codes. Cycle the ignition switch
on, off, on, off, on, within five seconds and the PCM
displays any diagnostic trouble codes stored in
memory.
The diagnostic trouble codes can also be read by
the scan tool.
GENERAL INFORMATION
The diagnostic system for vehicles with a manual
transaxle conforms to OBD-II, where the one for
vehicles with an automatic transaxle conforms to
OBD-I.
OBD II has been developed to allow to meet the
requirements of the Federal Clean Air Act and
California Air Resources Board (CARB) legislation.
It is impractical (and very expensive) to provide
L every vehicle on the road with the equipment necessary to measure emissions of carbon monoxide
(CO), hydrocarbons (HC) and oxides of nitrogen
(NOx). Instead, the proven emissions control devices available for these vehicles are checked for
proper operation.
U71AK32AA
NOTE
When monitoring the misfire and fuel system, if
trouble is detected, the MIL will light until the completion of the next operation cycle (trip) following the
cycle where the trouble is detected. In addition,
if the detected trouble may cause damage to the
catalytic converter, the MIL will light immediately.
However, if the trouble is not detected in the
succeeding trip under almost the same driving condition, MIL should go out. And if the same trouble
will not be detected within 80 trips following the
trip where the trouble is detected, the diagnostic
trouble code will be erased.
MIL ILLUMINATION:
. FAULT ON TWO SUCCESSIVE TRIPS
. (MIL ON) NO FAULT ON THREE
SUCCESSIVE TRIPS
FAULT CODE STORAGE:
. FAULT ON TWO SUCCESSIVE TRIPS
L
. (DTC) NO FAULT ON 40-80
SUCCESSIVE TRIPS
b
h
b
MIL ON
MIL OFF
DIAGNOSTIC TROUBLE
CODE STORED
DIAGNOSTIC TROUBLE
CODE ERASED
1-32
ENGINE <NON-TURBO> - Control System
In addition to illuminating the MIL lamp, a diagnostic
trouble code (DTC) is stored in the Powertrain Control Module (PCM) and can be retrieved by a service
technician using a diagnostic scan tool.
To meet OBD-II requirements the following systems
must be monitored:
0 Catalyst
l Fuel System
l Misfire
l Oxygen Sensor and Oxygen Sensor Heater
l Secondary Air
l Evaporative System (Purge)
l Exhaust Gas Recirculation
Any other input or output component that can
l
affect emissions
The operating conditions of the components can
be monitored using MUT-II scan tool, as well as
general purpose scan tools. The OBD II system
monitors are different. They are checks made by
DIAGNOSTIC SYSTEM OPERATION
Trip Indicator
“Trip” is a difficult concept to define because the
requirements for a trip vary depending on the test
being run. These conditions can include seemingly
unrelated items such as driving style, length of trip,
and ambient temperature. The minimum requirement for a trip is that it includes one key cycle with
the vehicle having to meet certain enabling conditions before a test is performed. Vehicle tests vary
in length and may be performed only once per trip
or may be performed continuously. If the pertinent
enabling conditions are not met during that key cycle,
the tests may not run at all.
NOTE
In California and other states requiring the PCM
to indicate that all monitors have passed before
issuing license plates, removing the vehicle’s battery
or using the MUT-II scan tool to erase DTC’s before
testing erases any record of passing a monitor. If
the monitor does not complete a trip on subsequent
key cycles, the vehicle will fail a licensing test.
What constitutes a trip for a particular OBD test
is important because in many instances, the vehicle
must fail a test on more than once before the MIL
is illuminated and a DTC is recorded. Tests that
illuminate the MIL when a single failure is recorded
are known as “one trip” monitors. “Two trip” monitors
the PCM’s software to determine not only if these
specific systems are operating, but if they are operating within pre-established limits. While OBD I tests L)
measure a component’s electrical operation, OBD
II monitors check a system’s performance.
The California Air Resources Board (CARB) monitors emission system repairs from several California
dealers. If a specific component or system fails on
more than 4% of the vehicles sampled, the manufacturer is required to research and evaluate the reasons. If the failure is not attributable to owner negligence or misuse, a component failure rate of 4%
could lead to vehicle recalls. The federal government
is considering a similar program. The manufacturer
is relying on its technicians throughout the country
to appropriately diagnose emissions concerns and
replace only those parts that have failed. The sloppy
practice of “hanging” parts on a car under emissions
warranty could lead to an unnecessary (and expensive) fleet-wide recall.
N71AK33AA
allow the system to double check itself and help
prevent unnecessary MIL illumination.
If the conditions to run the test are not met on consecutive key cycles, the information from the first test
’
is not lost. The diagnostic system waits until the L)
next time the appropriate test conditions occur and
continues the count.
If this is a “two trip fault” and the test failed the
first time, a malfunction the second consecutive
time the test is run (even if there were ten key
cycles between these tests) will illuminate the MIL.
If the malfunction does not occur the second time
the test is run, the MIL lamp does not illuminate
and no DTC is recorded.
The diagnostic system can turn the MIL off if it records three consecutive trips where the system
passes the test. However, with the misfire and fuel
monitors, the system must past the test under the
same circumstances (within 375 rpm) under which
it failed the test.
In summary, it is the diagnostic system’s job to determine if the conditions are appropriate for a test
to be run, know the definition of a trip for each
test, and record the results of each test when it
is run.
1-33
ENGINE <NON-TURBO> - Control System
DTC Identification, Maturation, and Erasure
Once a test has been run, the diagnostic system
ii determines whether the system has passed or failed.
It must then determine if the test has failed the
specified number of times required to illuminate the
MIL. If not, the diagnostic system stores a maturing
code. When this test is run again (on the next “trip”)
the results are once again either pass or fail. If
the component fails the test, a code “matures,” and
a DTC is set. The MIL lamp is illuminated if an
emission component is involved. If the component
or system passes the test a specified number of
times, the maturing code is erased.
NOTE
It is important to understand that a system need
not fail a test under exactly the same conditions
for a code to nature and trigger the MIL.
Freeze Frame Data Storage and Erasure
All monitored systems provide “freeze frame” data
of the vehicle’s operating conditions when a maturing code was set. This information can be retrieved
using the diagnostic scan tool and may help a technical pinpoint the source of a concern more quickly.
When there are multiple monitor failures, the first
to occur is stored in freeze frame. The exceptions
are the misfire and fuel system monitors. They have
priority
and can write over other freeze frame data.
L
Freeze Frame Priority
The freeze frame only indicates the operating conditions under which the maturing code was set. While
these conditions are usually the same as those
which trigger the maturation of the DTC, there can
be exceptions. This first condition is important for
fuel system and misfire DTC’s as it is the condition
MIL Illumination
As described earlier, the PCM diagnostic system
is responsible for operation of the MIL lamp. This
is an important function as unnecessary operation
of this lamp has a negative effect on customer satisfaction. In most cases, if a component or system
passes diagnostics on three consecutive trips after
the MIL has been illuminated, the MIL is extinguished. This explains how customers can note
that the “Check Engine” light went on, and then
off, on its own. The OBD II has reconsidered its
diagnosis. The DTC remains in the memory until
N7lAKMAA
DTC’s are erased if the component passes the diagnostic test in the course of a number of subsequent
warm-up cycles. The number of trips required for
this is usually 40. This is why it is best to attempt
to diagnose intermittent problems soon after they
occur. While initially a DTC may have been available,
subsequent trips (which passed the diagnostic test)
have erased the code. The OBD II system, based
on the latest inputs it received, reconsidered its
diagnosis on this intermittent concern.
Of course, a diagnostic scan tool can be used to
erase DTC’s at any time. In addition, DTC’s (along
with records of successful trips) are erased whenever the vehicle’s battery is disconnected.
N7lAK35AA
Information in the freeze frame includes:
l Diagnostic Trouble Code (DTC)
l Engine rpm
l Engine load
l
Fuel trim (short term and long term)
o Engine coolant temperature
l Manifold absolute pressure
l Operation mode (open or closed loop)
l Vehicle speed
N71AK3SAA
the vehicle must repeat successfully during a test
to allow the diagnostic system to erase a DTC and
turn off the MIL on its own.
Should the diagnostic system determine that the
DTC can be erased, the freeze frame related to
that code is also eliminated.
N7l AK37AA
a larger number of warm-up cycles (40) have been
successfully completed.
The MIL flashed in misfire situations where continued driving could damage the catalytic converter.
Continued driving of the vehicle when this condition
occurs is not recommended.
The MIL can be used to produce diagnostic trouble
codes. Quickly turning the key to the RUN position
three times allows the MIL to flash out any existing
flash codes.
I-34
ENGINE <NON-TURBO> - Control System
Test condition
N7lAK30AA
There are a large number of tests waiting to be
performed once the vehicle is stat-ted. It is the diagnostic system’s job to see that these tests are not
only performed, but performed under the appropriate
conditions.
An additional job of the diagnostic system is to prevent false DTC’s from being stored. The diagnostic
system accomplishes this by not running certain
tests when it recognizes that faults already in the
system or tests currently being run could cause
the next test to fail erroneously. For example:
The test for the catalyst monitor does not run
if the MIL light is on due to an oxygen sensor
fault. The oxygen sensor is a key component
in the catalyst monitor test. If the sensor is not
functioning properly, there is no reason to run
the catalyst monitor - it won’t pass. This test
will not be run pending repair of the sensor
concern.
The diagnostic system does not run the test
monitoring catalyst operation if the EGR monitor ‘d
test is being run. The EGR monitor is an “intrusive” test and will cause the catalyst monitor
to produce data not representative of normal
operating conditions. This represents a conflict
of test data. The diagnostic system will wait
until the EGR monitor is finished before running
the catalyst monitor.
Finally, the results from the catalyst monitor
are always held until the oxygen sensor test
has been successfully completed. The results
from the test are suspended until the required
prerequisite test has been completed.
By reviewing these guidelines, the diagnostic system
avoids storing DTC’s that are the result of failure
of other components in the system. The diagnostic
system allows you to use the diagnostic scan tool
more confidently in diagnosing and repairing a concern.
DIAGNOSTIC TROUBLE CODES
N71AK39AA
The diagnostic items are shown in the following table. Note that a fault’s numeric codes are different,
depending on the method of inspection.
d
Diagnostic trouble code No.
Diagnostic items
Scan tool
(MUT-II)
General scan
tool
MIL
01
PO340
54
No cam signal at PCM
02
PO605
53
Internal controller failure
05
47
Charging system voltage too low
06
46
Charging system voltage too high
10
42
MFI relay (ASD relay) control circuit
11
41
Generator field not switching properly
16
-
33
A/C clutch relay circuit
17
PO403
32
EGR solenoid circuit
18
PO443
31
EVAP solenoid circuit
19
PO203
27
Injector #3 control circuit
20
PO202
27
Injector #2 control circuit
21
PO201
27
Injector #l control circuit
25
PO505
25
Idle air control motor circuits
26
PO122
24
Throttle position sensor voltage low
MIL: Check engine/Malfunction indicator lamp
d
ENGINE <NON-TURBO> - Control System
Diagnostic trouble code No.
Diagnostic items
Scan tool
(MUT-II)
General scan
tool
MIL
27
PO123
24
Throttle position sensor voltage high
30
PO117
22
Engine coolant temperature sensor voltage too low
31
PO118
22
Engine coolant temperature sensor voltage too high
32
PO134
21
Upstream H02S stays at center
17
Engine is cold too long
33
35
PO500
15
No vehicle speed sensor signal
36
PO1 07
14
MAP sensor voltage too low
37
PO1 08
14
MAP sensor voltage too high
39
P1297
13
No change in MAP from start to run
40
PO335
11
No crank reference signal at PCM
42
PO352
43
Ignition coil #2 primary circuit
43
PO351
43
Ignition coil #l primary circuit
42
No MFI relay (ASD relay) output voltage at PCM
32
EGR system failure
62
PCM failure SRI mile not stored
44
46
PO401
48
49
-
63
PCM failure EEPROM write denied
51
PO412
36
Pulsed secondary air injection solenoid circuit <M/T>
57
PO112
23
Intake air temperature sensor voltage low
58
PO113
23
Intake air temperature sensor voltage high
59
PO325
16
Knock sensor #l circuit
61
PO204
27
Injector #4 control circuit
62
PO132
21
Upstream H02S shorted to voltage
68
PO605
53
PCM failure SPI communications
44
Battery temperature sensor volts out of limit
71
92
P1490
35
Low speed fan control relay circuit
93
P1489
35
High speed fan control relay circuit
96
P1698
66
No CCD messages from TCM <A/T>
101
-
42
Fuel pump relay control circuit
102
PO133
21
Upstream H02S response <M/T>
103
PO135
21
Upstream H02S heater failure <M/T>
MIL: Check engine/Malfunction indicator lamp
SRI: Service Reminder Indicator
I-36
ENGINE <NON-TURBO> - Control System
Diagnostic trouble code No.
Diagnostic items
Scan tool
(MUT-II)
General scan
tool
MIL
104
PO1 39
21
Downstream H02S stays at center <MTT>
105
PO141
21
Downstream H02S heater failure <M/T>
106
PO300
43
Multiple cylinder misfire* <M/T>
107
PO301
43
Cylinder #l misfire* <M/T>
108
PO302
43
Cylinder #2 misfire* <M/T>
109
I
PO303
I
43
Cylinder #3 misfire* <M/T>
110
I
PO304
I
43
Cylinder #4 misfire* <M/T>
111
PO41 1
36
Too little secondary air or too much secondary air <M/T>
112
PO422
64
Catalytic converter efficiency failure <M/T>
113
PO441
31
Evaporative purge flow monitor failure <M/T>
114
I
P1899
I
37
1 Park/Neutral switch <A/T>
115
I
PO551
I
65
1 Power steering switch failure <M/T>
118
I
PO1 72
I
52
/ Fuel system rich*
119
PO171
51
Fuel system lean*
126
PO138
21
Downstream H02S shorted to voltage <M/T>
128
PO125
17
Closed loop temperature not reached <M/T>
132
PO121
24
Throttle position sensor voltage does not agree with MAP <M/T>
133
P1390
11
Timing belt skipped 1 tooth or more
138
157
I
I
I
P1294
P1391
I
I
I
25
11
1 Target idle not reached (k200 r/min) <M/T>
1 Intermittent loss of CMP or CKP
I
MIL: Check engine/Malfunction indicator lamp
*: The diagnostic code is memorized on the first detection of the trouble.
ENGINE <NON-TURBO> - Control Svstem
MAIN MONITORS
To meet OBD II requirements, the on-board diagnosL tic system must monitor the electrical input signals
and the performance of output responses that can
have an effect on vehicle emissions. In addition,
there are several “main monitors” that review the
result of system operations and their effect on emissions. The main monitors are as follows:
l Catalyst
l Fuel System
l Misfire
0 Oxygen Sensor
l Exhaust Gas Recirculation
l Secondary air (air injection)
I-37
N71 AMOAA
Each of the main monitors is listed below with a
brief background explanation and a description of
how the monitor operates. Following these conditions is the diagnostic trouble code (DTC) this monitor produces along with the DTC flashout number
and a number referred to as a SAE J 2012 or “P
code. SAE J 2012 codes required by law for use
with generic diagnostic scan tools.
Oxygen Sensor Monitor
N71AK41AA
Background
Effective control of exhaust emissions is achieved
by an oxygen feedback system. The most important
element in this system is the oxygen (02) sensor
mounted in the exhaust manifold.
id
h\
AFUOO74
ENGINE <NON-TURBO> - Control Svstem
Operation
Once it reaches its operating temperature of 572”
to 662”F, the sensor generates a voltage inversely
proportional to the amount of oxygen in the exhaust.
This information is used by the PCM to calculate
the fuel injector pulse width necessary to provide
the critical 14.7 to 1 air/fuel ratio (stoichiometric).
A properly operating sensor must not only be able
to generate an output voltage across its operating
range of 0 to 1 volt as it is exposed to different
02 levels, it also must be able to detect these
changes quickly. To detect a shift in the air/fuel
mixture (lean or rich) the output voltage must change
beyond a threshold value. A malfunctioning sensor
could have difficulty changing beyond the threshold
value.
While there are existing tests that determine if an
02 sensor is shorted to voltage, contains an open
circuit, or does not function at all, prior to OBD
II, it was impossible to identify sluggish or marginal
sensors.
A slow response rate or reduced voltage output
are all signs of an improperly operating oxygen sensor. This could mean longer instances of combustion
of less than optimum air/fuel mixtures. This can
significantly increase emissions.
The 02 sensor must have a voltage output of greater
than .67 volt in order to pass the test. It must also
switch more times over a 120 second period than
a given threshold (to demonstrate quick response)
or produce a given number of steep slope switches
(demonstrating dynamic range and quick response)
over the same time period. Data is not stored unless
idle time exceeds 10 seconds.
Front 02
High switching
frequency
fast response
Front O2 ’
I
Low switching
frequency
slow response
E
.Q
.-2
WE
Trigger 1.5 x STD
Switching frequency
AFUOO88
ENGINE <NON-TURBO> - Control System
02 Heater Monitor
Background
L In order for the 02 sensor to function properly, the
02 sensor must be heated to approximately 572“
- 662°F. To assist the 02 sensor in achieving this
temperature, the O2 sensor is equipped with a Positive Thermal Coefficient (PTC) heater element. Both
the upstream an downstream’s heater element is
fed battery voltage any time the MFI relay is energized. The ground for the heater element is routed
through the 02 sensor’s 4-pin connector to an external ground source. As current flows through the
element, the temperature of the O2 sensor increases. As the temperature increases, the resistance of the element increases causing the current
flow to decrease. The 02 sensor’s heater maintains
the temperature of the sensor to around 1200°F.
After the engine has started, the upstream 02 sensor’s information is used by the PCM to assist in
the air/fuel calculation. If the sensor is not up to
operating temperatures, the information given by
the sensor may be inaccurate, possibly causing
an increase in emissions.
The downstream O2 sensor is used by the PCM
to calculate the efficiency of the catalytic converter.
The sensor must be heated to allow the 02 sensor
to function normally. Without the O2 functioning normally, the catalytic converter test would be invalid.
Operation
The resistance of the 02 sensor changes with temperature and age. It’s resistance normally is between
100 Sz to 4.5 MegR. When the temperature of the
sensor is increased, the resistance of the sensor
decreases. Inversely, as the sensor ages, the resistance increases. It is the resistance of the sensor’s
output circuit that is tested for proper heater operation, not the heater element itself.
The test begins approximately 5 seconds after the
L engine has been turned off with the ignition key
and battery voltage greater than 10 volts (the PCM
still operates even though the key is in the off position). Once the timer has timed out, the PCM bias
5 volts to the O2 sensors output wire once every
1.6 seconds, and keeps it biased each time for
35 ms. During this portion of the test, the PCM
monitors the voltage on the output wire of the 02
sensor. As the sensor cools down, the resistance
should increase, causing the PCM to register an
increase of voltage. The PCM determines a 02 sen-
sor that has cooled enough by detecting an increase
of 0.49 - 1.56 volts higher what the PCM detected
at the beginning of the test. The maximum amount
of time to perform this portion of the test is 144
seconds.
When the O2 sensor has cooled enough, the PCM
energizes the MFI relay for the next 48 seconds.
With the relay energized, current should flow through
the heater element causing an increase of temperature at the sensor. As the heater warms the 02
sensor, resistance of the 02 sensors output circuit
should decrease. As the resistance decreases, voltage at the PCM decreases. While the MFI relay
is energized, the PCM pulses the 5 volt biased signal
30 times. Each time the biased voltage is activated,
the PCM checks for a voltage drop. The 02 heater
monitor test passes if the PCM detects at least
0.157 volt decrease in 15 out of the 30 pulsed signals.
ENGINE <NON-TURBO> - Control System
Catalyst Monitor
U71AK42AA
Current vehicles use a three-way catalytic converter
to reduce emission of harmful gases. The converters
are referred to as three-way because they specifically address three pollutants (hydrocarbons, carbon
monoxide, and nitrogen oxide) produced in the combustion chamber. The catalyst monitor uses a pair :j
of inputs to indirectly measure just how effective
the catalyst is at reducing emissions.
Operation
02 sensors located above (upstream) and below
(downstream) the catalytic converter are able to
monitor the efficiency of the converter. The dual
02 sensor strategy is based on the fact that as
a catalyst deteriorates, it oxygen storage capacity
and efficiency are both reduced. By monitoring the
Upstream(primary) --.,
oxygen storage capacity of the catalyst, its efficiency
can be indirectly calculated. The upstream sensor
detects the amount of oxygen in the exhaust gas
before it enters the converter. This sensor should
switch fairly rapidly.
Downstream
Exhaust
gas
()ooo/ Engine
AFUO089
I-41
ENGINE <NON-TURBO> - Control System
A functioning converter stores oxygen so it can be
used for oxidation of hydrocarbons (HC) and carbon
monoxide
(CO). The downstream sensor detects
L
a lower oxygen level in the exhaust than the upstream sensor. It indicates this by switching at a
significantly slower rate than the upstream sensor.
As the converter deteriorates and loses its ability
to store oxygen, the switch rate at the downstream
Upstream 02
Downstream 02
Downstream 02
oxygen sensor approaches that of the upstream
sensor. The system is monitored so that when the
switch rate of the downstream sensor reaches 90%
of the switch rate of the upstream sensor (automatic
transmissions), the MIL is illuminated. The threshold
for manual transmissions is 70%. At this point, exhaust emissions are projected to exceed 1 l/z times
the legal limit.
Stoich A/F /
lzFgjE+
Low oxygen
storage
low
catalyst
beff icikncy
I
\dw@
I
-
-
AFU0090
1-42
ENGINE <NON-TURBO> - Control System
Fuel System Monitor
Background
N71AK43AA
To control the level of undesirable emissions, the
fuel system must be able to maintain strict control
of the air/fuel ratio. Stoichiometry is the optimum
air/fuel ratio, which is 14.7 to 1. At this point the
best balance between the production of HC’s and
CO’s (which drop as the mixture becomes leaner)
and NOx (which increases as the air/fuel mix be-
comes leaner) can be found. This is also the point
where the catalytic converter is most efficient at
converting all three gases to less harmful compounds. The goal of the PCM is to examine input
information and control outputs to produce a
constant stoichiometric ratio.
80-
80-
15:l
14:l
18:l
Air/fuel ratio
AFuOO91
i/j
I-43
ENGINE <NON-TURBO> - Control System
Operation
The Power-train Control Module (PCM) varies the
iipulse width of the fuel injectors to provide precise
control of the air/fuel mixture. Wider pulse widths
increase the volume of fuel delivered to the cylinders.
The PCM uses the input from a number of sensors
in its attempt to reach and maintain this air/fuel
ratio. Manifold Absolute Pressure (MAP), and the
02 sensor have the greatest influence (authority)
over injector pulse width. Other inputs such as the
Throttle Position Sensor (TPS), engine RPM, Engine
Upstream 02
sensor
Coolant Temperature (ECT) Sensor, Intake Air Temperature (IAT) Sensor. Vehicle Speed Sensor (VSS)
and battery voltage all have varying levels of influence on pulse width, depending on the circumstances.
As noted earlier, the system uses two oxygen sensors both of which monitor the oxygen content of
the combustion byproducts on their way out of the
engine as exhaust. Only the upstream sensor has
authority over fuel injector pulse width.
Downstream 02
sensor
_.
Exhaust gas
AFU0092
If a large amount of oxygen remains following the
combustion process, this sensor produces a low
voltage. This indicates a lean condition caused by
a ratio greater than stoichiometric. Little oxygen
in the exhaust allows the sensor to produce a higher
voltage, indicating a rich condition where the air/fuel
ratio is less than stoich.
Upstream 02 sensor feedback to the PCM is used
to fine tune injector pulse width to maintain stoichiometric and meet emission standards. It can increase
or decrease injector pulse width by as much as
50%. Pulse width is calculated from the data supplied from the MAP, TPS, ECT, IAT, upstream 02
sensor, battery voltage, RPM and VSS.
1-44
ENGINE <NON-TURBO> - Control Svstem
To control air/fuel ratio feedback, the PCM uses
short term correction and long term memory. Before
the PCM can alter the programmed injector pulse
width, it must enter closed loop operation. The requirements for closed loop operation are listed below:
l Engine temperature exceeds 35°F
l OS sensor is in the readv mode
l
AN timers have timed out -following the START
to RUN transfer (The length of these timers
varies with engine temperature)
35°F - 41 sec.
50°F - 35 sec.
70°F - 22 sec.
d
167°F - 11 sec.
Once in the closed loop control, the feedback systems begin to operate. Short term memory works
with the long term memory, which is broken down
into 14 different cells. Two of these cells (12 and
13) are used only during idle. Each cell represents
a manifold pressure and rpm range and can be
accessed with the MUT-II diagnostic scan tool.
Long Term Memory Cells
ABOVE
1
3
5
Purge
Free*
0
2
Purge
Free*
4
2048
RPM
BELOW
Map Voltage
1.38
2.0
T
7
11
9
6
2.64
3.26
13
Idle
Neutral
Manual
Transaxle
Purge
Free*
10
3.9
*PCM disables the canister purge function in these cells to gather data used for purge control and diagnostics.
For example:
If the PCM were in cell 3, the MAP voltage must
be between 1.38 and 2.OV and engine rpm must
be greater than 2048. This is the cell that the control
system would update.
J
I-45
ENGINE <NON-TURBO> - Control System
If the oxygen sensor registers a rich or lean condition
while driving in this cell, the cell will require updating
L to aid in fuel control. The short term correction is
used first. It starts increasing pulse width quickly
(kick), then ramps up slowly. Each control is in inverse relation to the signal sent from the 02 sensor.
For example:
The 02 sensor switches lean to rich. Short term
compensation kicks in lean, then ramps lean until
the 02 sensor switches lean. At this point short
term compensation reverses the process.
Stoich AIF ratio 14.7:1 .
AFU0093
If the oxygen sensor shows lean, the short term
compensation goes rich and multiplies the pulse
width from long term memory in that cell by an
amount greater than 1. If the sensor shows rich,
the short term compensation drives the pulse width
narrower by multiplying by a number less than 1
(perhaps 0.97). The short term compensation can
multiply pulse width by as much as 1.25 or as little
as 0.75 to compensate for lean or rich conditions.
In this way, the short term compensation can increase pulse width by up to 25% (by multiplying
by 1.25) or decrease pulse width by up to 25%
(by multiplying by 0.75).
Example:
Pulse width 0.05 x 1.25 = 0.0625 (increase of 25%)
Pulse width 0.05 x 0.75 = 0.0375 (decrease of 25%)
1-46
ENGINE <NON-TURBO> - Control System
Long term memory also has control over pulse width
by being able to increase or decrease the pulse
width stored in the cell by up to 25%. Long term
memory is retained by the battery in the PCM, while
short term correction is lost whenever the ignition
is turned off.
The long term memory works to bring the short
term correction to the point where the average per-
cent of pulse width compensation it provides in this
memory cell is 0%. The long term memory returns
to this level of pulse width compensation the next ‘&
time the vehicle enters this cell. It is in this way
that the PCM is continually relearning the most appropriate level of control, even as the vehicle ages,
internal engine components wear, and operating
conditions change.
Short term fuel
compensation
Stoich
A/F ratio
Long term fuel
compensation
AFUO094
There are several “purge free” cells. These cells
contain information on how much effect the canister
has on the air/fuel ratio. The purge solenoid is turned
on to shut off the purge flow and the cell is allowed
to register any purge corruption. The monitor looks
at the combination of short and long term fuel control
values to see if the system is in control.
The fuel system is continuously monitored during
each trip once the enabling conditions have been
met. Short term and long term values are multiplied
together. The test fails if the fuel control system
reduces pulse width by 25% long term memory and
7% short term compensation due to a rich condition
or increases pulse width by 25% long term memory
and 12% short term compensation due to a lean
condition.
ENGINE <NON-TURBO> - Control System
L
Misfire Monitor
Background
I-47
WlAK44M
Operation
Misfire is defined by the California Air Resources
Board as the lack of combustion in a cylinder due
to absence of spark, poor fueling, compression,
or any other cause. As a result, the air/fuel mixture
will not burn, and during the exhaust stroke, it enters
the exhaust system. The raw fuel and excess oxygen
adversely affect the fuel system’s feedback mechanism (the oxygen sensor) and can cause permanent
damage to the catalytic convertor.
The OBD II misfire monitor uses information provided by the crank position sensor to determine
engine rpm and detect slight variations due to engine
misfire. Crankshaft rpm is calculated between the
69” and 9” falling edges of the crankshaft position
sensor signal.
2 revolutions
- 120”
--I
60” reference notch
iz
Crank signal
AFUOO95
i
I-48
ENGINE <NON-TURBO> - Control System
The threshold for determining what amount of rpm
change indicates misfire varies with engine speed
and load. This is required because as engine speed
increases or load decreases, the overall effect of
a single cylinder misfire diminishes due to the momentum of the crankshaft.
The misfire monitor contains an adaptive feature
that can take into account component wear, sensor
fatigue, and machining tolerances. The PCM notes
rpm variance between cylinders during normal vehicle operation and then uses these figures as a
foundation for calculating the threshold at which
rpm variance is considered to indicate misfire.
NOTE
The PCM requires normal vehicle operation to update its memory. Because the PCM has no reference
for “normal operation”, the PCM considers a misfire
condition to be normal if installed in a vehicle that
is misfiring. The same situation can occur anytime
battery power to a PCM is lost and a vehicle is
misfiring when the controller is reconnected,
The misfire monitor triggers operation of the MIL
in two different operating situations:
1,000 Rev Misfire
Misfire is continuously monitored (in 200 revolution
segments) once the enabling conditions have been
met. If the monitor detects misfire in more than
1.6% of the engine cycles in a 1,000 revolution
period, a temporary fault is set. Freeze frame data
of the operating conditions during the last 200 rpm
of that 1,000 revolution period are stored. As with
other monitors, failure of the misfire monitor on the
next trip matures the code, the MIL illuminates, and
a DTC is stored. It is important to note that two
trips are required for the code to mature. Continued
misfiring during the initial trip does not illuminate
the MIL.
200 Rev Misfire
If the monitor detects misfire in more than 15%
of cylinder firing opportunities during any 200 revolution monitored segment, the MIL immediately begins
flashing, a DTC is started, and the freeze frame
is stored with information regarding the conditions
at which the misfire occurred. This indicates that
engine misfire has reached the point where damage
to the catalytic converter is likely to occur. The vehicle defaults to open loop operation to prevent the
adaptive fuel controls from dumping additional fuel
into the cylinders and accelerating damage to the
catalyst. Driving the vehicle with the MIL flashing
is not recommended.
Once out of the operating condition where the 15%
misfire is occurring, the MIL will stop flashing but
remain illuminated. The vehicle may be driven, but
should be serviced immediately.
Because some misfire is a common occurrence
in a number of driving conditions, MIL illumination
due to misfire may occur when no component has
failed. Try to identify conditions that could trigger
the misfire monitor that are not related to component
failure. Example of these are included below:
l Damp ignition system components
l Low fuel/running out of gas (monitor triggers
as engine sputters)
l “Lugging” the engine
l Pulling heavy loads
l Low quality gasoline
In addition, the following situations could mistakenly
trigger the MIL:
l Large potholes
l Extended rough road operation
I-49
ENGINE <NON-TURBO> - Control System
Exhaust Gas Recirculation Monitor
WlAK45AA
Background
L
Exhaust Gas Recirculation (EGR) is a method of
reducing oxides of nitrogen (NOx) emissions by
introducing non-combustible exhaust gases into the
combustion chamber. These gases absorb heat and
reduce the high cylinder operating temperatures
where NOx is most likely to occur. Lower combustion
chamber temperatures result in lower NOx emissions.
Upstream (primary)
02 sensor
--. .
Exhaust gas
AFU0006
I-50
ENGINE <NON-TURBO> - Control System
Operation
The EGR system consists of a vacuum solenoid,
back pressure transducer and a vacuum operated
valve. When activated, the solenoid allows vacuum
to flow to the transducer. Negative exhaust backpressure allows manifold vacuum from the solenoid
to vent to atmosphere. Positive exhaust backpres-
sure causes the transducer diaphragm to modulate.
This allows intake manifold vacuum to reach the L)
EGR valve. The combination of vacuum on one
side of the valve diaphragm and exhaust back pressure on the other allows exhaust gases to be
introduced into the intake manifold.
transducer
EGR valve
AFUOW7
An EGR system stuck in the closed position prevents
the system from decreasing NOx emissions. A systern stuck in the open position can increase hydro-
carbon emissions, fuel consumption, and produce
rough engine operation.
ENGINE <NON-TURBO> - Control System
The detect operation of the system, the solenoid
is disabled and the 02 compensation control is monitored.
If ttie EGR system is operating properly, turni
ing’it off shifts the air/fuel ratio in the lean direction.
I-51
02 sensor data should indicate an increase in oxygen in the exhaust gases and cause the short term
control to shift rich. The amount of the shift indirectly
monitors the operation of the system.
EGR valve
OFF
Short term fuel
compensation .
Stoich A/F ratio
COMPREHENSIVE COMPONENTS
Refer to Group 13 - Troubleshooting in the Service Manual.
N71AK46AA
I-52
ENGINE <NON-TURBO> - Control System
DATA TRANSMISSION SYSTEM
N71AKSOAA
The power train control module (PCM) and transaxle
control module (TCM) transfer control data to and
from each other via a data communication system.
The scan tool receives various tvpes of data from
the transaxle control module through the data com-
munication line and displays the data on the display.
(Various types of data are also received by the scan
tool from the power train control module through
a line different from this data communication line.)
Power train control module
Transaxle control module
Bus+
T <
AFU0084
The power train control module and transaxle control
module communicate with each other by alternately
sending the data in their respective modules to the
data bus.
In other words, the power train control module sends
all its data to the data bus, and the transaxle control
module receives only those data items it needs from
the bus. Then the transaxle control module sends
all its data to the data bus. The power train control
module does not require any specific data from the
data bus.
ENGINE <NON-TURBO> - Control System
I-53
tmAW1 AA
Bus+ and Bus- Circuits
The data transmission system has two wires conL netted in parallel to the PCM and TCM. One circuit
is Bus+, and the other is Bus-. For proper communication, the wires must be twisted together at 1.75”
intervals. Twisting of the wires is intended to prevent
switched-to-battery or switched-to-ground circuits
from inducing electromagnetic interference (EMI)
into the bus circuits.
If the twists are not maintained throughout the bus
circuits (at connectors and splices), false signals
can be conveyed to all modules on the bus.
Communication chip (Communication Control Integrated Circuits)
The bus circuits connect inside all modules to a communication chip. The illustration at left shows a representative communication chip block diagram. For
communication to occur, the bus must have Biasing
and Termination (see the following sections.)
------’ Transmit data
i
i
AFUOOB! 5
1-54
ENGINE <NON-TURBO> - Control System
Biasing
5 volt supply
Both bus circuits are biased (supplied voltage) to
approximately 2.5 volts. The Bus+ and Bus- circuits ‘&
are biased through a series circuit (see the illustration
at left). The bus current travels from a 5 volt source
through a 13k ohm resistor to Bus-, then through
a 120 ohm termination resistor to Bus+, and then
to ground through a 13k ohm resistor. Bus bias is j
the voltage required to operate the bus.
If the system is functioning normally, the Bus- circuit
voltage is slightly higher than the Bus+ circuit voltage.
This is normal, and is caused by the 120 ohm termination resistor. The operating bus bias range is approximately 1.5 - 3.5 volts. At voltage above or below
this range, the bus has difficulty communicating correctly.
4
13kQ
resistor
N7lAU52AA
{
Termination
resistor
Termination
13k&2
resistor
7757
AFUOOBG
The termination resistors are provided both the inside
of PCM and the inside of TCM.
For the bus circuit to be complete, at least one termination point must exist.
The resistance in the bus circuit is due to the termination resistors. It can be measured with an ohmmeter
at the data linkconnector by attaching the two ohmmeter leads to the two bus wires. The ohmmeter will
read 100 to 140 ohms for one controller with termination and 40 to 80 ohms for two controllers with termination.
The termination points are inside of a controller but
outside the communication chip.
Inputs and Outputs
N71AK53AA
Messages sent over the communication system can
be considered both inputs and outputs. Output messages from any one module are used as input messages to the other modules on the communication
system.
Input messages are used by the modules to implement specific features. This arrangement allows more
than one module to use information from the same
sensor. Another example of output messages are
those sent to the scan tool for diagnostic purposes.
t
d
ENGINE <NON-TURBO> - Control System
Bus Communication
id
1-55
NllAK54AA
Communication is based on voltage differential between the two bus wires. The differential occurs
when two parts of the communication chip, the current sink and the current source, are used by the
communication chip to control the bus current flow.
Two different signal conditions can exist when the
bus functions normally; there can be a “0” bit or
a “1” bit.
For communication to occur, the following basics
are needed:
a Bus+ and Bus- wires must be connected in
parallel to all modules.
l
Bus+ and Bus- wires are biased to approximately 2.5 volts.
l
Bus+ and Bus- wires must have at least one
point of termination.
$,;e;;’ ; OFF ;
II
’
Bus+ ;1 2.49 j
ON
2.52
; OFF
;
1
I 2.49 I
1
ON
2.52
;
1
1
Voltage
Bus- I 2.51
II
Binary [
L
1A
F
;
i
1
1
U
I 2.51
2.48
0
0
When the bus circuits are not allowing current to
flow, there is a “1” condition. When the bus is idle
and no messages are being sent, the bus is in the
“1” condition.
When the current source passes a small amount
of current into the Bus+ wire, and the current sink
allows a small amount of current to be passed to
ground, there is a “0” condition.
/
I
1
0
1
I
;
I
2.48
0
8
II
j
I
7 )
Messages are made from a series of these “0” and
“1” signals. Messages are generally transmitted every ten or more milliseconds.
Each microprocessor on the bus is connected to
a communication chip. The communication chip
communicates to the CPU the messages transmitted
and received on the bus.
1-56
ENGINE <NON-TURBO> - Engine Electrical
ENGINE ELECTRICAL
N71AXOlM
GENERATOR
The generator is mounted on the right side of the
engine, and is secured to the cylinder block with
a pivot bracket and an adjustment bracket. The
pivot bracket is secured with three mounting bolts.
The case is grounded to the block, and three electrical connections are provided for charging system
operation.
STARTER MOTOR
The output voltage of the generator is regulated
by the power train control module.
NOTE
The Power supply cable is connected to the generator with a nut. The PCM voltage control circuit is
the smaller of the two-way connectors at the rear
of the generator.
N71hX02AA
The starter motor is located on the left side of the
engine. Locations to connect the battery positive
wires are provided at the starter solenoid.
IGNITION SYSTEM
This engine uses the distributorless electronic ignition system. The distributor-less electronic ignition
system is referred to as the Direct Ignition System.
Basic ignition timing is not adjustable. The powertrain control module (PCM) determines spark advance. The system’s three main components are
the coil pack, crankshaft position sensor, and camshaft position sensor.
N71 AXO3AA
The crankshaft position sensor and camshaft position sensor are hall effect devices. The camshaft
position sensor and crankshaft position sensor generate pulses that are inputs to the PCM. The PCM
determines crankshaft position from these sensors.
The PCM calculates injector sequence and ignition
timing from crankshaft position. For a description
of both sensors; refer to Camshaft Position Sensor
and Crankshaft Position Sensor in this section.
d
I-57
ENGINE <NON-TURBO> - Emission Control System
EMISSION CONTROL SYSTEM
L
GENERAL INFORMATION
There are three sources of vehicle exhaust emissions generated: the exhaust gases resulting from
combustion, the blow-by gases generated within
the crankcase, and the evaporative emissions generated from the fuel tank and other components
of the fuel line.
The emissions-control system, which is designed
to control the discharge of these exhaust gases
into the atmosphere, is composed of the following
system components.
(1) Exhaust emission control system
(2) Crankcase emission control system
(3) Evaporative emission control system
N71APOOAA
The exhaust emissions-control system reduces the
amount of carbon monoxide, hydro carbon and oxides of nitrogen in the exhaust gases by adding
the exhaust gas recirculation device and the catalytic
converter to fundamental improvements such as
an improvement of the combustion chamber and
the camshaft, as well as other improvements to
the engine such as feedback control of the air/fuel
ratio by the electronically controlled fuel injection
system.
The crankcase emissions-control system is a closed
type so that blow-by gases are not discharged out
to the atmosphere. The evaporative emissions-control system is the canister type; vapors that are
generated within the fuel tank are introduced into
the intake manifold and are cornbusted so that they
are not emitted out to the atmosphere.
Canister
Evaporative emission
purge solenoid
r
From fuel
pump
Positive
crankcase
ventilation
valve
+1
/I
‘3
Electric EGR
transducer solenoid1
_ - _ _ ,
I
i
,
-
Pulskd secondary
air injection valve
i
MIT only 1
- - -
Heated oxygen
sensor (rear)
AFU0063
1-58
ENGINE <NON-TURBO> - Emission Control Svstem
POSITIVE CRANKCASE VENTILATION SYSTEM
The positive crankcase ventilation system is a systern for preventing the escape of blow-by gases
from inside the crankcase into the atmosphere.
Fresh air is sent from the air cleaner into the crankcase through the breather hose to be mixed with
the blow-by gases inside the crankcase.
The blow-by gas inside the crankcase is drawn into
the intake manifold through the positive crankcase
ventilation valve.
N71APOlAA
The positive crankcase ventilation valve is designed
to lift the plunger according to the intake manifold
vacuum so as to regulate the flow of blow-by gas
properly.
In other words, the blow-by gas flow is regulated
during low load engine operation to maintain engine
stability, while the flow is increased during high load
operation to improve the ventilation performance.
Positive crankcase
ventilation valve
AFU0003
ENGINE <NON-TURBO> - Emission Control System
I-59
N71AP03AA
EVAPORATIVE EMISSION CONTROL SYSTEM
I
During the cold start warm-up period and the hot
The evaporative emission control system prevents
start
time delay, the PCM does not energize the
the
emission
of
fuel
tankvapors
into
the
atmosphere.
id
When fuel evaporates in the fuel tank, the vapors
pass through vent hoses or tubes to the charcoal
filled EVAP canister. The EVAP canister temporarily
holds the vapors. Through the EVAP purge solenoid,
the power-train control module (PCM) allows intake
manifold vacuum to draw vapors into the combustion
chambers during certain operating conditions. The
solenoid regulates vapor flow from the canister to
the engine.
OPERATION
The EVAP purge solenoid regulates the rate of vapor
flow from the EVAP canister to the throttle body.
The PCM operates the solenoid.
solenoid. When de-energized, no vapors are purged.
The PCM de-energizes the solenoid during open
loop operation.
The engine enters closed loop operation after it
reaches a specified temperature and the programmed time delay ends. During closed loop operation, the PCM energizes and de-energizes the
solenoid approximately 5 to 10 times per second,
depending upon operating conditions. The PCM varies the vapor flow rate by changing solenoid pulse
width. Pulse width is the amount of time the solenoid
de-energizes.
PULSED SECONDARY AIR INJECTION SYSTEM
Only manual transaxle vehicles have a pulsed secondary air injection system. The system injects fresh
air upstream of the catalytic convertor. It operates
for a short period after cold engine start-up until
the engine coolant temperature reaches approximately 5% (125°F)
The secondary air injection system contains:
l Pulsed secondary air injection valve
l Pulsed secondary air injection solenoid
l Connecting hoses and tubes
N71AP03AA
OPERATION
The PCM controls the ground path for the solenoid.
When the PCM grounds the solenoid, fresh air from
the air cleaner flows through the aspirator valve
to the catalytic convertor.
The aspirator valve prevents exhaust gases from
flowing into the fresh air stream, at the air cleaner
when the solenoid is grounded. If the aspirator valve
malfunctions, a popping noise could be heard during
cold start throttle stabs.
Pulsed secondary
Pulsed secondary
air injection solenoid
I
AFU0015
I
i d
I-60
ENGINE <NON-TURBO> - Emission Control System
EXHAUST GAS RECIRCULATION (EGR) SYSTEM
The exhaust gas recirculation (EGR) system lowers
the nitrogen oxide (NOx) emission level. When the
air/fuel mixture combustion temperature is high, a
large quantity of nitrogen oxides (NOx) is generated
in the combustion chamber. Therefore, this system
recirculates part of emission gas from the exhaust
port of the cylinder head to the combustion chamber
through the intake manifold to decrease the air/fuel
mixture combustion temperature, resulting in reduction of NOx.
N71APO4AA
The EGR flow rate is controlled by the EGR valve
so as not to decrease the driveability.
The EGR system contents:
l EGR tube
l EGR valve
l Electronic EGR transducer (EET)
l Connecting hoses
OPERATION
The electronic EGR transducer (EET) contains an
electrically operated solenoid and a back-pressure
transducer. The PCM operates the solenoid. The
PCM determines when to energize the solenoid.
Exhaust system back-pressure controls the transducer.
When the PCM energizes the solenoid, vacuum
does not reach the transducer. Vacuum flows to
the transducer when the PCM energizes the solenoid. When exhaust system back-pressure becomes
high enough, it fully closes bleed valve in the trans-
ducer. When the PCM energizes the solenoid and
back-pressure closes the transducer bleed valve,
vacuum flows through the transducer to operate
the EGR valve.
Energizing the solenoid, but not fully closing the
transducer bleed hole (because of low back-pressure), varies the strength of vacuum applied to the
EGR valve. Varying the strength of the vacuum
changes the amount of EGR supplied to the engine.
This provides the correct amount of exhaust gas
recirculation for different operating conditions.
1-61
ENGINE <NON-TURBO> - Mount
<I
,
i d
MOUNT
N?‘1AUOOAA
and top of the transaxle to effectively control engine
vibration.
The engine mounts use a principal axis inertia support system.
This support method on the principal axis inertia
is a structure that supports the top of the engine
FEATURES
l
l
l
The mount elements are arranged near the roll
axes of the engine and transaxle so that the
rolling moment can be limited and vibrations
can be reduced during idling.
The front and rear roll stopper brackets have
been relocated to the transaxle housing. As
a result, the bracket has been made shorter
and more rigid, which contributes to less vibration and noise.
Each insulator with internal hollows has outstanding vibration absorbing characteristics.
Dynamic
damper
l
l
Brackets cast from aluminum are used for the
engine mounts and transaxle mounts so as to
reduce booming noise.
Conventional arrangement of the engine and
transaxle has been reversed to mount the engine on R.H. side of the vehicle and the transaxle
on the L.H. side, resulting in reversal of the
positions of the respective mounts.
LI ,yu 1.z
H mount
b wossmemuer
L
Dynamic
Engine
damp&& Transaxle
Rear roll
stopper
Front
Centermember
Transaxle I
mount
Crossmember
stopper
01X0251
:
i
u
Centermember
01X0252
I-62
ENGINE <NON-TURBO> - Acceleration System
ACCELERATION SYSTEM
N77AWOQAA
ACCELERATOR PEDAL AND ACCELERATOR CABLE
The accelerator system is a cable and suspended
pedal combination.
The accelerator pedal side end of the cable is provided with a plastic bushing which effectively suppresses the noise that would result from direct contact of the cable and the accelerator arm.
Plastic
bushing
I
’
’
03X01 2’
ENGINE <NON-TURBO> - Acceleration System
AUTO-CRUISE CONTROL SYSTEM
By using the auto-cruise control, the driver can drive
at the speed he likes [in a range of approximately
56 to 137 km/h (35 to 65 mph)] without depressing
the accelerator pedal.
The actuator system consists of a reservoir assembly and a speed control assembly. The actuator
is operated by intake manifold vacuum.
I-63
N?‘lAWOlAA
The control unit is incorporated in the engine control
module. Transmission of information including vehicle speed and engine speed is accomplished in
the inside of the module.
Control switch
Intermediate link
L
Vehicle speed
sensor CM/T>
Park/Neutral position
A07X0038
IY
switch <A/T>
Engine control module
Reservoir assembly
Main switch y
Control switch
Auto-cruise control indicator
L
Main switch
03x0159
07x0038
I-64
ENGINE <TURBO> - General Information
ENGINE <TURBO>
GENERAL INFORMATION
N7lSAOlAA
This 4G63-DOHC engine with turbocharger is essentially the same as the one currently used for Eclipse.
MAJOR SPECIFICATIONS
Specifications
Items
Total displacement
Bore x Stroke
cm3 (cu.in.)
mm (in.)
1,997 (121.9)
85.0 (3.35) x 88.0 (3.46)
Compression ration
8.5
Combustion chamber
Pentroof type
Camshaft arrangement
DOHC
Valve timing
Intake
Open
Close
Exhaust
Open
Close
21’ BTDC
51’ ABDC
57” BBDC
15” ATDC
Fuel system
Electronic control multipoint fuel injection
Rocker.arm
Roller type
Lash adjuster
Equipped
d
ENGINE <TURBO> - Cooling System
COOLING SYSTEM
N710mmM
The cooling system is of the water-cooled, forced
l
i circulation type with the following features:
l
l
A small-size, high-performance radiator has
been adopted for better cooling efficiency and
less weight.
Reduction in size of the automatic transaxle
oil cooler had resulted in a lowered radiator
position, which has permitted the “slant nose”
design of the body.
l
The cooling fan control has been integrated
into the centralized control by the engine control
module for better cooling efficiency, better fuel
consumption, less noise, and better acceleration. (For detailed information on the controls,
refer to P.l-76.)
The system uses an “inlet coolant temperature
method” which is achieved by locating the thermostat at the coolant inlet side of the engine.
COOLANT FLOW
When engine is cold (Thermostat closed):
Cylinder head
Throttle body
1 Water inlet pipe k
Heater
Turbocharger
When engine is hot (Thermostat open):
Cylinder head
Throttle body
Water inlet pipe
Heater
Turbocharger
i
1-I 1
I
Thermostat case
(Thermostat)
1
1-66
ENGINE <TURBO> - Cooling System
SPECIFICATIONS
Specifications
Items
Water-cooled pressurized, forced circulation
with electrical fan
Cooling method
Radiator
Type
Thermostat
Water pump
Type
Drive method
Pressurized corrugated fin type
Wax pellet type with jiggle valve
Impeller of centrifugal type
Drive belt
CONSTRUCTION
Radiator fan assembly
An(Air cooled)
AIT oil cooler hose and pipe
I-67
ENGINE <TURBO> - Intake and Exhaust
INTAKE AND EXHAUST
i
i INTAKE MANIFOLD AND EXHAUST MANIFOLD
N71 BEOOM
The intake and exhaust manifolds are basically the
same as the once currently used.
EXHAUST PIPE
N71BEOlAA
The exhaust pipe consists of three parts: a front
pipe, a center pipe, and a main muffler with muffler
cutter. It is mounted on the body via rubber hangers
to minimize vibration transmission from the exhaust
system to the body. A large main muffler, sub muffler
and pre-muffler reduce exhaust noise.
CONSTRUCTION
<FWD>
Muffler cutter
Pre-muffler
/
Sub muffler
\
/
Main muffler
id
Heated oxygen sensor
05x0090
F&t pipe
Muffler cutter
<AWD>
/I
Flexible pipe
Center pipe
Front pipe
1-68
ENGINE <TURBO> - Fuel System
FUEL SYSTEM
N71 BFOOAA
The fuel system of the 4G63 engine consists of
electrcmagnetic fuel injectors, a fuel rail, a fuel pres-
sure regulator, an electric motor-driven fuel pump,
fuel filter and fuel tank.
FUEL FLOW DIAGRAM
4
b
Intake manifold
,i Fuel tankAI
/I\
II\
II\
I
I Fuel I
CONFIGURATION DIAGRAM
Fuel cut-off
Evaporative
emission
canister
Fuel rail
A03X0148
ENGINE <TURBO> - Fuel System
FUEL TANK
I-69
N716FOlAA
<FWD>
Features cAWD>
L The fuel tank is the same as the one of the 420A
l
engine. (Refer to P. 1-12.)
l
<AWD>
The fuel tank is made from a high density polyethylene (HDPE) material and blow-formed into an integral tank.
The tank has an internally installed pump and gauge
assembly and pipe and gauge assembly. In addition,
a fuel cut-off valve assembly is provided to prevent
the leakage of the fuel that would occur when the
vehicle rolls over.
l
l
l
Light weight - 20% weight reduction as
compared with a steel tank
Increased tank capacity due to improved space
efficiency
Highly rust-resistant
Use of a resin cap for better serviceability
Saddle-shaped tank striding across the exhaust
and power transmission systems for effective
use of the space under the body
I
I
Pump and gauge assembly
\
Saddle-shaped tank
Fuel tank
Protector
AO~XOOSI
A03X0076
I-70
ENGINE <TURBO> - Control System
CONTROL SYSTEM
N71 BKOOAA
GENERAL INFORMATION
LJ
Except the following improvements, the MFI system is essentially the same as the one used on the 1994
4G63 2.0-liter DOHC engine.
Major improvements
I
Remarks
ECU control of the generator is adopted.
Improves idling speed stability electric loads.
ECM control of radiator fan and condenser fan is
adopted.
Basically the same as the one introduced on the 1994
Galant.
Diagnostic system conforming to OBD-II is adopted.
Manifold Difference Pressure (MDP) sensor added to
detect changes in manifold vacuum.
I
I
This supports OBD-II EGR monitoring.
ENGINE <TURBO> - Control System
SYSTEM BLOCK DIAGRAM
N71 BKOOAB
Sensors
Engine control module (ECM)
Volume air flow sensor
I
--b Fuel injection control
1
t
I
I
--+I No. 3 injector
b
Engine coolant temperature sensor
+
Throttle position sensor
-1 No. 4 injector
Idle air control motor
-’ (stepper motor)
Idle air control
b
1
Ignition timing control
Engine and transaxle
total control
Closed throttle position switch
Crankshaft position sensor
b
Ignition coil
- (ignition power transistor)
Power supply control
Fuel , pump control
Multiport fuel injection
- (MFI) relay
Heated oxygen sensor (front, rear)
-+ Air conditioning compressor
clutch relay control
- Air conditioning compressor
clutch relay
Vehicle speed sensor (reed switch)
+
Camshaft position sensor
Air conditioning switch
Air conditioning pressure switch
Fuel pressure control
___*I Fuel pressure solenoid
Intake charge pressure control
---+ Turbocharger waste gate solenoid
Turbo meter control
& Turbo meter
b
b
I
I
Power steering pressure switch
b
Electric load switch
b
Park/Neutral position switch <AIT>
+
Ignition switch-IG
+ Ey;‘purge solenoid
-1 EVAP purge solenoid
Knock sensor
.----b EGR solenoid control
- EGR solenoid
Transaxle control module (TCM)
-W Volume air flow sensor
reset signal control
__+I Volume air flow sensor
Manifold differential pressure (MDP) ,
sensor
!(,&
-1 No. 2 injector
II-1
I
Barometric pressure sensor
i
‘ti
-1 No. 1 injector
I
I
Intake air temperature sensor
Actuators
Generator FR terminal
b
Ignition timing adjustment terminal
b
Ignition power transistor unit
b
I
,
Diagnostic control terminal
Power supply
Cooling fan control
Radiator fan motor relay and air
- conditioning condenser relay
Generator current control
-1 Generator G terminal
Oxygen sensor heater control
d Oxygen sensor heater
I
1x1 ;;IEd diagnostic (OBD)
Check Engine/Malfunction
- injector lamp
-1 Diagnostic output terminal
I
1-72
ENGINE <TURBO> - Control System
SYSTEM DIAGRAM
injector
r ala2 Evaporative
emission purge solenoid
+l Heated oxygen sensor (Front)
*2 Volume air flow sensor
*3 Intake air temperature sensor
~4 Throttle position sensor
+5 Closed throttle position switch
6 Camshaft position sensor
217 Crankshaft position sensor
*8 Barometric pressure sensor
Sl Engine coolant temperature sensor
+lO Knock sensor
*II Heated oxygen sensor (Rear)
~12 Manifold differential pressure sensor
0 Power supply
l Vehicle speed sensor
l A/C switch
0 Park/Neutral position switch cm>
0 Power steering pressure switch
0 Ignition switch-ST
a3
a4
a5
a6
a7
L
l
l
l
l
l
Idle air control motor
EGR solenoid
Ignition coil, ignition power transistor
Fuel pressure solenoid
Turbocharger waste gate solenoid
Fuel pump relay
Multiport fuel injection (MFI) relay
Air conditioning compressor clutch relay
Check engine/Malfunction indicator lamp
Diagnostic output
Purge control valve
I
Idle air control motor
I
;~;~ttJ3p~;i$msyor \1
hFast “le air valve
,
Evaporative
emission
canister
my
I
-
Intake air temperature sensor
Volume air flow
\
Evaporative
emission
ww
solenoid
A9 Engine coolant temperature sensor
*I 0 Knock sensor
Heated <&en
sensor (rear)
TWC
irankshaft position sensor
/
Heated oxygen
sensor (front)
Camshaft position sensor
6FU2068
I-73
ENGINE <TURBO> - Control System
SENSORS
NllBKQ1AA
GENERATOR FR TERMINAL
ii
x Trio diode
L---_-------------------------------
Voltage regulator
L
Generator
I
1.
Engine control module
1 FU0887
Terminal FR of the generator inputs the ON/OFF
state of the generator field coil to the engine control
module. In response to this signal, the engine control
module senses the generator output current, and
drives the ISC servo according to the output current
(electric load). This prevents a change in idling
speed that may otherwise be caused by the electric
load.
* The generator generates power when the power
transistor in the voltage regulator is caused to
be ON to supply a current (field current) to the
field coil. When the power transistor is caused
to be OFF, the power generated by the generator
rapidly decreases. The size of the generator
output current, therefore, depends on the ratio
that the power transistor is ON (ON duty). The
voltage at terminal FR is low when the power
transistor is ON, and high when the power transistor is OFF. Therefore, the ON duty of the
power transistor ini the voltage regulator or the
generator output current can be sensed by calculating the ratio that the voltage at terminal
FR is low.
When the generator output voltage reaches the
regulated voltage (approx. 14.4V), the voltage
regulator switches the power transistor from
ON to OFF. When ithe output voltage falls below
the regulated voltage, the voltage regulator
switches the power transistor from OFF to ON.
In this manner, the generator output voltage
is maintained constant.
1-74
ENGINE <TURBO> - Control System
ACTUATORS AND CONTROL
N7l BK2OAA
FAN MOTOR RELAY (RADIATOR AIR CONDITIONING CONDENSER)
This relay controls the radiator fan and air conditioning condeser fan based on signals from the engine
control module.
GENERATOR G TERMINAL
N71 BK2SAA
The engine control module limits the generator output current by duty control of the continuity between
generator terminal G and the ground.
--
I+ Trio diode
$-/$-I+ / 1: - - - - - - - - &---------
1
- ’ ’
- a ’ - ’
=
II-+,
c o i l
u.
x f
I--’ ‘d
\- -------_ ---_
L
---_----_-------------II
-----JI
I
I
I I
Field
coil
Voltage regulator
Generator
\
111
-_I
\
S terminal voltage: 14.4 V or more
3.
Engine control module
lFUO889
When there is no continuity between generator terminal G and the ground (let this be 100% duty),
transistor No. 1 (Trl) stays in the always ON state.
When the voltage at generator terminal S reaches
14.4 V, the power transistor is forced to OFF to
adjust the generator output voltage to 14.4 V. This
operation is the same as that of the conventional
generator.
ENGINE <TURBO> - Control System
I-75
Voltage regulator
Generator
S terminal voltage: 12.3 V or more
Engine control module
1 FUO890
When generator terminal G is short-circuited to the
ground (let this be 0% duty), the Trt stays in the
always OFF state. In this case, when the voltage
at generator terminal S reaches 12.3 V, the power
transistor is forced to OFF to adjust the output voltage to 12.3 V. Since the voltage is lower than
charged battery voltage, practically no current flows
from the generator.
I-76
ENGINE <TURBO> - Control Svstem
COOLING FAN CONTROL
WI BK60AA
This sytem is similar to the one introduced on the
1994 Galant.
Two transistors inside the engine control module
control the radiator fan and the air conditioning condenser fan motor according to the engine coolant
temperature and the vehicle speed. When the air
conditioning switch and air conditioning pressure
switch are ON, the fan motor rotate at high speed
regardless of the engine coolant temperature and
vehicle speed.
l
When the engine coolant temperature is faulty,
the fan motors (radiator and condenser) are
driven at high speed.
The engine control module also controls the
fan suitable to the various driving conditions
- cruising, accelerating and decelerating, etc.
Ignition switch
Battery
I
Radiator
fan motor
relay
relay
relay
1
L
I
,
Iesistor
F
Radiator
fan motor
/\
0
(Low speed
transistor)
Engine coolant temperatUre Sensor
.
.
.
.
.
(High speed
transistor)
Throttle position sensor
Closed throttle position switch
Crankshaft position sensor
Vehicle speed sensor
Air conditioning switch
.
.
Air conditioning pressure switch
ECM
6FUO356
1-77
ENGINE <TURBO> - Control System
GENERATOR CURRENT CONTROL
N71EiK61AA
During the period the engine is in operation, the
engine
ECM achieves duty control of the continuity
L
between generator terminal G and the ground. (In
this case, the OFF duty of terminal G is controlled
to equal the ON duty of the power transistor in the
voltage regulator.)
Operation of the headlights causes a sudden increase in current consumption, but the engine ECM
suppresses a sudden increase in the generator output current, thereby preventing the sudden increases in electric load from abruptly reducing the
engine speed while the engine is running at idle.
(During the period before the generator generates
enough power, the battery current is additionally
supplied to the headlights, etc.) During the period
of approximately 0.5 seconds after the power steering pressure switch has been set to ON and also
during the period of approximately 0.5 seconds after
the selector lever has been changed over from the
N range to the D range, the engine ECM controls
generator terminal G in terms of 30% OFF duty
to suppress generation of power by the generator.
L
Under the following conditions, however, this control
is not achieved.
l High engine speed
l Engine coolant ternperature 50°C or lower
l Air conditioner swiitch ON
l
More than 0.5 seconds after the power steering
pressure switch has been set to ON
o More than 0.5 seconds after the selector lever
has been changed over from “N” to “D”
l
Three seconds or less after the engine has been
started
When a high signal at generator terminal FR lasting
for more than 20 seconds is input to the engine
ECM during operation of the engine, the engine
ECM determines that the generator terminal FR
circuit has been open-ciircuited and stores diagnostic
trouble code (No. P1500) in memory, and places
generator terminal G iin the always OFF state.
ECM
Engine coolant temperature sensor
Generator G terminal
Crankshaft position sensor
Air conditioning switch
D
D
Power steering pressure switch
D
I
Generator FR terminal
-I
llrEl
FR G
Ignition switch-ST
D
Generator
1 FUO907
id
1-78
ENGINE <TURBO> - Control System
DIAGNOSTIC SYSTEM
DESCRIPTION OF OBD-II SYSTEM
N716K7OAA
The engine control module (ECM) monitors its input/
output signals. Some signals are monitored all the
time, and others only under specified conditions.
When an irregularity has continued for a specified
time from when the irregular signal is initially monitored, the engine control module judges that a fault
has occurred.
After detecting a fault, the engine control module
stores its diagnostic trouble code in memory when
it re-detects the same fault in an operation following
the next engine startup.
In regard to the items marked *, however, the engine
control module stores the diagnostic trouble code
of any of them the first time the module detects
it.
There are 35 diagnostic items, and the diagnostic
results can be read out with a scan tool.
Moreover, since memorization of the diagnostic
trouble codes is backed up directly by the battery,
the diagnostic results are memorized even if the
ignition key is turned off. The diagnostic trouble
codes will, however, be erased when the battery
terminal or the engine control module connector
is disconnected.
In addition, the diagnostic trouble code can be also
be erased by turning the ignition switch to ON and
sending the diagnostic trouble code erase signal
from the scan tool to the engine control module.
NOTE
If the sensor connector is disconnected with the
ignition switch turned on, the diagnostic trouble code
is memorized. In this case, send the diagnostic
trouble code erase signal from the scan tool to the
engine control module and the diagnostic memory
will be erased.
The 35 diagnostic items are provided as follows,
and if plural items are activated, they are all indicated
sequentially from the smallest code number.
NOTE
The diagnostic trouble code of ignition timing adjustment signal is outputted when terminal for ignition
timing adjustment is grounded. Therefore, it is not
abnormal that the code is outputted even when terminal for ignition timing adjustment is grounded for
ignition timing adjustment.
The engine control module stores in memory not
only the diagnostic trouble code of a fault but also
the intra-module RAM data on the engine operating
conditions that existed when it detected the fault.
(The data is called freeze frame data.)
The data shows the engine operating conditions
that existed when the engine control module detected the fault as well as those that existed when
the module did not detect any fault.
However, when the engine control module detects
a misfiring or fuel trim malfunction, it clears the
existing data and stores the new data.
The data can be read by a scan tool and can be
conveniently used in performing fault repetition tests
for troubleshooting.
The data items to be stored in memory are shown
below.
Data item
Unit
Engine coolant temperature
“C
Engine speed
r/min.
Vehicle speed
km/h
Long term fuel trim
%
Short term fuel trim
%
Fuel control state
0 Open loop
l Closed loop
l Open loop - drive condition
l Open loop - DTC set
l Closed loop - 02 (rear) trouble
Calculated load value
%
Diagnostic trouble code associated with the data in
memory
-
ii
d
ENGINE <TURBO> - Control System
l-79
Items indicated by Check Engine/Malfunction indicator lamp
2. After lighting the Engine Check/Malfunction indiNOTE
1.
After
detecting
a
fault,
the
engine
control
module
cator lamp, the ECfvI turns it off when the ECM
L
(ECM) lights the Check Engine/Malfunction indidoes not detect the same fault in three consecucator lamp when it re-detects the same fault
tive operations (provided that the operations
in an operation following the next engine start.
are inclusive of power train component monitor
In regard to the items marked *, however, the
and that if the fault is a misfiring or fuel trim
ECM lights the Check Engine/Malfunction indimalfunction, it occurs at the second and subsecator lamp the first time the ECM detects any
quent times under much the same operating
of them.
conditions as at the first time), each following
an engine start.
L/
Engine control module (ECM) malfunction
Injector circuit malfunction ‘- cylinder 3
Volume air flow circuit malfunction
Injector circuit malfunction .- cylinder 4
Barometric pressure circuit malfunction
Random misfire detected*
Intake air temperature circuit malfunction
Cylinder 1 misfire detected*
Engine coolant temperature circuit malfunction
Cylinder 2 misfire detected*
Throttle position circuit malfunction
Cylinder 3 misfire detected*
Excessive time to enter closed loop fuel control*
Cylinder 4 misfire detected*
O2 sensor circuit malfunction (bank 1 sensor 1)
Crankshaft position sensor circuit malfunction
O2 sensor heater circuit malfunction (bank 1 sensor 1)
Camshaft position sensor circuit malfunction
O2 sensor circuit malfunction (bank 1 sensor 2)
Exhaust gas recirculation fllow malfunction
02 sensor heater circuit malfunction (bank 1 sensor2)
Catalytic efficiency below tlhreshold (bank 1)
Fuel trim malfunction (bank 1)
Evaporative emission control system malfunction
Injector circuit malfunction - cylinder 1
Idle control system malfunction
injector circuit malfunction - cylinder 2
Transmission*
Caution
When the Check Engine/Malfunction indicator
lamp lights because of a fault in the ECM, no
diagnostic trouble code can be read because
of disruption of communications between the
scan tool and ECM.
ENGINE <TURBO> - Control System
DIAGNOSTIC TROUBLE CODES
The diagnostic items are shown in the following table.
N710K71M
‘d
Diagnostic trouble code No.
Diagnostic items
General scan tool
mode
Scan tool mode
PO1 00
PO100
Volume air flow circuit malfunction
PO105
PO105
Barometric pressure circuit malfunction
PO110
PO110
Intake air temperature circuit malfunction
PO115
PO115
Engine coolant temperature circuit malfunction
PO1 20
PO120
Throttle position circuit malfunction
PO1 25
-
Excessive time to enter closed loop fuel control*
PO1 30
-
02 sensor circuit malfunction (bank 1 sensor 1)
PO1 35
-
02 sensor heater circuit malfunction (bank 1 sensor 1)
PO136
02 sensor circuit malfunction (bank 1 sensor 2)
PO141
02 sensor heater circuit malfunction (bank 1 sensor 2)
PO1 70
-
PO201
PO201
Injector circuit malfunction - Cylinder 1
PO202
PO202
Injector circuit malfunction - Cylinder 2
PO203
PO203
Injector circuit malfunction - Cylinder 3
PO204
PO204
Injector circuit malfunction - Cylinder 4
PO300
PO301
Fuel trim malfunction (bank 1)
Random misfire detected*
-
Cylinder 1 misfire detected*
PO302
Cylinder 2 misfire detected*
PO303
Cylinder 3 misfire detected*
PO304
Cylinder 4 misfire detected*
PO325
PO325
Knock sensor 1 circuit malfunction
PO335
PO335
Crankshaft position sensor circuit malfunction
PO340
PO340
Camshaft position sensor circuit malfunction
PO400
- 1
-
Evaporative emission control system malfunction
Evaporative emission control system purge control valve circuit
malfunction
PO443
PO500
Exhaust gas recirculation flow malfunction
Catalyst efficiency below threshold (bank 1)
PO420
PO440
LJ
PO500
Vehicle speed sensor malfunction
NOTE:
*: ECM stores the DTC in memory at the first detection of the malfunction.
d
ENGINE <TURBO> - Control Svstem
Diagnostic trouble code No.
/
ii
Diagnostic items
General scan tool
mode
Scan tool mode
PO505
-
Idle control system malfunction
A cable from transmission control module for transmission of
torque reduction signal
PO600
PO700
Transmission*
P1300
Ignition timing adjustment circuit malfunction
P1300
P1400
Manifold Differential Pressure (MDP) sensor circuit malfunction
1Generator FR terminal circuit malfunction
NOTE:
*: ECM stores the DTC in memory at the first detection of the malfunction.
SERVICE DATA REFERENCE TABLE
N13AEWAC
There are two modes for reading service data, general scan tool mode and scan tool (MUT-II) mode.
The service data readable in each mode is as follows.
Inspection item
Item No.
L
11
Heated oxygen sensor (Front)
X
X
12
Volume air flow sensor
X
X
13
Intake air temperature sensor
X
X
14
Throttle position sensor
X
X
16
Power supply voltage
X
18
Cranking signal (Ignition switch-ST)
X
21
Engine coolant temperature sensor
X
X
22
Crankshaft position sensor
X
X
Vehicle speed sensor
X
2 4
L
25
Barometric pressure sensor
X
26
Closed throttle position switch
X
27
Power steering pressure switch
X
28
A/C switch
X
29
Park/Neutral position switch <A/T>
X
33
Electrical load switch
X
41
Injectors
X
44
Ignition coils and ignition power transistor
X
45
Idle air control (stepper) position
X
49
A/C compressor clutch relay
X
ENGINE <TURBO> - Control System
Item No.
Inspection item
General scan
tool mode
Scan tool
mode
X
59
Heated oxygen sensor (Rear)
X
81
Long term fuel trim - Bank 1
X
82
Short term fuel trim - Bank 1
X
87
Calculated load value
X
88
Fuel control state
X
-
95
Manifold differential pressure sensor
X
X
I
ACTUATOR TEST REFERENCE TABLE
Item No.
Inspection item
01
N71BK73AA
Drive contents
Cut fuel to No. 1 injector
02
Cut fuel to No. 2 injector
- Injectors
03
Cut fuel to No. 3 injector
04
Cut fuel to No. 4 injector
07
Fuel pump
FueLpump operates and fuel is recirculated.
08
Evaporative emission purge solenoid
Solenoid valve turns from OFF to ON.
09
Fuel pressure solenoid
Solenoid valve turns from OFF to ON.
10
EGR solenoid
Solenoid valve turns from OFF to ON.
12
Turbocharger waste gate solenoid
Solenoid valve turns from OFF to ON.
17
Basic ignition timing
Set to ignition timing adjustment mode
20
Radiator fan (Hi)
Condenser fan (Hi)
Drive the fan motors (radiator and condenser).
21
Radiator fan (Hi)
Condenser fan (Low)
Drive the fan motors (radiator and condenser).
I-83
ENGINE <TURBO> - Control Svstem
MAIN MONITORS
N710K40AA
CATALYST MONITORING
L (1) Monitoring method
l
Conversion efficiency is monitored on the
FTP (Federal Test Procedure) basis.
l
Calculate a frequency ratio (RF) of output
signals, oscillating from lean to rich or vice
versa, from the front and rear 02 sensors
according to the following equation.
(2) Malfunction criteria
If RF becomes larger than the predetermined
value, a catalyst malfunction is indicated.
Output signal frequency of rear O2 sensor
RF =
Output signal frequency of front O2 sensor
MISFIRE MONITORING
(1) Monitoring method
Fluctuation of crankshaft speed is monitored.
(2) Malfunction criteria
If the fluctuation of the crankshaft rotation is
larger than the predetermined value, an engine
misfire is indicated.
But the determination of misfire is masked under
some conditions like rough-road driving to avoid
false diagnostic trouble codes.
(3) System figure
UL-
Damper pul
Crank sprocket
6FU2103
I-84
ENGINE <TURBO> - Control System
OXYGEN SENSOR MONITORING
(1) Monitoring method
Detect the response time of front 02 sensor
output signals when air-fuel ratio is changed
intentionally from lean to rich or rich to lean
under the hot steady state condition.
EGR SYSTEM MONITORING
(1) Monitoring method
Operate EGR valve intentionally in the area
of deceleration and detect the change of the
EGR gas flow signal.
FUEL SYSTEM MONITORING
(1) Monitoring method
A/F feedback compensation value is monil
tored.
(2) Malfunction criteria
If the response time value is larger than the
predetermined value, an 02 sensor malfunction
is indicated.
(2) Malfunction criteria
If the change of the EGR gas flow signal is
smaller than the predetermined value, an EGR
system malfunction is indicated.
(2) Malfunction criteria
If the A/F feedback compensation value is larger
than the predetermined value, an fuel system
malfunction is indicated.
OTHER SYSTEM MONITORS
(1) Refer to Group, 13 - Troubleshooting in the Service manual.
ENGINE <TURBO> - Engine Electrical / Emission Control System
ENGINE ELECTRICAL
I-85
N71BXOlM
The generator, starter motor and ignition system
iiare basically the same as the current ones.
EMISSION CONTROL SYSTEM
GENERAL INFORMATION
l
N71 EPOOAA
The manifold pressure sensor is adopted to
monitor the EGR system.
l
Other features of the system are essentially
the same as the ones of the current system.
Purge control valve
Evaporative
emission
canister
Air cleaner
I
B emission
ioid
Air inlet I$
Turbocharger
gate solenoid
w L-2
Heated oxygen
sensor (rear)
l-WC
/
Heated oxygen
sensor (front)
6FU2101
id
1-86
ENGINE <TURBO> - Emission Control System
EXHAUST GAS RECIRCULATION (EGR) SYSTEM
The exhaust gas recirculation (EGR) system lowers
the nitrogen oxide (NOx) emission level. When the
air/fuel mixture combustion temperature is high, a
large quantity of nitrogen oxides (NOx) is generated
in the combustion chamber. Therefore, this system
recirculates part of emission gas from the exhaust
port of the cylinder head to the combustion chamber
through the intake manifold to decrease the air/fuel
mixture combustion temperature, resulting in reduction of NOx.
OPERATION
When the engine coolant temperature is low, when
the engine is at idle or when a wide open throttle
operation is performed, the EGR valve is kept
closed, achieving no EGR.
In normal vehicle operation performed after warming
up of the engine, the EGR valve is opened to carry
out EGR.
N71BKMAA
The EGR flow rate is controlled by the EGR valve
so as not to decrease the driveability.
The EGR system contents:
l EGR valve
l EGR solenoid
l Connecting hoses
The engine control module checks the operation
of the EGR system and, if a trouble is detected,
lights the Check Engine/Malfunction indicator lamp
to warn the driver of the trouble.
solenoid
Engine cOntrOl
module
Volume air flow
Is e n s o r
6EM0464
I-87
ENGINE <TURBO> - Mount
/ MOUNT
The mounts are basically the same as used on
L 420A engine except that the arrangement of the
WI BUOQAA
engine and transaxle is reversed from that on 420A
engine.
Crossmember
FRONT
Centermember
Engine
mount
Dynamic
damper
Dynamic
damper
L
stopper
Engine
mount
/
/
Centermember
01X0250
Transaxle
mount
I
Crosimember
01X0249
1-88
ENGINE <TURBO> - Acceleration System
ACCELERATION SYSTEM
N71 BWOOAA
ACCELERATOR PEDAL AND ACCELERATOR CABLE
The accelerator pedal and accelerator cable are
the same as used on 420A engine. (Refer to P.l-62)
AUTO-CRUISE CONTROL SYSTEM
N71BWOlM
By using the auto-cruise control, the driver can drive
at the speed he likes [in a range of approximately
40 to 200 km/h (25 to 124 mph)] without depressing
the accelerator pedal.
CONTROL SYSTEM
The throttle position sensor signal is used in addition
to the conventional vehicle speed sensor as the
input signal to bring about the following improvements in control.
(1) The amount of actuator control varies according
to vehicle speed and throttle opening not only
for an expansion of conformity to differences
in engine output but also for better response.
(2) On A/T models, overdrive is released (4-speed
+ 3-speed) when climbing inclines and the system judges the return time by vehicle speed
and throttle opening to prevent hunting between
3-speed and 4-speed.
ACTUATOR SYSTEM
The actuator system consists of the motor-driven
vacuum pump, actuator and intermediate link. The
vacuum pump and actuator are in different locations.
System Block Diagram
<Control system>
I
I
Main switch
II
1
I
I
Throttle position
sensor
Vehicle speed
sensor
II
OD switch
II
------r - - Cancel
- - system :
I
I I
I I
Control switch
l SET switch
l RESUME
switch
l CANCEL
switch
Closed throttle
position switch
I
I
I
I
I
1
1
1
,
Stop light switch
i
I
I
Park/
Neutral
position
switch
<A!T>
Clutch
pedal
position
switch
<M/T>
I
1
I
1
I
L---------.---J
1
1
1
1
Control unit
-
-
-
- -
-
-
-
-
-
-
-
-
-
<Actuator system>
I
Vacuum pump assembly
Diagnostic output
terminal
1 TmTr;Ele c o n t r o l j
Auto-cruise control indicator light
(in combination meter)
I
ENGINE <TURBO> - Acceleration System
/
Components and Functions
L
fi--,rrl SM.,:+,&
~“,,ll”l 2wvllC.l I
\
Li
A07X0037
sensor
sensor
Auto-cruise control indicator light
L
[StCUAIPIl
l3EEl
lIIlIz3
(-ii$gc]
n
f-Y*
03x0159
I-90
-- _
- ______- - <TURBO>
ENGlNE
- Acceleration Svstem
, ------
Components
Function
Vehicle speed sensor
It generates a pulse signal proportional to vehicle speed (revolving
speed of the transaxle output gear).
Control unit
It receives signals from the vehicle speed sensor and each switch,
and uses a micro-computer to control all functions of the auto-cruise
control.
Actuator system
It drives the motor-driven vacuum pump according to signals from the
control unit and adjusts the throttle valve via the intermediate link to
the set opening.
Main switch
Switch for cruise control power.
Control switch
SET (COAST) switch
J
Vehicle speed is set with the SET (COAST) switch and RESUME (ACCEL) switch.
RESUME (ACCEL)
switch
Cancel system
CANCEL switch
It is used to cancel the setting of the cruise speed
Stop light switch
It outputs a signal to cancel cruise control
Clutch pedal position
switch <M/T>
Park/Neutral position
switch <A/T>
Throttle position sensor
It generates an analog voltage proportional to throttle opening.
Idle switch
Based on the valve of throttle position sensor voltage when the idle
switch goes from ON to OFF, it varies throttle position sensor voltage
to compensate for fluctuations.
Diagnostic output terminal
If the scan tool or a voltmeter is connected, diagnostic test mode and
input check codes from the control unit can be read.
Auto-cruise control indicator light
It is in the combination meter and lights up when the auto-cruise control functioning.
J
I-91
ENGINE <TURBO> - Acceleration System
AUTO-CRUISE CONTROL UNIT
The control unit is made up of the input interface
circuit, micro-computer, constant voltage power supply circuit, micro-computer monitor circuit and output
interface circuit. Signals from the vehicle speed sensor, throttle position sensor and each switch are
input into the control unit. It processes them accord-
ing to the program in the micro-computer memory
and outputs control signals to the actuator. It also
outputs system diagnostic test code results and
conditions of input signals to the diagnostic output
terminal.
Control Logic and Block Diagram
Auto-cruise control unit
r-
-
I
-
I
I
Battery
4t
IGl IG2
I
I
Constant
-voltage power
supply circuit
- (battery back-up)
I
+
Micro- computer
- monitor
circuit
I
I
Output interface
circuit
---1
I
I
I-1;
E-------l
I Stop light I,
switch
I
I
I
1
I
,
4
Cancel
* signal input -+
circuit
Park/Neutral
’
position
switch
-AT> ’
I I
c
pi%--
III ’
I’
Cancel system
I
--I
I
I
I,
Motor-driven
vacuum
pump
assembly
i
A..ocruise
control indicator
indicator
light
m
”
OD switch
(NC)
T
NOTE
NC: Normally closed
I
I
Diagnostic
-O ZXal
f
Transaxle
control module
Q3EQQQ0
2-1
POWER TRAlN
CONTENTS
AUTOMATIC TRANSAXLE . . . . . . . . . . . . . . . . . 35
Construction and Function <F4ACl>
. . . . . . . . . -40
Electronic Control System . . . . . . . . . . . . . . . . . . 73
Hydraulic Control System . . . . . . . . . . . . . . . . . . 53
Transaxle.. . . . . . . . . . . . . . . . . . . . . . . . . . . . . . . . 40
Sectional View . . . . . . . . . . . . . . . . . . . . . . . . . . . . . . .37
Specifications . . . . . . . . . . . . . . . . . . . . . . . . . . . . . . . . 35
Transaxle Control . . . . . . . . . . . . . . . . . . . . . . . . . . . . 99
id
CLUTCH . . . . . . . . . . . . . . . . . . . . . . . . . . . . . . . . . . . 2
Clutch Control . . . . . . . . . . . . . . . . . . . . . . . . . . . . . . . . 3
Inter-lock Switch . . . . . . . . . . . . . . . . . . . . . . . . . . . . . . 4
Specifications . . . . . . . . . . . . . . . . . . . . . . . . . . . . . . . . . 2
FRONT AXLE . . . . . . . . . . . . . . . . . . . . . . . . . . . . 104
Features . . . . . . . . . . . . . . . . . . . . . . . . . . . . . . . . . . . 104
Specifications . . . . . . . . . . . . . . . . . . . . . . . . . . . . . . . 104
N72ZAOOAA
MANUAL TRANSAXLE . . . . . . . . . . . . . . . . . . . . . 5
Construction and Operation cF5MCl> . . . . . . . . . . 9
Power Flow . . . . . . . . . . . . . . . . . . . . . . . . . . . . . . 10
Power Train Component . . . . . . . . . . . . . . . . . . . 18
Shift System . . . . . . . . . . . . . . . . . . . . . . . . . . . . . . 31
Synchronizer . . . . . . . . . . . . . . . . . . . . . . . . . . . . . . 29
Transaxle Case . . . . . . . . . . . . . . . . . . . . . . . . . . . . 9
Sectional View . . . . . . . . . . . . . . . . . . . . . . . . . . . . . . . . 8
Specifications . . . . . . . . . . . . . . . . . . . . . . . . . . . . . . . . . 5
Transaxle Control . . . . . . . . . . . . . . . . . . . . . . . . . . . . 34
PROPELLER SHAFT . . . . . . . . . . . . . . . . . . . . . 103
Construction Diagram . . . . . . . . . . . . . . . . . . . . . . . 103
Specifications . . . . . . . . . . . . . . . . . . . . . . . . . . . . . . . 103
REAR AXLE <AWD> . . . . . . . . . . . . . . . . . . . . . 106
Differential . . . . . . . . . . . . . . . . . . . . . . . . . . . . . . . . . . 107
Differential Support . . . . . . . . . . . . . . . . . . . . . . . . . . 108
Features . . . . . . . . . . . . . . . . . . . . . . . . . . . . . . . . . ..lO 8
REAR AXLE <FWD> . . . . . . . . . . . . . . . . . . . . . 105
Features ................................... 10 5
POWER TRAIN - Clutch
CLUTCH
N72ZBWM
The clutch is a dry single-disc, diaphragm type;
hydraulic pressure is used for clutch control,
The automatic centering type release bearing has ‘d
been adopted.
SPECIFICATIONS
Items
Non-turbo
Clutch operating method
Hydraulic type
Clutch disc type
Clutch disc facing diameter
O.D. x I.D.
Single dry disc type
mm (in.)
Clutch cover type
Clutch cover setting load
Clutch release cylinder
I.D.
Turbo
228 x 150 (9.0 x 5.9)
225 x 150 (8.9 x 5.9)
Diaphragm spring strap drive type
N (Ibs.)
4,400 (989)
6,174 (1,388)
mm (in.)
22.23 (7/8)
20.64 (13/16)
2-3
POWER TRAIN - Clutch
CLUTCH CONTROL
N722001AA
A hydraulic system has been adopted for the control
ii of the clutch. It offers the following features.
0
l
<Turbo>
A clutch fluid chamber and a compression type
turnover spring have been adopted for better
pedal feeling and less foot pressure.
In order to prevent sudden movement of the
vehicle when the engine is started, an inter-lock
l
switch has been equipped (within the pedal support bracket)
<Turbo>
The clutch switch for the auto-cruise control
system has been equipped at the pedal support
bracket.
<Non-turbo>
Clutch release
,j
L
<Turbo>
Clutch hose
\.
Clutch release
cylwwer
Clutch pipe
Pedal support
bracket
Clutch fluid chamber
08X0036
I master
08X0037
2-4
Inter-lock
POWER TRAIN - Clutch
INTER-LOCK SWITCH
8WitCh
N72ZB02AA
The inter-lock switch is a switch provided in order to prevent
sudden movement of the vehicle when the engine is started. d
Thus, the starter motor will not be switched ON unless the
clutch pedal is depressed, thereby switching OFF the inter-lock
switch.
NOTE
The inter-lock switch is normally ON; it is switched OFF when
the clutch pedal is depressed.
IGNITION SWITCH (ST)
I
L
---------
STARTER
RELAY
INTER-LOCK
SWITCH
STARTER MOTOR
0%X0045
If the Clutch Pedal is Not Depressed:
Because the inter-lock switch is switched ON when
the ignition switch is switched to the START position,
electricity flows from the coil of the starter relay,
through the inter-lock switch, to ground. As a result,
the contacts of the starter relay separate, switching
it OFF, and the starter motor is therefore not activated.
When the Clutch Pedal is Depressed:
The inter-lock switch is switched OFF when the
clutch pedal is depressed. If the ignition switch is
then switched to the START position at this time,
the flow of electricity to the coil of the starter relay
will be interrupted, the contacts of the starter relay
will close, switching it ON, and the starter motor
will be activated.
d
POWER TRAIN - Manual Transaxle
MANUAL TRANSAXLE
N72ZCOOAA
b Three types of manual transaxle, F5MC1, F5M33,
and W5M33 have been provided.
F5MCl is a newly developed small and light-weight
transaxle produced by Chrysler Corporation, while
F5M33 and W5M33 transaxles are essentially the
same as the conventional ones.
SPECIFICATIONS
Drive type
Transmission model
Engine model
Transmission type
Gear ratio (number of teeth)
1st
2nd
3rd
4th
5th
Reverse
L
Reduction ratio (number of teeth)
Primary
Secondary
Transfer
Reverse brake
Speedometer gear ratio
FWD
AWD
F5MCl-1 -QQAF
F5M33-2-SPZT
W5M33-2-NPZT
Non-turbo
Turbo
Turbo
5speed,
constant mesh
5-speed,
constant mesh
5-speed,
constant mesh
3.538 (46/l 3)
2.125 (34/16)
1.360 (34/25)
1.029 (35/34)
0.810 (30/37)
3.417 (41/12)
3.090 (34/l 1)
1.833 (33/l 8)
1.217 (28/23)
0.888 (24/27)
0.741 (23/31)
3.166 (38/l 2)
3.083 (37/l 2)
1.684 (32/l 9)
1.115 (29/26)
0.833 (25/30)
0.666 (22/33)
3.166 (38/l 2)
3.944 (71/l 8)
1.208 (29/24)
3.437 (55/l 6)
1.275 (37/29)
3.866 (58/l 5)
1.090 (24/22)
Provided
Provided
Provided
28135
29136
29136
2-6
POWER TRAIN - Manual Transaxle
SECTIONAL VIEW
F5MCl <FWD - 5M/T>
4 5 6
1. Reverse brake
2. 5th synchronizer
3. 5th speed gear
4. 4th speed gear
5. 4th synchronizer
6. 3rd synchronizer
7. 3rd speed gear
8. Reverse idler gear
9.
10.
11.
12.
13.
14.
15.
Differential
1 st speed gear
1 st synchronizer
2nd synchronizer
2nd speed gear
3rd/4th gear
5th gear
POWER TRAIN - Manual Transaxle
2-7
F5M33 <FWD - 5M/T>
6
’ 18
- 19
1. Clutch housing
2. Input shaft
3. Bearing retainer
4. 1 st speed gear
5. 1 stPnd synchronizer
6. 2nd speed gear
7. 3rd speed gear
8. 3rd-4th synchronizer
9. 4th speed gear
10. 5th speed gear
11. 5th synchronizer
12. Reverse brake
13. Rear cover
14. 5th intermediate gear
15. Intermediate gear
16. Output shaft
17. Transaxle case
18. Differential drive gear
19. Differential
20. Drain plug
TFMOlll
2-8
POWER TRAIN - Manual Transaxle
W5M33 <AWD - 5M/T>
8
16
v
J
20
0
1.
2.
3.
4.
5.
6.
7.
8.
9.
10.
11.
12.
13.
14.
15.
16.
17.
18.
19.
20.
21.
22.
Clutch housing
Input shaft
Bearing retainer
1st speed gear
1 stPnd synchronizer
2nd speed gear
3rd speed gear
3rd-4th synchronizer
4th speed gear
5th speed gear
5th synchronizer
Reverse brake
Rear cover
5th intermediate gear
Intermediate gear
Center shaft
Viscous coupling
Center differential
Front output shaft
Front differential
Driven bevel gear
Drive bevel gear
POWER TRAIN - Manual Transaxle
CONSTRUCTION AND OPERATION <F5MCl>
Transaxle Case
L
The transaxle case assembly consists of front case
housing, rear case housing and rear cover. Front
2-9
N72ZCOlAA
case housing and rear case housing are made of
cast aluminum.
FRONT CASE HOUSING
The clutch housing and front case are a one-piece aluminum
casting for reduced weight. The clutch housing encloses the
mechanical clutch assembly.
0475-021
J
REAR CASE HOUSING
The rear case housing encloses the rear of the transaxle, and
is made of cast aluminum.
Rear case
housing
i
Rear cover
0475-022
L
J
2-10
POWER TRAIN 1 Manual Transaxle
Power Flow
N72ZC02AA
The F5MCl transaxle is a fully synchronized (except
reverse), constant mesh transaxle. “Constant Mesh”
means that all of the forward gears are constantly
in mesh with each other. This eliminates the need
to move gears together for engagement like reverse.
The gears turn whenever the input shaft is supplying
power; however, none of the gears transmits torque
until a synchronizer is engaged. When the synchronizer engages a speed gear, power is transferred
to the output shaft, then out to the wheels. Power
flows from the input shaft, to the output shaft, across
the appropriate synchronizer, to the differential assembly, then out to the halfshafts.
Input
shaft
1 qu!put shaft
plnlon gear
\
Differential
assembly
Ring gear
a
POWER TRAIN - Manual Transaxle
L
NEUTRAL
The input shaft supplies input power. First and second gears turn, but none of the synchronizers are
engaged with speed gears. Because the synchroniz-
ers are not engaged with any of the gears, power
is not transferred to the output shaft.
0475-062
2-12
POWER TRAIN - Manual Transaxle
FIRST GEAR
The 1-2 synchronizer sleeve moves forward to engage the clutch teeth on the first-speed gear. The
power coming in the input shaft goes through the
first-speed gear and into the synchronizer sleeve.
-
/
1-2 synchronizer
sleeve
/
1 st speed
gear
The sleeve turns the synchronizer hub and output
shaft. The output shaft pinion gear turns the differen- ‘&
tial ring gear. All other gears are freewheeling. The
gear ratio for first is 3.54:1.
n
POWER TRAIN - Manual Transaxle
L
SECOND GEAR
The 1-2 synchronizer sleeve moves rearward to
engage the clutch teeth on the second-speed gear.
The power coming in the input shaft goes through
the second-speed gear and into the synchronizer
2nd speed
gear
2-13
sleeve. The sleeve turns the synchronizer hub and
the output shaft, The output shaft pinion gear turns
the differential ring gear. The gear ratio for second I_
is 2.13:1.
1-2 synchronizer
sleeve
0475-064
2-14
POWER TRAIN - Manual Transaxle
THIRD GEAR
The 3-4 synchronizer sleeve moves forward to engage the third-speed gear clutch teeth. Input power
goes through the input shaft, into the 3-4 synchronizer hub. The hub turns the synchronizer sleeve, third
speed gear and the output shaft. The output shaft
pinion gear turns the differential ring gear. The gear
ratio for third is 1.36:1
3rd speed
gear
/
/ In
nchronizer
: i-1 ‘&m&J L,
,d
POWER TRAIN - Manual Transaxle
FOURTH GEAR
/
The 3-4 synchronizer sleeve moves rearward to
I/ engage the fourth-speed gear clutch teeth. Input
power goes through the input shaft, into the 3-4
synchronizer hub. The hub turns the synchronizer
4th speed
gear
2-15
sleeve, fourth speed gear and the output shaft. The
output shaft pinion gear turns the differential ring
gear. The gear ratio for fourth is 1.03:1
3-4 synchronizer
sleeve
0475-056
2-16
POWER TRAIN - Manual Transaxle
FIFTH GEAR
The 5-R synchronizer sleeve moves forward to engage the fifth-speed gear clutch teeth. Input power
goes through the input shaft, into the 5-R synchronizer hub. The hub turns the synchronizer sleeve, the
fifth speed gear and the output shaft. The output
shaft pinion gear turns the differential ring gear.
The gear ratio for fifth is 0.81 :l
AZ=-.
r
\
I
-
\
5th speed gear
J=&EzT
5-R synchronizer
sleEwe
0475-067
,,d
2-17
POWER TRAIN - Manual Transaxle
L
REVERSE GEAR
The 5-R synchronizer sleeve and the reverse idler
gear move rearward and engages with both input
shaft reverse gear and the gear teeth around the
outside of the l-2 synchronizer sleeve. Input power
goes through the input shaft, across the reverse
idler gear, and into the 1-2 synchronizer sleeve.
The sleeve turns the synchronizer hub and output
shaft. The output shaft pinion gear turns the differential ring gear in the reverse direction. The gear ratio
for reverse is 3.42:1.
Reverse idler gear
\
Input shaft
reverse
/ gear
Reverse gea; teeth
on outside of
l-2 synchronizer sleeve
0475-066
2-18
POWER TRAIN - Manual Transaxle
Power Train Component
INPUT SHAFT
The front of the shaft is supported by a roller bearing
in the front transaxle case housing. The rear of
the shaft is supported by a sealed ball bearing in
the rear case.
Rear sealed
ball bearing
I
Input
shaft
/
0475-056
ii
POWER TRAIN
- Manual Transaxle
2-19
Input Shaft Bearing Assembly
An input shaft bearing assembly is pressed into the front case
of the transaxle. The assembly consists of the bearing housing,
bearing, and seal. The seal prevents transmission fluid leakage
into the clutch disc area. Individual components are not serviceable, if any of the components fail the entire assembly must
be replaced. The clutch release bearing rides on the smooth
round surface of the retainer during clutch operation. Grease
is not required on the retainer where the release bearing rides.
id
2-20
POWER TRAIN - Manual Transaxle
Input Shaft Assembly
The input shaft transmits engine torque to the transaxle. The assembly consists of the input shaft, 3-4
and 5-R synchronizer assemblies, third, fourth and
fifth speed gears, snap rings, caged needle bearings
and thrust washers.
3-4 sleeve
5th speed gear
1 st gear
5-R sleeve
Reverse gear
2nd geeir
\
3rd speed gear
\
4th speed gear
POWER TRAIN - Manual Transaxle
First, second and reverse gears are machined on
the shaft. Third, fourth and fifth speed gears ride
L on caged needle bearings that rotate on the shaft
journals. All of the forward gears are helical-type
gears, and are in constant mesh with the output
2-21
shaft gears. The speed gears all have clutch teeth
and cones, which are used to equalize shaft speeds
during shifts. The clutch teeth engage with the synchronizer sleeves and the cones engage with the
stop rings during a shift.
i
1.
2.
3.
4.
5.
6.
7.
8.
9.
10.
11.
Input shaft
Third gear bearing
Third speed gear
Third stop ring
3-4 synchronizer
3-4 synchronizer snap ring
Fourth stop ring
Fourth gear bearing
Fourth speed gear
Retaining ring
Anti-spin pin
12.
13.
14.
15.
16.
17.
18.
19.
20.
21.
22.
Thrust washer (2-piece)
Fifth gear bearing
Fifth speed gear
Fifth stop ring
5-R synchronizer
5-R synchronizer snap ring
Reverse stop ring
Reverse brake bearing race
Reverse brake bearing
Reverse brake friction cone
Thrust washer
0475-040
2-22
POWER TRAIN - Manual Transaxle
OUTPUT SHAFT
The front of the output shaft is supported by a roller
bearing that rides in the front transaxle case housing.
The rear of the output shaft is supported by a sealed
ball bearing in the rear case.
Front
roller
/ bearing
\
Output shaft
\I
l-l+7
III III
Rear sealed
ball bearing
0475-057
I
L)
2-23
POWER TRAIN - Manual Transaxle
Output Shaft Assembly
The output shaft assembly transmits torque from
i the input shaft to the differential ring gear. The front
of the output shaft rides in a caged roller bearing
supported by the front case. The rear of the shaft
is supported by a sealed ball bearing located in
the rear case.
l-2 sleeve
shaft
1 st speed
gear
\
Pinion gear
4th gear
erse
. .
gear teetn
\
2nd speed
gear
5475-041
POWER TRAIN - Manual Transaxle
The assembly consists of the output shaft, l-2 synchronizer assembly, first and second speed gears,
snap rings and needle bearings. First and secondspeed gears use caged needle bearings that rotate
on the shaft journals. Third, fourth and fifth gears
1.
2.
3.
4.
5.
6.
7.
8.
Output shaft
First gear bearing
First speed gear
First gear stop ring
Outer cone
Inner cone
l-2 synchronizer
l-2 synchronizer snap ring
are heated and pressed on the output shaft. Individual components are not serviceable because of the
heat and press operations, if any of the components
fail the entire assembly must be replaced.
9. Second gear bearing
10. Inner cone
11. Outer cone
12. Second gear storing
13. Second speed gear
14. Third and fourth gears
15. Fifth gear
16. Fifth gear snap ring
0475-042
‘L/
2-25
POWER TRAIN - Manual Transaxle
REVERSE IDLER
The reverse idler gear shaft is supported by the
i front and rear cases.
Reverse
idler gear
Rear case
support
Front case
/ suppofl
-
-
4
I
0475-058
2-26
POWER TRAIN - Manual Transaxle
Reverse Idler Gear
The reverse idler gear slides into mesh with the input shaft
reverse gear and the gear teeth around the 1-2 synchronizer J
sleeve. The idler gear allows the output shaft to turn in the
opposite direction for reverse operation. The gear is supported
by a shaft that is held in the front and rear cases.
Reverse idler
Input shai 4
POWER TRAIN - Manual Transaxle
id
DIFFERENTIAL ASSEMBLY
The differential assembly is supported by two tapered roller bearings, one in the front case housing
and the other in the rear case housing.
Front tapered
roller bearing
/
roller bearing
Differential
assembly
0475-05s
2-28
POWER TRAIN - Manual Transaxle
Differential
The F5MCl differential assembly is similar to previous transaxles, except the vehicle speed sensor drive gear is mounted
on the differential case. The ring gear is an open center design
and is bolted to the differential case. The pinion gear of the
output shaft is in constant mesh with the ring gear which provides torque to the differential.
0475-051
-
The differential case transfers torque from the ring gear to
the differential side gears. The differential case is mounted
between the front and rear case housings and supported by
two tapered roller bearings. The outer bearing races are pressed
into the front and rear transaxle case housings. The outer
race mounted in the front transaxle case uses a selectable
shim behind it for differential bearing preload adjustment.
Roll
Differential case
Side gear thrust
thrust washer
Pinion shaft
0475-053
The differential allows the wheels to turn at different speeds
while the same amount of torque is applied to both. The differential contains two sets of gears, the pinion gears and the side
gears. The pinions are meshed with the side gears and turn
on the pinion shaft which is held in the case by a roll pin.
The side gears are splined to the halfshafts and transfer torque
to the wheels. The side gear clearance must be adjusted by
using selectable side gear thrust washers.
2-29
POWER TRAIN - Manual Transaxle
Synchronizer
L
N72zco4AA
Three synchronizer assemblies are used in the
F5MCl transaxle. The 3-4 and 5-R synchronizers
are mounted on the input shaft assembly and the
1-2 synchronizer is mounted on the output shaft
assembly.
3-4 synchronizer
\
5-R synchronizer
Input shaft
Output shaft
I
l-2 synchronizer
0475-047
2-30
POWER TRAIN - Manual Transaxle
-I
Hub
Sleeve
Detent
ball (3)
SYNCHRONIZER COMPONENTS
The synchronizer assemblies contain a sleeve, hub, struts,
springs and detent balls. The sleeve has inner splines that ‘d
slide on the hub and an outer radial slot that engages the
shift fork. The hub has inner splines that engage the shafts
and outer splines that the sleeve rides on. The outer hub splines
have three slots, cut lengthwise, for the struts.
0475-048
Stop rings are located between the synchronizer and the speed
gears. The stop ring acts as a clutch to bring both the shaft
and speed gear to the same speed, without gear clash. During
a shift, the sleeve slides on the hub and over the stop ring
to engage the gear clutch teeth. When the sleeve and the
stop ring touch, they immediately begin to equalize speeds,
or synchronize.
sleeve Stop ring Speed gear Sleeve contkts
stop ring
/
6
Gear
teeth
F&
Spring Hub Gear cone
0
Sleeve
contacts
gear teeth
.Q
The balls are held against the sleeve by the synchronizer
springs. The struts slide in the hub slots during a shift. The
synchronizer springs use a detent ball to center the strut in
the synchronizer sleeve. Before the sleeve and stop ring contact
each other, the struts engage lugs on the stop ring, pushing
the stop ring onto the gear cone. The sleeve teeth then block
against the stop ring teeth until the gears synchronize. The
slots in the hub are slightly larger than the lugs on the stop
ring allowing the ring to turn when it contacts the gear. The
turning of the stop ring is often referred to as “clocking.”
Full gear
engagement
ffG!El
Stop ring is pushed
into gear cone
@
045-050
REVERSE BRAKE
A reverse brake assembly is used to stop input shaft rotation
through a friction cone which is locked to the transaxle case.
The brake is located in the rear case behind the input shaft
5-R synchronizer. The brake prevents the reverse idler gear
from clashing with the input and output shaft gears.
d
Gear
L
0475-045
POWER TRAIN - Manual Transaxle
2-31
The assembly looks and functions much like a synchronizer.
It consists of a stop ring, friction cone, shim, needle bearing
and bearing race.
If a shift to reverse is attempted before the clutch completely
spins down (stops turning) the brake will stop the input shaft
before the idler gear engages any other gear. The friction cone
has lugs that fit into the case and holds the cone stationary.
The 5-R synchronizer sleeve engages with the stop ring.
Stop ring cone
0475046
Shift System
tu2ZC05AA
The shift system is the link between the driver and the transaxle.
The shifter assembly selects different gears by moving the
shift forks. The shift system consists of the shift knob, lever,
selector cable, crossover cable and transaxle shift levers.
5 FWD
zz;for
0475-025
Two transaxle shift shafts operate the shift selector assembly
inside the transaxle. A selector shaft and a crossover shaft
move the shift assembly during shifts. The selector shaft controls shifts into first and second, third and fourth, fifth and
reverse. The arrows indicate selector shaft movement.
0475-026
The crossover shaft is used to move the shift assembly from
one plane to another. The crossover shaft moves the shift
assembly from side to side allowing for shifts between second
and third, fourth and fifth. A bias spring is located around the
crossover shaft. The bias spring returns the assembly to the
3-4 neutral position when the transaxle is in neutral and the
shift lever is released.
2-32
POWER TRAIN - Manual Transaxle
SHIFT SELECTOR ASSEMBLY
The shift selector assembly moves the appropriate shift fork
based on the drivers selection. The assembly consists of the
selector, shaft, housing, and pin.
Selector
housing
0475-030
(hT=fl
cnlnrtnr
The selector housing blocks the other shift forks and prevents
a shift into two gears at the same time. The selector pivots
in an arc to select the different shift forks.
4hift
,I ,,!/,I
I II
Select& shaft1
A shift from fifth-to-reverse is blocked by a 5-R guide (guides
from 5th to 4th). The shift assembly has a pin sticking out
of one side that engages the guide as it comes out of fifth
gear. The guide pushes the pin and shift assembly away from
reverse gear.
‘5-032
fL%;~ ;;;
e t---FF-a “‘!!I’
54
t--1.
IWK
SHIFT RAILS AND FORKS
The F5MCl uses three rail and fork assemblies. All of the
shift forks have dual functions in that they control shifts into
two different gears.
4 A l-2,
0475-033
2nd speed
1 st speed
l-2 shift
fork
0475-034
When the 1-2 shift fork moves to the front of the transaxle,
first gear is obtained. When it moves to the rear of the transaxle,
second gear is obtained.
POWER TRAIN - Manual Transaxle
2-33
When the 3-4 shift fork moves to the front of the transaxle,
third gear is obtained. When it moves to the rear of the transaxle,
fourth gear is obtained.
5th speed
SIe
0475036
When the 5-R shift fork moves to the front of the transaxle,
fifth gear is obtained. When the 5-R shift fork and the reverse
shift fork move to the rear of the transaxle, reverse gear is
obtained.
2-34
POWER TRAIN - Manual Transaxle
TRANSAXLE CONTROL
N72ZClOAA
The shift cable and selector cable are equipped
with bushings on their transaxle ends to absorb
minute vibrations from the engine and transaxle.
<Non-turbo>
Also, the shift cable bracket on the shift lever end
uses rubber to provides elastic support to the shift ;L)
lever assembly thus minimizing vibration of the shift
lever.
Vibration-prevention rubber
Cable bracket
cable
Rubber
1
Bushing
\
Shift cable and
selector cable
Shift lever
assembly
Cross section A-A
Vibration-prevention
rubber
Floor panel
Shift lever
bracket
POWER TRAIN - Automatic Transaxle
AUTOMATIC TRANSAXLE
i; l
l
The automatic transaxle comes in three models:
F4ACl for 420A-DOHC, F4A33 and W4A33
for 4G63-DOHC-T/C.
F4ACl is electronically controlled 4-speed
automatic transaxle newly developed for
N72MOOAA
l
420A-DOHC and manufactured by Chrysler
Corporation.
F4A33 and W4A33 are essentially the same
as the previous models.
SPECIFICATIONS
N72ZDOlAA
Provided (2nd to 4th)
Gear ratio
(Total gear ratio)
2-35
POWER TRAIN - Automatic Transaxle
AWD
FWD
Drive system
Self-diagnosis function
Provided
Fail-safe function
Provided
Data list function
Provided
Actuator forced drive function
Provided
ATF capacity
Speedometer gear ratio
dm3(qts.)
8.6 (9.1)
6.7 (7.1)
-
29136
POWER TRAIN - Automatic Transaxle
SECTIONAL VIEW
2-37
t472zDmAA
F4ACl <FWD - 4A>
i
SFAOl12
id
1. Damper clutch
2. Torque converter
3. Case
4. Oil pump
5. Input speed sensor
6. Underdrive clutch
7. Overdrive clutch
8. Reverse clutch
9. 2-4 clutch
10. Low/Reverse clutch
11. Output speed sensor
12. Planetary gear set
13. Output shaft gear
14. Transfer shaft
15. Transfer shaft gear
16. Defferential
17. Input shaft
2-38
POWER TRAIN - Automatic Transaxle
F4A33 <FWD - 4AlT>
TFA0540
1. Damper clutch
2. Torque converter
3. Oil pump
4. Front clutch
5. Kick-down brake
6. Rear clutch
7. Low/Reverse brake
8. Planetary gear set
9.
10.
11.
12.
13.
14.
15.
16.
Transfer idler gear
Rear cover
Input shaft
Transfer drive gear
End clutch
Transfer shaft
Transaxle case
Differential
POWER TRAIN - Automatic Transaxle
W4A33 <AWD - 4AlT>
i
2
3
4 56
11
12
13
14
15
TFA0928
L’
1. Damper clutch
2. Torque converter
3. Oil pump
4. Front clutch
5. Kick-down brake
6. Rear clutch
7. Low/Reverse brake
8. Planetary gear set
9. Transfer idler gear
10. Rear cover
11. Input shaft
12. Transfer drive gear
13. End clutch
14. Transfer driven gear
15. Center differential
16. Viscous coupling
17. Center shaft
18. Front output shaft
19. Front differential
20. Driven bevel gear
21. Drive bevel gear
POWER TRAIN - Automatic Transaxle
CONSTRUCTION AND FUNCTION <F4ACl>
Transaxle
r
\
N722002AA
I ransnllsslur I
range switch
Sole&d
assembly
9321-415
l
l
The transaxle consists of the torque converter,
oil pump, gear train and valve body.
The torque converter incorporates the damper
clutch and is of the 3-element, single stage,
2-phase type.
L)
The gear train consists of three sets of multiple
disc type input clutch, two sets of multiple disc
type holding clutch and one set of Simpson
type planetary gear set.
l
OPERATING ELEMENTS IN SELECT LEVER POSITIONS
Select lever position
P
Speed
R
N
R
-
Underdrive
clutch
Input clutch
D
1st 2nd 3rd
0
0
O v e r d r i v e
clutch
2-4 clutch
clutch
Low/Reverse
clutch
4th (With OD switch
turned ON)
0
0
L
1st
2nd
1st
0
0
0
0
0
Reverse clutch
Holding
2
0
.*
.
.*
.
NOTE
*: Low/Reverse clutch is operated at P and N to provide smooth shift to D or R.
0
0
0
0
d
POWER TRAIN - Automatic Transaxle
2-41
TORQUE CONVERTER
Torque converter clutch operation is controlled by the TCM
through the solenoid assembly and valve body as mentioned.
The clutch lining material is not bonded to either the piston
or the torque converter cover in the F4ACl transaxle, it is
free floating.
When the clutch is not engaged, pressure is directed through
the center of the input shaft to the front side of the piston.
This pressure pushes the piston rearward and allows oil to
flow around the outer edge of the piston. The oil exits the
torque converter between the input shaft and the reaction shaft.
Turbine
Solenoid Transaxle Identification
When the torque converter clutch engages, the pressure that
was directed to the front side of the piston through the input
shaft is shut off and the circuit is vented. The pressure on
the back side of the piston pushes the piston forward and
connects the turbine to the converter housing. The piston has
no outer seal. The friction disc provides the seal between the
piston and the housing. As mentioned the friction disc is freefloating and is not bonded to either the piston or the housing.
When the torque converter clutch is engaged, fuel economy
is improved, engine noise is reduced, and the transaxle and
fluid operating temperature is lowered.
CASE
The F4ACl transaxle uses an aluminum cast case with a
stamped steel oil pan. The transfer gears on the end of the
transaxle and differential assembly towards the back of the
transaxle are under stamped steel covers. This transaxle is
a single sump design. That is it uses only one fluid for both
the transmission and differential areas. The transaxle case
is vented through the top of the manual shaft.
2-42
POWER TRAIN - Automatic Transaxle
CLUTCH
All flve clutches in the F4ACl transaxle are applied
hydraulically. Four of the clutches are released with
belleville springs, and one is released with a coil
spring. Three of the clutches supply input power
to the planetary geartrain and are called input
clutches. The other two clutches hold components
of the planetary geartrain and are called holding
Overdrive/Reverse Diston 1
m-f-q f&drive 1
C
It hub
~u/ljjU$lerdrive
rdrive
Overdrive
#3 thrust
plate
Overdrive
Input Clutch Assemblies
The input clutch assembly is located directly behind the oil
pump housing, and rides on the reaction shaft support journal.
The assembly consists of an input shaft, input hub, clutch
retainer, clutch pistons, an overdrive hub, an underdrive hub
and three input clutches. The clutches are the underdrive clutch,
overdrive clutch and reverse clutch. When the torque converter
turbine (which is splined to the input shaft) turns, the input
shaft, hub, and clutch retainer also turn.
Underdrive Clutch Hub
The underdrive clutch is splined to the underdrive hub assembly.
The underdrive hub and shaft assembly is splined to the rear
sun gear. When the underdrive clutch is applied the rear sun
d
gear is driven (rotated).
Underdrive hub
#3 thrust washer
clutches. With the exception of direct gear, one input
clutch and one holding clutch must be applied to d
obtain a gear range. In direct gear, two input clutches
are applied and basically connect the input and
output shafts together. This causes the entire gearset to rotate as one with no relative motion between
planetary gearset components.
I
Overdrive Hub
The overdrive clutch is splined to the overdrive hub assembly
and the overdrive hub is splined to the front carrier assembly.
The reverse clutch is splined to the front sun gear assembly
and rotates it when applied.
Input Clutches
Each of the three clutches, in the input clutch assembly, have
the job of supplying input power to a particular component
in the planetary gearset when they are hydraulically applied.
I
They are connected to the planetary gearset through the overdrive hub and shaft assembly, the underdrive hub and shafta
assembly, and the front sun gear assembly. When any of these
clutches are applied, they turn or drive a component in the
planetary gearset.
POWER TRAIN - Automatic Transaxle
2-43
Underdrive Clutch
L
Underdrive
clutch
Rear sun
gear
Hub -
j Underdrive clutch
hub shaft
Input clutch
reiainer
-
The underdrive clutch is located in the front of the
input clutch retainer. Line pressure is supplied to
the clutch from the valve body, through passages
in the case, oil pump and reaction shaft support.
i The pressure then passes through a drilled passage
in the input clutch hub and to the front side of the
underdrive piston. The piston moves toward the
rear of the transaxle, compressing the clutch and
connecting it to the underdrive hub. The underdrive
hub is splined to the rear sun gear and turns it
when the clutch is engaged.
When line pressure is released, the clutch piston
returns with tension from the coil spring between
the piston and spring retainer. The piston has a
vent in it, and the spring retainer has a seal on
it. Both the vent and retainer seal are used to keep
oil on the back side of the piston. They counteract
the centrifugal pressure that develops when the
clutch is spinning. Centrifugal pressure can cause
the piston to move slightly and the clutch to drag
when the clutch is not actually being applied.
Overdrive Clutch
Overdrive clutch
/
Clutch retainer
Front planetary
carrier
Overdrive
clutch hub
2-44
POWER TRAIN - Automatic Transaxle
The overdrive clutch is the center clutch in the input
clutch assembly. The clutch pack is held on the
retainer, and the piston that applies the clutch is
located around the outside of the retainer. A pressure
plate in the rear of the clutch pack is used to compress the overdrive clutch when needed. Line pressure from the valve body is directed through passages in the case, oil pump housing and reaction
shaft support. It is then directed through the input
hub and input clutch retainer to the back side of
the OD/REV clutch piston. The pressure pushes
the piston forward and applies the overdrive clutch.
The clutch pack is compressed against the same
reaction plate that the underdrive clutch uses.
When applied, the overdrive clutch engages and
turns the overdrive hub, which is splined to the front
planetary carrier. When line pressure to the clutch
is released, the belleville spring on the front side
of the OD/REV piston returns the piston to its released position.
Reverse Clutch
Reverse
clutch
Front sun
gear hub
Hub
The reverse clutch is located in the back of the
input clutch assembly. The reverse clutch is operated by the same piston, pressure plate and belleville
spring that operates the overdrive clutch. Line pressure that applies the reverse clutch comes from
the valve body, directed through passages in the
case, oil pump and reaction shaft support. The line
pressure then goes through the input hub to the
front side of the ODFIEV piston. The pressure
moves the piston to the back and compresses the
reverse clutch pack. When the clutch is applied,
it turns the front sun gear and hub assembly.
When line pressure to the reverse clutch is removed,
the belleville spring will pull the piston forward to
its released position. The OD/REV clutch piston
belleville spring is positioned so it will counter the
piston to prevent either the overdrive or reverse
clutches from dragging when they are not applied.
POWER TRAIN - Automatic Transaxle
2-45
Holding Clutches
2-4 Clutch
i;
2-4 clutch
I
Front sun
gear hub
Transaxle case /
Lf
Piston
retainer
Snao
.
Belleville
spring
Piston
The 2-4 clutch is one of two clutches located in
the rear portion of the transaxle case. This clutch
sits behind the input clutch assembly. The 2-4 clutch/
piston retainer is in the front and held in place by
a snap ring. The 2-4 piston is located inside the
b 2-4 clutch/piston retainer. A belleville spring is used
to return the piston after releasing the clutch. The
clutch pack comes next in the case. The reaction
plate is secured to the case using two snap rings.
The reaction plate for the 2-4 clutch is shared with
the Low Reverse clutch. When the 2-4 clutch is
Separator
plates
Clutch’;; discs
applied hydraulically, it locks or secures the front
sun gear/hub assembly to the case so it does not
turn.
To apply the 2-4 clutch, line pressure is sent from
the valve body straight into the piston retainer. The
valve body has a rubber seal located on the top
of it that seals the valve body to the piston retainer.
When line pressure is removed and vented, th
belleville spring returns the p’iston to release th 1
clutch.
2-46
POWER TRAIN - Automatic Transaxle
Low/Reverse Clutch
Front planetary
carrier
Low-reverse
clutch
.
Transaxle case /
Snap
ring
Reaction
plate
Separator
plates
v
Clutch
discs
The second clutch, located in the rear of the transaxle case, is the Low Reverse (L/R) clutch. The
UR clutch is located in the very back of the case
and, as previously mentioned, shares the reaction
plate with the 2-4 clutch. Behind the reaction plate
is the clutch pack, belleville spring, L/R piston, and
piston retainer. The piston retainer is secured to
the case with three screws and sealed with a gasket.
Belleville
spring
Belle~lle
snap ring
Piston
retainer
I
d
Piston
The clutch is applied with line pressure from the
valve body that is directed through the transaxle
case to the piston retainer. This pushes the piston
forward and applies the clutch. When the clutch
is applied, it will lock or secure the front planetary
carrier to the transaxle case so it can not rotate. L)
When line pressure is released, the belleville spring
pushes the piston back to release the clutch.
POWER TRAIN - Automatic Transaxle
2-47
POWER TRAIN
Planetary Geartrain Assembly
Front sun
gear assembly
rear annulus
assembly
The entire planetary gear-train is located behind the
input clutch assembly and is inside the 2-4 and
UR clutch assemblies. The planetary geartrain con-
2-4 clutch
Low-reverse
Splined to
#7 thrust
#6 thrust
gear
front annulus
assembly
sists of two sun gears, two planetary carriers, two
annulus (ring) gears, and one output shaft.
Front Sun Gear Assembly
The front sun gear assembly rides in the center of the front
carrier and is welded to the center of two hubs that are arranged
back to back. Each of the hubs are splined to a clutch. The
front most hub is splined to the reverse clutch and when applied
turns the front sun gear. The rearward hub is splined to the
2-4 clutch and when applied prevents the front sun gear from
turning.
Front Carrier Assembly
The front planetary carrier and rear annulus (ring) gear are
splined together as one unit. When the overdrive clutch is
applied, it drives the front carrier assembly by the overdrive
hub. When the low/reverse clutch is applied, it holds or prevents
the front carrier assembly from rotating.
Rear Sun Gear
The rear sun gear is located in the center of the rear carrier
assembly. There are two thrust bearings located on either side
of the sun gear. When the underdrive clutch is applied, it drives
the rear sun gear through the underdrive hub and shaft.
2-48
POWER TRAIN - Automatic Transaxle
out
sha
I
Lugs for parking
pawl and output
speed sensor
annulus
gear
Rear Carrier Assembly
The rear planetary carrier, front annulus (ring) gear and output
shaft are all one assembly. The rear carrier assembly is responsible for providing all output power for the transaxle assembly.
In other words, all output from the transaxle must go through
the rear carrier. The lugs around the outside of the assembly
have two purposes; to engage the parking pawl when the driver
selects “park”, and to generate an output speed signal used
by the TCM.
There are no clutches splined or connected to this unit in any
way. The rear carrier assembly is supported to the case by
two tapered roller bearings which must be set up with a specific
preload setting.
Planetary Geartrain Powerflow
The planetary gear-train in this transaxle provides
four forward gear ratios and one reverse gear ratio.
To obtain these different gear ratios, two planetary
carrier and pinion assemblies, two sun gears and
two annulus (ring) gears are used. Two shafts are
used as input to the planetary gearset, the underdrive hub and shaft assembly, and the overdrive
hub with its shaft. The underdrive shaft protrudes
through, the center of the overdrive shaft and is
the longer of the two.
To achieve any output through the components of
this planetary gearset, the following rules apply;
At least one component must be driven or turned,
one component must be held stationary (kept from
rotating), two components must be driven at the
‘d
same speed and in the same direction, and all output
from this gearset must go through the rear carrier
assembly.
The planetary gear-train is driven by three input d
clutches. One of the input clutches must be applied
before the vehicle can move. A variety of gear ratios
are accomplished by using different input clutches
to turn different components of the planetary gear
set. Two clutches in the rear of the case must be
used to hold specific planetary components. When
going through the following power flows, keep in
mind that the gear-train must somehow complete
its power-flow by turning the rear carrier assembly.
If the output shaft/rear carrier assembly does not
turn, the vehicle will not move.
POWER TRAIN - Automatic Transaxle
2-49
First Gear
L
Underdrive clutch applied
(turns rear sun)
In first gear range, torque input is through the underdrive clutch to the underdrive hub assembly. The
underdrive hub is splined to the rear sun gear. When
the underdrive clutch is applied, it rotates the underdrive hub and rear sun gear. The UR clutch is applied
to hold the front carrier/rear annulus (ring gear)
assembly.
The rear sun gear drives the rear planetary pinion
L gears. The rear planetary pinion gears are forced
Low-reverse clutch applied
(holds rear annulus/front carrier)
to “walk around” the inside of the stationary rear
annulus gear. ‘The pinions are pinned to the rear ’
carrier and cause the rear carrier assembly to rotate
as they “walk around” the annulus gear. This provides the torque output for first gear. The other planetary gearset components are freewheeling. The first
gear ratio is 2.84:1.
Second Gear
Underdrive clutch applied
(turns rear sun)
gear is achieved by having both planetary
id Second
gear sets contribute to torque multiplication. As in
first gear, torque input is through the underdrive
clutch to the rear sun gear. The 2-4 clutch is applied
to hold the front sun gear stationary. The rotating
rear sun gear turns the rear planetary pinions. The
2-4 clutch applied
(holds front sun)
rear pinions rotate the rear annulus/front carrier assembly. The pinions of the front carrier will “walk
around” the stationary front sun gear. This transmits
torque to the front annulus/rear carrier assembly
which provides output torque and a gear ratio of
1.57:1.
2-50
POWER TRAIN - Automatic Transaxle
Third Gear
Underdrive clutch applied
(turns rear sun)
\.
Overdrive clutch applied
(turns front carrier/rear annulus)
/
In third gear, two input clutches are applied to provide
torque input; the underdrive and overdrive clutches.
The underdrive clutch rotates the rear sun gear,
while the overdrive clutch rotates the front carrier/
rear annulus assembly. The result is two compo-
nents (rear sun gear and rear annulus gear) rotating
at the same speed and in the same direction. This
effectively “locks” the entire planetary gearset together and is rotated as one unit. The gear ratio
in third is 1:l.
‘d
Fourth Gear
Overdrive clutch applied
(turns rear sun)
In fourth gear input torque is through the overdrive
clutch which drives the front carrier. The 2-4 clutch
is applied to hold the front sun gear. As the overdrive
clutch rotates the front carrier, it causes the pinions
of the front carrier to “walk around” the stationary
front sun gear. This causes the front carrier pinions
clutch applied
(holds front sun)
2-4
to turn the front annulus/rear carrier assembly which
provides output torque. In fourth gear, transaxle ii
output speed is more than engine input speed. This
situation is called overdrive. Fourth gear (overdrive)
ratio is 0.69:1.
POWER TRAIN - Automatic Transaxle
2-51
Reverse Gear
Reverse clutch applied
(turns front sun)
In reverse, input power is through the reverse clutch.
When applied, the reverse clutch drives the front
sun gear through the overdrive hub and shaft. The
UR clutch is applied to hold the front carrier/rear
annulus
assembly stationary. The front sun gear
ii
Low-reverse clutch applied
(holds rear annulus front carrier)
rotates the front carrier assembly pinions. The front
carrier is being held by the UR clutch so the pinions
are forced to rotate the Jnt annulus/rear carrier
assembly in the reverse direction. Output torque
is provided, in reverse, with a gear ratio of 2.21::1.
Transfer System
The F4ACl transaxle uses a transfer gear system to transfer
power from the output shaft of the rear carrier to the transfer
shaft. The gear that is splined and bolted to the output shaft
of the rear carrier i,s called the output shaft transfer gear. It
supplies power to the transfer shaft transfer gear which is
splined and retained by a large nut to the transfer shaft. The
bolt and nut that retain the transfer gears to each shaft must
be tightened to the proper torque specification. Proper torque
is essential for two reasons; to keep the gears on the shafts
and to maintain the bearing settings that provide for long life
of the system.
Both gears have helical cut teeth designed for quiter operation.
The overall gear ratio of the transaxle is in part determined
by the transfer gear ratio.
POWER TRAIN - Automatic Transaxle
Differential
case
pinion
Final Drive Gears and Differential
The final drive gears include the transfer shaft which has a
pinion gear on one end and the differential ring gear which
is driven by the transfer shaft pinion gear. The ring gear is
bolted to the differential case and when rotated drives the
case. The case drives the differential gearset and in turn, the
front axle shafts. The axle shafts then drive the front wheels.
The differential gears are typical in design and include; a shaft,
two pinion gears, and two side gears. The final drive gears
and the differential case each are supported by tapered roller
bearings. The transfer shaft and its tapered roller bearings
are set-up with a specific amount of endplay. The differential
ring gear and case assembly bearings are set-up with a specific
amount of preload. Follow the service manual procedures for
setting up these bearings to ensure long life of the bearings
and the components they support.
POWER TRAIN - Automatic Transaxle
Pump
housing
+
;;rpump
Reaction shafi
support
I
Seal rings (4)
Hydraulic Control System
OIL PUMP
The oil pump is located in the pump housing inside the bell
housing of the transaxle case. The F4ACl uses a crescent
type gear pump. The inner gear is driven by the torque converter
hub. Torque is supplied to the hub by the engine crankshaft
through the flex plate and torque converter housing.
As the gears rotate, the clearance between the gear teeth
increases in the crescent area and creates a suction at the
inlet side of the pump. Fluid is pulled through the pump inlet
from the oil pan. As the clearance between the gear teeth
in the crescent area decreases, it forces fluid into the pump
outlet. The pressurized oil from the outlet operates the torque
converter, clutches, and the lubrication system. The pump is
held in the housing by the reaction shaft support. The reaction
shaft is splined to and holds the inner race of the torque converter stator’s overrunning clutch.
VALVE BODY AND SOLENOID ASSEMBLY
The valve body and solenoid assembly work together to control five transaxle clutches and the torque
converter clutch. It also directs pressurized fluid
for lubrication. The oil pump is the source of pressurized fluid for the valve body and solenoid assembly.
The pump is a positive displacement, gear and crescent type pump. It is driven by the engine through
the torque converter hub.
Fluid for the pump is drawn through the transaxle
filter, through the valve body housing, and into the
pump. The pump pressurizes the fluid and sends
it back through the valve body to the regulator valve.
The valve body uses only five valves along with
four solenoids in the solenoid assembly. They perform all functions needed to operate the transaxle
for each of its gear ranges. A brief description on
the operation of each valve and solenoid follows.
POWER TRAIN - Automatic Transaxle
Valve Body Assembly
Retainer
Q-
-
Valves removed
Valves installed
9x-439
The F4ACl has a relatively simple, cast aluminum
valve body that uses only five valves. No governor
pressure or throttle pressure is used to operate
this valve body. These two pressures have been
replaced by electronic signals from the output speed
sensor and throttle position sensor. Shift valves have
also been eliminated and replaced by the solenoid/
valves in the solenoid assembly.
The valve body has two major functions. To control
line pressure and torque converter clutch pressure
Solenoid and
pressure switch
assembly
Screen
filter
and to direct fluid to the clutches, torque converter,
lubrication system, and the solenoid/valves by
means of the manual and switch valves.
One side of the rooster comb (secured to top of
valve body) operates two switches, the park neutral
and transmission range switches. The solenoid and ii
pressure switch assembly is indirectly connected
to the valve body through an extension of the case
in the oil pan area.
Solenoid and Pressure Switch Assembly
The solenoid and pressure switch assembly is controlled by
the TCM through the transmission control relay. The assembly
consists of four solenoid/valve assemblies that control hydraulic
pressure to four of the five clutches in the transaxle and the
torque converter clutch. A unique feature of the solenoid/valves
are that they directly control the application of a clutch. In
other electronically controlled transaxles/transmissions, the
clutches are indirectly controlled by the solenoids through the
normal hydraulic valving. The solenoid assembly also contains
three pressure switches that feed information to the TCM. The
“UR” pressure switch, the “2-4” pressure switch and the “OD”
pressure switch. The eight-way electrical connector to the solenoid is sealed and bolted in place with the bolt tightened to
proper specification.
The assembly is located outside the transaxle case, under
a sound shield and protective cover, towards the front of the
vehicle. The filter screen between the solenoid assembly and
valve body protects the assembly from contamination and is
a replaceable item. However, if the valve body and solenoid ‘a
pack have been heavily contaminated, the solenoid pack should
be closely inspected to determine the need for its replacement.
The solenoid pack is not a serviceable unit.
POWER TRAIN - Automatic Transaxle
Torque converter
control valve
Overdrive clutch
2-55
Regulator Valve
The regulator valve has one function, to regulate or control
hydraulic pressure in the transaxle. The pump supplies unregulated pressure to the regulator valve. The regulator valve controls or limits pump pressure. Regulated pressure is referred
to as “line pressure”. The regulator valve has a spring on one
end that pushes the valve to the right. This closes a dump
(vent) to lower pressure. Closing the dump will cause oil pressure to increase. Oil pressure on the opposite end of the valve
pushes the valve to the left, opening the dump and lowering
oil pressure. The result is spring tension working against oil
pressure to keep or maintain the oil at specific pressures. Regulated pressure will vary depending on the gear range the transaxle is operating in.
A system of sleeves and ports allows the regulator valve to
work at one of three different predetermined pressure levels.
The oil that is dumped by the regulator valve is directed back
to the intake side of the oil pump.
Solenoid
Pump (IN)
1
Torque Converter Control Valve
The main responsibility of the torque converter (T/C) control
valve is to control hydraulic pressure applied to the front (“off”)
side of the converter clutch (CC). Line pressure from the regulator valve is fed to the T/C control valve where it passes through
the valve. The T/C control valve reduces or regulates the pressure slightly. The T/C control valve pressure is then directed
to the converter clutch (CC) control valve and to the front
side of the converter clutch piston.
The pressure that is being fed to the front of the piston pushes
the piston back. This disengages the converter clutch. The
oil then passes around the outside of the piston, flowing out
of the torque converter and back to the T/C control valve.
From the T/C control valve the oil flows to the transaxle oil
cooler and cooler bypass valve. It returns to the transaxle
as lube oil pressure.
2-56
POWER TRAIN - Automatic Transaxle
Converter Clutch Control Valve
The CC control valve has the job of controlling the back or
“on” side of the torque converter clutch. When the TCM ener- “L)
gizes the LR/CC solenoid to engage the converter clutch piston,
the CC control valve and T/C control valves move to the left.
The oil on the front or “off” side of the converter clutch piston
is vented to the sump.
Line pressure enters the CC control valve through the manual
valve and then passes through the CC control valve and the
T/C control valve to the back (“on”) side of the converter clutch
piston. Line pressure forces the piston forward which engages
the torque converter clutch. This action effectively connects
the torque converter turbine with the impeller. Line pressure
also flows from the regulator valve, through the T/C control
valve, to the cooler and cooler bypass for improved fluid and
transaxle cooling.
Regul
valve
L From manual valve
UR
clutch
IA
Dressure
4
z/4
CLUTCH
Solenoid
energized
t
i
Line
pressure
t
anus
de
Ma&al
valve
Solenoide
de-energized
UR
clutch
t
II
2/4
clutch
UR
pressure
switch
t
Manual
valve
t
t
Manual
valve
Solenoid Switch Valve
The switch valve controls line pressure direction from the LR/CC
solenoid. When the valve is shifted to the right, it allows the
low/reverse (L/R) clutch to be pressurized. When it is shifted
to the left, it directs line pressure to the T/C and CC control d
valves to operate the T/C clutch. The valve is shifted to the
right in all positions except second, third, or fourth gear. When
the transaxle upshifts to second gear, the valve moves to the
left which allows converter clutch engagement when needed.
The valve must return to the right before a downshift to first
gear can occur.
POWER TRAIN - Automatic Transaxle
2-57
Manual Valve
The manual valve is operated by mechanical shift linkage only.
Its job is to send line pressure to the appropriate hydraulic
circuits and solenoids. The valve has three operating ranges
or positions. The valve is shifted to the left position when Overdrive (OD), Drive (3) or Low (L) is selected. The valve is shifted
to the middle position in both Park (P) and Neutral (N). The
valve is moved to the right position when Reverse (R) is selected.
UD clutcn
valve
Solenoid
switch
valve
4
1
mxgive
/
Taaer
Vent to
sump
+
/
hh
I
\mn,
I.” “rod
I
Overdrive
~~~~~~11,
-. - .-.
cllltnh
solenok i
(de-ene rgized)
3
Manual Manual
valve
valve
?~%i~=J)
Low Reverse/Converter Clutch and Overdrive Solenoids
When these two solenoids are not energized by the TCM,
their check balls are seated on orifices and do not allow hydraulic
pressure to pass through their particular circuits. The top of
these solenoids are tapered to allow fluid to vent to the sump
when de-energized. They are referred to as normally vented
valves. When the solenoids are energized by the TCM, the
check balls are unseated, allowing hydraulic pressure to flow
past the check ball and into the circuit. At the same time,
the tapered part of the solenoid closes the vent port to the
sump. This action causes full line pressure to be applied to
the desired clutch.
The TCM can cycle (turn “on” and “off”) the solenoids at a
high frequency (many times per second). This action modulates
the element pressure between zero and line pressure. The
modulation is used when the solenoids are initially eneragized
for more precise control of the clutches. Under certain driving
conditions, the TCM may modulate the LWCC solenoid to
obtain a specific amount of T/C clutch slippage. This feature
is referred to as Electronically Modulated Converter Clutch
(EMCC). It allows partial converter clutch engagement, which
gives increased fuel economy and smoothes out engine pulses.
2-58
POWER TRAIN - Automatic Transaxle
Underdrive
clutch
Underdrive
solenoide
(de-energized)
2-4/Law-reverse
solenoid
(energized)
Orifice located
in piston
- 1 Reverse
. .
Torque converter
apply pressure
~-~/LOW Reverse and Underdrive Solenoids
When these two solenoids are not energized by the TCM,
their check balls prevent venting of a clutch. In this position ‘d
the check balls allow line pressure to reach the desired clutch.
These solenoids allow oil pressure to the clutch when de-energized and are referred to as normally applied valves. When
the solenoids are energized, the plunger forces the check ball
down and prevents line pressure from reaching the clutch.
At the same time, pressure is vented from the clutch.
Similar to the normally vented valves, these normally applied
valves are also cycled to modulate clutch pressure to any
value between line pressure and zero.
Dribbler Circuits
Two dribbler circuits feed low flow rate oil (residual pressure)
from the torque converter to the overdrive and reverse clutches
at all times. The low flow rate oil provided by the dribbler circuits
keeps both clutches full of oil. These clutches share a common d
piston. If there is a difference in the amount of oil on either
side of the piston, the piston would tend to move toward the
clutch with less oil and cause that clutch to drag. If oil is only
on one side of the piston, and the retainer is spinning at high
speed, the spinning action will force oil to the outer diameter
of the retainer and cause the piston to move. The oil pressure
build-up caused by spinning is called centrifugal pressure.
Another feature added to avoid this situation is a small orifice
in the overdrive/reverse piston that helps equalize pressure
on both sides of the piston. The dribbler circuits only involve
low flow rates, which do not have any significant effect when
the clutches receive full line pressure.
POWER TRAIN - Automatic Transaxle
;. c
I?
D
2
Fluid venting
from UD clutch
(through Ul orifice
and thermal valve)
r
2-59
Thermal Valve
The thermal valve is a bi-metallic shutter valve that helps control
the venting rate of oil pressure in the underdrive clutch passage
during release of the clutch. When the oil temperature is approximately 20 degrees Fahrenheit or less, the valve will be fully
open to assist in venting oil past the Ul orifice. At temperatures
above 20 degrees, the valve starts to close and becomes fully
closed at approximately 140 degrees, The thermal valve is
located in the transfer plate of the valve body.
f
Cold-open
from UD clutch
Hot-closed
No pressure
switch off
With pressure
switch on
Pressure Switches
The pressure switches in the solenoid assembly supply information to the TCM. When pressure is applied to a hydraulic circuit
where there is a pressure switch, the switch is forced to the
“on” or closed position. The switches do not tell the TCM how
much pressure there is in a circuit, but rather that pressure
does exist. Basically, the switches confirm to the TCM that
the intended solenoid action did occur. They can also be used
to determine a hydraulic problem.
2-60
POWER TRAIN - Automatic Transaxle
VALVE AND SOLENOID HYDRAULIC CONTROL IN SELECTED GEAR RANGES
Park/Neutral
Hydraulically, this internal transaxle condition is
In either of these gear selections, the transaxle has
lube pressure. To provide smoother engagement,
identical for both the Park and Neutral positions.
the low/reverse clutch is pressurized, anticipating
The only mechanical difference is that the parking
a shift to a forward or reverse gear. The LWCC
pawl is engaged in the Park position.
solenoid is energized which permits line pressure
to the low/reverse clutch. The 2-4/LR solenoid is
energized to close off the circuit to the manual valve.
PARK/NEUTRAL
Speed under .8 mph
LR = Low reverse
UD = Underdrive
R = Reverse
AC = Accumulator
PT = Pressure tap
S = Solenoid
PARK/NEUTRAL
SPEED UNDER 8 MPH
ccm
LUBE
24 =2-4 CLUTCH
I
““=“N”tmK,YL
OD =OVERDRIVE
R =REVERSE
SW=SWITCH
CC -CONVERTER CL.
PT=PRESSURE TAP D =DRIsELER
.;
.V =VENT
LR=LOW REVERSE
..^ . ..^r--^...-
.
.
\ I. 8, L-KL-7,
LR(p-N-‘>
?Af?-II
“VI
“Y . -7-n
- - ,
1
24 = 2-4 clutch
OD = Overdrive
SW = Switch
CC = Converter CL
D = Dribbler
V = Vent
ODCZ-4)
- - .- ,
RCREV)
2-61
POWER TRAIN - Automatic Transaxle
Rolling Neutral Above Eight MPH
When the transaxle is in neutral, and vehicle speed
i/’IS ab ove eight mph, all friction elements are disengaged to minimize or reduce drag and to avoid
excessive element speed. The TCM de-energizes
the LFUCC solenoid to vent the LR circuit. This configuration is ready to engage any forward gear, depending on vehicle speed and throttle position.
NEUTRAL
Speed over 8 mph
LR = Low reverse
UD = Underdrive
R = Reverse
AC = Accumulator
PT = Pressure tap
S = Solenoid
NEUTRAL
SPEED OVER 8 MPH
LR=LOW REVERSE
24 -2-4 CLUTCH
UD=UNDERCRIVE
OD =OVERDRIVE
LR(R-N- I )
24(2-4)
24 = 2-4 clutch
OD = Overdrive
SW = Switch
CC = Converter CL
D = Dribbler
V = Vent
uD( l - 2 - 3 ) O G‘(3-4)
AT(500RPM
PRESSURE(PSI)
RCREV)
2-62
POWER TRAIN - Automatic Transaxle
Reverse
With the manual valve moved to the reverse position,
line pressure is allowed through the manual valve
directly to the reverse clutch and also through the
2-WLR solenoid to the low/reverse clutch. The regulator valve is designed to increase line pressure
in the reverse gear range above the pressure that
is normal for other ranges. This is done to increase
clutch capacity. Line pressure is directed between
a small valve and larger valve at the right end of
the regulator valve. This neutralizes the effects of
the larger valve on the regulator valve. With only IL)
the smaller valve working against the regulator
valve, the regulator valve spring further closes down
the vent, causing line pressure to increase. There
are no solenoids energized in the reverse gear
range. However, the 2-4/LR solenoid is modulated
during initial engagement to smooththe torque transition and prevent harsh engagement into reverse.
REVERSE
LR = Low reverse
UD = Underdrive
R = Reverse
AC = Accumulator
PT = Pressure tap
S = Solenoid
REVERSE
R=LOW REVERSE
D=UNDERCRIVE
y
t.1
LR(R-N-I)
B .
24(2-4)
24 q-4 CL”TC”
OD =OVERDRIVE
-.
_
.-
AC’ACCUhULATOR CC=CONVERTERCL.
..^_ - .PT=PRESSutt I A,’ D =DR,SBLER
_
RESERVOIR
AT ,SOORPM
PRESSURE(PSI)
24 = 2-4 clutch
OD = Overdrive
SW = Switch
CC = Converter CL
D = Dribbler
V = Vent
2-63
POWER TRAIN - Automatic Transaxle
Reverse Block Above Eight MPH
Reverse gear will not engage if the TCM senses
vehicle
speed above eight mph. This is to prevent
I/
damage that could occur if a driver accidentally
puts the gear selector in “R” while rolling in any
forward gear range. If the output speed sensor detects that the output shaft is spinning at a speed
equal to or greater than eight mph, the TCM activates
reverse block to protect the transaxle. The function
is inoperable in “limp-in” mode. To accomplish or
initiate reverse block, the TCM energizes the 2-4/LR
solenoid. The solenoid prevents line pressure from
applying the low/reverse clutch. Without a holding
element, the planetary gearset in this range will
provide no output. It must have both an input and
a holding element to provide output. In this condition,
the transaxle is effectively in Neutral.
REVERSE BLOCK
Shift to Rev. w/speed over 8 mph
REVERSE BLOCK
SHIFT TO REV. Y/SPEED OVER 8 MPH
AC=ACCUMULATOR
/j
PT
[
,)j
24 = 2-4 clutch
OD = Overdrive
SW = Switch
CC = Converter CL
D = Dribbler
V = Vent
LR = Low reverse
UD = Underdrive
R = Reverse
AC = Accumulator
PT = Pressure tap
S = Solenoid
S
SW=SWITCH
CC iCONVERTER
=SOLENOID
v
=VENT
LR(R-N-I )
24(2-4)
UD(I -2-3)
OD(3-4)
CL.
,,
r,&,“”
r’lI
. ’
.
-
-
II
,
VENT
RESf;lR[
rxr&
PRESSURE(PSI)
AT,500RPM
,,
R (RE
,2-64
POWER TRAIN - Automatic Transaxle
First Gear
When any of the forward gear selections are made,
line pressure is directed to all four solenoids. In
first gear the TCM will energize the LWCC and
2-4/LR solenoids. This action applies the low/reverse and underdrive clutches. The forward gear
position selected by the driver has no effect on
manual valve position. Its location will be the same
for all forward positions. The selection difference
is detected by the TCM through the transmission
range and park/neutral position switches. The
switches provide the TCM with the information needed to determine which shift pattern and schedule
to use for the selected gear range.
FIRST GEAR
LR = Low reverse
UD = Underdrive
R = Reverse
AC = Accumulator
PT = Pressure tap
S = Solenoid
LR(R-N- 1)
-
FIRST GEAR
cc RiBA
LR=LOW REVERSE
.._ ____ - .._
04
OD(
.3)
24(2-41
7
24 =2-4 CLUTCH
OD =OVERDRIVE
SW=SWITCH
OFF ON
-r
,,“1’*;y
.,’ III 1; ;iov /I
11.
[
LRJCC
II
II
UD
n
//
q
2&jk
*,
RESERVOIR
71
24 = 2-4 clutch
OD = Overdrive
SW = Switch
CC = Converter CL
D = Dribbler
V = Vent
-4)
R(REV)
2-65
POWER TRAIN - Automatic Transaxle
Second Gear
/
There are no solenoids energized in second gear.
i With the solenoids de-energized, line pressure is
directed to the 2-4 and underdrive clutches. Line
pressure from the 2-4 clutch circuit is also directed
to the solenoid switch valve, which moves the valve
to the left. When the solenoid switch valve is moved
to this position, it opens a circuit that can be applied
by the TCM and LWCC solenoid for torque converter
clutch engagement. When the TCM recognizes a
problem or is unable to function properly, the transaxle goes into a default or limp-in mode. In this
mode of operation, the solenoids and valve body
shift to a position that only provides second gear
range, regardless of any forward gear that is selected by the driver.
SECOND GEAR
LR = Low reverse
UD = Underdrive
R = Reverse
AC = Accumulator
PT = Pressure tap
S = Solenoid
SECOND GEAR
LR=LOW REVERSE
UD=UNDERCRIVE
24 =2-4 CLUTCH
OD =OVERDRIVE
SW=SWlTCH
AC=ACCUMULATOR CC =CONVERTER CL.
PT=PRESSURE TAP D =DRIBBLER
LR(R-N-l)
24
.
4)
I
9
AC
)FF ON
‘JD( l-2-3)
24 = 2-4 clutch
OD = Overdrive
SW = Switch
CC = Converter CL
D = Dribbler
V = Vent
OD(3-4)
R(REV)
2-66
POWER TRAIN - Automatic Transaxle
Second Gear EMCC
When conditions allow for it, the TCM pulses or
modulates the LWCC solenoid. This is called Electronically Modulated Converter Clutch (EMCC), as
mentioned earlier. By pulsing or modulating the solenoid, the TCM can lower the line pressure that
passes through the solenoid before reaching the
converter clutch and torque converter control valves.
When the modulated pressure reaches the two
valves, it fully moves the T/C control valve to the
left, but only partially moves the CC control valve.
When the T/C control valve moves, it vents the
fluid from the front side of the torque converter piston. At the same time, the CC control valve provides
modulated pressure to the back side of the torque
converter piston. This condition does not cause the
torque converter piston to fully engage but instead
regulates the amount of slippage (partial engagement).
SECOND GEAR
EMCC
LR = Low reverse
UD = Underdrive
R = Reverse
AC = Accumulator
PT = Pressure tap
S = Solenoid
SECOND
._^^GEAR
Eht.sta
LR=LOW REVERSE
UD=UNDERCRlVE
AC=ACCUMULATOR
LR(R-N-l)
24 =2-4 CLUTCH
OD =OVERDRIVE
SW=SWITCH
CC =CONVERTER CL.
n
,,.
UD(
.-I
281(2-
Vl
.::.
i
3
AC
p!
3FF ON
V
24 = 2-4 clutch
OD = Overdrive
SW = Switch
CC = Converter CL
D = Dribbler
V = Vent
d
2-67
POWER TRAIN - Automatic Transaxle
Direct Gear (Third)
To shift into direct gear, the TCM energizes the
L 2-4/LR and overdrive solenoids. This feeds line pressure to the underdrive and overdrive clutches. Line
pressure from the overdrive clutch circuit is directed
to an area between two large plugs at the end of
the solenoid switch valve. This keeps the solenoid
switch valve shifted to the left. The redirected line
pressure from the overdrive clutch circuit allows
for torque converter clutch engagement. It also takes
the place of second gear line pressure, that was
holding the valve to the left but has now been vented.
The line pressure has also been reduced by using
line pressure from the same overdrive clutch circuit
that keeps the solenoid switch valve moved to the
left. Line pressure is directed to an area between
the regulator valve and the smaller of the two valves
on the end. This aids in moving the regulator valve
to the left, dumping additional oil, which results in
lower line pressure.
DIRECT GEAR
24 = 2-4 clutch
LR = Low reverse
UD = Underdrive
R = Reverse
AC = Accumulator
PT = Pressure tap
S = Solenoid.
^^
DIRECT GEAR
LR=LOW REVERSE
24 =2-4CLUTCH
LR(R-N-I)
24(2-4)
I “d I
k=
AC
,
L
I
I I IIIsoLI ISW~VAI~E I
E
60
cc
II
I
UD(l -2-3)
PT
AC
P
OD = Overdrive
SW = Switch
CC = Converter CL
D = Dribbler
V = Vent
00 1(3-4)
P!
R(REV)
2-68
POWER TRAIN - Automatic Transaxle
Direct Gear EMCC
Direct gear EMCC is accomplished the same way
as second gear EMCC. Whenever the TCM activates EMCC, it provides full line pressure from the
regulator valve through the T/C control valve to the
transaxle cooler to help improve transaxle cooling.
For a review of EMCC operation, refer to Second ij
Gear EMCC.
DIRECT GEAR
LR = Low reverse
UD = Underdrive
R = Reverse
AC = Accumulator
PT = Pressure tap
S = Solenoid
DIRECT GEAR
LR=LOW REVERSE
UD=UNDERCRIVE
LR(R-N-1)
24(2-4)
UD(l -2. -3)
24 = 2-4 clutch
OD = Overdrive
SW = Switch
CC = Converter CL
D = Dribbler
V = Vent
00
4)
R(REV)
24 =2-4 CLUTCH
OD =OVERDRIVE
AC=ACCUMULATOR
CC =CONVERTER CL.
PT=PRESSURE TAP
I I IL
I
i
‘L
E
UD
l-l
3
I
c
m
:I
VENT
RESERVOIR
2-69
POWER TRAIN - Automatic Transaxle
Direct Gear CC On
In direct gear, when the torque converter clutch
is
L fully engaged it is called CC On. The solenoid
and valve configuration for this position is the same
as direct gear EMCC except the LR/CC solenoid
is fully energized instead of pulsed or modulated.
When the LR/CC solenoid is energized, it sends
full line pressure to the ends of the T/C and CC
control valves. Both the valves shift to the left. This
allows the T/C control valve to fully vent the pressure
on the front side of the torque converter piston,
causing full engagement.
DIRECT GEAR
CC ON
24 = 2-4 clutch
OD = Overdrive
SW = Switch
CC = Converter CL
D = Dribbler
U = Vent
LR = Low reverse
UD = Underdrive
R = Reverse
AC = Accumulator
PT = Pressure tap
S = Solenoid
DIRECT GEAR
CC ON
cc
PT
LR=LOW REVERSE
UD=UNDERCRIVE
R =REVERSE
LR(R-N-1)
24(2-4)
I ,,A r-l
g;:;;;g:;; L=- L J
S =SOLENOID
1
n
T/C
PI
,4)
UD(
.-!I
:!
Vl
r
I
II
I1
AC
P
. .
OFF ON
UD
n
~14’HHHh
R(REV)
2-70
POWER TRAIN - Automatic Transaxle
Overdrive Gear (Fourth)
The TCM energizes the underdrive solenoid which
shuts off line pressure to the underdrive clutch. The
TCM also de-energizes the 2-4 solenoid and allows
the 2-4 clutch to engage. This shifts the transaxle
into overdrive by allowing only the 2-4 and overdrive d
clutches to be applied.
OVERDRIVE
LR = Low reverse
UD = Underdrive
R = Reverse
AC = Accumulator
PT = Pressure tap
S = Solenoid
OVERDRIVE
LR(R-N-I)
-
24
.m
4)
UO(I
-2-3)
00
24 = 2-4 clutch
OD = Overdrive
SW = Switch
CC = Converter CL
D = Dribbler
V = Vent
,4)
R(F?Eb
z
.
.. . .
iT
OFF
m
OFF 1 CCON
lRESlDUAL/
LUBE ISUCTION
ON
POWER TRAIN - Automatic Transaxle
Overdrive Gear EMCC
The EMCC function is the same in Overdrive as
Lj I‘twas in the second and direct gear positions. For
a review of EMCC operation, refer to second Gear
EMCC.
OVERDRIVE
EMCC
24 = 2-4 clutch
OD = Overdrive
SW = Switch
CC = Converter CL
D = Dribbler
V = Vent
LR = Low reverse
UD = Underdrive
R = Reverse
AC = Accumulator
PT = Pressure tap
S = Solenoid
OVERDRIVE
EMCC
cc
1
LR=LOW REVERSE
UD=UNDERCRIVE
24 =2-4 CLUTCH
OD =OVERDRIVE
.?‘_I-CI.,ITC”
‘“=I )
UD(l -2-3)
4)
OC ,(3- .4)
w4
LX-
I
5(RI EV)
...
R
i
YR
IFF ON
OFF ON
I?tJ:
OD
VENT
V
__
2-72
POWER TRAIN - Automatic Transaxle
Overdrive Gear CC On
In this position the torque converter clutch is fully
engaged (CC On). The LWCC solenoid is fully energized as it was in the direct gear CC on position.
For a review of the transaxle operation in the CC
on position, refer to Direct Gear CC On.
OVERDRIVE
CC ON
LR = Low reverse
UD = Underdrive
R = Reverse
AC = Accumulator
PT = Pressure tap
S = Solenoid
OVERDRIVE
CC ON
LR(R-N-l)
r---l
2d 1(2-4 I)
.
UD(
l-2-3)
’
d
24 = 2-4 clutch
OD = Overdrive
SW = Switch
CC = Converter CL
D = Dribbler
V = Vent
OD
24 =2-4 CLUTCH
LUBE
I
,J
IFF ON
OFF ON
OD
PRESSURE(PS0
AT 1500RPM
POWER TRAIN - Automatic Transaxle
Electronic Control System
/
LJ
INTRODUCTION TO THE ELECTRONIC CONTROL
The advantage of using the electronic control system
is more precise control over transaxle function. An
added advantage of the system is that it can help
the technician find a problem in a malfunctioning
transaxle. The system can do this through what
is called On-Board Diagnostics. The Transmission
Control Module (TCM) continuously monitors its critical functions during normal operation. It records
malfunctions in the form of diagnostic trouble codes
and the number of engine starts since the last code
stored in memory. The technician can use this information in the event of a malfunction or complaint.
Up to seven, two digit numeric diagnostic trouble
codes may be stored in memory at one time.
When a failure is identified by the TCM, the system
may go into a limp-in mode by turning off the solenoids. TCM logic is included to ensure that the limpin event results in an orderly shut-down of transaxle
Electronic Control System
Each of the major system components are represented as a block of information. The lines between
the blocks represent the flow of input and output
information between the components.
Some of the input and output information is unique
L to the TCM. In other words, some of the input to
the TCM is “Direct Input.” Some information (input)
to the TCM is shared with other components through
SYSTEM
function when possible. The shut-down sequence
will vary depending on which gear the transaxle
is in and what the vehicle speed is at the time the
failure is identified by the TCM. This “all-solenoids
off” limp-in mode is designed to allow for shift lever
manual control of PARK, REVERSE, NEUTRAL and
SECOND GEAR operation. When any forward gear
shift lever position is chosen, the transaxle will remain in second gear range.
All failures do not result in limp-in, just those that
could potentially cause internal transaxle damage.
If the TCM itself fails, the transaxle will also go
into the limp-in mode.
The transaxle control system consists of an electronic control module, called the TCM, and a system
of input and output components, that function together to control the operation of the transaxle.
the Chrysler Collision Detection (CCD) data bus.
As the TCM receives input information, it continuously processes it through its logic circuits in order
to perform all of the control functions that it has
been designed to perform. The following is a list
of inputs related to the transaxle control system,
both direct and indirect.
2-74
POWER TRAIN - Automatic Transaxle
Electronic control system
Brake switch
Map sensor
I
Speed contr
Other vehicle
-ontrol modules
Scan tool
(MUT-II)
Transmission
control module
control
relay
Output speed sensor
-f
Input speed sensor
Transaxle
Transmission range
and ParWNeutral
position switches
Four solenoids
---a----__
t
3 pressure switches
TCM Direct Inputs
The direct inputs connected to the TCM are battery
feed, ignition run signal, cranking signal, throttle
poskion sensor signal, engine speed signal (distributor or DE crank sensor signal), input speed sensor
signal, output speed sensor signal, transmission
range switch signal, park neutral position switch
signal, low/reverse pressure switch signal, 2-4 pressure switch signal, and the overdrive pressure switch
signal.
TCM Indirect Inputs over the CCD Bus
The indirect input signals the TCM senses from
the powertrain control module (PCM) that are sent
over the CCD data bus are, target idle speed, coolant
temperature, battery temperature, brake switch ON/
OFF signal, engine speed (verifies direct input engine speed signal), speed control ON/OFF switch
signal, and the manifold absolute pressure sensor
signal.
As stated earlier, the TCM receives input information, and it continuously processes this information
through its logic circuits in order to perform all of
the control functions that it has been designed to
perform. However, some of these control functions
are internal to the TCM, while other control functions
are performed when the TCM provides some type
of output signal to another control device. The following is a list of outputs related to the transaxle control
system.
Direct Outputs from the TCM
The direct output signals or output devices the TCM
has control over are, the transmission control relay,
the four solenoids in the solenoid pack, and the
vehicle speed signal.
Indirect Outputs from the TCM over the CCD Bus
The only signal sent out from the TCM over the
CCD data bus is communication with the scan tool
(MUT-II) for diagnostics.
d
POWER TRAIN - Automatic Transaxle
2-75
TRANSMISSION CONTROL MODULE (TCM)
The Transmission Control Module (TCM), is the brain of the
transaxle. It receives information from several inputs for making
decisions on how the transaxle should function. Some of the
information is used only by the TCM, and some of the information is shared with other components through the CCD bus.
The CCD bus is simply a communication link between the
TCM and other electronic components on the vehicle.
TCM Inputs
The TCM uses various inputs to determine when to upshift
or downshift and when to engage or disengage the torque
converter clutch. The TCM also uses these inputs for continuous
feed-back data for controlling shift quality. Without any input,
the TCM has no way to determine the state of the transaxle
and therefore cannot control its operation as designed. The
illustration is a list of the input sensors and signals that the
TCM uses to determine control over its outputs.
Engine cranking
Scan tool
communication
TCM Outputs
In order for the TCM to perform, it must have the necessary
number of outputs (signals or devices) that cause the transaxle
to function as desired. Some of these controlled functions (or
outputs) are used by the TCM to cause upshifts or downshifts
(clutch control). Other TCM outputs are information signals
sent across the CCD bus to another control module. The illustration provides a list of the output signals or devices controlled
by the TCM.
Transmission
control relay
J
Transmission Control Module Operation
The main reason for having the transaxle controlled
by the TCM is to have superior shift quality. The
TCM actually “learns” the characteristics of a particu-
lar transaxle to optimize vehicle shift quality using
its program logic.
(1) Adaptive Memory
The TCM automatically adapts for engine performance variations and clutch torque variations to
provide consistent shift quality for the life of the
transaxle. This learning capability is called adaptive
memory. If for some reason the TCM loses its
memory, through a loss of battery power or the
disconnection of its 60-way connector, it takes
approximately ten shifts for the TCM to re-learn
shift characteristics.
(2) Quick Learn
A quick-learn procedure is available to pre-program
the shift characteristics into the TCM. The quicklearn procedure simply speeds up the TCM learning
process. The vehicle still must be driven and shifted
L several times in each gear range during the road
test. This will fully utilize the TCM’s adaptive memory
capability. The quick-learn procedure is accessed
through transaxle diagnosis and performed by the
scan tool (MUT-II).
2-76
POWER TRAIN - Automatic Transaxle
(3) Self Diagnostics
Another feature of the TCM is that it helps the technician find a problem within a malfunctioning transaxle
or control system. It can do this through self-diagnostics. When something goes wrong with any of the
(4) Diagnostic Trouble Codes
In addition to sensing electrical malfunctions, the
TCM can also detect some hydraulic and mechanical
malfunctions that also produce diagnostic trouble
codes. Each code represents a different malfunction.
In order to read the diagnostic trouble codes, the
technician must hook-up a special diagnostic scan
tool, called a scan tool (MUT-II). It will be hooked
(5) Default or Limp-In Mode
Another feature of the TCM is the ability to protect
the transaxle from potentially hazardous.operation,
when certain problems arise. The TCM constantly
monitors its systems. If it senses a problem, it puts
a diagnostic trouble code in memory and shuts down
the electronic controls. When this happens, it is
referred to as default or limp-in. Not all diagnostic
trouble codes put the transaxle into default or limp-in
mode. Only the codes that indicate a problem that
could potentially cause further transaxle internal
damage or hazardous operation. If the TCM fails
for some reason, the transaxle automatically goes
into default.
When the transaxle goes into the default mode,
it automatically shifts to second gear when in any
forward gear selection and stays there. When the
ignition key is turned “off” and then back “on” again,
the TCM resets itself to operate normally until it
senses the fault and again goes into second gear.
major electronic circuits in the TCM and/or its input
sensor and output device network, a two digit numeric diagnostic trouble code is put into memory.
up to a diagnostic connector, located under the
instrument panel.
To retrieve diagnostic trouble codes, it is necessary
to follow the procedures outlined in the Powertrain
Diagnostic Procedures manual for this transaxle.
The TCM can retain up to seven diagnostic trouble
codes in memory at one time.
No matter what forward gear is selected, the vehicle
stays in second gear. Park, Neutral, Reverse, and
Second gear are the only gears that the transaxle
will operate in when in the limp-in mode. The idea
behind limp-in mode is to prevent the customer from
being stranded and to provide them the ability to
drive in (or limp-in) for service.
As mentioned previously in the “Component Identification” section, the TCM has the job of controlling
four solenoids in the solenoid assembly. To do this,
the TCM uses its programming and information from
several sensors. Some of the sensors are wired
directly to the TCM and other sensor signals come
from other electronic components across the CCD
bus. The CCD bus is simply a communication link
between the TCM and other electronic components
on the vehicle. The communication link is made
through two twisted wires.
POWER TRAIN - Automatic Transaxle
L
TRANSMISSION CONTROL MODULE INPUTS AND SENSORS
at what information it receives and how it uses that
The TCM must depend on receiving information
’ in order to control shift quality. Let’s take a look
information.
Direct Battery Voltage
There is constant battery voltage supplied to the
TCM, even when the ignition is turned off. This
battery supply is responsible for keeping the TCM’s
memory alive. If the TCM loses battery voltage at
any time, it will lose the adaptive memory and have
to re-learn the characteristics of the transaxle for
optimum shift quality.
Ignition Voltage
When the ignition switch is turned to the OFF (column unlock), the RUN (on), or the Start (crank)
positions, the TCM is activated and looks at incoming
voltage. If the voltage is above approximately 24
volts or below eight volts, the TCM automatically
puts itself in default. Either voltage condition could
damage the TCM.
When the TCM is activated, besides checking the
incoming voltage level, it performs a self-test to
determine if the transmission control relay and the
solenoid assembly are performing as they should.
If the self-test results are good, the TCM sends
battery voltage to the transmission control relay.
The relay closes its internal contacts which supply
battery voltage to the TCM, the four solenoids and
the three pressure switches in the solenoid assembly. Whenever the TCM goes into default, it de-energize the transmission control relay and prevents
the solenoids from functioning. The solenoids will
then be in de-energized positions, which cause the
transaxle to shift into second gear.
Throttle Position Sensor
The F4ACl does not use throttle pressure to control shift points
like previous transaxles did. Instead, an electronic signal from
the Throttle Position Sensor is used by the TCM to help determine shift points and shift quality.
Engine Speed Signal
Engine speed is supplied to the TCM from the engine crankshaft
position sensor or distributor, depending on the engine and
ignition system used. This signal not only lets the TCM know
the engine is running, but also lets the TCM calculate engine
speed to control torque converter clutch engagement, determine torque capacity, etc.
POWER TRAIN - Automatic Transaxle
here
End of the
sensor counts
I
tor
attaches
here
g+j h+spe&-j 1 1
I
Park/N&tral
\ position switch
Input Speed Sensor
The input speed sensor gives information, to the TCM, on
how fast the torque converter turbine is spinning. The sensor
is located on the front side of the transaxle case, close to
the bell housing. Even though the sensor is called the input
speed sensor, the sensor is actually generating a signal from
the torque converter turbine through the input clutch hub. The
torque converter turbine and input clutch hub are splined together through the input shaft. The information supplied to the
TCM from the input sensor is compared to the output shaft
signal and the engine speed signal to determine planetary
gearset operating ratio, torque converter clutch slippage, torque
converter element speed ratio, torque capacity, etc. The rate
of input speed change is calculated and used in controlling
shifts.
‘d
Output Speed Sensor
The output speed sensor is located on the same side of the
transaxle case as the input speed sensor, but much closer
to the end of the transaxle. The output speed sensor generates
a signal from the rotation of the rear planetary carrier assembly.
When the output speed sensor signal is received by the TCM,
the signal is compared to the input speed signal to deternmine
gear ratio, detect clutch slippage, etc. It is also compared to
the throttie signal to determine shift points.
The output speed sensor is also used as the input for calculating
vehicle speed to the Powertrain Control Module (PCM). The
F4ACl transaxle does not have a vehicle speed sensor as
in other applications. The output speed signal is a direct input
to the TCM and is sent across the CCD bus for use by other
control modules.
Transmission Range and Park Neutral Position Switches
The transmission range switch is mounted to the case in the
valve body area. The input from the switch along with the
park neutral position switch tells the TCM what gear range
was selected by the driver. The TCM uses this input to determine
what gear range and shift pattern to use. The park neutral
position switch operates the starter relay and both the park ;L)
neutral position and transmission range switches operate the
back up lamp relay. The park neutral position switch does
not allow starter engagement in any positions other than Park
“P” or Neutral “N”. Both switches must be closed to operate
the back-up lamps.
POWER TRAIN - Automatic Transaxle
Solenoid and
2-79
Pressure Switches
The low/reverse, overdrive, and 2-4 pressure switches are
all located in the solenoid pack assembly. All three switches
send the same type of information to the TCM. These switches
tell the TCM if there is hydraulic pressure in their particular
circuits. The pressure switches do not tell the TCM how much
pressure is in the circuit. They just indicate that pressure exists
or does not exist. This information verifies that the solenoids
are operating correctly and what gear the transaxle is in. The
switches open at approximately 11 psi and close at approximately 23 psi.
Engine Coolant Temperature Sensor
This engine coolant temperature sensor tells the TCM the temperature of the engine. When the engine is cold, the TCM
may delay upshifts slightly to improve vehicle driveability. The
TCM prevents the torque converter clutch from engaging until
the engine warms up to normal operating temperature. If the
engine temperature is too high in any forward position, the
TCM engages the torque converter clutch in second, third,
or fourth gears to help cool the engine and prevent the transaxle
from overheating.
Brake Switch
The brake switch signal is used to make sure the torque converter clutch is disengaged when the brakes are applied. It is
also used to cancel cruise control so that braking can occur.
2-80
POWER TRAIN - Automatic Transaxle
Engine Speed
The TCM uses both direct engine speed input from the crankshaft position sensor or distributor and calculated engine speed ‘Lj
input from the PCM over the CCD bus. The direct input is
required to provide immediate information for use by the TCM
control logic. The slower CCD engine speed data is used by
the TCM fail-safe logic to confirm that the direct engine speed
data is valid.
Speed Control Switch
The speed control on/off switch modifies the shift pattern when
a speed control “on” signal is received by allowing a torque
converter clutch engagement or disengagement, as well as
kickdown shifts.
Manifold Absolute Pressure Sensor (MAP)
The MAP sensor provides engine load input and output torque
load on the input shaft to the TCM. These signals are sent
across the CCD bus to the TCM. The TCM uses this information
to modify shifting and reduce 3-4 shift hunting on grades. d
POWER TRAIN - Automatic Transaxle
2-81
TRANSMISSION CONTROL MODULE OUTPUT SIGNALS AND DEVICES
/
The TCM takes the input information from the sensembly. The following items are output components
sors,
evaluates
the
input,
then
uses
it
to
control
operated
by the TCM.
L
the transmission control relay and the solenoid as-
Transmission Control Relay
The instant the ignition is turned on, the TCM performs a self-test
to determine if its internal electronic circuits are all working
properly. If the self-test results are good, the TCM sends battery
voltage to the transmission control relay. The relay closes its
internal contacts which then supply battery voltage to the TCM
(confirms function of the relay), the four solenoids and the
three pressure switches in the solenoid assembly. If the TCM
“sees” a problem in the system, it turns off the power feed
to the transmission control relay, causing the contacts to open.
A diagnostic trouble code is then stored in memory. The transmission control relay is located in various places depending
on the vehicle model. It can be located directly on the TCM
or in the harness near the TCM.
Solenoid and pressure
Solenoid Assembly
When the transmission control relay contact points are closed,
the solenoid assembly receives electrical power. The TCM
can now operate the solenoids, as determined by its programming. The relay provides power to all four solenoids through
a single wire. This means that all the solenoids have voltage
supplied to them whenever the transmission control relay is
closed. The solenoids, however, are not energized until the
TCM grounds the solenoid return wire for the solenoid that
is needed.
Power and Ground
The ground wire from each solenoid goes back to the TCM.
The TCM energlizes each solenoid by connecting the solenoid
return wire to ground. Four of the wires in the 8-way solenoid
assembly connector are solenoid return wires. Three wires
are for each pressure switch, and the last wire is the battery
feed wire from the transmission control relay. The TCM controls
both the power feed (through the transmission control relay)
and the ground to each solenoid (through the return wires).
2-82
POWER TRAIN - Automatic Transaxle
Vehicle Speed Signal
The vehicle speed signal is sent as a direct input
from the TCM to the PCM. This system is called
electronic pinion. The output speed sensor signal
is sent to the TCM and used as the vehicle speed
signal. The F4ACl does not use a vehicle speed
sensor as in past transaxles. The TCM converts
the output speed sensor signal to an 8000 pulse-perScan Tool (MUT-II) Interface
The TCM and other components have the ability
to interface (“talk” to each other) over the CCD bus.
The scan tool (MUT-II) connects to a data link connector located in the passenger compartment. This
mile signal. The signal is then sent directly to the
PCM.
Using the transaxle output speed sensor for the
vehicle speed signal has resulted in reduced
manufacturing process time, cost savings, increased
reliability, and increased speedometer accuracy.
allows communication with the TCM on the CCD
bus. Refer to the F4ACI Transaxle Powertrain Diagnostic Procedures manual for the data link connect
location.
POWER TRAIN - Automatic Transaxle
:
L
2-83
TRANSMISSION CONTROL MODULE OPERATION
Introduction
What does it do and how does it know? You have
probably asked yourself this question more than
once as you pondered some transaxle problems.
This is really a very complex question. Just stop
and think about it for a minute. Think of all the
electronic logic features that have to be programmed
into this small control module so that it will always
know just what clutch to apply and release, at just
the right time, under all the different driving conditions that could possibly take place.
A description of the TCM’s electronic functions can
be simplified if we look at them, one main logic
function at a time. We will use this “logic function”
approach to describe in simple terms how the TCM
makes some of these complex decisions. We will
concentrate on the main logic functions and define
the primary input and output requirements. By doing
this we will be able to use simple block diagrams,
charts and graphs to illustrate how some of the
decisions are made. We will not cover electronically
how the actual logic circuits inside the TCM work.
The main logic functions, covered in this lesson,
include the Start Routine, Transmission Range and
Park Neutral Position Switch Logic, Shift Lever Position Logic, Speed Sensor Logic, Transaxle Temperature, Shift Schedule Logic, Torque Converter EMCC
Logic, Shift Selection Logic, Shift Execution Logic,
Solenoid Switch Valve Control Logic, Clutch Apply
Status (Clutch Volume Tracking), Normal Shutdown
Routine, Fail-Safe Routine.
TCM Routine and Logic Functions
Many of the control logic functions discussed in
this section rely on output information from a prior
logic function as their main input information. This
should be kept in mind when you are doing your
diagnosis. Most of these logic functions are recalculated and updated on a regular basis and in a specific
sequence. This sequence and the time interval that
it takes to complete these normal functions is referred to as a program loop. A program loop occurs
once every 7 milliseconds (.007 seconds). Some
special checks or logic functions may be performed
more or less frequently.
Start Routine
/
Li The first function the TCM performs, when the ignition key is turned on, is the Start Routine. This
routine allows the TCM to check critical inputs and
memory circuits before it powers-up the system.
If everything is ok up to and including the switched
battery tests to the TCM and pressure switches,
then the TCM will power-up the transmission control
relay and finish the remaining checks as described
below.
The Start Routine is performed when the ighition
switch is turned to the OFF (column unlock) or RUN
positions and again when the ignition switch is returned to the run position after engine cranking.
NOTE
The ignition switch has been redesigned to allow
for power up of the TCM, BCM and electronic
PRND2L display. This occurs with the key in the
column unlock position, just before the ignition run
position.
Any invalid result sets the appropriate diagnostic
trouble code, and the system immediately goes into
limp-in. The TCM identifies the crank period by the
crank signal input provided at pin 8. When the crank
signal is present, the TCM is stopped and is re-initialized after cranking to eliminate the possibility of
low cranking voltages or spikes confusing the Central Processing Unit (CPU). The CPU is a small
microprocessor inside the TCM that contains thousands of transistors and diodes on a chip of silicone
small enough to fit on the tip of your finger.
POWER TRAIN - Automatic Transaxle
Random Access Memory (RAM)
One of the start routine checks is to verify that the
data storage bits in each RAM location are functioning properly. RAM is a form of memory that can
Read Only Memory (ROM)
A ROM check also occurs during the start routine.
The check is to verffy that all of the data stored
in the ROM is valid. ROM is a permanent memory
be written to and changed, as well as read from.
Code 17 is reported with a failure of RAM.
in the TCM and is used to store the programs needed
to run the system. Code 16 is reported with a failure
of ROM.
Transmission Control Relay and Driver Circuit Continuity Checks
Prior to power-up, the relay contacts should not
for each solenoid. Codes 41 through 44 are reported
be passing current (relay open). Code 14 is reported
with a failure of any one solenoid.
with a failure of the transmission control relay conAfter completion of the Start Routine, all of the nectacts (stuck closed).
essary control logic variables are reset prior to actiAll three pressure switch inputs should be in a powervating the main control program. Some of the varioff condition. Code 20 is reported with a failure
ables that require resetting are clutch volume trackof any pressure switch (switch closed, indicating
ing values set to zero, initial speed values are calcupressure when none exists).
lated, various counters and timers are cleared, and
With the above checks all valid, the TCM then closes
shift logic selection is set to neutral.
the relay and verifies that the relay contacts are
For the first few seconds of main program execution
passing current. Code 15 is reported if this fails
following start up, the pressure switch checks are
(relay contacts never close).
not performed. This allows time for the transaxle
With the transmission control relay contacts closed,
oil pump to develop pressure and purge the air
the TCM then confirms the driver circuit continuity
from the various hydraulic circuits.
Park/Neutral Position and Transmission Range Switch Logic
This logic function reads the switch positions of
Reverse, N = Neutral, D = Drive, 2 = Second, and
the transmission range and park neutral position
L = Low. There are also some transition codes that
switches on the manual lever (rooster comb) to deoccur between switch positions that are recognized
termine the driver-selected operating mode.
by the TCM. They are Tl, T2, and T3. An I code
The primary input for shift lever position to the TCM
also exists as an invalid code.
comes from the transmission range and park neutral
These logic output codes are then used by the Shift
position switches. The logic in the TCM for these
Lever Position (SLP) logic in the TCM.
switches reads the four bit code determined by the
NOTE
switch positions. When closed, each switch provides
The scan tool (MUT-II) does not recognize the differground for the particular circuit it is in (TI, T3, T41,
ence between transition and invalid codes. A “?”
T42). The status of these switches is based on
on the display screen, of the scan tool (MUT-II),
shift lever, manual valve and rooster comb positions
is used to represent these codes when they are
which determines the logic output code.
present. They can occur between shift lever posiThe output signal may be any of the following, detions. F4ACl Transaxle Electronics
pending on the logic output code. P= Park, R =
POWER TRAIN - Automatic Transaxle
SLP
T42
T41
P
R
N
D
2
L
Tl
T2
CL
OP
OP
OP
OP
CL
OP
OP
CL
OP OP
OP
CL
CL
CL
CL
OP
OP OP
CL
OP
CL
OP
OP
OP
OP
CL
OP OP
OP
OP
OP
TO1
TO3
Shift Lever Position (SLP) Logic
The primary function of SLP logic is to provide safe, continuous,
but limited operation of the transaxle with the presence of
an invalid or transition input code. The SLP logic function
screens the input codes from the switches and provides an
SLP output signal to control actual gear selection.
Inputs include the codes indicated by the transmission range
and park neutral position switches, current shift lever position,
pressure switch indications, and speed ratio data from the
input and output speed sensors.
Shift Lever Position output becomes the “PRND2L”
input to most of the other functions.
The R, P, N, Tl and ‘73” PRND2L codes are always
accepted by the SLP logic as being valid and are
always converted directly to R, N or “D” SLP codes.
This is done because these codes can only occur
when the corresponding Reverse, Neutral or Drive
manual valve porting is established. This improves
the response time necessary for garage shifts (Reverse - Neutral - ‘ID”).
SLP output with 2, L, T2 and Tl codes is based
onthe current SLP position as well as current pressure switch and speed ratio data. The pressure
switch and speed ratio data are monitored to identify
which hydraulic mode of operation exists (reverse,
neutral or drive) so that the appropriate selection
is made for Shift Lever Position.
NOTE
To help clarify the SLP table, keep in mind that
SLP logic only uses N because transmission control
On some vehicles it may be possible to cause pressure switch or speed check diagnostic trouble codes
Speed Sensor Logic
Speed and acceleration calculations provide critical
input information to the logic functions within the
TCM. Speed sensor logic determines gear selection,
shift timing and shift quality. This information is used
as input to the shift schedule, shift logic selection
and shift logic execution functions, programmed into
the TCM.
There are four important input values that must
be calculated; engine speed, input speed, input acceleration, and output speed.
The TCM receives a direct engine speed signal
from the crankshaft position sensor or distributor
depending on the vehicle and engine used. Engine
speed is calculated and updated with each sensor
pulse. The TCM also receives an engine speed
signal from the PCM over the CCD bus. Immediate
direct input of engine speed is needed for proper
transaxle operation. It cannot be provided by the
engine speed signal from the PCM over the bus.
However, both “engine run” signals allow the TCM
module logic is identical in Park and Neutral (same
hydraulic porting).
NOTE
An incorrect input (for example, a defective switch)
of one of these positions could, with sufficient time,
result in either a pressure switch or speed check
fault, when in fact the real cause is a transmission
range or park neutral position switch error. This
type of fault can occur, for example, when the manual
valve porting is in reverse but the code is indicating
“D”. In this case, the low/reverse pressure switch
data and input speed data will not agree with the
expected results for Shift Lever Position = 73”.
NOTE
It is extremely important that accurate shift lever
position data be available to the TCM. The accuracy
of any diagnostic trouble code found in memory
is doubtful unless the Shift Lever Test, performed
on the scan tool (MUT-II), passes without fail.
by holding the shift lever mid-way between ‘ID” and
Neutral.
to distinguish between a failure of the crankshaft
position sensor or distributor pulse input through
the circuits versus an actual engine stall or key
on engine off condition.
Input speed data from the input speed sensor is
calculated by the TCM. The data is based on the
number of teeth and time between each tooth since
the last main program loop. Input acceleration is
calculated from the change in torque converter input
speed over time.
Output shaft speed data from the output speed sensor is calculated based on the number of teeth and
the time between each tooth since the last main
program loop.
Speed information is also used to verify that steady
state in-gear operation is normal. Output shaft speed
times current gear ratio is continually checked
against input speed in order to identify the occurrence of an input or output speed sensor failure
or a clutch that is slipping.
POWER TRAIN - Automatic Transaxle
Transaxle Temperature
The transaxle temperature operating range is based
ona predicted fluid temperature which is calculated
from a combination of inputs. The predicted fluid
temperature is continually updated and retained in
memory for 20 minutes after the ignition switch is
turned off. When the vehicle is started after an extended off time, the predicted fluid temperature is
reinitialized at a value equal to the battery temperature signal received from the PCM over the CCD
bus. The temperature input signal must then be
calculated and then increased primarily based on
transaxle run time in gear. Time calculation excludes
operation in park and neutral.
A detailed explanation of how transaxle temperature
range affects transaxle operating characteristics is
covered in the shift schedule and EMCC sections.
The primary temperature inputs to the TCM are
battery temperature, engine coolant temperature
and in-gear run time since start-up.
Transaxle Temperature Output Modes
Output modes used by the TCM are extreme cold,
supercold, cold, warm or hot. The extreme cold
range is set when the initial predicted fluid temperature is less than - 15 degrees F. It will clear two
minutes after a cold start. The supercold range is
set when the predicted fluid temperature is less
than 0 degrees F. It will clear when the predicted
fluid temperature exceeds 10 degrees F. The super-
cold range allows for near normal transaxle operation under sub-zero conditions. The cold, warm,
and hot ranges provide different operating features
as warm-up occurs. The transaxle temperature
range is “cold” at less than 36 degrees F, “warm”
above 40 degrees F and “hot” above 80 degrees
F.
Shift Schedule Logic
Shift schedule logic, programmed into the TCM,
selects the appropriate shift schedules for the current operating conditions. This is to determine the
“desired” gear range the transaxle must be operated
in. The desired gear range is a primary input to
the shift logic selection function. The TCM then activates the appropriate shift logic schedule to achieve
the desired gear. The actual shift points within each
shift schedule have been pre-determined for best
transaxle operation and are stored in the TCM’s
ROM memory.
The primary inputs to the TCM are the transmission
range and park neutral position switches (shift lever
position), throttle position, and output speed. Some
other secondary inputs include, but are not limited
to, calculated transaxle temperature and current
shift logic.
Shift schedule output codes simply provide the TCM
with the desired operating gear range signal. Shift
schedule logic output is updated every 7 milliseconds and is a primary input to the Shift Logic Selection function programmed into the TCM.
POWER TRAIN - Automatic Transaxle
L
I
L
Inhibits and Shift Action Summary
For neutral (N) and reverse (R) there are no logic
inhibits placed on SLP changes into or out of either
neutral or reverse. These gear ranges are shift lever
controlled modes of operation. Neutral and reverse
must be immediately provided for. Also, a reverse
block function is used at speeds over approximately
10 - 15 mph by continuously venting the Low/Reverse (L/R) clutch. The L/R clutch is also vented
at speeds over 8 mph in neutral.
For drive (D), Second (2) or low (L), when speed
ratio or pressure switch errors occur during transaxle
use, the TCM will maintain the current gear range
to prevent potentially hazardous gear selection.
A separate set of shift schedules exist for each
engine/transaxle application. The TCM knows which
set of shift schedules to use by looking at the PCM
identiftcation over the CCD bus. The engine and
body identifications are retained in the TCM’s
memory to ensure that the correct schedule is used
if the CCD bus fails.
There are four different shift schedules within each
engine set. They are selected primarily by the Shift
Lever Position input code and the transaxle operating temperature range that is calculated. Separate
shift schedules exist for the following; Shift Lever
Position = D, Shift Lever Position = D (supercold
temperature range), and Shift Lever Position = L.
A typical set of shift schedules have been plotted
out in graph form. These have been modified ‘for
clarity. The shift schedules primarily use throttle
angle and output shaft speed as the determining
factors. The main difference between these schedules are as follows:
SLP = “D” Cold, Warm or Hot
The “D” schedule provides first, second, third and
fourth gears. This shift schedule is selected when
SLP = “D” and the transaxle calculated temperature
range is cold, warm or hot. It should be noted that
the “D” schedule will delay the 3-4 upshift, and will
cause earlier 4-3 downshifts when the transaxle
temperature range is cold. Throttle input is also
limited to prevent high engine speeds with a cold
engine.
SLP = “D” (Supercold and Extreme Temperature
The supercold “D” schedule is a revised D schedule.
It is selected whenever the initial calculated transaxle temperature is less than 0 degrees F. This
revised schedule prevents closely spaced shifts and
part throttle kickdowns. This results in delayed (higher speed) upshifts, earlier closed throttle downshifts,
and in most cases the inability to obtain either 4-2
or 3-1 kickdowns. The primary reason is to allow
more time for clutch pressures to achieve their normal in-gear condition after a shift. This should happen before the next shift occurs to avoid clutch
overlap (two clutches applied at the same time).
SLP = L
The L schedule also has 1-2 and 2-3 shifts but
they are much more delayed. The determining factor
for this schedule is that engine speed is monitored
and shifts occur at peak engine RPM. Even though
the driver has selected the low position, the shift
schedule is designed to upshift the transaxle at up-
Range)
If the calculated transaxle temperature at start-up
is in the extreme cold range of - 15 degrees F.
or less, all the solenoids will be held off. Also, the
pressure switch and speed sensor checks will ,be
disabled. This action provides the same mode of
operation as with limp-in or default (second gear
operation only, in any forward gear range selection).
This is done to prevent clutch damage and inadvertent shutdowns by delaying all TCM operation until
supercold conditions can be met.
per level engine RPM to protect the engine from
over-speed. Downshifts also occur at higher vehicle
speeds. This is done to provide the highest gear
ratio for maximum engine braking when descending
steep grades.
POWER TRAIN - Automatic Transaxle
Adaptive Coast Down Scheduling
Adaptive scheduling may result in delayed 4-3 or
3-2 downshifts under certain conditions in order
to maintain good shift quality.
Speed Control
When the transmission temperature range is either
warm or hot, the 4-3 shift pattern is modified to
kickdown earlier if a cruise control “on” signal is
received over the CCD bus from the PCM. If the
bus should fail, this logic will not be initiated with
speed control “on”, and the vehicle may lose more
speed and not kick down on grades.
d
Manifold Absolute Pressure (MAP)
This signal is used to calculate changes in engine
output torque to the input shaft of the transaxle.
This information is used by the TCM to improve
shift quality and reduce 3-4 shift hunting on steeper
road grades. A loss of this signal will cancel grade
hunting detection logic.
Throttle Failure
A throttle default value of 25 degrees throttle opening
is substituted to provide reasonable driveability.
Third gear is substituted for fourth to provide a toler-
able performance level. Throttle induced kickdowns
will become unavailable, but selection of drive and
low shift lever operation remains normal.
CCD Bus Failure
The initial predicted fluid temperature is based on
the battery temperature after an extended time off.
It is important to understand that if this data becomes
invalid (out of normal range or the CCD bus fails),
the TCM will substitute -3 degrees F. for ambient
temperature. This is done because the control logic
for the colder temperature range is designed to
tolerate an actual warmer transaxle. Some of the
effects of this are as follows; Defaults are possible
if the actual transaxle temperature is within the extreme cold range. The 3-4 shift will occur at a higher
speed for approximately the first minute of operation
in-gear (see supercold “OD” shift schedule). A reduction in upshift shift quality is possible for approximately 4 minutes if the actual transaxle temperature \
is in the warm to hot range.
Loss of Prime Protection
Special logic is included in the fail safe routines
to identify a loss of oil pump prime. A no pressure
condition is usually due to a low fluid level and
typically occurs following hard braking or cornering.
This will cause the oil filter to be exposed to air.
I
I
I
1 %g’ 1-1 $!&
.
J
The result will be a loss of oil pump prime and
possibly a no drive condition. The special logic prevents the inappropriate setting of diagnostic trouble
code.
Torque Converter EMCC Logic
The use of partial Electronically Modulated Converter
Clutch (EMCC) is available at speeds as low as 17
mph, giving the advantage of improved fuel economy
while buffering the rest of the power-train from engine
firing pulses. Full EMCC is utilized under certain
conditions to improve gas mileage. Both full EMCC
or partial EMCC may also be scheduled to help reduce
heat build-up of the transaxle or its fluid under certain
driving conditions.
Torque converter full EMCC and partial EMCC availability depends on many different input conditions.
These include shift lever position (D, 2, L), current
gear range (second, third, or fourth), engine coolant
temperature, input speed, and throttle angle.
The outputs controlling the torque converter are; No’d
EMCC, Partial EMCC, Full EMCC and Gradual to
No EMCC. The boxes in the chart represent the
four EMCC logic states.
POWER TRAIN - Automatic Transaxle
Types of EMCC Logic
No EMCC Logic -This is when the torque converter
L clutch is off.
Partial EMCC Logic - This logic will modulate the
LB/CC solenoid (duty-cycle) to obtain partial torque
converter clutch application. Partial EMCC operation
Full EMCC Logic - This increases the LR/CC solenoid duty-cycle to full “on”, after partial EMCC control
brings the engine speed to within the desired slip
Gradual to No EMCC from Full or Partial Logic This logic is designed to soften the change from
Full or Partial EMCC to No EMCC, at mid-throttle,
id
is maintained until full EMCC logic is called for and
actuated.
range of transaxle input speed relative to engine
rpm (crankshaft speed).
by gradually decreasing the LFUCC solenoid dutycycle.
EMCC Fail-safe
A malfunction of the EMCC system is detected from
a lengthy partial EMCC operation near the maximum
allowable duty-cycle, except at heavy throttle. If a
diagnostic trouble code is reported, the TCM will
not operate the torque converter clutch. It will remain
unapplied until the next restart. Diagnostic trouble
code 38 will be stored in memory.
EMCC Break-in Procedure
With the vehicles odometer reading from 0 to 500
miles, there will be no torque converter EMCC. From
500 to 1500 miles, the TCM will gradually decrease
EMCC from a 200 rpm slip to a 60 rpm slip. When
vehicle mileage is above the EMCC break-in period
and a malfunction occurs with the torque converter,
the new replacement torque converter must go
through the same EMCC break-in procedure. The
TCM must be re-programmed to allow for (restart)
the break-in period. To do this, use the scan tool
(MUT-II).
EMCC Inhibits
The TCM is provided with EMCC inhibits to prevent
EMCC from occurring under specific conditions. The
following are times when EMCC will not occur.
Transaxle Temperature - When the transaxle temperature range is cold or supercold, EMCC is inhibited (kept from occurring). In the event of a CCD
Bus failure, -3 degrees F. is substituted for the initial
Brake Signal (on) - This will cancel and prevent
EMCC as long as a brake signal is “on”. If a bus
failure occurs, the “brake on” signal is not received,
and EMCC is still possible.
Solenoid Switch Valve - If a solenoid switch valve
(SSV) malfunction is detected, EMCC will not occur.
A SSV diagnostic trouble code will only be stored
EMCC Fault - Any reported EMCC diagnostic
trouble code will prevent any type of EMCC from
occurring.
i
temperature. This initial value is incremented up
to normal engine operating temperature based on
engine running time. This will result in delayed
EMCC operation under start-up conditions.
Throttle Position Sensor - Any throttle value less
than 2 or 3 degrees (closed throttle) will cancel
EMCC. If a throttle position sensor failure is identified
by the TCM, EMCC will not occur.
if the transaxle operating temperature range is hot,
and the malfunction occurs at least three times.
The fault counter is reset during the start routine.
2-90
POWER TRAIN - Automatic Transaxle
2s
2ND
I
1ST
q
= In-gear logic
n = Shift logic
1 S, 2s = Shift schedule output
1 ST, 2ND = Speed ratio shift
complete signal
1s
Shift Logic Selection
The purpose of the Shift Logic Selection program is to activate
the appropriate “shift logic” so that the “in-gear logic” condition d
matches the gear called for by the shift schedule (driver selected
gear, throttle position).
Imagine that the TCM must always be in one of the logic boxes
at any given time. The double line boxes represent the “in-gear
logic” the TCM uses to maintain a certain gear range. The
single line boxes represent the “shift logic” required by the
TCM to execute a desired gear change from one gear to another.
The paths (lines with arrows) between the blocks are labeled
with one or more of the shift schedule output signals (Is, 2s).
These desired gear signals (shift schedule output signals) become the primary input which will cause the correct path to
be taken, from one in-gear box (such as inl) to a shift logic
box (such as l-2).
The output is a change to “shift logic” in order to obtain an
in-gear conditon that matches the output of the shift schedule
routine. The TCM knows whether the desired shift has been
completed when a correct speed ratio check of the input and
output speed sensors is present. The speed ratio check is
used to verify that the desired gear has been achieved. For
example, when the correct speed ratio signal for second gear
has been verilied by the TCM by checking the speed ratio
between the input and output speed sensors, it will switch
to the appropriate in-gear logic (in2).
Changes to “In Gear” or “Shift” Logic
If the transaxle is in first gear logic (inl) and the
shift schedule output changes to call for second
gear (2s), then “1-2” logic will be activated. This
generally remains in effect until the completion of
the shift is determined by the speed ratio check.
When the speed ratio check confirms that the degired gear (second) has been obtained, ‘in2” logic
is activated. There are other possible exits or
changes that may be made to the normal shift schedule logic from the “1-2” shift logic example, such
as a change-mind condition.
A “change-mind” shift condition may occur when
a shift that has begun directly from within another
Shift Logic Chart
Another exit or change to the normal shift schedule
logic is the fail shift timer may expire. The TCM
will only allow a certain amount of time to elapse
for the shift logic to complete a shift. If a speed
shift, instead of from an in-gear condition. A “change
mind” condition occurs if a change in the throttle
position signal causes the normal shift schedule
routine to select a different desired gear signal, such
as is, during a 1-2 shift change. These shifts are
accommodated by direct paths between upshift and
downshift logic within the logic selection routine.
“Change mind” shifts are needed to provide the
proper response to changes in driver demand.
Changes in the manual lever (selector lever) position
may also cause a “change-mind” shift depending
on when the lever position changes. A more detailed
shift logic chart is illustrated.
ratio check does not confirm the completion of an
attempted shift within this time limit, the shift logic ’d
is aborted, and the desired in gear logic is activated.
POWER TRAIN - Automatic Transaxle
1 ‘121 )9(
421
101 = In-gear logic 1 S, 2S, 3S, 4S, RS = Shift schedule output
lst, 2nd 3rd, 4th, Rev. = Speed ratio shift
= Shift logic
complete signal
q
i
d
Shift Execution Logic
As with most automatic transmissions, including the
F4ACl gearset, two clutches must be applied to
provide an operating gear range. One of the applied
clutches must be an input clutch driven by the torque
converter, such as the Reverse, the Underdrive,
or the Overdrive clutches. The other applied clutch
is usually a reaction or holding device, such as
cc
Gear
L
Reverse
Neutral
First
Second
Direct
Overdrive
Ratio
Clutches
applied
2.21
R, LR
2.64
1.57
1 .oo
0.69
UFLR
UD; 24
UD, OD
24, OD
the 2-4 or L/R clutches. For all gear ratios this is
the rule, except Direct Drive (3) where output is
achieved by applying two input clutches. All shifts
leave one clutch continuously engaged and involve
changing another clutch from the releasing clutch
to a different applying clutch.
POWER TRAIN - Automatic Transaxle
Solenoid Driver Logic
Electronic solenoid valves connect the clutches to
either a hydraulic source or a vent. Solenoid coils,
when energized, exert force on a push rod which
in turn opens or closes a ball valve and/or vent.
To increase efficiency, the current through the solenoid coil is pulse-width modulated. The microcomPulsing the Solenoids
The Full ON pulse time is normally around 8 milliseconds and provides rapid pull-in response time. Pullin response time is dependent upon battery voltage.
The pull-in response time will increase with reduced
battery voltage to maintain pull in power.
To protect against inadvertent drop-out of an energized solenoid, each ON solenoid is issued a refresher pulse every 50 milliseconds. The refresher
pulse is used to prevent hydraulic pressure from
overcoming the solenoids strength. The frequency
is increased during shifts and as certain faults start
to occur.
The hold-in duty cycle is also dependent on battery
voltage as well as the in-gear condition. The percent-
puter within the TCM is responsible for providing
this modulation (pulsing) signal as well as an initial ’d
pull-in current pulse each time a solenoid is energized.
age of solenoid on-time is normally 38%. In third
or fourth gear, the typical percentage is 30%. This
is because less power is required to overcome the
reduced hydraulic line pressure in third and fourth
gear ranges.
Current efficiency is maximized by the use of the
inductive energy of the solenoid during the OFF
portion of the cycle.
The turn OFF command opens the circuit to provide
for rapid drop-out response time. The circuit is monitored to permit checking the continuity of the solenoid and its power return line.
SOLENOID DRIVER LOGIC
‘d
Solenoid control logic:
FFJ
Driver pulse logic:
Ek- n J
H-u-Ln
-+I Full on pulse W- Hold-in duty cycle +j
Solenoid voltage:
VL
1
0
Inductive current flow -H I+
from ground
Inductive path opened --C +
Solenoid current:
(1) provides rapid ON pull-in response time
(2) reduces power level
(3) refresh pulse - a periodic reissue of the FULL ON
pulse to any energized solenlcid
(4) provides for rapid OFF drop-out response time;
inductive OFF voltage spike monitored
to confirm circuit continuity
d
POWER TRAIN - Automatic Transaxle
Clutch
Solenoid
id
OD
ON
ON
LRJCC
ON
ON
UD
OFF
ON
24lLR~
OFF
ON
J
2-93
Solenoid and Element Logic
Since both normally-ON and normally-OFF solenoids are used,
the following logic is recognized by the TCM.
The LWCC solenoid controls the LR clutch in first gear, Neutral,
and Park and controls the Converter clutch (CC) in second,
third, and fourth gears. The solenoid switch valve position determines which clutch (LR or CC) the solenoid will control.
The 2-4/LR solenoid controls the 2-4 clutch in Overdrive, Drive
and Low. The 2-4/LR solenoid controls the LR clutch in Reverse.
In this case, the manual valve position determines which clutch
is being controlled.
Solenoids
Gear
s2
s3
Sl
s4
OD
LRKC
UD
24/LR
0
Park/Neutral
(Under 8 MPH)
0
0
LR
Neutral
(Over 8 MPH)
Reverse
L
LR
Reverse
(Over 8 MPH)
0
LR
First
Second
0
cc
Second EMCC
Third EMCC
id
UD
24
UD
24
UD
Fourth
0
Fourth EMCC
;
Solenoid energized = (>
Clutch applied = OD, LR, CC, UD, 2-4, R
@
0
0
UD
UD
Third
Manual valve
0
0
0
24
0
24
R
R
2-94
POWER TRAIN - Automatic Transaxle
Solenoid Switch Valve Control Logic
This valve protects against the inadvertent application of LR clutch in second, third, or fourth gear
ranges. When shifting to first gear, the Solenoid
Switch Valve (SSV) must be in the downshifted position or action must be taken to shift the SSV into
the downshifted position. As long as any of three
pressures (2-4, OD, or UD) are greater than X%
of line pressure (X = 60% for UD and OD, 70%
for 2-4), the SSV will remain upshifted. To confirm
that the SSV has downshifted, both the LR solenoid
and LR pressure switch must be high (voltage value
seen by TCM). To downshift the valve for 3-1 or
2-1 shifts, shift logic will briefly vent the UD clutch
(shift logic must vent the other two clutches also)
and test for valve motion by eneraizing the LR/CC
L/R
clutch
solenoid and verifying that the LR pressure switch
turns on.
A SSV diagnostic trouble code will only be stored
if the transaxle operating temperature range is hot,
and the malfunction occurs at least three times.
The fault counter is reset during the start routine.
Under certain conditions, such as very cold fluid
temperatures, it is possible that the SSV valve may
not move as quickly as it normally would at operating
temperature. This slow response may occasionally
result in a second gear launch or a change mind
shift to second gear from a 2-l or 3-1 shift. No
diagnostic trouble code will be set if the transaxle
operating temperature range is cold.
UR clutch
Manual
valve
I
Manual
valve
Clutch Apply Status
To execute the shift logic, the TCM must maintain
a continuous record of each clutch element apply
status. This is done by tracking the instantaneous
fluid volumes in each clutch circuit. Instantaneous
fluid volumes are tracked using predetermined flow
rates and learned “clutch fill volumes”. This is particularly useful for closely-spaced shifts or changemind shifts.
Learned clutch fill volumes represent the volume
of fluid that is required to stroke a clutch piston
to the point where zero clutch pack clearance is
obtained. The clutch fill volume learn value is the
fill volume without stroking the accumulator or picking up any torque load on the clutch. This learned
fill volume is updated for each clutch element as
it wears and clutch pack clearance increases.
Manual
valve
2/4 clutch
Manual
valve
The Clutch Volume Index (CVI) display of the scan
tool (MUT-II) can be used to view learned clutch
fill volumes for each clutch. The normal range for
clutch fill volumes are LR = 35 to 85, OD = 75
to 150, 2-4 = 20 to 77, and UD = 24 to 70.
If the battery feed is disconnected from the TCM,
the learned clutch fill volumes will be lost, and initial
values will be substituted until correct values can
be re-learned. Shifting may be somewhat harsh.
The initial values are; LR = 64, OD = 89, 2-4 =
48, and UD = 45.
A transmission which has experienced a sudden
clutch failure may not be capable of learning the
correct values. A road test of a transaxle with this
condition may exhibit an upshift runaway condition,
but have acceptable clutch fill volumes.
POWER TRAIN - Automatic Transaxle
Normal Shutdown Routine
When the ignition switch is turned off (column lock,
i key out position), the TCM will go through a specific
shutdown routine.
For the first twenty minutes after ignition off, the
CPU remains in the “awake” mode. In tills off-time
tracking mode, the TCM continues to perform certain
functions such as predicting fluid temperature calculations.
Longer off-time tracking is currently prohibited due
to battery drain concerns since the CPU remains
powered up during this time.
After 20 minutes have elapsed, the CPU will switch
into a Sleep mode. In this mode the TCM does
not perform any functions and its Keep Alive Memory
uses only a very small amount of current.
The TCM uses a “Keep Alive Memory” that must
always remain connected to the battery voltage supFail-Safe Routine
The TCM is designed and programmed with what
is called a fail-safe routine. This routine constantly
monitors and checks all input and control features
for normal operation. The TCM uses inputs from
the PCM, transmission range and park neutral
switches, input and output speed signals, throttle
position, ignition and pressure switches to determine
the desired outputs. The primary outputs are to
ii
the four solenoid valves which control the transaxle
clutches. Changes in these solenoid outputs can
When a failure has been identified which prevents
continued safe transaxle operation, the TCM eventually goes into limp-in by turning off all of the solenoids. This provides for shift lever controlled operation of SECOND GEAR, NEUTRAL, REVERSE,
and PARK. The TCM has logic to ensure the limp-in
results in an ORDERLY SHUTDOWN. Certain failures will prevent an orderly shutdown, and an IMMEDIATE SHUTDOWN will occur.
Orderly Shutdown -A Shutdown routine is activated
with certain failures prior to opening the transmission
control relay. The result of an orderly shutdown is
dependent on the operating condition at the time
of the failure. If the transaxle is in Park, Reverse,
Neutral, or Second Gear, there is no additional action
needed by the TCM. The transmission control relay
is opened immediately because the power off state
of the transaxle has already been achieved.
If the transaxle is in first gear, then the shutdown
sequence (default to second gear) begins immediately.
If the transaxle is in third or fourth Gear above 45
b mph, then the current gear range is maintained
to prevent the possibility of causing high engine
rpm and/or engine braking.
2-95
ply. If the TCM is disconnected, the “Keep Alive
Memory” will be lost. This memory is where d/agnostic trouble codes and other learned values are
stored. These values may be clutch apply and release rates and clutch fill volumes. If the TCM is
disconnected from its direct battery voltage supply,
initial stored values are substituted for the erased
learned values when the CPU is re-initialized. These
values will then be updated as new values are
learned when operating the transaxle.
A code 12 will also be stored on any initialization
following a direct battery feed disconnection. Code
12 lets you know that a direct battery disconnection
has occurred.
result in changes in clutch pressures, pressure
switch states and input speeds. These changes
become the new input. If they are not as desired,
then the solenoid output is adjusted accordingly.
This feed-back control is referred to as a closed
loop system and is an integral part of fail-safe.
NOTE
The purpose of this section is to cover fail-safe
logic. Refer to the Fault Code Explanation section
for diagnostic information and probable causes.
The actual shutdown sequence to second Gear begins once the vehicle speed drops below 45 mph.
The exception to this rule is when the vehicle is
at high speed and develops a solenoid circuit error.
If this occurs, a temporary “neutral” state is generated by venting all clutches to avoid incorrect clutch
combinations - see Codes 41 to 44.
The shutdown sequence reduces the possibility of
having engine flare-up or clutch overlap (three
clutches applied) as the transaxle defaults to second
gear. This is accomplished by releasing the non
second gear clutches slightly before the transmission control relay is opened. This will occur when
the throttle angle is less than approximately l/3
full open. At greater throttle angles, the transmission
control relay is immediately opened. This is done
because second gear clutches typically apply faster
than the non second gear clutches. Again, the purpose for this sequence of events is to prevent more
than the correct number of clutches from being applied at the same time during moderate throttle
angles and to prevent engine flare at higher throttle
openings.
2-96
POWER TRAIN - Automatic Transaxle
Immediate Shutdown -To cause an immediate shutdown to occur, all solenoids are turned off at the
same time. To cause an immediate shutdown the
transmission control relay is opened at the time
of the failure. Default to second gear will take place
from first, third, or fourth gear. The immediate shutdown may result in clutch overlap at low to moderate
throttle angles and a temporary engine flare with
heavier throttle angles. An engine braking condition
may also result at high vehicle speeds.
At the end of either shutdown routine, the failure
condition will be recorded in memory. The use of
the scan tool (MUT-II) is required to determine what
the diagnostic trouble code was at the time of the
failure.
TRANSMISSION CONTROL MODULE
I
I-
1h
I
I
L-f-l
I
12v
INPUTS
PCM 41 Bus m R A M w
--IO Speed
signals
Throttle
0 Ignition
l
Power supply
I;$!;
,, r-f ,
I
I
OUTPUTS
POWER TRAIN - Automatic Transaxle
DIAGNOSTIC FUNCTION CHART
Diagnostic trouble
code No.
ii
Item
11
Internal control module (watchdog circuit test failure)
12
Battery power was disconnected since last power down
13
Internal control module (watchdog circuit shutdown)
14
Relay always On (relay contacts are welded closed)
15
Relay always Off (relay contacts are stuck open)
16
Internal control module (ROM checksum failure)
17
Internal control module (RAM checksum failure)
18
Engine speed sensor circuit
19
CCD bus communication with SBEC
20
Switched battery
21
Pressure switch circuit
OD
2-4
2-4/OD
LR
24
LWOD
LR/2-4
All
27
28
Check shifter signal
Throttle position signal
31
Hydraulic pressure switch
/ OD
/ 2-4
1 OD/2-4
I
I
35
Check ATF level
36
Fault immediately after a shift
37
Solenoid switch valve latched in the LU position
Lockup control out of range
41
Solenoid circuit error
LR
1 2-4
43
OD
44
UD
45
Internal control module (engine model EEPROM cell failure)
POWER TRAIN - Automatic Transaxle
Diagnostic trouble
code No.
Item
46
UD hydraulic circuit failure
47
Solenoid switch valve latched in the LR position
50
Speeds error
Gear ratio in Reverse
51
Gear ratio in 1st
52
Gear ratio in 2nd
53
Gear ratio in 3rd
54
Gear ratio in 4th
56
Input speed sensor
57
Output speed sensor
58
Speed sensor’s ground
60
Inadequate element volume
LR
61
2-4
62
OD
POWER TRAIN - Automatic Transaxle
2-99
TRANSAXLE CONTROL
/
l
L
l
N72ZDlbA
To prevent abrupt starting made through mistakes in selector lever operation, automatic
transaxle fail-safe mechanism (key interlock
system, shift lock system and reverse “R” position warning system) has been adopted.
Vibration-prevention rubber has been installed
to the transaxle control cable support area on
the transaxle side as well as to that on the
selector lever side so as to decrease transmission of vibration to the vehicle body.
NOTE
For the reverse ‘9” position warning system,
refer to GROUP 7 - ETACS.
REVERSE “R” POSITION WARNING
SYSTEM
, Inhibitor switch
REVERSE “R” POSITION WARNING
SYSTEM
<Non-turbo>
Transaxle range
switch
/
L
/c---n
SHIFT LOCK SYSTEM
Selector lever
‘L_ /
.<
m
A,’
ViO;on-preve;tion
Selector
lever
Ignition key cylinder
Key interlock cable
Shift lock ca
09x0115
POWER TRAIN - Automatic Transaxle
A/T FAULTY OPERATION PREVENTION
MECHANISM
Shift Lock System
d
Unless the brake pedal is being depressed, the
selector lever cannot be shifted to any other position
from the “P” position. Moreover, if the ignition key
is in “LOCK” position or if the key has been removed,
the selector lever cannot be shifted to any other
position from “P” position even if the brake pedal
is depressed.
1. WHEN BRAKE PEDAL IS NOT DEPRESSED
When the selector lever is in “P” position and
the brake pedal is not depressed, the detent
pin is locked because the shift lock pin locks
the lock cam, therefore, the selector pushbutton
cannot be pressed and the lever cannot be
shifted from the “P” position.
09X0106
2. WHEN BRAKE PEDAL IS DEPRESSED
\,/
When the brake pedal is depressed in the aforementioned condition 1, the inner cable of the
shift lock cable is pulled in the direction of the
arrow ( @ ) in the figure and the lock cam,
which is interlinked with the shift lock pin, is
released. As a result, the selector pushbutton
can be pressed and the selector lever can be
shifted from ‘P” position to another position.
3. SHIFTING TO “P” POSITION FROM ANOTHER
POSITION
In the case of shifting to “P” position from another
position (for example, “R” position), the lock
cam is held in the position shown in the figure
by the force of the shift lock pin return spring;
consequently, there is no need to depress the
brake pedal. When the selector lever is shifted
to “P” position and the selector lever pushbutton
\
is released, the lock cam is rotated leftward
while the detent pin moves upward. Conse- ’d
quently, the shift lock pin is pressed down on
by the force of the return spring and the lock
cam is locked. In this way, the selector lever
is held fixed in the “P” position.
POWER TRAIN - Automatic Transaxle
Revolving cam
nder
Slide
lever
Slide
lever
2-101
Key Interlock System
Unless the selector lever is in ‘P” position, the ignition key cannot be turned to the “LOCK” position,
and the key cannot be removed.
The key interlock device installed in the inside of
the ignition key cylinder consists of the slide lever,
cam lever and revolving cam.
The slide lever is connected to the key interlock
cable. When the selector lever is operated, the slide
lever moves to interlock with the cam lever. The
revolving cam is designed to interlock with the ignition key.
1. WHEN THE IGNITION KEY IS IN THE LOCK
POSITION OR PULLED OUT
The cam lever meshes with the projection on
the revolving cam inside the ignition key cylinder
to restrict movement of the slide lever that is
connected with the cam lever. As a result, since
turning of lock cam is restricted and movement
of the detent pin is hindered, the selector lever
pushbutton cannot be depressed and the selector lever cannot be moved to any position other
than the “P” position.
2. WHEN THE IGNITION KEY IS IN ANY
POSITION BUT LOCK POSITION (SELECTOR
LEVER IS IN “P” POSITION)
The projection on the revolving cam inside the
ignition key cylinder is in a position where it
does not hinder movement of the cam lever
and the restriction of the slide lever connected
with the cam lever is released. As a result, when
the pushbutton of the selector lever is pressed,
lock cam is turned in the direction of the arrow
shown in the illustration and the detent pin
moves down.
As a result! .the selector lever can be moved
to any posrtron other than the “P” position.
NOTE
While the brake pedal is not depressed, the
selector lever cannot be moved to any position
other than the “P” position even if the ignition
key is not in the “LOCK” position. (Refer to the
section of SHIFT LOCK SYSTEM.)
POWER TRAIN - Automatic Transaxle
Removed section
Select lever
3. WHEN THE IGNITION KEY IS PULLED OUT
Selector Lever is a Position Other than “P” Position
Lock cam turns in the direction of the arrow
shown in the illustration and stays there.
As a result, the key interlock cable is caught
on lock cam and the cam lever inside the ignition
key cylinder is turned in the direction of the
arrow shown in the illustration (it is in the removed section of the revolving cam).
Consequently, even if one tries to turn the ignition key to the “LOCK” position, the ignition
key only turns to the “ACC” position since movement of the revolving cam is restricted by the
cam lever and the key cannot be pulled out.
Selector Lever is in “P” Position
The slide lever inside the ignition key cylinder
is pushed in the direction of the arrow by the
key interlock cable and the cam lever turns in
the direction of arrow shown in the illustration.
As a result, the revolving cam removes any
restriction to the rotation of the cam lever so
it turns freely and the ignition key can be turned
to the “LOCK” position and can be removed.
\
a
2-103
POWER TRAIN - Propeller Shaft
PROPELLER SHAFT
L
N72ZEOOM
The AWD vehicles have a 3-section, 4-joint type
propeller shaft with center bearings. The center
bearing, provided with front and rear oil seals, is
compact, lightweight and has excellent vibration and
noise characteristics, In keeping with adoption of
the compact center bearing, the insulator for installation of the bearing to the body has been changed
in shape to further reduce vibration.
SPECIFICATIONS
r Item
Propeller
shaft
Universal
joint
Specifications
4-joint propeller shaft
Type
Lenath x O.D. mm (in.) 1Front
Type
676.5 x 65 (26.63 x 2.56)
Center
642.5 x 65 (25.30 x 2.56)
Rear
634.5 x 50.8 (24.98 x 2.00)
No. 1,2,4
Cross type
No. 3
Equal velocity type
Pre-packed
Lubrication
Cross type joint journal O.D.
mm (in.) 14.689 (.5783)
Constant velocity joint O.D.
mm (in.) 94 (3.7)
NOTE
Propeller shaft length indicates the length between center points of each joint.
ii CONSTRUCTION DIAGRAM
Rear propeller shaft
/
Center bearing
eller shaft
Center prop
/
-.sds-Tv
Front propeller shaft
Center bearing
Heat 1
protector 7
10NOOlO
Insulator
seals
2-104
POWER TRAIN - Front Axle
FRONT AXLE
N72ZFOOM
The drive shaft use the BJ-TJ constant velocity joint
combination which offers high power transmission
efficiency, ensures smooth inward-outward sliding
movement and transmits less engine vibration during idling.
FEATURES
l
l
l
l
l
The front hub has a press-fitted unit bearing.
The unit bearing consists of inner and outer
races and an oil seal. It features low rotating
resistance and higher protection against mud.
The front hub assembly bolted to the knuckle
improves serviceability.
On the AWD vehicles, a center bearing and
an inner shaft have been adopted to reduce
vibration, noise and torque steer.
On AWD vehicles, dust seals have been provided on both sides of the center bearing and
l
l
l
l
the inner shaft has been press-fitted in the TJ
outer race for higher protection against mud.
The drive shafts on some model versions have
a dynamic damper for reduction of vibration
and noise.
The drive shaft and hub area serration coupled.
The ABS equipped vehicles have a wheel speed
detection rotor on the drive shaft and a speed
sensor on the knuckle.
The BJ boots are highly durable plastic ones.
SPECIFICATIONS
items
Specifications
Wheel bearing type
Double-row angular contact ball bearing
Bearing (outside diameter x inside diameter)
-
mm (in.)
84 x 40 (3.31 x 1.57)
Knuckle
Drive shaft
Rotor
<Vehicles with ABS>
11X0006
11x0012
T.J.
B.J.
11X0096
2-105
POWER TRAIN - Rear Axle <FWD>
REAR AXLE <FWD>
N72ZGOOAA
(-, The rear axle is of a design having axle shafts with
press-fitted unit bearings.
FEATURES
l
l
i
The unit bearing consists of inner and outer
races and an oil seal for lower rotating resistance
and higher protection against mud.
The rear axle shaft bolted to the knuckle improves serviceability.
Rear axle shaft
l
ABS equipped vehicles have a wheel speed
detection rotor on the rear axle shaft and a
speed sensor on the knuckle.
with ABS>
Oil seal
13X0061
2-106
POWER TRAIN - Rear Axle <AWD>
REAR AXLE <AWD>
N72ZHWM
The constant velocity joint on the differential side
of the drive shaft is a TJ type one which ensures
smooth inward-outward sliding movement. A BJ
type joint is used on the hub side.
FEATURES
l
l
l
The drive shaft is spline coupled on the different
side and serration coupled on the hub side,
eliminating the need for an axle shaft to allow
for simplicity around the hub.
The R.H. drive shaft on VCU type LSD equipped
vehicles has splines provided in two stages on
the T.J.
ABS equipped vehicles have a wheel speed
detection rotor on the drive shaft BJ outer race
and a speed sensor on the knuckle.
l
l
l
l
The unit bearing is press-fitted in the rear hub.
The unit bearing consists of inner and outer
races and an oil seal for lower rotating resistance
and higher protection against mud.
The rear hub assembly bolted to the knuckle
improves serviceability.
The differential carrier is elastically supported
via the bushing of the differential mount bracket
assembly at the front and via the bushings on
the cross member at the rear.
Differential carrier
hub
11X0064
Rotor <Vehicles with ABS
<Vehicles with LSD>
T.J.
Oil seal
Rear hub
Drive shaft
\
Two splines
2-107
POWER TRAIN - Rear Axle cAWD>
DIFFERENTIAL
/
L
N72ZHOlAA
The differential uses a low frictional torque bearing
and oil seal to provide improved power and fuel
efficiency.
For better cooling of the differential during highspeed operation, the differential carrier has cooling
fins.
In addition, VCU type LSD is used on some models.
SPECIFICATIONS
Limited slip differential (VCU type)
Conventional differential
Items
M/T
AK
Differential gear type
(Type x number of gears)
Side gear
Pinion gear
Number of teeth
Drive gear
Drive pinion
Side gear
Pinion gear
L
AK
3.545
3.307
Hypoid gear
Reduction gear type
Reduction ratio
M/T
3.545
3.307
Straight bevel gear x 2*
Straight bevel gear x 2
Straight bevel gear x 2
Straight bevel gear x 2
39
11
14
10
Bearing (outside diameter x
mm (in.)
inside diameter)
Side
Front
Rear
39
11
14
10
43
13
14
10
43
13
16
10
72 x 35 (2.83 x 1.38)
62 x 25 (2.44 x .98)
72 x 35 (2.83 x 1.38)
NOTE
*: Denotes the gear (L.H.) which is in a single body with the viscous coupling.
Conventional differential
Limited slip differential (VCU type)
Cooling fin
11x0015
11X0006
2-108
POWER TRAIN - Rear Axle <AWD>
DIFFERENTIAL SUPPORT
The front of the differential carrier is elastically supported by the bushing of the differential mount brack-
N72ZH02AA
et assembly, and its rear is supported by the bushings on the rear cross member.
‘j
Rear crossmember
Differential mount
11x0011
d
d
,
3-i
I
/
L
CONTENTS
ANTI-LOCK BRAKE SYSTEM (ABS)
<AWD> . . . . . . . . . . . . . . . . . . . . ..*....a.....
PARKING BRAKES . . . . . . . . . . . . . . . . . . . . . .
44
ABS Electrical Circuit Diagram . . . . . . . . . . . . . . 46
ABS Hydraulic Function Schematic . . . . . . . . . . 47
Actuator . . . . . . . . . . . . . . . . . . . . . . . . . . . . . . . . . . . 50
Electronic Control Unit (ECU) . . . . . . . . . . . . . . . 51
Sensor . . . . . . . . . . . . . . . . . . . . . . . . . . . . . . . . . . . . 48
System Drawing . . . . . . . . . . . . . . . . . . . . . . . . . . . 45
LJ
ANTI-LOCK BRAKE SYSTEM (ABS)
<FWD> . . . . . . . . . . . . . . . . . . . . . . . . . . . . . . . . . .
27
..............
29
ABS Hydraulic Pressure Function Diagram ... 30
Actuator . . . . . . . . . . . . . . . . . . . . . . . . . . . . . . . . . . . 32
ABS Electrical Circuit Diagram
Electronic Control Unit (ECU) . . . . . . . . . . . . . . . 34
Sensor . . . . . . . . . . . . . . . . . . . . . . . . . . . . . . . . . . . . 31
System Drawing . . . . . . . . . . . . . . . . . . . . . . . . . . . 28
BRAKES . . . . . . . . . . . . . . . . . . . . . . . . . . . . . . . .
22
Construction Diagram . . . . . . . . . . . . . . . . . . . . . . 22
Features . . . . . . . . . . . . . . . . . . . . . . . . . . . . . . . . . . 22
FRONT SUSPENSION
. . . . . . . . . . . . . . . . . a..
N73ZAOOAA
3
Construction . . . . . . . . . . . . . . . . . . . . . . . . . . . . . . . . 5
High-mounted upper arm . . . . . . . . . . . . . . . . . 9
Optimized virtual kingpin axis positioning . . . 6
Shock absorber with damping force
control valve for very low and low
speed operation <Turbo> . . . . . . . . . . . . . . . . 10
Variation in camber during cornering . . . . . . 10
Features . . . . . . . . . . . . . . . . . . . . . . . . . . . . . . . . . . . 3
Specifications . . . . . . . . . . . . . . . . . . . . . . . . . . . . . . . 4
59
Construction Diagram . . . . . . . . . . . . . . . . . . . . . . . . 59
POWER STEERING
.....................
16
Construction . . . . . . . . . . . . . . . . . . . . . . . . . . . . . . .
Features . . . . . . . . . . . . . . . . . . . . . . . . . . . . . . . . . .
17
16
Oil Pump . . . . . . . . . . . . . . . . . . . . . . . . . . . . . . . . . .
Specifications . . . . . . . . . . . . . . . . . . . . . . . . . . . . . .
Steering Gear and Linkage . . . . . . . . . . . . . . . . .
Steering Shaft and Column . . . . . . . . . . . . . . . . .
Steering Wheel . . . . . . . . . . . . . . . . . . . . . . . . . . . .
20
16
REAR SUSPENSION
....................
Construction . . . . . . . . . . . . . . . . . . . . . . . . . . . . . . .
Variation in toe angle by rearward force
input . . . . . . . . . . . . . . . . . . . . . . . . . . . . . . . . . . .
Variation in toe angle by side forces . . . . .
Variation in toe angle on turns . . . . . . . . . . .
Features . . . . . . . . . . . . . . . . . . . . . . . . . . . . . . . . . .
Specifications . . . . . . . . . . . . . . . . . . . . . . . . . . . . . .
SERVICE BRAKES . . . . . . . . . . . . . . . . . . . . . .
21
18
18
11
13
14
14
14
11
12
23
Brake Booster . . . . . . . . . . . . . . . . . . . . . . . . . . . . . 25
Disc Brakes . . . . . . . . . . . . . . . . . . . . . . . . . . . . . . . 26
Master Cylinder . . . . . . . . . . . . . . . . . . . . . . . . . . . . 24
Rear Drum Brakes . . . . . . . . . . . . . . . . . . . . . . . . . 26
Specifications . . . . . . . . . . . . . . . . . . . . . . . . . . . . . . 23
SUSPENSION
Features
............................
...................................
WHEELS AND TIRES
...................
Specifications . . . . . . . . . . . . . . . . . . . . . . . . . . . . . .
2
2
15
15
DRIVE-CONTROL COMPONENTS - Suspension
SUSPENSION
N732000AA
Both the front and rear suspension are a new multilink design which is the result of the development
effort for the best compromise between high-level
steering stability and ride.
FEATURES
N73ZBOlAA
1. New multi-link design
2. Increased caster angle, reduced kingpin angle (front)
3. Reduced initial camber (front)
4. Adoption of virtual kingpin axis scheme
5. High-mounted front and rear upper arms
6. Increased rigidity of front cross member
7. Front shock absorbers with a damping force control valve
for very low and low speed operation <Turbo>
8. Use of a ball joint type stabilizer link
9. Use of an anti-dive geometry for the front and an anti-lift
geometry for the rear
10. Use of an anti-squatting geometry
1. Reduced shock absorber friction
2. Increased wheel stroke
Reduced road noise
Crossmember with vibro-isolating supports
)- Toe adjustment mechanism in front and rear suspensions
J
3-3
DRIVE-CONTROL COMPONENTS - Front Suspension
FRONT SUSPENSION
i
-
N73ZCOOAA
FEATURES
The front suspension is similar to that introduced
on the 1994 Galant. It is a multi-link structure featuring two lower arms by which an ideal virtual kingpin
&?x==Y
axis is formed. In addition, the upper arms have
been raised above the tire level to improve both
directional stability and ride.
/
Compression lower arm
Crossmember
Centermember
Stabilizh bar
12X0216
DRIVE-CONTROL COMPONENTS - Front Sumension
3-4
SPECIFICATIONS
items
Medium price
M/T
High price
A/T
Suspension type
Wheel alignment
Camber
Caster
Toe-in
M/T
A/T
Multi-link type
-0”05’ Ik 30’
4”40’ f 1030’
0+3(Of.12)
mm (in.)
Coil spring
Wire dia. x O.D. x
free length
mm (in.)
Identification color
Spring constant
N/mm (Ibs./in.)
-0”20’ f 30’
4”40’ f 1030’
0+3(Of.12)
13.1 x71.1 111.1 x 309.5
(52 x 2.80 4.37 x 12.19)
White + Pink
13.2x71.2111.2 x 315.5
(52 x 2.80 4.38 x 12.42)
White + Gray
12.9 x 70.9 110.9 x 300.5
(51 x 2.79 4.37 x 11.83)
Yellow + Pink
13.1 x 71.1 111.1 x 306.5
(.52 x 2.80 4.37 x 12.07)
Yellow + Gray
43.0 (245)
43.0 (245)
43.0 (245)
43.0 (245)
Shock absorber
Type
Stroke
mm (in.)
Damping force
[at 0.3 m/set. (.9 ft./set.)]
Expansion
N (Ibs.)
Contraction
N (Ibs.)
Hydraulic cylindrical double-acting type
118 (4.65)
1,265 - 1,677 (284 - 377)
431 - 647 (97 - 146)
Items
Premium price
FWD
AWD
M/T
A/T
Suspension type
Wheel alignment
Camber
Caster
Toe-in
NT
Multi-link type
mm (in.)
Coil spring
Wire dia. x O.D. x
free length
mm (in.)
Identification color
Spring constant
N/mm (Ibs./in.)
Shock absorber
Type
Stroke
Damping force
M/T
mm (in.)
-0”20’ zk 30’
4”40’ zk l”30’
0+3(0*.12)
-0”05’ f 30’
4”40’ * 1030’
0*3(0*.12)
13.1 x 71.1 111.1 x 306.5
(.52 x 2.80 4.37 x 12.07)
Yellow + Gray
13.2x71.2111.2 x 312.5
(52 x 2.80 4.38 x 12.30)
Yellow +
Light Blue
13.3x71.3111.3 x 312.0
(.52 x 2.81 4.38 x 12.28)
Green +
Light Blue
13.5 x 71.5 111.5 x 317.5
(.53 x 2.81 4.39 x 12.50)
Green + Purple
43.0 (245)
43.0 (245)
46.4 (265)
46.4 (265)
Hydraulic cylindrical double-acting type
118 (4.65)
Hydraulic cylindrical double-acting type
118 (4.65)
1,432 - 1,902 (322 - 428)
470 - 706 (106 - 159)
1,471 - 1,961 (331 - 441)
559-814(126-183)
[at 0.3 mkiec. (.9 ft./set.))
Expansion
Contraction
N (Ibs.)
N (Ibs.)
3-5
DRIVE-CONTROL COMPONENTS - Front Suspension
CONSTRUCTION
A high mounted upper arm and two lower arms
id act like a double-wishbone arrangement. In this arrangement, a virtual kingpin axis is formed on the
line connecting the external vertex of the upper arm
triangle and the point where the lines extended from
the two lower arms intersect. This construction provides the following advantages:
l
A negative offset geometry is established which
assures better stability during braking.
l
l
l
Reduced offset between the virtual kingpin axis
and the wheel center results in a lower steering
movement at the time when the vehicle is accelerated or goes over a bump on road, assuring
better stability.
The high-mounted upper arm helps improve
the wheel supporting rigidity.
The multi-link suspension, like a double-wishbone suspension, suffers little change in “camber to ground” when a rolling motion occurs,
assuring better stability during cornering.
Compression
lower arm
i
Lateral
lower arm
Upper arm
Link model
12X0161
Compression
lower arm
/
axis
3-6
DRIVE-CONTROL COMPONENTS - Front Suspension
Double Wishbone Suspension
OPTIMIZED VIRTUAL KINGPIN AXIS POSITIONING
In a double-wishbone type suspension, the lower point the
kingpin axis passes through is the joint between knuckle and d
lower arm (point A in the illustration at the left). If the doublewishbone type suspension has a high-mounted upper arm,
therefore, the extension of the kingpin axis will meet the ground
at a point inside the center of the ground contacting area of
the tire as shown in the illustration (positive offset).
In the case of the multi-link suspension, a virtual
kingpin axis is formed in such a way that its lower
section passes through the intersection (point A’
as illustrated below) of the lateral lower arm and
compression lower arm extensions. This makes it
possible for the virtual kingpin axis ground meeting
point to be located outside the center point where
the tire contacts the ground surface (negative offset).
In addition, the offset between the wheel center
(point C in the illustration) and the kingpin axis can
be made smaller than that in a strut type or doublewishbone type suspension.
Multi-Link Suspension
Rear View
Plan View
‘Virtual kingpin axis
Front of vehicle
b-L4
Upper arm
Point A’
/
Poin
Point
WI I , , , ax
Negative offset
12x0094
12x0093
d
DRIVE-CONTROL COMPONENTS - Front Suspension
i
Vehicle moving direction
The direction
The direction
toward which
the wheels
tend to pull
P$Ti, / j-/T:
ynt
Fc
Large; road
surface
resistance
I
12AOO3
,
L
3-7
Effects of Negative Offset Geometry
(1) When the brake pedal is depressed on a running vehicle
with one wheel on a slippery surface, a force is produced
which causes the vehicle to pull toward the side with larger
road surface resistance (to the right in the case illustrated
at the left).
(2) Because of the dynamics resulting from the negative offset,
moments Fc and Fo are generated in both wheels around
point A (the point where the kingpin axis meets the ground).
Since the magnitude of these moments is proportional
to the road surface resistance, a pull force is produced
in the wheels to turn them toward the side with either
the Fc or Fb moment whichever is greater (to the left
in the illustrated case).
(3) This means that the wheels pivot toward the direction in
which the vehicle’s pull force resulting from the difference
in road surface resistance is compensated for, thus maintaining the vehicle’s straight-line movement.
3-8
DRIVE-CONTROL COMPONENTS - Front Suspension
Effects of Reduced Wheel Center to Kingpin Axis Offset
(1) When the vehicle is accelerated or decelerated,
(3) In the multi-link suspension, the offset is as
or when it goes over a projection on road without
small as about a third of that in a strut type d
braking, the traction acting on the wheel center
suspension and about one half of that in a
generates a moment around the kingpin axis
double-wishbone suspension. The reduced offset, therefore, assures by far better directional
that would cause the toe angle to change.
(2) Since the moment is proportionaf to the magnistability when the vehicle is accelerated or deceltude of offset between the ‘wheel center and
erated, or when it goes over a projection on
the kingpin axis, the smaller the offset, the less
road.
the change in toe angle, and the better the directional stability.
&rut Type Suspension>
<Multi-Link Suspension>
<Double-Wishbone Type Suspension>
y -Kingpin axis
12x0099
DRIVE-CONTROL COMPONENTS - Front Suspension
HIGH-MOUNTED UPPER ARM
When a side force or any other force acts on the
i tire in a way to change its camber angle, the degree
of the rigidity that supports the tire depends on the
hardness of the upper and lower arm rubber bushing.
If the hardness of the bushings is increased, however, a larger friction will result during up-and-down
motion of the suspension, leading to a poorer ride.
The high-mounted upper arm has made it possible
to use a softer bushing because the bushing on
3-9
it receives smaller camber affecting force as
compared to the case with a low-mounted upper
arm (see the illustrations below), and enough wheel
supporting rigi,dity is ensured even with a softer
bushing. The high-mounted upper arm and softer
bushing combination, therefore, provides a successful compromise between soft ride and outstanding
directional stability.
Comparison of Forces Acting- on Upper Arm Bushing between High-Mounted and Low-Mounted
Upper Arms
F: Lateral force acting on tire
Fu: Lateral force caused to act on upper arm by force F
FL: Lateral force caused to act on lower arm by force F
When the equilibrium of moments established at point A in
the illustration is considered, the following formulas hold true.
Fu . L2 = F . L,
Fu = F . L1/L2
Also, when the equilibrium of moments established at point
B is considered, the following formulas hold true.
FL . L2 = F . &I + L2)
FL = F . (L, + L2)/L2
Assume that L2 = L1 in the case of the low-mounted upper
arm and that L2 = 2L1 in the case of the high-mounted upper
arm. Then the Fu and FL are expressed as follows:
Low-Mounted Upper Arm
<Low-Mounted Upper Arm>
/
id
<High-Mounted Upper Arm>
Fu
A
Upper arm
\
f
L2
----_
----.
-Point A
,
FL
12X0166
Fu = F . L,/L1
=F
FL = F . 2L,/L,
= 2F
High-Mounted Upper Arm
Fu = F . L,/2L1
= 0.5F
FL = F . 3L,/2L,
= 1.5F
In the case of the high-mounted upper arm, as evident from
the above, smaller camber affecting forces are input in both
upper and lower arms.
340
DRIVE-CONTROL COMPONENTS - Front Suspension
VARIATION IN CAMBER DURING CORNERING
When the steering wheel is turned, camber varies
as shown below because of increased caster angle
and reduced kingpin angle. On the vehicle with multilink suspension, the change in “camber to ground”
caused by the body rolling during cornering is small
<Variation in Camber during Up-and-Down
stroke>
by the same action as the one experienced in a
double-wishbone suspension. These effects help
provide outstanding directional stability by making
the most of the tire performance.
<Variation in Camber during Cornering>
Bump
Strut type suspension
Camber to ground 0”
Inner
wheel
steering
angle
Positive
Negative
Multi-link subpension
Multi-link suspension -
Negative
Rebound
12X0104
12x0103
SHOCK ABSORBER WITH DAMPING FORCE CONTROL VALVE FOR VERY LOW AND LOW SPEED
OPERATION <TURBO>
characteristics have become linear as shown below,
When the shock absorber piston speed is at less
so that the vehicle provides better feeling when
than 0.1 m/set., the control of the damping force
it rolls and shows better responsiveness to the steeris impossible with the conventional fixed opening
ing wheel operation.
orifice alone. This control has been made possible
by adding a relief valve for very low and low speed
range operation. As a result, the damping force
Piston section
- With control valve
---- Without control valve
I
Piston speed m/set.
Base Valve Area
Very low and
low speed
relief valve
Notched
relief valve
12X0114
2
8
12x0095
DRIVE-CONTROL COMPONENTS - Rear Suspension
REAR SUSPENSION
L
3-11
N73ZDOOAA
FEATURES
The rear suspension is similar to that introduced
on the 1994 Galant. It is a new development in
multi-link design. By properly arranging the individual control arms and properly selecting their bushings
for well balanced rigidity, a best compromise between high-level directional stability and riding comfort has been realized in the suspension.
<FWD>
w Shock absorber
g
Upper arm
Toe control arm
/’
id
I
Lower arm
Stabilizer bar
<AWD>
I
Trailing arm
12X0218
12x0214
DRIVE-CONTROL COMPONENTS - Rear Suspension
3-12
SPECIFICATIONS
Items
Medium price
Suspension type
Wheel alignment
Toe-in
Camber
mm (in.)
Identification color
Spring constant
N/mm (Ibs./in.)
Shock absorber
We
Stroke
mm (in.)
Damping force
[at 0.3 m/set. (.9 ft./set.)]
Expansion
N (Ibs.)
N (Ibs.)
NOTE
*l: Vehicles with 14-inch wheels
: Vehicles with 16-inch wheels
(3) *4: M/T
Premium price
<AWD>
Multi-link type
Coil spring
Wire dia. x O.D. x free length
mm (in.)
Contraction
High price,
Premium price cFWD>
-1”20’ + 30’
3 f 3 (.12 zk .12)
-1”20’ f 30’*’
-1040’ f 30’*2
-1”20’ * 30’*3
-1”40’ + 30’*4
11.0x75.0117.0 x 297.0
(.433 x 2.953 4.606 x 11.692)
Light Blue + Purple
28+1.4(173+8)
10.8 x 74.6 116.6 x 288.0
(.425 x 2.937 4.591 x 11.339)
Light Blue + Green
28f 1.4 (173rt8)
11.2x75.4117.4 x 294.5
(.441 x 2.968 4.622 x 11.594)
Light Blue + Orange
30.4&1.5(162+8)
Hydraulic cylindrical
double acting type
164 (6.5)
Hydraulic cylindrical
double acting type
154 (6.1)
Hydraulic cylindrical
double acting type
154 (6.1)
834- 1,128
(187 - 254)
314 - 471
(71 - 106)
834- 1,128
(187 - 254)
314 - 471
(71 - 106)
834-1,128
(187 - 254)
314 - 471
(71 - 106)
DRIVE-CONTROL COMPONENTS - Rear Suspension
343
CONSTRUCTION
A high-mounted upper arm and a combination of
’
i lower arm and trailing arm act like a double-wishbone configuration having a virtual kingpin axis.
This construction, like that of the front suspension,
provides the following features:
l Small offset between the virtual kingpin axis
and wheel center provides better directional stability.
l The high-mounted upper arm helps improve
the tire supporting rigidity and riding comfort.
l
Like a double-wishbone suspension, the multilink suspension features small change in “camber to ground” at the time of a roll, which assures
better stability during cornering.
In addition, optimum arrangement of the individual
arms and proper selection of the individual bushings
for well balanced rigidity have provided the following
effects:
l
Changes in toe angle caused by the up and
down strokes of the suspension are properly
controlled for better stability during cornering.
l
Changes in toe angle caused by a lateral force
acting on the tire are properly controlled for
better stability during cornering.
l
Even under the effect of a rearward force on
the tire, the wheel alignment does not increase
the “toe-out” tendency. This helps retain the
straight-line motion of the vehicle.
12X0106
DRIVE-CONTROL COMPONENTS - Rear Suspension
3-14
VARIATION IN TOE ANGLE ON TURNS
When the vehicle rolls as it makes a turn, the toe geometry
changes as shown by the characteristics curve at the left under d
the effect of the toe control arm action. Also, under the side
forces that are generated during a turn, the toe angle of the
outer wheel changes in such a way that the toe-in state will
be maintained thanks to the balance in rigidity of the individual
arms’ bushings properly selected for that effect. These characteristics allow the rear wheels to make directional changes
in phase with the front wheels (steered wheels) during a turn,
assuring better steering stability.
Bump
Toe-out
Rebound
12x0105
VARIATION IN TOE ANGLE BY SIDE FORCES
Since the side force acting on the tire causes the bushings
at both ends of the trailing arm to twist in an oblique direction,
point A in the illustration is caused to shift toward the center
of the vehicle. The force also acts on the bushings at both
ends of the lower arm in their diametric direction, and point
B is consequently displaced toward the center of the vehicle
by the amount equivalent to the total deflection of the two
bushings (at both ends of the lower arm). The force exerted
\
to the bushing of the toe control arm also acts in the diametric
direction as in the case of the lower arm bushings, but point d
C is displaced toward the center of the vehicle only by the
amount equivalent to the one bushing’s deflection since point
C is a ball joint.
The amount of the displacement of these points are compared
below.
Toe-in
12x0107
Point A > Point B > Point C > (Small
(Large
displacedisplacement)
ment)
Such being the displacement relationship of the three points,
a toe-in state is maintained even in side force conditions.
VARIATION IN TOE ANGLE BY REARWARD FORCE INPUT
Generally, when the vehicle goes over a projection on road
or when braking, rearward forces will act on the tires and a
toe-out condition will occur because of the resulting compliance
steer. The multi-link suspension, however, maintains a toe-in
state as shown at the left thanks to its proper arrangement
of the individual control arms even when the vehicle goes
over a bump or it is braked and its wheels are subject to
rearward forces.
Toe control arm
‘d
DRIVE-CONTROL COMPONENTS - Wheels and Tires
L
3-15
WHEELS AND TIRES
N73ZGWAA
SPECIFICATIONS
Premium price
Items
Medium price
High price
AWD
FWD
A/T
Wheel
Tire size
Wheel type
Wheel size
Amount of wheel offset
mm (in.)
Tire inflation pressure
kPa (psi.)
Front
Rear
Pl95/7ORl4
90H
Steel type
Aluminum
type**
14 x 5.5JJ
P205/55Rl6
89H
Steel type
Aluminum
type*’
l6x6JJ
P205/55Rl6 89V
46 (1.8)
220 (32)
200 (29)
Spear wheel
Tire size
Wheel size
L
Amount of wheel offset
mm (in.)
Tire inflation pressure
kPa (psi.)
NOTE
(1) *‘: Option
(2) *2: Option in combination with ABS
M/-T
Aluminum type
215/55Rl6
9lV
Aluminum
type
l6x6JJ
l6x6JJ
46 (1.8)
46 (1.8)
46 (1.8)
220 (32)
200 (29)
220 (32)
200 (29)
220 (32)
200 (29)
Tl25/7ODl5
Tl25/80Dl 6*2
l5x4T
16~4T*~
T125/90D16
46 (1.8)
46 (1.8)
420 (60)
420 (60)
l6x4T
3-16
DRIVE-CONTROL COMPONENTS - Power Steering
POWER STEERING
N73ZEOCjAA
All models come standard with an engine speed
sensitive power steering system.
‘d
FEATURES
N73ZEOTAA
Engine speed sensitive power steering
1. Impact absorption mechanism
2. Supplemental Restraint System (SW)
Double-lip oil seals used in power cylinder
l
l
The 4-spoke type steering wheel with SRS unit
is adopted on all models.
[For information on the SRS, refer to the “Interior
- Supplemental Restraint System (SRS)” section.]
The steering column incorporates both a shock
absorbing mechanism and a tilt steering mechanism.
l
l
The steering system uses a vane oil pump.with
fluid flow control system.
The steering gear and linkage system is highly
reliable integral rack and pinion type which features light weight and compact size.
.’
SPECIFICATIONS
Items
Turbo
Non-turbo
2.41
Steering wheel maximum turns
Steering angle (vehicle in unladen)
Inner wheel
Outer wheel
Steering gear and linkage
Type
Gear type
Gear ratio
Rack stroke
32”30’ + 2”
27”OO
mm (in.)
Oil pump type
Displacement
Relief set pressure
cm3/rev. (cu.in./rev.)
MPa (psi.)
Integral type
Rack and pinion
00 (infinity)
124 (4.9)
Vane type with fluid flow
control system
10.5 (.64)
8.8 (1,277)
Vane type with fluid flow
control system
9.6 (.59)
8.8 (1,277)
‘d
DRIVE-CONTROL COMPONENTS - Power Steering
/
id
3-17
CONSTRUCTION
Steering wheel
Steering column assembly
<Non-Turbo>
Coolet! pipe
Cooleipipe
Al 3X0225
3-18
DRIVE-CONTROL COMPONENTS - Power Steering
STEERING WHEEL
The steering wheel have the following features to
provide excellent maneuverability and stability.
l
The steering wheel has been specially designed
for improved maneuverability and good view
of meters. Some model versions come with a
l
steering wheel with auto-cruise control switches
on it.
Ij
The air bag incorporated in the steering wheel
provides the driver with additional protection
against the shock from a front-end collision.
Cross section A - A
Air bag
A1-j
Auto-cruise cdntrol switch
A13X0218
STEERING SHAFT AND COLUMN
All model versions come standard with a tilt steering
mechanism which allows the driver to select an
optimum driving position. Also adopted is an impact
absorption mechanism to absorb impact energy in
a collision, thereby ensuring the safety of the driver.
Tilting fulcrum
A13X0221
#‘L-J
DRIVE-CONTROL COMPONENTS - Power Steering
3-l 9
SHOCK ABSORBING STRUCTURE
(1) When the vehicle collides with something and
there is a load added to the steering shaft from
the gear box (primary shock), the polyacetal
resin in the joint assembly is separated, and
the shaft assembly slides into the pipe assembly,
absorbing the shock load.
BEFORE SHOCK
Polyacetal resin
Shaft assembly
13x0057
AFTER SHOCK
13X0056
i
(2) If the driver’s body falls against the steering
BEFORE SHOCK
wheel (secondary shock), the shock load is absorbed in the following two steps.
0 When a load is added to the steering wheel,
the column bracket crushes the polyacetal resin
and slides forward, absorbing the shock load.
Column bracket
13x0053
AFTER SHOCK
Cross-section B-B
-FTl
13X0072
J
DRIVE-CONTROL COMPONENTS - Power Steering
3-20
@ When a shock load is applied to the steering
wheel, the upper column slides forward. At the
same time, the bellows of the steering shaft L)
are deformed. During this process, the shock
load is absorbed by the friction between the
lower column and the inside surface of the steering bushing attached to the upper column.
BEFORE SHOCK
Steering bushing
Bellows
/
Upper column
Lower column
Al 3X0223
AFTER SHOCK
Al 3X0222
OIL PUMP
The oil pump is an engine speed sensitive type
which changes its delivery rate so that the steering
wheel turning effort will always be optimized.
OIL PUMP PERFORMANCE
<Non-turbo>
10
e
g
a
E
z?
‘-9
8
4
E
12
2
<Turbo>
dm3/min
8
6
0
70
10 20 30 40 50 60
Pump speed (N) (Xl OOr/min.)
L’
**I’
“1
I
0 1
2 3 4 5 6 7 8 9
Pump pressure (P) MPa
Al 3X0220
NOTE
(1) P-Qf characteristic: Pump pressure and pump delivery rate.
(2) N-Qf characteristic: Pump speed and pump delivery rate.
Pump speed (N) (XlOOr/min.)
t 11 11
I
I
I
I
0 1 2 3 4 5 6 7 8
Pump pressure (P) MPa
(
9
A13X0219
Ls
DRIVE-CONTROL COMPONENTS - Power Steerina
3-21
STEERING GEAR AND LINKAGE
(1) The bearings used in the rack end and the tie rod end
ball joints are one-piece type bearings which ensure higher
rigidity.
Tie rod end
Bear:ng
13x0014
Lip
I
I
(2) Double-lip type oil seals are used in the power cylinder
to improve the reliability.
Al 3X0226
(3) The pinion shaft side of the steering gear and linkage
assembly has been secured directly to the cross member
for higher rigidity and positional accuracy.
Al 3X0227
3-22
DRIVE-CONTROL COMPONENTS - Brakes
BRAKES
N73ZLOOAA
The brake system offers high dependability and
durability along with improved braking performance
and brake sensitivity.
d
FEATURES
/1 bm,mrov&b~king
1. The 4-wheel anti-lock brake system (4ABS) prevents skidding that may result from locked wheels, thereby assuring
safe braking.
2. For some models, 2-piston type ventilated disc brakes
have been adopted for front wheels to provide more stable
braking and better braking feel.
3. For some models, a tandem brake booster has been
adopted which provides powerful braking with a light foot
pressure.
4. For some models, drum-in-disc brakes have been adopted
for rear wheels. This type of brakes have built-in parking
brakes which provide outstanding braking stability.
Improved
serviceability
For ease of inspection, a self-diagnosis capability has been
adopted for the 4ABS.
2. Both the front and rear brakes use a lug nut mounted
outer disc design for ease of removal and installation
3. The master cylinder reserve tank cap is white for easy
recognition
Higher safety
1. An audible wear indicator alerts the driver to the brake
pad limit.
2. Proportioning valves prevent the rear wheels from locking
too quickly
3. Front and rear X brake lines.
1.
d
CONSTRUCTION DIAGRAM
14X0271
DRIVE-CONTROL COMPONENTS - Service Brakes
3-23
SERVICE BRAKES
i SPECIFICATIONS
FWD
Non-Turbo
Items
AWD
Medium price
Except medium
price
Turbo
Tandem type
(with level sensor)
23 8 (15/,6)
2i.4 (l)*
Tandem type
(with level sensor)
23 8 ('5/,6)
25.4 (l)*
Tandem type
(with level sensor)
23 8 (15/,s)
2i.4 (l)*
Tandem type
(with level sensor)
25.4 (1)
Vacuum type
230 (9)
180+205(7+8)*
6.0, 6.5*
Vacuum type
230 (9)
180+205(7+8)*
6.0, 6.5*
Vacuum type
180+205(7+8)
205+230(8+9)*
6.5, 7.0*
Vacuum type
180+205(7+8)
205+230(8+9)*
6.5, 7.0*
Dual type
0.25
Dual type
0.25
Dual type
0.25
Dual type
0.25
Floating caliper,
single-piston,
ventilated disc
Floating caliper,
single-piston,
ventilated disc
Floating caliper,
single-piston,
ventilated disc
Floating caliper,
single-piston,
ventilated disc
204 (8)
60.3 (2 3/s)
204(8)
60.3 (2 3/8)
204 (8)
60.3 (2 3/s)
228 (9)
42.9 x 2
(1 ‘l/,2 x 2)
Leading-trailing
203 (8)
-
Master cylinder
Type
I.D.
mm (in.)
Brake booster
Type
Effective dia. of power
mm (in.)
cylinder
Boosting ratio
Proportioning valve
Type
Decompression ratio
Front brakes
Type
Disc effective dia.
mm (in.)
Wheel cylinder I.D.
mm (in.)
Rear drum brakes
We
Drum I.D.
mm (in.)
Wheel cylinder I.D.
mm (in.)
Lining thickness
mm (in.)
Rear disc brakes
Type
Disc effective dia.
mm (in.)
Wheel cylinder I.D.
mm (in.)
ABS
Rotor teeth
Front
Rear
Speed sensor
NOTE *: Vehicles with ABS
-
-
20.6 (13/ts)
-
-
4.4 (.17)
-
-
Floating caliper,*
single piston,
solid disc
Floating caliper,
single piston,
solid disc
Floating caliper,
single piston,
solid disc
Floating caliper,
single piston,
ventilated disc
222 (8.7)*
222 (8.7)
222 (8.7)
237 (9.3)
34.9 (1 s/s,*
34.9 (1 s/*>
34.9 (1 s/s,
38.1 (1 1/2)
43
43
Magnet coil type
43
43
Magnet coil type
43
43
Magnet coil type
43
43
Magnet coil type
3-24
DRIVE-CONTROL COMPONENTS - Service Brakes
MASTER CYLINDER
Constructed to provide a maximum measure of safety, the master cylinder offers the following features.
l A tandem type master cylinder.
l
On ABS equipped vehicles, a filter is provided
in the reserve tank to prevent foreign matter
from entering when adding or replacing brake
fluid.
<Vehicles without ABS>
l
l
The reserve tank cap is white for easy recognition which improves serviceability.
The master cylinder for the ABS equipped vehicles incorporates a center valve to cope with
a high pressure that is generated when the ABS
is in operation.
\
LJ
<Vehicles with ABS>
Filter
14X0308
14x0309
ii
Center valve
14X0230
14X0231
DRIVE-CONTROL COMPONENTS - Service Brakes
3-25
BRAKE BOOSTER
Brake booster comes in three types: 230 mm (9
L in.), 180 + 205 mm (7 + 8 in.) and 205 + 230 mm
(8 + 9 in.) diameter ones. An appropriate one of
them is used to each model variation. The tandem
type boosters have two diaphragms each. The two-
diaphragm configuration can utilize a doubled pressure difference between the vacuum and the atmospheric pressure, so that a large boosting effect
can be obtained with a small outside diameter, thereby contributing to size and weight reduction.
<230 mm (9 in.) Brake Booster>
rod
Push
rod
14POO75
L
<205 + 230 mm (8 + 9 in.)
Tandem Brake Booster>
480 + 205 mm (7 + 8 in.)
Tandem Brake Booster>
Front
gj diaphragm Rear diaphragm
Rear diaphragm
Front
diaphragm /
LJ
Operating rod
Push
rod
Booster return
spring
Reaction disc
’
Booster return
spring
Atmospheric
chamber
k4;;$eric
Vacuum
chamber
14AO124
i
Vacuum
chamber
14COO62
3-26
DRIVE-CONTROL COMPONENTS - Service Brakes
DISC BRAKES
Either single- or double-piston type disc brakes are
used for the front wheels, and the single-piston type
disc brakes are used for the rear wheels.
l Drum in-disc brakes with dedicated parking
brake shoes and drum.
l
l
The outer disc system, which jointly tightens
the wheel and brake disc, improves serviceabilityFor improved safety, the brake pad employs
an audible wear indicator (inside the body).
<Double-piston type>
14AO545
<Single-piston type>
La
<Wear indicator>
/ When new
When
worn
-7
14X0228
REAR DRUM BRAKES
The rear drum brakes are 205 mm (8 in.)-diameter
leading-trailing type brakes which always provide
stable braking during a forward or reverse movement.
The drum brakes incorporates an automatic adjuster
mechanism which automatically adjusts the shoe
clearance when the brake pedal is depressed.
Shoe-to-lever
Adi1 lctnr
I
A
Parking brake
cable
~“,U”L”’
assembly
Retainer spring
14COO61
DRIVE-CONTROL CbMPONENTS - A B S <FWD>
ANTI-LOCK BRAKE SYSTEM (ABS) <FWD>
L
The ABS used in the 1995 Eclipse is similar to
the previous one.
The ABS is a brake system which detects skids
that could be caused by abrupt brake application
or by brake application on a slippery road surface,
and adequately controls the brake fluid pressure
to prevent skids caused by locked wheels. It assures
directional stability and steerability during brake application and reduces the brake stopping distance.
The basic principles and effects of the ABS are
the same as those of the conventional system.
3-27
N73ZMOOAA
The major features of the ABS are described below.
l
When a failure occurs in the system, you can
identify the faulty area in the diagnostic test
mode. The failure data stored in memory is
not erased even if the ignition switch is placed
in the OFF position. Use of the scan tool enables
you to read the diagnostic trouble code or clear
the memory. In addition, you can read the sensor
data (data list) stored in the electronic control
unit (ECU) and test the hydraulic unit (HU) and
other actuators. (Refer to P. 3-43.)
14X0269
No.
Function
Wheel speed sensor
1
Sends an AC signal with a frequency proportional to the rotating speed of the individual wheel to the ABS-ECU.
Stop light switch
2
Sends a signal to the ABS-ECU indicating whether the
brake pedal is pressed or not.
Hydraulic unit (HU)
3
Controls braking pressure for each wheel depending on the
signal from the ABS-ECU.
Includes built-in plunger valve
Motor relay
4
Closes contact in response to a signal from the ABS-ECU to
allow the power to be supplied to the motor in the HU.
Valve relay
5
Is turned ON by the ABS-ECU signal and supplies power to
the solenoid valve in HU.
ABS warning light
6
Is in the combination meter and lights up when there is
trouble in ABS.
Data link connector
7
Outputs diagnostic trouble codes.
8
Controls the actuators such as HU according to the signals
from the individual sensors.
Part name
Sensor
Actuator
i
Electronic control unit (ECU)
DRIVE-CONTROL COMPONENTS - ABS <FWD>
SYSTEM DRAWING
Rear solenoid valve
Wheel speed sensor (FL)
I
FL solenoid valve
b
Wheel speed sensor (FR)
FR solenoid valve
ABS valve relay
Wheel speed sensor (RR)
’ /heel speed sensor (RL) F
III
ABS motor relay
ABS valve relay response slgnal
ABS-ECU
. ”
r ECU power
supply
Front right wheel (FR)
---7
I I Fi=!E-
I
light
.
1
I
I
m.
I.
.
.
.
.
J
I 11
Rear right wheel (RR)
sensor
/
I
J
,I---, -----I
YI Ieel spew
1-^^”
Front left wheel (FL)
-r
J
)(
speed
sensor v
Rear left wheel (RL:
14X0227
DRIVE-CONTROL COMPONENTS - A B S <FWD>
ABS ELECTRICAL CIRCUIT DIAGRAM
L
Ignition
switch IG2
0L 1
10A
Dedicated
fuse
Dedicated
fuse
1
Combination
meter
ii
Hydraulic
unit (HU)
I
I
I
Stop light
switch
::
u.
I-
ABS
motor
relay
ABS-ECU
18
26
p
valve power
supefvision
Sol&oid
FLw-
valve
4-A
M
28 30
L
FR
RL
{if
23 24
Data link
connector
RR
Wheel speed sensor
1
2
3
4
5
6
7
8
9
10 11 12 13 14 15 16 17 18
19~20~21~22~23~24~25~26~27~28~29~30~31~32~33~34~35
ABS-ECU Connector Pin Configuration
f
DRIVE-CONTROL COMPONENTS - A B S <FWD>
3-30
ABS HYDRAULIC PRESSURE FUNCTION DIAGRAM
The ABS for FWD operates independently on the
right and left front wheels and controls each solenoid
valve by sensing each wheel speed sensor. It controls the solenoid valve for the rear wheels by using
the rear wheel speed sensor select-low for the right
and left rear wheels. In other words, when either
the right or left rear wheel is about to lock, the
solenoid valve for the rear wheels is activated and
hydraulic pressure is simultaneously reduced in both
rear wheels through the use of a plunger valve.
Select-low: this is a method of providing the same
hydraulic control to both wheels when either wheel
is about to lock, matching it to the side about to
lock, or a method to control by matching pressure
to the low side.
N Master cylinder
7
I
L
I-
Solenoid
valve
control
---
valve
control
Wheel speed sensor
Wheel speed sensor f
----_
Hydraulic unit
L
: /
Left front 1
wheel
I
I
4
left front
wheel
\L)
I
I
I
I
I
I
I
I
I
I
r
Solenoid
valve
control
I
I
/
LI
Right frc mt
1 whee I
I
I
I
I
F
(1
Proportioning valve
”
1 1 ‘ZD
“1 Wheel speed sensor
Left rear wheel
.
Right rear wheel
14FOO13
DRIVE-CONTROL COMPONENTS - A B S <FWB>
SENSOR
id
N732MOlAA
WHEEL SPEED SENSOR
The wheel speed sensor is a type of pulse generator
consisting of a rotor rotating at the same soeed
as the wheel and a speed sensor secured to the
knuckle.
l
For a front wheel, the rotor (43 teeth) is mounted
on the front drive shaft and the speed sensor
mounted on the knuckle.
FRONT
Knuckle
3-31
l
l
For a rear wheel, the rotor (43 teeth) is mounted
on the rear hub, and the speed sensor mounted
on the knuckle.
For both front and rear wheels, the spacing
between the sensor and rotor is adjustment-free.
REAR
,
Knuckle
,,
sensor
li
sensor
Drive shaft
14X0062
Rear hub
14X0062
+B
T
Stop light switch
To stop light
14X0063
14X0063
STOP LIGHT SWITCH
The signal from the stop light switch is input to the ABS-ECU
as a brake pedal movement signal.
When the brake pedal is depressed, the stop light switch circuit
contact closes (ON), and when the brake pedal is released,
it opens (OFF). When the contact is closed, the output voltage
is at the battery voltage level (HIGH), and when it is opened,
the output voltage is at about 0 V (LOW).
DRIVE-CONTROL COMPONENTS - A B S cFWD>
3-32
ACTUATOR
N73ZM02AA
HYDRAULIC UNIT (HU)
The HU, elastically supported by the shield plate
l
at the front left of the engine room, consists
of a motor pump, plunger valve, reservoir and
three solenoid valves.
The HU, positioned between the brake master
l
cylinder and each wheel cylinder, is a hydraulic
circuit split into two systems associated with
the normal X pipings when the ABS is inactive.
When the ABS is active, the motor is operated d
by a signal from the ABS-ECU to let the pump
generate a hydraulic pressure required to return
fluid against master cylinder pressure. At the
same time, three solenoid valves are operated
to control the hydraulic pressure that acts on
the wheel cylinder.
Solenoid
14x0305
Hydraulic unit
--------___
Master cylinder
Wheel
14FOO54
14FOO54
Solenoid valve and plunger valve
Refer to 1991 3000GT Technical Information Manual (Pub. No. PXSE9001).
DRIVE-CONTROL COMPONENTS - A B S <FWD>
3-33
Relay Box
The motor relay and valve relay are mounted on the hydraulic
unit.
Pump motor relay m
14X0288
r-- --7I
30
a7
86
MOTOR RELAY
This relay turns the pump motor in the HU ON and OFF.
NOTE
Refer to the section on ECU control for ON/OFF control.
’
a5
EY
L_-_ i
14A0145
16R0670
14A0139
VALVE RELAY
This relay turns current to the solenoid valve in the HU ON
and OFF.
NOTE
Refer to the section on ECU control for ON/OFF control.
id
14AO146
16R0670
14A0140
warning
14X0296
ABS WARNING LIGHT
This light lights up in case if there is a breakdown in the ABS.
Furthermore, it checks whether the bulb is burnt out when
the engine is started.
NOTE
Refer to the section on ECU Control for warning light control.
DRIVE-CONTROL COMPONENTS - A B S <FWD>
3-34
ELECTRONIC CONTROL UNIT (ECU)
l
The ABS-ECU detects the vehicle speed in
terms of a signal from the wheel speed sensor
to determine the rotating condition of the wheel,
estimates the skidding condition of the wheel
on the basis of the predetermined theory, and
outputs a signal to move the solenoid valve
in the HU in such a way as to prevent locking
the wheel.
N73ZMO3AA
l
The ABS-ECU has diagnostic and memoryfunctions.
d
If any failure is found by diagnostic test mode,
the fail-safe function is activated and the ABS
warning light will illuminate.
BLOCK DIAGRAM
ABS-ECU
+ Power
monitor
. .
El
Battery
CPU II
Operation control,
.
~~~A,~~~
Sensor
interface
circuit
Stop light
switch
-
Generator
terminal L
-
I!I
t-l+
- v,
I I
rDU monitor circuit
r+
. Mc )tor, solenoid control, H I
mcsnitor circuit
l
Motor relay
drive circuit
t
I
Valve relay
drive circuit
t
yT&$Jq
#-i&ii+
fail-safe
-D
I
I
I 1 interface circuit 1
DRIVE-CONTROL COMPONENTS - ABS <FWD>
id
3-35
FUNCTION OF INDIVIDUAL CIRCUITS
(1) The wheel speed sensor interface circuit converts the AC
voltage signal into DC pulse signal.
(2) The power monitor circuit, sensor interface circuit and motor
drive monitor interface circuit are electrical converters for
inputting the stop light switch and other vehicle condition
signals.
(3) The CPU I and II are microcomputers which perform wheel
speed, wheel deceleration and other calculations required
for anti-lock control on the basis of the wheel speed signals
input from the wheel speed sensors, and provides anti-lock
controls according to the calculated data. The two microcomputers, CPU I and II, monitor each other to detect
a failure in the system.
They also have diagnostic test mode and failure detection
fail-safe functions.
(4) The solenoid drive circuit, motor relay drive circuit, valve
relay drive circuit and ABS warning light drive circuit are
electrical converters for ON/OFF control of the HU solenoid
valves to control the brake fluid pressure, and for ON/OFF
control of the motor for producing a high fluid pressure
in the HU, and also for lighting the warning light to alert
the driver to a system error.
(5) The failure code memory stores the codes of failures that
occurred in the system and does not clear the data even
if the battery power supply is disconnected.
DRIVE-CONTROL COMPONENTS - ABS <FWD>
3-36
EXPLANATION OF ECU CONTROL
Braking Hydraulic Pressure Control
The figure below shows the relation between the
wheel speed, wheel acceleration, control signal from
the ECU and braking hydraulic pressure.
The ECU uses the signal from each wheel speed
sensor to calculate wheel speed and wheel acceleration, calculates suspected vehicle speed from these
and monitors the slipping of the wheels. If it seems
the wheels are about to lock during sudden braking,
a signal to reduce pressure or a signal to hold pressure is sent to control wheel locking. On the other
hand, if the danger of the wheel locking disappears,
a signal to increase pressure is sent and the braking
hydraulic pressure is increased to normal master
cylinder pressure. Furthermore, in order to prevent
a sudden increase in hydraulic pressure at this time,
a pulse step control is performed to repeat the signal
to increase pressure and the signal to hold pressure.
By repeating this cycle and controlling the output
braking hydraulic pressure, the wheel is kept in a
narrow slipping ratio to assure the ideal braking
force. This hydraulic pressure control is applied independently to the left front wheel, right front wheel
and both rear wheels.
Actual vehicle speed
--\ -Wheel speed
-.
- - / e-N
‘\
------‘..*;-.+;y:;;~; speed
\
Slip ratio set value
‘\ \--\\ //
-------_ -- ----+.+-\$/I
.-------- j+-fy- ----- -Wheel acceleration
Pressure reduction
_-----__- 4*---t- - - - - - - - ~ _
_
_
_
Signal pressure hole
Pressure increase
control
Brake hydraulic
pressure
Time
4-wheel Control
The ABS for FWD is a 4-sensor/3channel method
for independent control of the right and left front
Control Speed
Brake pressure is controlled at a vehicle speed of
approximately 8 km/h (5 mph) or higher. When ve-
wheels and select-low control of the rear wheels.
hicle speed falls below approximately 3 km/h (2
mph), control ends.
DRIVE-CONTROL COMPONENTS - A B S <FWD>
ABS MOTOR RELAY CONTROL
When a drive signal is output from the ABS-ECU
LJ to any of the solenoid valves, the motor relay is
ABS VALVE RELAY CONTROL
If the system is found O.K. after an initial check,
the ABS valve relay is placed in the “ON” state
Approx. 1
second
START
Ignition ON
switch
ACC,
LOCK
i
3-37
placed in the ON state to operate the pump motor.
to supply power to the solenoid valves of the HU
to prepare for operation of ABS.
ABS Warning Light Control
In the following cases the ABS warning light lights up.
l
If lights up when trouble in the system is recognized.
l
It illuminates in the pattern shown in the figure on the
left when the ignition switch is turned ON, to check the
ABS warning light circuit.
DRIVE-CONTROL COMPONENTS - A B S <FWD>
3-38
INITIAL CHECK FUNCTION
The ECU always performs an initial check on the
ABS system with the on-board diagnostic function.
1. Initial Check Operation
(1) When the ignition key is placed in the ON position, the power is supplied to the ABS-ECU,
and the ABS-ECU starts a diagnostic sequence.
During the diagnostic period, the ABS valve
relay stays in the “OFF” state and the warning
light continues to light.
(2) Then, the ABS-ECU forces the ABS valve relay
into the “ON” state and executes diagnostic test
mode of the ABS valve relay to detect an ON
or OFF failure.
(3) All the solenoid valves are caused to be ON
and OFF to make sure that the valves are not
sticking.
(4) With the ignition key placed in the “START”
position and engine started, the voltage at the
generator terminal L rises. At the moment, the
ABS-ECU power supply is cut off, but since
,(‘)I
- 4
(2)
,
If it detects an error, it illuminates the warning light,
and disables the ABS system.
the ABS valve relay is caused to be “OFF”,
the warning light is kept in the ON state by
the ground contact circuit of the ABS valve relay.
(5) If the engine starts and the ignition key is returned to the “ON” position, the ABS-ECU power
supply is resumed, and initial checks in (1)
through (3) are performed again.
(6) When the initial checks are satisfactorily completed, the ABS becomes ready for operation.
The warning light goes out upon detection of
a high voltage at the generator terminal L.
NOTE
An operation check for the motor relay and the motor
is performed when the vehicle is put in motion after
starting the engine. This check is performed only
one whenever the ignition switch is turned “ON”.
(3)
START
Ignition key
ON
.:.
ACC
ABS-ECU
power supply
12v
.,
,.
.
.
ov
Generator High
terminal L Ei Or more)
:
:
.:
(Less than 6 V)
ABS warning
light
ABS valve
relay
O
N --..--‘.
OFF
‘. ,‘.j ‘.’
ON
OFF
Solenoid
valve
:i
.
I
I
‘,. :
. . . . . . ,. .,
‘..
,‘...’ : .,::
.: ,.,., .: :
ON
OFF
14X0242
DRIVE-CONTROL COMPONENTS - A B S <FWD>
DIAGNOSIS OF THE WHEEL SPEED SENSOR SYSTEM
On-board diagnosis of the wheel speed sensor sysis detectable only when the vehicle is put into
motion or when it is running.
L tern is accomplished by executing the diagnostic
program stored in the computer. U&g the program,
(2) Hardware failure detection
the ABS-ECU monitors each wheel speed sensor
The ABS-ECU monitors the sensors, harness,
system (wheel speed sensor, rotor, etc.) to detect
etc. by using its open/short circuit monitoring
a failure. In addition, the ABS-ECU monitors a short
circuit and voltage monitoring program to detect
or open circuit in the sensor system by using its
a failure such as an open or short circuit. A
voltage monitoring circuit and voltage monitoring
major feature of the open/short circuit monitoring
program.
circuit
is that an open or short circuit failure
The former is called “software failure detection”,
is
always
detectable (even when the vehicle
whereas the latter is called “hardware failure detecis
stationary).
tion”.
When the vehicle is in motion, however, a failure
(1) Software failure detection
may be detected by software failure detection
In this diagnostic test mode, the speeds of the
function before the same open or short circuit
four wheels calculated from the sensor outputs
failure is detected by the hardware failure detecare compared. If there is any sensor system
tion function. Such a situation may occur depending on the condition of vehicle and the
that outputs an abnormal speed or an abnormal
decelerated speed, the ABS-ECU determines
nature of the failure.
that the system is out of order. Such a failure
FAIL-SAFE FUNCTION
Should a failure occur in the ABS system, the ABSECU isolates the system to retain the vehicle’s ordinary braking function, thus assuring a high measure
of safety.
l If the ABS-ECU determines that the system
L
is defective as the result of diagnosis, it causes
DIAGNOSTIC FUNCTIONS
To facilitate inspection of the ABS system, the ABSECU offers the following facilities:
l
Diagnostic trouble code output and erasure
l Data list output
l Actuator tests
All of the items described above can be checked
by the scan tool.
Scan Tool - ABS Interface
The scan tool function is entered by connecting
the scan tool to the data link connector. At this time,
the ABS warning light to light, drives the valve
relay to interrupt control of the solenoid valves
in the HU, and restores the ordinary braking
mode.
the vehicle must be stopped, and the ignition should
be OFF.
The ABS scan tool mode is entered when you select
the ABS system on the scan tool. In this mode,
diagnostic output, data list output and actuator test
functions are available. During an actuator test, however, the ABS warning light illuminates and anti-lock
control is inhibited to prevent ABS operation when
a brake is temporarily inactivated during the actuator
test.
Scan tool
mode entry
condition
0 Wheel speeds of 0 km/h (0 mph), parked condition
0 Check harness of scan tool connected to data
link connector of vehicle
0 ABS system selected by control switch of scan
tool (Specified serial data received)
NOTE
No communications with the ABS-ECU can be made by connecting the scan tool while the vehicle is in operation [wheel
speeds not 0 km/h (0 mph)]
DRIVE-CONTROL COMPONENTS - A B S <FWD>
3-40
Diagnostic Trouble Codes
Conditions detected as a result of diagnosis are
associated with a total of 18 codes including that
for normal state, and the codes are stored in the
volatile memory.
Even if the ignition key is placed in the “OFF” position, the contents of the memory are not cleared,
as the memory remains powered by a backup power
supply.
These codes are readable by connecting the scan ,
tool. When the scan tool is not used, they are also d
readable from the ABS warning light which is turned
ON and OFF repeatedly in a pattern specific to
each code.
1. Diagnostic items, diagnostic trouble codes and detection condition
Code No. display
on Scan tool
Inspection item
Diagnostic content
11*’
Front right wheel speed sensor
12*’
Front left wheel speed sensor
13*’
Rear right wheel speed sensor
14*’
Rear left wheel speed sensor
15*’
Wheel speed sensor system
Abnormal output signal
1 6*2
Power supply system
Abnormal battery positive voltage
21*’
Front right wheel speed sensor
22*’
Front left wheel speed sensor
23*’
Rear right wheel speed sensor
24*’
Rear left wheel speed sensor
38*3
Stop light switch system
41
Front right solenoid valve
42
Front left solenoid valve
43
Rear solenoid valve
51
Open circuit or short in +wire
53*4
63
No fault code
displayed
Detection
conditions
A
B
x
x
X
x
x
J
Excessive gap
Long-time radio interference
X
Open circuit or ON malfunction
x
x
No response to solenoid valve drive
signal
x
x
Valve relay
Valve relay OFF failure
x
x
Motor relay or Motor
Motor relay OFF failure and motor
drive failure
ABS-ECU
ABS-ECU internal failure (program
maze, etc)
(The system is in order)
Detection conditions
A: During system check immediately after starting
B: During driving
X
x
x
DRIVE-CONTROL COMPONENTS - A B S <FWD>
3-41
NOTE
*l: The ABS-ECU can detect only an open circuit from the moment the ECU power supply is ON.
The ABS-ECU lights the ABS warning light when it detects an open circuit, but it does not immediately store
LJ
the trouble code in memory and does not cause the system to shut down.
When an open circuit is detected, the trouble code is stored in memory and the system caused to shut down
when the vehicle starts and the wheel speed reaches 6 km/h (4 mph) (the first acceleration after the IG has
been placed in the ON state).
Troubles other than an open circuit cannot be detected until the wheel speed reaches 6 km/h (4 mph). When
the ABS-ECU detects any of these troubles, it causes the system to shut down and simultaneously lights the
ABS warning light.
When the ABS ECU detects a wheel speed sensor error during ABS control, it causes the system to shut down
and simultaneously lights the ABS warning light.
*2: The ABS-ECU detects a power supply error when the supplied voltage is a low voltage (approx. 9V or less).
When the power supply error is detected, it causes the system to shut down and simultaneously lights the ABS
warning light, but does not store the trouble code in memory. The trouble code is stored in memory when the
voltage returns to normal.
When the power voltage is low (approx. 9V or less), none of the trouble codes is stored in memory.
*3: The ABS-ECU takes more than 15 minutes from when it detects an error to when it determines that the fault
has occurred.
*4: The ABS-ECU makes an initial check on the motor relay and motor when the wheel speed reaches 6 km/h
(4 mph) for the first time after engine start. If anything wrong is detected, it causes the system to shut down
and simultaneously lights the ABS warning light.
<Diagnostic Trouble Code Display by ABS Warning Light>
(1) The codes for the currently present or previously
tic trouble codes and goes back to the normal
occurred failures are displayed. Each code is
displayed once. After all the codes in store have
been displayed, they are repeatedly displayed,
beginning with the first one.
L (2) If the vehicle is put in motion and any of the
wheels reaches a speed of more than IO km/h
(6 mph) during display of diagnostic trouble
codes, the system stops displaying the diagnos-
control mode. Thereafter, if the ABS system
is in order, the ABS control is available. If the
system is out of order, the warning light illuminates and the brake system is placed in the
ordinary braking mode. No more codes will be
output until the ignition key is placed in the ON
position again.
2. Diagnostic Trouble Code Indication Method
Diagnostic trouble codes are indicated as described
below, depending on failure conditions in the system.
I
System failure condition
No failure detected in the past
detected in the past
I
Display on scan tool
Display by ABS warning light
No diagnostic trouble code displayed.
ON/OFF at 0.5 sec. intervals
(no-failure code)
All codes associated with the failures
that occurred in the past are displayed,
beginning with the most recent one.
All codes associated with the failures
that occurred in the past are displayed,
beginning with the most recent one.
NOTE
Even if failures of a same code repeatedly occur, the code that is displayed is the one stored for the first time only.
DRIVE-CONTROL COMPONENTS - ABS <FWD>
3. Diagnostic Trouble Code Clearing Procedure
NOTE
(3) Even after the memory has been cleared, an
(1) When the ABS-ECU system is out of order,
instruction from the scan tool can be accepted.
the diagnostic trouble codes in the memory canTo,confirm a diagnostic trouble code, the scan
not be cleared by use of the scan tool.
tool should be re-operated.
(2) To check whether the memory has been cleared,
the diagnostic trouble code reading procedure
should be performed.
<When the scan tool is used>
Clear the memory according to the message that
appears on the scan tool. (For details, refer to the
instruction manual for the scan tool.)
<When scan tool is not used>
To erase the trouble codes in memory, place the
stop light switch in the ON state and then set the
ignition switch to ON (generator terminal L voltage:
LOW) and change over the stop light switch IO
times within the following time intervals. The trouble
codes in memory will then be erased in about a
second.
Ignition
switch
ON
OFF
Generator HI
terminal
L voltage
LOW
I
I
I
;
I
Stop light ON
switch
OFF ---i
I
I
I
I SSC. or ISS
1st
2nd
3rd
I
I
Warning
light
4th
9th
16th
I
I
J
ON
1 sec.
OFF
1 sec.
ABS-ECU
memory
If any of the following conditions is true, the trouble
codes in memory will not erase.
l
When the stop light switch is not ON before
the ignition switch is set to ON
l
When the first stop light switch input change
(ON-OFF) does not occur in less than three
1.
Erasure completed 14xo229
l
seconds, or when the second and subsequent
change does not occur in less than one second
When the generator terminal L voltage goes
“HI” before erasure is completed
DRIVE-CONTROL COMPONENTS - A B S <FWD>
3-43
Data List Output
Of the ABS-ECU input data, the following items can be read by the scan tool.
id
1. When the System is in Order
Code No.
Items
Displayed unit
11
Front right wheel speed
km/H
12
Front left wheel speed
km/H
13
Rear right wheel speed
km/H
14
Rear left wheel speed
km/H
21
ABS-ECU power voltage
v
22
Generator power voltage
v
23
Stop light switch ON/OFF state
ON/OFF
__--
2. When the System is in the ABS-ECU Isolated State
When the ABS-ECU is placed in the out of service
not displayed. The data displayed by the scan tool
state by the on-board diagnostic program, the wheel
speeds of No. 11 through 14 described above are
Actuator Test
The actuator can be force-driven using the scan
tool for easy operation inspection.
i/ NOTE
(1) If the ABS-ECU function has been cancelled,
an actuator test cannot be performed.
(2) Actuator testing is only possible when the vehicle is stationary. If the vehicle speed during
Item No.
Drive object
01
F.R. solenoid valve
and pump motor
is always “0.0 km/h (0 mph)“.
actuator testing exceeds 10 km/h (6 mph),
forced actuation will be cancelled.
(3) The following item numbers are those to be
entered on the scan tool to give an actuator
test instruction.
Drive pattern
Increase in
Solenoid
valve
02
F.L. solenoid valve
and pump motor
03
Rear solenoid valve
and pump motor
Pump
motor
Start of forced actuation
SYSTEM OPERATION
Refer to 1991 3000GT Technical Information Manual (Pub. No. PXSE9001).
End of forced actuation
DRIVE-CONTROL COMPONENTS - ABS <AWD>
ANTI-LOCK BRAKE SYSTEM (ABS) <AWD>
The ABS used in the 1995 Eclipse is similar to
the previous one.
Combining the ABS with the AWD system has significantly improved the “stopping” as well as “running”
performance of the AWD vehicles. It assures a high
level of running performance under any conditions,
not only on a dry pavement but also on a slippery
road surface.
I
4
7
N73ZNaQM
The AWD version ABS is a 4-sensor, 2-channel
type and is the same as the FWD system except
for the following respects.
l Wheel speed sensor rotor (rear) press-fitted
in drive shaft
@ Gap adjustment-free wheel speed sensor and
rotor
l Semiconductor type G sensor
6
14x0288
Part name
Sensor
Actuator
No.
Function
Wheel speed sensor
1
Sends an AC signal with a frequency proportional to the rotating speed of the individual wheel to the ABS-ECU.
G-sensor
2
Sends an ON/OFF signal to the ABS-ECU depending on
vehicle acceleration/deceleration.
Stop light switch
3
Sends a signal to the ABS-ECU indicating whether the
brake pedal is pressed or not.
Hydraulic unit (HU)
4
Controls braking pressure for each wheel depending on the
signal from the ABS-ECU.
Includes built-in select-low valve
ABS power relay
5
Supplies power to the ABS-ECU.
Motor relay
6
Closes contact in response to a signal from the ABS-ECU to
allow the power to be supplied to the motor in the HU.
Valve relay
7
Is turned ON by the ABS-ECU signal and supplies power to
the solenoid valve in HU.
ABS warning light
8
Is in the combination meter and lights up when there is
trouble in ABS.
Data link connector
9
Outputs diagnostic trouble codes.
10
Controls the actuators such as HU according to the signals
from the individual sensors.
Electronic control unit (ECU)
-
3-45
DRIVE-CONTROL COMPONENTS - A B S <AWD>
SYSTEM DRAWING
i
Wheel speed sensor (FL)
Wheel speed sensor (FR)b
Wheel speed sensor (RR)
w
FL solenoid valve
1
FR solenoid valve
ABS valve relay
ABS motor relay
ABS valve relay response signal) Pump m o t o r r e s p o n s e s i g n a l i ABS-ECU 1
G sensor
Stop light switch
Fl$iF$r
*
1 ECU power SUDDIV
r
Front right wheel (FR)
q=yf&--,
-,-‘;
L
Stop light switch
\ I
ft-
-1
I
G sensor
ABS
B
Rear right wheel (RR)
sensor
t
+
valve
I
L’tt
,..A __..I !_
l Inyaraulic
unit (HU)
I
(OoA)
Wheel speed sensor
Front left wheel (FL)
1
I
i A
Rear left wheel (RL)
14x0107
3-46
DRIVE-CONTROL COMPONENTS - ABS <AWD>
ABS ELECTRICAL CIRCUIT DIAGRAM
Fusib ink (2)
-_
0
L
Ignition
switch IG2
Fusit
Ignition
F uswitch
s i ,bIGll e
link (9)
l i n k
( 2 )
1 [
Dedicated
fuse
IOA
Dedicated
fuse
Stop light
switch
Combination
meter
ABS power
relay
d
I
iydraulic
rnit (HU)
F
I
$
-
Diode
-
.-_
1r
-
ABS
valve
relay
It-
Ir
ABS-ECU
1
Solenoid
valve
-El
stop
light
x
-
4
Resistor
I
n
r
L
A
L
5
I:
E CU power
SUPPlY
7
26
I
2
k
Motor
relay
valve
a
ib
7
,:
relay
Motor ’
power
SUPPlY
7
*
Wheel speed sensor
1
2
3
4
5
6
7
8
9 10 11 12 13 14 15 16 17 18
19)20~21~22~23~24~25~26(27~26~29~30~31~32~33~34~35
ABS-ECU Connector Pin Configuration
L
29
Y
3-47
DRIVE-CONTROL COMPONENTS - ABS <AWD>
ABS HYDRAULIC FUNCTION SCHEMATIC
FWD vehicles. In the case of the AWD vehicles,
the rear right and left wheels are subject to Select
Low control by the Select Low valves. As a result,
the fluid pressure for a total of three wheels (the
front right wheel and the rear right and left wheels)
are under simultaneous control.
Select-low: this is a method of providing the same
hydraulic control to both wheels when either wheel
is about to lock, matching it to the side about to
lock, or a method to control by matching pressure
to the low side.
The ABS in the AWD models is of two-channel system (two-fluid pressure system). In this system, the
solenoid valves are energized or de-energized so
that the front and rear wheel brakes on the same
side are controlled on the “Select Low” rule.
For example, when either the front or rear wheel
on the right side is about to be locked, all the solenoid
valves on the right side, including those on the front
right wheel, are controlled to hold or slightly reduce
the fluid pressure. In order to prevent one wheel
locking state in the rear wheels, it is necessary
to control the rear wheels by Select Low as in the
- Master cylinder
u
Wheel I ?ed sensor (FL)
Wheel speed sensor (FR)
il
Hydraulic Unit (HU)
r-----------Front left wheel
D
Solenoid
valve control
Front right wheel
Solenoid
valve control
T
b
_)I R e s e r v o i r J)
c
Select Low
7
C
Select Low
I
U-J
n
i
id
1
Rear left wheel
1
Wheel speed
sensor (RR)
In
Rear right wheel
14A0629
(mLx\
DRIVE-CONTROL COMPONENTS - ABS cAWD>
3-48
REAR
Knuckle
l-l--i!.
Rotor
SENSOR
N73ZN01AA
WHEEL SPEED SENSOR
The wheel speed sensor of the AWD vehicle is the same as ‘d
in the FWD vehicle, except that the rear rotor is mounted on
the drive shaft. (Refer to P. 3-31.)
0
0’
’ Speed
sensor
Drive shaft
14X006:
STOP LIGHT SWITCH
The same as in the FWD vehicle. (Refer to P. 3-31.)
N73ZNO4AA
G SENSOR
The G sensor, mounted inside the center console panel, detects
the longitudinal acceleration/deceleration (body G) of the vehicle body.
Construction and operation
The inside of the sensor is shown at left. A semiconductor
strain gauge has been adopted as the sensor.
DRIVE-CONTROL COMPONENTS - ABS <AWD>
Piezo diffusion
resistor
L
Weight
Damping
oil
3-49
The semiconductor strain gauge type sensor, constructed as
shown at the left, consists of a weight mounted at the free
end of an N-type silicon leaf spring, and four P-type diffusion
layers made on the surface of the leaf spring to constitute
piezo diffusion resistors. The case is filled with a damping
oil to prevent breakdown that may be caused by resonance.
9FAOO50
Bridge circuit
Piezo diffusion
resistor
The piezo diffusion resistors, arranged as shown at the left,
complete a bridge circuit which constitutes a semiconductor
strain gauge.
When the sensor is placed under strain by acceleration, the
piezoelectric effect changes its electrical resistance, causing
the bridge circuit to go out of balance.
If a voltage is applied across the bridge circuit, the acceleration
can be measured by detecting the amount the bridge circuit
goes out of balance in terms of a change in the voltage.
9FAOO44
output
characteristics
The output characteristics vary as shown at the left in the
direction of acceleration with 2.5 V as 0 G.
Output voltage (V)
I
/y(G)
I,
-0.1
0
1.0
Accele- - Rate of - Deceleration
acceleration
ration
9FAOO46
L
3-50
DRIVE-CONTROL COMPONENTS - A B S <AWD>
ACTUATOR
N73zN02M
HYDRAULIC UNIT (HU)
l
The HU, elastically supported by the shield plate
at the front left of the engine compartment, consists of a motor pump, plunger valve, reservoir
and three solenoid valves.
l
The HU, positioned between the brake master
cylinder and each wheel cylinder, is a hydraulic
circuit split into two systems associated with
the normal X pipings when the ABS is inactive.
When the ABS is active, the motor is operated
by a signal from the ABS-ECU to let the pump
generate a hydraulic pressure required to return
fluid against master cylinder pressure. At the
same time, three solenoid valves are operated
to control the hydraulic pressure that acts on
the wheel cylinder.
Lj
Solenoi
14x0305
Hydraulic unit
I----- - --------___
d
1
Master cylinder
- -.
/
Wheel speed sensor
14FOO54
Solenoid valve and select-low valve
Refer to 1991 3000GT Technical Information Manual (Pub. No. PXSE9001).
Relay box
Refer to P. 3-33.
MOTOR RELAY
Refer to P. 3-33.
VALVE RELAY
Refer to P. 3-33.
ABS WARNING LIGHT
Refer to P. 3-33.
DRIVE-CONTROL COMPONENTS - ABS <AWD>
ELECTRONIC CONTROL UNIT (ECU)
l
L
3-51
N73ZNO3AA
The ABS-ECU has diagnostic and memory functions.
If any failure is found, the fail-safe function is
activated and the ABS warning light will illuminate.
l
The ABS-ECU detects the vehicle speed in
terms of a signal from the wheel speed sensor
to determine the rotating condition of the wheel,
estimates the skidding condition of the wheel
on the basis of the predetermined theory, and
outputs a signal to move the solenoid valve
in the HU in such a way as to prevent locking
the wheel.
BLOCK DIAGRAM
ABS-ECU
1
Battery
Wheel speed
sensors
r
-
I-1
l-
r
Sensor
interface
circuit
I
1
I
i
J
-j-YE%q~
0 CPU monitor circuit
-+ 0 Motor, solenoid control, monitor circuit
Valve relay
--) drive circuit
f
I
~f~iZcuit[
~~~
interface circuit
FUNCTION OF INDIVIDUAL CIRCUITS
The function of each circuit is the same as in the
FWD vehicle. (Refer to P. 3-35.)
d-5
Motor-relay
4V a l v e r e l a y /
3-52
DRIVE-CONTROL COMPONENTS - ABS <AWD>
EXPLANATION OF ECU CONTROL
Braking Hydraulic Pressure Control
Braking hydraulic pressure control is the same as
in the FWD vehicle. (Refer to P. 3-36.)
4-wheel Control
ABS on AWD models controls the front and rear
wheels using select-low and activates the solenoid
valve on one side, including either of the front
wheels. Furthermore, since the rear right and left
wheels are controlled mechanically in select-low
by the select-low valve, there is, as a result, pressure
control of three wheels (either front wheel and the
rear right and left wheels) at a time.
n FR wheel
FL wheel
Selectlow
/G5tidl~
,,’
RL wheel
+-r
~,-
1
Selectlow
wheel
I
SLV: Select-low valve
14AOl35
Control Speed
The control speed is the same as in the FWD vehicle.
(Refer to P. 3-36.)
DRIVE-CONTROL COMPONENTS - ABS <AWD>
Control with G-sensor
Since four wheels are connected in AWD models,
the
four wheels may decelerate almost in phase.
L
This tendency is especially strong on a low frictional
resistance road; suspected vehicle speed does not
match actual speed, the road is judged to be a
high frictional resistance road and the ABS control
becomes unreliable. At such a time, the G-sensor
distinguishes* between low frictional resistance road
Warning
light
Approx.
1 sec.
-
Approx.
1 sec.
14X0120
3-53
and a high frictional resistance road and makes
the ABS control reliable by switching the method
of calculating suspected vehicle speed.
* When braking on a low frictional resistance road,
the rate of vehicle deceleration is slow. On the ’
other hand, when braking on a high frictional
resistance road, the rate of vehicle deceleration
is fast.
ABS Warning Light Control
In the following cases the ABS warning light lights up.
l
It lights up when trouble in the system is recognized.
l
It illuminates in the pattern shown in the figure on the
left when the ignition switch is turned ON, to check the
ABS warning light circuit.
DRIVE-CONTROL COMPONENTS - ABS <AWD>
3-54
INITIAL CHECK FUNCTION
The ECU always performs an initial check on the
ABS system with the on-board diagnostic function.
1. Initial Check Operation
(1) When the ignition key is placed in the ON position, the power is supplied to the ABS-ECU,
and the ABS-ECU starts a diagnostic sequence.
During the diagnostic period, the ABS valve
relay stays in the “OFF” state and the warning
light continues to light.
(2) Then, the ABS-ECU forces the ABS valve relay
into the “ON” state and executes diagnostic test
mode of the ABS valve relay to detect an ON
or OFF failure.
(3) All the solenoid valves are caused to be ON
and OFF to make sure that the valves are not
sticking.
If it detects an error, it illuminates the warning light,
and disables the ABS system.
(4) If the engine starts and the ignition key is returned to the “ON” position, the ABS-ECU power
supply is resumed, and initial checks in (1)
through (3) are performed again.
(5) When the initial checks are satisfactorily completed, the ABS becomes ready for operation.
NOTE
An operation check for the motor relay and the motor
is performed when the vehicle is put in motion after
starting the engine. This check is performed only
once whenever the ignition switch is turned “ON”.
START
Ignition key ON
ACC
ABS-ECU
12v
power supply
ov
. ..i..
ABS
warning light
ABS valve ON
relay
Solenoid
valve
ON
OFF
14X0243
DRIVE-CONTROL COMPONENTS - ABS <AWD>
FAIL-SAFE FUNCTION
Should a failure occur in the ABS system, the ABSi ECU isolates the system to retain the vehicle’s ordinary braking function, thus assuring a high measure
of safety.
l If the ABS-ECU determines that the system
is defective as the result of diagnostic test mode,
/
DIAGNOSTIC FUNCTIONS
To facilitate inspection of the ABS system, the ABSECU offers the following facilities:
l
Diagnostic trouble code output and erasure
l Actuator test
All of the items described above can be checked
by the scan tool.
Scan Tool - ABS Interface
The scan tool function is entered by connecting
the scan tool to the data link connector. At this time,
it causes the ABS warning light to light, drives
the valve relay to interrupt control of the solenoid
valves in the HU, and restores the ordinary braking mode.
the vehicle must be stopped, and the ignition should
be OFF.
The ABS scan tool mode is entered when you select
the ABS system on the scan tool. In this mode,
diagnostic output, data list output and actuator test
functions are available. During an actuator test, however, the ABS warning light illuminates and anti-lock
control is inhibited to prevent ABS operation when
a brake is temporarily inactivated during the actuator
Scan tool
mode entry
condition
i
3-55
0 Wheel speeds of 0 km/h (0 mph), parked condition
Q Check harness of scan tool connected to data
link connector of vehicle
0 ABS system selected by control switch of scan
tool (Specified serial data received)
NOTE
No communications with the ABS-ECU can be made by connecting the scan tool while the vehicle is in operation [wheel
speeds not 0 km/h (0 mph)].
DRIVE-CONTROL COMPONENTS - ABS <AWD>
3-56
Diagnostic Trouble Codes
Conditions detected as a result of diagnosis are
associated with a total of 14 codes including that
for normal state, and the codes are stored in the
volatile memory.
Even if the ignition key is placed in the “OFF” position, the contents of the memory are not cleared,
as the memory remains powered by a backup power
supply.
These codes are readable by connecting the scan
tool.
When the scan tool is not used, they are also readable with a voltmeter which deflects in a pattern
unique to each code.
1. Diagnostic items, diagnostic codes and detection condition
Code No. display
on Scan tool
Inspection item
Diagnostic content
Detection
conditions
A
B
x
x
11*’
Front right wheel speed sensor
12*’
Front left wheel speed sensor
13*’
Rear right wheel speed sensor
14*’
Rear left wheel speed sensor
15*’
Wheel speed sensor system
Abnormal output signal
X
21
G sensor
Broke wire in G sensor or OFF malfunction
X
22*2
Stop light switch system
Open circuit or ON malfunction
X
41
Front left solenoid valve
42
X
Front right solenoid valve
No response to solenoid valve drive
signal
43
Rear solenoid valve
Current value in both valves is different when in same mode
X
51
Valve relay
Valve relay OFF failure
Motor relay or Motor
Motor relay OFF failure and motor
drive failure
ABS-ECU
ABS-ECU internal failure (program
maze, etc)
Open circuit or short in + wire
53*3
55
No fault code
displayed
(The system is in order)
Detection conditions
A: During system check immediately after staritng
B: During operation
x
x
X
x
x
DRIVE-CONTROL COMPONENTS - ABS <AWD>
3-57
NOTE
*l: The ABS-ECU can detect only an open circuit from the moment the ECU power supply is ON.
The ABS-ECU lights the ABS warning light when it detects an open circuit, but it does not immediately store
i
the trouble code in memory and does not cause the system to shut down.
When an open circuit is detected, the trouble code is stored in memory and the system caused to shut down
when the vehicle starts and the wheel speed reaches 6 km/h (4 mph) (the first acceleration after the IG has
been placed in the ON state).
Troubles other than an open circuit cannot be detected until the wheel speed reaches 6 km/h (4 mph). When
the ABS-ECU detects any of these troubles, it causes the system to shut down and simultaneously lights the
ABS warning light.
The shut down responce time varies with the wheel speed as described below.
First start after engine start:
When the wheel speed is less than 10 km/h (6 mph), the system shuts down 60 seconds later.
When the wheel speed is 10 km/h (6 mph) or more, the system shuts down immediately.
Restart:
l
When the wheel speed is less than 20 km/h (12 mph), the system shuts down 60 seconds later.
l
When the wheel speed is 20 km/h (12 mph) or more, the system shuts down immediately.
When the ABS-ECU detects a wheel speed sensor error during ABS control, it causes the system
to come down and simultaneously lights the ABS warning light after ABS control.
l
l
*2: The ABS-ECU takes more than 15 minutes from when it detects an error to when it determines that the fault
has occurred.
*3: The ABS-ECU makes an initial check on the motor relay and motor when the wheel speed reaches 6 km/h
(4 mph) for the first time after engine start. If anything wrong is detected, it causes the system to shut down
and simultaneously lights the ABS warning light.
3-58
DRIVE-CONTROL COMPONENTS - ABS <AWD>
2. Diagnostic Trouble Code Indication Method
Diagnostic trouble codes are indicated as described
below, depending on failure conditions in the system.
System failure condition
‘d
Display on scan tool
Display by voltmeter
No failure detected in the
past
No diagnostic trouble code displayed.
ON/OFF at 0.5 sec. intervals
(no-failure code)
Failure detected in the
past
All codes associated with the failures that
occurred in the past are displayed, beginning with the most recent one.
All codes associated with the failures that
occurred in the past are displayed, beginning with the most recent one.
NOTE
Even if failures of a same code repeatedly occur, the code that is displayed is the one stored for the first time only,
3. Diagnostic Trouble Code Clearing Procedure
Clear the memory according to the message that
(2) To check whether the memory has been cleared,
appears on the scan tool. (For details, refer to the
the diagnostic trouble code reading procedure
instruction manual for the scan tool.)
should be performed.
(3)
Even
after the memory has been cleared, an
NOTE
instruction
from the scan tool can be accepted.
(1) When the ABS-ECU system is out of order,
To
confirm
a diagnosis code, the scan tool
the diagnostic trouble codes in the memory canshould
be
re-operated.
not be cleared by use of the scan tool.
Actuator Test
The actuator can be force-driven using the scan
tool for easy operation inspection,
NOTE
(1) If the ABS-ECU function has been cancelled,
an actuator test cannot be performed.
(2) Actuator testing is only possible when the vehicle is stationary. If the vehicle speed during
Item No.
Drive object
04
F.R. solenoid valve
and pump motor
Drive pattern
Increase in
Solenoid
valve
05
F.L. solenoid valve
and pump motor
actuator testing exceeds IO km/h (6 mph),
forced actuation will be cancelled.
(3) The following item numbers are those to be
entered on the scan tool to give an actuator
test instruction.
;;;
;;;ij’ijiq+r
,9”:
44 ms
3sec.
I
I1
Start of forced actuation
*ms
End of forced actuation
14AO588
Lj
DRIVE-CONTROL COMPONENTS - Parking Brakes
PARKING BRAKES
l
The parking brake for all models is a mechanical
control type acting on the rear wheels. The brake
is either a drum type or a drum-in-disc type.
3-59
N73ZOOOAA
0
The parking brake lever is offset torward the
front passenger’s seat side.
CONSTRUCTION DIAGRAM
14X0253
4-1
I
i
BODY
CONTENTS
DOORS . . . . . . . . . . . . . . . . . . . . . . . . . . . . . . . . . . . . 7
KEYLESS ENTRY SYSTEM . . . . . . . . . . . . . . . . 15
Door Lock.. . . . . . . . . . . . . . . . . . . . . . . . . . . . . . . . . . . 7
Door Panel . . . . . . . . . . . . . . . . . . . . . . . . . . . . . . . . . . . 7
Window Glass Regulator . . . . . . . . . . . . . . . . . . . . . 11
Receiver .................................... 17
Structure and Operation . . . . . . . . . . . . . . . . . . . . . . 16
ELECTRIC SUNROOF . . . . . . . . . . . . . . . . . . . . . 20
Sunroof Control System . . . . . . . . . . . . . . . . . . . . . . 20
Sunroof Control Unit . . . . . . . . . . . . . . . . . . . . . . . . . 21
GENERAL DESCRIPTION . . . . . . . . . . . . . . . . . . . 2
i;
N74ZAOOM
Features . . . . . . . . . . . . . . . . . . . . . . . . . . . . . . . . . . . . . .
MAIN BODY . . . . . . . . . . . . . . . . . . . . . . . . . . . . . . . 3
Body Color Charts . . . . . . . . . . . . . . . . . . . . . . . . . . . . 4
Body Paneling . . . . . . . . . . . . . . . . . . . . . . . . . . . . . . . . .
REDUCTION OF AERODYNAMIC NOISE . . . . 5
Flush Surface . . . . . . . . . . . . . . . . . . . . . . . . . . . . . . . . 5
Glass Catch . . . . . . . . . . . . . . . . . . . . . . . . . . . . . . . . . . .
4-2
BODY - General Description
GENERAL DESCRIPTION
N74ZBOOM
The main body (monocoque body) is highly-rigid
and excellent in noise and vibration reduction. It
also reduces vehicle weight.
The keyless entry system which allows the doors
to be locked and unlocked by remote control has
also been adopted.
d
FEATURES
Light weight, added rigidity
1. Extensive use of high tension steel panels
2. Effective use of reinforcement to improve the rigidity of
door outer panel
Corrosion control
1. Extensive use of anticorrosion steel panels
2. Application of rocker panel primer to the side sills
Tapering at each body corner
ij
Glass area surfaces made flush with body paneling
Effective arrangement of sound absorbing and insulating
materials
Improved controllability and
safety
1.
Side door beam to enhance occupant’s safety in side collision
2. Central door lock system with key reminder system <Some
models>
3. Radio wave remote control type keyless entry system (Option)
4. Power window switch with a one-touch-open mechanism
Improved merchantability
and appearance
1. Flush surface body
2. Motor driven outer slide glass sunroof with tilt-up mechanism (Option)
BODY - Main Bodv
MAIN BODY
L
4-3
N74ZCOOAA
BODY PANELING
The body features a monocoque construction. Ample use of high-tensile steel panels and galvanized
steel panels not only reduces the body weight but
ensures good corrosion control.
m : High-tensile steel panels
: Galvanized steel panels
31 x0305
BODY - Main Body
4-4
BODY COLOR CHARTS
Color
Body color code
Color number
WHITE
w12
AC10812
SILVER
A52
AC11052
GRAY
A74
AC11074
BLACK
x13
AC10813
RED
R87
AC1 0987
COPPER RED
PO1
AC11101
YELLOW
Y76
AC11076
GREEN
G36
AC11036
BLUE
873
AC11073
AC10812
31
W12A74*
,“:,’
AC11074
SILVER
A52
AC11 052
A74
AC11074
A52A74*
GRAY
’ AC10813
51
X13A74*
:;;
AC11074
AC1 0987
FFi
R87A74*
;;;
AC11074
COPPER RED
PO1
AC11101
A74
AC11074
Y76
AC11076
A74
AC1 1074
G36
AC11036
A74
AC11074
673
AC11073
A74
AC11074
POlA74*
GRAY
YELLOW
Y76A74*
GRAY
GREEN
- G36A74*
GRAY
BLUE
GRAY
l
Two-tone body color
B73A74*
4-5
BODY - Reduction of Aerodynamic Noise
REDUCTION OF AERODYNAMIC NOISE
FLUSH SURFACE
L The
glass areas have been made flush with the
body paneling for less aerodynamic noise and higher
directional stability during high-speed operation.
N74ZDOOAA
Additional body design features for these purposes
include round-shaped body, tapering at each corner,
beadless flat floor for smoother under-floor air flow,
etc.
18X0702
Tapering at rear
Dillar sections
Tapering at front
side corners
I
18X0703
Tapering at rear
side sections
Section A - A
Windshield
18X0633
18X0648
Section B - B
Section C - C
Section D - D
Liftgate
glass
glass
18X0634
18X0631
Quarter window
4-6
BODY - Reduction of Aerodvnamic Noise
GLASS CATCH
Since sashless doors have been adopted, glass
catches have been provided in the weatherstrip holders to prevent the door glasses from being drawn
outward by the negative pressure during high-speed
operation. This also improves sealing between the
weatherstrip and door glass. This reduces noise
Lj
generated by the air drawn out by negative pressure
during high-speed operation.
Section A - A
Glass catch
v
4i2
Vdo~$erstrip
Door
Glass in normal
position
18X0701
18X0400
4-7
BODY - Doors
DOORS
/ DOOR PANEL
L To ensure safety of the driver and passengers in
N74ZEOOM
a side collision, a reinforcement (side door beam)
has been installed inside the door.
beam
DOOR LOCK
N74ZEOlAA
A key reminder equipped central door lock system
has been adopted. This allows all the doors to be
locked and unlocked by the key or door lock switch
id at either the driver’s or front passenger’s door.
(Some models)
The central door lock system offers the following
features.
l
The driver’s door only can be unlocked by operating the driver’s door key once. All the doors
can be unlocked by operating the key twice.
l
l
l
All the doors can be locked by the driver’s door
inside lock knob.
The keyless entry system has been adopted
which allows operation of the central door lock
system by remote control. (Option)
Key reminder equipment (Refer to GROUP 7
ETACS.)
<Driver’s side>
Outside handle
\
tch
<Passenger’s side>
Door lock
switch
Inside handle
Door lock actuator
18X0635
18X0627
4-8
BODY - Doors
CENTRAL DOOR LOCKING SYSTEM OPERATION
1. Door Locking Operation
(1) Door locking operation by Inside Lock Knob or d
Key
When the driver’s lock knob or door key is placed
in the lock position, the door lock actuator switch
is forced to OFF by a mechanical link. The OFF
signal from the actuator switch is input to the
ETACS. In response to the signal, the ETACS
delivers a lock output. Accordingly, the lock side
coil of the door lock power relay is energized
to operate the door lock actuators and lock the
doors.
Fusible link
Door lock
power relay
Door lock
actuator (R.H.)
Door lock
key cylinder
switch (L.H.)
d
18X0636
(2) Door locking operation by door lock switch
When the lock side of the door lock switch is
turned ON, the lock side coil of the door lock
power relay is energized to operate the door lock
actuators and lock the doors.
Fusible link
rt
Door IOCK
key cylinder
switch (L.H.)
18X0637
BODY - Doors
L
4-9
2. Door Unlocking Operation
(1) Door Unlocking Operation by Key
When the driver’s door key is operated once toward the unlock side, the driver’s door is unlocked
by a mechanical link. At the time, the driver’s
door lock actuator switch signal to the ETACS
changes to ON. In this state, when the driver’s
door key is operated once again toward the unlock
side, the ON signal is input from the door lock
key cylinder switch to the ETACS. In response
to these signals the ETACS delivers an unlock
output. Accordingly, the unlock side coil of the
door lock power relay is energized to operate
the front passenger’s door actuator and unlock
the front passenger’s door.
Fusible link
rt
Door lock
power relay
Door lock
key cylinder
switch (L.H.)
L
18X0639
When the front passenger’s door key is placed
in the unlock position, the unlock side coil of
the door lock power relay is energized to operate
the door lock actuators and unlock all the doors.
Fusible link
I
Door lock
key cylinder
switch (L.H.)
16X0952
4-10
BODY - Doors
(2) Door Unlocking Operation by Door Lock Switch
When the unlock side of the door lock switch
is turned ON, the unlock side coil of the door d
lock power relay is energized to operate the door
lock actuators and unlock the doors.
Fusible link
I
Door lock
key cylinder
switch (L.H.)
DOOR LOCKING PREVENTED WITH KEY IN
IGNITION SWITCH
(1) When any of the doors is opened with the key
inserted in the ignition switch (key reminder
switch), the signals from the key reminder switch
and door switch are input to the ETACS.
(2) In this state, when the driver’s door inside lock
knob is placed on the lock side (the OFF signal
from the actuator switch input to the ETACS),
an unlock output is supplied from the ETACS
for 5 seconds.
(3) This moves the door lock actuator to the unlock
side. Therefore, the door cannot be locked unless
the key is removed from the ignition switch (key
reminder switch) or the door is closed.
Fusible link
Door lock
power relay
OFF (Key in position)
ON (Door open)
18X0799
4-11
BODY - Doors
WINDOW GLASS REGULATOR
N74ZEOZAA
Since the sashless doors have been adopted, highly
L rigid X type window glass regulators have been
adopted.
The door glass is supported by a whole length of
hollow lip provided in the door belt line molding.
The structure, compared with the localized support
of the conventional outer stabilizers, places less
<Vehicles with power window>
load on the glass. Therefore, the outside of glass
is less vulnerable to damage.
On power window equipped vehicles, the power
window switch has been changed to lower the door
glass when the knob is pressed in, and raise the
door glass when the knob is pulled up.
<Vehicles without power window>
Door glass stabilizer
Door glass stabilizer
Door belt
line molding
L
Inner stabilizer
Manual window regulator
Power window regulator
18X0707
18X0708
HOLDING OF DOOR GLASS
When fully raised, stabilizer hook on the door glass
catches the inner stabilizer cushion to hold the door
glass securely and draw it inward. In addition, from
outside the door glass, the door glass stabilizer presses glass striker and the door glass inward.
18X0408
Inner stabilizer
18X0409
WHEN DOOR GLASS BEGINS TO OPEN
The glass striker moves down with the door glass,
but the hollow lip provided over the full length of
the door belt line molding provides a proper pressure
against the glass. Therefore, the outside of glass
is less vulnerable to damage.
NOTE
The stabilizer hook also moves down with the glass.
4-12
BODY - Doors
OPERATION OF POWER WINDOWS
Operation of Power Windows When Controlled by Main Switch
When the ignition switch is placed at IG1, current
(3) Even after the ignition switch has been placed d
is supplied from the ETACS-ECU to the coil
at OFF, the power window can be operated
of the power window relay. This causes the
for a period of 30 seconds. During this period,
power window relay to be ON.
however, the output is interrupted the moment
(2) Current is supplied from the power window relay
the door is opened.
through the main switch to the power window
motor to operate the power window.
Ignition switch (IG1)
Fusible link
Fusible link
I
t.
r
/\
I\
/\
/\
t- \,c
\/
x,
Power window
relay
OFF
I
sz
Constant
voltage 12V
I;D
Constant
voltage 5V
Power window ON
I
I
switch
1
Door switch
W-U
Power window
main switch
Power
window
motor
W-0
Power
windou
motor
W-f)
Power window
d
18X0640
~
4-13
BODY - Doors
2. Operation of Power Windows When Controlled by Sub Switches
(3) Even after the ignition switch has been placed
(1) When the ignition switch is placed at IG,, current
at OFF, the power window can be operated
is supplied from the ETACS-ECU to the coil
for a period of 30 seconds. During this period,
of the power window relay. This causes the
however, the output is interrupted the moment
power window relay to be ON.
the
door is opened.
(2) Current is supplied from the power window relay
through the sub switch to the power window
motor to operate the power window.
Fusible link
Ignition switch (IG,)
Fuse
Fusible link
J
d
ETACS-ECU
Power window
relay
Ignition switch
Door switch
p#~
P o w e r w i n d o w ON
oFF
output
j-l--;
Power window
main switch
Power
window
motor
0-W
Power window
sub-switch
18X0641
4-14
BODY - Doors
3. Operation of LOCK Switch
When the lock switch of the power window main
switch is placed at the lock position, the front passenger’s side power window cannot be operated by
the power window main switch or power window
sub switch.
Ignition switch (IG,)
Fuaeg
v
Fusible link
ETACS-EC”
--F
V
Power window
relay
Door switch
Power window
main switch
Power
window
motor
WI
Power
window
motor
W-U
Power window
sub-switch
4-15
BODY - Keyless Entry System
KEYLESS ENTRY SYSTEM
N742GoQM
The radio wave remote control type keyless entry
l
i system has been adopted. The system is similar
to the one introduced on the 1993 3000GT. It allows
all the doors to be locked and unlocked by remote
control. (Option)
The system consists of a transmitter and receiver
added to the conventional central door lock mechanism. Even if the keyless entry system fails, the
doors can be locked and unlocked by the key.
The system offers the following features.
l
Because of the radio wave remote control design, the operating range of the system is about
6 m (20 ft.) from the vehicle in all directions.
l
The receiver has a built-in memorize/operation
changeover switch (programming switch). Even
if the transmitter is lost, the whole system need
not be replaced. Just program a new transmitter
to the receiver.
l
The receiver can store two secret codes. Therefore, two transmitters can be used for a single
vehicle.
l
A timer lock function has been adopted so that
even if the unlock switch of the transmitter is
pressed by mistake, all the doors will be relocked unless any of the doors is opened within
a period of 30 seconds after the unlock switch
has been pressed.
For confirmation of system operation at night,
a confirming function flickers the dome light
twice after the doors have been locked, and
keeps the dome light lit for three seconds after
the doors have been unlocked. (The dome light
switch, however, must be in the “DOOR” position.)
NOTE
The foot light also simultaneously flashes or
lights with the dome light.
Transmitter
Receiver
Drive
signal
16X0625
Dome light
Drive
signal
1
‘When locked:
Flashes twice.
When unlocked:
Lights for
three seconds.
4-16
BODY - Keyless Entry System
Part name
Function
d
Transmitter
Sends its secret code by the radio wave signals.
Receiver
Switched over between the operation and memorizing modes by the code registration
switch.
In the operation mode, the receiver compares the signal received from the transmitter by
the built-in antenna with the code stored in the receiver and outputs the drive signal to the
ETACS-ECU and dome light only when the signal coincides with the code.
In the registration (programming) mode, the receiver stores the signals from the transmitter
in the EEPROM in the receiver as a new code.
Outline of the System
Operating Section
Vehicle-Mounted Section
r - - - -Transmitter
- -------~
Receiver
r - - - - - - - - - - - - - - - - - - - _ _ _
Antenna
I
T
I
1
I
Stored
code
Code registration
switch
I
l Dome light
I
Control circuit
I
I
i
ETACSECU
L-----------j
STRUCTURE AND OPERATION
TRANSMITTER
The transmitter is a key holder type independent of the master
ignition key. The transmission switch comprises two switches
which independently perform the lock and unlock functions.
When the transmission switch is operated, the secret code
unique to the transmitter is transmitted in radio form.
The transmitter has an indicator light which lights when the
transmission switch is placed in the ON state. The light makes
it possible to confirm switch operation and battery discharge.
The battery comprises two lithium cells (CR2016) and offers
a life expectancy of about two years at a rate of use of 10
times/day.
Lock switch
Indicator light
Battery
16X079EI
‘d
BODY - Keyless Entry System
Transmission switch
2, Transmission code
ir”
Cyclic code
Data
code /l
uvu
4-17
Transmission Code
The illustration at left shows a code transmitted from the transmitter. When the switch is operated once, three data codes
following the cyclic code are sent. One data code comprises
a total of 51 bits, of which 21 bits are used to constitute a
secret code for identification of the user, and the remaining
25 bits are used for system identification, etc. The secret code
for user identification is a combination of “OS” and “1s”. More
than a million combinations are available.
18CO571
RECEIVER
The receiver is mounted at the driver’s side rear
quarter panel. The receiver has a code registration
switch by which the receiver is switched between
the system operation mode and code registration
mode.
Normal keyless entry system operations are performed in the system operation mode. In the system
operation mode, the signals transmitted from the
transmitter are compared with the code stored in
the EEPROM in the receiver. Only when the results
are in agreement, a signal is output to the ETACSECU to lock or unlock the doors and cause the
dome light to flash (when the doors are locked)
or steadily light (when the doors are unlocked). (The
dome light switch, however, must be in the “DOOR”
i position.)
When the transmitter or receiver is replaced, note
that the secret code unique to the transmitter and
the code stored in the EEPROM in the receiver
will be out of agreement. To allow operation of the
system, the code sent from the transmitter must
coincide with the code stored in the receiver. For
this purpose, place the receiver in the registration
mode and write (transmit) the secret code assigned
to the transmitter in the EEPROM in the receiver
as a new code.
The EEPROM can store two codes. Since the user
has only one transmitter at first, the EEPROM stores
two identical codes at shipment. When the user
wants to use one more transmitter, a maximum
of two transmitters can be used by repeating the
registration operation to the EEPROM.
(EEPROM: Electrical Erasable & Programmable
ROM which allows data to be electrically erased
and rewritten)
(L.H.)
Code registration switch
18X0704
4-18
BODY - Keyless Entry System
Transmitter switch
Unlock switch
ZFI
Lock switch
ON
n
OFFI
Signals
transmitted
Unlock signal
I
Lock signal
Signals
received
by receiver
I
Door unlock signal 1
ON
I
I
I
1
OFF
I
Door lock signal
OPERATION IN SYSTEM OPERATION MODE
When the transmission switch is pressed once, three
identical codes are transmitted from the transmitter.’d
The secret code is decrypted by the comparator circuit
in the receiver which compares the code with the
code stored in the receiver. When the transmitted
code coincides with the stored code, the receiver
sends a door unlock signal or door lock signal to
the ETACS-ECU.
In response to the signal, the doors are locked or
unlocked. When the door lock switch in the door lock
actuator is caused to be ON (unlock) or OFF (lock),
the receiver causes the dome light to flash or steadily
light (operation confirmation function).
NOTE
The receiver determines that the codes are in agreement when any of the three codes transmitted from
the transmitter coincides with the code stored in the
receiver.
I
I
!
I
ON
I
I
OFF
I
I
Door lock
switch
I
I
ON
(Unlock)
OFF
(Lock)
1
; ;
I
i 1
Dome light
ON
OFF
I
I I
I l
I
I
I I
I
I
-
3 sec.
0.5 sec. 0.5 sec.
0.5 sec.
18CO573
TIMER LOCK FUNCTION
If none of the doors is opened in less than 30 seconds
after the doors have been unlocked by the keyless
entry system, the receiver will automatically output
a door lock signal to the ETACS-ECU to re-lock the
doors.
This function prevents accidental unlocking of the
doors that may be caused by an unintentional operation of the transmitter.
Operation Inhibit Conditions
In the following cases, operation of the system is
inhibited.
l
When a code different from the one stored in
the receiver is received 30 consecutive times
in a minute, operation of the system is inhibited
for 10 minutes.
l
When the ignition key is in the ignition switch
d
(detected by the key reminder switch)
l
When any of the doors is not fully closed (door
switch: ON)
Signals
received
by receiver
Unlock signal
r1 - lI
I
Door unlock signal 1
1
Door lock signal
ON
OFF
Door switch
ON
OFF
I
I
I
I
H
I
I
I
I
I
Door lock switch I
ON
bUF”:““k’
I
I
I
30 sec.
*
I
I
I
I
I
I
I
I
I
I
(Lock)
18CO57:
4-19
BODY - Keyless Entry System
/’
L
OPERATION IN CODE REGISTRATION MODE
(PROGRAMMING)
When the code registration switch is in the SETI or SETII
position, the receiver enters the registration mode where it
stores the first received secret code in the EEPROM.
Two different secret codes can be stored with the switch in
the SETI and ,SETII positions. Therefore, the user can use
two transmitters.
Code registration switch
V
*-<-I *T-"s
L3
Receiver
18N0384
Timing Chart
SET-l
Code
registration FIX
switch
SET-II
L
Signal sent from
transmitter A
Signal sent from
transmitter B
Valid
-
I
’
I
I
’
Invalid
r--q
I
I
Signal received
by receiver
’
SET-I Starts 1accepting
secret code
to be stored.
Valid
Invalid
r--7
I
I
i
sE!ll
“:‘-;
I
I
!
/
Secret code is stored in EEPROM when
the switch is changed over from SET-l
or SET-II to FIX.
*EC0574
BODY - Electric Sunroof
4-20
ELECTRIC SUNROOF
N74ZFOOAA
SUNROOF CONTROL SYSTEM
The motor driven outer slide glass sunroof tilt-up
mechanism is an option for all models. This glass
sunroof provides a well-lighted, open environment
even with the roof lid glass in the fully closed state.
The sun roof provides the following features.
0 To slide open or close the sunroof or tilt it up
or down, you don’t have to continue to press
the switch like the conventional one. The sunroof
operates at the touch of the switch.
0 If motion of the roof lid glass is interrupted during
a tilt-up operation, the tilt up operation does
not stop until the roof lid glass reaches the fully
tilted up state.
l
l
l
If an obstruction interferes with the sliding open
motion, the roof lid glass immediately stops.
If an obstruction interferes with the sliding close
or tilt down motion, the roof lid glass will automatically reverse.
Even after the ignition switch has been placed
at OFF, the sunroof can be operated for 30
seconds. When a door is opened during the
period, the sunroof can be operated for another
30 seconds from that time.
Components
Roof lid glass
18X0706
/y Draii hose
&WL
/ ‘-lP\
7 .
c3
“‘=-=dJ
\\
\
&
?-‘
/
Tilt-down a$ x-up and
sliding )pel,
c sliding close
control
control
Sunroof control uni
’
18X0705
4-21
BODY - Electric Sunroof
SUNROOF CONTROL UNIT
The sunroof motor drive circuits, incorporated in
the sunroof control unit, operate under control of
the microcomputer.
The microcomputer in the sunroof control unit conL trols several functions with two different signals (tilt
up and sliding open, tilt down and sliding close)
from various points: the sunroof switches, the door
switch.
System diagram ‘~
Sunroof
control unit
---
Motor
Ignition switch
-W
1
Dzitch
Sunroof switch
t
‘L./
r --
$$
--
1 01
Microcomputer
: Tilt-up, Sliding open
1
16x0644
4-22
BODY - Electric Sunroof
TILT UP OPERATION
(1) When the tilt up switch is pressed for more
than 0.2 seconds, the motor activates.
0.2 sec. 0.2 sec.
Sunroof
switch
Roof lid
glass
External
force
(load)
UP
(2) If motion of the roof lid glass is interrupted during
a tilt up operation, the-motor does not stop until
the roof lid glass reaches the fully tilted up state.
0.2 sec.
‘d
0.2 sec.
-
OFF
DOWN -
I
I
I
I
I
LN ---l-J=*
h
APPLIEDFREE
-
16X0645
TILT DOWN OPERATION
(1) When the tilt-down switch is pressed for more
than 0.2 seconds, the motor activates.
(2) If motion of the roof lid glass is interrupted during
a tilt-down operation, the motor reverses and
stops after the roof lid is returned to its full up
position.
0.2 sec. 0.2 sec.
NOTE
Full up position: Where the roof lid glass begins
to slide open
0.2 sec.
0.2 sec.
Jr,
Sunroof
switch
DOWN
Lj
-
I
I
I
I
FULL UP --f-;--- +TILT UP Roof lid
glass
TlLTDOWN--- External
APPLIED -
(load)
FREE
force
-
-
-
-
‘d
18X0646
~
4-23
BODY - Electric Sunroof
SLIDING OPEN OPERATION (AFTER TILT-UP)
(1) When the sliding open switch is pressed for
more than 0.2 seconds, the motor activates.
L
(2) If movement of the roof lid glass is blocked
during the sliding open operation, the motor
will stop immediately.
(3) The motor can be stopped by pressing the sliding close switch even while the roof lid is sliding
open.
(4) If the sliding close switch is kept pressed further,
the motor turns in the opposite direction (to
the lid closing direction).
0.2 sec. 0.2 sec.
2’sec.
OPEN I
TTiI
I
CLOSE I
I
-w-yFULLY
OPEN
z&J;gf OFF
Roof lid
glass
-
I
--mm
I
i
1
I
-
- I
-
-
$L-k
T-jjr
1
CLOSE -
Externa’ APPLIED force
FREE (load)
ll18X0600
SLIDING CLOSE OPERATION
(1) When the sliding close switch is pressed for
more than 0.2 seconds, the motor activates.
(2) If movement of the roof lid glass is blocked
during the sliding close operation, the motor
will rotate in the reverse direction by approx.
60 mm (2 s/s in,) in terms of the roof lid glass
movement distance before it stops.
0.2 sec. 0.2 sec.
OPEN f$r’ O F F
CLOSE - l-l
I
FULLY OPEN
Roof lid
glass
- ---
Approx. 60 mm (2.38 in.)
r
C L O S E - -- --
External APPLIED force
FREE (load)
16X0647
4-24
BODY - Electric Sunroof
KEY OFF OPERATION
(1) The sunroof can be operated for 30 seconds
after the ignition switch has been set to OFF.
In the slide close mode only, however, the motor
can continue until the sunroof reaches the fully
closed position.
30 sec.
Ignition switch
ON
OFF
Door switch
ON (Opening) OFF (Closing) - I
I
- f-----j
I
0.2
OPEN
Sunroof switch OFF
CLOSE
Roof lid glass
sec.
;
I
I
’
--+-+--y..-..-+
O
-
S
-
I
I
I
I
I
-
I
--**
’
I
t-x$-
E - - - I - -
-,I
seconds. In the slide close mode only, however,
the motor can continue until the sunroof reaches
its fully closed position.
30 sec.
+---I
-
ON (Opening) OFF (Closing)0.2
CLOSE
--
_rI;&
1’
I
II,
I
-
I
I
I
S[I
30 sec.
OPEN
Sunroof switch OFF
I
--
(2) If any of the doors is opened in 30 seconds
after the ignition switch has been placed at OFF,
the sunroof can be operated for another 30
Door switch
I
,
-
FULLY OPEN -
ON
Ignition switch oFF
sec.
0.2 sec.
I
L
0.2
-
FULLUP
TILT UP
TILT DOWN -
C
I
I
I
I
sec.
17
1
I
I
I
I
I
I
_
0 . 2 sec.
1
0.2
sec.
1
“ni
1
I
I
-
’
I
FULLUP
- --e-TILTUP
--7-ITILT DOWN d--Roof lid glass
I
I
F U L L Y O P E N - --+ - l
I
C L O S E - ----I
I
z;
I
I
--r;l-
-
.
1;
I I
II
I
11
I
-
-
--i
; ;
---_
--- -l-I
-_
--&- 3L
’ I
I I
-ii:-’
I
-
I
18X0804
-
BODY - Electric Sunroof
(3) Once the sunroof reaches its fully closed position in less than 30 seconds after the ignition
switch has been placed at OFF, the sunrdof
can no longer be operated.
1
Ignition switch ON
OFF
so sec.
k
1
-
IDoor switch
30 sec.
cl
ON (Opening)OFF (Closing)0.2 sec.
0.2 sec.
OPEN
-
0.2 sec.
0.2 sec.
Sunroof switch OFF
CLOSE
-
FULLUP
-
TILT
Roof lid glass
UP
J--t)
w
--
;
--Ih-
’
CLOSE
I
-
I
I\
--
-
-+
I
TILT DOWN - --I
FULLY OPEN -
-
I
-
-
- -lI I1
1
Ah ---
--18X0802
I
44;
ii~D.
,*-
,.,Y’
“* ” ”
5-I
/'
L
EXTERIOR
CONTENTS
DOOR MIRRORS . . . . . . . . . . . . . . . . . . . . . . . . . . . 3
GENERAL DESCRIPTION . . . . . . . . . . . . . . . . . . . 2
Features . . . . . . . . . . . . . . . . . . . . . . . . . . . . . . . . . . . . . 2
id
N?SUOQM
5-2
EXTERIOR - General Description
GENERAL DESCRIPTION
N75ZBOOAA
All models are equipped with large front and rear
resin bumpers to enhance styling.
d
FEATURES
Improvement of appearance
1. The bumpers, door mirrors, and side protection mouldings
(some models) color coordinated with the vehicle body.
2. Large resin bumpers wrapped round the corners up to
the wheel arches.
Enhancement of
aerodynamic characteristic
3. Rounded bumper corners
Improvement of facility
for easy operation
4. Use of heated door mirrors (some models)
5. Adoption of electric remote-controlled door mirrors (some
models)
,
Material identification marks stamped on plastic parts and maxi- d
mum use of recyclable parts.
EXTERIOR - Door Mirrors
DOOR MIRRORS
large-size Talbot mirrors are attached on the
L The
front doors that smoothly blend into the body styling.
They also contribute to the reduced aerodynamic
drag, and offer the following features:
l
The mirrors can be either manually remote-controlled or electric remote-controlled depending
on the model.
Electric remote
Printed therm0 wires
5-3
N75ZCOOAA
*
Heated door mirrors are available on some models (mirror defogger). This function is performed
together with the rear window defogger function
by operating the rear window defogger switch.
The mirror defoggers are controlled by the same
timer that controls the rear window defogger.
6-l
INTERIOR
CONTENTS
INSIDE REAR VIEW MIRROR WITH
READING LAMP . . . . . . . . . . . . . . . . . . . . . . . . . . 10
SUMMARY OF INTERIOR PARTS . . . . . . . . . . . 2
INSTRUMENT PANEL AND
FLOOR CONSOLE BOX . . . . . . . . . . . . . . . . . . . . 3
SUPPLEMENTAL RESTRAINT SYSTEM
(SW . . . . . . . . . . . . . . . . . . . . . . . . . . . . . . . . . . . . . 11
LUGGAGE COMPARTMENT FLOOR . . . . . . . 10
Air Bag Module . . . . . . . . . . . . . . . . . . . . . . . . . . . . . . 17
Clock Spring . . . . . . . . . . . . . . . . . . . . . . . . . . . . . . ..2 8
Construction and Operation . . . . . . . . . . . . . . . . . . . 16
SRS Connector . . . . . . . . . . . . . . . . . . . . . . . . . . . . . . 26
SRS Diagnostic Unit . . . . . . . . . . . . . . . . . . . . . . . . . 22
SRS Schematic . . . . . . . . . . . . . . . . . . . . . . . . . . . . . . 12
SRS Warning Light . . . . . . . . . . . . . . . . . . . . . . . . . . 30
Warning/Caution Labels . . . . . . . . . . . . . . . . . . . , . . 13
SEAT . . . . . . . . . . . . . . . . . . . . . . . . . . . . . . . . . . . . . . 4
L
N762AOOAA
Construction and Operation . . . . . . . . . . . . . . . . . . . . 5
Front seat . . . . . . . . . . . . . . . . . . . . . . . . . . . . . . . . . . . . 4
Power seat . . . . . . . . . . . . . . . . . . . . . . . . . . . . . . . . . . . 7
Rear seat . . . . . . . . . . . . . . . . . . . . . . . . . . . . . . . . . . . . .
SEAT BELTS . . . . . . . . . . . . . . . . . . . . . . . . . . . . . . 8
Features . . . . . . . . . . . . . . . . . . . . . . . . . . . . . . . . . . . . . 2
6-2
INTERIOR - Summary of Interior Parts
SUMMARY OF INTERIOR PARTS
The interior parts are designed to create a sense
of high quality while attaching great importance to
the vehicle’s function, comfort and safety.
Also, they reflect our attitude getting active in protection of global environment and recycling of resources.
,.J
FEATURES
Improved quality feeling
I
1. Fully trimmed cabin
2. Flowing, integral type instrument panel
3. Integral head lining
Greater ease of handling
1. Large glove box
2. Cup holders
Convenient accommodation
space for small articles
Ample accommodation space in instrument panel, floor console, door, luggage compartment, etc.
Greater safety
#i)
1. Instrument panel padding
2. Three-point seat belt with ELR (driver’s side)/Three-point
seat belt with ELR and ALR (passenger’s side and rear
seat)
3. Flame-retardant material for upholstery covering and padding (urethane pad.)
4. Installation of air bag module for front seat passenger
Provision for optimum
driving position
1. One-touch pushbutton type adjustable shoulder anchor
2. Seat cushion using high-elasticity urethane pad to allow
long driving with little fatigue
3. Dual height control mechanism
4. Power seat (3-way adjustment)
1. Stamping of material names on plastic parts
2. Use of CFC-free sheet urethane
3. Use of recyclable material for sound insulating pads
INTERIOR - Instrument Panel and Floor Console Box
L
INSTRUMENT PANEL AND FLOOR CONSOLE BOX
The flowing instrument panel provides the feeling
of a cockpit. It has the following characteristics.
l
The instrument panel surface has been covered
with a soft pad to enhance the safety and the
sense of quality.
l
The center console has been tilted toward the
driver’s seat to provide the driver with improved
control and visibility of the console.
l
A large glove box with a sunglass holder has
been adopted.
l
l
l
l
6-3
N762COOAA
To offer more convenience, the floor console
has been provided with two cup holders which
can be stored inside the console.
On some models, the floor console lid has been
covered with a soft pad to serve as an armrest.
An air bag module has been installed in the
upper part of the instrument panel on the front
passenger’s side.
The resin parts have been stamped with their
material names to facilitate recycling.
CUD holder
Glove box
Floor console box
19X0620
6-4
INTERIOR - Seat
SEAT
N76ZD6llAA
FRONT SEAT
The front seats are designed around the body’s
center of gravity. The driver’s seat has been
equipped with various adjustment mechanisms
(7-way adjustments at maximum) to best fit the driver’s physical features and riding posture. On some
models, optional power seats with three-way adjust-
ment mechanisms, namely, power-driven dual
height adjustment mechanisms and slide adjustment
mechanism are available. In addition, use of Freon
in urethane pad manufacturing process has been
suspended in an effort to protect the global environment.
Driver’s seat
Items
Manual seat
Front passenger’s seat
Power seat
Manual seat
I
Front height
adjustment
X
X (power)
Rear height
adjustment
X
X (power)
X
X (power)
X
X (with memory)
X (with memory)
X (with walk-in
mechanism)
Lumbar support adjustment
X*
X
Side support adjustment
X*
X
Head restraint vertical adjustment
X
X
Dual height
adjustment
I
Slide adjustment
Reclining adjustment
X
NOTE: * indicates the item available on some models.
<Front passenger’s seat>
vertical adjustment
<Driver’s power seat>
<Driver’s manual seat>
Lumbar support
.
Head restraint
vertical adjustment
/
CiAd CII Innrr.41
- ~ /‘\ U”,“U Ull”‘;: / , -A&JQ )
\w( / Z$rt2n t
\ a---@----E2$
“L
II
Slide adjustment FDual height
adjustment
Power seat switch
r
Slide adjustment
b
1
Slide aajustment
19x0595
6-5
INTERIOR - Seat
Power Seat Circuit
FUSIBLE LINK @
POWER SEAT ASSEMBLI I
POWER SEAT SWITCH
SLIDE
I
T
SLIDE MOTOR
) OFF
IN
OFF-.
ON
I
FRONT HEIGHT
T
REAR HEIGHT
T
UP
FRONT HEIGHT
MOTOR
ll
,pOFF
IN
rl
1
REAR HEIGHT
MOTOR
,>OFF
IN
OFF%,
ON
19X061 7
CONSTRUCTION AND OPERATION
RECLINING ADJUSTMENT MECHANISM WITH MEMORY
If the seatback is raised after being inclined to the front, it
can be returned to the original angle set in memory by previously
setting the seatback angle in memory.
Furthermore, even after it is reclined at any angle, if the seatback
is raised after being inclined to the front, it can be returned
to the original angle set in memory.
Memory lever d:
The reclining memory mechanism consists of a memory lever,
memory plate, guide plate, guide lever and spring.
(1) Set the seatback to the position to be memorized, and
push the memory lever.
1
19X0660
6-6
INTERIOR - Seat
I
(2) When the memory lever is pushed, it releases the meshing
of the memory plate and memory lever, and the memory
plate is rotated by the spring force and contacts the guide
plate.
When the memory lever is released, the lever engages
with the memory plate, completing the memorizing operation.
Memory lever4 ’
d
19X0661
(3) Pull the reclining adjuster lever and fold the seatback forward.
19X0662
(4) Raise the seatback.
As the guide lever is now held by the guide plate, the
reclining gear cannot be locked.
:
i
Guide lever
Guide
plate
19X0663
(5) Raise the seatback further
Then the memory plate contacts the position A of the guide
plate and the guide plate starts to rotate.
When the memorized position is reached, the guide plate
releases the guide lever and the reclining gear is locked
to hold the seatback in position.
Guide lever
\
bide plate
19X0664
Memory range
(6) The memory range is between A and 6 in the illustration.
If the memory lever is operated at a position between
B and C, position 6 is memorized.
A
19X0659
INTERIOR - Seat
POWER SEAT
Slide adjustment switcl
Worm
aear B
-.-----a---
N76ZDOlAA
Slide Adjustment Structure
The motor, limit switch and gears are mounted on the plate
fixed to the lower rails.
When the slide adjustment switch is operated, the motor starts
and rotates worm gear A in the gear box via the cable wire.
This rotating torque is transmitted through gears A and B to
worm gear B. The worm gear B moves the upper rails and
therefore the seat mounted on the upper rails.
When the seat slides to the forward or backward limit, the
cover mounted to the upper rail pushes the limit switch and
turns the motor off. This stops the seat slide operation.
Limit .ywq
Lower rail
-
Cable wire
6-7
19X0668
Front Height and Rear Height Adjusting Structure
The front and rear portions of the seat cushion can
As the seat cushion continues to rise, the claw on
be raised and lowered independently. If the front
the shaft turns the limit switch from ON to OFF,
height and rear height switch is pushed to the up
cutting off power to the motor and stopping it.
side, motor revolutions will be transferred to gear
In addition, if the front height and rear height switch
to sector gear. Since the sector gear, shaft and arm
is pushed to the down side, operation is reversed
are fixed, the seat cushion rises continuously (stepwith the motor revolving in the opposite direction
less) along with the revolution of the sector gear.
and lowering the seat cushion.
Sector gear
Rear height motor
When raising front height
Front height motor
a Arm \
When raising rear height
/!&.=I
When raisiyg front and rear height
: cushion
19FOO49
<Raising>
<Lowering>
Seat cushion
/
,.f-----.
Power seat switch ‘+“.
Seat yshion
,
Power seat switch
Limit switch
Limit switch
19X0673
Arm
6-8
INTERIOR - Seat / Seat Belts
REAR SEAT
N76ZDO2AA
The rear seat comes in two types, bench type and
split type. Both types can be tilted forward, to extend
the luggage compartment as an additional cargo
loading space.
<Bench Type>
<Split Type>
19X0646
19x0647
SEAT BELTS
The seat belts have the following mechanisms.
FRONT SEAT BELTS
l 3-point seat belt with ELR (Driver’s side)
3-point seat belt with ELR and ALR
l
(Passenger’s side)
l Seat-mounted buckle
l
One-touch push button type adjustable shoulder
anchor
N76ZDlOAA
REAR SEAT BELTS
3-point seat belt with ELR and ALR
l
19X0651
6-9
INTERIOR - Seat Belts
ONE-TOUCH PUSHBUlTON TYPE ADJUSTABLE
SHOULDER BELT ANCHOR
The mechanism allows adjustment of shoulder belt anchor
height in five stages depending with the physique of the front
seat occupant. It consists of an adjuster rail, a slider and a
pushbutton provided on the seat belt sash guide.
The adjuster rail is secured to the center pillar and provided
with five holes in which the lock pin of the slider may fit.
The slider is so assembled to the adjuster rail that it may
move up and down along the rail. The lock pin is provided
in the slider to secure the slider in place.
The lock pin is always kept pressed to the rail by spring. Depressing the pushbutton against on the seat belt sash guide
will push the ring out of the sash guide. Then, the lever inside
the slider is pushed to lift the lock pin until the pin is disengaged
from the adjuster rail, making the slider movable up and down.
Each lock pin hole of the adjuster rail is provided with a guide
in the upward direction only so that the upward movement
of the seat belt anchor can be made without depressing the
pushbutton, improving the operability.
Locked
(Pushbutton released)
4
Unlocked
(Pushbutton depressed)
Adjuster rail
Lever
Pushbutton
Guide
Ring
Lock pin
1950060
Inward
Forward
CONSTRUCTION AND OPERATION OF THE BUCKLE
There is a spring installed in the portion connecting the buckle
to the arm, allowing the buckle to tilt forward and inward so
that the belts can be tight enough around the body.
6-10
Inside Rear View Mirror with Reading Lamp /
INTERIOR - L uggage Compartment Floor
INSIDE REAR VIEW MIRROR
READING LAMP
Inside rear view mirror
WITH
N76ZJOOAA
Vehicles with power sunroof have been provided with an inside
rear view mirror with reading lamps.
LX
Reading lamps
0611
LUGGAGE COMPARTMENT FLOOR
N76ZHOlAA
For greater convenience in loading and unloading the spare
wheel or other articles, the luggage compartment floor board
is hinged at the front, and its rear end can be held raised
with a hook. A box on the left side under the luggage compart” ment floor board may be used to hold small articles. A luggage
compartment side box is located in the R.H. side of the rear
side trim. In addition, a cargo net has been provided inside
the luggage compartment to prevent cargo from shifting during
vehicle operation, as well as to offer more convenience to
the user.
Rear side trim RH
\
Luggage compahment side box Iid
\
19X0649
INTERIOR - Supplemental Restraint System (SRS)
SUPPLEMENTAL RESTRAINT SYSTEM (SRS)
L
The Supplemental Restraint System (SRS) is designed to supplement the front seat belts to help
reduce the risk or severlty of injury to the front seat
occupants by activating and deploying two air bags
during certain frontal collisions.
The SRS consists of: left front and right front impact
sensors (located on the right and left front shield
plate); air bag modules for the driver (located in
the center of the steering wheel) and for the front
seat passenger (located above the glove box). Each
module contains a folded air bag and an inflator
unit. The SRS also contains: an SRS Diagnostic
Unit (SDU) with safing impact sensor (located under
the floor console assembly); and SRS warning light
to indicate the operational status of the SRS (located
on the instrument panel); clock spring (mounted
behind the steering wheel); and wiring.
6-11
N76ZIOOAA
The SRS is designed so that the air bags will deploy
when the safing sensor, plus either or both of the
left front and right front impact sensors simultaneously activate while the ignition switch is in the
ON position. These sensors are designed to activated in frontal or near-frontal impacts of moderate
to server force.
Only authorized service personnel should work on
or around SRS components. Those personnel
should read this manual carefully before starting
such work. Extreme care must be used when servicing the SRS to avoid injury to service personnel
(by inadvertent deployment of the air bags) or vehicle
occupant (by rendering the SRS inoperative).
Air bag module (Passenger’s side)
i
VEHICLE
IDENTIFICATION
CODE CHART
PLATE
E.59
L-L
I
Front impact
sensor (R.H.)
SRS warning light
\
L---
Clock
19X0363
v9xo555
SRS diagnostic uni:(SDU)
(with built-in safing
impact sensor)
6-12
INTERIOR - Supplemental Restraint System (SRS)
SRS SCHEMATIC
IGNITION SWITCH
<ST>
Gl>
1
3 Multi-purpose
fuses
_I
jFF
r
Connector lock switch
-
Combination
meter (SRS
warning light)
Park/Neutral
position switch
- - - SDU
-
1
Battery
voltage
detection
circuit
w EEP
ROM
Micro
computer
t _
0 AID
Converter
4
t
I
-l
Scan tool
interface
circuit
-
-
-
-
-
-
-
/- - .-l&F
1
Condenser
voltage
detection
circuit
Impact sensor
resistance
detection
circuit
[
I
L,
rr
L,
VI
r?
I!
1!
4:
Squib
resistance +
detection
circuit
I
:
Safing
II impact
sensor
I
, 1:
!. t 1
““6C /
%Ll
I
I
c
4
I
I ’
---__ --
OFF
Y
(1
41
I
1
j
0
,I
C3
A
Clock
spring
ON
Data link connector
(For scan tool)
Front impact
sensor (L.H.)
Front impact
sensor (R.H.)
Air bag
Air bag
module
module
(Passenger’s (Driver’s side)
side)
19X0588
INTERIOR - Supplemental Restraint System (SRS)
643
WARNING/CAUTION LABELS
A number of caution labels relating to the SRS are
found in the vehicle, as shown in the following illustration. Follow label instructions when servicing
SRS.
If labels are dirty or damaged, replace them with
new ones.
A
\ ’ l- l sus-1
1p
--j‘fyy
I
P
F+2i~\7z
----\-‘I
)CDJ[
r;-J
r7‘
\
/
19x0547
19X0562
19x0557
13X0187
INTERIOR - Supplemental Restraint System (SRS)
A. WARNING
This vehicle has an air bag system.
Refer to service manual before servicing or disassembling underhood components. Read
“SRS” section of manual for important instructions.
Improper service procedures can result in the
air bag firing or becoming inoperative, possibly
leading to injury.
B,
C
CAUTION
This vehicle has air bags for front occupants
as a supplemental restraint system (SRS).
You must always wear your seatbelt, even with
an air bag:
Air bags are not designed to inflate in rollovers
or in rear, side or low-speed frontal crashed.
Air bags inflate powerfully and in a moment.
If you’re too close to an inflating air bag, it could
seriously injure you. Seatbelts help keep you
in position for air bag inflation in a crash. An
inflating air bag can seriously injure small children. A child in a rear-facing child restraint can
be badly injured by an inflating air bag, so never
use a rear-facing child restraint in the front seat
of this vehicle: a rear-facing child restraint should
be used only in the rear seat. Use a forward-facing child restraint with the front passenger seat
as far back as possible, or in the rear seat.
Before driving read label inside the glove box;
if the “SRS” light comes on while you are driving,
or does not come on when you first start the
vehicles, see your dealer for service.
Driver’s air bag information
This vehicle has an air bag which will supplement the seatbelt in certain frontal collisions.
The air bag is not a substitute for the seatbelt
in any type of collision. The driver, and all other
occupants, should wear seatbelts at all times.
WARNING!
If the “SRS” warning light does not illuminate
For several seconds when ignition key is turned
to “ON” or the engine is started, or if the warning
light stays on while driving, take the vehicle
to your nearest authorized dealer immediately.
Also if the vehicle’s front end is damaged or
if the air bag has deployed.
Take the vehicle for service immediately.
The air bag system must be inspected by an
authorized dealer ten years after the vehicle
rna~~f~ct~ra date shown on the certification label located cn the left front door-latch post or
Read the “SRS” section of your owner’s manual
before driving, for important information, about
operation, and service of the air bag system.
When you are going to discard your gas generator or vehicle, please see your MITSUBISHI
dealer.
D. CAUTION: SRS diagnostic unit
This unit cannot be repaired.
If defective, remove and replace entire unit per
service manual instructions.
Do not disassemble or tamper.
See service manual for handling and storage
instructions.
Do not drop: keep dry.
Failure to follow instructions could render air
bag inoperative and result in driver injury.
E. 1 CAUTION: SRS
Before replacing steering wheel, read service
manual, center front wheels and align SRS clock
spring neutral marks.
Failure to do so may render SRS system inoperative, risking serious driver injury.
F.
DANGER POISON
Keep out of the reach of children.
Contains sodium azide and potassium nitrate
contents are poisonous and extremely flammable. Contact with acid, water, or heavy metals
may produce harmful and irritating gases ot
explosive compounds. Do not dismantle, incinerate, bring into contact with electricity or store
at temperatures exceeding 93°C (200°F).
FIRST AID: If contents are swallowed induce
vomiting. For eye contact flush eye with water
for 15 minutes. If gases from acid or water contact are inhaled, seek fresh air. In every case,
get prompt medical attention.
For additional information, see material safety
data sheet (MSDS) for this product.
G. CAUTION: SRS clock spring
This is not a repairable part. Do not disassemble
or tamper.
If defective, remove and replace entire unit per
service manual instructions.
Before replacement, read service manual, ten
ter front wheels and align neutral marks.
Failure to follow instructions may render SRS
system inoperative, risking serious driver injury
INTERIOR - Supplemental Restraint System (SRS)
L
id
H. CAUTION: SRS
Before removal of steering gear box, read service manual, center front wheels and remove
ignition key.
Failure to do so may damage SRS clock spring
and render SRS system inoperative, risking serious driver injury.
I.
6-15
WARNING: SRS
This air bag module cannot be repaired. Do
not disassemble or tamper.
Do not perform diagnosis. Do not touch with
electrical test equipment or probes.
Refer to service manual for further instructions,
and for special hadling.
Storage and disposal procedures. Tampering
or mishandling can result in injury.
DANGER POISON
Keep out of the reach of children.
Contains sodium azide and potassium nitrate
contents are poisonous and extremely flammable. Contact with acid, water or heavy metals
may produce harmful and irritating gases or
explosive compounds. Do not dismantle. Incinerate, bring into contact with electricity or store
at temperatures exceeding 93°C (200°F).
FIRST AID:
If contents are swallowed induce vomiting. For
eye contact flush eye with water for 15 minutes.
If cases from acid or water contact are inhaled,
seek fresh air. In every case, get prompt medical
attention.
6-16
INTERIOR - Supplemental Restraint System (SRS)
CONSTRUCTION AND OPERATION
IMPACT SENSORS
There are 2 different types of sensors used; 2 front
impact sensors and safing impact sensor. One front
impact sensor is provided in each of the right and
left shield pla?e, and one safing impact sensor is
Safing impact
sensor (Incorporated
in SRS diagnostic unit)
built in the SRS diagnosis unit. The right and left
front impact sensors are connected in parallel.
The front impact sensors are connected in series
with the safing impact sensor.
Air bag
module
<Driver’s side>
L.&J
Front impact
sensor (L.H.)
From
power supply -----)
<Passenger’s side>
Front impact
sensor (R.H.)
19x0593
If a front-end collision causes either of the front
impact sensors and the safing impact sensor to
be simultaneously “ON”, the air bag will deploy.
They are constructed as shown below and contain
a G sensor each.
The front and safing impact sensors are essentially
identical in construction.
The G sensor consists of a moving contact which
is a roll spring wound around a roller, a fixed contact
positioned in its moving direction, consisting of a
base, a metallic case, etc. If an impact greater than
preset is applied in the direction of the arrow shown
in the illustration, the inertial force causes the roller
Front impact sensor
to rotate and move, so that contacts are brought
into the ON stage. To maintain a high measure
of G sensor reliability, the contacts have been gold
plated and the metallic case charged with an inactive
gas.
Each impact sensor contains a resistor connected
in parallel with the contacts for detection of a fault
in the wiring. The SRS diagnosis unit always supplies a very small amount of current to the sensor
circuit to monitor a change in the circuit resistance.
Caution
Make sure that the impact sensors are never
disassembled.
Safing impact sensor
Roller
Roller
\
Moving contact
Fixed
19X0824
Fixed contact
19X0825
d
6-17
INTERIOR - Supplemental Restraint System (SRS)
AIR BAG MODULE
<Driver’s side>
The air bag module is an assembly part comprising of an
air bag, pad cover, inflator, and parts for securing them. It
is provided at the center of the steering wheel.
Caution
Make sure that the air bag is never disassembled.
Hinge portion
of pad cover
Groove portion
d\
e
Pad cover
/
Groove oortion
‘Air bag
Inflator
Inflator
Section B - B
Section A - A
e : Pad cover deploying direction
13R0694
Air bag
The air bag is made of a nylon cloth with a rubber
coating inside. It is accommodated in the pad at
the center of the steering wheel together with the
inflator.
The air bag is inflated by the nitrogen gas from
the inflator. The load of the driver pressed against
Pad cover
The pad cover is made from urethane. When the
air bag deploys, the crease is broken, allowing the
air bag to move out and deploy with the hinge portions as its fulcrums. The pad cover has a net, etc.
13R0695
the air bag by the impact causes the nitrogen gas
to escape through the two exhaust holes made on
the rear, and the deflation helps lessen the impact.
insert-molded except for the crease to prevent the
air bag from being broken as it deploys, and also
to prevent broken pieces from scattering around.
648
INTERIOR - Sutwlemental Restraint System (SRS)
Inflator
The inflator consists of a squib, igniter, gas generants, diffuser screen, etc. contained in an aluminum
container. It is mounted in the air bag module housing.
The bottom of the inflator is provided with an electrical connection to which an ignition current is supplied. If current is supplied to the squib, a small
amount of explosive in the squib is burnt causing
the igniter to burn, and the resultant heat burns
the gas generants. Combustion of the generants
Diffuser
To air bag
Igniter
\
\
Diffuser screen
rapidly produces nitrogen gas which is forced
through the diffuser screen into the air bag. The
diffuser screen serves as a filter to remove cinders
and also helps cool down the gas temperature and
reduce the gas generation noise. A shorting pin
is provided in the connector portion of the squib.
Whenever the air bag module is removed, the shorting pin makes a short circuit across the terminals
to prevent flow of current caused by static electricity
to the squib.
Gas generant
I
To air bag
/
/////////- -
Connecto?lock
Sq\uib
\
Shorting clip
B&e
e : Nitrogen gas
c : Flame
19N0233
d
INTERIOR - Supplemental Restraint System (SW)
6-19
<Passenger’s side>
The air bag module consists of an air bag, module cover,
inflator, and parts for securing them. It is provided above the
glove box.
Caution
Make sure that the air bag is never disassembled.
Module cover
Lock
/
191-0419
Air bag
The air bag, made of nylon cloth lined with rubber
coating, is housed together with the inflator, under
the module cover provided above the glove box.
The air bag is inflated with nitrogen gas generated
by the inflator. Then, as the front passenger hits
Module cover
The module cover has aluminum sheet and urethane
formed into a unit. It is normally closed by hard
rubber type locks on both the sides.
When the air bag is deployed, the hard rubber type
lock is broken, allowing the module cover to turn
the air bag, the gas is discharged from the two
exhaust holes, one on each side, deflating the air
bag to reduce the impact on the passenger.
on the hinge provided at the upper part, open upward
and let the air bag out to be inflated.
INTERIOR - Supplemental Restraint System (SRS)
6-20
Inflator
The inflator has a squib, ignition cord (fuse), priming
powder, gas generator, filter, etc. put in an aluminum
container and is installed inside the air bag module.
On one side of the inflator is the harness through
which an ignition current flows. When the current
flowing through the harness reaches the squib, a
small quantity of powder is burned to ignite the
ignition cord. The cord burns the priming powder
and the generated heat causes the gas generator
Harness
Sqbib
Ignition cord (fuse)
I
Gas generant
to burn. Combusion of the gas generator produces
nitorogen gas quickly, which is sent to the inside
of the air bag through the filter.
The filter eliminates cinders, lowers the gas temperature and reduce the gas generator noise.
The inflator has a shorting clip provided at the connector of the squib harness in the same manner
as the driver’s side inflator.
Filter
\
d
Priming powder
19LO418
Air bag deployment [in case of 50 km/h (30 mph) frontal
impact]
(1) OPERATION FOR APPROXIMATELY 15 MILLISECONDS
AFTER THE COLLISION
If a strong impact produced by a collision is detected by
either of the front impact sensors and the safing impact d
sensor in approximately 10 milliseconds after the collision,
the SRS diagnostic unit will supply an ignition signal to
the squib.
In approximately 3 milliseconds after the ignition signal
has been supplied to the squib, gas generation will begin.
INTERIOR - Supplemental Restraint System (SRS)
6-21
(2) In approximately 20 milliseconds after the collision, the
air bag folded in the pad cover will begin to inflate, the
pad cover will break at its crease, and the air bag will
expand outward.
13R0706
(3) In approximately 35 milliseconds after the collision, the
inflated air bag will touch the chest of the driver.
13R0707
(4) In approximately 40 milliseconds after the collision, the
air bag will be fully inflated.
13R0706
J
(5) In approximately 55 milliseconds after the collision, the
pressure of the driver against the air bag causes the gas
to escape through the two exhaust holes on the rear of
the module, and the deflation helps lessen the impact imposed on the driver.
13R0709
(6) In approximately 105 milliseconds after the collision, the
air bag that has absorbed the impact will rapidly deflate,
providing visibility for the driver.
13R0710
INTERIOR - SuDdemental Restraint System (SRSI
6-22
SRS DIAGNOSTIC UNIT
The SRS diagnostic unit monitors the impact sensors, squib, wiring harness, condensers, battery voltage etc. If it detects a problem, it illuminates the
“SRS” warning light to alert the driver. It also stores
in memory what the problem is, and the duration
of the problem (the duration during which the warning light stayed ON).
The condensers provided in the diagnostic unit accumulate electric energy during the period the ignition
switch is ON. This supplies squib ignition current,
even if the power cable from the battery is broken
by the collision, to inflate the air bag as soon as
the front impact sensor and safing impact sensor
are simultaneously switched ON.
Caution
Make sure that the SRS diagnostic unit is never
disassembled.
1. Monitoring function
The SRS diagnostic unit monitors the wiring harness and SRS
components shown in the following table to check whether
they satisfy the specified values. When the ignition key is in
“ON” or “START” position, the SRS warning light should illuminate for about 7 seconds and then turn off.
This indicates that the SRS system is in operational order.
If the SRS warning light does any of the following, immediate
inspection is needed.
(1) The SRS warning light does not illuminate as described
above.
(2) The SRS warning light stays on for more than 7 seconds.
(3) The SRS warning light illuminates while driving.
The fault data is stored in terms of a diagnostic code in the
non-volatile memory (EEPROM)*. The duration of the fault
is also stored in terms of the ON duration of the warning light.
Component
Front impact sensor
Air bag module (Driver’s side)
Air bag module (Passenger’s side)
Condenser
Cranking detection circuit
Main Monitoring Point
\
d
Diagnostic Code No.
Short circuit
11
Open-circuit once
12
Open-circuit twice
13
Short circuit
21
Open circuit
22
Short circuit
24
Open circuit
25
Terminal voltage high
31
Terminal voltage low
32
Cranking signal detection time
‘d
33”
a
6-23
INTERIOR - Supplemental Restraint System (SRS)
I
Component
Double lock connector
Main Monitoring Point
Diagnostic Code No.
Unlock or lock switch open-circuited
34**
IGl voltage low (Multi-purpose fuse No. 4 is blown)
41**
IGl voltage low (Multi-purpose fuse No. 8 is blown)
42**
External circuit open-circuited or short-circuited
43**
Battery
SRS warning light
Drive circuit defective
44
SRS diagnostic unit
NOTE
* EEPROM = Electrically Erasable Programmable ROM
A ROM to which data can be stored and be electrically written and from which data can be electrically erased.
**: Equipped. with the automatic diagnosis code erasure function. (Refer to P.6-25)
6-24
INTERIOR - Supplemental Restraint System (SRS)
2. Supplying squib ignition energy
The energy for ignition of the squib is supplied by two circuits;
the battery of the vehicle and the condensers.
d
Even if the Dower voltage to the SRS diagnostic unit is lost.
the ignition capability is-retained by the condensers for more
than 0.5 seconds.
(1) The two independent battery power supplies (from fuses
4 and 8) are connected via diodes in the diagnostic unit.
If the voltage is larger than 9V between the connector
terminal of the unit and the ground, the squib can be ignited.
(2) The IGl voltage is boosted to about 25V by the DC-DC
converter to provide more in reserve than the low limit
voltage mentioned above in charging the condensers that
supply the ignition energy.
Caution
1. When the SRS is to be repaired or parts to be replaced,
make sure that the negative (-) cable of the battery
is disconnected beforehand for insulation.
After the negative (-) cable of the battery has been
disconnected, wait for more than 60 seconds before
making any service attempt.
The condensers in the SRS diagnostic unit retain for
a given period the voltage necessary for inflating the
air bag even after removal of the battery voltage.lf a
service attempt is made during the period, accidental
inflation could cause serious personal injury.
2. Do not measure the resistance across the terminals
of the SRS diagnostic unit. Do not directly touch the
test probe to any of the terminals.
Even if an attempt is made to measure the resistance,
no correct value can be obtained because of the effects
of internal circuits. In addition, there is a danger of
damage to the gold plated portion of the terminals.
Ignition switch <ST>
I
I
Multi-purpose
fuse
yr D C - D C
converter
L,
vl
L1
()
,
Safing
impact
sensor
<Passen- <Driver’s
side>
Fron:‘zpact se::; igz
\
/
v
Air bag module
19x0592
INTERIOR - Supplemental Restraint System (SRS)
14x029
Data to be stored
Description
Faults
All faults stored in
diagnostic codes
Fault duration
The period the warning
light is ON is integrated in
minutes.
(Maximum stored period:
9999 minutes S 7 days)
Number of times
memory can
be erased
The number of times the
diagnostic codes and fault
durations
have
been
erased by a scan tool is integrated.
(Maximum number of
times to be stored: 250)
6-25
3. Diagnostic function
Fault diagnosis continues to be performed during the period
the ignition switch is ON except during cranking. If a fault
is detected, the SRS warning light is lit.
The microcomputer determines a diagnostic code on the basis
of the results of measurements by various measuring circuits
and stores it in “EEPROM”.
The fault duration (the period the warning light has been ON)
is integrated in increments of a minute and stored in the EEPROM together with the diagnostic code. The stored data can
be read and erased by a scan tool. The number of times the
memory has been erased by a scan tool is stored in the “EEPROM” to provide reference information on the past service
history. The data can be read by a scan tool in the same
way as the fault durations.
NOTE
Once a fault is detected, the SRS warning light continues
to light, even if normal operation of the system is restored,
until the diagnostic code is erased.
4. Automatic diagnostic code erasure function
The automatic diagnostic code erasure function operates
according to the indicated diagnostic code No. (Refer to
P.6-22). Once the malfunction location that causes a diagnostic code to be displayed returns to the normal condition,
if the malfunction reoccurs continuously at 5-second intervals, the appropriate malfunction code can be erased. At
this time, if all other diagnostic codes have been erased,
the SRS warning light will switch off and the intermittent
durations of the malfunction will also be erased automatically. In this case, the erasure is not included in the number
of times erased.
NOTE
If the A/D converter inside the SRS diagnostic unit is malfunctioning, diagnostic codes No. 41, 42 and 43 will not
be erased by the automatic diagnostic code erasure function. Furthermore, during cranking, none of the codes will
be erased by this function.
INTERIOR - Supplemental Restraint System (SRS)
6-26
SRS CONNECTOR
The connector of the SRS diagnostic unit has a double lock
mechanism, fit verification mechanism and connector shorting a
mechanism.
19X0485
UNLOCKED
LOCKED
Secondarv lock lever
Connecter
notch
DOUBLE LOCK MECHANISM
The mechanism is composed of two mechanisms: each connector of the SRS diagnostic unit is locked to the connector of
the harness, then these connectors (of the four harnesses)
are locked with the secondary lock lever mounted on the connector of the SRS diagnostic unit side.
The secondary lock lever locking is done as the lock spring
fits in the notch of the connector. The operating principle is
described below.
Lock sprmg
Harness side
connector
19N029(
SRS diagnostic
unit side connector
Primary lock
/
Improperly fitted state
Forced down
Secondary
lock lever
projection
lonnector xojection ,-
13R0685
Properly fitted state
Lock spring
Primary lock
!'
13R068E
When Connectors are to be Fitted
(1) The SRS diagnostic unit and harness side connectors are
fitted. (Primary lock)
(2) The secondary lock lever mounted to the SRS diagnostic
unit side connector is pressed down by finger until a click ’vj
is heard indicating that the connectors have been locked.
(Secondary lock)
If the harness and SRS diagnostic unit connectors do not
properly fit, the secondary lock lever side projection and
the harness side connector projection interfere with each
other, making it impossible to lock the connectors.
When Connectors are Unlocked
(1) Press in the lock spring with a flat tip (-) screwdriver to
disengage the lock spring from the notch area of the connector, and release the lock (secondary lock) of the secondary
lock lever.
Caution
Forced removal of the connector without releasing
the secondary lock lever will result in a damaged lock
lever.
(2) Press the primary lock of each of the harness side connectors and remove the harness side connector.
INTERIOR - Supplemental Restraint System (SRS)
Secondary
lock lever
Short bar
iarness side connector
13R0667
Pressed down
6-27
FIT VERIFICATION MECHANISM
The mechanism is used to electrically check the engagement
of the connector between the SRS diagnostic unit and the
body wiring harness. The operating principle is described below.
(1) Securely connect the SRS diagnostic unit and harness
side connectors and press the secondary lock lever down
to lock the connectors.
(2) At this time, the short bar provided on the rear surface
of the secondary lock lever produces a short circuit across
terminals No. 7 and 8 of the SRS diagnostic unit. The
SRS diagnostic unit supplies monitoring current to the circuit
to electrically verify that the connectors have been locked.
(Press-fitted terminal
Short bar
13R0688
To body wiring
tab terminals
harness (2-pin)Press-fitted
I\
19X0600
CONNECTOR SHORTING MECHANISM
The mechanism is designed for prevention of accidental explosion of the inflator when the clock spring connector (for the
squib circuit) is removed from the SRS diagnostic unit. The
operating principle is described below.
Short terminal (open)
connector t
13R069C
When Connectors are Disconnected
When the clock spring connectors are disconnected from the
SRS diagnostic unit, the partition plate between the short terminals and clock spring connector terminals is removed. As a
result, a short circuit is formed between the two poles of the
clock spring connector terminals to prevent generation of a
potential difference (current) between the squib terminals.
Short terminal
connector termin
L
I
When Connectors are Fitted
When the SRS diagnostic unit and clock spring connector are
coupled, the circuit between the short terminals and clock spring
connector terminals are kept in the OFF state by the partition
plate provided in the connector of the SRS diagnostic unit.
13R0691I
INTERIOR - Supplemental Restraint System (SRS)
6-28
CLOCK SPRING
ends mounted to the rotor and the other end
mounted to the upper case. The upper and lower
cases are mounted to the steering column. The
rotor is coupled with. the steering shaft. Rotation
of the steering wheel (steering shaft) causes the
rotor to rotate. Accordingly, the flat cable is wound
round the rotor or loosened, and operates with the
rotor as the steering wheel is turned.
The clock spring is provided between the steering
wheel (air bag module) and column switch body
(steering column).
The clock spring provides harness connections between the air bag module and SRS diagnostic unit,
between the horn switch and dashboard wiring harness, and between the remote control switch and
dashboard wiring harness.
The clock spring consists of a neutral position indication mechanism, flat cable, upper case, lower case,
rotor, etc.
The flat cable is loosely wound like a coil, and is
held in the upper and lower cases with one of its
Caution
Make sure that the clock spring is never disassembled.
Flat
Steering wheel
\ Lower case
UV- Anti-vibration sheet
Cable end support
13R0700
Body
wiring
harness
Air bag module
To air bag module
/ ._
I
2 horn
To ciuise control switch
19X0565
Q ‘--,&Gnostic u n i t
I
When steering wheel is
turned clockwise
When steering whe!el is in
neutral position
(straight ahead position)
When steering wheel is
turned counter-clockwise ,
Rotor
Flat
Flat cablecover
w
Upper cover
' '13R0702
Uppercover
13R0701
INTERIOR - Supplemental Restraint System (SRS)
i
NEUTRAL POSITION INDICATION MECHANISM
The system consists of a ring gear (number of teeth:
90) provided in the upper case, a transparent cover
mounted on the rotor with screws, and a gear (number of teeth: 80) which is in mesh with the ring
gear and is driven by the convex portion of the
cover.
The upper case is mounted on the steering column
and is always held in position.
The rotor coupled with the steering shaft and always
operates with the steering wheel. The gear is always
kept in mesh with the ring gear by the convex portion
of the cover. If the rotor turns through a rotation,
the convex portion of the cover also turns through
a rotation. So the gear is displaced in the opposite
6-29
direction to the rotating direction of the rotor by
the difference in the number of teeth between the
gear and ring gear or by 10 teeth.
Markings R2, 1, NEUTRAL, 1, and 2L are made
on the gear for every IO teeth. An alignment mark
is made on the upper case. The clock spring is
placed in the neutral (straight ahead) position by
lining up the alignment mark with the mark NEUTRAL of the gear. The mark “R” on the gear indicates
that the rotor has been turned clockwise, whereas
the mark “L” indicates counterclockwise rotation of
the rotor.
How the gear operates when the rotor is turned
one rotation clockwise
ii
B
Cover
Upper case k
Iear
’ Ring gear
Alignment hark
w
kr
13FOO26
How the clear‘operates when the rotor is turned
one rotaiion ciockwise
Alignment
Gear d&e portion
A quarter of a rotation
Gear
Half a rotation
A rotation
13R0696
6-30
INTERIOR - Supplemental Restraint System (SRS)
SRS WARNING LIGHT
warning
light
14x0291
Ignition switch
To SRS diagnosis unit
13R0661
The SRS warning light is provided at the left side of the combinaLJ
tion meter.
When the SRS is in good order, the light should illuminate
for approximately 7 seconds after the ignition key has been
turned ON, or the engine has been started, and will then go
out.
The SRS warning light has only one display area but contains
two lights. Even if one of the lights is defective, the other one
can be lit.
The SRS warning light is checked by the SRS diagnostic unit
for defective light.
EQUIPMENT
CONTENTS
BATTERY . . . . . . . . . . . . . . . . . . . . . . . . . . . . . . . . . . 5
Specifications . . . . . . . . . . . . . . . . . . . . . . . . . . . . . . . . . 5
COMBINATION METERS . . . . . . . . . . . . . . . . . . . 11
Electric Type Speedometer . . . . . . . . . . . . . . . . . . . 12
Meters and Gauges . . . . . . . . . . . . . . . . . . . . . . . . . . 11
Vehicle Speed Sensor . . . . . . . . . . . . . . . . . . . . . . . . 12
ETACS . . . . . . . . . . . . . . . . . . . . . . . . . . . . . . . . . . . 17
Functions and Summary of Operation . . . . . . . . .
Input Check Facility of ETACS . . . . . . . . . . . . . . . .
Operation . . . . . . . . . . . . . . . . . . . . . . . . . . . . . . . . . . .
Parts and Funcitons Related with ETACS . . . . . .
17
29
20
N?7zAOOhA
Refrigerant Temperature Switch <Turbo> . . . . . . . 36
Service Valve................................4 0
Specifications . . . . . . . . . . . . . . . . . . . . . . . . . . . . . . . . 31
IGNITION SWITCH . . . . . . . . . . . . . . . . . . . . . . . . . 6
Ignition Key Push Type Double-action Ignition
Switch <M/T> . . . . . . . . . . . . . . . . . . . . . . . . . . . . . . . . . 6
Operation . . . . . . . . . . . . . . . . . . . . . . . . . . . . . . . . . . . . 7
LIGHTING . . . . . . . . . . . . . . . . . . . . . . . . . . . . . . . . . 6
Headlight . . . . . . . . . . . . . . . . . . . . . . . . . . . . . . . . . . . . . 9
Specifications . . . . . . . . . . . . . . . . . . . . . . . . . . . . . . . . . 8
29
ON-BOARD DIAGNOSTIC SYSTEM . . . . . . . . . 3
FEATURES . . . . . . . . . . . . . . . . . . . . . . . . . . . . . . . . 2
Data Link Connectors . . . . . . . . . . . . . . . . . . . . . . . . . 4
HEATER AND AIR CONDITIONING . . . . . . . . . 31
A/C Functional Components List . . . . . . . . . . . . . . 35
Auto Compressor-ECM . . . . . . . . . . . . . . . . . . . . . . . 36
Compressor . . . . . . . . . . . . . . . . . . . . . . . . . . . . . . . ..3 7
Condenser Fan and Radiator Fan Control . . . . . 40
Construction Diagram . . . . . . . . . . . . . . . . . . . . . . . . 32
Features . . . . . . . . . . . . . . . . . . . . . . . . . . . . . . . . . . . . 31
Reciever . . . . . . . . . . . . . . . . . . . . . . . . . . . . . . . . . . ..4 0
RADIO AND TAPE PLAYER,
CD PLAYER, CD AUTO CHANGER,
SPEAKER, ANTENNA . . . . . . . . . . . . . . . . . . . . . 15
THEFT-ALARM SYSTEM . . . . . . . . . . . . . . . . . . . 30
WIPERS AND WASHERS . . . . . . . . . . . . . . . . . . 13
Rear Wiper and Washer . . . . . . . . . . . . . . . . . . . . . . 14
Windshield Wipers and Washers . . . . . . . . . . . . . . 13
7-2
EQUIPMENT - Features
FEATURES
Nrn8QoAA
Improved reliability
1. Gold plating of electronic control system terminals
2. MWP (Multipole Water Proof type) connector
Improved visibility
and safety
1. Double action ignition switch (ignition key push type)
adopted to prevent locking the steering wheel during driving
by accidentally removing the ignition key <M/T vehicles>
2. Large-sized combination meter adopted
3. High-mounted stop light used.
4. Multi-reflector type headlights adopted.
Improved usability and
convenience
1.
ETACS adopted for centralized control of the alarm buzzer
and timer functions
2. Electric type speedometer whose pointer moves smoothly
without vibrations as the speed changes
Improved serviceability
1.
’d
Data link connectors (centralized terminals for inspection)
adopted to allow inspection of the diagnostic functions
by a scan tool
>d
2. Dedicated connectors for adjustment of ignition timing,
engine speed detection and fuel pump operation check
adopted
3. Plug-in type combination meter easy to mount and demount
adopted
4. Wiper motor and link system removable as a unit.
EQUIPMENT - On-board Dignostic System
7-3
ON-BOARD DIGNOSTIC SYSTEM
L’
The on-board diagnostic system comprises the following functions to assure better serviceability.
Auto-cruise
control
ELC-4A/T
Diagnostic trouble
code (low speed
signal) output
0
0
Diagnostic trouble
code (high speed
signal) output
0
0
Service data
(high speed signal)
output
0
ABS
SRS
FWD
0
0
L
0
0
0
0
/
Simplified inspection
code output (Same
indication pattern as
for diagnosis code)
0
0
Diagnostic trouble
code retained in
memory
Diagnostic trouble
code erased by
scan tool
0
0
Actuator test
(low speed signal)
Actuator test
(high speed signal)
AWD
0*
EEPROM
0
Until battery is OFF
0
0
UOTE
‘: Data is retained in memory until it is electrically cleared.
0
0
0
7-4
DATA
EQUIPMENT - On-board Dignostic System
LINK
CONNECTORS
Data link connectors (centralized terminals for inspection) have been adopted to allow inspection
of the diagnosis functions by the scan tool.
Al 6X0740
Data link connector (12 pin)
Data link connector (16 pin)
1
2
3
4
5
6
7
8
9 10 11 12 13 14 15 16
I-J
16R1336
Data link connector (12 pin)
21. g: 1
24. 25. SCI Eng. RX*’
26. 27. CCD Bus (+)*2
;;. CCD Bus (-)*2
. ;:: z
32. -
NOTE
*l: Non-turbo
*2: Vehicles with F4ACl automatic transaxle
*s: Engine (MFI), ABS (FWD)
16X0621
Data link connector (J1962-16 pin)
1. Diagnosis control
g’ I
4: Chassis around
5. Signal gr&nd
6. ELC-4A/T
7. 9141 -K*3/SCI-2 TX*’
8. ABS (AWD)
9. ETACS (One shot pulse signal)
10. ::* SRS
13: Auto-cruise control
14. Simulated vehicles speed
15. 16. Battery power supply (+B)
7-5
EQUIPMENT - Battery
BATTERY
i
N77ZDOOAA
The battery of the following specifications has been
established.
SPECIFICATIONS
Items
Type
Capacity (5HR)
Ah
Reserve capacity
min.
Cold cranking current
A
Specifications
B.C.I. Group size 86
50
90
430
B.C.I. Group size 86
50
90
525
7-6
EQUIPMENT - Ignition Switch
IGNITION SWITCH
N77ZEOOAA
The ignition key push type double-action ignition
switch is installed that prevents the steering wheel
from being locked up as a result of the ignition key
being inadvertently removed from the key cylinder
while the vehicle is in motion. This contributes to
greater safety.
For additional convenience, an ignition switch illumination light has been adopted which is lit at night
for approximately 10 seconds by the timer function
of the ETACS-ECU so that the ignition key can be d
easily inserted.
NOTE
For the timer function of the ignition switch illumination light, refer to the section on the ETACS-ECU
on P.7-23.
IGNITION KEY PUSH TYPE DOUBLE-ACTION IGNITION SWITCH <M/T>
A double-action lever has been provided in the steering lock cylinder, and a raceway for orbital motion
of the double-action lever and an ACC position stopper provided in the key cylinder to make sure that
the ignition key cannot be removed unless the driver
rotates it to the LOCK position, while pushing the
key in.
16X0940
/
Key cylinder
ACC position stopper
16X0553
EQUIPMENT - Ignition Switch
7-7
OPERATION
Double-action
lever
With the ignition key not pushed in (at the ACC position)
The key cylinder is locked by the double-action lever pressed
against the ACC position stopper. Therefore, the ignition key
cannot be rotated from the ACC position to the LOCK position.
16X0551
Key cylinder
ACC position
stopper
L
Double-action
Steering lock
-
-
/
Key cylinder
1
Raceway
i
16X0552
\
ACC position
stopper
With the ignition key pushed in (at the ACC position)
The key cylinder is forced into the steering lock cylinder, and
the double-action lever is moved away from the ACC position
stopper. The double-action lever can now move along the raceway, so the ignition key can be rotated to the LOCK position.
EQUIPMENT - Lighting
LIGHTING
N77ZFOOAA
The headlight system is a thin, flush-surfaced,
4-lamp type with on-board aiming mechanism. The
headlight is a multi-reflector design in which the
light rays from the bulb are directed by the multistepped reflector. The front turn signal light and
the front position light are combined with the headlight to form one headlight unit.
The front side marker lights are mounted on the
front bumper.
The LED (Light Emitting Diode) type high-mounted
stop light is used on rear spoiler equipped vehicles,
while the bulb type is installed on the vehicles not
equipped with rear spoiler. The dome light of vehicles
with a sunroof is incorporated in the inside rear
view mirror.
SPECIFICATIONS
c
Items
Exterior lights
Headlight
High-beam
Low-beam
Turn signal light/position light
Front side marker light
Fog light
Rear combination light
Turn-signal and stop light/tail light
Side marker light
Back-up light
License plate light
High-mounted stop light
Interior lights
Dome light
Vehicles with sunroof
Vehicles without sunroof
Foot light
Luggage compartment light
NOTE
*: Rear-spoiler equipped vehicle
60
W
W
CP
CP
W
3213
3
55
CP
CP
CP
CP
CP
3212
2
32
3
45 or LED*
CP
W
W
W
6
51
10
1.4
5
7-9
EQUIPMENT - Lighting
Dome light
(Vehicles with sunroof)
Dome light
(Vehicles without sunroof)
\
Headlight (front turn
signal and front
\
/
position light)
\
/
Fog light
-Y
Front side marker
A16XOO23
light
High-mounted stop light
Foot light
Foot. light
(bulb ty?
\
light
Rear combination light
Al 6X0024
Back-up light
HEADLIGHT
ON-BOARD AIMING MECHANISM
The vertical aiming adjustment can be made by
turning the vertical adjusting screw to bring the
bubble of the vertical adjusting gauge to the position
between the adjusting marks.
:Horizontal adjusting>
<Vertical adjusting>
\\.Arc* _
4-k
Adjusting
mark
,
The horizontal aiming adjustment can be accomplished by turning the horizontal adjusting screw
to align the “0” mark of the gear (B) with the line
of the stopper and that of the headlight housing.
CO854 i
EQUIPMENT - Lighting
MULTI-REFLECTOR
The reflector is divided into minor sections to produce an adequate light pattern.
This design eliminates the lens cut from the outer lens, providing
a characteristic appearance.
Outer lens
Shade
A16XO
d
EQUIPMENT - Combination Meters
COMBINATION METERS
,
i METERS AND GAUGES
7-11
N77ZGOOAA
The combination meter is of the plug-in type to facilitate its removal and installation. It is also a pointer
type to provide good visibility.
The combination meter has large speedometer and
tachometer located in the middle, with the fuel gauge,
engine coolant temperature gauge, boost gauge,
and oil pressure gauge on both sides.
The speedometer is an electric type speedometer
whose pointer moves smoothly without vibrations
in response to a pulse signal from the vehicle speed
sensor as the speed changes.
NOTE
The indicator lamps and warning lamps vary on
different models.
<Turbo>
i
16X0956
<Non-turbo>
i
Vehicles with
automatic transaxle
16X0955
EQUIPMENT - Combination Meters
7-12
VEHICLE SPEED SENSOR
The rotating shaft of the vehicle speed sensor is
mounted directly on the transaxle speedometer driven gear. The rotation of the driven gear is transmitted
to a magnet via the rotating shaft. The IC built into
the Magneto Resistive Element (MRE) in the top
of the magnet detects the rotation of the magnet
and generates a 4-pulse electric signal for each
rotation of the speedometer driven gear.
NOTE
For the operation, refer to the 1991 3000GT Technical Information Manual (Pub. No. PXSE9001).
,
#Lj
16X0913
\-i
(built into MRE)
Magnet
Rotating shaft
16X0931
ELECTRIC TYPE SPEEDOMETER
The electric type speedometer uses an electronic
circuit to control the electric signal from the vehicle
speed sensor and a cross coil type speedometer
that has a magnet fixed to the pointer shaft and
two coils that pass directly through it. Furthermore,
the odometer and trip meter are directly driven by
the stepping motor with built-in gear.
NOTE
For the operation, refer to the 1991 3000GT Technical Information Manual (Pub. No. PXSE9001).
Al 6X0930
EQUIPMENT - WiDers and Washers
f-1 3
_I
,NTIZ!#QAA
WIPERS AND WASHERS
i
WINDSHIELD WIPERS AND WASHERS
The windshield wiper comes in two types; two speed
type with fixed interval intermittent function, and
two speed type with variable intermittent function.
They have the following characteristics.
l
The wiper motor and links are mounted as a
unit on a frame to enhance the serviceability.
l
A washer interlocked wiper function and mist
wiper function have been adopted for greater
convenience.
e
l
The washer nozzle is a 2-nozzle, 4-jet type.
The windshield washer tank is installed in the
L.H. side of the engine compartment on non-turbo vehicles and in the R.H. side of the luggage
compartment on turbo vehicles.
<Turbo>
Wiper blade
I
Windshield
washer
tank
Wiper arm
I
Washer hose
Frame
Nozzle
Link
Al 6X0661
<Non-turbo>
\Alinmr hlzarin
Frime
I
Nozzle
WiPer arm
Winbshield
washer
tank
Link
Washer hose
7-I 4
EQUIPMENT - Wipers and Washers
REAR WIPER AND WASHER
The rear wiper has an intermittent wiper function
for better rear visibility in the event of a light rain.
It offers the following features.
l On non-turbo vehicles, the rear washer tank
is installed in the L.H. side of the luggage
l
compartment. On turbo vehicles, the windshield
washer tank is also used as a rear washer tank.
The washer is one-nozzle, two-jet type.
d
<Turbo>
Washer nozzle
motor
Wash& hose
w--7-
d
Washer tank
Al 0X0773
<Non-turbo>
Washer nozzle
/
Wiper blade
Wiper arm
/
motor
/
Washer hose
Washer tank
Al 6X0772
EQUIPMENT
i
- Radio And Tape Player, CD Player, CD Auto Changer, Speaker, Antenna
7-15
RADIO AND TAPE PLAYER, CD PLAYER, CD AUTO CHANGER,
NT??TlOOAA
SPEAKER, ANTENNA
LJ The following radio, cassette tape player, CD player,
CD auto changer, speakers and antenna are available:
Radio and Tape Player, CD Player, CD Auto Changer
l AM/FM electronic tuning radio
l
AM/FM electronic tuning radio with tape player
l CD player
l CD auto changer
Speaker
l 4-speaker <Door speaker: 13 cm (5.1 in.) single cone, Rear speaker: 16 cm (6.3 in.) double cone>
6-speaker <Front speaker: 8 cm (3.1 in.) -single
l
cone, Door speaker: 13 cm (5.1 in.) - single
cone, Rear speaker: 16 cm (6.3 in.) - double
cone>
6-speaker <Front speaker: 8 cm (3.1 in.) -single
l
cone, Door speaker: 16 cm (6.3 in.) - double
cone, Rear speaker: 6 in. x 9 in. - single cone>
8-speaker <Front speaker: 2.5 in. -single cone,
l
Door speaker: 6.5 in. -single cone, Rear speaker: 6 in. x 9 in. + 2.5 in. - coaxial 2 way>
Antenna
l Whip antenna
l Glass antenna
Whip antenna
Door speaker (LH)
Radio and tape plaier
Rear speakdr (LH)
Amplifier
Al 6X0941
7-16
EQUIPMENT
- Radio And Tape Player, CD Player, CD Auto Changer, Speaker, Antenna
<AM/FM Electronic Tuning Radio>
<AM/FM Electronic Tuning Radio and
Tape Player>
16x0940
<AM/FM Electronic Tuning Radio and
Tape Players
16X0949
<AM/FM Electronic Tuning Radio and
Tape Player with Equalizer>
16X0921
7-17
EQUIPMENT - ETACS
NrmWM
ETACS
The ETACS (Electronic Time and Alarm Control System) has
been adopted for centralized control of various timer and alarm
functions.
The ETACS control unit has an input check function which
makes it possible to easily check whether the circuit from the
input switch to the microprocessor in the control unit is functioning properly or not.
FUNCTIONS AND SUMMARY OF OPERATION
Function and Summary of Operation
Item
Light reminder alarm
function
When the ignition key is removed
from the ignition switch and the
driver’s door is opened while the
lighting switch is ON (PARKING or
HEAD), the buzzer will sound continuously to remind the driver that
the lights are ON.
Lighting switch
%F -
Ignition switch
OOPF J
Driver’s door
switch
ON (open)
OFF (closed) r
:;;;;;; xds.J ~-~
ON
Buzzer output
L
not sound.) OFF
16X0881
Ignition key reminder
timer function
To prevent accidental door locking
with the key still in the ignition, the
following will take place. If the driver’s door is opened, and the driver
or passenger lock knob is operated,
the system will automatically release the lock.
NOTE
This function has priority over the
central door lock system function.
Key
reminder
switch
;fgh odN:gyd) I
Door lock LOCK
yyor fjjr2cK n
(ON)
ifgygk gf$cK-/n
W-U
(ON)
;;;;WW
Ignition key reminder
alarm function
When the driver’s door is opened
without removing the ignition key
(OFF or ACC position), the buzzer
will sound intermittently to remind
that the ignition key has not been
gJF -
ignition switch
;pp
1Fg-j
5 sec. 5 sec.
n
ff
5 sec.
16X0877
g:ForACC d
($y removed)
lb&minder
removed.
Driver’s door
switch
Buzzer output
(Key inserted) n
OFF
(Open) ON
(Closed) OFF 7
(Buzzer sounds.)
ON
(Buzzer does
not sound.) OFF
16X0883
EQUIPMENT - ETACS
7-18
Item
Ignition switch illumination light timer
function
Function and Summary of Operation
When the driver’s seat door is
opened with the ignition switch in
the OFF or ACC position, the ignition switch illumination light will light
for approximately 10 seconds so
that the ignition key can be easily
inserted even at night. However, if
the ignition key is placed in the ON
position within the 1 O-second interval, the ignition switch illumination
light will go out immediately.
ignition switch
1
g# or ACC
I
Driver’s door
switch
I
ON (open)
OFF (closed) _
nr
J-L
I
%mer output
(Light OFF)
10 sets. 10 sets.
10 sets.
16X0878
Dome light and foot
light dimming timer
function
Defogger timer function
When all the doors and tailgate are
closed with the dome light switch in
the door interlocked position (vehicles with sunroof) or OFF (vehicles without sunroof) and with the
ignition switch in the OFF or ACC
position, the dome light and foot
light will slowly dim, and will go out
in approximately six seconds.
When the ignition switch is in the
ON position, however, no dimming
operation will be performed.
When the defogger switch is turned
ON with the ignition switch in the
ON position, the defogger will operate for 11 minutes.
If the defogger switch is pressed
again during the 11 -minute interval,
however, the defogger will stop operating,
Ignition switch
:;ForACC I
Door switch,
liftgate switch”,
ON (open)
lwwe mmpafiment OFF ( c l o s e d )
light switch**
Timer output
(Light ON) ON
(Light OFF) OFF
i;
-Y
l-l
‘\
\
+ Dimming interval
F
approx. 6 seconds
4PTEVehicles with theft-alarm system.
16X0879
@ Vehicles without theft-alarm system.
ignition switch
Defogger switch
Timer output
:PFm
EF_J-L_nn_n__
::F
11 minutes 11 minutes
11 minutes
7-19
EQUIPMENT - ETACS
Item
Seat belt warning timer fuction
<Warning light>
<Buzzer>
Function and Summary of Operation
ON
ignition
switch
When the ignition key is turned on,
the seat belt warning light flashes
for 6 seconds (4 times).
I-------
OFF
H signal
I
Timer output &r!r~N)
(Light OFF) -p+=+
6 s e c . ----t
If the driver’s seat belt is not worn
when the ignition switch is turned to
the ON position, the buzzer sounds
intermittently for six seconds, urging the driver to wear the seat belt.
Ignition switch
::,n
;.egp
swtich
ru
Timer output
16X0875
Central door lock timer
function
When the driver’s door is locked by
means of its key or inside lock
knob, all doors can be locked.
With the driver’s door unlocked, unlocking for the second time by
means of the key unlocks all other
doors.
Door lock
actuator (LH)
Door lock
key cylinder
switch (LH)
$pF)
Al
:ruu
Timer output
LK J&l--Fi
16X0876
Power window timer
function
When the ignition key is turned off,
the ETACS timer function is activated, and the power window can
be opened and closed using the
power window switch for 30 seconds.
The power window timer stops,
however, if a door or liftgate is
opened within 30 seconds.
Ignition
switch
EF
Door switch,
liftgate switch”‘, OFF (closed)
ON (open)
kmaw
compartment
light switch*2
ON
Trmer
OFF
output
’
++J--$%
j-,
30 sec.
30 sec.
!jPTE
Vehicles with theft-alarm system.
21 Vehicles without theft-alarm system.
l
16X0882
EQUIPMENT - ETACS
OPERATION
LIGHT REMINDER ALARM FUNCTION
1. When the lighting switch is in the ON (TAIL
or HEAD) position, the tail light relay is in the
ON state, so the H signal from the tail light
is input to AND2.
2. When the ignition switch is in the OFF position,
the H signal of the ignition switch inverted by
NOT1 is input to AND,.
3. As a result, when the driver’s door is opened
(door switch ON), the H signal of the door switch
inverted by NOT2 is input to ANDl. Then AND1
outputs H signal.
4. When the H signal output from AND1 is input
to AND2, the signal output from AND2 also
changes to H signal which operates the detector
circuit. Then the buzzer output causes the transistor to be ON, and the buzzer sounds continuously to remind the driver that the lights (tail
lights or headlights) are ON.
NOTE
If the ignition key is left inserted with the ignition
switch in the OFF position, even if the conditions
for the light reminder function hold good, the buzzer
will sound intermittently, as the ignition key reminder
alarm function takes precedence.
Ignition switch (IGl)
Fusible link
I
-T-
Tail light
relay
---_
ON
Buzzer h!l
--cm
r
NOT
5v
AND
-
I
To tail
light
3
Ignition
switch
Driver’s
door
nwitch
1
(0pened)ON
(Closed) OFF
-
JANDz
LJ-
I
1 Buzzer &zzer s o u n d s ; ’
output
( B u z z e r d o e s _]
not sound) OFF
Ll
UL
ETACS-ECU
_
_
El
ilFi
’ -.
nt-F
ON
1
‘..
n#
:
Driver’s door
switch
16X0881
EQUIPMENT - ETACS
LJ
IGNITION KEY REMINDER TIMER FUNCTION
(1) While the ignition key is inserted in the ignition
switch (key reminder switch OFF), the H signal
of the key reminder switch is input to ANDs.
(2) If either front door is open (door switch ON)
at that time, the L signal from the door switch
is reversed to the H signal by NOT and applied
to AND3.
(3) As a result, AND3 outputs the H signal and
inputs it to AND2.
(4) If the inside lock knob of the driver’s door is
pushed forward at that time (the door lock actuator LOCK), the H signal from the door lock actuator is applied to AND2.
7-21
(5) As a result, AND2 outputs the H signal, which
is input to the timer circuit through OR to operate
the timer circuit, turn ON the transistor Tr for
five seconds, and unlock all doors.
(6) If the front passenger’s door is opened and
the inside lock knob is pushed forward (door
lock actuator LOCK) while the ignition key is
inserted in the ignition switch (key reminder
switch OFF) and the driver’s door is locked (door
lockactuator LOCK), AND, outputs the H signal.
The signal is input to the timer circuit through
OR to operate the timer circuit, turning ON the
transistor Tr for five seconds and unlocks all
doors.
Fusible link
I
A
ETACS-ECU
V
limer circuit
Key
reminder
switch
L
gJF,
Door
OFF(open)
@‘Osed) I
switch ON
Timer
(unlock)
output
ON
OFF
Door lock
power relay
\/
\I
16X0877
EQUIPMENT - ETACS
IGNITION KEY REMINDER ALARM FUNCTION
1. When the ignition key is left inserted with the
ignition switch in the OFF or ACC position, the
H signals of the key reminder switch and the
ignition switch inverted by NOT1 are input to
ANDi. As a result, AND1 outputs H signal.
2. When the driver’s door is opened (door switch
ON), the H signal of the door switch inverted
by NOT2 and the H signal output from AND1
are input to AND2. Then AND2 outputs H signal
to cause the detector circuit to operate.
3. The buzzer output causes the transistor to be
alternately ON and OFF, and the buzzer sounds
intermittently to remind the driver that the ignition
key has not been removed.
Fusible link
Ignition switch (IGl)
ETACS-EC1
8 NOTI
4NDl
3
ANDz
Detection circuit
Ignition
switch
Key
~w~~~r
gFForACC/
(Key removed) ON n
(Key inserted) OFF
Driver’s
door
switch
Buzzer
output
(Buzzer sounds)
(Key inserted)
I
Driver’s door
switch
Key
reminder
swi
tch
Key removed)
k(
=
16x0883
EQUIPMENT - ETACS
L
IGNITION SWITCH ILLUMINATION LIGHT TIMER FUNCTION
4. When the ignition switch is placed in the ON
1. When the ignition switch is in the OFF or ACC
position during operation of the timer, the L sigposition, the H signal of the ignition switch innal of the ignition switch inverted by NOT, is
verted by NOT, is input to AND, and AND2.
input to AND2. As a result, AND2 outputs L
2. When the driver’s door is opened (door switch
signal which causes the transistor to be OFF,
ON), the H signal of the door switch inverted
and the ignition switch illumination light goes
by NOT2 is input to AND,. As a result, AND1
out immediately.
outputs H signal to cause the timer circuit to
operate.
NOTE
3. Accordingly, when the H signal output from the
Even if the driver’s door is opened and closed (door
timer is input to AND2, the output signal from
switch caused to be ON and OFF) while the timer
AND2 changes to H signal which causes the
is in operation, no input signal is accepted.
transistor to be ON for 10 seconds to light the
ignition switch illumination light.
Fusible link
Ignition switch (IGl)
ii
‘(
4
Ignition switch
illumination light
I
Timer circuit
Ignition ON
switch
OFForACC Driver‘s
(Opened) ON
door
switch ( C l o s e d ) O F F n
,
Timer
output
H signal (ON)
L signal (OFF)
/1
l-l
1
I
I
10 sets.
ETACS-ECU
/
L/
‘E)l, Driver’s door
1 q..k~~g~.2~ i switch
T
:
16x0878
7-24
EQUIPMENT - ETACS
DOME LIGHT AND FOOT LIGHT DIMMING TIMER
1. When any of the doors or tailgate is opened
(door switch ON or luggage compartment light
switch* ON) with the dome light switch in the
DOOR position (vehicles without sunroof) or
OFF position (vehicles with sunroof), the dome
light will light ON.
NOTE
When the front doors or tailgate is opened, the
foot light comes on regardless of the light switch
position.
2. When all the doors and tailgate are closed with
the ignition switch in the OFF or ACC position
(door switch OFF and luggage compartment
light switch* OFF), the H signal of the ignition
switch inverted by NOT and the H signal of
the door switch are input to AND. As a result,
Fusible link
Ignition switch (IGl)
I
I
FUNCTION
AND outputs H signal which operates the timer
circuit.
3. The timer output provides signals which slowly
reduce the voltage to the transistor in approximately six seconds , thereby dimming the dome
light and foot light.
4. When the ignition switch is placed in the ON
position during operation of the timer, the L signal of the ignition switch inverted by NOT is
input to AND. As a result, AND outputs L signal,
and the timer circuit stops operation. The dome
light and foot light, therefore, goes out immediately without dimming.
NOTE
*: On vehicles with theft-alarm system, this switch
is the liftgate switch.
r
:
Dome light
:Without < W i t h ;:
iunroof> s u n r o o f >
ETACS-EC1J
-/-JAN:
Ignition switch
1
Timer circuit
EFor ACC/
Foot
light
iR
f
Door switch
(Opened) ON
;;
( C l o s e d ) OFFU
Timer output
(Light ON)
I
Door
switch (LH)
-
l
-
-
approx. 6 sets.
-
-
Transistor
= or liftgate
switch
16x0679
d
7-25
EQUIPMENT - ETACS
id
DEFOGGER TIMER FUNCTION
1. When the ignition switch is turned to the ON
position, the H signal of the ignition switch and
the H signal of the constant voltage are input
to AND. As a result, AND outputs H signal.
2. When the defogger switch is placed in the ON
position, the H signal inverted by NOT is input
to timer circuit to activate the timer circuit.
3. Since the defogger switch (auto reset switch)
placed in the ON position is automatically reset
to the OFF state, the L signal which is opposite
to the signal in Item (2) is input to the timer
circuit after the switch has been caused to be
ON, but the timer keeps on operating.
The timer output causes the transistor to be
ON for II minutes. The defogger relay is also
placed in the ON position to operate the defogger.
When the ignition switch is placed in the OFF
position or when the defogger switch is placed
in the ON position again during operation of
the timer, the H signal is input to the timer circuit
again. As a result, the timer circuit stops operating, and the transistor is forced to the OFF state.
The defogger relay is also placed in the OFF
oosition and the defogger stops operating.
Ignition switch
WI)
Fusibl le link
-
-I-
Ignition switch
- -
(iG2)
i;
NOT
1
Timer circuit
Ignition ON
switch
OFF m
s”w”&fger g:F a
Timer ON m
-1
7
output
OFF 11 mins 11 mins 11 mins
Transistor
L
3
OFF
.
ON ~;f#c.w
ETACS-ECU
Defogger
relay
7-26
EQUIPMENT - ETACS
SEAT BELT WARNING TIMER FUNCTION
<Warning light>
(1) Placing the ignition switch to the ON position
will apply the H signal of the ignition switch
and the H signal of constant voltage circuit to
AND. Then AND outputs the H signal to operate
the timer circuit.
(2) The timer output turns the transistor Trl ON
and OFF alternately four times in six seconds
and seat belt warning lamp blinks to remind
the driver of wearing the seat belt.
(3) If the ignition switch is turned OFF while the
timer is in operation, the H signal of the ignition
switch mentioned in (1) above changes to the
L signal to stop the timer circuit operation and
to turn off the warning light.
<Buzzer>
(1) Placing the ignition switch in the ON position
will apply the L signal inverted by NOT, to NOR.
If the seat belt is not worn at this time (seat
belt buckle switch OFF), the L signal inverted
by NOT2 is applied to NOR. As a result, NOR
outputs the H signal and operates the timer
circuit. The buzzer output turns on the transistor
Tr2 and sounds the buzzer intermittently for
six seconds to remind the driver of wearing
the seat belt.
(2) If, during timer operation, the seat belt is worn
(seat belt buckle switch ON) or the ignition switch
is placed in the OFF position, the L signal from
NOT changes to H signal and NOR outputs
the L signal. Then the timer circuit stops operation and the buzzer stops sounding.
Ignition switch (IGl)
f%sible link
-
Constant
voltage 5V
AND
Timer circuit
(Buzzer)
Ignition ON
switch
O
F
Timer circuit
(Warning light)
F J-u-Ln- 2$2
j
::;it
L - - - - - -
Timer H $gnal (ON)
output L sIgnal (OFF) w
Seat
belt
buckle
switch
f
S#eat bell
wrarning
Ii! aht
4
:pFp-’
n-1
1
t
1
ETACS-ECU
16X0675
7-27
EQUIPMENT - ETACS
/
id
CENTRAL DOOR LOCK TIMER FUNCTION
(1) If the ignition key has already been removed
from the ignition switch (key reminder switch
ON), the L signal of the key reminder switch
is applied to NAND. Or if all doors have been
closed (door switches OFF), the H signal of
the door switch inverted to L by NOT is applied
to NAND.
(2) If the ignition key has been removed from the
ignition switch or all doors have been closed,
NAND outputs the H signal to be applied to
AND.
(3) At this time, pushing the inside lock knob of
the driver’s door forward (door lock actuator
LOCK) will apply the H signal to AND.
(4) As a result, AND outputs the H signal and is
input to the timer circuit through OR to operate
the timer circuit, turning on the transistor Trl
for 0.5 second to lock all doors.
NOTE
The door key cylinder and door lock actuator are
connected together by the rod through the door
latch. When, therefore, the driver’s door is locked
by means of the key, similar operation is accomplished.
(5) When the driver’s door is in the unlocked condition, the L signal of the door lock actuator is
applied to NOR.
(6) If, in this condition, the unlocking operation of
the driver’s door using the ignition switch is
done for the second time, the L signal of the
door lock key cylinder switch is applied to NOR.
(7) As a result, NOR outputs the H signal to NOR
and outputs it to the timer circuit through OR
to operate the timer circuit, turning on the transistor Tr2 for 0.5 second to unlock all doors.
Fusible link
I
A
I
1
ETACS-ECU
Y
Timer circuit 1
OR
AN
L-r
Door lock
key cylinder
switch (LH)
;;gt yIcK Jd/=I
0.5 sec.
NOT
Transistor
Tr 1
Tr2
Door lock
power relay
7-28
EQUIPMENT - ETACS
POWER WINDOW TIMER FUNCTION
(1) If the ignition switch is placed in the ON position,
the transistor Trl is turned ON and the power
window relay is also turned ON, allowing the
power window to be opened/closed by the power
window switch (main or sub switch).
(2) Turning the ignition switch from ON to OFF will
turn OFF the transistor Trl. At this time, the
ignition switch signal inverted by NOT to H is
applied to AND. In addition, when all doors and
liftgate are closed, the H signal from the door
switches and the luggage compartment light
switch is also applied to AND. Therefore, AND
outputs the H signal to operate the timer circuit
and turn on the transistor Tr2 for 30 seconds,
allowing the window to be opened and closed.
(3) If any door or the liftgate is opened while the
timer is in operation, the L signal from the door
switch or luggage compartment light switch*
is applied to AND. Therefore, AND outputs the
L signal to stop operation of the timer circuit.
As a result, the transistor Tr2 is turned off, making it impossible to open and close the window.
NOTE
*: On vehicles with theft-alarm system, the luggage compartment light switch is the liftgate
switch.
Ignition
switch (IGI)
Fusible
link
Fusible
link -
-I-
b1
I
IIt f
Constant
voltage 5V
i,
Transistor
q
Trl
1
NOT
sc
I
AND
Timer circuit
Ignition
switch
EfF
Door
switch ,,OFF (closed)
liftgate ON (open)
switch
Power window
main switch
Timer
output
YY
ETACS-ECU
Luggage compartment
light switch or
liftgate switch
W-0
0-H)
)
Door switch
T
U-W
‘
”
I
Power window motor
16x0662
EQUIPMENT - ETACS
PARTS AND FUNCTIONS RELATED WITH E T A C S
Functions
Door lock actuator*
Door lock power relay
NOTE
(1) * mark indicates a switch or sensor that can be used for input inspection with a scan tool or voltmeter.
(2) x mark indicates a part relevant for each function.
INPUT CHECK FACILITY OF ETACS
L
The ETACS-ECU has an input check facility which
enables you to check all the circuits between the
individual switches and the ETACS-ECU on the basis of a change in voltage at the ETACS terminal
of the data link connector by use of a scan tool
or voltmeter.
NOTE
For the location and pin positions of the data link
connector, refer to P.7-4.
The input check facility of the ETACS includes the
following functions.
1. Ignition switch
2. Door switch
3. Defogger switch
4. Tail light
5. Key reminder switch
6. Door lock switch
7. Seat belt buckle switch
8. Door lock key cylinder switch (LH)
9. Liftgate switch
7-30
EQUIPMENT - Theft-alarm System
THEFT-ALARM SYSTEM
N77ZKOOAA
When the door, liftgate or hood locked by the specified procedure is opened without using the key or
remote control switch (keyless entry system), the
horn sounds intermittently and the headlights blink
to give visual and audible alarm.
Furthermore, the starter circuit is interrupted in such
a way that the engine cannot be started, if the ignition
key is not used.
Note that this system is controlled by the Electronic
Control Unit (ECU) as one function of the ETACS
(Electronic Time and Alarm Control System).
The system is composed of the components described below.
NOTE
For arming/disarming the system, activating/deactivating the alarm and checking the system operation,
refer to the 1991 Model 3000GT Technical Information Manual (Pub.No.PXSE9001).
Key-reminder switch
and R.H.)
Door lock actuatorswitch
Theft alarm
starter relay (M/T)
Al 6FO296
‘I/’
EQUIPMENT - Heater and Air Conditioning
HEATER AND AIR CONDITIONING
The heating system is a high-performance and lownoise full-air-mix system that provides a two-layer
stratified airflow. It features an independent face-level air flow and cool air by-passing functions.
The air conditioning system is essentially the same
as the conventional ones, but they incorporate a
7-31
NiT’ZLOOAA
new CFC-free refrigerant (R134a) system that uses
hydro fluorocarbon (HFC) containing hydrogen
atoms as the refrigerant gas to meet the CFC control
regulations that call for protection of the ozone layer.
FEATURES
Improvement in comfort
1. Full-air-mix heater providing two-layer stratified air flow.
2. Cool air by-passing function capable of sending fresh air
to the face even with the heater unit in operation.
3. Independent face-level air flow function capable of sending
air constantly from the side ventilators.
4. Scroll type variable delivery air compressor that offers
improved cooling performance and quietness. <Turbo>
Independent face-level air flow from side ventilators.
/
L
Protection of global
environment
Adoption of new refrigerant (R134a) system.
1. Adoption of flange fitting design and O-ring slip-off preventing construction for piping joints to improve serviceability
and reliability.
2. Compressor lock controller for protecting the drive belt
when compressor is locked. <Non-turbo>
SPECIFICATIONS
Specifications
Item
I
LJ
Heater unit
Type
Heater control switch
Compressor
Model
<Turbo>
<Non-turbo>
Dual pressure switch
High pressure switch
Low pressure switch
Refrigerant and quantity
Two-way-flow full-air mix system
Dial and lever type
Scroll type cMSC 105 CVS>
Inclined-plate type <lOPAl 7C>
kPa (psi)
g (oz.)
OFF: 3,140 (456) ON: 2,550 (370)
ON: 220 (32)
OFF: 200 (29)
R134a (HFC-134a), Approx. 700-740 (24.69-26.10)
7-32
EQUIPMENT - Heater and Air Conditioning
CONSTRUCTION DIAGRAM
<AIR CONDITIONING>
<Turbo>
Refrigerant
temperature
Condenser fan
High pressure
relief
valve
,
i/
Cond
Compressor
A20X024E
Dual rxessure switch
A20X0244
<Non-turbo>
Dual pressure switch
‘::\I
Condenser fan
/120X0243
Compressor
High
pressure
relief
valve
I
Revolution pidk-up
sensor
AZOXO238
7-33
EQUIPMENT - Heater and Air Conditioning
HeatFr unit
Fin therm0 sensor
assembly
Evapo:ator
Air inlet s&sor
A2OXO242
<HEATER>
To windshield (defroster)
ront door window
20X0245
7-34
EQUIPMENT - Heater and Air Conditioning
<VENTILATION>
Air guide duct
/
A2OXO247
EQUIPMENT - Heater and Air Conditioning
A/C FUNCTIONAL COMPONENTS LIST
i
The following table relates the A/C system’s functions to its components.
Heater/A/C control
Ducts
Refrigerant circuit
Fin therm0 sensor
7935
7-36
EQUIPMENT - Heater and Air Conditioning
REFRIGERANT TEMPERATURE SWITCH
<TURBO>
The refrigerant temperature switch detects the temperature d
of the refrigerant at the delivery port of the A/C compressor
to provide the ON/OFF control of the A/C compressor.
For the location of the refrigerant temperature switch, refer
to the Construction Diagram on P.7-32.
ON
OFF
--I
b
110
(230)
165 Temperature
(329) “C (“F)
2050142
1
AUTO COMPRESSOR-ECM
The auto compressor-ECM uses the signals sent from the
A/C switch, fin therm0 sensor and air inlet sensor to provide
the ON/OFF control of the magnetic clutch.
AUTO COMPRESSOR-ECM CONTROL CHARACTERISTICS DIAGRAM
15 (59)
ECONO mode ON
G‘
e
9
fi
5 IO (50)
$
E
8
5
5
A/C mode ON
0
A/C and ECONO modes ON
2
Tig 5(41)
4°C (39°F)
\
2
ii
A/C mode OFF
3°C (37’F)
Differential
A/C and ECONO modes OFF
I
Low 4
Inlet air temperature
* High
2OPOi22
7-37
EQUIPMENT - Heater and Air Conditioning
/
L
COMPRESSOR
l
The A/C system on the non-turbo models incorporates a belt locking control function which
prevents the belts from being broken due to
a slip that would occur when the compressor
is locked. This function is achieved by the belt
lock controller located below the blower motor.
The controller compares the compressor speed
obtained from the compressor revolution pick-up
sensor with the engine speed and stops the
*
A/C if the result of the calculation exceeds the
predetermined value.
When the compressor is locked, the compressor
operation indicator light in the A/C switch blinks
to warn the driver of the abnormal condition.
A high pressure relief valve is provided to limit
the release of the refrigerant into air to a minimum when the high-pressure side pressure becomes too high.
<Non-turbo>
‘- ’ ’
High pressure
relief valve
A2OXO246
820X0238
<Turbo>
High pressure
relief valve
Blinking A/C switch
A20X0239
HIGH PRESSURE RELIEF VALVE
The valve, which is normally closed by the spring force, is
forced open to release the refrigerant into open air when the
high-pressure side pressure becomes so high that it overcomes
the spring force. When the pressure is lowered back to the
normal level, the valve is closed by the spring force not to
let out any more refrigerant.
cNon-turbo>
z;;pressor
<Turbo>
Compressor
side
A20X0273
Valve characteristics
100
(6,102)
820X0248
Fully open
~
7-38
EQUIPMENT - Heater and Air Conditioning
A/C COMPRESSOR CONTROL
If any of the switches and sensors is caused to
be OFF, the compressor clutch relay and compressor magnet clutch are forced to the OFF state.
‘2=:
e
0E
b
ii
z
-E
CrJ
6
.=
2
Blower switch
Manually set to ON and OFF
I-W switch
Manually set to ON and OFF
Dual pressure switch
Low pressure switch
OFF at 200 kPa (29 psi) or lower;
ON at 220 kPa (32 psi) or higher
High pressure switch
OFF at 3,140 kPa (456 psi) or lower;
ON at 2,550 kPa (370 psi) or higher
Refrigerant temperature switch <Turbo>
ON at approx. 110°C (230°F) or lower;
OFF at approx. 165°C (329°F) or higher
Air inlet sensor
Measure the evaporator inlet air and surface temperatures and input the measured data to the auto compressor-ECM. (Refer to the auto compressor-ECM
control characteristic diagram on P.7-36.)
Fin therm0 sensor
Revolution pick-up sensor <Non-turbo>
<Turbo>
Ignition switch (IG2)
OFF when compressor slipping rate(s) is 70% or
more
Fusible link
Fuse
____-- -------.
Auto
compressorECM
1
A/C
, compressor
FF clutch relay
Air therm0 Fin therm0
sensor
sensor
Compressor
20X0237
EQUIPMENT - Heater and Air Conditioning
/
L+J
<Non-turbo>
Ignition coil
Ignition switch (IG2)
Auto compressor-ECM
n
Id
ed
Air therm0
sensor
Fin
thermo. .._....
sensor
I
Revolution
pick-up sensor
Dual
pressure
switch
Fusible link
i
Compressor
20X0297
7-40
EQUIPMENT - Heater and Air Conditioning
CONDENSER FAN AND RADIATOR FAN CONTROL
For information on condenser fan and radiator fan control,
refer to Group 1 Control System of Engine.
Section
A-A
’
RECEIVER
l
iccan it
Meltable
bolt
/
(Abolished)
l
w
20x0197
New refrigerant
system
Conventional
refrigerant
system
Charging hose
a
The new refrigerant (R134a) is highly hygroscopic and
would require much more amount of conventional desiccant
(silica gel) to be kept dry.
The new desiccant (molecular sieve) used for drying the
refrigerant has enough capacity to absorb moisture without
need for change to the receiver capacity.
In the conventional design, the meltable bolt on the receiver
fuses to let out the refrigerant gas in its entirety into open
air when the high-pressure side pressure becomes too
high.
The new system has a relief valve in the compressor which
plays the same role as the meltable bolt but closes after
release of only necessary quantity of refrigerant, so that
the amount of released refrigerant is limited to the minimum.
NOTE
‘2
For details about the relief valve, see COMPRESSOR,
P.7-37.
SERVICE VALVE
A quick-disconnect type joint, instead of conventional screw-in
type joint, is used for the service valve to prevent incorrect
charging and enhance serviceability.