1
2
Before Assembly
1. Make sure that the fan voltage (120) is compatible with your own electrical
system.
2. Check to make sure that your carton contains all the parts mentioned in the
parts list.
NOTE: The box can be used as a work space to prevent any damage on the
ornamental surface.
CAUTION: Before installing, choose a location for mounting the fan where the
blades have at least 7 feet of clearance from all objects and floor. Mount an
outlet box to the ceiling or use an existing box
CAUTION: Do not mount fan to sheet rock or drywall type materials. To
insure proper support, use the two #1 wood screws to secure mounting bracket
to joist or beam. If the location you choose does not have a suitable support
beam, install a 2”x 4” brace between ceiling joists to support.
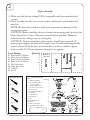
Screw Package
S1.
S2.
S3.
S4.
S5.
S6.
S7.
S8.
Quantity
Wood Screws & Washers
Motor Screws & Washers
Bracket Screws & Washers
Blade Screws & Washers
Wire Connectors
Safety Bolt & Nut
"J" Hook
Zip Tie
Tools you Need
1. Phillips Screwdriver
3. Adjustable Wrench
2. Flat Screwdriver
2
9
2
13
5
1
1
1
Hardware
Inventory
S5
S7
S2
S6
S4
S1
What You Have
1
Parts
Quantity
1. Mounting Bracket
1
2. Down Rod Assembly
1
6" Rod Supplied
3. Canopy Night Light
1
& Canopy Screw Cover
4. Flange Cover
1
5. Fan Housing & Motor
1
6. Light Kit
1
7. Light Kit Lens
4
8. Blade Arms
4
9. Net
1
10. Blade Medallion
12
11. Blades
4
12. Bulb (18W GU24)
1
13. TCS Hand Held Control
1
11
4. Wire Strippers
S3
2
3
4
5
6
7
9
10
11
8
13