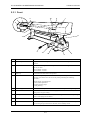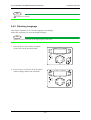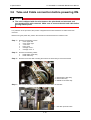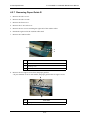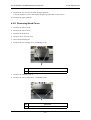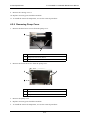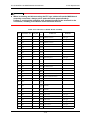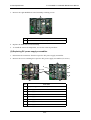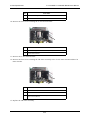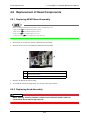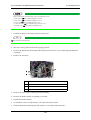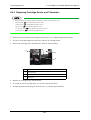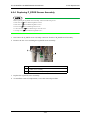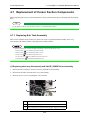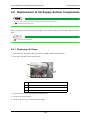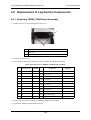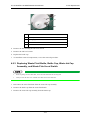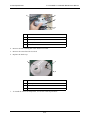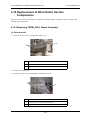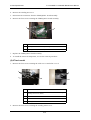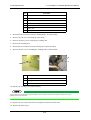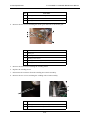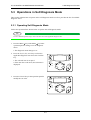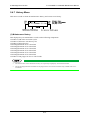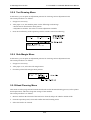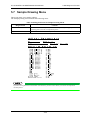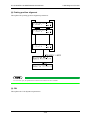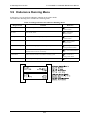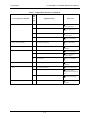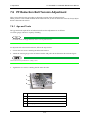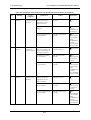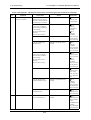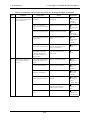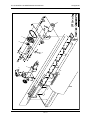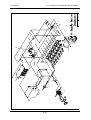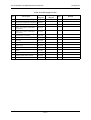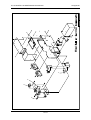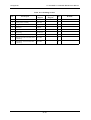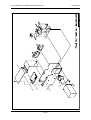
1
MAINTENANCE MANUAL Grand-Format Inkjet Printer PJ-1614NXE PJ-2216NXE Rev. Read This Manual Before Using The Equipment. PJ16E-M-00 Important Notice Important Notice This product has been tested and found to comply with the limits for a Class A digital device, pursuant to Part 15 of FCC Rules. These limits are designed to provide reasonable protection against harmful interference when the product is operated in a commercial environment. This product generates, uses, and can radiate radio frequency energy and if not installed and used in accordance with the this manual, may cause harmful interference to radio communications. Operation of this product in a residential area is likely to cause harmful interference in which case the user will be required to correct the interference at his own expense. 1. Radio interfere Product generates weak radio signals and may interfere with television reception and utilities. If a product does interfere with radio or TV reception, try following: • Change the direction of your radio and TV reception antenna or feeder. • Change the direction of the product • Move either the product or the receiving antenna so there is more distance between them. • Be sure the product and the receiving antenna are on separate power lines. 2. Trademark mentioned in this manual. • MUTOH, PJ-1614NXE, PJ-2216NXE, MH-RTL are registered trademarks or product names of MUTOH INDUSTRIES LTD. • Centronics and Bitronics are registered trademarks or product names of Centronics Data Computer Corporation. • Windows95, Windows98, Windows NT4.0, Windows2000, and MS-DOS are registered trademarks or product names of Microsoft Corporation. • DOS/V is registered trademark and product name of International Business Machine Corporation (IBM). • Other company and product names may be registered trademarks or product names. CAUTION • No part of this product or publication may be reproduced, copied, or transmitted in any form or by any means, except for personal use, without the permission of MUTOH INDUSTRIES LTD. • The product and the contents of this publication may be changed without prior notification. • MUTOH INDUSTRIES LTD. has made the best efforts to keep this publication free from error, but if you find any uncertainties or misprints, please call us or the shop where you bought this equipment. • MUTOH INDUSTRIES LTD. shall not be liable for any damages or troubles resulting from the use of this equipment or this manual. (1) Warranty Limitations Warranty Limitations 1. MUTOH INDUSTRIES LTD. warrants part repair or replacement as a sole measure only if a failure is found in the system or in the materials and workmanship of the product the seller produced. However, if the cause of failure is uncertain, decide the action after due mutual consultation. 2. The warranty shall not apply to any direct or indirect loss, or compensation for the loss due to the product that has been subject to misuse, neglect, or improper alternation. (2) About This Manual About This Manual 1. Purpose and target readers This manual explains preparations needed before using and procedures for operations for MUTOH INDUSTRIAL LTD. Grand Format Inkjet Printer(PJ-1614NXE,PJ-2216NXE) Use the built-in self-diagnostic program to locate a defective part and adjust/check during maintenance. Before using this printer, first understand the contents and directions in this manual. 2. Manual configuration Section Contents 1 Safety Instructions Explains types of warnings, cautions and warnings labeled on the printer for the both operators of the printer and maintenance personnel. 2 Product Overview Explains the features, part names, and functions of the printer. 3 Specifications Explains the specifications of the printer. . 4 Procedures of parts replacement Explains the procedures of replacement and removal of the service parts of the printer. 5 Self diagnostic function Explains the self diagnostic functions of the printer. 6 Maintenance mode Explains the maintenance mode of the printer. 7 Adjustment Explains the adjusting procedures of the printer parts. 8 Maintenance Explains daily maintenance of the printer. 9 Troubleshooting Explains troubles that may occur when using the printer and how to solve them. 10 Appendix Explains the specifications, optional parts and supplies, installation procedures for optional parts, and user support for this printer. NOTE ・ Use the built-in self-diagnostic program to locate a defective part and adjust/check during maintenance. (3) About This Manual 3. Manual notation The following symbols are used in this manual for easier understanding of the information. Symbol Meaning Must be followed carefully to avoid death or serious injury WARNING Must be observed to avoid injury or damage to your equipment CAUTION NOTE Contains important information and useful tips on the operation of your printer Indicates useful tips for operating or understanding the printer TIP TIP Indicates referrence pages in this manual (4) PJ-1614NX PJ-2216NX MAINTENANCE MANUAL GENERAL TABLE OF CONTENTS 1 Safety Instructions 1.1 Introduction . . . . . . . . . . . . . . . . . . . . . . . . . . . . . . . . . . . . . . . . . . . . . . . . . 1-1 1.2 Warnings, Cautions, and Notes. . . . . . . . . . . . . . . . . . . . . . . . . . . . . . . . . 1-1 1.3 Important safety instructions . . . . . . . . . . . . . . . . . . . . . . . . . . . . . . . . . . 1-2 1.4 Warning labels . . . . . . . . . . . . . . . . . . . . . . . . . . . . . . . . . . . . . . . . . . . . . . 1-4 1.4.1 1.4.2 Handling the warning labels . . . . . . . . . . . . . . . . . . . . . . . . . . . . . . . . . . . . . . . 1-4 Locations and types of warning labels . . . . . . . . . . . . . . . . . . . . . . . . . . . . . . . 1-4 2 Product Overview 2.1 Introduction . . . . . . . . . . . . . . . . . . . . . . . . . . . . . . . . . . . . . . . . . . . . . . . . . 2-1 2.2 Features . . . . . . . . . . . . . . . . . . . . . . . . . . . . . . . . . . . . . . . . . . . . . . . . . . . . 2-1 2.3 Part names and functions . . . . . . . . . . . . . . . . . . . . . . . . . . . . . . . . . . . . . 2-2 2.3.1 2.3.2 2.3.3 2.3.4 2.4 Front . . . . . . . . . . . . . . . . . . . . . . . . . . . . . . . . . . . . . . . . . . . . . . . . . . . . . . . . . Rear section (PJ-1614NXE) . . . . . . . . . . . . . . . . . . . . . . . . . . . . . . . . . . . . . . . Rear section (PJ-2216NXE) . . . . . . . . . . . . . . . . . . . . . . . . . . . . . . . . . . . . . . . Operation panel . . . . . . . . . . . . . . . . . . . . . . . . . . . . . . . . . . . . . . . . . . . . . . . . 2-3 2-4 2-5 2-6 Printer status. . . . . . . . . . . . . . . . . . . . . . . . . . . . . . . . . . . . . . . . . . . . . . . . 2-8 2.4.1 2.4.2 2.4.3 2.4.4 2.4.5 Normal . . . . . . . . . . . . . . . . . . . . . . . . . . . . . . . . . . . . . . . . . . . . . . . . . . . . . . . Setup menu display . . . . . . . . . . . . . . . . . . . . . . . . . . . . . . . . . . . . . . . . . . . . . Self-diagnosis Function Display . . . . . . . . . . . . . . . . . . . . . . . . . . . . . . . . . . . . Maintenance Mode Display . . . . . . . . . . . . . . . . . . . . . . . . . . . . . . . . . . . . . . . Selecting Language . . . . . . . . . . . . . . . . . . . . . . . . . . . . . . . . . . . . . . . . . . . . . 2-8 2-8 2-8 2-8 2-9 3 Basic Installation 3.1 3.2 Introduction . . . . . . . . . . . . . . . . . . . . . . . . . . . . . . . . . . . . . . . . . . . . . . . . . 3-1 Product Specifications . . . . . . . . . . . . . . . . . . . . . . . . . . . . . . . . . . . . . . . . 3-1 3.2.1 3.2.2 3.3 PJ-1614NXE Unit specifications . . . . . . . . . . . . . . . . . . . . . . . . . . . . . . . . . . . . 3-1 PJ-2216NXE Unit specifications . . . . . . . . . . . . . . . . . . . . . . . . . . . . . . . . . . . . 3-2 Interface Specifications . . . . . . . . . . . . . . . . . . . . . . . . . . . . . . . . . . . . . . . 3-4 3.3.1 3.3.2 Centronics Bidirection Parallel Interface:IEEE1284) Specifications . . . . . . . . . . . . . . . . . . . . . . . . . . . . . . . . . . . . . . . . . . . . . . . . . . 3-4 Network Interface (Optional) Specifications . . . . . . . . . . . . . . . . . . . . . . . . . . . 3-5 (5) PJ-1614NX PJ-2216NX MAINTENANCE MANUAL 3.4 Options/Supply list . . . . . . . . . . . . . . . . . . . . . . . . . . . . . . . . . . . . . . . . . . 3-6 3.4.1 3.4.2 3.5 3.6 Options . . . . . . . . . . . . . . . . . . . . . . . . . . . . . . . . . . . . . . . . . . . . . . . . . . . . . . . 3-6 Supply . . . . . . . . . . . . . . . . . . . . . . . . . . . . . . . . . . . . . . . . . . . . . . . . . . . . . . . . 3-6 Conditions of the installation environment . . . . . . . . . . . . . . . . . . . . . . . 3-8 Tube and Cable connection before powering ON .. . . . . . . . . . . . . . . . . 3-10 4 Handling the printer 4.1 4.2 Introduction . . . . . . . . . . . . . . . . . . . . . . . . . . . . . . . . . . . . . . . . . . . . . . . . . 4-1 Removal of Covers . . . . . . . . . . . . . . . . . . . . . . . . . . . . . . . . . . . . . . . . . . . 4-1 4.2.1 4.2.2 4.2.3 4.2.4 4.2.5 4.2.6 4.2.7 4.2.8 4.2.9 4.3 Replacement of Board Assemblies . . . . . . . . . . . . . . . . . . . . . . . . . . . . . 4-13 4.3.1 4.3.2 4.3.3 4.4 4.4.3 4.4.4 4.4.5 4.4.6 Replacing PF Motor Assembly . . . . . . . . . . . . . . . . . . . . . . . . . . . . . . . . . . . . Replacing PF_ENC Assembly and PF Scale Assembly . . . . . . . . . . . . . . . . . . . . . . . . . . . . . . . . . . . . . . . . . . . . . . . . . . . . Replacing P_REAR_R sensor assembly . . . . . . . . . . . . . . . . . . . . . . . . . . . . Replacing Lever Motor Assembly . . . . . . . . . . . . . . . . . . . . . . . . . . . . . . . . . . Replacing Heater and Thermister Assembly . . . . . . . . . . . . . . . . . . . . . . . . . Replacing Transmission Type Photo Sensor . . . . . . . . . . . . . . . . . . . . . . . . . 4-22 4-23 4-24 4-25 4-28 4-30 Replacement of Y-axis Driving System Components . . . . . . . . . . . . . . . . . . . . . . . . . . . . . . . . . . . . . . . . . . . . . . . 4-32 4.5.1 4.5.2 4.5.3 4.5.4 4.5.5 4.5.6 4.5.7 4.5.8 4.6 Replacing SUB Board Assembly . . . . . . . . . . . . . . . . . . . . . . . . . . . . . . . . . . 4-13 Replacing MAIN Board Assembly, DIMM, MOTHER Board Assembly, HDD_MOTHER Board Assembly . . . . . . . . . . . . . . . . . . . . 4-14 Replacing POWER A Board Assembly, POWER B Board Assembly, DC Power Supply Assemblies . . . . . . . . . . . . . . . . . . . . . . 4-17 Replacement of PF Driving Section Components . . . . . . . . . . . . . . . . . 4-22 4.4.1 4.4.2 4.5 Removing Side Cover R . . . . . . . . . . . . . . . . . . . . . . . . . . . . . . . . . . . . . . . . . . 4-2 Removing Side Cover L . . . . . . . . . . . . . . . . . . . . . . . . . . . . . . . . . . . . . . . . . . 4-3 Removing Front Cover . . . . . . . . . . . . . . . . . . . . . . . . . . . . . . . . . . . . . . . . . . . 4-4 Replacing Panel Board Assembly . . . . . . . . . . . . . . . . . . . . . . . . . . . . . . . . . . 4-6 Removing Y-axis rail cover . . . . . . . . . . . . . . . . . . . . . . . . . . . . . . . . . . . . . . . . 4-7 Removing Paper Guide F . . . . . . . . . . . . . . . . . . . . . . . . . . . . . . . . . . . . . . . . . 4-8 Removing Paper Guide R. . . . . . . . . . . . . . . . . . . . . . . . . . . . . . . . . . . . . . . . 4-10 Removing Head Cover . . . . . . . . . . . . . . . . . . . . . . . . . . . . . . . . . . . . . . . . . . 4-11 Removing Pump Cover. . . . . . . . . . . . . . . . . . . . . . . . . . . . . . . . . . . . . . . . . . 4-12 Replacing Steel Belt . . . . . . . . . . . . . . . . . . . . . . . . . . . . . . . . . . . . . . . . . . . . Replacing CR Motor Assembly . . . . . . . . . . . . . . . . . . . . . . . . . . . . . . . . . . . . Replacing SLID Motor Assembly . . . . . . . . . . . . . . . . . . . . . . . . . . . . . . . . . . Replacing HD_SLIDE Sensor Assembly . . . . . . . . . . . . . . . . . . . . . . . . . . . . Replacing T Fence . . . . . . . . . . . . . . . . . . . . . . . . . . . . . . . . . . . . . . . . . . . . . Replacing CR Driven Pulley . . . . . . . . . . . . . . . . . . . . . . . . . . . . . . . . . . . . . . Replacing Steel Bearer, Tube Guide, CR Tape Wire, and Intake Tube . . . . . . . . . . . . . . . . . . . . . . . . . . . . . . . . . . . . . . . . . . . . . . . Replacing Cover R Sensor Assembly and Cover L Sensor Assembly . . . . . . . . . . . . . . . . . . . . . . . . . . . . . . . . . . . . . . . . . . . . . . 4-32 4-33 4-35 4-36 4-36 4-38 4-39 4-42 Replacement of Head Components. . . . . . . . . . . . . . . . . . . . . . . . . . . . . 4-44 4.6.1 Replacing HEAD Board Assembly . . . . . . . . . . . . . . . . . . . . . . . . . . . . . . . . . 4-44 (6) PJ-1614NX PJ-2216NX MAINTENANCE MANUAL 4.6.2 4.6.3 4.6.4 4.7 Replacement of Cursor Section Components . . . . . . . . . . . . . . . . . . . . 4-48 4.7.1 4.7.2 4.7.3 4.7.4 4.7.5 4.7.6 4.8 Replacing Sub Tank Assembly. . . . . . . . . . . . . . . . . . . . . . . . . . . . . . . . . . . . Replacing CR_BASE Board Assembly and CR_HEAD Board Assembly . . . . . . . . . . . . . . . . . . . . . . . . . . . . . . . . . . . . . . Replacing CR_ENC Assembly . . . . . . . . . . . . . . . . . . . . . . . . . . . . . . . . . . . . Replacing Three-way Valve . . . . . . . . . . . . . . . . . . . . . . . . . . . . . . . . . . . . . . Replacing CR Cursor Assembly . . . . . . . . . . . . . . . . . . . . . . . . . . . . . . . . . . . Replacing Cursor Roller . . . . . . . . . . . . . . . . . . . . . . . . . . . . . . . . . . . . . . . . . 4-48 4-51 4-54 4-56 4-57 4-57 Replacement of Ink Supply Section Components . . . . . . . . . . . . . . . . . 4-59 4.8.1 4.8.2 4.8.3 4.8.4 4.8.5 4.8.6 4.8.7 4.8.8 4.8.9 4.8.10 4.8.11 4.8.12 4.9 Replacing Head Assembly . . . . . . . . . . . . . . . . . . . . . . . . . . . . . . . . . . . . . . . 4-44 Replacing Cartridge Heater and Thermister . . . . . . . . . . . . . . . . . . . . . . . . . . 4-46 Replacing P_EDGE Sensor Assembly . . . . . . . . . . . . . . . . . . . . . . . . . . . . . . 4-47 Replacing Ink Pump . . . . . . . . . . . . . . . . . . . . . . . . . . . . . . . . . . . . . . . . . . . . Replacing Air Pump . . . . . . . . . . . . . . . . . . . . . . . . . . . . . . . . . . . . . . . . . . . . Replacing Bimor Pump . . . . . . . . . . . . . . . . . . . . . . . . . . . . . . . . . . . . . . . . . . Replacing Regulator . . . . . . . . . . . . . . . . . . . . . . . . . . . . . . . . . . . . . . . . . . . . Replacing Air Chamber . . . . . . . . . . . . . . . . . . . . . . . . . . . . . . . . . . . . . . . . . Replacing Two-way Valve . . . . . . . . . . . . . . . . . . . . . . . . . . . . . . . . . . . . . . . Replacing PRESS_SENSE Board Assembly . . . . . . . . . . . . . . . . . . . . . . . . . Replacing TERM_PUMP Board Assembly . . . . . . . . . . . . . . . . . . . . . . . . . . . Replacing Safety Valve Assembly . . . . . . . . . . . . . . . . . . . . . . . . . . . . . . . . . Replacing Ink Filter . . . . . . . . . . . . . . . . . . . . . . . . . . . . . . . . . . . . . . . . . . . . . Replacing Throttle Valve . . . . . . . . . . . . . . . . . . . . . . . . . . . . . . . . . . . . . . . . Replacing Nipple . . . . . . . . . . . . . . . . . . . . . . . . . . . . . . . . . . . . . . . . . . . . . . 4-59 4-60 4-61 4-62 4-62 4-63 4-63 4-64 4-65 4-66 4-66 4-67 Replacement of Leg Section Components. . . . . . . . . . . . . . . . . . . . . . . 4-69 4.9.1 4.9.2 4.9.3 Replacing TERM_TANK Board Assembly . . . . . . . . . . . . . . . . . . . . . . . . . . . 4-69 Replacing Main Bottle, Bottle Cap, Ink Cap, and Ink Level Switch. . . . . . . . . . . . . . . . . . . . . . . . . . . . . . . . . . . . . . . . . . . . 4-70 Replacing Waste Fluid Bottle, Bottle Cap, Waste Ink Cap Assembly, and Waste Fluid Level Switch . . . . . . . . . . . . . . . . . . . . . 4-71 4.10 Replacement of Wind Roller Section Components . . . . . . . . . . . . . . . . . . . . . . . . . . . . . . . . . . . . . . . . . . . . . . . 4-73 4.10.1 Replacing TERM_ROLL Board Assembly . . . . . . . . . . . . . . . . . . . . . . . . . . . 4-73 4.10.2 Replacing Winding Unit Components . . . . . . . . . . . . . . . . . . . . . . . . . . . . . . . 4-75 4.11 Replacement of Feed Out Section Components . . . . . . . . . . . . . . . . . . 4-80 5 Maintenance 5.1 Introduction . . . . . . . . . . . . . . . . . . . . . . . . . . . . . . . . . . . . . . . . . . . . . . . . . 5-1 5.2 Preparation . . . . . . . . . . . . . . . . . . . . . . . . . . . . . . . . . . . . . . . . . . . . . . . . . 5-1 5.2.1 5.2.2 5.3 Preparations on Machine . . . . . . . . . . . . . . . . . . . . . . . . . . . . . . . . . . . . . . . . . 5-1 Starting Up . . . . . . . . . . . . . . . . . . . . . . . . . . . . . . . . . . . . . . . . . . . . . . . . . . . . 5-2 Operations in Self-Diagnosis Mode . . . . . . . . . . . . . . . . . . . . . . . . . . . . . 5-3 5.3.1 5.3.2 Operating Self-Diagnosis Mode . . . . . . . . . . . . . . . . . . . . . . . . . . . . . . . . . . . . 5-3 Diagnosis Items in Self-Diagnosis Menu . . . . . . . . . . . . . . . . . . . . . . . . . . . . . 5-4 (7) PJ-1614NX PJ-2216NX MAINTENANCE MANUAL 5.4 Inspection Menu . . . . . . . . . . . . . . . . . . . . . . . . . . . . . . . . . . . . . . . . . . . . . 5-6 5.4.1 5.4.2 5.4.3 5.4.4 5.4.5 5.4.6 5.4.7 5.4.8 5.5 Memory Size Menu. . . . . . . . . . . . . . . . . . . . . . . . . . . . . . . . . . . . . . . . . . . . . . 5-7 Version Menu . . . . . . . . . . . . . . . . . . . . . . . . . . . . . . . . . . . . . . . . . . . . . . . . . . 5-8 Operation Panel Menu . . . . . . . . . . . . . . . . . . . . . . . . . . . . . . . . . . . . . . . . . . . 5-9 Sensor Menu . . . . . . . . . . . . . . . . . . . . . . . . . . . . . . . . . . . . . . . . . . . . . . . . . 5-10 Encoder Menu . . . . . . . . . . . . . . . . . . . . . . . . . . . . . . . . . . . . . . . . . . . . . . . . 5-11 Fan Menu . . . . . . . . . . . . . . . . . . . . . . . . . . . . . . . . . . . . . . . . . . . . . . . . . . . . 5-11 History Menu. . . . . . . . . . . . . . . . . . . . . . . . . . . . . . . . . . . . . . . . . . . . . . . . . . 5-12 Head Waveform Menu . . . . . . . . . . . . . . . . . . . . . . . . . . . . . . . . . . . . . . . . . . 5-15 Adjustment Menu . . . . . . . . . . . . . . . . . . . . . . . . . . . . . . . . . . . . . . . . . . . 5-16 5.5.1 5.5.2 5.5.3 5.5.4 5.5.5 5.5.6 5.5.7 5.5.8 5.5.9 5.5.10 5.5.11 5.5.12 Skew Check Menu . . . . . . . . . . . . . . . . . . . . . . . . . . . . . . . . . . . . . . . . . . . . . Voltage Input Menu. . . . . . . . . . . . . . . . . . . . . . . . . . . . . . . . . . . . . . . . . . . . . Head Nozzle Check Menu . . . . . . . . . . . . . . . . . . . . . . . . . . . . . . . . . . . . . . . Head Inclination Check Menu. . . . . . . . . . . . . . . . . . . . . . . . . . . . . . . . . . . . . Two-Way Printing Position Alignment Menu. . . . . . . . . . . . . . . . . . . . . . . . . . CW Adjustment Menu. . . . . . . . . . . . . . . . . . . . . . . . . . . . . . . . . . . . . . . . . . . Band Feed Correction Menu. . . . . . . . . . . . . . . . . . . . . . . . . . . . . . . . . . . . . . Test Drawing Menu. . . . . . . . . . . . . . . . . . . . . . . . . . . . . . . . . . . . . . . . . . . . . Side Margin Menu. . . . . . . . . . . . . . . . . . . . . . . . . . . . . . . . . . . . . . . . . . . . . . Head Cleaning Menu . . . . . . . . . . . . . . . . . . . . . . . . . . . . . . . . . . . . . . . . . . . Software Counter Initialization Menu . . . . . . . . . . . . . . . . . . . . . . . . . . . . . . . Feed Pitch Check Menu . . . . . . . . . . . . . . . . . . . . . . . . . . . . . . . . . . . . . . . . . 5-17 5-17 5-18 5-20 5-22 5-24 5-26 5-28 5-28 5-28 5-30 5-30 5.6 Purge Menu . . . . . . . . . . . . . . . . . . . . . . . . . . . . . . . . . . . . . . . . . . . . . . . . 5-32 5.7 Sample Drawing Menu . . . . . . . . . . . . . . . . . . . . . . . . . . . . . . . . . . . . . . . 5-33 5.8 Parameter Menu . . . . . . . . . . . . . . . . . . . . . . . . . . . . . . . . . . . . . . . . . . . . 5-35 5.8.1 5.8.2 5.9 Parameter Initialization Menu . . . . . . . . . . . . . . . . . . . . . . . . . . . . . . . . . . . . . 5-36 Parameter Update Menu . . . . . . . . . . . . . . . . . . . . . . . . . . . . . . . . . . . . . . . . 5-36 Endurance Running Menu . . . . . . . . . . . . . . . . . . . . . . . . . . . . . . . . . . . . 5-44 5.9.1 5.9.2 5.9.3 5.9.4 5.9.5 5.9.6 5.9.7 5.9.8 CR Motor Endurance Menu . . . . . . . . . . . . . . . . . . . . . . . . . . . . . . . . . . . . . . PF Motor Endurance Menu. . . . . . . . . . . . . . . . . . . . . . . . . . . . . . . . . . . . . . . Head Up/Down Endurance Menu . . . . . . . . . . . . . . . . . . . . . . . . . . . . . . . . . . Lever Motor Endurance Menu . . . . . . . . . . . . . . . . . . . . . . . . . . . . . . . . . . . . Sequential Drawing Endurance Menu . . . . . . . . . . . . . . . . . . . . . . . . . . . . . . Pump Menu . . . . . . . . . . . . . . . . . . . . . . . . . . . . . . . . . . . . . . . . . . . . . . . . . . General Endurance Menu. . . . . . . . . . . . . . . . . . . . . . . . . . . . . . . . . . . . . . . . Endurance Running Check Menu. . . . . . . . . . . . . . . . . . . . . . . . . . . . . . . . . . 5-45 5-46 5-47 5-47 5-49 5-49 5-50 5-51 6 Troubleshooting 6.1 Introduction . . . . . . . . . . . . . . . . . . . . . . . . . . . . . . . . . . . . . . . . . . . . . . . . . 6-1 6.2 Overview . . . . . . . . . . . . . . . . . . . . . . . . . . . . . . . . . . . . . . . . . . . . . . . . . . . 6-1 6.3 Operations in Maintenance Mode . . . . . . . . . . . . . . . . . . . . . . . . . . . . . . . 6-2 6.3.1 6.3.2 Starting Up Maintenance Mode . . . . . . . . . . . . . . . . . . . . . . . . . . . . . . . . . . . . 6-2 Operating Maintenance Mode . . . . . . . . . . . . . . . . . . . . . . . . . . . . . . . . . . . . . 6-2 (8) PJ-1614NX PJ-2216NX MAINTENANCE MANUAL 6.4 Maintenance Menu . . . . . . . . . . . . . . . . . . . . . . . . . . . . . . . . . . . . . . . . . . . 6-3 6.4.1 6.4.2 Counter Display Menu . . . . . . . . . . . . . . . . . . . . . . . . . . . . . . . . . . . . . . . . . . . 6-3 Counter Initialization Menu . . . . . . . . . . . . . . . . . . . . . . . . . . . . . . . . . . . . . . . . 6-4 7 Appendix 7.1 Introduction . . . . . . . . . . . . . . . . . . . . . . . . . . . . . . . . . . . . . . . . . . . . . . . . . 7-1 7.2 Adjustment Item . . . . . . . . . . . . . . . . . . . . . . . . . . . . . . . . . . . . . . . . . . . . . 7-1 7.3 Parameter Backup . . . . . . . . . . . . . . . . . . . . . . . . . . . . . . . . . . . . . . . . . . . 7-5 7.3.1 7.3.2 7.3.3 7.4 Firmware Installation . . . . . . . . . . . . . . . . . . . . . . . . . . . . . . . . . . . . . . . . . 7-8 7.4.1 7.4.2 7.5 Jigs and Tools . . . . . . . . . . . . . . . . . . . . . . . . . . . . . . . . . . . . . . . . . . . . . . . . . 7-8 Installing Firmware . . . . . . . . . . . . . . . . . . . . . . . . . . . . . . . . . . . . . . . . . . . . . . 7-8 Steel Belt Tension Adjustment . . . . . . . . . . . . . . . . . . . . . . . . . . . . . . . . 7-10 7.5.1 7.5.2 7.6 Jigs and Tools . . . . . . . . . . . . . . . . . . . . . . . . . . . . . . . . . . . . . . . . . . . . . . . . . 7-5 Downloading Backup Parameters . . . . . . . . . . . . . . . . . . . . . . . . . . . . . . . . . . 7-6 Installing Backup Parameters. . . . . . . . . . . . . . . . . . . . . . . . . . . . . . . . . . . . . . 7-6 Jigs and Tools . . . . . . . . . . . . . . . . . . . . . . . . . . . . . . . . . . . . . . . . . . . . . . . . 7-10 Adjusting Steel Belt Tension. . . . . . . . . . . . . . . . . . . . . . . . . . . . . . . . . . . . . . 7-10 PF Reduction Belt Tension Adjustment . . . . . . . . . . . . . . . . . . . . . . . . . 7-12 7.6.1 Jigs and Tools . . . . . . . . . . . . . . . . . . . . . . . . . . . . . . . . . . . . . . . . . . . . . . . . 7-12 7.7 Head Accuracy Adjustment . . . . . . . . . . . . . . . . . . . . . . . . . . . . . . . . . . . 7-13 7.8 Cover Sensor Adjustment . . . . . . . . . . . . . . . . . . . . . . . . . . . . . . . . . . . . 7-14 7.9 Platen Height Adjustment . . . . . . . . . . . . . . . . . . . . . . . . . . . . . . . . . . . . 7-16 7.9.1 7.9.2 Jigs and Tools . . . . . . . . . . . . . . . . . . . . . . . . . . . . . . . . . . . . . . . . . . . . . . . . 7-16 Adjustment Procedure . . . . . . . . . . . . . . . . . . . . . . . . . . . . . . . . . . . . . . . . . . 7-16 8 Maintenance 8.1 Introduction . . . . . . . . . . . . . . . . . . . . . . . . . . . . . . . . . . . . . . . . . . . . . . . . . 8-1 8.2 Periodical Services. . . . . . . . . . . . . . . . . . . . . . . . . . . . . . . . . . . . . . . . . . . 8-2 8.3 Part Life Information. . . . . . . . . . . . . . . . . . . . . . . . . . . . . . . . . . . . . . . . . . 8-3 8.4 Lubrication/Bonding. . . . . . . . . . . . . . . . . . . . . . . . . . . . . . . . . . . . . . . . . . 8-4 8.5 Transportation of Machine. . . . . . . . . . . . . . . . . . . . . . . . . . . . . . . . . . . . . 8-5 9 Troubleshooting 9.1 Introduction . . . . . . . . . . . . . . . . . . . . . . . . . . . . . . . . . . . . . . . . . . . . . . . . . 9-1 (9) PJ-1614NX PJ-2216NX MAINTENANCE MANUAL 9.2 Troubleshooting with Error Message . . . . . . . . . . . . . . . . . . . . . . . . . . . . 9-1 9.2.1 9.2.2 9.2.3 9.2.4 9.2.5 9.3 Operation Status. . . . . . . . . . . . . . . . . . . . . . . . . . . . . . . . . . . . . . . . . . . . . . . . 9-2 Errors with Message . . . . . . . . . . . . . . . . . . . . . . . . . . . . . . . . . . . . . . . . . . . . . 9-5 Data Errors . . . . . . . . . . . . . . . . . . . . . . . . . . . . . . . . . . . . . . . . . . . . . . . . . . . . 9-9 Command Errors . . . . . . . . . . . . . . . . . . . . . . . . . . . . . . . . . . . . . . . . . . . . . . . 9-9 Errors Requiring Reboot . . . . . . . . . . . . . . . . . . . . . . . . . . . . . . . . . . . . . . . . . 9-11 Troubleshooting without Error Message . . . . . . . . . . . . . . . . . . . . . . . . 9-24 9.3.1 9.3.2 9.3.3 9.3.4 9.3.5 9.3.6 Initial Operation Problems . . . . . . . . . . . . . . . . . . . . . . . . . . . . . . . . . . . . . . . Paper Feed Problems. . . . . . . . . . . . . . . . . . . . . . . . . . . . . . . . . . . . . . . . . . . Drawing Problems . . . . . . . . . . . . . . . . . . . . . . . . . . . . . . . . . . . . . . . . . . . . . Noise Problems . . . . . . . . . . . . . . . . . . . . . . . . . . . . . . . . . . . . . . . . . . . . . . . Online Function Problem . . . . . . . . . . . . . . . . . . . . . . . . . . . . . . . . . . . . . . . . Other Problems. . . . . . . . . . . . . . . . . . . . . . . . . . . . . . . . . . . . . . . . . . . . . . . . 9-24 9-29 9-30 9-39 9-41 9-44 10 Appendix 10.1 Introduction . . . . . . . . . . . . . . . . . . . . . . . . . . . . . . . . . . . . . . . . . . . . . . . . 10-1 10.2 Wiring Diagram . . . . . . . . . . . . . . . . . . . . . . . . . . . . . . . . . . . . . . . . . . . . . 10-1 10.3 Jig and Tool List . . . . . . . . . . . . . . . . . . . . . . . . . . . . . . . . . . . . . . . . . . . . 10-2 10.3.1 Required Tools . . . . . . . . . . . . . . . . . . . . . . . . . . . . . . . . . . . . . . . . . . . . . . . . 10-2 10.4 Exploded Views/Service Parts List . . . . . . . . . . . . . . . . . . . . . . . . . . . . . 10-3 (10) 1 SAFETY INSTRUCTIONS 1.1 Introduction . . . . . . . . . . . . . . . . . . . . . . . . . . . . . . . . 1-1 1.2 Warnings, Cautions, and Notes . . . . . . . . . . . . . . . . 1-1 1.3 Important safety instructions. . . . . . . . . . . . . . . . . . 1-2 1.4 Warning labels. . . . . . . . . . . . . . . . . . . . . . . . . . . . . . 1-4 1.4.1 1.4.2 Handling the warning labels . . . . . . . . . . . . . . . . . . . . 1-4 Locations and types of warning labels. . . . . . . . . . . . . 1-4 <Memo> PJ-1614NXE PJ-2216NXE Maintenance Manual 1 Safety Instructions 1 Safety Instructions 1.1 Introduction This chapter explains the meaning of safety terms for personnel who operates this equipment, important safety instructions, and the positions of the warning labels. WARNING Be sure to follow all instructions and warnings on this manual when installing the equipment. 1.2 Warnings, Cautions, and Notes Safety terms in this manual and the contents of warning labels attached to the printer are categorized into the following three types depending on the degree of risk (or the scale of accident). Read the following explanations carefully, and follow the instructions in this manual. Safety terms WARNING CAUTION NOTE Details Must be followed carefully to avoid death or serious bodily injury Must be observed to avoid bodily injury (moderately or lightly) or damage to your equipment Contains important information and useful tips on the operation of your printer 1-1 1 Safety Instructions PJ-1614NXE PJ-2216NXE Maintenance Manual 1.3 Important safety instructions General safety instructions that must be observed to use the equipment safely are explained below. WARNING • Do not place the printer in the following areas. Doing so may result in the printer tipping or falling over and causing injury. • Angled place • Areas subject to vibration by other equipment • Do not stand on or place heavy objects on your printer. Doing so may result in the printer tipping or falling over and causing injury. • Do not cover the ventilation hole of your printer with cloth, such as a blanket or table cloth. Doing so could obstruct ventilation and cause fire. • Do not place the printer away from humid and dusty areas. Doing so may result in electrical shock or fire. • Insure that the following is performed before replacing parts. • Turn the power off of the printer. • Disconnect the power from the electric outlet. Not doing so may cause electric shock or damage to the electric circuit. • Unplug the cables connected to the printer. Not doing so may cause the printer trouble. 1-2 PJ-1614NXE PJ-2216NXE Maintenance Manual 1 Safety Instructions CAUTION • Assembling and disassembling of the printer are possible only for the parts whose disassembling procedures are shown in the operation manual. Do not disassemble any frame parts or parts whose disassembling procedures are not shown in the manual. Doing so may cause trouble that cannot be restored, as the printer is originally assembled in the factory with a high accuracy of 1/100 mm. • Do not touch the elements on the circuit board with bare hands. Doing so may cause static electricity and break the elements. • Do touch the nozzle of the print head. Be sure that the nozzle does not get any dust. • There is some remaining ink in the tubes. Be careful that the ink is not spilled from the tube onto the printer or items close to the printer. • If you need to operate the printer with the cover removed for maintenance, be careful not to get hurt by the moving parts. • Do not oil the printer mechanism with oil other than that designated by MUTOH. Doing so may damage the parts or shorten the lifetime. • If the power substrate assembly needs to be removed, disconnect the power cable and wait for at least 5 minutes before taking it out; this will discharge the residual electrical charge of the electrolytic capacitor. Touching the substrate before the capacitor discharges may cause electric shock. • When connecting or disconnecting the FFC type cable from the connector of the main substrate assembly, be sure to connect or disconnect the cable straight out from the connector. Connecting or disconnecting at a slant angle may damage, break or shortcircuit the inner terminal of the connector. That may damage the elements on the substrate. • When connecting or disconnecting the FFC type cable from the connector of the CR substrate, be sure to connect or disconnect the cable straight out from the connector. Connecting or disconnecting at a slant angle may damage, break or shortcircuit the inner terminal of the connector. That may damage the elements on the substrate. • Perform adjustment of the capping position before using the printer. Otherwise it will cause dysfunctional performance of the printer such as cleaning being performed at the wrong position. • Insure the following when performing cutter blade durability operation. • Install the usable ink cartridge. • Insure that media initialization is finished. Performing the cutter blade durability operation with the ink cartridges unloaded may damage the printer as the cutter blade may be down outside of the cutting range. 1-3 1 Safety Instructions PJ-1614NXE PJ-2216NXE Maintenance Manual • Insure the power of the printer is OFF before performing the parameter backup. Performing the parameter backup with the power ON may damage the main substrate or the data may not be properly installed. • Insure the power of the printer is OFF before installing the firmware. Installing the firmware with the power ON may damage the main substrate assembly or the data may not be properly installed. • Insure there is sufficient space around the printer when performing maintenance work. • Maintenance must be done by more than one person for the following work. • When detaching the printer from the stand or attaching it. • When packing the printer for transportation. 1.4 Warning labels The handling, attachment locations, and types of warning labels are explained below. Warning labels are attached to areas where care should be paid. Read and understand the positions and contents thoroughly before performing your work. 1.4.1 Handling the warning labels Be sure to note the following when handling the labels. NOTE • Make sure that all labels can be recognized. If text or illustrations cannot be seen clearly, either clean or replace the label. • When cleaning labels, use a cloth with water or neutral detergent. Do not use a solvent or gasoline. • If a warning label is damaged, lost, or cannot be recognized, replace the label. 1.4.2 Locations and types of warning labels The locations of warning labels are shown below. 1-4 PJ-1614NXE PJ-2216NXE Maintenance Manual 1 Safety Instructions (1) Unit 2 1 No. Type 1 2 1-5 1 Safety Instructions PJ-1614NXE PJ-2216NXE Maintenance Manual (2) Scroller 3 No. Type 3 1-6 2 PRODUCT OVERVIEW 2.1 Introduction . . . . . . . . . . . . . . . . . . . . . . . . . . . . . . . . 2-1 2.2 Features . . . . . . . . . . . . . . . . . . . . . . . . . . . . . . . . . . . 2-1 2.3 Part names and functions . . . . . . . . . . . . . . . . . . . . 2-2 2.3.1 2.3.2 2.3.3 2.3.4 2.4 Front . . . . . . . . . . . . . . . . . . . . . . . . . . . . . . . . . . . . . . Rear section (PJ-1614NXE) . . . . . . . . . . . . . . . . . . . . Rear section (PJ-2216NXE) . . . . . . . . . . . . . . . . . . . . Operation panel . . . . . . . . . . . . . . . . . . . . . . . . . . . . . . 2-3 2-4 2-5 2-6 Printer status . . . . . . . . . . . . . . . . . . . . . . . . . . . . . . . 2-8 2.4.1 2.4.2 2.4.3 2.4.4 2.4.5 Normal . . . . . . . . . . . . . . . . . . . . . . . . . . . . . . . . . . . . . Setup menu display . . . . . . . . . . . . . . . . . . . . . . . . . . . Self-diagnosis Function Display. . . . . . . . . . . . . . . . . . Maintenance Mode Display . . . . . . . . . . . . . . . . . . . . . Selecting Language . . . . . . . . . . . . . . . . . . . . . . . . . . . 2-8 2-8 2-8 2-8 2-9 <Memo> PJ-1614NXE PJ-2216NXE Maintenance Manual 2 Product Overview 2 Product Overview 2.1 Introduction This chapter explains the features, part names, and functions of the printer. 2.2 Features The features of the printer are explained below. (1) High speed output Both models use a newly designed high-speed print head, with an improvement of up to 6 times the speed of previous models. Also, the PJ-1614NXE can print up to a maximum width of 1600mm, and the PJ2216NXE can print up to a maximum of 2159mm in width. (2) Outstanding weather resistance With the specially developed solvent-type ink, the output product can last up to 3 years even without lamination. Not only is delivery time reduced, but total cost is reduced as well. (3) Wide variety of compatible media Because the height of the head can be adjusted, several types of media including 0.08-1.0 mm Terpolin, cloth, and marking film can be selected. (4) Vibrant Color Reproduction To reproduce clear and vibrant colors, the PJ-1614NXE uses 4 colors, and the PJ-2216NXE uses 6 colors. Both models uses 2000cc ink tanks, allowing continuous operation, and raising productivity. (5) Effective usage of media A JOG feature is provided to allow setting of the printing position as required. Because printing can be performed on media that has already been printed on, excess space can be used effectively. 2-1 2 Product Overview PJ-1614NXE PJ-2216NXE Maintenance Manual 2.3 Part names and functions Part names and functions are explained below. NOTE • See the figure below for the direction in this manual. 2-2 PJ-1614NXE PJ-2216NXE Maintenance Manual 2 Product Overview 2.3.1 Front 4 10 4 9 1 5 6 7 11 13 8 14 No. 3 12 Name 2 Function 1 Operation panel This panel is used to set operational conditions, the status of the printer, and other functions. 2 Main tank Container for holding the ink and the jet wash fluid. The following are attached to the tank tray for each. • PJ-1614NXE: 5 bottles • PJ-2216NXE: 7 bottles 3 Tank tray Used to attach the main tank to the product. 4 Front cover This cover keeps the operator safe from the drive parts of the printer while it is operating. Open and/or close the cover only when performing the following operations. • Media setting and replacement • Cutter blade replacement • Clearing cleaning wiper • media jamming 5 Pressurizing roller This roller is used to press the media from above and keep it flat when printing. 6 Platen Set inside the front cover. A heater for drying ink is built in. On the surface, there is a cutter groove for paper cutting. 7 Media guide This is used to feed the media smoothly when setting the media and when printing. There is a ink drying device built in. 8 Foot switch This switch is used to raise and lower the pressurizing roller. 9 Valve cover This is a cover to protect the user from the internal components of the unit. It is opened when cleaning the print head or the sub-tank, and is normally closed. 2-3 2 Product Overview No. PJ-1614NXE PJ-2216NXE Maintenance Manual Name Function 10 Maintenance cover This is a cover to protect the user from the internal components of the unit. This is opened during the following conditions: • When turning the unit ON or OFF • When cleaning the print head surface. • When cleaning the print head Inside the cover, there is a waste fluid tray to collect waste fluid from the print head. 11 Waste fluid tank A tank for storing waste fluids discharged from the product. 12 Waste fluid valve Opened when discharging waste fluid from the waste fluid tank. This is normally closed. 13 Stand This stand is used to install the printer on a surface flat floor. 14 Winding unit Winds and collects the printed media. 2.3.2 Rear section (PJ-1614NXE) 4 5 3 1 6 7 8 2 9 9 No. Name Function 1 AC inlet The power cable plug is inserted here. 2 Interface connector A connector to connect the centronic interface 3 Foot switch connector A connector to attach the foot switch cable 4 Interface slot The network interface board (option) attaches here. When not using the network interface, keep the cover closed. 5 Hard disk slot The hard disk (optional) attaches here. When not using a hard disk, keep the cover closed. 2-4 PJ-1614NXE PJ-2216NXE Maintenance Manual No. 2 Product Overview Name Function 6 Ink filter cover This cover protects the user from the internal components of the unit. There is an ink filter inside the cover. The cover is opened when changing the ink filter. This is normally closed. 7 Media feed slot This is the media feed slot for placing the media during the media setting procedure. 8 Damper Adjusts the tension of the media between the scroller and the media feed slot. 9 Scroller receiver Loads the scroller when using the roll media. 2.3.3 Rear section (PJ-2216NXE) 4 5 3 1 6 7 8 2 11 10 No. 10 Name Function 1 AC inlet The power cable plug is inserted here. 2 Interface connector A connector to connect the centronic interface. 3 Foot switch connector A connector to attach the foot switch cable. 4 Interface slot The network interface board (option) attaches here. When not using the network interface, keep the cover closed. 5 Hard disk slot The expansion hard disk optional) attaches here. When not using an expansion hard disk, keep the cover closed. 6 Ink filter cover This cover protects the user from the internal components of the unit. There is an ink filter inside the cover. The cover is opened when changing the ink filter. This is normally closed. 7 Media feed slot This is the media feed slot for placing the media during the media setting procedure. 8 Damper Adjusts the tension of the media between the scroller and the media feed slot. 2-5 2 Product Overview No. PJ-1614NXE PJ-2216NXE Maintenance Manual Name Function 10 Feed unit This is the device which sets the media when using roll media, and feeds it to the printing position. 11 Tension Sensor Detects the tension of the roll media 2.3.4 Operation panel The operation panel is used to set operational conditions, display the status of the printer, and set other functions. The names and functions of the operation keys and status lamps are explained below. TIP • Operation Manual 2 3 4 F2 F1 10 5 6 F3 F4 12 8 ERROR 13 14 7 DATA RECEIVE PROCESS MENU 11 POWER MEDIA SET 9 CANCEL ENTER 1 (1) Operation keys NOTE • Some keys have multiple functions and names depending on the printer status (normal or setup menu display). "2.4 Printer status" 2-6 PJ-1614NXE PJ-2216NXE Maintenance Manual No. Name 2 Product Overview Normal setup menu display 1 [POWER] key Turns the printer on and off. Turns the printer on and off. 2 [F1] key Executes the function assigned to F1. Executes the function assigned to F1. 3 [F2] key Executes the function assigned to F2. Executes the function assigned to F2. 4 [F3] key Executes the function assigned to F3. Executes the function assigned to F3. 5 [F4] key Executes the function assigned to F4. Executes the function assigned to F4. 6 7 [MENU ] key Changes the LCD monitor display to setup menu status. Changes the menu in reverse order. [MENU ] key Changes the LCD monitor display to setup menu status. Changes the menu in forward order. 8 [ENTER] key - Determines the new parameter value and changes the LCD monitor display to the next menu. Sets the parameter value and changes the LCD monitor display to the next menu. 9 [CANCEL] key - Cancels the new parameter value and changes the LCD monitor display to the next menu. Clears the parameter value and changes the LCD monitor display to the next menu. (2) LCD monitor and status lamps No. Name Color Status Function 10 LCD monitor - - 11 POWER lamp Red On The printer is on. Off The printer is off. 12 13 ERROR lamp DATA lamp Red Green This monitor displays the operation status and error messages of the printer. Flashing An error has occurred. The contents will be displayed on the LCD monitor. Off Either there is no error in the printer or the power is off. On The printer is receiving print data. Flashing The printer is analyzing received data. 14 MEDIA SET lamp Green Off The printer is waiting to receive print data. On • The pressurizing roller is in the release position. • Media is not set. Off • The pressurizing roller is in the secured position. • The media is set. 2-7 2 Product Overview PJ-1614NXE PJ-2216NXE Maintenance Manual 2.4 Printer status The status of the printer is explained below. 2.4.1 Normal Indicates that the printer can draw print data when media is loaded. You can also make settings concerning printing using the operation panel. TIP Operation Manual 2.4.2 Setup menu display Indicates that you can make settings concerning printing using the operation panel. Operations for plotting can be conducted with the operation panel. TIP Operation Manual 2.4.3 Self-diagnosis Function Display Indicates that you can make settings concerning adjusting the printer using the operation panel. Keys of the operation panel have the same names and the functions as the display status of the setup menu. TIP "5 Self-Diagnosis Function" 2.4.4 Maintenance Mode Display Indicate that you can make settings concerning the life of the printer. Keys of the operation panel have the same names and the functions as the display status of the setup menu. 2-8 PJ-1614NXE PJ-2216NXE Maintenance Manual 2 Product Overview TIP "6 Maintenance Manual" 2.4.5 Selecting Language This chapter explains how to select the language on the display. Follow the steps below to select the display language. TIP Japanese or English is selectable for the display language of the printer. 1. Press the [Power] key while pressing the [Cancel] key on the operation panel. F1 F2 F3 F4 ERROR DATA RECEIVE PROCESS MENU POWER MEDIA SET CANCEL 2. Press [F1] key or [F2] key on the operation panel to change and save the parameter. ENTER F1 F2 F3 F4 ERROR DATA RECEIVE PROCESS MENU POWER MEDIA SET CANCEL 2-9 ENTER 2 Product Overview PJ-1614NXE PJ-2216NXE Maintenance Manual 2-10 3 SPECIFICATIONS 3.1 3.2 Introduction . . . . . . . . . . . . . . . . . . . . . . . . . . . . . . . . 3-1 Product Specifications . . . . . . . . . . . . . . . . . . . . . . . 3-1 3.2.1 3.2.2 3.3 Interface Specifications . . . . . . . . . . . . . . . . . . . . . . 3-4 3.3.1 3.3.2 3.4 3.6 Centronics Bidirection Parallel Interface:IEEE1284) Specifications . . . . . . . . . . . . . . . . . . . . . . . . . . . . . . . 3-4 Network Interface (Optional) Specifications. . . . . . . . . 3-5 Options/Supply list . . . . . . . . . . . . . . . . . . . . . . . . . 3-6 3.4.1 3.4.2 3.5 PJ-1614NXE Unit specifications . . . . . . . . . . . . . . . . . 3-1 PJ-2216NXE Unit specifications . . . . . . . . . . . . . . . . . 3-2 Options . . . . . . . . . . . . . . . . . . . . . . . . . . . . . . . . . . . . 3-6 Supply . . . . . . . . . . . . . . . . . . . . . . . . . . . . . . . . . . . . . 3-6 Conditions of the installation environment . . . . . . 3-8 Tube and Cable connection before powering ON. . . . . . 3-10 <Memo> PJ-1614NXE PJ-2216NXE Maintenance Manual 3 Specifications 3 Specifications 3.1 Introduction This section explains the specifications, optional parts and supplies, installation procedures for optional parts, and user support for this printer. 3.2 Product Specifications 3.2.1 PJ-1614NXE Unit specifications Item Specifications Model name PJ-1614NXE Printing method Piezo inkjet Drive method Firmware servo/DC motor drive Media feed method Multi-point pressure grid roller method Media fixing method Pressurizing roller auto-down method Media supply and discharge Back feeding/front paper discharge Roll paper specifications External: 150mm(5.9in.) or less, weight 50kg(110Lbs.) or less. Max. media width 1626mm(64.0in.) Max. print width 1600mm(63.0in.) printing margins Front: 100mm, Back: 0-50mm, Left: 12.7mm, Right: 12.7mm Media cut method Manual cut Head height adjustment Three levels: Low/Normal/High CPU 64Bit RISC CPU, Memory 64MB Commands MH-RTL (RTL-PASS) Interface • Standard: bi-directional centronic method (IEEE1284 compliant; compatible, nibble, ECP mode) • Optional: Network Interface Ink Head life expectancy Supply method Pump supply method from individual color tanks to a sub-tank. Supply from the tank to print head through ink weight using vacuum control. Ink Color Maximum 4 colors (black, cyan, magenta, yellow) Tank Capacity 2000ml(0.52Gal.) for each color 10 billion dots or more per nozzle(in case of the sequence discharging under the condition of the temperature 25°C(77F) with no dust) 3-1 3 Specifications PJ-1614NXE PJ-2216NXE Maintenance Manual Item Environmental conditions Power source Fuze (F01, F02) Power consumption Outer diameter dimensions Specifications Operation environment Temperature: 18°C(64.4F) to 32°C(89.6F), Humidity 30%-70%, without condensation Storage environment Temperature: -10°C(14F) to 60°C(140F), Humidity 30%-70%, without condensation (with ink empty) Voltage AC100V-120V+/-10% / AC220V-240V +/-10% Automatic Switching Frequency 50Hz / 60Hz±1Hz Fuze pipe dimension φ10.31×38.1mm Voltage 250V Current 20A When Printing 1100VA or less (when the heater is on) When in standby 200VA or less Height 1227mm(48.3in.) Width 3018mm(118.8in.) Depth 720mm(28.3in.) Mass 228kg(50.3Lbs.) 3.2.2 PJ-2216NXE Unit specifications Item Specifications Model name PJ-2216NXE Printing method Piezo inkjet Drive method Firmware servo/DC motor drive Media feed method Multi-point pressure grid roller method Media fixing method Pressurizing roller auto-down method Media supply and discharge Back feeding/front paper discharge Feed unit Automatic/Manual Roll paper specifications External: 250mm(10.0in.) or less, weight 100kg(220Lbs.) or less. Max. media width 2210mm(87.0in.) Max. print width 2159mm(85.0in.) printing margins Front: 100mm, Back: 0-50mm, Left: 25.4mm, Right: 25.4mm Media cut method Manual cut Head height adjustment Three levels: Low/Normal/High CPU 64Bit RISC CPU, Memory 128MB Commands MH-RTL (RTL-PASS) Interface • Standard: bi-directional centronic method (IEEE1284 compliant; compatible, nibble, ECP mode) • Optional: Network Interface 3-2 PJ-1614NXE PJ-2216NXE Maintenance Manual 3 Specifications Item Ink Supply method Pump supply method from individual color tanks to a sub-tank. Supply from the tank to print head through ink weight using vacuum control Ink Color Maximum 6 colors (black, cyan, magenta, yellow, light cyan, light magenta) Tank Capacity 2000ml(0.52Gal.) for each color Head life Environmental conditions Power source Fuze (F01, F02) Power consumption Outer diameter dimensions mass Specifications 10 billion dots or more per nozzle(in case of the sequence discharging under the condition of the temperature 25°C(77F) with no dust) Operation environment Temperature: 18°C(64.4F) to 32°C(89.6F), Humidity 30%-70%, without condensation Storage environment Temperature: -10°C(14F) to 60°C(140F), Humidity 20%-80%, with no condensation (with ink empty) Voltage AC100V-120V+/-10% / AC220V-240V +/-10% Automatic Switching Frequency 50Hz/60Hz +/-1Hz Automatic switching Fuze pipe dimension φ10.31×38.1mm Voltage 250V Current 20A When Printing 1400VA or less (when the heater is on) When in standby 200VA or less Height 1227mm(48.3in.) Width 3586mm(141.2in.) Depth 720mm(28.3in.) 294kg(648Lbs.) 3-3 3 Specifications PJ-1614NXE PJ-2216NXE Maintenance Manual 3.3 Interface Specifications This section explains the specifications for the interfaces supported by this product. 3.3.1 Centronics Bidirection Parallel Interface:IEEE1284) Specifications (1) Interface Specifications Item Specifications Transmission modes Compatible , Nibble , ECP Mode Data length 8 bits Transmission direction Unidirectional (receiving only), Bidirectional Connector pin number (2) Table of parallel interface pin numbers and signals Pin number Connection signal Pin number Signal direction Connection signal 1 STROBE To printer← 19 SG 2 DATA1 To and from printer←→ 20 SG 3 DATA2 To and from printer←→ 21 SG 4 DATA3 To and from printer←→ 22 SG 5 DATA4 To and from printer←→ 23 SG 6 DATA5 To and from printer←→ 24 SG 7 DATA6 To and from printer←→ 25 SG 8 DATA7 To and from printer←→ 26 SG 9 DATA8 To and from printer←→ 27 SG 10 ACK From printer→ 28 SG 11 BUSY From printer→ 29 SG 3-4 Signal direction PJ-1614NXE PJ-2216NXE Maintenance Manual Pin number Connection signal 3 Specifications Pin number Signal direction Connection signal Signal direction 12 P ERROR From printer→ 30 SG 13 SELECTED From printer→ 31 INIT To printer← 14 AUTOFD To printer← 32 FAULT From printer→ 15 Not connected 33 Not connected 16 SG 34 Not connected 17 FG 35 Not connected 18 +5V 36 SELECTIN To printer← (3) Recommended centronics cable specifications Item Specifications Interface Dual-direction Parallel Interface:IEEE1284 Structure AWG28×18 (twisted pair wiring) Shield construction Metallic tape+weaving(double shielded cable) Characteristic impedance 62Ω 3.3.2 Network Interface (Optional) Specifications Item NetWork Type NetWork I/F Specifications Ethernet IEEE802.3 10 Base-T,100 Base-TX(automatic switching) (RJ-45 connector,twisted pair cable,category 5) Protocol TCP/IP NetWare(V3.1) EtherTalk Mode • ftp • lpr • socket • remote printer mode • print server • printer name • zone name Functions • Automatic protocol recognition • Transmission speed up to 330 KB/s (differs according to networking environment) • IP address and other settings are enabled by the accessory utility software (Printset) and general browser software 3-5 3 Specifications 3.4 PJ-1614NXE PJ-2216NXE Maintenance Manual Options/Supply list 3.4.1 Options (1) Interface cable Name Centronics cable (3.6m/11.8ft) Model PCT36 Sales units 1 box (includes one set) (2) Network interface Name Network interface board Model RJ-ETH13TXEN Sales units 1 box (includes one set) (3) Hard Disk Name Hard disk (20GB) Model RJ2-HDD-ASSY Sales units 1 box (includes one set) (4) Scroller Name Model Sales units Scroller 64inches (for PJ-1614NXE) PJ2-SR64 1 box (includes one set) Scroller 87inches (for PJ-2216NXE) PJ2-SR87 1 box (includes one set) 3.4.2 Supply (1) Supply Ink Name Model Sales units Supply ink K (Black) PJ2-SOINK-BK 1 bottle (3.2L/ 1.0Gal.) Supply ink C (Cyan) PJ2-SOINK-CY 1 bottle (3.2L/ 1.0Gal.) Supply ink M (Magenta) PJ2-SOINK-MA 1 bottle (3.2L/ 1.0Gal.) Supply ink Y (Yellow) PJ2-SOINK-YE 1 bottle (3.2L/ 1.0Gal.) 3-6 PJ-1614NXE PJ-2216NXE Maintenance Manual 3 Specifications Name Model Sales units Supply ink Lc (Light Cyan) PJ2-SOINK-LC 1 bottle (3.2L/ 1.0Gal.) Supply ink Lm (Light Magenta) PJ2-SOINK-LM 1 bottle (3.2L/ 1.0Gal.) Jet wash fluid PJ2-SOJW*5 1 bottle (5L/1.5Gal.) (2) Roll media NOTE For more information about the recommended media, contact MUTOH local leader. (3) Other supply items Name Model Sales units Ink filter PJ2-FILTER*2 1 box (2 filters per box) Polynit wiper PJ-POLYNITW 1box (300 sheets per box) 3-7 3 Specifications PJ-1614NXE PJ-2216NXE Maintenance Manual 3.5 Conditions of the installation environment WARNING • Do not install the printer at any of the following places. Doing so may cause the printer fall and injure people • Slanted place • Where vibration of other machines is transmitted. • Do not sit on the printer or put heavy things on the printer. Doing so may cause the printer fall and injure people. • Do not cover the printer with something like a blanket or a table cloth. That may cover the ventilation hole, confine the heat inside of the printer and cause fire. • Do not install the printer in a damp or dusty place. Doing so may cause electric shock or fire. (1) Conditions of the installation environment Select the place to install the printer in accordance with "3-1 Conditions of the installation environment". Table 3-1 Conditions of the installation environment Installation area 5m 2or more, 2.6m or more is required for the width Floor strength of the installation place 2490Pa (300kgf/m 2) or more Power Voltage specifications Frequency Capacity AC 100V to 120V±10% 50/60Hz±1Hz 10A or more temperature Conditions of the environment humidity Operational environment 10°C to 35°C 20% to 80%, No condensation is allowed. Guarantee range of the printing accuracy 15°C to 28°C 40% to 60%, No condensation is allowed. Change rate 2°C or less per hour 5% or less per hour 3-8 PJ-1614NXE PJ-2216NXE Maintenance Manual 3 Specifications NOTE • Avoid the following places with regard to the temperature or humidity; otherwise the printing result may be adversely affected: • Places where the temperature of humidity may rapidly change even though it is within the correct range. • Places where there is direct sunlight or strong light. • Places where there is direct air from the air conditioner. • It is recommended that the printer be installed in an environment where the air conditioning is adjustable for temperature and humidity. (2) Installation space Install on a horizontal place that satisfies the following conditions. • The floor has the sufficient strength to sustain the weight of the printer and the stand. NOTE Refer to "3.2Product Specifications" for the weight of the printer and the stand. 1250 a c b 3-9 d 3 Specifications PJ-1614NXE PJ-2216NXE Maintenance Manual 3.6 Tube and Cable connection before powering ON. WARNING • The unit is shipped with the tube between the print head and sub-tank, and thermostat signal cable removed. Make sure to connect the tube and cable before t•urning ON the power • For protection of the print head, this product is shipped with the tube between the head and sub tank removed. Before turning the power ON, perform the instructions mentioned below to install the tube. Step 1 : Remove the following covers : Ø Ø Ø Ø Ø Ø Cover upper left Cover upper right Y rail cover Front cover Carriage cover-1 Carriage cover –2 Step 2 : Remove the following cables : Ø Ø Head heater cable assy Head cable assy Step 3 : Remove the screws that is holding the head circuit board assy to remove the board. 1 = Head heater cable assy 2 = Head cable assy 3 = HEAD circuit board assy Step 4 : Remove the sub tank protection tube that is connected to he sub tank. 1 = Sub tank protection tube 3-10 PJ-1614NXE PJ-2216NXE Maintenance Manual 3 Specifications Step 5 : Remove the pin that is plugging the tube coming from the head. Note that when removing the pin be careful, because jetwash can spurt out. Make sure not to spill jetwash onto the HEAD circuit board. Step 6 : Attach the tube to the connector of the sub tank. Make sure there are no bends in the tube. 1 = tube Step 7 : Install the head circuit board assy and plug in the cables. 1 = HEAD circuit board assy Step 8 : Repeat step 2 to step 7 for the other print heads. Step 9 : Reinstall the covers. NOTE Perform the adjustment of the print heads. 3-11 3 Specifications PJ-1614NXE PJ-2216NXE Maintenance Manual 3-10 4 PART REPLACEMENT 4.1 4.2 Introduction . . . . . . . . . . . . . . . . . . . . . . . . . . . . . . . . 4-1 Removal of Covers . . . . . . . . . . . . . . . . . . . . . . . . . . 4-1 4.2.1 4.2.2 4.2.3 4.2.4 4.2.5 4.2.6 4.2.7 4.2.8 4.2.9 4.3 Replacement of Board Assemblies . . . . . . . . . . . . 4-13 4.3.1 4.3.2 4.3.3 4.4 4.4.3 4.4.4 4.4.5 4.4.6 Replacing PF Motor Assembly . . . . . . . . . . . . . . . . . Replacing PF_ENC Assembly and PF Scale Assembly . . . . . . . . . . . . . . . . . . . . . . . . . . . . . . . . . . Replacing P_REAR_R sensor assembly. . . . . . . . . . Replacing Lever Motor Assembly . . . . . . . . . . . . . . . Replacing Heater and Thermister Assembly . . . . . . . Replacing Transmission Type Photo Sensor. . . . . . . 4-22 4-23 4-24 4-25 4-28 4-30 Replacement of Y-axis Driving System Components . . . . . . . . . . . . . . . . . . . . . . . . . . . . . . 4-32 4.5.1 4.5.2 4.5.3 4.5.4 4.5.5 4.5.6 4.5.7 4.5.8 4.6 Replacing SUB Board Assembly . . . . . . . . . . . . . . . . 4-13 Replacing MAIN Board Assembly, DIMM, MOTHER Board Assembly, HDD_MOTHER Board Assembly . 4-14 Replacing POWER A Board Assembly, POWER B Board Assembly, DC Power Supply Assemblies . . . . 4-17 Replacement of PF Driving Section Components 4-22 4.4.1 4.4.2 4.5 Removing Side Cover R . . . . . . . . . . . . . . . . . . . . . . . 4-2 Removing Side Cover L. . . . . . . . . . . . . . . . . . . . . . . . 4-3 Removing Front Cover. . . . . . . . . . . . . . . . . . . . . . . . . 4-4 Replacing Panel Board Assembly . . . . . . . . . . . . . . . . 4-6 Removing Y-axis rail cover . . . . . . . . . . . . . . . . . . . . . 4-7 Removing Paper Guide F . . . . . . . . . . . . . . . . . . . . . . 4-8 Removing Paper Guide R . . . . . . . . . . . . . . . . . . . . . 4-10 Removing Head Cover . . . . . . . . . . . . . . . . . . . . . . . 4-11 Removing Pump Cover . . . . . . . . . . . . . . . . . . . . . . . 4-12 Replacing Steel Belt . . . . . . . . . . . . . . . . . . . . . . . . . Replacing CR Motor Assembly . . . . . . . . . . . . . . . . . Replacing SLID Motor Assembly . . . . . . . . . . . . . . . . Replacing HD_SLIDE Sensor Assembly . . . . . . . . . . Replacing T Fence . . . . . . . . . . . . . . . . . . . . . . . . . . Replacing CR Driven Pulley . . . . . . . . . . . . . . . . . . . Replacing Steel Bearer, Tube Guide, CR Tape Wire, and Intake Tube. . . . . . . . . . . . . . . . . . . . . . . . . . . . . Replacing Cover R Sensor Assembly and Cover L Sensor Assembly. . . . . . . . . . . . . . . . . . . . . . . . . . . . 4-32 4-33 4-35 4-36 4-36 4-38 4-39 4-42 Replacement of Head Components. . . . . . . . . . . . 4-44 4.6.1 4.6.2 Replacing HEAD Board Assembly. . . . . . . . . . . . . . . 4-44 Replacing Head Assembly. . . . . . . . . . . . . . . . . . . . . 4-44 4.6.3 4.6.4 4.7 Replacement of Cursor Section Components . . . 4-48 4.7.1 4.7.2 4.7.3 4.7.4 4.7.5 4.7.6 4.8 Replacing Sub Tank Assembly . . . . . . . . . . . . . . . . . Replacing CR_BASE Board Assembly and CR_HEAD Board Assembly . . . . . . . . . . . . . . . . . . . Replacing CR_ENC Assembly . . . . . . . . . . . . . . . . . Replacing Three-way Valve. . . . . . . . . . . . . . . . . . . . Replacing CR Cursor Assembly . . . . . . . . . . . . . . . . Replacing Cursor Roller . . . . . . . . . . . . . . . . . . . . . . 4-48 4-51 4-54 4-56 4-57 4-57 Replacement of Ink Supply Section Components 4-59 4.8.1 4.8.2 4.8.3 4.8.4 4.8.5 4.8.6 4.8.7 4.8.8 4.8.9 4.8.10 4.8.11 4.8.12 4.9 Replacing Cartridge Heater and Thermister . . . . . . . 4-46 Replacing P_EDGE Sensor Assembly . . . . . . . . . . . 4-47 Replacing Ink Pump . . . . . . . . . . . . . . . . . . . . . . . . . Replacing Air Pump. . . . . . . . . . . . . . . . . . . . . . . . . . Replacing Bimor Pump . . . . . . . . . . . . . . . . . . . . . . . Replacing Regulator . . . . . . . . . . . . . . . . . . . . . . . . . Replacing Air Chamber . . . . . . . . . . . . . . . . . . . . . . . Replacing Two-way Valve . . . . . . . . . . . . . . . . . . . . . Replacing PRESS_SENSE Board Assembly . . . . . . Replacing TERM_PUMP Board Assembly . . . . . . . . Replacing Safety Valve Assembly . . . . . . . . . . . . . . . Replacing Ink Filter . . . . . . . . . . . . . . . . . . . . . . . . . . Replacing Throttle Valve . . . . . . . . . . . . . . . . . . . . . . Replacing Nipple . . . . . . . . . . . . . . . . . . . . . . . . . . . . 4-59 4-60 4-61 4-62 4-62 4-63 4-63 4-64 4-65 4-66 4-66 4-67 Replacement of Leg Section Components. . . . . . 4-69 4.9.1 4.9.2 4.9.3 Replacing TERM_TANK Board Assembly. . . . . . . . . 4-69 Replacing Main Bottle, Bottle Cap, Ink Cap, and Ink Level Switch . . . . . . . . . . . . . . . . . . . . . . . . . 4-70 Replacing Waste Fluid Bottle, Bottle Cap, Waste Ink Cap Assembly, and Waste Fluid Level Switch . . 4-71 4.10 Replacement of Wind Roller Section Components . . . . . . . . . . . . . . . . . . . . . . . . . . . . . . 4-73 4.10.1 Replacing TERM_ROLL Board Assembly . . . . . . . . . 4-73 4.10.2 Replacing Winding Unit Components . . . . . . . . . . . . 4-75 4.11 Replacement of Feed Out Section Components . 4-80 PJ-1614NXE PJ-2216NXE Maintenance Manual 4 Part Replacement 4 Part Replacement 4.1 Introduction This chapter provides information on removal and replacement of service parts. WARNING Before starting part replacement, always perform the following operations. • Turn OFF the machine power. • Disconnect the power plug from the outlet. Otherwise, you may suffer electric shock or the system circuit may be damaged. • Disconnect any cables connected to the machine. Otherwise, the machine may malfunction. CAUTION The components in the machine can be disassembled only if so instructed in this manual. The frame components and other components that are not mentioned as serviceable in the manual shall not be disassembled. The machine has been assembled in our factory with extremely high precision up to 1/100mm. If disassembled inappropriately, it may not restore its normal functionality. NOTE After replacing any parts, perform necessary lubrication and bonding following the instructions in section "8.4 Lubrication/Bonding". 4.2 Removal of Covers Before replacing any parts in the machine, you must remove some external covers. This section describes the procedure to remove the covers. Table 4-1 Cover Component List No. Part name 1 Side cover R 2 Side cover L 3 Front cover 4-1 4 Part Replacement PJ-1614NXE PJ-2216NXE Maintenance Manual Table 4-1 Cover Component List (Continued) No. Part name 4 Panel cover 5 Y-axis rail cover 6 Paper guide F 7 Paper guide R 8 Head cover 9 Pump cover 4.2.1 Removing Side Cover R 1. Remove the three front screws from the side cover R lower. 1 No. 1 Part name Front screw in side cover R lower (M4×8) 2. Remove the three right screws from the side cover R lower. 1 No. 1 Part name Right screws in side cover R lower (M4×8) 3. Remove the three rear screws from the side cover R lower. 4-2 PJ-1614NXE PJ-2216NXE Maintenance Manual 4 Part Replacement 1 No. 1 Part name Rear screws in side cover R lower (M4×8) 4. Remove the side cover R upper. 5. Replace necessary parts inside the machine. 6. To install the removed components, reverse the removal procedure. 4.2.2 Removing Side Cover L 1. Remove the three front screws from the side cover L lower. 1 No. 1 Part name Front screw in side cover L lower (M4×8) 2. Remove the three left screws from the side cover L lower. 4-3 4 Part Replacement PJ-1614NXE PJ-2216NXE Maintenance Manual 1 No. 1 Part name Left screws in side cover L lower (M4×8) 3. Remove the three lower screws from the side cover L lower. 1 No. 1 Part name Lower screws in side cover L lower (M4×8) 4. Remove the side cover L upper. 5. Replace necessary parts inside the machine. 6. To install the removed components, reverse the removal procedure. 4.2.3 Removing Front Cover 1. Open the front cover. 2. Remove the left and right screws (four) of the cover shaft and the E ring. 4-4 PJ-1614NXE PJ-2216NXE Maintenance Manual 4 Part Replacement 2 1 1 No. Part name 1 Left/right screw of cover shaft (M3×8) 2 E ring 3. Pull out the cover shaft L. 1 No. 1 Part name Cover shaft L 4. Slide and remove the front cover. 5. Replace necessary parts inside the machine. 6. To install the removed components, reverse the removal procedure. 4-5 4 Part Replacement PJ-1614NXE PJ-2216NXE Maintenance Manual 4.2.4 Replacing Panel Board Assembly 1. Remove the side cover R upper. 2. Detach the panel tape wires from the main board. 3. Remove the two panel bracket-retaining screws. 1 No. Part name 1 Panel bracket-retaining screw (M3×8) 4. Remove the panel bracket. 5. Remove the six screws retaining the panel board assembly to the panel cover. 1 1 No. 1 Part name Screw retaining panel board assembly to panel cover (M3×8) 6. Remove the panel cover. 7. Remove the four screws retaining the panel board assembly to the panel bracket. 4-6 PJ-1614NXE PJ-2216NXE Maintenance Manual 4 Part Replacement 1 1 No. 1 Part name Screw retaining panel board assembly to panel bracke (M3×8) 8. Remove the panel board assembly. 4.2.5 Removing Y-axis rail cover 1. Remove the side cover R. 2. Remove the side cover L. 3. Remove the front cover. 4. Remove the six front screws from the Y-axis rail cover. 1 1 No. 1 Part name Front screw of Y-axis rail cover (M4×8) 5. Remove the five rear screws from the Y-axis rail cover. NOTE If your machine is an 87-inch model, the Y-axis rail cover has seven rear screws. 4-7 4 Part Replacement PJ-1614NXE PJ-2216NXE Maintenance Manual 1 No. 1 Part name Rear screw of Y-axis rail cover (M3×8) 6. Remove the Y-axis rail cover. 7. Replace necessary parts inside the machine. 8. To install the removed components, reverse the removal procedure. 4.2.6 Removing Paper Guide F 1. Remove the side cover L. 2. Remove the side cover R. 3. Remove the front cover. 4. Remove the Y-axis rail cover. 5. Remove the 12 screws from the paper guide F. NOTE If your machine is an 87-inch model, the paper guide F has 16 screws. 1 2 4-8 PJ-1614NXE PJ-2216NXE Maintenance Manual No. 4 Part Replacement Part name 1 Screw for paper guide F (M3×6) 2 Screw for paper guide F (M3×8) 6. Remove the paper guide F. 7. Replace necessary parts inside the machine. 8. To install the removed components, reverse the removal procedure. 4-9 4 Part Replacement PJ-1614NXE PJ-2216NXE Maintenance Manual 4.2.7 Removing Paper Guide R 1. Remove the side cover L 2. Remove the side cover R. 3. Remove the front cover. 4. Remove the Y-axis rail cover. 5. Remove the two screws retaining the right end of the cushion roller. 6. Detach the right end of the cushion roller shaft. 7. Remove the cushion roller. 1 3 2 No. Part name 1 Cushion roller 2 Retaining screw 3 Cushion roller shaft 8. Remove the five upper screws from the paper guide R. • If your machine is an 87-inch model, the paper guide R has six upper screws. 1 1 No. 1 Part name Paper guide R screw (M4×8) 4-10 PJ-1614NXE PJ-2216NXE Maintenance Manual 4 Part Replacement 9. Remove the five rear screws from the paper guide R. • If your machine is an 87-inch model, the paper guide R has six rear screws. 10. Remove the paper guide R. 4.2.8 Removing Head Cover 1. Remove the side cover R. 2. Remove the side cover L. 3. Remove the front cover. 4. Remove the Y-axis rail cover. 5. Move the head leftward. 6. Remove the two carriage cover 2-retaining screws. 1 No. 1 Part name Carriage cover 2-retaining screw (M3×6) 7. Remove the carriage cover 2. 8. Remove the two carriage cover 1-retaining screws. 1 No. 1 Part name Carriage cover 1-retaining screw (M3×6) 4-11 4 Part Replacement PJ-1614NXE PJ-2216NXE Maintenance Manual 9. Remove the carriage cover 1. 10. Replace necessary parts inside the machine. 11. To install the removed components, reverse the removal procedure. 4.2.9 Removing Pump Cover 1. Remove the three lower screws from the pump cover. 2 1 No. Part name 1 Pump cover lower screw (M3×6) 2 Pump cover 2. Remove the four front screws from the pump cover. 1 1 2 No. Part name 1 Pump cover front screw (M3×6) 2 Pump cover 3. Remove the pump cover. 4. Replace necessary parts inside the machine. 5. To install the removed components, reverse the removal procedure. 4-12 PJ-1614NXE PJ-2216NXE Maintenance Manual 4 Part Replacement 4.3 Replacement of Board Assemblies This section describes the procedures to replace the SUB board assembly, MAIN board assembly, POWER A board assembly and POWER B board assembly. CAUTION Do not touch any devices on the circuit boards with a bare hand. Doing so may cause electrostatic discharge and damage the devices. 4.3.1 Replacing SUB Board Assembly 1. Disconnect the connectors shown in the table below from the SUB board assembly. CAUTION • When connecting and disconnecting the FFC type cables to/from the SUB board assembly connectors, always pull or push the cables perpendicularly. Pulling or pushing them slantwise may damage/short/break the terminals in the connectors, resulting in breakdown of the on-board devices. Table 4-2 Connectors to SUB Board Assembly No. Connector No. # of pins Colo r Connect to Remark 1 J001 14 White POWER A board Lock type 2 J002 10 White POWER B board Lock type 3 J003 40 White MAIN board Lock type 4 J004 40 White MAIN board Lock type 5 J005 40 White MAIN board Lock type 6 J006 30 White CR_BASE board Lock type 7 J007 30 White CR_BASE board Lock type 8 J008 30 White CR_HEAD board Lock type 9 J009 30 White CR_HEAD board Lock type 10 J010 30 White CR_HEAD board Lock type 11 J011 30 White CR_HEAD board Lock type 12 J012 30 White CR_HEAD board Lock type 13 J013 30 White CR_HEAD board Lock type 16 J016 2 White 17 J017 2 White 4-13 4 Part Replacement PJ-1614NXE PJ-2216NXE Maintenance Manual Table 4-2 Connectors to SUB Board Assembly (Continued) No. Connector No. # of pins Colo r Connect to 18 J018 8 White 17 J019 16 White Blower fan 18 J020 12 White POWER B board 19 J021 30 White TERM_POMP board 20 J022 8 White Thermister 21 J023 9 White Thermister 22 J024 40 White TERM_TANK Remark Lock type Lock type 2. Remove the nine SUB board assembly-retaining screws. 3. Replace the SUB board assembly 1 No. 1 Part name SUB board assembly-retaining screw (M3×6) 4. To install the removed components, reverse the removal procedure. 4.3.2 Replacing MAIN Board Assembly, DIMM, MOTHER Board Assembly, HDD_MOTHER Board Assembly 1. Remove the SUB board assembly following the instructions in "4.3.1 Replacing SUB Board Assembly". 2. Replace DIMM. 3. Disconnect the connectors shown in the table below from the MAIN board assembly. 4-14 PJ-1614NXE PJ-2216NXE Maintenance Manual 4 Part Replacement CAUTION • When connecting and disconnecting the FFC type cables to/from the MAIN board assembly connectors, always pull or push the cables perpendicularly. Pulling or pushing them slantwise may damage/short/break the terminals in the connectors, resulting in breakdown of the on-board devices. Table 4-3 Connectors to MAIN Board Assembly No. Connector No. # of pins Colo r Connect to Remark 1 J101 12 White POWER A board Lock type 2 J102 6 White POWER A board Lock type 3 J103 10 White POWER A board 4 J104 9 White POWER B board 5 J105 50 White 6 J106 50 White 7 J107 168 White 8 J108 68 White 9 J109 28 White Operation panel 10 J110 3 Yello w 11 J112 64 White 12 J113 96 White MOTHER board 13 J114 36 White HDD_MOTHER board 14 J115 5 15 J116 4 White Sensor board(DE-49845) 16 J117 4 Blue Sensor board(DF-42624) 17 J118 4 Black GPIS74P 18 J119 5 Yello w 19 J120 4 Yello GPIS74P w 20 J121 4 Red 21 J122 5 Blue Foot switch 22 J123 40 White SUB board 23 J124 5 Black 24 J125 40 White SUB board Lock type 25 J126 40 White Lock type 26 J127 2 White X-axis motor Lock type 27 J128 3 White SS-5GL13-F Lock type Red GPIS74P 4-15 Lock type 4 Part Replacement PJ-1614NXE PJ-2216NXE Maintenance Manual Table 4-3 Connectors to MAIN Board Assembly (Continued) No. Connector No. # of pins Colo r Connect to 28 J129 3 Black 29 J130 3 Red 30 J131 3 White Y-axis motor 31 J132 5 White Encoder board 32 J133 4 White Encoder board 33 J134 6 White Slide motor Remark SS-5GLF Lock type Lock type 4. Remove the six screws retaining the SUB board stay A and the SUB board stay B. 2 3 1 No. Part name 1 Screw retaining SUB board stay A and SUB board stay B (M3×8) 2 SUB board stay A 3 SUB board stay B 5. Remove the SUB board stay A and SUB board stay B. 6. Remove the eight MAIN board assembly-retaining screws and the three spacers. 1 6 3 2 3 4 5 1 No. Part name 1 Screw retaining MAIN board assembly (M3×6) 2 Screw retaining MAIN board assembly (M3×8) 4-16 PJ-1614NXE PJ-2216NXE Maintenance Manual No. 4 Part Replacement Part name 3 Spacer 4 HDD_MOTHER board assembly 5 MOTHER board assembly 6 DIMM 7. Remove the MAIN board assembly, DIMM, MOTHER board assembly, and HDD_MOTHER board assembly. 8. To install the removed components, reverse the removal procedure. 4.3.3 Replacing POWER A Board Assembly, POWER B Board Assembly, DC Power Supply Assemblies CAUTION Before removing the POWER A board assembly, POWER B board assembly, or DC power supply assemblies, always disconnect the power cable and wait for 5 minutes or more to discharge residual electric charge in the capacitors. If you handle these boards before the capacitor charge is fully discharged, you may suffer electric shock. (1) Replacing POWER B board assembly NOTE Before replacing the POWER B board assembly, you must remove the DC power supply assemblies. To remove the DC power supply assemblies, refer to "(3) Replacing DC power supply assemblies". 1. Remove the MAIN board assembly following the instructions in "4.3.2 Replacing MAIN Board Assembly, DIMM, MOTHER Board Assembly, HDD_MOTHER Board Assembly". 2. Remove the six screws retaining the MAIN board base. 1 1 4-17 4 Part Replacement PJ-1614NXE PJ-2216NXE Maintenance Manual No. 1 Part name Screw retaining MAIN board base (M3×8) 3. Remove the MAIN board base. 4. Disconnect the following connectors from the POWER B board assembly. Table 4-4 Connectors to POWER B Board Assembly No. Connector No. # of pins. Colo r Connect to Remark 1 J1 2 White AC inlet Lock type 2 J2 3 White Noise filter Lock type 3 J3 9 White MAIN board 4 J4 12 White SUB board 5 J5 10 White SUB board Lock type 6 J6 5 White ZWS100PF-48/J Lock type 7 J7 8 White ZWS100PF-48/J Lock type 8 J8 5 White ZWS100PF-48/J Lock type 9 J9 8 White ZWS100PF-48/J Lock type 10 J10 5 White ZWS30-24/J Lock type 11 J11 4 White ZWS30-24/J Lock type 12 J12 2 White Cooling fan 13 J20 4 White Heater Lock type 14 J21 4 White Heater Lock type 15 J22 4 White Heater Lock type 16 J23 4 White Heater Lock type 17 J30 4 White Heater Lock type 18 J31 4 White Heater Lock type 19 J32 4 White Heater Lock type 20 J33 4 White Heater Lock type 5. Remove the eight POWER B board assembly-retaining screws. 1 1 4-18 PJ-1614NXE PJ-2216NXE Maintenance Manual No. 1 4 Part Replacement Part name POWER B board assembly-retaining screw (M3×6) 6. Replace the POWER B board assembly. 7. To install the removed components, reverse the removal procedure. (2) Replacing POWER A board assembly NOTE Before replacing the POWER A board assembly, you must remove the DC power supply assemblies. To remove the DC power supply assemblies, refer to "(3) Replacing DC power supply assemblies". 1. Remove the POWER B board assembly following the instructions in "(1) Replacing POWER B board assembly". 2. Disconnect the following connectors from the POWER A board assembly. Table 4-5 Connectors to POWER A Board Assembly No. Connector No. # of pins Colo r Connect to Remark 1 J1 2 White AC inlet Lock type 2 J2 4 White Noise filter Lock type 3 J3 3 White Noise filter Lock type 4 J4 10 White MAIN board 5 J5 12 White MAIN board Lock type 6 J6 6 White MAIN board Lock type 7 J7 14 White SUB board Lock type 8 J8 2 White Cooling fan 9 J9 5 White ZWS5-5J Lock type 10 J10 4 White ZWS5-5J Lock type 11 J11 5 White ZWS50-5J Lock type 12 J12 4 White ZWS50-5J Lock type 13 J13 5 White ZWS50-12/J Lock type 14 J14 4 White ZWS50-12/J Lock type 15 J15 5 White ZWS150PF-24/J Lock type 16 J16 7 White ZWS150PF-24/J Lock type 17 J17 6 White ZWS150PF-24/J Lock type 18 J18 5 White ZW75PF-48/J Lock type 19 J19 6 White ZW75PF-48/J Lock type 20 J20 4 White 4-19 4 Part Replacement PJ-1614NXE PJ-2216NXE Maintenance Manual 3. Remove the eight POWER A board assembly-retaining screws. 1 1 No. 1 Part name POWER A board assembly-retaining screw (M3×6) 4. Replace the POWER A board assembly. 5. To install the removed components, reverse the removal procedure. (3) Replacing DC power supply assemblies 1. Disconnect the connectors from the respective DC power supply assemblies. 2. Remove the screws retaining the respective DC power supply assemblies (32 screws). 1 1 5 2 8 3 1 7 4 6 1 No. 1 Part name 1 DC power supply assembly-retaining screw (M3×6) 2 Power supply (5V/5W) 3 Power supply (24V/30W) 4 Power supply (48V/100W) 5 Power supply (5V/50W) 6 Power supply (12V/50W) 7 Power supply (24V/150W) 8 Power supply (48V/75W) 4-20 PJ-1614NXE PJ-2216NXE Maintenance Manual 4 Part Replacement 3. Replace the respective DC power supply assemblies. 4. To install the removed components, reverse the removal procedure. 4-21 4 Part Replacement PJ-1614NXE PJ-2216NXE Maintenance Manual 4.4 Replacement of PF Driving Section Components 4.4.1 Replacing PF Motor Assembly NOTE Before replacing parts of the PF motor assembly, remove the following covers. Side cover R: "4.2.1 Removing Side Cover R" • Side cover L: • Front cover: "4.2.2 Removing Side Cover L" "4.2.3 Removing Front Cover" • Y-axis rail cover: "4.2.5 Removing Y-axis rail cover" 1. Remove the PF motor assembly connector from the PF motor cable assembly. 2. Remove the two screws retaining the X-axis motor bracket to the side of the side frame L. 1 2 No. Part name 1 Screws retaining X-axis motor bracket to side of the side frame L, screw retaining PF motor assembly to X-axis motor bracket (M3×6) 2 PF speed reduction belt 3. Remove the two screws retaining the PF motor assembly to the X-axis motor bracket. 4. Replace the PF motor assembly. NOTE • When installing the PF motor assembly, ensure that the PF speed reduction belt is evenly guided along the PF motor assembly pulley by moving the PF speed reduction pulley by hand. 5. To install the removed components, reverse the removal procedure. 6. Perform adjustment following the instructions in "3.2 Product Specifications". 4-22 PJ-1614NXE PJ-2216NXE Maintenance Manual 4 Part Replacement 4.4.2 Replacing PF_ENC Assembly and PF Scale Assembly NOTE Before replacing parts of the PF_ENC assembly, remove the following covers. • Side cover R: "4.2.1 Removing Side Cover R" • Side cover L: "4.2.2 Removing Side Cover L" • Front cover: "4.2.3 Removing Front Cover" • Y-axis rail cover: "4.2.5 Removing Y-axis rail cover" 1. Disconnect the PF_ENC assembly connector. 2. Remove the bearing. 3. Remove the four screws retaining the PF scale bracket. 3 1 2 2 No. Part name 1 Bearing 2 PF scale bracket-retaining screw (M3×6) 3 PF scale 4. Remove the PF scale bracket. 5. Remove the PF scale assembly. 6. Remove the screws retaining the PF_ENC assembly to the PF encoder bracket. 4-23 4 Part Replacement PJ-1614NXE PJ-2216NXE Maintenance Manual 3 2 1 No. Part name 1 PF_ENC assembly 2 Screw retaining PF_ENC assembly to PF encoder bracket. (M2×6) 3 PF encoder bracket 7. Replace the PF_ENC assembly. 8. To install the removed components, reverse the removal procedure. 4.4.3 Replacing P_REAR_R sensor assembly NOTE Before replacing the P_REAR_R sensor assembly, remove the following covers. • Side cover R: "4.2.1 Removing Side Cover R" • Side cover L: "4.2.2 Removing Side Cover L" • Front cover: "4.2.3 Removing Front Cover" • Y-axis rail cover: • Paper guide R: "4.2.5 Removing Y-axis rail cover" "4.2.7 Removing Paper Guide R" 1. Remove the P_REAR_R sensor assembly connector from the MAIN board assembly. 2. Remove the one screw retaining the paper sensor bracket. 1 2 4-24 PJ-1614NXE PJ-2216NXE Maintenance Manual No. 4 Part Replacement Part name 1 Paper sensor bracket 2 Paper sensor bracket-retaining screw (M3×8) 3. Remove the paper sensor bracket. 4. Remove the two screws retaining the P_REAR_R sensor assembly. 2 1 No. Part name 1 P_REAR_R sensor assembly 2 P_REAR_R sensor assembly -retaining screw (M2×5) 5. Replace the P_REAR_R sensor assembly. 6. To install the removed components, reverse the removal procedure. 4.4.4 Replacing Lever Motor Assembly NOTE Before replacing the lever motor, remove the following covers. • Side cover R: "4.2.1 Removing Side Cover R" • Side cover L: "4.2.2 Removing Side Cover L" • Front cover: "4.2.3 Removing Front Cover" • Y-axis rail cover: • Paper guide R: "4.2.5 Removing Y-axis rail cover" "4.2.7 Removing Paper Guide R" 1. Disconnect the lever motor assembly connector. 2. Remove the one screw retaining the sensor bracket. 4-25 4 Part Replacement PJ-1614NXE PJ-2216NXE Maintenance Manual 1 2 No. Part name 1 Sensor bracket 2 Sensor bracket-retaining screw (M3×8) 3. Remove the sensor bracket. 4. Remove the two screws retaining the R cover L. 3 4 2 1 No. Part name 1 R cover L 2 R cover L-retaining screw (M4×8) 3 Arm motor bracket 4 Hexagon screw 5. Remove the two hexagon screws retaining the arm motor bracket. 6. Remove the arm motor bracket. 7. Remove the E ring retaining the intermediate gear. 4-26 PJ-1614NXE PJ-2216NXE Maintenance Manual 4 Part Replacement 1 2 4 3 No. Part name 1 Intermediate gear 2 E ring 3 Driving gear 4 Retaining screw 8. Remove the intermediate gear. 9. Remove the one screw retaining the driving gear. 10. Remove the driving gear. 11. Remove the 4 screws retaining the lever motor. 1 2 2 3 No. Part name 1 Arm motor bracket 2 Lever motor-retaining screw (M4×8) 3 Lever motor 12. Replace the lever motor. 13. To install the removed components, reverse the removal procedure. 4-27 4 Part Replacement PJ-1614NXE PJ-2216NXE Maintenance Manual 4.4.5 Replacing Heater and Thermister Assembly NOTE Before replacing the heater and thermister assembly, remove the following covers. • Side cover R: "4.2.1 Removing Side Cover R" • Side cover L: "4.2.2 Removing Side Cover L" • Front cover: "4.2.3 Removing Front Cover" • Y-axis rail cover: "4.2.5 Removing Y-axis rail cover" (1) Replacing heater and thermister assembly (platen side) 1. Remove the following screws retaining the plmainaten. • Screw (M3×8): 1 • Platen-retaining screw: 7 3 2 1 3 No. Part name 1 Platen 2 Screw retaining platen (M3×8) 3 Platen-retaining screw 2. Disconnect the heater connector. 2 3 4 1 4-28 PJ-1614NXE PJ-2216NXE Maintenance Manual No. 4 Part Replacement Part name 1 Platen 2 Heater 3 Hexagon nut 4 Thermister assembly 3. Using a circuit tester, identify which heater is broken. 4. Replace the broken heater. 5. Disconnect the thermister assembly connector. 6. Remove the hexagon nut retaining the thermister assembly. 7. Replace the thermister assembly. 8. To install the removed components, reverse the removal procedure. (2) Replacing heater and thermister assembly (Paper guide F side) 1. Remove the paper guide F following the instructions in "4.2.6 Removing Paper Guide F". 1 2 3 4 No. Part name 1 Paper guide F 2 Heater 3 Hexagon nut 4 Thermister assembly 2. Disconnect the heater connector. 3. Using a circuit tester, identify which heater is broken. 4. Replace the broken heater. 5. Disconnect the thermister assembly connector. 6. Remove the hexagon nut retaining the thermister assembly. 7. Replace the thermister assembly. 4-29 4 Part Replacement PJ-1614NXE PJ-2216NXE Maintenance Manual 8. To install the removed components, reverse the removal procedure. 4.4.6 Replacing Transmission Type Photo Sensor NOTE Before replacing the transmission type photo sensor, remove the following covers. • Side cover R: "4.2.1 Removing Side Cover R" • Side cover L: "4.2.2 Removing Side Cover L" • Front cover: "4.2.3 Removing Front Cover" • Y-axis rail cover: "4.2.5 Removing Y-axis rail cover" (1) Replacing transmission type photo sensor (Lever motor side) 1. Remove the one screw retaining the sensor bracket. 1 2 No. Part name 1 Sensor bracket 2 Sensor bracket-retaining screw (M3×8) 2. Remove the sensor bracket. 3. Remove the transmission type photo sensor from the sensor bracket. 3 1 2 4-30 PJ-1614NXE PJ-2216NXE Maintenance Manual No. 4 Part Replacement Part name 1 Sensor bracket 2 Connector 3 Transmission type photo sensor 4. Disconnect the connector from the transmission type photo sensor. 5. Replace the transmission type photo sensor. 6. To install the removed components, reverse the removal procedure. (2) Replacing transmission type photo sensor (CR origin side) 1. Move the carriage leftward from the capping position. 2. Remove the transmission type photo sensor from the ORG sensor bracket. 2 3 1 No. Part name 1 ORG sensor bracket 2 Connector 3 Transmission type photo sensor 3. Disconnect the connector from the transmission type photo sensor. 4. Replace the transmission type photo sensor. 5. To install the removed components, reverse the removal procedure. 4-31 4 Part Replacement PJ-1614NXE PJ-2216NXE Maintenance Manual 4.5 Replacement of Y-axis Driving System Components 4.5.1 Replacing Steel Belt NOTE Before replacing the steel belt, remove the following covers. • Side cover R: "4.2.1 Removing Side Cover R" • Side cover L: "4.2.2 Removing Side Cover L" • Front cover: "4.2.3 Removing Front Cover" • Y-axis rail cover: "4.2.5 Removing Y-axis rail cover" 1. Loosen the two steel belt-adjusting screws. 2 No. 1 Part name 1 Steel belt-adjusting screw 2 Steel belt 2. Remove the two steel belt-retaining screws. 1 2 4-32 PJ-1614NXE PJ-2216NXE Maintenance Manual 4 Part Replacement No. Part name 1 Steel belt-retaining screw 2 Steel belt 3. Replace the steel belt. 4. To install the removed components, reverse the removal procedure. 5. Perform adjustment following the instructions in "3.2 Product Specifications". 4.5.2 Replacing CR Motor Assembly NOTE Before replacing parts of the CR motor assembly, remove the following covers. • Side cover R: "4.2.1 Removing Side Cover R" • Side cover L: "4.2.2 Removing Side Cover L" • Front cover: "4.2.3 Removing Front Cover" • Y-axis rail cover: "4.2.5 Removing Y-axis rail cover" 1. Disconnect the CR motor assembly connector from the MAIN board assembly. 2. Pull out the CR motor assembly wire harness. 3. Move the carriage leftward from the capping position. 4. Remove the steel belt following the instructions in "4.5.1 Replacing Steel Belt". 5. Remove the MAIN board assembly following the instructions in "4.3.2 Replacing MAIN Board Assembly, DIMM, MOTHER Board Assembly, HDD_MOTHER Board Assembly". 6. Remove the MAIN board assembly base. 7. Disconnect the connectors from the POWER B board assembly. 8. Remove the six screws retaining the power supply stay. 9. Remove the power supply stay. 2 1 2 4-33 4 Part Replacement PJ-1614NXE PJ-2216NXE Maintenance Manual No. Part name 1 Steel belt-retaining screw 2 Steel belt 10. Remove the four screws retaining the Y-axis motor bracket. 2 1 No. Part name 1 Screw retaining Y-axis motor bracket (M4×8) 2 Y-axis motor bracket 11. Remove the Y-axis motor bracket. 12. Remove the four screws retaining the CR motor assembly to the Y-axis motor bracket and the CR motor bracket. 1 2 3 No. Y-axis motor bracket 1 Y-axis motor bracket 2 CR motor bracket 3 Screw retaining CR motor assembly to Y-axis motor bracket and CR motor bracket (M4×8) 13. Replace the CR motor assembly. 4-34 PJ-1614NXE PJ-2216NXE Maintenance Manual 4 Part Replacement NOTE • When installing the CR motor assembly, ensure that the steel belt is evenly guided along the CR motor assembly pulley by moving the carriage left and right by hand. 14. To install the removed components, reverse the removal procedure. 4.5.3 Replacing SLID Motor Assembly NOTE Before replacing parts of the SLID motor assembly, remove the following covers. • Side cover R: "4.2.1 Removing Side Cover R" • Side cover L: • Front cover: "4.2.2 Removing Side Cover L" "4.2.3 Removing Front Cover" • Y-axis rail cover: "4.2.5 Removing Y-axis rail cover" 1. Disconnect the SLID motor assembly connector from the MAIN board. 2. Remove the two screws retaining the SLID motor assembly. 1 2 No. Part name 1 SLID motor assembly 2 Screw retaining SLID motor assembly (M3×6) 3. Replace the SLID motor assembly. 4. To install the removed components, reverse the removal procedure. 4-35 4 Part Replacement PJ-1614NXE PJ-2216NXE Maintenance Manual 4.5.4 Replacing HD_SLIDE Sensor Assembly NOTE Before replacing parts of the HD_SLIDE sensor assembly, remove the following covers. • Side cover R: "4.2.1 Removing Side Cover R" • Side cover L: "4.2.2 Removing Side Cover L" • Front cover: "4.2.3 Removing Front Cover" • Y-axis rail cover: "4.2.5 Removing Y-axis rail cover" 1. Disconnect the HD_SLID sensor assembly connector from the MAIN board assembly. 2. Remove the screw retaining the HD_SLID sensor assembly. 3. Replace the HD_SLID sensor assembly. 1 2 No. Part name 1 HD_SLID sensor assembly 2 Screw retaining HD_SLID sensor assembly (M2×8) 4. To install the removed components, reverse the removal procedure. 4.5.5 Replacing T Fence NOTE Before replacing the T fence, remove the following covers. • Side cover R: "4.2.1 Removing Side Cover R" • Side cover L: "4.2.2 Removing Side Cover L" • Front cover: "4.2.3 Removing Front Cover" • Y-axis rail cover: "4.2.5 Removing Y-axis rail cover" 1. Detach the T fence from the T fence spring hook located at the side frame L. 4-36 PJ-1614NXE PJ-2216NXE Maintenance Manual 4 Part Replacement 2 1 3 No. Part name 1 T fence spring 2 T fence spring hook 3 T fence 2. Remove the one screw from the T fence bracket. 3 2 1 No. Part name 1 T fence bracket 2 T fence 3 T fence bracket screw (M3×6) 3. Detach the T fence from the hook and pull it in the direction of the arrow in the figure. 4. Replace the T fence. NOTE • When installing the T fence, make sure to follow the instructions below. • Correctly attach the T fence to the hook on the T fence bracket referring to the figure for step 2. • Referring to the following figure, insert the T fence in the T fence push plate and CR_ENC assembly. 4-37 4 Part Replacement PJ-1614NXE PJ-2216NXE Maintenance Manual 3 1 2 2 No. Part name 1 T fence push plate 2 T fence 3 CR_ENC assembly 5. To install the removed components, reverse the removal procedure. 4.5.6 Replacing CR Driven Pulley NOTE Before replacing the CR driven pulley, remove the following covers. • Side cover R: "4.2.1 Removing Side Cover R" • Side cover L: • Front cover: "4.2.2 Removing Side Cover L" "4.2.3 Removing Front Cover" • Y-axis rail cover: "4.2.5 Removing Y-axis rail cover" 1. 4.5.1 Replacing Steel BeltRemove the steel belt following the instructions in "4.5.1 Replacing Steel Belt". 2. Replace the CR driven pulley. 2 1 4-38 PJ-1614NXE PJ-2216NXE Maintenance Manual No. 4 Part Replacement Part name 1 CR driven pulley 2 Steel belt 3. To install the removed components, reverse the removal procedure. NOTE • The driven pulley shaft fits only in one orientation. Ensure that it is oriented correctly referring to "10.6 Exploded View" • After installing the CR driven pulley, always ensure that the steel belt is evenly guided along the CR motor assembly pulley by moving the carriage left and right by hand. 4. Perform adjustment following the instructions in "3.2 Product Specifications". 4.5.7 Replacing Steel Bearer, Tube Guide, CR Tape Wire, and Intake Tube NOTE Before replacing the steel bearer and tube guide, remove the following covers. • Side cover R: "4.2.1 Removing Side Cover R" • Side cover L: • Front cover: "4.2.2 Removing Side Cover L" "4.2.3 Removing Front Cover" • Y-axis rail cover: "4.2.5 Removing Y-axis rail cover" 1. Remove the six screws retaining the wire holder. 2 1 No. Part name 1 Wire holder 2 Screw retaining wire holder (M3×8) 4-39 4 Part Replacement PJ-1614NXE PJ-2216NXE Maintenance Manual 2. Remove the CR tape wire from the CR-BASE board assembly and SUB board assembly. 3. Remove the two screws retaining the steel bearer. 2 1 3 2 4 No. Part name 1 Steel belt 2 Steel belt-retaining screw, tube holder 2-retaining screw (M3×8) 3 Cable holder 2 4 Tube holder 2 4. Remove the two screws retaining the cable holder 2. 5. Remove the one screw retaining the tube holder 2. 6. Remove the intake tube from the mini fitting. 1 2 2 1 No. Part name 1 Ink tube 2 Mini fitting 7. Remove all cable clamps and tie wraps. 4-40 PJ-1614NXE PJ-2216NXE Maintenance Manual 4 Part Replacement 1 2 No. Part name 1 Cable clamp 2 Tie wrap 8. Remove the two screws retaining the tube holder1. 2 3 1 2 No. Part name 1 Tube holder 1 2 Tube holder 1-retaining screw, cable holder1-retaining screw (M3×8) 3 Cable holder1 9. Remove the two screws retaining the cable holder1. 10. Replace the ink tube. 11. Replace the tube guide. 12. Replace the CR tape wire. 13. Replace the steel bearer. 14. To install the removed components, reverse the removal procedure. 4-41 4 Part Replacement PJ-1614NXE PJ-2216NXE Maintenance Manual 4.5.8 Replacing Cover R Sensor Assembly and Cover L Sensor Assembly NOTE Before replacing the cover R sensor assembly and cover L sensor assembly, remove the following covers. • Side cover R: "4.2.1 Removing Side Cover R" • Side cover L: "4.2.2 Removing Side Cover L" • Front cover: "4.2.3 Removing Front Cover" • Y-axis rail cover: "4.2.5 Removing Y-axis rail cover" (1) Replacing cover R sensor assembly 1. Disconnect the cover R sensor assembly connector from the MAIN board assembly. 2. Remove the two screws retaining the cover R sensor assembly. 3. Replace the cover R sensor assembly. 1 2 No. Part name 1 Cover R sensor assembly 2 Screw retaining cover R sensor assembly (M2×10) 4. To install the removed components, reverse the removal procedure. (2) Replacing cover L sensor assembly 1. Disconnect the cover L sensor assembly connector 4-42 PJ-1614NXE PJ-2216NXE Maintenance Manual 4 Part Replacement 3 2 1 No. Part name 1 Connector 2 Screw retaining cover L sensor assembly (M2×12) 3 Cover L sensor assembly 2. Remove the two screws retaining the cover L sensor assembly. 3. Replace the cover L sensor assembly. 4. To install the removed components, reverse the removal procedure. 4-43 4 Part Replacement PJ-1614NXE PJ-2216NXE Maintenance Manual 4.6 Replacement of Head Components 4.6.1 Replacing HEAD Board Assembly NOTE Before replacing the HEAD board assembly, remove the following covers. • Side cover R: "4.2.1 Removing Side Cover R" • Side cover L: "4.2.2 Removing Side Cover L" • Front cover: "4.2.3 Removing Front Cover" • Y-axis rail cover: "4.2.5 Removing Y-axis rail cover" 1. Disconnect the connectors from the HEAD board assembly. 2. Remove the two screws retaining the HEAD board assembly. 1 2 No. Part name 1 HEAD board assembly 2 HEAD board assembly-retaining screw (M3×6) 3. Replace the HEAD board assembly. 4. To install the removed components, reverse the removal procedure. 4.6.2 Replacing Head Assembly CAUTION While working, exercise extreme caution not to touch the head nozzles or contaminate them with foreign objects. 4-44 PJ-1614NXE PJ-2216NXE Maintenance Manual 4 Part Replacement NOTE Before replacing the head assembly, remove the following covers. • Side cover R: "4.2.1 Removing Side Cover R" • Side cover L: • Front cover: "4.2.2 Removing Side Cover L" "4.2.3 Removing Front Cover" • Y-axis rail cover: • Carriage cover: "4.2.5 Removing Y-axis rail cover" "4.2.8 Removing Head Cover" 1. Perform ink purge to discharge ink from all ink lines. TIP "5.5.10 Head Cleaning Menu" 2. Move the carriage leftward from the capping position. 3. Remove the HEAD board assembly following the instructions in "4.6.1 Replacing HEAD Board Assembly". 4. Remove the two tubes 1 3 2 No. Part name 1 Tube 2 Head assembly 3 Head assembly-retaining screw (M3×6) 5. Remove the three screws retaining the head assembly. 6. Remove the head assembly by pushing it rearward. 7. Replace the head assembly. 8. To install the removed components, reverse the removal procedure. 9. Perform adjustment following the instructions in "3.2 Product Specifications". 4-45 4 Part Replacement PJ-1614NXE PJ-2216NXE Maintenance Manual 4.6.3 Replacing Cartridge Heater and Thermister NOTE • Before replacing the cartridge heater and thermister, remove the following covers. • Side cover R: "4.2.1 Removing Side Cover R" • Side cover L: "4.2.2 Removing Side Cover L" • Front cover: "4.2.3 Removing Front Cover" • Y-axis rail cover: • Carriage cover: "4.2.5 Removing Y-axis rail cover" "4.2.8 Removing Head Cover" 1. Remove the head assembly following the instructions in "4.6.2 Replacing Head Assembly". 2. Cut the tie wrap that bundles the thermister cable to the cartridge heater. 3. Remove the cartridge heater and thermister from the head assembly. 2 1 3 No. Part name 1 Head assembly 2 Cartridge heater 3 Thermister 4. Replace the cartridge heater and thermister. 5. To install the removed components, reverse the removal procedure. 6. Perform adjustment following the instructions in "3.2 Product Specifications" 4-46 PJ-1614NXE PJ-2216NXE Maintenance Manual 4 Part Replacement 4.6.4 Replacing P_EDGE Sensor Assembly NOTE Before replacing the P_EDGE sensor assembly, remove the following covers. • Side cover R: "4.2.1 Removing Side Cover R" • Side cover L: "4.2.2 Removing Side Cover L" • Front cover: "4.2.3 Removing Front Cover" • Y-axis rail cover: • Carriage cover: "4.2.5 Removing Y-axis rail cover" "4.2.8 Removing Head Cover" 1. Disconnect the P_EDGE sensor assembly connector from the CR_BASE board assembly. 2. Remove the one screw retaining the P_EDGE sensor assembly. 1 2 No. Part name 1 P_EDGE sensor assembly 2 P_EDGE sensor assembly-retaining screw (M2×6) 3. Replace the P_EDGE sensor assembly. 4. To install the removed components, reverse the removal procedure. 4-47 4 Part Replacement PJ-1614NXE PJ-2216NXE Maintenance Manual 4.7 Replacement of Cursor Section Components Before replacing the cursor section components, always perform ink purge to discharge ink from all ink lines. TIP For the details on the ink purge operation, refer to "5.5.10 Head Cleaning Menu". 4.7.1 Replacing Sub Tank Assembly This section explains the procedures to replace the VALVE_SENSE board assembly, three-way Valve(hand), sub tank assembly, cartridge heater, and thermister. NOTE • Before replacing the sub tank assembly components, remove the following covers. • Side cover R: "4.2.1 Removing Side Cover R" • Side cover L: "4.2.2 Removing Side Cover L" • Front cover: "4.2.3 Removing Front Cover" • Y-axis rail cover: "4.2.5 Removing Y-axis rail cover" • Carriage cover: "4.2.8 Removing Head Cover" (1) Replacing three-way Valve(hand) and VALVE_SENSE board assembly 1. Disconnect the connectors from the VALVE_SENSE board assembly. 2. Disconnect the tubes from the three-way Valve(hand). 3. Remove the two screws retaining the Valve bracket. 6 3 2 5 1 No. 4 Part name 1 Valve bracket-retaining screw (M3×12) 2 Screw retaining Valve position-indicating plate (tapping screw M3×6) 4-48 PJ-1614NXE PJ-2216NXE Maintenance Manual No. 4 Part Replacement Part name 3 Valve position-indicating plate 4 Screw retaining VALVE_SENSE board assembly (round head screw with nut M3×6) 5 VALVE_SENSE board assembly 6 Valve bracket 4. Remove the one screw retaining the Valve position-indicating plate. 5. Remove the Valve position-indicating plate. 6. Remove the two screws retaining the VALVE_SENSE board assembly. 7. Replace the VALVE_SENSE board assembly. 8. Remove the two screws retaining the three-way Valve(hand). 1 2 No. Part name 1 three-way Valve(hand) 2 three-way Valve(hand)-retaining screw (M3×16) 9. Replace the three-way Valve(hand). 10. To install the removed components, reverse the removal procedure. (2) Replacing sub tank assembly 1. Remove the three-way Valve(hand) and VALVE_SENSE board assembly following the instructions in "(1) Replacing three-way Valve(hand) and VALVE_SENSE board assembly". 2. Remove the two screws retaining the Valve bracket. 4-49 4 Part Replacement PJ-1614NXE PJ-2216NXE Maintenance Manual 2 1 2 3 4 No. Part name 1 Valve bracket 2 Valve bracket-retaining screw (M3×12) 3 Sub tank assembly-retaining screw (M3×8) 4 Sub tank assembly 3. Disconnect the tubes from the sub tank assembly. 4. Remove two screws retaining the sub tank assembly. 5. Replace the sub tank assembly. 6. To install the removed components, reverse the removal procedure. NOTE When replacing the sub tank, do not lose the polyacetal spacers. (3) Replacing cartridge heater and thermister 1. Remove the sub tank assembly following the instructions in "(2) Replacing sub tank assembly". 2. Disconnect the cartridge heater and thermister connectors from the CR_BASE board assembly. 3. Remove the cartridge heater and thermister from the sub tank assembly. 1 2 3 4-50 PJ-1614NXE PJ-2216NXE Maintenance Manual No. 4 Part Replacement Part name 1 Cartridge heater 2 Thermister 3 Sub tank assembly 4. Replace the cartridge heater and thermister. 5. To install the removed components, reverse the removal procedure. 4.7.2 Replacing CR_BASE Board Assembly and CR_HEAD Board Assembly 1. Remove the six screws retaining the wire holder. 2 2 1 No. Part name 1 Wire holder 2 Wire holder-retaining screw (M3×8) 2. Disconnect the connectors shown in the following table from the CR_HEAD board assembly. CAUTION • When connecting and disconnecting the FFC type cables to/from the CR_HEAD board assembly connectors, always pull or push the cables perpendicularly. Pulling or pushing them slantwise may damage/short/break the terminals in the connectors, resulting in breakdown of the on-board devices. Table 4-6 Connectors to CR_HEAD Board Assembly No. Connector No. # of pins Colo r Connect to 1 J1 30 White SUB board 2 J2 16 White HEAD board 4-51 Remark Lock type 4 Part Replacement PJ-1614NXE PJ-2216NXE Maintenance Manual Table 4-6 Connectors to CR_HEAD Board Assembly (Continued) No. Connector No. # of pins Colo r Connect to 3 J3 30 White SUB board 4 J4 16 White HEAD board 5 J5 30 White SUB board 6 J6 16 White HEAD board 7 J7 30 White SUB board 8 J8 16 White HEAD board 9 J9 30 White SUB board 10 J10 16 White HEAD board 11 J11 30 White SUB board 12 J12 16 White HEAD board Remark Lock type Lock type Lock type Lock type Lock type 3. Remove the six brass spacers retaining the CR_HEAD board assembly. 2 2 1 No. Part name 1 CR_HEAD boardAssy 2 Brass spacer 4. Replace the CR_HEAD board assembly. 5. Disconnect the connectors shown in the following table from the CR_BASE board assembly. CAUTION • When connecting and disconnecting the FFC type cables to/from the CR_BASE board assembly connectors, always pull or push the cables straightforwardly. Pulling or pushing them slantwise may damage/short/break the terminals in the connectors, resulting in breakdown of the on-board devices. 4-52 PJ-1614NXE PJ-2216NXE Maintenance Manual 4 Part Replacement Table 4-7 Connectors to CR_BASE Board Assembly No. Connector No. # of pins Colo r Connect to Remark 1 J001 30 White SUB board Lock type 2 J002 30 White SUB board Lock type 3 J003 5 White 4 J004 4 White Sensor board 5 J005 5 White Encoder board 6 J006 6 White 7 J010 8 White INK_SENSE board 8 J011 2 9 J012 5 White VALVE_SENSE board 10 J013 2 White Thermister 11 J014 3 White Cartridge heater 12 J015 6 White HEAD board 13 J020 8 White INK_SENSE board 14 J021 2 15 J022 5 White VALVE_SENSE board 16 J023 2 White Thermister 17 J024 3 White Cartridge heater 18 J025 6 White HEAD board 19 J030 8 White INK_SENSE board 20 J031 2 21 J032 5 White VALVE_SENSE board 22 J033 2 White Thermister 23 J034 3 White Cartridge heater 24 J035 6 White HEAD board 25 J040 8 White INK_SENSE board 26 J041 2 Blue Three-way solenoid valve 27 J042 5 White VALVE_SENSE board 28 J043 2 White Thermister 29 J044 3 White Cartridge heater 30 J045 6 White HEAD board 31 J050 8 White INK_SENSE board 32 J051 2 Blue Three-way solenoid valve 33 J052 5 White VALVE_SENSE board 34 J053 2 White Thermister 35 J054 3 White Cartridge heater 36 J055 6 White HEAD board blue blue blue Three-way solenoid valve Three-way solenoid valve Three-way solenoid valve 4-53 4 Part Replacement PJ-1614NXE PJ-2216NXE Maintenance Manual Table 4-7 Connectors to CR_BASE Board Assembly (Continued) No. Connector No. # of pins Colo r Connect to 37 J060 8 White INK_SENSE baord 38 J061 2 Blue Three-way solenoid valve 39 J062 5 White VALVE_SENSE board 40 J063 2 White Thermister 41 J064 3 White Cartridge heater 42 J065 6 White HEAD board Remark 6. Remove the six polyacetal spacers retaining the CR_BASE board assembly. 7. Replace the CR_BASE board assembly. 2 2 1 No. Part name 1 CR_BASE board assembly 2 Polyacetal spacer 8. To install the removed components, reverse the removal procedure. 4.7.3 Replacing CR_ENC Assembly 1. Disconnect the CR_ENC assembly connector from the CR_BASE board assembly. 2. Remove either of the center sub tank assemblies following the instructions in "4.7.1Replacing Sub Tank Assembly". • If your machine is an 87-inch model, you must also remove the sub tank assemblies at the both ends. 3. Remove the connectors from the HEAD board assembly. 4. Remove the four screws retaining the CR board bracket. 4-54 PJ-1614NXE PJ-2216NXE Maintenance Manual 4 Part Replacement 2 2 1 3 No. Part name 1 CR board bracket 2 CR board bracket-retaining screw (M3×8) 3 Sub tank assembly 5. Lift the CR board bracket and remove the two CR_ENC assembly-retaining screws by accessing them from the back. 2 1 No. Part name 1 CR_ENC assembly 2 CR_ENC assembly-retaining screw (M2×12) 6. Replace the CR_ENC assembly. 7. To install the removed components, reverse the removal procedure. NOTE When removing the CR_ENC assembly, exercise extreme caution not to damage the T fence. 4-55 4 Part Replacement PJ-1614NXE PJ-2216NXE Maintenance Manual 4.7.4 Replacing Three-way Valve 1. Remove the CR_BASE board assembly following the instructions in "4.7.2Replacing CR_BASE Board Assembly and CR_HEAD Board Assembly". 2. Remove the four screws retaining the filter bracket. 1 2 No. Part name 1 Filter bracket 2 Filter bracket-retaining screw (M3×8) 3. Slide the filter bracket backward. 4. Disconnect the tubes from the three-way valve. 5. Remove the sub tank assembly located in front of the three-way valve to be replaced following the instructions in "4.7.1Replacing Sub Tank Assembly". • If your machine is an 87-inch model, you must also remove the sub tank assemblies at the both ends. 6. Remove the four screws retaining the CR board bracket. 7. Lift the CR board bracket. 8. Remove the two screws retaining the three-way valve. 1 2 No. 1 Part name Three-way valve 4-56 PJ-1614NXE PJ-2216NXE Maintenance Manual No. 2 4 Part Replacement Part name Three-way valve-retaining screw (M3×5) 9. Replace the three-way valve. 10. To install the removed components, reverse the removal procedure. 4.7.5 Replacing CR Cursor Assembly 1. Remove all head assemblies following the instructions in "4.6.2 Replacing Head Assembly". 2. Remove the P_EDGE sensor assembly following the instructions in "4.6.4 Replacing P_EDGE Sensor Assembly". 3. Remove the steel belt following the instructions in "4.5.1 Replacing Steel Belt". 4. Remove the CR_ENC assembly following the instructions in "4.7.3 Replacing CR_ENC Assembly". 5. Lift the CR board bracket and head assembly together. 6. Remove the two CR blade springs. 1 2 No. Part name 1 CR blade spring 2 CR cursor assembly 7. Replace the CR cursor assembly. 8. To install the removed components, reverse the removal procedure. 4.7.6 Replacing Cursor Roller 1. Remove the CR cursor assembly following the instructions in "4.7.5 Replacing CR Cursor Assembly". 2. Remove the one E ring retaining the cursor roller. 4-57 4 Part Replacement PJ-1614NXE PJ-2216NXE Maintenance Manual 1 No. 1 Part name Cursor roller, E ring 3. Replace the cursor roller. 4. To install the removed components, reverse the removal procedure. 4-58 PJ-1614NXE PJ-2216NXE Maintenance Manual 4 Part Replacement 4.8 Replacement of Ink Supply Section Components NOTE Before replacing a component of the ink supply section, remove the pump cover. • "4.2.9 Removing Pump Cover" Before replacing a component of the ink supply section, perform ink purge to discharge ink from all ink lines. TIP "5.5.10 Head Cleaning Menu" 4.8.1 Replacing Ink Pump 1. Disconnect the ink pump connector from the TERM_PUMP board assembly. 2. Disconnect the tubes from the ink pump. 1 2 3 No. Part name 1 Tube 2 Pump bracket-retaining screw (M3×5) 3 Pump bracket 3. Remove the two screws retaining the pump bracket. 4. Remove the pump bracket. 5. Remove the two screws retaining the ink pump. 4-59 4 Part Replacement PJ-1614NXE PJ-2216NXE Maintenance Manual 1 2 No. Part name 1 Ink pump 2 Ink pump-retaining screw (M3×5) 6. Replace the ink pump. 7. To install the removed components, reverse the removal procedure. 4.8.2 Replacing Air Pump 1. Disconnect the air pump connector from the TERM_PUMP board assembly. 2. Remove the tubes from the air pump. 2 3 1 No. Part name 1 Tube 2 Air pump-retaining screw (M3×8) 3 Air pump 3. Remove the four screws retaining the air pump. 4. Replace the air pump. 5. To install the removed components, reverse the removal procedure. 4-60 PJ-1614NXE PJ-2216NXE Maintenance Manual 4 Part Replacement 4.8.3 Replacing Bimor Pump 1. Disconnect the bimor pump connector from the TERM_PUMP board assembly. 2. Disconnect the tubes from the bimor pump. 3 2 1 No. Part name 1 Tube 2 Pump bracket 2-retaining screw (M3×5) 3 Pump bracket 2 3. Remove the two screws retaining the pump bracket 2. 4. Remove the pump bracket. 5. Remove the two screws retaining the bimor pump. 2 1 No. Part name 1 Bimor pump 2 Bimor pump-retaining screw (M4×30) 6. Replace the bimor pump. 7. To install the removed components, reverse the removal procedure. 4-61 4 Part Replacement PJ-1614NXE PJ-2216NXE Maintenance Manual 4.8.4 Replacing Regulator 1. Disconnect the tubes from the regulator. 4 3 1 1 2 No. Part name 1 Tube 2 Regulator bracket 3 Regulator bracket-retaining screw (M3×5) 4 Regulator 2. Remove the two screws retaining the regulator bracket. 3. Replace the regulator. 4. To install the removed components, reverse the removal procedure. 4.8.5 Replacing Air Chamber 1. Disconnect the tubes from the air chamber. 3 2 1 No. Part name 1 Tube 2 Air chamber-retaining screw (M3×5) 3 Air chamber 4-62 PJ-1614NXE PJ-2216NXE Maintenance Manual 4 Part Replacement 2. Remove the four screws retaining the air chamber. 3. Replace the air chamber. 4. To install the removed components, reverse the removal procedure. 4.8.6 Replacing Two-way Valve 1. Disconnect the two-way valve connector from the TERM_PUMP board assembly. 2. Disconnect the tubes from the two-way valve. 3 2 1 No. Part name 1 Tube 2 Two-way valve-retaining screw (M3×4) 3 Two-way valve 3. Remove the two screws retaining the two-way valve. 4. Replace the two-way valve. 5. To install the removed components, reverse the removal procedure. 4.8.7 Replacing PRESS_SENSE Board Assembly 1. Disconnect the connector and tubes from the PRESS_SENSE board assembly. 4-63 4 Part Replacement PJ-1614NXE PJ-2216NXE Maintenance Manual 3 1 2 No. Part name 1 Tube 2 PRESS_SENSE board assembly-retaining screw (M3×6) 3 PRESS_SENSE board assembly 2. Remove the two screws retaining the PRESS_SENSE board assembly. 3. Replace the PRESS_SENSE board assembly. 4. To install the removed components, reverse the removal procedure. 4.8.8 Replacing TERM_PUMP Board Assembly 1. Remove the air chamber following the instructions in "4.8.5 Replacing Air Chamber". 2 3 2 1 No. Part name 1 Air chamber 2 TERM_PUMP board assembly-retaining screw (M3×6) 3 TERM_PUMP board assembly 2. Disconnect the connectors from the TERM_PUMP board assembly. 4-64 PJ-1614NXE PJ-2216NXE Maintenance Manual 4 Part Replacement CAUTION • When connecting and disconnecting the FFC type cables to/from the TERM_PUMP board assembly connectors, always pull or push the cables straightforwardly. Pulling or pushing them slantwise may damage/short/break the terminals in the connectors, resulting in breakdown of the on-board devices. Table 4-8 Connectors to TERM_PUMP Board Assembly No. Connector No. # of pins Colo r Connect to 1 J1 30 White SUB board 2 J2 2 Blue Ink pump 3 J3 2 White Ink pump 4 J4 2 White Ink pump 5 J5 2 White Ink pump 6 J6 2 White Ink pump 7 J7 2 White Ink pump 8 J8 2 White Ink pump 9 J11 2 White Two-way solenoid valve 10 J12 3 White Air pump 11 J13 2 White Bimor pump 12 J14 5 White PRESS_SENS 3. Remove the six screws retaining the TERM_PUMP board assembly. 4. Replace the TERM_PUMP board assembly. 5. To install the removed components, reverse the removal procedure. 4.8.9 Replacing Safety Valve Assembly 1. Disconnect the tube from the safety valve assembly. 4-65 Remark Lock type Lock type 4 Part Replacement PJ-1614NXE PJ-2216NXE Maintenance Manual 2 1 No. Part name 1 Tube 2 Safety valve 2. Replace the safety valve assembly. 3. To install the removed components, reverse the removal procedure. 4.8.10Replacing Ink Filter 1. Twist the lure fitting (male) and remove the ink filter. 1 1 2 No. Part name 1 Lure fitting (male) 2 Ink filter 2. Replace the ink filter. 3. To install the removed components, reverse the removal procedure. 4.8.11Replacing Throttle Valve 1. Disconnect the tube from the nipple. 4-66 PJ-1614NXE PJ-2216NXE Maintenance Manual 4 Part Replacement 2. Remove the one screw retaining the speed controller bracket. 2 1 3 No. Part name 1 Speed controller bracket 2 Speed controller bracket-retaining screw (M3×5) 3 Throttle valve 3. Remove the speed controller bracket. 4. Remove the two screws retaining the throttle valve to the speed controller bracket. 2 3 1 No. Part name 1 Speed controller bracket 2 Screw retaining throttle valve to speed controller bracket (M3×16) 3 Throttle valve 5. Replace the throttle valve. 6. To install the removed components, reverse the removal procedure. 4.8.12Replacing Nipple 1. Remove the throttle valve following the instructions in "4.8.11 Replacing Throttle Valve". 2. Press the portion indicated by the arrow "3" in the following figure to remove the nipple. 4-67 4 Part Replacement PJ-1614NXE PJ-2216NXE Maintenance Manual 3 1 2 No. Part name 1 Throttle valve 2 Nipple 3. Replace the nipple. 4. To install the removed components, reverse the removal procedure. 4-68 PJ-1614NXE PJ-2216NXE Maintenance Manual 4 Part Replacement 4.9 Replacement of Leg Section Components 4.9.1 Replacing TERM_TANK Board Assembly 1. Remove the two screws retaining the board cover. 1 2 No. Part name 1 Board cover 2 Board cover-retaining screw (M3×4) 2. Remove the board cover. 3. Disconnect the following connectors from the TERM_TANK board assembly. Table 4-9 Connectors to TERM_TANK Board Assembly No. Connector No. # of pins Colo r Connect to 1 J1 40 White SUB board 2 J2 2 White Level switch 3 J3 2 White Level switch 4 J4 2 White Level switch 5 J5 2 White Level switch 6 J6 2 White Level switch 7 J7 2 White Level switch 8 J10 2 Blue Level switch 9 J11 2 White Level switch 10 J14 12 White TERM_ROLL board 11 J15 12 White 4. Remove the six screws retaining the TERM_TANK board assembly. 5. Replace the TERM_TANK board assembly. 4-69 Remark Lock type 4 Part Replacement PJ-1614NXE PJ-2216NXE Maintenance Manual 2 1 2 No. Part name 1 TERM_TANK board assembly 2 TERM_TANK board assembly-retaining screw (M3×6) 6. To install the removed components, reverse the removal procedure. 4.9.2 Replacing Main Bottle, Bottle Cap, Ink Cap, and Ink Level Switch 1. Remove the bottle cap from the main bottle. 3 2 1 No. Part name 1 Main bottle 2 Bottle cap 3 Ink cap 2. Remove the ink cap from the bottle cap. 3. Remove the ink supply pipe. 4-70 PJ-1614NXE PJ-2216NXE Maintenance Manual 4 Part Replacement 2 3 1 4 No. Part name 1 Bottle cap 2 Ink supply pipe 3 Nut 4 Ink level switch 4. Remove the nut retaining the ink level switch. 5. Remove the ink level switch. 6. Replace the bottle cap. 7. To install the removed components, reverse the removal procedure. 4.9.3 Replacing Waste Fluid Bottle, Bottle Cap, Waste Ink Cap Assembly, and Waste Fluid Level Switch NOTE • Before replacing the waste fluid tank, extract all waste fluid from the existing tank. • Always ensure that there is no residual waste fluid in the waste fluid tube. 1. Disconnect the waste fluid tube from the waste ink cap assembly. 2. Remove the bottle cap from the waste fluid bottle. 3. Remove the waste ink cap assembly from the bottle cap. 4-71 4 Part Replacement PJ-1614NXE PJ-2216NXE Maintenance Manual 1 2 3 4 No. Part name 1 Waste fluid tube 2 Waste ink cap assembly 3 Bottle cap 4 Waste fluid bottle 4. Remove the nut retaining the waste fluid level switch. 5. Remove the waste fluid level switch. 6. Replace the bottle cap. 3 1 2 No. Part name 1 Bottle cap 2 Nut 3 Waste fluid level switch 7. To install the removed components, reverse the removal procedure. 4-72 PJ-1614NXE PJ-2216NXE Maintenance Manual 4 Part Replacement 4.10 Replacement of Wind Roller Section Components This section describes the procedures to replace the TERM_ROLL assembly, sensor assembly, and winding unit components. 4.10.1Replacing TERM_ROLL Board Assembly (1) 64-inch model 1. Remove the two screws retaining the roller cover. 2 1 No. Part name 1 Roller cover-retaining screw (M4×8) 2 Roller cover 2. Remove the roller cover. 3. Remove the four screws retaining the winding unit cover. 1 2 No. Part name 1 Winding unit cover-retaining screw (M3×8) 2 Winding unit cover 4-73 4 Part Replacement PJ-1614NXE PJ-2216NXE Maintenance Manual 4. Remove the winding unit cover. 5. Disconnect the connectors from the TERM_ROLL board assembly. 6. Remove the four screws retaining the TERM_ROLL board assembly. 1 2 No. Part name 1 TERM_ROLL board assembly-retaining screw (M3×8) 2 TERM_ROLL board assembly 7. Replace the TERM_ROLL board assembly. 8. To install the removed components, reverse the removal procedure. (2) 87-inch model 1. Remove the four screws retaining the roller cover1 and roller cover 2. 1 1 3 2 No. 4 Part name 1 Screw retaining roller cover1 and roller cover 2, screw retaining winding motor cover (M4×8) 2 Roller cover 1 3 Roller cover 2 4 Winding motor cover 2. Remove the four screws retaining the winding motor cover. 4-74 PJ-1614NXE PJ-2216NXE Maintenance Manual 4 Part Replacement 3. Remove the six screws retaining the winding unit cover. 3 1 4 2 No. Part name 1 Winding unit cover-retaining screw (M4×8) 2 Winding unit cover 3 TERM_ROLL board assembly-retaining screw (M3×6) 4 TERM_ROLL board assembly 4. Disconnect the connectors from the TERM_ROLL board assembly. 5. Remove the four screws retaining the TERM_ROLL board assembly. 6. Replace the TERM_ROLL board assembly. 7. To install the removed components, reverse the removal procedure. 4.10.2Replacing Winding Unit Components (1) 64-inch model 1. Remove the TERM_ROLL board assembly following the instructions in "4.10.1 Replacing TERM_ROLL Board Assembly". 2. Remove the two screws retaining the winding unit sensor base. 3. Remove the four winding chassis-retaining bolts. Remove the cable from the clamp located at the back. 5 2 6 3 4 1 7 5 3 4-75 4 Part Replacement PJ-1614NXE PJ-2216NXE Maintenance Manual No. Part name 1 Winding chassis 2 Hexagon socket bolt 3 Roller shaft-retaining screw (M3×8) 4 Winding unit-retaining screw (M4×8) 5 Clamp 6 Roller shaft 7 Winding unit 4. Disconnect the connectors from the TERM_ROLL board assembly. 5. Remove the one screw retaining the roller shaft. 6. Remove the three screws retaining the winding unit. 7. Remove the winding unit. 8. Disconnect the connector from the winding unit switch assembly. 9. Remove the two screws retaining the winding unit switch assembly. 2 3 1 No. Part name 1 Winding unit switch assembly-retaining screw (M3×16) 2 Winding unit switch assembly 3 Switch nut 10. Replace the winding unit switch assembly. NOTE When removing the winding unit switch assembly, exercise extreme caution not to drop the switch nut on to the TERM_ROLL board assembly. 11. Replace the two snaps located left and right that retain the limiter shaft. 12. Replace the mini keeper. 4-76 PJ-1614NXE PJ-2216NXE Maintenance Manual 4 Part Replacement 13. Remove the two retaining screws for the small gear and remove the small gear. 14. Replace the limiter gear. 15. Replace the limiter spring. 7 1 No. 2 5 4 3 6 Part name 1 Snap 2 Limiter shaft 3 Gear (small) 4 Retaining nut 5 Mini keeper 6 Limiter gear 7 Limiter spring 16. To install the removed components, reverse the removal procedure. (2) 87-inch model 1. Remove the TERM_ROLL board assembly following the instructions in "4.10.1 Replacing TERM_ROLL Board Assembly". 2. Disconnect the winding motor connector. 3. Remove the three screws retaining the winding motor bracket. 1 2 3 4-77 4 Part Replacement PJ-1614NXE PJ-2216NXE Maintenance Manual No. Part name 1 Winding motor bracket-retaining screw (M4×8) 2 Winding motor bracket 3 Winding motor 4. Remove the two screws retaining the motor gear and remove the motor gear. 5 3 1 2 4 No. Part name 1 Motor gear 2 Retaining screw 3 Winding motor bracket 4 Winding motor-retaining screw (M4×8) 5 Winding motor 5. Remove the four screws retaining the winding motor. 6. Replace the winding motor. 7. Disconnect the connector from the winding unit switch assembly. 8. Remove the two screws retaining the winding unit switch assembly. 2 3 1 No. Part name 1 Winding unit switch assembly-retaining screw (M3×16) 2 Winding unit switch assembly 4-78 PJ-1614NXE PJ-2216NXE Maintenance Manual No. 3 4 Part Replacement Part name Switch nut 9. Replace the winding switch assembly. NOTE When removing the winding unit switch assembly, exercise extreme caution not to drop the switch nut on to the TERM_ROLL board assembly. 10. To install the removed components, reverse the removal procedure. 4-79 4 Part Replacement PJ-1614NXE PJ-2216NXE Maintenance Manual 4.11 Replacement of Feed Out Section Components To replace the components, refer to "4.10 Replacement of Wind Roller Section Components". 4-80 5 SELF-DIAGNOSIS FUNCTION 5.1 Introduction . . . . . . . . . . . . . . . . . . . . . . . . . . . . . . . . 5-1 5.2 Preparation . . . . . . . . . . . . . . . . . . . . . . . . . . . . . . . . 5-1 5.2.1 5.2.2 5.3 Operations in Self-Diagnosis Mode. . . . . . . . . . . . . 5-3 5.3.1 5.3.2 5.4 Operating Self-Diagnosis Mode. . . . . . . . . . . . . . . . . . 5-3 Diagnosis Items in Self-Diagnosis Menu . . . . . . . . . . . 5-4 Inspection Menu . . . . . . . . . . . . . . . . . . . . . . . . . . . . 5-6 5.4.1 5.4.2 5.4.3 5.4.4 5.4.5 5.4.6 5.4.7 5.4.8 5.5 Preparations on Machine. . . . . . . . . . . . . . . . . . . . . . . 5-1 Starting Up. . . . . . . . . . . . . . . . . . . . . . . . . . . . . . . . . . 5-2 Memory Size Menu . . . . . . . . . . . . . . . . . . . . . . . . . . . 5-7 Version Menu . . . . . . . . . . . . . . . . . . . . . . . . . . . . . . . 5-8 Operation Panel Menu. . . . . . . . . . . . . . . . . . . . . . . . . 5-9 Sensor Menu . . . . . . . . . . . . . . . . . . . . . . . . . . . . . . . 5-10 Encoder Menu . . . . . . . . . . . . . . . . . . . . . . . . . . . . . . 5-11 Fan Menu . . . . . . . . . . . . . . . . . . . . . . . . . . . . . . . . . 5-11 History Menu . . . . . . . . . . . . . . . . . . . . . . . . . . . . . . . 5-12 Head Waveform Menu. . . . . . . . . . . . . . . . . . . . . . . . 5-15 Adjustment Menu . . . . . . . . . . . . . . . . . . . . . . . . . . 5-16 5.5.1 5.5.2 5.5.3 5.5.4 5.5.5 5.5.6 5.5.7 5.5.8 5.5.9 5.5.10 5.5.11 5.5.12 Skew Check Menu. . . . . . . . . . . . . . . . . . . . . . . . . . . Voltage Input Menu . . . . . . . . . . . . . . . . . . . . . . . . . . Head Nozzle Check Menu . . . . . . . . . . . . . . . . . . . . . Head Inclination Check Menu . . . . . . . . . . . . . . . . . . Two-Way Printing Position Alignment Menu . . . . . . . CW Adjustment Menu . . . . . . . . . . . . . . . . . . . . . . . . Band Feed Correction Menu . . . . . . . . . . . . . . . . . . . Test Drawing Menu . . . . . . . . . . . . . . . . . . . . . . . . . . Side Margin Menu . . . . . . . . . . . . . . . . . . . . . . . . . . . Head Cleaning Menu . . . . . . . . . . . . . . . . . . . . . . . . . Software Counter Initialization Menu . . . . . . . . . . . . . Feed Pitch Check Menu . . . . . . . . . . . . . . . . . . . . . . 5-17 5-17 5-18 5-20 5-22 5-24 5-26 5-28 5-28 5-28 5-30 5-30 5.6 Purge Menu . . . . . . . . . . . . . . . . . . . . . . . . . . . . . . . 5-32 5.7 Sample Drawing Menu . . . . . . . . . . . . . . . . . . . . . . 5-33 5.8 Parameter Menu . . . . . . . . . . . . . . . . . . . . . . . . . . . 5-35 5.8.1 5.8.2 Parameter Initialization Menu . . . . . . . . . . . . . . . . . . 5-36 Parameter Update Menu . . . . . . . . . . . . . . . . . . . . . . 5-36 5.9 Endurance Running Menu . . . . . . . . . . . . . . . . . . . 5-44 5.9.1 5.9.2 5.9.3 5.9.4 5.9.5 5.9.6 5.9.7 5.9.8 CR Motor Endurance Menu. . . . . . . . . . . . . . . . . . . . PF Motor Endurance Menu . . . . . . . . . . . . . . . . . . . . Head Up/Down Endurance Menu . . . . . . . . . . . . . . . Lever Motor Endurance Menu . . . . . . . . . . . . . . . . . . Sequential Drawing Endurance Menu . . . . . . . . . . . . Pump Menu . . . . . . . . . . . . . . . . . . . . . . . . . . . . . . . . General Endurance Menu . . . . . . . . . . . . . . . . . . . . . Endurance Running Check Menu . . . . . . . . . . . . . . . 5-45 5-46 5-47 5-47 5-49 5-49 5-50 5-51 PJ-1614NXE PJ-2216NXE Maintenance Manual 5 Self-Diagnosis Function 5 Self-Diagnosis Function 5.1 Introduction This chapter provides information on the self-diagnosis function. The self-diagnosis function adjusts the drawing accuracy. It is used in the manufacturing process, adjustment, and maintenance. The self-diagnosis function is implemented in the system firmware. All functions are available from the operation panel. TIP "2.3 Part names and functions" 5.2 Preparation Before you can use the self-diagnosis function, you must make the machine ready for that and call up the self-diagnosis menu. 5.2.1 Preparations on Machine Before starting up the self-diagnosis function, perform the following preparations. (1) Setting printing paper Set a roll paper for adjustment. NOTE • Make sure to use coated paper for the adjustment purpose. (2) Connecting power cable Connect the power cable to the machine’s inlet assembly and insert the power plug into an outlet. NOTE Do not connect three or more power plugs to one outlet. 5-1 5 Self-Diagnosis Function PJ-1614NXE PJ-2216NXE Maintenance Manual 5.2.2 Starting Up To use the self-diagnosis function, you must first call up the self-diagnosis menu on the operation panel. The self-diagnosis menu is completely independent of the normal operation mode and self-diagnosis display mode. To call up the self-diagnosis menu, follow the steps below. 1. If the system is in the operation mode or the self-diagnosis menu mode, press the Power key. 2. Press and hold the F2 key, F4 key, and Menu key simultaneously. While holding down these keys, press the Power key. F1 F2 F3 F4 ERROR DATA RECEIVE PROCESS MENU POWER MEDIA SET • The system will enter the self-diagnosis mode and display the self-diagnosis menu. CANCEL 5-2 ENTER PJ-1614NXE PJ-2216NXE Maintenance Manual 5 Self-Diagnosis Function 5.3 Operations in Self-Diagnosis Mode This section explains how to operate in the self-diagnosis mode as well as provides the list of available diagnosis items. 5.3.1 Operating Self-Diagnosis Mode Follow the operation flow shown below to operate the self-diagnosis mode. TIP For more detailed operation steps, refer to the flow chart of the applicable diagnosis item. 1. Press the Menu key or the Menu key in the operation panel to change over the diagnosis menu. • The diagnosis menu changes over. 2. Press the F1, F2, F3, or F4 key to select the applicable diagnosis item. Press the Confirm key. • The selected item is accepted. • If the item has a sub menu, the sub menu is displayed. F1 F2 F3 F4 ERROR DATA RECEIVE PROCESS MENU POWER MEDIA SET CANCEL 3. Press the F2 or F4 key in the operation panel to modify the set value. ENTER F1 F2 F3 F4 ERROR DATA RECEIVE PROCESS MENU POWER MEDIA SET CANCEL 5-3 ENTER 5 Self-Diagnosis Function PJ-1614NXE PJ-2216NXE Maintenance Manual 4. To save the modified value, press the Confirm key in the operation panel. • The modified set value is stored and a next item is displayed. F1 F2 F3 F4 ERROR DATA RECEIVE PROCESS NOTE MENU POWER MEDIA SET CANCEL ENTER If you press the Cancel key instead of the Confirm key, the modification is not stored. 5. To quit the diagnosis, press the Cancel key in the operation panel. • The system returns to an upper hierarchy of the diagnosis menu. F1 F2 F3 F4 ERROR DATA RECEIVE PROCESS MENU POWER MEDIA SET CANCEL ENTER 6. To exit the self-diagnosis menu, press the Power key. 5.3.2 Diagnosis Items in Self-Diagnosis Menu The Self-Diagnosis menu includes the following diagnosis items. Table 5-1 Diagnosis Items in Self-Diagnosis Menu Diagnosis item Contents Inspection Menu Performs various inspections on the circuit boards, sensors, and fans. Adjustment Menu Performs various adjustments for the printer mechanism. Purge Menu Performs mode-specified purge. Sample Printing Menu Performs sample printing necessary for adjustment. Parameter Menu Configures various adjustment parameters. Endurance Running Menu Performs endurance running of the printer mechanism. Reference 5.4 Inspection Menu 5.5 Adjustment Menu 5.6 Purge Menu 5-4 5.7 Sample Drawing Menu 5.8 Parameter Menu 5.9 Endurance Running Menu PJ-1614NXE PJ-2216NXE Maintenance Manual 5 Self-Diagnosis Function 5-5 5 Self-Diagnosis Function PJ-1614NXE PJ-2216NXE Maintenance Manual 5.4 Inspection Menu In the Inspection menu, you can perform various inspections on the circuit boards, sensors, and fans. The Inspection menu includes the following diagnosis items. Table 5-2 Diagnosis Items in Inspection Menu Diagnosis item Contents Memory size Displays the size of memories mounted on the main board assembly. Version Displays the versions of the firmware and main board assembly. Reference 5.4.1 Memory Size Menu 5.4.2 Version Menu •Firmware version •Backup parameter version •Setting of dip switches •Revision of main board assembly Operation panel Used to check the functions of the operation panel keys, LCD, and LED. Sensor Displays the status of the following sensors. 5.4.3 Operation Panel Menu 5.4.4 Sensor Menu •CR_HP sensor •Cover sensor •Cover maintenance sensor •Lever sensor •P_EDGE sensor •P_REAR sensor •HD_SLIDE sensor •Thermister sensor •Ink END sensor •Vacuum sensor Encoder Displays the detected values from the following encoders. 5.4.5 Encoder Menu •CR (Carriage) •PF (Paper feed) Fan Used to check if the fan operates normally by turning it ON and OFF. 5.4.6 Fan Menu History Used to check the following records. 5.4.7 History Menu •Maintenance history •Serious error history Head waveform Used to check the head-driving waveform. 5.4.8 Head Waveform Menu 5-6 PJ-1614NXE PJ-2216NXE Maintenance Manual 5 Self-Diagnosis Function 5.4.1 Memory Size Menu This menu displays the memory size. NOTE The Memory Size menu displays the size of the expansion memory (64MB or 128MB). 5-7 5 Self-Diagnosis Function PJ-1614NXE PJ-2216NXE Maintenance Manual 5.4.2 Version Menu This menu displays the following contents about the firmware and main board assembly. • Firmware version • Backup parameter version • Setting of dip switches of main board assembly • Revision of main board assembly TIP The details of the dipswitch setting of main board assembly are as follows. • ON: 0, OFF: 1 • Switch No. 1: LSB • Switch No. 2: MSB 5-8 PJ-1614NXE PJ-2216NXE Maintenance Manual 5 Self-Diagnosis Function 5.4.3 Operation Panel Menu This menu is used to check the functions of the operation panel keys, LCD, and LEDs. (1) Operation panel key check When you press a key in the operation panel, the name of the key is displayed on the LCD. To exit the operation panel key check, press the Cancel key. (2) LCD check The entire LCD screen is filled in black. You can check for any missing dots. (3) LED check The following LEDs light up in order. The LCD displays the name of the LED that is currently illuminated. • Power lamp • Error lamp • Data lamp • Lever lamp 5-9 5 Self-Diagnosis Function PJ-1614NXE PJ-2216NXE Maintenance Manual 5.4.4 Sensor Menu This menu displays the sensor status in the operation panel. If the displayed sensor status does not match the actual machine status, replace or adjust the relevant sensor referring to "Table 5-3 Inspection Items in Sensor Menu". Table 5-3 Inspection Items in Sensor Menu No. Sensor name Status in display Reference 1 Head thermister **°C 2 Sub tank **°C 3 Platen **°C 4 Thermister (dry) **°C 5 Valve sensor Sensor error / Jet wash / Ink side / Sensor error 6 Ink level sensor Enough / Poor 7 Cable sensor OK / NG 8 Paper feed/wind sensor ON / OFF 9 CR_HP sensor ON / OFF 4.5.2 Replacing CR Motor Assembly 10 HD_SLIDE sensor ON / OFF 4.5.3 Replacing SLID Motor Assembly 11 Cover sensor Open / Close 7.8 Cover Sensor Adjustment 12 Cover maintenance sensor Open / Close 13 Lever sensor Up / Down 14 Foot lever sensor ON / OFF 15 Waste fluid sensor OK / Full 16 Vacuum sensor 0 to FF 17 P_EDGE sensor 0 to FF 7.9.1 Jigs and Tools 18 P_REAR sensor ON / OFF 7.9.2 Adjustment Procedure 19 Ink END sensor KCMY (64-inch spec) KCMmY (87-inch spec) 4.8.1 Replacing Ink Pump 4.6.1 Replacing HEAD Board Assembly 4.5.4 Replacing HD_SLIDE Sensor Assembly NOTE • The sensitivity of the following sensors is displayed by a hexadecimal number. • P_EDGE sensor • Vacuum sensor • For the ink end sensor, the color of the ink that has run out is displayed. • For an 87-inch model, the items for head temperature, sub tank temperature, valves, and ink level (High/Low) also include the data of the No.5 and No.6 heads. The items for platen temperature and dry temperature also include the data of the No.4 head. 5-10 PJ-1614NXE PJ-2216NXE Maintenance Manual 5 Self-Diagnosis Function NOTE For the 87-inch spec, "Feed&wind" is displayed instead of "Wind". 5.4.5 Encoder Menu This menu displays the detected values from the following encoders. • CR_ENC (Carriage) • PF_ENC (Paper feed) NOTE For the encoder-detected values, the encoder pulse numbers are displayed in hexadecimal number. 5.4.6 Fan Menu This menu is used to check if the fan operates normally by turning ON and OFF the fan. As soon as you select this menu, the fan is activated. When you press the Cancel key, the fan is deactivated and the operation panel displays "Inspection: Fan". 5-11 5 Self-Diagnosis Function PJ-1614NXE PJ-2216NXE Maintenance Manual 5.4.7 History Menu This menu is used to check the maintenance history and serious error history. (1) Maintenance history This displays the past maintenance records on the following components. • Number of CR motor activation cycles • Number of PF motor activation cycles • Number of printed copies • Discharged amount of No.1 head ink • Discharged amount of No.2 head ink • Discharged amount of No.3 head ink • Discharged amount of No.4 head ink • Discharged amount of No.5 head ink • Discharged amount of No.6 head ink • Number of ink purges for No.1 to No.6 heads NOTE • All numeral values in the maintenance history are respectively displayed by a hexadecimal number. • The ink discharged amount and number of ink purges for the No.5 and No.6 heads are only available with an 87inch model. 5-12 PJ-1614NXE PJ-2216NXE Maintenance Manual 5 Self-Diagnosis Function NOTE Only in an 87-inch spec, "Discharge 5, 6" and "Purge 5, 6" are displayed. (2) Serious error history This menu displays the serious errors that have occurred so far. NOTE • A serious error history does not include any CPU errors. • A serious error history can contain up to 32 error events. 5-13 5 Self-Diagnosis Function PJ-1614NXE PJ-2216NXE Maintenance Manual 5-14 PJ-1614NXE PJ-2216NXE Maintenance Manual 5 Self-Diagnosis Function 5.4.8 Head Waveform Menu This menu is used to check the head-driving waveform. 5-15 5 Self-Diagnosis Function PJ-1614NXE PJ-2216NXE Maintenance Manual 5.5 Adjustment Menu In this menu, you can align the printing position and correct the paper feed operation. The Adjustment menu includes the following diagnosis menus. Table 5-4 Diagnosis Items in Adjustment Menu Diagnosis item Contents Reference Skew check Performs paper feed and detects the degree of skew in paper feed by the sensor. Voltage input To this item, enter the characteristic value of the printer heads in use. After the entry, refill ink. Head nozzle check Prints out a drawing to check the ink discharge performance of the 5.5.3 Head Nozzle Check head nozzles. Menu Head Inclination Check Prints out a drawing to check for printer head inclination. Mechanical adjustment must be performed as necessary. 5.5.4 Head Inclination Check Menu Two-way printing position alignment Prints out a drawing to align the two-way printing position. 5.5.5 Two-Way Printing Position Alignment Menu CW adjustment Prints out a drawing to adjust any gaps between the heads. 5.5.6 CW Adjustment Menu Band feed correction Prints out a drawing to correct the paper feed amount for each pass. 5.5.7 Band Feed Correction Menu Test printing Prints out a nozzle check pattern and the adjustment variables. 5.5.8 Test Drawing Menu Side margin Prints out a drawing to adjust the side margin. Head cleaning Cleans the tubes and heads using cleaning fluid. 5.5.10 Head Cleaning Menu Software counter initialization Clears various software counters. 5.5.11 Software Counter Initialization Menu Feed pitch check Used to check the paper feed amount for one band. 5.5.12 Feed Pitch Check Menu 5-16 5.5.1 Skew Check Menu 5.5.2 Voltage Input Menu 5.5.9 Side Margin Menu PJ-1614NXE PJ-2216NXE Maintenance Manual 5 Self-Diagnosis Function 5.5.1 Skew Check Menu In this menu, you can perform paper feed and check the degree of skew in the paper feed operation by means of the sensors. When you select this item from the Adjustment menu, the machine feeds the paper by one pass and checks for paper feed skew by comparing the paper edge positions before and after the paper feed detected by the sensors. NOTE Before performing skew check, ensure that the paper is set correctly. Table 5-5 Skew Amount Specification Condition Specification Right side 0mm Left side 5mm or less 5.5.2 Voltage Input Menu This menu is used to input the head voltage. The head voltage value is used to determine the head-driving voltage and correct the head temperature. To input the head voltage, follow the steps below. 1. Using the keys in the operation panel, enter an appropriate parameter value for the head voltage. 5-17 5 Self-Diagnosis Function PJ-1614NXE PJ-2216NXE Maintenance Manual 2. The system identifies the voltage rank of the head applicable to the entry and then performs initial filling. NOTE The ink colors light cyan and light magenta are only available with a 87-inch spec. 5.5.3 Head Nozzle Check Menu In this menu, you can check if the head nozzles, after refilled, can discharge ink correctly by printing a sample drawing. To print out head nozzle check patterns, follow the steps below. 1. Set paper as necessary. 2. After paper is set, the machine prints out head nozzle check patterns in the following modes. • 1 pass, single way • PF: 180dpi • CR: 180dpi 5-18 PJ-1614NXE PJ-2216NXE Maintenance Manual 5 Self-Diagnosis Function NOTE Pressing the Cancel key in the operation panel during the printout causes the machine to stop the printout. 3. Check the printed head nozzle check patterns for the following points. • Ink nozzle discharge amount (omission, discontinuity, meandering) • Satellite • T fence • Nozzle alignment in vertical direction • Nozzle alignment in horizontal direction Nozzle check: Prints out patterns in the order of K, C, M, and Y. Nozzle alignment in vertical direction: Prints out patterns in the order of K, C, M, and Y. NOTE An 87-inch spec prints out patterns in the order of K, C, Lc, M, Lm, and Y. 4. If any abnormal conditions are found in the ink discharge status of the head nozzles, perform ink purge on the relevant heads. TIP "5.6Purge Menu" 5. After the ink purge, the system returns to the purge selection menu. 5-19 5 Self-Diagnosis Function PJ-1614NXE PJ-2216NXE Maintenance Manual 5.5.4 Head Inclination Check Menu This menu prints out a sample drawing to check for head inclination. To perform head inclination check, follow the steps below. 1. Set paper as necessary. 2. After paper is set, the machine prints out head inclination check patterns in the following modes. • 1 pass, single way • PF: 180dpi, CR: 360dpi NOTE Pressing the Cancel key in the operation panel during the printout causes the machine to stop the printout. 5-20 PJ-1614NXE PJ-2216NXE Maintenance Manual 5 Self-Diagnosis Function 3. Check the printed head inclination check patterns. 25.4mm A CCW c c c c CW A: Check by these connection points. B: Paper feed direction 4. If any head inclination is found, perform mechanical adjustment. TIP "7.7 Head Accuracy Adjustment" 5. After mechanical adjustment, make the machine print out head nozzle check patterns again. 5-21 B 5 Self-Diagnosis Function PJ-1614NXE PJ-2216NXE Maintenance Manual 5.5.5 Two-Way Printing Position Alignment Menu This menu is used to align the head positions for two-way printing. To align the head position for two-way printing, you must first print out a Bi-D drawing and identify the difference between the CW printing position and the CCW printing position. Then, you enter the difference for the relevant parameter. The actual procedure is as follows. 1. Set paper as necessary 2. After paper is set, the machine prints out two-way printing position alignment patterns. 3. Check the printed two-way printing position alignment patterns for the following points. Table 5-6 Adjustment Items and Drawing Mode Item Contents No.1 head 1 Bi-D adjustment for No.1 head, head gap: LOW No.1 head 2 Bi-D adjustment for No.2 head, head gap: LOW No.1 head 3 Bi-D adjustment for No.3 head, head gap: LOW No.1 head 4 Bi-D adjustment for No.4 head, head gap: LOW No.2 head 1 Bi-D adjustment for No.1 head, head gap: MIDDLE No.2 head 2 Bi-D adjustment for No.2 head, head gap: MIDDLE No.2 head 3 Bi-D adjustment for No.3 head, head gap: MIDDLE No.2 head 4 Bi-D adjustment for No.4 head, head gap: MIDDLE No.3 head 1 Bi-D adjustment for No.1 head, head gap: HIGH No.3 head 2 Bi-D adjustment for No.2 head, head gap: HIGH No.3 head 3 Bi-D adjustment for No.3 head, head gap: HIGH No.3 head 4 Bi-D adjustment for No.4 head, head gap: HIGH No.1 ALL Prints by all heads with the LOW head gap No.2 ALL Prints by all heads with the MIDDLE head gap No.3 ALL Prints by all heads with the HIGH head gap ALL Prints by all heads with all head gaps Exit Exit the menu 5-22 PJ-1614NXE PJ-2216NXE Maintenance Manual 5 Self-Diagnosis Function # # # # # # # # # # # # Media Feed Direction 4. If any abnormal conditions are found, identify the difference between the CW printing position and the CCW printing position and enter the difference as the two-way printing position aligning parameter. 5. If you have changed any parameters, make sure to update the parameters. 5-23 5 Self-Diagnosis Function PJ-1614NXE PJ-2216NXE Maintenance Manual NOTE For an 87-inch spec, parameters for the No.5 and No.6 heads are also available. 5.5.6 CW Adjustment Menu In this menu, you can adjust the gap between two heads. To adjust the gap between two heads, you must first print out a Uni-D drawing and identify the difference between the selected two heads. Then, you enter the difference for the relevant parameter. The actual procedure is as follows. 1. Set paper as necessary. 2. After paper is set, the machine prints out CW adjustment check patterns. 3. Check the printed CW adjustment check patterns for the following points. 5-24 PJ-1614NXE PJ-2216NXE Maintenance Manual 5 Self-Diagnosis Function Table 5-7 CW Adjustment Check Item Item Contents Head 1-2 Uni-D adjustment of No.2 head to No.1 head Head 1-3 Uni-D adjustment of No.3 head to No.1 head Head 1-4 Uni-D adjustment of No.4 head to No.1 head ALL Print outs Uni-D adjustment patterns for No.2/3/4 heads to No.1 head Exit Exit the menu Print pattern (If ALL) A: Paper feed direction 4. If any abnormal conditions are found, identify the gap between the two heads and enter it as the CW adjustment parameter. After entering parameters, make sure to update the parameters. 5-25 5 Self-Diagnosis Function PJ-1614NXE PJ-2216NXE Maintenance Manual NOTE For an 87-inch spec, the items "Head 1-5" and "Head 1-6" are also available. 5.5.7 Band Feed Correction Menu In this menu, you can correct the paper feed distance. To correct the paper feed distance, you must first print out check patterns and measure the distance between lines drawn in the paper feed direction. Then you enter the measured value through this menu. The system uses this entered value to determine the PF encoder resolution parameter in the firmware. The actual procedure is as follows. 1. Set paper as necessary. 2. After paper is set, the machine prints out band feed correction patterns in the following modes. • Length: 300 - 1000mm • 2 pass Single way • PF: 180dpi, CR: 180dpi 3. Check the printed band feed correction patterns for the following point. • Paper feed amount 5-26 PJ-1614NXE PJ-2216NXE Maintenance Manual 5 Self-Diagnosis Function 4. Enter the measured value as the paper feed distance parameter. 5-27 5 Self-Diagnosis Function PJ-1614NXE PJ-2216NXE Maintenance Manual 5.5.8 Test Drawing Menu In this menu, you can print out adjustment patterns for checking various adjustment items. The actual procedure is as follows. 1. Set paper as necessary 2. After paper is set, the machine prints out the following test drawings. • Nozzle check: Head nozzle check pattern • Adjustment variables: Set values of various adjustment variables 3. Press the Confirm key in the operation panel to start the selected test drawing. 5.5.9 Side Margin Menu In this menu, you can print out adjustment patterns for checking various adjustment items. The actual procedure is as follows. 1. Set paper as necessary. 2. After paper is set, select the side margin menu. 3. Check the printed side margin check patterns. 5.5.10Head Cleaning Menu This menu is used to purge ink and clean the heads at the end of the manufacturing process, before printer head replacement, and before long-time storage of the machine. The actual procedure is as follows. 1. Remove ink from the ink tank of the head to be cleaned, and put in 300ml to 500ml of JW. 2. From the operation panel, select and confirm the head cleaning menu. 3. Select the head to be cleaned. 5-28 PJ-1614NXE PJ-2216NXE Maintenance Manual 5 Self-Diagnosis Function 5-29 5 Self-Diagnosis Function PJ-1614NXE PJ-2216NXE Maintenance Manual 5.5.11Software Counter Initialization Menu This menu initializes the software counters such as the ink amount counter. NOTE Before delivery, always initialize the software counters. The software counters that can be initialized through this menu are as follows. Table 5-8 Software Counters Initialized Counter Initial value Ink amount counter 0 Cumulative printout timer 0 Initial ink charge flag 1 Pressing the Confirm key in the operation panel performs the software counter initialization. Pressing the Cancel key cancels the initialization. 5.5.12Feed Pitch Check Menu In this menu, you can check the paper feed amount for one band by reviewing a sample drawing. To check the feed pitch, follow the steps below. Set paper as necessary. After paper is set, the machine prints out feed pitch check patterns in the following modes. 1 pass single way NOTE Pressing the Cancel key in the operation panel during the printout causes the machine to stop the printout. Check the printed feed pitch check patterns. 5-30 PJ-1614NXE PJ-2216NXE Maintenance Manual 5 Self-Diagnosis Function A A: Paper feed direction 5-31 5 Self-Diagnosis Function PJ-1614NXE PJ-2216NXE Maintenance Manual 5.6 Purge Menu In this menu, you can purge ink from the printer heads. The Purge menu includes the following diagnosis items. Table 5-9 Diagnosis Items in Purge Menu Diagnosis item Contents Normal Performs normal purge. Powerful Performs powerful purge. Minimum purge Performs minimum purge. Initial ink charge Performs initial ink charge. NOTE The ink colors of light cyan and light magenta are only available for an 87-inch spec. 5-32 PJ-1614NXE PJ-2216NXE Maintenance Manual 5 Self-Diagnosis Function 5.7 Sample Drawing Menu This menu prints out a sample printing. The Sample printing menu includes the following items. Table 5-10 Diagnosis Items in Sample Drawing Menu Diagnosis item Contents Nozzle check Print the head nozzle check pattern, head lean check pattern, repeating pass print positioning pattern, and the CW adjustment pattern. Adjustment variables Prints out the set values of various adjustment items. NOTE If you have not registered the serial number of the machine, you must enter it before you can start the adjustment variable printout. 5-33 5 Self-Diagnosis Function PJ-1614NXE PJ-2216NXE Maintenance Manual 5-34 PJ-1614NXE PJ-2216NXE Maintenance Manual 5 Self-Diagnosis Function 5.8 Parameter Menu In this menu, you can modify the set values of various adjustment items (adjustment parameter). The Parameter menu includes the following items. Table 5-11 Diagnosis Items in Parameter Menu Diagnosis item Contents Reference Initialization Initializes the adjustment parameters. 5.8.1 Parameter Initialization Menu Update Updates the adjustment parameters. 5.8.2 Parameter Update Menu 5-35 5 Self-Diagnosis Function PJ-1614NXE PJ-2216NXE Maintenance Manual 5.8.1 Parameter Initialization Menu This menu initializes the adjustment parameters. The parameters that can be initialized through this menu are as follows. • Paper feed distance • Serial number • Maintenance history (head, CR motor, PF motor) • Initialization of all items 5.8.2 Parameter Update Menu This menu updates the adjustment parameters. The parameters that can be updated through this menu are as follows. • Head voltage • Printing position alignment • CW adjustment • Paper feed distance • Side margin • Ink parameter • Serial number • Head temperature • Sub tank heater NOTE If you update any parameter in the Parameter Update menu, always turn the power OFF after quitting the menu. The updated parameters will not be stored in the flash memory unless the system power is turned OFF. 5-36 PJ-1614NXE PJ-2216NXE Maintenance Manual 5 Self-Diagnosis Function 5-37 5 Self-Diagnosis Function PJ-1614NXE PJ-2216NXE Maintenance Manual (1) Head voltage In this menu, you can enter a head voltage. The head voltage is used to determine the printer head-driving voltage and perform temperature correction. After a head voltage is entered, the system shifts to the Ink Charge menu. NOTE The ink colors of light cyan and light magenta are only available for an 87-inch model. 5-38 PJ-1614NXE PJ-2216NXE Maintenance Manual 5 Self-Diagnosis Function (2) Printing position alignment This updates the printing position alignment parameters. NOTE For an 87-inch spec, the parameters for "Head 5" and "Head 6" are also available. (3) CW This updates the CW adjustment parameters. 5-39 5 Self-Diagnosis Function PJ-1614NXE PJ-2216NXE Maintenance Manual NOTE For an 87-inch model, the parameters of "Gap1-5" and "Gap1-6" are also available. (4) Paper feed distance This updates the paper feed distance parameters. 5-40 PJ-1614NXE PJ-2216NXE Maintenance Manual 5 Self-Diagnosis Function (5) Side margin This updates the side margin parameters. (6) Ink parameter This updates the ink parameter. The available options are as follows. • Set: Ink not filled • Reset: Ink filled (7) Serial number entry This is for entering the serial number. 5-41 5 Self-Diagnosis Function PJ-1614NXE PJ-2216NXE Maintenance Manual TIP • The third figure of a serial number differs with the machine size. • 6: 64 inch • 8: 87 inch • The fourth figure of a serial number differs with the destination market. • J: Japan • C: China • A: America • E: Europe • K: International Sales Division • F: America (for Iris) (8) Update/ Head temperature This updates the head temperature parameter. 5-42 PJ-1614NXE PJ-2216NXE Maintenance Manual 5 Self-Diagnosis Function (9) Update/Sub tank heater This updates the sub tank heater temperature parameter. 5-43 5 Self-Diagnosis Function PJ-1614NXE PJ-2216NXE Maintenance Manual 5.9 Endurance Running Menu In this menu, you can perform endurance running on the printer heads. The Endurance Running menu includes the following items. Table 5-12 Diagnosis Items in Endurance Running Menu Diagnosis item Contents Reference CR motor Performs carriage stroke. 5.9.1 CR Motor Endurance Menu PF motor Drives the PF motor. 5.9.2 PF Motor Endurance Menu Head up/down Changes over the head height repeatedly. 5.9.3 Head Up/Down Endurance Menu Lever motor Drives the lever motor. 5.9.4 Lever Motor Endurance Menu Sequential drawing Prints out a drawing by printer heads repeatedly. 5.9.5 Sequential Drawing Endurance Menu General endurance Performs endurance running on the CR, PF, head up/down, cutter 5.9.7 General Endurance solenoid, and lever motor concurrently. Menu Confirmation Used to check the number of endurance running cycles. Pump Drives the positive/negative pressure pump motor. 5-44 5.9.8 Endurance Running Check Menu 5.9.6 Pump Menu PJ-1614NXE PJ-2216NXE Maintenance Manual 5 Self-Diagnosis Function 5.9.1 CR Motor Endurance Menu This menu performs endurance running for the CR motor. You can perform carriage stroke according to your desired setting. The available setting is shown below. Table 5-13 Set Item in CR Motor Endurance Menu Set item Contents Set value Number of endurance running Set the number of endurance cycles running cycles Remark -1 to 10000 TIP • The operation speed is 291.66cps. • If the number of endurance running cycles is set to -1, the carriage continuously repeats stroking until a key input is given from the operation panel. • The maximum counter value for endurance running cycles is 99999999 (up to 8-digit number). If the number of cycles exceeds the maximum value, the counter is reset to 0. • The maximum and minimum values of the carriage stroking distance are as follows. • MAX: 2,066 mm (64-inch spec), 2,637.478 mm (87-inch spec) from origin • MIN: 8mm from origin 5-45 5 Self-Diagnosis Function PJ-1614NXE PJ-2216NXE Maintenance Manual 5.9.2 PF Motor Endurance Menu This menu performs endurance running for the PF motor. You can drive the PF motor according to your desired settings. The available settings are shown below. Table 5-14 Set Items in PF Motor Endurance Menu Set item Paper feed amount Contents Set value Set the paper feed amount per 0.1 to 100 endurance running cycle Number of endurance running Set the number of endurance cycles running cycles Remark Unit: mm -1 to 10000 TIP • The motor drive parameters are determined as follows depending on the paper feed amount. • If the number of endurance running cycles is set to -1, the PF motor continuously repeats endurance running until a key input is given from the operation panel. • The maximum counter value for endurance running cycles is 99999999 (up to 8-digit number). If the number of cycles exceeds the maximum value, the counter is reset to 0. 5-46 PJ-1614NXE PJ-2216NXE Maintenance Manual 5 Self-Diagnosis Function 5.9.3 Head Up/Down Endurance Menu This menu performs endurance running for the head up/down operation. You can perform the capping operation according to your desired settings. The available settings are shown below. Table 5-15 Set Items in Head Up/Down Endurance Menu Set item Waiting tim Contents Set value Set the waiting time after one 10 cycle of endurance running Number of endurance running Set the number of endurance cycles running cycles Remark Unit: second -1 to 10000 TIP • If the number of endurance running cycles is set to -1, the heads continuously repeat endurance running until a key input is given from the operation panel. • The maximum counter value for endurance running cycles is 99999999 (up to 8-digit number). If the number of cycles exceeds the maximum value, the counter is reset to 0. • The waiting time is not modifiable. 5.9.4 Lever Motor Endurance Menu This menu performs endurance running for the lever motor. You can drive the lever motor according to your desired settings. The available settings are shown below. 5-47 5 Self-Diagnosis Function PJ-1614NXE PJ-2216NXE Maintenance Manual Table 5-16 Set Item in Lever Motor Endurance Menu Set item Contents Set value Number of endurance running Set the number of endurance cycles running cycles Remark -1 to 10000 TIP • If the number of endurance running cycles is set to -1, the lever motor continuously repeats endurance running until a key input is given from the operation panel. • The maximum counter value for endurance running cycles is 99999999 (up to 8-digit number). If the number of cycles exceeds the maximum value, the counter is reset to 0. 5-48 PJ-1614NXE PJ-2216NXE Maintenance Manual 5 Self-Diagnosis Function 5.9.5 Sequential Drawing Endurance Menu This menu performs endurance running for the printer heads. You can operate the printer heads according to your desired settings. The available settings are shown below. Table 5-17 Set Item in Sequential Drawing Endurance Menu Set item Contents Set value Number of endurance running Set the number of endurance cycles running cycles Remark -1 to 10000 TIP • If the number of endurance running cycles is set to -1, the heads continuously repeat endurance running until a key input is given from the operation panel. • The maximum counter value for endurance running cycles is 99999999 (up to 8-digit number). If the number of cycles exceeds the maximum value, the counter is reset to 0. 5.9.6 Pump Menu The specified pump will be activated. While the pump is activated, pressure adjustment of the specified pump is performed. 5-49 5 Self-Diagnosis Function PJ-1614NXE PJ-2216NXE Maintenance Manual CAUTION When performing the pump menu, always perform the ink discharge. If the ink is not discharged there will be a possibility of the ink spraying out or reversing. Ink discharge operation: "5.5.10 Head Cleaning Menu" 5.9.7 General Endurance Menu This menu performs the general endurance running. You can operate various driving systems according to your desired settings. The available settings are shown below. Table 5-18 Settings of the comprehensive endurance menu Set item Paper feed amount Contents Set value Set the paper feed amount per 0 to 100 cycle Number of endurance running Set the number of endurance cycles running cycles Remark Unit: mm -1 to 10000 TIP • In the General Endurance menu, the following operations are performed as one cycle of endurance running. • Carriage stroking: 185 strokes • Paper feed: 185 cycles • Head U/D operation: 8 cycles • If the number of endurance running cycles is set to -1, the units continuously repeat endurance running until a key input is given from the operation panel. • The maximum counter value for endurance running cycles is 99999999 (up to 8-digit number). If the number of cycles exceeds the maximum value, the counter is reset to 0. 5-50 PJ-1614NXE PJ-2216NXE Maintenance Manual 5 Self-Diagnosis Function 5.9.8 Endurance Running Check Menu In this menu, you can confirm the number of endurance running cycles that have been already finished. The number of endurance running cycles is stored in NVRAM in the system. Therefore, even if a serious error occurs during endurance running, you can confirm the number of finished cycles just before the occurrence of the serious error. 5-51 5 Self-Diagnosis Function PJ-1614NXE PJ-2216NXE Maintenance Manual 5-52 6 MAINTENANCE MANUAL 6.1 Introduction . . . . . . . . . . . . . . . . . . . . . . . . . . . . . . . . 6-1 6.2 Overview . . . . . . . . . . . . . . . . . . . . . . . . . . . . . . . . . . 6-1 6.3 Operations in Maintenance Mode . . . . . . . . . . . . . . 6-2 6.3.1 6.3.2 6.4 Starting Up Maintenance Mode . . . . . . . . . . . . . . . . . . 6-2 Operating Maintenance Mode . . . . . . . . . . . . . . . . . . . 6-2 Maintenance Menu . . . . . . . . . . . . . . . . . . . . . . . . . . 6-3 6.4.1 6.4.2 Counter Display Menu . . . . . . . . . . . . . . . . . . . . . . . . . 6-3 Counter Initialization Menu . . . . . . . . . . . . . . . . . . . . . 6-4 <Memo> PJ-1614NXE PJ-2216NXE Maintenance Manual 6 Maintenance Manual 6 Maintenance Manual 6.1 Introduction This chapter provides information on the maintenance mode. 6.2 Overview The maintenance mode provides the user with functions of displaying and initializing the life counters. It is used in the manufacturing process, adjustment, and maintenance. The maintenance mode is implemented in the system firmware. All functions are available from the operation panel. TIP For the details on the operation panel components and functions, refer to "2.3 Part names and functions". 6-1 6 Maintenance Manual PJ-1614NXE PJ-2216NXE Maintenance Manual 6.3 Operations in Maintenance Mode This section explains how to start up and operate the maintenance mode as well as provides the list of available diagnosis items. 6.3.1 Starting Up Maintenance Mode To use the maintenance mode, you must first call up the maintenance menu on the operation panel. The maintenance menu is completely independent of the normal operation mode and setup menu display mode. To call up the maintenance menu, follow the steps below. 1. If the system is in the operation mode or the setup menu mode, turn off the system power. 2. Press and hold the [F1] key, [F3] key, and [Menu ] key simultaneously. While holding down these keys, press [Power] key. • The system will enter the maintenance mode and display the maintenance menu. F1 F2 F3 F4 ERROR DATA RECEIVE PROCESS MENU POWER MEDIA SET CANCEL ENTER 6.3.2 Operating Maintenance Mode To learn how to operate in the maintenance mode, refer to "5.3 Operations in Self-Diagnosis Mode". 6-2 PJ-1614NXE PJ-2216NXE Maintenance Manual 6 Maintenance Manual 6.4 Maintenance Menu The maintenance menu includes the following diagnosis items. Table 6-1 Diagnosis Items in Maintenance Menu Diagnosis item Contents Reference Counter display Displays the life counter 6.4.1 Counter Display Menu Counter initialization Initializes the life counter 6.4.2 Counter Initialization Menu 6.4.1 Counter Display Menu This menu displays the life counters. It consists of the following diagnosis items. Table 6-2 Diagnosis Items in Counter Display Menu Diagnosis item Contents CR motor Displays the life counter of the CR motor. PF motor Displays the life counter of the PF motor. Head 1 Displays the life counter of the head unit 1. Head 2 Displays the life counter of the head unit 2. Head 3 Displays the life counter of the head unit 3. Head 4 Displays the life counter of the head unit 4. Head 5 Displays the life counter of the head unit 5. Head 6 Displays the life counter of the head unit 6. Number of total prints Displays the total number of printed copies. NOTE ° All life counters are displayed in decimal number. ° The diagnosis items of Head 5 and Head 6 are only available with 87-inch models. 6-3 6 Maintenance Manual PJ-1614NXE PJ-2216NXE Maintenance Manual 6.4.2 Counter Initialization Menu This menu initializes the life counters. The parameters that can be initialized in this menu are as follows. Table 6-3 Diagnosis Items in Counter Initialization Menu Initialization item Contents Number of total prints Initializes the total print counter. Head unit Head unit Initializes the head nozzle life counter. Entire system Initializes the timer, life counter, and mechanism counter. NVRAM Initializes NVRAM. CR motor Initializes the CR motor life counter. PF motor Initializes the PF motor life counter. Timer Initializes the timer. Head error clear Cancels a serious error caused by overcurrent to the printer head. 6-4 PJ-1614NXE PJ-2216NXE Maintenance Manual 6 Maintenance Manual 6-5 6 Maintenance Manual PJ-1614NXE PJ-2216NXE Maintenance Manual 6-6 7 ADJUSTMENT 7.1 Introduction . . . . . . . . . . . . . . . . . . . . . . . . . . . . . . . . 7-1 7.2 Adjustment Item . . . . . . . . . . . . . . . . . . . . . . . . . . . . 7-1 7.3 Parameter Backup. . . . . . . . . . . . . . . . . . . . . . . . . . . 7-5 7.3.1 7.3.2 7.3.3 7.4 Firmware Installation . . . . . . . . . . . . . . . . . . . . . . . . 7-8 7.4.1 7.4.2 7.5 Jigs and Tools . . . . . . . . . . . . . . . . . . . . . . . . . . . . . . . 7-8 Installing Firmware. . . . . . . . . . . . . . . . . . . . . . . . . . . . 7-8 Steel Belt Tension Adjustment . . . . . . . . . . . . . . . 7-10 7.5.1 7.5.2 7.6 Jigs and Tools . . . . . . . . . . . . . . . . . . . . . . . . . . . . . . . 7-5 Downloading Backup Parameters . . . . . . . . . . . . . . . . 7-6 Installing Backup Parameters . . . . . . . . . . . . . . . . . . . 7-6 Jigs and Tools . . . . . . . . . . . . . . . . . . . . . . . . . . . . . . 7-10 Adjusting Steel Belt Tension . . . . . . . . . . . . . . . . . . . 7-10 PF Reduction Belt Tension Adjustment . . . . . . . . 7-12 7.6.1 Jigs and Tools . . . . . . . . . . . . . . . . . . . . . . . . . . . . . . 7-12 7.7 Head Accuracy Adjustment . . . . . . . . . . . . . . . . . . 7-13 7.8 Cover Sensor Adjustment . . . . . . . . . . . . . . . . . . . 7-14 7.9 Platen Height Adjustment . . . . . . . . . . . . . . . . . . . 7-16 7.9.1 7.9.2 Jigs and Tools . . . . . . . . . . . . . . . . . . . . . . . . . . . . . . 7-16 Adjustment Procedure . . . . . . . . . . . . . . . . . . . . . . . . 7-16 <Memo> PJ-1614NXE PJ-2216NXE Maintenance Manual 7 Adjustment 7 Adjustment 7.1 Introduction This chapter provides information on necessary adjustment items and procedures. TIP For jigs and tools necessary for adjustment, refer to "10.3 Jig and Tool List". 7.2 Adjustment Item This section describes the adjustment items required in part replacement procedures. When you adjust or replace any of the service parts listed in "Table 7-1 Adjustment Part List", you must always adjust the printout quality using the self-diagnosis function referring to "Table 7-1 Adjustment Part List". 7-1 7 Adjustment PJ-1614NXE PJ-2216NXE Maintenance Manual Table 7-1 Adjustment Part List Part replaced or adjusted Printer head Adju stme nt orde r Adjustment item Reference 1 Voltage input 5.5.2 Voltage Input Menu 2 Head nozzle check 5.5.3 Head Nozzle Check Menu 3 Head inclination check 5.5.4 Head Inclination Check Menu 4 Head accuracy 7.7 Head Accuracy Adjustment 5 Two-way printing position alignment 5.5.5 Two-Way Printing Position Alignment Menu 6 CW adjustment 5.5.6 CW Adjustment Menu 7 Band feed correction 5.5.7 Band Feed Correction Menu 8 Test drawing 5.5.8 Test Drawing Menu 9 Reset of head unit life counter 5.8.1 Parameter Initialization Menu 7-2 PJ-1614NXE PJ-2216NXE Maintenance Manual 7 Adjustment Table 7-1 Adjustment Part List (Continued) Part replaced or adjusted MAIN board assembly CR motor assembly Adju stme nt orde r Adjustment item Reference 1 Parameter backup 2 Firmware installation 7.4 Firmware Installation 3 Skew check 5.5.1 Skew Check Menu 4 Voltage input (no need for initial ink charge) 5.5.2 Voltage Input Menu 5 Head nozzle check 5.5.3 Head Nozzle Check Menu 6 Head inclination check 5.5.4 Head Inclination Check Menu 7 Two-way printing position alignment 5.5.5 Two-Way Printing Position Alignment Menu 8 CW adjustment 5.5.6 CW Adjustment Menu 9 Band feed correction 5.5.7 Band Feed Correction Menu 10 Side margin 5.5.9 Side Margin Menu 11 Test drawing 5.5.8 Test Drawing Menu 1 Steel belt tension adjustment 7.5 Steel Belt Tension Adjustment 2 Two-way printing position alignment 5.5.5 Two-Way Printing Position Alignment Menu 3 Side margin adjustment 5.5.9 Side Margin Menu 4 Test drawing 5.5.8 Test Drawing Menu 7-3 7.3 Parameter Backup 7 Adjustment PJ-1614NXE PJ-2216NXE Maintenance Manual Table 7-1 Adjustment Part List (Continued) Part replaced or adjusted PF motor assembly Adju stme nt orde r Adjustment item Reference 1 PF reduction belt tension adjustment 7.6 PF Reduction Belt Tension Adjustment 2 Skew check 5.5.1 Skew Check Menu 3 Band feed correction 5.5.7 Band Feed Correction Menu 4 Test drawing 5.5.8 Test Drawing Menu P_EDGE sensor assembly 1 Side margin adjustment 5.5.9 Side Margin Menu Cover sensor assembly 1 Cover sensor adjustment 7.8Cover Sensor Adjustment PF_ENC assembly 1 PF_ENC inspection 2 Band feed correction 5.5.7 Band Feed Correction Menu 3 Test drawing 5.5.8 Test Drawing Menu Platen 1 Platen height adjustment 7.9 Platen Height Adjustment T fence 1 CR encoder inspection 2 Two-way printing position alignment 5.5.5 Two-Way Printing Position Alignment Menu 3 Test drawing 5.5.8 Test Drawing Menu 1 Steel belt tension adjustment 7.5Steel Belt Tension Adjustment CR driven pulley 7-4 5.4.5 Encoder Menu 5.4.5 Encoder Menu PJ-1614NXE PJ-2216NXE Maintenance Manual 7 Adjustment 7.3 Parameter Backup This section describes how to back up various parameters. The NVRAM (Flash-Rom and EEPROM) installed on the MAIN board assembly stores various parameters for the system operation. The available backup parameters are as follows. • Panel settings • Mechanism adjustment parameters • Main board-unique adjustment parameters TIP The MAIN board-unique adjustment parameters cannot be erased and modified. If the MAIN board assembly is found to need replacement in service operations, make sure to back up the system parameters before replacing the board. The backup data can be used to restore the original system status, eliminating some adjustment steps. CAUTION Before backing up the system parameters, always ensure that the machine power is OFF. Parameter backup with the machine power ON may damage the MAIN board or prevent correct parameter restoration. 7.3.1 Jigs and Tools The following jigs and tools are required for parameter backup. • Flash memory card TIP • For further details on the jigs and tools, refer to "10.3 Jig and Tool List". Note that the flash memory card used for parameter backup should not be used for any other purposes. 7-5 7 Adjustment PJ-1614NXE PJ-2216NXE Maintenance Manual 7.3.2 Downloading Backup Parameters This section describes the procedure to download the backup parameters to the memory card from the existing main board assembly. Follow the steps below. 1. Remove the memory cover. 2. Prepare a memory card for parameter backup and insert it in the memory card connector slot (J108) of the MAIN board assembly. NOTE The memory card front face should direct to the inside of the machine. 3. Press the Power key in the operation panel. • After all lamps in the operation panel light up for an instant, the LCD displays "PLOTTERÅ®CARD". 4. Press the Confirm key in the operation panel. • The LCD displays "PÅ®C Started". • The backup parameter download starts. 5. Verify that the backup parameters are downloaded correctly and "PÅ®C Completed" appears on the LCD. 6. Turn the machine power OFF. 7. Remove the memory card. 7.3.3 Installing Backup Parameters This section describes the procedure to install the backup parameters in the memory card to a new MAIN board assembly. Follow the steps below. 1. Insert the memory card with backup parameters in the memory card connector slot of the new MAIN board assembly. NOTE The memory card front face should direct to the inside of the machine. 2. Press the Power key in the operation panel. • After all lamps in the operation panel light up for an instant, the LCD displays "PLOTTERÅ®CARD". 3. Press the Set value key or the Set value key to change the display to "CARDÅ®PLOTTER". 7-6 PJ-1614NXE PJ-2216NXE Maintenance Manual 7 Adjustment 4. Press the Confirm key in the operation panel. • The LCD displays "CÅ®P Started". • The backup parameter installation starts. 5. Verify that the backup parameters are installed correctly and "CÅ®P Completed" appears on the LCD. 6. Turn the machine power OFF. 7. Remove the memory card. 8. Install the memory cover. 7-7 7 Adjustment PJ-1614NXE PJ-2216NXE Maintenance Manual 7.4 Firmware Installation This section describes the procedure to install the firmware. The NVRAM (Flash-Rom) on the MAIN board assembly stores the programs (firmware) that control the machine operations. When performing the following maintenance works, always install the firmware. • Replacing the MAIN board assembly • Updating the firmware CAUTION Before installing the firmware, always ensure that the machine power is OFF. Firmware installation with the machine power ON may damage the MAIN board or prevent correct data installation. 7.4.1 Jigs and Tools The jigs and tools required for firmware installation are as follows. Flash memory card or relevant PC TIP • For further details on the jigs and tools, refer to "10.3 Jig and Tool List". • Note that the flash memory card used for firmware installation should not be used for any other purposes. 7.4.2 Installing Firmware This section describes the procedure to install the firmware. Follow the steps below. (1) Installation using a flash memory card 1. Remove the memory cover. 2. Prepare a memory card for firmware installation and insert it in the memory card connector slot (J108) of the MAIN board assembly NOTE • The memory card front face should direct to the inside of the machine. 7-8 PJ-1614NXE PJ-2216NXE Maintenance Manual 7 Adjustment 3. Turn the machine power ON. • The firmware installation starts • The firmware installation takes about 60 seconds. During the installation process, the following messages will appear on the LCD of the operation panel in order. • "Erase" • "Copy" • "Compare" • "End" 4. A buzzer sound signals that the firmware installation has finished correctly. 5. Turn the machine power OFF. 6. Remove the memory card for firmware installation. 7. Install the memory cover. (2) Installation using a PC 1. Turn the machine power OFF as necessary. 2. Connect the machine and a PC with a Centronics cable. 3. Press the Power key in the operation panel. • All lamps light up for an instance. 4. Within one second after all lamps light up, press the F2 key in the operation panel. • The system enters the firmware installation mode. 5. Transmit the new firmware data from the PC. 6. A buzzer sound signals that the firmware installation has finished correctly. 7. Turn the machine power OFF. 7-9 7 Adjustment PJ-1614NXE PJ-2216NXE Maintenance Manual 7.5 Steel Belt Tension Adjustment This section describes the procedure to adjust the steel belt tension. When you have removed and installed the steel belt, always adjust the belt tension. 7.5.1 Jigs and Tools The following tools are required for steel belt tension adjustment. • Tension gauge with max. capacity of 500g TIP For further details on the jigs and tools, refer to "10.3 Jig and Tool List". 7.5.2 Adjusting Steel Belt Tension To adjust the steel belt tension, follow the steps below. 1. Press the center of the steel belt with a tension gauge. 1 2 No. Part name 1 Steel belt 2 Tension gauge TIP The steel belt tension specifications are as follows. • 64-inch model: 100g ± 10g • 87-inch model: 120g ± 10g 2. If the measured tension is outside the specification, adjust the tension using the steel belt tensionadjusting screw. 7-10 PJ-1614NXE PJ-2216NXE Maintenance Manual 7 Adjustment 2 1 No. Part name 1 Steel belt 2 Steel belt tension-adjusting screw CAUTION When adjusting the belt tension, ensure that the belt is evenly tight. Uneven tension may break the belt. 7-11 7 Adjustment PJ-1614NXE PJ-2216NXE Maintenance Manual 7.6 PF Reduction Belt Tension Adjustment This section describes the procedure to adjust the tension of the PF reduction belt. When you have removed and installed the PF reduction belt, such as for PF motor removal, always adjust the PF reduction belt tension. 7.6.1 Jigs and Tools The jigs and tools required for PF reduction belt tension adjustment are as follows. • Tension gauge with max. capacity of 4000g TIP For further details on the jigs and tools, refer to "10.3 Jig and Tool List". To adjust the PF reduction belt tension, follow the steps below. 1. Loosen the two screws retaining the PF motor bracket. 2. Attach the tension gauge to the PF motor bracket and pull it in the direction shown in the figure. NOTE The PF belt tension specification is 3,500g ± 10%. 3. Tighten the two screws retaining the PF motor bracket. 1 3 2 4 No. Part name 1 PF reduction belt 2 PF motor bracket-retaining screwÅiM4Å~6Åj 3 PF motor bracket 4 Tension gauge 7-12 PJ-1614NXE PJ-2216NXE Maintenance Manual 7 Adjustment 7.7 Head Accuracy Adjustment This section describes the procedure to adjust the head accuracy. NOTE Before adjusting the head accuracy, remove the following covers. • Side cover R: "4.2.1 Removing Side Cover R" • Side cover L: "4.2.2 Removing Side Cover L" • Front cover: "4.2.3 Removing Front Cover" • Y-axis rail cover: • Carriage cover: "4.2.5 Removing Y-axis rail cover" "4.2.8 Removing Head Cover" When you have removed and installed the head assembly for part replacement for example, always adjust the head inclination and position in back and forth following the steps below. 1. Adjust the head inclination-adjusting screw so that the printed pattern edges of respective colors line up in a line. 2. Adjust the head position-adjusting screw so that the printed pattern of respective colors align to the black line and forms a continuous line. 2 1 No. Part name 1 Adjusting screw (inclination) 2 Adjusting screw (back and forth position) 7-13 7 Adjustment PJ-1614NXE PJ-2216NXE Maintenance Manual 7.8 Cover Sensor Adjustment This section describes the procedure to adjust the cover sensor. NOTE Before adjusting the cover sensor, remove the following covers. • Side cover R: "4.2.1 Removing Side Cover R" • Side cover L: "4.2.2 Removing Side Cover L" • Front cover: "4.2.3 Removing Front Cover" When you have replaced the cover sensor assembly or removed the front cover, always adjust the cover sensor following the steps below. 1. Start up the self-diagnosis function. TIP To learn how to start up and operate the self-diagnosis function, refer to "5 Self-Diagnosis Function". 2. Select "Diagnosis: Sensor" from the Self-diagnosis menu. 3. Select "Inspection: Sensor" from the Inspection menu. 4. Select "Sensor: etc." from the Sensor menu. 5. Verify that the operation panel display "etc.: Cover" changes as follows while opening and closing the front cover assembly. Table 7-2 Cover Sensor Adjustment Front cover Display in operation panel Open Cover: Open Close Cover: Close 6. If the display in the operation panel differs from the front cover status, adjust the sensor cam position. 2 1 7-14 PJ-1614NXE PJ-2216NXE Maintenance Manual No. 7 Adjustment Part name 1 Sensor cam 2 Retaining screw 7. Following the instructions in step 5, check the cover sensor assembly again. 7-15 7 Adjustment PJ-1614NXE PJ-2216NXE Maintenance Manual 7.9 Platen Height Adjustment This section describes the procedure to adjust the platen height. 7.9.1 Jigs and Tools The jigs and tools required for platen height adjustment are as follows. • Platen height-adjusting jig TIP For further details on the jigs and tools, refer to "10.3 Jig and Tool List". 7.9.2 Adjustment Procedure Follow the steps below to adjust the platen height. NOTE Before adjusting the platen height, remove the following covers. • Side cover R: "4.2.1 Removing Side Cover R" • Side cover L: "4.2.2 Removing Side Cover L" • Front cover: "4.2.3 Removing Front Cover" • Y-axis rail cover: "4.2.5 Removing Y-axis rail cover" 7-16 8 MAINTENANCE 8.1 Introduction . . . . . . . . . . . . . . . . . . . . . . . . . . . . . . . . 8-1 8.2 Periodical Services . . . . . . . . . . . . . . . . . . . . . . . . . . 8-2 8.3 Part Life Information . . . . . . . . . . . . . . . . . . . . . . . . . 8-3 8.4 Lubrication/Bonding . . . . . . . . . . . . . . . . . . . . . . . . . 8-4 8.5 Transportation of Machine . . . . . . . . . . . . . . . . . . . . 8-5 <Memo> PJ-1614NXE PJ-2216NXE Maintenance Manual 8 Maintenance 8 Maintenance 8.1 Introduction This chapter provides information about the periodical services, part life, lubrication/bonding, and transport. WARNING Before starting any maintenance work, always perform the following operations. • Turn the machine power OFF. • Disconnect the power plug from the outlet. Otherwise, you may suffer electric shock or the machine electric circuits may be damaged. • Disconnect all cables from the machine. Otherwise, the machine may break down. CAUTION • Before performing any maintenance work, ensure that sufficient space is secured around the machine. • When servicing the machinery inside with some covers removed, exercise extreme caution not to be injured by the driving mechanisms. • In the periodical services, the following work must be performed with one or more assistant worker. • Packaging the machine for transport 8-1 8 Maintenance PJ-1614NXE PJ-2216NXE Maintenance Manual 8.2 Periodical Services This section describes the periodical services required for this machine. The periodical services ensures stable printout quality of the machine. In the periodical services, some service parts may be checked, cleaned, or replaced. Perform periodical inspections according to "Table 8-1 Periodical Inspection Part List" and perform cleaning and part replacement as necessary. TIP • For details of the cleaning procedure, refer to the operation manual. • For the names and locations of the respective service parts, refer to "10.4 Exploded Views/Service Parts List". Table 8-1 Periodical Inspection Part List Part Paper guide L Platen surface Timing Several times in a year Check point •Paper dust accumulation •Foreign objects Foreign objects •Damages Timing fence (CR encoder detection slit plate) P_REAR sensor surface Several times in a year •Paper dust accumulation •Foreign objects Several times in a year Action Clean it. NOTE If ink deposits are present, remove them with a dampened cloth and wipe the area with a clean dry cloth. Clean it. •Damages If any damages are found, replace the part. •Paper dust accumulation Clean it. •Foreign objects 8-2 PJ-1614NXE PJ-2216NXE Maintenance Manual 8 Maintenance 8.3 Part Life Information This section shows how to check the life of a service part. To know the life of a service part, check the maintenance counter from the counter display menu in the maintenance mode. TIP For further details on the counter display menu, refer to "6.4.1 Counter Display Menu". 8-3 8 Maintenance PJ-1614NXE PJ-2216NXE Maintenance Manual 8.4 Lubrication/Bonding This section covers the lubrication/bonding information. After disassembling/assembling this machine, always perform necessary lubrication/bonding according to "Table 8-2 Lubricant List". CAUTION Only use specified lubricants and greases. The use of unauthorized lubricants and greases may damage the components and shorten the machine life. 8-4 PJ-1614NXE PJ-2216NXE Maintenance Manual 8 Maintenance 8.5 Transportation of Machine This section describes how to transport the machine. Before transporting the machine, you must package it in the same manner as it was delivered using protective materials and packaging materials so that the machine will not be subject to excessive impact and vibrations during the transportation. Follow the steps below to package the machine. (1) Task before transportation 1. Turn the machine power OFF. 2. Verify that the machine is in normal state. 3. Clean the printer heads following the instructions in "5.5.10 Head Cleaning Menu". 4. Clean the flushing box with jet wash. 5. Extract all waste fluid from the waste fluid tank. 6. Attach caps. 7. Remove all cables including the power cable. 8. Fit the machine with protective materials. TIP For details on protective materials, refer to the operation manual. 9. Package the machine. (2) Task after transportation 1. Unpack, assemble, and install the machine. 2. Make the machine ready for operation. 8-5 8 Maintenance PJ-1614NXE PJ-2216NXE Maintenance Manual 8-6 9 TROUBLESHOOTING 9.1 9.2 Introduction . . . . . . . . . . . . . . . . . . . . . . . . . . . . . . . . 9-1 Troubleshooting with Error Message . . . . . . . . . . . 9-1 9.2.1 9.2.2 9.2.3 9.2.4 9.2.5 9.3 Operation Status . . . . . . . . . . . . . . . . . . . . . . . . . . . . . 9-2 Errors with Message . . . . . . . . . . . . . . . . . . . . . . . . . . 9-5 Data Errors . . . . . . . . . . . . . . . . . . . . . . . . . . . . . . . . . 9-9 Command Errors . . . . . . . . . . . . . . . . . . . . . . . . . . . . . 9-9 Errors Requiring Reboot . . . . . . . . . . . . . . . . . . . . . . 9-11 Troubleshooting without Error Message . . . . . . . 9-24 9.3.1 9.3.2 9.3.3 9.3.4 9.3.5 9.3.6 Initial Operation Problems . . . . . . . . . . . . . . . . . . . . . Paper Feed Problems . . . . . . . . . . . . . . . . . . . . . . . . Drawing Problems . . . . . . . . . . . . . . . . . . . . . . . . . . . Noise Problems . . . . . . . . . . . . . . . . . . . . . . . . . . . . . Online Function Problem . . . . . . . . . . . . . . . . . . . . . . Other Problems . . . . . . . . . . . . . . . . . . . . . . . . . . . . . 9-24 9-29 9-30 9-39 9-41 9-44 <Memo> PJ-1614NXE PJ-2216NXE Maintenance Manual 9 Troubleshooting 9 Troubleshooting 9.1 Introduction This chapter provides information on possible causes of machine errors/damage and corrective actions. If the machine is malfunctioning and an error message is displayed on the operation panel, refer to "9.2 Troubleshooting with Error Message". If the machine is malfunctioning but no error messages are displayed, refer to "Troubleshooting without Error Message". 9.2 Troubleshooting with Error Message This section describes the messages displayed in normal operation and upon an error occurrence as well as how to correct the error. The available messages are as follows. Table 9-1 Error Message Type Prio rity Message type Contents Reference 1 Operation status Displayed when the machine is operating normally. 9.2.1 Operation Status 2 Error with message Displayed when an abnormal condition occurs during normal operation. 9.2.2 Errors with Message 3 Data error Displayed when a data communication error occurs between PC and the machine. 4 Command error Displayed when an abnormal condition occurs during analysis of PC commands. 9.2.4 Command Errors 5 Error requiring reboot Displayed when a serious error critical to the machine operation occurs. 9.2.5 Errors Requiring Reboot 9-1 9.2.3 Data Errors 9 Troubleshooting PJ-1614NXE PJ-2216NXE Maintenance Manual 9.2.1 Operation Status This section describes the message contents, check items, and corrective actions for normal operation. Table 9-2 Events and Check Items for Operation Status Messages No. Message Event/ symptom Check item Action 1 Cover open Front cover is open. Maintenance cover is open. (1) Is cover sensor assembly ÅETighten cover sensor loose? assembly screws. 2 Set paper Lever is up. (2) Does cover sensor assembly turns ON/OFF correctly as front cover opens and closes? ÅEAdjust cover sensor assembly height. (3) Is cover sensor assembly ÅECorrectly connect cover cable connected securely? sensor assembly cables to MAIN board assembly connectors J128, J129 and J130. Reference 4.5.8 Replacing Cover R Sensor Assembly and Cover L Sensor Assembly 7.8 Cover Sensor Adjustment 4.3.2Replac ing MAIN Board Assembly, DIMM, MOTHER Board Assembly, HDD_MOTHER Board Assembly (4) Is transmission type photo sensor fitted correctly? ÅEInstall transmission type 4.4.6 photo sensor correctly. Replacing Transmission Type Photo Sensor (5) Is transmission type photo sensor face contaminated? ÅEClean sensor face using a 4.4.6 swab. Replacing Transmission Type Photo Sensor 9-2 PJ-1614NXE PJ-2216NXE Maintenance Manual 9 Troubleshooting Table 9-2 Events and Check Items for Operation Status Messages (Continued) No. Message Event/ symptom Check item Action Reference (6) Is transmission type photo sensor connected securely? ÅECorrectly connect transmission type sensor assembly cables to MAIN board assembly connectors J118 and J120. 4.3.2 Replacing MAIN Board Assembly, DIMM, MOTHER Board Assembly, HDD_MOTHER Board Assembly (7) Panel board assembly may be damaged. ÅEReplace panel board assembly. 4.2.4 Replacing Panel Board Assembly (8) Panel cable may be damaged. ÅEReplace panel cable. 4.2.4 Replacing Panel Board Assembly (9) Check cover sensor assembly operation from "Sensor: etc." of selfdiagnosis function. ÅEReplace cover sensor assembly. 4.5.8 Replacing Cover R Sensor Assembly and Cover L Sensor Assembly (10) Check transmission type sensor assembly operation from "Sensor: etc." of self-diagnosis function. ÅEReplace transmission type sensor assembly. 4.4.6 Replacing Transmission Type Photo Sensor (11) MAIN board assembly ÅEReplace MAIN board may be damaged. assembly. 9-3 4.3.2 Replacing MAIN Board Assembly, DIMM, MOTHER Board Assembly, HDD_MOTHER Board Assembly 9 Troubleshooting PJ-1614NXE PJ-2216NXE Maintenance Manual Table 9-2 Events and Check Items for Operation Status Messages (Continued) No. 3 Message No paper Event/ symptom No paper is set. Check item (1) Is P_EDGE sensor assembly at cursor connected correctly? Action Reference ÅESecurely connect it to CR_BASE board assembly connector J004. 4.7.2 Replacing CR_BASE Board Assembly and CR_HEAD Board Assembly ÅESecurely connect it to (2) Is P_REAR sensor assembly under paper guide MAIN board assembly connector J117. R connected correctly? 4.3.2 Replacing MAIN Board Assembly, DIMM, MOTHER Board Assembly, HDD_MOTHER Board Assembly (3) CR_HEAD board assembly and CR_BASE board assembly may be damaged. ÅEReplace CR_HEAD 4.7.2 board assembly and Replacing CR_BASE board assembly. CR_BASE Board Assembly and CR_HEAD Board Assembly (4) Check if sensor is ON from "Sensor: etc." of selfdiagnosis function. ÅEIf this message appears though paper is set, replace P_REAR sensor assembly. 4.4.3 Replacing P_REAR_R sensor assembly (5) CR tape wire may be broken. ÅEReplace CR tape wire assembly. 4.5.7 Replacing Steel Bearer, Tube Guide, CR Tape Wire, and Intake Tube (6) MAIN board assembly may be damaged. ÅEReplace MAIN board assembly. 4.3.2 Replacing MAIN Board Assembly, DIMM, MOTHER Board Assembly, HDD_MOTHER Board Assembly 9-4 PJ-1614NXE PJ-2216NXE Maintenance Manual 9 Troubleshooting 9.2.2 Errors with Message This section describes the contents of errors with messages as well as the check items and corrective actions. These messages are displayed when an abnormal condition occurs while the machine is running. Upon an occurrence of an error with message, the machine stops its operation at the same time. The error can be cancelled by removing the error causes. After that, the machine will restart its operation. 9-5 9 Troubleshooting PJ-1614NXE PJ-2216NXE Maintenance Manual Table 9-3 Symptoms and Check Items for Errors with Message No. 1 2 Message Paper detection error Paper skew error Event/ symptom Paper detection failed Paper is running obliquely. Check item (1) Is P_EDGE sensor assembly at cursor connected correctly? Action Reference ÅESecurely connect it to CR_BASE board assembly connector J004. 4.7.2 Replacing CR_BASE Board Assembly and CR_HEAD Board Assembly ÅESecurely connect it to (2) Is P_REAR sensor assembly under paper guide MAIN board assembly connector J117. R connected correctly? 4.3.2 Replacing MAIN Board Assembly, DIMM, MOTHER Board Assembly, HDD_MOTHER Board Assembly (3) Is CR tape wire inserted Reconnect following obliquely? connectors. ÅESUB board assembly: J006 - J007 ÅECR_BASE board assembly: J1 - J2 ÅECR_HEAD board assembly 4.3.2 Replacing MAIN Board Assembly, DIMM, MOTHER Board Assembly, HDD_MOTHER Board Assembly (4) CR tape wire may be broken. ÅEReplace CR tape wire. 4.5.7 Replacing Steel Bearer, Tube Guide, CR Tape Wire, and Intake Tube (5) CR_HEAD board assembly and CR_BASE board assembly may be damaged. ÅEReplace CR_HEAD 4.7.2 board assembly and Replacing CR_BASE board assembly. CR_BASE Board Assembly and CR_HEAD Board Assembly ÅEIf this message appears (6) Check if P_REAR sensor is ON from "Sensor: though paper is set, replace P_REAR sensor assembly. etc." of self-diagnosis function. 4.4.3 Replacing P_REAR_R sensor assembly (7) MAIN board assembly may be damaged. ÅEReplace MAIN board assembly. 4.3.2 Replacing MAIN Board Assembly, DIMM, MOTHER Board Assembly, HDD_MOTHER Board Assembly (1) Set paper again and check repeatability. ÅEIf this error is caused by Å\ user's inappropriate paper setting, instruct correct paper setting procedure. 9-6 PJ-1614NXE PJ-2216NXE Maintenance Manual 9 Troubleshooting Table 9-3 Symptoms and Check Items for Errors with Message (Continued) No. 3 Message Roll paper end Event/ symptom This error is issued when paper end is detected in roll paper mode. Lifting lever upward cancels this error. Check item Action (1) Turn machine OFF. Turn If message it ON again and check if the appears: Step (2) same message appears. Reference Å\ (2) Check contact of P_REAR sensor assembly. ÅEReconnect MAIN board 4.4.3 assembly connector J117. If Replacing machine does not initialize P_REAR_R paper, sensor may be sensor assembly damaged. Replace P_REAR sensor assembly. (3) MAIN board assembly may be damaged. ÅEReplace MAIN board assembly. 4.3.2 Replacing MAIN Board Assembly, DIMM, MOTHER Board Assembly, HDD_MOTHER Board Assembly 4 [ ] Little ink Ink is running short. Printout is possible. (1) Check for ink end from "Sensor: etc." of selfdiagnosis function. ÅECheck if ink end display 5.4.4 Sensor from "Sensor: etc." changes Menu when moving level switch up and down. 5 [ ] No ink Ink has run out. Any printout operation stops immediately. (1) Check level switch connector for contact. ÅEReconnect following connectors. ÅEJ2(K) ÅEJ3(Y) ÅEJ4(Lm) ÅEJ5(M) ÅEJ6(Lc) ÅEJ7(C) ÅEJ10(JW) ÅEJ11(waste fluid) 6 Warning: Waste fluid tank Waste fluid tank is almost full. (1) Turn machine OFF. Turn ÅEIf message it ON again and check if the appears: Step (2) same message appears. 4.9.1 Replacing TERM_TANK Board Assembly Å\ (2) Waste ink in waste fluid ÅEDispose of waste fluid in Å\ tank reaches full level. waste fluid tank. (3) TERM_TANK board ÅEReplace TERM_TANK assembly may be damaged. board assembly. 9-7 4.9.1 Replacing TERM_TANK Board Assembly 9 Troubleshooting PJ-1614NXE PJ-2216NXE Maintenance Manual Table 9-3 Symptoms and Check Items for Errors with Message (Continued) No. 7 Message Event/ symptom Warning: Ink tube Ink tube life has almost expired. Check item Action (1) Turn machine OFF. Turn If message appears: it ON again and check if the Step (2) same message appears. Å\ (2) Use of ink tube has exceeded specified level. ÅEReplace ink tube. 4.5.7 Replacing Steel Bearer, Tube Guide, CR Tape Wire, and Intake Tube (3) MAIN board assembly may be damaged. ÅEReplace MAIN board assembly. 4.3.2 Replacing MAIN Board Assembly, DIMM, MOTHER Board Assembly, HDD_MOTHER Board Assembly NOTE • Reference The square bracket pair in an error message contains the applicable ink color. 9-8 PJ-1614NXE PJ-2216NXE Maintenance Manual 9 Troubleshooting 9.2.3 Data Errors This section describes the message contents of data errors as well as the check items and corrective actions. These errors are displayed when a communication error occurs between the PC and the machine. Upon an occurrence of a data error, the machine stops its operation at the same time. The error can be cancelled by removing the error causes. After that, the machine will restart its operation. Table 9-4 Symptoms and Check Items for Data Errors No. Message Event/ symptom 1 I 15-1 error command [ ] Online frame error 2 I 15-2 error command [ ] Overrun error 3 I 15-3 error command [ ] Online parity error 4 I 15-4 error command [ ] Sum check error 5 I 15-5 error command [ ] ESC parameter 6 I 15-6 error command [ ] Undefined ESC 7 I 15-7 error command [ ] Unauthorized character ESC 8 I 15-8 error command [ ] Numeral character ESC 9 I 15-9 error command [ ] Parameter error ESC 10 I 15-10 error command [ ] Buffer overflow Check item (1) Is there any errortriggering statement in drawing data? (2) MAIN board assembly may be defective. Action ÅEReplace application driver. ÅEReplace MAIN board assembly. Reference 4.3.2 Replacing MAIN Board Assembly, DIMM, MOTHER Board Assembly, HDD_MOTHER Board Assembly NOTE The square bracket pair in a message may contain the applicable command code. 9.2.4 Command Errors This section describes the message contents of command errors as well as the check items and corrective actions. These errors are displayed when an abnormal condition is found during analysis of PC command data. Upon an occurrence of a command error, the machine stops its operation at the same time. The error can be cancelled by removing the error causes. After that, the machine will restart its operation. 9-9 9 Troubleshooting PJ-1614NXE PJ-2216NXE Maintenance Manual Table 9-5 Symptoms and Check Items for Command Errors No. 1 Message MH01 Error Command [ ] Event/ symptom Undefined command: Command being analyzed is not defined in applicable command mode. 2 MH 02 Error Command [ ] Parameter error: Number of parameters following command is inappropriate. 3 MH 03 Error Command [ ] Numeral value error: Number of parameters following command is inappropriate. 4 MH 04 Error Command [ ] Undefined character set: Unknown character set is present. 5 MH 05 Error Command [ ] Buffer overflow: Polygon buffer or downloadable character buffer overflows. Check item Action (1) Is there any errortriggering statement in drawing data? ÅEReplace application driver (2) MAIN board assembly may be defective. ÅEReplace MAIN board assembly. NOTE • The square bracket pair in a message may contain the applicable command code. • For the PC settings, refer to your PC's operation manual. 9-10 Reference 4.3.2 Replacing MAIN Board Assembly, DIMM, MOTHER Board Assembly, HDD_MOTHER Board Assembly PJ-1614NXE PJ-2216NXE Maintenance Manual 9 Troubleshooting 9.2.5 Errors Requiring Reboot This section describes the contents of reboot-requiring errors as well as the check items and corrective actions. These errors are issued when any of the following critical problems occurs. ÅEObstacle that prevents the machine's operation ÅEMalfunction of electric circuits (boards, motors, sensors) ÅEAbnormal operation of control programs ÅEError that requires system reboot. When any of the above conditions occurs, the machine follows the steps shown below before stopping its operation. 1. Turn OFF the driving system power. 2. Light up all lamps in the operation panel and generate intermittent audible alarm. 3. Display the applicable error message on the LCD. The error can be cancelled by removing the error causes and restarting the machine. (1) CPU system serious error Table 9-6 Symptoms and Check Items for CPU System Serious Errors No. Message Event/ symptom Check item 1 E 001 error DRAM Standard DRAM (1) MAIN board assembly may be defective. error: Abnormal condition in standard memory mounted on MAIN board assembly. 2 E 002 error Opt. DRAM Option DRAM error: Abnormal condition in optional memory mounted on MAIN board assembly. Action ÅEReplace MAIN board assembly. Reference 4.3.2 Replacing MAIN Board Assembly, DIMM, MOTHER Board Assembly, HDD_MOTHER Board Assembly (1) Dust in extended memory slot (J107) may cause error. ÅERemove dust using 4.3.2 compressed air and reinstall Replacing MAIN memory. Board Assembly, DIMM, MOTHER Board Assembly, HDD_MOTHER Board Assembly (2) Mount known good optional memory (with the same size as that in question) and check memory size from "Inspection: Memory size" of self-diagnosis function. ÅEReplace memory. (3) MAIN board assembly may be defective. ÅEReplace MAIN board assembly. 9-11 9 Troubleshooting PJ-1614NXE PJ-2216NXE Maintenance Manual Table 9-6 Symptoms and Check Items for CPU System Serious Errors (Continued) No. Message 3 E 016 error CPU ErrÅm00Ån Event/ symptom Interruption exception error: Abnormal condition in interruption process Check item (1) Check AC power supply ÅEReplace MAIN board assembly. and printer peripherals. (2) Check repeatability by cycling machine power ON/ OFF several times. Make sure to perform this check Command border repeatedly even if no problems seem to be exception error: present. Abnormal condition in (3) MAIN board assembly command border may be defective. Data border error: Abnormal condition in data boarder 4 E 016 error CPU ErrÅm02Ån 5 E 016 error CPU ErrÅm03Ån 6 E 016 error CPU ErrÅm04Ån Address exception error (load or command fetch): Address error in command loading or fetching 7 E 016 error CPU ErrÅm05Ån Address exception error (store): Address error in clearing process 8 E 016 error CPU ErrÅm06Ån Address exception error (command fetch): Address error in command loading or storing Action 9-12 Reference 4.3.2 Replacing MAIN Board Assembly, DIMM, MOTHER Board Assembly, HDD_MOTHER Board Assembly PJ-1614NXE PJ-2216NXE Maintenance Manual 9 Troubleshooting Table 9-6 Symptoms and Check Items for CPU System Serious Errors (Continued) Event/ symptom No. Message 9 E 016 error CPU ErrÅm07Ån Bus exception error (Command fetching): Bus error in command loading or storing 10 E 016 error CPU ErrÅm08Ån System call exception error: Abnormal condition in system call 11 E 016 error CPU ErrÅm09Ån Break point exception error: Abnormal condition in break point 12 E 016 error CPU ErrÅm10Ån Reserved command exception error: Abnormal condition in reserved command 13 E 016 error CPU ErrÅm03Ån Coprocessordisabling exception error: Abnormal condition in coprocessor 14 E 016 error CPU ErrÅm12Ån Processing overflow exception error: overflow occurs Check item 9-13 Action Reference 9 Troubleshooting PJ-1614NXE PJ-2216NXE Maintenance Manual Table 9-6 Symptoms and Check Items for CPU System Serious Errors (Continued) Event/ symptom No. Message 15 E 016 error CPU ErrÅm13Ån Trap exception error: Trap occurs 16 E 016 error CPU ErrÅm15Ån Floating point exception error: Abnormal condition in floating point process 17 E 016 error CPU ErrÅm22Ån Watch exception error: Abnormal condition in Watch process 18 E 016 error CPU ErrÅm32Ån Watchdog timeout exception error: Timeout in watchdog 19 E 016 error CPU ErrÅm33Ån Abort error: Aborted Check item NOTE For the PC settings, refer to your PC's operation manual. 9-14 Action Reference PJ-1614NXE PJ-2216NXE Maintenance Manual 9 Troubleshooting (2) Mechanical Serious Errors Table 9-7 Symptoms and Check Items for Mechanical Serious Errors No. Message 1 E065 error Paper feed motor 2 3 4 E067 error Paper feed encoder Event/ symptom Abnormal condition in PF motor (X-axis) during machine operation. This error is issued when encoder feedback largely differs from motor command. Abnormal condition in paper feed amount (Xaxis) during machine operation. This error is issued when encoder returns no feedback. Check item Action (1) Check error history from Å\ "Test: History" of selfdiagnosis function. (2) Set endurance running cycles to 50 or more from "Life: PF motor" of selfdiagnosis function and check if X-axis motor error is issued. (3) Check "Encoder: PF" under "Test: Encoder" of self-diagnosis function. ÅECheck connection of following connectors in MAIN board assembly: ÅEPF motor cable assembly connector J127 ÅEPF_ENC assembly connector J132 (4) PF motor assembly may ÅEReplace PF motor be damaged. assembly. E069 error Paper feed timeout Timeout in paper (5) MAIN board assembly feed amount (X- may be damaged. axis) during machine operation. This error is issued when pressure roller does not reach specified point. E071 error Paper feed overcurrent PF motor (X-axis) is overloaded during machine operation. 9-15 ÅEReplace MAIN board assembly. Reference 5.4.7 History Menu 4.3.2 Replacing MAIN Board Assembly, DIMM, MOTHER Board Assembly, HDD_MOTHER Board Assembly 4.4.1 Replacing PF Motor Assembly 4.3.2 Replacing MAIN Board Assembly, DIMM, MOTHER Board Assembly, HDD_MOTHER Board Assembly 9 Troubleshooting PJ-1614NXE PJ-2216NXE Maintenance Manual Table 9-7 Symptoms and Check Items for Mechanical Serious Errors (Continued) No. 5 6 7 8 Message E066 error Carriage motor E068 error Carriage encoder E068 error Carriage encoder E068 error Carriage encoder Event/ symptom Check item (1) Check error history from "Test: History" of selfdiagnosis function. (2) With machine power OFF, move carriage laterally by hand to check for any drag. (3) Set endurance running cycles to 50 or more from "Life: CR motor" of selfdiagnosis function and check if Carriage motor Abnormal error is issued. condition in head (4) Check T fence for dirt, travel (Y-axis) wear. during machine (5) Check "Encoder: Y" operation. under "Test: Encoder" of This error is self-diagnosis function. issued when (6) MAIN board assembly encoder returns may be damaged. no feedback. Abnormal condition in CR motor (Y-axis) during machine operation. This error is issued when encoder feedback largely differs from motor command. Abnormal condition in head travel (Y-axis) during machine operation. This error is issued when encoder returns no feedback. Abnormal condition in head travel (Y-axis) during machine operation. This error is issued when encoder returns no feedback. 9-16 Action Å\ ÅEClean and lubricate CR rail roller runner. ÅECheck following connectors for proper connection. Main board ÅECR motor assembly connector: J131 SUB board ÅECR tape wire: J006 J007 CRBASE board ÅECR tape wire: J1 - J2 ÅECR_ENC assembly connector: J005 ÅEIf grease or dust deposits are present: Wipe with dry cloth. ÅEIf ink deposits are present: Lightly wipe them away with cloth moistened with neutral detergent. ÅEIf too much contaminated to clean: Replace T fence. ÅEa) If NG: Check following connector for proper connection. ÅECR_BASE board assembly connector J005 ÅEb) Replace following parts. ÅET fence ÅECR motor assembly ÅECR_BASE board assembly ÅECR tape wire ÅEReplace MAIN board assembly. Reference 5.4.7 History Menu 8.4 Lubrication/ Bonding 4.3.2 Replacing MAIN Board Assembly, DIMM, MOTHER Board Assembly, HDD_MOTHER Board Assembly 4.5.5 Replacing T Fence 4.5.2 Replacing CR Motor Assembly 4.7.2 Replacing CR_BASE Board Assembly and CR_HEAD Board Assembly 4.5.7 Replacing Steel Bearer, Tube Guide, CR Tape Wire, and Intake Tube 4.3.2 Replacing MAIN Board Assembly, DIMM, MOTHER Board Assembly, HDD_MOTHER Board Assembly PJ-1614NXE PJ-2216NXE Maintenance Manual 9 Troubleshooting Table 9-7 Symptoms and Check Items for Mechanical Serious Errors (Continued) No. 9 10 Message Event/ symptom Check item Action Reference E073 error Origin CR_HP cannot be (1) Check transmission type ÅECheck transmission type 5.4.4 Sensor detection detected. photo sensor from "Sensor: photo sensor assembly for Menu proper connection. etc." of self-diagnosis function. (2) Transmission type photo ÅEReplace transmission sensor may be damaged. type photo sensor. 4.4.6 Replacing Transmission Type Photo Sensor (3) MAIN board assembly may be damaged. 4.3.2 Replacing MAIN Board Assembly, DIMM, MOTHER Board Assembly, HDD_MOTHER Board Assembly ÅEReplace MAIN board assembly. (1) Check cover sensor from ÅECheck cover sensor E 074 error Cover Abnormal assembly for proper condition in cover "Sensor: etc." of selfconnection. diagnosis function. sensor. 5.4.4 Sensor Menu (2) Cover sensor assembly may be damaged. ÅEReplace cover sensor assembly. 4.5.8 Replacing Cover R Sensor Assembly and Cover L Sensor Assembly (3) MAIN board assembly may be damaged. ÅEReplace MAIN board assembly. 4.3.2 Replacing MAIN Board Assembly, DIMM, MOTHER Board Assembly, HDD_MOTHER Board Assembly 9-17 9 Troubleshooting PJ-1614NXE PJ-2216NXE Maintenance Manual Table 9-7 Symptoms and Check Items for Mechanical Serious Errors (Continued) No. Message 11 E075 error Head overcurrent Event/ symptom Abnormal condition due to printer head overload during machine operation. Check item (1) HEAD board assembly may be damaged. HD_SLID origin cannot be detected. 4.6.1 Replacing HEAD Board Assembly ÅEReplace MAIN board assembly. 4.3.2 Replacing MAIN Board Assembly, DIMM, MOTHER Board Assembly, HDD_MOTHER Board Assembly ÅECancel head error. 6.4.2 Counter Initialization Menu ÅEReplace head assembly. 4.6.2 Replacing Head Assembly ÅECancel head error. 6.4.2 Counter Initialization Menu (1) Check HD_SLIDE sensor from "Sensor: Head slide" of self-diagnosis function. ÅECheck HD_SLIDE sensor assembly connector. 5.4.4 Sensor Menu (2) Check HD_SLIDE sensor assembly for proper connection. ÅEReplace HD_SLIDE sensor assembly. 4.5.4 Replacing HD_SLIDE Sensor Assembly (3) SLIDE motor assembly may be damaged. ÅEReplace SLIDE motor assembly. 4.5.3 Replacing SLID Motor Assembly (4) MAIN board assembly may be damaged. ÅEReplace MAIN board assembly. 4.3.2 Replacing MAIN Board Assembly, DIMM, MOTHER Board Assembly, HDD_MOTHER Board Assembly (3) Head assembly may be damaged. E 076 error PG origin detection ÅEReplace HEAD board assembly. ÅECancel head error. Reference 6.4.2 Counter Initialization Menu (2) MAIN board assembly may be damaged. 12 Action 6.4.2 Counter Initialization Menu 9-18 PJ-1614NXE PJ-2216NXE Maintenance Manual 9 Troubleshooting Table 9-7 Symptoms and Check Items for Mechanical Serious Errors (Continued) No. Message 13 E 077 error Head overheat Event/ symptom Check item (1) MAIN board assembly Abnormal condition in head may be damaged. driver. Action ÅEReplace MAIN board assembly. Reference 4.3.2 Replacing MAIN Board Assembly, DIMM, MOTHER Board Assembly, HDD_MOTHER Board Assembly 6.4.2 Counter Initialization Menu 14 E 078 error Head cable Abnormal condition in head cable or head thermister. (1) Check if head cables are ÅEReconnect head cable. securely locked at CR_HEAD board assembly and head board assembly connectors. (2) Is head cable broken? ÅEReplace head cable. (3) Head thermister may be ÅEReplace thermister. malfunctioning. 15 (1) Lever motor may be E 079 error Lever Lever motor is overcurrent overloaded during damaged. machine operation. (2) MAIN board assembly may be damaged. 4.6.1 Replacing HEAD Board Assembly 4.7.2 Replacing CR_BASE Board Assembly and CR_HEAD Board Assembly 4.6.3 Replacing Cartridge Heater and Thermister ÅEReplace lever motor. 4.4.4 Replacing Lever Motor Assembly ÅEReplace MAIN board assembly. 4.3.2 Replacing MAIN Board Assembly, DIMM, MOTHER Board Assembly, HDD_MOTHER Board Assembly 6.4.2 Counter Initialization Menu 9-19 9 Troubleshooting PJ-1614NXE PJ-2216NXE Maintenance Manual Table 9-7 Symptoms and Check Items for Mechanical Serious Errors (Continued) No. 16 Message Event/ symptom Check item Action Reference (1) Lever sensor assembly E 080 error Lever Abnormal sensor condition in lever may be damaged. sensor. ÅEReplace transmission type photo sensor. 4.4.6 Replacing Transmission Type Photo Sensor (2) MAIN board assembly may be damaged. ÅEReplace MAIN board assembly. 4.3.2 Replacing MAIN Board Assembly, DIMM, MOTHER Board Assembly, HDD_MOTHER Board Assembly 6.4.2 Counter Initialization Menu 17 E 081 error CR cable Abnormal condition in CR cable. (1) Check CR cable for proper connection from "Sensor: Cable" of selfdiagnosis function. ÅEReconnect CR cable to connectors. 4.7.2 Replacing CR_BASE Board Assembly and CR_HEAD Board Assembly 4.3.2 Replacing MAIN Board Assembly, DIMM, MOTHER Board Assembly, HDD_MOTHER Board Assembly (2) Is CR cable broken? ÅEReplace CR cable. 4.5.7 Replacing Steel Bearer, Tube Guide, CR Tape Wire, and Intake Tube (3) MAIN board assembly may be damaged. ÅEReplace MAIN board assembly. 4.3.2 Replacing MAIN Board Assembly, DIMM, MOTHER Board Assembly, HDD_MOTHER Board Assembly 9-20 PJ-1614NXE PJ-2216NXE Maintenance Manual 9 Troubleshooting Table 9-7 Symptoms and Check Items for Mechanical Serious Errors (Continued) No. 18 Message E 082 error Sub tank cable Event/ symptom Abnormal condition in sub tank cable. Check item (1) Is sub tank cable disconnected? Action ÅEReconnect sub tank cable. (2) Is sub tank cable broken? ÅEReplace sub tank cable. Reference 4.7.1 Replacing Sub Tank Assembly 4.7.2 Replacing CR_BASE Board Assembly and CR_HEAD Board Assembly (3) MAIN board assembly may be damaged. 19 (1) Check pump cable for E 083 error Pump Abnormal cable condition in pump proper connection from "Sensor: Cable" of selfcable. diagnosis function. (2) Is pump cable broken? ÅEReplace MAIN board assembly. 4.3.2 Replacing MAIN Board Assembly, DIMM, MOTHER Board Assembly, HDD_MOTHER Board Assembly ÅEReconnect pump cable. 4.8 Replacement of Ink Supply Section Components ÅEReplace pump cable. 4.3.1 Replacing SUB Board Assembly 20 E 084 error Ink tank cable Abnormal condition in ink tank cable. (3) MAIN board assembly may be damaged. ÅEReplace MAIN board assembly. 4.3.2 Replacing MAIN Board Assembly, DIMM, MOTHER Board Assembly, HDD_MOTHER Board Assembly (1) Is ink tank cable disconnected? ÅEReconnect ink tank cable. (2) Ink tank cable may be broken. ÅEReplace ink tank cable 4.3.1 Replacing SUB Board Assembly (3) MAIN board assembly may be damaged. ÅEReplace MAIN board assembly. 9-21 4.10.1 Replacing TERM_ROLL Board Assembly 4.3.2 Replacing MAIN Board Assembly, DIMM, MOTHER Board Assembly, HDD_MOTHER Board Assembly 9 Troubleshooting PJ-1614NXE PJ-2216NXE Maintenance Manual Table 9-7 Symptoms and Check Items for Mechanical Serious Errors (Continued) No. 21 22 23 Message Event/ symptom Check item Action (1) Check head temperature ÅEReconnect thermister E 086 error Head Abnormal connector. thermister condition in head reading from "Sensor: Temperature" of selfthermister. diagnosis function. Abnormal condition in dry thermister 5.4.4 Sensor Menu (2) Thermister may be damaged. ÅEReplace thermister. 4.6.3 Replacing Cartridge Heater and Thermister (3) MAIN board assembly may be damaged. ÅEReplace MAIN board assembly. 4.3.2 Replacing MAIN Board Assembly, DIMM, MOTHER Board Assembly, HDD_MOTHER Board Assembly ÅEReconnect thermister assembly connector. 5.4.4 Sensor Menu (2) Thermister assembly may be damaged. ÅEReplace thermister assembly. 4.4.5 Replacing Heater and Thermister Assembly (3) MAIN board assembly may be damaged. ÅEReplace MAIN board assembly. 4.3.2 Replacing MAIN Board Assembly, DIMM, MOTHER Board Assembly, HDD_MOTHER Board Assembly (1) Check dry temperature reading from "Sensor: Temperature" of selfdiagnosis function. ÅEReconnect thermister assembly connector. 5.4.4 Sensor Menu (2) Thermister assembly may be damaged. ÅEReplace thermister assembly. 4.4.5 Replacing Heater and Thermister Assembly (3) MAIN board assembly may be damaged. ÅEReplace MAIN board assembly. 4.3.2 Replacing MAIN Board Assembly, DIMM, MOTHER Board Assembly, HDD_MOTHER Board Assembly (1) Check platen E 087 error Platen Abnormal temperature reading from thermister condition in platen thermister. "Sensor: Temperature" of self-diagnosis function. E 088 error Dry thermister Reference 9-22 PJ-1614NXE PJ-2216NXE Maintenance Manual 9 Troubleshooting Table 9-7 Symptoms and Check Items for Mechanical Serious Errors (Continued) Event/ symptom No. Message 24 E 089 error Winding motor rotation (only for 87-inch model) Abnormal condition in winding motor rotation 25 E 097 error Ink pump Abnormal condition in ink pump. 26 E 100 error Vacuum pump Abnormal condition in vacuum pump. 27 E 101 error Sub tank sensor Abnormal condition in sub tank sensor. Check item (1) MAIN board assembly may be damaged. Action ÅEReplace MAIN board assembly. Reference 4.3.2 Replacing MAIN Board Assembly, DIMM, MOTHER Board Assembly, HDD_MOTHER Board Assembly (1) Sub tank sensor ÅEReplace sub tank assembly may be damaged. assembly. 4.7.1 Replacing Sub Tank Assembly (2) MAIN board assembly may be damaged. ÅEReplace MAIN board assembly. 4.3.2 Replacing MAIN Board Assembly, DIMM, MOTHER Board Assembly, HDD_MOTHER Board Assembly ÅEReplace MAIN board assembly. 4.3.2 Replacing MAIN Board Assembly, DIMM, MOTHER Board Assembly, HDD_MOTHER Board Assembly 28 E 113 error NVRAM Parameters (1) MAIN board assembly cannot be written. may be damaged. 29 E 161 error Ink tube life Ink tube life has expired. (1) Turn machine OFF. Turn ÅEIf message is it ON again and check if the displayed: step (2) same message appears. - (2) Use of ink tube has exceeded specified limit. ÅEReplace ink tube. 4.5.7 Replacing Steel Bearer, Tube Guide, CR Tape Wire, and Intake Tube (3) MAIN board assembly may be damaged. ÅEReplace MAIN board assembly. 4.3.2 Replacing MAIN Board Assembly, DIMM, MOTHER Board Assembly, HDD_MOTHER Board Assembly 9-23 9 Troubleshooting PJ-1614NXE PJ-2216NXE Maintenance Manual 9.3 Troubleshooting without Error Message This section describes the symptoms of errors without an error message as well as the check items and corrective actions. 9.3.1 Initial Operation Problems Table 9-8 Symptoms, Check Items and Actions for Initial Operation Problems No. 1 Symptom Machine power cannot be turned ON Check item (1) Is panel unit cable assembly broken or shorted? Action ÅEReplace panel cable. (2) Panel board assembly may ÅEReplace panel board assemby. be damaged. 2 Reference 4.2.4 Replacing Panel Board Assembly ÅEReconnect following connectors. ÅEMain board: J109 ÅEPanel unit assembly 4.3.2 Replacing MAIN Board Assembly, DIMM, MOTHER Board Assembly, HDD_MOTHER Board Assembly (2) Panel cable may be damaged. ÅEReplace panel cable. 4.2.4 Replacing Panel Board Assembly (3) Is panel unit LCD damaged? ÅEReplace panel board assembly. 4.2.4 Replacing Panel Board Assembly (4) MAIN board assembly may be damaged. ÅEReplace MAIN board assembly. 4.3.2 Replacing MAIN Board Assembly, DIMM, MOTHER Board Assembly, HDD_MOTHER Board Assembly Abnormal LCD operation (no (1) Check panel cable for displays/garbage characters) proper connection at panel unit assembly and MAIN board assembly. ÅEIs panel cable inserted obliquely? ÅEIs connector securely locked? 9-24 PJ-1614NXE PJ-2216NXE Maintenance Manual 9 Troubleshooting Table 9-8 Symptoms, Check Items and Actions for Initial Operation Problems (Continued) No. 3 Symptom Check item Initial ink charge not available (1) Is "Cover open" displayed ÅEAdjust cover sensor. on LCD with front cover closed? (2) Check panel cable for proper connection at panel unit assembly and MAIN board assembly. locked? ÅEIs panel cable inserted obliquely? ÅEIs connector securely locked? 4 Action Though initial charge has started, ink does not reach head. ÅEReconnect following connectors. ÅEMAIN board assembly: J109 ÅEPanel unit assembly Reference 7.8 Cover Sensor Adjustment 4.3.2 Replacing MAIN Board Assembly, DIMM, MOTHER Board Assembly, HDD_MOTHER Board Assembly (3) Is "Lever up" displayed on ÅEReplace transmission type photo sensor. LCD with pressure arm lowered? 4.4.6 Replacing Transmission Type Photo Sensor ÅEReconnect connectors. (4) Check MAIN board assembly connectors J118 and J120 for proper connection. 4.3.2 Replacing MAIN Board Assembly, DIMM, MOTHER Board Assembly, HDD_MOTHER Board Assembly (5) Level switch may be damaged. ÅEReplace level switch 4.9.2 Replacing Main Bottle, Bottle Cap, Ink Cap, and Ink Level Switch (6) Is CR cable broken? ÅEReplace CR tape wire. 4.5.7 Replacing Steel Bearer, Tube Guide, CR Tape Wire, and Intake Tube (7) MAIN board assembly may be damaged. ÅEReplace MAIN board assembly. 4.3.2 Replacing MAIN Board Assembly, DIMM, MOTHER Board Assembly, HDD_MOTHER Board Assembly (1) Ink pump assembly may be malfunctioning. ÅEReplace ink pump assembly. 4.8.1 Replacing Ink Pump (2) Air pump assembly may be malfunctioning. ÅEReplace air pump assembly. 4.8.2 Replacing Air Pump 9-25 9 Troubleshooting PJ-1614NXE PJ-2216NXE Maintenance Manual Table 9-8 Symptoms, Check Items and Actions for Initial Operation Problems (Continued) No. Symptom Check item Action Reference 5 Ink is not discharged though ink charge is finished. (1) Ink amount may be detected incorrectly due to malfunction of INK_SENSE board assembly in sub tank. ÅEReplace sub tank assembly. 4.7.1 Replacing Sub Tank Assembly (2) Check head cable connectors at CR_HEAD board assembly and HEAD board assembly. ÅEIs head cable inserted obliquely? ÅEIs it locked securely? ÅEReconnect head cable. 4.6.1 Replacing HEAD Board Assembly (3) Is head cable broken? ÅEReplace head cable. (4) Is CR_BASE board malfunctioning? ÅEReplace CR_BASE board assembly. 4.7.2 Replacing CR_BASE Board Assembly and CR_HEAD Board Assembly (5) Check CR cable connectors at CR_BASE board assembly and SUB board assembly. ÅEIs CR cable inserted obliquely? ÅEIs it locked securely? ÅEReconnect CR cable. 4.3.1 Replacing SUB Board Assembly (6) Is CR cable broken? ÅEReplace CR tape wire. 4.5.7 Replacing Steel Bearer, Tube Guide, CR Tape Wire, and Intake Tube (7) Is CR_HEAD board assembly malfunctioning? ÅEReplace CR_HEAD board assembly. 4.7.2 Replacing CR_BASE Board Assembly and CR_HEAD Board Assembly 4.7.2 Replacing CR_BASE Board Assembly and CR_HEAD Board Assembly 4.7.2 Replacing CR_BASE Board Assembly and CR_HEAD Board Assembly (8) SUB board assembly may ÅEReplace SUB board assembly. be malfunctioning. 4.3.1 Replacing SUB Board Assembly (9) MAIN board assembly may be malfunctioning. 4.3.2 Replacing MAIN Board Assembly, DIMM, MOTHER Board Assembly, HDD_MOTHER Board Assembly 9-26 ÅEReplace MAIN board assembly. PJ-1614NXE PJ-2216NXE Maintenance Manual 9 Troubleshooting Table 9-8 Symptoms, Check Items and Actions for Initial Operation Problems (Continued) No. Symptom Check item 6 Machine makes no operations after turned ON. After turned ON, machine displays "Initializing" and resets itself. Machine does not perform initialization even if paper is set. Machine does not start operation even if front cover is closed. Machine does not stop even if front cover is opened. (1) Is "Cover open" displayed on LCD with front cover closed? Or, is cover sensor assembly judged as normal when checked through "Test: Sensor" of self-diagnosis function? 7 8 9 10 Action Reference ÅEAdjust cover sensor. 7.8 Cover ÅEReconnect MAIN board Sensor assembly connectors J128 and Adjustment J129. 4.3.2 ÅEReplace cover sensor assembly. Replacing MAIN Board Assembly, DIMM, MOTHER Board Assembly, HDD_MOTHER Board Assembly 4.5.8 Replacing Cover R Sensor Assembly and Cover L Sensor Assembly (2) Check panel cable connectors at panel unit assembly and MAIN board assembly. ÅEIs panel cable inserted obliquely? ÅEIs it locked securely? ÅEReconnect following connectors. ÅEMAIN board assembly: J109 ÅEPanel unit assembly (3) Is "Set paper" displayed on ÅEReconnect MAIN board assembly connectors J118 and LCD with pressure arm J120. lowered? ÅEReplace transmission type photo sensor. 4.3.2 Replacing MAIN Board Assembly, DIMM, MOTHER Board Assembly, HDD_MOTHER Board Assembly 4.3.2 Replacing MAIN Board Assembly, DIMM, MOTHER Board Assembly, HDD_MOTHER Board Assembly 4.4.6 Replacing Transmission Type Photo Sensor 9-27 9 Troubleshooting PJ-1614NXE PJ-2216NXE Maintenance Manual Table 9-8 Symptoms, Check Items and Actions for Initial Operation Problems (Continued) No. Symptom Check item (4) Is P_REAR sensor assembly judged as normal when checked through "Test: Sensor" of self-diagnosis function? Action ÅEReconnect MAIN board assembly connector J117. ÅEReplace P_REAR sensor assembly. Reference 4.3.2 Replacing MAIN Board Assembly, DIMM, MOTHER Board Assembly, HDD_MOTHER Board Assembly 4.4.3 Replacing P_REAR_R sensor assembly 11 12 Operation panel accepts no inputs. Machine prints nothing though it receives data. (5) MAIN board assembly may be damaged. ÅEReplace MAIN board assembly. (1) Is operation panel cover broken or contaminated? ÅEReplace operation panel cover. - (2) Check panel cable connectors at panel unit assembly and MAIN board assembly. ÅEIs panel cable inserted obliquely? ÅEIs it locked securely? ÅEReconnect following connectors. ÅEMAIN board assembly: J109 ÅEPanel unit assembly 4.3.2 Replacing MAIN Board Assembly, DIMM, MOTHER Board Assembly, HDD_MOTHER Board Assembly (3) Panel unit assembly may be damaged. ÅEReplace panel board assembly. 4.2.4 Replacing Panel Board Assembly (4) MAIN board assembly may be malfunctioning. ÅEReplace MAIN board assembly. 4.3.2 Replacing MAIN Board Assembly, DIMM, MOTHER Board Assembly, HDD_MOTHER Board Assembly (1) Refer to "9.3.5 Online Function Problem". - 9.3.5 Online Function Problem 9-28 4.3.2 Replacing MAIN Board Assembly, DIMM, MOTHER Board Assembly, HDD_MOTHER Board Assembly PJ-1614NXE PJ-2216NXE Maintenance Manual 9 Troubleshooting 9.3.2 Paper Feed Problems Table 9-9 Symptoms, Check Items and Actions for Paper Feed Problems No. Symptom Check item 1 Paper comes off during paper set initialization or printout. Paper runs obliquely or meanders during paper set initialization or printout. Paper crinkles during paper set initialization or printout. Paper jams during paper set initialization or printout. Machine registers wrong paper size after paper set initialization. (1) Are P_REAR sensor assembly and P_EDGE sensor assembly judged as normal when checked through "Test: Sensor" of selfdiagnosis function? 2 3 4 Action ÅECheck following connectors. ÅEMAIN board assembly: J117 ÅECR_BASE board assembly: J004 ÅEReplace P_REAR sensor assembly and P_EDGE sensor assembly. Reference 4.3.2 Replacing MAIN Board Assembly, DIMM, MOTHER Board Assembly, HDD_MOTHER Board Assembly 4.7.2 Replacing CR_BASE Board Assembly and CR_HEAD Board Assembly 5 4.4.3 Replacing P_REAR_R sensor assembly 4.6.4 Replacing P_EDGE Sensor Assembly (2) Does pressure roller drag when pressure arm is raised? ÅEIf pressure roller collects paper Operation dust on itself, wipe dust away manual using a wet soft cloth. (3) Does paper guide F have large distortion or foreign objects? ÅEIf paper guide F collects paper 4.2.6 dust or other foreign objects on it, Removing Paper remove them. Guide F ÅEReplace paper guide F. (4) Are flanges attached correctly? ÅEInsert flanges correctly into core pipe of paper roll. 9-29 Operation manual 9 Troubleshooting PJ-1614NXE PJ-2216NXE Maintenance Manual 9.3.3 Drawing Problems Table 9-10 Symptoms, Check Items and Actions for Drawing Problems No. 1 2 Symptom Machine cannot draw sequentially Paper feed after printout is excessive. Check item Action Reference (1) Program ROM may be defective. ÅEUpdate firmware. 7.4 Firmware Installation (2) MAIN board assembly may be damaged. ÅEReplace MAIN board assembly. 4.3.2 Replacing MAIN Board Assembly, DIMM, MOTHER Board Assembly, HDD_MOTHER Board Assembly (1) Is P_REAR sensor assembly judged as normal when checked through "Test: Sensor" of self-diagnosis function? ÅEReconnect MAIN board assembly connector J117. ÅEReplace P_REAR sensor assembly. 4.3.2 Replacing MAIN Board Assembly, DIMM, MOTHER Board Assembly, HDD_MOTHER Board Assembly 4.4.3 Replacing P_REAR_R sensor assembly 3 Missing dots in printout. (2) Program ROM may be defective. ÅEUpdate firmware. 7.4 Firmware Installation (3) MAIN board assembly may be damaged. ÅEReplace MAIN board assembly. 4.3.2 Replacing MAIN Board Assembly, DIMM, MOTHER Board Assembly, HDD_MOTHER Board Assembly (1) Perform purge twice consecutively. (2) Perform "Drawing: Nozzle check" of selfdiagnosis function or test drawing. 9-30 Operation manual ÅEIf nozzle check patterns are printed out correctly: 5.5.8 Test step (4) Drawing Menu PJ-1614NXE PJ-2216NXE Maintenance Manual 9 Troubleshooting Table 9-10 Symptoms, Check Items and Actions for Drawing Problems (Continued) No. 4 Symptom Check item Action Nozzle plugging or ink splash (1) Is registered head voltage ÅEEnter correct head voltage. different from actual head is not eliminated even after voltage? ink purge. (2) Does residual ink collect on head assembly or in nozzles? ÅEClean head as follows. 1) Clean head through "Adjustment: Head cleaning" of self-diagnosis function. 2) Perform initial charge through "Adjustment: Voltage input". 3) Check printouts again. Reference 5.5.2 Voltage Input Menu 5.5.10 Head Cleaning Menu 5.5.2 Voltage Input Menu ÅEIf they contact with each other, (3) Check if CR_ENC 4.5.5 assembly and T fence contact adjust CR_ENC assembly and T Replacing T fence positions. with each other. Fence ÅEIf problem remains even after 4.7.3 position adjustment, replace Replacing CR_ENC assembly and T fence. CR_ENC Assembly (4) Is head assembly damaged? ÅEReplace damaged head assembly. 4.6.2 Replacing Head Assembly (5) MAIN board assembly may be damaged. ÅEReplace MAIN board assembly. 4.3.2 Replacing MAIN Board Assembly, DIMM, MOTHER Board Assembly, HDD_MOTHER Board Assembly 9-31 9 Troubleshooting PJ-1614NXE PJ-2216NXE Maintenance Manual Table 9-10 Symptoms, Check Items and Actions for Drawing Problems (Continued) No. 5 6 Symptom No printout. Particular color is missing. Check item (1) Is CR cable inserted obliquely? Action ÅEReconnect following connectors:SUB board assembly J006 - J013, CR_BASE board assembly J1 - J2, CR_HEAD board assembly J1, J3, J5, J7, J9 Reference 4.3.1 Replacing SUB Board Assembly 4.7.2 Replacing CR_BASE Board Assembly and CR_HEAD Board Assembly (2) CR cable may be damaged ÅEReplace CR tape wire. 4.5.7 Replacing Steel Bearer, Tube Guide, CR Tape Wire, and Intake Tube (3) Does ink tube have bend, scratch, or leak? ÅEReplace damaged ink tube. 4.5.7 Replacing Steel Bearer, Tube Guide, CR Tape Wire, and Intake Tube (4) Check head cable connectors at CR_HEAD board assembly and HEAD board assembly. ÅEIs head cable inserted obliquely? ÅEIs it locked securely? ÅEReconnect head cable. 4.7.2 Replacing CR_BASE Board Assembly and CR_HEAD Board Assembly (5) Is head assembly damaged? ÅEReplace damaged head assembly. 4.6.2 Replacing Head Assembly (6) CR_HEAD assembly may ÅEReplace CR_HEAD assembly be malfunctioning. 4.7.2 Replacing CR_BASE Board Assembly and CR_HEAD Board Assembly (7) SUB board assembly may ÅEReplace SUB board assembly be malfunctioning. 4.3.1 Replacing SUB Board Assembly (8) MAIN board assembly may be damaged. 4.3.2 Replacing MAIN Board Assembly, DIMM, MOTHER Board Assembly, HDD_MOTHER Board Assembly 9-32 ÅEReplace MAIN board assembly. PJ-1614NXE PJ-2216NXE Maintenance Manual 9 Troubleshooting Table 9-10 Symptoms, Check Items and Actions for Drawing Problems (Continued) No. 7 Symptom Machine outputs all black drawing. Check item Action (1) Check head cable connectors at CR_HEAD board assembly and HEAD board assembly. ÅEIs head cable inserted obliquely? ÅEIs it locked securely? ÅEReconnect head cable. (2) Is CR cable inserted obliquely? ÅEReconnect following connectors:SUB board assembly J006 - J013, CR_BASE board assembly J1 - J2, CR_HEAD board assembly J1, J3, J5, J7, J9 Reference 4.6.1 Replacing HEAD Board Assembly 4.7.2 Replacing CR_BASE Board Assembly and CR_HEAD Board Assembly 4.3.1 Replacing SUB Board Assembly 4.7.2 Replacing CR_BASE Board Assembly and CR_HEAD Board Assembly (3) CR cable may be damaged ÅEReplace CR tape wire. 4.5.7 Replacing Steel Bearer, Tube Guide, CR Tape Wire, and Intake Tube (4) Is head assembly damaged? 4.6.2 Replacing Head Assembly ÅEReplace damaged head assembly. (5) CR_HEAD assembly may ÅEReplace CR_HEAD assembly be malfunctioning. 4.7.2 Replacing CR_BASE Board Assembly and CR_HEAD Board Assembly (6) SUB board assembly may ÅEReplace SUB board assembly be malfunctioning. 4.3.1 Replacing SUB Board Assembly (7) MAIN board assembly may be damaged. 4.3.2 Replacing MAIN Board Assembly, DIMM, MOTHER Board Assembly, HDD_MOTHER Board Assembly 9-33 ÅEReplace MAIN board assembly. 9 Troubleshooting PJ-1614NXE PJ-2216NXE Maintenance Manual Table 9-10 Symptoms, Check Items and Actions for Drawing Problems (Continued) No. 8 9 10 11 Symptom Blocky printout quality. Blocky image printout. CR line seems dotted. White or black lines appear. Check item Action Reference (1) Is working environment appropriate? ÅEUse machine under specified environment. (2) Have you started printout immediately after initial charge? Printout just after initial charge Operation may cause following symptoms. manual ÅEPrinted line blurs. ÅEWhite lines appear. In such cases, perform purge twice or three times and check printout again. If symptoms remain even after purging, leave machine unused for 1 hour or more. Then perform ink purge and check printout. 3.5 Conditions of the installation environment (3) Is PF belt tension adjusted ÅEAdjust PF reduction belt to specification? tension. 7.6 PF Reduction Belt Tension Adjustment (4) Is nozzle face wiped correctly? ÅEClearly wipe it away using a wiper. Operation manual (5) Is T fence dirty? ÅEClean T fence. ÅEIf T fence is still dirty or damaged, replace T fence. 4.5.5 Replacing T Fence (6) Does pressure roller drag when pressure arm is raised? ÅEIf pressure roller collects paper Operation dust on itself, wipe dust away manual using a wet soft cloth. (7) Is registered head voltage ÅEEnter correct head voltage. different from actual head voltage? 5.5.2 Voltage Input Menu (8) Does residual ink collect on head assembly or in nozzles? ÅEClean head as follows. 1) Clean head through "Adjustment: Head cleaning" of self-diagnosis function. 2) Perform initial charge through "Adjustment: Voltage input". 3) Check printouts again. 5.5.10 Head Cleaning Menu (9) Is head assembly damaged? ÅEReplace damaged head assembly. 4.6.2 Replacing Head Assembly 9-34 5.5.2 Voltage Input Menu PJ-1614NXE PJ-2216NXE Maintenance Manual 9 Troubleshooting Table 9-10 Symptoms, Check Items and Actions for Drawing Problems (Continued) No. 12 Symptom Printout borders blur. Check item Action Reference (10) CR_HEAD assembly may be malfunctioning. ÅEReplace CR_HEAD assembly 4.7.2 Replacing CR_BASE Board Assembly and CR_HEAD Board Assembly (11) SUB board assembly may be malfunctioning. ÅEReplace SUB board assembly 4.3.1 Replacing SUB Board Assembly (12) MAIN board assembly may be damaged. ÅEReplace MAIN board assembly. 4.3.2 Replacing MAIN Board Assembly, DIMM, MOTHER Board Assembly, HDD_MOTHER Board Assembly (1) Does purge correct symptom? ÅEPerform purge twice consecutively. Operation manual (2) Is paper in use a recommended one? ÅESet recommended paper and check printout again. With nonauthorized paper, paper sensor may fail to detect paper correctly. Operation manual (3) CR cable may be damaged ÅEReplace CR tape wire. 4.5.7 Replacing Steel Bearer, Tube Guide, CR Tape Wire, and Intake Tube (4) Is head assembly damaged? 4.6.2 Replacing Head Assembly ÅEReplace damaged head assembly. (5) CR_HEAD assembly may ÅEReplace CR_HEAD board be malfunctioning. assembly 4.7.2 Replacing CR_BASE Board Assembly and CR_HEAD Board Assembly (6) SUB board assembly may ÅEReplace SUB board assembly be malfunctioning. 4.3.1 Replacing SUB Board Assembly (7) MAIN board assembly may be damaged. 4.3.2 Replacing MAIN Board Assembly, DIMM, MOTHER Board Assembly, HDD_MOTHER Board Assembly 9-35 ÅEReplace MAIN board assembly. 9 Troubleshooting PJ-1614NXE PJ-2216NXE Maintenance Manual Table 9-10 Symptoms, Check Items and Actions for Drawing Problems (Continued) No. Symptom 13 Many satellites (unnecessary dots) Shaggy printout Uneven lines 14 15 Check item Action Reference (1) Is working environment appropriate? ÅEUse machine under specified environment. 3.5 Conditions of the installation environment (2) Is ink sufficient? ÅEAdd ink. Operation manual (3) Perform purge three times ÅEPrint out drawing again. consecutively. Operation manual (4) Perform test drawing. ÅEIf nozzle check patterns are printed correctly, refer to step (6). (5) Have you started printout immediately after initial charge? ÅEBe sure to wait 1 hour or more Operation after initial ink charge. Printout manual before ink charge stabilization will not provide adequate drawing quality. (6) Is steel belt tension adjusted to specification? ÅEAdjust steel belt tension. 7.5 Steel Belt Tension Adjustment ÅEIf they contact with each other, (7) Check if CR_ENC 4.5.5 assembly and T fence contact adjust CR_ENC assembly and T Replacing T fence positions. with each other. Fence ÅEIf problem remains even after 4.7.3 position adjustment, replace Replacing CR_ENC assembly and T fence. CR_ENC Assembly (8) Is nozzle face wiped correctly? ÅEClearly wipe it away using a wiper. Operation manual (9) Is registered head voltage ÅEEnter correct head voltage. different from actual head voltage? 5.5.2 Voltage Input Menu (10) Is head assembly damaged? ÅEReplace damaged head assembly. 4.6.2 Replacing Head Assembly (11) SUB board assembly may be malfunctioning. ÅEReplace SUB board assembly 4.3.1 Replacing SUB Board Assembly (12) MAIN board assembly may be damaged. ÅEReplace MAIN board assembly. 4.3.2 Replacing MAIN Board Assembly, DIMM, MOTHER Board Assembly, HDD_MOTHER Board Assembly 9-36 PJ-1614NXE PJ-2216NXE Maintenance Manual 9 Troubleshooting Table 9-10 Symptoms, Check Items and Actions for Drawing Problems (Continued) No. 16 Symptom Mixed color lines are not overlaid. Check item (1) Is steel belt tension adjusted to specification? Action ÅEAdjust steel belt tension. Reference 7.5 Steel Belt Tension Adjustment (2) Is registered head voltage ÅEEnter correct head voltage. different from actual head voltage? 5.5.2 Voltage Input Menu (3)Is head inclination inappropriate? ÅEAdjust head inclination. 7.7 Head Accuracy Adjustment (4) Are two-way printing positions aligned correctly? ÅEAlign two-way printing positions. 5.5.5 TwoWay Printing Position Alignment Menu (5) Is CW adjustment inappropriate? ÅEPerform CW adjustment. 5.5.6 CW Adjustment Menu 17 ÅEIf they contact with each other, Black and other colors do not (1) Check if CR_ENC 4.5.5 align. assembly and T fence contact adjust CR_ENC assembly and T Replacing T fence positions. with each other. Fence ÅEIf problem remains even after 4.7.3 position adjustment, replace Replacing CR_ENC assembly and T fence. CR_ENC Assembly 18 (1) Is working environment Poor accuracy of segment length in head travel direction appropriate? (main scan direction). 19 Poor linearity in head travel direction (straightness) ÅEUse machine under specified environment. 3.5 Conditions of the installation environment (2) Is steel belt tension adjusted to specification? ÅEAdjust steel belt tension. 7.5 Steel Belt Tension Adjustment (3) Is T fence dirty? ÅEClean T fence. ÅEIf T fence is still dirty or damaged, replace T fence. 4.5.5 Replacing T Fence (4) Internal process of MAIN ÅEInitialize parameters and reenter or modify them. Then, board assembly may be check machine operation again. abnormal. 5.8.1 Parameter Initialization Menu (1) Is PF belt tension adjusted ÅEAdjust PF reduction belt to specification? tension. 7.6 PF Reduction Belt Tension Adjustment (2) Does pressure roller drag when pressure arm is raised? 9-37 ÅEIf pressure roller collects paper Operation dust on itself, wipe dust away manual using a wet soft cloth. 9 Troubleshooting PJ-1614NXE PJ-2216NXE Maintenance Manual Table 9-10 Symptoms, Check Items and Actions for Drawing Problems (Continued) No. 20 21 Symptom Check item (1) Is working environment Poor accuracy of segment length in paper feed direction appropriate? (sub scan direction) Poor linearity in paper feed direction (paper splicing accuracy) Action Reference ÅEUse machine under specified environment. 3.5 Conditions of the installation environment ÅEPerform distance correction. (2) Have you performed distance correction with paper in use? 5.5.7 Band Feed Correction Menu (3) Is PF driving pulley loose ÅEReplace PF motor assembly. 4.4.1 Replacing PF Motor Assembly (4) Is PF belt tension adjusted ÅEAdjust PF reduction belt to specification? tension. 7.6 PF Reduction Belt Tension Adjustment (5) Does pressure roller drag when pressure arm is raised? ÅEIf pressure roller collects paper Operation dust on itself, wipe dust away manual using a wet soft cloth. (6) Is rough surface of grid roller partially worn out? (7) Is grid roller rotation heavy? Does rattling occur when it rotates? If grid roller is contaminated with Operation paper dust, clean roller with a manual nylon brush. (1) Is registered head voltage ÅEEnter correct head voltage. different from actual head voltage? 5.5.2 Voltage Input Menu (2) Adjust head inclination. ÅEAdjust head inclination. 7.7 Head Accuracy Adjustment (3) Is steel belt tension adjusted to specification? ÅEAdjust steel belt tension. 7.5 Steel Belt Tension Adjustment (4) Are two-way printing positions aligned correctly? ÅEAlign two-way printing positions. 5.5.5 TwoWay Printing Position Alignment Menu (5) Is T fence dirty? ÅEClean T fence. ÅEIf T fence is still dirty or damaged, replace T fence. 4.5.5 Replacing T Fence (6) Is CR cursor assembly loose? ÅEReplace CR cursor assembly. 4.7.5 Replacing CR Cursor Assembly 9-38 PJ-1614NXE PJ-2216NXE Maintenance Manual 9 Troubleshooting Table 9-10 Symptoms, Check Items and Actions for Drawing Problems (Continued) No. 22 Symptom Poor right angle accuracy Check item Action Reference (1) Does pressure roller drag when pressure arm is raised? ÅEIf pressure roller collects paper Operation dust on itself, wipe dust away manual using a wet soft cloth. (2) Is rough surface of grid roller partially worn out? (3) Is grid roller rotation heavy? Does rattling occur when it rotates? If grid roller is contaminated with paper dust, clean roller with a nylon brush. Operation manual 9.3.4 Noise Problems Table 9-11 Symptoms, Check Items, and Actions for Noise Problems No. 1 Symptom Abnormal noise in waiting mode Check item Action (1) Are there any foreign objects or obstacles at noisegenerating position? ÅERemove obstacles and foreign objects. 9-39 Reference - 9 Troubleshooting PJ-1614NXE PJ-2216NXE Maintenance Manual Table 9-11 Symptoms, Check Items, and Actions for Noise Problems (Continued) No. 2 Symptom Abnormal noise is heard while head is moving laterally. Check item Action Reference (1) Does customer recognize ink discharge noise as abnormal noise? ÅEExplain machine operations. - (2) Is abnormal noise caused by loose screw in covers? ÅEAdditionally tighten screws. 4.2 Removal of Covers (3) Is rattling noise head when ÅERemove dust from carriage moving carriage laterally? bearing and roller runner. After cleaning roller runner, always apply thin lubricant film over its surface using a grease-sprayed cloth. (4) Is abnormal noise heard from CR cable? 4.7.5 Replacing CR Cursor Assembly ÅERemove twists from CR cable. 4.5.7 ÅEIf abnormal noise sounds from Replacing Steel between steel bearer and tube Bearer, Tube guide, replace tube guide. Guide, CR Tape Wire, and Intake Tube ÅEIf they contact with each other, (5) Check if CR_ENC 4.5.5 assembly and T fence contact adjust CR_ENC assembly and T Replacing T fence positions. with each other. Fence ÅEIf problem remains even after 4.7.3 position adjustment, replace Replacing CR_ENC assembly and T fence. CR_ENC Assembly 3 Abnormal noise is heard during paper feeding. (6) Is abnormal noise heard from CR driven pulley bearing? ÅEReplace CR driven pulley. 4.5.6 Replacing CR Driven Pulley (7) Is steel belt tension adjusted to specification? ÅEAdjust steel belt tension. 7.5 Steel Belt Tension Adjustment (8) Is abnormal noise heard from CR motor assembly? ÅEReplace CR motor assembly. 4.5.2 Replacing CR Motor Assembly (1) Is PF reduction belt slipping between pulleys? ÅEReplace PF reduction belt. 4.4.1 Replacing PF Motor Assembly (2) Is abnormal noise heard from PF motor assembly? ÅEReplace PF motor assembly. 4.4.1 Replacing PF Motor Assembly (3) Is rough surface of grid roller partially worn out? (4) Is grid roller rotation heavy? Does rattling occur when it rotates? ÅEIf grid roller is contaminated Operation with paper dust, clean roller with a manual nylon brush. 9-40 PJ-1614NXE PJ-2216NXE Maintenance Manual 9 Troubleshooting 9.3.5 Online Function Problem Table 9-12 Symptoms, Check Items, and Actions for Online Function Problems No. 1 2 3 4 5 Symptom Centronics interface cannot establish communication. Scaling does not work correctly. Mirror function does not work correctly. Other functions do not work correctly. Check item Action Reference (1) Does an alternative cable also cause the same error? ÅECommunication error may be caused by an open circuit in I/F cable or too long cable length. Make sure to use a spec. compliant cable. (2) Program ROM may be defective. ÅEUpdate firmware. 7.4 Firmware Installation (3) MAIN board assembly may be malfunctioning. ÅEReplace MAIN board assembly. 4.3.2 Replacing MAIN Board Assembly, DIMM, MOTHER Board Assembly, HDD_MOTHER Board Assembly (1) Program ROM may be defective. ÅEUpdate firmware. 7.4 Firmware Installation (2) MAIN board assembly may be damaged. ÅEReplace MAIN board assembly. 4.3.2 Replacing MAIN Board Assembly, DIMM, MOTHER Board Assembly, HDD_MOTHER Board Assembly ÅEPerform CW adjustment. 5.5.6 CW Adjustment Menu (2) Program ROM may be defective. ÅEUpdate firmware. 7.4 Firmware Installation (3) MAIN board assembly may be damaged. ÅEReplace MAIN board assembly. 4.3.2 Replacing MAIN Board Assembly, DIMM, MOTHER Board Assembly, HDD_MOTHER Board Assembly Drawing position is incorrect (1) Is CW adjustment inappropriate? 9-41 9 Troubleshooting PJ-1614NXE PJ-2216NXE Maintenance Manual Table 9-12 Symptoms, Check Items, and Actions for Online Function Problems (Continued) No. 6 7 Symptom Check item (1) Program ROM may be Some data are not printed defective. (missing). Some data change to garbage. Action ÅEUpdate firmware. Reference 7.4 Firmware Installation (2) Is T fence contaminated or ÅEIf grease or dust collect: Wipe worn? fence with a dry cloth. ÅEIf ink deposit present: Wipe it with cloth dampened in small amount of jet wash and then wipe with a dry cloth. ÅEIf contamination or deposit is too heavy: Replace T fence. 4.5.5 Replacing T Fence (3) Check "Encoder: PF" from ÅEIf NG, check MAIN board assembly connector JI32. "Test: Encoder" of selfÅEReplace T fence. diagnosis function. ÅEReplace CR_ENC assembly. ÅEReplace CR motor. ÅEReplace CR_BASE board assembly. ÅEReplace CR tape wire. 4.3.2 Replacing MAIN Board Assembly, DIMM, MOTHER Board Assembly, HDD_MOTHER Board Assembly 4.5.5 Replacing T Fence 4.5.2 Replacing CR Motor Assembly 4.7.2 Replacing CR_BASE Board Assembly and CR_HEAD Board Assembly 4.5.7 Replacing Steel Bearer, Tube Guide, CR Tape Wire, and Intake Tube (4) MAIN board assembly may be damaged. 9-42 ÅEReplace MAIN board assembly. 4.3.2 Replacing MAIN Board Assembly, DIMM, MOTHER Board Assembly, HDD_MOTHER Board Assembly PJ-1614NXE PJ-2216NXE Maintenance Manual 9 Troubleshooting Table 9-12 Symptoms, Check Items, and Actions for Online Function Problems (Continued) No. 8 Symptom Paper feed after printout is excessive. Check item Action Reference (1) Program ROM may be defective. ÅEUpdate firmware. 7.4 Firmware Installation (2) MAIN board assembly may be damaged. ÅEReplace MAIN board assembly. 4.3.2 Replacing MAIN Board Assembly, DIMM, MOTHER Board Assembly, HDD_MOTHER Board Assembly 9-43 9 Troubleshooting PJ-1614NXE PJ-2216NXE Maintenance Manual 9.3.6 Other Problems Table 9-13 Symptoms, Check Items, and Actions No. 1 2 Symptom Machine hangs up. Machine power is shut off during drawing. Check item Action Reference (1) Internal process of MAIN ÅEInitialize parameters and reenter or modify them. board assembly may be abnormal. 7.3 Parameter Backup (2) MAIN board assembly may be damaged. ÅEReplace MAIN board assembly. 4.3.2 Replacing MAIN Board Assembly, DIMM, MOTHER Board Assembly, HDD_MOTHER Board Assembly (1) Is power cable shorted? ÅECheck by a circuit tester. - (2) Electric leak? ÅECheck for short to chassis ground due to damaged cable insulation. - 9-44 10 APPENDIX 10.1 Introduction . . . . . . . . . . . . . . . . . . . . . . . . . . . . . . . 10-1 10.2 Wiring Diagram . . . . . . . . . . . . . . . . . . . . . . . . . . . . 10-1 10.3 Jig and Tool List . . . . . . . . . . . . . . . . . . . . . . . . . . . 10-2 10.3.1 Required Tools . . . . . . . . . . . . . . . . . . . . . . . . . . . . . 10-2 10.4 Exploded Views/Service Parts List . . . . . . . . . . . . 10-3 <Memo> PJ-1614NXE PJ-2216NXE Maintenance Manual 10 Appendix 10 Appendix 10.1 Introduction This chapter provides referential information such as service data and exploded views. 10.2 Wiring Diagram 10-1 10 Appendix PJ-1614NXE PJ-2216NXE Maintenance Manual 10.3 Jig and Tool List This section provides lists of jigs and tools required for service operations. 10.3.1Required Tools (1) Tools for part replacement Table 10-1 Tools for Part Replacement No. Tool Part code Remark 1 Philips driver No.2 Generic product Shaft length should be 250mm or more. 2 Philips driver No.2 Generic product Shaft length should be 50mm or less. 3 Philips driver No.1 Generic product 4 Flat-head driver Generic product 5 Ratchet Generic product 6 Pliers Generic product 7 Tweezers Generic product 8 Hexagon wrench set Generic product (2) Tools for adjustment Table 10-2 Tools for Adjustment No. Tool Part code Remark 1 Personal computer Generic product 2 Tension gauge Generic product Max. capacity should be 4000g. 3 Tension gauge Generic product Max. capacity should be 500g. 4 Y-axis tension attachment JD-42050 5 Flash memory card Generic product Spec.: 4MBFlash Memory Card Type-II(PCMCIARel.2.1/JEIDAVer.4.2) 6 Marking film (TBD) For adjusting drawing accuracy 7 Straight scale (1000mm) Generic product 8 PF_ENC locating jig (TBD) 9 Platen height adjusting jig (TBD) 10-2 PJ-1614NXE PJ-2216NXE Maintenance Manual 10 Appendix 10.4 Exploded Views/Service Parts List This section includes the exploded views of respective units and service parts list. 10-3 PJ-1614NXE PJ-2216NXE Maintenance Manual 2 3 1 10 Appendix 10-4 10 Appendix 2 3 1 PJ-1614NXE PJ-2216NXE Maintenance Manual 10-5 10 Appendix PJ-1614NXE PJ-2216NXE Maintenance Manual Table 10-3 Cover Section No. Service part Service diagram Component part Qty. diagram 1 Cover R sensor assembly DF-42443 1 2 Cover L sensor assembly DF-42444 1 Remark Table 10-4 Panel Section No. 3 Service part PANEL board assembly Service diagram Component part Qty. diagram DE-35092 1 10-6 Remark 10 Appendix 7 8 9 1 2 4 3 5 6 12 13 10 14 11 PJ-1614NXE PJ-2216NXE Maintenance Manual 10-7 PJ-1614NXE PJ-2216NXE Maintenance Manual 7 8 9 1 2 4 3 5 6 12 13 10 14 11 10 Appendix 10-8 PJ-1614NXE PJ-2216NXE Maintenance Manual 10 Appendix Table 10-5 Board Base Section No. Service part Service diagram Component part Qty. diagram 1 POWER-A board assembly DE-35241 1 2 Power supply 5V/5W DF-43170 1 3 Power supply 12V/50W DF-43171 1 4 Power supply 5V/50W EA-47797 1 5 Power supply 24V/150W DF-43172 1 6 Power supply 48V/75W DF-43173 1 7 POWER-B board assemblyy DE-35242 1 8 Power supply 48V/100W DF-43174 2 9 Power supply 24V/30W DF-43175 1 10 MAIN board assembly DE-35234 1 11 DIMM DF-42303 1 12 MOTHER board assembly DE-48667 1 13 HDD_MOTHER board assembly DF-42518 1 14 SUB board assembly DE-35235 1 10-9 Remark PJ-1614NXE PJ-2216NXE Maintenance Manual 8 9 6 7 3 2 1 4 10 Appendix 10-10 10 Appendix 8 9 6 7 3 2 1 4 PJ-1614NXE PJ-2216NXE Maintenance Manual 10-11 10 Appendix PJ-1614NXE PJ-2216NXE Maintenance Manual Table 10-6 PF Driving System No. Service part Service diagram Component part Qty. diagram 1 Reduction pulley DE-35051 1 2 PF scale assembly 3 PF_ENC assembly DF-42440 1 4 CR motor assembly DE-34087 1 5 P_REAR_R sensor assembly DF-42637 1 6 Lever motor assembly DE-35023 1 7 Transmission type photo sensor E-GP1S74P 3 8 HeaterÅiPJ-1614NXEÅj DE-35265 12 8 HeaterÅiPJ-2216NXEÅj DE-35265 16 9 Thermister assemblyÅiPJ1614NXEÅj EA-47711 6 9 Thermister assemblyÅiPJ2216NXEÅj EA-47711 8 1 10-12 Remark 10 Appendix 9 1 6 10 5 2 3 8 7 4 PJ-1614NXE PJ-2216NXE Maintenance Manual 10-13 PJ-1614NXE PJ-2216NXE Maintenance Manual 9 1 6 10 5 2 3 8 7 4 10 Appendix 10-14 PJ-1614NXE PJ-2216NXE Maintenance Manual 10 Appendix Table 10-7 CR Driving System No. Service part Service diagram Component part Qty. diagram 1 T fenceÅiPJ-1614NXEÅj DE-35169 1 1 T fenceÅiPJ-2216NXEÅj DE-35170 1 2 SLID motor assembly DE-35228 1 3 HD SLIDE sensor assembly DF-42522 1 4 CR tape wireÅiPJ-1614NXEÅj DF-43125 6 4 CR tape wireÅiPJ-2216NXEÅj DF-43126 8 5 Steel bearerÅiPJ-1614NXEÅj DF-42879 1 5 Steel bearerÅiPJ-2216NXEÅj DF-42563 1 6 Tube guideÅiPJ-1614NXEÅj DE-35187 1 6 Tube guideÅiPJ-2216NXEÅj DE-35188 1 7 Ink tubeÅiPJ-1614NXEÅj 8 7 Ink tubeÅiPJ-2216NXEÅj 10 8 Y-axis motor assembly DE-35050 1 9 CR driven pulley DF-42559 1 10 Steel beltÅiPJ-1614NXEÅj DF-43271 1 10 Steel beltÅiPJ-2216NXEÅj DF-43325 1 10-15 Remark PJ-1614NXE PJ-2216NXE Maintenance Manual 15 13 14 12 1 2 17 16 8 7 6 10 9 4 5 3 10 Appendix 10-16 10 Appendix 15 13 14 12 1 2 17 16 8 7 6 10 9 4 5 3 PJ-1614NXE PJ-2216NXE Maintenance Manual 10-17 10 Appendix PJ-1614NXE PJ-2216NXE Maintenance Manual Table 10-8 Cursor Section No. Service diagram Service part Component part Qty. diagram 1 CR cursor assembly 2 CR_ENC assembly DF-42441 1 3 Three-way valveÅiPJ-1614NXEÅj DE-35276 4 3 Three-way valveÅiPJ-2216NXEÅj DE-35276 6 4 CR_BASE board assembly DE-35236 1 5 CR_HEAD board assembly DE-35237 1 6 VALVE_SENSE board assemblyÅiPJ-1614NXEÅj DE-35246 4 6 VALVE_SENSE board assemblyÅiPJ-2216NXEÅj DE-35246 6 7 Three-way Valve(hand)ÅiPJ1614NXEÅj DE-35262 4 7 Three-way Valve(hand)ÅiPJ2216NXEÅj DE-35262 6 8 Cartridge heaterÅiPJ-1614NXEÅj DF-43284 8 8 Cartridge heaterÅiPJ-2216NXEÅj DF-43284 12 9 ThermisterÅiPJ-1614NXEÅj DF-43285 8 9 ThermisterÅiPJ-2216NXEÅj DF-43285 12 10 Sub tank assemblyÅiPJ-1614NXEÅj DF-43279 4 10 Sub tank assemblyÅiPJ-2216NXEÅj DF-43279 6 Remark 1 Table 10-9 Head Bracket Section No. Service part Service diagram Component part Qty. diagram 11 P_EDGE sensor assembly DF-43182 1 12 Head assemblyÅiPJ-1614NXEÅj 4 12 Head assemblyÅiPJ-2216NXEÅj 6 13 Head board assemblyÅiPJ1614NXEÅj DE-35238 4 13 Head board assemblyÅiPJ2216NXEÅj DE-35238 6 14 Cartridge heaterÅiPJ-1614NXEÅj 4 14 Cartridge heaterÅiPJ-2216NXEÅj 6 15 ThermisterÅiPJ-1614NXEÅj 4 15 ThermisterÅiPJ-2216NXEÅj 6 16 CappingÅiPJ-1614NXEÅj DE-21691 1 17 Cap spongeÅiPJ-1614NXEÅj DF-43299 4 17 Cap spongeÅiPJ-2216NXEÅj DF-43299 6 10-18 Remark 10 Appendix 8 6 4 3 1 7 12 2 5 11 10 9 PJ-1614NXE PJ-2216NXE Maintenance Manual 10-19 PJ-1614NXE PJ-2216NXE Maintenance Manual 8 6 4 3 1 7 12 2 5 11 10 9 10 Appendix 10-20 PJ-1614NXE PJ-2216NXE Maintenance Manual 10 Appendix Table 10-10 Ink Supply Section No. Service part Service diagram Component part Qty. diagram 1 TERM_PUMP board assembly DE-35239 1 2 Ink pump assemblyÅiPJ-1614NXEÅj DF-43233 5 2 Ink pump assemblyÅiPJ-2216NXEÅj DF-43233 7 3 Safety valve holder assemblyÅiPJ1614NXEÅj DE-35266 5 3 Safety valve holder assemblyÅiPJ2216NXEÅj DE-35266 7 4 Ink filterÅiPJ-1614NXEÅj DF-43288 6 4 Ink filterÅiPJ-2216NXEÅj DF-43288 8 5 Air pump DE-35268 1 6 Regulator DF-43253 1 7 Bimor pump DE-35269 1 8 Air chamber DE-35270 1 9 Nipple DF-43261 1 10 Throttle valve DF-43262 1 11 PRESS_SENSE board assembly DE-35248 1 12 Two-way valve DE-35271 1 10-21 Remark PJ-1614NXE PJ-2216NXE Maintenance Manual 5 3 4 2 6 1 7 8 10 Appendix 10-22 10 Appendix 5 2 6 7 8 PJ-1614NXE PJ-2216NXE Maintenance Manual 10-23 10 Appendix PJ-1614NXE PJ-2216NXE Maintenance Manual Table 10-11 Winding Section No. Service part Service diagram Component part Qty. diagram 1 Geared motorÅiPJ-1614NXEÅj WN-4L940 1 2 Winding switch assembly EA-47720 1 3 Limit gear WN-4L487 1 4 Mini keeper E-MK12 1 5 Snap N-40197E 2 6 Limit spring WN-4L745 1 7 Sensor assembly DF-41253 1 8 TERM_ROLL board assemblyÅiPJ1614NXEÅj DE-35249 1 8 TERM-ROLL board assemblyÅiPJ2216NXEÅj DE-35249 2 10-24 Remark 10 Appendix 1 PJ-1614NXE PJ-2216NXE Maintenance Manual 10-25 10 Appendix PJ-1614NXE PJ-2216NXE Maintenance Manual Table 10-12 Sending Section No. 1 Service part Winding motorÅiPJ-2216NXEÅj Service diagram Component part Qty. diagram DE-35319 2 10-26 Remark 1 9 8 7 5 2 6 3 10 Appendix 4 PJ-1614NXE PJ-2216NXE Maintenance Manual 10-27 1 9 8 7 5 2 6 3 PJ-1614NXE PJ-2216NXE Maintenance Manual 4 10 Appendix 10-28 PJ-1614NXE PJ-2216NXE Maintenance Manual 10 Appendix Table 10-13 Leg Section No. Service part Service diagram Component part Qty. diagram 1 Main bottleÅiPJ-1614NXEÅj DF-43306 5 1 Main bottleÅiPJ-2216NXEÅj DF-43306 7 2 Waste fluid bottle DF-43307 1 3 Bottle capÅiPJ-1614NXEÅj DE-35283 6 3 Bottle capÅiPJ-2216NXEÅj DE-35283 8 4 Ink capÅiPJ-1614NXEÅj DF-43308 5 4 Ink capÅiPJ-2216NXEÅj DF-43308 7 5 Waste ink cap DF-43309 1 6 Level switch (ink)ÅiPJ-1614NXEÅj DF-43312 5 6 Level switch (ink)ÅiPJ-2216NXEÅj DF-43312 7 7 Level switch (waste fluid) DF-43313 1 8 TERM_TANK board assembly DE-35240 1 Remark Table 10-14 Accessory No. 9 Service part Foot switch assembly Service diagram Component part Qty. diagram DE-35131 1 10-29 Remark 10 Appendix PJ-1614NXE PJ-2216NXE Maintenance Manual 10-30 PJ-1614NXE PJ-2216NXE Maintenance Manual Self-Diagnosis Function Configulation Diagram Self-Diagnosis Function Configulation Diagram(1/2) *Check*(1/2) [F1]Test *Test*(1/2) *Test*(2/2) [F2]Adjustment [F1]Memory size [F2]Version [F3]Operation panel [F4]Sensor [F1]Encoder [F2]Fan [F3]History [F4]Head waveform *Sensor*(1/2) *Sensor*(2/2) *Head skew* *Adjustment*(1/3) [F1]Skew check [F2]Voltage input [F3]Head nozzle check [F4]Head inclination check *Adjustment*(2/3) [F1]Two-way printing position alignment [F2]CW adjustment [F3]Band feed correction [F4]Side margin *Print* [F1]Test printing *Adjustment*(3/3) [F2]Head cleaning *Head cleaning*(1/2:PJ-1614NX) *Head cleaning*(2/2:PJ-1614NX) *Head cleaning*(1/2:PJ-2216NX) *Head cleaning*(2/2:PJ-2216NX) [F3]Software counter initialization [F4]Feed pitch check *Purge* [F1]Normal [F2]Powerful [F3]Little [F4]Initial ink charge Self-Diagnosis Function Configulation Diagram(2/2) *Print* [F1]Nozzle check [F2]Ajustment variables [F1]Nozzle check [F2]Ajustment variables [F1]Black [F2]Cyan [F3]Magenta [F4]Yellow [F1]All [F1]Black [F2]Cyan [F3]Light cyan [F4]Magenta [F1]Light magenta [F2]Yellow [F3]All [F1]180dpi [F2]360dpi [F3]720dpi [F4]Length *Mode-specified purge* (1/2:PJ-1614NX) [F1]Black [F2]Cyan [F3]Magenta [F4]Yellow [F1]All [F1]Black [F2]Cyan [F3]Light cyan [F4]Magenta [F1]Light magenta [F2]Yellow [F3]All *Mode-specified purge*(2/2:PJ-1614NX) *Mode-specified purge*(1/2:PJ-2216NX) *Mode-specified purge*(2/2:PJ-2216NX) [F4]Print [F1]CW [F2]CCW [F3]CW,CCW [F4]End *Feed pitch* [F3]Purge [F1]Humidity [F2]Valve [F3]Ink level [F4]Cable [F1]Wind [F2]etc CR_HP HD_SLIDE Cover Cover maintenance Lever up Lever down Foot lever Waste fluid Positive perssure lever AD P_EDGE AD P_REAR Jet wash Ink end Self-Diagnosis Function Configulation Diagram PJ-1614NXE PJ-2216NXE Maintenance Manual Self-Diagnosis Function Configulation Diagram(2/2) Self-Diagnosis Function Configulation Diagram(1/2) *Check*(2/2) [F1]Parameter *Parameter* [F1]Initialize *Initialize*(1/2) *Initialize*(2/2) [F2]Update *Update*(1/3) *Update*(2/3) *Update*(3/3) [F2]Life *Life*(1/2) [F1]CR motor [F2]PF motor [F3]Head up/down [F4]Lever motor *Life*(2/2) [F1]Sequential printing [F2]Pump [F3]General endurance [F4]Confirmation [F1]Media feed length [F2]Serial number [F3]Head history [F4]CR motor history [F1]PF motor history [F2]All [F1]Head voltage [F2]Printing position alignment [F3]CW adjustment [F4]Paper feed distance [F1]Side margin [F2]Ink parameter [F3]Serial number [F4]Head temperature [F1]Sub tank heater MUTOH INDUSTRIES LTD. Tel.:81-(0)3-5486-7145 Fax:81-(0)3-5486-7163 E-mail:[email protected] http://www.mutoh.co.jp MUTOH AMERICA INC. Tel.:1-602-4144613 Fax:1-602-4144645 E-mail:[email protected] http://www.mutoh.com MUTOH EUROPE N.V. Tel.:32-(0)59-8 Tel.:32-(0)59-561400 Fax:32-(0)59-807117 E-mail:[email protected] http://www.mutoh.be MUTOH DEUTSCHLAND GmbH. Tel.:49-(0)2159-913430 Fax:49-(0)2159-913456 E-mail:[email protected]