1
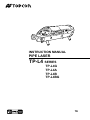
INSTRUCTION MANUAL
PIPE LASER
TP-L4 SERIES
TP-L4G
TP-L4A
TP-L4B
TP-L4BG
TE
FOREWORD
FOREWORD
Thank you for purchasing the TOPCON Pipe Laser TP-L4 series.
The TP-L4 instrument has unique features based on the model.
These include:
•High-visibility green laser beam on models TP-L4G and TP-L4BG.
The green laser is over four times more visible to the human eye,
making it easier to accurately use the laser over longer distances–
inside or outside the pipe.
•Automatic beam alignment on models TP-L4G and TP-L4A. The laser
beam will automatically locate and lock onto the center of the pipe
target placed in its path.
•High-resolution laser spot on all models, making it easy to accurately
locate the center of the beam.
This instruction manual describes procedures for safe use, operation and maintenance of TP-L4.
For the best performance of the instrument, please carefully
read these instructions and keep them in a convenient location
for your future reference.
1
FOREWORD
General Handling Precautions
ÅEBefore starting work or operation, be sure to check that the
instrument is functioning correctly with normal performance.
ÅEWhen setting up the instrument, position it so the bubble in
the digital level vial on the display is in the center position
(See page 1-3).
ÅE When you remove the instrument from the carrying case,
be sure to open the cover of the case after laying the case
down, right side up.
ÅEWhen using an external power supply, it should be rated
between 11 and 14 volts DC.
ÅEBe sure to check the power level of the on-board battery
packbefore using the instrument.
ÅE When you insert the dry battery in the instrument, be sure
to insert in the shown direction. The insertion in reverse
direction causes fault.
ÅERemove the dry cells from the instrument when you will not
use it for more than one month.
ÅEPhysical reflection and refraction may occur under hot
weather conditions or in a small pipe diameter due to its
temperature or moisture conditions. To minimize the effect of
these conditions please take the following precautions.
1)Place the pipe hot side (heated by sunlight etc.) down.
2)Do not apply an excessive amount of “pipe adhesive” to
the pipe joints.
3)Immediately back fill the trench as pipe work is finished.
4)Set the instrument on top of the pipeline.
5)Use a blower or van to move air through the pipe.
2
FOREWORD
Notice for Safe Use
In order to encourage the safe use of products and prevent any danger to the operator and others or damage to properties, important warnings are put on the products
and inserted in the instruction manuals.
We suggest that everyone understand the meaning of the following notices and icons
before reading the “Safety Cautions” and text.
Meaning
Display
WARNING
•Ignoring or disregard of this notice may lead to the
danger of death or serious injury.
CAUTION
•Ignoring or disregard of this notice may lead to personal injury or physical damage.
● Injury refers to hurt, burn, electric shock, etc.
● Physical damage refers to extensive damage to buildings or equipments and furniture.
3
FOREWORD
Safety Cautions
WARNING
Prevention item
•There is a risk of fire, electric shock or physical harm if you attempt to disassemble
or repair the instrument yourself.
This is only to be carried out by TOPCON or an authorized dealer, only!
•Risk of fire or electric shock.
Do not use damaged power cable, plug and socket.
•May ignite explosively.
Never use an instrument near flammable gas, liquid matter, and do not use in a coal mine.
• Cause eye injury or blindness.
Do not stare into beam or view directly with optical instruments.
• Cause eye injury or blindness.
Do not stare into beam.
• Battery can cause explosion or injury.
Do not dispose in fire or heat.
•Risk of fire or electric shock.
Do not use a wet battery or charger.
•Do not cover the charger while it is charging.
Risk of fire or electric shock.
•Laser beam can cause injury to eye or skin.
Avoid exposure to beam.
•Battery can cause outbreak of fire.
Do not use any other type of charger than the one specified.
•Risk of fire or electric shock.
Do not use any other power cable other than the one specified.
•Risk of fire.
Do not use any power voltage except the one given on manufacturers instructions.
•The short circuit of a battery can cause a fire.
Do not short circuit battery when storing it.
4
FOREWORD
CAUTION
Prevention item
Use of controls or adjustment or performance of procedures other than those specified
herein may result in hazardous radiation exposure.
Do not connect or disconnect equipment with wet hands, you are at risk of electric shocks
if you do!
Do not place yourself or a reflecting object in the path of the laser beam. If using the laser
outside the pipe, avoid positioning it anywhere near eye level to avoid any possibility of it
striking someone in the eye. If this should happen, visibility could be temporarily impaired,
causing disorientation and possible accidental injury.
Do not allow skin or clothing to come into contact with acid from the batteries, if this does
occur then wash off with copious amounts of water and seek medical advice.
Do not stand or sit on the carrying cases.
It could overturn, causing injury.
Do not use a damaged instrument case.
It could accidentally open causing damage to the instrument or injury to people.
Do not place instrument on unstable platform, surface or tripod.
If using tripod, make sure instrument is securely attached.
5
FOREWORD
User
Wear the required protectors (safety shoes, helmet, etc.) when operating.
Exceptions from Responsibility
1)The user of this product is expected to follow all operating instructions and make periodic
checks of the product’s performance.
2)The manufacturer, or its representatives, assumes no responsibility for results of a faulty or
intentional usage or misuse including any direct, indirect, consequential damage, and loss
of profits.
3)The manufacturer, or its representatives, assumes no responsibility for consequential
damage, and loss of profits by any disaster, (an earthquake, storms, floods etc.),
a fire, accident, or an act of a third party and/or a usage any other usual conditions.
4)The manufacturer, or its representatives, assumes no responsibility for any damage, and
loss of profits due to a change of data, loss of data, an interruption of business etc., caused
by using the product or an unusable product.
5)The manufacturer, or its representatives, assumes no responsibility for any damage, and
loss of profits caused by usage except for explained in the user manual.
6)The manufacturer, or its representatives, assumes no responsibility for damage caused by
wrong movement, or action due to connecting with other products.
Laser Safety
Safety Information
This product uses a invisible laser beam, and is manufactured and sold in accordance with
“Performance Standards for Light-Emitting Products” (FDA/BRH 21 CFR 1040) or “Radiation
Safety of Laser Products, Equipment Classification, Requirements and User’s Guide” (IEC
Publication 825) provided on the safety standards for laser products.
As per the said standard, this product is classified as a “Class 3A (IIIA) Laser Product”.
This is a simple product to operate and does not require training from a laser safety officer.
In case of any failure, do not disassemble the instrument. Contact TOPCON or your TOPCON dealer.
Labels
The labels on your unit may be slightly different from the samples shown due to specific local
requirements.
AVOID EXPOSURE
LASER LIGHT IS EMITTED
FROM THIS APERTURE
Beam aperture
LASER RADIATION
DO NOT STARE INTO THE BEAM OF VIEW
DIRECTLY WITH OPTICAL INSTRUMENTS
CLASS 3A @LASER PRODUCT
Explanatory Label
6
Warning Label
FOREWORD
Contents
FOREWORD . . . . . . . . . . . . . . . . . . . . . . . . . . . . . . . . . . . . . . . . . . . . . . . . . . . . . . . 1
General Handling Precautions. . . . . . . . . . . . . . . . . . . . . . . . . . . . . . . . . . . . . . . . 2
Notice for Safe Use . . . . . . . . . . . . . . . . . . . . . . . . . . . . . . . . . . . . . . . . . . . . . . . . 3
Safety Cautions . . . . . . . . . . . . . . . . . . . . . . . . . . . . . . . . . . . . . . . . . . . . . . . . . . . 4
User . . . . . . . . . . . . . . . . . . . . . . . . . . . . . . . . . . . . . . . . . . . . . . . . . . . . . . . . . . . . 6
Exceptions from Responsibility . . . . . . . . . . . . . . . . . . . . . . . . . . . . . . . . . . . . . . . 6
Laser Safety . . . . . . . . . . . . . . . . . . . . . . . . . . . . . . . . . . . . . . . . . . . . . . . . . . . . . 6
Contents . . . . . . . . . . . . . . . . . . . . . . . . . . . . . . . . . . . . . . . . . . . . . . . . . . . . . . . . 7
Standard Package Components . . . . . . . . . . . . . . . . . . . . . . . . . . . . . . . . . . . . . . 8
1 NOMENCLATURE AND FUNCTIONS . . . . . . . . . . . . . . . . . . . . . . . . . . . . . . . . . . . . 1-1
1.1 Nomenclature . . . . . . . . . . . . . . . . . . . . . . . . . . . . . . . . . . . . . . . . . . . . . . . . 1-1
2 PREPARING FOR USE . . . . . . . . . . . . . . . . . . . . . . . . . . . . . . . . . . . . . . . . . . . . . . . 2-1
2.1 Power Source . . . . . . . . . . . . . . . . . . . . . . . . . . . . . . . . . . . . . . . . . . . . . . . . 2-1
2.1.1 Using On-board Battery of BT-53Q, DB-53 . . . . . . . . . . . . . . . . . . . . . . . . . 2-1
2.1.2 Using 12 volt DC battery . . . . . . . . . . . . . . . . . . . . . . . . . . . . . . . . . . . . . . . 2-1
2.2 Setting TP-L4 (all models) . . . . . . . . . . . . . . . . . . . . . . . . . . . . . . . . . . . . . . 2-2
2.3 Grade setting procedure . . . . . . . . . . . . . . . . . . . . . . . . . . . . . . . . . . . . . . . . 2-3
2.3.1 Direct entry of grade value . . . . . . . . . . . . . . . . . . . . . . . . . . . . . . . . . . . . . . 2-3
2.3.2 Set grade value by moving laser . . . . . . . . . . . . . . . . . . . . . . . . . . . . . . . . . 2-3
2.4 Setting Laser Line . . . . . . . . . . . . . . . . . . . . . . . . . . . . . . . . . . . . . . . . . . . . . 2-4
2.4.1 Automatic Centering . . . . . . . . . . . . . . . . . . . . . . . . . . . . . . . . . . . . . . . . . . . 2-4
2.4.2 Automatic alignment with the target (TP-L4G and TP-L4A only) . . . . . . . . . 2-5
2.5 Changing the laser beam mode . . . . . . . . . . . . . . . . . . . . . . . . . . . . . . . . . . 2-6
3 STANDARD ACCESSORIES . . . . . . . . . . . . . . . . . . . . . . . . . . . . . . . . . . . . . . . . . . . 3-1
3.1 Self Centering Feet and Single Point Foot . . . . . . . . . . . . . . . . . . . . . . . . . . 3-1
3.1.1 Single point foot . . . . . . . . . . . . . . . . . . . . . . . . . . . . . . . . . . . . . . . . . . . . . . 3-1
3.2 Remote Controller, RC-200 . . . . . . . . . . . . . . . . . . . . . . . . . . . . . . . . . . . . .
3.3 Safety Lock System . . . . . . . . . . . . . . . . . . . . . . . . . . . . . . . . . . . . . . . . . . .
3.4 Replacing battery for Remote Control, RC-200 . . . . . . . . . . . . . . . . . . . . . .
3.5 Target . . . . . . . . . . . . . . . . . . . . . . . . . . . . . . . . . . . . . . . . . . . . . . . . . . . . . .
4 OPERATION EXAMPLE . . . . . . . . . . . . . . . . . . . . . . . . . . . . . . . . . . . . . . . . . . . . . .
4.1 Pipe Laying . . . . . . . . . . . . . . . . . . . . . . . . . . . . . . . . . . . . . . . . . . . . . . . . . .
3-1
3-3
3-3
3-3
4-1
4-1
4.1.1 Setting TP-L4G/A/B/BG . . . . . . . . . . . . . . . . . . . . . . . . . . . . . . . . . . . . . . . . 4-1
4.1.2 Setting grade . . . . . . . . . . . . . . . . . . . . . . . . . . . . . . . . . . . . . . . . . . . . . . . . 4-2
4.1.3 Setting line . . . . . . . . . . . . . . . . . . . . . . . . . . . . . . . . . . . . . . . . . . . . . . . . . . 4-3
4.1.4 Setting Excavation, Base Material and Pipe Elevation (Fig.5) . . . . . . . . . . . 4-5
4.1.5 In-the-Pipe Set up. . . . . . . . . . . . . . . . . . . . . . . . . . . . . . . . . . . . . . . . . . . . . 4-6
4.1.6 Grade Checking . . . . . . . . . . . . . . . . . . . . . . . . . . . . . . . . . . . . . . . . . . . . . . 4-7
5 POWER SOURCE AND CHARGING . . . . . . . . . . . . . . . . . . . . . . . . . . . . . . . . . . . . . 5-1
5.1 Dry battery (Alkaline) pack DB-53 (Optional Accessories) . . . . . . . . . . . . . . 5-1
5.1.1 Removing . . . . . . . . . . . . . . . . . . . . . . . . . . . . . . . . . . . . . . . . . . . . . . . . . . . 5-1
5.1.2 Replacing . . . . . . . . . . . . . . . . . . . . . . . . . . . . . . . . . . . . . . . . . . . . . . . . . . . 5-1
5.2 Rechargeable battery pack BT-53Q . . . . . . . . . . . . . . . . . . . . . . . . . . . . . . . 5-1
5.2.1 Removing and Installing . . . . . . . . . . . . . . . . . . . . . . . . . . . . . . . . . . . . . . . . 5-1
5.2.2 Charging . . . . . . . . . . . . . . . . . . . . . . . . . . . . . . . . . . . . . . . . . . . . . . . . . . . . 5-1
5.2.3 Charging while operating from DC 12V external battery . . . . . . . . . . . . . . . 5-2
6 CHANGING OPERATING PARAMETERS . . . . . . . . . . . . . . . . . . . . . . . . . . . . . . . .
6.1 Operating Parameters . . . . . . . . . . . . . . . . . . . . . . . . . . . . . . . . . . . . . . . . .
6.2 How To Change Operating Parameters . . . . . . . . . . . . . . . . . . . . . . . . . . . .
6.3 How to Input (Change) Security Code . . . . . . . . . . . . . . . . . . . . . . . . . . . . .
6.4 How to Change Company Name . . . . . . . . . . . . . . . . . . . . . . . . . . . . . . . . .
7 CHECKING AND ADJUSTING CALIBRATION . . . . . . . . . . . . . . . . . . . . . . . . . . . . .
7.1 Procedure To Check and Adjust Laser Calibration . . . . . . . . . . . . . . . . . . .
6-1
6-1
6-2
6-3
6-5
7-1
7-1
7.1.1 Checking Calibration . . . . . . . . . . . . . . . . . . . . . . . . . . . . . . . . . . . . . . . . . . 7-1
7.1.2 Adjusting Calibration . . . . . . . . . . . . . . . . . . . . . . . . . . . . . . . . . . . . . . . . . . 7-1
8 ERROR DISPLAYS . . . . . . . . . . . . . . . . . . . . . . . . . . . . . . . . . . . . . . . . . . . . . . . . . . 8-1
9 TROUBLESHOOTING . . . . . . . . . . . . . . . . . . . . . . . . . . . . . . . . . . . . . . . . . . . . . . . . 9-1
10 OPTIONAL ACCESSORIES . . . . . . . . . . . . . . . . . . . . . . . . . . . . . . . . . . . . . . . . . 10-1
11 SPECIFICATIONS . . . . . . . . . . . . . . . . . . . . . . . . . . . . . . . . . . . . . . . . . . . . . . . . . 11-1
7
FOREWORD
Standard Package Components
Composition
Target .............................................................................. 1set
AC/DC converter ............................................................. 1pc.
Battery adapter BA-2....................................................... 1set
Battery BT-53Q............................................................... 1pc.
Carrying case .................................................................. 1pc.
Self-centering Feet
Ø 150mm ...................................................................... 1set
Ø 200mm ...................................................................... 1set
Ø 250mm ...................................................................... 1set
Ø 300mm ...................................................................... 1set
Single point foot ............................................................. 1pc.
Remote controller RC-200 ............................................. 1pc.
Instruction manual .......................................................... 1vol.
Warranty card ............................................................... 1vol.
Make sure that all of the above items are with the instrument when purchased.
(If you purchased other than a standard package, please confirm the contents
with your local Topcon dealer.)
8
FOREWORD . . . . . . . . . . . . . . . . . . . . . . . . . . . . . . . . . . . . . . . . . . . . . . . . . . . . . . . 1
General Handling Precautions. . . . . . . . . . . . . . . . . . . . . . . . . . . . . . . . . . . . . . . . 2
Notice for Safe Use . . . . . . . . . . . . . . . . . . . . . . . . . . . . . . . . . . . . . . . . . . . . . . . . 3
Safety Cautions . . . . . . . . . . . . . . . . . . . . . . . . . . . . . . . . . . . . . . . . . . . . . . . . . . . 4
User . . . . . . . . . . . . . . . . . . . . . . . . . . . . . . . . . . . . . . . . . . . . . . . . . . . . . . . . . . . . 6
Exceptions from Responsibility . . . . . . . . . . . . . . . . . . . . . . . . . . . . . . . . . . . . . . . 6
Laser Safety . . . . . . . . . . . . . . . . . . . . . . . . . . . . . . . . . . . . . . . . . . . . . . . . . . . . . 6
Contents . . . . . . . . . . . . . . . . . . . . . . . . . . . . . . . . . . . . . . . . . . . . . . . . . . . . . . . . 7
Standard Package Components . . . . . . . . . . . . . . . . . . . . . . . . . . . . . . . . . . . . . . 8
1 NOMENCLATURE AND FUNCTIONS . . . . . . . . . . . . . . . . . . . . . . . . . . . . . . . . . . . . 1-1
1.1 Nomenclature . . . . . . . . . . . . . . . . . . . . . . . . . . . . . . . . . . . . . . . . . . . . . . . . 1-1
2 PREPARING FOR USE . . . . . . . . . . . . . . . . . . . . . . . . . . . . . . . . . . . . . . . . . . . . . . . 2-1
2.1 Power Source . . . . . . . . . . . . . . . . . . . . . . . . . . . . . . . . . . . . . . . . . . . . . . . . 2-1
2.1.1 Using On-board Battery of BT-53Q, DB-53 . . . . . . . . . . . . . . . . . . . . . . . . . 2-1
2.1.2 Using 12 volt DC battery . . . . . . . . . . . . . . . . . . . . . . . . . . . . . . . . . . . . . . . 2-1
2.2 Setting TP-L4 (all models) . . . . . . . . . . . . . . . . . . . . . . . . . . . . . . . . . . . . . . 2-2
2.3 Grade setting procedure . . . . . . . . . . . . . . . . . . . . . . . . . . . . . . . . . . . . . . . . 2-3
2.3.1 Direct entry of grade value . . . . . . . . . . . . . . . . . . . . . . . . . . . . . . . . . . . . . . 2-3
2.3.2 Set grade value by moving laser . . . . . . . . . . . . . . . . . . . . . . . . . . . . . . . . . 2-3
2.4 Setting Laser Line . . . . . . . . . . . . . . . . . . . . . . . . . . . . . . . . . . . . . . . . . . . . . 2-4
2.4.1 Automatic Centering . . . . . . . . . . . . . . . . . . . . . . . . . . . . . . . . . . . . . . . . . . . 2-4
2.4.2 Automatic alignment with the target (TP-L4G and TP-L4A only) . . . . . . . . . 2-5
2.5 Changing the laser beam mode . . . . . . . . . . . . . . . . . . . . . . . . . . . . . . . . . . 2-6
3 STANDARD ACCESSORIES . . . . . . . . . . . . . . . . . . . . . . . . . . . . . . . . . . . . . . . . . . . 3-1
3.1 Self Centering Feet and Single Point Foot . . . . . . . . . . . . . . . . . . . . . . . . . . 3-1
3.1.1 Single point foot . . . . . . . . . . . . . . . . . . . . . . . . . . . . . . . . . . . . . . . . . . . . . . 3-1
3.2 Remote Controller, RC-200 . . . . . . . . . . . . . . . . . . . . . . . . . . . . . . . . . . . . .
3.3 Safety Lock System . . . . . . . . . . . . . . . . . . . . . . . . . . . . . . . . . . . . . . . . . . .
3.4 Replacing battery for Remote Control, RC-200 . . . . . . . . . . . . . . . . . . . . . .
3.5 Target . . . . . . . . . . . . . . . . . . . . . . . . . . . . . . . . . . . . . . . . . . . . . . . . . . . . . .
4 OPERATION EXAMPLE . . . . . . . . . . . . . . . . . . . . . . . . . . . . . . . . . . . . . . . . . . . . . .
4.1 Pipe Laying . . . . . . . . . . . . . . . . . . . . . . . . . . . . . . . . . . . . . . . . . . . . . . . . . .
3-1
3-3
3-3
3-3
4-1
4-1
4.1.1 Setting TP-L4G/A/B/BG . . . . . . . . . . . . . . . . . . . . . . . . . . . . . . . . . . . . . . . . 4-1
4.1.2 Setting grade . . . . . . . . . . . . . . . . . . . . . . . . . . . . . . . . . . . . . . . . . . . . . . . . 4-2
4.1.3 Setting line . . . . . . . . . . . . . . . . . . . . . . . . . . . . . . . . . . . . . . . . . . . . . . . . . . 4-3
4.1.4 Setting Excavation, Base Material and Pipe Elevation (Fig.5) . . . . . . . . . . . 4-5
4.1.5 In-the-Pipe Set up. . . . . . . . . . . . . . . . . . . . . . . . . . . . . . . . . . . . . . . . . . . . . 4-6
4.1.6 Grade Checking . . . . . . . . . . . . . . . . . . . . . . . . . . . . . . . . . . . . . . . . . . . . . . 4-7
5 POWER SOURCE AND CHARGING . . . . . . . . . . . . . . . . . . . . . . . . . . . . . . . . . . . . . 5-1
5.1 Dry battery (Alkaline) pack DB-53 (Optional Accessories) . . . . . . . . . . . . . . 5-1
5.1.1 Removing . . . . . . . . . . . . . . . . . . . . . . . . . . . . . . . . . . . . . . . . . . . . . . . . . . . 5-1
5.1.2 Replacing . . . . . . . . . . . . . . . . . . . . . . . . . . . . . . . . . . . . . . . . . . . . . . . . . . . 5-1
5.2 Rechargeable battery pack BT-53Q . . . . . . . . . . . . . . . . . . . . . . . . . . . . . . . 5-1
5.2.1 Removing and Installing . . . . . . . . . . . . . . . . . . . . . . . . . . . . . . . . . . . . . . . . 5-1
5.2.2 Charging . . . . . . . . . . . . . . . . . . . . . . . . . . . . . . . . . . . . . . . . . . . . . . . . . . . . 5-1
5.2.3 Charging while operating from DC 12V external battery . . . . . . . . . . . . . . . 5-2
6 CHANGING OPERATING PARAMETERS . . . . . . . . . . . . . . . . . . . . . . . . . . . . . . . .
6.1 Operating Parameters . . . . . . . . . . . . . . . . . . . . . . . . . . . . . . . . . . . . . . . . .
6.2 How To Change Operating Parameters . . . . . . . . . . . . . . . . . . . . . . . . . . . .
6.3 How to Input (Change) Security Code . . . . . . . . . . . . . . . . . . . . . . . . . . . . .
6.4 How to Change Company Name . . . . . . . . . . . . . . . . . . . . . . . . . . . . . . . . .
7 CHECKING AND ADJUSTING CALIBRATION . . . . . . . . . . . . . . . . . . . . . . . . . . . . .
7.1 Procedure To Check and Adjust Laser Calibration . . . . . . . . . . . . . . . . . . .
6-1
6-1
6-2
6-3
6-5
7-1
7-1
7.1.1 Checking Calibration . . . . . . . . . . . . . . . . . . . . . . . . . . . . . . . . . . . . . . . . . . 7-1
7.1.2 Adjusting Calibration . . . . . . . . . . . . . . . . . . . . . . . . . . . . . . . . . . . . . . . . . . 7-1
8 ERROR DISPLAYS . . . . . . . . . . . . . . . . . . . . . . . . . . . . . . . . . . . . . . . . . . . . . . . . . . 8-1
9 TROUBLESHOOTING . . . . . . . . . . . . . . . . . . . . . . . . . . . . . . . . . . . . . . . . . . . . . . . . 9-1
10 OPTIONAL ACCESSORIES . . . . . . . . . . . . . . . . . . . . . . . . . . . . . . . . . . . . . . . . . 10-1
11 SPECIFICATIONS . . . . . . . . . . . . . . . . . . . . . . . . . . . . . . . . . . . . . . . . . . . . . . . . . 11-1
9
1 NOMENCLATURE AND FUNCTIONS
1
NOMENCLATURE AND FUNCTIONS
1.1
Nomenclature
Battery pack knob
Remote control receiving window
Battery pack
Operating keys
Display
Handle
Handle fixing screw
Power supply connector
(with cap)
Laser centerline mark / LED
Starting point of the laser line
Remote control receiving window
Grade axis mark
Laser grade starting point
Laser beam window
Laser beam is emitted from here
1-1
1 NOMENCLATURE AND FUNCTIONS
Operating Panel
Warning/Standby Indicator LED
Lock key
Beam mode key
Auto alignment key
(TP-L4G/A only)
Centerline LED key
Line control / Digit shifting /
Auto centering key
Line control / Digit shifting /
Auto centering key
Power key
Setting key
Grade up or down / Value setting key
*The illumination of the display will be ON for 30 seconds whenever anyone key is pressed.
Key
Name
Functions
Centerline
LED key
Turn the centerline LED ON or OFF by pressing.
(Auto shut off after 30 minutes.)
Beam mode
key
The mode of laser beam is switched alternately.
(Standard power, high power)
Lock key
This key prevents input from grade control keys.
Pressing again releases this function.
Auto alignment
key
The laser beam is aligned to the center of the target automatically.
Line control /
Digit shifting /
Auto centering
key
Press to move the laser beam to the right or to the left.
Active indicating digit shifts to the right or the left. By pressing
both keys at the same time, the laser beam returns to the center automatically.
Grade up or
down /
Value setting
key
Press to move the laser beam up or down.
Positive and negative values are indicated in the display for
grade setting.
By pressing both keys at the same time, returns grade to
00.000%.
Setting key
Press to enter grade shown on display.
Power key
Turn the instrument ON or OFF.
Warning/Standby Indicator
LED
Flashes to indicate warning or standby mode.
1-2
1 NOMENCLATURE AND FUNCTIONS
Indicators
Digital level vial, rotate instrument until centered
Battery warning indication
Remaining battery capacity is shown in 3
steps.
Laser line indicator
Indicates the direction of the laser line.
Okay to operate.
Centerline LED indication
Operating time is limited.
Recharging or alternate
power will be required
soon.
Blinking
Grade indication
Lock indicator
Charging while using
12 volt DC external battery.
Self leveling indication (Flashing)
Percent or Permilli symbol
Indicates when the instrument
is locked.
Flashes when the instrument is auto
leveled. After self leveling is finished,
the display changes laser mode.
Laser mode indication
ON mode
Blinking mode
High power mode
(TP-L4G/BG only)
Level vial display indicates instrument rotation status
When the instrument is titled sideways, the small level vial
indicator on the display enlarges to fill the entire display to aid
the user in accurate instrument setup. (see section 6, Setting
Operating Modes for more information)
Warning indications
Battery warning indication
Operating is impossible, and the laser beam is not emitted.
Replace or recharge the battery.
Level warning indication
The instrument tilted beyond the auto-leveling range to the back
or front.
Reposition the instrument by tilting in the direction indicated by
arrow.
Rotation warning indication
The instrument is tilted too far to the right or left.
Reposition the instrument to the direction indicated by arrow.
1-3
2 PREPARING FOR USE
2
PREPARING FOR USE
2.1
Power Source
2.1.1 Using On-board Battery of BT-53Q, DB-53
The on-board battery BT-53Q is a rechargeable system and the DB-53 is a disposable
(dry) battery system. Refer to "POWER SOURCES AND CHARGING" for instruction on
how to charge the BT-53Q, and how to replace the DB-53 dry batteries.
2.1.2 Using 12 volt DC battery
Red clip to positive terminal
PC-17
(Power cable for DC-12V )
Black clip to
negative terminal
12 volt DC
battery
•Stop the engine while using automobile battery.
•Be sure to connect the red clip to positive terminal and black clip to negative terminal of
the battery when using the Power source cable for 12 volt DC.
(Electric current consumption: Max. 3A)
•Always turn OFF the instrument before removing on-board battery pack or external power
cable.
Turning Power ON
Press the Power key. A company name (default; TOPCON) will be indicated for about five
seconds.
(See “6 CHANGING OPERATING PARAMETERS” for instruction on how to change the
company name.)
Security Mode
A four-digit security code can be set and activated to prevent unauthorized used.
When Security mode is set, the security code input is necessary when power is turned on
(in Normal mode, Selecting mode and Checking and Adjusting mode).
(See Section “6 CHANGING OPERATING PARAMETERS” for instruction on how to set
Security Mode.)
2-1
2 PREPARING FOR USE
2.2
Setting TP-L4 (all models)
Always position the instrument so the bubble in the digital level vial is centered.
The instrument has a self-leveling range of ±10%. To assure proper self-leveling
the instrument must be positioned to within 10% of the grade entered.
+10%
-10%
Setting grade
Level warning
Rotation warning
Inclination of
the instrument
When the instrument is not positioned within the self-leveling range, the level warning will appear. The laser blinks
slowly. Reposition the instrument in the direction indicated
by arrow.
When the instrument is tilted beyond the rotation compensation range (approx. ±4°), the rotation warning will appear.
The laser blinks slowly. Reposition the instrument by rotating it in the direction indicated by the arrow.
2-2
2 PREPARING FOR USE
2.3
Grade setting procedure
2.3.1 Direct entry of grade value
(Example) Setting grade of +01.234% (+12.34ÅÒ)
Be sure that the lock is disengaged before operating. (Format AB.CDE%)
Procedure
1
Key operation
2
Press [SET] key.
The previous data will be shown, and ± mark blinks.
Press [ ] or [ ] key to change the sign to +.
3
Press [
] key to shift to digit A.
4
Press [
] or [
5
Press[
] key to shift to digit B.
6
Press [
] or [
7
Repeat previous steps to change values of digit C
to "2", digit D to "3" and digit E to "4".
8
Press [SET] key to desired grade.
After entering, the instrument starts repositioning
the laser to the grade. The Auto leveling indication
blinks during the grade setting process. The laser
beam blinks at the same time.
Input range: -15.000% to 40.000%
(-150.00~+400.00 ÅÒ)
Åú
Display
-13.678%
OR
+13.678%
+13.678%
] key to change value to "0".
OR
+03.678%
+03.678%
] key to change value to "1".
OR
+01.678%
+01.234%
SET
2.3.2 Set grade value by moving laser
Grade value can be set directly by moving laser up or down.
Be sure that the lock is disengaged before operating.
The grade display will increase or decrease
according to the direction of the laser.
Pressing the [
] or [
] key, the laser beam moves up or down.
Zero Setting :Pressing the [ ] and [ ] key at the same time, the display and the
laser will return to 0.00%.
2-3
2 PREPARING FOR USE
2.4
Setting Laser Line
Use the line control key on the instrument display panel or the RC-200 remote control to
move the horizontal laser position to the left or right required.
The maximum adjusting range is 9 m (29.5 ft.) at a distance of 30 m (100ft.)
The speed of the line travel is variable. When the key is first pressed, the speed will be
slow. By pressing the key continuously, the speed of line travel will increase.
The relative position of the laser beam is shown on the display as indicated below.
LASER LINE INDICATOR
This display indicates that
the laser line is positioned at
the left end of the adjustment range. The laser line
will not travel to the left even
if the line control key is held
down. In addition, the laser
will blink to alert the user of
this condition.
It is always a good idea to
pre-position the laser to the
center of its adjusting range
prior to setup. (see below)
Maximum line adjust range
9m(29.5ft.)
30m
(100ft.)
This display indicates that
the laser line is positioned
at the right end of the adjustment range. The laser
line will not travel to the
right even if the line control
key is held down. In addition, the laser will blink to
alert the user of this condition.
It is always a good idea to
pre-position the laser to
the center of its adjusting
range prior to setup. (see
below)
2.4.1 Automatic Centering
Press both line control left and right keys at the same time. The laser will return to the
center of the line adjustment range automatically.
Laser line indication
Press the [
] and [
] key at the same time.
2-4
2 PREPARING FOR USE
2.4.2 Automatic alignment with the target (TP-L4G and TP-L4A only)
This function is helpful for second day set ups. When the alignment is placed on centerline
so it is in the alignment path of the beam, the laser will search the horizontal center of the
target and automatically align the beam to it. Set the alignment target as follows and press
the automatic alignment key on the instrument or the RC-200 remote control. The instrument starts auto alignment and the following display is shown.
Detection strips
Target
Laser receiving side
5m to 150m
(16.4 ft to 492ft)
Automatic alignment key
Set the target so the detection strips
face the front of the instrument.
Display
The display shows self leveling is in process.
After self leveling is completed, automatic alignment
starts.
The display shows stabilizing laser output after completing self leveling. When laser output is stable, automatic
alignment starts. (Only on TP-L4G)
The display shows auto alignment is in process.
Each step shows alignment progress.
Alignment is completed.
Confirm the laser beam on the target. If necessary,
use the line control key or the remote control RC-200 and
align the laser precisely.
Alignment target is lost during auto alignment mode. Reset the instrument and press the automatic alignment key
again.
2-5
2 PREPARING FOR USE
2.5
Changing the laser beam mode
Two laser beam modes are available, ON and Blinking.
A third mode, High-Power, is available on green laser beam models.
By pressing the beam mode key, the beam mode will change alternatively.
Press the beam mode key.
Display
ON mode
Blinking mode
High power mode
(Only TP-L4G/BG)
TP-L4G and TP-L4BG Model Only:
The laser output is not stable for several minutes when the power is on or the mode of laser is
changed. After the beam is stabilized (display does not show WAIT), the mode can be changed.
2-6
3 STANDARD ACCESSORIES
3
STANDARD ACCESSORIES
3.1
Self Centering Feet and Single Point Foot
150mm / 6"
200mm / 8"
Single point foot
250mm / 10"
300mm / 12"
Four sets of centering feet are provided with the TP-L4. The feet provided with TP-L4
will center the laser beam inside the following diameters of pipe:
150mm(6"), 200mm(8"), 250mm(10") and 300mm(12")
They can also be used to set laser on top of the pipe or on a flat surface.
3.1.1 Single point foot
Use the single pointed foot when the TP-L4 is unstable due to setting up on rough surfaces. It is possible to use two self-centering feet for 200 mm(8") diameter with the single
point foot when the surface is level.
3.2
Remote Controller, RC-200
The RC-200 allows you to remotely control most function of the TP-L4 as shown below.
The RC-200 is convenient for aligning the beam while using a transit, or for saving power
by temporarily putting the unit in standby mode using the ON/OFF switch.
Signal aperture
Automatic alignment mode key
Signal lamp
When red LED is blinking, the
signal is transmitting
Automatic centering key
Press both keys at the same time
Line control key
(Left direction)
Line control key (Right direction)
Laser ON/OFF switch
Controls laser ON/OFF for
the instrument
Laser beam mode key
3-1
3 STANDARD ACCESSORIES
• Remote control operation is not possible when the instrument is locked. Press the lock key
to release the lock function of the instrument.
• Operating range by remote control :Å@
Approx.200 m (656 ft.) (Though the pipe from a forward position)
Approx.25 m (82 ft.) (From above panel)
•The laser ON/OFF switch controls the laser beam only, not for the instrument. To turn
power OFF to the instrument, be sure to switch OFF the instrument after operation is
finished. When the laser is turned off by the laser ON/OFF switch, “STAND BY” is indicated
on the display and the laser flashes once for five seconds.
Note:To turn laser beam ON again, press the laser ON/OFF switch for 2 seconds.
Laser line will travel in the opposite
direction of the line control keys
when using the remote control from
a forward position.
Laser line will travel in the direction
of the line control keys when using
the remote control from above or
behind the panel position.
When using the remote controller, direct the signal aperture to the remote control receiving
window on front of the TP-L4.
RC-200
Signal aperture
Manhole
Remote control receiving
window
Remote control
receiving window
Signal aperture
3-2
RC-200
3 STANDARD ACCESSORIES
3.3
Safety Lock System
If the instrument is moved while it is in standby mode it will not be possible to turn the
instrument back on from the remote control. This is to insure operational accuracy. In a
situation such as this, “ERROR” will be displayed and laser beam will flash.
To reset, turn power OFF then ON at the instrument.
3.4
Replacing battery for Remote Control, RC-200
1 Lift the battery cover on the back of the remote controller RC-200 is lifted up slightly by pressing toward the
direction of the mark . When the lid lifts up, take it
out.
2 Replace the 4 old AAA alkaline batteries with new
ones.
3 Click to close the lid by pressing on it.
Note
•Replace all 4 batteries with new ones at the same time.
•Insert the batteries in the battery box according to the appointed direction.
•Do not mix used and new batteries, and do not mix different types of batteries together.
3.5 Target
Select the size of target assembly appropriate for the pipe diameter.
Fixing screw
Target (s)
Level vial
Detection strips
(TP-L4G, TP-L4A only)
When laser beam strikes
the detection strips in
auto alignment mode, the
laser beam starts alignment.
Target holder
Laser receiving side
Target (L)
3-3
4 OPERATION EXAMPLE
4
OPERATION EXAMPLE
4.1
Pipe Laying
Establish the Correct Elevation of the Laser
Staff position
(Top surface of mounting clamp)
Rod Handle Mount
73mm
(2.87’’)
73mm
(2.87’’)
Laser
60mm
(2.36 ’’)
Laser
Leveling Screw
Using trivet stand
(Optional Accessories)
4.1.1 Setting TP-L4G/A/B/BG
1
Attach the TP-L4G/A/B/BG to the trivet stand (Fig. 1a) and position the LED over centerline of the pipe or invert in the center of the manhole (Fig. 1b). By using three leveling
screws, adjust the angle of the laser in direction indicated on the display until the bubble
indicator is in the center position. For pre-poured inverts attach the appropriate sized feet
and set the laser in the center of the invert (Fig. 1c).
2
Set up a level or rotating laser between the manhole and offset hub. Take a rod reading on
the hub and add this reading to the cut indicated on the guard stake. (Fig. 2)
3
Place the grade rod on the top of the Rod Handle Mount clamp (if using leg set, elevation
transfer is not necessary due to the fact that the pre-poured invert must be placed at the
correct elevation). When measuring from the clamp, remember to add the offset distance
to center the beam. (73mm or 2.87 inches) (Fig. 2)
4
Adjust the Trivet Rod using the height adjustment knob until the laser beam is at the correct elevation.
Height adjustment knob
Fig. 1a
Fig. 1b
4-1
4 OPERATION EXAMPLE
Fig. 1c
Grade rod
Grade rod
Level
73mm
(2.87’’)
Laser beam
TP-L4G/A/B/BG
Fig. 2
4.1.2 Setting grade
1
To set grade follow procedures as described in section “2.3 Grade setting procedure”.
4-2
4 OPERATION EXAMPLE
4.1.3 Setting line
Example 1
1
2
Position a transit directly over the centerline of the pipe using a plumb bob.
3
4
Tilt the transit up so the view is forward into the base of the open ditch.
5
Lay pipe.
Align the transit to the forward manhole marker and then plummet the transit to view the
bottom of the manhole. Position the laser so the LED is on the vertical cross hair of the
transit.
Use the RC-200 remote control to adjust the laser line until centered on the vertical cross
hair.
Transit
Forward
manhole
marker
Plumb bob
Laser beam
Center of manhole
4-3
4 OPERATION EXAMPLE
Example 2
1
2
Position the laser so it is centered in the manhole, over centerline of pipe.
3
4
5
6
Align the transit to forward manhole marker.
Using the Manhole Transit Tower (optional), attach a transit and use a plumb bob to position it directly over the centerline LED on top of the laser and lock in place.
Plumb the transit downward into the open excavation.
Align the laser beam to the transit using in RC-200 Remote Control.
Lay pipe.
Transit
Forward
manhole
marker
Manhole
transit tower
(Option)
Plumb bob
Laser beam
Center of manhole
4-4
4 OPERATION EXAMPLE
4.1.4 Setting Excavation, Base Material and Pipe Elevation (Fig.5)
1
Calculate the base elevation from beam center as follows:
Example:
Pipe diameter: 300mm (12 inch)
Pipe thickness: 25mm (1 inch)
Base material: 150mm (6 inch)
Distance from beam to base elevation
Pipe radius: 300 divided by 2=150mm(12 divided by 2=6 in)
Pipe thickness: 25=25mm (1=1 in)
Base material: 150=150mm (6=6 in)
Distance from beam to base elevation:
150mm + 25mm + 150mm = 325mm
(6 in + 1 in + 6 in = 13 in)
2
3
Using a grade board or any reference rod you can now use the beam to control the depth
of excavation by simply making a mark at the reference elevation (325mm or 13 in).
To set a sub-base elevation calculate the distance from the center of the beam as follows:
Example:
Beam Diameter: 300mm (12 inch)
Pipe Thickness : 25mm (1 inch)
Distance from beam to sub base elevation.
Pipe Radius: 300 divided by 2=150mm(12 divided by 2=6 in)
Pipe Thickness: 25mm=25mm(1inch=1inch)
Distance from beam to sub-base elevation:
150mm + 25mm = 175mm (6 in + 1 in = 7 in)
4
Using the grade board with the correct reference point (175mm or 7 inches) you can now
control the elevation of the sub-base material.
5
To set pipe at the correct elevation simply set the pipe target for the correct size of pipe,
place inside of the pipe and adjust the pipe until the laser beam is located precisely at the
center "bulls-eye" on the target.
Target
Excavation
Sub-base
elevation
Pipe
Sub-base material
Base elevation
Base
4-5
4 OPERATION EXAMPLE
4.1.5 In-the-Pipe Set up.
If some pipe distance has already been layed, the instrument can be set inside the pipe.
1
2
3
4
Attach the correct leg set for the appropriate pipe size.
Position the laser inside the pipe and adjust the rotation until bubble display is centered.
Locate the pipe target in the last section of pipe.
Using the RC-200 remote control or the alignment key on the control panel, automatically
align the beam to the center of the target. The auto alignment function is available on the
TP-L4G and TP-L4A models. For the TP-L4B/BG, use the alignment keys on the RC-200
remote control or on the control panel. Refer to “2 PREPARING FOR USE”.
Manhole
Pipe
TP-L4G/A/B/BG
Pipe target
Laser beam
Base material
4-6
4 OPERATION EXAMPLE
4.1.6 Grade Checking
After some pipe is layed (8 to 15m / 25 to 50 ft) you should check to make sure the laser
has been set up for proper grade and line.
1
2
3
Determine the elevation of pipe starting point A, using transit or level and grade rod.
Determine the elevation of pipe end point B in the same manner.
The grade can be determined by subtracting the elevations of the two points (A minus B)
divided by the horizontal distance between the two points.
B
A
Manhole
8~15 m
4-7
5 POWER SOURCE AND CHARGING
5
POWER SOURCE AND CHARGING
5.1
Dry battery (Alkaline) pack DB-53 (Optional Accessories)
5.1.1 Removing
1
2
Turn the battery pack knob to “OPEN”, lift and remove the battery DB-53.
Open battery pack by turning the lid knob to “OPEN”.
5.1.2 Replacing
1
2
Place the battery pack into the instrument. Pack will
fit in only one orientation. If operator is on the panel
side (back), the lettering should be right side up.
DB-53
Secure by turning the knob to “LOCK”.
Note
•Replace all 4 batteries with new ones at the same time.
•Insert the batteries in the battery box according to the appointed direction.
•Do not mix used and new batteries, and do not mix different types of batteries together.
5.2
Rechargeable battery pack BT-53Q
5.2.1 Removing and Installing
1
Turn the battery pack knob to "OPEN",
lift and remove the rechargeable battery
pack BT-53Q.
Battery adapter BA-2
5.2.2 Charging
(Charging time: Approx. 9hours)
AC/DC converter
1
Insert the BA-2 battery adapter into the
BT-53Q rechargeable battery as shown.
2
3
Plug the AC/DC converter into the BA-2.
4
When charging is complete, the LED will change to solid green. Unplug the BA-2 battery
adapter from the BT-53Q.
5
Unplug the AC/DC converter power cord from the AC receptacle.
BT-53Q
Insert the AC/DC converter power cord
into the appropriate AC outlet. LED of
the BT-53Q rechargeable battery will
light red.
5-1
5 POWER SOURCE AND CHARGING
Note:To charge the battery, the following commercial AC/DC converter can be used.
Output: DC12V 1A
Inside diameter: ø 2.1mm
Outside diameter: ø 5.5mm
9.5mm
AC/DC converter plug
Note
• Recharging should take place in a room with an ambient temperature range of 10°C to 35°C (50°F to
95°F).
• Exceeding the specified charging time may shorten the life of the battery and should be avoided if possible.
• The battery source will discharge when stored and should be checked before using with instrument .
• Be sure to charge a stored battery source every 3 or 4 months and store in a place at 30 °C (86 °F)
and below when it will not used for a long period.
If you allow the battery to be completely discharged, it will have an effect on the overall performance
for proper charging in the future.
• Recharging can take less than 9 hours depending on the discharge condition of the battery when
charging begins.
5.2.3 Charging while operating from DC 12V external battery
This function is useful when operating from the rechargeable battery pack (BT-53Q) that is
low and needs charging. Using the instrument with 12vDC external battery in ambient temperature [+10°C to +35 °C (+50 °F to 95 °F)], the rechargeable battery pack can be
recharged while the instrument is in use. Connect DC-12V external battery and turn the
instrument ON, the charging indicator LED on top of the battery pack will indicate charging
status.
The LED on the battery pack indicates charging status as follows:
Red ON:
Green ON:
Green flashing:
Red flashing:
Charging
Charging completed.
Internal error of BT-53Q rechargeable battery
BT-53Q rechargeable battery protection feature* is working automatically. The instrument can be used in this case.
*Automatic protection feature:
In case of overcharge or high or low ambient temperatures that exceeds charging temperature range, charging will be stopped or changed to protect battery.
If the 12vDC external battery is disconnected while working, the power source will automatically switch to
the rechargeable battery pack (BT-53Q).
5-2
6 CHANGING OPERATING PARAMETERS
6
CHANGING OPERATING PARAMETERS
6.1
Operating Parameters
The standard (default) setting for several operating parameters of the TP-L4 can be
changed by the user. This table below lists the operating parameters that can be changed,
the stand default setting and optional settings for each one.
Parameter
Options
[default]
Description
Selects whether or not to enlarge the level vial indicator
on the display when the unit is first turned on or when
the unit is tilted.
R-TILT DISPLAY
(level vial indicator)
DISP1
ON / [OFF]
DISP2
[ON] / OFF
DISP1: default OFF
When this parameter is set to ON, the level vial indicator is enlarged when the instrument is off and
the power key is first pressed.The power key must
be pressed again to turn instrument on.
DISP2: default ON
The level vial indicator enlarges to fill the display
anytime the TP-L4 is tilted.The display returns to
normal when the instrument is properly positioned
or when any other control key is pressed.
V -LED
--- / [30]
Selects automatic cut-off parameter for the center-line
(vertical) LED indicator on top of instrument.
--- : Automatic cut-off is disabled. LED remains on
whenever after being turned on by user.
30 : Default setting. Centerline LED automatic-ally
cuts off 30 minutes after it has been turned on by
user (see page 1-2).
UNIT
[%] / ÅÒ
Selects how grade is displayed, in percent (%) or
per milli (ÅÒ ).
% : Default setting. Grade is displayed to the nearest
thousandths of a percent (+01.235%)
ÅÒ : Grade is diplayed as per milli [+01.235% (percent) equals +012.35ÅÒ (per milli)]
S CODE
ON / [OFF]
Activates security code function. Default is OFF.
Changing to ON requires the entry of a 4-digit security
to turn on instrument.
CHANGE
S CODE
(no preset code)
Allows user to input any 4-digit security code after
S CODE is set to ON.
CHANGE NAME
(TOPCON preset)
Allows user to enter name that will display during powerup. Default name is TOPCON.
6-1
6 CHANGING OPERATING PARAMETERS
6.2
How To Change Operating Parameters
EXAMPLE
Change R-TILT DISPLAY, DISP1 from OFF to ON and disable the V-LED automatic cut-off.
Procedure
Key operation
Display
1
Press Power ON key while pressing
and holding the Lock key
The R-TILT DISPLAY is the first parameter setting.
2
Press [SET] to select R-TILT DISPLAY.
PARAMETERS
DISP1 ON [OFF]
DISP2 [ON] OFF
3
The DISP1 parameter flashes to
show it is active. Press [ ] key to
select [ON] for DISP1.
PARAMETERS
DISP1 [ON] OFF
DISP2 [ON] OFF
4
Press [SET] key to accept new setting.
5
Press [
6
Press [SET] key to accept new setting.
+Power ON
PARAMETERS
[R-TILT DISPLAY]
V-LED --- [30]
PARAMETERS
R-TILT DISPLAY
V-LED --- [30]
] key to select [---].
PARAMETERS
R-TILT DISPLAY
V-LED [---] 30
SET
Display will change to operating
mode. The unit will now operate with
the new parameter settings (level vial
indicator enlarged on power-up and
centerline LED always on).
6-2
6 CHANGING OPERATING PARAMETERS
6.3
How to Input (Change) Security Code
To prevent unauthorized use of the TP-L4 a four-digit security can be set. The following
table describes how to activate the security mode (S CODE) and select a four-digit code.
When Security mode is set, it is necessary to input the code every time power is turned on
(in Normal mode, Selecting mode and Checking & Adjusting mode).
IMPORTANT:
Memorize the security code and file it in a safe place. It is not possible to operate the TP-L4 without entering the code.
Procedure
Key operation
1
Press and hold down lock key
while turning power on.
(see note 1 on next page)
(text in [brackets] indicates present
setting)
2
Select “CHANGE S CODE” (If first
time to set code, “INPUT S CODE” is
indicated.) by pressing the [
] key
four times.
3
Press [SET] key. (see note 2)
4
Select a numeric character by pressing the [
], [ ], [ ], [ ] keys.
Example: 7
+Power ON
5
Press [SET] key.
6
Repeat steps 4 and 5 to set remaining three code numbers.
Example: 7777 (see note 3)
7
Select “SET” by pressing the [
[ ], [ ], [ ] keys.
],
4 times
OR
OR
PARAMETERS
[R-TILT DISPLAY]
V-LED --- [30]
PARAMETERS
S CODE [ON]OFF
[CHANGE S CODE ]
ENTER
SECURITY
CODE [
01234
56789
] SET
ENTER
SECURITY
CODE [
01234
56789
] SET
ENTER
SECURITY
CODE [7
01234
56789
] SET
ENTER
01234
SECURITY
56789
CODE [7777] SET
OR
OR
8
Display
ENTER
01234
SECURITY
56789
CODE [7777] SET
Press [SET] key.
SECURITY CODE
SET
The display returns to menu.
PARAMETERS
S CODE [ON]OFF
CHANGE S CODE
6-3
6 CHANGING OPERATING PARAMETERS
9
Press [SET] key.
SET
The instrument returns to normal
mode.
Note 1) When security mode is ON, the security code must be input to operate.
Note 2) When security code has been entered, but security mode is OFF, input of current
security code is necessary to change security code.
Note 3) After all four digits are chosen and the SET key is pressed, each digit will flash in
sequence. While it is flashing, it is possible to change the number in case of error.
ON/OFF of Security Mode
Procedure
Key operation
1
Press and hold down lock key
while power is turned on.
(see note 1 above)
(text in [brackets] indicates present
setting)
2
Select “S CODE” by pressing the
[
] key three times.
3
Select ON or OFF by pressing the
[ ] or [ ] keys.
4
Press [SET] key.
5
Enter the security code which was
previously set. (see note 2 above)
6
Press [SET] key.
+Power ON
3 times
OR
Display
PARAMETERS
[R-TILT DISPLAY]
V-LED
--- [30]
PARAMETERS
UNIT
[%] ÅÒ
S CODE ON [OFF]
PARAMETERS
UNIT
[%]
ÅÒ
S CODE [ON] OFF
CHECK
SECURITY
CODE [
01234
56789
] SET
Enter Code
SECURITY CODE
ACCEPTED
The instrument returns to normal
mode.
6-4
6 CHANGING OPERATING PARAMETERS
6.4
How to Change Company Name
The company name displayed during power-up can be changed.
The following characters can be used:
Numeric digits 0 to 9; capital letters A to Z; period; comma; apostrophe; space;
opened and closed parenthesis.
Maximum of 32 characters can be input (2 lines of 16 characters each).
Procedure
Key operation
1
Press and hold down lock key
while power is turned on.
(see note 1 on next page)
(text in [brackets] indicates present
setting)
2
Press the down arrow key five[
]
times to scroll to CHANGE NAME.
3
Press [SET] key. (see note 2)
4
Select a character string by pressing
the [
] or [ ] keys.
+Power ON
5 times
Display
PARAMETERS
[R-TILT DISPLAY]
V-LED
--- [30]
PARAMETERS
CHANGE S CODE
[CHANGE NAME]
COMPANY NAME
ENTER
NEW NAME
OR
TOPCON
ABCDEFGHIJ←→SET
KLMNOPQRST←→SET
UVWXYZ., ←→SET
()01234567←→SET
89
←→SET
5
6
Select a character in the character
string by pressing the [
] or [ ]
keys.
Example; LASER(1)
OR
TOPCON
KLMNOPQRST←→SET
Press [SET] key.
LOPCON
KLMNOPQRST←→SET
7
Repeat procedures 4 to 6 until
complete. (see note 3 on next
page)
8
Select “SET” by pressing the
[ ] or [ ] keys.
9
Press [SET] key.
LASER(1)
OR
()01234567←→SET
()01234567←→SET
COMPANY NAME
SET
6-5
6 CHANGING OPERATING PARAMETERS
The display returns to menu.
10
PARAMETERS
S CODE ON [OFF]
CHANGE S CODE
Press [SET] key.
The instrument returns to normal
mode.
SET
Note 1) When security mode is ON, the security code must be input to operate.
Note 2) When security code has been entered, but security mode is OFF, input of current security code is necessary to change security code.
Note 3) Follow the steps below if it's necessary to correct a character during input.
How to correct a character
1
Select the left or right arrow by
pressing the [ ] or [ ] keys.
OR
LASOR(1)
()01234567←→SET
2
Press [SET] key.
The underline (cursor) moves to left
or right by pressing the [SET] key.
LASOR(1)
()01234567←→SET
LASOR(1)
3
Select a character string by pressing
the [
] or [ ] keys.
()01234567←→SET
OR
ABCDEFGHIJ←→SET
OR
ABCDEFGHIJ←→SET
4
Select a character in the character
string by pressing the [ ] or [ ]
keys.
5
Press [SET] key.
LASER(1)
Repeat steps 1 to 5 to correct other
characters.
()01234567←→SET
6-6
7 CHECKING AND ADJUSTING CALIBRATION
7
CHECKING AND ADJUSTING CALIBRATION
7.1
Procedure To Check and Adjust Laser Calibration
x1
x2
+00.000%
1m
30 m
30 m
60 m
7.1.1 Checking Calibration
1
2
Make sure grade is set to 00.000% or 000.00‰.
3
4
Set up a transit or level midway between the 1st and 2nd control points.
Locate control points directly beneath the laser beam 1m (3.3 ft) in front of the TP-L4 and
60m (197ft.) from the first control point (see illustration above).
Take elevation readings at both control points using the laser beam and the transit or
level. If the distance between the readings at each point (x1 and x2) are the same, the unit
does not need adjustment. If x1 and x2 are not the same, the unit requires adjustment as
follows.
7.1.2 Adjusting Calibration
Procedure
Key operation
1
When checking is finished, turn the power OFF.
2
Press and hold [SET] key while turning power
ON.
3
Press the [SET] key.
Display
Power OFF
+
Power
ON
0 SET
INIT
LASER
4
Adjust the height of laser beam until x1 and x2
measurements are equal (use[ ] or [ ] key).
5
After the display stops flashing "LASER", press
the [SET] key *.
or
WAIT
+00000
6
When +00000 appears on the display, press the
[SET] key again. Turn power OFF.
END
Repeat checking procedure above to confirm accurate calibration.
* If the adjustment range is exceeded, "E72"(error) will be displayed in step 5 . Repeat
checking and adjusting procedure. If the error continues, contact dealer or Topcon.
7-1
8 ERROR DISPLAYS
8
ERROR DISPLAYS
Error
Code
E02
E03
E72
E86
E87
E99
Contents
Countermeasure
Abnormal operation of internal measuring Switch OFF the power, then ON again.
system.
Excessive vibration around the laser may
cause this error. Eliminate vibration.
Indicates excessive tilt of the laser instru- Switch OFF the power. Set the instrument
ment during calibration checking or adjust- level then repeat checking and adjusting caling.
ibration procedure.
Internal communication error
Switch OFF the power, then ON again.
Abnormal operation of internal memory
system detected.
Switch OFF the power, then ON again.
If error code remains after trying countermeasures above, please contact your Topcon
dealer.
8-1
9 TROUBLESHOOTING
9
TROUBLESHOOTING
Check to see the instrument referring to the error list or the following troubleshooting list
when you notice the failure of the instrument.
If the instrument can’t be recovered or the failure isn’t written in the following list, please
contact your local Topcon dealer.
Conditions
1. Laser beam does
not emit
Causes
1) Battery level is low.
2) Improper connection to an external power source (such as a
12 volt DC battery).
3) The laser is turned off because
the laser ON/OFF switch of the
remote controller is pushed.
Countermeasures
1) Recharge or replace the batteries with new ones.
2) Make sure connection is secure and attached to correct
terminals.
3) Push the laser ON/OFF
switch of the remote controller, then the laser is turned
on.
2. Laser beam blinks
1) When Level Warning Indicator 1) Reposition the instrument
blinks, the instrument is tilted
until the level warning indicabeyond the self-leveling range
tor disappears.
(laser blinks slowly).
2) Any shock or vibration to the
2) Eliminate the source of disunit produces unstable conditurbance to the unit.
tion causing beam to blink.
3. Laser beam emits
but grade setting is
not possible
1) The instrument is in lock mode. 1) Press the lock key on the instrument to release the lock
function.
2) The value entered is out of the 2) Grade entry must be between 15%~+40%.
grade range.
3) When Level Warning Indicator 3) Reposition the instrument
until the level warning indicablinks, the instrument is tilted
tor disappears.
beyond the self-leveling range
(laser blinks slowly).
4) Recharge or replace the bat4) Battery level is low.
teries with new ones.
4. Laser beam emits
but line setting is
not possible.
1) The instrument is in lock mode. 1) Press the lock key on the instrument to release the lock
function.
2) The laser beam has reached 2) Center the line adjustment
and aim instrument so laser
the limit of line adjusting range.
is roughly aimed at target.
5. Remote control
does not function.
1) The instrument is in lock mode. 1) Press the lock key on the instrument to release the lock
function.
2) Replace the batteries.
2) The battery power of remote
control is low.
9-1
9 TROUBLESHOOTING
6. The laser beam is
unstable.
1) The laser beam is refracted
1) When the pipe is laid, the
due to temperature differences
trench must be backfilled imwithin the pipe.
mediately to help maintain
temperature stability.
2) Use a blower (optional ac2) The laser beam is refracting
cessory) to move air through
and reflecting due to fog and/or
the pipe to blend the air and
mist.
remove mist or fog.
• Cover the pipe to prevent
heat build up inside the pipe
before laying.
• Clear the mist or fog.
7. The laser position
shifts over time
passed.
1) The pipe may be sinking.
1) Confirm the pipe grade setting using a level.
2) The target is not securely held. 2) Secure the target within its
holder.
8. The grade setting
1) Incorrect grade value was en- 1) Confirm the input value (‰or
value of the TP-L4
tered.
%) and reset.
and the measured 2) The bubble on the bubble tube 2) Adjust the laser and/or targrade value are not
display of the instrument or the
get so the bubble is cenequal.
bubble on the target was not
tered.
adjusted correctly.
3) The laser beam is refracted
3) When the pipe is laid, the
due to temperature differences
trench must be backfilled imwithin the pipe.
mediately to help maintain
temperature stability. Use a
blower (optional accessory)
to move air through the pipe
to keep temperature and
moisture stable.
9. The charging lamp 1) The charging temperature is
of the internal batout of range.
tery BT-53Q is blinking slowly when
connected to the
2) The battery BT-53Q is comDC-12V external
pletely discharged.
battery.
(Error blinking)
9-2
1) Recharging should take
place in the temperature
range of 10°C to 35°C (50°F
to 95°F).
2) Continue the charging for 30
minutes.
• If the lamp changes to red
light -up mode, the battery is
normal.
• If the lamp continues green
blinking, battery is faulty and
must be replaced. Always
properly dispose old battery.
10 OPTIONAL ACCESSORIES
10 OPTIONAL ACCESSORIES
AC/DC Converter model 2
Power cable for 12VDC PC-17
Drop manhole kit model 5
Dry battery holder DB-53
Trivet handle model 2
Single pointed foot model 2
Trivet stand model 3
Tripod adapter model 3
Transit tower kit model 2
Scope model 2
Target (Large)
10-1
10 OPTIONAL ACCESSORIES
DT
DS
DR
DQ
DP
DP
DQ
DR
DS
DT
Vertical target model 2
Over the top target
These accessories should be available through the same Topcon dealer that supplied the
TP-L4. Other accessories may also be available.
10-2
11 SPECIFICATIONS
11 SPECIFICATIONS
TP-L4G/A/B/BG
Light source
Wave length
:
:
Laser power output
Laser diameter
Line control width
Grade readout
Minimum setting of grade
Grade setting method
Self leveling range
Slope direction
Axis direction
Horizontal accuracy
Automatic alignment distance
Operating time [+20°C (+68°F)]
TP-L4G/BG
:
:
:
:
:
:
Visible laser diode
532nm (TP-L4G/BG, green)
633nm (TP-L4A/B, red)
2.8mW(Max.)
ø12mm
±15% (±15 ft and 100 ft distance)
-15% ~ +40%(-150 ‰ ~ +400 ‰)
0.001%
Absolute encoder
:
:
:
:
Å}10%
Approx. Å}4ÅK
±10 arc seconds
5m ~150 m/16.5 ft ~ 492 ft (TP-L4G/A)
:
DB-53:Approx. 45 hours
(Using alkaline manganese dry batteries)
TP-L4A/B
:
BT-53Q:Approx.32 hours
DB-53:Approx.70 hours
(Using alkaline manganese dry batteries)
Operating temperature
Dimensions
:
:
Weight
:
BT-53Q:Approx.48 hours
-20°C ~ +50 °C (-4°F to 122°F)
ø122mm ~ 330mm/ 4.8 in ~ 13 in (Without handle)
ø125mm ~ 374mm / 4.9 in ~ 14.7 in (with rear handle)
Approx. 3.8kg (8.21lbs)
Remote controller Model RC-200
Operating distance
Functions
:
:
Power supply
Operating time
:
:
Through the pipe from front, approx.200m (624ft.)
Line control, Laser beam ON/OFF, Laser beam
mode, Automatic alignment mode, Line centering
Four AAA size dry batteries
Approx. 8 months (Using alkaline manganese dry batteries)
11-1
PIPE LASER
TP-L4
SERIES
TOPCON LASER SYSTEMS, INC.
5758 West Las Positas Blvd., Pleasanton, CA 94588, U.S.A.
Phone: 925-460-1300 Fax: 925-460-1315 www.topconlaser.com
TOPCON AMERICA CORPORATION
CORPORATE OFFICE
37 West Century Road, Paramus, New Jersey 07652, U.S.A.
Phone: 201-261-9450 Fax: 201-387-2710 www.Topcon.com
TOPCON CALIFORNIA
3380 Industrial BLVD, Suite 105, West Sacramento, CA 95691,
U.S.A.
Phone: 916-374-8575 Fax: 916-374-8329
TOPCON MIDWEST
891 Busse Road, Elk Grove Village, IL 60007, U.S.A.
Phone: 847-734-1700 Fax: 847-734-1712
TOPCON EUROPE B.V.
Esse Baan 11, 2908 LJ Capelle a/d IJssel, The Netherlands.
Phone: 010-4585077 Fax: 010-4585045 www.topconeurope.com
TOPCON BELGIUM
Preenakker 8, 1785 Merchtem, Belgium
Phone: 052-37.45.48 Fax: 052-37.45.79
TOPCON DEUTSCHLAND G.m.b.H.
Weidkamp 180 45356 Essen, Germany.
Phone: 001-49-201-8619-150 Fax: 001-49-201-8619-148
TOPCON S.A.R.L.
89, rue de Paris 92585 Clichy, Cedex France.
Phone: 01-4106 9494 (MEDICAL) 1-4106 9490 (TOPOGRAPHIE)
Fax: 01-47390251
TOPCON ESPAÑA S.A.
HEAD OFFICE
Frederic Mompou 5, ED. EUR03 08960, Sant Just Desvern Barcelona, Spain.
Phone: 93-473-4057 Fax: 93-473-3932
MADRID OFFICE
Avenida Burgos,16E, 1° 28036, Madrid, Spain.
Phone: 91-302-4129 Fax: 91-383-3890
TOPCON SCANDINAVIA A. B.
Neongatan 2 S-43151 Molndal Sweden.
Phone: 001-46-31-7109200 Fax: 001-46-31-7109249
TOPCON (GREAT BRITAIN) LTD.
Topcon House Kennet Side, Bone Lane Newbury Berkshire RG14
5PX U.K. Phone: 001-44-1635-551120 Fax: 001-44-1635-551170
TOPCON SINGAPORE PTE. LTD.
Alexandra Distripark Block 4, #05-15, Pasir Panjang Road, Singapore 118491
Phone: 2780222 Fax: 2733540 E-mail: [email protected]
TOPCON AUSTRALIA PTY. LTD.
408 Victoria Road, Gladesville, NSW 2111, Australia
Phone: 02-9817-4666 Fax: 02-9817-4654
TOPCON INSTRUMENTS (THAILAND) CO., LTD.
77/162 Sinn Sathorn Tower, 37th Fl.,
Krungdhonburi Rd., Klonglonsai, Klongsarn, Bangkok 10600 Thailand.
Phone: 662-440-1152~7 Fax: 662-440-1158
TOPCON INSTRUMENTS (MALAYSIA) SDN. BHD.
Lot 226 Jalan Negara 2, Pusat Bandar Taman Melawati,
Taman Melawati, 53100, Kuala Lumpur, Malaysia.
Phone: 603-41079801~2 Fax: 603-4107976
TOPCON KOREA CORPORATION
Hyobong Bldg., 1-1306, Seocho-Dong, Seocho-Gu, Seoul, Korea.
Phone: 02-3482-9231 Fax: 02-3481-1928
TOPCON OPTICAL (H.K.) LIMITED
2/F., Meeco Industrial Bldg., No. 53-55 Au Pui Wan Street, Fo Tan
Road, Shatin, N.T., Hong Kong
Phone: 2690-1328 Fax: 2690-2221 E-mail: [email protected]
TOPCON CORPORATION BEIJING OFFICE
Room No. 962 Poly Plaza Building, 14 Dongzhimen Nandajie,
Dongcheng District, Beijing, 100027, China
Phone: 10-6501-4191~2 Fax: 10-6501-4190
TOPCON CORPORATION BEIRUT OFFICE
P. O. BOX 70-1002 Antelias, BEIRUT-LEBANON.
Phone: 961-4-523525/961-4-523526 Fax: 961-4-521119
TOPCON CORPORATION DUBAI OFFICE
Offce No. 102,Khalaf Rashd AI Nayli Bldg., 245 Abu Hail Road, Deira,Dubai,UAE
Phone: 971-4-696511 Fax: 971-4-695272
TOPCON CORPORATION
75-1 Hasunuma-cho,Itabashi-ku,Tokyo,174-8580 Japan
Phone:3-3558-2520 Fax:3-3960-4214 http:// www.topcon.co.jp
32948 90160 TP-L4 SERIES 0101(2b)