1
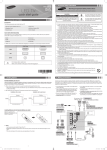
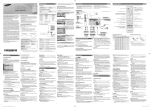
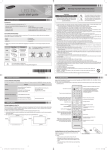
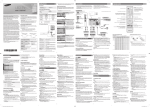
5. Configuring the Basic Settings with Plug & Play 5. Set the Clock Mode Set the Clock Mode. Plug & Play Select Language of the OSD. English Language Español Français : Auto E Enter The TV will automatically download the correct time from a digital channel. m Skip If you selected Manual: E Enter The Clock Set screen appears. Use the ▲/▼ buttons to change the values in each field or use the number buttons to enter the values directly. Use the ◄/►/ buttons to move from field to field. When done with all the fields, press ENTERE. Plug & Play Select ‘Home Use’ when installing this TV in your home. 2. Select the Home Use Mode On the Home Use screen, press ENTERE to select the Home Use mode. ✎✎ Store Demo mode is for retail environments only. Store Demo Home Use L Move The DST (Daylight Savings Time) screen will appear. Press ENTERE. Select On if you want to turn the DST adjustment on and off manually. Select Off to turn off the DST adjustment. Select Auto if you want the TV to adjust to DST automatically. Press ENTERE when done. The Time Zone screen will appear. Use the▲/▼ button to select your Time Zone, and then press ENTERE. On the Language screen, press the ENTERE button. Use the ▲/▼buttons to select a language, and then press ENTERE again. U Move If you selected Auto: Clock Mode ✎✎ Plug & Play is available only when the Input source is set to TV. See "Changing the Input Source". 1. Start Screen → Select a Language After you press the POWER button, the Start Screen appears. Press the ENTERE button on your remote to continue. Press ENTERE and select Auto or Manual, and then press ENTERE again. Plug & Play When you turn the TV on for the first time, a sequence of prompts and screens will assist you in configuring basic settings. Before you begin, make sure you have connected the TV to an antenna or a cable connection and that the TV is plugged in. See "Connections" for instructions. To begin Plug and Play, press the POWER button on your remote. 6. View the HD Connection Guide See the best way to connect a cable or satellite box for the highest quality HD pictures. Press the ENTERE button to close the guide. E Enter 8. Enjoy your TV. 3. Select the Antenna Source On the Antenna Source screen, select the source of your TV signal. Plug & Play Select the Antenna source to memorize. Air Air Start Cable Start Auto Start U Move E Enter m Skip If your TV is connected to an antenna Choose Air, and then press ENTERE. The TV will automatically start memorizing channels. When it is done, go to "Set the Clock Mode". Cable If your TV is connected to a cable outlet, choose Cable, and then press ENTERE. Go to "Select the Cable Type". Auto ✎✎ If you have connected a cable or If you choose Auto, and then press ENTERE, the TV will automatically satellite box to an HDMI, Component, select the correct Antenna source. Go to "Select the Cable Type" Composite, or Antenna input, and you will use the box to select channels, press the Menu (m) button on your remote to skip this step. Auto Program Select the cable system. Analog STD HRC IRC Digital STD HRC IRC START U Move 4. Select the Cable Type On the Cable Type screen, use the ◄/►/▲/▼ buttons to select the type of digital and analog cable systems you have: STD, HRC, or IRC. Most systems are STD (Standard). When done, select Start, and then press ENTERE. The TV will start memorizing channels. ✎✎ Channel memorization can take up to 45 minutes, depending on your cable system. ✎✎ Memorized channels are added to the Added Channel list. These are E Enter R Return the channels you will see when you use the Channel buttons on your remote. Press the ENTERE button. ✎✎ To set or unset Store Demo mode outside of Plug & Play, press and release the Controller when the power is on. The Function menu screen appears. Push the Controller to the left (to MENU (m)) and hold for more than 5 seconds. The Store Demo mode is set. To cancel Store Demo, bring up the Function menu using the Controller, push the Controller to the right (to Source( )) and hold for more than 5 seconds. 6. Changing the Input Source Source List When you are watching TV and you want to watch a movie on your DVD player or Blu-ray player or switch to your cable box or STB satellite receiver, you need to change the Source. 1.Press the SOURCE button on your remote. 2.Use the ▲/▼ buttons to select an external input source. ■■TV / AV / Component / HDMI1/DVI / HDMI2 ✎✎ You can only choose external devices that are connected to the TV. In the Source List, connected inputs are highlighted. How to Use Edit Name Edit Name lets you associate a device name to an input source. To access Edit Name, press the TOOLS button when the Source List is displayed The following selections appear under Edit Name: ■■VCR / DVD / Cable STB / Satellite STB / PVR STB / AV Receiver / Game / Camcorder / PC / DVI PC / DVI / TV / IPTV / Blu-ray / HD DVD / DMA: Select the name of the device connected to specific input jacks to make your input source selection easier. ✎✎ If you connect a PC to the HDMI IN 1 (DVI) port with an HDMI cable, assign PC to HDMI 1 in Edit Name. ✎✎ If you connect a PC to the HDMI IN 1 (DVI) port with an HDMI to DVI cable, assign DVI PC to HDMI 1 in Edit Name. ✎✎ If you connect an AV device to the HDMI IN 1 (DVI) port with an HDMI to DVI cable, assign DVI to HDMI 1 in Edit Name. -5- -6- 7. Accessing and Using the Main Menu Your TV's Main menu contains functions that let you control many of the TV's features. For example, in the Main menu you can change the size and configuration of the picture, its brightnes, its contrast and so on. There are also functions that let you control the TV's sound, channel configuration, energy use, and a host of other features. To access the main, on-screen menu, press the MENU (m) button on your remote. To use the Main menu, press the ▲/▼ buttons to move between the main option categories: Picture, Sound, Channel, etc. Each time you press a ▲/▼ button, the main category name on the left side of the menu changes. To select a menu option in one of the categories, press the ► button or the ENTERE button. Press it again or press ENTERE to see the values or choices associated with that option. Usually, you would then press ENTERE to select a value or choice. Press the RETURN button or the ◄ button to return to a previous screen or selection. 8. Using the TV's Controller The TV's Controller, a small joy stick like button on the bottom right side of the TV, lets you control the TV without the remote control. Function menu MEDIA.P m Selecting a Source (s) With the Function menu visible, open the Source List (s) by pushing the Controller to the right. The Source List screen appears. To select a source. move the Controller back and forth. When the source you want is highlighted, press the Controller. Power Off (P) With the Function menu visible, select Power Off (P) by pulling the Controller forwards, and then press the Controller. ✎✎ To close the Menu, Media Play List, or Source List, press the Controller for more than 1 second. ✎✎ When selecting the function by moving the controller to the up/down/left/right directions, be cautious not to press the controller unconsciously. If you press it, you cannot select the desired function. 9. Important Safety Information Caution: Pulling, pushing, or climbing onto the TV may cause the TV to fall. In particular, ensure that your children do not hang over or destabilize the TV. Doing so may cause the TV to tip over, resulting in serious injuries or death. Follow all safety precautions provided on the included Safety Flyer. R 10. Questions? Comments? P Return TV Controller Contact SAMSUNG WORLDWIDE If you have any questions or comments about your Samsung TV, please contact the SAMSUNG customer care center. Country CANADA U.S.A Samsung Electronics Canada Inc., Address Remote control sensor Power on Turn the TV on by pressing the Controller when the TV is in standby mode. Adjusting the volume Adjust the volume by moving the Controller from side to side when the power is on. Selecting a channel Select a channel by moving the Controller backwards and forwards when the power is on. Using the Function menu To view and use the Function menu, press and release the Controller when the power is on. To close the Function menu, press and release the Controller again. Selecting Media Play With the Function menu visible, select MEDIA.P by moving the Controller backwards. The Media Play main screen appears. Select a media source by moving the Controller back and forth, and then pressing the Controller. Selecting the MENU (m) With the Function menu visible, select the MENU (m) by moving the Controller to the left. The OSD (On Screen Display) Menu appears. Select an option by moving the Controller to the right. Move the Controller to the right or left, or backwards and forwards to make additional selections. To change a parameter, select it, and then press the Controller. -7- [UE4000_5000_6000-ZA-QSG]-ENG.indd 2 Customer Service 85 Challenger Road 55 Standish Court Mississauga Ridgefield Park, NJ 07660-2112 Ontario L5R 4B2 Canada Customer Care Center 1-800-SAMSUNG (726-7864) Web Site www.samsung.com Samsung Electronics America, Inc. -8- 2012-01-05 �� 11:09:35