1
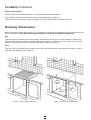
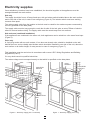
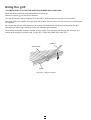
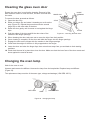
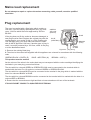
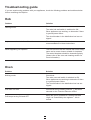
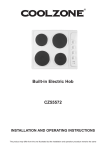
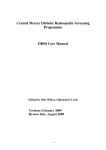
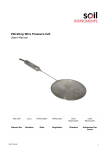
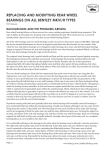
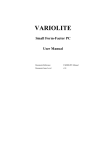
Stainless Steel
Built-in 4 Function Fan Oven
and Electric Hob pack
CZ55525
INSTALLATION AND OPERATING INSTRUCTIONS
These products may differ from the ones illustrated but the installation and operation procedure remains the same
Contents
Introduction
Unpacking
Before installation
Combined or Separate installation
Location
Housing dimensions
Electricity supplies
Hob cut-out
Hob electrical connection
Fitting the Hob
Fitting the Oven
Oven and hob preparation
Safety notes
Using the hob
Fire safety
Using the oven
Using the grill
Care of the hob
Cleaning the hob
Cleaning the oven
Cleaning the glass oven door
Changing the oven lamp
Mains lead replacement
Plug replacement
For best cooking results
Troubleshooting guide
Customer Helpline
Specification
Safe product disposal
3
3
3
4
4
5
6
7
8
9
10
10
11
12
12
13
14
15
15
15
16
16
17
17
18
19
Back page
Back page
Back page
Introduction
This quality oven and hob have been designed to provide trouble-free service provided they are installed
and maintained correctly. Both units are for domestic use only.
Please read these instructions carefully before installing or using your appliances. It is advisable to keep
your purchase and installation receipts with these instructions in a safe place for future reference. Included
is some important safety information, guidelines and recommendations to enable you to safely use your
oven and hob.
These appliances have been tested and certified to meet all applicable UK electrical and safety standards.
The hob must only be installed by a qualified electrician. The appliances must only be repaired by qualified
electricians or authorised service personnel. If not repaired properly you could be putting yourself and
others in danger. It will also invalidate the guarantee.
If you have any questions or need assistance please telephone the Helpline on 0844 871 0011.
When contacting the Helpline please have model numbers to hand. The oven’s model number is shown on
the data label which is visible by opening the door. The hob’s number is shown on the data label on the
underside of the casing.
Unpacking
Carefully remove all the packaging and lift out the appliances and accessories, watching out for sharp
edges.
Remove any tape or packing material used for transit, including any material inside the oven.
Check the appliances for any damage. If either unit has been damaged do not use it and contact the
retailer from whom the appliance was bought.
Retain the packaging until the units have been installed, removing it from the area of installation and
keeping it out of the reach of children.
Dispose of all the packaging in accordance with your local authority guidelines as well as any old appliance
that is being replaced – see safe oven disposal section.
Before installation
Before any installation work can be carried out a number of requirements must be met.
Make sure that you or your installer are familiar with all the relevant building and fire regulation
requirements before choosing the location of your appliance.
This appliance must be installed in accordance with the instructions to validate the guarantee.
Refer to the “Location” section for minimum clearances and safe placement of your appliances
3
Combined or Separate Installation
There are two installation options for this oven and hob pack:
1. Oven and hob combined in a single housing unit under a worktop, as shown in Figure 1.
2. Oven and hob installed separately into individual housing units as shown in Figure 2.
Before deciding on the position of your appliances, please read the ‘location’ and ‘housing dimensions’
sections that follow..
Figure 2 - separate installation
Figure 1 - combined installation
Location
Avoid installing the oven or hob next to a fridge, freezer or boiler.
It is best if the hob is surrounded by work surface, giving safe space to rest a hot pan and space to turn
handles so that they do not protrude into the walkway or become too hot over a neighbouring hotplate.
Hob clearance space
Certain minimum clearances must be allowed for when planning the unit’s location (Figure 3):
Beneath the work surface, allow the required clearance
for appliances or units to be installed below.
There should be an open space above the hob to
allow kitchen odours to disperse. A cooker hood may
be installed to either absorb or extract the odours. The
distance between the hob and the hood must not be
less than 650mm (Figure 3).
650mm
MIN
The distance between the hob and the back edge of
the worktop should be no less than 50mm (Figure 3).
15
0m
m
Leave adequate clearance between the hob and
adjacent cupboards (no less than 150mm.)
To ensure that the hob is properly supported, the
distance between the hob cutout and the worktop end
should be no less than 60mm (Figure 3).
Ensure a gap of not less than 400mm between the
hob surface and overhanging cupboards.
400mm
MIN
MI
N
m
m
50
60
mm
MI
N
Figure 3 - minimum clearances (hob)
4
Location continued
Safety Requirements
Ensure that the surrounding material is heat resistant and non-combustible.
The electricity supply must be routed near to the installation (see page 6).
There must not be any plugs, wires or sockets in the wall directly above or behind the hob.
Housing dimensions
Before starting the installation process, it is important to check that the appliances will fit into the units they
will be housed in. These dimensions apply equally to combined or separate installations.
Hob
The hob must be installed into a work surface, fitted with an opening cut into the surface so that the top
plate sits flush with the surface. It can be fitted above the oven, or separately, but in either case It is best
positioned directly above a 600mm wide fitted kitchen cabinet (Figure 4).
Oven
The oven can be installed into a housing unit of the correct dimensions, either below a worktop, or into a
separate floor standing unit. (Figure 5).
m
0m
0
6
N
MI
585mm
HEIGHT
MIN
565
m
WID m ±2
TH
m
0m TH
6
5 EP
D
600
mm
Figure 5 - oven housing dimensions
Figure 4 - hob housing dimensions
5
Electricity supplies
Once satisfactory locations have been established, the electrical supplies to the appliances must be
arranged beneath the work surface.
Hob only
The supply should be from a 45 amp fused spur, with an isolator switch installed above the work surface
and to one side of the unit, in case of an emergency (Figure 6). The isolator switch must have working
contacts 3mm apart.
The mains supply cable from the isolator to the hob must be rated for the maximum power consumed by
the hob (specified on the data plate).
The supply cable must be long enough to reach the far side of the hob, plus an extra 750mm of slack to
allow for removal and servicing. The supply cable must be routed away from hot surfaces.
Hob and oven (combined installation)
If the appliances are combined in the same unit, both appliances can be wired into a the same fused spur
(Figure 6).
Oven only
A 3-pin plug socket with an earth contact, if one does not already exist, should be installed on the wall
behind the oven, and a suitably rated isolator switch should be installed to one side of the unit, above the
work surface or at similar height, for easy access in case of emergency (Figure 7).
This installation must be carried out in accordance with current I.E.E. Wiring Regulations and Building
Regulations (Part P).
If in any doubt consult a qualified electrician
The mains voltage must correspond exactly to that which is specified on the data plates.
3-PIN
SOCKET
ISOLATOR
SWITCH
ISOLATOR
SWITCH
HOB
POSITION
CONNECTION
BOX
Figure 6 - electricity supply (hob / combined)
Figure 7 - electricity supply (oven only)
6
Hob cut-out
PLEASE NOTE: If the hob and oven are to be installed into a single housing unit (combined
installation), the hob must be fully installed before the oven can be installed.
A cut-out for the hob can be made onto the work surface as follows:
1. Cover the approximate area for the cut-out with masking tape.
2. Position the unit face down on the surface, ensuring that the top plate is exactly centred above the
600mm kitchen cabinet supporting the worktop, and that you have the correct clearance spaces around
the hob.
3. Draw round the hob to mark the space that will be taken up by the top plate on the work surface.
4. Lift the unit away to a safe distance, and check that the outline produced corresponds with the hob
dimensions (585 x 500) in Figure 8.
5. Mark the cut-out (565 x 480 as in Figure 8) onto the masked work surface. The cut-out line should be in
a central position so that there is an even space of 10mm between the cut-out shape and the hob
outline, all the way round (Figure 9).
6. Ensure that no pipes, hoses or wires are present as obstructions below the worktop, then cut the
opening into your work surface exactly where you have marked the cut-out shape (Figure 9).
7. Remove the tape and ensure the area is clean and free of dust and debris.
8. Carefully lift the hob and place it into the cut-out opening to check for a good fit.
Do not clamp the unit into place yet as arrangements must be made to connect the unit to its
electricity supply.
m
0m
50
585
mm
HOB
OUTLINE
CUT-OUT
SHAPE
565
mm
m
0m
48
7
10mm
Figure 8 - cut-out dimensions
Figure 9 - marking the cut-out
7
Hob electrical connection
The hob must be properly connected to the mains supply by a qualified electrician according to
current safety regulations.
This appliance must be earthed.
1. Release the cover by removing the cover screws (Figure 10).
2. Loosen the cable clamp (Figure 10).
3. Connect the mains supply cable to the terminal block on the hob using the following colour code
(Figure 11):
•The green or yellow/green (earth) wire should be connected to the corresponding yellow/green wire on
the terminal block or marked E or E.
•The blue or black (neutral) wire should be connected to the corresponding blue wire on the terminal
block or marked N.
•The brown or red (live) wire should be connected to the corresponding brown wire on the terminal
block or marked L.
4. Secure the cable clamp. Check the cable terminals for tightness and ensure that the terminal links are
in place, then close the cover over the terminal block (Figure 10).
COVER
COVER
SCREWS
CABLE
CLAMP
SCREWS
E
N
L
CABLE
CLAMP
EARTH
TERMINAL
LIVE
TERMINAL
NEUTRAL
TERMINAL
MAINS
SUPPLY
Figure 11 - terminal block
Figure 10 - connection box
8
Fitting the hob
Once the hob has been connected to its electricity supply, it can be fitted into position as follows:
1. Place the hob upside down on an adjoining surface.
2. Fit the clips onto the hob by sliding the notched end into the slot and loosely screwing the screw into
the screw-hole (Figure 12). Turn the clips round so that they are in line with the hob (Figure 13).
3. Make sure that the underside edge of the hob is clean and dry.
4. Stick the foam sealing strip around the underside of the hob, 5mm in from the edge, removing the
adhesive backing as you go (Figure 13). When the sealant has been stuck round all four sides and
meets up with itself, trim off any excess sealing strip, leaving a neat join.
5. You may wish to add a thin bead of clear silicone sealant around the underside edge of the hob.
6. Turn the hob over and place it in centralised position in the cut-out hole, making sure that the electricity
supply cable is clear of the base of the hob and any other possible heat source.
7. Turn the clips, making sure that the clips grip the worktop, and then tighten the screws (Figure 14).
8. If necessary, finish the bead of sealant with a suitable tool while it is still workable.
SCREW
CLIPS
CLIP
SLOT
SCREW-HOLE
FOAM
SEALING
STRIP
Figure 13 - applying sealing strip
Figure 12 - preparing the clips
CLIP
CLIP
SCREWS
Figure 14 - fixing to worktop
9
Fitting the oven
Before installing the oven in its housing, insert the mains plug into the mains outlet socket. Avoid trapping
the mains cable between the appliance and the housing and ensure it is routed away from hot surfaces.
Place the oven into the housing unit and adjust its position until it is level, making sure it aligns with any
adjacent units, drawers, and cupboard doors (Figure 15).
When correctly positioned, drill the unit and secure the appliance in place with two fixing screws
(Figure 16).
SCREWS
Figure 15 - centralising the oven
Figure 16 - installing the oven
Oven and hob preparation
1. Remove any stickers and glue from the surfaces of the oven and hob with warm water and washing-up
liquid.
2. When using for the first time, turn on the hot plates, one at a time, and set the temperature selector
knob to position '6'. Leave them on for about 5 minutes.
This will burn off the protective film covering the plates.
3. When the plates are cool, wipe them with a soft dry cloth.
PLEASE NOTE: When using for the first time the oven may smell for a short time while burning off
dust and manufacturing residues from the heating elements. This is normal and does not indicate a
fault with the oven.
10
Safety notes
Hob
• Never leave children unsupervised where the hob
is installed as the appliance will get hot during
and after use.
• Allow the hob to cool before cleaning.
• Make sure you understand what the controls do
before using the hob.
• Never allow anyone to sit or stand on the hob or
the surrounding work surface.
• Always turn off the hotplates when not in use
• Always be careful when operating the hob and
take care to avoid touching the hotplates
• Never store chemicals, food stuffs or pressurised
containers in cabinets above or next to the hob.
• Ensure that the cables of other household
appliances used near the hob are away from the
hotplates
• Never place flammable or plastic items on or
near the hob.
• Never use the hob as a room heater.
• Place pans centrally on the hotplates and
position them so that the handles cannot
accidentally be caught or become heated by
other hotplates
• Never use the hob to dry clothes and tea-towels
or for any other purpose than the cooking of
food.
• Keep the hob clean as a build up of grease or fat
from cooking can cause a fire.
Oven
•
Allow the oven to cool before cleaning.
•
Make sure you understand what the oven
controls do before using the oven.
•
•
•
Never leave children unsupervised where the
oven is installed as the appliance will get hot
during and after use.
Always turn the oven controls to the OFF
position when the oven is not in use.
•
Never allow anyone to sit or stand on any part
of the oven.
Before removing cooked food from the oven
open the door carefully to allow any heat to
disperse.
•
Never heat up unopened food containers as
pressure can build up causing them to burst.
•
Never store chemicals, food stuffs or
pressurised containers in cabinets above or
next to the oven.
•
Use dry oven gloves when removing items from
the oven.
•
Be careful when operating the oven and take
care to avoid touching hot elements inside the
oven.
•
Never use the oven as a room heater.
•
Never dry clothes or place other items on the
oven door.
•
Ensure that the cables of other household
appliances used near the working oven are
away from its hot elements. Ensure also that
the cables are not trapped by the oven door.
•
Never line any part of the oven cavity with
aluminium foil.
•
Keep the oven door closed when the oven is
not in use.
•
Keep the oven clean as a build up of grease or
fat from cooking can cause a fire.
•
Keep any ventilation holes clear of obstructions.
11
Using the hob
Before using your hob for the first time:
Read the operating and safety instructions thoroughly
If you have not already done so, follow the steps in the “Preparation” section on page 7 to burn off the
protective film covering the plates.
Before switching on a hotplate, make sure that the selector knob you are using corresponds to the hotplate
you wish to switch on (Figure 17).
WARNING: If any of the hotplates become cracked, disconnect the appliance from the mains supply
and do not use until repaired by a qualified technician.
The hotplates
The hotplate power is regulated with a 7 position temperature selector knob. The control allows for the
efficient transfer of heat to the cooking pan. (Figure 18).
The selector knob can be turned in both directions:
• Anti-clockwise to increase heat
• Clockwise to decrease heat
There are symbols
hotplate.
to 6 marked on the knobs (Figure 18). These correspond to the heat setting of the
• 6 is the highest setting
•
is OFF
3
2
4
1
4
3
2
1
LED INDICATOR
LIGHTS
Figure 17 - hotplate controls
Figure 18 - control knob
Fire safety
Never fill a deep fat frying pan more than 1/3 full of oil
Do not leave unattended while cooking!
In the event of a cooking pan fire:
1. Turn off the hob at the electricity wall socket
2. Cover the pan with a fire blanket or damp cloth
3. Leave the pan to cool for at least an hour before you try to move it.
Never use a fire extinguisher to put out a pan fire (the force of the extinguisher could tip the pan over.)
Never use water to put out oil or fat pan fires.
12
Using the oven
THERMOSTAT
CONTROL
FUNCTION
SELECTOR
TEMPERATURE
INDICATOR
Figure 19 - controls
The oven is fan assisted and evenly distributes the heat throughout the oven. This may reduce the cooking
times compared with a conventional oven so always read the cooking instructions on the packaging when
cooking convenience food.
It is recommended to preheat the oven for a few minutes or wait until the temperature indicator goes off
before placing food in the oven for cooking.
Be careful when using aluminium foil. Do not cover the sides of the oven, the shelf or oven interior. If
wrapping food in foil the cooking time may increase.
Thermostat Control
The thermostat control determines the temperature inside the oven during cooking. Turn the control knob
clockwise to align the cooking temperature with the marker on the control panel. During cooking the
thermostat will maintain the set temperature.
The temperature can be set between 50°C and 250°C.
Function Selector
There are 4 functions and OFF.
Turn the control selector so that the symbol on the selector aligns with the marker on the control panel. The
interior oven light illuminates when a function is selected..
Defrost setting
Top heating element (grill)
This function operates the fan without the
oven heating up. This is suitable for
defrosting frozen food.
Use this function for grilling or top oven
heat which is suitable for browning food.
Fan assisted grill
Fan assisted cooking
Select this function to use the fan and
grill together.
Fan assisted cooking uses the fan and
circular heating element to evenly distribute
the heat throughout the oven.
G
13
OFF position.
Using the grill
IT IS IMPORTANT TO CLOSE THE OVEN DOOR WHEN GRILLING FOOD.
Move the shelf to the first or second position from the top.
Select the symbol
on the control selector.
Turn the thermostat control between 50°C and 250°C and preheat the element for five minutes.
Place the food in the middle of the grill pan and position the pan so the food is near but not touching the
top element.
Do not line the grill pan with aluminium foil or wrap food items with foil before placing under the grill.
Aluminium foil has a high reflectivity which can damage grill elements.
When fitting the handle, hook the handle over the edge of the grill pan and through the wire rack at a
central point along the grill pan edge, (Figure 20). Lower the handle fully down to fit.
HANDLE
WIRE RACK
EDGE
Figure 20 - fitting the handle
14
Care of the hob
Never turn the hotplate on before placing a pan on it (except when first used).
Never sprinkle cold water onto a heated hotplate.
Do not allow spills to be burnt onto the hotplate since baked stains are very difficult to remove.
Keep the hotplates clean. A dirty hotplate does not transfer heat efficiently.
Avoid placing wet pans on the hotplates.
Never use the hot plates for preparing foods wrapped in aluminium foil or in plastic pans, or place any
plastic trays etc. on the hotplates.
Cleaning the hob
WARNING: Switch off the hob at the mains isolator switch before cleaning.
Clean the hob regularly to maintain its working condition and appearance. Clean it when it is cold.
When cleaning the hob, do not use harsh abrasives, caustic cleaners or sharp objects.
All stainless steel parts should be cleaned with a non-abrasive cleaning liquid on a soft cloth.
Clean the hotplates with a damp sponge and then dry them by turning them on for a few seconds. To
maintain their appearance, apply a commercially available grease intended for hotplates.
The hotplate trim rings can be cleaned with products intended for stainless steel. The rings can become
yellowed as a result of heating. This is normal.
If a hotplate is to be out of use for a long time, apply the special grease periodically.
Cleaning the oven
Before cleaning the oven, wait for it to cool down.
It is best to clean the bottom of the oven after every use and not allow the food or spots of oil to remain and
become permanent stains.
Wash surfaces in warm soapy water.
For stubborn marks on glass surfaces, a mild cream cleaner can be used. Dry parts with a soft cloth.
For the interior surfaces in the oven use normal oven cleaners but always read the manufacturer’s
instructions on how to use them.
Do not use caustic paste, abrasive wire, powders or hard instruments to clean any part of the appliance.
15
Cleaning the glass oven door
Ensure the oven door is cool before cleaning. Removal of the
door makes it easier to clean the door, the door surround and
the seals.
HINGE CLIP
HINGE
OPENING
To remove the door proceed as follows:
1. Open the door fully.
STOP
2. Raise one hinge clip and rotate it towards you as far as the
SLOT
stop (Figure 21). Repeat the procedure with the second
hinge clip on the other side of the door.
3. Raise the door gently until it comes to rest against the hinge
CATCH
clips.
4. Grip the edges of the door and lift the door clear of the
Figure 21 - removing the oven door
catches in the hinge openings.
5. When cleaning the door, take care not to move the clips from their position.
6. Once cleaning is complete, lift the door and slide the hinges into the hinge openings.
7. Engage the slots on the hinges with the catches in the hinge openings.
8. Check that the weight of the door is fully supported on the hinges.
9. Lower the door and raise the hinge clips, then return them away from you and back to their starting
positions.
10. Check that the seal is in place then close the door. Make sure that the inner face of the door meets and
shuts against the seal all around.
Changing the oven lamp
Wait for the oven to cool.
Unscrew and remove the diffuser. Unscrew the lamp from the lampholder. Replace lamp and diffuser
(Figure 22).
The replacement lamp must be of the same type, voltage and wattage (15W SES 300°C).
DIFFUSER
LAMPHOLDER
LAMP
Figure 22 - changing the lamp
16
Mains lead replacement
Do not attempt to repair or replace the mains connecting cable yourself, consult a qualified
electrician.
Plug replacement
The oven is supplied with a fitted plug which contains a
13A fuse. If you are simply replacing the fuse, you must
use a 13A fuse which has been approved by ASTA to
BS1362.
GREEN/
YELLOW
(EARTH)
If the plug does not fit the socket or becomes damaged, a
new plug must be fitted. Replace the original plug with the
correct plug for your socket. If this is a 3-pin (square pin)
13A (BS1363) plug, you must make sure that it is fitted
with an ASTA approved 13A fuse. If another type of plug is
used, it must be protected by a 15A fuse, either in the plug
or at the distribution board.
1. Remove the existing fitted plug.
FUSE
BLUE
(NEUTRAL)
BROWN
(LIVE)
CABLE
CLAMP
Figure 23 - plug wiring
2. The wires in the mains lead supplied with this appliance are coloured in accordance with the following
code:
GREEN/YELLOW = EARTH (E)
BLUE = NEUTRAL (N)
BROWN = LIVE (L)
This product must be earthed
As the colours of the wires in the mains lead may not correspond with the colour markings identifying the
terminals in your new plug, proceed as follows.
The wire which is coloured GREEN or GREEN/YELLOW must be connected to the terminal which is
marked with the letter E or E symbol or coloured GREEN or GREEN/YELLOW.
The wire which is coloured BLUE must be connected to the terminal in the plug which is marked with the
letter N or coloured BLACK or BLUE.
The wire which is coloured BROWN must be connected to the terminal which is marked with the letter L or
coloured RED or BROWN.
3. Ensure that the connections are tight and that no loose strands are left out of the terminals.
IF IN ANY DOUBT CONSULT A QUALIFIED ELECTRICIAN.
17
For best cooking results
For best results and good use of energy:
Hob
• Use good quality cooking pans with thick flat
bases. This gives the most efficient energy
transfer from the hotplate
• Never use recessed or ridged base pans. This
wastes energy and gives a longer cooking time
• If the pan base is too small for the hotplate,
energy is wasted
• Use pans of the correct diameter. The base
should be about the same size as the hotplate
• Do not place lids on the hotplates.
• Use pans which are large enough for the amount
of food being cooked to ensure that they do not
boil over and cause unnecessary cleaning.
• Do not heat an empty pan on the hotplates, as
this will damage and discolour the cooking
surface at the bottom of the pan.
• Use a correctly fitting lid when boiling or stewing
to contain heat and improve boiling times.
• Do not use wet pans on the hotplates
Oven
• For even grilling, ensure that the grill pan is
positioned centrally below the grill element.
• To avoid fat splattering onto the oven interior
whilst grilling, ensure that the grill pan is not lined
with foil and the grill setting is not too high.
• Ensure that the oven shelf is level. This will
ensure even rising of cakes and cooking of food.
• Do not use pans greater than 52mm (2¼”) in
height for roasting.
• To avoid under/overcooking, reduce or increase
cooking times and temperatures to suit personal
taste.
18
Troubleshooting guide
If you are experiencing problems with your appliances, check the following problems and solutions below
before contacting the Helpline.
Hob
Solution
Problem
Check that:
Nothing works.
The main hob wall switch is switched to ON.
Other appliances are working, to determine if there
is general power failure.
The circuit breaker in the distribution box has not
tripped.
Hotplates are slow to boil or will not simmer.
Check that your pans conform to the
recommendations in these instructions.
Marks appearing on hotplates.
The hob surround can be cleaned with warm soapy
water and a cream cleaner suitable for hotplates.
The sealed hotplates should be cleaned regularly
(please refer to the care and cleaning section for
more information).
Oven
Problem
Solution
Nothing works
Check that:
The main oven wall switch is switched to ON.
Other appliances are working to determine if there
is a general power failure.
The circuit breaker in the distribution box has not
tripped.
Check that the top heating element
has been
selected on the Function Selector control.
Grill does not work.
When the grill is operated at a setting less than
‘High’ it is controlled by the regulator – this is
normal.
Grill keeps turning ON and OFF.
19
Customer Helpline
For help and assistance regarding your oven telephone 0844 871 0011.
Specification
Hob
230 volts ~ 50Hz 5000W
Oven
230 volts ~ 50Hz 2000W
Safe product disposal
To help the environment, Local authority instructions should be followed for the disposal of your product
This appliance/fitting is marked according to the European directive 2002/96/EC on Waste Electrical and
Electronic Equipment (WEEE). By ensuring this product is disposed of correctly, you will help prevent
potential negative consequences for the environment and human health, which could otherwise be
caused by inappropriate waste handling of this product.
The symbol on the product, or on the documents accompanying the product, the Crossed Out Wheelie
Bin symbol, indicates that this appliance/fitting may not be treated as household waste. Instead it shall
be handed over to the applicable collection point for the recycling of electrical and electronic equipment.
Disposal must be carried out in accordance with local environmental regulations for waste disposal. For more
detailed information about treatment, recovery and recycling of this product, please contact your local
authority, your household waste disposal service or the retailer where you purchased the product.
Customer Service, Unit B1, Senator Point, South Boundary Road,
Knowsley, LIVERPOOL L33 7RS
HELPLINE TEL: 0844 871 0011
Monday to Friday (8.30am to 5pm)
We continuously try to improve our products for the benefit of our customers.
For this reason we reserve the right to make changes to any product at any time, without notice.
Instructions ref 26805/140108© 2008