1
Important safety instructions
•
•
•
•
•
•
•
•
•
•
•
•
•
•
•
•
•
Read these instructions.
Keep these instructions.
Heed all warnings.
Follow all instructions.
Do not use this apparatus near water.
Clean only with dry cloth.
Do not block any ventilation openings. Install in accordance with
the manufacturer’s instructions.
Do not install near any heat sources such as radiators, heat
registers, stoves, or other apparatus (including amplifiers) that
produce heat.
(North America) Do not defeat the safety purpose of the
polarized or grounding-type plug. A polarized plug has two blades
with one wider than the other. A grounding type plug has two
blades and a third grounding prong. The wide blade, or the third
prong are provided for your safety. If the provided plug does
not fit your outlet, consult an electrician for replacement of the
obsolete outlet.
Protect the power cord from being walked on or pinched
particularly at plugs, convenience receptacles, and at the point they
exit from the apparatus.
Only use attachments/accessories specified by the manufacturer.
Use only with the cart, stand, tripod, bracket, or table
specified by the manufacturer, or sold with the apparatus.
When a cart is used, use caution when moving the cart/
apparatus combination to avoid injury from tip-over.
Unplug the apparatus during lightning storms or when unused for
long periods of time.
Refer all servicing to qualified service personnel. Servicing is
required when the apparatus has been damaged in any way, such
as power-supply cord or plug is damaged, liquid has been spilled
or objects have fallen in to the apparatus, the apparatus has been
exposed to rain or moisture, does not operate normally, or has
been dropped.
Do not expose the product to dripping or splashing.
Do not place any object filled with liquid, such as a vase, on the
product.
Do not place naked flame sources, such as lighted candles, on the
product.
To avoid interference
Do not position the product:
• Near strong magnetic radiation, such as near a power amplifier.
• Near to a television, or where connecting cables may be subject
to or cause interference.
WARNING: TO REDUCE THE RISK OF FIRE OR ELECTRIC
SHOCK, DO NOT EXPOSE THIS APPARATUS TO RAIN OR
MOISTURE
This apparatus has been designed with Class 1 construction and
must be connected to a mains socket outlet with a protective
earthing connection (the third grounding pin).
This apparatus has no on/off switch. To disconnect this apparatus
from power, you must disconnect the power cord. Make sure the
power cord is always easily accessible.
To avoid overheating
• Leave at least 10cm around the equipment to ensure sufficient
ventilation.
Do not position the product:
• In direct sunlight.
• Near heat sources, such as a radiator.
• Directly on top of heat producing equipment, such as a power
amplifier.
• On a soft surface, such as a carpet, which would obstruct the
ventilation holes in the base.
The product normally runs warm to the touch.
FCC Information (USA Only)
CAUTION:
Changes or modifications not approved by Meridian could void the
user’s authority to operate the equipment.
FCC Warning
This equipment generates and can radiate radio frequency energy
and if not installed and used correctly in accordance with our
instructions may cause interference to radio communications or
radio and television reception. It has been type-tested and complies
with the limits set out in Subpart J, Part 15 of FCC rules for a Class
B computing device. These limits are intended to provide reasonable
protection against such interference in home installations. However,
there is no guarantee that interference will not occur in a particular
installation. If this equipment does cause harmful interference to
radio or television reception, which can be determined by turning
the equipment off and on, the user is encourage to try to correct
the interference by one or more of the following measures:
• Reorient or relocate the receiving antenna.
• Increase the separation between the equipment.
• Connect the equipment into an outlet on a circuit different from
that to which the receiver is connected.
• Consult the dealer or an experienced radio/TV technician for help.
ii
Contents
Getting started
Welcome
Using the F80
Operating the F80 from the front panel
1
2
7
8
General functions
10
Connecting to the F80
12
Playing discs
15
Playing discs
16
Playing discs (continued)
18
Playing DVDs
20
Listening to the radio
23
Listening to DAB radio
24
Using presets
26
Listening to FM or AM
28
Setting up
31
Adjusting the F80
32
Setting up the F80
34
Setting up the F80 (continued)
36
Index
39
iii
Copyright
Acknowledgements
Sales and service in the UK
The F80 incorporates FreeRTOS Version v3.0.0 under the terms and
conditions of the GNU General Public License at:
Meridian Audio Ltd
Latham Road
Huntingdon
Cambridgeshire
PE29 6YE, England
Tel +44 (0)1480 445678
Fax +44 (0)1480 445686
Sales and service in the USA
Meridian America Inc
8055 Troon Circle
Suite C
Austell
GA30168-7849, USA
Tel +1 (404) 344 7111
Fax +1 (404) 346 7111
World Wide Web – http://www.meridian-audio.com/
Copyright © 2007 Meridian Audio Ltd
Designed and manufactured in the UK by Meridian Audio
Ltd. Meridian Audio reserves the right to make changes and
improvements to any of the products described in this document
without prior notice.
Boothroyd|Stuart Meridian, Meridian, and Meridian Digital Theatre
are registered trademarks of Meridian Audio Ltd. F80 is a trademark
of Meridian Audio Ltd.
Ferrari and the prancing horse logo are registered trademarks of
Ferrari S.p.A.
iv
Dolby and the double-D symbol are trademarks of Dolby
Laboratories.
http://www.freertos.org/a00114.html
DOLBY: Manufactured under license from Dolby Laboratories.
MACROVISION: This product incorporates copyright protection
technology that is protected by method claims of certain
U.S. patents and other intellectual property rights owned by
Macrovision Corporation and other rights owners. Use of this
copyright protection technology must be authorised by Macrovision
Corporation, and is intended for home and other limited viewing
uses only unless otherwise authorised by Macrovision Corporation.
Reverse engineering or disassembly is prohibited.
This guide was produced by Human-Computer Interface Ltd,
http://www.interface.co.uk/
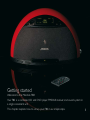
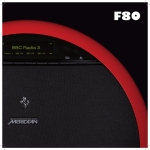
Getting started
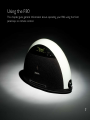
Welcome to the Meridian F80!
Your F80 is a combined CD and DVD player, FM/DAB receiver, and sound system in
a single convenient unit.
This chapter explains how to set up your F80 in six simple steps.
Welcome
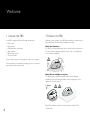
1 Unpack the F80
2 Position the F80
Your F80 is supplied with the following components:
Although you can position your F80 almost anywhere convenient, for
best results bear the following considerations in mind:
•
•
•
•
•
•
Power cord.
Rod antenna.
DAB-optimised coil antenna.
Wire antenna.
F80 remote control.
This User Guide.
If any of these items are missing please contact your supplier.
We recommend you retain the packaging in case you need to
transport the unit at a later date.
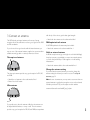
Avoid wet locations
The F80 is an electrical appliance, and so should not be positioned in
a location where it may get splashed or wet, such as in a bathroom
or on a kitchen sideboard.
D
Avoid direct sunlight or carpets
The F80 includes a powerful amplifier, which needs adequate
ventilation. Avoid positioning the F80 in direct sunlight, such as in a
window, or on a pile carpet.
DD
If the F80 overheats, protection circuits switch it off until it has
cooled down.
3 Connect an antenna
The F80 includes an internal antenna, and in areas of strong
reception this will be sufficient to receive a good signal on the DAB
and FM wavebands.
If you do not achieve good results with the internal antenna, you
may use one of the external antennas supplied, or connect another
suitable external (eg cable or outdoor) antenna, as follows:
Telescopic rod antenna
with the lay of the wire to get the best signal strength.
• Attach the wire antenna to the socket marked Ant. 1
DAB-optimised coil antenna
A UK DAB-optimised coil antenna may be included.
• Attach the antenna to the socket marked Ant. 1.
Cable or external antenna
In difficult reception areas (eg some high-rise or shielded buildings)
it may be necessary or preferable to connect an external antenna,
or a radio feed provided by a Cable supplier or in the building
infrastructure.
• Attach the antenna cable to the socket marked Ant. 1.
Change the antenna setting
The telescopic antenna provides very good reception for FM, AM,
and DAB.
• Attach the rod antenna to the socket marked Ant. 1.
• Extend it to its full extent.
Wire antenna
If you have fitted an external antenna, you need to change the
antenna setting for the band you want to use; see To set up the
antennas, page 34.
Note: In some circumstances you may want to use more than one
external antenna to get the best reception on two or three bands.
Meridian provides an FAQ on this subject on their website:
www.meridian-audio.com/data/f80_ant_faq.htm
If you prefer not to have the antenna visible, the wire antenna can
be draped behind furniture, or run up a wall. The wire antenna
provides very good reception for FM, AM, and DAB, but experiment
4 Connect power
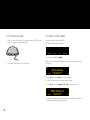
5 Listen to the radio
• Plug one end of the power cord supplied with the F80 into the
power connector on the back panel.
• Press the Home key, marked H.
The Home menu will be displayed:
Radio
Disc
Aux
Adjust
• Press the key labelled Radio.
• Connect the other end to a wall socket.
When you first select the DAB band you will be prompted to scan
for stations:
DAB
(
No services
Band
Please select Scan
` Station ^
)
• Press ( followed by Scan to scan for stations.
The radio will then tune to the first station found.
• Press ) followed by Station ` or ^ to select a station:
DAB
(
BBC Radio 2
Band
Selecting service
` Station ^
|_
)
• Adjust the volume by turning the knob to the right of the F80, or
mute the sound by pressing the knob.
6 Play a CD
What next?
• Press the Home key, marked H.
For more information about playing audio CDs and DVDs see
Playing discs, page 15.
The Home menu will be displayed:
For more information about using the Radio see Listening to the
radio, page 23
Radio
Disc
Aux
Adjust
For information about setting up your F80 the way you want it see
Setting up, page 31.
• Press the key labelled Disc.
• Insert a CD in the slot, label uppermost, and gently push it into
the slot until it is drawn into the drive:
The CD will start playing automatically.
• Adjust the volume by turning the knob to the right of the F80, or
mute the sound by pressing the knob.
Using the F80
This chapter gives general information about operating your F80, using the front
panel keys or remote control.
Operating the F80
from the front panel
You operate your F80 using the keys below the display.
These change function depending on what you’re
doing, as shown by the labels on the bottom
line of the display.
CD
Mu
44k1
Radio
Displaying the Home
keys
Whatever you're doing, you can always
display the Home keys.
• Press H.
The Home keys are available even when the
F80 is in standby.
Disc
Selecting the radio
To select the radio
• Press Radio.
For more information about using the Radio
see Listening to the radio, page 23
ute
Aux
Adjust
Selecting the disc player
Selecting external inputs
To select the disc player
To select an external input
• Press Disc.
• Press Aux.
For more information about playing audio
CDs and DVDs see Playing discs, page 15.
You can then select one of the external
inputs: Aux 1, Aux 2, Aux 3, or Optical.
Adjusting settings
To adjust the F80 settings
• Press Adjust.
For more information see Setting up, page 31.
Displaying the time
To display the time
• Press the 2 key when the F80 is in
standby to display the time, or time and
date.
For information about setting the clock see
Adjusting the clock, page 32.
General functions
Changing the volume and muting
the sound
You can adjust the volume between 0dB and 99dB in precise steps
of 1dB, where 9dB is equivalent to doubling the loudness.
To change the volume
• Turn the volume knob to the right of the F80.
The display shows the current source and volume setting:
CD
Disc 39
44k1
=
*
[
Setting the alarm
The F80 includes an accurate alarm clock, which you can use to
wake you up in the morning or remind you of an appointment with
a tone, or the last radio station you were listening to.
Before using the alarm you should set the clock to the correct time;
see Adjusting the clock, page 32.
To set the alarm
• Press H, Adjust, Clock, Alarm to display the ALARM menu.
• Press Alarm to turn the alarm On.
The Alarm display allows you to set the alarm time:
]
)
ALARM
To mute the sound
• Press the volume knob.
¬
The display shows Mute:
CD
=
*
[
]
)
Next
In a similar way you can adjust the minutes, choose the source from
Radio or Tone, and set the volume.
• Press the volume knob again.
• At any stage press ¬ to return to the CLOCK menu with the
settings you have chosen.
Alternatively the sound is unmuted if you increase the volume.
To unset the alarm
To unmute the sound
10
9:45
Adjust hours
^
`
• Press ` or ^ to set the hours (24-hour clock).
• Press Next.
Mute
44k1
On
Alarm
• Press H, Adjust, Clock, Alarm to display the ALARM menu.
• Press Alarm to turn the alarm Off.
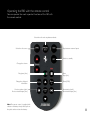
Operating the F80 with the remote control
You can operate the most important functions of the F80 with
the remote control.
Select the radio and step between bands
Select the disc source
Step between external inputs
Switch to standby
Change the volume
Play/pause (disc)
Change the displayed
information
Previous station (radio)
Previous track/chapter (disc)
Note: The remote control is supplied with
a button cell battery already fitted; pull out
the plastic tab to activate the battery.
Mute
Stop (disc)
Menu (DVD)
Next station (radio)
Next track/chapter (disc)
11
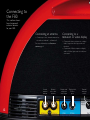
Connecting to
the F80
This section shows
how to connect
external devices
to your F80.
Connecting an antenna
• Connect up to two external antennas for
the radio to Antenna 1 or Antenna 2.
For more information see Connect an
antenna, page 3.
Second
external
antenna
12
External
rod or wire
antenna
Connecting to a
television or video display
• Connect the Video connector to a display
with a composite video input, such as a
television.
• Connect the S-Video output to a display
with an S-Video input, such as a television
or monitor.
Display with
composite
video input
Display with
S-Video
input
External
analogue
source
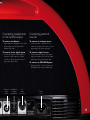
Connecting headphones
or the optical output
Connecting external
sources
To connect headphones
To connect an analogue source
• Plug headphones (equipped with a 3.5mm
mini jack plug) into the Optical Out/
Headphones socket.
• Connect the Aux 1 input to the line
output of an audio source, such as a music
player, using a mini stereo jack plug.
To connect to the digital output
To connect a digital source
• Connect the Optical Out/Headphones
socket to an optical input on a digital
recorder or digital surround processor,
using a mini optical cable.
• Connect the Aux 2 input to the optical
output of a digital source, such as a digital
music player, using a mini optical cable.
To connect an MP3/WMA player
• Connect the Aux 1 or Aux 2 input to an
MP3/WMA player, using a suitable cable.
External
digital
source
Headphones
or digital
preamplifier
For
future
accessories
Power
cord
13
14
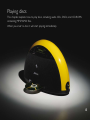
Playing discs
This chapter explains how to play discs, including audio CDs, DVDs, and CD-ROMs
containing MP3/WMA files.
When you insert a disc it will start playing immediately.
15
Playing discs
To see the disc options press H followed by Disc.
CD
3 2
44k1
=
*
Playing a disc
Pause and stop
To insert a disc
When a disc is playing the ± label changes
to =.
• Insert the disc, label uppermost, into the
drive, under the standby light.
To pause the disc
The top left of the display shows the type of
disc: CD (audio CD), DVD, or MP3/WMA,
followed by the bit rate (44.1k or 48k).
• Press =.
To play the disc
CD
• Press ±.
Some discs start playing immediately when
you insert them.
As the disc is playing the display shows the
track number (CDs) or chapter number,
(DVDs) and the elapsed time of the current
track (CDs) or whole disc (DVDs).
The = label changes to ±.
= 2:15
44k1
¬
*
[
]
)
To resume after pause
• Press ±.
To stop the disc
• Press *.
To resume after stop
• Press ±.
The disc will resume playing from the position
at which you stopped.
16
To clear the resume memory
• Press * twice.
2:15
[
]
)
Stepping between tracks
Ejecting the disc
To step to the start of the next
track
To eject the disc
While the disc is playing:
• Press ].
• Press the å key.
You can also eject a disc when another
source, such as Radio, is selected.
To step to the start of the current
track
While the disc is playing:
• Press [.
To select a track
While the disc is playing:
• Press [ or ] until the display shows the
track number you want to play.
With DVDs these keys step between
chapters.
17
Playing discs (continued)
The second row of disc functions allow you to repeat a disc,
and scan through a disc.
To see the second row of disc options press ..
CD
} 2
44k1
(
Repeat
>
Reverting to normal play
Repeating a disc
To revert to normal play after
scanning
To repeat the current track
• Press ±.
Play resumes from the point you reached.
• Press Repeat.
The display shows the Repeat Track symbol:
CD
3 2:26
44k1
(
=
Repeat
{
@
Track
}
To repeat the disc
• Press Repeat again.
The display shows the Repeat All symbol:
CD
3 2:26
44k1
(
=
Repeat
{
@
All
}
To cancel repeat
• Press Repeat until the repeat indicator
disappears.
18
8X
2:26
}
{
Scanning through a disc
Changing the displayed
information
To scan at faster than normal
speed
• Press { for reverse or } for forward.
To change the displayed
information
Each time you press the key the speed steps
between 2X, 4X, 8X, 16X, and 32X, as shown
at top right of the display.
• Press the 2 key to step between the
following options:
The display shows { or } followed by
the track time:
CD
CD
(
>
Repeat
{
12 3:45
44k1
8X
} 2:26
44k1
Track number and track time
=
*
[
]
)
[
]
)
Track number
}
• Press ± to revert to normal play.
Play resumes from the point you reached.
CD
12
44k1
=
*
19
Playing DVDs
When you play a DVD three additional rows of functions allow
you to navigate the DVD menus and choose DVD options.
To see the additional DVD functions press ..
DVD
2 3
( Top Menu
Menu
Displaying DVD menus
Navigating DVD menus
DVDs generally provide a Top Menu, which
provides access to the contents of the disc.
To navigate the DVD menus
Many DVDs also provide a disc menu, which
allows you to select additional sections or
special options.
DVD
To display the top menu
• Press ( to display the menu keys:
2 3:53
48k
(
<
>
`
^
)
• Press Top Menu.
• Press <, >, `, or ^ to navigate the menus.
To display the disc menu
To select a highlighted menu item
• Press Menu.
20
48k
• Press ) to display the Enter key.
• Press Enter.
3:51
Return
Enter
)
Selecting items on menus
Changing DVD options
To select a highlighted menu item
• Press Enter.
• Press ) to display the row of functions
for changing DVD options:
To return from a menu
DVD
• Press Return.
48k
This will exit from the menu without selecting
an option.
(
2 3:56
Angle
Subtitle
Audio
To change the camera angle
• Press Angle while viewing a scene with
multiple camera angles.
Each time you press Angle the next camera
angle is selected after a short delay.
To change the subtitles
• Press Subtitle.�
Each time you press Subtitle the next
subtitle language is selected.
To change the audio soundtrack
• Press Audio.�
Each time you press Audio the next available
soundtrack is selected.
21
22
Listening to the radio
This chapter explains how to use the F80 radio tuner, which provides DAB (Digital
Audio Broadcasting), the FM waveband, and AM (LW and MW).
It supports RDS (Radio Data System) on FM to display the station name.
23
Listening to DAB radio
To see the radio options press H, Radio, followed by
, if you have saved presets.
To select the DAB waveband press Band until
the top left of the display shows DAB.
DAB
(
Band
` Stat
Selecting the band
Tuning
To select the band
To step between stations
• Press Band.
• Press Station ` or ^.
The radio steps between the wavebands
DAB, FM, and AM.
On DAB pressing ` or ^ displays the
station names in alphabetical order, and the
currently displayed station is selected after a
short delay.
The current band is shown at top left of the
display.
A graphical signal-strength meter is shown at
top right of the display. Adjust the antenna for
the highest reading.
24
BBC R
|_
Radio 2
)
tion ^
Changing the display
Text display
To change the DAB information
Country music throughou
• Press 2.
(
This steps through the following options:
Normal display
DAB
(
BBC Radio 2
Band
` Station ^
|_
Detailed display
(
Band
Stereo
BBC Radio 2
BBC National DAB
` Station ^
Band
BBC Radio 2
` Station ^
)
Scrolling information about the programme
(Dynamic Label), signal strength indicator, and
station name.
Technical display
)
Station name (Long Service Label) and signal
strength indicator.
DAB 192kb/s
|_
DAB
|_
)
DAB 12B
(
Band
[230] 800
BBC National DAB
` Station ^
)
Information to help you set up an antenna:
Ensemble (eg 12B), minimum desired signalto-noise ratio (eg 230), and actual signal-tonoise ratio of the ensemble (eg 800).
Bit rate (higher is better quality), Stereo/
Mono, signal strength indicator, station name,
and network or operator name.
25
Using presets
You can save up to 16 preset stations across all bands so you
can select them with a single key press.
Press . to display the preset names. When you
have defined at least one preset, the preset
keys will be displayed first when you select
the radio.
DAB
(
BBC R
Virgin
BBC R2
Selecting a preset
Saving a preset
To select a preset
Before you have saved any presets the preset
keys are labelled 1 to 16:
• If necessary, press ) until the preset
names are displayed.
DAB
• Press ( or ) to step between rows.
• Press the key corresponding to the station
you want to select.
(
|_
BBC Radio 2
There are four rows of presets.
1
2
3
4
)
To save a preset
• Tune to the band and station you want to
save.
• Hold down the preset key you want to
assign to the station until its label changes
to the station name or frequency.
The preset key will be labelled with the name
of the station:
DAB
(
26
|_
BBC Radio 2
1
BBC R2
3
4
)
|_
Radio 2
Chill
)
91.10
On FM or AM it will be labelled with the
frequency if no name is available:
DAB
(
|_
BBC Radio 2
1
88.90
3
Scanning for stations
(DAB only)
To scan for DAB stations
4
)
The preset saves the band, frequency, and any
audio settings.
Note: If you move location, you will need
to resave presets for stations that are on a
different frequency in the new location.
• Press ( to display the Scan and Prune
options:
DAB
BBC Radio 2
Scan
Prune
DRC
|_
)
• Press Scan.
The radio scans for services, and a progress
indicator shows the progress of the scan.
To remove inactive services
• Press Prune.
To choose dynamic range control
• Press DRC.
This improves the dynamic range for stations
that broadcast dynamic range information.
27
Listening to FM or AM
The F80 also provides the FM and AM wavebands.
FM
(
91.10
Band
` St
Selecting the band
Tuning to a station
To select the band
On FM and AM you have the choice of Tune
or Step mode.
• Press Band.
The radio steps between the wavebands
DAB, FM, and AM.
The current band is shown at top left of the
display.
Tune mode
• Press Tune ` or ^ to scan down or up
in frequency to the next available station.
Step mode
• Press ( to display the second row of
radio functions.
The ` and ^ keys change to Step.
• Press Step ` or ^ to step down or up
in frequency
28
Stereo |_
0 MHz
tep ^
Audio
)
Audio
To change the audio setting
On FM and AM you can change the audio
setting for best quality.
• Press ( to display the second row of
radio functions.
• Press Audio to step between the audio
options.
The current option is shown at top right of
the display.
On FM you can step between Stereo or
Mono. Selecting Mono will reduce noise on
weak stations.
On AM you can step between Filter Off,
Lowpass which removes excess hiss, or
Notch which removes 4.5kHz whistle.
29
30
Setting up
In most cases you will get superb results with your F80 without altering its settings
from those initially supplied. This chapter explains how you can configure the F80 to
suit your preferences, and to achieve the best possible sound.
Two menus of settings are provided:
The Adjust menu allows you to adjust the clock, audio, and display brightness.
The Setup menu allows you to change the configuration of the F80.
31
31
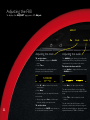
Adjusting the F80
To display the ADJUST page press H, Adjust.
ADJUST
¬
Audio B
Adjusting the clock
Adjusting the audio
To set the time
The AUDIO menu allows you to adjust the
sound of the F80 to your preferences, and to
compensate for its position in the room.
• Press Clock to display the CLOCK
menu.
• Press Time.
To adjust the bass and tilt
The clock shows the current time, and
prompts you to adjust the hours:
• Press Audio to display the first row of the
AUDIO menu.
TIME
AUDIO
¬
12:39:00
Set
Adjust hours
`
^
Next
• Press ` or ^ to set the hours to the
correct time.
• Press Next.
In a similar way you can adjust the minutes
and seconds.
• At any stage press Set to set the time
with the settings you have chosen.
To set the date
32
Clock
In a similar way the DATE menu allows you
to set the date and day of week.
¬
Bass
0.0
- Bass +
Tilt
0.0
- Tilt +
)
• Press Bass - or + to adjust the bass.
The bass control allows you to adjust the
bass response in the room by ±5dB in 0.5dB
steps.
• Press Tilt - or + to adjust the overall
balance.
The tilt control tilts the frequency of the
response over the entire frequency range to
make the sound brighter or dimmer. It can be
adjusted between ±10dB in 0.5dB steps.
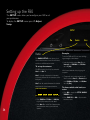
Brightness Setup
Adjusting the location
Adjusting the brightness
The second row of options on the AUDIO
menu allow you to optimise the sound for
the location of the F80, and adjust the stereo
image width.
The BRIGHTNESS menu allows you
to adjust the brightness of the front panel
display, both in normal operation and in
standby.
To adjust the location
To adjust the brightness
• Press . to display the second row of the
AUDIO menu.
• Press Brightness to display the
BRIGHTNESS menu.
AUDIO
BRIGHTNESS
Table
¬ Location
Width 3
- Width +
• Press Location to set the appropriate
setting: Table, Shelf, Floor, Corner, or
Free.
• Press Width - or + to adjust the width of
the spatial image between 0 and 6.
Choose a larger value if you are positioned
further from the F80.
¬
Brightness 10
- Brightness +
Brightness
5
- Standby +
• Press Brightness - or + to adjust the
normal brightness between 1 and 12.
• Press Standby - or + to adjust the
standby brightness between 1 and 12.
As you adjust each setting the display shows
the brightness you have set.
We recommend setting the brightness as low
as possible to prolong the life of the display.
33
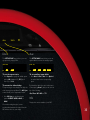
Setting up the F80
The SETUP menus allow you to configure your F80 to suit
your preferences.
To display the SETUP menus press H, Adjust,
Setup.
SETUP
¬
Radio
To set up the antennas
The F80 provides a choice of two antennas,
Ant.1 and Ant. 2.
Ant. 1 is usually connected to an external
rod or wire antenna via the connector on the
back panel.
Ant. 2 can be switched between the internal
antenna, and a second external antenna.
SETUP RADIO ANTENNAS
¬
34
Disc
Examples
The RADIO SETUP menu allows you to
choose which antenna is used for each band,
and choose which bands are active.
1
DAB Ant.
Radio
2 (Int)
FM Ant.
2 (Int)
AM Ant.
Internal
Ant. 2
)
• Press DAB Ant., FM Ant., or AM Ant.
to specify the antenna for each band.
• Press Ant. 2 to switch Ant. 2 between the
internal antenna, and a second external
antenna.
To receive DAB and FM in an area with high
signal strength on both bands:
• Leave the default settings: Ant. 2 set to
Internal, and DAB Ant. and FM Ant.
set to 2 (Int).
If the internal antenna does not give good
reception:
• Connect the rod or wire antenna to the
Ant. 2 socket, set Ant. 2 to External, and
leave DAB Ant., FM Ant., and AM Ant.
set to 2 (Ext).
To choose which radio bands are
active
• Press . to display the SETUP RADIO
BANDS menu.
• Press DAB, FM, or AM to choose which
bands are active.
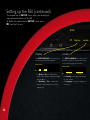
Aux
Info
)
Disc
Aux
The SETUP DISC menu allows you to set
up options for playing DVDs.
The SETUP AUX menu allows you to set
up the label for each of the auxiliary inputs.
SETUP DISC
SETUP AUX
¬
LB
Aspect
SHORT
AV Sync
¬
Aux 1
Aux 1
Aux 2
Aux 2
Aux 3
Aux 3
Optical
Optical
To set the aspect ratio
To set auxiliary input labels
• Press Aspect to specify the default aspect
ratio as LB (letterbox 4:3), PS (Pan &
Scan 4:3), or 16:9.
• Press Aux 1, Aux 2, Aux 3, or Optical
to set the label for the corresponding
input.
To correct for video delays
By default the label is the same as the name
of the input (eg Aux 1), but you can set it to
any of the following:
The processing in some displays can delay the
video, causing lipsync problems. The AV Sync
control allows you to compensate for this.
• Press AV Sync to step between the
options SHORT, MED, LONG, or
MAX.
Choose the setting that gives correct
synchonisation between the sound from the
F80 and the video on your display.
iPod, Zune, MP3, MD, or TV.
Info
Displays the version number of your F80.
35
Setting up the F80 (continued)
The second row of SETUP menus allow you to configure
more advanced features of the F80.
To display the second row of SETUP menus press
. from the first row.
SETUP
(
Display
Locale
Display
Locale
The SETUP DISPLAY menu allows you to
choose how the F80 display behaves.
The SETUP LOCALE menu allows you to
specify the country, for the operation of the
radio, and the language of the menus.
SETUP DISPLAY
SETUP LOCALE
¬
No
Blank
No
Dimming
• Set Blank to Yes to include a blank
display in the sequence of displays available
with the 2 key.
• Set Dimming to Yes to automatically
adjust the display brightness to suit the
ambient light.
36
¬
U.K.
- Country +
Eng. (UK)
- Language +
• Set Country to the appropriate setting
for your location.
• Set Language to the menu language you
want to use.
Outputs
System
)
Outputs
System
The SETUP OUTPUTS menu allows
you to mute the speakers when using the
headphone output.
The SETUP SYSTEM menu allows you to
use the F80 with your Meridian System.
SETUP OUTPUTS
Mute
¬ Headphone
• Set Headphone to Mute to mute the
speakers when headphones are connected,
or No Mute to leave the speakers active
when using the headphone output.
• Set MSR(+) to Enabled to operate your
F80 with a Meridian MSR+ system remote.
Reset
• Press ) to display the Reset and Lock
options.
• Press Reset followed by Yes to reset the
F80 to the default settings.
Lock
Allows you to prevent anyone changing
settings on the SETUP menus.
To lock the SETUP menus
• Press Lock followed by Yes.
To unlock the SETUP menus
• Hold down Setup for several seconds
until the SETUP menus appear.
37
38
Index
A
alarm
setting 10
unsetting 10
antennae
cable 3
coil 3
connecting 3, 12
external 3
telescopic rod 3
wire 3
AUDIO menu 32, 33
auxiliary input labels 35
B
bass, adjusting 32
brightness, adjusting 33
BRIGHTNESS menu 33
C
CLOCK menu 32
coil antenna 3
components 2
D
DAB 24
scanning for stations 4, 27
date, setting 32
DATE menu 32
digital output 13
discs
displays 19
ejecting 17
pausing 16
playing 5, 16
repeating 18
scanning 19
stepping between tracks 17
stopping 16
DRC 27
DVDs
aspect ratio 35
audio soundtrack 21
camera angle 21
displaying menus 20
navigating menus 20
selecting menu items 21
subtitles 21
dynamic range control 27
H
E
MP3/WMA player, connecting 13
mute 10
ejecting a disc 17
external sources, connecting 13
P
F
fast forward 19
fast reverse 19
front panel keys 8
headphones
connecting 13
muting speakers 37
Home keys 8
Adjust 9, 32
Aux 9
Disc 9, 16
Radio 8, 24
I
info 35
L
lipsync, correcting 35
location, adjusting 33
locking the Setup menus 37
M
positioning 2
power, connecting 4
Prune 27
39
R
radio
choosing active bands 34
DAB 24
displays 25
FM/AM audio setting 29
presets 26
selecting the band 24
tuning 24
using 4
RADIO SETUP menu 34
remote control 11
repeat play 18
resetting the F80 37
40
SETUP menus (continued)
System 37
unlocking 37
signal-strength meter 24
T
telescopic rod antenna 3
television, connecting 12
tilt, adjusting 32
time, displaying 9
time, setting 32
U
unpacking 2
S
V
Scan 27
scanning for stations 4
scanning through a disc 19
SETUP menus 34
Aux 35
Disc 35
Display 36
Info 35
Locale 36
locking 37
Outputs 37
Radio 34
video delays, correcting 35
video display, connecting 12
volume 10
W
wire antenna 3