1
Aviano at Desert Ridge
II
WARRANTY INFORMATION
• In-Sink ·Erator Commercial Products are warranted against defects in material and
workmanship for one year from the date of installation.
• The warranty includes parts and labor, provided the service is performed by an
In-Sink-Erator Factory Authorized Service Genter.
• This warranty does not apply if a disposer failure is due to: faulty or improper
electrical installation, faulty or improper plumbing installation, product abuse or
. misuse, accidental damage, grinding elements jammed by·fcreign objects,
clogged drain lines, improperly sized unit (as specified by In..$ink-Erator).
• Commercial disposer accessories are included in this warranty only if they are
included in the original disposer purchase package.
• To obtain service, call the nearest In-Sink-Erator Factory Authorized Service
Agency. For the location of your nearest Factory Authorized Service Agency,
call 1·800-558-5712. ext. 4326.
In-Sink-Erator has been an ISO 9001 Certified manufacturing facility since 1996.
ISO s1ands for International Organization for Standardization, a group which
provides for the development of international standards. The ISO standard
promotes documentation of procedures; consistency of procedures; and control
of all aspects of the manufacturing cycle. There are three levels of ISO certification,
ISO 9001 is the highest and most comprehensive level for companies that design
and manufacture their own products.
OMSION
~
530406 1£1.: .,.
564-6432 '-800-li68-57111 FA)(:.'4li64-8tl7
I
Aviano at Desert Ridge
IN-SINK-ERATOR'"
DISPOSER IN-HOME FULL SERVICE WARRANTY
7nss - Seven
Ye., W.rranty
555SS • Five Ye.r Warntnty
444 - Four Year Warranty
17 • Five Yeer Warranty
Badger 5 Plus - Three Year Warranty
Badger 5 - Two Year Warranty
Badger 1 - One Year Warranty
This warr8llty covers all replacement parts and
repair labor to correct defects in disposer materia/ and workmanship for the full warranty period
from the date of installation in your home. If
warranty service Is required during the warranty
period, contact an authorized In-Slnk-Erator®
service center to replace or repair the unit in
your home at no cost to you. If you have Questions concerning your disposer or determining
when service Is needed, please call the toll
free In-Sink-Eratord' AnswerUnellol to obtain the
name of the authorized service center nearest
you. The toll free number is 1 (BOO) 558-
It your disposer does not operate, follow
theee steps In order:
1. Check the things you can do yourself. Se sure
the disposer is connected to the electric power
and the fuses or circuit breakers are In working
order. Reread the instruction book to ensure that
you are operating the disposer correctly.
5700.
3. Write to us if a satisfactory solution is not
reached in steps 1 and 2. Our address is:
This warranty gives you specific legal rights and
you may also have other rights Which vary from
state to state. If the manUfacturer determines
the unit should be replaced rather than repaired.
the warranty on the replacement unit will be
limited to the unexpired term of the original warranty. No other express warranty, written or oral,
applies.
2. Call In-Sink-Erator4 for Information or for the
location of the authorized service center nearest
you. (The toll free In-Sink-Erato" AnswerUne™
number is listed above.)
In-Sink-Erato"service Department
4700 21st Street
Racine, Wisconsin 53406 USA
When writing or call1ng, supply the following
information: date, your name, your address, and
your phone number. Desoribe the product by
model number, serial number, date purchased.
place purchased, and service history (including
name and address of service agent). Clearly
describe the problem and service required.
NOTE: Warranty Is determined by unit serial
number and date of installation. Purchase or
installation receipt may be required to verify
warranty status.
This disposer is intended to be installed in the
United States of America; installation outside of
the United States may void the warranty.
Aviano at Desert Ridge
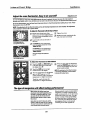
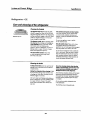
OPERATING INSTRUCTIONS
CONTINUOUS
FEED DISPOSERS
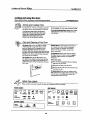
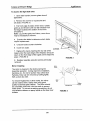
1. Remove stopper from sink opening and run strong flow of cold water.
2. Turn on wall switGh to start c1ispowr.
3. Slowly insert food waste Into disposer and position stopper to minimize possible ejection of
material while grinding (see Figure A).
4. After grinding is complete. turn disposer off and run water for at least 15 seconds to flush drain
hne.
BATCH FEED DISPOSERS
Batch feed disposer differ from continuous feed models in that the batch feed onloff switch is built
into the disposer and activated by the stopper. (see Instruction
1, Installation Dimensions chart, for
modelref&rence.)
1. Read important safety instructions contained in the Installation. CaRl & U58 manual.
2. Aemo~ stopper from sink opening and place food waste into disposer grind chamber. 00 not
pack chamber with waste. Place stopper back in sink opening. Run a strong flow of cold water.
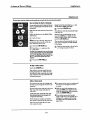
3. Turn on disposer by lifting stoPPer slightly and turning to left or right until disposer starts. (See
Figure B: Seal- Completely in, Drain - Uft 1/4 inch and turn, Start - Turn fully left or right.)
4. Aftvr grinding is complelll, turn disposer off by Rlmoving the stopper and allow walllr to run for at
least 15 HCOnds to flush drain line.
DO_.
First turn on a moderate to strong
flow of cold water and then turn
on the disposer. Continue running
cold water for 15 seconds alter
grincing is complet~
to flush the
drain line.
Grind hard materials suGh as
small bones. fruit pits. and ice. A
scouring action is created by the
particles inside the grind chamber.
Grind peelings from citrus fruits to
fnlshen up drain smells.
Use a disposer cleaner, degreaser,
or deodorizer as necessary to
relieve objectionable
odOf'$ caused
by grease build-up.
DON'T ••.
Don't pour grsase or fat down your disposer or any
drain. It can build up in pip85 and CSU$8 dl8in blockages. Put grease in a jar or can and dispose In the
lrash.
Don't use hot water when grinding food waste. It is OK
10 drain hot water into the disposer between grinding
periods.
Don't f~1disposer with a lot of vegetable peels all at
once. Instead, turn the water'and disposer on first and
then feed the plll8ls in gradually.
Don't grind extremely fibrous materials like com husks.
artichokes, etc .• to avoid possible drain blockage.
Don't turn off disposer until grinding Is completed and
only sound of motor and walllr is heard.
Don't be aJanned if a brown discoloration appears
on the face of the grinding diac. This is normal. It is
surface discoloration only and will not affect the life or
performance of the disposer.
USER-MAINTENANCE INSTRUCTIONS
CLEANING DISPOSER
Over time, food particles may accumulate in the grind chamber and baffle. An odor from the cisposer is usually a sign of grease and food buildup. caused by insufficient walllr flow during and after
disposer use. To Clean disposer:
1. Turn oIf djspgllflr and disconnect power supply.
2. Reach through sink opening and clean underside of splash baffle and inside upper ~p of grind
chamber With scouring pad.
3. P1_ stopper in sink opening and fill sink halfway with warm waler.
4. Mix \/4 cup baking soda with water. Turn diapoMr on lIr1d ~move stopper from sink at same
time to wash awwtj loose pertK:les.
Disposef'$ may also be cleaned with Diaposer Care". This PI1)~ct is not sold by In-Sink-Erator, but
is generally available in major home centers, hardware. and grocery stores. For more information on
Disposer Care-. contacllron
Oul, Inc. at 1-800-654-0791 or www.ironoulcom.
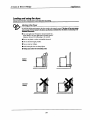
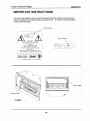
RELEASING
DISPOSER JAM
If the motor stops during operation, the dispo$8r may be lammed. To 1'818858 jam:
1. Turn oft diSPOser and water.
2. Insert one end of self-service wrenchette into center hole on bottom of cisposer (see Figure 0).
Work wrenchette back and forth until it turns one full revolution. Remove wrenchell8.
3. Reach into disposer With tongs and remove object(s). Allow disposer motor to cool for 3 - 5 minullls and lightly push nld _t
button on the disposer bottom (S89 Figure 0). (If motor remains
inoperative, check service panel for tripped cill;uit braakers or blown fuses.)
Regularly Inspect disposer
and plumbing fittings for
water leaks. as water leaks
can cause property
damage.
Manufacturer
cannot be held responsible
for property damage as a
result of water leaks.
Aviano at Desert Ridge
EfflClENCY
RATING
G8ma
GAMA certification applies 10
all residential gas water
haatars with capacitias of 20
10 100 gallons with input rating
of 75,000 BTUlHr. or less.
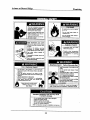
WARNING: If the information in these
instructions Is not follQwed exactly, a fire
or explosion may result causing property
damage, personal injury or death.
-
Do not store or use gasoline or other
flammable vapors and liquids in the
vicinity of this or any other appliance.
• Do not try to light any appliance.
• Do not touch any electrical switch; do
not use any phone in your building.
• Immediately call your gas supplier
from a neighbor's phone. Follow the
gas supplier's instructions.
• If you cannot reach your gas supplier,
call the fire department.
-Installation
and service
must be
performed
by a qualified
Installer,
service agency or the gas supplier.
C3 Technology'"
Gas Water Heaters meet the new
ANSI Z21.10.1 standard that deals with the accidental or
unintended ignition of flammable vapors, such as those
emitted by gasoline.
AWARNING
Read and understand instruction
manual and safely messages
before installing, operating or
servicing this water heater.
Failure to follow instructions and
safety messages could result in
death or serious injury.
Instruction manual must remain
Withwater heater.
• For Your Safety •
AN OOORANT ISAODED TO THE GAS USED
BYTHISWATER HEATER.
ALL TECHNiCAl AND WARRANTY QUESTlONS: SHOULD BE DIRECTED TO THE LOCAL DEALER FROM WHOM THE WATER HEATER WAS
PURO-lASED.IFYOUARE UNSUCCESSFUL, PLEASE WRlTE TO THE cot.PANYUSTEDONTHE RATJo.lGPlATE ONTHE WATER HEATER
KEEP ntlS MANUAL IN THE POCKET ON HEATER FOR FUTURE REFERENCE
WHENEVER MAINTENANCE ADJUSTMENT OR SERVICE IS REQUIRED.
Aviano at Desert Ridge
Many safety-related messages and Instructions have been provided In this manual and on your own water heater to wam you and
others of a potential InJury hazard. Read and obey all safety messages and Instructions throughout this manual. It Is very
Important that the meaning of each safety message Is understood by you and others who Install, use or service this water heater.
A
This Is the safety alert symbol. It Is used to alert you
to potential personal InJury hazards. Obey all safety
messages that follow this symbol to avoid possible
InJury or death.
AOANGER
DANGER
Indicates
an Imminently
hazardous situation which, If not avoided,
could result In death or InJury.
A
WARNING Indicates a potentially hazardous
situation which, If not avoided, could result
In death or Injury.
WARNING
ACAUTION
CAUTION
CAUTION Indicates a potentially hazardous
situation Which, If not avoided, may result
In minor or moderate Injury.
CAUTION used without the safety alert
symbol Indicates a potentially hazardous
situation which, If not avoided, could result
In property damage.
All safety messages will generally tell you about the type of hazard, what can happen If you do not follow the safety message and
how to avoid the risk of Injury.
•
Qualified Installer: A qualified installer must have ability equivalent to a licensed tradesman in the fields of plumbing,
air supply, venting and gas supply, including a thorough understanding of the requirements of the National Fuel Gas
Code as it relates to the installation of gas fired water heaters. The qualified installer must also be familiar with the
design features and use of flammable vapor ignition resistant water heaters, and have a thorough understanding of this
instruction manual.
•
Service Agency: A service agency also must have ability equivalent to a licensed tradesman in the fields of plumbing,
air supply, venting and gas supply, including a thorough understanding of the requirements of the National Fuel Gas
Code as it relates to the installation of gas fired water heaters. The service agency must also have a thorough
understanding of this instruction manual, and be able to perform repairs strictly in accordance with the service guidelines
provided by the manufacturer.
•
Gas Supplier: The Natural Gas or Propane Utility or service who supplies gas for utilization by the gas burning
appliances within this application. The gas supplier typically has responsibility for the inspection and code approval of
gas piping up to and including the Natural Gas meter or Propane storage tank of a building. Many gas suppliers also
offer service and inspection of appliances within the building.
Aviano at Desert Ridge
AWARNING
AWARNING
Fire Hazard
Read and understand instruction
manual and safety messages
before installing, operating or
servicing this water heater,
For continued protection against
risk of fire:
·00 not install water heater on
carpeted floor,
Failure to follow instructions and
safety messages could result in
death or serious injury,
• Do not operate water heater if
flood damaged.
Instruction manual must remain
with water heater.
water temperature over 125·F
(52· C) can cause severe burns
instantly resulting in severe injury
or death.
• Overheated water can cause
water tank explosion.
Children, the elderly, and the
physically or mentally disabled
are at highest risk for scald injury.
Feel water
showering.
before
bathing
Temperature
available.
limiting valves are
• Properly sized temperature
and pressure relief valve must
be installed
in opening
provided.
or
Read instruction manual for safe
temperature setting.
AWARNING
AWARNING
Breathing Hazard· Carbon Monoxide Gas
• Install vent system in accordance with
codes.
• Do not operate water heater if flood
damaged.
• High altitude orifice must be installed
for operation above 2, 000 feet.
• Do not operate ifsootbuildup.
• Do not obstruct water heater air intake
with insulatingjacket.
• Do not place chemical vapor emitting
products near water heater.
• Gas and carbon monoxide detectors
are available.
• Do not store or' use gasoline or other flammable
vapors and liquids in the vicinity of this or any other
appliance.
Avoid all ignition sources if you smell LP gas.
• Do not expose water heater control to excessive gas
pressure.
• Use only gas shown on rating plate.
• Maintain required dearances to combustibles.
Keep ignition sources away from faucets after
~tended period of non-use.
e
'
Read instruction manual before
installing, using or servicing
water heater.
Breathing carbon monoxide can cause brain damage or
death. Always read and understand instruction manual.
CAUTION
Improper installation and use may result
in property damage.
•
•
•
•
•
Do not operate water heater if flood damaged.
Inspect and replace anode.
Install in location with drainage.
Fill tank with water before operation.
Be alert for thermal expansion.
Refer to instruction manual for installation and service.
Aviano at Desert Ridge
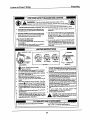
A
WARNING:
explosion
L..---
If you do not follow these instructions exactly, a fire or
may result causing property damage, personal injury or loss of life.
---J
A. This appliance has a pilot which must be lighted by hand.
When lighting the pilot, follow Ihese instructions exactly.
B. BEFORE LIGHllNG smell all around Ihe appliance area
for gas. Be sure to smell next to the floor because some
gas is heavier than air and will settle on the floor.
WHAT TO DO IF YOU SMELL GAS:
• Do not try to light any appliance.
• Do not touch any electric switch; do not use any phone
in your building.
• Immediately call your gas supplier from a neighbor's
phone. Follow the gas supplier's instructions.
1.
2.
3.
4.
5.
ta\
STOP! Read the safety information
~
above on this label.
Set the thermostat to lowest setting (PilOT LIGHTING).
Turn thermostat dial fully clockwise,""
until it stops.
Push the gas control knob down slightly and turn dockwise
'"" to"OFP,SEEFIGURE "A".
NOTE: Knob CANNOT be turned from "PIlOr to "OFP
unless it is pushed down slightly. Do not force.
Remove the outer burner door located below the gas
control.
Wait five (5) minutes to dear out any gas. If you then
•
6.
7.
8.
fL..-E
If you cannot reach your gas supplier, call the flre
department.
C. Use only your hand to push in or turn the gas control
knob. Never use tools. If the knob will not push in or tum
by hand, don't try to repair it, call a qualified service
technician. Force or attempted repair may result in a fire
or explosion.
D. Do not use this appliance if any part has been under
water. Immediately call a qualified service technician to
inspect the appliance and to replace any part of the
control system and any gas control which has been
under water.
9.
10.
,
<I>
smell gas,
STOP! Follow "B" in the safety information
above on this label. If you cIon'tsmell gas, go to next step.
ThIs unit is equipped with a push button pilot ignitor, which
is used to light the pilot. locate the ignitor on the gas
control.
Turn gas control knob counterdockwise ("\ to "Pilor,
SEE FIGURE'S".
The pilot is located on the right side of the burner. It can be
located by looking through the glass vlew port while
pressing the pieza ignitor button several times. look for a
spark at the pilot location, FIGURE '0'.
liJ
11.
12.
13.
Once the pilot has been found, push the gas knob all the
way down. Immediately press the pilot ignitor button rapidly
(4) to (5) times. If the pilot will not light, repeat step (3)
through (9).
Continue to hold the gas control knob down for about one
(1) minute after the pilotis lit. Release the gas control knob
and it will pop back up. Pilot should remain lit. If it goes out.
repeat step (3) through (9). It may take several minutes for
air to dear the lines before the pilot will light.
If knob does not pop up when released, stop and
immediately call your service technidan or gas supplier.
If the pilot will not stay lit after several tries, turn the gas
control knob clockwise f"\ to "OFF" and call your servlce
technician orgas supplier. SEE FIGURE "A",
Once the pilot flame is established replace the outer burner
door.
At arms length away, turn gas control
knob
counterdockwise("\
to "ON". SEE FIGURE "Co.
Set thermostatto desired setting.
A
DANGER: Hotter water Increases the risk of
scald Injury. Consult the Instruction manual
before changing temperature.
TO TURN OFF GAS TO APPLIANCE
2. Push gas control knob down slightly and turn dockwise
r"\
to"OFP.
Do not force. SEE FIGURE "A".
Aviano at Desert Ridge
Due to the nature of the typical gas water heater, the water temperature
in certain situations may vary up to 30P (16.7 CO)higher or lower at the
point of use such as, bathtubs,
showers,
sink, etc.
Any water heater's intended purpose is to heat water. Hot water is
needed for Cleansing, Cleaning, and sanitizing (bodies, dishes, Clothing).
Untempered hot water can present a scald hazard. Depending on the
time element, and the people involved (adults, children, elderly, infirm,
etc.) scalding may occur at different temperatures.
Water
temperature
over
125°F
(52°C)
can cause severe
burns
instantly
resulting in severe injury
or death.
Children,
the elderly,
and the
physically
or mentally
disabled
are at highest risk for scald injury.
Feel
water
showering.
before
bathing
or
Temperature
available.
limiting
valves
are
Read instruction
manual
temperature
setting.
HoneR
Never allow small children to use a hot water tap, or to draw their own
bath water. Never leave a child or handicapped person unattended in
a bathtub or shower.
MQIE;
A water temperature range of 120°F-140°F
recommended by most dishwasher manufacturers.
(49°C-60°C)
is
The thermostat of this water heater has been factory set at its lowest
position (PILOT LIGHTING).
It is adjustable and must be reset to the
desired temperature setting to reduce the risk of scald injury. The mark
(A) indicative of approximately
120°F (49°C) is preferred starting
point. Some States have a requirement for a lower setting.
Turn the water temperature
dial Clockwise ( "
) to decrease the
temperature, or counterclockwise
( ("'\ ) to increase the temperature.
Should overheating occur or the gas supply fail to shut off, turn off the
manual gas control valve to the appliance.
PIEZO
IGNITOR
GENERATOR
for safe
WATER CAN SCALD: Water heaters are Intended to produce
hot water. Water heated to a temperature
which will satisfy space
heating, clothes washing, dish washing, and other sanitizing needs
can scald and permanently injure you upon contact. Some people are
more likely to be permanently injured by hot water than others. These
include the elderly, children,
the infirm, or physically/mentally
handicapped.
If anyone using hot water in your home fits into one of
these groups or if there is a local code or state law requiring a certain
temperature water at the hot water tap, then you must take special
precautions. In additlon to using the lowest possible temperature setting
that satisfies your hot water needs, a means such as a mixing valve,
shall be used at the hot water taps used by these people or at the
water heater. Mixing valves are available at plumbing supply or
hardware stores, see Figure 2. Follow manufacturer's instructions for
installation of the valves. Before changing the factory setting on the
thermostat, read the "Temperature Regulation" section in this manual,
see Figures 14 and 15.
Temperature
Time to Produce 2nd & 3rd
Settings
Degree Burns on Adult Skin
VERYHOT=approx.16O"F(71"C)
About 1/2 second
C
= approx.
150°F (66°C)
About
B
= approx.
140°F (60°C)
Less than 5 seconds
A = approx.
• = approx.
1-1/2 seconds
130°F (54"C)
About 30 seconds
120°F (49°C)
More than 5 minutes
LOW = approx.
BO"F (27°C)
will form while the bumer Is on. A water healer may appear to be leaking
when in fact the water is condensatlon.
This usuelly happens when:
Check draft hood operation by performing a worst case depressurization
of the bUilding. With all doors and windows closed, and with all air
handing equipment and exhauslfans operating such as furnaces, clothes
dryers, range hoods and bathroom fans, a match flame should still be
drewn into the drafl hood of the water heater with its bumerfiring.
If the
flame is not drawn toward the draft hood, shut off water heater and
make necessary air supply changes to correct.
a. A new water heater Is filled with cold water for the first time.
b. Burning gas produces water vapor in water heaters, particularly
high efflciency models where flue temperatures are lower.
c. Large amounts of hot water are used in a short time and the refill
water in the tank is very cold.
Moisture from the products of combustion condense on the oooIer tank
sllfaces
and form drops of water which may fall onto the burner or
other hot surfaces to produce a 'slzzling" or "frying" noise.
Excessive condensation can cause pilot outage due to water running
down the flue lube onto the main bumer and putting out the pilot.
Aviano at Desert Ridge
Because of the suddenness and amount of water. condensation water
may be diagnosed as a "tank leak". Afterthe water In the tank warms up
(about 1-2 hours), the condition should disappear.
Do not assume the water heater is leaking until there has been enough
time for the water in the tank to warm up.
An undersized water heater will cause more condensation. The water
heater must be sized properly to meet the family's demands for hot water
induding dishwashers. washing machines and shower heads.
Excessive condensation may be noticed dUring the winter and early
spring months when incoming water temperatures are at their lowest.
Good venting is essential for a gas fired water heater to operate property
as well as to carry away products of combustion and water vapor.
It is not uncommon to experience a small amount of smoke and odor
during the initial start-up. This is due to burning off of oil from metal parts.
and will disappear in a short while.
In each water heater there is Installed at least one anode rod (see
parts sections) for corrosion protection of the tank. Certain water
conditions will cause a reaction betWeen this rod and the water. The
most common complaint associated with the anode rod is one of a
"rotten egg smell" in the hot water. ThIs odor is derived from hydrogen
sulfide gas dissolved in the water. The smell is the result of four
factors which must all be present for the odor to develop:
a. A concentration of sulfate In the supply water.
b. Little or no dissolved oxygen in the water.
c. A sulfate reducing bacteria which has accumulated within the water
heater (this harmless bacteria is nontoxic to humans).
d. An excess of active hydrogen in the tank. This is caused by the
corrosion protective action of the anode.
Smelly water may be eliminated or reduced in some water heater
models by replacing the anode(s) with one of less active material. and
then chlorinating the water heater tank and all hot water lines. Contact
the local water healer supplier or service agency for further information
concerning an Anode Replacement Kit and this chlorination treatment.
If the smelly water persists after the anode replacement and chlorination
treatment. we can only suggest that chlorination or aeration of the
water supply be considered to eliminate the water problem.
CAUTION
Property Damage Hazard
Do not remove the anode leaving the tank unprotected.
doing so, all warranty
on the water heater tank Is voided.
By
" Avoid water heater damage.
" Install thermal
expansion
" Contact qualified
installer
tank or device if necessary.
or service
agency.
Water supply systems may. because of such events as high line
pressure, frequent cut-offs. the effects of water hammer among
others. have installed devices such as pressure reducing valves. check
valves. back now preventers. etc. to control these types of problems.
VVhen these devices are not equipped with an Internal by-pass. and no
other measures are taken. the devices cause the water system to be
dosed. As water is heated. it expands (!hennal expansion) and dosed
systems do not allow for the expansion of heated water.
The water within the water heater tank expands as it Is heated and
increases the pressure of the water system. If the relieving point of
the water heater's temperature-pressure
relief valve is reached. the
valve will relieve the excess pressure. The temperature-pressure
relief valve Is not Intended for the constant
relief of thermal
expansion. This is an unacceptable condition and must be corrected.
It is recommended that any devices installed which could create a
closed system have a by-pass and/orthe system have an expansion
tank or device to relieve the pressure built by thermal expansion in the
water system. Expansion tanks are available for ordering through a
local plumbing contractor. Contact the local water heater supplier or
service agency for assistance in controlling these situations.
Possible noises due to expansion and contraction of some metal parts
during periods of heat-up and cool-down do not necessarily represent
harmful or dangerous conditions.
Condensation causes sizzling and popping wtthin the burner area during
heating and cooling periods and should be considered normal. See
"Condensation" in this section.
"Flammable
hydrogen
gases may be present.
" Keep all ignition sources
away from faucet when
turning on hot water.
HYDROGEN GAS: Hydrogen gas can be prodUced in a hot water
system that has not been used for a long period of time (generally two
weeks or more). Hydrogen gas is extremely ftammable and explosive.
To prevent the possibility
of injury under these conditions. we
recommend the hot water faucet, located farthest away. be opened
for several minutes before any electrical appliances which are
connected to the hot water system are used (such as a dishwasher or
washing machine). If hydrogen gas is present, there will probably be
an unusual sound similar to air escaping through the pipe as the hot
water faucet is opened. There must be no smoking or open Dame near
the faucet at the time it is open.
This water heater Is equipped with an automatic gas Shut-off system.
This system works when high water temperatures are present. Turn.
"OFF" the entire gas supply to the water heater. The high temperature
Shut-off is built into the gas control valve. It is non-resettable.
If the
high temperature Shut-off activates. the gas control valve must be
replaced. Contact your gas supplier or service agency.
Aviano at Desert Ridge
You should check for sooting. Soot is not normal and will impair proper
combustion .
.Soot bt.ild-up indicates a problem that requires correction before further
AWARNING
use. Turn ·OFF" gas to water heater and leave off until repairs are
made, because failure to correct the cause of the sooting can result in
a fire causing death, serious injury, or property damage.
Breathing Hazard - Carbon Monoxide Gas
• FI ue gases may escape
not connected.
if vent pipe is
• Be alert tor obstructed,
sooted or
deteriorated
vent system
to avoid
serious injury or death.
• Do not store corrosive
vicinity otwater heater.
• Chemical corrosion
system can cause
death.
chemicals
in
of flue and vent
serious injury or
Breathing carbon monoxide can cause brain damage or
death. Always read and understand
instruction
manual.
At least once a year a visual inspection
system.
should be made of the venting
If inspection of the burner shows that cleaning is required, turn the gas
control knob cIockwlse ( ""') to the ·OFF" position, depressing slightly.
You should look for:
1. Obstructions
which could cause improper venting. The combustion
and ventilation
~
The knob cannot be turned from "PILOr'to
knob Is depressed
slightly.
DO NOT FORCE.
air flow must not be obstructed.
2. Damage or deterioration
leakage of combustion
which could cause improper
venting
or
products.
Be sure the vent piping is properly connected to prevent escape of
dangerous flue gasses which could cause deadly asphyxiation.
"OFF"
unless
The burner needs to be removed for cleaning. Call a service agency to
remove and clean the burner and correct the problem that required the
burner to be cleaned.
Vacuum around base of water heater for dust, dirt, and lint on a regUlar
basis.
Obstructions and deteriorated vent systems may present serious health
risk or asphyxiation.
Chemical vapor corrosion oHhe flue and vent system may occur If air
for combustion contains certain chemical vapors. Spray can propellants,
cleaning solvents,
refrigerator
and air conditioner
refrigerants,
swirTVTlingpool chemicals, calcium and sodium chloride, waxes, bleach
and process chemicals are typical compounds which are potentially
corrosive.
If after inspection of the ventsystem you found sooting or deterioration,
something is wrong. Call the local gas utility to correct the problem and
clean or replace the flue and venting before resuming operation of the
water heater.
Flood damage to a water heater may not be reedilyvisible
or immediately
detectable. However, over a period of time a flooded water heater will
create dangerous conditions which can cause DEATH, SERIOUS
BODILY INJURY, OR PROPERTY DAMAGE. Contact a qualified installer
or service agency to replace a flooded water heater. Do not attempt to
repair the unit! It must be replaced!
At least once a year a visual inspection
burner and pilot burner, see Figure 16.
should be made of the main
ADANGER
Fire and Explosion Hazard
• Do not obstruct combustion
air
openings
at the bottom of the
water heater.
• Do not use or store flammable
vapor prodUcts such as gasoline,
solvents
or adhesives
in the
same room or area near water
heater or other appliance.
• Visibly inspect air intake screen
at least once every six months
and clean if accumulated
lint.
AT L.AST ONC. eVERY SIX _ONTHS A VISUAL
INS".CT,ON
SHOULD ••
_AD.
OF THE AIR
'IID_
SClfEEN.CUJUI IF UIIT ACCU_ULATlOliS
AR. "OTIC.D.
Aviano at Desert Ridge
INSTALLED IN SUITABLE AREA: To insure sufficient ventilation and
combustion air supply, proper clearances from the water heater must
be maintained.
See "Locating the New Water Heater" section.
Combustible materials such as clothing, cleaning materials, orflarnmable
liquids, etc. must not be placed against or adjacent to the water heater
which can cause a fire.
If after manually operating the valve, it fails to completely reset and
continues to release water, immediately close the cold water inlet to
the water heater, follow the draining instructions,
and replace the
temperature-pressure
relief valve with a newone.
If the temperature-pressure
relief valve on the appliance weeps or
discharges periodically, this may be due to thermal expansion.
You
may have a check valve installed in the water line or a water meter
with a check valve.
Consult your local water supplier or service
agency for further information. Do not plug the temperature-pressure
relief valve.
CAUTION
Property Damage Hazard
• Avoid water
• Inspection
heater
damage .
and replacement
of anode
rod required.
The anode rod is used to protect the tank from corrosion.
Most hot
water tanks are equipped with an anode rod. The submerged rod
sacrifices itself to protect the tank. Instead of corroding the tank,
water ions attack and eat away the anode rod. This does not affect
the water's taste or color. The rod must be maintained to keep the tank
in operating condition.
Anode deterioration depends on water conductivity, not necessarily
water condition. A corroded or pitted anode rod indicates high water
conductivity and should be checked and/or replaced more often than
an anode rod that appears to be intact. Replacement
of a depleted
anode rod can extend the life of your water heater. Inspection should
be conducted by a qualified technician, and at a minimum should be
checked annually after the warranty period.
• Keep
hands dear
of drain valve
discharge.
The water heater should be drained if being shut down during freezing
temperatures.
Also periodic draining and cleaning of sediment from
the tank may be necessary.
1. Tum the gas control knob to the "OFF" position.
2. CLOSE the cold water inlet valve to the water heater.
3. OPEN a nearby hot water faucet and leave open to allow for
draining.
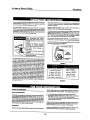
TEMPERATURE~RESSURE
REUEFVALVEOPERAnON
4. Connect
drain.
a hose to the drain valve and terminate
to an adequate
5. OPEN the water heater drain valve to allow for tank draining.
~
If the water heater Is going to be shut down and
drained for an extended period, the drain valve should be
left open with hose connected allowing water to terminate
to an adequate drain •
• Keep clear of relief valve discharge
6. CLOSE the drain valve.
outlet.
7. Follow instructions
in the "Filling The Water Heater" section.
8. Follow the lighting instructions on the label or see page 14 under
"Lighting Instructions· to restart the water heater.
The temperature-pressure
least once a year.
relief valve must be manually
operated
at
DRAIN VALVE WASHER REPLACEMENT
(See Figure 18)
1. Tum "OFF" gas supply to water heater.
2. Follow "Draining"
instructions.
3. Turning counterclockwise
screw handle.
4. Remove the washer
When checking the temperature-pressure
sure that (1) no one is in front of or around
pressure relief valve discharge line. and
will not cause any property damage, as
hot, see Figure 17.
relief valve operation, make
the outlet of the temperature(2) that the water discharge
the water may be extremely
«(' l, remove
the hex cap below the
and put the new one in place.
5. Screw the handle and cap assembly back into the drain valve and
retighten using a wrench. DO NOT OVER TIGHTEN.
Aviano at Desert Ridge
8. Follow the IighUng instructions in the "UghUng" section to restart the
water heater.
If a condition persists or you are uncertain
.
~-~
~
about the operation of the
water heater contact a service agency .
.•••. HANDLEAND
CAP ASSEMBLY
Use this gUide to check a "Leaking" water heater. Many suspected
"Leakers" are not leaking tanks. Often the source of the water can be
found and corrected.
If you are not thoroughly
familiar with gas codes, your water heater.
and safety practices, contact your gas supplier or qualified installer to
check the water heater.
Read this manual first. Then before checking the water heater make
sure the gas supply has been turned "OFF", and never tum the gas
"ON" before the tank is completely full of water.
Never use this water heater unless it is completely filled with water. To
prevent damage to the tank, the tank must be filled with water. Water
must flow from the hot water faucet before turning "ON" gas to the
water heater.
A. Water at the draft hood is water vapor which has condensed out of
the combustion products. This is caused by a problem in the vent.
Contact the gas utility.
B. ·Condensation
may be seen on pipes in humid weather
connections may be leaking.
or pipe
D. Small amounts of water from temperature-pressure
relief valve
may be due to thermal expansion or high water pressure in your
area.
E
*The temperature-pressure
fitting.
relief valve may be leaking at the tank
F. Water from a drain valve rnay be due to the valve being slighUy
opened.
H Combustion products contain water vapor which can condense on
the cooler surfaces of the tank. Droplets form and drip onto the
burner or run on the floor. This is common at the time of start-up
after installation and when incoming water is cold.
Water in the water heater bottom or on the floor may be from
condensation, loose connections. a the relief valve. DO NOT replace
AWARNING
Read and understand instruction
manual
and safely
messages
before
installing,
operating
or
servicing this water heater.
Failure to follow instructions and
safely messages could result in
death or serious injury.
Instruction
Manual
With water heater.
must remain
the water heater until a full inspection of all possible water sources
is made and necessary corrective steps taken.
Leakage from other appliances, water lines, or ground seepage should
also be checked.
•
To check where threaded portion enters tank, insert cotton swab
between jacket opening and fitting. If cotton is wet, follow "Draining"
Instructions in the "Periodic Maintenance" section and 1hen remove
fitting. Put pipe dope or tefton tape on the threads and replace.
Then follow "Filling the Water Heater" instructions in the "Inslalling
the New Water Heater" section.
Aviano at Desert Ridge
These guidelines
should be utilized by a qualified service agent. When calling for service notify the service agent
that this is a "Aammable
Problem
WATER LEAKS
Vapor Ignition Resistanr
Cause
Solution
Improperly sealed, hot or cold supply connection,
Tighten threaded connections.
relief valve, drain valve, or thermostat threads.
Leakage from other appliances or water lines.
Condensation of llue products.
Thermal expansion
LEAKING T&P VALVE
Product.
in closed water system.
Improperly seated valve.
Inspect other appliances
near water heater.
Refer to CONDENSATE.
Install thermal expansion tank (DO NOT plug T&P valve).
Check relief valve for proper operation
(DO NOT plug T&P valve).
High sulfate or mineral content in water supply.
Drain and flush heater thoroughly, then refill.
Bacteria in water supply.
Chlorinate or aerate water supply.
SMELLY ODORS
Gas control knob not positioned correctly.
Refer to LIGHTING INSTRUCTIONS.
Main gas supply off.
Tum on main gas Shut-ott valve.
Igniter tip more then 1/8" from pilot hood.
Adjust ignitor tip.
Thermocouple
malfunction.
Replace pilot assembly.
Thermocouple
TCO malfunction.
Replace pilot assemblv.
Melted insulation on ignitor wire or shorting
PILOT WILL NOT LIGHT
Contact a service agency to determine cause.
of ignitor wire.
High ambient room temperature.
l,;ontact a service agency to determine cause.
Wire disconnected
Reconnect wire connector
from spark ignitor.
to spark ignitor.
Broken electrode or electrical wire.
Reolace cilot assemblY.
Piezo Ignitor generator fails to operate or
Replace Pieza Ignitor generator.
malfunctions.
Thermocouple
TCO malfunction.
High ambient room temperature.
Replace pilot assembly.
Contact a service agency to
determine cause.
BURNER WILL NOT
Dirty or clogged air intake screen.
Clean and reinstall air intake screen.
STAY LIT
Flame arrestor openings blocked.
Contact a service agency to
determine cause.
PILOT OUTAGE
Defective Gas Control.
Replace Gas Control.
Dirty pilot bumer.
Clean pilot assembly.
Dirty or clogged air intake screen.
Clean and reinstall air intake screen.
Thermocoucle
tic is not in contact with cilot llame.
Insert thermocouDle
Thermocoucle
malfunction.
Replace pilot assembly.
Thermocouple TCO malfunction.
DefectiVe Gas Control.
HOT WATER
Replace pilot assemblv.
Replace Gas Control.
Heater not lit or thermostat not on.
Refer to LIGHTING INSTRUCTIONS.
Thermostat
Refer to TEMPERATURE REGULATION.
set too low.
Heater undersized.
NOT ENOUGH
correctlv.
Reduce hot water use.
Low gas pressure.
Contact your gas supplier.
Incoming water is unusually cold.
Allow more time for heater to re-heat.
Leaking hot water pipes or fixtures.
Have plumber check and repair leaks.
High temperature
Contact a service agency to
limit switch activated.
determine cause.
WATER TOO HOT
WATER HEATER SOUNDS
SIZZUNG-RUMBUNG
SoonNG
Thermostat
set too high.
Condensation
dripping on burner.
Refer to TEMPERATURE REGULATION.
Refer to CONDENSATE
above.
Sediment or calcium in bottom of heater tank.
Clean sediment from tank. Refer to DRAINING
Improper combustion.
No adjustment available. Contact a service agency
instructions in Maintenance
section of manual.
to determine cause.
Lack of suoolv air.
Improperly installed vent piping.
VENT GAS ODORS
Downdraft.
Poor combustion.
Contact a service agency to determine cause.
Aviano at Desert Ridge
Aviano at Desert Ridge
GSD Models
• 1000
• 1200
• 1900
.2000
.2001
.2200
.2201
.2600
.2700
.3200
.3400
.3500
.3600
.3700
.3800
.3900
.4000
.4200
.4500
.5400
.5500
.6000
.5700
.5900
.6100
.6200
.6300
.6500
.6600
.6700
.6760
.6800
.6900
PDWModels
.7300
.7380
.7700
.7800
.7880
.8000
.8060
.8100
.8200
.8280
.8400
.8480
.8500
.8600
.8700
.8800
.8880
.9200
.9280
.9700
.9800
• 9880
Appliances
Other Models
• EDW 3000
• EDW 4000
• EDW 4060
• GHDA 960
• GHDA 980
• GSS 1800
• GSS 2000
• SSD 4900
Aviano at Desert Ridge
Appliances
IMPORTANT SAFETY INFORMAnON.
READ AU INSTRUcnONS BEFOREUSING.
AWARNINGI
For your saftlty, the information in this manual must be followed to minimize the risk af fire
or explosion, electric shock, or to prevent propetty damage, personal injury, or death.
Under certain conditions hydrogen gas may be produced in a water heater that has not been used for
two weeks or more. HYDROGENGAS IS EXPLOSIVE.
If the hot water has not been used for two weeks or more, prevent the possibility of damage or injury
by turning on all hot water faucets and allow them to run for several minutes. Do this before using any
electrical appliance which is connected to the hot water system. This simple procedure will allow any
built-up hydrogen gas to escape. Since the gas is flammable, do not smoke or use an open flame or
appliance during this process.
PROPER INSTALLATION AND MAINTENANCE
This dishwasher must be properly installed and located in accordance with the Installation
Instructions before it is used. If you did not receive an Installation Instructions sheet with
your dishwasher, you can receive one by visiting our website at GEApp/iBnCes.com.
• Connect to a grounded metal, permanent
wiring system; or run an equipmentiVOunding
conductor with the circuit conductors and
connect to the equipment-grounding terminal
or lead of the appliance.
• Improper connection of the equipmentgrounding conductor can result in a risk of
electric shock. Check with a qualified electrician
or service representative if you are in doubt
whether the appliance is properly grounded.
• Use supply conductors
(167°F).
rated at least 75°C
• Dispose of discarded appliances and shipping
or packing material properly.
• Do not attempt to repair or replace any part
of your dishwasher unless it is specifically
recommended in this manual. All other
servicing should be referred to a qualified
technician.
• To minimize the possibility of electric shock,
disconnect this appliance from the power
supply before attempting any maintenance .
N07ETuming the dishwasher off does not
disconnect the appliance from the power
supply. We recommend having a qualified
technician service your appliance.
AWARNINGI
DO NOT. ..
• Do not tamper with controls.
• Do not abuse, sit on, or stand on the door or
dish rack of the dishwasher.
• Do not discard a dishwasher without first
removing the door of the washing compartment.
• Do not store or use combustible materials,
gasoline or other flammable vapors and liquids
in the vicinity of this or any other appliance.
• Do not allow children to play around dishwasher
when opening or closing door due to the
possibility of small fingers being pinched in door.
• Do not allow children to play with, on or around
this appliance or any discarded appliance.
Aviano at Desert Ridge
Caring for the dishwasher.
To clean the control panel use
appliance polish.
a lightly dampened cloth then dry thoroughly. To clean the exten'or use a good
Never use sharp object, scouring pads or harsh cleaners on any part of the dishwasher.
Protect Against Freezing
If your dishwasher is left in an unheated
place during the winter, ask a service
technician to:
Cut off electrical power to the
dishwasher. Remove fuses or
trip circuit breaker.
IIDrain water from the inlet line and water
valve. (Use a pan to catch the water.)
•
•
Reconnect the water inlet line to the
water valve.
11Remove the plastic sump cover in the
tub bottom and use a sponge to soak up
water in the rubber boot
I:Turn off the water supply and
. .~.disconnect the water inlet line from
the water valve.
Does Your Dishwasher Have an Air Gap?
An air gap protects your dishwasher against
water backing up into it if a drain clogs.
The air gap is not a part of the dishwasher.
It is not covered by your warranty. Not all
plumbing codes require air gaps, so you
may not have one.
Check the air gap any time your
dishwasher isn't draining well.
ThBair'BfI is BIISYto clBan.
•
Turn off the dishwasher and lift off the
chrome cover.
Unscrew the plastic cap and clean with
a toothpick.
Aviano at Desert Ridge
Before you call for service ...
?
•
Troubleshooting Tips
Save time and money! Review the charts on the following pages,
or visit GEApplisRCss.com. You may not need ta call far service.
~
Problem
Dishwuhe,
wonlrun
Noi.
Fuse is blown, or the
circuit breaker tripped
• Replace fuse or reset circuit breaker. Remove any other appliances
from the circuit
Some of che sounds
• Soft food disposal shredding action.
• Drain valve opening to pump water out.
• Timer control as cycle progresses.
• Detergent cup opening.
• The motor stopping during the drying period.
you'D hear are normal
Utemils are not secure
in the rack or something
small has dropped into
cherack
• Make sure everything is secured in dishwasher.
• Dishwasher has not been used on a regular basis. If you do not use
your dishwasher often, set it to fill and pump out once every week.
This will help keep the seal moist and the garbage disposer dear.
Wsw standing in
• A small amount of clean water around the oudet on the tub bottom
at the back of the tub keeps the water seal lubricated.
the botIDm of the tub
WatBr wonl pump
DIll
• If you have an air gap, clean it
• Check to see if your kitchen sink is draining well. If nol. you may need
a plumber .
• If the dishwasher drains into a disposer, run disposer clear.
of the tub
Correct detergent
wasn't used
• Use only automatic dishwasher detergents to avoid sudsing. Cascade~,
Cascade- Complete and Electrasol~ Automatic Dishwashing
Detergents have been approved for use in all GE dishwashers.
• To remove suds from the tub, open the dishwasher and let suds
evaporate. Add 1 gallon of cold water to the tub. Close and latch the
dishwasher. Pump out water by slowly turning the Dial until a drain
period is reached. Repeat if necessary.
Rinse agent
was spilled
• Always wipe up rinse agent spills immediately.
Detergent with
colorant was used
• Some detergents contain colorant (pigment or dyes) that will discolor
the tub interior with extended use. Check the detergent cup for signs
of any discoloration. If cup is discolored, change to detergent without
any colorant Cascade~, Cascade~ Complete and ElectrasoP
Automatic Dishwashing Detergents have been approved for use
in all GE dishwashers.
Some tomato-based
foods can stain
• Use of the RINSE ONLY cycle (on some models) after adding the dish
to the load can decrease the level of staining.
Low inlet water
temperature
• Make sure inlet water temperature
Rinse agent dispenser
is empty
• Check the rinse agent dispenser.
is correct
Aviano at Desert Ridge
Before you call for service ...
Problem
Dishes end fllltWere
notc/een
Inlet water temperature
is below 120"F.
• Raise the water heater temperature
• Use the HOTSTARTfeature.
Water pressure is
temporarily low
• Turn on a faucet. Is water coming out more slowly than usual?
If so, wait until presl;ure is normal bt.>fore w.ing your dishwasher.
Air gap is clogged
• Clean the air gap.
Improper
• Make sure large dishware does not block the detergent dispenser or
the wash arm.
rack loading
Spots end filming
end
Extremely bard water
fllltWtlre
Low inlet water
temperature
on glllSSfIS
Overloading
dishwasher
Improper
the
loading
Old or damp powder
detergent
Rinse agent dispenser
empty
Too little detergent
Cloudiness on
glllSSWllre
to 120°F.
• Use Jet-Drye rinse agent to remove spots and prevent new fihn
build-up.
• To remove stubborn spots and pre-existing film from glassware:
, Remove all metal utensils from the dishwasher.
Z Do not add detergent.
3 Select the longest cycle.
4 Start the dishwasher and allow to run for 18 to 22 minutes.
DishwdSher ",ill now be in the main wash.
5 Open the door and pour 2 cups (500 ml) of white vinegar into the
bottom of the dishwasher.
6 Close the door and allow to complete the cycle. If vinegar rinse
doesn't work; Repeat as above, except use 1/4 cup (60 ml) of dtric
add crystals instead of vinegar.
Combination of soft
water and too much
detergent
• This is called etching and is permanent
To prevent this from
happening, use less detergent if you have soft water. Wash glassware
in the shortest cycle that will get them clean.
Water temperature
entering the dishwasher
exceeds 150°F.
• Lower the water heater temperature.
Yellow Dr brown film
onlUb
• Remove the stain by hand, using a solution of 1/2 cup bleach and
3 cups warm water.
A WARNING
Before cleaning interior, wait at least 20 minutes after a cycle for the
heating element to cool down. Failure to do so can ~"Ult in burns.
An overall yellow or
brown film am be
caused by iron deposits
in water
White film on inside
• To clean the interior. apply dishwasher detergent to a damp sponge.
Wear rubber gloves. Do not use any type of cleanser other than
dishwasher detergent because it may cause foaming or sudsing.
Cascadell, C.ascade* Complete and Electrasol4D Dishwashing
Detergents have been approved for use in all GE dishwashers.
surfaces
Detllrgent cup lid
• A special IDter in the water supply line is the only way to correct this
problem. Contact a water softener company.
• Turn the Dial to OFF and slide the door latch to the left.
won'tletch
Dial is not in the
DFfposition
Detergent /eft in
dispellS8f cups
Dishes are blocking
the detergent cups
Steam
This is normal
BlecIc or gray
Aluminum utensils have • Remove marks with a mild, abrasive cleaner.
IIIBI1cs on disha
nabbed against dishes
• Steam comes through the vent by the door latch during drying and
when water is being pumped out.
Aviano at Desert Ridge
BE Dishwasher Warrant}'.
~
.
All warranty service provided by. our Factory Service Centers,
or an authorized Customer Care@technician. Toschedule service,
on-line, 24 hours a day, visit us at GEAppliances.com, or call
8OO.G£CARES (800.4322737).
For The Period Of:
Staple your receipt here.
Proof of the original purchase
date is needed to obtain service
under the warranty.
GE Will Replace:
One Year
From the date of the
original purchase
Any plUtof the dishwasher which fails due to a defect in materials or workmanship. During
this full one-year WBIJ'lInty, GE will also provide, free of charge, all labor and in-home service
to replace the defective part.
SecDndYear
From the date of the
original purchase
Any pal1 of the Water Distribution System which fails due to a defect in materials or workmanship.
Associated inlet and drain plumbing parts are not covered by this warranty. During this
second-year limited wamtnty, you will be responsible for any labor or in-home service costs.
Ten YeBIS
From the date of the
original purchase
The Perms Tuf~ tub or door lilllll; if it fails to contain water due to a defect in materials or
workmanship. During this full WIllTllnty, GE will also provide, tree of charge, all labor and
in-home service to replace the defective part.
• Service trips to your home to teach you how to
use the product.
• Damage to the product caused by accident, f'Jre,
floods or acts of God.
• Improper installation.
.lncidental or consequential damage caused by
possible defects with this appliance.
• Failure of the product if it is abused, misused, or
used for other than the intended purpose or used
commercially.
• Cleaning or servicing of the air gap device in the
drain line.
• Replacement of bouse fuses or resetting of circuit
breakers.
This warranty is extended to the original purchaser and any succeeding owner for products purchased for home
use within the USA. In Alaska, the warranty excludes the cost of shipping or service calls to your home.
Some states do not allow the exclusion or limitation of incidental or consequential damages. This warranty gives
you specific legal rights, and you may also have other rights which vary from state to state. To know what your
legal rights are, consult your local or state consumer affairs office or your state's Attorney General.
Aviano at Desert Ridge
Consumer Support.
m-,'d:
GE Appliances Website
,.,l,
<;.~
.•..
..f'."'.."'.
~
,
Have a question or need assistance with your appliance? 1ry the GE Appliances Website 24 hours a day,
any day of the year! For greater convenience and faster service, you can now download Owner's Manuals,
order parts, catalogs, or even schedule service on-line. You can also "Ask Our Team of Experts""
your questions, and so much more ...
GEAppliances.com
~...•
,:-':','
Expert GE repair service is only one step away from your door. Get on-line and schedule your service at
your convenience 24 hours any day of the year! Or call 800.GE.CARES (800.432.2737) during normal
business hours.
Real Life Design Studio
GE supports the Universal Design concept-products,
services and environments that can be used by
people of all ages, sizes and capabilities. We recognize the need to design for a wide range of physical and
mental abilities and impairments. For details ofGE's Universal Design applications, including kitchen
design ideas for people with disabilities, check out our Website today. For the hearing impaired, please call
800.TDD.GEAC (800.833.4322).
Purchase a GE extended warranty and learn about special discounts that are available while your warranty
is still in effect. You can purchase it on-line anytime, or call 800.626.2224 during normal business hours.
GE Consumer Home Services will still be there after your warranty expires.
Individuals qualified to service their own appliances can have parts or accessories sent directly to their
homes (VISA, MasterCard and Discover cards are accepted). Order on-line today, 24 hours every day or
by phone at 800.626.2002 during normal business hours.
Instructions contained in this mlJlWal cover procedures to be petfomred by My 1IStIr. 0t1uIr stIIlIicing generally
should be refrmed to qualified _mce personnel. CaUlion must be exercised. since improper stIIlIicing may ceuse
IlRSllfe openllion.
If you are not satisfied with the service you receive from GE, contact us on our Website with all the details
including your phone number, or write to: General Manager, Customer Relations
GE Appliances, Appliance Park
Louisville, K.Y40225
Register Your Appliance
Register your new appliance on-line-at your convenience! Timely product registration will allow for
enhanced communication and prompt service under the terms of your warranty, should the need arise.
You may also mail in the preprinted registration card included in the packing material.
Aviano at Desert Ridge
IMPORTANT SAFETY INFORMATION.
READ ALL INSTRUCTIONS BEFORE USING.
AWARNINGI
For your safety, the information in this manual must be followed to minimize the risk of fire or explosion,
electric shock, or to prevent property damage, personal injury, or loss of life.
11 WARNING ANTI- TIP DEVICE
All ranges can tip and injury could rasult
Toprevent accidental tipping of the range; attach
it tothe wall by installing the Anti-lip device
supplied.
If the Anti-lip device supplied with the range does
not fit this application, use the universal Anti-lip
device W82X7909.
To check if the device is installed and engaged
properly, carefully tip the range forward. The
..Anti-lip device should engage and prevent
the range from tipping over.
If you pull the range out from the wall for
any reason, make sure the device is properly
engaged when you push the range back ag'.llnst
the wall. If it is not, there is a possible risk of the
range tipping over and causing injury if you or
a child stand, sit or lean on an open door.
Please refer to the Anti-Tip device information
in this manual. Failure to take this precaution
could result in tipping of the range and injury.
IMPORTANT SAFETY NOTICE
The California Safe Drinking Water and Toxic
Enforcement Act requires the Governor of
California to publish a list of substances known
to the state to cause cancer, birth defects or other
reproductive harm, and requires businesses to
warn customers of potential exposure to such
substances.
The fiberglass insulation in self-clean ovens gives
off a very small amount of carbon monoxide during
the cleaning cycle. Exposure can be minimized by
venting with an open window or using a ventilation
fan or hood.
Aviano at Desert Ridge
Adjust the oven thermostat-Easy to do yourself!
Youmay find that your new oven cooks differently than the one it replaced. Use your new oven for a few weeks to
become more familiar with it If you still think your new oven is too hot or too cold, you can adjust the thermostat yourself.
Do not use thermometers, such as those found in grocery stores, to check the temperature settmg of your oven. These
thermometers may vary 2fJ-4I)0F.
NOTE: This adjustment will not affect the broiling orthe self-cleaning temperatures (on some models). The adjustment
will be retained in memory after
a power failure.
To Adjust the Tbennostat with this Type of Knob
[f] lighten
[l] Pull the Oven Temp knob off the
shaft, look at the back of the knob and
note the current setting before making
any adjustments.
[£]
Front of OVEN TEMP knob
{knob .ppa.ranc.
may vsry}
G!]
~
the screws.
Replace the knob, matching the flat
area of the knob to the shaft.
Loosen both screws on the back of
the knob.
To ;1fC1fI1fSe the oven temperature,
move the pointer toward the words
-MAKE HOrrER.To decrelfSe the oven temperature,
turn the pointer toward the words
-MAKE COOLER.Each notch changes the temperature
by 10°F.
To Adjust the Thennostat on Other Models
IIJ Touch
the BAKE and BROILHIIlO pads
at the same time for 2 seconds until
the display shows SF.
[£]
.
G!]
Touch the BAKE pad. A two digit
number shows in the display.
·
d
Th e oven temperature
.
can be adyuste·
up to (+) 35°F hotter or (_) 35"F
cooler. Touch the + pad to increase the
temperature in 1 degree increments.
[f]
When you have made the adjustment,
touch the STARTION pad to go back to
the time of day display. Use your oven
as you would normally.
NOTE: "nlis adjustment wil} not affect the broiling
or self-cleaning temperatures. It will be retained
ft<
fa l
mmemorya erapower
lure.
Touch the -pad to decrease the
temperature in 1 degree increments.
The type of margarine· will affect baking performance!
Most recipes for baking have been
developed using high fat products such
as butter or margarine (80% fat). If you
decrease the fat the recipe may not
give the same results as with a higher
fat product.
Recipe failure can result if cakes, pies, pastries,
cookies or candies are made with low fat spreads.
The lower the fat content of a spread product the
more noticeab{e these differences become.
Federal standards require products labeled
"margarine" to contain at least 80% fat by
weight. Low-fat spreads, on the other hand,
contain less fat and more water. The high
moisture content of these spreads affects
the texture and flavor of baked goods. For
best results with your old favorite recipes,
use margarine, butter or stick spreads
containing at least 70% vegetable oil.
Aviano at Desert Ridge
Using the self-cleaning oven. (on some models)
Never force the latch handle. Forcing the handle will damage the door lock mechanism.
The oven door must be closed and all controls set COfTf1ctfyfor the cycle to· work properly.
Before"
Cleen Cycle
For the first self-clean cycle, we recommend
venting your kitchen with an open window
or using a ventilation fan or hood.
Remove the shelves, broiler pan, broiler
grid, all cookware and any aluminwn foil .
from the oven.
Wip. up hfSVY soH on th. ov.n
bottom.
The oven. shelves can be self-eleaned,
but they will darken, lose their luster
and, become hard to slide.
Do not use commercial oven cleaners or
oven protectors in or near the self-cl~g
oven. A combination of any of these
produc~ plus the high clean cycle
temperatures may damage the porcelain
finish of the oven.
Soil on the: front frame of the range and
ou~ide the gasket on the door will need
to be cleaned by hand. Qean these areas
with hot water, soap4illed steel-wool pads
or cleansers such as Soft Scrub~
Rinse well with clean water and dry.
Do not clean the gasket The fiberglass
material of the oven door gasket cannot
withstand abrasion. It is essential for the
gasket to remain intact. If you notice it
becoming worn or frayed, replace it
Wipe up any heavy spilloverson
bottom.
the oven
Make sure the oven light bulb cover is in
place and the oven light is off.
CAUTION: ."",,,.,.tmdddp,,.,,.
(on.",.
motIels) BhouIdntMr be clftned in
th••• H-cI•• ning
Do not
•••
prt1IrJCtDIS
0""'-
cDllllntll'CI., DWln clune,.
Dr DWIII
in Drnu, the NIf-e/ •• ning IMJIJ.
A combination of any of these produw
plus the high clean cycle temperatures may
damage the porcelain finish of the oven.
IMPORTANT: The health of some birds is
extremely sensitive to the fumes given off
during the self-cleaning cycle of any range.
Move birds to another well ventilated room.
How to Set the Oven for Cleaning
Follow the directions in the Before a Clean
Cycle section.
[l]
Latch the door.
NOTE: Never force the.lateh. If the oven is
too hot, you will not be able to slide the
latch. Allow the oven to cool.
I£]
[JJ
Touch the SEUCLEAN pad.
Touch the + or - pads until the
desired Qean Time is displayed.
The Clean TIITI6 is normally 4 hours and 20 minl1te$.
Youcan change the Clean Time to any time between
3 and 5 hours, depending on the amount of soil in
your
~
0'i9ll.
Touch the STARTION
pad;
. The self-clean cycle.will automatically
begin after CI.EAN is displayed and the time
countdown appears in the display.
While the
.touch the
of day. To
touch the
oven is self-cleaning, you can
CWCK pad to display the time
return to the clean countdown,
SEUctEANpad.
The oven shu~ off automatically when the
clean cycle is complete, and 0:00 will flash
in. the display.
[Q]
Slide the latch handle to the left as fur
as it will go and open the door.
Appliances
The oven door must be closed and aI/controls set correctly for the cycle to work properly.
How to DBlay the Start of Cleaning
Change the Start TIfTI8 by touching the + or - pads.
The start time will appear in the display.
You can set the oven control to delay-start the oven.
clean for a specific length of time and then tum off
automatically.
[QJ
Make sure the clock shows the correct time
of day.
The self-clean cycle will automatically begin
at the time set
Follow the directions in the Before a Clean
CYcle section.
While the
touch the
of day. To
touch the
[l]
Latch the door.
NOTE: Never force the latch. If the oven is
too hot, you will not be able to slide the
, latch. Allow the oven to cool.
[£]
Touch the SElF CLEAN pad.
G1]
Touch the .,. or - pads to set the
Clean Tune.
The Clean Time is preset for 4 hours and 20 minutes.
You can change the Clean Time to any time between
3 and 5hours. depending on the amount of soil in
your oven If a different Clean Time is desired. touch
the + or - pads until the desired Clean Time is
displayed.
[fJ
Touch the STAlfTION pad.
oven is self-cleaning. you can
CLOCK pad to display the time
return to the clean countdown.
SELF CI.!AN pad.
The oven shuts off automatically when the
clean cycle is complete, and 0:00 will flash
in the display.
~
Slide the latch handle to the left as far
as it will go and open the door.
Touch the START nME pad.
To Stop a Clean Cycle
Touch the CLEANOff'pad.
Wait until the oven has cooled below the
locking temperature to unlatch the door.
You will not be able to open the door right
away unless the oven has cooled below the
locking temperature.
After a Clean Cycle
You cannot set the oven for cooking until
the oven is cool enough for the door to be
unlatched.
• You cannot set the oven for cooking \lJltil
the oven is cool enough for the door
to unlock.
You may notice some white ash in the oven.
Wipe it up with a damp cloth after the
oven cools.
• While the
touch the
of day. To
touch the
If lMIite spots remain, remave them with a soapfilled steel-wool pad and rinse thoroughly with
a vinegar and water mixture.
These deposits are usually a salt residue
.that cannot be removed by the clean cycle.
If the oven is not clean after one clean
cycle, repeat the cycle.
oven is self-deaning, you can
CWCK pad to display the time
return to the clean countdown,
COOKING 11MEpad.
• If the shelves become
apply a small amount
cooking oil to a paper
the edges of the oven
paper towel.
hard to slide,
of vegetable oil or
towel and wipe
shelves with the
Aviano at Desert Ridge
Carel!"d cleaning of the range. ,
Be sure electrical power is off and all surfaces are cool before cleaning any part of the range.
If your range is removed for cleaning,
servicing or any reason, be sure the
anti-tip device isre-engaged properly
Oven Interior
(non-self clean models)
With proper care, the porcelain enamel
finish on the inside of the oven-top,
bottom. sides, back and inside of the doorwill stay new-looking for years.
Let the range cool before cleaning, We
recommend that you wear rubber gloves
when cleaning the range.
Soap and water will nonnally'do the job.
Heavy spattering or spilloveilimay require
cleaning with a mild abrasive cleaner.
.Soap-tilled scouring pads may also be used.
.•
Do notallow food spills with a high
sugar or acid content (such as milk.
tomatoes, sauerkraut fruit juices or
, pie filling) to remain on the surface. They may
.cause a dullspot even after cleaning.
Household ammonia may make the
cleaningjob easier. Place 1/2 cup in a
shallow glass or pottery container in a cold
Lift the door stnIight up ,nd off /h,
hinges-
8Bc'11$B /h, firs, insid, the g,skBt is
cIB,,,,d during the sBlf·clHn eye/"
you do II9t n"t! to clHn this by h,nd
on sBlf-eiBBn mod.
ThII ,,,, ouWd, the g,skBt ,nd the
front fnIme c,n b, c!e,,,,d with"
SOBp·fillBd ste/·wooIpad,
hot WIrtlrr
.nd d.t.rpsllt. Rinse weD with,
vinBgBr,nd wetBr solution.
00 notrub 'oT/;/tJ,n the door '
gask,Ht hlS.,n BXtr8mtJly low
fI1SistBnc, to ,brlIsion.
"you
nalictJ /htJ g,skBt btJcoming
worn, frayed or d,maged in any wel\
or if it hIS b,coms disp!actJd on /h,
door, you should have/t repJ,ctJd.
oven overnight The ammonia fumes will
help loosen the burned'on grease and food.
If necessary. you may use an oven cleaner.
Follow the package directions.
Do not spray oven cleaner on the electrical controls
and switches because it could cause a short circuit
and result in sparking or fire.
Do not allow a film from the cleaner to build up on
the temperature sensor-it could cause the oven to
heat improperly. (The sensor is located at the toP of
the oven.) Carefully wipe the sensor clean after each
oven cleaning, being careful not to move the sensor
as a change in its position could affect how the
oven bakes.
Do not spray any oven cleaner on the oveil door.
handles or any exterior surface of the oven, cabinets
or painted surfaces. The cleaner can damage these
SUlfaces.
'
The oven door is removable for cleaning.
To cl•• n the oUlside 01the door:
Do not lift the door by the handle. Make sure the
oven is compfetely cool
• Use soap and water to thoroughly clean
the top, sides and front of the oven door.
Rinse well. You may also use a glass
cleaner to clean the glass on the outside
of the door. Do not let water drip into the
vent openings.
To ffIIIft1IIfIlhe door,open it to the special
stop position. Grasp finnly on each side and
lift the door straight up and off·the hinges.
Do not place hands between the hinge and the oven
door frame.
ThII g,sk,t is design,d with , g,p
It the bottom to ,1Iow for proper
air circuIBtion.
when the range is replaced. Failure
to take this precaution could result in
tipping of the range and CBuse injury.
To repl1lcelhe door.make sure the hinges
are in the special stop position. Position
the slots in the bottom of the door ~uarely
over the hinges and slowlylower it over
both hinges.
To c/elllllhe ;lI$ideoilhe door:
• Do not allow excess water to run into any
holes or slots in the door.
• Soap and water will normally do the job.
Heavy spattering or spilloveili may require
cleaning with a mild abrasive cleaner.
Soap-tilled, steel-wool pads may also
be used.
Do not affow food spills with a high sugar or acid
content (such as milk. tomatoes, sauerkraut fruit
juices orpie tiffing) to remain on the surface. They
may cause a dull spot even after cleaning.
• Spillage of marinades, fruit juices. tomato
sauces and bilSting materials containing
acids may cause discoloration and should
be wiped up immediately. When surface
is cool, clean and rinse.
.Do not use oven cleaners; cleaning
powdeili or haIllh abrasives on the
outside of the door.
Aviano at Desert Ridge
Oven Heating Elements
Do not clean the bake element or the broil element
Any soil will bum off when the elements are heated.
To clean the oven floor, gently lift the bake
element Dean with w.mn soapy water.
Dean the oven shelves with an abrasive
cleanser or scouring pad. After cleaning,
rinse the shelves with clean water and diy
with a clean cloth.
To make the shelves slide more easily, apply
a small amount of vegetable oil or cooking
oil to a paper towel and wipe the edges of
the oven shelves with the paper towel.
NOTE:Take the shelves out of the oven
before you bt:gin the self-clean cycle or
they may discolor.
Oven Ught Replacement
(on some models)
CAUTION: Before replacing your oven light
bulb, tum the oven light off and disconnect the
electrical powsr to the range at the main fuse
or circuit breaker panel.
Be sure to let the light cover and bulb cool
completely.
To remove the cover.
II]Hold
a hand under the cover so it
doesn't fall when released. With fingers
, of the same hand, fum1y push back the
wire cover holder. Lift off the cover.
Do not remove any screws to remove the cover.
1£1 Replace
bulb with a 4O-watthousehold
appliance bulb.
To I8plllCflths cover.
II]Place it into groove of the light
receptacle. Pull wire forward to the
center of the cover until it snaps
into place.
1£1 Connect
electrical power to the range.
Aviano at Desert Ridge
Care and cleaning of the range.
Broiler Pan & Grid.
After broiling, rtmIOlIfI the b/T)J71H
psn
from the
Olllln.
Do not clean the broiler pan or grid in a
self-cleaning oven.
After broiling, remove the broiler pan from
the oven. Remove the grid from the pan.
Carefully pour out the grease from the pan
into a proper container.
The broiler pan may be cleaned with a
commercial oven cleaner. If the grid is grey
enamel, it can also be cleaned with an oven
cleaner.
Both the broiler pan and grid can also be
cleaned in the dishwasher.
Wash and rinse the broiler pan and grid
in hot water with a soap-filled or plastic
scouring pad.
Do not store a soiled broiler pan and grid anywhere
in the range.
If food has burned on, sprinkle the grid
with detergent while hot and cover with wet
paper towels or a dishcloth. Soaking the
pan will remove burned-on foods.
Do not clean the broiler
pan or grid in a self-cleaning oven.
A CAUTION:
Storage Drawer Removal
To temDVfI thB 810"". dlflwer.
To lf1pllJCt1 thB Btor8g. dlflwer.
[l] Pull
[l] Insert
the drawer out all the way.
glides at the back of ~e drawer
beyond the stop on range glides.
[£] Uft
the drawer if necessary to insert
easily.
.
~
Let the front of the drawer down, then push in to close.
Control Panel and Knobs
It's a good idea to wipe the control panel
after each use of the oven. Use a damp
cloth to clean or rinse. For cleaning, use
mild soap and water or a 50/50 solution of
vinegar and water. For rinsing, use clean
water. Polish dry with a soft cloth.
Da not use abrasive cleansers, strong liquid
cleaners, plastic scouring pads or oven
cleaners on the control panel-they
will
damage the finish.
The control knobs may be removed for
easier cleaning.
To remove a knob, pull it straight off the
stem. If a knob is difficult to remove, place
a towel or dishcloth between the knob and
control panel and pull gently. Wash the
knobs in soap and water or a vinegar and
hot water solution.
Before removing the knobs for cleaning,
please note that the knobs are in the OFF
position. When replacing the knobs, check
the OFF position to ensure proper placement.
Do not bend knobs by pulling them up or
down or by hanging a towel or other such
loads. This can damage the shaft.
Aviano at Desert Ridge
POfCBlain
Enalllfli
Cooktop
(on some models)
The porcelain enamel finish is sturdy
but breakable if misused. This finish is
acid-resistant. However, any acidic foods
spilled (such as fruit juices, tomato or
vinegar) should not be permitted to remain
on the finish.
Be lUre ell surface units are rumed
off before raising the coolctDp.
IT acids spill on the cooktop while it is hot,
use a dry paper towel or cloth to wipe it up
right away. When the surfuce has cooled;
wash with soap and water. Rinse well.
-
For other spills such as fat spatterings, wash
with soap and water or cleansing powders
after the surface has cooled. Rinse well.
Polish with a dry cloth.
Some models have a cooktop that can be
lifted up for easier cleaning. The entire
cooktop may be lifted up and suppOrted
in the up position.
After cleaning under the cooktop with hot,
mild soapy water and a clean cloth, lower
thecooktop. Be careful not to pinch your
fingers.
The surface units do not need to be
removed; however, you may remove one to
make raising the cooktop easier. There are
two side supports that lock into position
whe~ the cooktop is lifted up.
To lower the cooktop, push the rods back
and gently lower the cooktop until it rests
in place.
NOTE: Do not lift the cooktop on radiant top models.
Lifting the cooktop can lead to damage and improper
operation of the range.
Surface Units (on some models)
Be sure all the controls are tumed to OFFand the
surface units are cool before attempting to remove
them.
To clean the surface units, turn the control
to the highest setting for a minute. The coils
will bum off any soil.
To IfII1WVII a $llf{aCfl unit
To remove the drip pans for cleaning, the
surface units must be removed first
Lift the surface unit about 1 inch above the
drip pan and pull it out
Do not lift the surface unit more than r. If you do,
it may not lie flat on the drip pan when you plug it
back in.
Repeated lifting of the sur&ce unit more than
1 inch alx>vethe drip' pan can permanently
damage the receptacle.
Drip Pans (on some
To replace a sutface unit
Replace the drip pan into the recess in the
cooktop. Make sure the opening in the pan
. lines up with the receptacle.
Insert the terminals of the surface unit
through the opening in the drip pan and
into the receptacle.
Guide the surface unit into place so it rests
evenly.
it
Do not immerse the surface units in
liquids of any kind
Do not clean the surface units in a
dishwasher
Do not bend the surface unit plug
terminals.
OO.nat attempt to clean, adjust or in any
way repsk the plug-in receptacle.
models)
Remove the surface units. Then lift out the
drip pans.
Clean the area under the drip pans often.
Built-up soil, especially grease. may catch fire.
Place them in a covered container. Add
1/ 4 cup ammonia and let soak several
hours or overnight. Wash, rinse well
and dry.
Do not cover the drip pans with foil. Using foil so
close to the receptacle could cause Shock, fire or
damage to the range.
The drip pans may also be cleaned in the
dishwasher.
NOT£; Do not clean the drip pans in a
self-cleaning oven.
Appliances
Care and cleaning of the range.
Oven Vent
On giass cooktop models, the oven is vented
through an opening at the rear of the
cooktop.
NtiVer t:I1Wr the opening with .Iuminum foil Dr
1lIIY other IIJIItBriBL
On coil cooktop models, the oven is vented
through an opening under the right rear
surface unit.
Painted Surfaces
(on some models)
Painted surfaces include the sides of the
range and the sides of the door trim.
To clean the painted surfaces, use a hot,
damp cloth with a mild detergent suitable
for these surfaces. Use a clean, hot, damp
cloth to remove soap. Dry with a dry, clean
cloth..
.
Stain/sss Stae/Surfaces
Do not
the
[l]
I£]
11$.
a 1It••
"""'ce.
(on some models)
I-wool pad; it wi/lscrtlteh
Shake bottle well.
Place a smaIl amount of CERAMA
BRYTE~ Stainless Steel Appliance
Cleaner on a dsmp cloth or damp
papertoweI.
Clean a small area (approximately
8" x 8"), rubbing with the grain of the
stainless steel if applicable.
[fJ
Dry and buffwith a clean, dry paper
towel or soft cloth.
[QJ. Repeat
as necessary.
NOTE: If a mineral oil-based stainless steel
appliance cleaner has been used before
to clean the appliance, wash the surface
with dishwashing liquid and water prior
to using the CERAMA BRYTEe Stainless
Steel Appliance Cleaner. After washing
the surface with dishwashing liquid
and water, use a generous amount
of CERAMA BRYI'Ee Stainless Steel
Appliance Cleaner to clean the appliance.
G/sss Window
Do not uSe steel-wood pads, commercial
oven cleaners, cleaning powders or other
abrasive cleaners. They will damage the
surface.
(on some models)
To clean the outside gIass finish, use a gJass
cleaner. Rinse and polish with a dry cloth.
To Order
To order GEMMA BRYfEe Stainless
Steel Appliance Cleaner, please calI our
toll-free number.
National Paris Center
ww.v.GEAppliancIIS.com
BtJ(J~.2OI12
CERAMA BRY'T'P
Stainle •• Ste.IAppliance
Cleaner
",PM10X311
Aviano at Desert Ridge
Cleaning the glass cooktop. (on some models)
,
Normal Daily Use Cleaning
ONLY use CERAMABRYTE-Ceramic
Cooktop Cleaner on the glasscooktop.
Other creams may not be as effective.
,
To maintain and protect the surface of your
glass cooktop, followthese steps:
III
CI."n your coolitop "fter
,"ch .pill. U•• CERAftfA
BRY7P C.ramic Cooktop
el."nef.
Before using the cooktop for the
first time, clean it with CERAMA
BRYTE·Ceramic Cooktop Cle'aner.
1bis helps protect the top and makes
cleanup easier.
Dailyuse of CERAMABRYTE·
Ceramic Cooktop Cleaner willhelp
keep the cooktop looking new.
G!j'
Shake the cleaning cream well.Apply
a few drops of CERAMABRYfE·
Ceramic Cooktop Cleaner directl}:to
the ~ooktop.
Use a paper towel or CERAMA
BRYfE· Cleaning Pad for Ceramic
Cooktops to clean the entire cooktop
surface.
Use a dry cloth or paper towel
to remove all cleaning residue.
No need to rinse.
NOTE: It is veIY important that you 00 NOT heat
the cooktop until it has been cleaned thoroughly.
Burned-On Residue
WARNING: DAMAGE to your glass surface may
occur if you use scrub pads other than those
recommended.
Allow the cooktop to cool.
Uss • CERAMA BRYTE- Cissning
P.d for Cs"mic Coolctaps.
Spread a few drops ofCERAMA
BRYTE·Ceramic Cooktop Cleaner
on the entire burned residue area.
NOTE: Do not us•• dull or
nicksd bI.d •.
For additional protection, after
all residue has been removed, polish
the entire surface with CERAMA
BRYfE· Ceramic Cooktop Cleaner
and a paper toweL
Using the included CERAMA
BRYfE· Cleaning Pad for Ceramic
Cooktops, rub the residue area,
applying pressure as needed.
Allow the cooktop to cool.
Ths CERAMA BRYTP Csrsmic
Coolctop Scrspsr .nd .11
rscomm,ndsd suppli.s .rs
.v.il.bls through our P.rrs Csnts"
S"" instructions und", "To Ordsr
P.rrs- ssction on nsxr p.g •.
If any residue remains, repeat the
steps listed above as needed.
Use a single-edge razor blade
scraper at approximately a 45° 'angle
against the glass surface and scrape
the soil. It will be necessary to apply
pressure to the razor scraper in '
order to remove the residue.
Mter scraping with the razor
scraper, spread a few drops of
CERAMABRYTE·Ceramic Cooktop
Cleaner on the entire burned residue
area. Use the CERAMABRYTE·
Cleaning Pad to remove any
remaining residue.
For additional protection,
after all residue has been removed,
polish the entire surface with
CERAMABRYrE· Ceramic Cooktop
,Cleaner and a paper toweL
Aviano at Desert Ridge
Cleaning the glass cooktop.
(on some models)
[l]
Be careful not to slide pots and pans
across your cooktop. It will leave
, metal markings on the cooktop
surface.
These marks are removable using
theCERAMA BRYTE" Ceramic
Cooktop Oeaner with the CERAMA
BRYTE" Oeaning Pad for Ceramic
Cooktops.
l£J
Ifpots with a thin overlay of
aluminum or copper are allowed to
boil dry, the ovei'lay may leave black
discoloration on the cooktop.
This should be removed immediately
before heating again or the
discoloration may be permanent.
WARNING: Carefully Check the bottom of pans
forroughness that would scratch
.
theroo~~.
.
Coolctop $eal
To clean the cooktop seal around the
edges of the glass. lay a wet cloth on it
Glass surface-potential
Our t•• ting .hOM thBt if
you IIr. 'cooking high sU,Br
mixtures such lIS jelly Dr
fudge Bnd hIve B spillove"
it CBn CBuse pemlBnent
dBmBge to the glB" SUrfBC.
unless the spillover is
immediBtely removed.
[l]
for a few minutes,. then wipe clean with
nonabrasive cleaners.
for pennanent damage.
Thm off all surface units. Remove
hot pans.
[£! Wearing
an oven mitt:
a. Use a single-edge razor blade
scraper (CERAMA BRITE"
Ceramic Cooktop Scraper) to
move the spill to a cool area on
the cooktop.
b. Remove the spill with
paper towels.
To Order Perts
To order CERAMA BRYTE" Ceramic
Cooktop Oeanerand
the cooktop
.scraper, please call our toll-free number:
NBtionBI
"rt6 C.nter
BOO.626.21102
CEHAMA BRYlP C,remic
Cooktop CleBner
1 WX10X300
·CEHAMA BRY'T'P CerBmic
Cooktop SCrBper
,
1 WX10X0302
Kit
,
1 WB64X5027
(Kit includes cream and coo~op scraper)
CEHAMA BRY'T'P Cleening Peds for
C'rBmic Cooktop$ ... , .... 1 WX10X350
G!I Any remaining
spillover should be
left until the surface of the cooktop
has cooled.
It] Don't
use the surface units again
until all of the residue has been
completely removed.
NOTE: If pitting or indentation in the glass
surface has already occurred. the cooktop glass
will have to be replaced In this case, service will
be necessary.
Aviano at Desert Ridge
Electric Range Warran~
ill
All warranty service provided by our Factory Service Centers,
or an authorized Customer Carfi'l technician. To schedule service,
on-line, 24 hours a day, visit us at GEAppliances.com,
or call BlKJ.GE.CARES(BlKJ.432.2737).
Staple your receipt here.
Proof of the original purchase
date is needed to obtain service
under the warranty.
GE Will Provide:
Any plitt of the range which fails due to a defect in materials or workmanship .
. During this fullollll-ytla, wsmllJty, GE will also provide. free of charge, all labor
and in-home seIVice to replace the defective part.
GE GLASS COOKTOP MODEL JBP6l1 ONLY-DOES NOT INCWDE HOTPOINT MODELS:
A replacBlJJBnt glass
coolctop if it should: crack due to thermal shock; discolor;
crack at the rubber seal between the glass cooktop and the porcelain edge; or
if the pattern wears off.
A replacement rsdiant surface unit if it should bum out.
During this limittld additional four-yesr wsrrsnty, you will be responsible for any
labor or in-home service.
• Service trips to your home to teach you how to use
the product.
• Replacement
breakers.
• Improper installation, delivery or maintenance.
• Damage to the pJ:Oduct caused by accident, fire, floods
or adS of God.
• Failure of the product if it is abused,misused,
or used for
other than the intended purpose or used commercially.
• Damage to the glasscooktop
other than the recommended
caused by use of clean~
cleaning creams.
of house fuses or resetting of circuit
• Incidental or consequential
defects with this appliance.
damage caused by possible
• Damage caused after delivery.
• Dam.age to the glass cooktop caused by hardened spills
of sugary materials or melted plastic that are not cleaned
according to the directions in the Owner's Manual
This warranty is extended to the original purchaser and any succeeding owner for products purchased for home
use within the USA. In Alaska, the warranty excludes the cost of shipping or service calls to your home.
Some states do not aI/ow the exclusion or limitation of incidental or consequential damages. This warranty gives
you specific legal rights, and you may also have other rights which vary from state to state. To know what your
legal rights are, consult your local or state consumer affairs office or your state's Attorney General.
Aviano at Desert Ridge
Consumer Support.
GEAppliances Website
Have a question or need assistance with your appliance? Try the GE Appliances Web5ite 24 hour.! a day,
any day of the yearl For greater convenience and faster service, you can now download Owner's Manuals,
order parts, catalogs, or even schedule service on-line. You can also "Ask Our Team of Experts""
your questions, and so much more ...
wwwGEAppliances.com
Expert GE repair service is only one step away from your door. Get on-line and schedule your service at
your convenience 24 hour.! any day of the year! Or call 8OO.GE.CARES(800.432.2737) during normal
business hour.!.
Real Life Design Studio
GE supports the Univer.la1Design concept-products,
services and environments that can be used by
people of all ages, sizes and capabilities. We recognize the need to design for a wide range of physical and
mental abilities and impairments. For details ofGE's Univer.la1Design applications, including kitchen
design ideas for people with disabilities, check out our Website today. For the hearing impaired, please call
BOO.TDD.GEAC(800.833.4322).
www.GEAppliances.com
Purchase a GE extended warranty and learn about special discounts that are available while your warranty
is still in effect. You can purchase it on-line anytime, or call 800.626.2224 during normal business hoUr.!.
GE Consumer Home Services will still be there after your warranty expires.
Parts and Accessories
Individuals qualified to service their own appliances can have parts or accessories sent directly to their
homes (VISA, Mastert::ard and Discover cards are accepted). Order on-line today, 24 hoUr.!every day or
by phone at 800.626.2002 during normal business hoUr.!.
cDntllined in this RlllIIUII1 CDlfflT pmcedurn to be pflffomHld by any user. Other servicing l""e,.11y
should be refarred to qUIIlifilld sellfice p8fSDllnel. Caution must be .ercised. since improper servicing RIlly CIIUSfI
unsefe operation.
InsInJctiDIIB
Contact Us
If you are not satisfied with the service you receive from GE, contact us on our Website with all the details
including your phone number, or write to: General Manager, Customer Relations
GE Appliances, Appliance Park
Louisville, KY40225
Register YourAppliance
Register your new appliance 0IHine-at yom conveniencel Timely product registration will allow for
enhanced communication and prompt service under the terms of your warranty, should the need arise.
You may also mail in the pre-printed registration card included in the packing material.
Aviano at Desert Ridge
IMPORTANT SAFETY INFORMATION.
READ ALL INSTRUCTIONS BEFORE USING.
AWARNINGI
MICROWAVE-SAFE COOKWARE
Make sure all cookware used
in your microwave oven is
suitable for microwaving.
Most glass casseroles, cooking
dishes, measuring cups,
custard cups, pottery or china
dinnerware which does not
have metallic trim or glaze
with a metallic sheen can be
used. Some cookware is
labeled "suitable for
microwaving. "
If you are not sure if a dish
is microwave-safe, use this
test: Place in the oven both
the dish you are testing and
a glass measuring cup filled
with 1 cup of water-set the
measuring cup either in or
next to the dish. Microwave
30-45 seconds at high. If
the dish heats, it should not
be used for microwaving.
If the dish remains cool
and only the water in the
cup heats, then the dish is
microwave-safe.
If you use a meat
thermometer while
cooking, make sure it is
safe for use in microwave
ovens.
Do not use recycled paper
products. Recycled paper
towels, napkins and waxed
paper can contain metal
flecks which may cause
arcing or ignite. Paper
products containing nylon
or nylon filaments should
be avoided, as they may
also ignite.
Some styrofoam trays
(like those that meat is
packaged on) have a thin
strip of metal embedded
in the bottom. When
microwaved, the metal can
bum the floor of the oven
or ignite a paper towel.
Do not use the microwave
to dry newspapers.
Not all plastic wrap is
suitable for use in
microwave ovens. Check
the package for proper use.
Paper towels, waxed paper
and plastic wrap can be
used to cover dishes in
order to retain moisture
and prevent spattering.
Be sure to vent plastic wrap
so steam can escape.
Cookware may become hot
because of heat transferred
from the heated food. Pot
holders may be needed to
handle the cookware.
Aviano at Desert Ridge
www.GEAppliancBS.com
"Boilable" cooking pouches
and tightly closed plastic
bags should be slit, pierced
or vented as directed by
package. If they are not,
plastic could burst during
or immediately after
cooking, possibly resulting
in injury. Also, plastic
storage containers should
be at least partially
uncovered because they
form a tight seal. When
cooking with containers
tightly covered with plastic
wrap, remove covering
carefully and direct steam
away from hands and face.
Use foil only as directed in
this manual. 1V dinners
may be microwaved in foil
trays less than 3/4" high;
remove the top foil cover
and retum the tray to the
box. When using foil in the
microwave oven, keep the
foil at least 1" away from
the sides of the oven.
Plastic cookware - Plastic
cookware designed for
microwave cooking is very
useful, but should be used
carefully. Even microwavesafe plastic may not be as
tolerant of overcooking
conditions as are glass or
ceramic materials and may
soften or char if subjected
to short periods of
overcooking. In longer
exposures to overcooking,
the food and cookware
could ignite.
Follow these guidelines:
Use microwave-safe
plastics only and
use them in strict
compliance with
the cookware
manufacturer's
recommendations.
Do not microwave
empty containers.
Do not permit children
to use plastic cookware
without complete
supervision.
Aviano at Desert Ridge
IMPORTANT SAFETY INFORMATION.
READ ALL INSTRUCTIONS BEFORE USING.
AWARNINGf
Improper use of the grounding plug can result in a risk of
electric shock.
GROUNDING INSTRUCTIONS
This appliance must be grounded. In the event of an electrical
short circuit, grounding reduces the risk of electric shock by
providing an escape wire for the electric current.
This appliance is equipped with a power cord having a
grounding wire with a grounding plug. The plug must be
plugged into an outlet that is properly installed and grounded.
Consult a qualified electrician or service technician if the
grounding instructions are not completely understood, or if
doubt exists as to whether the appliance is properly grounded.
If the outlet is a standard 2-prong wall outlet, it is your personal
responsibility and obligation to have it replaced with a properly
grounded 3-prong wall outlet.
Do not under any circumstances cut or remove the third
(ground) prong from the power cord.
Do not use an adapter plug with this appliance.
Do not use an extension cord with this appliance. If the power
cord is too short, have a qualified electrician or service
technician install an outlet near the appliance.
For best operation, plug this appliance into its own electrical
outlet to prevent flickering of lights, blowing of fuse or tripping
of circuit breaker.
Aviano at Desert Ridge
WWK'.GEApplianCBs.com
THE VENT FAN
The fan will operate automatically under certain conditions
(see Automatic Fan feature). Take care to prevent the starting
and spreading of accidental cooking fires while the vent fan
is in use.
Clean the underside of the microwave often. Do not allow
grease to build up on the microwave or the fan filters.
In the event of a grease fire on the surface units below the
microwave oven, smother a flaming pan on the surface unit
by covering the pan completely with a lid, a cookie sheet or
a flat tray.
Use care when cleaning the vent fan filters. Corrosive cleaning
agents, such as lye-based oven cleaners, may damage the filters.
When preparing flaming foods under the microwave, turn
the fan on.
Never leave surface units beneath your microwave oven
unattended at high heat settings. Boilovers cause smoking
and greasy spillovers that may ignite and spread if the
microwave vent fan is operating. To minimize automatic fan
operation, use adequate~ized cookware and use high heat
on surface units only when necessary.
READ AND FOllOW THIS SAFETY
INFORMATION CAREFUllY
SAVE THESE INSTRUCTIONS
Aviano at Desert Ridge
Care and cleaning of the
•
mIcrowave oven.
Helpful Hints
An occasional thorough wiping with a solution of
baking soda and water keeps the inside fresh.
NOTE:Be certBin the power is off before cleaning any
part of this oven.
~]:D
•
How to Clean the Inside
Walls, Floor, Inside Window, Metal and Plastic Parts
on the Door
Some spatters can be removed with a paper towel;
others may require a damp cloth. Remove greasy
spatters with a sudsy cloth; then rinse with a damp
cloth. Do not use abrasive cleaners or sharp
utensils on oven walls.
Never use a commercial oven cleaner on any part of
your microwave.
Removable Turntable and Turntable Support
To prevent breakage, do not pla~e the turntable
into water just after cooking. Wash it carefully
in warm, sudsy water or in the dishwasher. The
turntable and support can be broken if dropped.
Remember, do not operate the oven without the
turntable and support in place.
Shelf
Clean with mild soap and water or in the dishwasher.
Do not clean in B self-cleaning oven.
Defrost Rack
Clean with mild soap and water or in the top rack
of the dishwasher.
Aviano at Desert Ridge
Care and cleaning of the microwave oven.
How to Clean the Outside
We ",commend .g.inst using c/e.ners with .mmoni.
or .Icohol, .s they c.n d.m.ge the .ppe.r.nce of the
microw.ve oven. Hyou choose to use. common household
c/e.ner, first .pply the cleaner directly to • clean cloth,
then wipe the soiled .rtI•.
Bottom
Clean off the grease and dust on the bottom often. Use a
solution ofwarm water and detergent
CBSe
Clean the outside of the microwave with a sudsy cloth.
Rinse and then dry. Wipe the window clean with a damp
cloth.
ControlP.ne/.nd ODDr
Wipe with a damp cloth. Dry thoroughly. Do not use
cleaning sprays. large amounts of soap and water,
abrasives or sharp objects on the panel-they
can
damage it. Some paper towels can also scratch the
control panel.
OoorSe.1
It's important to keep the area clean where the door
seals against the microwave. Use only mild, non-abrasive
detergents applied with a clean sponge or soft cloth.
Rinse well.
Stainless Steel (on some models)
Do not use a steel-wood pad; it will scratch the surface.
To clean the stainless steel surface, use a hot, damp cloth
with a mild detergent suitable for stainless steel surfaces.
Use a clean, hot, damp cloth to remove soap. Dry with a
dry, clean cloth.
If food soil remains, try a general kitchen cleaner.
For hard-to-clean soil. use a standard stainless steel
cleaner, such as Bon-Amilt or Cameo~
Apply cleaner with a damp sponge. Use a clean, hot,
damp cloth to remove cleaner. Dry with a dry, clean
cloth. Always scrub lightly in the direction of the grain.
Mter cleaning, use a stainless steel polish, such as
Stainless Steel Magic~ Revere Copper and Stainless Steel
Cleane~ or Wenol All Purpose Metal Polish~ Follow the
product instructions for cleaning the stainless steel
surface.
Aviano at Desert Ridge
Replacing the light bulbs.
wwwGEAppliances.com
Cooktop Light/Night Light
On models JVMI850 and JVM1B5f, replace the
burned-out bulb with a 4O-watt incandescent bulb
(WB36XI0D03), available from your GE supplier.
On models JVMfB60, JVMI861, JVM1870 and JVM2050
replace the burned-out bulb with a 120 volt, 2O-watt
halogen bulb (WB36XI0213), available from your GE
supplier.
To replace the bulb(s)t first disconnect the
power at the main fuse or circuit breaker panel
or pull the plug.
Remove the screw at the right edge of the light
cover and push on the left edge of the cover to
open.
Be sure the bulb(s) to be replaced are cool
before removing. Mter breaking the adhesive
sealt remove the bulb by either gently turning
(for modelsJVM1850 andJVM1851) or pulling
straight out (for modelsJVM1860tJVM1861t
JVM1870 andJVM2050). Replace with the same
size and type bulb.
Raise the light shield and replace the screw.
Connect electrical power to the oven.
Aviano at Desert Ridge
Replacing the light bulbs.
Oven Light
~
__ =~~_ ~~_
I
Replace the burned-out bulb with a 120 volt 2O-watt
halogen bulb (WB36X10213), available from your
GE supplier.
To replace the oven light, first disconnect the
power at the main fuse or circuit breaker panel
or pull the plug.
Remove the top grille by taking out the screws
on top of the grille that hold it in place and
sliding the grille to the left (opening the door
makes grille removal easier).
Next, remove the light cover.
On some models, the light cover is located
in the center of the top opening. Remove the
screw that secures the light cover and lift the
cover off.
On some models, the light cover is located at the
left of the top opening. Lift the cover off.
Pinch the clips that hold the light socket in
place and lift the socket out.
Remove the bulb from the light socket by
pulling straight out. Replace with the same size
and type bulb, then replace the light socket and
cover.
Replace the grille and screws. Connect electrical
power to the oven.
Aviano at Desert Ridge
About the exhaust feature.
wwwGEAppliances.com
Charcoal Filter
(on some models)
The vent fan has 2 metal reusable grease filters.
Models that recirculate air back into the room also
use a charcoal filter.
Reusable Grease Filters
(on all models)
Reusable Grease Filters
The metal filters trap grease released by foods on
the cooktop. They also prevent flames from foods
on the cooktop from damaging the inside of the
microwave.
For this reason, the filters must ALWAYSbe in
place when the hood is used. The grease filters
should be cleaned once a month, or as needed.
Removing and Cleaning the Filter
To remove, slide it to the outside using the tab.
Pull it down and out.
To cleaR the grease filter, soak it and then swish it
around in hot water and detergent. Don't use
ammonia or ammonia products because they will
darken the metal. Light brushing can be used to
remove embedded dirt.
Rinse, shake and let it dry before replacing.
To replace, slide the filter in the frame slot at the
outside of the opening. Pull up and in to lock
into place.
Aviano at Desert Ridge
About the exhaust feature.
Charcoal Filter (on some models)
The charcoal filter cannot be cleaned. h must be
replaced.
For JVM1BOOSeries models, order Part No. WB2X10133
from your GE supplier.
For JVM2000 Series models, order Part No. WB2X10956
from your GE supplier.
If the model is not vented to the outside, the air
will be recirculated through a disposable charcoal
filter that helps remove smoke and odors.
The charcoal filter should be replaced when it is
noticeably dirty or discolored (usually after 6 to
12 months, depending on hood usage) .
•
D
~==~
Remove grille screws
to remove the grille.
To remove the charcoal filter, disconnect power
at the main fuse or circuit breaker panel or pull
the plug.
Remove the top
top of the grille
grille to the left
removal easier).
of the oven and
grille by removing the screws on
that hold it in place and sliding the
(opening the door makes grille
Slide the filter towards the front
remove it.
To install a new filter, remove plastic and other
outer wrapping from the new filter.
Insert the filter into the top opening of the oven as
shown. It will rest at an angle on 2 side support tabs
and in front of the right rear tab. Replace the grille
and screws.
Aviano at Desert Ridge
Before you call for service ...
•
i ...•
•.
.....
7 ·.~.·
i
'
.
Troubleshooting lips
Save time and moneyl Review the charts on the following pages
first and you may not need to call for service.
•
Possible Causes
Oven willlll1l stBlt
What To Do
A fuse in your home may
be blown or the circuit
breaker tripped.
Replace fuse or reset
circuit breaker.
Power surge.
Unplug the microwave
oven; then plug it back in.
Plug not fully inserted
into wall oudet.
Make sure the 3-prong
plug on the oven is fully
inserted into wall outlet.
Roor of the oven ;s wann,
even when the OVfIII has
IlI1I been used
The cooktop light is
located below the oven
floor. When the light is
on, ilie heat it produces
may make ilie oven floor
get warm.
This is normal.
"CONTROL LOCKED"
or "LOCKED" applIIIlS on
the display
The control has been
locked.
Press and hold CLEANOFF
for about 3 seconds to
unlock the control.
"SENSOR ERROR" appealS
on the display
When using a Sensor
feature, the door was
opened before steam
could be detected.
Do not open door until
steam is sensed and time
is shown counting down
on the display.
Steam was not detected
in maximmn am01Dlt
of time.
You hear an unusual,
low-tone beep
Food amount too large
for Sansor Rehest
You have tried to start
the Reminder without
a valid time of day.
'1
'6
Use Time Coole to heat
for more time.
Start over and enter a
valid time of day.
You have tried to start
the Auto Nite light
without a valid time of
day entered for the on-time
and off-time.
Start over and enter a
valid time of day.
You have tried to change
the power level when it is
not allowed.
Many of the oven's features
are preset and cannot be
changed.
Sensor Reheat is for
single servings of
Use Time Cook for large
amounts of food.
recommended foods.
331
Aviano at Desert Ridge
Before you call for service ...
Things Thst Are NOnDsl With Your Microwave Oven
Moisture on the oven door and walls while cooking. Wipe the
moisture off with a paper towel or soft cloth.
Moisture between the oven door panels when cooking certain
foods. Moisture should dissipate shortly after cooking is finished.
Steam or vapor escaping from around the door.
Ught reflection around door or outer case.
Dimming oven light and change in the blower sound at
power levels other than high.
Dull thumping sound while oven is operating.
'IV/radio interference might be noticed while using the
microwave. Similar to the interference caused by other small
appliances, it does not indicate a problem with the microwave.
Plug the microwave into a different electrical circuit, move the
radio or 'IV as far awayfrom the microwave as possible, or check
the position and signal of the 'IV/radio antenna.
The Active Vent door (on some models) will open during
operation, and remain open while the microwave is running,
to keep the electronics cool. It is also normal to hear a clicking
noise as the vent door opens and closes.
Aviano at Desert Ridge
GE Microwave Oven Warran~
All warranty service provided by our
Factory Service Centers, or an authorized
Customer Caree technician. To schedule
service, on-line, 24 hours a day, visit
us at www.GEAppliances.com.
or call
800.GE.CARES (800.432.2737).
One Yesr
From the date of the
original purchase
Staple your receipt here.
Proof of the original
purchase date is needed
to obtain service under
the warranty.
Any palt of the microwave oven which fails due to a
defect in materials or workmanship. During this full
one-year wannty, GE will also provide, free of charge,
all labor and related service costs to repair or replace
the defective part.
Second Through Tenth Year The magnetron lUbe,if the magnetron tube fails due to
From the date of the
original purchase
a defect in materials or workmanship. During this
additional nine-year limited wannty, you will be
responsible for any labor or related service costs.
Service trips to your home to teach
you how to use the product.
Replacement of house fuses or
resetting of circuit breakers.
Improper installation, delivery or
maintenance.
Damage to the product caused by
accident, fire, floods or acts of God.
Failure of the product if it is
abused, misused, or used for other
than the intended purpose or used
commerdally.
Incidental or consequential damage
caused by possible defects with this
appliance.
Damage caused after delivery.
Replacement of the cooktop light
bulbs.
This wananty is extended to the original purchaser and any succeeding owner for products purchased
for ordinary home use within the USA. In Alaska. the warranty excludes the cost of shipping or service
calls to your home.
Some states do not allow the exclusion or limitation of incidental or consequential damages, so the
above limitation or exclusion may not apply to you. This wananty gives you specific legal rights, and
you may also have other rights which vary from state to state. Toknow what your legal rights are,
consult your local or state consumer affairs office or your state Attomey General.
s
Aviano at Desert Ridge
Care and cleaning of the refrigerator.
Cleaning the Outside
The dispenser drip sres, beneath the grille,
should be wiped dry. Water left in this area
may leave deposits. Remove the deposits by
adding undiluted vinegar to the well. Soak
until the deposits disappear or become
loose enough to rinse away.
The dispenser clIJdle. Before cleaning, lock
the dispenser by pressing and holding the
LOCK CONT1l0L pad for 3 seconds. Clean
with wann water and baking soda
solution-about
a tablespoon (15 ml) of
baking soda to a quart (1 liter) of water.
Rinse thoroughly and wipe dry.
The door hBndles snd trim. Clean with
a cloth dampened with soapy water.
Dry with a soft cloth.
TIle stainless steel psnels snd door hBndles
(on some models) can be cleaned with
a commercially available stainless steel
cleaner. A spra}'-Qnstainless steel cleaner
works best.
Do not use appliance wax or polish
on the stainless steel.
Keep the outside clean. Wipe with a clean
cloth lightly dampened with kitchen
appliance wax or mild liquid dish detergent
Dry and polish with a clean, soft cloth.
Do not wipe the refrigerator with a soiled dish
cloth or wet towel. These may leave a residue
that can erode the paint. Do not use scouring
pads. powdered cleaners, bleach or cleaners
containing bleach because these products can
scratch and weaken the paint finish.
Cleaning the Inside
To help prevent odors, leave an open box of
baking soda in the fresh food and freezer
compartments.
Unplug the refrigerator before cleaning. If this
is not practical, wring excess moisture out
of sponge or cloth when cleaning around
switches, lights or controls.
Use wann water and baking soda solutionabout a tablespoon (15 ml) of baking soda
to a quart
liter) of water. This both
cleans and neutralizes odors. Rinse and
wipe dry.
o
Use of any cleaning solution other than thBt
which is recommended, especially those that
contain petroleum distillBt8s, can clBC1cor
damBge the interior of the refrigerator.
Avoid cleaning cold glass shelves with hot water
because the extreme temperature difference
may cause them to break. Handle glass shelves
carefully. Bumping tempered glass can cause
it to shatter.
Do not wash any plastic refrigerator parts
in the dishwasher.
The chill/thaw tray is dishwasher safe.
Aviano at Desert Ridge
GEApp/iaIlCfl&COIII
:
Behind the Refrigerator
Be careful when moving the refrigerator
away from the wall. All types of floor
coverings can be damaged. particularly
cushioned coverings and those with
embossed surfaces.
When pushing the refrigerator back, make sure
you don't roll over the power cord or icemaker
supply line.
Pull the refrigerator straight out and return
it to position by pushing it straight in.
Moving the refrigerator in a side direction
may result in damage to the floor covering
or refrigerator.
Preparing for Vacation
For long vacations or absences. remove
food and unplug the refrigerator. Clean the
interior with a baking soda solution of one
tablespoon (15 ml) of baking soda to one
quart (lliter) of water. Leave the doors
open.
Set the icemaker power switch to the 0 (off}
position and shut off the water supply to
the refrigerator.
Preparing to Move
Secure all loose items such as shelves and
drawers by taping them securely in place
to prevent damage.
When using a hand truck to move the
refrigerator. do not rest the front or back
of the refrigerator against the hand wck.
This could damage the refrigerator. Handle
only from the sides of the refrigerator.
8e sure the refrigerator stays in an upright
position during moving.
If the temperature can drop below freezing,
have a qualified seIVicer drain the water
supply system to prevent serious property
damage due to flooding.
Aviano at Desert Ridge
Replacing the light bulbs.
•
Unplug
the refrigerator.
•
The bulbs are located at the top of the
compartment, inside the light shield.
On some models, a screw at the front of
the light shield will have to be removed.
•
To remove the light shield, press in on
the tabs on the sides of the shield and
slide forward and out
Refrigellltor Compertment-Lower
Unplug the refrigerator.
•
Remove the convertible meat drawer
control knob by pulling straight out
•
Lift the light shield up and pull it out
Mter replacing the bulb with an
appliance bulb of the same or lower
wattage, replace the light shield and
screws (on some models). When
replacing the light shield, make sure
that the tabs at the back of the shield
fit into the slots at the back of the light
shield housing.
•
Plug the refrigerator
•
Mter replacing the bulb with an
appliance bulb of the same or lower
wattage, replace the shield and
~ack in.
Ught
This light is located above the top drawer.
•
•
the knob.
Freeze, Compartment
•
Unplug the refrigerator.
•
Remove the shelf just above the light
shield. (The shelf will be easier to
remove if it is emptied first) On some
models, a screw at the top of the light
shield will need to be removed.
•
To remove the light shield, press in
on the sides, and lift up and out
•
Replace the bulb with an appliance
bulb of the same or lower wattage,
and reinstall the light shield. When
reinstalling the light shield, make
sure the top tabs snap securely
into place. Replace the screw
(on some models).
•
Reinstall the shelf and plug the
refrigerator back in.
Dispense,
•
Unplug the refrigerator.
•
•
The bulb is located on the dispenser
under the control panel.
Remove the light bulb by turning
it counterclockwise.
Replace the bulb with a bulb of the
same size and wattage.
•
Plug the refrigerator
back in.
Aviano at Desert Ridge
Normal operating sounds.
Newer refrigerators sound different from older refrigerators.
Modem refrigerators have more features and use newer
technology.
==
•
•
HU••••••
WHOOSH•••
The new high efficiency compressor may run faster
and longer than your old refrigerator and you may
hear a high-pitched hum or pulsating sound while
it is operating.
Sometimes the refrigerator runs for an extended period.
especially when the doors are opened frequently. This
means that the Frost Guanf" feature is working to
prevent freezer bum and improve food preservation.
• You may hear the fans spinning at high speeds.
This happens when the refrigerator is first plugged
in, when the doors are opened frequently or when
a large amount of food is added to the refrigerator
or freezer compartments. The fans are helping to
maintain the correct temperatures.
•
If either door is open for over 3 minutes, you may
hear the fans come on in order to cool the light
bulbs.
•
The fans change speeds in order to provide optimal
cooling and energy savings.
• You may hear a whooshing sound when the doors dose.
This is due to pressure equalizing within the refrigerator.
• You may hear the fans running after selecting one of
the CustomCoorsettings.
CLICKS, POPS,
CRACKS and CHIRPS
WATER SOUNDS
• You may hear cracking or popping sounds when the
refrigerator is first plugged in. This happens as the
refrigerator cools to the correct temperature.
~
•
Electronic dampers dick open and closed to provide
optimal cooling and energy savings.
•
The compressor may cause a clicking or chirping
sound when attempting to restart (this could take
up to 5 minutes).
•
•
•
The electronic control board may cause a clicking
sound when relays activate to control refrigerator
components.
•
The flow of refrigerant through the freezer cooling
coils may make a gurgling noise like boiling water.
•
Water dropping on the defrost heater can cause a
sizzling, popping or buzzing sound during the
defrost cycle.
• A water dripping noise may occur during the defrost
cycle as ice melts from the evaporator and flows into
the drain pan.
•
Closing the door may cause a gurgling sound due to
pressure equalization.
Expansion and contraction of cooling coils during
and after defrost can cause a cracking or popping
sound.
On models with an icemaker, after an icemaking
cycle, you may hear the ice cubes dropping into
the ice bucket.
Fa'
nddl!IO/i,II/lJloIITJ,,/ll!
~
IIJII
,/ollrJdl
ofJu dlllJ!! suunds,
S{'f' 1/1[' About tile automatic Icemaker
,1,)(1About tbe Ice and water dispenser
.sectiOns
/CCl'ldkL'/
dlJd rl,SIJCIISCI
Aviano at Desert Ridge
Before you call for service •..
Troubleshooting Tips
Save time and money! Review the charts on the following
pages first and you may not need to call for service.
PDS8ibl. CII". ••
Refrigerator
in defrost cycle.
• Wait about 30 minutes
FJther or both controls set to OFF. • Set the controls
Refrigerator
is mpluged.
The fUBe is blown/circuit
breaker is tripped.
for defrost cycle to end.
to a temperature
• Push the plug completely
• Replace
setting.
into the outlet.
fuse or reset the breaker.
The refrigerator
is in
showroom mode.
Vibl'lltion III" rattling
(slight ribrawn
i."""".IJ
Motor",.,.,.
fDr
long ptIIio6", t:re-
on.f1If1ratpJMtly.
("""1'fIIrigenIIrns
willi mora ."""".
••••
_Iarger
IraezrIT raquira mora
DpfIIIItiag ••••
They
"",,8l1li..,•••
,., mainIJIiIJ •••
,.""...,.,...J
Normal when refrigerator
is first plugged in.
• Wait 24 hours for the refrigerator
cool down.
Often occurs when ~
amOlDlts of food are
placed in refrigerator.
• This is nonna!.
Door left open.
• Check to see if package
Hot weather or frequent
door opeoinga.
• This is nonna!.
iBlIOmMij
OiriIIerNIWNII
"""""'8l1li "..,
CIIIIIpa"""""
,...
WIt""
~.iI:MnaIuIr
dfwlltlt WOIt
door open.
Temperature
controls
set at the coldest
setting.
Temperature
cold enough.
Fro«",it» I:IJIIIIIB
l1li nz. food
",.,witItitr ,....
is holding
to completely
control not set
Warm _ther
or frequent
door openings.
• Set the temperature
control one step colder.
See About the controls.
Door left open.
• Check to see if package
is holding
door open.
Door left open.
• Check to see if package
is holding
door open.
Too frequent or too long
door openings.
Automalic energy tIIm!1"
system cin:ulates WIIrID
liquid around front edge
of freezer CODlplU lment.
Icemaker power switch
is in the off position.
Water supply turned off or
not coonectecL
Freezer compartment
too warm.
• Wait 24 hours for the refrigerator
cool down.
Piled up cubes in the storage
bin ClIU8ethe icemaker
to Bbut off.
• Level cubes by hand.
Ice cubes stuck in icemaker.
(Green power ligbt on
icemaker blinking).
• Thm off the icemaker,
icemaker back on;
to completely
remove cubes and turn the
Aviano at Desert Ridge
Possible Causes
What To Do
Icemaker power switch is in the
I {1III}positioo,but the wateI' supply
to the refrigerator bas not been
• Set the power switch to the 0 {of/} position. Keeping it
in the I {IIII} position will damage the water valve.
COIDlected.
Ice stonge bin needs cleaning.
• Empty and wash bin. Discard old cubes.
Food trmmdUiDg odor/ta&te
• Wrap foods well
to ice c:ubc5.
Interior of refrigaatol'
needs cleaning.
Water titer dogged.
• Replace filter cartridge with new cartridge or with plug.
Door left open.
• Oleck to see if package is holding door open.
Temperature control not set
cold enough.
• See About the controls.
Icemaker turned off or
wateI' supply turned off.
An item is bloc:king or has fallen into
the ice mute iuside the top door
• Remove any item that might be blocking, or has fallen into,
the chute.
bin of the freezer.
Ice cubes are frozen to
icemaker feeler
II1'ID.
hregular ice dumps in
storage container.
• Break up with fingertip pressure and discard remaining clumps.
• Freezer may be too warm. Adjust the freezer control to a
colder setting, one position at a time, until clumps do not form.
Dispemer is LOCKED.
• Press and hold the LOCK CON71IOL pad for 3 seconds.
Water dispemer hils not been
used for a loog 1Dne.
• Dispense water until all water in system is replenished
Normal when refrigerator
is lint iDsIalled.
Water dispenser has not been
used for a loog 1Dne.
Water &yBtao hils been dnined.
• Allow several hours for replenished supply to chill.
Water supply line turned
• See Instaning the water line.
off or not connected.
Water filter doged.
• Replace filter cartridge or remove filter and install plug.
Air may be tripped in the water system. • Press the dispenser ann for at least two minutes.
WIfw"""'"
,.
Dispeuser is LOCKED.
• Press and hold the LOCK CON71IOL pad for 3 seconds.
N~ed
• Run water from the dispenser for 3 minutes (about
one and a half gallons).
filter c:artridge.
d/qIIIIIet
WIfw
is"",.,."".
but ictmabr is wedritJr
Water in reservoir is
frozen.
Re&igerator control setting
is too cold.
Supply line or shutoff
CUBED ICE
WIt""""'"
t:lfUSHEDlt:E ••
.".",.
VIM!
is dogged.
• Call a plumber.
Water filter doged.
• Replace filter cartridge or remove filter and install plug.
Dispenser is LOCKED.
• Press and hold the LOCK CON71IOL pad for 3 seconds.
I.t
setting was CRUSHED ICE.
• A few cubes were left in the crusher from the previous
setting. This is normal.
Aviano at Desert Ridge
Before you call for service ...
9Mif::'1i*,~\:,,:!
thnge g/tIw in
tIuI IrtNIzs,
R.m"..,,,,,
DIlor
Possible Ceuses
Defrost heater is
00.
Foods tnmBmiUiDg
odor to refrigerator.
• Foods with strong odors should be tightly wrapped.
Interior needs cleaoiog.
• See Care and cleaning.
Door gasket on binge side
stickiDg 01' folding over.
• Apply paraffin wax to the face of the gasket.
• Keep an open box of baking soda in the refrigerator;
replace every three months.
A door bin is hitting a shelf
inside the refrigerator.
on
..m,.,.",.
"".""
__
"".""
coI1fIt*
0III6ide of
i"..
(in humid wu_lli,
CIIm••••••••
Not unusual during
periods of high humidity.
Too frequent or too
long door openings.
illlD
trIItigtlrlltDr when doors
111'8 ....,,}
InIlItior light •••
IIOtWlri
W*r on 1dIcIJImfloor III
on bDtlt1m
of",.",.
Hilla •• ""'"
botIum
ofrelri,.,.,
1ItIfrigenIttIT IIfWfII'
."",.
fIIf bIIt
,.".,.,..,.,..
the
•• OK
1ItI/rigeIator 1NHIping
Food ilrJl tlulwing/chilling
At:bMI ,."",.,.".
not
""./10 Set fllmpertllUlfI
No power at outlet.
• Replace fuse or reset the breaker.
Ught bulb burned out.
• See Replacing the light bulbs.
Cubes jammed in chute.
• Poke ice through with a wooden spoon.
Nonnal air flow cooliDg motor.
In the refrigeration proce8B. it is
normal that heat be expelled in the
area under the refrigerator. Some
floor coverinp are sensitive and will
di&c:olor at these normal and safe
temperatures.
Adaptift defrost keeps
COIDpt"eMOI'running during
door openings.
• This is normal. The refrigerator will cycle off after the
door remains closed for 2 hours.
Door open.
• Close door.
Packaging,
• Increase time or re-package in plastic.
Wrong weight &elected.
• Select a larger weight.
Item with high fat content.
• Select a larger weight.
Not UlIing Cilll/Thaw tray.
• Place items on tray and allow space in between items for
better airflow.
Unit just plugged in.
• Allow 24 hours for system to stabilize.
Door open for too long.
• Allow 24 hours for system to stabilize.
Warm food added to refrigerator.
• Allow 24 hours for system to stabilize.
Defrost cycle is in process.
• Allow 24 hours for system to stabilize.
Refrigenttor compartment
temperature control is let
at WIII'IIIest seuing.
• This is normal. In order to minimize energy usage, the
Select Temp feature is disabled when the refrigerator
temperature control is set at the warmest setting.
Aviano at Desert Ridge
CONSUMER WARRANTY
(for customers in Canada)
Your refrigerator is warranted to be free of defects in material and workmanship.
What is covered
Compressor
Sealed System (including
evaporator, condenser
tubing and refrigerant)
All Other Parts
Ten (10) Years
Five (5) Years
Parts
Repair or Replace
at Camco's Option
Ten (10) Years
Five (5) Years
Five (5) Years
Five (5) Years
One (1) Year
One (1) Year
One (1) Year
How Long Warranted
(From Date of Sale)
TERMS AND CONDITIONS:
This warranty applies only for single
family domestic use in Canada when the
Refrigerator has been properly installed
according to the instructions supplied by
Camco and is connected to an adequate
and proper utility service.
Damage due to abuse, accident, commercial
use, and alteration or defacing of the serial
plate cancels all obligations of this warranty.
Service during this warranty must be
performed by an Authorized Camco
Service Agent.
Neither Cameo nor the Dealer is liable for
any claims or damages resulting from any
failure of the Refrigerator or from service
delays beyond their reasonable control.
To obtain warranty service, purchaser must
present the original bill of sale. Components
repaired or replaced are warranted through the
remainder of the original warranty period only.
This warranty is in addition to any statutory
warranty.
Labour
WHAT IS NOT COVERED:
• Owner is responsible to pay for service
calls related to product installation and/or
teaching how to use the product.
• Damage to finish must be reported within
48 hours following the delivery of the
appliance.
• Service trips to your home to teach you
how to use the product.
• Damage to finish after delivery.
• Improper installation-proper installation
includes adequate air circulation to the
refrigeration system, adequate electrical,
plumbing and other connecting facilities.
• Replacement of house fuses or resetting
of circuit breakers.
• Replacement of light bulbs.
• Damage to product caused by accident,
fire, floods or acts of God.
• Loss of food due to spoilage.
• Proper use and care of product as listed
in the owner's manual, proper setting of
controls.
• WARRANTOR IS NOT RESPONSIBLE
FOR CONSEQUENTIAL DAMAGES.
IMPORTANT
Keep this warranty and your bill of sale as proof of original purchase and purchase date.
Camco service is available coast to coast.
If further help is needed concerning this warranty, contact:
Manager, Consumer Relations, Cameo Inc.,
Suite 310, 1 Factory Lane, Moncton, N.B. E1C 9M3
Staple your receipt here.
Proof of the original purchase
date is needed to obtain service
under the warranty.
Aviano at Desert Ridge
Refrigerator Warran~
(For customers in the United States)
All warranty service provided by our F8ctOry Service Centers,
or an authorized Customer Carf!P technician. To schedule service,
on-line, 24 hours a day, visit us at GEAppliances.com, or call
800.GE.CARES (800.432.2737).
Staple your receipt here.
Proof of the original purchase
date is needed to obtain service
under the warrenty.
.•••
:"rJI:_~,_~_G_f_Wl_il_'_RB_"_'B_c_s:
_
One..,.
From the date of the
original purchaSB
Finr-
_
Any plitt of the refrigerator which fails due to a defect in materials or workmanship.
During this full ""...,.., WlJI1lI~ GE will also provide, free of ch",.,., all labor and in-home
sernce to replace the defective part.
From the date of the
original purchase
Any pIIIt of tII" •• 1ed fflfrigtH'llling sptem (the compressor, condenser, evaporator
and all connecting tubing) which fuils due to a defect in materials or workmanship.
During this full five..,.., •• 1edI'fIfrigefllling rptem Wlfmr~ GE will also provide, frN of cIuIlf18,
all labor and in-home service to replace the defective part in the sealed refrigerating system .
UfeIiIIHI III PrrIduct
From the date of the
originel purchase
."", full"xtIIn6i"" slides, if they should fuiI due to a defect in materials or workmanship.
During this product lifrItitne limitfIdWlfmrnty, you will be responsible for any labor or related
sernce costs.
1111", Os,.
From the original
purchase date of the
refrigerator
Any plitt of the water filter cartridge which fails due to a defect in materials or workmanship.
During this lilnitfldtill",.,
WlImrnty, GE will also provide, 1m of ch.fJ/tI, a replacement water
filter cartridge.
Senic:e trips to your home to teach you how to use
lhe product.
"'I., Improper iDstaIJatioo, delivery or mainteoance.
r: Failure of lhe product if it is abused, misused, or used for
other than lhe intended purpose or used c:ommen:ially.
;1Loss of food due to spoilage.
iJJ1i Replacement
of house fuses or resetting of circuit
breakers.
~> Rep1acemeot of the water filter c:artridge due to water
pressure that is outside lhe specified operating range or
due to exc:etlSire sediment in lhe water supply.
~ Replacement of the Hght bulbs or water filter cartridge
other than BIi noted above.
"' Damage to the product caused by accident, fire, floods
or ad5 of God.
!ii: Incideotal or coDleCJuentiai damage caused by pOMI'ble
defec:ls with this app6ance.
~ Damage caused after delivery.
This warranty is extended to the origin81 purchaser and any succeeding owner for products purchased for home
use within the USA. In Alaska, the warranty excludes the cost of shipping or service calls to your home.
Some states do not allow the exclusion or limitation of incidental or consequential damages. This warranty gives
you specific legal rights, and you may also have other rights which vary from state to state. To know what your
legal rights are, consult your local or state consumer affairs office or your state's Attorney General.
Aviano at Desert Ridge
Dryer (electric) - GE Hotpoint
IMPORTANT SAFETY INFORMAnON.
READ AU INSTRUCTIONS BEFORE USING.
AWARNINGI
For your safety, the information in this manual must be followed to minimize the risk of fire
or explosion, electric shock. or to prevent propetfy damage, personal injury, or death.
• Do not store or use guoline or other
flammable vapors and liquids in the
vicinity of this or any other appliance.
• Installation and service must be
petformed by a qualified installer,
service agency or the gu supplier.
WHAT TO DO IF YOU SMELL GAS:
[Z] Do not try to light a match, or cigarette, or
111m on any gas or electrical appliance.
III Do not touch any electrical
switch;
do not use any phone in your building.
~ Clear the room, building or sres of all
occupants.
!tJ Immediately call your gas supplier from
neighbor's phone. Follow the gu
supplie"s instnJetions carefully.
B
~ H you CBnnotreach your gas supplier,
call the fire department.
This act requires the governor of California to publish a list of substances known to the state to cause
cancer, birth defects or other reproductive harm and requires businesses to warn customers of potential
exposure to such substances.
Gas appliances can cause minor exposure to four of these substances, namely benzene, carbon monoxide,
fonnaldehyde and soot, caused primarily by the incomplete combustion of natural gas or LP fuels.
Properly adjusted dryers will minimize incomplete combustion. Exposure to these substances can be
minimized further by properly venting the dryer to the outdoors.
This dryer must be properly installed and located in accordance with the Installation Instructions
before it is used. If you did not receive an Installation Instructions sheet, you can receive one by
visiting GEApp/illnces.com, or by calling BOO.GE.CARES(800.432.2737).
• Properly groWld dryer to conform with all
governing codes and ordinances. Follow details
in Installation Instructions.
• Install or store where it will not be exposed to
temperatures below freezing or exposed to the
weather, which could cause permanent damage
and invalidate the warranty.
• Connect to a properly rated. protected and sized
power supply circuit to avoid electrical overload.
• Remove all sharp packing items and dispose of
all shipping materials properly.
ExhIlust/DUeting
[Z] Gas dryers
MUSTbe exhausted to the outside.
III Use only rigid metal 4" diameter
ductwork
inside the dryer cabinet. Use only rigid metal
or flexible metal 4" diameter ductwork for
exhausting to the outside. USE OF PlAS1JC DR
OTHER COMBUSTlBLE DUCTWORK CAN CAUSE
A RRE. PUNCTVRED DUCTWORK CAN CAUSE A
RRE IF" CDUAflSES DR BECOMES OTHERWISE
RESTRICTED IN USE DR DURING INSTAUATION.
For complete details, follow the Installation
Instructions.
Aviano at Desert Ridge
AWARNINGI
• Keep the area underneath and around your
appliances free of combustible materials
(lint, paper, rags, etc.), gasoline, chemicals and
other flammable vapors and liquids.
• Keep all laundry aids (such as detergenlll,
bleaches, etc.) out of the reach of children,
preferably in a locked cabinet Observe all
warnings on container labels to avoid injury.
• Keep the floor around your appliances clean
and dry to reduce the possibilityof slipping.
• Never climb on or stand on the dryer top.
• Close supervision is necessary if this appliance is
used by or near children. Do not allowchildren
to play on, with or inside this or any other
appliance.
• Never reach into the dryer while the drum is
moving. Before loading, unloading or adding
clothes, wait until the drum has completely
stopped.
• The laundry process can reduce the flame
retardaney of fubrics. To avoid such a result,
carefully follow the garment manufueturer's
care instructions.
• Clean the lint filter before each load to prevent
lint accumulation inside the dryer or in the
room. DO NOT OPERATE 7Hf DRYER WITHOUT
THE UNT RLTER IN PLACE.
• Do not dry articles containing rubber, plastic
or similar materials such as padded bras, tennis
shoes, galoshes, bath mm, rugs, bibs, baby panlll,
plastic bags, pillows, etc. that may melt or bum.
Some rubber materials, when heated, can under
certain circumstances produce fire by
spontaneous combustion.
• Do not wash or dry articles that have been
cleaned in, washed in, soaked in or spotted
with combustible or explosive substances (such as
wax, oil, paint, gasoline, degreasers, dry-cleaning
solvents, kerosene, etc.) which may ignite or
explode. Do not add these substances to the
wash water. Do not use or place these substances
around your washer or dryer during operation.
• Do not place items exposed to cooking oils in
your dryer. Items contaminated with cooking oils
may contribute to a chemical reaction that could
cause a clothes load to catch fire.
• Any article on which you have used a cleaning
solvent or that contains flammable materials
(such as cleaning cloths, mops, towels used in
beauty salons, restaurants or barber shops, etc.)
must not be placed in or near the dryer until
solvenlllor flammable materials have been
removed There are many highly flammable
items used in homes such as acetone, denatured
alcohol, gasoline, kerosene, some household
cleaners, some spot removers, turpentines,
waxes, wax removers and products containing
petroleum distillates.
• Do not store plastic, paper or clothing that may
bum or melt on top of the dryer during
operation.
• Garments labeled Dry Away from Heator 00 Not
Tumble Dry (such as lifejackelll containing Kapok)
must not be put in your dryer.
• Do not dry fiberglass articles in your dryer.
Skin irritation could result from the remaining
particles that may be picked up by clothing
during subsequent dryer uses.
• To minimize the possibility of electric shock,
unplug this appliance from the power supply
or disconnect the dryer at the household
distribution panel by removing the fuse or
switching off the circuit breaker before
attempting any maintenance or cleaning
(except the removal and cleaning of the lint
filter). NOTE:Tuming the Cycle Selector knob
to an off position or pressing PAUSEdoes NOT
disconnect the appliance from the power supply.
Aviano at Desert Ridge
IMPORTANT SAFETY INFORMATION.
READ AU INSTRUCTIONS BEFORE USING.
AWARNINGI
WHEN USING YOUR DRYER (cant.)
• Never attempt to operate this appliance if it is
damaged, malfunctioning, partially disassembled,
or has missing or broken parts, including a
damaged cord or plug.
• The interior of the machine and the exhaust
duct connection inside the dryer should be
cleaned at least once a year by a qualified
technician. See the Loading and Using the Dryer
section.
• lfyOUfS is a gas dryer, it is equipped with an
automatic electric ignition and does not have
a pilot light. DO NOT ATTEMPT TO UGIff WITH
A MATCH. Bums may result from having your
hand in the vicinity of the burner when the
automatic ignition turns on.
2 o WHEN NOT USING
• You may wish to soften your laundered fabrics
or reduce the static electricity in them, by using
a dryer-applied fabric softener or an anti~tatic
conditioner. We recommend you use either a
fabric softener in the wash cycle, according to
the manufacturer's instrUCtions for those
products, or try a drye.....wded product for
which the manufacturer gives written assurance
on the package that their product can be safely
used in your dryer. Service or performance
problems caused by use of these products are
the responsibility of the manufacturers of those
products and are not covered under the warranty
to this appliance.
YOUR DRYER
• Grasp the plug firmly when disconnecting this
appliance to avoid damage to the cord while
pulling. Place the cord away from traffic areas
so it will not be stepped on, tripped over or
subjected to damage.
• Before discarding a dryer, or removing it from
service, remove the dryer door to prevent
children from hiding inside.
• Do not tamper with controls.
• Do not attempt to repair or replace any part of
this appliance or attempt any servicing unless
specifically recommended in this Owner's Manual
or in published user-repair insouctions that you
understand and have the skills to carry out.
READ AND FOLLOW THIS SAFETY INFORMATION CAREFULLY.
SAVE THESE INSTRUCTIONS
Aviano at Desert Ridge
Loading and using the dryer.
Always follow the fabric manufacturer's CBre label when laundering.
Sorting and Loading Hints
Do not ollflrlolld. This wastes energyand causes 'Minkling.
As a general rule, if clothes are soned properly for
the washer, !hey are sorted properly for !he dryer.
Do not dty the following itwM: fiberglass items, woolens,
rubber-coated items, plastics. items with plastic trim and
foam-filled items.
Do not add fabric softener sheets once the load has
become warm. They may cause fabric softener stains.
FJounce- Fabric Conditioner Dryer Sheets have been
approved far use in af( GE Dryers when used in
accordance with the manufacturer's instructions.
Care and Cleaning of the Dryer
7h &tltricrr.Wipe or dust any spills or washing
compounds wi!h a damp do!h. Dryer control
panel and finishes may be damaged by some
laundry pretreatment soil and stain remover
products. Apply !hese products away from !he dryer.
The fabric may !hen be washed and dried normally.
Damage to your dryer caused by !hese products is
not covered by your warranty.
7h1.hrt FilttH: Clean !he lint filter before each
use. Moisten your finger.; and reach into the filter
opening. Run your fingers across the filter. Have a
qualified technician vacuum the lint from the dryer
once a year.
Stainless StInI/: To clean stainless steel surfaces,
use a damp cloth with a mild, non-abrasive
cleaner suitable for stainless steel surfaces.
Remove the deaner residue, and then dry
with a dean cloth.
.",. ExhausI Duct: Inspect and clean the exhaust
ducting at least once a year to prevent clogging.
A partially clogged exhaust can lengthen the
drying time.
Follow these steps:
[Z] Turn
off electrical supply by disconnecting !he
plug from the wall socket.
!lI Disconnect
the duct from !he dryer.
r:J1 Vacuum
~
the duct with the hose attachment and
reconnect the duct.
7h ExhausI Hood: Oteck from the outside that the
flaps of the hood move freely when operating. Make
sure that there is no wildlife (birds, insects, etc.)
nesting inside the duct or hood.
Tumble
dty
D[][][QJ~~
-==...
*' ••••.•.
Orv
N_I
••••••••••••
~,.....
Water
temperature
Hest
setting
Special
Bleach
symbols
6
.::.=.
•••••
hnul:•••••••
MellI!
••
880.
instructions
EJ
-..IIl)
Aviano at Desert Ridge
Loading and using the dryer.
AlwBys follow the fabric manufacturer's
care label when laundering.
Venting the Dryer
For the best drying performance, the dryer needs to be properly vented . ."", dty8I' will USII more fill""
and nm /ongM if it is not venIIHI to the below .ptlcificlltiou CBrrlfullyfollow the.,.il.
on ExhaUBtingin the
InstlIllllliOilInstnH:lion£
• Use only rigid metal 4" diameter ductwork inside the
dryer cabinet Use only rigid metal or flexible metal 4"
diameter ductwork for exhausting to the outside.
• Do not use plastic or other combustible ductwork.
• Use the shortest length possible.
• Do not crush or collapse .
• Avoid resting the duct on sharp objects.
• Venting must conlotm to loeBI building codes.
CDrrect
Venting
-~~
....•
,......- I -
I
11\
IncD"fH:t
Venting
Aviano at Desert Ridge
Before you call Customer Support ...
C?{
?
Troubleshooting Tips
Save time and money/ Review the charts on the following pages, or wsit
www.GEApplillnctlS.COIIl
You may not need to call Customer Support
Possible Causes
Dryer is unplugged
Fuse is blown/circuit
is tripped
• Make sure the dryer plug is pushed completely into
the outlet.
breakeI"
• Check the house fuse/ circuit breaker box and replace
fuse or reset breaker. NOJE-Most elecnic dryers use
2 fuses/breakers.
Fuse is blown/circuit breaker is
tripped; the dryer may tumble
but not heat
• Check the house fuse/ circuit breaker box and replace
both fuses or reset both breakers. Your dryer may tumble
if only one fuse is blown or one breaker nipped.
Gas service is off
• Make sure gas shutoff at dryer and main shutoff are
fully open.
Some sbakiDg/noise is normal.
Drya- may be siUing lDleven1y
• Move dryer to an even floor space, or adjust leveling legs
as necessary until even.
Improper
• Follow directions on fabric softener package.
use of fabric softener
Drying dirty items with
clean ODes
• Use your dryer to dry only dean items. Dirty items can
stain clean items and the dryer.
aodles were not
completely clean
• Sometimes stains which cannot be seen when the
clothes are wet appear after drying. Use proper washing
procedures before drying.
Improper
• Sort lint producers
(like corduroy).
sorting
(like chenille) from lint collectors
Static e1ectridty can auract lint
• See suggestions in this section under STATIC.
Owedoading
• Separate large loads into smaller ones.
Paper, tissue, etc.1eft in pockets
• Empty all pockets before laundering
clothes.
• 1ly a fabric softener.
• Bounce- Fabric Conditioner Dryer Sheets have been
approved for use in all GE Dryers when used in
accordance with the manufacturer's instructions.
• Try a fabric softener.
• A4just setting to LESS DRY or DAM" DRY.
• Try a fabric softener.
• Automatic drying times will vary according to the type
of heat used (elecnic, natural or LP gas), size of load,
types of fabrics, wetness of clothes and condition of
exhaust ducts.
Aviano at Desert Ridge
Before you call Customer Support ...
Prob/llm
!'oaib/II
CIIUSIIS
WhlltToDo
CIothIIs tlllce too 10IIfI
totky
Improper sorting
• Separate heavy items from lightweight items (generally,
a well-sorted washer load is a weU«>rted dryer load).
Large loads of heavy fabrics
(like beach towels)
• Large. heavy fabrics contain more moisture and take
longer to dry. Separate large, heavy fabrics into smaller
loads to speed drying time.
Controls improperly
• Match control settings to the load you are drying.
set
Lint filter is fun
• Oean lint filter before every load.
Improper
ducting
• Qleck installation
dueting/venting.
or obstructed
instructions
for proper
• Make sure ducting is clean, free of kinks and
unobstructed.
• Check to see if outside wall damper operates easily.
• Check the Installation Instructions
dryer venting is correct
Blown fuses or tripped
circuit breaker
to make sure the
• Replace fuses or reset circuit breaken. Since most dryers
use 2 fuses/breakers,
make sure both are operating.
• Do not put more than one washer load in the dryer
ata time .
• If you are drying only one or two items, add a few items
to ensure proper tumbling.
• Select a shorter drying time.
• Remove items while they still hold a slight amount of
moisture. Select a LESS DRY or DAMP DRY setting.
l.etdng items sit in dryer
lifter cyde ends
• Remove items when cycle ends and fold or hang
immediately.
0ved0llding
• Separate large loads into smaller ones.
Some
when
safely
in the
• To avoid shrinkage,
fabrics wiD naturally shrink
washed. Others can be
wa&hed, but will shrink
dryer
follow garment care labels exactly.
• Some items may be pressed back into shape after drying.
elf you are concerned about shrinkage in a particular
item, do not machine wash or tumble dry it
Aviano at Desert Ridge
GEDryerWarra~
_
All warranty support provided by- our Factory Service Centers,
or an authorized Customer Care~ technician. To get Customer
Support, on-line, 24 hours a day, visit us at www.GEAppliaocllS.com.
or call800.GECARES (800.432.2737).
~
0". Yur
From the date of the
original purchase
• Service trips to
use the product.
• Improper
de~
YOlD"
installadon
Any ,." of the dryer which fails due to a defect in materials or workmanship. During this
fuR "".,.",
~
GE will also provide, frN t1Icharge, all labor and related service costs to
replace the defective part.
home to teach you bow to
• Replacement
of house fuses or resetting of circuit
breakers.
fmcluding improper
venting),
or mainteDaDce.
• Failure of the product if it is abused, misused, or
used for other than the intended purpose or used
conunen:iaDy.
• Replacement
Staple your receipt here.
Proof of the original purchase
date is needed to obtain support
under the warranty.
of the light bulb.
• Produds wbic:h are DOt defective or broken, or wbich
are working as deIcribed in the Owner's Manual.
• Damage to the product
or acts of God.
caused by accident, fire, floods
• Incidental or consequential
defects with this appliance.
damage caused by pOlSible
• Defects or damage due to operation
temperatures.
in freezing
• Damage caused after deliwery.
This warranty is extended to the original purchaser and any succeeding owner for products purchased for home
use within the USA. In Alaska, the warranty excludes the cost of shipping or service calls to your home.
Some states do not allow the exclusion or limitation of incidental or consequential damages. This warranty gives
you specific legal rights, and you may also have other rights which vary from state to state. To know what your
legal rights are, consult your local or state consumer affairs office or your state's Attorney General.
Aviano at Desert Ridge
IMPORTANT SAFETY INFORMAnON.
READ AU INSTRUCTIONS BEFORE USING.
A rUIIr,..JI R'•.'llVG'
WI
•
For your safety, the information in this manual must be followed to minimize the risk of fire
or explosion, electric shock, or to prevent property damage, personal injury, or loss of life.
WATER HEATER SAFETY
Under certain conditions hydrogen gas may be produced in a water heatsr that has not been used for
two weeks or more. Hydrogen gas can be explosive under these circumstances.
H the hot water has not been used for two weeks or more, prevent the possibility of damage or injury by
turning on all hot water faucets and allowing them to run for several minutes. Do this before using any
electrical appliance which is connected to the hot water system. 1bis simple procedure will allow any
built-up hydrogen gas to escape. Since the gas is flammable, do not smoke or use an open flame or
appliance during this process.
PROPER INSTALLATION
This washer must be properly installed and located in accordance with the Installation Instructions
before it is used. If you did not receive an Installation Instructions sheet you can receive one by visiting
GEAppliancflS.com, or by calling _GE.CARES (BOO.432.2737).
• Install or store where it will not be exposed to
temperatures below freezing or exposed to
the weather.
• Properly ground washer to conform with all
governing codes and ordinances. Follow details
in Installation Instructions.
YOUR LAUNDRY AREA
• Keep the area underneath and around your
appliances free of combustible materials such as
lint, paper, rags, chemicals, etc.
• Qose supervision is necessary if this appliance is
used by or near children. Do not allow children
to play on, with, or inside this or any other
appliance.
A viano at Desert Ridge
• Never reach into washer while it is moving.
Wait until the machine has completely stopped
before opening the lid.
Use this
appliance
only for its
intended
purpose as
described in
this Owne(s
Manual
• Do not mix chlorine bleach with ammonia or
acids such as vinegar and/or rust remover.
Mixing different chemicals can produce
a toxic gas which may cause death.
• The laundry process can reduce the flame
retardancy of fabrics. To avoid such a result,
carefully follow the garment manufacturer's
wash and care instructions.
• To minimize the possibility of electric shock,
unplug this appliance from the power supply
or disconnect the washer at the building's
distribution panel by removing the fuse or
switching off the circuit breaker before
attempting any maintenance or cleaning.
N07l:Tuming the Cycle Selector Knob to an
off position, or pressing PAUSE does NOT
disconnect the appliance from the power supply.
• Do not wash or dry articles that have been
cleaned in, washed in, soaked in or spotted with
combustible or explosive substances (such as
wax, oil, paint, gasoline, degreasers, dry<leaning
solvents,kerosene, etc.). These substances giveoff
vapors that may ignite or explode. Do not add these
substances to the wash water. Do not use or place
• Never attempt to operate this appliance if it is
damaged, malfunctioning, partially disassembled,or
these substances around your washer or dryer
during operation.
has missing or broken parts, including a damaged
cord or plug.
• Turn off water faucets to relieve pressure on hoses • Do not attempt to repair or replace any pan of
and valvesand to minimize leakage if a break or
this appliance unless specifically recommended in
this Owner's Manual, or in published user-repair
rupture should occur. Check the condition of the
fill hoses; they should be replaced every 5 years.
instructions that you understand and have the
skills to carry out.
• Before discarding a washer, or removing it
from service, remove the washer lid to prevent
• Do not tamper with controls.
children from hiding inside.
"
~(E'
READ AND FOLLOW THIS SAFElY INFORMATION
\'
"" "
SAVE THESE INSTRUCTIONS
CAREFULLY.
Aviano at Desert Ridge
Care and Cleaning of the Washer
II/IovingIIIIfI Strnge: AU the service technician to
remove water from drain pump and hoses. See the
Installation Instructions packed with product for
information on how to reinstall the shipping rod to
keep the tub stationary when moving the washer.
For more information, visit GEApp1ianca.ClIRI, or
call _GE.CARES (BOO.432.2737). Do notstore
the washer where it will be exposed to the weather.
Wash Bllsket Leave the lid open after washing to
allow moisture to evaporate. If you want to dean the
basker. use a clean soft cloth dampened with liquid
detergent, then rinse. (Do not use harsh or gritty
cleaners.)
Fill Hous: Hoses connecting washer to faucet
should be replaced every 5 years.
Exterior: Immediately wipe off any spills.
Wipe with damp cloth. Try not to hit surface
with sharp ol?iects.
Long Vacans: Be sure water supply is shut off at
faucets. Drain all water from hoses if weather will
be below freezing.
Fabric Care Labels
Machine
wash
cycle
Water
temperature
Tumble
dry
o [Q][Q][OJBS
d.i....
do.•.
Ilty
Nv"",,1
P.rmlllllll ProlW
•••_
Heat
setting
e e
Hith
Special
instructions
Medium
E1
lilli dIy/
hlllll to dry
Bleach
symbols
GIIllloI
Do nOltumble dry
,••••• with
railbont
Willi'
0 e
Low
[OJ]
Dripdoy
NohooV.r
EJ rJ
Dryflot
Intho III.d.
Aviano at Desert Ridge
Before you call for
Ci{
•
service ...
Troubleshooting Tips
Save time and money! Review the charts on the foRowing pages, or
visit GEAppliances.com. You may not need to caR for service.
I'ERFECTEIfP
Petf8cTemp
wash ,."",.,..,."
• This normal. The PerlfH:Temp fearure is designed
not to activate during a cold rinse cycle to improve
the energy efficiency of your washer.
is illl:tJn'fH:t
(RmfIW PedecTIIIIIp
in the -AbcJut waIr8f
"""",.-
AU the water in your hOUllehold
water heater 11M been used
• Wait until the water in the water heater is heated to the
correct temperarure.
section}
WA7Bf
• Switch to a lower sudsing detergent brand and follow
instIUctions on package.
Very
110ft
water
• Try less detergent.
Too mudl detergent
• Measure your detergent carefully. Use less soap if you
have soft water, a smaller load, or a lightly soiled load.
no hoses
or drain hose is
improperly oonnected
• Make sure hose connections are tight at faucets and
rubber washers are installed. Make sure end of drain
hose is correctly inserted in and secured to drain fucility.
Household drain may
be clogged
• Check household plwnbing. You may need to call
aplwnber.
Constant water pressure
to the fill hoses at the
• Tighten hoses at the faucets and turn the water off after
each use.
• Check condition of the fill hoses; they should be
replaced every 5 years.
water
8OUR:e
Using too mudl detergent
inwasber
• Use less detergent. Use less soap if you have soft water,
a smaller load, or a lightly soiled load.
Cooler _ter
tempera1un!S
pnn>ide~d
energy
efficiency
• New laundry detergents have been formulated to work
with cooler water temperatures without affecting
wash perfonnance.
Control is not set properly
• Check water temperature
Water supply is blrned off
or improperly connerted
• Turn both hot and cold faucets fully on and make sure
hoses are connected to correct faucets.
Water ~
screeDII III'e
ltOppedup
• Turn off the water source and remove the water
connection hoses from the upper back of the washer.
Use a brush or toothpick to clean the screens in the
machine. Reconnect the hoses and turn the water back on.
House water heater is
not set properly
• Make sure house water heater is delivering water
at 120°F-140°F(48°C-60°C).
Ild lifted or cycle _ put in
pause for ewer 24 holU'll
• Reset cycle.
Drain hOlle is kinked or
improperly connected
• Straighten drain hose and make sure washer is not
sitting on it.
control and adjust.
• Top of drain outlet should be less than 8 ft (2.5 m)
above floor.
'l1le HANDWASH or CASUALS
cycle _ chorien
• This is normal. The washer alternates between agitate
and soak during the HANDWASH and CAStJALS cycles to
get your clothes cleaner with less wear.
• The washer may pause during the spin cycle to remove
soapy water more efficiently.
Aviano at Desert Ridge
"'-ill" Causes
Washer is 1IDpI~
• Make sure cord is plugged securely into a working outlet
Water supply is turned off
• Turn both hot and cold faucets fully on.
Controls are not llet properly
• Check controls.
Lid is open - safety feature
prevents agitation and spinning
when lid is up
• Qose lid and reset cycle. to the beginning if necessary.
Orcuit breaker/fuse
tripped/blown
• Check house circuit breakers/fuses. Replace fuses or
reset breaker. Washer should have separate outlet
b;
EIectronic:s need to be reset
• Unplug washer, wait 2 minutes, plug back in, and
press STARr.
• Press STARr.
• Make sure the spin cycle selected matches the load you
are washing. Some fabrics will feel wetter when rinsed
with cold water.
InCOITeCt use of fabric
softener
• Check fabric softener package for instructions and follow
directions for using dispenser.
• Pretreat stain and rewash.
Dyetnmsfer
• Sort whites or lightly colored items from dark colors.
Not enough detergent
• Use more detergent (especially with largerloads).
Be sure to follow detergent manufacturer's directions.
• Use a water conditioner
a water softener.
like Calgon brand or install
• Make sure water heater is delillering water at
120°F-140°F (48°G-60°C).
WlUIher is oftdoaded
• Select load size to match clothes load.
Detergent is not
dissolving
• Add detergent as wash basket fills with water before
you load clothes.
Dye transfer
• Sort clothes by color. If fabric label states wash separately.
unstable dyes may be indicated.
Untor~OII
• If you do not dry your clothes with a clothes dryer. your
clothes may retain more lint
C/"".
InCOITeCt 8OI1iog
• Separate lint producers from lint collectors.
Washing too long
• Wash small loads for a shorter time than larger loads.
Detergent not disso1viog
• Add detergent
load clothes.
as wash basket fills with water, before you
• Try a liquid detergent.
• Use wanner water temperature.
• Load clothes no higher than the top row of holes in the
washer basket
• Make sure load size selected matches clothes load size.
Incorrect use of fabric softener
• Check fabric softener package for instructions
and follow directions for using dispenser.
Aviano at Desert Ridge
Before you call for service ...
<i\
Troubleshooting
PERFORMANCE(ct1lJt.j
T/{1S
PoaiblB Ctmses
Result of normal wear on
poJy-cottOD blends BDd
fuzzy fabrics
• While this is not caused by the washer, you can slow the
pilling process by washing garments inside out.
Pins, snaps, hooks, sharp
buttom, belt buckles,
zippers and sharp objects
left in poc:ketll
• Fasten snaps. hooks, buttons and zippers.
• Remove loose items like pins, o~eets in pockets
and sharp buttons.
• Turn knits (which snag easily) inside out.
• Check bleach package instructions for proper amount.
• Never add undiluted bleach to wash or allow clothes
to come in contact with undiluted bleach.
01emic::a1s like hair bleach
or ety.!, permanent wave
solution
• Rinse items that may have chemicals on them
before washing.
• Avoid mixing heavy items (like work clothes) with
light items (like blouses).
• Try a fabric softener.
Overloading or
incorrect water Ieve1
wash and
• Load your washer so clothes have enough room
to move freely with water covering all of the clothes.
dry cycles
• Match Cycle selection to the type of fabric you are
washing (especially for easy care loads).
Repeated wasbing in
water that is too hot
• Wash in warm or cold water.
InCOJTeCt
• To level the front of the washer, a<ljust the front leveling
legs by rotating the individual leg in the proper direction
for up or down. To level back of washer. lift back of
machine 4" (11 cm) and set down.
Washer load is
unbaIanc:ed
• Press PAUSE to stop the washer, open the lid
and redistribute the load evenly. Qose the lid and
press srARr.
Shipping rod is stiD usembled
in unit
• To remove shipping rod from washer, pull yellow tag and
attached rod from the bottom right-hand side of washer.
Wa.her is siUing too dole
to waD (causes knocking
during eyde)
• Pull washer away from the wall; about 4" (11 ern)
is needed.
Possible
Ubels on thell1dBTitK
III fbtI
wi" not
w"""
peel offdun"
c.u..
0ccalIi0naDy the ~
used 011 the .Iabe1sdoes
not reIea8e c1eaDJy
• Use a hair dryer set at the lowest heat setting, directing
the air at the label for a shon amount of time. This will
release the adhesive easily, without damaging the surface
of the washer.
Aviano at Desert Ridge
Consumer Support.
GEAppliances Website
Have a question or need assistance with your appliance? Try the GE Appliances Website 24 hours a day,
any day of the year! For greater convenience and faster service, you can now download Owner's Manuals,
order parts, catalogs, or even schedule service on-line. You can also •Ask Our Team of Experts'·'
your questiOTI5,and so much more ...
Schedule Service
Expert GE repair service is only one step away from your door. Get on-line and schedule your service at
your convenience 24 hours any day of the year! Or call 8OO.GE.CARES(800.432.2737) during normal
business hours.
Real Life Design Studio
GE supports the Universal Design concept-products,
services and environments that can be used by
people of all ages, sizes and capabilities. We recognize the need to design for a wide range of physical and
mental abilities and impairments. For details of GE's Universal Design applications, including kitchen
design ideas for people with disabilities. check out our Website today. For the hearing impaired. please call
800.1DD.GEAC (800.833.4322).
Purchase a GE extended wammty and learn about special discounts that are available while your warranty
is still in effect. You can purchase it on-line anytime. or call 800.626.2224 during normal business hours.
GE Consumer Home Services wiDstill be there after your warranty expires.
GEAppliances.com
Individuals qualified to service their own appliances can have parts or accessories sent directly to their
homes (VISA, MasterCard and Discover cards are accepted). Order on-line today, 24 hours every day or
by phone at 800.626.2002 during normal business hours.
lMttrIctions CDIJIBilHld in tJu. mllllUIII cover pmclllJunls to be ptIIfonmId IIy .", IIStIr.••
..mcm, flllllfIIB'/y
should be I'IIfenrId IrJ qllBliIi«J stHlIice pet$DIIIHIL Caution ".,., be tlXBCised, since improper servicing RIll, __
IIRSIIfe
opemion.
GEApplianCBS.com
If you are not satisfied with the sernce you receive from CE. contact us on our Website with all the details
including your phone number, or write to: General Manager, Customer RelatiOTI5
GE Appliances, Appliance Park
Louisville. KY40225
.~
Register YourAppliance
~
1i;, ...,,,,,;':"~i'ld;
Register your new appJimc:e on-liDe--at yom COIlftIIienc:eI Timely product registration will allow for
enhanced communication and prompt sernce under the terms of your warranty. should the need arise.
You may also mail in the pre-printed registration card included in the packing material.
Aviano at Desert Ridge
GE Washer Warrant¥.
All warranty service provided by. our Factory Service Centers,
or an authorized Customer Care«J technician. To schedule service,
on-line, 24 hours a day, visit us at GEAppfiances.com, or calf
800.GECARES (800.432.2737).
For The Period
Y..,
ot
We Will Replllce:
One
From the date of the
original purchase
Second
thtrlllgh RIth
From the date of the
original purchase
Any
plitt of the washer which fails due to a defect in materials or workmanship. During
this full DlHl-ytIII, ~
GE will also provide, ".. of chllrgfl, all labor and related
service to replace the defective part.
Y..,
Second through Tenth
From the date of the
original purchase
Staple your receipt here.
Proof of the original purchase
date is needed to obtain service
under the warranty.
The """"'iaiD", ~
rod and spring••••
", if any of these parts should fail due
to a defect in materials or workmanship. GE will also replace the waller lid or cover. if
they should rust under normal operating conditions. During this BdditiDnlll louT-year
limitfld wamnty. you win be responsible for any labor or related service costs.
y..,
SBcond thtDugh TwentitIth
From the date of the
original purchase
II.,..,
y..,
711. WltSher 1IIb,if it should tail due to a defect in materials or workmanship. During this
IIdditionIII
limited watnIIJfyI you will be responsible for any labor or related
service costs.
The WII$IJeT lNIsIcet if it should fail due to a defect in materials or workmanship. During
this HdiIionBI ninetHll-yu, limitfId WlHntIIty, you win be responsible for any labor or
related service costs.
• Serrice trips to your home to teach you how to use
die product.
• Damage to the product caused by aa:ident, fire, floods
or IIdlI of God.
• Improper iDstaDation, deliYery or maintenance.
• Incidental or c:omequenlial cIanaage caused by poIIIiI'bIe
defeds with d1is apptiance.
• Failure of the product if it is abused, misused, or used for
other dum the intended plII'pMe or used conunercially.
• Replacement
breakers.
• ~
caused after delivery.
of house fwles or resetting of dn:uit
This wananty is extended to the original purchaser and any succeeding awner for products purchased for home
wammty excludes the cost of shipping or setVica calls to your home.
USB
within the USA In Alaska. the
Some states do not allow the exclusion or limitation of incidental or consequential damages. This warranty gi'l8s you specific legal rights, and you
may also have other rights which vary from state to state. Toknow what your legal rights are, consult your local or state consumer affairs office or
your state's Attorney General.
Aviano at Desert Ridge
Appliances
iX:Dimplex
PRACTICAL USER'S GUIDE
FOR THE
OPTIFLAME ELECTRIC FIREPLACE
MODEL NUMBERS:
BF33ST/DX
BF39ST/DX
HBI39ST/DX
BF45ST/DX
HBI45ST/DX
Wite Your Remote
Control Code Number
Here:
Valued" Customet;
We are pfeased" tfiat you fiave cfiosen to purcfiase an efectric jirepface
manufactured 6y (j)impfe:{:Nortfi jlmerica Lta.
Over tfie years) vafua6fe memories wilI occur around" the wanntfi and"
comfort of your heartfi. 'Ifiankyou for alIowing ourprod"uct to 6e tfie 6ac{.d"rop
for tfiose speciaf moments.
Aviano at Desert Ridge
QUICK REFERENCE GUIDE FOR THE OPTIFLAME
ELECTRIC FIREPLACE
1. Prior to the first use of the fireplace verify the following:
• Are the circuit breakers for the fireplace on?
• Are the light bulbs in your fireplace loose? (to check, follow the
instructions for replacing the light bulbs under the maintenance
section of this manual)
2. The heater on your fireplace may emit a slight, harmless odor when
first used. This odor is a normal condition caused by the initial
heating of internal heater parts and will not occur again.
3. If your heater does not emit heat, ensure the large switch is on, the
wall thermostat is set above the current room temperature and any
wall switches for the unit are on. If this does not work, switch the unit
off for 5 minutes and try again. Consult operation section of your
practical users guide for further information.
4. The information regarding the model of your fireplace can be found
on the rating plate located under the logs in the lighting area.
5. If you have any technical questions, questions regarding the
operation of your fireplace, or require service for your fireplace
contact Dimplex North America customer service at 1-888-DIMPLEX
(1-888-346-7539).
Aviano at Desert Ridge
Appliances
VVhen using electrical appliances, basic precautions should always be followed to reduce the
risk of fire, electric shock, and injury to persons, including the following:
1. Read all instructions before using this fireplace.
2. This fireplace is hot when in use. To avoid burns, do not let bare skin touch hot
surfaces. The trim around the heater outlet becomes hot during heater operation.
combustible materials, such as furniture, pillows, bedding, papers, clothes, and curtains
at least 3 feet (O.9m) from the front of the unit.
3. Extreme caution is necessary when any heater is used by or near children or invalids
and whenever the fireplace is left operating and unattended.
.
4. Do not operate any fireplace if the heater has malfunctioned, or if the fireplace has been
dropped or damaged in any manner.
5. Do not use outdoors
6. This fireplace is not intended for use in bathrooms, laundry areas and similar indoor
locations.
7. Do not insert or allow foreign objects to enter any ventilation or exhaust opening as this
may cause an electric shock or fire, or damage to the heater.
8. To prevent a possible fire, do not block are intake or exhaust in any manner.
9. All electrical heaters have hot and arcing or sparking parts inside. Do not use in areas
where gasoline, paint, or flammable liquids are used or stored or where the unit will be
exposed to flammable vapors.
10. Do not modify this fireplace. Use it only as described in this manual. Any other use not
recommended by the manufacturer may cause fire, electric shock or injury to persons.
11. Do not burn wood or other materials in this fireplace.
12. Do not strike fireplace glass.
13.Always use a certified electrician for installation.
14. Disconnect all power coming to fireplace at main service panel before performing any
cleaning, or maintenance.
15. VVhen transporting or storing the fireplace, keep in a dry place, free from excessive
vibration and store as to avoid damage.
CAUTION: Procedures and techniques which, if not carefully followed, will result in damage to
the equipment
WARNING: Procedures and techniques which, if not carefully followed, will expose he user to
the risk of fire, serious injury, illness or death
Aviano at Desert Ridge
IMPORTANT INSTRUCTIONS
If you have any questions about out products please have the product model and serial
numbers available upon calling Dimplex customer service. To locate the model and serial
number labels see below.
~
~~~$:~~:N~i
Lh
PART NO,
,======;7
C=:::=:J
RISV: OF ELECTRIC SHOCK DO NOT OPEN
NO USER-SERVICEABLE PARTS INSIDE
ATTENTION
RISQUE DE DECHARGE ELECTRIQUE
NE PAS OUVRIR AUCUNE PIECE
REPARABLE PAR L'UTIUSATEUR A L'INTERIEUR
PRECAUCION
RIESGO DE CHOQUE ELECTRICO NO ABRIR NO HAY
PARTES ADENTRO QUE EL USUARIO PUEDA REPARAR
AIR HEATI:R/CHAUFFE
-AIR/CALENTADOR
DE /lIRE
c@us
~~.jl6~dCJ"lj9%&''j;Jt~JB
~Dinplex
f6~~t~Np~~t~~
~trJDlWd2
NOOTH
MADE IN CANADA
AIo4ERICA
LB1III
LIMITED
=
R.,
0
14-6l
E71416
SERIAL
I
~~o.
XXX
Aviano at Desert Ridge
~-
Appliances
MAINTENANCE
WARNING
Disconnect all power coming to fireplace at main service panel before attempting an
maintenance or cleaning to reduce risk of fire, shock or damage to persons.
NOTE
Allow at least 5 minutes for light bulbs to cool off before touching bulbs to avoid accidental
burning of skin.
TOOL REQUIREMENTS
Slot screw driver
LIGHT BULB REPLACEMENT
Allow at least 5 minutes for light bulbs to cool off before touching bulbs to avoid accidental
burning of skin.
Light bulbs need to be replaced when you notice a dark section of the flame or when the
clarity and detail of the log exterior disappears. There are four bulbs under the log set
which generate the flames and embers.
LIGHT BULB REQUIREMENTS
Quantity of 4 clear chandelier or chandelabra bulbs with an E-12 (small) socket base, 60
watt rating. Example: GE 60BC or Philips 60CTC.
DO NOT EXCEED 60 WATTS PER BULB.
CAUTION
VVhen handling log only apply force to the ember bed section not directly to the logs.
HELPFUL HINTS
It is a good idea to replace all light bulbs at one time if they are close to the end of their
rated life. Group replacement will reduce the number oftimes you need to open the unit to
replace light bulbs. Long life bulbs are recommended to reduce the frequency of bulb
changes.
Aviano at Desert Ridge
1. Open steel curtain (remove glass doors if
applicable ).
2. Remove two screws on log bracket and
set aside. (FIGURE 3)
3. Pull front edge of plastic ember bed or plastic
grate up and forward until rear tab releases from
the ledge located at the bottom of the mirror.
(FIGURE 4)
Note: Log set fits tightly into firebox, some force
may be necessary to remove.
4. Examine the bulbs to determine which bulbs
require replacement.
5. Unscrew bulbs counter clockwise.
7. Replace the log by inserting the rear tab of the
logset under the back ledge of the fireplace and push
down on the front edge of the logset until it snaps into
place. (FIGURE 4)
8. Replace log grate using two screws previously
removed.
Mirror Cleaning
The mirror is cleaned in the factory during the
Assembly operation. During shipment, installation,
Handling, etc., the mirror surface may collect dust
Particles; these can be removed by buffing lightly
With a clean dry cloth.
To remove fingerprints or other marks, the mirror
can be cleaned with a damp cloth using good
quality household glass cleaner. The mirror should
be completely dried with a lint free cloth to prevent
water spots. To prevent scratching scratching, do not
use abrasive cleaners or spray liquids on the clear door
surface.
I
I
I·
Aviano at Desert Ridge
Products to which this limited warranty applies
This limited warranty applies to the following models of your newly purchased Dimplex electric
fireplace BF33ST, BF33DX, BF39ST, BF39DX, BF45ST, BF45DX, HBI39ST, HBI39DX,
HBI45ST, HBI45DX and to newly purchased Dimplex fireplace surrounds (mantels) and trims.
This limited warranty applies only to purchases made in any province of Canada except for
Yukon Territory, Nunavut, or Northwest Territories or in any of the 50 States of the USA (and
the District of Columbia) except for Hawaii and Alaska. This limited warranty applies to the
original purchaser of the product only and is not transferable.
Light bulbs are not covered by this limited warranty and are the sole responsibility of the
owner/purchaser.
Products purchased in Yukon Territory, Nunavut, Northwest Territories,
Hawaii, or Alaska are not covered by this limited warranty. Products purchased in these
States, provinces, or territories are sold AS IS without warranty or condition of any kind
(including, without limitation, any implied warranties or conditions of merchantability or fitness
for a particular purpose) and the entire risk of as to the quality and performance of the
products is with the purchaser, and in the event of a defect the purchaser assumes the entire
cost of all necessary servicing or repair.
Products, other than fireplace surrounds (mantels) and trims, covered by this limited warranty
have been tested and inspected prior to shipment and, SUbject to the provisions of this
warranty, Dimplex warrants such products to be free from defects in material and workmanship
for a period of 2 years from the date of the first purchase of such products.
Dimplex fireplace surrounds (mantels) and trims covered by this limited warranty have been
tested and inspected prior to shipment and, subject to the provisions of this warranty, Dimplex
warrants such products to be free from defects in material and workmanship for a period of 1
year from the date of first purchase of such products.
The limited 2 year warranty period for products other than fireplace surrounds (mantels) and
trims and the limited 1 year warranty period for fireplace surrounds (mantels) and trims also
applies to any implied warranties that may exist under applicable law. Some jurisdictions do
not allow limitations on how long an implied warranty lasts, so the above limitation may not
apply to the purchaser.
What this limited warranty does not cover
This limited warranty does not apply to products that have been repaired (except by Dimplex or
its authorized service representatives) or otherwise altered. This limited warranty does further
not apply to defects resulting from misuse, abuse, accident, neglect, incorrect installation,
improper maintenance or handling, or operation with an incorrect power source.
Aviano at Desert Ridge
What you must do to get service under this limited warranty
Defects must be brought to the attention of Dimplex Technical Service by contacting Dimplex
at 1-888-DIMPLEX (1-888-346-7539), or 1367 Industrial Road, Cambridge Ontario, Canada
N1 R 7G8. Please have proof of purchase, catalogue/model and serial numbers available
when calling. Limited warranty service requires a proof of purchase of the product.
What Dimplex will do in the event of a defect
In the event a product or part covered by this limited warranty is proven to be defective in
material or workmanship during (i) the 2 year limited warranty period for products other than
fireplace surrounds (mantels) and trims, and (ii) the 1 year limited warranty period for
surrounds (mantels) and trims, you have the following rights:
•
Dimplex will
without charge.
or replacement
lieu of repair or
part.
in its sole discretion either repair or replace such defective product
If Dimplex is unable to repair or replace such product or part, or if
is not commercially practicable or cannot be timely made, Dimplex
replacement, choose to refund the purchase price for such product
or part
repair
may, in
or
•
Limited warranty service will be performed solely by dealers or service agents of
Dimplex authorized to provide limited warranty services.
•
For products other than surrounds (mantels) and trims, this 2 year limited
warranty entitles the purchaser to on-site or in-home warranty services. Accordingly,
Dimplex will be responsible for all labour and transportation associated with repairing or
replacing the product or part except as follows: (i) charges which may be levied for travel
costs incurred to travel to the purchaser's site where the product is located if the
purchaser's site is beyond 30 miles (48 km) from the closest service depot of Dimplex's
dealer or service agent; and (ii) the purchaser is solely responsible for providing clear
access to all serviceable parts of the product.
•
For surrounds
(mantels) and trims, this 1 year limited warranty does not entitle the
purchaser to on-site or in-house warranty services. The purchaser is responsible for
removal and transportation of the surrounds (mantels) and trims (and any repaired or
replacement product or part) to and from the authorized dealer's or service agent's place
of business. On-site or in-home services for surrounds (mantels) and trims may be
performed at the purchaser's specific request and expense at Dimplex's then-current
rates for such services. Dimplex will not be responsible for, and this limited warranty shall
not include, any expense incurred for installation or removal of the surrounds (mantels) or
trims or any part thereof (or any replacement product or part) including, without limitation,
all shipping costs and transportation costs to and from the authorized dealer's or service
agent's place of business and all labour costs. Such costs shall be the purchaser's
responsibility.
A viano at Desert Ridge
What Dimplex and its dealers and service agents are also not responsible for:
IN NO EVENT WILL DIMPLEX, OR ITS DIRECTORS, OFFICERS, OR AGENTS, BE LIABLE
TO THE PURCHASER OR ANY THIRD PARTY WHETHER IN CONTRACT, IN TORT, OR
ON ANY OTHER BASIS, FOR ANY INDIRECT, SPECIAL, PUNITIVE, EXEMPLARY,
CONSEQUENTIAL,
OR INCIDENTAL LOSS, COST, OR DAMAGE ARISING OUT OF OR IN
CONNECTION WITH THE SALE, MAINTENANCE, USE, OR INABILITY TO USE THE
PRODUCT, EVEN IF DIMPLEX OR ITS DIRECTORS, OFFICERS, OR AGENTS HAVE
BEEN ADVISED OF THE POSSIBILITY OF SUCH LOSSES, COSTS OR DAMAGES, OR IF
SUCH LOSSES, COSTS, OR DAMAGES ARE FORESEEABLE.
IN NO EVENT WILL
DIMPLEX, OR ITS OFFICERS, DIRECTORS, OR AGENTS BE LIABLE FOR ANY DIRECT
LOSSES, COSTS, OR DAMAGES THAT EXCEED THE PURCHASE PRICE OF THE
PRODUCT.
SOME JURISDICTIONS DO NOT ALLOW THE EXCLUSION OR LIMITATION OF
INCIDENTAL OR CONSEQUENTIAL DAMAGES, SO THE ABOVE LIMITATION OR
EXCLUSION MAY NOT APPLY TO THE PURCHASER.
This limited warranty gives you specific legal rights, and you may also have other rights
which vary from jurisdiction to jurisdiction. The provisions of the United Nations Convention
on Contracts for the Sale of Goods shall not apply to this limited warranty or the sale of
products covered by this limited warranty.