1
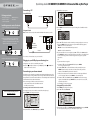
Quick Setup Guide I DX-WBRDVD1/DX-WBRDVD1-CA Connected Blu-ray Disc Player Connecting a TV 4 The Wireless screen opens. Using HDMI (best) Package contents • Blu-ray disc player • Remote control • Quick Setup Guide Language Wireless Parental TV • AAA batteries (2) • User Guide Back of player System Settings Network Network List WiFi Protected Setup(WPS) Manual BD-Live IP Settings Display Audio Installing remote control batteries 1 Remove the battery compartment cover. 5 Press ENTER. The Network List screen opens showing a list of available wireless networks. Using an AV cable Network List Note: The AV cable can only send standard-definition video (480i) to your TV. Steven Back of player TV 2 Insert two AAA batteries into the battery compartment. Make sure that the + and – symbols on the batteries match the + and – symbols in the battery compartment. Linsys Yellow=Video White=Left audio Red=Right audio A/V cable To connect to a home theater, see your User Guide. 3 Replace the battery compartment cover. Plugging in your DVD player and turning it on 1 Plug the power cord into a standard power outlet. 2 Press the (standby/on) button on your DVD player or the button on the remote control. STANDBY/ON Connecting to your home network For the most updated User Guide, please visit www.dynexproducts.com Hartleys This player can be connected to your wired network using the Ethernet port on the back of your player or using a wireless network. Using a wired network provides the best performance, because the attached devices connect directly to the network and avoid interference from other wireless devices. There are two types of wireless network connections: • Select a network from a list of available networks • Use WIFI protected setup Connecting to the Internet with a wireless network: 1 Set up your access point or wireless router (if not already set up). 2 Press ENTER. The Settings menu opens. 6 Press or to select the wireless network you want your player to connect to, then press ENTER. A Network Setup screen opens with the following options: • Connect—Connect to this network. • WPS Pin—Create a random PIN number password. • Cancel—Go back to Network List. 7 If your network does not use encryption, press or to select Connect, then press ENTER. If the wireless network is working, you should see a checkmark and a connected message on the TV. If the message does not appear, repeat the steps above. OR If your network uses encryption: a Press or to select the Password field, then press ENTER. An on-screen keyboard opens. b Press , , , or to select the first letter in the password, then press ENTER. Repeat this step to enter the rest of the password. If you make a mistake, use the Clear key to delete the character. c After you enter the password, select the red “Done” in the upper left-hand corner of the keyboard, then press ENTER to close the keyboard. d Press or to select Connect, then press ENTER. A connection message appears. Select Close, then press ENTER. If the connection is not successful, repeat the steps above. e Press to go to the previous menu. Setting up WiFi protection (WPS) 1 Press ENTER. The Settings menu opens. 2 Press or to select Network. Language Parental System Display System Network BD-Live Settings Display Audio HDMI Status Connected HDMI preferred Format 1080P Resolution HDMI Auto TV Aspect 16:9 Original Film Mode(1080p24) Off Deep Color Auto Language Settings Network BD-Live Display Network Interface Link Status MAC Address IP Mode IP Address Subnet Mask Gateway Primary DNS Secondary DNS Signal Strength Network Name(SSID) Wireless Link Up 00:26:4D:B4:01:54 Dynamic 192.168.42.131 255.255.255.0 192.168.42.1 202.96.128.166 10.4.4.11 Excellent TP-Link Audio Parental 3 Press or to select Network, then press ENTER. 3 Press , then press to select WiFi Protected Setup (WPS), then press ENTER. A screen appears, asking you to press the button on your router. 4 Press the button on top of your router. A screen should appear on your TV that says “Success” when your player is connected to the router. Press ENTER to close the message. Network List Hartleys Steven Linsys 5 Press to go to the previous menu. Connecting to the Internet with a wired network: 1 Connect a network cable to the INTERNET jack on the back of your player and into a wired router using a commercially available LAN or Ethernet cable. Back of player Network cable Wired router 2 Press ENTER. The Settings menu opens. 3 Select Network. Language Parental System Settings Network BD-Live Display Network Interface Link Status MAC Address IP Mode IP Address Subnet Mask Gateway Primary DNS Secondary DNS Wired Link Up 00:22:84:FB:C6:05 Dynamic 192.168.42.119 255.255.255.0 192.168.42.1 202.96.128.166 10.4.4.11 Audio 4 If the network connection is active, Link Up appears next to Link Status. If the network connection is not active, Link Down appears next to Link Status. 5 Press ENTER, select IP Mode, then press ENTER. 6 Press or to select an IP Mode. You can select: • Dynamic - Uses DHCP to automatically obtain an IP address. • Manual - Lets you manually configure network settings. (See your User Guide to set up your connection manually.) Please enter new IP Address Valid range of each segment is 0 to 255 Current value 111.11.11.11 New Value OK Canc el 7 Press to go to the previous menu. Advanced users only: To make changes to your network connection, see your User Guide. Testing your network connection Watching movies with CinemaNow (Application available in US) 1 Press ENTER. The Settings menu opens. 2 Press or to select Network, then press ENTER. 3 Press or to select Network Test, then press ENTER. The Network Test begins and runs three tests: 1 Local Network Test. If this test fails, check the connection to your home network. • If you have a wired connection: * Make sure your network cable is securely attached to your router and your player. * Make sure your router is connected to your cable or DSL modem correctly. • If you have a wireless connection: * Make sure your router is connected to your cable or DSL modem correctly. * Make sure your player is within the range of your router. * Make sure the desired WIFI network is selected. * If you have a security password, be sure you have entered the password correctly. * If further help is need for setting up security and obtaining your security password, contact your router manufacturer and/or cable or DSL modem manufacturer. 2 DNS Server Test. If this test fails, there may be an issue with your Internet service provider. • Make sure your router is connected to your cable or DSL modem correctly. • Contact your Internet service provider for more help. 3 Internet Connection Test. If this test fails, there may be an issue with your Internet service provider. • Make sure your router is connected to your cable or DSL modem correctly. • Contact your Internet service provider for more help. 1 First set up your CinemaNow account through your PC. Go to www.cinemanow.com/activate to get an activation PIN. 2 Log in to CinemaNow with your account information and password. 3 Browse to Activate/Deactivate under the My Account section. 4 Click on Activate a New Device and sign in again with your user name/password. 5 Enter any name in the Name Your Device section, then click Continue. You are provided with a valid activation number to enter into the activation field within the Cinemanow application on your Blu-ray player. 6 After you have successfully established an Internet connection on your Blu-ray player, select the Cinemanow application using your remote control, then press ENTER. 7 Select the Settings tab at the bottom of the screen, then press ENTER. 8 Select Activate and enter your activation code. You can now rent movies using Cinemanow. 9 To exit CinemaNow, press /Setup. Using connected applications You can watch movies over the Internet (for example, from Netflix or CinemaNow), or to listen to Pandora Internet radio. Before being able to use these Internet services, you must first: • Have connected the player to the Internet, and passed the Network Test. • Have a valid account to these services. Watching movies with Netflix (Application available in US & Canada) 1 Select Netflix to register the player with your Netflix account. Follow the directions on the screen. You will be provided with an activation code. 2 If you already have an existing Netflix account, log in to your account on your PC. Click on the Your Account & Help link in the upper-right corner of the screen. 3 In the WATCHING INSTANTLY ON YOUR TV OR COMPUTER section, click Activate a Netflix Ready Device and enter the activation code from Step 1. - OR If you do not have an existing Netflix account, go to http://www.netflix.com/Dynex (US) or http://www.netflix.ca/Dynex (Canada) to start your free trial and enter the activation code from Step 1 into the Dynex code field on the screen. 4 After setting up your account and activating your Blu-ray player, browse to Instant under the Your Queue tab and add movies to your queue. 5 To exit Netflix, press /Setup. Listening to music with Pandora (Application available in US) To use an existing Pandora account: 1 Press or to select Pandora, then press ENTER. 2 Select I have a Pandora account from the options, then sign in with your account information. To create a new Pandora account on your player: 1 Select Pandora. 2 Select I am new to Pandora from the options. You will receive an activation code. 3 On your PC, go to www.pandora.com/dynex and enter the activation code from Step 2, then click Activate. 4 Click Create a Pandora Account and follow the on-screen instructions. 5 To exit Pandora, press Home/Setup. To create a new Pandora account using a PC: • Go to http://www.pandora.com/ to create a new account. Contact the partner company (not Dynex) if you experience an issue using one of these applications. Note: Support numbers for the connected applications apply to the US market only. Netflix: www.netflix.com/help 1-866-579-7113 CinemaNow: www.cinemanow.com/support Pandora: http://blog.pandora.com/faq/ Using connected applications To stay up-to-date on future service options, visit www.dynexproducts.com. One-year limited warranty Visit www.dynexproducts.com for details. Contact Dynex: For customer service, call 800-305-2204 www.dynexproducts.com © 2012 BBY Solutions, Inc. All Rights Reserved. DYNEX is a trademark of BBY Solutions, Inc. Registered in some countries. All other products and brand names are trademarks of their respective owners. ENGLISH 12-0071