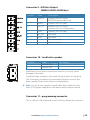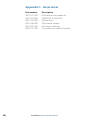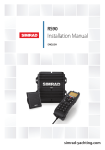
1
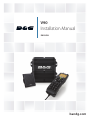
V90
Installation Manual
ENGLISH
bandg.com
Preface
Copyright © 2014 Navico. All rights reserved.
B&G® is a registered trademark of Navico
No part of this manual may be copied, reproduced, republished,
transmitted or distributed for any purpose, without prior written
consent of B&G Electronics. Any unauthorized commercial distribution
of this manual is strictly prohibited.
B&G Electronics may find it necessary to change or end our policies,
regulations, and special offers at any time. We reserve the right to do
so without notice. All features and specifications subject to change
without notice.
All screens in this manual are simulated.
For free owner’s manuals and the most current information on this
product, its operation and accessories, visit our web site:
www.bandg.com
Navico Holding AS is not responsible for any changes or modifications
to the radio not expressly approved by Navico AS as the responsible
entity for its compliance. Modifications could void the user’s authority
to operate the radio.
Compliance statements
DISCLAIMER: It is the owner’s sole responsibility to install and use
the instrument and peripheral components in a manner that will
not cause accidents, personal injury or property damage. The user
of this product is solely responsible for observing safe boating
practices.
NAVICO HOLDING AS. AND ITS SUBSIDIARIES, BRANCHES AND
AFFILIATES DISCLAIM ALL LIABILITY FOR ANY USE OF THIS PRODUCT
IN A WAY THAT MAY CAUSE ACCIDENTS, DAMAGE OR THAT MAY
VIOLATE THE LAW.
Governing Language: This statement, any instruction manuals,
user guides and other information relating to the product
(Documentation) may be translated to, or has been translated from,
another language (Translation). In the event of any conflict between
any Translation of the Documentation, the English language
version of the Documentation will be the official version of the
Documentation.
V90 Installation Manual
|3
This manual represents the V90 as at the time of printing. Navico
Holding AS. and its subsidiaries, branches and affiliates reserve the
right to make changes to specifications without notice.
IMPORTANT
1. DSC functions will not operate on the V90 until your MMSI has been
entered.
2. The radio channels installed into this B&G VHF radio may vary from
country to country depending upon the model and government or
national communications authority regulations.
3. Navico recommends that you check the radio operating licensing
requirements of your country before using this B&G VHF radio. The
operator is solely responsible for observing proper radio installation
and usage practices.
4. A DSC warning label is supplied with this B&G VHF radio. To comply
with FCC regulations, this label must be affixed in a location that is
clearly visible from the operating controls of this radio. Make sure
that the chosen location is clean and dry before applying this label.
5. This radio is designed to generate a digital maritime distress call to
facilitate search and rescue. To be effective as a safety device, this
radio must be used only within the geographic range of a shorebased VHF marine Channel 70 distress and safety watch system.
The geographic range may vary but under normal conditions is
approximately 20 nautical miles.
MMSI and license information
You must obtain a user Maritime Mobile Service Identity (MMSI)
and enter it into your V90 radio in order to use the DSC functions.
Similarly for the Automatic Transmitter Identification System (ATIS)
MMSI. Contact the appropriate authorities in your country. If you are
unsure who to contact, consult your B&G dealer.
The user MMSI is a unique nine digit number, similar to a personal
telephone number. It is used on marine transceivers that are
capable of using DSC (Digital Select Calling).
Depending upon your location, you may need a radio station
license for the V90 You may also need an individual operator’s
license.
B&G recommends that you check the requirements of your national
radio communications authorities before operating DSC functions.
4|
V90 Installation Manual
RF emissions notice
This equipment complies with FCC radiation exposure limits set
forth for an uncontrolled environment. This device’s antenna must
be installed in accordance with provided instructions; and it must
be operated with minimum 96 cm spacing between the antennas
and all person’s body (excluding extremities of hands, wrist and feet)
during operation. Further, this transmitter must not be co-located or
operated in conjunction with any other antenna or transmitter.
FCC statement
This device complies with Part 15 of the FCC Rules. Operation
is subject to the following two conditions: (1) this device may
not cause harmful interference, and (2) this device must accept
any interference received, including interference that may cause
undesired operation.
¼¼ Note: This equipment has been tested and found to comply with
the limits for a Class B digital device, pursuant to Part 15 of the FCC
Rules. These limits are designed to provide reasonable protection
against harmful interference in a normal installation. This equipment
generates, uses and can radiate radio frequency energy and, if not
installed and used in accordance with the instructions, may cause
harmful interference to radio communications. However, there is no
guarantee that interference will not occur in a particular installation.
If this equipment does cause harmful interference to radio or
television reception, which can be determined by turning the
equipment off and on, the user is encouraged to try to correct the
interference by one or more of the following measures:
• Reorient or relocate the receiving antenna.
• Increase the separation between the equipment and receiver.
• C
onnect the equipment into an output on a circuit different from
that to which the receiver is connected.
• Consult the dealer or an experienced technician for help.
• A
shielded cable must be used when connecting a peripheral to the
serial ports.
V90 Installation Manual
|5
Industry Canada statement
This device complies with Industry Canada license-exempt RSS
standard(s).
Operation is subject to the following two conditions: (1) this device
may not cause interference, and (2) this device must accept any
interference, including interference that may cause undesired
operation of the devise.
Le présent appareil est conforme aux CNR d’industrie Canada
applicables aux appareils radio exempts de licence.
L’exploitation est autorisée aux deux conditions suivantes : (1)
l’appareil ne doit pa produire de brouillage, et (2) l’utilisateur de
l’appareil doit accepter tout brouillage radioélectrique subi, même si
le brouillage est susceptible d’en compromettre le fonctionnement.
Under Industry Canada regulations, this radio transmitter may
only operate using an antenna of a type and maximum (or lesser)
gain approved for the transmitter by Industry Canada. To reduce
potential radio interference to other users, the antenna type and its
gain should be so chosen that the equivalent isotropically radiated
power (e.i.r.p.) is not more than that necessary for successful
communication.
Conformément à la réglementation d’Industrie Canada, le présent
émetteur radio peut fonctionner avec une antenne d’un type et
d’un gain maximal (ou inférieur) approuvé pour l’émetteur par
Industrie Canada. Dans le but de réduire les risques de brouillage
radioélectrique à l’intention des autres utilisateurs, il faut choisir
le type d’antenne et son gain de sorte que la puissance isotrope
rayonnée quivalente (p.i.r.e.) ne dépassepas l’intensité nécessaire à
l’établissement d’une communication satisfaisante.
Notice specific to the H50 handset
This ISM device complies with Canadian ICES-001.
Maintain a minimum separation of 2.5 cm (1 inch) from the face.
Cet appareil ISM est conforme à la norme NMB-001 du Canada.
Maintenir une distance minimum de 2,5 cm (1 inch) de la surface.
6|
V90 Installation Manual
CE compliance statement
This product complies with CE under R&TTE directive 1999/5/EC.
The relevant Declaration of Conformity is available in the following
website under the model’s documentation section:
http://www.bandg.com
Important safety information
Read carefully before installation and use
Warning: Indicates a potentially hazardous situation that could result
in death or serious injury.
Caution: Indicates a potentially hazardous situation that could result in
minor or moderate injury.
V90 Installation Manual
|7
Contents
9
About this manual
10
System Overview
10Introduction
11
System overview diagram
12Preparation
12Checklist
14Installation
14Positioning
14 Installing the transceiver
16 Installing a wireless handset cradle
17 Installing a wired handset cradle
18 Installing a handset cable connector
19 External speakers installation options
21 Transceiver external connectors
21 Transceiver internal connectors
26 Setting up the radio
26 NMEA 2000 Network
27 NMEA 2000 Network Diagram
28
8|
Appendix 1 - Accessories
Contents | V90 Installation Manual
1
About this manual
This manual describes the installation of the B&G V90 marine VHF
radio.
For instructions on operating the radio, please see the separate
manual: B&G V90 Marine VHF Radio Operating Manual.
This manual is organized as follows:
• System Overview
Describes the components and main features of the radio.
• Preparation
Describes the parts and tools you need to install the radio.
• Installation
Describes the mounting instructions and electrical connections.
¼¼ Notes:
• Different setups of the V90 marine VHF radio are required for
different countries, depending on the VHF radio regulations of each
country.
• Diagrams in this manual are not to scale.
About this manual | V90 Installation Manual
|9
2
System Overview
Introduction
The B&G V90 VHF radio is a comprehensive solution for marine VHF
radio applications.
The radio comprises:
• V90 VHF transceiver
• One wired handset as standard, and optionally up to 3 more
wired handsets. (Maximum of 4 wired handsets in total)
• One external speaker, and optionally up to 3 more external
speakers
• Up to 2 optional wireless handsets
In addition to routine ship-to-ship or ship-to-shore VHF
communications, the V90 has many advanced features, including
NMEA 2000 and NMEA 0183 network connectivity, which allows the
radio to share information with other onboard devices, such as a
GPS antenna, a chartplotter or a multi-function display.
For detailed features and specifications, see the Appendices in B&G
V90 Marine VHF radio Operating Manual.
System diagram legend
1
2
3
4
5
6
7
8
9
10
10 |
V90 VHF radio transceiver
12 VDC power supply
H50 wireless handset
H90 wired handset
External loudspeaker
NMEA 0183 GPS and horn button
AIS Data Output
Loud hailer speaker
VHF antenna with PL259 connector
NMEA 2000 network connection
System Overview | V90 Installation Manual
System overview diagram
10
9
1
+
12 VDC
8
2
7
6
4
5
3
System Overview | V90 Installation Manual
| 11
3
Preparation
Caution: Under extreme operating conditions, the
temperature of the rear heat-sink on this radio may
reach a surface temperature that is unsafe to touch.
Caution is advised to prevent possible skin burns.
¼¼ Note: You must obtain a Maritime Mobile Service Identity (MMSI)
for the vessel before you can use the Digital Selective Calling (DSC)
function of this radio. Consult your local maritime authority or radio
spectrum authority to obtain your MMSI.
Checklist
The following items are included in the V90 radio package:
Wired handset
• H90 wired handset with cradle
• 5 m handset connector cable, including mid-cable connector
• Flush mounting plate for handset connector cable socket
• Silicon cover for cable connector
• Handset fasteners:
• M3.5 x 15 mm selftapping screw x2 (cable mounting plate)
• M3.5 x 10 mm selftapping screw x2
• M3 x 40 mm selftapping screw x1
• M3.5 x 28 mm machine screw x2
• M3.0 x 40 mm machine screw x1
• M3.5 nut x2
• M3.0 nut x1
• Spring washers and flat washers
Transceiver
• V90 transceiver unit
• 2 m power supply cable
• 8-pin terminal connector x4
• 2-pin terminal connector x2
• Special mounting bracket
12 |
Preparation | V90 Installation Manual
• Cable ties x 10
• Spare 10 A fuse
• Transceiver fasteners:
• M3.5 x 23 mm selftapping screw x4
• M3.5 x 28 mm machine screw x4
• M3.5 hex nut x4
• Flat washer x4
External speaker unit
• External speaker (with 5m cable)
• Foam gasket (for flush mounting)
• Plastic speaker surface mount box
• Speaker fasteners:
• M3 x 40 mm selftapping screw x4
• M3 x 10 mm selftapping screw x4
• M3 x 10 mm machine screw x4
• M3 x 40 mm machine screw x4
• M3 nut x8
• Spring washer x8
• Flat washer x8
Documentation
• Operating Manual 988-10723-001
• Installation Manual 988-10728-001 (this document)
• Warranty Card
• DSC Warning Label
• Declaration of Conformity document (where applicable)
¼¼ Note: A VHF antenna is not provided by B&G. An antenna with
a PL259 plug is required. Consult your B&G dealer for advice if
required.
Preparation | V90 Installation Manual
| 13
4
Installation
Positioning
Transceiver
Make sure that the position of the transceiver:
• Is at least 1 m (39 inches) from the VHF antenna.
• Allows easy connection to the 12 VDC electrical source, the antenna,
and the NMEA 2000 connection.
• Is at least 45 cm (18 inches) from any magnetic compass to avoid
magnetic deviation of the compass during radio operation.
• Provides suitable space for installing the wired handset cradle(s)
nearby. (A 20 m extension cable is available as an optional extra.)
• Provides reasonable access to the wiring via the top panel.
The transceiver can be positioned vertically on a bulkhead or
horizontally. Avoid positions that might get wet or hot, such as in
the engine compartment or close to the bilge.
Ideally, the transceiver is positioned vertically with the wiring glands
facing downwards in order to prevent the ingress of water.
DSC warning label
The DSC warning label should be positioned close to the wired
handset.
Installing the transceiver
1. Hold the transceiver at the chosen location and mark the 4 hole
positions onto the mounting surface.
2. Drill the 4 holes where marked with a drill bit suited to the selected
mounting fasteners.
3. Attach the transceiver using the supplied selftapping screws or pan
head machine screws.
14 |
Installation | V90 Installation Manual
211.2 mm (8.31”)
65.0 mm (2.56”)
92.4 mm (3.64”)
15.5 mm (0.61”)
195.7 mm (7.70”)
195.1 mm (7.68”)
Installation | V90 Installation Manual
| 15
Installing a wireless handset cradle
The wireless handset has a cradle that incorporates inductive
charging for the rechargeable battery.
1. Choose a suitable location that provides sufficient room for the
handset to fit securely in the charging cradle.
2. Hold the cradle at the chosen location and mark the positions of the
fastening holes and the wire hole onto the mounting surface.
3. Drill the holes where marked with a drill bit suited to the selected
mounting fasteners.
4. Feed the wire through the wire hole. If mounting outside, apply a
suitable sealant or fit a cable gland.
5. Attach the handset cradle using selftapping screws or pan head
machine screws, see below.
6. Connect the wire to a 12 VDC source via a 1 A fuse:
• Red wire to 12 VDC positive
• Black wire to negative.
Fastenings
• Top holes
2 x M3.5 x 28 mm machine screws,
nuts and washers, or
2 x M3.5 selftapping screws
• Bottom hole
1 x M3 x 40 mm machine screw, nut
and washers, or
1 x 3 mm x 40 mm selftapping screw.
16 |
Installation | V90 Installation Manual
Installing a wired handset cradle
This is the same as installing a wireless handset cradle with the
exception that no wiring is required.
Fastenings
• Top holes
2 x M3.5 x 28 mm machine screws, nuts and washers, or
2 x M3.5 selftapping screws
• Bottom hole
1 x M3 x 40 mm machine screw, nut and washers, or
1 x 3 mm x 40 mm selftapping screw.
122.0 mm
(4.80”)
191.5 mm
(7.54”)
2 x 5.0 mm
(0.20”) holes
202.5 mm
(7.97”)
20.0 mm
(0.79”)
69.0 mm
(2.72”)
1 x 3.5 mm
(0.14”) hole
Installation | V90 Installation Manual
| 17
Installing a handset cable connector
Each wired handset cable includes a connector assembly that must
be installed in a bulkhead, dashboard or other suitable panel.
Socket body
Mounting
surface
Bezel
Drill 24 mm diameter hole
to clear socket body
Connector cover
18 |
Installation | V90 Installation Manual
External speakers installation options
Flush mount option
1. Fit the foam gasket to the rear of the speaker and remove the plastic
trims that cover the screw holes.
2. Cut a 92 mm (3 5/8”) diameter hole in the mounting surface,
allowing space for the speaker’s overall dimensions.
3. Temporarily fit the speaker and mark the four screw holes.
4. Drill holes of appropriate size for fasteners to be used.
5. Fit the speaker and secure with a small amount of sealant applied to
the fasteners.
6. Refit the plastic trim pieces.
Fasteners
• 4 x M3 x 10 mm machine screws, spring washers, flat washers and
M3 nuts, or
• 4 x M3 x 10 mm selftapping screws.
Installation | V90 Installation Manual
| 19
External speaker - surface mount option
1. Position the surface mount box at desired location and mark the
four screw holes through the corner tunnels. Make sure the drain
hole in box is oriented to be at lowest side.
2. Drill holes of appropriate size for fasteners to be used.
3. Remove the plastic trims that cover the screw holes on speaker front.
4. Drill a hole in the mounting surface for the speaker wire, ensuring
hole is near one of the corner screw holes, to prevent cable pinching
under speaker.
5. Feed speaker wire through surface mount box and through
mounting surface hole.
6. Apply sealant to the cable and around hole.
7. Fix the speaker with fasteners through it and the box, ensuring the
logo on speaker and drain hole in box are aligned.
8. Replace the plastic trims.
Fasteners
• 4 x M3 x 40 mm machine screws, spring washers, flat washers and
M3 nuts, or
• 4 x 3 mm x 40 mm selftapping screws.
Box drain hole
20 |
Installation | V90 Installation Manual
Transceiver external connectors
VHF antenna
A suitable radio antenna (not supplied) must be mounted and
connected with a PL259 connector before you can operate the
radio. Consult your B&G dealer for advice, if necessary.
Always mount the VHF antenna as high as possible and at least 1 m
(39 inches) from the transceiver.
NMEA 2000 (N2K) connector
The V90 radio can be connected to an NMEA 2000 network using
a cable (not supplied). For further information, see “NMEA 2000
Network” on page 26.
¼¼ Note: A GPS source is required to enable full functionality of DSC
calling, especially DISTRESS calls.
Transceiver internal connectors
To access the internal connectors, remove the cover plate by
unscrewing the captive screws. The connectors are on the internal
circuit board, which is located as shown below.
Internal
connector
blocks
Installation | V90 Installation Manual
| 21
Transceiver internal connector numbering
22 |
Installation | V90 Installation Manual
Connector 1 - Fuse
Install a 10 Amp MINI® blade fuse.
Connector 2 - Power connection
Number
1
2
Label
VCC
GND
Wire color
Red
Black
¼¼ Notes:
• Voltage: 12 VDC (10.8 VDC to 15.6 VDC)
• 2 m twin-core power cable is supplied
• Ground must be connected to the vessel’s common ground,
which must be negative.
Connectors 3, 4, 5 and 6 - Wired handsets
Number
1
2
3
4
5
6
7
8
Label
GND
TX/RX_A
TX/RX_B
VCC
POWER-SW
PTT
MIC_AFMIC_AF+
Wire color
Black
Blue
Green
Red
White
Grey
Yellow
Orange
¼¼ Note: All the necessary wires are included in the handset cable
supplied.
Installation | V90 Installation Manual
| 23
Connector 7 - External speakers
Number
1
2
3
4
5
6
7
8
Label
GND
SPK1
GND
SPK2
GND
SPK3
GND
SPK4
Wire color
Black
Red
Black
Red
Black
Red
Black
Red
¼¼ Notes:
• You can connect a (minimum) 4 W 8 Ω or an 8 W 4 Ω speaker to
each pair of speaker terminals.
• Speakers are supplied pre-terminated with 5 m twin-core cable
(red/black).
Connector 8 - Horn button and
NMEA 0183 (4800 bps - GPS input)
Number
1
Label
RX GPS+
2
RX GPS-
3
TX GPSO
4
GND
5
6
7
8
GND
HORN
-
Description
NMEA 0183 Input+
Balanced, RS422, GPS data input
NMEA 0183 InputBalanced, RS422, GPS data input
NMEA 0183 Output+
Connect to ship’s NMEA 0183 input
NMEA 0183 OutputSingle end, GND
Wire to horn button
Wire to horn button
Not connected
Not connected
¼¼ Notes:
• Use a normally-open horn button.
• A GPS source is required to enable full functionality of DSC
calling, especially DISTRESS calls.
24 |
Installation | V90 Installation Manual
Connector 9 - AIS Data Output
(NMEA 0183HS 38400 bps )
Number
1
Label
RS422+
2
3
RS422AIS_TX
4
5
6
7
8
GND
AIS_RX
GND
-
Description
Output+ (RS-422 type)
AIS RS422 data output only
Output- (RS-422 type)
Output+ (RS-232 type)
Connect to PC or chartplotters
Output- (RS-232 type)
Not used
Not used
Not connected
Not connected
Connector 10 - Loud hailer speaker
Number
1
2
Label
HAILER SPK+
HAILER SPK-
Description
Important: Do not short circuit these two pins, as it may cause
damage to the radio.
Install the hailer speaker in a forward-facing location on the boat.
This is because, in addition to transmitting foghorn sounds, the
hailer speaker ‘listens back’ when not transmitting.
¼¼ Note: Use a 4-8 ohm speaker or loud hailer horn rated at no less
than 30 W. Higher impedance will reduce audio output volume.
Connector 11 - programming connector
This is a Micro-USB receptacle used for factory diagnostic purposes.
Installation | V90 Installation Manual
| 25
Setting up the radio
¼¼ Note: You must enter your User MMSI before the DSC functions of
this radio will work.
See the Setup section in the V90 Operating Manual for full setup
details.
NMEA 2000 Network
The radio can be connected to an NMEA 2000 network using an
NMEA 2000 compliant cable (not supplied).
1
2
3
4
5
6
B&G chartplotter or MFD
GPS antenna
12 VDC supply
NMEA 2000 backbone with termination and drop cables
VHF antenna
V90 VHF radio transceiver
¼¼ Notes
• The NMEA backbone must be terminated at each end.
• The drop cable to each device must not exceed 6 m.
• Further information on NMEA 2000 is available on the B&G website.
26 |
Installation | V90 Installation Manual
NMEA 2000 Network Diagram
PU
SH
STBY
AUTO
1
TO
E
NTE R
MARK
MENU
GOTO
PAGES
IN
MOB
OUT
MOB
2
+
12 VDC
5
3
120
120
4
T
T
6
Installation | V90 Installation Manual
| 27
Appendix 1 - Accessories
Part number
000-11677-001
000-11678-001
000-11679-001
000-11680-001
000-10791-001
000-11727-001
28 |
Description
H90 handset and speaker kit
V90 BB VHF AIS RX ONLY
H90 handset
S90 external speaker
H50 wireless handset
20 m extension cable for handset
Installation | V90 Installation Manual
1177
*988-10728-001*