1
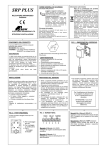
Manuale d’Uso e Manutenzione
Operating and Maintenance manual
Betriebs- und Wartungsanleitung
Manuel d’Utilisation et d’Entretien
Manual de Uso y Mantenimiento
mod.
AS650
NORM - CARB - EPA
®
S.p.A.
TABLE OF CONTENTS
Page
Page
3 ........ 3 ........ 1
- Warnings
- Warranty terms
4
4
6
6
6
- TECHNICAL DATA
- components
- technical specifications
- noise and vibrations
- equipment supplied
........ 2
........ 2.1 ........ 2.2 ........ 2.3 ........ 2.4 10 ........ 6
- USE IN SAFE
CONDITIONS
11 ........ 6.1 - use, techniques and
precautions
12 ........ 6.2 - principal safety regulations
13 ........ 7 - CARBURETTOR
13 ........ 7.1 - a
djusting the carburettor
7 ........ 4 - SYMBOLS AND
PICTOGRAMS
14 ........ 8 - MAINTENANCE AND
WARRANTY
8
8
9
9
- PREPARING the machine
- fuelling
- starting
- stopping the engine
14 ........ 9
- SHORT AND LONG IDLE
PERIODS
........ 5 ........ 5.1 ........ 5.2 ........ 5.3 15 ........ 10 TROUBLESHOOTING
SERIAL NUMBER AND YEAR OF MANUFACTURE
Do not keep the engine
running out of the water for
more than 10 seconds.
Do not allow water to enter
through the snorkel or in the
fuel tank.
Take care when refuelling.
Water may be present.
WARNINGS.
Our sincerest congratulations on becoming the Owner of this
FANTASTIC AQUASCOOTER.
- The Aquascooter is a unique product, designed and built with the greatest attention to the user’s health and safety, and protection of the environment.
- No other machine is so complete. It is ideal for a number of recreational uses.
- It is a simple 2-stroke engine that will give you many hours of enjoyment if used and serviced correctly. It is designed for your leisure time and not as an instrument of work.
Failure to comply with the operation and maintenance procedures will void the warranty. Read this manual carefully before using your Aquascooter: in this way you can
prevent damage to the engine and avoid costly repairs.
- The manual, the declarations of conformity and power engine are integral parts of the machine. It must be kept in a safe place and delivered with the machine if it is sold to a new user.
- The information in this manual may change without prior notice, without prejudice to the
safety-related technical characteristics.
This danger symbol in the manual draws your attention to important instructions concerning safety. Failure to comply with such instructions can
cause serious injuries to persons.
- Any jobs or repairs the customer feels he is unable to do himself should be carried out by
authorised service centres, with the fuel tank empty.
1 - WARRANTY TERMS
- The warranty is valid for 24 months from the date of delivery, so long as the certificate
is filled out correctly and forwarded within 8 days from the purchase date. During
this warranty period, COMER S.p.A. undertakes, after having carried out the due technical assessments, to repair and/or replace the defective parts for which the manufacturer is
responsible.
WARNING! Tampering voids the warranty.
- The costs of any labour, forwarding expenses and sending spare parts are always at
the purchaser’s complete charge.
WARNING! for Service Centres
- Parts replaced under warranty must be returned to the manufacturer with a
copy of the warranty within 20 days at most, or the warranty will become void.
IN ANY CASE THE MANUFACTURER DECLINES ALL LIABILITY FOR:
- Modifications made without the manufacturer’s approval.
- Use of accessories not contemplated by the manufacturer.
- Improper use of equipment with snap-hooks, cords around the fuel tank, collisions with
rocks, etc.
- Failure to comply with the instructions in this manual.
- Failure to comply with the safety regulations and recommendations in this manual.
- When the engine has blocked owing to the entrance of water.
- Failure to comply with the general and basic rules of caution and prudence.
- COMER S.p.A. declines all liability for damage to persons, things or the machine itself
caused by incorrect or improper use of the same.
All disputes are the competence of the Court of Reggio Emilia.
3
2 - TECHNICAL DATA
2.1 - COMPONENTS
1 - AIR TANK
2 - AIR TANK PLUG FOR SNORKEL CONNECTION
3 - FUEL TANK PLUG
4 - FUEL TANK
5 - FUEL VALVE
6 - EXHAUST GAS OUTLET
7 - FUEL PIPE
8 - STARTER HANDLE
9 - STEERING HANDLE
10 - THROTTLE LEVER
4
11 - “AVVIAMENTO - START - STOP” POSITIONS
12 - CARBURETTOR TO CARB - EPA STANDARDS
13 - “START AND RUN” LEVER
14 - “RUN/MARCIA” POSITIONS
15 - PROTECTIVE GRILLE
16 - FUEL TANK BREATHER PIPE
17 - PROPELLER GUARD AND WATER DEFLECTOR
18 - CARRY HANDLE
19 - SPARK PLUG
20 - AIR INTAKE TUBE (SNORKEL)
21 - SNORKEL EXTENSION
22 - RUBBER BUMPER
5
2.2 - TECHNICAL SPECIFICATIONS 650
2-stroke, direct drive engine
Power output at 5000 rpm 2 HP - 1.47 KW
Swept volume
49 c.c.
Thrust 22 kg
Ignition Electronic C.D.I.
Spark plug Bosch WR 10 BC
Fuel tank capacity 2 l. (no reserve)
Fuel mixture with synthetic oil (biodegradable)
1,5%(100:1,5) first 5 hours
Autonomy of operation (approx.) 2 hours
Weight 7.00 kg
Dimensions
530 X 300 X 195 cm
2.3 - AIRBORNE NOISE AND VIBRATIONS
Sound Pressure Level: continuous equivalent sound pressure measured at
the ear of the user, measured conventionally at a height of 20 cm and at the
centre of the tank, with the engine supplying 1.2 kW at 4000 rpm.: LAeq = 75
dBA
Vibrations: weighted mean square value in frequency to which the upper limbs
are subjected, with engine at 85% of top speed, in accordance with ISO standards = 10m/s2.
2.4 - EQUIPMENT SUPPLIED:
Spark plug wrench, spark plug, funnel, starter rope,
biodegradable oil.
Warranty - Declaration of conformity and engine power,
use and maintenance manual.
OPTIONAL ACCESSORIES:
- Carrier bag
- “AQUA MAT” mattress
150 ml.
SYNTHETIC
oil mixture
30 ml.
AQUA MAT
Carrier Bag
Boat Bracket
6
4 - SYMBOLS AND PICTOGRAMS
- The following pictograms are affixed to the tank (see page 4 - 5). Always pay
particular attention to them and bear in mind what they mean:
DANGER of electric shock; do not let
any part of your body
touch the electrical
parts of the machine.
It is obligatory to read
the whole manual
carefully before using the machine.
DANGER of amputation due to the presence of the propeller.
Turn off the engine
before
proceeding
with any maintenance or repairs.
It is forbidden to remove the protective
covers when the machine is running.
Do not lubricate,
clean or perform
maintenance on the
machine while it is
running.
It is obligatory to put
on a lifejacket before
getting into the water.
Do not smoke near
the machine.
7
5 - PREPARING THE MACHINE
- The machines are equipped with handy carrying points.
- They are shipped from the factory in specific packaging.
- The machines are tested before delivery. Prior to using the machine and with
the engine off, always make sure the protective covers have not been tampered
with and that there is no evident damage.
5.1 FUELLING
Fuel: use unleaded petrol.
Oil: special synthetic oil at 1,5% (100 parts petrol to 1,5 parts oil), which guarantees excellent
lubrication.
How to prepare the mixture: pour one litre of
petrol into the tank through the rear inlet marked
with the symbol . Add the oil and then pour in
the remaining litre of fuel.
WARNING. Do not fill the tank right up to the
brim. Leave a small amount of air above the level of the fuel. Screw on the plug
and shake for 5 seconds, then unscrew the tank plug to relieve any overpressure
before screwing it back on again.
BEFORE USE:
1 - Unscrew the air tank plug and fit the snorkel in its place.
WARNING. Make sure the snorkel is fully
tightened.
WARNING!!
Do not fully empty the can used for fuelling as
it may contain water.
Do not refuell while the machine is in the water: even only a few drops of water in the fuel
tank can damage the carburettor and the engine.
8
5.2. STARTING
1 - Open the fuel valve by moving the yellow lever to the
horizontal “APERTO-OPEN” position.
2 - Turn the red lever of the carburettor anticlockwise
to the “AVVIAMENTO-START-STOP” position for a cold
start and after a LONG IDLE PERIOD only.
3 - Grip the steering handle with one hand, while moving
the throttle lever to full throttle position.
4 - Pull the starter handle up to three times with your other hand. When you hear
the engine fire, move the carburettor lever immediately back to the “RUN/MARCIA” position by turning it clockwise.
Pull the starter cord again until the engine starts.
When the engine has started, accelerate up to 2-3 times before getting into the
water.
WARNING. Do not allow the engine to run for more than
10 seconds out of the water or the piston will begin to
deform through overheating.
NOTE: Follow the procedure described in points 1-2-34 with a new machine and for cold starts. Just pull the
starter cord with the carburettor lever still in the “RUN/
MARCIA” position if you are starting with the engine still
hot either on the beach or in the water.
5.3 - STOPPING THE MOTOR
1- For short stops: block the opening of the snorkel with a finger, leaving the
fuel tap and the carburettor lever in the “run” positions. It will be easier to start
the engine the next time, because you just have to pull the starter cord with the
accelerator always at maximum.
2 - For longer stops (when the engine has cooled down):
stop the engine with the carburettor lever in the “AVVIAMENTO-START-STOP”
position.
Now immediately move the lever back to the “RUN/MARCIA” position. It will be
easier to stat the engine again, with the accelerator always at maximum.
NOTE: If the Aquascooter does not start in the water, follow the cold start
procedure by moving the carburettor lever to the ”AVVIAMENTO-START-STOP”
position and pull the starter cord once only. Then move the lever back to the
”RUN/MARCIA” position and start again.
9
6 - USE IN SAFE CONDITIONS
- Only carry the Aquascooter by its handle. Do not let it fall sideways into the
water because water will enter the snorkel and block the engine.
- Hold the steering handle and hold down the throttle with your thumbs.
- Do not use the engine at top rate for the first 10 hours.
- Use the Aquascooter with your arms outstretched. Keep your body and legs in
a relaxed horizontal position to reach top speed.
- Keep the snorkel well out of the water and use the extension.
- Make sure you do not accidentally touch the red carburettor lever during use, as
this will stop the motor immediately.
- Avoid zones with banks of algae, shallow water and rocks (these can damage
the propeller).
- If you let go of the Aquascooter when it is running, it will perform a slow turn
around you and can be easily recovered.
Avoid this operation when there are bathers present, in rough seas, where
there are strong currents, or if the carburettor has not been properly adjusted to
allow the engine to idle (you could lose the Aquascooter).
- You can stop the Aquascooter and start it again in the water. In the case of
brief stops, to start again just pull the starter with one hand, while using the other
to hold the steering handle with the accelerator at maximum.
For longer stops, use the cold start procedure to start again.
IMPORTANT - The Aquascooter is only a surface craft for one person. In
order to run, the engine needs air to come in through snorkel, but if water
should get in through the snorkel, it can cause serious problems with the
internal parts of the motor.
a) Always use the snorkel with the extension, especially in rough seas.
b) Fully tighten the ring nut on the snorkel and the fuel tank plug. Check to make
sure that the gaskets are not damaged.
c) Absolutely avoid situations that could let water get into the snorkel (rough sea,
user acrobatics under the water, throwing the machine into the water, overturning,
etc.).
10
6.1 - USE, TECHNIQUES AND PRECAUTIONS
- If just a few splashes of water get in, this water will remain in the bottom hollows
inside the air tank without causing damage. However, it is advisable to empty
out any water as soon as you get back to the beach.
- It’s an entirely different matter if a large amount of water flows quickly
into the snorkel. This happens in particular if the end of the snorkel becomes
submerged, causing a mass of water to suddenly flow in and stop the engine
immediately. The water must be emptied out as soon as possible, or the
engine will be irreparably damaged.
SOLUTION !
Drain any water out of the tank immediately. Then drain the machine
completely in the following way.
1) Shut off the fuel valve (OFF - CLOSED - CHIUSO).
2) Unscrew the snorkel and the spark plug.
3) Turn the aquascooter upside down and pull the starter repeatedly (as many
as 8 times) until all the water has been drained out of the engine. This is the only
way to avoid the damage to the internal parts of the engine through rust. After
this,replace the spark plug and open the fuel valve again (APERTO -OPEN - ON).
4) Now attempt to start the engine according to the normal procedure; if the
machine fails to start, clean or replace the spark plug. Start the motor again using
the cold start procedure. It is important to get the engine started and to then
get into the water and use the aquascooter for at least 10 minutes.
WARNING - If the engine has stopped because water has got into the snorkel,
and after repeatedly draining the engine and attempted starts you cannot
get it to re-start, it is advisable to unscrew the spark plug, fill the cylinder
with the oil used in the mixture (20 ml) and to pull on the starter cord slowly
2-3 times. Then contact your nearest Aquascooter Service Centre within 48
hours.
Starter rope and spring replacement.
11
6.2 - PRINCIPAL SAFETY REGULATIONS.
- Aquascooter is designed for use by good swimmers. A lifejacket must be
worn at all times.
- Keep at a safe distance from the beach (do not go out farther than you can
swim back).
- The Aquascooter is not a buoyancy aid and is not designed to support the
weight of a person in the water.
- Long hair, ribbons, cords, necklaces, etc. must be kept away from the
propeller. If you have long hair, wear a bathing cap (long hair can be caught
up by the propeller).
- Children should only use the Aquascooter under adult supervision.
- Beware of obstacles under water or on the surface.
- Always avoid getting too close to other bathers or craft in the water.
- Never leave the Aquascooter running and unattended in zones where
there are other people.
- Do not put anything into the water intake deflector (propeller guard).
- Do not smoke while refuelling, emptying or preparing the fuel mixture.
- Only start out with a full fuel tank (roughly 2 hours of run time). There is
no reserve.
- Do not start the engine in closed environments (the exhaust gases are
toxic).
- Empty the fuel out of the Aquascooter before transporting it on any type of
vehicle. Use metal containers for the fuel that comply with the law.
- The Aquascooter is not for diving. Keep the intake of the snorkel well
above the surface of the water and check frequently for any traces of water
in the air tank: if there is any water, empty it out.
- If necessary, the Aquascooter can be turned off quickly by blocking the
snorkel with a finger, or with the START-STOP lever.
- Do not tamper with the controls and never remove the safety systems and
guards of the machine, even momentarily.
- Do not inhale the exhaust gas.
12
7 - CARBURETTOR
- The Aquascooter has a carburettor with two membranes. The first membrane
acts as a pump, drawing the fuel from the tank and into the engine as required.
Faults involving this pump-membrane are extremely rare.
- The second membrane, located in the bottom part, regulates the flow of fuel and
needs to be connected to the external atmospheric pressure so as to regulate
the fuel to suit the engine’s needs. In normal engines that do not run in the water,
this is done with a simple hole in the cover of the membrane. The Aquascooter’s
carburettor has to run in the water, so this system cannot be used. There is
therefore a rubber tube connecting the carburettor to the atmospheric pressure in
the air tank (5, fig.7).
7.1- ADJUSTMENTS.
L
1 - Idling/Medium rate adjuster screw ( )
2 turns
2 - Full throttle (H) rpm adjuster screw 1
and 3/4 turns
3 - Idling adjuster screw
4 - “Start and Run” lever
5 - Membrane pressure compensation tube
6 - Spark plug
7 - Air tank
8 - Rubber stopper for closing the carburetor
screws
9 - Adjusting key
fig.7
- This engine has been designed and built in accordance with CARB-EPA
Exhaust Emission Standards.
- The Exhaust Emission Control System includes the fuel system, the intake system
and, more importantly, the carburettor: designed to allow only adjustments of
screws
and H in a preset range established by the manufacturer that
cannot be modified by the user.
You can only adjust the throttle valve “idling” adjuster screw (3, fig. 7) to regulate
the engine in the water if it stops when idling.
L
7.2 - WARNING: With the Aquascooter out of the water and the accelerator at full
throttle, the engine must always be abundantly supplied with fuel, otherwise you
will not obtain maximum power in the water.
If faults or fuel problems occur, contact your nearest dealer who can adjust the
relevant screws and H by 1/8 of a turn with a special wrench, to find the optimal
setting and allow the engine to function without stopping in the water.
L
13
8 - MAINTENANCE
Before servicing the Aquascooter in any way, turn the off the engine
and take care of any hot parts that could scorch the skin.
After use, even when stopping for only a few hours, comply with the
”Short stops” procedure to prevent the internal parts of the engine from rusting or
the engine from seizing (which would require costly repairs).
NOTE: Traces of corrosion in the engine are due to the user’s failure to
comply with the procedures described in this manual. This situation, testified by the corrosion inside the engine, is regarded as negligence and voids
the warranty.
9 - SHORT STOPS
At the end of each day of use and even for brief periods of effective use of the
machine:
1 - Unscrew the snorkel and turn the Aquascooter upside down to empty all traces
of water out of the air tank.
Slowly turn the Aquascooter so the water can gradually flow out of the air
tank intake. Turning the machine over suddenly may allow water to flow
into the carburettor.
2 - Start the Aquascooter out of the water and run it only for 10 seconds, inclined
at 30°, at different speeds, using various positions of the accelerator. This warms
the engine up sufficiently to eliminate any water that may have entered or condensed in the combustion chamber, engine block or silencer.
WARNING: To avoid overheating the engine, never allow it to run out of
the water for more than 10 seconds and never at full throttle speed. After
10 seconds the piston begins to overheat and can become deformed with
possible seizure.
3 - After running the engine out of the water, turn it off by blocking the snorkel or,
even better, with the START-STOP lever.
14
LONG STOPS (e.g.: at the end of the season)
1 - If it has been used in salt water, wash the outside of the Aquascooter
with fresh water.
2 - Unscrew the SNORKEL and turn the Aquascooter upside down to eliminate
any water from the tank.
3 - Allow the Aquascooter to operate with a fuel mixture at 6% for not more than
12 seconds at different speeds, then stop it by moving the carburettor lever to the
“STOP” position with the engine at top rate.
4 - Close the air tank with its plug.
5 - Empty the fuel mixture from the tank to eliminate any drops of water.
6 - Turn off the fuel valve.
7 - Store the Aquascooter in a dry, sheltered place.
WARNING: If you cannot test the Aquascooter, remove the spark plug and pour
20 ml of fuel mixture oil into the cylinder. Slowly pull the starter cord 2-3 times so
the oil lubricates all the parts. Screw the spark plug back on.
10 - TROUBLESHOOTING
- Most problems can be solved simply with a little patience, by systematically
checking the initial procedure for ”Preparing the machine” (page 8) and the starting procedure (page 9).
- For example, if the engine fails to start, make sure there is fuel mixture in the
tank and that the fuel valve is open. Have you installed the snorkel in place of the
plug on the air tank? Have you changed the spark plug? You might have flooded
the engine.
- If you cannot find the problem after having followed this procedure, take your
Aquascooter to the nearest Service Centre, as you would for any other machine.
Any judgement as to the performance of the Aquascooter must be made in normal conditions of use in the water. This procedure presumes that the fuel mixture
used is in the correct proportions and that the machine has not been modified (for
example, fitted with an unsuitable spark plug, filled with the wrong oil, tampering
with the carburettor screws and fuel lines, tampering with the intake connector,
clamps and screws, assembly of cords and snap hooks).
A) THE MACHINE FAILS TO START OR IS DIFFICULT TO START:
- Are you following the correct starting procedure? (page 9)
- Make sure that the red carburettor lever is in the correct position.
- Is the spark plug wet? Clean, dry, or replace if necessary (in some cases, this
operation must be repeated). Try starting again with the red carburettor lever in
“RUN/MARCIA” position.
15
- Water in the fuel tank: empty the entire contents of the tank, and replace with
new fuel. Check the carburettor: may contain drops of water.
- Check the plug: it may not have been closed properly, or the plug seal may be
damaged and water may have entered the carburettor (which must be replaced).
- Check that the fuel draw pipe is correctly positioned on the bottom of the tank.
Make sure that the tubes are not broken and that the draw
pipe is not clogged.
- Idling adjustment wrong: follow the procedure (page 13, fig.
7).
B) THE ENGINE STOPS WHEN THE MACHINE IS PLACED IN THE WATER:
1 - If the engine stops when the water reaches the spark plug, a solution is to fill
the inside of the spark plug cap with grease or Vaseline.
Install a new, original spark plug cap as soon as possible.
2 - The throttle valve idling adjuster screw is not adjusted properly: turn clockwise.
3 - The engine slows in the water when cruising at full power: is poor power from
the carburettor, turn the H screw anticlockwise for 1/8 of a turn (page13, fig. 7).
OTHERWISE
4 - Light blue breather tube (D, fig. 8) blocked
or full of fuel. Remove from the tank and clean.
5 - Intake elbow clamps loose.
6 - The engine fails to tick over in the water?
7 - Piston worn due to water entering from the
snorkel, the intake union, the exhaust valve or
the fuel tank.
8 - Tank breather. The rubber valve is in the
small internal tube in the fuel tank inlet: check
that it is there and move the internal part with
a pin (C, fig. 8) to allow a small amount of air
to pass through.
fig.8
- Make sure that the exhaust gas valve is not deformed or flat. If it is, dismantle it
with a screwdriver, start the engine, and then reassemble it or replace it (A, fig. 8).
- Replace the exhaust valve at least twice a year to prevent water from entering the engine.
Warning: It is absolutely essential to empty the fuel tank if you send your
Aquascooter away for repairs.
16
Fig.1 SERBATOIO / TANK
Fig.2 AVVIAMENTO/STARTER SYSTEM
Fig.3 BLOCCO MOTORE / ENGINE BLOCK
POS DESCRIZIONE
DESCRIPTION
1
1a
2
4
5
6
7
8
9
10
11
12
13
14
15
16
17
18
19
20
21
22
23
24
25
25D
26
27
28
29
Fuel shut-off cock, compI.
Shut-off cock screw
Decal set
Fuel pick-up
Valve
Tank
Cap
Carry handle
Clamp Ø 6
Pressure relief hose cm.20
Fuel hose cm.30
Intake elbow
Clamp
Pressure relief hose
Washer
Screw, lateral
Spark plug spring
Cap and spring
Spark plug Bosch
Screw, cruise handle 5x25
Washer
Snorkel
Snorkel extension
Tool kit
Oil mix bottle 150 ml.
Oil mix bottle 30 ml.
Elbow 90°
Clamp Ø 8
Tank bush
Rubber bumper
Rubinetto completo
Vite rubinetto
Set adesivi
Pesca carburante
Valvola sfiato
Serbatoio
Tappo
Manico trasporto
Clip Ø 6
Tubo compensazione cm.20
Tubo carburante cm.30
Raccordo aspirazione
Fascetta
Tubo sfiato
Rondella
Vite laterale
Molla candela
Cappuccio e molla
Candela Bosch.
Vite frontale 5x25
Rondella
Snorkel
Prolunga snorkel
Busta attrezzi
Conf. olio mix 150 ml.
Conf. olio mix 30 ml.
Raccordo a 90°
Clip Ø 8
Boccola serbatoio
Paracolpi in gomma
POS DESCRIZIONE
DESCRIPTION
1
2
3
4
5
6
7
8
9
10
11
12
13
14
Starter pulley axle
Starter spring
Starter housing w/oil seal
Water seal
Starter pulley
Starter rape
Conical screw 4x16
Nosepiece
Starter handle
Starter compI.
Screw, starter housing 5x25
Washer
O ring, starter axle
Bush for rape
Inserto puleggia
Molla avviamento
Scat. avv. c/paraolio
Anello di tenuta
Puleggia avviamento
Funicella avviamento
Vite conica 4x16
Calotta
Impugnatura avviamento
Avviamento completo
Vite scatola 5x25
Rondella
O.R. perno puleggia
Boccola x fune
N. CODICE-PART N. QT PREZZO UNITARIO
UNIT PRICE €
7000 2033
1
12,00
70001066
1
4,00
7000 1013
1
8,00
7000 1061
1
6,00
7000 1039
1
3,50
7000 2010
1
70,00
7000 2005
2
5,00
7000 1017
1
5,00
7000 1068
3
0,30
7000 0003
1
2,00
7000 0003
1
2,00
7000 1055
1
8,00
7000 1056
1
4,00
7000 1054
1
3,00
7000 1037
2
0,30
7000 1024
2
4,00
7000 1095
1
0,60
7000 1093
1
4,00
7000 1133
1
5,00
7000 1038
1
1,00
7000 1021
1
0,30
7000 2001
1
12,00
7000 2002
1
10,00
7000 1010
1
15,00
7500 9001
1
6,75
7500 9002
1
2,00
7000 1069
1
2,20
7000 1072
2
0,30
7000 1063
1
4,00
7000 2046
1
10,00
N. CODICE-PART N. QT PREZZO UNITARIO
UNIT PRICE €
7000 1047
1
12,00
7000 1051
1
10,00
7000 2040
1
18,00
7000 1050
1
3,50
7000 1046
1
10,00
7000 2009
1
2,00
7000 1049
1
1,00
7000 1045
1
3,00
7000 1052
1
4,00
7000 2007
1
38,00
7000 1022
4
1,00
7000 1018
4
0,30
7000 1062
1
0,50
7000 1044
1
0,50
N. CODICE-PART N. QT PREZZO UNITARIO
UNIT PRICE €
7000 1020
1
2,00
7000 2004
1
14,00
7000 1086
1
0,80
7000 1091
2
3,50
7000 2037
1
10,00
7000 2020
1
75,00
7000 1125
1
2,00
7000 1089
1
5,00
7000 1092
2
5,00
7000 1090
1
5,00
7000 2032
1
90,00
7000 1140
1
90,00
C050-048
1
5,00
7000 1131
1
5,00
7000 1018
4
0,30
7000 1081
4
1,00
7000 1088
1
2,50
7000 1018
6
0,30
7000 1032
6
1,00
7000 1118
1
4,00
7000 1116
2
0,30
7000 1028
1
1,00
7000 1120
1
40,00
7000 1142
1
40,00
7000 1119
2
4,50
7000 1144
2
4,50
7000 2035
1
95,00
7000 2044
1
95,00
7000 1071
1
4,00
7000 1025
1
5,00
7000 2030
1
10,00
70001036
5
0,50
7000 1078
1
280,00
7000 2036
1
50,00
7000 1000
1
10,00
7000 1000
1
10,00
7000 1139
1
100,00
7000 1110
1
50,00
KACC-126
1
4,00
POS DESCRIZIONE
DESCRIPTION
1
2
3
4
5
6
7
8
9
10
11
Nut, propeller
Propeller
Protection sleeve
Water seal
Needle bearing kit
Crankase assy
Sleeve
Propeller bearing
Witon oil seal
Bearing, flywheel side
Crankshaft+needle bearing
Crankshaft+needle bearing SM
Upper needle bearing
Sliding needle bearing
Washer
Screw, cylinder 5x20
O ring, flywheel side
Washer
Screw 5x40
Piston pin
Piston pin clip
Cylinder gasket
Piston complete Ø 40
Piston complete Ø 41 SM
Piston rings Ø 40
Piston rings Ø 41 SM
Cylinder / piston kit Ø 40
Cylinder / piston kit Ø 41 SM
Cylinder head
Safety-Grid CE
Set gasket + O ring
Safety screw 4x10
Engine assy assembly
Propeller puller
Oil seal buffer
Propeller oil seal buffer
CranKase lock bush
Connetting rod
Piston check pin
12
12a
13
14
16
19
20
21
22
23
24
25
26
27
28
29
31
32
33
34
35
36
37
38
Dado autobloccante elica
Elica
Disco di protezione
Anello di tenuta elica
Kit gabbia e boccola
Coppia basamenti
Distanziale
Cuscinetto elica
Anello tenuta alb.Witon
Cuscinetto Iato volano
Albero motore Ø 40
Albero motore Ø 41 SM
Astuccio a rulli
Gabbia a rulli sfilabile
Rondella
Vite cilindro 5x20
O.R. tenuta volano
Rondella
Vite basamenti 5x40
Spinotto
Anello di fermo
Guarnizione cilindro
Pistone completo Ø 40
Pistone completo Ø 41 SM
Segmenti Ø 40
Segmenti Ø 41 SM
Kit cilindro / pistone Ø 40
Kit cilindro / pistone Ø 41 SM
Cuffia cilindro
Griglia protezione CE
Set guarnizioni + O.R.
Vite protezione 4x10
Blocco motore assemblato
Estrattore elica
Tampone paraolio
Tampone paraolio elica
Boccola chius. basamento
Biella completa
Perno ferma pistone
Fig.4 MARMITTA / MUFFLER
Fig.5 ACCENSIONE ELETTRONICA
ELECTRONIC IGNITION
Fig.6 CARBURATORE WALBRO
WALBRO CARBURETOR
Fig.7 IMPUGNATURA / CRUISE HANDLE
*Rondelle e viti inox
*Stanley steel washers and screws
*Guarnizioni speciali *High quality gaskets
*Anelli O-ring speciali *High quality O-rings
POS DESCRIZIONE
DESCRIPTION
1
2
3
4
5
6
7
8
9
10
11
Propeller guard
Screw, muffler 5x90
Copper washer
Muffler
O. Ring (Iarge)
O. Ring (medium)
Screw, guard 4x16
Washer
Exhaust valve kit
Muffler extractor
Muffler buffer
Convogliatore acqua
Vite marmitta 5x90
Rondella in rame
Marmitta
O.R. di tenuta grande
O.R. di tenuta medio
Vite convogliat. 4x16
Rondella
Kit valvola di scarico
Estrattore marmitta
Tampone scarico
POS DESCRIZIONE
DESCRIPTION
1
2
3
4
5
6
7
8
12
13
14
15
16
C.D.I. ignition
Woodruft key
Washer
Grover ø 4
Screw electric system 4x16
Grommet, stop cord
Grover ø 8
Nut flywheel
Starter pawl spring
Starter pawl
Pin starter pawl
Hose with cap
Flywheel puller
Accensione elettronica
Chiavetta
Rondella
Grover ø 4
Vite statore 4x16
Gommino passacavo
Grover ø 8
Dado fissaggio volano
Molla arpioncino
Arpioncino
Perno fissaggio arpioncino
Cavo con cappuccio
Estrattore volano
POS DESCRIZIONE
DESCRIPTION
1
2
3
4
5
6
7
8
9
10
11
12
13
14
15
16
Flange gasket
Walbro flange
Washer
Screw, flange 5x20
Carburetor gasket
Walbro carburetor
Intake flange gasket
Intake flange
Clamp, intake elbow
Washer
Screw, carburetor 5x67
Walbro diaphragm set
Carburetor tester
Carburetor wrench
Set gasket 1/5/7/23
Small rubber cap
Guarnizione flangia
Flangia per Walbro
Rondella
Vite flangia 5x20
Guarnizione carburatore
Carburatore Walbro
Guarniz. collettore
Collettore aspirazione
Fascetta
Rondella in rame
Vite carburatore 5x67
Set membrane Walbro
Prova carburatore
Chiave carburazione
Set guarnizioni 1/5/7/23
Tappino in gomma
N. CODICE-PART N. QT PREZZO UNITARIO
UNIT PRICE €
7000 1014
1
10,00
7000 1023
2
3,50
7000 1080
2
0,70
7000 2026
1
55,00
7000 1103
1
2,50
7000 1104
1
2,50
7000 1082
2
1,00
7000 1031
2
0,30
7000 2034
1
8,00
7000 2031
1
60,00
7000 2041
1
10,00
N. CODICE-PART N. QT PREZZO UNITARIO
UNIT PRICE €
7000 1132
1
110,00
7000 1070
1
0,80
7000 1031
2
0,30
7000 1085
2
0,30
7000 1082
2
1,00
7000 2019
1
2,00
7000 1084
1
0,30
7000 1040
1
0,50
7000 1108
2
1,50
7000 1109
2
3,00
7000 1107
2
3,00
7000 1136
1
12,00
7000 1130
1
18,00
N. CODICE-PART N. QT PREZZO UNITARIO
UNIT PRICE €
7000 1074
1
1,00
7000 2015
1
10,00
7000 1018
1
0,30
7000 1081
1
1,00
7000 1076
1
1,00
7000 1128
1
65,00
7000 1077
1
1,00
7000 2017
1
7,00
7000 1034
1
4,00
7000 1080
2
0,70
7000 1073
2
2,00
7000 1122
1
16,00
KACC 140
1
33,00
7000 1124
1
4,00
7000 1137
1
4,00
7000 1145
1
1,00
N. CODICE-PART N. QT PREZZO UNITARIO
UNIT PRICE €
7000 2006
1
12,00
7000 1016
1
18,00
7000 1021
2
0,30
7000 1081
2
1,00
7000 1021
1
0,30
7000 1019
1
0,30
POS DESCRIZIONE
DESCRIPTION
2
3
4
5
6
7
Leva acceleratore
Impugnatura
Rondella
Vite impugnatura 5x20
Rondella
Dado fiss. impugnatura
Throttle lever
Cruise handle
Washer
Screw, cruise handle 5x20
Washer
Nut, cruise handle
Scatola Aquascooter
Imballo neutro
Aquascooter box
Packing
7000 1012
1
1
5,00
3,00
DICHIARAZIONE di POTENZA
Engine Power Declaration
(Art.28 Decreto Legislativo 18 luglio 2005,n° 171)
x
Costruttore del motore
Legale Rappresentante
Rivenditore Autorizzato (*)
Engine Manufacturer/legal representative/authorized seller
COMER SPA – VIA STORCHI, 8 –42011 BAGNOLO IN PIANO (RE)
Modello AQUASCOOTER AS 650 CE
Engine Model
Tipo di motore PROPULSORE X HOBBY Numero di serie
Serial Number
Combustibile impiegato MISCELA 1%
Engine Type
Potenza dichiarata 2 HP
Kw a 1,47
Declared Rated Power
Giri/min 5.000
Kw a All’albero portaelica Declared propeller shaft power
Specification of reccomended fuel
rp0
All’albero motore
Consumo orario Massimo 1 l/h
Ciclo QUATTRO
Iniezione a carburatore
Hourly max consumpion
Cycle
Stroke
Tempi 2 T
Number of cylinder
Massa [kg]
Weight [kg]
Ora A/h
Ampere ora
Carburettor injection
Numero e disposizione cilindri
Declared crankshaft power
1 in linea
Cilindrata totale 49
Total swept volume
Alesaggio
Cylinder Bore
40 mm Corsa
cm³
39 mm
Piston Stroke
7
Sistema di aspirazione ASPIRAZIONE NATURALE
Induction System
Raffreddamento aria di sovralimentazione NO
Charge air cooling
Massima contropressione allo scarico
Maximum premissible exhaust backpressure
0,00 kPa
Timbro e firma del costruttore, del legale rappresentante
o del rivenditore autorizzato nel territorio UE
(*)Marcare la voce corretta
Tickthe item which is applicable
Stamp and signature of engine manufacturer, legal representative
or authorized seller in EU
COMER S.p.A.
Vanessa Santini
La falsità della dichiarazione e/o l’utilizzo di dichiarazione falsa concretizzano le fattispecie di cui agli articoli 483 o.p. (falsità ideologica commessa dal privato in atto pubblico) e 489 c.p. (uso di atto falso).
Comer S.p.A. – Loc. S. Tomaso – 42011 BAGNOLO IN PIANO (RE) – Uffici: Via Storchi, 8 – Magazzino: Via Rabitti, 9
Tel. +39 (0) 522 – 955045 / FAX +39 (0) 522 – 955040
Cap Soc. i.v. € 817.438,96 – R.E.A. di RE 108113 – N. Mecc. RE 005160 – Registro Imprese di RE/cod. Fisc. – P. I.
00130020357 – Cod. Identificativo C.E.E. IT 0013002
10 . DICHIARAZIONE DI CONFORMITA’. DECLARATION OF CONFORMITY. KONFORMITÄTSERKLÄRUNG.DECLARATION DE CONFORMITÉ.
DECLARACIÓN DE CONFORMIDAD
DICHIARAZIONE “CE” di CONFORMITA’ - “CE” DECLARATION OF CONFORMITY
“CE” KONFORMITATSERKLARUNG - DECLARATION DE CONFORMITÉ “CE”.
DECLARACIÓN DE CONFORMIDAD “CE”
La ditta: Messrs.
COMER S.p.A.
Die Firma Via Storchi, 8
La maison 42011 - S.Tomaso - Bagnolo in Piano - RE - ITALY
La empresa
Dichiara sotto la propria responsabilità che la macchina/ Declares under its own responsibility
that the machine / Erklärt unter der eigen Verantwortung, daß die Machine/ Déclara sous sa
propre responsabilité que la machina/ Declara bajo su propia responsabilidad que la máquina
Marca / Make / Fabrikat / Marque / Marca . :COMER
Tipo/ Type/ Typ/ Type/ Tipo: PROPULSORE PER HOBBY
Modello/Model/Modell/Modèle/Modelo : AS 650
N. di serie/Serial N./Seriennummer/N.de série/Número de serie:
é conforme ai Requisiti Essenziali di Sicurezza e di Tutela della Salute di cui alle Direttive
CEE 89/392 - CEE 89/336 e successive modifiche.
is conforming to the Essential Safety and Health Protection Requirements pursuant to
EEC Directive 89/ 392, EEC 89/336 and subsequent amendments.
den wesentlichen Anforderungen in Sachen Sicherheit und Gesundheitsschutz
entspricht, die nach den EU-Richtlinien 89/392/EWG - 89/336/EWG und anschließenden
Novellierungen vorgesehen sind.
est conforme aux Prescriptions minimales de sécurité et de santé de la Directive CEE
392 - CEE 89/336 et successives modifications.
está conforme a los Requisitos Esenciales de Seguridad y Protección de la Salud según
las Directivas CEE 89/392, CEE 89/336 y sucesivas modificaciones.
Vanessa Santini
legale rappresentante - authorised Officer - rechtlicher Vertreter
le représentant légal - representante legal
Reggio Emilia,lì (firma - firma - Unterschriftsignature - firma)
ITALY
La presente Dichiarazione è valida solo se compilata e firmata in ogni sua parte
This Declaration is valid only if ali its sections have been filled in and signed
Diese Erklärung ist nur dann gültig, wenn sie in allen Teilen ausgefüllt ist.
La présente déclaration n’est varable que si elle est dû
La presente declaración es válida sólo si rellenada en todas sus parte y firmada
www.aquascooter.it
®
S.p.A.
Via Storchi, 8 - località S. Tomaso
42011 BAGNOLO IN PIANO - RE - Italy
Tel. +39 (0)522.955045
Fax +39 (0)522.955040
E-mail: [email protected]
Cap. Soc. int. vers.€ 817.438,96 - REA di RE 108113
n.Mecc RE005160 - Reg Imprese di RE - C.F./P.IVA 00130020357