1
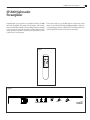
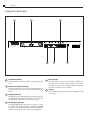
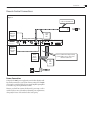
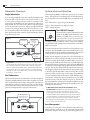
SP-8000 Subwoofer Preamplifier Your Subwoofer Instruction Manual SP-8000 Subwoofer Preamplifier High Performance Customized Bass Management For Any Freestanding Amplified Subwoofer 2 Safety Precautions SP-8000 Subwoofer Preamplifier IMPORTANT NOTE These instructions are for Atlantic Technology Model SP-8000, which must be used with either a powered subwoofer or a subwoofer with external power amplifier. The SP-8000 is a preamplifier controller only, it does not contain a power amplifier. The SP-8000 can be used with virtually any amplified subwoofer system which has either a balanced or unbalanced line-level input. Table of Contents 3 SP-8000 Subwoofer Preamplifier 4 SP-8000 Features 4 5 6 7 7 Test and Training CD-ROM Preamplifier Front Panel Premplifier Back Panel Remote Control Connecting Your Preamplifier 7 7 Input Output 9 Power Connection 10 10 Single Subwoofers Dual Subwoofers CAUTION: To reduce the risk of electric shock, do not remove the cover . No user serviceable parts inside. Refer to qualified personnel. 10 10 11 11 11 WARNING: To reduce the risk of fire or electric shock, do not expose this appliance to rain or moisture. This device generates a fair amount of heat. Make sure nothing blocks the ventilation openings on the top and bottom of the unit. 11 12 12 12 The Low Pass Control Bass Management The Phase Control Parametric Room Equalizer (EQ) Adjusting the Parametric EQ Using a Meter or Real Time Analyzer (RTA) Setting the Parametric EQ Using an SPL Meter Level Setting Using an SPL Meter Level Setting Without an SPL Meter Setting the Subwoofer Level Without an SPL Meter or Test Tones How Much is Enough? Safety Precautions 8 Basic Hookup 9 Remote Control Connections 10 Subwoofer Placement 10 System Setup and Operation The lightning flash with arrowhead, within an equilateral triangle, is intended to alert the user to the presence of uninsulated “dangerous voltage” within the product’s enclosure that may be of sufficient magnitude to constitute a risk of electrical shock to persons. The exclamation point within an equilateral triangle is intended to alert the user to the presence of important operating maintenance (servicing) instructions in the literature accompanying the appliance. 12 12 13 13 13 14 15 Remote Control Functions Direct Access Connector Care of Your SP-8000 System Troubleshooting Guide Specifications Program EQ Setting Curves For Future Reference Record your product's serial numbers and date of purchase here: Model Number Serial Number Date of Purchase The serial number is found on the back panel. Copyright © 2003 Atlantic Technology International. Specifications are those in effect at the time of printing. Atlantic Technology reserves the right to change specifications or designs at any time without notice. THX and THX Ultra 2 are registered trademarks of Lucasfilm, Ltd. Dolby Digital, AC-3, Dolby Stereo and Dolby Pro Logic are trademarks of Dolby Laboratories Licensing Corporation. SP-8000 Subwoofer Preamplifer 3 Instruction Manual SP-8000 Subwoofer Preamplifier Congratulations on your purchase of an Atlantic Technology SP-8000 Subwoofer Preamplifier. This unique unit will enhance your listening pleasure dramatically. Its flexible control capability brings new meaning to the terms system and room integration, providing unheard of fine tuning capability to optimize its your subwoofer's performance as well as increase your own enjoyment. This system consists of a pre-amplifier (Figure 2) with remote control (Figure 1). Your Atlantic Technology SP-8000 preamplifier is designed to acoustically integrate with not only Atlantic's boxed subwoofers but also with virtually all other brands of subwoofer on the market. Figure 1 �������� ���������� � ��� ��� ��� ��� ���� ���� Figure 2 ��� 4 Features SP-8000 Subwoofer Preamplifier SP-8000 Features Built-in Parametric Equalizer (pages 5 and 13) Designed to flatten and smooth bass response deviations caused by standing waves at the listening position, in your room. Four Built-in Program Equalizations with Reference setting (pages 7 and 14) We’ve carefully chosen and built in 4 preset bass EQ curves, plus a flat/THX response setting, to enhance your enjoyment of all program materials. Wireless Remote Operation (pages 7, 12 and 13) Control the program EQs, volume trim adjustment, and subwoofer muting from your easy chair. Adjustable (50 Hz to 150 Hz) low-pass crossover (@ 18dB per octave) with a THX/External setting (page 10) Allows for much better bass integration with the satellite speakers while making the woofer less localizable. Low level inputs, low level outputs, balanced and unbalanced (pages 6, 8 and 9) Easily solves compatability issues between balanced and unbalanced components. Four position Phase Invert switch (pages 5, 11 and 12) Allows precise acoustic matching with satellite speaker systems whose output may be phase reversed. Can also help to compensate for unusual room acoustics that can occur, causing a lack of bass at the listening position. A convenient front panel mounted Level Control with a clickstop THX/REF input sensitivity setting (pages 5 and 12) Meets all current UL/CSA and European safety requirements Test and Training CD-ROM The enclosed Atlantic Technology/Sencore Test and Training Disc includes lots of useful information. (Sencore is a world famous manufacturer of electronic test and measurement equipment. We strongly support the use of this caliber of equipment in the setup of home surround sound systems). Please take a moment to go over its contents before proceeding with your system’s setup. The disc includes room mode calculators, explanations of how sound spreads in a room, information about home theater setup, a glossary, and even an explanation of how standing waves “set up” in rooms. Most importantly, there are test tones on the disc intended to be used to set the equalizer awoofer level in your system. Front Panel 5 Instruction Manual Preamplifier Front Panel Figure 3 2 6 10 3 4 1 5 1 LEVEL TRIM display Indicates amount of trim adjustment applied (via the remote control) above or below the reference volume setting of your SP-8000. (page 12) 2 6 7 8 WIDTH EQ control ATTENUATION EQ control Program Equalization indicators Light indicates selected Reference or EQ program as applied via the remote control. (page 11-12) MUTE indicator PHASE control LOW PASS crossover control Sets the low frequency crossover between the Subwoofers and your satellite speakers. A detent is provided for the THX/EXT setting. (pages 10 and 12) 9 Reduces the subwoofer’s output at those frequencies selected by the parametric equalizer. (page 11-12) 5 9 Sets correct Subwoofer phase (0°, 90°, 180°, or 270°) to best match your satellite speakers and room. (pages 11-12) Selects how wide a range of frequencies will be adjusted by the parametric equalizer. (page 11-12) 4 8 Lights when amplifier volume is muted via the remote control. (page 7 and 13) FREQUENCY EQ control Selects the frequency to be adjusted by the parametric equalizer. (page 11-12) 3 7 BASS LEVEL control Sets the reference volume level of the connected Subwoofers. A detent is provided for the THX/REF setting. (pages 12) 10 IR RECEIVED indicator Blinks when command is received from remote control, either via built-in or remote receiver. Back Panel 6 SP-8000 Subwoofer Preamplifier Preamplifier Back Panel Figure 4 5 OUTPUT MODEL - SERIAL NUMBER EXT IR RCVR OUT TO SLAVE SLAVE IR IN THRU COMMAND VOL + VOL MUTE REF EQ 1 EQ 2 EQ 3 EQ 4 EQ 5 COM INPUT 2 +12 V DATA GND 1 AC INPUT 16 V 50 / 60 Hz Manufactured under license from THX Ltd. THX, THX Ultra2 and THX Select are registered trademarks of THX Ltd. WARNING RISK OF ELECTRIC SHOCK DO NOT OPEN DESIGNED AND ENGINEERED IN USA, MANUFACTURED IN TAIWAN AVIS: RISQUE DE CHOC ELECTRIQUE / NE PAS OUVRIR 4 1 Product Serial Number Write this number in the space provided on page 2 for future reference. 2 3 Remote Control jacks The IR IN jack accepts an IR signal from a separately powered system or an IR signal generated by a “whole-house” controller. Use the THRU jack to “daisy-chain” to other devices. (page 9) 4 5 Low Level jacks 7 AC Input Direct Access Remote Control port Use for hard-wired direct access of remote control functions. A contact closure between "com" and any function will activate that function EXT IR Receiver Connector Use the EXT IR RCVR input powered port to connect to a 3-wire 12 volt IR receiver module (xantech,ect.) when the preamplifier is not in line-of-sight with the remote control. Use the OUT TO SLAVE jack to pass on the received signal to other equipment. 3 7 Use the input jack to connect to the "subwoofer" or "LFE line out" from your processor/receiver. Use the output jack to connect to your subwoofer's input. Use the XLR-type balanced connectors, if possible, to obtain lowest noise and hum. Use the included AC adapter to connect your preamplifier to a wall outlet. (page 9) Remote Control and Connections 7 Instruction Manual Remote Control Connecting Your Preamplifier The Atlantic Technology SP-8000 is relatively simple to hook up. Figure 5 WARNING: To prevent risk of electrical shock or damage to your equipment, always unplug all component AC cords before proceeding with speaker and component connections! The last step in wiring your system should be plugging in the AC cords! Input �������� ���������� � ��� 1 ��� ��� ��� ��� 2 ���� 4 ���� 3 Connect your system's sub output here; this jack may be labeled Sub, Subwoofer, or LFE (Low Frequency Effects). Simply connect to the Input jack on your preamplifier with high-quality shielded cables as shown in Figures 6 and 7. Please consult your processor/receiver manual for further information regarding the use of these outputs. If possible use the XLR- type input (balanced). Output Connect a high quality shielded cable from here to the input of your subwoofer's amplifier; if possible, use the XLR-type balanced output. 1 Preset Program EQ buttons Select from 4 preset equalization settings in any sequence. (page 14) 2 Reference EQ button REF button returns the preamplifier to its flat/THX EQ settings and returns the volume trim level to 0dB. (page 12) 3 MUTE button Mutes the output of the preamplifier. Pressing again returns the preamplifier to the previous volume setting 4 Level TRIM buttons The button increases and the button decreases the volume of the preamplifier above or below the preset reference level in 1dB increments. (page 13) 8 Connections SP-8000 Subwoofer Preamplifier Basic Hookup Figure 6 ������ ������� ���� ����� ������� ����� ����� ������� ��� ��� � ��� EXT IR RCVR OUT TO SLAVE SLAVE IR IN THRU COMMAND VOL + VOL MUTE REF EQ 1 EQ 2 EQ 3 EQ 4 EQ 5 COM OUTPUT +12 V DATA GND INPUT MODEL - SERIAL NUMBER AC INPUT 16 V 50 / 60 Hz Manufactured under license from THX Ltd. THX, THX Ultra2 and THX Select are registered trademarks of THX Ltd. WARNING RISK OF ELECTRIC SHOCK DO NOT OPEN DESIGNED AND ENGINEERED IN USA, MANUFACTURED IN TAIWAN AVIS: RISQUE DE CHOC ELECTRIQUE / NE PAS OUVRIR ����� ������ ������ ���� �������� ��� ����� ����� �� ����������� ��������� ����� �������� Connections Instruction Manual Remote Control Connections Figure 7 � ���� �� ���� �� �������� ��� �� ���������� ����������� ������� � ���� ����� ���� EXT IR RCVR OUT TO SLAVE COMMAND SLAVE IR IN THRU VOL + VOL MUTE REF EQ 1 EQ 2 EQ 3 EQ 4 EQ 5 COM OUTPUT +12 V DATA GND INPUT MODEL - SERIAL NUMBER AC INPUT 16 V 50 / 60 Hz Manufactured under license from THX Ltd. THX, THX Ultra2 and THX Select are registered trademarks of THX Ltd. WARNING RISK OF ELECTRIC SHOCK DO NOT OPEN DESIGNED AND ENGINEERED IN USA, MANUFACTURED IN TAIWAN AVIS: RISQUE DE CHOC ELECTRIQUE / NE PAS OUVRIR ��� �� ���������� ����������� ������� ������ ������ ������ ������� Power Connection Connect the SP-8000's power supply unit to an AC outlet only after making all other connections to your system. You may connect the SP-8000's power supply to a switched outlet on your system's amplifier, preamplifier or reciever, as its power requirements are small. However, you should not connect the subwoofer's power amp to such a switched outlet, as most of them have substantial power requirements, often greatly in excess of the switched outlet's safe capacity. ������� �� �� �� ���� ������������� ������� �� �������� �� ����� ������ ����� ���� ��������� �� ���� ����� 9 Placement & Setup 10 SP-8000 Subwoofer Preamplifier Subwoofer Placement System Setup and Operation Single Subwoofers When using the SP-8000, your subwoofer's controls are of a secondary nature. They will be left at a nominal position, and all adjustments to your system will then be via the SP-8000. Preset your subwoofer as follows: If you are using a single subwoofer, then, generally speaking, the ideal location would be in the front of the room, between the LRs, or close to or in a corner (see Figure 8). Every room has its own unique sound characteristics, and flexibility in the exact placement of subwoofers is always desirable. The closer a subwoofer is placed to a wall and especially a corner, the more and deeper the bass response you will hear. However, in some rooms, corner placement can produce too much bass or a “one ����������� the subwoofer may ����� note” boomy effect. Under such circumstances work ���������� better away from the wall or corner. You should experiment to ��find���the �� ��� ��� � ��� best position in your room. Figure 8 �� � �� � � � ��� ��� ��� ��� ����������� ����� ���� ����� �� ��� ���� ��� ��� �� ���� �� ����������� ������ ��� ��� ���� ���� �� ��� � ��� � �������� � �� ��� ��� ��� ��� ��� Level - THX / Preset or approx 1/3 up from minimum Lowpass - THX / External or set to highest frequency Phase - Normal / 0 Degrees �������� When used with a complete THX Certified speaker system, the Sp-8000's system’s LOW PASS control ����������� should be set to 80Hz, unless you are using a pro�� ��� ��� ��� cessor ��������� ���������with a built-in crossover. If your processor is THX certified or has a built-in crossover, bypass the �� Preamplifier's amplifier’s LOW PASS control by setting it to the THX/EXT setting. All THX certified satellites have been ����������� optimized to work with an 80 Hz �� crossover ��� point. ��� ��� �� ��������� y �� ���� ���� ���� ���� ��� ���� ���� ® Helpful Hint: A particularly useful experiment is to place the subwoofer right at the prime listening position (move the couch or chair out of the way and put the sub in its place). Then play something with lots of good bass (preferably music), and walk around the room, listening to the subwoofer’s response. When you locate an area that has ample amounts of well-defined bass, you have found a potentially good place to locate the sub. Dual Subwoofers When two subwoofers are used you may wish to place them asymmetrically; that is, in slightly different positions in the room (Figure 9). This will reduce common mode room resonances that typically occur with symmetrically placed subwoofers. Another good option is to place the subwoofers in the same corner. Several tests have shown this to be a viable means of producing smooth bass response in many rooms. Figure 9 ����� ���������� ��������������� �� ���� ��� �������� ���� The���������� LOW PASS Control ��������� If your Processor/Receiver has no internal crossover (a fairly rare occurrence these days) the SP-8000's Low Pass Control should be used to optimize the performance of the system, by ensuring that the subwoofer and SA-700 satellites produce a cohesive and well integrated sound picture. Servo Controlled Subwoofer Amplifier Higher crossover frequencies pass more bass to the subwoofer but can quickly begin to sound boomy. They also make it easier to localize the subwoofer sonically, which is highly undesirable. Higher crossover frequencies may be suitable, however, when using very small satellites that have no real low frequency performance. Settings lower than 80Hz should be employed if you are using larger speakers that have extended bass response. This way, the subwoofer will only reproduce the very lowest bass frequencies that are in the range where the main speakers begin to roll off. It’s generally undesirable to have the main speakers and the subwoofer overlap too much. Larger speakers means a lower LOW PASS crossover frequency, smaller speakers means a higher LOW PASS crossover frequency. You may also contact the manufacturer of your satellite speakers for their specified low frequency response to determine the appropriate LOW PASS setting on your subwoofer amplifier. In the end, however, a little time spent experimenting will generally result in dramatically better bass response. A Word About Bass, Center Channel Modes, and System Setup: Many Dolby Pro Logic surround processors and surround receivers provide a choice between “Wide” (full frequency range) and “Normal” (restricted low frequency) mode for the center channel speaker. Atlantic Technology recommends that the center channel be operated in the Normal mode when using a powered subwoofer. The center channel speaker will sound more dynamic and the intelligibility of the system will generally be improved when in the Normal mode. Bass Management Today, many processors and receivers offer Bass Management capability. If yours does it will ask you to choose between Large and Small loudspeakers during the system setup procedure. When speakers are set Setup Instruction Manual to Large the processor/receiver assumes that they can produce full frequency range sound, including very deep bass at fairly high volume levels. When set to Small it assumes that the speakers are bass limited and feeds the bass from that channel to the subwoofer. If your processor/receiver offers this choice, all Atlantic Technology satellite speakers should be set to Small, regardless of their actual size. � Adjusting the Room EQ Using a Meter or Real Time Analyzer (RTA) IMPORTANT NOTE: During all set up operations except setting the Phase control it will be beneficial to shut off or disconnect all the speakers except the Subwoofer. It’s important to complete the preceding steps regarding speaker setup before adjusting the parametric room equalizer. Once they’re complete, insert the Atlantic Technology/Sencore Test and Training CD into your CD or DVD player and go to Track 16, which is a full range test signal including all bass frequencies from 20Hz to 120Hz. Set the BASS LEVEL of your SP-8000 for approximately 75dB at the primary listening position. If you are using an RTA, set it to at least 1/6th octave resolution and slow response (Use slow response to allow the meter to average the standing waves that build up in the room). Continue using Track 16 to observe the overall response of the subwoofer. It is highly likely that you will find at The PHASE Control���������� ����� �������� least one significant peak (between 20Hz and the crossover point set on A subwoofer operating out of phase with the rest of �� ��� �� the amplifier or in the processor). Write down the center frequency of the � ��� the system won’t provide optimum low frequency perpeak, how wide the peak is (by noting the upper and lower frequencies formance. Also, the correct subwoofer phase can����������� help where it starts and stops) and how large it is, in dB. �� ��� ��� compensate for���room acoustic anomalies. Therefore, ��������� ��������� Begin setting the paraa PHASE switch that will alter the phase of the SubFREQUENCY WIDTH ATTENUATION 75 1.0 -10 metric EQ by adjusting woofer��is���provided on the SP-8000. It has 4 positions (0°,90°,180°,270°) �� � ��� the FREQUENCY control for added flexibility. To set the PHASE control, insert the supplied Atlantic ����������� to the approximate center Technology/Sencore Test and Training CD in your CD/DVD player and select 25 125 0.2 1.5 -20 0db ��� ��� �� ��� frequency of the peak. Next the broadband bass test tones on Track 16. Have someone sit in the prime ���� �� ��������� ��������� adjust the WIDTH control listening position to evaluate the sound. Pay particular attention to the tranto the approximate width of the peak. Note that the WIDTH control is sition of bass from the subwoofer to the satellite speakers. calibrated in octaves. An octave is a doubling or halving of any chosen You can also listen to a musical source such as a CD or DVD, with strong SA-700 frequency. ForControlled example, if the chosen frequency is 40Hz, 1 octave higher Servo bass content that spans the range from deep bass to mid bass (a well Amplifier would beSubwoofer 80Hz, and one octave lower would be 20Hz. Since the WIDTH recorded jazz disc with someone playing a full stand up bass is always a control ranges from 0.2 octave to 1.5 octaves you see that you can adjust good choice). It’s best not to use a “one note” special effects track like a big from a fairly narrow band to a fairly wide band on either side of the center explosion or dinosaur stomping to test the subwoofer. Experiment with the frequency. Next, set the ATTENUATION control to the approximate minus position of the PHASE control(s) to get the best transition from sub to satdB value to compensate for the peak. Measure the bass response again ellites. It should be fairly obvious which is the correct setting. In particular, and see how much you have reduced the overall peak. You may need to there will be a smoother, more integrated transition between the satellites fine-tune the controls to smooth the response as much as possible. and the subwoofer when they are properly phased. For those of you who may have heard otherwise, the choice of Large or Small is not a matter of opinion, preference, taste, or based upon the phases of the moon. So please ignore any and all free and helpful (and many times incorrect) advice and set them to Small. In fact, the vast majority of speakers on the market today should be set to small. As a rule of thumb, if any satellite speaker in your system doesn’t have a 10-inch or larger woofer, it most probably should be set to Small, as far as Bass Management is concerned. � � 11 ��� ��� ��� ����������� ��� ��� ��� Parametric Room Equalizer (EQ) Setting the Parametric EQ Using an SPL Meter In order to optimize the performance of your subwoofer the parametric room equalizer should be utilized. The built in Room EQ allows you to select the frequency you want to adjust, and how wide a band on either side of that frequency you’re going to adjust with it. It is designed specifically to remove (turn down) unwanted peaks in the bass. The procedure is fairly simple: the included Atlantic Technology/Sencore Test and Training CD is used along with a SPL meter to define the single largest bass peak at the prime listening position and then reduce it with the Room EQ. If you only have an SPL meter, set the meter to C Weighting and Slow response. Set the Bass Level of your SP-8000 for approximately 75dB at the listening position as outlined above using Track 16 of the test disc. Sit in the prime listening position with a pencil and paper. Play Tracks 1-15 sequentially to measure the subwoofer response. Take enough time with each measurement to allow the meter to stabilize. Write down the measured level for each frequency, covering the range from 20Hz to the crossover point selected on the subwoofer amplifier or in the receiver/ processor. Once again, you will most likely find one or more significant peaks in the bass response. Proceed as detailed above to reduce the largest peak as much as possible. The test and setup CD also includes a wealth of general information concerning sound reproduction and home theater, in addition to the test tones. Although the test tones can be used to set the Room EQ “by ear” we very strongly recommend using a Sound Pressure Level meter or a Real Time Analyzer to set the Parametric EQ. Setup & Operation 12 SP-8000 Subwoofer Preamplifier Level Setting Using an SPL Meter ����������� ���������� When setting up a complete home theater we strongly recommend that you use a Sound Pressure Level meter to calibrate the individual channel levels. At the time of this writing Radio Shack® has one that is affordably priced (approximately $40) and works well. However, for the best result in setting up the levels and the parametric EQ you would be much better served by using a true audio test instrument with a Real Time Acoustic Analyzer (RTA) such as the Sencore® SP 295. �� �� �� � � � � ��� ��� ��� ��� ��� ��� ��� ��� ��������� ����� ����������� �� ��� ��� ���� � �������� � �� ��� ��� ��� ��� ��� To calibrate channel levels using an SPL meter, turn on your system, put the Processor/Receiver in the Test Mode and set its main volume control to a moderate volume level. If the volume control has a 0dB setting Atlantic Technology with minus dB below and plus dB above 0, set the control to 0dB. Sit in the prime listening position, set the SPL meter to the 70dB scale, Slow Response, and C Weighting. Holding the meter in front of you with the microphone pointed up at the ceiling, cycle the test tone from speaker to speaker, setting every speaker (including the subwoofer) to 75dB using the individual channel level adjustments in the Processor/Receiver. In some cases, you may have to use the Processor/Receiver’s main volume control to get the first speaker you set (typically the left front) to 75 dB, but from then on use the receiver’s internal level adjustments to set each channel. These may only be accessible through the Processor/Receiver’s remote control. ® IN N O V A T I V E H O M E T Play some music that you know has good bass content, and turn the Processor/ ����������� Receiver’s level control up until you just start to hear the subwoofer working. Now, from your normal listening position, determine whether the subwoofer is playing����������� loudly enough and filling in the bass frequencies of the music evenly. If adjustment is necessary, change the processor’s subwoofer level adjustment setting (or use the front panel BASS LEVEL control if your processor lacks a subwoofer SA-700 level adjustment). Servo Controlled ����� H E A T E R �������� �� ��� � �� ��� �� ��������� �� ��� � ���������� ��� ��� ��������� ��� ��� ��� ��������� ��� �� ��� �� ��������� How Much is Enough? Subwoofer Amplifier Sometimes people prefer more bass impact for movies than sounds natural when reproducing music. The SP-8000 Preamplifier offers 4 EQ settings plus the LEVEL TRIM to help maximize your enjoyment of different source material. Remember however, the most common error people make when setting up their system is to play the subwoofer (and surrounds) too loudly. Although the Home Theater Police will not arrest you for this act, should you desire the most accurate overall reproduction, a well-balanced sound from deepest bass to highest treble is the best way to get it. Have fun. Experiment. Enjoy. As tempting as it may be to set the subwoofer and/or surround speakers higher than 75dB, don’t. Set them to 75dB and see if you can acclimate to the sound as the film maker created it. Try watching several different movies and keep in mind that the goal is to have a system that sounds like you’re actually in the movie. Just like in a well set up movie theater, in most cases, you shouldn’t be consciously aware of the surround speaker’s output at all, much less have so much bass that your furniture moves across the room. Remote Control Functions When using the latest discrete digital electronics we recommend setting the SP-8000’s BASS LEVEL control to its THX/REF position and using the Processor/Receiver’s built-in subwoofer level control. Should you have difficulty achieving the correct subwoofer volume this way or should your Processor/Receiver not have a subwoofer level adjustment built in, you can use the SP-8000’s main BASS LEVEL control to make this adjustment. EQ1 - This EQ was primarily designed to enhance music. It ��� ��� ��� reduces midbass frequencies by a small, but noticeable amount. You ��� ��� will find that on many music sources this will make the bass sound tighter ���� and more defined. It should make individual bass notes easier to hear ���� as well. EQ1 can also be used to remove some overall bass boominess when playing particularly bass heavy material. EQ2 - This EQ was programmed to enhance the impact and punch of special effects. It increases the bass output centered at 60Hz. Depending upon the source material, EQ2 could also be used to add some warmth to a bass shy music recording. EQ3 - Another choice primarily intended to enhance movie and video soundtracks. This one uses a more subtle increase of bass output centered at 80HZ with the addition of a very low frequency (subsonic) filter. This gives you the option of punching up the mid-bass while at the same time reducing the possibility of overdriving the subwoofer with extreme low frequencies. EQ4 - We call EQ4 After Dark. At lower volume levels human hearing Level Setting Without an SPL Meter If you cannot use an SPL meter to calibrate the system try to set all the speaker volumes to the same level using the Test Tones. Of course, this will be much more difficult without the meter, especially for the subwoofer. Setting the Subwoofer Level Without an SPL Meter or Test Tones Start your listening with the SP-8000's LOW PASS control set at the recommended crossover point (or in the THX/EXT position if you’re using a THX Certified processor or unit with a built-in crossover). Set the PHASE control to 00, and the front panel BASS LEVEL control to the THX/REF position as shown to the left. There are 4 custom EQ settings that have been programmed into the SP-8000 (see graphs on back cover). These have been chosen to enhance your enjoyment of both movies and music. These EQ settings are fairly subtle in their effect, as we wanted to make them truly useful with a wide selection of software. They can be accessed by pressing one of the four EQ buttons on your Remote Control. Operation & Troubleshooting 13 Instruction Manual is less sensitive at the frequency extremes (deep bass and very high sounds). In order to compensate when you must play the system at lower volume levels, EQ4 has been designed to raise the overall bass output of the sub slightly. The result will be a fuller and richer sounding bass at low volumes. EQ4 is designed for both music and movies. It can also be used to help compensate ��� ��� for ���lack of bass at the listening position. REF - This resets the EQ to flat response and the also resets the volume ��� ��� trim to 0dB. LEVEL TRIM and MUTE ���� - The and buttons let you change the total output level of ���� your subwoofer to compensate for soundtrack variations and your personal preferences. Each push of the button results in a 1dB change above or below the preset reference set with the BASS LEVEL control. The LEVEL TRIM readout on the amplifier indicates the level of adjustment in dB. Pressing the MUTE button turns off the volume of the Subwoofer. Pressing it again returns the volume to its previous setting. Direct Access Connector Located on the rear panel, this port and the corresponding male plug (shipped installed in the port) is for use with a hard wired remote control system using electronic or mechanical switching. Each contact function is labeled. To access the control functions use a normally open connection. Momentary closure will activate each function. The LEVEL TRIM function will respond in 1dB steps to a single contact closure while con- stant closure will result in continuous steps to the maximum of ± 10dB. The REF EQ and REF volume reset functions each have their own set of contacts. Care of Your SP-8000 The preamplifier can be wiped with a clean, dry cloth. If necessary, you can clean the front panel with a soft cloth moistened with mild window cleaner or dampened slightly with water. IMPORTANT: SAVE YOUR BOXES! If you can do so, save the carton, packing pieces and plastic bags that came with your SP-8000. They will be useful in case you move or have to ship your system for any reason. In any case, save all packing materials until you are certain that the system has suffered no damage in shipment. If you find such damage, either visible or internal, contact your dealer immediately for the proper return procedure. Troubleshooting Guide Once your Preamp is set up, you should have many years of maintenance free enjoyment from your system. However, if you should encounter a problem, refer to the following guide to help find the solution. If the problem persists, please contact your local authorized Atlantic Technology dealer. Problem Possible Cause Possible Solution No bass output AC power cord unplugged or plugged into a non-working outlet. Plug into a working outlet. Input cables not securely connected or defective. Check all connections, then try another input cable. Input cable not securely connected or defective. Check all connections, then try another input cable. Ground loop through antenna or cable TV system input. Test by disconnecting antenna and/or cable system input leads. If hum goes away, install isolation balun(s) at that point. Audible buzz or hum 14 Specifications SP-8000 Subwoofer Preamplifier Specifications Signal to Noise Ratio (-90dB hum) -97dB @ full output Total Harmonic Distortion .03% @ full output Low Level Input Sensitivity 250mv @ full output, 100Hz Low Level Input Impedance 22K Ω Output Level 3 V, max Output Impedance 150 Ω Dimensions W x H x D (in/cm) 16.875/42.9 W x 1.75/4.5 H(feet and faceplate) x 7.5/19.1 D Weight (lbs/kg) 4lbs. (1.9kg) Program EQ Setting Curves 15 Instruction Manual Program EQ Setting Curves EQ1 �������������������� ��� �� �� �� �� �� �� �������� �������� ��� EQ2 �� �� �� �� �� �� �� ��� �������������� ��� ��� �� �� �� EQ3 �������������������� ��� �� �� �� �� �� �� �� �� ��� �������������� ��� �� ��� �� �� �� �� �� �� ��� �������������� ��� �� �������������������� �� �� �� �� �� EQ4 �������� �������� �� �� �� �� �������������������� �� �� �� ��� �������������� REF/THX (flat) ��� �������������������� Note: These graphs represent the response of a typical THX Ultra 2 Subwoofer System without crossovers. In actual use, the system is not designed to respond beyond 400 Hz. �� �������� �� �� �� �� �� �� �� �� �� ��� �������������� ��� �� 16 SP-8000 Subwoofer Preamplifier 343 Vanderbilt Avenue Norwood, MA 02062 (781) 762-6300 www.atlantictechnology.com 015-1866