1
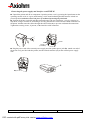
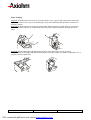
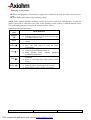
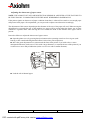
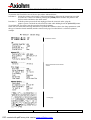
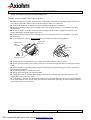
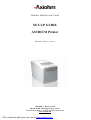
THERMAL PRINTING SOLUTIONS
SET-UP GUIDE
ASTRIUM Printer
Reference :3108332 - Issue Z
AXIOHM, 1, Rue d’Arcueil
BP 820, 92542 Montrouge Cedex, France
Tel: (33) (0) 1 58 07 17 17 Fax: (33) (0) 1 58 07 17 18
www.axiohm.com
1/14
PDF created with pdfFactory trial version www.pdffactory.com
CONTENTS
YOUR PRINTER.......................................................................................................................................................3
PACKAGE ..................................................................................................................................................................3
GENERAL DESCRIPTION ..............................................................................................................................................3
TECHNICAL SPECIFICATIONS .......................................................................................................................................4
DELIVERY & INSTALLATION..............................................................................................................................5
PRINTER LOCATION ....................................................................................................................................................5
CONNECTING THE POWER SUPPLY AND INTERFACE ON ASTRIUM ..................................................................................6
PAPER LOADING ........................................................................................................................................................7
POWERING ON THE PRINTER ........................................................................................................................................7
ADJUSTING THE ALMOST OUT OF PAPER SENSOR ............................................................................................................7
SELF TEST TICKET DESCRIPTION.....................................................................................................................7
TROUBLESHOOTING.............................................................................................................................................7
CLEANING YOUR PRINTER .................................................................................................................................7
GENERAL INFORMATION ....................................................................................................................................7
SAFETY PRECAUTIONS AND GENERAL OPERATING NORMS................................................................................................7
ASTRIUM Set-Up Guide
2/14
PDF created with pdfFactory trial version www.pdffactory.com
Reference :3108332 - Issue Z
YOUR PRINTER
Package
The packing box contains:
n Thermal printer
n External power supply unit (if supplied)
n Power cord (if supplied)
n Roll of thermal paper
n Set up guide
General description
OPEN
FEED
ON/OFF
ROLL
ON
ASTRIUM Set-Up Guide
ERR
3/14
PDF created with pdfFactory trial version www.pdffactory.com
Reference :3108332 - Issue Z
Technical specifications
ITEM
Technology
Printing resolution
Resolution of the received bitmaps
Character size
Character sets
Print field
Speed
Columns
Paper loading
Receipt width
Paper roll diameter
Roll core diameter
Cutter
User Flash memory
Data reception buffer
Interface
(according to the version)
Dimensions (WxDxH)
Weight
Temperature
Humidity
Power supply
Power supply unit
ASTRIUM Set-Up Guide
VALUE
Direct thermal
203 dpi/8 dots per mm
203 x 203 dpi
Font A: 1.41(W) x 3.39(H)
Font B: 0.99 (W) x 2.40 (H)
mm
Font A (predefined): 15 cpi,
Font B: 20 cpi
72 mm, 576 dots
Up to 200
Font A: 42 / Font B: 56
Clamshell TH
80
Up to 100
Internal: 12.7, External: 18
(suggested)
Automatic (partial cut), manual
(with tear bar)
384
4 Kbytes / 45 bytes
Mutually exclusive, available
on a slot pluggable interface
board:
- RS 232 C (25-pin connector),
- RS 232 C (9-pin connector +
display connector),
- Bi-directional parallel,
- USB (with display connector),
- Ethernet soon available
140 x 217 x 157
About 1.9
Operating: +10 to 40 °C,
Storage: -15 to 40 °C
Operating: HR 20 to 85% (noncondensing)
Storage: HR 5 to 90% (noncondensing)
24 Vdc
External (110/240 Vac, 50-60
Hz), with detachable power
cord
4/14
PDF created with pdfFactory trial version www.pdffactory.com
UNIT
mm
mm/s
mm
mm
mm
KBytes
-
-
mm
Kg
°C
Hertz
Reference :3108332 - Issue Z
DELIVERY & INSTALLATION
Unpack the printer, saving all packaging materials for future shipping or storage.
Printer location
Installing the printer horizontally or vertically so the paper is expelled upward, or vertically so the paper is
expelled from the front.
EXTERNAL VIEW
Horizontal Installation
Vertical Installation
Paper output slot
Operating console
Paper output slot
Operating console
INTERNAL VIEW
Automatic cutter
counter blade
Manual
cutter
Printhead
Printer cover
Automatic cutter
blade
Paper feed roller
Almost out of paper
sensor adjustment
Paper roll compartment
ASTRIUM Set-Up Guide
5/14
PDF created with pdfFactory trial version www.pdffactory.com
Reference :3108332 - Issue Z
Connecting the power supply and interface on ASTRIUM
n Unpack the printer and all its components. Open the printer cover by pressing the Open button on the
operating console as far as it goes (until hearing a click sound indicating that the button is locked in a
pressed position) and then remove the piece of cardboard protecting the print head.
n Position the printer vertically and then open and remove the rear connectors’ cover by releasing its
snap hook, using a screwdriver, and lifting it off. Plug the interface cables into the related connectors on
the printer and then route the cables through the cable blocks (A) to prevent accidental disconnections.
Tighten the securing screws, if present, of the interface cable connectors.
A
Drawer
Display
(if available)
n Plug the power cord of the external power supply unit into printer power jack (B). Attach one end of
the power cord, provided with the printer, into the related connector (C) on the external power supply
unit.
C
B
ASTRIUM Set-Up Guide
6/14
PDF created with pdfFactory trial version www.pdffactory.com
Reference :3108332 - Issue Z
n Using a screwdriver, remove extractable parts (D) so that you can then route the cables externally
according to your needs. Ensure that the passage slots are completely clear of any plastic protrusion that
could damage the cables.
WARNING: Once removed, the extractable parts cannot be reattached.
D
D
D
D
D
n Refit the connectors’ cover by inserting the cover’s lower and upper tabs into the corresponding slots
(E) and (F), routing the cables through the passage slots that were opened in the previous step.
F
E
E
VIEW BEHIND THE CONNECTORS’ COVER
Mutually exclusive
interface (available on slot
pluggable interface card):
- Bi-directional parallel
- Serial (25-pin)
- USB
- Serial (9-pin)
Power supply jack
Drawer interface
Display interface
available with the
following interfaces:
Serial (9-pin) and USB
Open
connector’s
cover
n Make sure that the printer and all the devices connected to it are powered off and then insert the free
end of the power cord into the electrical power outlet.
n Power on the printer as explained in the section Powering On the Printer.
n Load the paper roll as explained in the section Loading the Thermal Paper Roll.
ASTRIUM Set-Up Guide
7/14
PDF created with pdfFactory trial version www.pdffactory.com
Reference :3108332 - Issue Z
Paper Loading
Step n°1: With the printer powered on, open the printer cover by pressing the Open button (A) on the
operating console as far as it goes (until hearing a click sound indicating that the button is locked in a
pressed position).
Step n°2: With the paper roll oriented as shown in the following figures, unroll about 20 cm of paper
and then insert the roll into its compartment inside the printer while holding the unrolled portion of
paper.
A
A
Step n°3: While holding the unrolled portion of paper, close the printer cover by pressing
simultaneously on the right-hand and left-hand sides of the paper output slot. Make sure that the cover is
properly closed on both sides.
ASTRIUM Set-Up Guide
8/14
PDF created with pdfFactory trial version www.pdffactory.com
Reference :3108332 - Issue Z
Powering on the printer
n Ensure that the printer’s external power supply unit is attached to an easily accessible electrical power
outlet.
n Press the ON/OFF button on the operating console.
NOTE: Under normal operating conditions only the green power (ON/OFF) LED should be on when the
printer is powered on. Therefore if the LED on the operating console indicate a different machine status,
refer to the troubleshooting section for the related corrective actions.
Button Functions and LED States
BUTTON/
DESCRIPTION
LED
q Press once to power on the printer.
ON/OFF
q With the printer powered on, press for more than
( )
2 seconds to power it off.
q Press to unlock the printer cover so that it can be
OPEN
opened.
q Press once to advance the paper one line feed.
FEED (
)
q Press and hold down to feed the paper
continuously.
q When off: Printer powered off.
q When on green: Printer powered on.
ON ( )
q When
flashing green: Thermal printhead
overheated, printer busy.
q When
off: Printer in normal operating
conditions.
ERR ( )
q When on red: Paper jam, cutter locked, printer
failure.
q When off: Printer loaded with paper.
ROLL ( )
q When on yellow: Printer almost out of paper.
q When flashing yellow: Printer out of paper.
ASTRIUM Set-Up Guide
9/14
PDF created with pdfFactory trial version www.pdffactory.com
Reference :3108332 - Issue Z
Adjusting the almost out of paper sensor
NOTE: THE ALMOST OUT OF PAPER DETECTION SENSOR IS ADJUSTED AT THE FACTORY TO
BE FUNCTIONALLY COMPATIBLE WITH THE MOST WIDESPREAD PAPER ROLLS.
If the printer signals an almost out of paper condition when there is either still too much or not enough paper
still present in the paper roll compartment, you can proceed to adjust sensor detection accordingly.
The adjustment of this sensor depends upon the diameter of the core of the paper roll used. When moving the
adjustment lever towards the rear of the machine less paper will be present when the almost out of paper
condition is signaled while when moving the lever towards the front of the machine more paper will be
present.
Proceed as follows to adjust the almost out of paper sensor:
n Open the printer cover by pressing the Open button on the operating console as far as it goes (until
hearing a click sound indicating that the button is locked in a pressed position).
n Move the green adjustment lever (A) towards the front of the printer if you wish to have a more
anticipated indication (in the case of cores with a larger diameter), or towards the rear of the printer if you
wish to have a more delayed indication (in the case of cores with a smaller diameter).
A
n Load the roll of thermal paper.
ASTRIUM Set-Up Guide
10/14
PDF created with pdfFactory trial version www.pdffactory.com
Reference :3108332 - Issue Z
SELF TEST TICKET DESCRIPTION
To print the Self-Test follow one of the two procedures indicated below:
Procedure 1: Switch the printer to the Printer Configuration Menu by following the instructions provided
in section 4.1.2 in the user manual; pressing the [FEED] button switches the printer to the
Self-test mode and then to the online mode.
Procedure 2: With the printer powered off and unplugged from the electrical outlet, plug the
printer’s power cord back into the electrical outlet while holding down the [ON/OFF] button.
To perform Self-Test again, start the procedure from the beginning.
In the Self Test mode the following information is printed: the firmware release, the Setup parameters (with
the type of interface board installed) and the selected code page. Provided below is a Self-test printout
example.
Firmware release
Setup parameters and related
values
Code page
ASTRIUM Set-Up Guide
11/14
PDF created with pdfFactory trial version www.pdffactory.com
Reference :3108332 - Issue Z
TROUBLESHOOTING
Consult the table below before contacting the field engineering service to attempt to correct the malfunction
by following the information provided.
Solutions
Problems
Make sure that the power cord of the external power supply unit is
properly connected to the electrical outlet.
The printer does not power on.
Make sure that the power cord of the external power supply unit is
properly connected to the printer.
Make sure that the building’s electrical system is working correctly.
The paper is jammed.
Remove the paper roll, make sure that the paper compartment is clear of
paper dust or residue and then reload the paper roll.
Reset the cutter by opening and closing the printer cover.
The paper is not cut (cutter
locked).
Open the printer cover and remove the wrinkled paper, then load paper
roll again.
Open the printer cover and then remove and reload the paper roll.
The yellow out/almost out of
paper LED (ROLL) is on or
flashing.
Load a new paper roll.
If the paper is jammed, clear the paper jam by following the instructions
of step 2.
The red ERROR LED (ERR) is
on.
If the cutter is locked, unlock the cutter by following the instructions of
step 3.
In the case of a printer failure, contact the field engineering service.
The power LED (ON/OFF) is
flashing.
The paper is not fed.
ASTRIUM Set-Up Guide
Wait for the LED to stop flashing.
Open the printer cover and then close it again by pressing
simultaneously on the right-hand and left-hand sides of the cover’s paper
output slot.
12/14
PDF created with pdfFactory trial version www.pdffactory.com
Reference :3108332 - Issue Z
CLEANING YOUR PRINTER
WARNING: Before proceeding with any type of operation, unplug the power cord of the external power
supply unit from the electrical power outlet and bear in mind the information provided in the chapter entitled
Safety Precautions and General Operating Norms.
Cleaning the paper roll compartment
n Open the printer cover, remove the paper roll from the paper roll compartment and then clean the
compartment with a soft cloth being very careful to avoid touching the printhead and cutter blades.
n Load the paper roll.
Cleaning the printer case
n Clean the printer’s external case using a soft cloth. Do not use solvents or hydrocarbon-based
products.
Cleaning the printhead
WARNING: The printhead could be easily damaged so it is suggested that you clean it with extreme care,
without scratching it.
n Open the printer cover and remove the paper roll.
n Gently pass a cotton swab dampened with isopropyl alcohol (IPA) over the surface of the thermal
printhead.
n Unroll about 20 cm of paper and, while holding the unrolled portion of paper; close the printer
cover by pressing on the right-hand and left-hand sides of the paper output slot. Make sure that the
cover is properly closed on both sides.
ASTRIUM Set-Up Guide
13/14
PDF created with pdfFactory trial version www.pdffactory.com
Reference :3108332 - Issue Z
GENERAL INFORMATION
Safety precautions and general operating norms
Read this section carefully before using this product.
n Make sure that the electrical characteristics of the printer’s external power supply unit (110/240 Vac,
50-60 Hz) correspond to those of the electrical socket to which it is connected.
n Connect the printer to an electrical system compliant with the latest standards.
n Do not locate the printer in direct sunlight, near water, near heat sources or in humid or very dusty
environments.
n In case of smoke, bad odors or unusual noise coming from the printer, unplug the external power
supply and contact the field engineering service.
n Do not locate the printer in direct sunlight, near water, near heat sources or in humid or very dusty
environments.
n To avoid the risk of injury, do not touch the parts indicated in the following figures :
Manual cutter
blade:
very sharp
Cutter blade:
very sharp
Cutter counter
blade:
very sharp
Printhead: very hot
n Do not pull the receipt paper from its output slot when the printer cover is closed.
n Do not open the printer cover during a print job or when the incorporated cutter is cutting the receipt
paper.
n Do not attempt to repair the printer except for following the troubleshooting procedures; contact the
field engineering service.
n Do not disassemble or modify the printer.
n Do not insert foreign objects into the printer.
n Unplug the printer’s external power supply unit from the electrical wall outlet if the printer is left
unattended for long periods of time.
n If the printer is not used for long periods of time, it is suggested that you open its cover by pressing the
cover open button as far as it goes. This prevents feeble areas from appearing on initial printouts taken as
soon as the printer is back into use.
ASTRIUM Set-Up Guide
14/14
PDF created with pdfFactory trial version www.pdffactory.com
Reference :3108332 - Issue Z