1
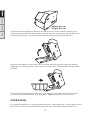
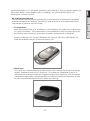
W-101 Bubble Machine
User Manual
Please read and save these instructions.
©2009 Antari Lighting and Effects Ltd.
Page>01
Page>08
Page>16
Page>28
User Manual
W-101 Bubble Machine
Congratulations on the purchase of your new
ANTARI W-Series bubble MACHINE.
Introduction
Thank you for choosing an Antari W-Series Bubble Machine. You now own a
rugged and powerful state-of-the-art bubble machine. Prior to use, we suggest
that you carefully read all of the instructions. By following the suggestions
found in this user manual, you can look forward to the reliable and satisfactory
performance of your Antari Bubble Machine for years to come.
Please follow these operation, safety and maintenance instructions to ensure a
long and safe life for your Antari bubble machine.
CAUTION
Risk of Electric Shock. Disconnect the appliance from the electric
supply before refilling liquid, cleaning or performing maintenance on
the machine.
Pay attention to all warning labels and instructions printed on the
exterior of your Antari Bubble Machine.
Do not overfill your bubble machine. Overfilling could cause the unit to leak.
Danger of Electric Shock
Keep this device dry.
Keep the bubble machine upright.
For all models, use a 3-prong grounded electrical outlet only. Prior to use take
care to determine that the unit is installed at the rated voltage.
Turn off or unplug the machine when not in use.
The power plug needs to be clearly seen by the user when installed on the
wall.
This machine is not water-proof. If moisture, water, or fluid gets inside the
housing, immediately unplug the unit and contact a service technician or your
Antari dealer before using it again.
No user serviceable parts inside. Refer to your Antari dealer or other qualified
service personnel.
-01-
For inside use only. Not designed for outside use.
This appliance must be earthed.
For adult use only. The bubble machine must be installed out of the reach of
children. Never leave the unit running unattended.
Never aim the output nozzle at open flames.
Extended use will make all surfaces slippery. Please kindly pay attention.
Position the output of bubbles away from people.
Switch off from mains when refilling the liquid or cleaning the system.
Regular cleaning of the bubble wheel is required.
Do not transport with liquid. If the machine gets wet, do not use until it is
completely dry.
Antari bubble liquid may leave permanent marks on clothing.
Unpacking & Inspection
Open the shipping carton and check that all equipments necessary to operate
the system have arrived intact. The shipping carton should contain the
following items:
1.
2.
3.
4.
5.
One unit of W-101 Bubble machine
One set of W-1 Transmitter
User manual
Power cord and plug.
Hanging bracket with washers/screws
If any equipment is missing contact your Antari dealer
immediately.
Before beginning your initial setup on the Antari W-101 Bubble Machine,
make sure that there is no evident damage caused by transportation.
In the event that the unit's housing or cable is damaged, do not plug it in
and do not attempt to use it until after contacting your Antari dealer for
assistance.
Setup
Remove all packing materials from the bubble machine.
Place bubble machine on a flat surface.
Loosen the side screws and lift the housing upwards. You will see a liquid
tank.
Pour bubble liquid into the liquid tank. Be careful not to exceed the maximum
fluid level. DO NOT OVERFILL.
It is recommended to use Antari BL- Bubble Liquid for best performance.
When the container is 3/4 full, lower the housing and tighten the screws.
Important:
- Always monitor tank fluid level as you are operating.
- Never drink bubble liquid. If it is ingested, call a doctor immediately. If the
bubble liquid comes in contact with skin or eyes, rinse thoroughly with
water.
-02-
- Always replace the caps on the liquid container immediately after filling to
avoid contamination.
W-101 Hanging Bracket:
Your model includes a mounting bracket designed for overhead installation;
it may be installed at floor level or suspended overhead. If the unit is to be
mounted using the bracket, it is important that the bubbles do not shoot
directly at anyone's face. Whatever installation method you choose, do not
allow the unit to have more than a 25 degree angle of inclination.
W-101 External View
01. Body
03
02. Spout
02
03. Yoke
04. Tightening screw
05. Washer
05
06. Pilot lamp
07. W-1 Wireless receiver
08. Rocker switch/Power
01
09. Fuse holder
10. Fan
11. Screw lock
12. Foot
04
11
13. Power cord
14. W-1 Wireless controller
06
WIRELESS
SIGNAL LIGHT
WI RE LE SS
RE CE IV ER
MA NU AL M OD E
07
OFF
08
WI RE LE SS M OD E
09
FU SE
PO WE R IN PU T
TO R ED UC E TH E RI SK O F FI RE .
RE PL ACE ON LY WI TH S AM E SI ZE
AN D TY PE O F FU SE .
14
12
13
10
IMPORTANT SAFETY NOTICE:
Ensure your bubble machine is unplugged from the mains electrical supply
before attempting to open the housing.
-03-
Safety Screw
Finger Screw
To help avoid accidental exposure to dangerous live AC mains voltage, two
safety screws are fitted that require a screw driver to remove. Once these are
removed, the finger screws can be undone by hand (see photo above).
Once the screws are removed, the lid of the housing can be carefully swung
upwards, as shown above. Take care not to spill any of the bubble fluid inside
the unit.
The fluid tank is designed to fit only one way around. Make sure you insert it
correctly, as shown above, with the lower edge facing into the machine.
OPERATION
For manual operation, set the power switch to “Manual Mode” on the back of the
machine. The internal bubble drum and fan are activated and the machine
-04-
produces bubbles. For wireless operation with the W-1, set the power switch to
“Wireless Mode”. Now please refer to chapter “W-1 Wireless Remote” for
setting the remote control.
W-1 Wireless Remote
The wireless remote control system W-1 consists of a transmitter equipped
with two buttons for bubbles on and off, and a receiver pre-attached to the
rear panel of each W-series model.
* Transmitter:
With the transmitter it is possible to emit bubbles via radio over a distance
of up to 50 meters. The transmitter is compatible to any receiver of the Wseries and can control an unlimited number of machines in parallel.
Press the button “A”, to emit bubbles. As control, the blue LED lights. To
stop the bubble output, press the button “B”.
* Receiver:
The receiver is tested and pre-attached to the rear panel of each W-series
model. Please do not try to remove it. The receiver responds to up to 5
different transmitters that are registered with the machine. The included
transmitter has been registered with the machine before shipment. It can
be directly operated without any start-up setting.
-05-
- Registering transmitters:
To operate the machine with a different transmitter than the included one,
or to operate it with up to 5 different transmitters, each transmitter must
be registered first. There is an LED light on the rear control panel of the
machine. When the machine is turned on, the green LED will be flashing for
15 seconds. During the 15-second interval, users can register signals for
one or more transmitters. For this purpose, press the button “A” on each
transmitter. If the registering signals of the transmitters are well received
by the receiver, the green LED will stop flashing and light permanently. The
previous transmitters are cleared from the memory of the receiver. If no
transmitter is registered while the machine is switched on, the memory of
the receiver will keep the record of the previous operation.
Setting Example 1:
In order to register several transmitters with a machine, turn on the
machine. While the green LED is flashing, press the button “A” on each
transmitter to establish the signal transmission.
Setting Example 2:
In order to use 1 transmitter to control 2 or more machines, turn on the
machines at the same time. While the green LEDs are flashing, press the
button “A” on the transmitter to establish the signal transmission.
- Battery change on the transmitter
If the range of the transmitter decreases, the battery is probably
exhausted and must be replaced. For this purpose, take off the housing
cover and remove the used battery. Insert a fresh 12 V battery, type 23A as
indicated in the battery compartment and refit the housing cover.
Technical Specifications
Power
Fuse
Weight
Dimensions (LxWxH)
Functions
Tank capacity
Remote included
Carrier frequency
Battery
Range
120 V AC, 60 Hz (120 V model)
230 V AC, 50 Hz (230 V model)
F 2 A/250 V (120 V model)
T 1 A/250 V (230 V model)
net 3.4 kg; gross 4.2 kg
241 x 170 x 172 (mm)
On/off, no DMX interface
1 liter
W-1
UHF-433.920 Mhz
12 V, type 23A
approx. 50 m
-06-
Approval
This product is in accordance with the R&TTE directive (Radio and
Telecommunication Technical Equipment) of the European Union and falls into
equipment Class 1. In all EU member countries, the operation of this wireless
system is generally approved by the national telecom regulatory authority.
The system is license-free. In some countries outside the EU, the operation of
this wireless system may needs to be approved by the national telecoms
regulatory authority.
Warranty
Warranty shall be valid only if the product is purchased from Antari's
authorized distributors or dealers. For warranty service, send the product
only to an authorized distributor or dealer.
All warranties are void if the product has been modified in any manner; if the
product has been repaired or serviced by unauthorized personnel; or the
product is damaged due to improper use or maintenance as set forth in the
instruction manual.
This is not a service contract and does not include standard maintenance or
cleaning. All expendables are not covered by this warranty.
Additional warranties provided at the discretion of the distributor dealers
shall remain the sole obligation of the distributor or dealer.
Always quote the unit's serial number and model name when contacting your
distributor for information or assistance.
Save these instructions
-07-