1
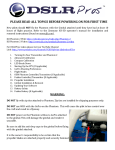
Sundance(HD(Edition(Aerial(Kit(Contents(List(
!
Congratulations!on!your!purchase!of!a!DSLRPros!Sundance!HD!Edition!Aerial!Kit.!
Inside!your!P2!Tough!Case!you!will!find!the!following!items!with!numbers!that!
correspond!to!the!kit!image!on!the!following!page.!
!
1. DJI!Phantom!2!With!3IAxis!Gimbal!PreIInstalled!!
2. Assorted!A/C!Power!Cables!With!International!Plug!Adaptors!
3. A/C!Power!Cable!For!TXSI8!Pro!LiPo!Charger!
4. DSLRPros!TXSI8!Pro!LiPo!Charger!with!Balance!Board!and!Necessary!Cabling!
5. 2!Sets!Of!4!9"!Propeller!Blades!(Carbon!Fiber!and!Plastic!Blades!Are!Not!To!
Be!Used!Together)!
6. Set!of!4!Propeller!Guards!and!Propeller!Guard!Screws!
7. Futaba!Transmitter!
8. LiPo!Battery!For!Futaba!Transmitter!
9. Deluxe!DSLRPros!Radio!Tx!Lanyard!
10. LiPo!Battery!Capacity!Checker!
11. 3!DJI!Smart!Flight!Batteries!(1!Shown)!
12. 1!DJI!Charging!for!Smart!Flight!Battery!!
13. 1!Additional!Charging!Block!for!DJI!Smart!Flight!Battery!
14. DJI!Smartphone!Mount!
15. HDMI!Cable!For!GoPro!To!DJI!Lightbridge!Air!System!
16. Set!of!2!DJI!Lightbridge!Air!System!Paddle!Antennas!&!Air!System!Antennas!
17. Set!of!2!Antennas!For!DJI!Lightbridge!Ground!System!
18. DJI!Lightbridge!Ground!System!
19. DJI!Lightbridge!Transmitter!Mount!
20. DSLRPros!LiPo!Battery!Guard!Bag!
21. Assorted!Cables!For!DJI!Lightbridge!System!(Please!Refer!To!Your!
Lightbridge!Manual!For!Detailed!Explanations!For!Each!Of!These!Cables)!
22. Assorted!Power!Cables!and!International!Plug!Adaptors!(Please!Refer!To!
Your!Lightbridge!Manual!For!Detailed!Explanations!For!Each!Of!These!Power!
Cables)!
REV 1.1—Page 1 of 12
REV 1.1—Page 2 of 12
!
!
!
PLEASE&READ&ALL&TOPICS&BEFORE&POWERING&ON&FOR&FIRST&TIME!
New!pilots!should!NOT!fly!the!Phantom!with!the!Gimbal!attached!until!they!have!had!at!least!10!
hours! of! flight! practice.! Refer! to! the! Zenmuse! H3A3D! operator's! manual! for! installation! and!
removal!instructions!(found!on!www.dji.com).!
!
DJI!Phantom!2!Wiki:!http://wiki.dji.com/en/index.php/Phantom_2!
DJI!Phantom!2!Videos:!http://www.dji.com/product/phantomA2/video!
!
For!DSLRPros!videos!please!visit!our!YouTube!Channel!
Link:!http://www.youtube.com/channel/UCJUVqDvAzr1jbdrmhxsH7jw!
!
1. !!Turning!On!Your!Transmitter!and!Phantom!2!
2. !!Advanced!Calibration!
3. !!Compass!Calibration!
4. !!LED!Break!Down!
5. !!GoPro!Shooting!Preferences!
6. !!Flight!Modes!
7. !!Futaba!Controller/Transmitter!!
8. !!Propeller!Installation!
9. !!Gimbal!Installation!&!Removal!
10. !!Updating!Your!Software!
11. !!Battery!Safety!
12. !!Using!The!DJI!Lightbridge!
13. !!Using!The!Zeiss!Cinemizer!OLED!(If!Applicable)!
!
WARNING:&
&
DO&NOT&fly!with!zip!ties!attached!to!Phantom.!Zip!ties!are!installed!for!shipping!purposes!only.!
!
DO&NOT!use!WiFi!with!the!GoPro!on!the!Phantom.!!This!will!cause!the!pilot!to!lose!control!over!
the!craft!and!result!in!a!flyaway.!
!
DO&NOT!power!on!the!Phantom!without!a!GoPro!attached!
to!the!gimbal.!This!will!damage!the!gimbal!and!render!it!
unusable.!
!
Be!sure!to!add!the!antiAdrop!caps!to!the!gimbal!before!
flying!with!the!gimbal!attached.!
!
It!is!the!owner's!responsibility!to!be!certain!that!the!
propeller!blades!are!attached!properly!and!securely!
fastened!before!every!flight.!!
!
REV 1.1—Page 3 of 12
!
!
1.
&
Turning&On&Your&Transmitter&and&Phantom&2&
•
•
Always!turn!on!your!transmitter!before!turning!on!your!craft.!To!turn!on!our!transmitter!press!the!
power!switch!to!the!"on"!position.!Make!sure!your!throttle!is!all!the!way!down!and!the!toggle!
switches!are!in!the!uppermost!position!before!turning!on!your!transmitter.&
To!turn!on!your!Phantom!2!insert!the!DJI!Smart!Flight!Battery!into!the!craft,!press!the!circular!
power!button!once,!then!press!again!and!hold!until!the!Power!Light!on!the!battery!turns!red.&
&&
Advanced&Calibration!
2.
!
Make!sure!the!settings!have!been!properly!adjusted!so!that!the!Phantom!can!run!with!the!best!
performance!possible.!
!
•
•
•
•
•
•
•
•
•
•
•
!
3.
&
Plug!the!Phantom!into!your!PC!or!Mac!using!the!USB!cable!provided.!
Power!on!the!transmitter!with!the!throttle!all!the!way!down.!
Power!on!the!Phantom.!
Open!the!DJI!Phantom!Application.!
Go!to!the!“Tools”!tab.!
Click!“Advance.”!
Make!sure!there!is!no!metal!anywhere!around!the!compass.!
Do!not!touch!the!table!that!the!craft!is!on!and!make!sure!it!is!very!still.!
Click!“advanced!cali.”!
When!a!box!pops!up!that!says!“power!down!MC”!ignore!it,!click!OK,!and!do!not!touch!anything.!
When!the!advanced!calibration!has!completed!successfully,!a!green!check!mark!will!appear!to!the!
right!of!the!status!bar.!!
Compass&Calibration&&
It!is!important!to!calibrate!your!compass!outdoors!every!time!you!fly!your!craft.!This!allows!the!
Phantom!2!to!track!its!own!position!from!multiple!satellites!and!ensures!optimal!performance.!
!
•
•
•
•
•
•
•
•
•
&
&
!
Set!the!Phantom!2!on!a!flat!surface.!
With!the!throttle!down!and!all!switches!in!the!uppermost!position!power!up!the!transmitter!and!
then!power!up!the!Phantom!2.!!
Wait!until!the!Phantom!2!has!full!GPS!lock.!You!will!know!the!craft!has!full!GPS!lock!when!the!
LEDs!under!the!arms!are!green!and!blinking.!
Flip!the!flight!mode!switch!from!“GPS”!to!“Atti”!five!times!in!a!steady!motion!until!the!lights!on!the!
underside!of!the!craft!turn!a!solid,!unblinking!yellow.!
Pick!up!the!Phantom!2!(do!not!hold!by!compass).!
Hold!the!Phantom!2!straight!out!and!turn!your!body!in!a!complete!circle!until!the!lights!turn!from!
yellow!to!green.!
Stop!turning.!
Rotate!the!Phantom!2!vertically!so!that!the!USB!port!is!facing!straight!down!and!repeat!your!360A
degree!rotation!until!the!lights!blink!green!again.!
Place!the!Phantom!2!back!on!the!ground!and!look!to!see!that!there!are!only!green!blinking!lights.!If!
not,!repeat!the!process.!
&
REV 1.1—Page 4 of 12
LED&Break&Down&
4.
&
!
5.&&
•
•
•
•
•
•
•
•
This!list!will!help!users!understand!the!meaning!of!some!of!the!different!LED!light!combinations!
on!the!Phantom!2.!!Please!refer!to!your!DJI!Phantom!2!manual!for!more!information.!!
!
Power!On!Self!Test:!Red!Green!Yellow!Flashing!
Initialization:!Alternating!Green!and!Yellow!Flashing!
Ready!To!Fly:!Consistent!Green!Flashing!
Signal!Loss:!Consistent!Yellow!Flashing!
1st!Low!Battery!Indication:!Slow!Red!Flashing!
2nd!Low!Battery!Indication:!Rapid!Red!Flashing!
Compass!Calibration!Necessary:!Alternating!Red!and!Yellow!Flashing!
DO!NOT!fly!with!any!red!lights!at!all.!
GoPro&Shooting&Preferences&
&
The!GoPro!has!an!array!of!different!shooting!modes!and!settings.!This!can!be!overwhelming&for!
users!who!are!not!accustomed!to!using!a!GoPro,!so!here!is!a!quick!reference!guide!on!our!
recommendations!for!different!shooting!conditions.!
!
•
•
•
•
Overall!best!shooting:!2.7k,!30!FPS,!
Low!light!shooting:!1080P!30!FPS,!Wide,!No!Pro!tune!
Slow!motion:!1080p!at!60!fps!(any!setting!at!a!higher!fps!than!60)!!
Put!all!GoPro!footage!through!“CineForm”!before!putting!it!into!any!other!editing!program.&
!
When!shooting!in!the!USA,!it!is!common!to!shoot!in!NTSC!and!not!in!PAL.!Use!the!following!steps!
to!change!the!video!system!on!your!GoPro.!
!
• Power!on!the!GoPro!by!pressing!and!holding!the!power!button.!
• Press!the!power!button!until!you!come!to!the!settings!menu!appears!on!the!GoPro's!screen!
(Wrench).!Press!the!record!button!to!enter!the!settings!menu.!
• Press!the!power!button!until!you!reach!the!setup!menu!(Two!Gears).!Press!the!record!button!to!
enter!the!setup!menu.!
• Press!the!power!button!until!you!see!NTSC/PAL.!Press!the!record!button!to!enter!the!menu.!
• Press!the!power!button!to!select!the!desired!video!system.!(NTSC!in!the!USA!and!PAL!in!Europe).!
• Press!the!power!button!until!you!reach!the!exit!option!and!select!with!the!record!button!to!leave!
the!menu!pages.!
!
6.&
Flight&Modes!
!
The!Phantom!2!comes!with!multiple!flight!modes!that!allow!users!to!control!the!Phantom!in!many!
different!ways.!
!
• Attitude!Mode:!Maintains!altitude!but!the!craft!will!keep!moving!in!one!direction!when!influenced!
by!wind!or!momentum.!
• GPS!Attitude!Mode:!Maintains!altitude!and!position.!Even!if!acted!upon!by!an!outside!force!it!will!
return!to!its!last!location!(where!the!user!let!go!of!the!sticks).!
• IOC!Mode:!No!matter!the!position!of!the!Phantom,!the!directional!controls!will!always!remain!the!
same.!
!
&
!
REV 1.1—Page 5 of 12
7.&
!
Futaba&Controller/Transmitter!
The!Futaba!controller!is!the!ideal!controller!for!DSLRPros!aerial!kits.!This!is!an!upgraded!
controller!that!provides!more!options!when!piloting!the!Phantom2.!The!DSLRPros!TXSA8!LiPo!
charger!is!meant!to!charge!the!LiPo!battery!for!the!Futaba.&NEVER&charge!a!LiPo!battery!with!any!
charger!that!is!not!a!LiPo!battery!charger.!!Incorrect!charging!can!cause!damage!the!battery!that!
may!result!in!severe!damage!to!persons!and!surroundings.!
!
•
•
•
•
•
•
•
•
!
!
Left!Stick:!Located!on!the!left!hand!side!of!the!transmitter,!pressing!up!and!down!on!the!throttle!
controls!vertical!movements.!Pressing!left!and!right!on!the!throttle!stick!causes!the!aerial!to!rotate!
clockwise!or!counterAclockwise.!
Right!Stick:!Located!on!the!right!hand!side!of!the!transmitter,!the!right!stick!controls!forward!and!
backward!movement!and!left!and!right!horizontal!movement.! !
To!turn!on!the!motors!for!your!craft,!move!both!the!left!and!right!control!stick!all!the!way!down!
and!towards!the!center!of!the!transmitter.!Release!the!sticks!when!the!motors!begin!to!spin.!
SA!Toggle!Switch:!This!is!the!Intelligent!Orientation!Control!(IOC)!mode,!which!is!NOT!enabled!by!
default.!This!switch!is!located!on!the!left!side!of!the!transmitter!just!above!the!throttle!control.!
SE!Toggle!Switch:!This!controls!the!flight!mode.!This!switch!is!located!on!the!top,!left!hand!side!of!
the!transmitter.!See!the!"Advanced!NAZA!Assistant!Manual"!for!further!details.!
SH!Toggle!Switch:!This!is!the!timer!reset.!This!timer!is!set!to!warn!the!user!when!to!start!landing!
the!Phantom.!This!switch!is!located!on!the!top,!right!hand!side!of!the!transmitter.!
RD!Knob:!This!sets!the!gimbal!stopping!point!for!the!tilt.!The!trim!slider!on!the!rear,!right!side!of!
the!Futaba!controls!the!tilt.!!The!RD!knob!is!located!on!the!front!of!the!transmitter,!above!the!
power!switch.!
SD!Toggle!Switch:!The!Dual!Rate!option!on!the!Futaba!allows!users!to!limit!the!overall!speed!at!
which!the!Phantom!can!operate!through!the!"Fluid!Slow!Pan"!mode.!!
!
!
!
!
!
!
!
!
!
!
!
!
!
!
!
!
!
!
!
!
!
&
&
&
!
REV 1.1—Page 6 of 12
8.&
&
Propeller&Installation&
Proper!direction!for!rotation!is!necessary!when!attaching!propeller!blades.!!When!the!battery!door!
is!facing!the!user,!the!motors!are!numbered!1!to!4!(counter!clockwise),!starting!with!the!left!hand!
motor.!!Motors!1!&!3!will!be!removed!as!usual,!counter!clockwise.!!
!
!
&
&
&
&
&
&
&
&
&
&
&
&
&
&
&
&
To!attach!the!propellers,!remove!the!warning!discs!from!the!motors!and!spin!the!propeller!blades!
onto!the!corresponding!motor!in!the!direction!indicated!by!the!warning!discs.!Correct!propeller!
installation!is!necessary!for!proper!flight.!Additional!information!can!be!found!in!the!DJI!User!
Manual.!
!
When!flying!your!craft!in!a!populated!area!or!if!you!are!an!inexperienced!pilot,!it!is!recommended!
to!use!the!DJI!propeller!guards.!The!DJI!propeller!guards!protect!your!propeller!blades!from!
damage!and!people!and!property!from!harm.!!
!
•
•
•
•
&
9.&
&
To!install!your!propeller!guards,!carefully!place!your!craft!upside!down!on!a!stable,!flat!surface.!
Under!each!motor,!you!will!see!4!2mm!Hex!screws.!Remove!the!two!outermost!screws!from!the!
base!of!each!motor.!Do!not!discard!the!removed!screws.!
Use!the!propeller!guard!screws!(note!that!these!screws!are!longer!than!those!that!you!just!
removed!from!the!P2)!to!secure!the!propeller!guards!to!the!base!of!the!motors.!
For!added!security,!thread!the!white!string!included!with!your!purchase!through!the!eyes!of!the!
propeller!guard.!
Gimbal&Installation&&&Removal&
It!is!highly!recommended!that!new!pilots!remove!the!lower!half!of!the!gimbal!before!flight!practice!
so!that!in!the!event!of!a!crash!while!learning!to!fly!the!Phantom!the!Zenmuse!H3A3D!will!not!be!
damaged.!!Please!refer!to!the!Zenmuse!H3A3D!operator!manual!for!detailed!installation!and!
removal!procedures.!!The!images!and!directions!below!are!only!supplemental!to!the!manuals!
found!on!the!DJI!website.&
&
Only!the!lower!half!of!the!gimbal!is!attached!and!secured!in!place!via!the!rubber!tension!
grommets,!which!have!a!lip!that!fits!into!the!bracket!rings.!!While!these!provide!enough!tension!to!
retain!the!gimbal!during!flight!they!can!come!loose!if!the!craft!is!involved!in!a!significant!crash.!!
The!grey/black!ribbon!cable!will!be!the!only!connection!to!the!craft!for!power!and!video.!!This!
!
REV 1.1—Page 7 of 12
cable!can!be!disconnected!and!reconnected!at!will!after!the!lower!half!is!removed!from!the!
brackets.!
!
•
•
•
•
!
10.&
!
To!disconnect!your!gimbal,!pinch!the!rubber!tension!grommets!and!pull!out!of!the!top!plate.!!
Disconnect!the!ribbon!cable!from!the!gimbal!by!firmly!pulling!it!out!of!the!back!of!the!gimbal.!It!is!
recommended!that!you!disconnect!the!gimbal!cable!before!performing!any!firmware!updates.!
Failure!to!do!so!can!result!in!damage!to!your!gimbal.!
To!reconnect!your!gimbal,!pinch!the!rubber!tension!grommets!back!into!place!and!reattach!the!
ribbon!cable.!
Be!sure!to!attach!the!antiAdrop!pins!before!flying!with!your!gimbal!installed.!!
!
!
&
&
&
&
&
&
&
&
&
&
&
&
&
&
&
&
&Updating&Your&Software&
It!is!recommended!that!you!periodically!check!for!software!updates!using!the!DJI!assistant!
software!application.!When!upgrading!the!firmware!on!either!the!transmitter!or!the!craft,!be!sure!
to!disconnect!the!gimbal!from!the!craft.!Upgrading!your!software!with!the!gimbal's!ribbon!cable!
still!attached!can!permanently!damage!the!gimbal.!!
!
•
•
•
•
•
•
•
!
11.&
&
Plug!the!Phantom!into!your!PC!or!Mac!using!the!USB!cable!provided.!
Power!on!the!transmitter!with!the!throttle!all!the!way!down.!
Power!on!the!Phantom.!
Open!the!DJI!Phantom!software.!
Go!to!the!“Upgrade”!tab.!
If!upgrades!are!available,!check!with!DSLRPros!to!ensure!that!the!upgrade!is!necessary!before!
installing.!!
After!the!upgrade!is!complete,!power!down!your!craft!and!transmitter!before!reattaching!the!
gimbal.!
Battery&Safety&
It!is!vital!to!the!safety!of!your!aerial!craft,!yourself,!and!others!that!you!practice!proper!battery!
safety!when!using,!charging,!and!storing!all!batteries!used!with!your!Phantom.!Improper!use,!
charging,!and/or!storage!of!batteries!can!result!in!damage!to!the!battery!or!personal!property.!
REV 1.1—Page 8 of 12
!
Please!adhere!to!all!battery!safety!guidelines!in!the!included!manuals.!The!estimated!flight!time!
for!a!Phantom!2!with!H3A3D!gimbal!under!ideal!conditions!is!11!minutes.!
!
•
•
•
•
•
!
Only!charge!your!batteries!using!the!included!charging!units.!Failure!to!do!so!may!result!in!fire.!
Never!charge!batteries!unattended.!
If!you!notice!that!a!battery!is!swelling!or!ballooning,!immediately!discontinue!the!charge,!remove!
the!battery!from!the!charger,!and!observe!the!battery!outside!and!away!from!any!combustible!
materials!for!at!least!15!minutes.!!
In!the!event!of!a!crash,!remove!the!battery!from!the!craft!and!observe!it!in!a!safe!location!looking!
for!swelling!or!damage!for!at!least!15!minutes!before!using!the!battery!again.!
When!storing!your!batteries!for!more!than!two!weeks,!you!must!reduce!their!charge!to!storage!
mode.!Refer!to!your!manual!for!proper!battery!storage!procedures.!
Please!adhere!to!the!guidelines!outlined!in!your!charging!kit!and!only!use!the!included!Futaba!
charging!station!when!charging!a!Futaba!battery.!It!is!always!recommended!to!charge!and!store!
your!LiPo!batteries!in!a!LiPo!Safe!Flame!Resistant!bag.!Failure!to!do!so!can!result!in!fire.!!
!!!!!!!!!!!!!!!!!!!!!!!!!!!!!!!!
!!
12.& Using&the&DJI&Lightbridge&&
&
Your!HD!kit!comes!with!the!DJI!Lightbridge!digital!video!downlink!system.!This!system!allows!for!
High!Definition!video!to!be!transmitted!to!your!ground!station,!allowing!you!to!see!what!you!are!
shooting!in!Full!HD!on!your!smartphone!or!tablet!device.!To!use!the!Lightbridge,!you!will!need!to!
download!the!DJI!Lightbridge!App!from!the!Googleplay!App!Store.!!
!
!
REV 1.1—Page 9 of 12
All!instructions!listed!are!meant!only!to!supplement!the!information!given!in!the!DJI!Lightbridge!
manual!included!with!your!purchase.!Please!refer!to!your!DJI!Lightbridge!Manual!for!more!
information.!
!
•
•
•
•
•
•
•
•
Be!certain!that!the!air!system!antennas!are!fully!plugged!into!the!Lightbridge!air!system.!
Attach!the!HDMI!cable!from!the!Lightbridge!to!the!HDMI!port!on!your!GoPro3.!!
On!the!ground!system,!attach!both!antennas!before!pressing!and!holding!the!ground!system!
power!button!to!start!up!the!Lightbridge.!
Attach!the!remote!controller!cable!from!the!back!of!the!ground!system!to!the!back!of!the!Futaba!
transmitter.!!
When!controlling!your!craft!through!the!Lightbridge!ground!system,!turn!off!the!RF!function!on!
your!transmitter!by!holding!down!the!RTN!button!on!your!Futaba!while!pressing!up!on!the!power!
button.!
o Spin!the!touch!wheel!to!select!RF!OFF!on!your!Futaba!and!press!RTN.!
Connect!your!smartphone!or!tablet!device!to!the!Lightbridge!ground!system!via!the!USB!port.!!
Connect!the!Phantom!2!to!your!computer!and!open!the!P2!assistant!software.!
o Under!the!"Basic"!tab,!select!RC.!
o Move!the!control!sticks!on!your!Futaba!transmitter!to!ensure!that!they!are!transmitting!
properly.!!
Start!the!DJI!Lightbridge!App!with!the!GoPro!and!Phantom!2!powered!on!to!see!the!HD!image!
being!sent!from!your!GoPro!to!your!smart!device.!
!
•
•
•
!
13.&
!
The!DJI!Lightbridge!App!has!three!options!for!the!transmitted!video!signal.!These!can!be!changed!
in!the!Video!Transmission!Mode!Settings!page.!!Each!mode!has!it's!own!advantages!and!it!will!be!
up!to!the!pilot!to!decide!which!mode!is!better!for!them!in!the!moment.!!
!
Real!Time:!This!mode!reduces!video!quality!while!improving!the!lag!time!and!offering!a!greater!
range.!
Smooth:!This!mode!transmits!a!better!quality!image!but!has!an!increased!lag!time!and!lower!range!
than!Real!Time.!
Full!HD:!This!mode!offers!the!highest!quality!image!(1080i)!but!has!the!highest!lag!time!and!
smallest!range.!!
!
More!information!regarding!the!proper!use!of!the!DJI!Lightbridge!App!(including!a!detailed!
breakdown!of!control!systems!and!displays!can!be!found!in!your!DJI!Lightbridge!manual.!!
Using&The&Zeiss&Cinemizer&OLED&
The!Zeiss!Cinemizer!OLED!is!a!powerful!tool!for!use!with!your!Lightbridge!FPV!system.!The!
Cinemizer!OLED!gives!you!HD!video!from!the!Lightbridge!while!still!in!flight.!A!valuable!feature!of!
the!Cinemizer!OLED!is!the!individual!diopters.!Adjust!the!diopters!by!rotating!the!wheels!on!the!
inside!of!the!OLED!until!the!image!is!sharp.!When!adjusting!the!diopters,!it!is!recommended!to!do!
this!one!eye!at!a!time!by!closing!the!eye!that!you!are!not!adjusting!for.!!
!
•
•
•
To!use!the!Cinemizer!goggles!with!your!Lightbridge,!connect!the!included!HDMI!adaptor!clip!to!
the!Cinemizer!via!the!battery!block.!
Attach!the!included!HDMI!cable!to!the!HDMI!adaptor!clip.!!
Connect!the!HDMI!cable!to!your!smart!device!with!the!DJI!Lightbridge!App!and!press!the!power!
button!on!the!Cinemizer!battery!block!to!start!using!your!the!Cinemizer!OLED!for!your!FPV.!!
!
!
REV 1.1—Page 10 of 12
DSLRPros
Futaba
8FG
Black
Edition
Super
14-Channel
Ultimate
Kit
Replacement
Transmitter
Pre-programmed
Control
Guide
(3)
(3)
(8)
(5)
(1)
(2)
(4)
(6)
(7)
(1) SE Toggle Switch (GPS, ATTI, ATTI): This is your flight mode control. The lowest ATTI position
can be set to trigger "FAILSAFE" as an advanced feature. See you DJI Phantom "Advanced NAZA
(1)
SE Toggle
Switch:
This is
your flight mode (i.e. GPS Atti, Failsafe)
Assistant
Manual"
for further
details.
(2)
SA Toggle
(OFF,
LOCK, HOME
LOCK): This
is yourIOC,
Intelligent
(2)
SA
ToggleSwitch
Switch:
ThisCOURSE
is your Intelligent
Orientation
Control,
mode Orientation
which is Control or IOC. This mode is not
enabled
by default.
NOT enabled
by default.
(3) SB and SC Toggle Switches (OFF, SMALL RADIUS, LARGE RADIUS): These switches control the advanced Point of Interest flight
(3)
SC Toggle Switch: This is your timer reset. The Futaba comes with a timer at 4
profiles. This function allows the operator to bank left or right using only the right joystick. Using the SB Toggle will allow the pilot to
minutes and at 7 minutes. (This can be reprogrammed in the Futaba controller to
fly an inside pivot around a central object. Using the SC Toggle will enable you to fly an outside pivot. These functions are reserved
allow for a two-battery setup).
for advanced users and NOT enabled at default.
(4)
RD Knob:
gimbal's
stopping
pointfor
forthe
thetilt.
camera
tilt.is
The
tilt is controlled
by the trim lever on the rear
(4)
RD
(4)
Knob:This
Thisknob
setssets
the the
gimbal's
stopping
point
The tilt
controlled
by
right
sideknob
of theon
Futaba.
the trim
the rear right side of the Futaba.
(5)
SD Toggle
(OFF,
50%):the
This
enables
thePan”
"Fluid
Slow(Off,
Pan"30%,
mode.
(5)
SD
ToggleSwitch
Switch:
This30%,
enables
“Fluid
Slow
mode
60%)
(6) Throttle and Pan Control Stick.
(6)
Throttle & Pan control stick
(7) Forward, Backward, Left and Right Control Stick.
(7)
Forward, backward, left, right control stick
(8) SH Toggle Switch: This is your timer reset. The Futaba comes with dual timers set to give you an audible alarm at 4 minutes and
again at 8 minutes. Once you switch out a new battery, use the SH switch to zero out the timer. NOTE: The automatic timer should
only be used as a reference point and should not be relied upon for accurate battery life. Under ideal conditions, a Phantom 2 with
H3-3D axis installed will have 11 minutes of flight time.
REV 1.1—Page 11 of 12
Phantom(2(Flight(Procedures(
(
It#is#recommended#that#you#follow#this#procedure#when#flying#your#craft.#
(
o
o
o
o
o
o
o
o
o
o
o
Be#certain#that#the#WiFi#function#on#your#GoPro#is#off.#If#you#see#a#flashing#blue#
light#on#your#GoPro,#this#means#the#WiFi#function#is#on#and#must#be#turned#off#
before#starting#your#craft.##
Check#that#batteries#for#transmitter#and#craft#are#fully#charged#and#properly#
installed.(
Check#that#a#camera#is#connected#to#gimbal.(
Check#that#antennas#are#connected#to#Lightbridge#Ground#and#Air#Stations.#
Check#that#propellers#are#securely#fastened#to#motors.#
Place#all#switches#on#transmitter#in#their#uppermost#position#with#the#throttle#all#
the#way#down.#
Power#on#your#transmitter.#
Power#on#your#craft#and#wait#for#LED#lights#to#stop#flashing#red,#indicating#that#
the#Phantom#2#has#achieved#its#GPS#signal.#
Perform#a#compass#calibration.#
With#the#craft#on#an#even#surface#at#least#ten#feet#away#from#you,#start#the#
motors#by#moving#the#control#sticks#down#and#towards#the#center#of#the#
transmitter.#
Press#up#on#the#throttle#to#take#off.#
REV 1.1—Page 12 of 12