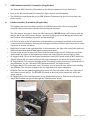
1
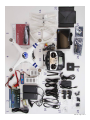
Sundance(Edition(Aerial(Kit(Contents(List(
!
Congratulations!on!your!purchase!of!a!DSLRPros!Sundance!Edition!Aerial!Kit.!Inside!
your!Special!Edition!tough!case!you!will!find!the!following!items!with!numbers!that!
correspond!to!the!kit!image!on!the!following!page.!
!
1. A/C!Power!Cable!For!LiPo!MultiFCharger!!
2. DSLRPros!TXSF8!Pro!LiPo!Charger!
3. Charging!Harness!For!LiPo!Battery!With!Car!Adaptor!
4. DJI!Phantom!2!With!3FAxis!Gimbal!PreFInstalled!
5. DJI!Phantom!2!Quick!Start!Guide!
6. DSLRPros!Lanyard!For!Futaba!Transmitter!
7. Set!Of!2!DJI!Smart!Flight!Battery!Chargers!
8. LiPo!Battery!For!Futaba!Transmitter!
9. Set!Of!3!DJI!Smart!Flight!Batteries!(2!Shown)!
10. Set!Of!2!MicroFUSB!Cables!
11. A/C!Power!Cables!For!DJI!Smart!Flight!Battery!Chargers!
12. Antenna!Set!For!FPV!Field!Monitor!
13. Futaba!Transmitter!
14. Cables!For!FPV!Field!Monitor!
15. Propeller!Guards!
16. Set!Of!4!SelfFTightening!Propeller!Blades!(Carbon!Fiber!Blades!Not!Pictured)!
17. String!For!Propeller!Guards!
18. AntiFDrop!Pins!For!Gimbal!
19. International!Plug!Set!
20. Field!Monitor!Charger!
21. A/C!Power!Cable!For!Field!Monitor!Charger!
22. DSLRPros!7"!FPV!Field!Monitor!
23. Sun!Shade!For!FPV!Field!Monitor!
24. Set!of!Spare!Gimbal!Vibration!Absorbers!
25. 5.8!GHz!Patch!Antenna!For!FPV!Field!Monitor!
26. Philip's!Head!Screwdriver!
27. Set!Of!Spare!Screws!and!Propeller!Wrench!
!
REV 1.3—Page 1 of 11
REV 1.3—Page 2 of 11
!
!
!
PLEASE&READ&ALL&TOPICS&BEFORE&POWERING&ON&FOR&FIRST&TIME!
New!pilots!should!NOT!fly!the!Phantom!with!the!Gimbal!attached!until!they!have!had!at!least!10!
hours! of! flight! practice.! Refer! to! the! Zenmuse! H3A3D! operator's! manual! for! installation! and!
removal!instructions!(found!on!www.dji.com).!
!
DJI!Phantom!2!Wiki:!http://wiki.dji.com/en/index.php/Phantom_2!
DJI!Phantom!2!Videos:!http://www.dji.com/product/phantomA2/video!
!
For!DSLRPros!videos!please!visit!our!YouTube!Channel!
Link:!http://www.youtube.com/channel/UCJUVqDvAzr1jbdrmhxsH7jw!
!
1. !!Turning!On!Your!Transmitter!and!Phantom!2!
2. !!Advanced!Calibration!
3. !!Compass!Calibration!
4. !!LED!Break!Down!
5. !!GoPro!Shooting!Preferences!
6. !!Flight!Modes!
7. !!OEM!Phantom!Controller/Transmitter!(If!Applicable)!
8. !!Futaba!Controller/Transmitter!(If!Applicable)!
9. !!Propeller!Installation!
10. !!Gimbal!Installation!&!Removal!
11. !!Updating!Your!Software!
12. !!Battery!Safety!
!
WARNING:&
&
DO&NOT&fly!with!zip!ties!attached!to!Phantom.!Zip!ties!are!installed!for!shipping!purposes!only.!
!
DO&NOT!use!WiFi!with!the!GoPro!on!the!Phantom.!!This!will!cause!the!pilot!to!lose!control!over!
the!craft!and!result!in!a!flyaway.!
!
DO&NOT!power!on!the!Phantom!without!a!GoPro!attached!
to!the!gimbal.!This!will!damage!the!gimbal!and!render!it!
unusable.!
!
Be!sure!to!add!the!antiAdrop!caps!to!the!gimbal!before!
flying!with!the!gimbal!attached.!
!
It!is!the!owner's!responsibility!to!be!certain!that!the!
propeller!blades!are!attached!properly!and!securely!
fastened!before!every!flight.!!
REV 1.3—Page 3 of 11
!
!
!
1.
&
Turning&On&Your&Transmitter&and&Phantom&2&
•
•
Always!turn!on!your!transmitter!before!turning!on!your!craft.!To!turn!on!our!transmitter!press!the!
power!switch!to!the!"on"!position.!Make!sure!your!throttle!is!all!the!way!down!and!the!toggle!
switches!are!in!the!uppermost!position!before!turning!on!your!transmitter.&
To!turn!on!your!Phantom!2!insert!the!DJI!Smart!Flight!Battery!into!the!craft,!press!the!circular!
power!button!once,!then!press!again!and!hold!until!the!Power!Light!on!the!battery!turns!red.&
&&
Advanced&Calibration!
2.
!
Make!sure!the!settings!have!been!properly!adjusted!so!that!the!Phantom!can!run!with!the!best!
performance!possible.!
!
•
•
•
•
•
•
•
•
•
•
•
!
3.
&
Plug!the!Phantom!into!your!PC!or!Mac!using!the!USB!cable!provided.!
Power!on!the!transmitter!with!the!throttle!all!the!way!down.!
Power!on!the!Phantom.!
Open!the!DJI!Phantom!Application.!
Go!to!the!“Tools”!tab.!
Click!“Advance.”!
Make!sure!there!is!no!metal!anywhere!around!the!compass.!
Do!not!touch!the!table!that!the!craft!is!on!and!make!sure!it!is!very!still.!
Click!“advanced!cali.”!
When!a!box!pops!up!that!says!“power!down!MC”!ignore!it,!click!OK,!and!do!not!touch!anything.!
When!the!advanced!calibration!has!completed!successfully,!a!green!check!mark!will!appear!to!the!
right!of!the!status!bar.!!
Compass&Calibration&&
It!is!important!to!calibrate!your!compass!outdoors!every!time!you!fly!your!craft.!This!allows!the!
Phantom!to!track!its!own!position!from!multiple!satellites!and!ensures!optimal!performance.!
!
•
•
•
•
•
•
•
•
•
!
Set!the!Phantom!on!a!flat!surface.!
With!the!throttle!down!and!all!switches!in!the!uppermost!position!power!up!the!transmitter!and!
then!power!up!the!Phantom.!
Wait!until!the!Phantom!has!full!GPS!lock.!You!will!know!the!Phantom!has!full!GPS!lock!when!the!
LEDs!under!the!Phantom's!arms!are!green!and!blinking.!
Flip!the!flight!mode!switch!from!“GPS”!to!“Atti”!five!times!in!a!steady!motion!until!the!lights!on!the!
underside!of!the!craft!turn!a!solid,!unblinking!yellow.!
Pick!up!the!Phantom!(do!not!hold!by!compass).!
Hold!the!Phantom!straight!out!and!turn!your!body!in!a!complete!circle!until!the!lights!turn!from!
yellow!to!solid!green.!
Stop!turning.!
Rotate!the!Phantom!vertically!so!that!the!USB!port!is!facing!straight!down!and!repeat!your!360A
degree!rotation!until!the!lights!blink!green!again.!
Place!the!Phantom!back!on!the!ground!and!look!to!see!that!there!are!only!green!blinking!lights.!If!
not,!repeat!the!process.!
&
REV 1.3—Page 4 of 11
&
4.
&
LED&Break&Down&
•
•
•
•
•
4.&&
&
This!list!will!help!users!understand!what!all!the!different!LED!light!combinations!on!the!Phantom!
mean.!!!
!
Initialization:!Slow,!steady!flashing!yellow!lights.!
Satellite!Lock:!2!green!blinks.!
Transmitter!Off:!Rapid!steady!flashing!yellow!lights.!
IOC!Enabled:!Users!will!see!green!flashing!lights!but!intermittently!have!a!yellow!flash!indicating!
that!it!is!working.!!Be!sure!to!fly!more&than!30!feet!away!from!the!craft's!home!location.!
DO!NOT!fly!with!any!red!lights!at!all.!
!
Starting&Up&the&FPV&(If&Applicable)&
Follow!these!steps!to!properly!turn!on!the!FPV!connection.!Not!following!these!steps!may!result!in!
damage!to!the!system.!!
!
•
•
•
•
•
!
5.&&
GoPro&Shooting&Preferences&
&
The!GoPro!has!an!array!of!different!shooting!modes!and!settings.!This!can!be!overwhelming&for!
users!who!are!not!accustomed!to!using!a!GoPro,!so!here!is!a!quick!reference!guide!on!our!
recommendations!for!different!shooting!conditions.!More!information!can!be!found!in!the!GoPRo!
manual.!
!
•
•
•
•
&
6.&
Make!sure!the!GoPro!is!connected!and!powered!on.!
Make!sure!the!antennas!are!screwed!in!to!both!the!TX!and!Monitor/Rx!of!the!FPV!system!before!
powering!on.!
Make!sure!the!BAND!and!CHANNELS!on!both!the!FPV!TX!and!Monitor/Rx!are!the!same.!!Our!FPV!
system!is!multichannel!and!multiAband!capable.!
When!the!digital!counter!turns!on!the!FPV!TX!is!on!and!transmitting.!
Turn!on!the!FPV!Monitor/Rx!by!pressing!and!holding!the!power!button!for!3!seconds.!A!red!light!
next!to!the!power!button!will!turn!on!when!the!Monitor!is!on.!
Overall!best!shooting:!2.7k,!30!FPS,!
Low!light!shooting:!1080P!30!FPS,!Wide,!No!Pro!tune!
Slow!motion:!1080p!at!60!fps!(any!setting!at!a!higher!fps!than!60)!!
Put!all!GoPro!footage!through!“CineForm”!(free!editing/conversion!software!offered!by!GoPro)!
before!putting!it!into!any!other!editing!program.&
Flight&Modes!
!
The!Phantom!2!comes!with!multiple!flight!modes!that!allow!users!to!control!the!Phantom!in!many!
different!ways.!
!
• Attitude!Mode:!Maintains!altitude!but!the!craft!will!keep!moving!in!one!direction!when!influenced!
by!wind!or!momentum.!
• GPS!Attitude!Mode:!Maintains!altitude!and!position.!Even!if!acted!upon!by!an!outside!force!it!will!
return!to!its!last!location!(where!the!user!let!go!of!the!sticks).!
• IOC!Mode:!No!matter!the!position!of!the!Phantom,!the!directional!controls!will!always!remain!the!
same.!
REV 1.3—Page 5 of 11
!
!
7.&
!
!
OEM&Phantom&Controller/Transmitter&(If&Applicable)!
The!Phantom!OEM!Controller/Transmitter!is!the!default!transmitter!for!the!Phantom!2.!!
• Refer!to!the!DJI!tutorials!and!User!Manual!for!flight!controls!and!information.!
• The!DSLRPros!Lanyard!attaches!to!the!OEM!Phantom!Transmitter!by!the!silver!loop!above!the!
power!switch.!
!
8.&
Futaba&Controller/Transmitter&(If&Applicable)!
!
The!Futaba!controller!is!the!ideal!controller!for!DSLRPros!aerial!kits.!This!is!an!upgraded!
controller!that!provides!more!options!when!piloting!the!Phantom.!
!
The!LiPo!charger!is!meant!to!charge!the!LiPo!battery!only.&NEVER&charge!a!LiPo!battery!with!any!
charger!that!is!not!a!LiPo!battery!charger.!!Incorrect!charging!can!cause!damage!the!battery!that!
may!result!in!severe!damage!to!persons!and!surroundings.&
!
• Left!Stick:!Located!on!the!left!hand!side!of!the!transmitter,!pressing!up!and!down!on!the!throttle!
controls!vertical!movements.!Pressing!left!and!right!on!the!throttle!stick!causes!the!aerial!to!rotate!
clockwise!or!counterAclockwise.!
• Right!Stick:!Located!on!the!right!hand!side!of!the!transmitter,!the!right!stick!controls!forward!and!
backward!movement!and!left!and!right!horizontal!movement.! !
• To!turn!on!the!motors!for!your!craft,!move!both!the!left!and!right!control!stick!all!the!way!down!
and!towards!the!center!of!the!transmitter.!Release!the!sticks!when!the!motors!begin!to!spin.!
• SA!Toggle!Switch:!This!is!the!Intelligent!Orientation!Control!(IOC)!mode,!which!is!NOT!enabled!by!
default.!This!switch!is!located!on!the!left!side!of!the!transmitter!just!above!the!throttle!control.!
• SE!Toggle!Switch:!This!controls!the!flight!mode.!This!switch!is!located!on!the!top,!left!hand!side!of!
the!transmitter.!See!the!"Advanced!NAZA!Assistant!Manual"!for!further!details.!
• SH!Toggle!Switch:!This!is!the!timer!reset.!This!timer!is!set!to!warn!the!user!when!to!start!landing!
the!Phantom.!This!switch!is!located!on!the!top,!right!hand!side!of!the!transmitter.!
• RD!Knob:!This!sets!the!gimbal!stopping!point!for!the!tilt.!The!trim!slider!on!the!rear,!right!side!of!
the!Futaba!controls!the!tilt.!!The!RD!knob!is!located!on!the!front!of!the!transmitter,!above!the!
power!switch.!
• SD!Toggle!Switch:!The!Dual!Rate!option!on!the!Futaba!allows!users!to!limit!the!overall!speed!at!
which!the!Phantom!can!operate!through!the!"Fluid!Slow!Pan"!mode.!!
!
!
!
!
!
!
!
!
!
!
!
!
!
!
!
!
REV 1.3—Page 6 of 11
!
!
!
!
!
!
!
!
!
!
!
!
&
&
&
&
&
&
9.&
Propeller&Installation&
&
Proper!direction!for!rotation!is!necessary!when!attaching!propeller!blades.!!When!the!battery!door!is!
facing!the!user,!the!motors!are!numbered!1!to!4!(counter!clockwise),!starting!with!the!left!hand!motor.!!
Motors!1!&!3!will!be!removed!as!usual,!counter!clockwise.!!To!remove!nuts!from!motors!2!&!4!the!prop!
nut!will!need!to!be!rotated!clockwise.!!!
!
!
&
&
&
&
&
&
&
&
&
&
&
&
&
&
&
&
To!attach!the!propellers,!remove!the!warning!discs!from!the!motors!and!spin!the!propeller!blades!onto!
the!corresponding!motor!in!the!direction!indicated!by!the!warning!discs.!Correct!propeller!installation!is!
necessary!for!proper!flight.!Additional!information!can!be!found!in!the!DJI!User!Manual.!
&
10.& Gimbal&Installation&&&Removal&
&
It!is!highly!recommended!that!new!pilots!remove!the!lower!half!of!the!gimbal!before!flight!practice!so!
that!in!the!event!of!a!crash!while!learning!to!fly!the!Phantom!the!Zenmuse!H3A3D!will!not!be!damaged.!!
Please!refer!to!the!Zenmuse!H3A3D!operator!manual!for!detailed!installation!and!removal!procedures.!!
The!images!and!directions!below!are!only!supplemental!to!the!manuals!found!on!the!DJI!website.&
!
REV 1.3—Page 7 of 11
&
Only!the!lower!half!of!the!gimbal!is!attached!and!secured!in!place!via!the!rubber!tension!grommets,!which!
have!a!lip!that!fits!into!the!bracket!rings.!!While!these!provide!enough!tension!to!retain!the!gimbal!during!
flight!they!can!come!loose!if!the!craft!is!involved!in!a!significant!crash.!!The!grey/black!ribbon!cable!will!
be!the!only!connection!to!the!craft!for!power!and!video.!!This!cable!can!be!disconnected!and!reconnected!
at!will!after!the!lower!half!is!removed!from!the!brackets.!
!
• To!disconnect!your!gimbal,!pinch!the!rubber!tension!grommets!and!pull!out!of!the!top!plate.!!
• Disconnect!the!ribbon!cable!from!the!gimbal!by!firmly!pulling!it!out!of!the!back!of!the!gimbal.!It!is!
recommended!that!you!disconnect!the!gimbal!cable!before!performing!any!firmware!updates.!
Failure!to!do!so!can!result!in!damage!to!your!gimbal.!
• To!reconnect!your!gimbal,!pinch!the!rubber!tension!grommets!back!into!place!and!reattach!the!
ribbon!cable.!
• Be!sure!to!attach!the!antiAdrop!pins!before!flying!with!your!gimbal!installed.!!
!
!
&
&
&
&
&
&
&
&
&
&
&
&
&
&
&
&
!
11.& &Updating&Your&Software&
!
It!is!recommended!that!you!periodically!check!for!software!updates!using!the!DJI!assistant!software!
application.!When!upgrading!the!firmware!on!either!the!transmitter!or!the!craft,!be!sure!to!disconnect!
the!gimbal!from!the!craft.!Upgrading!your!software!with!the!gimbal's!ribbon!cable!still!attached!can!
permanently!damage!the!gimbal.!!
!
• Plug!the!Phantom!into!your!PC!or!Mac!using!the!USB!cable!provided.!
• Power!on!the!transmitter!with!the!throttle!all!the!way!down.!
• Power!on!the!Phantom.!
• Open!the!DJI!Phantom!software.!
• Go!to!the!“Upgrade”!tab.!
• If!upgrades!are!available,!check!with!DSLRPros!to!ensure!that!the!upgrade!is!necessary!before!
installing.!!
• After!the!upgrade!is!complete,!power!down!your!craft!and!transmitter!before!reattaching!the!
gimbal.!
!
!
!
REV 1.3—Page 8 of 11
!
12.& Battery&Safety&
&
It!is!vital!to!the!safety!of!your!aerial!craft,!yourself,!and!others!that!you!practice!proper!battery!safety!
when!using,!charging,!and!storing!all!batteries!used!with!your!Phantom.!Improper!use,!charging,!and/or!
storage!of!batteries!can!result!in!damage!to!the!battery!or!personal!property.!Please!adhere!to!all!battery!
safety!guidelines!in!the!included!manuals.!The!estimated!flight!time!for!a!Phantom!2!with!H3A3D!gimbal!
under!ideal!conditions!is!11!minutes.!
!
• Only!charge!your!batteries!using!the!included!charging!units.!Failure!to!do!so!may!result!in!fire.!
• Never!charge!batteries!unattended.!
• If!you!notice!that!a!battery!is!swelling!or!ballooning,!immediately!discontinue!the!charge,!remove!
the!battery!from!the!charger,!and!observe!the!battery!outside!and!away!from!any!combustible!
materials!for!at!least!15!minutes.!!
• In!the!event!of!a!crash,!remove!the!battery!from!the!craft!and!observe!it!in!a!safe!location!looking!
for!swelling!or!damage!for!at!least!15!minutes!before!using!the!battery!again.!
• When!storing!your!batteries!for!more!than!two!weeks,!you!must!reduce!their!charge!to!storage!
mode.!Refer!to!your!manual!for!proper!battery!storage!procedures.!
!
If!your!kit!includes!a!Futaba!transmitter!with!a!Lithium!Polymer!Battery,!please!adhere!to!the!guidelines!
outlined!in!your!charging!kit!and!only!use!the!included!Futaba!charging!station!when!charging!a!Futaba!
battery.!It!is!always!recommended!to!charge!and!store!your!LiPo!batteries!in!a!LiPo!Safe!Flame!Resistant!
bag.!Failure!to!do!so!can!result!in!fire.!!
!
!!!!!!!!!!!!!!!!!!!!!!!!!!!!!!!!
!
!
REV 1.3—Page 9 of 11
DSLRPros
Futaba
8FG
Black
Edition
Super
14-Channel
Ultimate
Kit
Replacement
Transmitter
Pre-programmed
Control
Guide
(3)
(3)
(8)
(5)
(1)
(2)
(4)
(6)
(7)
(1) SE Toggle Switch (GPS, ATTI, ATTI): This is your flight mode control. The lowest ATTI position
can be set to trigger "FAILSAFE" as an advanced feature. See you DJI Phantom "Advanced NAZA
(1)
SE Toggle
Switch:
This is
your flight mode (i.e. GPS Atti, Failsafe)
Assistant
Manual"
for further
details.
(2)
SA Toggle
(OFF,
LOCK, HOME
LOCK): This
is yourIOC,
Intelligent
(2)
SA
ToggleSwitch
Switch:
ThisCOURSE
is your Intelligent
Orientation
Control,
mode Orientation
which is Control or IOC. This mode is not
enabled
by default.
NOT enabled
by default.
(3) SB and SC Toggle Switches (OFF, SMALL RADIUS, LARGE RADIUS): These switches control the advanced Point of Interest flight
(3)
SC Toggle Switch: This is your timer reset. The Futaba comes with a timer at 4
profiles. This function allows the operator to bank left or right using only the right joystick. Using the SB Toggle will allow the pilot to
minutes and at 7 minutes. (This can be reprogrammed in the Futaba controller to
fly an inside pivot around a central object. Using the SC Toggle will enable you to fly an outside pivot. These functions are reserved
allow for a two-battery setup).
for advanced users and NOT enabled at default.
(4)
RD Knob:
gimbal's
stopping
pointfor
forthe
thetilt.
camera
tilt.is
The
tilt is controlled
by the trim lever on the rear
(4)
RD
(4)
Knob:This
Thisknob
setssets
the the
gimbal's
stopping
point
The tilt
controlled
by
right
sideknob
of theon
Futaba.
the trim
the rear right side of the Futaba.
(5)
SD Toggle
(OFF,
50%):the
This
enables
thePan”
"Fluid
Slow(Off,
Pan"30%,
mode.
(5)
SD
ToggleSwitch
Switch:
This30%,
enables
“Fluid
Slow
mode
60%)
(6) Throttle and Pan Control Stick.
(6)
Throttle & Pan control stick
(7) Forward, Backward, Left and Right Control Stick.
(7)
Forward, backward, left, right control stick
(8) SH Toggle Switch: This is your timer reset. The Futaba comes with dual timers set to give you an audible alarm at 4 minutes and
again at 8 minutes. Once you switch out a new battery, use the SH switch to zero out the timer. NOTE: The automatic timer should
only be used as a reference point and should not be relied upon for accurate battery life. Under ideal conditions, a Phantom 2 with
H3-3D axis installed will have 11 minutes of flight time.
REV 1.3—Page 10 of 11
Phantom(2(Flight(Procedures(
(
It#is#recommended#that#you#follow#this#procedure#when#flying#your#craft.#
(
o
o
o
o
o
o
o
o
o
o
o
Be#certain#that#the#WiFi#function#on#your#GoPro#is#off.#If#you#see#a#flashing#blue#
light#on#your#GoPro,#this#means#the#WiFi#function#is#on#and#must#be#turned#off#
before#starting#your#craft.##
Check#that#batteries#for#transmitter#and#craft#are#fully#charged#and#properly#
installed.(
Check#that#a#camera#is#connected#to#gimbal.(
Check#that#antennas#are#connected#to#FPV#monitor.#
Check#that#propellers#are#securely#fastened#to#motors.#
Place#all#switches#on#transmitter#in#their#uppermost#position#with#the#throttle#all#
the#way#down.#
Power#on#your#transmitter.#
Power#on#your#craft#and#wait#for#LED#lights#to#stop#flashing#red,#indicating#that#
your#craft#has#achieved#its#GPS#signal.#
Perform#a#compass#calibration.#
With#the#craft#on#an#even#surface#at#least#ten#feet#away#from#you,#start#the#
motors#by#moving#the#control#sticks#down#and#towards#the#center#of#the#
transmitter.#
Press#up#on#the#throttle#to#take#off.#
REV 1.3—Page 11 of 11