1
AIR CLEANER:
Use stock air cleaners unless changing carburetor.
NOTE: If a new or replacement air cleaner is used, there may be
inadequate hood clearance. Make sure it performs the same
function as stock and meets legal emissions requirements.
AUTOMATIC TRANSMISSION CHECK:
1. To assure best performance, economy and emissions, the shift
point MUST be checked before and after the manifold change. We
suggest this method. From a standing start in drive, PUSH THE
THROTTLE WIDE OPEN. Hold in this position. Note speedometer
M.P.H. when it makes the first shift. After new manifold
installation, make the same test noting M.P.H. of the first shift.
2. If adjustment is necessary and to avoid possible transmission
damage, refer to manifold instruction sheet, your local dealer, a
transmission shop, or automotive repair manual for the correct
adjustment procedure.
CHECKING EMISSION LEVELS:
1. Where required by law, after making any equipment change to the
engine package, it is the responsibility of the consumer to make
certain all OEM emission equipment remains operational.
2. Edelbrock recommends that tailpipe levels be measured before and
after equipment installation. This procedure will provide guidelines
for keeping vehicle emission levels within legal limits.
3. Edelbrock cannot be responsible for vehicle emissions if all such
devices are not re-connected.
NOTE: If any emission part cannot be re-installed with your
Edelbrock manifold, contact: Edelbrock Corporation.
EGR SYSTEMS:
Exhaust Gas Recirculation (EGR) systems are used on some 1972
and later passenger cars, trucks and recreational vehicles. If your
vehicle has an EGR system, law requires that you retain this
system with your new Edelbrock manifold.
EXHAUST MANIFOLD HEAT RISER VALVE:
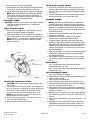
1. If your vehicle is equipped with an exhaust manifold heat riser
valve (generally located on the passenger side of vehicle below the
exhaust manifold), check the valve for proper operation.
2. This valve is spring-loaded and must work freely from the close to
open position by hand.
3. After engine warm up, the bi-metal spring must keep the valve in
the open position. If the valve does not open or opens only part
way, excessive exhaust heat will transfer through intake manifold,
causing damage to the manifold.
BRACKETS:
You may require some bracket parts or bracket modification when
replacing a 2-bbl carburetor with a 4-bbl carburetor. Refer to the
manifold instruction sheet for Edelbrock and OEM part numbers
needed and drawings of possible parts modification.
CLEAN ENGINE:
1. We recommend cleaning engine to prevent dirt from falling into
engine lifter valley or intake ports.
2. Cover ignition system Use Gunk (or equivalent) and a brush to
thoroughly clean manifold and the area between manifold and
valve covers.
3. Rinse with water and blow dry.
VACUUM LINES:
1. Vacuum lines are a major source of manifold, carburetor, and
ignition malfunction problems causing poor mileage, performance,
and high emissions.
CAUTION: It is very critical that the procedure outlined below
be followed and completed with extreme care.
2. Before removing stock manifold, you may either make a sketch or
tag each vacuum line with masking tape showing where each line
goes on the carburetor, manifold, distributor, transmission, all
emission sensors and EGR valve.
NOTE: You are dealing with two types of vacuum signals. No. 1
is called Manifold Vacuum. No. 2 is called Timed Port Vacuum.
Each has its particular function and must be connected correctly
for proper engine, transmission, ignition, emission and accessory
function. Use the following procedure to determine one from the
other and note it on your sketch or tags.
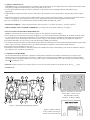
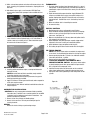
MANIFOLD VACUUM CHECK:
1. Start the engine with vehicle out of gear, set the brake and block
the wheels. Idle until engine is warm and the automatic choke is
completely off.
2. With engine at idle, place a vacuum gauge or your finger over the
end of each line and check for vacuum. If it shows vacuum, note
on your sketch or tag as “manifold vacuum”. As seen below.
TIMED PORT VACUUM CHECK:
1. For lines not showing vacuum in the previous test, open throttle
slowly to about 1500 rpm. If you now show some vacuum, note on
tags or sketch as “timed port vacuum”.
CAUTION: Vacuum line fatigue is common. It is wise, at this
time, to replace all vacuum lines, making sure you use the correct
size.
NOTE: Remember all lines must be re-connected to their proper
vacuum source.
AUTOMATIC CHOKE:
1. With engine cold and not running, remove air cleaner and open
throttle by hand. This will allow the choke blade to close.
2. By hand, feel how much tension is holding the blade closed.
Preliminary setting should be the same AFTER manifold
installation. See choke section on later pages.
© 2001 Edelbrock Corporation
Brochure No. 63-0048
Page 3 of 8
Rev 1/02