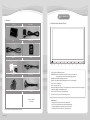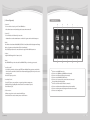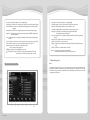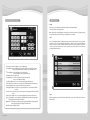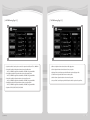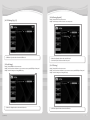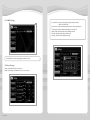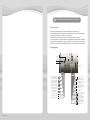
1
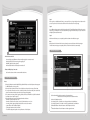
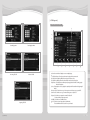
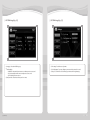
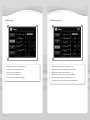
Beat Evolve N-1 User Manual
www.beat-audio.co.uk
Table of Contents
[
I / Before Using ]
[
II / How to Use ]
[
III / How to Set up ]
1. Warning
2. Safety Information
3. Contents
1. Control Locations – Monitor Closed
2. General Operation
3. RADIO Tuner Operation
4. DVD Operation
5. Bluetooth Operation
6. USB Operation
7. iPod Operation (optional)
1. SYSTEM Settings (Page 1/3)
2. SYSTEM Settings (Page 2/3)
3. SYSTEM Settings (Page 3/3)
4. VIDEO Settings
5. AUDIO Settings (Page 1/3)
6. AUDIO Settings (Page 2/3)
7. AUDIO Settings (Page 3/3)
8. DVD Settings (Page 1/3)
9. DVD Settings (Page 2/3)
10. DVD Settings (Page 3/3)
11. Radio Settings
12. iPod Settings (Optional)
13. AUX Settings
14. CAMERA Settings
15. Bluetooth Settings
[ IV / Installation, Troubleshooting, Specifications ]
[ Use Manual ]
1. Before You Start
2. Wiring Diagram
3. Troubleshooting
4. Specifications
04
04
04
06
07
07
08
10
11
13
19
20
21
21
22
23
24
25
26
27
28
29
30
30
31
31
32
32
35
35
35
36
36
02 >>
03
I _ Before Using
To prevent damage or injury:
[ 1. Warning ]
Upon installation of this Monitor/DVD player (Unit) into a vehicle, the driver of the vehicle must not
operate this unit by watching videos or playing video games while driving.
Failure to follow this instruction could lead to driver distraction which could result in serious injury or
death to the vehicle’s occupants or persons outside the vehicle and/or property damage.
Several countries and states prohibit the installation of monitors/DVD players if the screen is visible
from the driver’s seat. If you reside in a jurisdiction which has enacted such a law, this unit must not be
installed so that the screen is visible from the driver’s seat.
When installing this unit in the front console/dashboard, the unit must be positioned so that it is facing
the front passenger seat only. Failure to following this instruction could lead to driver distraction which
could result in serious injury or death to the vehicle’s occupants or persons outside the vehicle and/or
property damage.
This unit is designed so that it might be operated only when the vehicle is in “Park” and the parking brake
is fully engaged. To this end, this unit includes a parking brake lock-out feature which prohibits the unit
from operating if the vehicle is not in “Park” and/or the parking brake is not fully engaged. When installing
this unit, the installer must connect the parking brake detect wire to the parking brake mechanism in
order to make the parking brake lock-out feature operable. DO NOT simply ground the parking brake
detect wire to a metal portion of the vehicle. Failure to properly install the parking brake lock-out feature
could lead to driver distraction which could result in serious injury or death to the driver’s occupants or
persons outside the vehicle and/or property damage.
Once the parking brake lock-out feature is installed, the owner/user must not attempt to disrupt/
neutralize the parking braking brake lock-out feature by (a) partially engaging the parking brake and/
or (b) purchasing/using any device or unit designed to send necessary brake signals to the unit. Failure
to follow these instructions could lead to driver distraction which could result in serious injury or death
driver’s occupants or persons outside the vehicle and/or property damage.
When operating this unit, keep the unit’s volume level low enough so that the vehicle’s occupants can
hear traffic-related sounds such as police and emergency vehicles. Failure to follow this instruction
could lead to driver distraction which could result in serious injury or death to the vehicle’s occupants or
persons outside the vehicle and/or property damage.
1. Make sure to ground the unit securely to the vehicle chassis ground.
2. Do not remove the top or bottom covers of the unit.
3. Do not install the unit in a spot exposed to direct sunlight or excessive heat or the possibility of water
splashing.
4.Do not subject the unit to excessive shock.
5.When replace a fuse, only use a new one with the prescribed rating. Using a fuse with the wrong rating
may cause the unit to malfunction.
6.To prevent short circuits when replacing a fuse, disconnect the wiring harness first.
7.Use only the provided hardware and wire harness.
8.You cannot view video while the vehicle is moving. Find a safe place to park and engage the parking
brake.
9.If you experience problems during installation, consult your nearest dealer.
10. If the unit malfunctions, reset the unit as described on manual first.
If the problem stall persists, consult your nearest dealer or call tech assistance.
11. To clean the monitor, wipe only with a dry silicone cloth or soft cloth.
Do not use a stiff cloth, or volatile solvents such as paint thinner and alcohol. They can scratch the surface of panel and/or remove the painting.
12. When the temperature of the unit falls (as in winter), the liquid crystal inside the screen will become darker than usual. Normal brightness will return after using the monitor for a while.
Additional Notes:
1.When extending the ignition, battery or ground cables, make sure to use automotive-grade cables or other cables with an area of 0.75mm or more to prevent voltage drops.
2.Do not touch the liquid crystal fluid if the LCD is damaged or broken. The liquid crystal fluid may be hazardous to your health or fatal. If the liquid crystal fluid from LCD contacts your body or clothing, wash it off soap immediately.
Operation is subject to the following two conditions:
1.This device may not cause harmful interference, and
2.This device must accept any interference received, including interference that may cause undesired operation.
[ 2. Safety Information ]
Please read all instructions carefully before attempting to install or operate.
Due to its technical nature, it is highly recommended that your G 9 is installed by a professional installer
or an authorized dealer. This product is only for use in vehicles with 12VCD negative ground only.
Safety Notes:
The DVD video display of the in-dash unit will not operate while the vehicle is moving. This is a safety
feature to prevent driver distraction. In-dash DVD video functions will only operate when vehicle is in
Park and the parking brake is engaged. It is illegal in most states for the driver to view video while the
vehicle is in motion.
[ Use Manual ]
04 >>
05
II. How to Use
[ 3. Contents ]
5.
매뉴얼BEAT N-1
GPS Antenna
USB
SD Map Card
Manual
Cable
[ 멀티엔터테인먼트 차량 올인원 ]
테인먼트
차량 올인원
]
[ 1. Control Locations – Monitor Closed ]
⇡
⇡
⇡
⇡
⇡
⇡
⇡
⇡
⇡
⇡
❶
❷
❸
❹
❺
❻
❼
❽
❾
❿
[ 멀티엔터
케이
: G9
지 2층
모델명
: (주) 오토씨에스 청계동 800-17번
판매원
의왕시
: 경기도
주 소
426-9815
: (031)
고객센터
Screws
Wire harness
Option
Remote controller
I-Pod cable
★ These contents may change depending on market area.
[ Use Manual ]
❶ Mic. : Mic. Hole of Bluetooth function
❷ PWR/MUTE : Press to turn the unit on. Hold 3 seconds to turn the unit off.
Press short time to turn off sound during playing function.
❸ MODE : Press MODE to display the main menu.
❹ Dimmer : Press DIM to adjust LCD brightness from 1 to 5 steps manually.
❺ Vol - : Press to volume down.
❻ Vol + : Press to volume up.
❼ PIP : Press PIP(Picture in Picture) to show navigation screen and other function’s screen together.
❽ NAVI : Press NAVI to select Navigation mode.
❾ EJECT : Press EJECT to insert or eject DVD or CD.
❿ Remote sensor : The part of remote controller sensor.
•Monitor Notes:
- The angle can be selected via the screen setting menu.
- The color of the LCD monitor varies between viewing angles.
Select the angle with most optimum view for your location.
- The last position of the monitor can be saved in memory.
06 >>
07
[ 2. General Operation ]
┃Power ON┃
• Main Menu Access •
❶
❷
❸
❹
★
★
★
★
★
★
★
★
★
★
❻
❼
❽
❾
❿
1.Turn on vehicle or locate key on ACC Unit’s LED will be on
2. Press Power button on unit. Unit displays the last status when unit was off.
┃Power OFF┃
1.Turn off vehicle or hold Power key for 3senconds.
Caution : Do not use this unit without turn on vehicle for long time. It makes vehicle battery out.
┃Mode┃
Press Mode to select between Radio, DVD, USB, TV, AUX, Camera, Bluetooth, iPod, Navigation and Setting. Modes of operation are indicated in the OSD (On Screen Display).
iPod, USB, TV(optional) must be connected/inserted to appear in the MODE selection icon.
┃Volume┃
Adjust VOLUME using the VOL+/- buttons (00-40)
┃Mute┃
Press PWR/MUTE key to silence the audio. Press PWR/MUTE key or volume key again to cancel.
┃Insert/Eject a Disc┃
1.Open panel to reveal disc slot by pressing EJECT button. With label facing up, insert a standard disc into the slot. The panel will close and the disc will automatically begin playback. Only one disc can be inserted at a time.
2.Press EJECT key to eject a disc.
┃Insert Map SD card┃
1.Press EJECT key to open panel down or set panel angle down in setting menu.
2.With label facing up, put Map SD card into SD card slot on the bottom of panel.
3.Push SD card to eject.
┃USB connection┃
❶ Touch to access AM/FM Tuner mode.
❷ Touch to access CD/DVD mode (CD/DVD must be inserted).
❸ Touch to access USB mode (USB must be connected).
❹ Touch to access AUXILIARY A/V INPUT mode.
❺ Touch to access Camera mode, if optional camera isn’t connected.
❻ “No signal detected” will be displayed.
Touch to access iPod mode (iPod must be connected).
❼ Touch to access Bluetooth mode (Bluetooth must be activated first).
❽ Touch to access Navigation mode (Navigation SD card must be inserted)
❾ Touch to access Settings mode.
USB mass-storage device can be connected with USB port.
Some hard disc device needs external power to use this function.
[ Use Manual ]
08 >>
09
[ 3.RADIO Tuner Operation ]
[ 4.DVD Operation ]
From the main menu, touch RADIO icon on the screen.
DVD Region Management
Some DVD Discs can be played only in certain playback modes according to the intentions of the
software. As this unit plays discs according to their intentions, some functions may not work as intended.
Please be sure to read the instructions provided with each disc.
This player has been designed to play back DVD software that has been encoded for specific region
areas. It cannot play DVD software encoded for other region areas than the region area for which it has
been designed.
• RADIO OSD Overview •
❼
❶
★
DVD Region Codes :
★
❷
❸
★
★
★
❹
★
❽
★
❾
★
❿
★
1. USA, Canada
2. Japan, Europe, South Africa, Middle East
3. Rep. of Korea, Taiwan, Hong Kong, Parts of Southeast Asia
4. Australia, New Zealand, Mexico, South America
5. Eastern Europe, Russia, India, Africa
6. China
• DVD Touch Screen Controls •
★
❺
❻
❶ Current Source Indicator : Displays source currently playing.
❷ FM Band : Show which band the radio is tuned to, FM-1, FM-2, FM-3.
❸ Local/DX Tuning Mode : Shows when local or distance tuning is on.
❹ Preset Number Indicator : Show what preset has been selected.
❺ Tune Button : Touching this icon will tune the radio adjust frequency by one frequency step.
❻ Seek Station : Touching this icon will tune to the next strong station at a higher or lower frequency.
❼ Current Display Indicator : Show current sound mode, band, and frequency.
❽ AM Band : Show which band the radio is tuned to, AM-1, AM-2.
❾ Auto Store Presets : Touch the icon to automatically program the 6 strongest stations available into the presets in the current band.
❿ Preset Scan : Touching the icon will scan through all tunable presets in the current band and play them for 10 seconds each.
[ Use Manual ]
❶
★
❷
★
❸
★
❹
★
★
❺
★
❻
★
❼
★
❽
★
❾
★
❿
★
11
10 >>
11
❶ Current Source Indicator : Displays source currently playing.
❷ Audio Mode : Touch this icon to change the audio stream. Each touch will cycle the language.
❸ Sub-Title Mode : Touch this icon to change the sub-title language. Each touch will cycle the language.
❹ Angle Mode : Touch this icon to change the angle mode. Each touch will cycle the angle.
❺ Play/Pause : Touching this icon will temporarily stop playback of the DVD. Touching it again will resume playback.
❻ Stop : Touching this icon to stop playback completely and will restart from the beginning of the disc.
❼ Previous Chapter : Touch this icon to go back to previous chapter. Keep press to operate F/R.
❽ Next Chapter : Touch this icon to go to next chapter. Keep press to operate F/F.
❾ Repeat : Touch this icon to repeat the current chapter or title.
Each touch will cycle the repeat mode.
❿ DVD Menu : Touch this icon to go DVD title menu screen.
11 Go To Time, Title or Chapter : Touch this icon to bring up the Search Window. The Search Window allows a search for a specific time, title or chapter.
❶ Current Source Indicator : Displays source currently playing.
❷ Track Time Indicator : Shows how much time has elapsed in the current track.
❸ Disc Folder List : Display all disc folders and touch a folder to select.
❹ Track Title List : Display all tracks in selected folder and touch a track to select.
❺ Play/Pause : Touching this icon will temporarily stop playback of the DISC.
Touching it again will resume playback.
❻ Stop : Touching this icon to stop playback completely and will restart from the beginning of the disc.
❼ Previous Track : Touch this icon to go back to previous track.
❽ Next Track : Touch this icon to go to next track.
❾ Repeat : Touch this icon to repeat the current Track, Dir, All. Each touch will cycle the repeat mode.
❿ Shuffle : Touch this icon to shuffle all tracks on the fold.
11 Go To : Touch this icon to bring up the Search Window.
The Search Window allows a search for a specific track or time.
[ 5. Bluetooth Operation ]
• MP-3 Touch Screen Controls •
Notes :
Some Bluetooth approved devices may not communicated or work properly with this head unit,
depending on the features or specifications of the device. During hands free operation, some noise may
be heard when using a mobile device with this head unit, depending on the mobile device and or the
communication environment.
❹
❶
★
❷
★
★
❸
★
★
❺
[ Use Manual ]
★
❻
★
❼
★
❽
★
❾
★
❿
★
11
12 >>
13
• Bluetooth Touch Screen Controls •
• Bluetooth Pairing •
Pairing
❶
Before you can use a mobile device with this head unit, it must be authenticated.
This is also referred to as “pairing” a device.
★
Note : Please make sure that Bluetooth is activated on your mobile device before you begin the pairing
process. Refer to the owner’s manual of your mobile device for more details.
14
★
❷
★
❸
❹
★
★
★
❺
Step 1
13
★
★
12
❿
★
★
11
★
❻
★
★
❼
Press “❾ Pairing Device Button” on Bluetooth main screen and touch “New device” icon to begin the
pairing process. The head unit will display “Wait Pairing…” and will search for any nearby Bluetooth
device. If you have more than one Bluetooth device, please make sure only the device you want to
connect to is powered on. Refer to the owner’s manual of your mobile device for more details on
searching for Bluetooth devices.
★
❽
❾
❶ Current Source Indicator : Displays source currently playing.
❷ Re-dial Button : Press to redial with previous phone number. Some mobile device cannot works properly for this function or required to press this button twice.
❸ Voice-dial Button : Press to dial with voice recorded number.
Some mobile device cannot support this function.
❹ Talk Button : Place an outgoing call.
❺ Setting Menu Icon : Press to access Bluetooth setup menu. Refer “III.
How to set up- Bluetooth Setting”.
❻ Call History Button : Press to access incoming and outgoing call numbers list.
❼ Phone Book List : Touch this icon to access phone book list transferred from mobile device.
❽ Disconnect Button : Press to disconnect mobile device and head unit.
❾ Pairing Device Button : Touch this icon to pair mobile device or see paired device with this head unit.
❿ Previous Track : Touch this icon to go back to previous track, playing audio function in mobile device.
11 Next Track : Touch this icon to go to next track, playing audio function in mobile device.
12 Stop : Touching this icon to stop playback completely and will restart from the beginning of MP3, playing audio function in mobile device.
13 Play/Pause : Touching this icon will temporarily stop playback of MP3. Touching it again will resume playback, playing audio function in mobile device.
14 Call Time Indicator : Display call time.
[ Use Manual ]
Step 2
When prompted by your mobile device. Enter the PIN code or pass code. The PIN code will be set on
“Bluetooth Set”.
14 >>
15
Step 1
Please make sure that Bluetooth Paring is connected before you begin the phonebook data transfer
process. The phone book data can be transferred on the disconnection mode of paring.
Step 2
Access Bluetooth setup menu in mobile device and search for Transfer Data function. Refer to the owner’s
manual of your mobile device for more details. When you begin the transfer data process, the head unit
will display “Phonebook Download”.
Step 3
After the transfer data process completed, pair the head unit and mobile device again.
Note :
When phone book data in mobile device is updated, process transfer data to this head unit again.
The head unit cannot support to update phone book data in mobile device automatically.
• Phone Book Operation •
•Mobile Connection Role
❻
Some mobile is using different mode but normally using below connection mode.
Hand free (HFP) : Mode for incoming and outgoing call.
AV (A2DP) : Mode for Audio playback.
Head set (HSP) : Mode for the latest phone number call.
★
★
❶
•Bluetooth MP3 player Connection
❷
★
Set Stereo Headset mode when connect with this head unit.
• Transfer Phone Book Data •
Notes :
>> Phonebook function is matched with OPP (Object Push Profile) in user's mobile phone and not supports for PBAP (Phone Book access profile).
>> Phonebook list is downloaded from user's mobile phone and store in the memory of head unit.
>> To use phonebook function, user has to download phonebook list from mobile phone to this head unit and re-download whenever phonebook list is changed and updated.
>> The contents in incoming call list, outgoing call list, and missed call list will be only call lists when this head unit and user's phone is paired.
>> Phone Book function supports below limited numbers and letters.
- Numbers of Paired device : Max. 4 sets
- Numbers of Phonebook list : Names - max. 500, Phone Numbers - max. 1900
- Incoming call list, Outgoing call list, Missed call list : max. 20 each numbers
- Letters of Name : Max. 26 letters (English)
- The length of numbers : Max. 20 numbers
- The downloading time depends on the specifications of mobile phone.
[ Use Manual ]
★
★
❸
★
❹
❺
❶ Phone Number : Display phone numbers of registered name.
Press beside Icon to make phone call or delete the number.
❷ Name List : Display name list.
❸ Searching by name : Touch this icon to bring up the Name Search Window
❹ Searching by number : Touch this icon to bring up the Number Search Window
❺ Delete Data Button : Press this button to delete all phonebook data.
❻ Delete Name Button : Press this button to delete registered name.
16 >>
17
[ 6. USB Operation]
• USB Touch Screen Controls •
❹
❶
★
❷
Searching by name
★
★
Searching by number
❸
★
★
★
❺
Incoming Call OSD
Missed Call OSD
★
❻
★
❼
★
❽
★
❾
★
❿
11
❶ Current Source Indicator : Displays source currently playing.
❷ Track Time Indicator : Shows how much time has elapsed in the current track.
❸ Track Folder List : Display all file folders and touch a folder to select.
❹ Track Title List : Display all tracks in selected folder and touch a track to select.
❺ Play/Pause : Touching this icon will temporarily stop playback of the file. Touching it again will resume playback.
❻ Stop : Touching this icon to stop playback completely and will restart from the beginning of the file.
❼ Previous Track : Touch this icon to go back to previous track. Keep press to operate F/R.
❽ Next Track : Touch this icon to go to next track. Keep press to operate F/F.
❾ Repeat : Touch this icon to repeat the current Track, Dir, All.
Each touch will cycle the repeat mode.
❿ Shuffle : Touch this icon to shuffle all tracks.
Outgoing Call OSD
[ Use Manual ]
11
Go To : Touch this icon to bring up the Search Window.
The Search Window allows a search for a specific track.
18 >>
19
III _ How to Set up
[ 7. iPod Operation (Optional)]
•Press Settings icon to access the setup mode.
•Select desired parameter you wish to change.
•Press PAGE icon in the upper right corner to move next page.
• iPod Touch Screen Controls •
❹
❶
★
❷
★
[ 1. SYSTEM Settings (Page 1/3)]
★
❷
❶
❸
★
★
★
★
❸
★
❹
★
★
★
★
★
★
★
★
❻
❼
❽
❾
❿
❶ Current Source Indicator : Displays source currently playing.
❷ Track Time Indicator : Shows how much time has elapsed in the current track.
❸ Track information Indicator : Display the track information.
❹ Track Title List : Display all tracks in selected folder and touch a track to select.
❺ Play/Pause : Touching this icon will temporarily stop playback of the file.
❼
11
Touching it again will resume playback.
❻ MENU : Touch this icon to bring up the audio contents list in iPod.
❼ Reverse Track : Touch this icon to go back to previous track. Keep press to operate F/R.
❽ Forward Track : Touch this icon to go to next track. Keep press to operate F/F.
❾ Repeat : Touch this icon to repeat the current Track, Dir, All.
Each touch will cycle the repeat mode.
❿ Shuffle : Touch this icon to shuffle all tracks.
11 iPod Video Browsing : Touch this icon to bring up the video contents list in iPod.
[ Use Manual ]
❻
★
★
❺
❺
★
❽
❶ Current Source Indicator : Displays source currently showing.
Press this icon to exit Settings menu.
❷ Page Button : Press this icon to move next page.
❸ Tilt Position : Set for best viewing angle for your vehicle.
❹ Tilt Movement : Select <AUTO>to make the last position of the monitor saved in memory.
❺ NAVI Audio Mix : Select the audio mode to mix with other source’s sound and navigation sound. <OFF><MIX><FULL>
❻ NAVI Volume : Adjusts the relative volume in Navigation mode.
❼ Rear Zone Out : Select desired Rear Zone source. Navigation source is not available for Rear Zone.
❽ Rear Zone Volume : Adjusts the relative volume in Rear Zone mode.
20 >>
21
[ 2.SYSTEM Settings (Page 2/3)]
[ 3.SYSTEM Settings (Page 3/3)]
★
❶
★
❷
★
★
★
★
★
❸
★
❹
★
❺
❸
❶ Time setting : Touch this area to adjust time.
❷ Touch Adjustment : For proper calibration you must touch each pointer for 2 seconds.
❸ Factory Set : Touch this icon to load all factory parameters to their original settings.
<ON(MUTE)> - Automatically rearview camera on without previous source sound.
<ON> - Automatically rearview camera on with previous source sound.
<OFF>- Manually rearview camera on.
❸ Beep Tone Mode : Select the touch beep sound on or mute.
❷
❻
❶ Language : Select desired OSD language.
❷ Rear View Mode :
❶
[ Use Manual ]
22 >>
23
[ 4.VIDEO Settings]
[ 5.AUDIO Settings (Page 1/3) ]
★
★
★
❶
❶
❷
❸
★
★
★
★
❸
❹
★
★❺
❷
★
❹
❺
★
❻
❶ Brightness : Press arrow icon to adjust the brightness.
❶ Bass Gain : Adjust the relative volume in Bass range. (-10 ~+ 10)
❷ Contrast : Press arrow icon to adjust the contrast.
❷ Bass Frequency : Set the bass center frequency for optimal bass effect.
❸ Tint : Press arrow icon to adjust the tint.
❸ Mid Gain : Adjust the relative volume in Mid range. (-10 ~+ 10)
❹ Color : Press arrow icon to adjust the color.
❹ Mid Frequency : Set the mid center frequency for optimal mid effect.
❺ Sharpness : Press arrow icon to adjust the sharpness.
❺ Treble Gain : Adjust the relative volume in Treble range. (-10 ~+ 10)
❻ Treble Frequency : Set the treble center frequency for optimal treble effect.
[ Use Manual ]
24 >>
25
[ 6.AUDIO Settings (Page 2/3) ]
[ 7.AUDIO Settings (Page 3/3) ]
★
★
❷
★
★
❸
❹
★
★
❶
❺
❻
★
★
❶
❷
★
❸
★
❹
★
❺
★
❻
❶ Speaker Out Mode : Set the speaker out mode for optimal sound effect. <AUTO>, <MANUAL>
❶ Balance : Adjust the relative volume balance in left, right speaker.
❷ Front Left Sound Mode : Adjust the relative volume in front left speaker.
❷ Fader : Adjust the relative volume balance in front, rear speaker.
<AUTO>, <SPEAKER : using this head unit AMP.>, <EXT.AMP : using external AMP.>
❸ Front Right Sound Mode : Adjust the relative volume in front right speaker.
<AUTO>, <SPEAKER : using this head unit AMP.>, <EXT.AMP : using external AMP.>
❹ Rear Left Sound Mode : Adjust the relative volume in rear left speaker.
<AUTO>, <SPEAKER : using this head unit AMP.>, <EXT.AMP : using external AMP.>
❺ Rear Right Sound Mode : Adjust the relative volume in rear right speaker.
<AUTO>, <SPEAKER : using this head unit AMP.>, <EXT.AMP : using external AMP.>
❻ Equalizer : FLAT, POP, JAZZ, CLASSIC, LIVE, ROCK
[ Use Manual ]
❸ High-pass Filter : Sets the frequency which affects the 4 speakers’ high-pass filter.
❹ Center Volume : Adjust the relative volume in center speaker.
❺ Woofer Volume : Adjust the relative volume in woofer speaker.
❻ Low-pass Filter : Sets the frequency which affects the subwoofer speakers’ low-pass filter.
26 >>
27
[ 8.DVD Settings (Page 1/3) ]
[ 9. DVD Settings (Page 2/3) ]
Step 1 : Select the DVD mode on menu screen.
Step 2 : Touch Current Source Indicator icon to access menu screen or press MODE key on front panel.
Step 3 : Touch the Setting icon to change DVD setup.
★
❶★
❶
★
❷
★
❸
❷★
★❹
❸★
★❺
❹★
★
❻
❺★
❻★
❶ Sound Mode : Select desired speaker output mode. <6CH> <2CH>
❷ Front Speaker : Select size of front speaker.
❶ Audio Language : Select the audio language.
❷ Menu language : Select the menu language.
❸ Sub-title language : Select the sub-title language.
❹ DVD Aspect : Select desired TV shape.
❸ Rear Speaker : Select size of rear speaker.
❹ Center Speaker : Select ON if a center speaker is included in your system.
❺ Woofer Speaker : Select ON if a subwoofer speaker is included in your system.
❻ Speaker Test : Touch this icon to test the speaker system.
❺ Video System : Select desired video system. <AUTO> <NTSC> <PAL>
❻ Dynamic Range Control : Select On to activate dynamic range control.
Notes :
<6CH> mode must be selected to adjust speaker size and Center & Woofer speaker.
[ Use Manual ]
28 >>
29
[ 12. iPod Settings (Optional) ]
[ 10. DVD Settings (Page 3/3) ]
Step 1 : Select the iPod mode on menu screen.
Step 2 : Touch the setup icon in iPod screen to access setup screen.
★
❶
★
❶
★
❶ DVD Gain : Adjust the relative volume in the DVD mode.
[ 11. Radio Settings ]
Step 1 : Select the RADIO mode on menu screen.
Step 2 : Touch Current Source Indicator icon to access menu screen or press MODE key on front panel.
Step 3 : Touch the Setting icon to change RADIO setup.
★
❶ Radio Gain: Adjust the relative volume in the iPod mode.
❷ Audio book Speed: Select desired audio book speed.
[ 13. AUX Settings ]
Step 1 : Select the AUX mode on menu screen.
Step 2 : Touch Current Source Indicator icon to access menu screen or press MODE key on front panel.
Step 3 : Touch the Setting icon to change AUX setup.
❶
★
❶ Radio Gain : Adjust the relative volume in the Radio mode.
[ Use Manual ]
❷
❶
❶ AUX Gain : Adjust the relative volume in the AUX mode.
30 >>
31
[ 14. CAMERA Settings ]
❶ Connection Role : Select connection profile, referring mobile device’s manual.
★
❶
<HF/HS> <AV> <HF/HS+AV>
❷ Auto Connect : The head unit will automatically connect to a previously paired phone.
❸ Auto Reception : The head unit will automatically receive incoming call.
❹ Bluetooth Gain : Adjust the relative volume in the Bluetooth mode.
❺ Mic. Gain : Adjust the relative volume in the Mic. sound.
❻ PIN Code : Set the PIN code for the Bluetooth paring.
❶ Horizontal Flip : Touch ON to change right side to left side for camera
[ 15. Bluetooth Settings]
Step 1 : Select the Bluetooth mode on menu screen.
Step 2 : Touch the setup icon in Bluetooth screen to access setup screen.
★
★
[ Use Manual ]
★
❺
★
❻
❶
❷
★
❸
★
❹
32 >>
33
IV _ Installation, Troubleshooting, Specifications
[ 1. Before You Start ]
•Disconnect negative battery terminal. Consult a qualified technician for instructions.
•Avoid installing the unit where it would be subject to high temperature, such as from direct sunlight, or where it would be subject to dust, dirt or excessive vibration.
•The DVD video display of the in-dash unit will not operate while the vehicle is moving.
This is a safety feature to prevent driver distraction. In-dash DVD video functions will only operate when vehicle is in Park and parking brake is engaged. It is illegal in most states for driver to view video while the vehicle is in motion. Altering or defeating this safety feature is a violation of law and is prohibited.
[ 2. Wiring Diagram ]
TV Antenna
GPS Antenna
iPod
Radio Antenna
Lineout Center (GRAY RCA)
Lineout Woofer (BLUE RCA)
Aux audio left IN (WHITE RCA)
Aux audio right IN (RED RCA)
Aux audio IN (YELLOW RCA)
Aux audio left OUT (WHITE RCA)
Aux audio right OUT (RED RCA)
Aux audio OUT (YELLOW RCA)
Lineout left front (WHITE RCA)
Lineout right front (RED RCA)
DVD_USB (BLACK USB)
Camera video IN (YELLOW RCA)
Reverse Gear IN (ORANGE)
Illumination IN (ORANGE/WHT)
Parkin IN (PINK)
Antenna on OUT (BLUE)
Steering wheel 1 IN (BROWN)
Steering wheel GND (GRAY/WHT)
GND (BLACK)
Bettery IN (YELLOW)
Lineout left rear (WHITE RCA)
Lineout right rear (RED RCA)
Rockford COMM (VIOLET)
Rockford ON (VIOLET/WHT)
ACC IN (RED)
Remote on OUT (BLUE/WHITE)
Speaker left rear- (GRN/BLK)
Speaker left rear+ (GRN)
Speaker left front- (WHT/BLK)
Steering wheel 2 (BROWN/BLK)
Speaker left front+ (WHITE)
Speaker right front+ (GRY)
Speaker right front- (GRY/BLK)
Speaker right rear+ (VIOLET)
Speaker right rear- (VIO/BLK)
[ Use Manual ]
34 >>
35
[ 3.Troubleshooting ]
Item
Problem
Cause
Action
Yellow wire not connected or
incorrect voltage Red wire not
connected or incorrect voltage
Check connections for proper
voltage (11~16VDC)
Black wire not connected
Check connection to ground
Fuse blown
Replace fuse
Speaker wires not connected
Check connections at speakers
One or more speaker wires
touching each other or touching
chassis ground
Insulate all bare speaker wires
from each other and chassis
ground
Unit has audio
(But no video)
Parking brake safety circuit not
connected
Parking brake not applied
Check connections at parking
brake
Apply parking brake as described
on wire diagram
No video display
(When in reverse)
Reverse circuit not connected
Vehicle is not in reverse
Check connections at reverse
lamp Select reverse gear
DVD does not start playback
Physical defect in media
Wrong region
Check media for scratches
Check region code on disc
Bad Disc appears on display
Focus error or disc is in upside
down
Press eject key or restart.
Unit will not turn on
(No power)
Unit has power
(But no sound)
Item
In/Out port
AMP.
Description
Size
6.95”
Resolutions
800 X 480 Digital LCD
Disc type
DVD Video, CDDA, VCD, MP3, JPG, MPEG,
DivX, WMA
CD/CD-R/CD-RW/DVD R/DVD RW Disc
DVD
[ Use Manual ]
AM
Navigation
[ 4.Specifications ]
Monitor
FM
Frequency response
20Hz ~ 20kHz
Channel separation
>70dB
Description
Tuning range
87.5MHz ~ 107.9MHz
Usable sensitivity
10dB
Stereo separation
>25dB
Frequency response
60Hz ~12kHz
Frequency response
531kHz ~ 1,620kHz
Usable sensitivity
35dBu
Input port
Audio, Video
I Pod
8P Mini DIN type
USB
A type
Rear View (RCA)
Camera IN
Output port
Audio, Video
Pre out port
Pre Out 6ch
Power
50W X 4Ch
Speaker impedance
2 ~ 4Ώ or 100 Ώ ~200 Ώ( Line drive mode)
OS
Win CE 5.0 core
CPU speed
533MHz
ROM
64 MB NAND Flash
RAM
64 MB
GPS
Sirf III
Power Voltage
12 V ~ 15 V
Operation Temperature
-10 ~ +60
Storage Temperature
-30 ~ +85
Weight
Size
3kg
178mm(W) + 100mm(H) + 196mm(D)
36 >>
37
www.beat-audio.co.uk