1
HP StorageWorks
Command View XP installation guide
Part number: B9357–96115
First edition: March 2005
Legal and notice information
© Copyright 1999–2005 Hewlett-Packard Development Company, L.P.
Hewlett-Packard Company makes no warranty of any kind with regard to this material, including, but not limited to, the implied warranties of
merchantability and fitness for a particular purpose. Hewlett-Packard shall not be liable for errors contained herein or for incidental or consequential
damages in connection with the furnishing, performance, or use of this material.
This document contains proprietary information, which is protected by copyright. No part of this document may be photocopied, reproduced, or
translated into another language without the prior written consent of Hewlett-Packard. The information is provided “as is” without warranty of any
kind and is subject to change without notice. The only warranties for HP products and services are set forth in the express warranty statements
accompanying such products and services. Nothing herein should be construed as constituting an additional warranty. HP shall not be liable for
technical or editorial errors or omissions contained herein.
Java™ is a U.S. trademark of Sun Microsystems, Inc.
Microsoft®, Windows®, and Windows NT® are U.S. registered trademarks of Microsoft Corporation.
Oracle® is a registered U.S. trademark of Oracle Corporation, Redwood City, California.
UNIX® is a registered trademark of The Open Group.
Command View XP installation guide
Contents
About this guide . . . . . . . . . . . . . . . . . . . . . . . . . . . . . . . . . . . . . . . . . . . . . 7
Intended audience . . . . . . . . . . . . . . . . . . . . . . . . . . . . . . . . . . . . . . . . . . . . .
Prerequisites. . . . . . . . . . . . . . . . . . . . . . . . . . . . . . . . . . . . . . . . . . . . . . . . . .
Related documentation . . . . . . . . . . . . . . . . . . . . . . . . . . . . . . . . . . . . . . . . . .
Document conventions and symbols . . . . . . . . . . . . . . . . . . . . . . . . . . . . . . . . .
HP technical support . . . . . . . . . . . . . . . . . . . . . . . . . . . . . . . . . . . . . . . . . . . .
HP-authorized reseller. . . . . . . . . . . . . . . . . . . . . . . . . . . . . . . . . . . . . . . . .
Helpful web sites . . . . . . . . . . . . . . . . . . . . . . . . . . . . . . . . . . . . . . . . . . . .
..
..
..
..
..
..
..
.
.
.
.
.
.
.
..
..
..
..
..
..
..
..
..
..
..
..
..
..
.......
.......
.......
.......
.......
.......
.......
.
.
.
.
.
.
.
.
.
.
.
.
.
.
.
.
.
.
.
.
.
.
.
.
.
.
.
.
7
7
7
8
9
9
9
1 Installation . . . . . . . . . . . . . . . . . . . . . . . . . . . . . . . . . . . . . . . . . . . . . . 11
Installation overview . . . . . . . . . . . . . . . . . . . . . . . . . . . . . . . . . . . . . . . . . . . . . . . . . . . . . . . . . . . . . 11
Verifying system requirements . . . . . . . . . . . . . . . . . . . . . . . . . . . . . . . . . . . . . . . . . . . . . . . . . . . . . . 12
Verify management station requirements . . . . . . . . . . . . . . . . . . . . . . . . . . . . . . . . . . . . . . . . . . . . . 12
Verify Web client requirements . . . . . . . . . . . . . . . . . . . . . . . . . . . . . . . . . . . . . . . . . . . . . . . . . . . 13
Verify disk array firmware requirements . . . . . . . . . . . . . . . . . . . . . . . . . . . . . . . . . . . . . . . . . . . . . 14
Verify host agent disk space requirements for Path Connectivity. . . . . . . . . . . . . . . . . . . . . . . . . . . . . 14
Verify HBA support for Path Connectivity . . . . . . . . . . . . . . . . . . . . . . . . . . . . . . . . . . . . . . . . . . . . 15
Verify Command Line Interface (CLI) requirements . . . . . . . . . . . . . . . . . . . . . . . . . . . . . . . . . . . . . . 18
Installing Command View . . . . . . . . . . . . . . . . . . . . . . . . . . . . . . . . . . . . . . . . . . . . . . . . . . . . . . . . . 19
Prepare for upgrade. . . . . . . . . . . . . . . . . . . . . . . . . . . . . . . . . . . . . . . . . . . . . . . . . . . . . . . . . . . 19
Implement the recommended network configuration . . . . . . . . . . . . . . . . . . . . . . . . . . . . . . . . . . . . . 19
Set up ports to bypass a network firewall . . . . . . . . . . . . . . . . . . . . . . . . . . . . . . . . . . . . . . . . . . . . 20
Other supported firewall configurations . . . . . . . . . . . . . . . . . . . . . . . . . . . . . . . . . . . . . . . . . . . 20
Alternate firewall case 1: Firewall running on Command View management station . . . . . . . . . . 20
Alternate firewall case 2: Firewall running on SVP . . . . . . . . . . . . . . . . . . . . . . . . . . . . . . . . . 21
Using multiple LAN cards . . . . . . . . . . . . . . . . . . . . . . . . . . . . . . . . . . . . . . . . . . . . . . . . . . . . . . . 21
Modifying the connection bindings order on Windows 2000, Windows Server 2003, or Windows XP .
21
Verify the host system name . . . . . . . . . . . . . . . . . . . . . . . . . . . . . . . . . . . . . . . . . . . . . . . . . . . . . 21
Confirming or modifying the system name . . . . . . . . . . . . . . . . . . . . . . . . . . . . . . . . . . . . . . . . . 22
Install SSL for secure communication (optional) . . . . . . . . . . . . . . . . . . . . . . . . . . . . . . . . . . . . . . . . 22
Install the SNMP service . . . . . . . . . . . . . . . . . . . . . . . . . . . . . . . . . . . . . . . . . . . . . . . . . . . . . . . . 22
Verify the SNMP configuration . . . . . . . . . . . . . . . . . . . . . . . . . . . . . . . . . . . . . . . . . . . . . . . . . . . 22
Install Command View . . . . . . . . . . . . . . . . . . . . . . . . . . . . . . . . . . . . . . . . . . . . . . . . . . . . . . . . . 22
Uninstall Command View XP . . . . . . . . . . . . . . . . . . . . . . . . . . . . . . . . . . . . . . . . . . . . . . . . . . 23
Installing Command View XP 2.1 . . . . . . . . . . . . . . . . . . . . . . . . . . . . . . . . . . . . . . . . . . . . . . . 23
Modify or repair Command View . . . . . . . . . . . . . . . . . . . . . . . . . . . . . . . . . . . . . . . . . . . . . . . . . 23
Uninstall Command View . . . . . . . . . . . . . . . . . . . . . . . . . . . . . . . . . . . . . . . . . . . . . . . . . . . . . . . 24
Verify Command View services . . . . . . . . . . . . . . . . . . . . . . . . . . . . . . . . . . . . . . . . . . . . . . . . . . . 24
Verify Command View execution . . . . . . . . . . . . . . . . . . . . . . . . . . . . . . . . . . . . . . . . . . . . . . . . . . 25
Set Up SMI-S XP . . . . . . . . . . . . . . . . . . . . . . . . . . . . . . . . . . . . . . . . . . . . . . . . . . . . . . . . . . . . . 25
Installing SMI-S XP. . . . . . . . . . . . . . . . . . . . . . . . . . . . . . . . . . . . . . . . . . . . . . . . . . . . . . . . . . 25
Verifying SMI-S XP installation . . . . . . . . . . . . . . . . . . . . . . . . . . . . . . . . . . . . . . . . . . . . . . . . . 26
Configuring SMI-S XP . . . . . . . . . . . . . . . . . . . . . . . . . . . . . . . . . . . . . . . . . . . . . . . . . . . . . . . 26
The UserAccountsManager.bat file . . . . . . . . . . . . . . . . . . . . . . . . . . . . . . . . . . . . . . . . . . . . 27
Listing groups and users . . . . . . . . . . . . . . . . . . . . . . . . . . . . . . . . . . . . . . . . . . . . . . . . . . . 27
Adding users . . . . . . . . . . . . . . . . . . . . . . . . . . . . . . . . . . . . . . . . . . . . . . . . . . . . . . . . . . . 28
Changing a user password . . . . . . . . . . . . . . . . . . . . . . . . . . . . . . . . . . . . . . . . . . . . . . . . . 28
Removing a user . . . . . . . . . . . . . . . . . . . . . . . . . . . . . . . . . . . . . . . . . . . . . . . . . . . . . . . . 28
Viewing help files. . . . . . . . . . . . . . . . . . . . . . . . . . . . . . . . . . . . . . . . . . . . . . . . . . . . . . . . 28
Starting and stopping SMI-S XP. . . . . . . . . . . . . . . . . . . . . . . . . . . . . . . . . . . . . . . . . . . . . . . . . 28
Command View XP installation guide
3
Enabling the SMI-S CIMOM service . . . . . . . . . . . . . . . . . . . . . . . . . . . . . . . . . . . . . . . . . . .
Disabling SMI-S CIMOM service . . . . . . . . . . . . . . . . . . . . . . . . . . . . . . . . . . . . . . . . . . . . .
Restarting SMI-S CIMOM service . . . . . . . . . . . . . . . . . . . . . . . . . . . . . . . . . . . . . . . . . . . . .
SSL support . . . . . . . . . . . . . . . . . . . . . . . . . . . . . . . . . . . . . . . . . . . . . . . . . . . . . . . . . . . . . .
Enabling SSL . . . . . . . . . . . . . . . . . . . . . . . . . . . . . . . . . . . . . . . . . . . . . . . . . . . . . . . . . . . . .
Disabling SSL . . . . . . . . . . . . . . . . . . . . . . . . . . . . . . . . . . . . . . . . . . . . . . . . . . . . . . . . . . . . .
Viewing certificates using the Keytool command . . . . . . . . . . . . . . . . . . . . . . . . . . . . . . . . . . . . .
Viewing all certificates using the Keytool command. . . . . . . . . . . . . . . . . . . . . . . . . . . . . . . . . . .
Uninstalling SMI-S XP . . . . . . . . . . . . . . . . . . . . . . . . . . . . . . . . . . . . . . . . . . . . . . . . . . . . . . .
Set up event notification and history reporting . . . . . . . . . . . . . . . . . . . . . . . . . . . . . . . . . . . . . .
Setting up Command View . . . . . . . . . . . . . . . . . . . . . . . . . . . . . . . . . . . . . . . . . . . . . . . . . . . . . . . .
Migrate data, settings, and preferences from a different management station . . . . . . . . . . . . . . . . . . .
Migrating your data with the Backup Utility . . . . . . . . . . . . . . . . . . . . . . . . . . . . . . . . . . . . . . . .
Saving or restoring your data from the Windows command line . . . . . . . . . . . . . . . . . . . . . . . . . .
Disable the Web Proxy service . . . . . . . . . . . . . . . . . . . . . . . . . . . . . . . . . . . . . . . . . . . . . . . . . . .
Disabling proxy service in the Internet Explorer browser . . . . . . . . . . . . . . . . . . . . . . . . . . . . . . .
Adding the IP address of the disk array to the list of web proxy excluded addresses . . . . . . . . . . . .
Adding IP addresses in Internet Explorer . . . . . . . . . . . . . . . . . . . . . . . . . . . . . . . . . . . . . . . .
Adding IP addresses in Mozilla . . . . . . . . . . . . . . . . . . . . . . . . . . . . . . . . . . . . . . . . . . . . . .
Verify the Internet Explorer browser requirements and configuration. . . . . . . . . . . . . . . . . . . . . . . . . .
Verify the Mozilla browser requirements and configuration . . . . . . . . . . . . . . . . . . . . . . . . . . . . . . . .
Install Java on clients running Mozilla on HP-UX . . . . . . . . . . . . . . . . . . . . . . . . . . . . . . . . . . . . .
Change the Session Timeout value . . . . . . . . . . . . . . . . . . . . . . . . . . . . . . . . . . . . . . . . . . . . . . . . .
Add disk arrays to Command View . . . . . . . . . . . . . . . . . . . . . . . . . . . . . . . . . . . . . . . . . . . . . . . .
Install license keys . . . . . . . . . . . . . . . . . . . . . . . . . . . . . . . . . . . . . . . . . . . . . . . . . . . . . . . . . . . .
Install the Command View client Command Line Interface (CLI) . . . . . . . . . . . . . . . . . . . . . . . . . . . . .
Accessing the Command View GUI . . . . . . . . . . . . . . . . . . . . . . . . . . . . . . . . . . . . . . . . . . . . . . . .
Setting up Path Connectivity. . . . . . . . . . . . . . . . . . . . . . . . . . . . . . . . . . . . . . . . . . . . . . . . . . . . . . . .
Add switches through Path Connectivity . . . . . . . . . . . . . . . . . . . . . . . . . . . . . . . . . . . . . . . . . . . . .
Adding switches . . . . . . . . . . . . . . . . . . . . . . . . . . . . . . . . . . . . . . . . . . . . . . . . . . . . . . . . . . .
Install Path Connectivity host agents . . . . . . . . . . . . . . . . . . . . . . . . . . . . . . . . . . . . . . . . . . . . . . . .
Prerequisites. . . . . . . . . . . . . . . . . . . . . . . . . . . . . . . . . . . . . . . . . . . . . . . . . . . . . . . . . . . . . .
Preliminary host agent installation tasks . . . . . . . . . . . . . . . . . . . . . . . . . . . . . . . . . . . . . . . . . . .
Preparing for installation on Microsoft Windows platforms . . . . . . . . . . . . . . . . . . . . . . . . . . .
Preparing for installation on UNIX platforms (HP-UX, Solaris, and AIX) . . . . . . . . . . . . . . . . . . .
Preparing for installation on UNIX platforms (Linux) . . . . . . . . . . . . . . . . . . . . . . . . . . . . . . . .
Installing host agents with the remote deployment tool . . . . . . . . . . . . . . . . . . . . . . . . . . . . . . . . .
Designating a single host . . . . . . . . . . . . . . . . . . . . . . . . . . . . . . . . . . . . . . . . . . . . . . . . . .
Designating multiple hosts . . . . . . . . . . . . . . . . . . . . . . . . . . . . . . . . . . . . . . . . . . . . . . . . . .
Installing the host agents . . . . . . . . . . . . . . . . . . . . . . . . . . . . . . . . . . . . . . . . . . . . . . . . . . .
Uninstalling the host agents with the remote deployment tool . . . . . . . . . . . . . . . . . . . . . . . . . .
Updating the host agent access files using the remote deployment tool . . . . . . . . . . . . . . . . . . .
Installing host agents using the local method . . . . . . . . . . . . . . . . . . . . . . . . . . . . . . . . . . . . . . .
Downloading the host agent file . . . . . . . . . . . . . . . . . . . . . . . . . . . . . . . . . . . . . . . . . . . . .
Installing the host agent locally . . . . . . . . . . . . . . . . . . . . . . . . . . . . . . . . . . . . . . . . . . . . . .
Uninstalling a host agent locally . . . . . . . . . . . . . . . . . . . . . . . . . . . . . . . . . . . . . . . . . . . . .
Uninstalling from Windows hosts . . . . . . . . . . . . . . . . . . . . . . . . . . . . . . . . . . . . . . . . . .
Uninstalling from hosts other than Windows . . . . . . . . . . . . . . . . . . . . . . . . . . . . . . . . . . .
Add or remove host agent installation files . . . . . . . . . . . . . . . . . . . . . . . . . . . . . . . . . . . . . . . . . . .
Verify data collection from disk arrays, hosts and switches . . . . . . . . . . . . . . . . . . . . . . . . . . . . . . . .
Verifying that Path Connectivity is working correctly . . . . . . . . . . . . . . . . . . . . . . . . . . . . . . . . . .
Install the Path Connectivity Command Line Interface (CLI) . . . . . . . . . . . . . . . . . . . . . . . . . . . . . . . .
Integrating the snap-in modules into Command View . . . . . . . . . . . . . . . . . . . . . . . . . . . . . . . . . . . . . .
HP StorageWorks Application Policy Manager . . . . . . . . . . . . . . . . . . . . . . . . . . . . . . . . . . . . . . . .
Integrating Command View with other platforms. . . . . . . . . . . . . . . . . . . . . . . . . . . . . . . . . . . . . . . . . .
Integrating with HP OpenView Storage Area Manager . . . . . . . . . . . . . . . . . . . . . . . . . . . . . . . . . .
Running Command View from a Storage Area Manager management station . . . . . . . . . . . . . . . .
Coexistence of Command View and Storage Area Manager host agents. . . . . . . . . . . . . . . . . . . .
Optional: Communicating with Storage Area Manager in an SSL environment . . . . . . . . . . . . . . . .
4
Contents
29
29
29
29
29
30
30
30
30
31
31
31
31
31
32
32
32
32
32
32
33
33
33
34
34
35
35
36
36
37
38
38
38
38
38
39
40
40
40
40
40
41
41
41
41
41
42
42
42
42
42
42
43
43
43
43
43
44
44
Integrating with miscellaneous management applications
GUI integration. . . . . . . . . . . . . . . . . . . . . . . . . . .
CLI integration . . . . . . . . . . . . . . . . . . . . . . . . . . .
Event notification . . . . . . . . . . . . . . . . . . . . . . . . .
.
.
.
.
..
..
..
..
..
..
..
..
.
.
.
.
..
..
..
..
..
..
..
..
.
.
.
.
..
..
..
..
.
.
.
.
..
..
..
..
..
..
..
..
.
.
.
.
..
..
..
..
..
..
..
..
.
.
.
.
..
..
..
..
.
.
.
.
..
..
..
..
....
....
....
....
44
44
44
44
2 Troubleshooting . . . . . . . . . . . . . . . . . . . . . . . . . . . . . . . . . . . . . . . . . . 45
Unable to start Command View . . . . . . . .
General Command View connection errors
Host agent deployment errors. . . . . . . . . .
Host agent uninstallation errors . . . . . . . .
..
..
..
..
..
..
..
..
.
.
.
.
..
..
..
..
..
..
..
..
.
.
.
.
..
..
..
..
.
.
.
.
..
..
..
..
..
..
..
..
.
.
.
.
..
..
..
..
..
..
..
..
.
.
.
.
..
..
..
..
.
.
.
.
..
..
..
..
..
..
..
..
.
.
.
.
..
..
..
..
..
..
..
..
.
.
.
.
..
..
..
..
.
.
.
.
.....
.....
.....
.....
.
.
.
.
45
47
49
50
A Installation checklist . . . . . . . . . . . . . . . . . . . . . . . . . . . . . . . . . . . . . . . . 51
Verifying the system requirements . . . . . . . . . . . . .
Installing Command View . . . . . . . . . . . . . . . . . . .
Other related procedures . . . . . . . . . . . . . . . . .
Setting up Command View . . . . . . . . . . . . . . . . . .
Setting up Path Connectivity . . . . . . . . . . . . . . . . .
Other related procedures . . . . . . . . . . . . . . . . .
Integrating the snap-in modules into Command View
Integrating Command View with other platforms . . .
...................................
...................................
...................................
...................................
...................................
...................................
...................................
...................................
.
.
.
.
.
.
.
.
51
51
51
52
52
52
52
52
Index . . . . . . . . . . . . . . . . . . . . . . . . . . . . . . . . . . . . . . . . . . . . . . . . . . . 53
Figures
1
2
Example of a network with added security from a firewall. . . . . . . . . . . . . . . . . . . . . . . . . . . . . . . . 19
Internet Options (Internet Explorer) . . . . . . . . . . . . . . . . . . . . . . . . . . . . . . . . . . . . . . . . . . . . . . . . 32
Tables
1
2
3
4
5
6
7
8
9
10
11
12
13
14
15
16
17
18
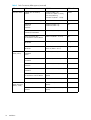
Document conventions . . . . . . . . . . . . . . . . . . . . . . . . . . . . . . . . . . . . . . . . . . . . . . . . . . . . . . . . . . 8
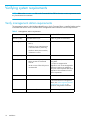
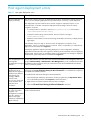
Management station requirements . . . . . . . . . . . . . . . . . . . . . . . . . . . . . . . . . . . . . . . . . . . . . . . . . 12
Web client requirements . . . . . . . . . . . . . . . . . . . . . . . . . . . . . . . . . . . . . . . . . . . . . . . . . . . . . . . . 13
Operating systems and host disk space requirements . . . . . . . . . . . . . . . . . . . . . . . . . . . . . . . . . . . . 14
Path Connectivity HBA support . . . . . . . . . . . . . . . . . . . . . . . . . . . . . . . . . . . . . . . . . . . . . . . . . . . 15
Ports used for inbound traffic to the SVP . . . . . . . . . . . . . . . . . . . . . . . . . . . . . . . . . . . . . . . . . . . . . 20
Ports used for outbound traffic from the SVP . . . . . . . . . . . . . . . . . . . . . . . . . . . . . . . . . . . . . . . . . . 20
Ports to be opened for a firewall on the Command View management station . . . . . . . . . . . . . . . . . . . 20
Command View services. . . . . . . . . . . . . . . . . . . . . . . . . . . . . . . . . . . . . . . . . . . . . . . . . . . . . . . . 24
SMI-S XP configuration files. . . . . . . . . . . . . . . . . . . . . . . . . . . . . . . . . . . . . . . . . . . . . . . . . . . . . . 26
Parameters in the cim.properties file . . . . . . . . . . . . . . . . . . . . . . . . . . . . . . . . . . . . . . . . . . . . . . . . 26
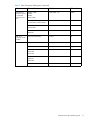
Extended features . . . . . . . . . . . . . . . . . . . . . . . . . . . . . . . . . . . . . . . . . . . . . . . . . . . . . . . . . . . . 34
Supported switches . . . . . . . . . . . . . . . . . . . . . . . . . . . . . . . . . . . . . . . . . . . . . . . . . . . . . . . . . . . 36
Command View host agent compatibility with Storage Area Manager host agents . . . . . . . . . . . . . . . 43
Unable to start Command View . . . . . . . . . . . . . . . . . . . . . . . . . . . . . . . . . . . . . . . . . . . . . . . . . . . 45
General connection errors . . . . . . . . . . . . . . . . . . . . . . . . . . . . . . . . . . . . . . . . . . . . . . . . . . . . . . 47
Host agent deployment errors . . . . . . . . . . . . . . . . . . . . . . . . . . . . . . . . . . . . . . . . . . . . . . . . . . . . 49
Host agent uninstallation errors . . . . . . . . . . . . . . . . . . . . . . . . . . . . . . . . . . . . . . . . . . . . . . . . . . . 50
Command View XP installation guide
5
6
Contents
About this guide
This guide provides information about:
• Installing Command View XP, Path Connectivity, SMI-S XP, and the snap-in modules
• Setting up the XP disk arrays
• Integrating Command View XP with other platforms
Intended audience
This guide is intended for customers and HP authorized service providers who are experienced with the
following:
• Disk array hardware and software
• Storage systems
Prerequisites
Prerequisites for installing this product include:
• Reading through the installation guide
• Meeting all the minimum installation requirements
• Reviewing the readme.txt file on the CD for any last-minute announcements
Related documentation
In addition to this guide, please refer to other documents for this product:
• HP StorageWorks Command View XP Path Connectivity user guide
• HP StorageWorks Command View XP Path Connectivity Command Line Interface (CLI) reference guide
• HP StorageWorks Command View XP for XP Disk Arrays user guide
• HP StorageWorks Command View XP Command Line Interface (CLI) reference guide
• HP StorageWorks Performance Control Export Tool reference guide
• Command View XP and Path Connectivity online help, which is located on the product CD
These and other HP documents can be found on the HP web site: http://www.hp.com/support/.
Command View XP installation guide
7
Document conventions and symbols
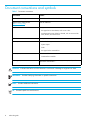
Document conventions
Table 1
Convention
Element
Medium blue text: Figure 1
Cross-reference links and e-mail addresses
Medium blue, underlined text
(http://www.hp.com)
Web site addresses
Bold font
•
Key names
•
Text typed into a GUI element, such as into a box
•
GUI elements that are clicked or selected, such as menu and list
items, buttons, and check boxes
Italics font
Text emphasis
Monospace font
•
File and directory names
•
System output
•
Code
•
Text typed at the command-line
•
Code variables
•
Command-line variables
Monospace, italic font
Monospace, bold font
Emphasis of file and directory names, system output, code, and text
typed at the command-line
CAUTION: Indicates that failure to follow directions could result in damage to equipment or data.
!
IMPORTANT: Provides clarifying information or specific instructions.
NOTE:
TIP:
8
Provides additional information.
Provides helpful hints and shortcuts.
About this guide
HP technical support
Telephone numbers for worldwide technical support are listed on the HP web site:
http://www.hp.com/support/.
Collect the following information before calling:
• Technical support registration number (if applicable)
• Product serial numbers
• Product model names and numbers
• Applicable error messages
• Operating system type and revision level
• Detailed, specific questions
For continuous quality improvement, calls may be recorded or monitored.
HP strongly recommends that customers sign up online using the Subscriber’s choice web site at
http://www.hp.com/go/e-updates.
• Subscribing to this service provides you with email updates on the latest product enhancements, newest
versions of drivers, and firmware documentation updates as well as instant access to numerous other
product resources.
• After signing-up, you can quickly locate your products by selecting Business support and then Storage
under Product Category.
HP-authorized reseller
For the name of your nearest HP-authorized reseller:
• In the United States, call 1-800-345-1518
• Elsewhere, visit http://www.hp.com and click Contact HP to find locations and telephone numbers
Helpful web sites
For additional product information, see the following web sites:
• http://www.hp.com
• http://www.hp.com/go/storage
• http://www.hp.com/support/
Command View XP installation guide
9
10
About this guide
1 Installation
HP StorageWorks Command View XP is a disk array management platform for HP StorageWorks
XP48/XP512/XP128/XP1024/XP12000 disk arrays. This guide describes how to install Command View.
In addition to disk array management functions, Command View includes Path Connectivity functionality.
Path Connectivity diagnoses and reports the status of connections between disk arrays and hosts that
consume disk array storage space.
Both Command View and Path Connectivity have graphical user interfaces and command line interfaces.
Additional software (known as snap-in modules) can be purchased to expand Command View functions.
This includes HP StorageWorks Performance Advisor XP and HP StorageWorks Application Policy
Manager.
Information about the integration of Command View with other management platforms such as HP
OpenView is included in this installation guide.
This chapter contains detailed descriptions of the installation procedures listed in ”Installation checklist” on
page 51.
Installation overview
Installing Command View involves the following tasks:
• Verifying that you have met or exceeded the requirements for the management station, any clients, disk
array firmware, host agent disk space, host bus adapters (HBAs), and CLI
• Installing Command View on the management station
• Setting up Command View
• Setting up Path Connectivity (optional)
• Integrating snap-in modules into Command View, if needed
• Integrating Command View with other platforms, if needed
Command View XP installation guide
11
Verifying system requirements
NOTE: Refer to the readme.txt file on the Command View CD for the most current requirements and
any last-minute announcements.
Verify management station requirements
The management station is the Windows-based host on which Command View is installed. Make sure the
workstation that serves as the Command View management station meets the minimum requirements.
Table 2
12
Management station requirements
Item
Requirement
Pertinent information
Processor (CPU)1
800 MHz Pentium III PC2
2 GHz or greater recommended
Operating System
•
Windows XP Professional (Service
Pack 2)
•
Windows Server 2003 Enterprise
or Standard edition (32-bit only)
•
Windows 2000 (Service Pack 4)
workstation or server
Memory (RAM)
1 GB minimum
Free Disk Space
•
2.5 GB free disk space (FAT or
NTFS) minimum for Command
View XP
•
30 GB or more of free disk space is
recommended
For security reasons, HP recommends
using NTFS.
If you plan to integrate other
applications such as HP StorageWorks
Performance Advisor XP, additional
disk space will be required. Refer to the
application’s documentation for disk
space requirements.
VGA monitor
256 colors or better
Ethernet LAN Card
At least one
If you have multiple LAN cards installed
in the Command View management
station, see ”Other supported firewall
configurations” on page 20 for
important configuration information.
IP Address
Use a static IP address
Do not use a dynamic IP address.
Installation
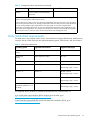
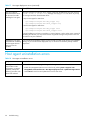
Table 2
Management station requirements (continued)
Item
Requirement
Monitor
Screen resolution of at least 800 by
600 pixels
Pertinent information
1
The Command View XP management station must be a single-processor server only. The management
station is not supported on multi-processor servers.
2
These values assume that you are using the array management GUI only and you are only monitoring
a few hosts by Path Connectivity. HP strongly recommends at least a 2 GHz processor and 2 GB RAM if
you are running multiple snap-in applications on the same system or if you are using the SMI-S
component. For optimal performance, do not run Command View XP and its snap-in applications with
other CPU-intensive applications. For example, the HP OpenView Storage Area Manager management
server should not run on the same system as the Command View XP management server.
Verify Web client requirements
The Web client is any computer used to access Command View through a Web browser. Make sure any
computer used as a Web client uses the supported operating system, Web browser, and Java software.
Table 3
Web client requirements
Operating system
Supported web browsers
Supported JRE plug-in
Windows Server 2003
(32-bit)
Internet Explorer 6.0 (SP1)
JRE 1.4.2
Windows XP
(32-bit)
Internet Explorer 6.0 (SP1)
JRE 1.4.2
Windows 2000
Internet Explorer 6.0 (SP1)
JRE 1.4.2
HP-UX 11.00
Mozilla 1.6
JRE/RTE 1.4.2.05
Runtime Plug-in (JPI) 1.4.2.05
HP-UX 11.11
Mozilla 1.6
JRE/RTE 1.4.2.05
Runtime Plug-in (JPI) 1.4.2.05
HP-UX 11.23 (IA-64)
Mozilla 1.6
JRE 1.4.2.05
Runtime Plug-in (JPI) 1.4.2.05
HP-UX 11.23PI (HP-UX 11i v2
for PA-RISC and HP-UX 11i v2
for IA-64)
Mozilla 1.6
JRE 1.4.2.05
Runtime Plug-in (JPI) 1.4.2.05
The supported JRE for Windows is available for download on the Command View CD.
If you would prefer to download the JRE for Windows from the Web, go to:
http://java.sun.com/products/archive/j2se/1.4.2/index.html.
To download the supported JRE/RTE and JPI that have been certified for HP-UX, go to:
http://www.hp.com/products1/unix/java/.
Command View XP installation guide
13
NOTE: If you install an earlier version of the JRE after installing the supported version, do not set the
client browser to use the older JRE. Choosing the older JRE as the default JRE may cause Command View
to work incorrectly.
In addition to these requirements, review the browser configuration requirements. For Internet Explorer, see
”Verify the Internet Explorer browser requirements and configuration” on page 32. For Mozilla, see
”Verify the Mozilla browser requirements and configuration” on page 33.
Verify disk array firmware requirements
Command View requires that the managed disk arrays have certain minimum firmware levels. Refer to the
HP StorageWorks Command View XP Readme for more information.
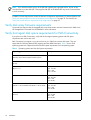
Verify host agent disk space requirements for Path Connectivity
If you plan to use Path Connectivity, verify that the host agent operating system and disk space
requirements are met for each host.
Path Connectivity host agents run on various hosts in your SAN that consume disk space. They are
responsible for collecting data-to-LDEV mapping and host HBA information. Table 4 shows which
operating systems are supported and the host disk space requirements for that operating system.
Table 4
14
Operating systems and host disk space requirements
Operating system
Disk space
Windows 2000 (Service Pack 4)
Windows Server 2003 Enterprise Edition (IA 32)
120 MB
Windows Server 2003 Enterprise/DataCenter Edition
(IA 64)
200 MB
HP-UX 11.00
HP-UX 11.11
Total: 224 MB
/opt: 113 MB
/etc: 1 MB
/var: 110 MB
HP-UX 11.23 (IA-64)
Total: 322 MB
/opt: 251 MB
/etc: 1 MB
/var: 70 MB
HP-UX 11.23PI
(HP-UX 11i v2 for PA-RISC and HP-UX 11i v2 for IA-64)
Total: 322 MB
/opt: 251 MB
/etc: 1 MB
/var: 70 MB
Solaris 8
Solaris 9
Total: 132 MB
/opt: 65 MB
/etc: 1 MB
/var: 66 MB
Installation
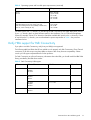
Table 4
Operating systems and host disk space requirements (continued)
Operating system
Disk space
AIX 5.1
AIX 5.2
Total: 346 MB
/opt: 210 MB
/etc: 6 MB
/var: 65 MB
/usr: 65 MB
Red Hat Linux Advanced Server 2.1, 2.4.9 kernel (IA 32)
Red Hat Enterprise Linux 3.0 (2.4.21) (IA 32)
SuSE Linux Enterprise Server 8 (SLES8)/ United Linux,
(2.4.19, 2.4.21 kernel) (IA 32)
Total: 144 MB
/opt: 70 MB
/etc: 4 MB
/var: 70 MB
On UNIX systems, the tmp directory is used during the Path Connectivity host agent deployment process.
If your tmp directory does not have sufficient space for the installation, use your Volume Management
System (for example, Online JFS or Veritas) to extend the available disk space in the tmp directory. Failure
to ensure that the tmp directory can accommodate the space requirements in Table 4 may cause an
installation failure.
Verify HBA support for Path Connectivity
If you plan to use Path Connectivity, verify that your HBA(s) are supported.
The following table lists HBAs that HP has verified to work properly with Path Connectivity. Fibre Channel
connectivity to XP disk arrays using these HBAs is subject to disk array firmware compatibility. Please
consult your HP support representative for further questions.
For Path Connectivity to collect all necessary information about the HBA, you should install the HBA SNIA
library provided by the HBA driver vendor.
Table 5
Path Connectivity HBA support
OS
HBA model
HBA driver
HBA vendor
HP-UX 11.00
A6795A
A6685A
A5158A
B.11.00.10
HP
HP-UX 11.11
A6826A
A9782A
A9784
B.11.11.02
HP
A5158A
A6685A
A6795A
B.11.11.09
HP
A6826A
A6795A
B.11.23.01
HP
HP-UX 11.23
Command View XP installation guide
15
Table 5
Path Connectivity HBA support (continued)
OS
HBA model
HBA driver
HBA vendor
Windows 2000
LP8000 (HP 176479-B21)
LP952L
5-4.82a4 (SNIA 1.8),
5-5.00a10-1 (SNIA 1.12.2.0),
5-2.13a4 (SNIA1.8),
5-2.20a12-2 (SNIA 1.12.2.0)
Emulex
D8602B (HP Netserver only)
2.0.25.44
HP
KGPSA-CB
FCA2101
FCA2355
5-4.82a14 (SNIA 1.6),
5-4.82a16 (SNIA 1.6)
HP
FCA2408,
FCA2404/FCA2404DC
5-4.82a16 (SNIA 1.6)
HP
FC2214/FCA2214DC,
FC Mezzanine Card for BL20P
5-8.2.0.73 (SNIA 1.27.15.0)
HP
QLA2200F
QLA2300F
8.1.5.12 (SNIA 1.27.06)
QLogic
QLA2310F
QLA2340
8.2.0.10 (SNIA 1.27.12),
8.2.2.10 (SNIA 1.27.15)
QLogic
LP9002
LP9002DC
LP952
5.2-22a8 (SNIA 1.4)
Emulex
LP1050
LP1050DC
5.5.10a9 (SNIA 2.0.4.0)
Emulex
FCA2101
FCA2355
5-4.82a16 (SNIA 1.6) (32 bit)
HP
FCA2408,
FCA2404
5-4.82a16 (SNIA 1.6) (32-bit)
HP
FC2214/FCA2214DC,
FC Mezzanine Card for BL20P
5-8.2.0.73 (SNIA 1.27.15.0)
(32-bit)
HP
FCA2214/FCA2214DC
8.2.0.13 (SNIA 1.27.15.0)
HP
LP982 (2 GB)
6.5.00a11-1 (SNIA 1.5.20)
(64-bit)
Emulex
A7298A
AB232A
6.5.00a11-1 (SNIA 1.5.20)
(64-bit)
HP
Windows Server
2003 (32-bit)
Windows Server
2003 (Enterprise
Edition, 64-bit)
16
Installation
Table 5
Path Connectivity HBA support (continued)
OS
HBA model
HBA driver
HBA vendor
Red Hat Linux
Advanced Server
2.1/Red Hat
Enterprise Linux
3.0
LP9002 (2 GB)
LP9000
LP8000
LP952 (2 GB)
4.20p (SNIA 1.3)
Emulex
FC2214/FCA2214DC,
FC Mezzanine Card for BL20P
6.04.00
HP
FCA-2214
FCA-2214DC
6.06.50
HP
QLA2340
QLA2342
6.06.50
QLogic
SuSE Linux
Enterprise Server
8 (SLE8)
FC2214/FCA2214DC
6.04.00
HP
Solaris 8
QLA 2310F
V3.22 (SNIA 2.02
Qlogic
QLA 2340
V4.08 (SNIA 2.02)
Qlogic
FCE-6410
FCE2-6410
FCE2-6412
4.1.5 (SNIA 2.0)
JNI
FCC 6460
FCX-6562
FCX2-6562
5.3.1 (SNIA 2.0)
JNI
X6799A
11.8.0
SUN
Command View XP installation guide
17
Table 5
Path Connectivity HBA support (continued)
OS
HBA model
HBA driver
HBA vendor
Solaris 9
LP9002L
LP9802DC
5.01e-1 (SNIA 1.6a)
Emulex
FCE-6410
FCE2-6410
FCE2-6412
4.1.3 (SNIA 2.0),
4.1.5 (SNIA 2.0)
JNI
FCI-1063
FC64-1063
2.5.18 (w/ SNIA 1.0 lib)
JNI
FCE-1063
FCE2-1063
4.1.3 (w/ SNIA 2.0 lib)
JNI
FCE-1473
5.1.1 (w/ SNIA 2.0 lib)
JNI
FCE-6460 (2 GB)
FCE2-6560 (2 GB)
FCX-6562 (2 GB)
FCX2-6562 (2 GB)
FCC-6460 (2 GB)
FCC2-6560 (2 GB)
5.1.1 (SNIA 2.0),
5.2.1 (SNIA 2.0),
5.3.0.1 (SNIA 2.0)
JNI
QLA2340
QLA2342
4.08 (SNIA 2.02)
QLogic
X6799A
X6767A
11.8.0
Sun
AIX 5.1
IBM 6228
V5.1.0.15
IBM
AIX 5.2
IBM 6228
V5.2.0.10
IBM
IBM 6239
V5.2.0.10
IBM
Verify Command Line Interface (CLI) requirements
If you are installing the Command View Command Line Interface (CLI) and/or Path Connectivity
Command Line Interface (CLI), verify the minimum requirements are met:
• The CLI client version of Command View must be the same as the version installed on the Command
View management station.
• Be sure that JRE 1.4.2 (Windows) or JRE/RTE 1.4.2.05 (HP-UX) is installed on the client platform (the
system from which you run the CLI). Other operating systems or JRE versions are not supported.
• The CLI client platform must have network connectivity to the Command View management station.
• To run the CLI from a telnet session using a command prompt window, use a command prompt window
that supports the X Windows function, such as Reflection X, or use the command line login method,
such as e2ecli -p user/user.
18
Installation
Installing Command View
Prepare for upgrade
If you are upgrading from a previous version of Command View XP, consider the following before
installing the new version:
• Command View XP 2.1 does not support the XP256 disk array except as external storage.
• Command View XP 2.1 does not support XP1024 and XP128 disk arrays with firmware version
21.09.XX or lower or early versions of 21.10.XX. Refer to the HP StorageWorks Command View XP
ReadMe document for the required firmware version.
• A specific disk array cannot be managed by multiple Command View XP management servers. For
example, a specific array can not appear in the list of actively managed arrays of two different
management servers.
• Before installing Command View XP 2.1 on the management server, uninstall all host agents using the
version of Command View XP currently installed.
• Before installing Command View XP 2.1 on the management server, use the Windows Add/Remove
Programs utility to uninstall the current version from the management server.
• All user-entered data (for example, array lists, users, passwords, and user-entered Path Connectivity
information) will be retained when you upgrade to Command View XP 2.1.
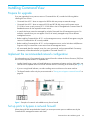
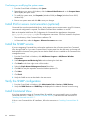
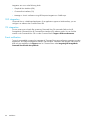
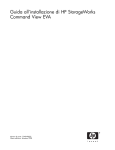
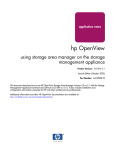
Implement the recommended network configuration
For enhanced security, HP recommends using a network firewall to isolate the Service Processor (SVP) from
the rest of the corporate intranet. To implement this:
• Install a firewall using a router or firewall software on a separate workstation with two LAN cards, one
LAN card for a separate network to the SVP and the other for connecting to the intranet (see Figure 1).
• If you are using firewall software, consider installing antivirus software on the same machine.
• The firewall needs to allow only the ports mentioned in ”Set up ports to bypass a network firewall” on
page 20.
Figure 1 Example of a network with added security from a firewall
Set up ports to bypass a network firewall
When placing XP disk arrays behind a firewall, you must open certain ports to enable access by the
Command View management station and clients.
Command View XP installation guide
19
NOTE: For the XP128/XP1024/XP12000, Command View array management web clients communicate
directly with the array. Therefore, access through the firewall is needed for each
XP128/XP1024/XP12000 web client.
To support Command View access through a firewall, assuming that all inbound and outbound traffic is
blocked by default, you must allow access to the ports listed in Table 6 and Table 7.
Table 6
Ports used for inbound traffic to the SVP
Array
Port
Protocol
Usage
XP128/XP1024/
XP12000
Port 80
TCP
Used by Command View Web
clients
XP128/XP1024/
XP12000
Port 443
TCP
TCP used by Command View
Web clients for https
communication
XP128/XP1024/
XP12000
Ports 1099 and
51099
TCP
Used by Command View Web
clients and the Command View
management station for
managing the disk array
XP48/XP512
Port 161
UDP
Used by the Command View
management station for
managing the disk array
Table 7
Ports used for outbound traffic from the SVP
Array
Port
Protocol
Usage
XP128/XP1024/
XP12000/XP48/
XP512
Port 162
UDP
Used for sending SNMP traps
from the SVP
Other supported firewall configurations
Alternate firewall case 1: Firewall running on Command View management station
Table 8 shows the necessary changes for a firewall running on the Command View management station,
assuming that by default it does not restrict outgoing traffic and blocks all inbound traffic.
Table 8
20
Ports to be opened for a firewall on the Command View management station
Array
Port
Protocol
Usage
XP128/XP1024/
XP12000/XP48/
XP512
Port 80 inbound
TCP
Used for Command View web
and CLI clients
Installation
Used for the Command View
management station if it is used
as a web or CLI client
Table 8
Ports to be opened for a firewall on the Command View management station (continued)
XP128/XP1024/
XP12000/XP48/
XP512
Port 443
inbound
TCP
Used for Command View web
clients, CLI clients, and the
Command View management
station if it is used as a web or
CLI client when the Command
View management station is
configured for SSL
XP128/XP1024/
XP12000/XP48/
XP512
Port 5988
inbound
TCP
Used by SMI-S clients
XP128/XP1024/
XP12000/XP48/
XP512
Port 5989
inbound
TCP
Used by SMI-S clients that use
HTTPS/WEBM
XP128/XP1024/
XP12000/XP48/
XP512
Port 161
inbound
UDP
Used for incoming SNMP traffic
from HP Enterprise Integrations
SNMP clients
XP128/XP1024/
XP12000/XP48/
XP512
Port 162
inbound
UDP
Used for incoming SNMP traps
from the SVP
Alternate firewall case 2: Firewall running on SVP
Assuming that all SVP outbound traffic is unrestricted by the SVP’s firewall, configure the ports listed in
Table 6.
Using multiple LAN cards
If you have multiple LAN cards installed in the Command View management station, you must:
• Configure the first LAN card to communicate with the hosts and Command View API clients on the
SAN.
• Modify the SERVER_HOST parameter in the APIServer.cfg file to point to the first LAN card. This
file is located at <install_root>\hpss\dm\tomcat\webapps\hpstmgmt\WEB-INF\cvapi\
config.
To set the LAN card as the first network card, modify the bindings order of the network adapters to bind
that network card first. To modify the connection bindings order, you must be logged on as a member of
the Administrators group.
Modifying the connection bindings order on Windows 2000, Windows Server
2003, or Windows XP
1. Open the Network and Dial-up Connections window by right-clicking the My Network Places icon on
the desktop and then choosing Properties.
2. From the Advanced menu, select Advanced Settings.
3. Select the connection you want to move, and then click the up or down arrow to change the order.
4. Click OK to save your changes.
Verify the host system name
The host system name should not contain spaces or non-alphanumeric characters.
Command View XP installation guide
21
Confirming or modifying the system name
1. From the Control Panel in Windows, click System.
2. Depending on your version of Windows, click the Network Identification tab or the Computer Name
tab to display the system name.
3. To modify the system name, click Properties (Windows 2000) or Change (Windows Server 2003,
Windows XP).
4. Enter a new system name and click OK to save your changes.
Install SSL for secure communication (optional)
Command View uses the Apache Web Server, which supports secure communication using SSL. However,
some manual configuration is required. The default Command View installation is non-SSL.
Refer to the Apache Web Server SSL Configuration for Command View Applications white paper
(hpss_apache_whitepaper.pdf) for SSL configuration instructions. The file is located in two places:
• The root directory of the Command View installation CD.
• In Command View, under the Support > Reference Documents menu item.
Install the SNMP service
If you are integrating Command View with another application that will receive events from Command
View through SNMP or if you want Command View to receive traps from the disk arrays so the traps will
be displayed in the events history pane, be sure that the SNMP service is installed on the Command View
management server.
1. From the Control Panel in Windows, click Add/Remove Programs > Add/Remove Windows
Components.
2. Select Management and Monitoring Tools without selecting the check box.
3. Click Details in the lower right corner of the window.
4. Select the Simple Network Management Protocol check box.
5. Click OK. You may be required to insert the Windows product CD.
6. Click Next.
7. Click Finish.
8. Verify the SNMP service as described in the next section.
Verify the SNMP configuration
1. From the Control Panel in Windows, click Administrative Tools > Services > SNMP Services.
2. Verify that SNMP Services and SNMP Trap are displayed in the Network Services list and running.
Install Command View
If you have a previous version of Command View XP installed, you must uninstall it prior to installing
Command View XP 2.1. Refer to ”Uninstall Command View XP”, and then follow the instructions in
”Installing Command View XP 2.1”.
If this is a new Command View XP installation, follow the instructions in ”Installing Command View XP
2.1”.
22
Installation
Uninstall Command View XP
If you have a previous version of Command View XP installed, you must uninstall it prior to installing
Command View XP 2.1. Refer to the installation guide for the currently installed version of Command View
XP for more information on uninstalling the management station.
Installing Command View XP 2.1
If you have a previous version of Command View XP installed, you must uninstall it prior to installing
Command View XP 2.1. Refer to ”Uninstall Command View XP” above.
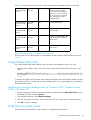
1. Verify that the system on which you are installing Command View XP meets or exceeds minimum
requirements for the management station. Refer to ”Verify management station requirements” on
page 12.
2. Insert the Command View CD in the CD drive.
3. The CD browser menu should start automatically. If not, run launch.exe located on the CD.
4. From the CD browser menu, click Install Command View XP.
NOTE:
Some of the links on the CD browser menu will not work until Command View is installed.
5. Click Continue Install. A window appears that displays important information for this release of
Command View XP.
6. Review the information and click OK.
7. Click Next.
8. After viewing the System Recommendations dialog box, click Next.
9. Select I accept the terms of the licence agreement if you agree to its terms, then click Next.
10.The installation wizard asks for the management station’s DNS name or IP address. If you have
multiple LAN cards configured in the management station, enter the IP address of your corporate LAN
and click Next.
11.In the Setup Type dialog box, click Next to accept the Complete selection (default).
12.In the Choose Host Agent Platforms dialog box, choose the operating systems that your hosts will be
running and click Next.
13.Click Install.
14.The setup program transfers application files to the destination folder and configures Command View.
When complete, click Finish.
Modify or repair Command View
Use the Modify option to install or uninstall components. Use the Repair option to reinstall Command
View.
1. Insert the Command View CD in the CD drive.
2. The CD browser menu should start automatically. If not, run launch.exe located on the CD.
3. From the CD browser menu, click Install Command View XP.
4. Click Continue Install.
5. Click Next.
6. To modify Command View:
a. Click Modify and click Next.
b. Select the components you want to install and clear the components you want removed.
Command View XP installation guide
23
c. Click Next.
d. Select the operating systems that your hosts are running in the Choose Host Agent Platforms
window, and click Next.
e. The setup program transfers and/or removes application files to and from the destination folder,
and configures Command View. When complete, click Finish.
7. To repair Command View:
a. Click Repair and click Next.
b. The setup program transfers application files to the destination folder and configures Command
View. When complete, click Finish.
Uninstall Command View
Complete the following instructions only if you need to uninstall Command View.
1. From the Control Panel in Windows, click Add/Remove Programs.
2. Select HP StorageWorks Command View XP.
3. Click Change.
4. Click Next.
5. Select Remove and click Next.
6. Click Remove.
7. Click Finish. A message appears indicating that uninstallation was successful.
8. Reboot the management station to ensure the Command View XP services are completely removed.
Verify Command View services
Verify that all the necessary Command View services are running. To view the services, from the Control
Panel in Windows, click Administrative Tools > Services.
NOTE: If you have elected not to install the Hpss Apache server (you installed the Apache Secure Socket
Layer (SSL) server instead), the setup program will continue to install and configure the Hpss Apache files
and service, but will not start the Hpss Apache service. For further instructions about installing an
SSL-enabled (non-Hpss) Apache server, refer to the document hpss_apache_whitepaper.pdf located
in the root directory of the Command View CD or under the Support tab in Command View.
Table 9 shows the services you need to verify.
Table 9
24
Command View services
Component
Service name
Process name(s)
Apache Web Server
HpssApache
apache.exe
Command View Trap
Distributor
HpssCVTrapDistributor
JWrapper_CVTrapdistributor.exe
Solid Database
HpssDb
solid.exe
Command View
Management Server
HpssCVManagementServer
JWrapper_CVManagementserver.exe
Installation
HpssCVTrapdistributor.exe
HpssCVManagementserver.exe
Table 9
Command View services (continued)
Component
Service name
Process name(s)
Command View Data
Collector Service
HpssDataCollectorService
JWrapper_DataCollectorService.exe
Array Manager servlet
engine
HpssDMTomcat
Path Connectivity servlet
engine
HpssE2ETomcat
Command View Proxy
SubAgent
HpssCVSubAgent
SMI-S XP Service
hp StorageWorks SMI-S CIMOM
hpSMIS_CIMOMService.exe
See ”Verifying SMI-S XP
installation” on page 26.
hp SMI-S array providers
hpSMIS_LicenseFrameworkService.exe
Service Location Protocol
java.exe
Security
HpssDataCollectorService.exe
HpssDMTomcat.exe
java.exe
HpssE2ETomcat.exe
java.exe
JWrapper_CVSubAgent.exe
HpssCVSubAgent.exe
HpssSecurity
JWrapper_HpssSecurity.exe
HpssSecurity.exe
Verify Command View execution
1. Start a Web browser.
2. Enter the IP address of the Command View management station into your browser. The Command
View login window is displayed.
3. Enter administrator in the User Name field.
4. Enter administrator in the Password field.
The main menu is displayed, indicating that Command View is running correctly.
If you cannot log in, refer to ”Troubleshooting” on page 45.
CAUTION: Please note that you cannot manage an XP disk array with more than one Command View
management station at a time.
Set Up SMI-S XP
SMI-S XP provides the WBEM interface for the management of the XP128, XP1024 and XP12000. SMI-S
XP is a component of Command View and runs as a service. The XP disk array is modeled per the SNIA
Storage Management Initiative Specification (SMI-S) version 1.0.2.
Additional information about SMI-S XP is available in the HP StorageWorks SMI-S XP release notes, which
is available from the Support tab in Command View.
Installing SMI-S XP
SMI-S XP is automatically installed when you select Typical in the Command View Installation Wizard. If
you do not want to install SMI-S XP, select the Custom mode installation in the Installation Wizard. In the
subsequent window, clear the hp StorageWorks SMI-S XP Service check box to avoid installing SMI-S XP.
Command View XP installation guide
25
After installation, SMI-S XP, by default, starts in the SSL mode. If the client application does not support SSL
communication with the SMI-S server, you need to disable the SSL mode. See ”Disabling SSL” on page 30
for more information.
NOTE: After you install SMI-S XP, the hp StorageWorks SMI-S CIMOM service is created. This
service is disabled, by default. To use SMI-S XP, you need to enable the service. See ”Starting and
stopping SMI-S XP” on page 28 for more information.
Verifying SMI-S XP installation
To verify that the SMI-S XP installation was successful, complete the following procedure:
1. Click Services in the Control Panel.
2. Verify that the hp StorageWorks SMI-S CIMOM service is listed.
Configuring SMI-S XP
You need to edit the cim.properties file before using SMI-S XP. This file is located in the following
directory:
<Install Drive>:\Program Files\Hewlett-Packard\SMI-S\cimom
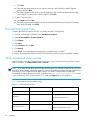
Table 10 describes the configuration file that you can modify before using SMI-S XP.
Table 10 SMI-S XP configuration files
File
Description
cim.properties
Configures CIMOM-related parameters for
enabling SSL, JAAS, and so on.
You can connect through the Windows Terminal Services to edit the configuration file. Use Notepad to
edit the configuration file.
Table 11 describes the parameters in the cim.properties file that you can modify.
Table 11 Parameters in the cim.properties file
26
Parameter
Description
EnableSSL
Specifies if SSL is enabled or disabled. Set to True to
enable SSL. Set to False to disable SSL.
LogResponseSeparate
Specifies if the requests and response packets must be
separated or not. Set to True to separate the requests and
response packets.
Installation
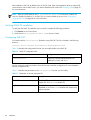
Table 11 Parameters in the cim.properties file (continued)
Parameter
Description
LogFilesCount
Indicates the number of log files maintained by the CIMOM.
The default number is 5. Modify this value to change the
number of log files. When you initiate the CIMOM, it starts
logging to the <serverDebugFile>+0 file. (The
serverDebugFile is specified in the cim.properties
file).
When the file size reaches the specified threshold
(MaxLogFileSize), the CIMOM starts logging into the
next file in the ascending order and overwrites the last
modified file.
MaxLogFileSize
Specifies the maximum size of each log file in bytes. The
default size of each log file is 15 MB. You can modify the
default size of the log files. When a log file reaches the
specified threshold, the CIMOM starts logging in to the next
log file.
Min_Memory_Usage
Specifies the minimum Java heap size for the CIMOM server.
The default value is 20 MB.
Max_Memory_Usage
Specifies the maximum Java heap size for the CIMOM
server. The default value is 119 MB.
NOTE:
Do not modify any parameter that is not listed in Table 11.
The UserAccountsManager.bat file
User accounts are organized into groups, and a set of permissions are assigned to each group using
JAAS. To manage the user accounts, you must have super user privileges. Use the script file
UserAccountsManager.bat located in the home directory. This is the directory where the CIMOM is
installed. Typically, it is in the following directory:
<Install Drive>:\Program Files\Hewlett-Packard\SMI-S\cimom
To find the list of switch options supported, run the UserAccountsManager.bat file with the -h option.
Following are the tasks that you can perform using the UserAccountsManager.bat file:
• List groups and users
• Add users
• Change a user password
• Remove a user
• View help
Listing groups and users
To list the groups and users, execute the following command:
UserAccountsManager -LG
Command View XP installation guide
27
NOTE: The -LG is the only input parameter that you can use to list the available groups and users. Currently,
the available groups are Administrator and User. You cannot add or remove groups. User accounts in the
Administrator group have complete control of all operations. User accounts in the User group can only execute
read-only operations.
Adding users
To add a user, execute the following command:
UserAccountsManager -AU -G <Group> -U <UserName> -P <Password>
where:
-G is the group name for the user
-U is the user name
-P is the password for the user
Example: UserAccountsManager -AU -G Administrator -U Tom -P Vanilla2
NOTE:
A user name can exist in only one group.
Changing a user password
To change a user password, execute the following command:
UserAccountsManager -CP -U <UserName> -O <OldPassword> -N <NewPassword>
where:
-U is the user name
-O is the old password of the user
-N is the new password for the user
Example: UserAccountsManager -CP -U Tom -O Vanilla2 -N Chocolate3
Removing a user
To remove a user, execute the following command:
UserAccountsManager -DU -U <UserName>
where:
-U is the user name
Example: UserAccountsManager -DU -U Tom
Viewing help files
To view the help, execute the following command:
UserAccountsManager -h
where:
-h is help
Example: UserAccountsManager -h
Starting and stopping SMI-S XP
By default, the SMI-S CIMOM service is not enabled. To use SMI-S XP, you must enable SMI-S CIMOM.
You can set the services to one of the following states:
• Automatic: If the service is enabled to start automatically, the service starts when the Command View
services are started or restarted, or when the machine is started.
28
Installation
• Manual: If the service is enabled to start manually, the service starts when the Command View services
are started or restarted, but it does not start when the machine is started.
• Disabled: If the service is disabled, which is the default, the service does not start when the Command
View services are started or restarted, or when the machine is started.
Enabling the SMI-S CIMOM service
1. From the Control Panel in Windows, click Administrative Tools.
2. Click Services.
3. Double-click the hp StorageWorks SMI-S CIMOM service to open the service Properties dialog box.
4. From the Startup type list, select Automatic or Manual.
5. Click OK to save your changes.
Disabling SMI-S CIMOM service
1. From the Control Panel in Windows, click Administrative Tools.
2. Click Services.
3. Double-click the hp StorageWorks SMI-S CIMOM service to open the service Properties dialog box.
4. From the Startup type list, select Disable.
5. Click OK to save your changes.
Restarting SMI-S CIMOM service
1. From the Control Panel in Windows, click Administrative Tools
2. Click Services.
3. Right-click the hp StorageWorks SMI-S CIMOM service and select Restart.
SSL support
By default, SSL is enabled in the provider. SMI-S XP uses an SSL server-side certificate to help clients
securely communicate with the SMI-S server. A self-signed certificate (hpSMIS.cert) is packaged with
SMI-S XP. The certificate is located in the following directory:
<Install Drive>:\Program Files\Hewlett-Packard\SMI-S\cimom
You can replace the certificate with a different certificate if you have administrator privileges. Be sure to
retain the certificate name (hpSMIS.cert). A client that wants to use SSL must copy the certificate from
the <Install Drive>:\Program Files\Hewlett-Packard\SMI-S\cimom and put it into its
trust store.
A trust store is a repository of trusted certificates that are recognized by the client program. When the
SMI-S certificate is “trusted” by a client program, the client communicates with the SMI-S server using SSL.
SSL helps secure the client/server communication by providing clients with the ability to authenticate the
entity that claims to be the SMI-S server. SSL also protects the integrity of the data transmitted between the
client and the server.
Enabling SSL
To enable SSL, set the EnableSSL property in the cim.properties file to True. This file is located in
the following directory:
<Install Drive>:\Program Files\Hewlett-Packard\SMI-S\cimom
When you enable SSL, all client connections use the https protocol.
If the client is implemented using Java, complete the following procedure to issue the certificate:
Command View XP installation guide
29
1. Import the server certificate into the client trust store.
a. Copy the server certificate to the client system.
b. Execute the following Java keytool command to import the certificate into the client trust store.
$ keytool -import -alias hpsmis -file hpSMIS.cert
-keystore mytruststore
2. You are prompted to enter a password.
NOTE: This password is required for modifying mytruststore in the future. If a trust store does not
currently exist, the keytool command creates the trust store and then imports the specified certificate.
3. To specify a trust store, execute the following command in the client application at the command
prompt:
$-Djavax.net.ssl.trustStore
Example:
$ java -Djavax.net.ssl.trustStore=mytruststore
<MyClient> <system> root/cimv2 5989 ssl
4. If the client application is programmed to update the trust store file, you must type the password you
used to create the trust store.
-Djavax.net.ssl.trustStorePassword
Example:
$ java -Djavax.net.ssl.trustStore=mytruststore
-Djavax.net.ssl.trustStorePassword=wbem01
<MyClient> <system> root/cimv2 5989 ssl
The CIMOM server will now work in the SSL mode and operates on port 5989.
Disabling SSL
To start the CIMOM in the non-SSL mode, complete the following procedure:
1. From the Service window, stop the hp StorageWorks SMI-S CIMOM service. See ”Starting and
stopping SMI-S XP” on page 28 for more information.
2. Open the cim.properties file located in the following directory:
<Install Drive>:\Program Files\Hewlett-Packard\SMI-S\CIMOM
3. Change the value of enableSSL=True to enableSSL=False
4. Start the hp StorageWorks SMI-S CIMOM service. See ”Starting and stopping SMI-S XP” on page 28
for more information.
The CIMOM server will now work in the non-SSL mode and operates on port 5988.
Viewing certificates using the Keytool command
To view certificates in a certificate file, execute the following command:
$keytool -printcert -file hpSMIS.cert
Viewing all certificates using the Keytool command
To view all certificates in the trust store, execute the following command:
$keytool -list -v -keystore mytruststore
Uninstalling SMI-S XP
SMI-S XP is uninstalled as part of the Command View uninstallation procedure.
30
Installation
Set up event notification and history reporting
To set up event notification and reporting, use the instructions located in Command View under Support >
Integrating HP StorageWorks Command View XP with Other Products. By setting up event notification,
Command View can display events, which are communicated to other management applications through
SNMP traps. For additional information, refer to ”Integrating with miscellaneous management
applications” on page 44.
Setting up Command View
Migrate data, settings, and preferences from a different
management station
If you are moving from an existing management station to a new management station, use the Backup
Utility to migrate Command View data, settings, and preferences. You can use this tool to preserve your
data and configuration preferences when upgrading hardware by saving your existing settings and then
restoring them on the new management station.
To use the Backup Utility, both management stations must have Command View XP 2.1 or later installed.
This tool is not compatible with older versions of Command View XP.
Migrating your data with the Backup Utility
1. Click Start > Programs > HP StorageWorks > Backup Utility. The Backup Utility window is displayed.
2. Complete the backup process:
a. Click Backup. The Open File window appears.
b. Choose a location, such as a network drive or shared file system, to save the backup file and click
Open. A confirmation window appears.
c. Click Yes. The Backup Progress status window appears.
d. When the backup process is completed, the Finished button becomes available. Click Finished. A
confirmation message appears.
e. Click OK.
3. If necessary, install Command View XP 2.1 or later on the new management station.
4. Complete the restore process:
a. Click Restore. The Open File window appears.
b. Navigate to where the backup file is located and click Open. A confirmation window appears.
c. Click Yes to proceed. The Restore Progress status window appears.
d. When the restore process is completed, the Finished button becomes available. Click Finished. A
confirmation message appears.
e. Click OK.
Saving or restoring your data from the Windows command line
• To save your files, enter %HPSS_HOME%\bin\backuputility -backup <target-path>. The
<target-path> is the location, such as a network drive or shared file system, where you want to
save the backup file.
• To restore your files, enter %HPSS_HOME%\bin\backuputility -restore
<target-path/file-name>. The <target-path/file-name> is the full path and name of the
backup file you want to restore.
Command View XP installation guide
31
Disable the Web Proxy service
When you are using a Web browser to manage an XP128/XP1024/XP12000, disable the Web proxy
on the client by completing one of the following:
• Internet Explorer only: Disable the proxy server in your browser,
or
• Internet Explorer or Mozilla: Add the XP128/XP1024/XP12000 IP address to the list of excluded
addresses (that are not to be directed through a Web proxy service).
Disabling proxy service in the Internet Explorer browser
1. In Internet Explorer, select Tools > Internet Options > Connections > LAN Settings.
2. Clear the Use a proxy server check box.
3. Click OK. Click OK again to exit and save changes.
Adding the IP address of the disk array to the list of web proxy excluded addresses
Adding IP addresses in Internet Explorer
1. In Internet Explorer, select Tools > Internet Options > Connections > LAN Settings > Advanced.
2. Enter the IP address of the disk array in the Exceptions box. If you are entering more than one IP
address, use semicolons to separate each IP address.
3. Click OK. Click OK again to exit and save changes.
Adding IP addresses in Mozilla
1. In Mozilla, select Edit > Preferences > Advanced > Proxies.
2. Click Manual Proxy Configuration.
3. Enter the IP address of the disk array in the No Proxy for field. If you are entering more than one IP
address, use commas to separate each IP address.
4. Click OK to exit and save changes.
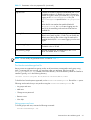
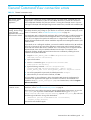
Verify the Internet Explorer browser requirements and
configuration
If you are using Internet Explorer, complete the procedures in this section to verify that the browser options
are set correctly and any additional configurations are made. If you are using Mozilla, skip to ”Verify the
Mozilla browser requirements and configuration” on page 33.
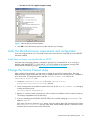
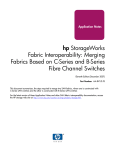
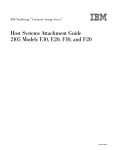
1. In Internet Explorer, select Tools > Internet Options > Advanced.
2. Verify that the following settings are enabled:
• Browsing > Disable script debugging
• HTTP 1.1 settings > Use HTTP 1.1
• HTTP 1.1 settings > Use HTTP 1.1 through proxy connections
32
Installation
• Use Java 2 v1.4.2 for <applet> (requires restart)
Figure 2 Internet Options (Internet Explorer)
3. Click OK to close the Internet Options window and save your changes.
Verify the Mozilla browser requirements and configuration
If you are using Mozilla for your Command View browser client sessions, verify that the correct JRE/RTE
has been installed.
Install Java on clients running Mozilla on HP-UX
Verify that the correct Java software is installed on the client. For Command View to run correctly in
Mozilla, install both JRE/RTE 1.4.2.05 and JPI 1.4.2.05 for HP-UX on the computer running HP-UX.
Download the software by going to http://www.hp.com/products1/unix/java/.
Change the Session Timeout value
After installing Command View, you may want to change the user session timeout value. This value
determines how long a session lasts after a user in Modify mode has not used the browser. The default is
set to 60 minutes. To change the timeout, edit the SESSION_TIMEOUT_PLAN value in the
CommandView.properties file.
1. Locate the CommandView.properties file in the \hpss\dm\tomcat\
webapps\hpstmgmt\webroot\Stormgmt directory.
2. Use a word processor or text editor to open the file. Look for the SESSION_TIMEOUT_PLAN setting by
locating the following line:
SESSION_TIMEOUT_PLAN=ONCE:60
3. Replace 60 with the number of minutes you want a session to last before it times out due to inactivity.
This setting is applicable to all XP disk arrays.
4. If you are managing an XP128/XP1024/XP12000, also consider changing ONCE to ALWAYS. The
default is ONCE:60.
Most users will want to choose the ONCE setting. Using this setting means that Command View checks
the CommandView.properties file only once, when someone adds a device or restarts the server,
and then sets the session timeout value at that time.
Command View XP installation guide
33
Certain users may find they need the flexibility of the ALWAYS setting, which ensures that Command
View always determines the timeout value. Using this setting means that Command View checks the
CommandView.properties file every time a user in Modify mode clicks a tab to manage an
XP128/XP1024/XP12000 (Identity and Status tabs excluded). You may want to consider using this
setting if you or someone else needs to change the timeout value on the SVP, but you want to override
that when using Command View. Note that this setting adds an additional delay of approximately 45
seconds when loading a new pane.
If you are managing an XP48/XP512, Command View ignores the ONCE or ALWAYS setting because
the ALWAYS setting is not available.
5. Save and close the file.
6. Restart Command View services by selecting Start > Programs > HP StorageWorks > Restart Services.
Add disk arrays to Command View
1. Start Command View.
2. Log on using administrator as the user ID and administrator as the password.
3. Click the Device Administration tab.
4. Enter the disk array’s IP address in the Agent IP Address field. A Hewlett-Packard customer engineer
can provide you with this IP address once the array’s SVP is installed.
5. Press Enter or click Submit.
The Serial Number, Product Type, and Product Number fields are filled in automatically.
6. If the Device Name field is blank, enter a name for the disk array.
7. For an XP1024, click the left DKU type and right DKU type from the drop-down lists.
8. If the Contact and Location fields are blank, enter a contact name and a location.
9. Select the Manage Array check box to enable extended features of Command View as described in
Table 12. Generally, if you want to use any feature besides the GUI for XP128/1024/XP12000, you
should select Manage Array.
Table 12 Extended features
Event
Notification
(All array
models)
CV CLI (All
array models)
XP48, XP512
GUI
XP128,
XP1240 &
XP12000 GUI
Managed
Functional
Array Selected
Functional
Functional
Functional
Functional
Unmanaged
Nonfunctional
Array Selected
Nonfunctional
Nonfunctional
Nonfunctional
Functional
SMI-S (All
array models)
10.Click Save and then click OK to confirm. Repeat the previous steps to add more disk arrays.
Install license keys
If you need to install any license keys that enable disk array product features such as Business Copy or
Continuous Access, use the License Key Management (Install) pane in Command View to install them. For
more information about license keys, refer to the HP StorageWorks Command View XP user guide.
1. Start Command View.
2. Log in, using administrator as the user ID and administrator as the password.
34
Installation
3. Click Licensing in the left panel in Command View.
4. Click the disk array you want to access from the Serial Number column. The License Key Management
main pane is displayed.
5. From the License Key Management main pane, click Install. The License Key Management (Install) pane
is displayed.
6. Select the check box for each license key you want to install.
7. Enter the license key code(s).
8. Click OK to add the license key and return to the License Key Management main pane.
Install the Command View client Command Line Interface (CLI)
Command View has a Command Line Interface (CLI). Use the CLI to manage and monitor XP disk arrays
from the operating system prompt of a system located anywhere on the network, including the Command
View management station.
1. Get the cvcli.tar file by navigating to the Command View Support tab. Select Support >
Download Page > Command View Command Line Interface (CV CLI) Download Section > CV CLI Client.
2. Un-tar the cvcli.tar file to any location on the CLI host. For a Windows host, use WinZip 7.0 or
later. For an HP-UX host, use the command tar xvf cvcli.tar.
3. After you un-tar the file, the CLI components will be in <your_path>/cvcli. It does not matter
where you un-tar the files, but all of the following files must be in the same directory:
• cli.jar: CLI java classes.
• CVCLI.bat: CLI execution Windows batch file.
• cvcli: CLI execution UNIX script.
• CVCLI.properties: CLI properties file.
• CVCLI.txt: Installation instructions for the CLI client.
4. To complete the installation, follow the instructions in the CVCLI.txt file.
Additional information about the CLI is in the HP StorageWorks Command View XP Command Line
Interface (CLI) reference guide, located on the Command View CD, or from the Support tab in Command
View.
Accessing the Command View GUI
1. Start the browser and enter the Command View management station’s host name or IP address as the
URL. The Command View initial window is displayed.
or
1. Point your browser directly at the array public IP address (for example, http://123.45.67.15).
2. Enter the user name and password.
3. Click OK.
4. After the user name and password have been verified, the Device Launcher pane is displayed if you
logged into the Command View server, and the Device Manager Identity pane is displayed if you
logged directly into the array.
Setting up Path Connectivity
Path Connectivity identifies, maps, and diagnoses the connections (or paths) between your XP disk array
and hosts that consumes storage on the disk array.
Command View XP installation guide
35
Path Connectivity is installed as part of the Command View installation, and it is required to manage an
XP disk array with Command View. However, you have to perform additional steps (primarily installing
host agents) to make Path Connectivity active.
Path Connectivity runs on the Command View management station. Path Connectivity has a Command
Line Interface (CLI) that can run on a host connected to the Command View management station.
Add switches through Path Connectivity
The following table lists the switches Path Connectivity supports. Consult your HP representative for
additional questions.
Table 13 Supported switches
36
Switch model
Tested firmware
Brocade 2400, Brocade 2800
2.6.2 , 2.6.2a, 2.6.2b (recommended)
HP SureStore FC Switch 6164 (32/64 ISL Ports)
2.6.1c
Compaq StorageWorks FC SAN Switch 8
2.6.2b 2.6.2c (recommended)
Compaq StorageWorks FC SAN Switch 16
2.6.2b 2.6.2c (recommended)
Compaq StorageWorks FC SAN Switch 8-EL
2.6.2b 2.6.2c (recommended)
Compaq StorageWorks FC SAN Switch 16-EL
2.6.2b 2.6.2c (recommended)
Compaq StorageWorks FC SAN Switch integrated /32
2.6.2b 2.6.2c (recommended)
Compaq StorageWorks FC SAN Switch integrated /64
2.6.2b 2.6.2c (recommended)
HP SureStore FC 1GB/2GB Switch 16B
3.1.2, 3.1.2a, 3.1.3a (recommended)
HP SureStore FC 1GB/2GB Switch 8B
3.1.2, 3.1.2a, 3.1.3a (recommended)
HP SureStore FC 1GB/2GB Entry Switch 8B
3.1.2, 3.1.2a, 3.1.3a (recommended)
HP StorageWorks SAN Switch 2/8 EL, 2/8 power pack
3.1.3b, 3.2.0 (recommended)
HP StorageWorks SAN Switch 2/16, 2/16 power pack,
2/16-EL
3.1.3b, 3.2.0 (recommended)
FC SAN Switch 2/8, 2/16 (3200/3800)
3.1.3b, 3.2.0 (recommended)
Compaq StorageWorks SAN Switch 2/8 EL
3.1.3b, 3.2.0 (recommended)
Compaq StorageWorks SAN Switch 2/16 EL
3.1.3b, 3.2.0 (recommended)
Compaq StorageWorks SAN Switch 2/16
3.1.3b, 3.2.0 (recommended)
HP StorageWorks SAN Switch 2/32, 2/32 power pack
4.2.2b (recommended)
HP StorageWorks Core Switch 2/64, 2/64 power pack
4.2.2b (recommended)
HP StorageWorks SAN switch 2/8V, 2/8V power pack,
2/8V GSA, 2/8V GSA power pack
4.2.0b, 4.2.0c, 4.2.2a (recommended)
HP StorageWorks SAN switch 2/16V, 2/16V GSA
4.2.0b, 4.2.0c, 4.2.2a (recommended)
HP StorageWorks SAN switch 2/16N FF, 2/16N power
pack, 2/16N FF GSA, 2/16N FF GSA power pack
4.2.0b, 4.2.0c, 4.2.2a (recommended)
HP StorageWorks SAN Director 2/128, 2/128 power
pack
4.2.0b, 4.2.0c, 4.2.2a (recommended)
Installation
Table 13 Supported switches (continued)
Switch model
Tested firmware
HP SureStore Director FC-64
05.02.00-13, 06.01.00-18, 06.02.00-22 (rec.)
HP StorageWorks Edge Switch 2/16, 2/24, 2/32, 2/64
05.02.00-13, 06.01.00-18, 06.02.00-22 (rec.)
HP StorageWorks Director 2/64, 2/140
05.02.00-13, 06.01.00-18, 06.02.00-22 (rec.)
McData ES-3016, ES-3032
05.02.00-13, 06.01.00-18, 06.02.00-22 (rec.)
Compaq McData Sphereon 3016 Fabric Switch
05.02.00-13, 06.01.00-18, 06.02.00-22 (rec.)
Compaq McData Sphereon 3032 Fabric Switch
05.02.00-13, 06.01.00-18, 06.02.00-22 (rec.)
HP StorageWorks Edge Switch 2/12
05.05.00-12, 06.01.00-18, 06.02.00-22
(recommended)
McData ED-5000 (not Windows 2003)
4.04.04-02
Cisco
Cisco
Cisco
Cisco
Cisco
1.2.1a, 1.2.1b, 1.3.4a , 2.0.1b (recommended)
1.2.1b 1.3.4a, 2.0.1b (recommended)
1.3.4a , 2.0.1b (recommended)
1.2.1b, 1.3.4a, 2.0.1b (recommended)
1.2.1b, 1.3.4a, 2.0.1b (recommended)
MDS 9120
MDS 9140
MDS 9216
MDS 9506
MDS 9509
Although these switches are supported, Path Connectivity does not automatically detect them in your SAN.
Use the Path Connectivity Fibre Channel Switch Management screen to add switches.
Adding switches
1. Start Command View.
2. Click the Path Connectivity link in the left pane.
3. Click Administration.
4. Click Switch Mgmt in the navigation tree.
5. Enter the IP address or DNS name of the switch to be added in the Enter IP Address or DNS name
below field.
6. Click Add. The list on the left displays the switch.
7. Repeat steps 5 and 6 until all switches are added.
8. Click Apply.
The Path Connectivity Data Collection Service will try to communicate with newly-added switches on its
next scheduled switch polling cycle.
Install Path Connectivity host agents
Prerequisites
The following prerequisites are necessary for installing Path Connectivity host agents:
• One of the supported operating systems (see ”Verify host agent disk space requirements for Path
Connectivity” on page 14).
• You must have administrator access to the remote host.
• The Command View management station must have a DNS name.
• A Linux host must be a rexec server (see page 39).
Command View XP installation guide
37
• Only one remote deployment tool may run at a given time.
• Review the online Host Software Installation checklist. To view the checklist, start the host agent
deployment utility and click Host Software Installation Checklist. Click the link for the remote host’s
operating system.
CAUTION: Do not deploy Path Connectivity host agents and Command View SDM host agents to the
same host system. They cannot coexist.
There are two ways to install Path Connectivity host agents:
• Use the Host Agent Deployment tool.
• Download the host agent to the remote host from the Support tab in Command View. Then, manually
invoke the installation executable as described in ”Installing host agents using the local method” on
page 41.
NOTE: If you plan to install the HP OpenView Storage Area Manger 3.2 host agent and Command View
XP Path Connectivity host agent on the same host, you must install the Storage Area Manager host agent
first and then install the Command View XP Path Connectivity host agent.
Please review the README file on the Command View CD to find limitations regarding host agent
installation.
Preliminary host agent installation tasks
If you choose to use local install instead of remote deployment, you do not need to share the drive or set
up services such as rexec and rsh on the hosts.
Preparing for installation on Microsoft Windows platforms
1. Be sure you have root, superuser, or administrator access to the system.
2. Share the system drive (for example, C$).
Preparing for installation on UNIX platforms (HP-UX, Solaris, and AIX)
1. Be sure you have root or superuser access to the system.
2. Be sure the exec/rexec and FTP functions are enabled. On these platforms, the services should be
enabled by default. For more details, consult the configuration instructions to enable exec/rexec from
the corresponding operating system manual.
3. Configure the root/superuser account to allow remote access via the exec/rexec and FTP services.
Preparing for installation on UNIX platforms (Linux)
1. Be sure you have root or superuser access to the system.
2. Set up the rexec server on the Linux host. Verify that you have the rsh server package installed on the
Linux host. For example, if you are using Red Hat Linux:
• Enter rpm -qa|grep rsh-ser* at the command prompt.
• If the command returns an entry, go to step 3.
• If the command does not return an entry, install the package:
• Insert the Red Hat CD in your CD-ROM.
38
Installation
• Enter rpm -Uvh /mnt/cdrom/RedHat/RPMS/rsh-ser*. You may need to mount your
CD-ROM if the OS cannot find the directory. The command mount /dev/cdrom should work.
3. Verify that the rexec service is started.
• Enter ntsysv at the command prompt.
• Check the rexec and rsh services and click OK.
• Restart the service by entering service xinetd restart.
• Edit /etc/pam.d/login. Comment out (add “#” to the line):
# auth required /lib/security/pam_securetty.so
• Edit /etc/pam.d/rexec. Comment out (add “#” to the line):
# auth required /lib/security/pam_securetty.so
• Edit /etc/pam.d/ftp. Comment out (add “#” to the line):
# auth required /lib/security/pam_listfile.so item=user sense=deny
file=/etc/ftpusers onerr=succeed
• Restart the service by entering service xinetd restart.
4. Configure the root/superuser account to allow remote access via the exec/rexec and FTP services.
• Run the /usr/sbin/ntsysv command and enable wu-ftpd.
• Edit /etc/pam.d/ftp by commenting out the following line with #:
auth required /lib/security/pam_listfile.so item=user sense=deny
file=/etc/ftpusers onerr=succeed
• Edit /etc/ftpusers by removing or commenting out the following line with #:
root
• Edit /etc/ftpaccess as follows:
Change allow-uid ftp to allow-uid ftp root.
Change allow-gid ftp to allow-gid ftp root.
• Run the /sbin/service xinetd restart command.
Installing host agents with the remote deployment tool
NOTE: If Performance Advisor XP 2.1 is installed on the same management station as Command View
XP, the remote deployment tool installs both the Command View Path Connectivity and Performance
Advisor XP host agents on the target hosts.
Designating a single host
1. Launch the remote deployment application by clicking Start > Programs > HP StorageWorks > Host
Agent Deployment Tools > Install Host Agent.
2. Add a single host by entering the host name or IP address, admin user name, and password.
3. Click Add Host.
Designating multiple hosts
1. Launch the remote deployment application by clicking Start > Programs > HP StorageWorks > Host
Agent Deployment Tools > Install Host Agent.
Command View XP installation guide
39
2. Click Add Multiple Hosts. A dialog box displays a table.
3. In the table, enter the host name or IP address, admin user name, and password in their respective
columns.
4. Click Add All Hosts Now.
Installing the host agents
1. The Managed Host list should now contain all the hosts previously added. From this list, select the hosts
to which you want to deploy a host agent.
2. Re-authenticate the selected hosts by right-clicking and selecting Re-authenticate from the menu.
3. If Performance Advisor XP 2.1 or Storage Area Manager 3.2 host agents are already installed on a
host, enable the Command View XP management station to access the host by selecting Start >
Programs > HP StorageWorks > Host Agent Deployment Tools > Update Host Agent Access, and then
selecting Set IP for each host and updating access for each host.
4. Click Install on Selected Hosts.
Uninstalling the host agents with the remote deployment tool
NOTE: The remote deployment tool uninstalls Command View XP Path Connectivity and Performance
Advisor XP host agents if both are installed on the same host.
NOTE: If the Storage Area Manger 3.2 host agent is also installed on the host, uninstall the Command
View XP Path Connectivity host agent prior to uninstalling the Storage Area Manager host agent.
Uninstalling the Storage Area Manager host agent first may result in uninstallation of some Command
View XP Path Connectivity components.
1. Launch the remote deployment application by selecting Start > Programs > HP StorageWorks > Host
Agent Deployment Tools > Uninstall Host Agent.
2. Select the hosts you want to remove from the Managed Host list.
If the Managed Host list does not contain the host agent you want to remove, manually add the host
from the Add Single Host box, click Add Host, and then select the host from the Managed Host list.
3. Re-authenticate the selected hosts by right-clicking and selecting Re-authenticate from the menu.
4. Click Uninstall from Selected Hosts.
Updating the host agent access files using the remote deployment tool
By default, only the management station used to install the host agent has access to the host agent. If you
want another management station to access the host, update the host access list by completing the
following procedure.
1. Launch the remote deployment application by selecting Start > Programs > HP StorageWorks > Host
Agent Deployment Tools > Update Host Agent Access File.
2. From the Managed Host list, select the hosts you want to update.
If the Managed Host list does not contain the host you want to update, manually add the host from the
Add Single Host box, click Add Host, and then select the host from the Managed Host list.
3. Select Set IP for each host under the Add-Access Mode column.
4. Select the hosts for which you want to update access, and click Add Access to Selected Hosts.
40
Installation
Installing host agents using the local method
Downloading the host agent file
1. Access Command View from your workstation.
2. Click the Support tab.
3. Navigate to the Path Connectivity Host Agent Download section. A list of supported host agents is
provided.
4. Click the link for the desired host.
5. Download the Host Agent tar file (which contains all of the required software) to your computer.
6. FTP the Host Agent tar file to the tmp directory of the remote host.
Installing the host agent locally
1. Telnet to the remote host as root.
2. Navigate to the tmp directory.
3. Untar the host agent tar file by entering: tar -xvf hostagent_<os_name>.tar.
4. Run the installation script:
For UNIX run: unix_local_install.sh.
For Windows systems running on IA-64 architecture, double-click setup64.exe. For other Windows
host system architectures, double-click setup.exe.
Uninstalling a host agent locally
NOTE: If the Command View XP Path Connectivity and Performance Advisor XP host agents are installed
on the same host, this procedure will have the following behavior:
For Unix hosts, the local uninstall script prompts you to choose which host agent to uninstall.
For Windows hosts, the local uninstall procedure removes both host agents on the host.
NOTE: If the Storage Area Manger 3.2 host agent is also installed on the host, uninstall the Command
View XP Path Connectivity host agent prior to uninstalling the Storage Area Manager host agent.
Uninstalling the Storage Area Manager host agent first may result in uninstallation of some Command
View XP Path Connectivity components.
Uninstalling from Windows hosts
1. At the host, select Start > Settings > Control Panel.
2. Double-click Add/Remove Programs.
3. Select HP StorageWorks XP 2.0 Host Agent Installer.
4. Click Change, and follow the online instructions to uninstall the Command View XP Path Connectivity
host agent.
Uninstalling from hosts other than Windows
1. Telnet to the remote host as root.
2. Navigate to the tmp directory.
3. Untar the host agent tar file by entering: tar -xvf hostagent_<os_name>.tar.
Command View XP installation guide
41
4. Run the uninstall script by entering: unix_local_uninstall.sh.
Add or remove host agent installation files
If you have already installed Command View and Path Connectivity, but need to add or remove host
agents, see ”Modify or repair Command View” on page 23.
Verify data collection from disk arrays, hosts and switches
Verify that Path Connectivity is working correctly by using the following procedure. After that, data is
collected regularly on a default schedule or a schedule you set.
Verifying that Path Connectivity is working correctly
1. Be sure the host agents are installed.
2. Be sure you have used Path Connectivity to add any switches.
3. Be sure the disk arrays you want to monitor have been added to Command View. Locate each disk
array on the ArrayManager > DeviceAdmin pane and be sure the Manage Array check box is
selected.
4. If the Command View management station and the hosts are located on different subnets, use the Path
Connectivity > Administration > Host Discovery > Host Mgmt pane to add the hosts.
5. Click Administration > Data Collection > Collect Now. Select all check boxes and click Collect Now.
6. Wait for 5-10 minutes. You should see new path connectivity data on the screens.
Install the Path Connectivity Command Line Interface (CLI)
Path Connectivity has a Command Line Interface (CLI). Use the Path Connectivity CLI to access path
connectivity information from the system prompt of a system located anywhere in your network, including
the Command View management station. The Path Connectivity CLI Installation note, which is located
under the Support tab in Command View, has detailed installation instructions.
Integrating the snap-in modules into Command View
This section provides additional information about integrating Performance Advisor XP (PA) and
Application Policy Manager (APM) with Command View 2.1.
PA 2.1 can coexist with Command View 2.1. For instructions on installing or upgrading PA on the
Command View management station, refer to the PA documentation. The following items are some issues
to consider:
• If you are upgrading PA, close all browser sessions of Command View and PA before performing the
upgrade.
• Always use the JRE supported by Command View 2.1.
!
IMPORTANT: To solve any JRE compatibility issues, refer to the readme.txt file on the CD.
HP StorageWorks Application Policy Manager
Command View 2.1 can only coexist with APM 3.0F.
42
Installation
Integrating Command View with other platforms
Integrating with HP OpenView Storage Area Manager
Command View and Storage Area Manager should not be installed on the same management station.
However, Storage Area Manager provides a way for users to launch a browser and access Command
View from a Storage Area Manager client GUI.
Also, host agents with compatible versions of each software product can coexist on the same host. For
more information, refer to ”Coexistence of Command View and Storage Area Manager host agents”
below.
Running Command View from a Storage Area Manager management station
1. Install Storage Area Manager. The HP OpenView Storage Area Manager installation guide provides
the information to accomplish this task.
2. For Storage Area Manager 3.0 or earlier, install the DPI patch on the Storage Area Manager platform
to integrate the disk arrays. To download the patch, go to
http://www.openview.com/products/dpi/index.html. Installation instructions are provided with the
patch.
3. Refer to the Storage Area Manager documentation for further details on running Command View.
Coexistence of Command View and Storage Area Manager host agents
Only certain versions of the host agents from each software product can coexist on the same hosts.
Table 14 Command View host agent compatibility with Storage Area Manager host agents
Command View version
Storage Area Manager version
2.0 or 2.1
3.2
1.8B
3.1
1.8A
3.1
1.7B
3.0 with patch SANMGR_00010
1.60.00 or 1.7A
3.0
1.51.00, 1.52.00, or 1.53.00
2.2, 2.2.1 with patch SANMGR_00006, or
2.2 with patch SANMGR_00007
1.40.04
2.2
1.40.01 or 1.30.00
2.1
Optional: Communicating with Storage Area Manager in an SSL environment
If you are using Command View in SSL mode, refer to the Storage Area Manager documentation to
properly link Command View to Storage Area Manager. Additional information about SSL configuration is
available under the Support tab in Command View.
Integrating with miscellaneous management applications
The latest HP StorageWorks Command View integration information is available under the Support tab in
Command View.
Command View XP installation guide
43
Integration can occur at the following levels:
• Graphical User Interface (GUI)
• Command Line Interface (CLI)
• Message or “event” notification using HP Enterprise Integrations or SNMP traps.
GUI integration
Command View is a Web-based application. If an application supports a Web interface, you can
configure it to reference the Command View URL.
CLI integration
You can write scripts or batch files containing Command View CLI commands. Refer to the HP
StorageWorks Command View XP Command Line Interface (CLI) reference guide. You can find this
manual on the Command View CD or under Command View’s Support > Reference Documents.
Event notification
Two tools are available to support the integration of Command View event notification messages into other
applications: HP Enterprise Integrations and HP Trap Distributor. Installation and operation instructions for
both tools are available in the Support panel in Command View under Integrating HP StorageWorks
Command View XP with other platforms.
44
Installation
2 Troubleshooting
This chapter contains troubleshooting information about installing, configuring, and logging on to
Command View. This chapter also has suggestions for solving host agent installation and configuration
problems. You will find recommended solutions to the following topics:
• ”Unable to start Command View” on page 45
• ”General Command View connection errors” on page 47
• ”Host agent deployment errors” on page 49
For other Command View troubleshooting topics, refer to the HP StorageWorks Command View XP user
guide. For Path Connectivity troubleshooting information, refer to the HP StorageWorks Command View XP
Path Connectivity user guide.
Unable to start Command View
Table 15
Unable to start Command View
Symptom
Cause/Solution
Nothing happens when
you try to start Command
View or you are unable to
start Command View.
Try the following solutions:
• Verify that all the Command View services are running on the Command View management
station.
• From the Control Panel in Windows, click Services and verify that all the Command View
services have started.
• Verify that you are using the following URL: http://<Command View management station
IP address>.
• When managing the XP128/XP1024/XP12000, disable the Web proxy on the client:
• Disable the proxy server in your browser, or
• Add the disk array IP address to the list of excluded addresses (that are not to be directed
through a Web proxy service).
For instructions, refer to ”Disable the Web Proxy service” on page 32.
• When managing the XP128/XP1024/XP12000, content is sent directly from the array to the
client browser, bypassing the Command View management station. If your SAN topology
includes firewall configurations, you must enable a connection through the firewall for each
system that will attempt to monitor or manage the XP128/XP1024/XP12000. For instructions,
see ”Implement the recommended network configuration” on page 19.
A login failure message is
displayed instead of a
new login window.
You may have entered an incorrect password and failed the first Command View login attempt.
Close the browser and start a new one.
Command View XP installation guide
45
Table 15
Unable to start Command View (continued)
Symptom
Cause/Solution
The browser displays the
message, “Invalid user
name or password,” but
never displays a login
box.
Your session authorization may have expired. The easiest way to resolve the problem is to close the
Web browser displaying the error and restart your management session in a new Web browser.
You receive a “Web page
not found on host” error
message.
The Web server may not have been started correctly because of an unsupported host name format.
Rename the computer’s host name if it has an unsupported name. For instructions, refer to ”Verify
the host system name” on page 21. You may also need to uninstall and then re-install Command
View.
Internet Explorer displays
the message, “To display
this page correctly, you
need to download and
install the following
components: Microsoft
virtual machine,” and
never displays a login
box when you start
Command View.
You need to install the Microsoft virtual machine for Command View to work correctly with Internet
Explorer.
46
Troubleshooting
If your session has expired, consider changing the timeout value. For instructions, refer to ”Change
the Session Timeout value” on page 33.
If the Install on Demand dialog box is displayed, click Download. Insert the Windows Update CD
and click OK. If you do not have the CD, select Internet in the drop-down list, click OK, choose the
location, and then click Yes in the Security Warning dialog box.
General Command View connection errors
Table 16
General connection errors
Symptom
Cause/Solution
Your browser crashes
while running the
application.
It is most likely related to the version of JRE running on your client system. Command View only
supports JRE 1.4.2 (Windows) or JRE 1.4.2.05 (HP-UX). Because it is possible for a machine to
have multiple JREs installed, verify that your browser is running the correct JRE version. If you are
running the correct JRE and still experiencing browser runtime errors, uninstall and re-install the JRE.
The application begins
loading, but then hangs,
or the expected
application does not load
when its tab is clicked.
If the browser window displays “Loading Applet,” but the application ceases downloading, it is
most likely due to the proxy settings on your browser. To correct this, disable the Web proxy on the
client. For instructions, refer to ”Disable the Web Proxy service” on page 32.
If an application tab is clicked and the application fails to load under SSL, it could be because the
Java component of the Command View management station is not configured to trust the Web
server. This can happen if the Apache SSL Web server is configured with a self-signed certificate,
but this self-signed certificate has not been installed or imported into the management station’s Java
certificate store.
If you decide to use a self-signed certificate, you must also install the certificate in the JRE certificate
store. This is because the Java part of the application communicates with the Apache SSL Web
server and must trust the Web server’s certificate. This is not necessary for a CA signed certificate
because the JRE comes with pre-installed certificates from the major CA companies. For a
self-signed certificate, the JRE must be told to trust the server certificate by installing the server
certificate into the JRE certificate file.
1. Copy the server_domain_name.crt file to \Program Files\JavaSoft\
JRE\<JRE version>\lib\security.
2. Open a shell window.
3. Use the cd command to go to \Program Files\JavaSoft\JRE\
<JRE version>\lib\security.
4. Type the following command: “<drive>:\Program Files\
JavaSoft\JRE\<JRE version>\bin\keytool” -import -alias
server_domain_name -file server_domain_name.crt -keystore cacerts
5. You will be prompted for a password; the default password is changeit.
6. When asked if you want to trust this certificate, click Yes.
For more details on SSL configuration, refer to the Apache Web Server SSL Configuration for
Command View Applications white paper. This document is located on the Command View
installation CD (hpss_apache_whitepaper.pdf) or in Command View, under the Support >
Reference Documents.
A Network Error
'10-6027' occurs.
Verify that the proxy settings are disabled for the IP address of disk array in question. For
instructions, refer to ”Disable the Web Proxy service” on page 32.
There may be an issue with the client security settings regarding RMI communication, as set in the
Java.policy file. If you have installed the JRE in the default directory, go to \Program
Files\JavaSoft\JRE\<JRE version>\Security, open the Java.policy file, and insert
the following line before the closing of the last brackets:
permission java.net.SocketPermission “*:1024-65535”,
“connect,accept,resolve”;
Save the file and reload the applet.
Command View XP installation guide
47
Table 16
General connection errors (continued)
Symptom
Cause/Solution
Error Message: “A
connection error occurred
between the Remote
Control and the
controller.(Control: {Array
#} )”
If you receive a connection error after clicking a disk array in the Device Launcher pane, do the
following:
(XP48/XP512 only)
•
Verify the SVP of the disk array is not in Modify mode.
•
Verify that another Remote Control has not locked the disk array.
•
Verify that another Command View XP management application has not locked the disk array.
If none of the previous suggestions resolves the issue, try the following:
A warning dialog is
displayed when you
attempt to connect to
Command View using
SSL.
48
Troubleshooting
•
Reboot Remote Control.
•
Restart the Command View XP services.
•
Contact your HP account support representative.
A warning dialog box indicates that your browser does not trust the certificate it received from the
server. This can happen for several reasons:
•
The certificate is a self-signed certificate. The browser will normally trust a certificate obtained
from a Certificate Authority (CA) such as VeriSign or Thawte. If you create your own self-signed
certificate, you must install the certificate in the browser’s certificate store if you don't want to
see the warning message. The Command View server must also have the self-signed certificate
installed in the JRE certificate store. Some Command View applications may also require a
self-signed certificate be installed into the client Java certificate store. This is not required for a
CA signed certificate.
•
The host name you used to initiate the request was an IP address or not a fully qualified DNS
name. SSL trusted certification relies on the fully qualified DNS name (such as
hostname.hp.com) to identify the request with the server certificate. An IP address or a partial
“host name” will not work.
•
The host name you used in your request did not match the server certificate’s host name.
•
Most browsers will let you continue past a failed SSL authentication. However, the Command
View application Java components require proper SSL authentication and will fail, for example,
if an improper host name is used in an https request. Also make sure that the Java components
trust the Apache Web server if you are using a self-signed server certificate by installing the
server certificate into the Java certificate store.
Host agent deployment errors
Table 17
Host agent deployment errors
Symptom
Cause/Solution
The host agent does not
deploy successfully.
The network or host to which you are deploying may be down. Verify that the network and host to
which you were attempting deployment are up and functional. If necessary, repeat deployment.
The deployment may have timed out due to network congestion. Deployment stops if it is not
successful within 10 minutes. Increase the deployment timeout setting to allow for network
congestion. To do this:
•
In a word processor or text editor, open the DeployServerConfig.prp file located in
\hpss\CVmanagementserver\config.
•
Increase the timeout setting and save the file. The line in the file to change is:
InstallTimeout=900000.
•
Restart the Command View services for the change to take effect, and then try to deploy the host
agent again.
CPU utilization may be too high on the host to allow for deployment. To solve this, close
applications, services, or processes running on the host. If this is not possible, try to install the host
agent from the Command View Support tab.
A third-party application might be preventing deployment. In some configurations, third-party
applications that provide rexec/exec support for Windows prevent Command View from deploying
the host agent. In these cases, an “Operating System is not Supported” error message is displayed.
Install the host agent locally from the Command View Support tab.
Error messages about the
hosts are displayed in the
event log after
uninstalling the host agent
software.
Uninstalling the host agent software will not stop Path Connectivity from collecting data from a host.
To stop data collection, you must remove this host from the database in the management station by
going to Path Connectivity > Administration > Host Management. If you do not delete the host from
the database, Path Connectivity will try to contact the host until the scheduled data removal time,
which is 30 days by default.
Using the host
deployment tools to
deploy the host agent to a
Windows host produces
the following error
message, “ERROR Unknown Host:
xx.xx.xx.xxx. Check and
correct hostname and
verify the host is
accessible.”
If you enter the correct login and password for the host that the login window does not accept, the
reason may be that File and Printer Sharing for Microsoft Networks is not enabled. This component
is installed and enabled by default.
The application does not
run when I click Start >
Programs > HP
StorageWorks Command
View XP > Deploy or
Remove Host Agent
Software (or Update Host
Agent Software).
The JRE may be corrupted. Uninstall Command View XP and the JRE. Install JRE 1.4.2 and then
install Command View XP.
To enable the File and Printer Sharing for Microsoft Networks:
1. Open the Network and Dial-up Connections window by right-clicking the My Network Places
icon on the desktop and then select Properties in the shortcut menu.
2. Right-click the Local Area Connection that you want to configure.
3. Select the File and Printer Sharing for Microsoft Networks check box.
Command View XP installation guide
49
Table 17
Host agent deployment errors (continued)
Symptom
Cause/Solution
You are not able to
reload the Emulex driver
for the Linux host after
installing the host agent.
When the host agent is running on Linux, it keeps contact with the HBA driver. You may receive a
lpfcdd: Device or resource busy message when trying to rmmod the driver. Try to stop
the host agent and then reload the HBA driver.
To stop the host agent for UNIX hosts:
/opt/sanmgr/hostagent/sbin/HA_trigger stop
/opt/sanmgr/hostagent/sbin/dial_trigger stop
To start the host agent for UNIX hosts:
/opt/sanmgr/hostagent/sbin/HA_trigger start
/opt/sanmgr/hostagent/sbin/dial_trigger start
A partial installation may have occurred due to a network timeout or other similar reason. Instead of
reinstalling the software, you may need to remove any partial host agent components on the host
first and then retry the installation.
Installing the host agent
has failed and reinstalling
the host agent software
does not solve the
problem.
If you used the local installation method, run the uninstall script that comes with the local installation
package. If you used the remote deployment tool, use the tool to uninstall the partially installed
components.
Host agent uninstallation errors
Table 18
Host agent uninstallation errors
Symptom
Cause/Solution
Host Agent uninstallation
may fail due to CPU
consumption or network
instability. Attempt the
following procedure with
fewer hosts selected.
1. Re-authenticate the host by right-clicking and selecting Re-authenticate from the menu.
50
Troubleshooting
2. Enable the management station access to the host by selecting Start > Programs > HP
StorageWorks Command View XP > Host Agent Deployment Tools > Update Host Agent Access.
3. Select Set IP for each host and update the access for these hosts.
A Installation checklist
This appendix contains a helpful installation checklist that you can print out and reference when installing
and setting up Command View. For details about each task, refer to ”Installation” on page 11.
Verifying the system requirements
• Verify that the hardware and disk space requirements are met on the Command View management
station and Web client (page 12).
• Verify that the firmware requirements are met on all disk arrays. Refer to the HP StorageWorks
Command View XP ReadMe for more information.
• If you plan to use Path Connectivity, verify that the host agent operating system and disk space
requirements are met (page 14).
• If you plan to use Path Connectivity, verify that supported HBAs are installed on the host (page 15).
• If you are installing the Command View CLI and/or Path Connectivity CLI, verify the requirements are
met (page 18).
Installing Command View
• Implement the recommended network configuration (page 19).
• If you place a disk array behind a firewall, set up the ports to bypass the firewall (page 20).
• If you are using multiple LAN cards, configure the first LAN card to communicate with the hosts and
Command View API clients on the SAN and modify the APIServer.cfg file to point to the first LAN
card. (page 20).
• Verify that the Command View management station system name does not contain spaces or illegal
characters (page 21).
• If you are installing Command View in a secure SSL environment, verify the correct procedures are
used. See ”Install SSL for secure communication (optional)” on page 22.
• Install the SNMP service, which is needed to view events in the Command View Event History pane.
SNMP is also needed if you plan to integrate Command View with other management applications
(page 22).
• Verify that the SNMP service is installed and running (page 22).
• Install Command View on the management station (page 22).
• Verify Command View installation, services, and execution (page 24 and page 25). Please note that
you cannot manage an XP disk array with more than one Command View management station at a
time.
• Set up SMI-S XP (page 25).
• Set up event notification and history reporting (page 31).
Other related procedures
• Modify or repair Command View on the management station (page 23).
• Uninstall Command View on the management station (page 24).
Command View XP installation guide
51
Setting up Command View
• If you are moving from an existing management station to a new management station, use the Backup
Utility to migrate the Command View data, settings, and preferences from the previous management
station (page 31).
• If you are managing an XP128/XP1024/XP12000, disable the Web proxy for your Web browser
(page 32).
• If you are using Internet Explorer for your Command View browser client session, verify that the
browser has been configured correctly (page 32).
• If you are using Mozilla for your Command View browser client session, verify that the browser has
been configured correctly (page 33).
• If needed, change the session timeout value (page 33).
• Add the disk arrays to Command View (page 34).
• Install any license keys if you need to enable array product features such as Business Copy or
Continuous Access (page 34).
• Install the Command View Command Line Interface (CLI) if needed (page 35).
Setting up Path Connectivity
• Add FC switches through Path Connectivity (page 36).
• Install the host agents (page 38). If you have purchased HP StorageWorks Command View SDM, do
not deploy Path Connectivity host agents and Command View SDM host agents on the same host
system. They cannot co-exist.
• Verify Path Connectivity is working correctly and is able to collect data from the XP disk arrays, hosts,
and switches (page 42).
• Install the Path Connectivity Command Line Interface (CLI) if needed (page 42).
Other related procedures
• Add or remove host agent installation files on the management station (page 42). If you have already
installed Command View and Path Connectivity, but need to add or remove operating systems that
your hosts will be running, complete this step.
Integrating the snap-in modules into Command View
• Install Performance Advisor XP or HP StorageWorks Application Policy Manager on the Command
View management station (page 43).
Integrating Command View with other platforms
• Integrate Storage Area Manager with Command View (page 43).
• Integrate other management platforms and applications with Command View (page 44).
52
Installation checklist
Index
A
adding
disk arrays 34
host agent installation files 42
switches 36
Apache Web Server 22
audience 7
authorized reseller, HP 9
B
bypassing a firewall 20
C
checklist 51
Collect Data Now operation 42
Command View
CLI 35
Command View, setting up 31
connections through a firewall 20
conventions
document 8
D
disk array firmware levels 14
document
conventions 8
prerequisites 7
related documentation 7
documentation, HP web site 7
F
firewall 20
additional configurations 20
bypassing 20
firmware 14
H
help, obtaining 9
host agent disk space requirements 14
host agents 38
HP
authorized reseller 9
storage web site 9
Subscriber’s choice web site 9
technical support 9
I
installation checklist 51
installation reference 11
installing
Command View 19, 22
CV CLI 35
host agents 38
license keys 34
Path Connectivity host agents 38
PC CLI 42
SMI-S XP 25
SNMP 22
Internet Explorer 32
M
minimum requirements
browser 13
client 13
management station 12
modifying
Command View 23
modifying Command View 42
Mozilla 33
P
Path Connectivity
CLI 42
host agents 38
Path Connectivity host agents 38
ports 20
prerequisites 7
R
rack stability, warning 9
reference 11
related documentation 7
removing
host agent installation files 42
repairing Command View 23
S
setting up Command View 31
SMI-S XP 25
SNMP
installing 22
verifying 22
SSL 22
Subscriber’s choice, HP 9
switches, adding 36
system name 21
T
technical support, HP 9
Command View XP installation guide
53
U
uninstalling
Command View 24
V
verifying
Command View execution 25
Command View services 24
disk array firmware levels 14
SNMP 22
W
warning
rack stability 9
Web proxy configuration 32
web sites
HP documentation 7
HP storage 9
HP Subscriber’s choice 9
54
Index
Figures
1
2
Example of a network with added security from a firewall. . . . . . . . . . . . . . . . . . . . . . . . . . . . . . . . 19
Internet Options (Internet Explorer) . . . . . . . . . . . . . . . . . . . . . . . . . . . . . . . . . . . . . . . . . . . . . . . . 33
Tables
1
2
3
4
5
6
7
8
9
10
11
12
13
14
15
16
17
18
Document conventions . . . . . . . . . . . . . . . . . . . . . . . . . . . . . . . . . . . . . . . . . . . . . . . . . . . . . . . . . . 8
Management station requirements . . . . . . . . . . . . . . . . . . . . . . . . . . . . . . . . . . . . . . . . . . . . . . . . . 12
Web client requirements . . . . . . . . . . . . . . . . . . . . . . . . . . . . . . . . . . . . . . . . . . . . . . . . . . . . . . . . 13
Operating systems and host disk space requirements . . . . . . . . . . . . . . . . . . . . . . . . . . . . . . . . . . . . 14
Path Connectivity HBA support . . . . . . . . . . . . . . . . . . . . . . . . . . . . . . . . . . . . . . . . . . . . . . . . . . . 15
Ports used for inbound traffic to the SVP . . . . . . . . . . . . . . . . . . . . . . . . . . . . . . . . . . . . . . . . . . . . . 20
Ports used for outbound traffic from the SVP . . . . . . . . . . . . . . . . . . . . . . . . . . . . . . . . . . . . . . . . . . 20
Ports to be opened for a firewall on the Command View management station . . . . . . . . . . . . . . . . . . . 20
Command View services. . . . . . . . . . . . . . . . . . . . . . . . . . . . . . . . . . . . . . . . . . . . . . . . . . . . . . . . 24
SMI-S XP configuration files. . . . . . . . . . . . . . . . . . . . . . . . . . . . . . . . . . . . . . . . . . . . . . . . . . . . . . 26
Parameters in the cim.properties file . . . . . . . . . . . . . . . . . . . . . . . . . . . . . . . . . . . . . . . . . . . . . . . . 26
Extended features . . . . . . . . . . . . . . . . . . . . . . . . . . . . . . . . . . . . . . . . . . . . . . . . . . . . . . . . . . . . 34
Supported switches . . . . . . . . . . . . . . . . . . . . . . . . . . . . . . . . . . . . . . . . . . . . . . . . . . . . . . . . . . . 36
Command View host agent compatibility with Storage Area Manager host agents . . . . . . . . . . . . . . . 44
Unable to start Command View . . . . . . . . . . . . . . . . . . . . . . . . . . . . . . . . . . . . . . . . . . . . . . . . . . . 45
General connection errors . . . . . . . . . . . . . . . . . . . . . . . . . . . . . . . . . . . . . . . . . . . . . . . . . . . . . . 47
Host agent deployment errors . . . . . . . . . . . . . . . . . . . . . . . . . . . . . . . . . . . . . . . . . . . . . . . . . . . . 49
Host agent uninstallation errors . . . . . . . . . . . . . . . . . . . . . . . . . . . . . . . . . . . . . . . . . . . . . . . . . . . 50