1
OWNER ’S GUIDE
INSTALLATION GUIDE
Video Cassette Recorder
MODEL VC2010
Limited One-Year Warranty
For a period of ONE YEAR from the date of purchase,
Directed Electronics, Inc. ("DIRECTED") promises to the
original purchaser to repair or replace, free of cost,
with a comparable reconditioned model any VIDEO
CASSETTE RECORDER (hereafter the "UNIT”), which
prove to be defective in workmanship or material
defect under normal use, provided the following conditions are met: the unit was purchased and installed by
an authorized DIRECTED dealer; the unit remains in the
vehicle in which the unit was originally installed; and
the unit is returned to DIRECTED. The unit in question
must be returned to DIRECTED postage paid and must
be accompanied by a clear, legible copy of the bill of
sale bearing the following information:
ized dealer to obtain the service charge for your unit.
TO THE MAXIMUM EXTENT ALLOWED BY LAW, ALL
WARRANTIES, INCLUDING BUT NOT LIMITED TO
EXPRESS WARRANTY, IMPLIED WARRANTY, WARRANTY OF MERCHANTABILITY, FITNESS FOR PARTICULAR
PURPOSE AND WARRANTY OF NON-INFRINGEMENT OF
INTELLECTUAL PROPERTY, ARE EXPRESSLY EXCLUDED;
AND DIRECTED NEITHER ASSUMES NOR AUTHORIZES
ANY PERSON OR ENTITY TO ASSUME FOR IT ANY DUTY,
OBLIGATION OR LIABILITY IN CONNECTION WITH ITS
PRODUCTS.
DIRECTED
DISCLAIMS
AND
HAS
ABSOLUTELY NO LIABILITY FOR ANY AND ALL ACTS
OF
THIRD
PARTIES
INCLUDING
DEALERS
OR
■
Date of Purchase
■
Your Full name and address
INVOLVING DIRECTED OR ITS SUBSIDIARY, THE PROP-
■
Authorized dealer's company name and address
ER VENUE SHALL BE SAN DIEGO COUNTY IN THE
■
Type of unit installed
STATE OF CALIFORNIA. CALIFORNIA STATE LAWS AND
■
Year, make, model, and color of the automobile
APPLICABLE FEDERAL LAWS SHALL APPLY AND GOV-
■
Automobile license number
ERN THE DISPUTE. THE MAXIMUM RECOVERY UNDER
■
Vehicle Identification number
ANY CLAIM AGAINST DIRECTED SHALL BE STRICTLY
■
Installation receipts
LIMITED TO THE AUTHORIZED DIRECTED DEALER'S
All components other than the unit, including and
without limitation the remote control, cables and
installation accessories, carry a 60-day warranty from
the date of purchase of the same.
INSTALLERS. IN THE EVENT OF A CLAIM OR A DISPUTE
PURCHASE PRICE OF THE UNIT. DIRECTED SHALL NOT
BE RESPONSIBLE FOR ANY DAMAGES WHATSOEVER,
INCLUDING BUT NOT LIMITED TO, ANY CONSEQUENTIAL DAMAGES, INCIDENTAL DAMAGES, DAMAGES
FOR THE LOSS OF TIME, LOSS OF EARNINGS, COM-
This warranty is automatically void if the unit's date
MERCIAL LOSS, LOSS OF ECONOMIC OPPORTUNITY
code or serial number is defaced, missing or altered;
AND THE LIKE. NOTWITHSTANDING THE ABOVE, THE
the unit has been modified or used in a manner con-
MANUFACTURER DOES OFFER A LIMITED WARRANTY
trary to its intended purpose; or the unit has been
TO REPLACE OR REPAIR THE CONTROL MODULE AS
damaged by accident, unreasonable use, neglect,
DESCRIBED ABOVE. Some states do not allow limita-
improper service, installation or other causes not aris-
tions on how long an implied warranty will last or the
ing out of defects in materials or construction. This
exclusion or limitation of incidental or consequential
warranty is nontransferable and does not apply to any
damages. This warranty gives you specific legal rights
until that has been modified or used in a manner con-
and you may also have other rights that vary from State
trary to its intended purpose and does not cover bat-
to State. DIRECTED does not and has not authorized
teries. This warranty does not cover labor costs for the
any person or entity to create for it any other obliga-
removal, diagnosis, troubleshooting or reinstallation of
tion, promise, duty or obligation in connection with
the unit. For service on an out-of-warranty product a
these UNITS.
flat fate fee by model is charged. Contact your author-
2
© 2001 Directed Electronics, Inc.
Safety Instructions
This symbol indicates the presence of high voltage in the unit. It
is dangerous to make any kind of
contact with any inside part of this
product.
RISK OF ELECTRIC SHOCK
DO NOT OPEN
CAUTION
TO REDUCE THE RISK
OF ELECTRIC SHOCK,
DO NOT REMOVE COVER
(OR BACK). NO USER
SERVICEABLE PARTS
INSIDE. REFER SERVICING
TO QUALIFIED PERSONNEL.
This symbol alerts you that important literature concerning operation and maintenance has been
included with this product.
CAUTION:
FCC REGULATIONS STATE THAT ANY UNAUTHORIZED CHANGES OR MODIFICATIONS TO THIS
EQUIPMENT MAY VOID THE USER'S AUTHORITY TO OPERATE IT.
IMPORTANT:
One Federal Court has held that unauthorized recording of copyrighted TV programs is an
infringement of U.S. copyright laws.
Certain Canadian programs may be copyrighted and any unauthorized recording in whole
or in part may be a violation of these rights.
To prevent damage that may result in fire or electric shock hazard, do not expose
this appliance to rain or moisture.
Important Safeguards
1.
Read Instructions - Read all safety and
operating instructions before operating
the product.
2.
Retain Instructions - Retain all safety
and operating instructions for future reference.
3.
Heed Warnings - Adhere to all warnings
on the product and in the operating
instructions.
4.
Follow Instructions - Follow all operating
and usage instructions.
5.
Cleaning - Use dry cloth only; do not use
liquid or aerosol cleaners.
© 2001 Directed Electronics, Inc.
6.
Attachments and Connections - Do not
use attachments or make any connections
other than those recommended by the
manufacturer.
7.
Ventilation - Slots and openings in the
cabinet are provided for ventilation. To
ensure reliable operation of the product
and to protect against overheating, these
openings must not be blocked or covered.
8.
Power Cord Wiring Harness - The power
cord should be routed in such a way that it
is not likely to be stepped on, have objects
placed on it, shorted to ground, or hinder
operation of the vehicle in any way.
3
9.
Unit Placement - The unit should be positioned on a flat, sturdy surface and
secured in such a way that it cannot move
freely about the passenger compartment or
hinder operation of the vehicle in any way.
10. Object and Liquid Entry - Never insert
objects (other than video cassette tapes,
as instructed) into this product. Electric
shock, fire, or electric short can occur.
Never spill/pour liquid of any kind
onto/into this product.
11. Servicing - Do not attempt to service this
product yourself; opening or removing the
covers may expose you to dangerous electric voltage or other hazards. Refer all
servicing to qualified service personnel.
12. Damage Requiring Service - Unplug this
product from the power source and refer to
qualified service personnel for the following:
a.
b.
Liquid has spilled into or objects
have been dropped onto the product.
The product has been exposed to rain
or water.
c.
The product does not operate
normally according to the operating
instructions. Adjust only those
controls covered by the operating
instructions, as improper adjustment
of other controls can cause damage
and can require extensive repair work
by a qualified technician to restore
normal operation.
d. The product has been dropped or
damaged in any way.
e.
The product exhibits a distinct
change in performance.
13. Repairs - If the unit stops working for any
reason, discontinue use immediately and
consult with your Directed retailer about
any necessary repairs.
14. Heat - The product should be located away
from heat source devices such as radiators,
heater vents, or other products (including
amplifiers) that produce heat.
Important Information
FCC NOTICE
YOUR WARRANTY
This device complies with Part 15 of FCC rules.
Your warranty registration must be completely
Operation is subject to the following two condi-
filled out and returned within 10 days of pur-
tions: (1) This device may not cause harmful
chase. Your product warranty will not be vali-
interference, and (2) this device must accept
dated if your warranty registration is not
any interference received, including interfer-
returned. Make sure you receive the warranty
ence that may cause undesired operation.
registration from your dealer. It is also neces-
Changes
or
modifications
not
expressly
approved by the party responsible for compliance could void the user's authority to operate
sary to keep your proof of purchase, which
reflects that the product was installed by an authorized dealer.
this device.
4
© 2001 Directed Electronics, Inc.
Table of Contents
Warranty . . . . . . . . . . . . . . . . . . . . . . .
Important Safeguards . . . . . . . . . . . . . .
Safety Instructions . . . . . . . . . . . . . . . .
Important Information . . . . . . . . . . . . .
FCC Notice . . . . . . . . . . . . . . . .
Your Warranty . . . . . . . . . . . . . .
Features . . . . . . . . . . . . . . . . . . . . . . .
Features . . . . . . . . . . . . . . . . . .
Accessories . . . . . . . . . . . . . . . .
Front Panel . . . . . . . . . . . . . . . . . . . . .
Installation . . . . . . . . . . . . . . . . . . . . .
Rear Panel/TV Connection/AV Power . . . .
Remote Control . . . . . . . . . . . . . . . . . .
Remote Control Battery Install/Replace .
Playing a Tape . . . . . . . . . . . . . . . . . . .
Manual Tracking . . . . . . . . . . . . .
Recording . . . . . . . . . . . . . . . . . . . . . .
Videocassette Tapes . . . . . . . . . . . . . . .
About Videocassettes . . . . . . . . .
Using Special Features . . . . . . . . . . . . .
Forward and Reverse Picture Search
Forward and Reverse Jet Search . .
Still and Frame Advance . . . . . . .
Slow Motion Playback . . . . . . . . .
Cleaning and Care . . . . . . . . . . . . . . . .
Video Head Cleaning . . . . . . . . . .
Setting the Main Menu . . . . . . . . . . . . . .
On-Screen Menu . . . . . . . . . . . . .
Record Speed . . . . . . . . . . . . . .
Auto Repeat . . . . . . . . . . . . . . .
Audio Output . . . . . . . . . . . . . .
Troubleshooting . . . . . . . . . . . . . . . . . .
Specifications . . . . . . . . . . . . . . . . . . .
© 2001 Directed Electronics, Inc.
.
.
.
.
.
.
.
.
.
.
.
.
.
.
.
.
.
.
.
.
.
.
.
.
.
.
.
.
.
.
.
.
.
.
.
.
.
.
.
.
.
.
.
.
.
.
.
.
.
.
.
.
.
.
.
.
.
.
.
.
.
.
.
.
.
.
.
.
.
.
.
.
.
.
.
.
.
.
.
.
.
.
.
.
.
.
.
.
.
.
.
.
.
.
.
.
.
.
.
.
.
.
.
.
.
.
.
.
.
.
.
.
.
.
.
.
.
.
.
.
.
.
.
.
.
.
.
.
.
.
.
.
.
.
.
.
.
.
.
.
.
.
.
.
.
.
.
.
.
.
.
.
.
.
.
.
.
.
.
.
.
.
.
.
.
.
.
.
.
.
.
.
.
.
.
.
.
.
.
.
.
.
.
.
.
.
.
.
.
.
.
.
.
.
.
.
.
.
.
.
.
.
.
.
.
.
.
.
.
.
.
.
.
.
.
.
.
.
.
.
.
.
.
.
.
.
.
.
.
.
.
.
.
.
.
.
.
.
.
.
.
.
.
.
.
.
.
.
.
.
.
.
.
.
.
.
.
.
.
.
.
.
.
.
.
.
.
.
.
.
.
.
.
.
.
.
.
.
.
.
.
.
.
.
.
.
.
.
.
.
.
.
.
.
.
.
.
.
.
.
.
.
.
.
.
.
.
.
.
.
.
.
.
.
.
.
.
.
.
.
.
.
.
.
.
.
.
.
.
.
.
.
.
.
.
.
.
.
.
.
.
.
.
.
.
.
.
.
.
.
.
.
.
.
.
.
.
.
.
.
.
.
.
.
.
.
.
.
.
.
.
.
.
.
.
.
.
.
.
.
.
.
.
.
.
.
.
.
.
.
.
.
.
.
.
.
.
.
.
.
.
.
.
.
.
.
.
.
.
.
.
.
.
.
.
.
.
.
.
.
.
.
.
.
.
.
.
.
.
.
.
.
.
.
.
.
.
.
.
.
.
.
.
.
.
.
.
.
.
.
.
.
.
.
.
.
.
.
.
.
.
.
.
.
.
.
.
.
.
.
.
.
.
.
.
.
.
.
.
.
.
.
.
.
.
.
.
.
.
.
.
.
.
.
.
.
.
.
.
.
.
.
.
.
.
.
.
.
.
.
.
.
.
.
.
.
.
.
.
.
.
.
.
.
.
.
.
.
.
.
.
.
.
.
.
.
.
.
.
.
.
.
.
.
.
.
.
.
.
.
.
.
.
.
.
.
.
.
.
.
.
.
.
.
.
.
.
.
.
.
.
.
.
.
.
.
.
.
.
.
.
.
.
.
.
.
.
.
.
.
.
.
.
.
.
.
.
.
.
.
.
.
.
.
.
.
.
.
.
.
.
.
.
.
.
.
.
.
.
.
.
.
.
.
.
.
.
.
.
.
.
.
.
.
.
.
.
.
.
.
.
.
.
.
.
.
.
.
.
.
.
.
.
.
.
.
.
.
.
.
.
.
.
.
.
.
.
.
.
.
.
.
.
.
.
.
.
.
.
.
.
.
.
.
.
.
.
.
.
.
.
.
.
.
.
.
.
.
.
.
.
.
.
.
.
.
.
.
.
.
.
.
.
.
.
.
.
.
.
.
.
.
.
.
.
.
.
.
.
.
.
.
.
.
.
.
.
.
.
.
.
.
.
.
.
.
.
.
.
.
.
.
.
.
.
.
.
.
.
.
.
.
.
.
.
.
.
.
.
.
.
.
.
.
.
.
.
.
.
.
.
.
.
.
.
.
.
.
.
.
.
.
.
.
.
.
.
.
.
.
.
.
.
.
.
.
.
.
.
.
.
.
.
.
.
.
.
.
.
.
.
.
.
.
.
.
.
.
.
.
.
.
.
.
.
.
.
.
.
.
.
.
.
.
.
.
.
.
.
.
.
.
.
.
.
.
.
.
.
.
.
.
.
.
.
.
.
.
.
.
.
.
.
.
.
.
.
.
.
.
.
.
.
.
.
.
.
.
.
.
.
.
.
.
.
.
.
.
.
.
.
.
.
.
.
.
.
.
.
.
.
.
.
.
.
.
.
.
.
.
.
.
.
.
.
.
.
.
.
.
.
.
.
.
.
.
.
.
.
.
.
.
.
.
.
.
.
.
.
.
.
.
.
.
.
.
.
.
.
.
.
.
.
.
.
.
.
.
.
.
.
.
.
.
.
.
.
.
.
.
.
.
.
.
.
.
.
.
.
.
.
.
.
.
.
.
.
.
.
.
.
.
.
.
.
.
.
.
.
.
.
.
.
.
.
.
.
.
.
.
.
.
.
.
.
.
.
.
.
.
.
.
.
.
.
.
.
.
.
.
.
.
.
.
.
.
.
.
.
.
.
.
.
.
.
.
.2
.3
.3
.4
.4
.4
.6
.6
.6
.7
.7
.8
.9
.9
.10
.10
.10
.11
.11
.12
.12
.12
.12
.12
.12
.12
.13
.13
.13
.13
.13
.14
.15
5
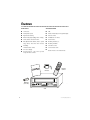
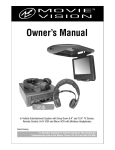
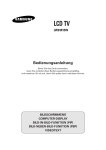
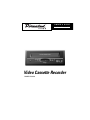
Features
FEATURES
ACCESSORIES
■
Hi-Fi stereo.
■
VCR.
■
Audio/Video inputs.
■
Remote infrared (IR) sensor (Optional part).
■
Digital auto tracking.
■
Remote control.
■
Built-in HQ (High Quality) video circuitry.
■
AA Batteries for remote.
■
Frame advance and slow motion.
■
Power harness.
■
DLC (Diamond Like Carbon) Head - special
alloy reduces head wear and increases
durability.
■
Mounting brackets (2).
■
Mounting hardware.
■
4 machine screws.
■
4 sheet metal screws.
■
Sticker sheet to cover unused holes.
■
Infrared remote control.
■
On-screen display.
■
Remote Ejection - tape can be ejected
using the remote control.
PO
WER
TV
RE
ENTE
R
SHIFT
/VCR
C
ME
NU
DISP
LAY
CH/TR
IISTIL
POWER
POWER REC
EJECT
STOP
SLP
DEW
HEAT
K
W
Remote
Control
Power
Harness
Batteries
(Two AA)
L/SLO
R
REW
REC
PLAY
FF
VCR
6
© 2001 Directed Electronics, Inc.
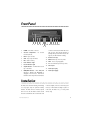
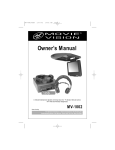
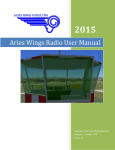
Front Panel
1
2
3 4 5
6
8
7
1.
POWER - Turns VCR on and off.
2.
Cassette Compartment - For cassette
insertion/removal.
3.
EJECT - Ejects cassette.
4.
STOP - Stops tape movement.
5.
REC - Starts recording.
6.
Power Indicator Light
7.
Record Indicator Light
8.
SP/SLP Indicator - Lit when VCR is recording in SLP mode.
9.
DEW/HEAT Indicator - When DEW/HEAT
indicator is blinking and “DEW/HEAT” is
displayed on the TV screen, which shows
the VCR is under a high moist circumstance
10
11 12 13 14 15 16
9
or VCR is overheated, the VCR will not be
able to work. Then the VCR will turn to
standby and dry itself. When moisture disappears, the VCR will work normally.
10. Remote Sensor Eye
11. REW -Rewinds tape from stop mode.
12. PLAY - Press to begin playback.
13. FF - Fast forwards tape from stop mode.
14. Video Input
15. Audio Input (left)
16. Audio Input (right)
Installation
The VCR can be mounted vertically, horizontally,
in direct sunlight, on the floor near heavy traf-
or at any angle using the optional mounting
fic areas, or where fluids are likely to spill on or
brackets. The VCR cannot be mounted upside
in the unit. The VCR is for (-) 12 volt ground
down or on its side. The VCR is sensitive to dirt
vehicles only.
and other contaminants. Do not mount the unit
© 2001 Directed Electronics, Inc.
7
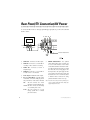
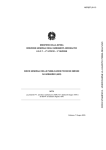
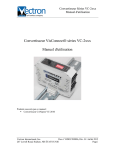
Rear Panel/TV Connection/AV Power
To connect the VCR and TV, use cable type (A/V RCA-type) appropriate to your TV. Connect the VCR
and TV as shown:
3 4 5 6
Back of TV
LINE
OUT
LINE
IN
7
LINE
OUT
R
AUDIO
L
VIDEO IN
ON TV
AUDIO IN
On TV
VIDEO
1 2
1.
VIDEO OUT - Connects to TV video input.
2.
VIDEO IN - Connects to a second VCR for
recording or video camera for recording.
3.
AUDIO OUT - Connects to receiver or
amplifier input.
4.
AUDIO IN - Connects to a second VCR or
an audio source to record audio.
5.
Audio Output - Additional audio output.
6.
DC (+) 12 VOLT INPUT - To provide power
for the VCR, connect the small plug end of
the power harness on the back of the VCR.
RED:
This wire connects to a circuit
that turns on and off with the key.
YELLOW: This wire connects to the battery
or a constant power source.
BLACK: This wire connects to a good
factory ground wire or a metal
part of the chassis.
8
DC 12V
INPUT
REMOTE
SENSOR
INPUT
To Remote IR Sensor
or Directed Video Monitor
7.
REMOTE SENSOR INPUT - The optional
remote infrared (IR) sensor eye allows you
to access all the features on the remote
control when the VCR is mounted in another location away from the remote. To install
the remote IR sensor, simply plug it into
the input next to the power plug. Run the
sensor cable to the front of the vehicle and
mount the sensor in a convenient location
so that the remote control can be easily
pointed toward the remote sensor eye.
Note: Route the wires so they can not be pinched, punctured, or chaffed against bare metal. Always fuse
appropriately at the source.
© 2001 Directed Electronics, Inc.
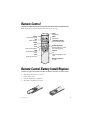
Remote Control
Always aim the remote control directly at the VCR or the remote sensor eye.
EJECT
Ejects the tape.
POWER
Turns VCR on and off.
REC
Starts recording.
ENTER
POWER
REC
EJECT
MENU
ENTER DISPLAY
SHIFT
SHIFT
PLAY
Press to begin playback.
REW
Rewinds tape from stop
mode.
STOP
Stops tape movement.
TRK
MENU
Selects menu.
TRACKING UP/DOWN
Adjusts cassette tracking.
IISTILL/SLOW
STILL(Pause)/SLOW
Selects still frame or variable
slow motion playback.
DISPLAY
FF
Fast forwards tape from stop
mode.
Battery Compartment
(on back)
Remote Control Battery Install/Replace
1.
Slide battery compartment cover out from
back of remote control.
2
Insert two AA batteries as diagrammed.
3.
Slide battery compartment cover back in.
© 2001 Directed Electronics, Inc.
9
Playing a Tape
1.
Turn on VCR and TV.
Videocassettes recorded on other VCRs and
2.
Set input mode on TV to AUX IN, VIDEO or
EXTERNAL.
videocassettes with copy protection may require
3.
Load a video cassette tape. VCR power
turns on automatically.
4.
5.
Press PLAY to start playback. If the tape
doesn’t have a safety tab, VCR will playback automatically. When playback starts,
the VCR automatically adjusts the tracking
for clear picture and sound.
To stop playback, press STOP.
some manual adjustment.
To adjust manually, press CH/TRK up or down as
necessary until the best picture possible is
achieved.
NOTE: Picture distortion often occurs at the beginning
of a tape. Let the tape play for a moment to see
if the distortion clears. If manual tracking adjustments do not produce a clear picture, there may
be a problem with the videotape.
MANUAL TRACKING
For best picture quality, the VCR video head
must be aligned with the recorded track on the
tape; this alignment is called tracking.
Recording
1.
Turn on TV and VCR.
5.
Press REC; the REC button will light.
2.
Insert videocassette tape.
6.
3.
Press the MENU button on the remote
control to access the on-screen menu. Use
the SHIFT button to select the Record
Speed function. Press the ENTER button to
select the desired recording speed. Press
MENU button to exit.
To pause recording, press STILL/SLOW. To
resume recording, press REC.
7.
To end recording, press STOP.
Note: Tape speed can be changed while recording; there
may be minor distortion but no interruption.
10
© 2001 Directed Electronics, Inc.
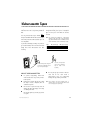
Videocassette Tapes
Always insert the videocassette window-side up
To record a tape that has the Record Protect
with the arrow on the case pointing toward the
Safety Tab removed, place a piece of cellophane
VCR.
tape over the space from which the tab was
Use only videocassette tapes marked VHS .
European-standard PAL VHS videocassette tapes
and S-VHS prerecorded videocassette tapes are
not compatible.
To prevent accidentally recording over previously recorded material, remove the Record Protect
Safety Tab on the videocassette case after
removed.
NOTE: The recording time available on a videocassette
depends on Tape Speed (SP or SLP) and Cassette
Type (T60 = 60 minutes at SP or 180 minutes at SLP;
T120 = 120 minutes at SP or 360 minutes at SLP).
Tape
SP (standard play)
SLP (super longplay)
T-120
T-160
T-180
2 hrs
2 hrs, 40 minutes
3 hrs
6 hrs
8 hrs
9 hrs
recording.
Break off the plastic safety tab
to prevent accidentally recording over important tapes.
ABOUT VIDEOCASSETTES
■
In general, high-quality, brand name
videocassettes last longer and provide a
better picture.
■
Rewind your cassettes all the way so that
the tape is not at a midpoint; this can
extend the tape life.
■
Do not touch or splice the tape; this can
damage the tape and playing such a tape
can damage the VCR.
■
Do not take apart any cassette you plan to
use again.
© 2001 Directed Electronics, Inc.
■
Cover the record protect
space with cellophane
tape to make a new
recording.
Do not put any object inside a videocassette and do not clean inside a
videocassette; this can permanently
damage the tape, making it unusable.
NOTE: Keep cassettes from direct sunlight, heat, or
extreme cold. Do not drop cassettes. Never touch
the recording surface of the tape.
11
Using Special Features
FORWARD AND REVERSE
PICTURE SEARCH
STILL AND FRAME ADVANCE
While in Play mode, press REW or FF; to resume
on a single still frame. Press STILL/SLOW again
normal viewing, press PLAY button.
to advance picture frame by frame. To resume
FORWARD AND REVERSE
JET SEARCH
While in Play mode, press and hold REW or FF;
Jet Search increases the tape speed 7 times if
While in Play mode, press STILL/SLOW to stop
normal viewing, press PLAY.
Note: Using Still mode for more than five minutes
stresses the tape and causes undue stress on the
video heads; the VCR automatically disengages
Still mode after five minutes have elapsed.
recorded at SP speed or 21 times for tapes
recorded at SLP speed. To resume normal viewing, release the button.
NOTE: While in Forward or Reverse Jet Search, audio
is muted.
SLOW MOTION PLAYBACK
Press STILL/SLOW for more than two seconds
for SLOW Motion Playback.
Cleaning and Care
■
Disconnect the VCR from the power source
before cleaning.
VIDEO HEAD CLEANING
■
Do not use liquid or aerosol cleaners on or
in the VCR.
If poor playback qualities (snow, distortion,
■
Use a dry cloth to dust the VCR.
videoheads may need cleaning. If necessary,
■
Keep the remote control with the VCR and
secure it in such a manner that it is unlikely to be lost or damaged.
■
Keep liquids away from the VCR. A spill on
the VCR can damage the electronics and
cause electric shock or fire.
IMPORTANT!
12
streaking, etc.) develop and persist, the unit’s
purchase a head cleaning cassette. Do not clean
the heads excessively.
When using a head cleaning cassette, read all
instructions carefully; incorrect head cleaning
can permanently damage the video heads.
DO NOT INSERT ANY OBJECTS INTO THE CABINET SLOTS; CONTACT WITH A VOLTAGE POINT
INSIDE THE VCR CAN CAUSE DANGEROUS SHOCK OR MAY SHORT OUT PARTS AND CAUSE
FIRE OR ELECTRIC SHOCK.
© 2001 Directed Electronics, Inc.
Using Special Features
ON SCREEN MENU
AUDIO OUTPUT
To access the on-screen menu press the MENU
The Audio Output function allows you to select
button on the remote control. You can access
four different types of audio output. Press the
the following functions: Record speed, Auto
MENU button on the remote control to access
repeat, and Audio output.
the on-screen menu. Use the SHIFT button to
select the Audio Output function. Press the
RECORD SPEED
ENTER button to select the audio output
Press the MENU button on the remote control to
desired, Left, Right, Mono, or Stereo. Press the
access the on-screen menu. Use the SHIFT but-
MENU button to exit.
ton to select the Record Speed function. Press
the ENTER button to select the desired recording speed. Press MENU button to exit.
AUTO REPEAT
NOTE: The tracking, recording speed, auto repeat, and
audio output can only be accessed through the
on- screen menu from the remote control. If you
lose or damage the remote control, you will not
be able to access these functions. S-VHS prerecorded videocassette tapes are not compatible.
The Auto Repeat function will play the videocassette tape repeatedly. Press the MENU button on the remote control to access the onscreen menu. Use the SHIFT button to select the
Auto Repeat function. Press the ENTER button
to switch Auto Repeat ON or OFF. Press the
MENU button to exit.
© 2001 Directed Electronics, Inc.
13
Troubleshooting
Before calling for service, check the following:
PROBLEM
SOLUTION
No Power.
Make sure the VCR is on and connected to an operating
power source; check the remote for “good” batteries.
Videocassette cannot be inserted.
Press EJECT to see if a cassette is already in the VCR.
Make sure the videocassette is window-side up, with the
arrow pointing toward the VCR.
No picture, distorted picture
playback.
■
■
■
■
■
No TV picture.
■
■
Streaks (noise) on a taped program.
■
■
■
■
Streaks (noise) or jitter with
the VCR in Still mode.
Streaks (noise) on a taped program.
14
Check all connections between VCR and TV.
Make sure TV is on.
Press TRK up or down to adjust the picture.
Check all connections.
View another videocassette to see if it plays back
properly.
If the problem occurs on more than one tape, try
using a video head cleaner cassette.
Press TRK up or down to adjust the picture.
■
■
The VCR motor continues to run
after STOP is pressed.
Try another videocassette to see if it plays back
properly.
Press TRK up or down to adjust the picture.
Set INPUT MODE on TV to AUX IN, VIDEO or EXTERNAL.
Make sure the TV is working properly.
If the problem occurs on more than one tape, try
using a video head cleaner cassette.
Check if the VCR is in Still mode.
Check if the cassette has been rewound.
This is normal; the video heads run for five minutes even
even after a cassette has been stopped.
© 2001 Directed Electronics, Inc.
Specifications
Format
VHS 1/2 inch (12.7mm)
Recording System
Rotary Double azimuth four-head helical scanning
Video Heads
DA-4 rotary heads
Audio heads
Linear : 1 stationary
Hi-Fi : 2 rotary
Control head
1 stationary
Erase
1 full track; 1 audio track
Record/play time
6 hours with T-120 in SLP mode
Video input
Video IN terminal (RCA)1.0 Vp-p
Video output
Video out terminal (RCA)1.0 Vp-p
Audio input
Audio IN terminal (RCA) 300 MV, 50K ohm
Audio output
Audio out terminal (RCA) 300 MV
Signal-to-noise ratio
Linear : Better than 40 dB
Hi-Fi : Better than 68 dB
Power source
12V DC
Power consumption
Approx. 10 Watts while in use
Dimensions
10.5 ” (W) x 3.64 ” (H) x 10.5 ” (D)
(265mm x 92.5mm x 265mm)
Fuse
Internal 1.6 Amp GMA style
Weight
6.17 lbs (2.8 kg)
© 2001 Directed Electronics, Inc.
15
The company behind this system is Directed Electronics, Inc.
Since its inception, Directed has had one purpose, to provide consumers with the finest vehicle security, car stereo
products, rear seat entertainment, and accessories available. The recipient of more than 20 patents in the field of
advanced electronic technology, Directed is ISO 9001 registered.
Quality Directed Electronics products are sold and serviced throughout North America and around the world.
Call (800) 274-0200 for more information about our products and services.
Directed® is committed to delivering world-class quality products
and services that excite and delight our customers.
Directed Electronics, Inc.
Vista, CA 92083
www.directed.com
© 2001 Directed Electronics, Inc. - All rights reserved
N82101 Rev. 1.0 12-01
16
© 2001 Directed Electronics, Inc.