1
DESIGN
T1
F&E cisterns
Components fitted
within the
appliance case
PRV
Discharge pipe
Commissioning/
filling assembly
Solar
Controls
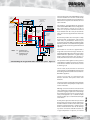
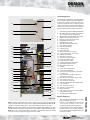
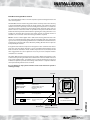
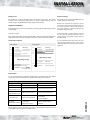
The arrangement of a typical BoilerMate A-Class
SP Solar installation is shown schematically
below. The basic unit which is covered by these
instructions incorporates the Danfoss SH - E01
solar controller.
S1/S2
T3
Solar
circuit
S4
Hot out
Mains
cold in
BoilerMate
A-Class SP Sol
S3
S6
Heating/hot
water controls
(ACB)
Automatic
bypass
valve
S5
T2
V2
Heating
circuit
V1
Note:
Sealed
system kit available as
an optional
extra
V1- normally open
(powered closed)
V2- normally closed
(spring return)
Boiler
Schematic Diagram of Typical BoilerMate 260 SP solar system Figure 1.1
The appliance generally follows the principles
of the standard BoilerMate A-Class SP appliance
but is fitted with a separate set of coils to
allow it to accept the maximum amount of
heat available from the solar panels/controls.
This is then used to supplement the hot water
system.
Because this product does not require a safety
discharge from a temperature and pressure
relief valve, any installations will be easy to
incorporate into the building and will not suffer
from the problems associated with using PVCu
soil stacks to take the discharge from unvented
cylinders.
The models 200 and 220 are supplied with a
single F&E cistern. All four larger models are
supplied with two F&E cisterns.The single cistern
will fit within the cupboard in a typical storey
height cupboard but when two cisterns are
used, these will need to be located elsewhere.
The operation of the appliance/solar system is
controlled by a number of sensors. The location
and reference numbers of the various sensors
is shown eg 2, S6.
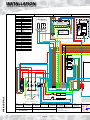
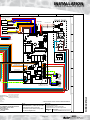
Sensors S1/S2, S3, S4, S5 and S6 are connected
to the appliance control PCB which operates all
the heating and hot water functions as the basic
BoilerMate appliance.
Sensors T1, T2 and T3 are connected to the
Danfoss controller and operate all the solar
functions.
Sensor T3 provides a high temperature interlock
to de-activate the solar pump at a temperature
of 90°C in the store.
Although sensors T3 and T2 are wired in to the
solar controller the cable provided for Sensor T1
(3 metres long) may require to be extended by
the installer dependant on the location of the
solar panels/appliance. (2 x 0.75mm2 double
insulated cable) up to a maximum total length
of 50 metres.
A safety device (pressure relief valve) to control
the risk of over-pressure in system components
should be fitted as shown on the Solar System
diagram. A termination from a safety pressure
device should minimise the risk of damage
to persons or materials. Suitable locations are
a high temperature receptacle, an internal
Page INTRODUCTION
Solar
collector