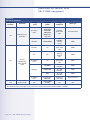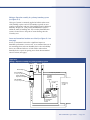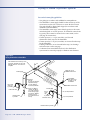
1
H U MI D I F I CA T I O N SYS T E M
D E S I GN G U I DE
from the Humidification Experts
For more information
www.dristeem.com
[email protected]
DRI-STEEM Humidification System Design Guide
DRI-STEEM Humidifier Company
A subsidiary of Research Products Corporation
U.S. Headquarters:
14949 Technology Drive
Eden Prairie, MN 55344
800-328-4447
952-949-2415
952-229-3200 (fax)
European office:
Bell Place, Bell Lane
Syresham, Brackley
NN13 5HP, UK
+44 1280 850122 (voice)
+44 1280 850124 (fax)
E-mail: [email protected]
DRI-STEEM, CRUV, DRI-CALC, GTS, HUMIDI-TECH, LTS,
MINI-BANK, RAPID-SORB, STS, ULTRA-SORB, VAPOR-LOGIC,
VAPORMIST, and VAPORSTREAM are registered trademarks of
DRI-STEEM Humidifier Company.
AREA-TYPE, CLEAN-STEEM, DRANE-KOOLER, and
ENERGY-CALC are trademarks of DRI-STEEM Humidifier
Company.
DRI-STEEM, CRUV, DRI-CALC, GTS, HUMIDI-TECH,
LTS, RAPID-SORB, STS, ULTRA-SORB, VAPOR-LOGIC,
VAPORMIST, and VAPORSTREAM are filed for trademark
registration in Canada and the European community.
© 2003 DRI-STEEM Humidifier Company
Table of contents
Introduction
Introduction to the Design Guide . . . . . . . . . . . . . . . . . . . . . . . . 1
Load
Calculating humidification load
Using inch-pound units of measure . . . . . . . . . . . . . . . . . . . . 4
Using SI (Système International) units of measure . . . . . . 13
Reference tables for calculating load
Steam loss . . . . . . . . . . . . . . . . . . . . . . . . . . . . . . . . . . . . . . . . 17
Heat gain . . . . . . . . . . . . . . . . . . . . . . . . . . . . . . . . . . . . . . . . . 23
Air duct pressure loss . . . . . . . . . . . . . . . . . . . . . . . . . . . . . . . 28
Energy
Select energy source . . . . . . . . . . . . . . . . . . . . . . . . . . . . . . . . . . . 30
Water
Humidifiers and water type . . . . . . . . . . . . . . . . . . . . . . . . . . . . 33
Humidifier
Evaporative system components and operation . . . . . . . . . . . . 39
Steam injection system components and operation . . . . . . . . 47
Humidifier maintenance considerations . . . . . . . . . . . . . . . . . . 51
Control
Controlling DRI-STEEM humidifiers . . . . . . . . . . . . . . . . . . . . 52
Achieving RH control with DRI-STEEM equipment . . . . . . . 56
Absorption
How to design for proper steam absorption . . . . . . . . . . . . . . . 57
Placement
Humidification system components placement . . . . . . . . . . . . 59
Piping
Piping an evaporative humidification system . . . . . . . . . . . . . . 63
Piping a steam injection system . . . . . . . . . . . . . . . . . . . . . . . . . 66
Summary
Summary . . . . . . . . . . . . . . . . . . . . . . . . . . . . . . . . . . . . . . . . . . . . 70
Glossary
Glossary of humidification terms . . . . . . . . . . . . . . . . . . . . . . . . 71
Introduction to the Design Guide
Your guide to humidification system design
Let us know what you think!
Welcome to DRI-STEEM’s Design Guide. In tandem with our
product catalogs, this guide gives you all the information you
need to design a humidification system using DRI-STEEM®
products. The Design Guide covers generic humidification issues
such as calculating load, determining absorption distance, and
laying out piping. Use this guide to help you understand general
humidification system design issues.
We’re constantly trying to improve the
information we share with you. If you
have comments or suggestions for
improvements to this guide, please
contact us at 800-328-4447 or e-mail
us at [email protected].
Use this guide with our catalogs
Our catalogs describe information specific to our products, such
as humidifier dimensions, capacities, and controller capabilities.
Use the catalogs for selecting equipment and completing a product
schedule.
The tools you need
Review the table on the following page,
which describes DRI-STEEM resources, to
see how this guide fits in with our overall
plan of educating you about humidification
issues.
Use this guide with DRI-CALC
DRI-CALC® is DRI-STEEM’s humidification system sizing and
selection software. The software sizes loads, selects equipment,
writes specifications, and creates as-configured installation
instructions and equipment schedules for DRI-STEEM products.
DRI-CALC is the easiest way to design a humidification system.
However, if you are interested in the basic theory behind system
design, or if you want or need to design a system without a
computer, the Design Guide walks you through the humidification
system design process.
Note: DRI-CALC Europe Version 3, with the capabilities described
above, will be released in Europe in 2003.
Use this guide with other DRI-STEEM resources
At DRI-STEEM we’re known for educating our readers
about humidification issues. If you’ve learned specifics about
humidification, it’s likely you learned them from us by reading
one of our newsletters, case studies or articles. Or, perhaps you’ve
read our Humidification Handbook, a comprehensive guide to
humidification theory commonly used as a college textbook.
DRI-STEEM Design Guide • Page 1
Table 2-1:
The tools you need — DRI-STEEM's educational resources
Tool
Purpose
Description
Location
Case studies
Humidification
education
Application-specific stories about installed
humidification systems. Recent topics include:
• Mercy Medical Center; absorption case study
• Waterloo Testing Facility; energy savings case
study
• View, print, download pdf file,
or order a preprinted copy at
www.dristeem.com
• Literature CD
Catalogs
Product-specific
information needed
to make a purchase
decision and create a
schedule
Available for the following products:
CRUV®
DRANE-KOOLER™
GTS®
LTS®
Steam Injection
STS®
ULTRA-SORB®
®
®
VAPORMIST
VAPORSTREAM
HUMIDI-TECH® (available only in Europe)
• View, print, download pdf file
or order a preprinted copy at
www.dristeem.com
• Literature CD
Design Guide
Explains the
humidification system
design process
With this document and a product catalog, HVAC
engineers can design a humidification system.
• Order at www.dristeem.com
DRI-CALC
software
Automates the
humidification system
design process
DRI-CALC automatically sizes loads, selects
equipment, writes specifications, and creates asconfigured installation instructions and equipment
schedules for DRI-STEEM products.
• Order at www.dristeem.com
• Note: DRI-CALC Europe Version 3 will
be available in 2003
ENERGY-CALC™ Calculates energy
savings by switching
from electric to gas
humidifiers
Easy-to-use and comprehensive, and includes
weather data from numerous cities. Savings from
switching from electricity to gas will usually cover
the cost and installation of a new GTS humidifier.
• Use ENERGY-CALC online at
www.dristeem.com
• Not available with European weather
and utility data
Engineering
Humidification
newsletters
Humidification
education
Recent topics include:
• Humidification and water types
• Boiler chemicals and humidification
• Six steps of humidification design
• Steam absorption
• View, print, download pdf file,
or order a preprinted copy at
www.dristeem.com
• Literature CD
Humidification
Handbook
In-depth
humidification theory
Use this handbook when you need more information • Order at www.dristeem.com
than what is available in the Design Guide.
Installation
Guides
Humidification
system installation
instructions
Print job-specific as-configured Installation Guides
• View, print, or copy Installation Guide
using DRI-CALC, or print complete Installation
pdf files from DRI-CALC
Guides from the DRI-CALC library for any DRI-STEEM • Order DRI-CALC at www.dristeem.com
product.
• Note: DRI-CALC Europe Version 3 will
be available in 2003
More tools on the next page u
Page 2 • DRI-STEEM Design Guide
Table 2-1 (continued):
The tools you need — DRI-STEEM's educational resources
Tool
Purpose
Description
Location
Installation,
Operation and
Maintenance
manuals (IOM)
Product-specific
operation and
maintenance
information
Available for the following products:
• View, print, or download pdf
CRUV
DRANE-KOOLER™ GTS
file, or order a preprinted copy at
LTS
Steam Injection
STS
www.dristeem.com
ULTRA-SORB
VAPORMIST
VAPORSTREAM • Literature CD
®
VAPOR-LOGIC 3
HUMIDI-TECH (available only in Europe)
Literature CD
All DRI-STEEM
product literature in
one place
Includes catalogs; Installation, Operation and
Maintenance manuals; Engineering Humidification
newsletters; case studies; and product photos
and other documents for viewing, printing, or
downloading to your computer. Also includes an
absorption video clip.
• Order the Literature CD at
www.dristeem.com
Psychrometric
chart
For calculating
humidification load
Laminated chart with steam absorption charts on
the back
• Order a preprinted copy at
www.dristeem.com
• Not available in Europe
Specifications in
CSI (Construction
Specifications
Institute) format
Descriptions of
humidification
systems for
specification
Print job-specific as-configured product
specifications using DRI-CALC. Print, view or
download specifications for all DRI-STEEM products
from the DRI-CALC library.
• View, print, or copy files from
DRI-CALC (order at
www.dristeem.com)
• Not available with European data
Videos
General product
information in video
format
Available titles include:
• Humidification Essentials
• Absorption
• Videos can be ordered at
www.dristeem.com
• An absorption video clip is also on the
Literature CD
Web site
Comprehensive
information about
DRI-STEEM products
and humidification
issues
Information available includes:
• Detailed product information
• Downloadable catalogs and manuals
• Humidification education
• New product announcements
• Representative locator
• News about trade shows
• www.dristeem.com
DRI-STEEM Design Guide • Page 3
Calculating humidification load
using inch-pound units of measure
Important notes
about calculating load
• When outside air is 10% or less, it is
wise to calculate the load twice. The
first calculation should be made on the
basis of air changes due to mechanical
ventilation; the second should be based
on the natural ventilation method.
Use the larger of the two results for
determining the load.
• Vapor naturally migrates from areas
with high vapor pressure to areas with
low vapor pressure, regardless of air
movement. Vapor retarders reduce vapor
migration, but should only be installed in
accordance with local codes.
DRI-CALC software will calculate load for you
The easiest way to calculate humidification load is to use
DRI-CALC, DRI-STEEM’s humidification system sizing and
selection software. The software not only sizes loads, but also selects
equipment, writes as-configured specifications, creates equipment
schedules, and provides as-configured installation instructions for
DRI-STEEM products.
Three methods for calculating humidification load
DRI-CALC uses the following methods for calculating load. Read
through the examples in this section to learn how to manually
calculate load using these same methods:
1. Natural ventilation method
2. Mechanical ventilation method
3. Economizer cycle method
Natural ventilation method
As a general rule, humidification load is based only on the
amount of air entering a building or space. In buildings without
mechanical ventilation systems, humidification load is usually
calculated using the air change method. Buildings can be classified
by number of air changes per hour, with typical air changes being
1, 11⁄2, or 2 air changes per hour. For more information about
calculating air infiltration see the chapter on natural ventilation and
infiltration in the ASHRAE Fundamentals Handbook (available at
www.ashrae.org). For noncritical applications, we typically use 11⁄2
air changes per hour for calculating load.
Page 4 • DRI-STEEM Design Guide
Sample Problem 1
Calculate the humidification load for a printing plant where:
• The desired conditions in the space are 70 °F and 50% RH.
• The outside entering conditions are 10 °F and 45% RH.
• The dimensions of the building are 120' × 80' × 12'
(length × width × height).
• Air changes per hour = 1
Solution to Sample Problem 1 using
the natural ventilation method
1. Find the moisture content of your desired conditions by
referring to Table 6-1 on Page 6: Read across the 70 °F line to the
50% RH column to find 3.44 lbs/hr/100 cfm.
2. Find the moisture content of the entering air by reading across
the 10 °F line to the 45% RH column to find 0.30 lbs/hr/100 cfm.
3. Determine the moisture in lbs/hr to be added per 100 cfm by
subtracting the moisture content of the entering conditions from
the moisture content of the desired conditions:
3.44 lbs/hr/100 cfm – 0.30 lbs/hr/100 cfm
= 3.14 lbs/hr/100 cfm
4. Determine the air quantity to be humidified by finding the total
cubic feet of the space, multiplying that by the air changes per
hour, and dividing by 60 minutes/hr to find air quantity to be
humidified in cfm:
120'
× 80' × 12' × 1 air change per hour
_________________________________
60 minutes/hr
= 1,920 cfm
5. Determine the humidification load by multiplying the quantity
of air to be humidified by moisture to be added:
1,920
cfm × 3.14 lbs/hr
___________________
100 cfm
= 60.29 lbs/hr
DRI-STEEM Design Guide • Page 5
Table 6-1:
Pounds of moisture per hour per 100 cfm at sea level
Air
temp.
Percentage of saturation
°F
5%
10%
15%
20%
25%
30%
35%
40%
45%
50%
55%
60%
65%
70%
80%
90%
100%
-20
0.00
0.014
0.022
0.03
0.035
0.043
0.05
0.057
0.064
0.071
0.078
0.085
0.093
0.099
0.114
0.13
0.14
-10
0.012
0.025
0.037
0.05
0.06
0.074
0.085
0.097
0.11
0.121
0.134
0.147
0.159
0.171
0.20
0.22
0.24
0
0.02
0.04
0.06
0.081
0.102
0.121
0.142
0.162
0.184
0.204
0.223
0.245
0.265
0.285
0.33
0.36
0.40
10
0.033
0.066
0.10
0.133
0.166
0.20
0.232
0.266
0.30
0.332
0.364
0.40
0.434
0.465
0.54
0.59
0.66
20
0.053
0.107
0.16
0.215
0.262
0.32
0.374
0.430
0.494
0.535
0.583
0.635
0.695
0.758
0.86
0.96
1.05
30
0.085
0.17
0.25
0.33
0.42
0.50
0.585
0.67
0.75
0.84
0.92
1.00
1.09
1.17
1.34
1.49
1.65
40
0.12
0.24
0.37
0.48
0.60
0.74
0.84
0.96
1.08
1.20
1.31
1.45
1.53
1.68
1.98
2.20
2.43
50
0.17
0.35
0.52
0.70
0.88
1.05
1.24
1.40
1.58
1.76
1.93
2.12
2.30
2.46
2.83
3.16
3.49
55
0.21
0.42
0.63
0.84
1.05
1.26
1.47
1.68
1.90
2.10
2.30
2.53
2.74
2.94
3.37
3.76
4.16
60
0.22
0.44
0.75
0.89
1.25
1.49
1.74
1.98
2.24
2.50
2.72
2.99
3.24
3.48
4.00
4.46
4.93
65
0.29
0.58
0.86
1.16
1.36
1.75
2.04
2.32
2.63
2.92
3.20
3.50
3.80
4.06
4.73
5.27
5.82
68
0.32
0.65
0.98
1.30
1.63
1.96
2.28
2.60
2.84
3.26
3.56
3.91
4.24
4.55
5.23
5.84
6.05
69
0.33
0.67
1.00
1.33
1.68
2.00
2.35
2.66
3.01
3.35
3.66
4.03
4.36
4.68
5.40
6.04
6.38
70
0.34
0.68
1.02
1.37
1.72
2.05
2.40
2.74
3.10
3.44
3.75
4.12
4.46
4.80
5.56
6.20
6.45
71
0.36
0.72
1.07
1.43
1.78
2.15
2.50
2.85
3.21
3.55
3.90
4.29
4.65
5.00
5.74
6.40
7.07
72
0.37
0.74
1.10
1.47
1.84
2.20
2.58
2.94
3.32
3.68
4.03
4.44
4.80
5.15
5.91
6.60
7.29
73
0.38
0.76
1.14
1.51
1.90
2.28
2.66
3.03
3.43
3.80
4.16
4.57
4.95
5.31
6.12
6.83
7.54
74
0.39
0.78
1.19
1.56
1.97
2.37
2.75
3.13
3.54
3.93
4.31
4.74
5.14
5.51
6.32
7.05
7.78
75
0.40
0.81
1.21
1.62
2.03
2.42
2.84
3.23
3.65
4.06
4.45
4.86
5.28
5.65
6.55
7.27
8.03
77
0.42
0.85
1.29
1.73
2.16
2.58
3.02
3.42
3.82
4.33
4.73
5.13
5.63
6.04
6.94
7.75
8.55
80
0.47
0.94
1.42
1.90
2.37
2.84
3.30
3.75
4.20
4.75
5.19
5.63
6.18
6.62
7.62
8.50
9.38
85
0.54
1.09
1.66
2.19
2.78
3.32
3.88
4.39
4.91
5.56
6.07
6.59
7.23
7.75
8.92
9.95
10.98
90
0.62
1.25
1.87
2.47
3.12
3.74
4.37
4.95
5.53
6.25
6.84
7.43
8.15
8.73
10.03
11.20
12.37
Page 6 • DRI-STEEM Design Guide
Mechanical ventilation method
The following example shows how to calculate load using the
mechanical ventilation method. This method works best when the
percentage of outside air volume is at least 10%.
Sample Problem 2
Calculate the humidification load for a printing plant where:
• The desired conditions in the space are 70 °F and 50% RH.
• The outside entering conditions are 10 °F and 45% RH.
• A mechanical ventilation system circulates air at 9,000 cfm, of
which 25% is outside air.
Solution to Sample Problem 2 using
the mechanical ventilation method
1. Find the moisture content of your desired conditions by
referring to Table 6-1 on Page 6. Read across the 70 °F line to the
50% RH column to find 3.44 lbs/hr/100 cfm.
2. Find the moisture content of the entering air by reading across
the 10 °F line to the 45% RH column to find 0.30 lbs/hr/100 cfm.
3. Determine the moisture in lbs/hr to be added per 100 cfm by
subtracting the moisture content of the entering conditions from
the moisture content of the desired conditions:
3.44 lbs/hr/100 cfm – 0.30 lbs/hr/100 cfm
= 3.14 lbs/hr/100 cfm
4. Determine the air quantity to be humidified by multiplying total
air circulation by the percentage of outside air:
9,000 cfm × 25% = 2,250 cfm
5. Determine the humidification load by multiplying the quantity
of air to be humidified by moisture to be added:
2,250
cfm × 3.14 lbs/hr
___________________
100 cfm
= 70.65 lbs/hr
DRI-STEEM Design Guide • Page 7
Figure 8-1:
Typical economizer control system
Outside air
Damper
Damper
arms
Mixed air controller
set at 55 ˚F
Damper motor
Mixed air
55 ˚F
Return air
Economizer cycle method
Many year-round air conditioning systems use economizer
cycle control. Economizer cycles use cool outside air instead of
mechanical cooling to maintain building temperature when the
outside temperature is moderate (typically spring and fall).
Figure 8-1 shows a typical application where a mixed-air controller
positions a modulating damper motor, which adjusts the outside
air intake and return dampers. Note that the dampers are opposing
— as one moves toward open, the other moves toward closed, and
vice versa — to maintain a mixed air temperature of 55 °F as the
outside air temperature rises and falls.
When the outside air temperature rises to 55 °F (100% outside air),
the outside air damper returns to a minimum setting (usually about
10%) and mechanical cooling takes over. Table 9-1 shows how
outside air percentages change with varying outside and mixed air
temperatures.
As the outside temperature rises, the ratio of outside air to return
air increases. This works toward increasing the humidification load.
For example, to cool return air to 55 ˚F, you can admit 50%
outdoor air at 40 ˚F, but only 17% outdoor air at -20 ˚F (see Table
9-1). The warmer the outdoor air temperature, the more air volume
that can be admitted. More air volume means more air that needs
to be humidified, thereby increasing the humidification load
required to maintain RH set point.
To better understand how varying temperatures and air volumes
affect humidification load calculations, review the following
formulas, sample problems, and tables.
The formula for determining the quantity of outside air in an
economizer cycle is:
V2 = VAH / [(A/B) + 1]
Where:
VAH = V1 + V2
V1 = Volume (cfm) of return air
V2 = Volume (cfm) of outside air
A = Temperature difference between mixed air
and outside air
B = Temperature difference between return
air and mixed air
Page 8 • DRI-STEEM Design Guide
Sample Problem 3
Determine the outside air quantity in an economizer cycle system
where:
•
•
•
•
The outside air is 20 °F.
The return (room) air is 70 °F.
The mixed air is 55 °F.
The total air is 12,000 cfm.
Solution to Sample Problem 3 using
the economizer cycle method
1. A = 55 °F – 20 °F = 35 °F
2. B = 70 °F – 55 °F = 15 °F
3. VAH = 12,000 cfm
4. V2 = VAH / [(A/B) + 1]
= 12,000 cfm / [(35 °F/15 °F) + 1]
= 3,600 cfm = outside air
To document outside air quantity at various points (typically 10 °F
intervals) over a temperature range of outside air, create a table
using the above formula. Table 9-1 shows percentages of outside air
at a consistent 70 °F room temperature and three different mixed
air temperatures.
Calculating maximum humidification
load in an economizer system
Table 9-1:
Outside air percentages with
70 °F return air and various mixed
air temperatures
Outside
temp (°F)
Outside air percentage
of 50 °F
mixed air
of 55 °F
mixed air
of 60 °F
mixed air
-20
22
17
11
-10
25
19
13
0
29
21
15
10
33
25
17
20
40
30
20
30
50
38
25
40
67
50
34
50
100
75
50
55
—
100
67
60
—
—
100
Determining maximum humidification load involves the use of
one of the three mixed air temperatures in Table 9-1 (or a similar
table developed from different mixed and return air temperature
conditions).
Also needed is the difference (lbs/hr/100 cfm) between the desired
moisture content of the air in the space and that contained in the
outside air. This difference is made up by the humidifier.
When calculating maximum humidification load in an economizer
system for noncritical applications, calculate load using the daily
minimum % RH for year by location. However, when calculating
maximum humidification load in an economizer system for critical
applications, to ensure that humidity set point can always be
met, calculate maximum humidification load using the extreme
minimum daily RH for year by location. Table 11-1 shows these
values for select cities.
DRI-STEEM Design Guide • Page 9
Notes about economizer cycle method
Sample Problem 4
Economizer “free cooling,” provided
by using outside air, is not always cost
effective. The operating cost advantage of
ambient cooling may be lost when certain
operating conditions prevail, such as:
Determine the maximum humidification load for an economizer
system located in Minneapolis where:
• The indoor relative humidity requirements
are in a fairly high range (40% RH or
greater).
• Electricity is used to heat water into
steam for humidification.
A crossover point occurs where the
economizer cycle’s increased humidification
energy costs (due to increased air volume
requiring humidification) are more than the
savings derived by outside air cooling.
• The desired conditions in the space are 70 °F and 35% RH.
• The mixed air is 55 °F.
• The total air is 12,000 cfm.
Solution to Sample Problem 4 using
the economizer cycle method
1. Find the moisture content of your desired conditions by
referring to Table 6-1 on Page 6. Read across the 70 °F line to the
35% column, and find 2.40 lbs/hr/100 cfm.
2. Determine the moisture to be added at each 10 °F increment by
using:
• Table 11-1 to find entering RH
• Table 6-1 to find moisture content of entering conditions
• Table 9-1 to find the percentage of outside air
Create a new table with your results by using the following
formula (where H = lbs/hr/cfm):
[H (space) – H (outside air)] × % outside air
× [cfm (total air)/100 cfm] = lbs/hr (load)
Table 12-1 shows data created from the above formula for this
sample problem.
3. Find the maximum humidification load from your created table.
The maximum load for this system is 70.68 lbs/hr and occurs
when the outdoor temperature is 40 °F as shown in Table 12-1.
Page 10 • DRI-STEEM Design Guide
Table 11-1:
Average daily minimum % RH for year and extreme daily minimum % RH for year, by location (U.S. and Canada)*
Average daily
minimum % RH
for year
Extreme daily
minimum % RH
for year
Average daily
minimum % RH
for year
Extreme daily
minimum % RH
for year
Akron, Ohio
54
20
Green Bay, Wisconsin
57
21
Albany, New York
51
Albuquerque, New Mexico
22
15
Indianapolis, Indiana
51
20
4
Jacksonville, Florida
54
16
Amarillo, Texas
Anchorage, Alaska
30
5
Kansas City, Missouri
46
14
59
15
Lake Charles, Louisiana
55
16
Apalachicola, Florida
53
16
Las Vegas, Nevada
16
1
Atlanta, Georgia
49
12
Little Rock, Arkansas
50
16
Atlantic City, New Jersey
53
20
Los Angeles, California
52
6
Baltimore, Maryland
48
18
Madison, Wisconsin
53
20
Birmingham, Alabama
46
13
Medford, Oregon
43
11
Bismarck, North Dakota
46
11
Miami, Florida
56
13
Boise, Idaho
35
6
Milwaukee, Wisconsin
58
21
Boston, Massachusetts
47
5
Minneapolis, Minnesota
51
20
Brownsville, Texas
54
13
Montreal, Quebec
54
21
Cape Hatteras, North Carolina
62
17
Nashville, Tennessee
50
20
Caribou, Maine
52
11
New York, New York
45
11
Charleston, South Carolina
51
14
Norfolk, Virginia
52
21
Cheyenne, Wyoming
32
5
North Omaha, Nebraska
47
7
Chicago, Illinois
48
13
Oklahoma City, Oklahoma
45
11
Cleveland, Ohio
52
19
Olympia, Washington
60
19
Colorado Springs, Colorado
31
2
Philadelphia, Pennsylvania
49
12
Columbia, Missouri
47
9
Phoenix, Arizona
20
5
Columbus, Ohio
51
19
Pittsburgh, Pennsylvania
48
12
Dayton, Ohio
47
13
Portland, Maine
51
14
Denver, Colorado
27
1
Portland, Oregon
52
14
Des Moines, Iowa
50
17
Raleigh/Durham, North Carolina
46
12
Detroit, Michigan
51
20
Salt Lake City, Utah
32
5
Dodge City, Kansas
40
7
San Antonio, Texas
43
14
Duluth, Minnesota
55
21
Santa Maria, California
49
7
Edmonton, Alberta
53
10
Seattle, Washington
58
18
El Paso, Texas
22
3
St. Louis, Missouri
50
18
Ely, Nevada
29
2
Sterling, Washington
48
11
Fairbanks, Alaska
51
10
Tallahassee, Florida
48
12
Fort Worth, Texas
45
12
Tampa, Florida
51
15
Fresno, California
37
7
Toronto, Ontario
57
16
Grand Rapids, Minnesota
54
21
Vancouver, British Columbia
65
17
Great Falls, Montana
37
6
Winnipeg, Manitoba
54
14
Location
Location
Note:
* When providing humidity for critical applications, use the values in the “Extreme daily minimum % RH for year” column to ensure that humidity set point will
always be met.
DRI-STEEM Design Guide • Page 11
Table 12-1:
Calculation table from economizer cycle method Sample Problem 3 (inch-pound units)
Outside
temp.
H
(space)
°F
lbs/hr/100 cfm
-20
2.4
–
0.072
=
2.328
x
17
x
12,000
÷
100
=
47.49
-10
2.4
–
0.124
=
2.276
x
19
x
12,000
÷
100
=
51.89
0
2.4
–
0.208
=
2.192
x
21
x
12,000
÷
100
=
55.24
10
2.4
–
0.338
=
2.062
x
25
x
12,000
÷
100
=
61.86
20
2.4
–
0.545
=
1.855
x
30
x
12,000
÷
100
=
66.78
30
2.4
–
0.856
=
1.544
x
38
x
12,000
÷
100
=
70.41
40
2.4
–
1.222
=
1.178
x
50
x
12,000
÷
100
=
70.68
50
2.4
–
1.794
=
0.606
x
75
x
12,000
÷
100
=
54.54
55
2.4
–
2.140
=
0.260
x
100
x
12,000
÷
100
=
31.20
–
H
(outside air)
=
lbs/hr/100 cfm
Page 12 • DRI-STEEM Design Guide
Subtotal
x
lbs/hr/100 cfm
% of
outside air
x
%
Total air
÷
cfm
100
=
cfm
Load
lbs/hr
Calculating humidification load
using SI (Système International)
units of measure
DRI-CALC software will calculate load for you
The easiest way to calculate humidification load is to use
DRI-CALC, DRI-STEEM’s humidification system sizing and
selection software. The software not only sizes loads, but also selects
equipment, writes specifications, creates equipment schedules, and
provides as-configured installation instructions for DRI-STEEM
products.
Note: DRI-CALC Europe Version 3, with the capabilities described
above, will be released in Europe in 2003.
Methods for calculating humidification load
DRI-CALC uses the following methods for calculating load. Read
through the examples in this section to learn how to manually
calculate load using these same methods:
Important notes
about calculating load
• When outside air is 10% or less, it is
wise to calculate the load twice. The
first calculation should be made on the
basis of air changes due to mechanical
ventilation; the second should be based
on the natural ventilation method.
Use the larger of the two results for
determining the load.
• Vapor naturally migrates from areas
with high vapor pressure to areas with
low vapor pressure, regardless of air
movement. Vapor retarders reduce vapor
migration, but should only be installed in
accordance with local codes.
• Natural ventilation method
• Mechanical ventilation method
DRI-CALC also calculates load using the economizer cycle method,
which is not described in this section
Natural ventilation method
As a general rule, humidification load is based only on the amount
of air entering a building or space. In buildings without mechanical
ventilation systems, humidification load is usually calculated using
the air change method. Buildings can be classified by number of
air changes per hour, with typical air changes being 1, 11⁄2, or 2
air changes per hour. See the chapter on natural ventilation and
infiltration in the ASHRAE Fundamentals Handbook (available
at www.ashrae.org) for more information about calculating air
infiltration. For noncritical applications, we typically use 11⁄2 air
changes per hour for calculating load.
DRI-STEEM Design Guide • Page 13
Sample Problem 1
Calculate the humidification load for a printing plant where:
• The desired conditions in the space are 21 °C and 50% RH.
• The outside entering conditions are -10 °C and 45% RH.
• The dimensions of the building are:
40 m × 25 m × 4 m (length × width × height).
• Air changes per hour = 1
Solution to Sample Problem 1
using the natural ventilation method
1. Find the moisture content of your desired conditions by
referring to Table 15-1 on Page 15: Read across the 21 °C line to
the 50% RH column to find 9.31 g/m3/h.
2. Find the moisture content of the entering air by reading across
the -10 °C line to the 45% RH column to find 0.97 g/m3/h.
3. Determine the moisture in g/h to be added per m3/h by
subtracting the moisture content of the entering conditions from
the moisture content of the desired conditions:
9.31 g/m3/h – 0.97 g/m3/h
= 8.34 g/m3/h
4. Determine the air quantity to be humidified by finding the total
cubic meters of the space and multiplying that by the air changes
per hour to find air quantity to be humidified in m3/h:
40 m × 25 m x 4 m × 1 air change per hour
= 4,000 m3/h
5. Determine the humidification load by multiplying the quantity
of air to be humidified by moisture to be added:
4,000 m3/h × 8.34 g/m3/h
= 33,360 g/h = 33.36 kg/h
Page 14 • DRI-STEEM Design Guide
Table 15-1:
Grams of moisture per m3/h at sea level
Air
temp.
Percentage of saturation
˚C
5%
10%
15%
20%
25%
30%
35%
40%
45%
50%
55%
60%
65%
70%
80%
90%
100%
-30
0.02
0.03
0.05
0.07
0.09
0.10
0.12
0.14
0.15
0.17
0.19
0.20
0.22
0.24
0.27
0.31
0.34
-25
0.03
0.06
0.08
0.11
0.14
0.17
0.19
0.22
0.25
0.28
0.31
0.33
0.36
0.39
0.44
0.50
0.56
-20
0.04
0.09
0.13
0.18
0.22
0.27
0.31
0.36
0.40
0.44
0.49
0.53
0.55
0.62
0.71
0.80
0.89
-15
0.07
0.14
0.21
0.28
0.35
0.42
0.49
0.56
0.63
0.70
0.77
0.84
0.91
0.98
1.12
1.25
1.39
-10
0.11
0.22
0.32
0.43
0.54
0.64
0.75
0.86
0.97
1.08
1.18
1.29
1.40
1.55
1.72
1.94
2.15
-5
0.16
0.33
0.49
0.65
0.82
0.98
1.14
1.31
1.47
1.63
1.80
1.96
2.12
2.28
2.61
2.93
3.26
0
0.24
0.49
0.73
0.98
1.22
1.47
1.71
1.95
2.20
2.44
2.68
2.93
3.17
3.41
3.90
4.38
4.86
5
0.34
0.69
1.03
1.37
1.72
2.06
2.40
2.74
3.09
3.42
3.77
4.11
4.45
4.79
5.46
6.15
6.82
10
0.48
0.95
1.43
1.91
2.38
2.86
3.33
3.80
4.27
4.75
5.21
5.69
6.16
6.62
7.57
8.50
9.43
13
0.58
1.15
1.73
2.31
2.88
3.45
4.02
4.59
5.17
5.73
6.30
6.87
7.44
8.01
9.13
10.30
11.40
14
0.61
1.23
1.84
2.45
3.06
3.67
4.28
4.89
5.49
6.10
6.71
7.32
7.92
8.52
9.72
10.90
12.10
16
0.70
1.39
2.08
2.78
3.47
4.16
4.84
5.53
6.22
6.90
7.58
8.27
8.95
9.63
11.00
12.30
13.70
18
0.79
1.57
2.35
3.14
3.92
4.69
5.47
6.24
7.02
7.79
8.57
9.33
10.10
10.90
12.40
13.90
15.40
19
0.84
1.67
2.50
3.33
4.16
4.99
5.81
6.63
7.45
8.27
9.09
9.90
10.70
11.50
13.10
14.80
16.40
20
0.88
1.77
2.66
3.53
4.41
5.29
6.16
7.04
7.92
8.78
9.65
10.50
11.40
12.20
14.00
15.70
17.40
21
0.94
1.88
2.82
3.75
4.68
5.61
6.55
7.47
8.40
9.31
10.20
11.10
12.10
13.00
14.80
16.60
18.40
22
1.00
2.00
2.99
3.98
4.97
5.96
6.94
7.92
8.90
9.87
10.80
11.80
12.80
13.80
15.70
17.60
19.50
23
1.06
2.12
3.17
4.22
5.27
6.32
7.36
8.40
9.43
10.50
11.50
12.50
13.50
14.60
16.60
18.60
20.70
24
1.12
2.24
3.36
4.48
5.60
6.70
7.80
8.90
10.00
11.10
12.20
13.30
14.30
15.40
17.60
19.70
21.80
25
1.19
2.38
3.56
4.75
5.92
7.09
8.27
9.42
10.60
11.80
12.90
14.10
15.20
16.30
18.60
20.90
23.10
27
1.34
2.67
4.00
5.32
6.64
8.00
9.27
10.60
11.90
13.20
14.40
15.70
17.00
18.30
20.80
23.30
25.80
30
1.59
3.17
4.74
6.30
7.87
9.42
11.00
12.50
14.00
15.60
17.10
18.60
20.10
21.60
24.60
27.50
30.50
35
2.10
4.19
6.26
8.33
10.40
12.40
14.40
16.40
18.50
20.40
22.40
24.40
26.30
28.30
32.20
36.00
39.70
DRI-STEEM Design Guide • Page 15
Mechanical ventilation method
The following example shows how to calculate load using the
mechanical ventilation method. This method works best when the
percentage of outside air volume is at least 10%.
Sample Problem 2
Calculate the humidification load for a printing plant where:
• The desired conditions in the space are 21 °C and 50% RH.
• The outside entering conditions are -10 °C and 45% RH.
• A mechanical ventilation system circulates air at 15,000 m3/h, of
which 25% is outside air.
Solution to Sample Problem 2 using
the mechanical ventilation method
1. Find the moisture content of your desired conditions by
referring to Table 15-1 on Page 15. Read across the 21 °C line to
the 50% RH column to find 9.31 g/m3/h.
2. Find the moisture content of the entering air by reading across
the -10 °C line to the 45% RH column to find 0.97 g/m3/h.
3. Determine the moisture in g/h to be added per m3/h by
subtracting the moisture content of the entering conditions from
the moisture content of the desired conditions:
9.31 g/m3/h – 0.97 g/m3/h
= 8.34 g/m3/h
4. Determine the air quantity to be humidified by multiplying total
air circulation by the percentage of outside air:
15,000 m3/h × 25% = 3,750 m3/h
5. Determine the humidification load by multiplying the quantity
of air to be humidified by moisture to be added:
3,750 m3/h × 8.34 g/m3/h = 31,275 g/h
= 31.275 kg/h
Page 16 • DRI-STEEM Design Guide
Reference tables for calculating load:
Steam loss
Steam loss in lbs/hr/ft2
Table 17-1:
Steam loss in lbs/hr/ft2 of duct area or ULTRA-SORB face area at 55 °F duct temperature for all ULTRA-SORB panels
and for RAPID-SORB, Multiple-Tube, and Single-Tube evaporative dispersion units
Duct air
velocity
Tube centers or duct height with Single-Tube
3"
6"
9"
12"
18"
24"
36"
48"
60"
fpm
lbs/hr/ft2
lbs/hr/ft2
lbs/hr/ft2
lbs/hr/ft2
lbs/hr/ft2
lbs/hr/ft2
lbs/hr/ft2
lbs/hr/ft2
lbs/hr/ft2
500
1.90
1.10
0.76
0.63
0.52
0.47
0.35
0.26
0.20
750
2.40
1.40
1.00
0.90
0.70
0.6
0.45
0.34
0.25
1000
2.80
1.77
1.20
1.00
0.85
0.75
0.56
0.42
0.32
1250
3.10
1.90
1.50
1.10
0.96
0.85
0.66
0.50
0.38
1500
3.40
2.10
1.60
1.25
1.05
0.95
0.72
0.55
0.42
1750
3.60
2.20
1.70
1.35
1.15
1.05
0.82
0.64
0.49
2000
3.70
2.30
1.75
1.40
1.25
1.10
0.86
0.68
0.53
2250
3.75
2.35
1.77
1.43
1.30
1.13
0.88
0.70
0.55
2500
3.78
2.37
1.78
1.44
1.32
1.15
0.89
0.71
0.56
2750
3.79
2.38
1.79
1.45
1.33
1.16
0.90
0.72
0.57
3000
3.80
2.39
1.80
1.46
1.34
1.17
0.91
0.73
0.58
DRI-STEEM Design Guide • Page 17
Steam loss in kg/h/m2
Table 18-1:
Steam loss in kg/h/m2 of duct area or ULTRA-SORB face area at 13 °C duct temperature for all ULTRA-SORB panels
and for RAPID-SORB, Multiple-Tube, and Single-Tube evaporative dispersion units
Duct air
velocity
Tube centers or duct height with Single-Tube
76 mm
152 mm
229 mm
305 mm
457 mm
610 mm
914 mm
1219 mm
1524 mm
m/s
kg/h/m2
kg/h/m2
kg/h/m2
kg/h/m2
kg/h/m2
kg/h/m2
kg/h/m2
kg/h/m2
kg/h/m2
2.54
9.28
5.37
3.71
3.08
2.54
2.30
1.71
1.27
0.98
3.81
11.72
6.84
4.88
4.39
3.42
2.93
2.20
1.66
1.22
5.08
13.67
8.64
5.86
4.88
4.15
3.69
2.73
2.05
1.56
6.35
15.14
9.28
7.32
5.37
4.69
4.15
3.22
2.44
1.86
7.62
16.60
10.25
7.81
6.10
5.13
4.64
3.52
2.69
2.05
8.89
17.58
10.74
8.30
6.59
5.62
5.13
4.00
3.13
2.39
10.16
18.07
11.23
8.55
6.84
6.10
5.37
4.20
3.32
2.59
11.43
18.31
11.48
8.64
6.98
6.35
5.52
4.30
3.42
2.69
12.70
18.46
11.57
8.69
7.03
6.45
5.62
4.35
3.47
2.73
13.97
18.51
11.62
8.74
7.08
6.49
5.66
4.39
3.52
2.78
15.24
18.56
11.67
8.79
7.13
6.54
5.71
4.44
3.56
2.83
Page 18 • DRI-STEEM Design Guide
Steam loss in lbs/hr/ft2
Table 19-1:
Steam loss in lbs/hr/ft2 of duct area at 55 °F duct temperature for MAXI-BANK™, Multiple-Tube, and Single-Tube
jacketed steam injection humidifiers
Tube centers or duct height with Single-Tube
Duct air
velocity
6"
9"
12"
18"
24"
36"
48"
60"
Insulated
Noninsulated
Insulated
Noninsulated
Insulated
Noninsulated
Insulated
Noninsulated
Insulated
Noninsulated
Insulated
Noninsulated
Insulated
Noninsulated
Insulated
Noninsulated
500
0.86
1.50
0.63
1.04
0.52
0.86
0.40
0.75
0.40
0.63
0.28
0.48
0.20
0.35
0.14
0.24
750
1.04
1.92
0.80
1.38
0.67
1.16
0.55
0.98
0.54
0.85
0.38
0.59
0.27
0.45
0.19
0.33
1000
1.15
2.30
0.92
1.73
0.81
1.38
0.69
1.15
0.57
1.04
0.48
0.73
0.32
0.55
0.24
0.42
1250
1.29
2.63
1.01
1.87
0.83
1.58
0.78
1.35
0.63
1.21
0.50
0.86
0.36
0.66
0.29
0.49
1500
1.38
2.93
1.04
2.07
0.86
1.73
0.85
1.50
0.68
1.42
0.53
1.02
0.40
0.78
0.30
0.57
1750
1.46
3.06
1.04
2.18
0.89
1.87
0.87
1.69
0.73
1.52
0.56
1.18
0.43
0.91
0.32
0.66
2000
1.53
3.21
1.07
2.26
0.93
1.95
0.89
1.83
0.77
1.61
0.58
1.22
0.46
0.97
0.32
0.66
2250
1.56
3.28
1.08
2.27
0.94
1.98
0.91
1.91
0.79
1.66
0.60
1.26
0.47
0.98
0.32
0.68
2500
1.57
3.29
1.10
2.30
0.95
2.00
0.93
1.95
0.80
1.67
0.60
1.27
0.48
1.01
0.33
0.68
2750
1.57
3.31
1.11
2.33
0.96
2.02
0.93
1.96
0.81
1.70
0.60
1.27
0.49
1.02
0.34
0.71
3000
1.58
3.32
1.11
2.33
0.96
2.03
0.95
1.99
0.81
1.71
0.61
1.28
0.49
1.02
0.35
0.73
fpm
DRI-STEEM Design Guide • Page 19
Steam loss in kg/h/m2
Table 20-1:
Steam loss in kg/h/m2 of duct area at 13 °C duct temperature for MAXI-BANK, Multiple-Tube, and Single-Tube
jacketed steam injection humidifiers
Duct air
velocity
Tube centers or duct height with Single-Tube
76 mm
152 mm
229 mm
305 mm
457 mm
610 mm
914 mm
1219 mm
Insulated
Noninsulated
Insulated
Noninsulated
Insulated
Noninsulated
Insulated
Noninsulated
Insulated
Noninsulated
Insulated
Noninsulated
Insulated
Noninsulated
Insulated
Noninsulated
2.5
4.21
7.30
3.09
5.06
2.53
4.21
1.97
3.65
1.97
3.09
1.35
2.33
0.99
1.72
0.67
1.16
3.8
5.06
9.40
3.92
6.74
3.29
5.65
2.70
4.80
2.65
4.13
1.85
2.87
1.31
2.19
0.93
1.60
5.1
5.62
11.24
4.49
8.43
3.93
6.74
3.37
5.62
2.78
5.06
2.36
3.57
1.56
2.70
1.18
2.05
6.4
6.32
12.85
4.92
9.13
4.07
7.73
3.79
6.60
3.08
5.90
2.46
4.21
1.76
3.23
1.40
2.39
7.6
6.74
14.33
5.06
10.11
4.21
8.43
4.13
7.33
3.32
6.91
2.59
4.97
1.95
3.79
1.46
2.78
8.9
7.11
14.94
5.08
10.66
4.36
9.15
4.25
8.27
3.54
7.44
2.74
5.76
2.11
4.42
1.55
3.24
10.2
7.45
15.65
5.25
11.02
4.53
9.52
4.35
8.95
3.74
7.85
2.83
5.94
2.26
4.74
1.57
3.28
11.4
7.63
16.03
5.28
11.09
4.60
9.66
4.44
9.33
3.85
8.09
2.92
6.14
2.29
4.80
1.58
3.32
12.7
7.65
16.05
5.35
11.24
4.64
9.75
4.54
9.53
3.89
8.17
2.95
6.22
2.35
4.94
1.59
3.34
14.0
7.69
16.15
5.41
11.36
4.70
9.87
4.56
9.57
3.96
8.32
2.95
6.20
2.38
5.00
1.66
3.48
15.2
7.71
16.20
5.41
11.36
4.78
9.91
4.62
9.70
3.97
8.33
2.98
6.26
2.38
5.00
1.71
3.58
m/s
Page 20 • DRI-STEEM Design Guide
Steam loss in lbs/hr/ft2 and kg/h/m2
Table 21-1:
Steam loss in lbs/hr/ft2 and kg/h/m2 of duct area at 55 °F or 13 °C
duct temperature for MINI-BANK® jacketed steam injection
humidifiers
3" or 76 mm tube centers
Duct air velocity
Insulated
Noninsulated
fpm
m/s
lbs/hr/ft2
kg/h/m2
lbs/hr/ft2
kg/h/m2
500
2.5
1.0
5.1
2.0
9.8
750
3.8
1.4
6.7
2.8
13.5
1000
5.1
1.6
7.9
3.0
14.4
1250
6.4
1.6
7.6
3.1
15.0
1500
7.6
1.7
8.1
3.3
16.0
1750
8.9
1.7
8.5
3.5
16.9
2000
10.2
1.8
8.9
3.6
17.8
2250
11.4
1.9
9.2
3.7
18.2
2500
12.7
1.9
9.2
3.7
18.2
2750
14.0
1.9
9.2
3.7
18.2
3000
15.2
1.9
9.2
3.7
18.2
DRI-STEEM Design Guide • Page 21
Steam loss in lbs/hr/ft2 and kg/h/m2
Table 22-1:
Steam loss of interconnecting vapor hose, tubing, and pipe
Description
Steam loss
Nominal hose,
tubing, or pipe size
Insulation thickness
Noninsulated
Insulated
inches
DN
lbs/hr/ft
kg/h/m
lbs/hr/ft
kg/h/m
inches
mm
11⁄2
40
0.15
0.22
N/A
N/A
N/A
N/A
2
50
0.20
0.30
N/A
N/A
N/A
N/A
11⁄2
40
0.11
0.16
0.020
0.030
2.0
50
2
50
0.14
0.21
0.025
0.037
2.0
50
3
80
0.20
0.30
0.030
0.045
2.5
64
4
100
0.26
0.39
0.030
0.045
3.0
76
5
125
0.31
0.46
0.035
0.052
3.0
76
6
150
0.36
0.54
0.039
0.058
3.0
76
11⁄2
40
0.22
0.33
0.020
0.030
2.0
50
2
50
0.25
0.38
0.025
0.037
2.0
50
3
80
0.39
0.58
0.030
0.045
2.5
64
4
100
0.49
0.73
0.030
0.045
3.0
76
5
125
0.59
0.88
0.035
0.052
3.0
76
6
150
0.70
1.04
0.039
0.058
3.0
76
Hose
Tubing
Pipe
Note: Data based on ambient air temperature of 80 °F (26.7 °C), fiberglass insulation, copper tubing, and Schedule 40 pipe.
Page 22 • DRI-STEEM Design Guide
Reference tables for calculating load:
Heat gain
Heat gain in °F
Table 23-1:
Heat gain in °F at 55 °F duct temperature for all ULTRA-SORB panels and for RAPID-SORB, Multiple-Tube, and
Single-Tube evaporative dispersion units
Duct air
velocity
Tube centers or duct height with Single-Tube
3"
6"
9"
12"
18"
24"
36"
48"
60"
fpm
°F
°F
°F
°F
°F
°F
°F
°F
°F
500
3.41
1.98
1.37
1.13
0.93
0.84
0.63
0.47
0.36
750
2.87
1.68
1.20
1.08
0.84
0.72
0.54
0.41
0.30
1000
2.52
1.59
1.12
0.90
0.76
0.68
0.50
0.38
0.29
1250
2.23
1.37
1.08
0.79
0.69
0.61
0.47
0.36
0.27
1500
2.04
1.26
0.96
0.75
0.63
0.57
0.43
0.33
0.25
1750
1.85
1.13
0.87
0.69
0.59
0.54
0.42
0.33
0.25
2000
1.66
1.03
0.79
0.63
0.56
0.49
0.39
0.31
0.24
2250
1.50
0.94
0.71
0.57
0.52
0.45
0.35
0.28
0.22
2500
1.36
0.85
0.64
0.52
0.47
0.41
0.32
0.26
0.20
2750
1.24
0.78
0.58
0.47
0.43
0.38
0.29
0.24
0.19
3000
1.14
0.72
0.54
0.44
0.40
0.35
0.27
0.22
0.17
DRI-STEEM Design Guide • Page 23
Heat gain in °C
Table 24-1:
Heat gain in °C at 13 °C duct temperature for all ULTRA-SORB panels and for RAPID-SORB, Multiple-Tube, and
Single-Tube evaporative dispersion units
Duct air
velocity
Tube centers or duct height with Single-Tube
76 mm
152 mm
229 mm
305 mm
457 mm
610 mm
914 mm
1219 mm
1524 mm
m/s
°C
°C
°C
°C
°C
°C
°C
°C
°C
2.54
1.90
1.10
0.76
0.63
0.52
0.47
0.35
0.26
0.20
3.81
1.60
0.93
0.67
0.60
0.47
0.40
0.30
0.23
0.17
5.08
1.40
0.88
0.62
0.50
0.42
0.38
0.28
0.21
0.16
6.35
1.24
0.76
0.60
0.44
0.38
0.34
0.26
0.20
0.15
7.62
1.13
0.70
0.53
0.42
0.35
0.32
0.24
0.18
0.14
8.89
1.03
0.63
0.49
0.39
0.33
0.30
0.23
0.18
0.14
10.16
0.92
0.57
0.44
0.35
0.31
0.27
0.21
0.17
0.13
11.43
0.83
0.52
0.39
0.32
0.29
0.25
0.20
0.16
0.12
12.70
0.76
0.47
0.36
0.29
0.26
0.23
0.18
0.14
0.11
13.97
0.69
0.43
0.33
0.26
0.24
0.21
0.16
0.13
0.10
15.24
0.63
0.40
0.30
0.24
0.22
0.19
0.15
0.12
0.10
Page 24 • DRI-STEEM Design Guide
Heat gain in °F
Table 25-1:
Heat gain in °F at 55 °F duct temperature for MAXI-BANK, Multiple-Tube, and Single-Tube jacketed steam injection
humidifiers
Tube centers or duct height with Single-Tube
Duct air
velocity
6"
9"
12"
18"
24"
36"
48"
60"
Insulated
Noninsulated
Insulated
Noninsulated
Insulated
Noninsulated
Insulated
Noninsulated
Insulated
Noninsulated
Insulated
Noninsulated
Insulated
Noninsulated
Insulated
Noninsulated
500
1.6
2.7
1.1
1.9
0.9
1.6
0.7
1.3
0.7
1.1
0.5
0.9
0.4
0.6
0.2
0.4
750
1.2
2.3
1.0
1.7
0.8
1.4
0.7
1.2
0.7
1.0
0.5
0.7
0.3
0.5
0.2
0.4
1000
1.0
2.1
0.8
1.6
0.7
1.2
0.6
1.0
0.6
0.9
0.4
0.7
0.3
0.5
0.2
0.4
1250
0.9
1.9
0.5
1.3
0.6
1.1
0.6
1.0
0.5
0.9
0.4
0.6
0.3
0.5
0.2
0.4
1500
0.8
1.8
0.6
1.2
0.5
1.0
0.5
0.9
0.5
0.9
0.4
0.6
0.3
0.5
0.2
0.3
1750
0.7
1.6
0.5
1.1
0.5
1.0
0.4
0.9
0.4
0.8
0.3
0.6
0.2
0.5
0.2
0.3
2000
0.7
1.4
0.5
1.0
0.4
0.9
0.4
0.8
0.3
0.7
0.3
0.5
0.2
0.4
0.1
0.3
2250
0.6
1.3
0.4
0.9
0.4
0.8
0.4
0.8
0.3
0.7
0.2
0.5
0.2
0.4
0.1
0.3
2500
0.6
1.2
0.4
0.8
0.3
0.7
0.3
0.7
0.3
0.6
0.2
0.5
0.2
0.4
0.1
0.2
2750
0.5
1.1
0.4
0.8
0.3
0.7
0.3
0.6
0.3
0.6
0.2
0.4
0.2
0.3
0.1
0.2
3000
0.5
1.0
0.3
0.7
0.3
0.6
0.3
0.6
0.2
0.5
0.2
0.4
0.1
0.3
0.1
0.2
fpm
DRI-STEEM Design Guide • Page 25
Heat gain in °C
Table 26-1:
Heat gain in °C at 13 °C duct temperature for MAXI-BANK, Multiple-Tube, and Single-Tube jacketed steam injection
humidifiers
Duct air
velocity
Tube centers or duct height with Single-Tube
76 mm
152 mm
229 mm
305 mm
457 mm
610 mm
914 mm
1219 mm
Insulated
Noninsulated
Insulated
Noninsulated
Insulated
Noninsulated
Insulated
Noninsulated
Insulated
Noninsulated
Insulated
Noninsulated
Insulated
Noninsulated
Insulated
Noninsulated
2.5
0.86
1.50
0.63
1.04
0.52
0.86
0.40
0.75
0.40
0.63
0.28
0.48
0.20
0.35
0.14
0.24
3.8
0.69
1.28
0.54
0.92
0.45
0.77
0.37
0.66
0.36
0.56
0.25
0.39
0.18
0.30
0.13
0.22
5.1
0.58
1.15
0.46
0.86
0.40
0.69
0.35
0.58
0.35
0.52
0.24
0.37
0.16
0.28
0.12
0.21
6.4
0.52
1.05
0.40
0.75
0.33
0.63
0.31
0.54
0.30
0.48
0.20
0.35
0.16
0.26
0.12
0.20
7.6
0.46
0.98
0.35
0.69
0.29
0.58
0.28
0.50
0.27
0.47
0.20
0.34
0.15
0.26
0.11
0.19
8.9
0.42
0.87
0.30
0.62
0.25
0.54
0.23
0.48
0.21
0.44
0.16
0.34
0.12
0.2
0.09
0.19
10.2
0.38
0.80
0.27
0.56
0.23
0.49
0.22
0.46
0.19
0.40
0.14
0.30
0.12
0.24
0.08
0.17
11.4
0.35
0.73
0.24
0.51
0.21
0.44
0.20
0.42
0.18
0.37
0.13
0.28
0.10
0.22
0.07
0.15
12.7
0.31
0.66
0.22
0.46
0.19
0.40
0.19
0.39
0.16
0.34
0.12
0.26
0.10
0.20
0.07
0.14
14.0
0.29
0.60
0.20
0.42
0.18
0.37
0.17
0.36
0.15
0.31
0.11
0.23
0.09
0.19
0.06
0.13
15.2
0.26
0.55
0.18
0.39
0.16
0.34
0.16
0.33
0.14
0.28
0.10
0.21
0.08
0.17
0.06
0.12
m/s
Page 26 • DRI-STEEM Design Guide
Heat gain in °F and °C
Table 27-1:
Heat gain in °F and °C of duct area at 55 °F and 13 °C duct
temperature for MINI-BANK jacketed steam injection humidifiers
3" or 76 mm tube centers
Duct air velocity
Insulated
Noninsulated
fpm
m/s
°F
°C
°F
°C
500
2.5
1.87
1.04
3.63
2.01
750
3.8
1.66
0.92
3.32
1.84
1000
5.1
1.45
0.81
2.90
1.61
1250
6.4
1.12
0.62
2.22
1.23
1500
7.6
1.00
0.55
1.97
1.09
1750
8.9
0.90
0.50
1.78
0.99
2000
10.2
0.82
0.46
1.64
0.91
2250
11.4
0.75
0.42
1.49
0.83
2500
12.7
0.68
0.38
1.34
0.74
2750
14.0
0.62
0.34
1.22
0.68
3000
15.2
0.57
0.31
1.12
0.62
DRI-STEEM Design Guide • Page 27
Reference tables for calculating load:
Air duct pressure loss
Air duct pressure loss in wc and Pa
Table 28-1:
Air duct pressure losses for all ULTRA-SORB panels and for RAPID-SORB, Multiple-Tube, and Single-Tube evaporative
dispersion units
Tube centers or duct height with Single-Tube (without airflow stabilizer panel)
Duct air velocity
3"
76 mm
6"
152 mm
9” and
greater
229 mm and
greater
wc
Pa
fpm
m/s
wc
Pa
wc
Pa
250
1.3
0.010
2.5
0.005
1.2
500
2.5
0.020
5.0
0.010
2.5
750
3.8
0.045
11.2
0.015
3.7
1000
5.1
0.080
20.0
0.025
1250
6.4
0.120
29.9
1500
7.6
0.170
1750
8.9
2000
Add to pressure values if
ULTRA-SORB has an airflow
stabilizer panel
wc
Pa
0
0
0.010
2.5
0.040
10.0
6.2
0.090
22.0
0.035
8.7
0.150
37.0
42.0
0.050
12.4
0.210
52.0
0.230
57.0
0.070
17.4
0.270
67.0
10.2
0.300
75.0
0.090
22.0
0.330
82.0
2250
11.4
0.380
95.0
0.110
27.0
0.420
105.0
2500
12.7
0.470
117.0
0.140
35.0
0.500
124.0
2750
14.0
0.570
142.0
0.170
42.0
0.620
154.0
3000
15.2
0.680
169.0
0.200
50.0
0.740
184.0
Page 28 • DRI-STEEM Design Guide
There is no
measurable
air pressure
loss for
these tube
spacings.
Air duct pressure loss in wc and Pa
Table 29-1:
Air duct pressure losses for MAXI-BANK, Multiple-Tube, and Single-Tube jacketed steam injection
humidifiers
With insulated jackets: Tube centers or duct height with Single-Tube
Duct air velocity
6"
152 mm
9"
229 mm
12"
305 mm
18"
457 mm
24"
610 mm
fpm
m/s
wc
Pa
wc
Pa
wc
Pa
wc
Pa
wc
Pa
500
2.5
0.02
5.0
0.02
5.0
0.01
2.5
0.01
2.5
0.01
2.5
1000
5.1
0.08
20.0
0.06
15.0
0.04
10.0
0.03
7.5
0.03
7.5
1500
7.6
0.18
45.0
0.14
35.0
0.10
25.0
0.07
17.0
0.07
17.0
With noninsulated jackets: Tube centers or duct height with Single-Tube
Duct air velocity
6"
152 mm
9"
229 mm
12"
305 mm
18"
457 mm
24"
610 mm
fpm
m/s
wc
Pa
wc
Pa
wc
Pa
wc
Pa
wc
Pa
500
2.5
0.02
5.0
0.01
2.5
0.01
2.5
0.01
2.5
0.01
2.5
1000
5.1
0.06
15.0
0.05
12.0
0.04
10.0
0.03
7.5
0.03
7.5
1500
7.6
0.14
35.0
0.11
27.0
0.08
20.0
0.07
17.0
0.07
17.0
DRI-STEEM Design Guide • Page 29
Select energy source
Choices when using on-site steam
Choose energy source wisely
Using on-site steam for humidification can
be a good economic choice. Pressurized
steam can be injected directly into the
airstream, or passed through a heat
exchanger to heat potable, softened, or
DI/RO water for humidification steam.
A pound of water requires approximately 1,000 BTUs to vaporize.
Given that proper humidification typically requires vaporizing
two to three pounds of water for every 100 cfm of outside air
introduced into the system, humidification energy use ranges from
2,000 to 3,000 BTUs per 100 cfm of outside air.
Chemically-treated boiler steam may affect
indoor air quality. Many humidifier users
are finding that chemically treated, boilergenerated steam is unsuitable for direct
injection humidification. This is because
boiler water is treated with anticorrosion
chemicals that are then emitted with the
steam into the occupied space. These
chemicals can irritate eyes and skin and
aggravate respiratory disorders such as
asthma. In addition, they can accelerate the
aging process of certain materials like paper
and wood, an issue especially relevant to
museums.
A kilogram of water requires approximately 2.4 kJ to vaporize.
Given that proper humidification typically requires vaporizing
1.5 to 2.5 kilograms of water for every 100 m3/h of outside air
introduced into the system, humidification energy use ranges from
3.5 kJ to 5.8 kJ per 100 m3/h of outside air.
When designing your humidification system
using boiler steam, consider a closed loop
system such as DRI-STEEM’S STS Steam-toSteam humidifier to prevent the discharge of
chemically treated steam into your building.
Two major types of humidifiers
• Isothermal systems use heat from an external source to create
humidity. Electricity, natural gas, hot water, and boiler steam
are isothermal heat sources used to boil water into steam for
humidification.
The table on Page 32 shows DRI-STEEM’s isothermal humidifiers
described by energy type.
• Adiabatic systems use heat from the surrounding air to change
water into vapor for humidification (evaporation). Foggers,
ultrasonic, and pezio disk humidifiers are typical adiabatic
systems.
Why choose isothermal humidification?
• Choose isothermal humidification if you require predictable,
controllable, and short absorption distances. Adiabatic systems
require long absorption distances and often do not provide
complete absorption in typical HVAC applications.
• Choose isothermal humidification if you have low air
temperatures in your ducts. Adiabatic humidification requires
very warm or preheated air for absorption to occur.
• Choose isothermal humidification if there is an on-site boiler
or hot water source. Direct steam injection or a heat-exchanger
type isothermal system may be most appropriate. Consider
DRI-STEEM’s:
– Steam injection humidifiers: ULTRA-SORB, MAXI-BANK,
Multiple-Tube, MINI-BANK, Single-Tube, or AREA-TYPE
– STS Steam-to-Steam (with heat exchanger) evaporative steam
humidifier
– LTS Liquid-to-Steam (with heat exchanger) evaporative steam
humidifier
See also the text at left for more detail about choices when using
on-site steam.
Page 30 • DRI-STEEM Design Guide
• Choose isothermal electric humidification for application
flexibility. Electric element humidification systems easily integrate
into existing systems. They are available in a wide range of sizes,
capacities and options, allowing them to meet the humidification
demands of virtually any environment. Consider DRI-STEEM’s:
–
–
–
–
VAPORSTREAM humidifier
VAPORMIST humidifier
CRUV humidifier
HUMIDI-TECH humidifier (available only in Europe)
• Choose isothermal humidification to gain the economic benefits
of natural gas. Gas-fired humidification systems offer substantial
energy savings over electric systems. Consider DRI-STEEM’s:
– GTS Gas-to-Steam humidifier
When is adiabatic appropriate?
Is the supply air warm and dry? If so, your humidification needs
may be met by an adiabatic system such as a fogger, which
uses sensible heat in the air for its energy source. In the right
environment, these systems can be very economical due to the
cooling effect they provide. Exercise caution, however, when
applying adiabatic humidification to standard commercial
applications with short absorption distances and low discharge
air temperatures. We have found there are very few applications
where adiabatic humidification provides complete absorption, often
resulting in wet ducts.
DRI-STEEM Design Guide • Page 31
Table 32-1:
DRI-STEEM products by energy source
DRI-STEEM product
ELECTRICITY
Maximum capacity
lbs/hr
kg/h
RH
control
capability*
4,000
1,814
±1%
Shortest absorption available
No unnecessary heat gain
Double-header design
Pre-assembled
MINI-BANK
•
•
•
•
Short to moderate absorption distance
Suitable for medium capacity systems
Sized for small ducts
Pre-assembled
84
38
±1%
•
•
•
•
•
Short to moderate absorption distance
Suitable for large capacity systems
Fits small ducts to large air handlers
MAXI-BANK pre-assembled
Multiple-Tube field-assembled
3,328
(Unlimited with
multiple valves)
1,509
(Unlimited with
multiple valves)
±1%
2,312
1,048
±1%
MAXI-BANK/
Multiple-Tube
Single-Tube
Pressurized steam injection dispersion
ULTRA-SORB
•
•
•
•
• Long absorption distance
• Suitable for small capacity systems
• Pre-assembled
AREA-TYPE™
• Suitable for medium capacity systems
• Used in ductless spaces
• Absorption varies by application
286
130
±3%
STS
• Chemical-free steam
• Economical: Uses on-site boiler steam
• Extra large capacity
1,600
(6,400 when four
units are connected)
726
(2,903 when four
units are connected)
±3%
GTS
• Economical benefits of gas
• Large capacity
• Indoor and outdoor enclosures
600
(3,600 when six
units are connected)
272
(1,633 when six
units are connected)
±3%
• Precise RH control (±1%)
• Industrial grade
• Suitable for any application
285
(1,140 when four
units are connected)
129
(517 when four units
are connected)
±1%
• For use in finished spaces
• Attractive cabinet
102
46
±3%
• For use in finished spaces
• Attractive cabinet
• Available only in Europe
102
46
±3%
CRUV
• For packaged AC units or small ducted
appliances
• Designed for easy service access
102
46
±3%
LTS
• Economical when there is on-site hot
water (minimum 240 °F [ 115 °C ] )
• Large capacity
540
(2,160 when four
units are connected)
245
(980 when four units
are connected)
±3%
VAPORSTREAM
HOT
WATER
Key features
VAPORMIST
HUMIDI-TECH
Evaporative steam dispersion
GAS
PRESSURIZED STEAM
Energy
source
Note:
* Many variables affect RH control capability. See Pages 52-56 for more information about the factors that affect humidifier controllability.
Page 32 • DRI-STEEM Design Guide
Humidifiers and water type
Water type affects humidifier performance, maintenance,
vapor quality, and efficiency
Water is often called the universal solvent because almost
everything is soluble to some degree in water. This property causes
water to become contaminated by virtually any material it contacts,
with the mix of contaminants varying greatly from one location to
another.
Humidification is the process of transforming water into vapor,
and so it is not surprising that water type has a great impact on
humidifier performance, maintenance requirements, humidification
vapor quality, and efficiency of operation.
There are four types of water used in humidifiers:
• Potable water (drinking, tap, or well water)
• Softened water (hardness reduced through an ion exchange
process)
• High-purity water (deionized and/or reverse osmosis treated
water)
• Boiler water (typically treated with anticorrosion chemicals)
Potable water: Usually safe for drinking
but can be hard on humidifiers
Potable water, commonly referred to as drinking, tap, or well
water, can contain any number of living microorganisms, dissolved
organic material, dissolved minerals, and suspended materials.
While all of these substances can affect humidification vapor
quality, humidifier maintenance, performance, and efficiency
are significantly affected by dissolved minerals and suspended
materials.
• Living microorganisms (bacteria) are killed when water is
heated to 180 °F (83 °C), and so bacteria are not a concern when
using isothermal humidifiers where water is boiled to make
steam (vapor). However, care should be taken to ensure that all
harmful microorganisms are removed from water sources feeding
nonboiling (adiabatic) humidifiers such as air washers, foggers,
atomizers, or pezio disk systems. In addition, even though a
water supply may be free of harmful bacteria, contaminants from
the air can still cause microbial growth in wetted-media or wick
systems. Water treatment for bacteria includes filtration, reverse
osmosis, chemical oxidation, and disinfection. The most common
treatment for bacteria is chemical oxidation by either ozonation
or by adding chlorine.
DRI-STEEM Design Guide • Page 33
• Dissolved organic material comes from three major sources:
Figure 34-1:
How a water softener works
Highly
soluble ions
Sodium
(does not
form scale)
exchanged
here for Slightly
soluble ions
Calcium and
magnesium
(minerals that
form scale)
– The breakdown of naturally occurring organic materials (plant
and animal matter)
– Domestic and commercial chemical wastes (agricultural and
urban runoff, or leaching from contaminated soils)
– Chemical reactions that occur during water treatment processes
(from disinfection by-products or pipe joint adhesives)
Activated carbon and microfiltration, and reverse osmosis and
deionization processes remove dissolved organic material.
Water
softener
Pressure
Semipermeable membrane
Figure 34-2:
How reverse osmosis filtration works
• Dissolved minerals found in potable water are magnesium,
calcium, iron, and silicon, with calcium and magnesium the
primary elements causing “hard” water. Water hardness is
commonly measured in grains per gallon (gpg). As water
hardness increases, so does the need for humidifier cleaning to
remove scale buildup. Downtime for cleaning, as well as time
required to heat fresh water that replaces frequently skimmed
or drained water (to remove minerals), can significantly affect
humidifier performance and efficiency. Water softening is the
most common method for reducing water hardness.
• Suspended materials, typically clay or silt, give water a cloudy
appearance. These particles should be removed from humidifier
makeup water as they will settle out and collect in humidifier
water reservoirs. These particles typically are removed by
filtration.
Softened water significantly reduces cleaning requirements
High
contaminant
concentration
Water
flow
Low
contaminant
concentration
Water softening is an ion exchange process where slightly soluble
magnesium and calcium ions are replaced by very soluble sodium
ions. The exchanged sodium ions stay in solution when in water
and do not attach to humidifier tank walls and elements as scale in
the way magnesium and calcium will.
Softening water can dramatically improve humidifier performance,
maintenance requirements, and efficiency. It is not unusual
for systems using softened water to go several seasons without
cleaning. However, water softeners need their brine tanks regularly
replenished with sodium (so that there are sodium ions available
to exchange with the magnesium and calcium ions). For this
reason, owners should regularly inspect their humidifiers using
softened water to verify softener operation. To lessen maintenance
requirements, we recommend softening water for humidifier use
where water hardness is greater than 12 gpg.
Page 34 • DRI-STEEM Design Guide
High purity water yields high purity humidification
for critical process environments
Figure 35-1:
Single tank (mixed bed) DI system
Semiconductor, pharmaceutical, and electronics manufacturers,
as well as laboratories, industrial clean rooms, and healthcare
facilities often require high purity humidification. To avoid
water contaminants that can be carried into the air with water
vapor, these types of environments use highly processed – and
very pure – water in their humidification systems. For these
environments, water is cycled through several prefilters, through
a reverse osmosis permeable membrane and, frequently, through
a chemical deionization process. This type of high purity water is
often called “DI/RO” water (deionized, reverse osmosis water) and,
depending on the quality of process, can be free of minerals and
other contaminants. The purity of this water degrades upon contact
with the atmosphere and certain materials, and should remain in a
closed system contacting only chemically stable materials.
Properly maintained DI/RO water is not corrosive
A well-maintained DI/RO system produces water that consists
solely of hydrogen and hydroxides and is free of most or all total
dissolved solids (TDS) including chlorides and other molecules that
cause metal corrosion.
Many users of high purity water have the false impression that it is
highly corrosive to metals. This may be due, in part, to the water
quality found in systems that have not been properly maintained
or operated. If, for example, DI beds are not properly maintained,
or the flow rate through them exceeds their capacity, the first of
the two DI beds (the cation bed) typically becomes saturated or
ineffective, and then the weak acid solutions generated by the
second bed (the anion bed) cannot be neutralized and flow into
the water system. If this happens, chlorides and other electrolytes
are introduced into the system in large quantities, with the ability
to cause substantial corrosion. This is important to note, for any
damage to DRI-STEEM equipment caused by chlorides will void
your DRI-STEEM warranty.
w
Ra
ter
wa
ure
ter
P
wa
Causes a series of cation
and anion exchanges
Figure 35-2:
Two-tank DI system
on
uti
ter
a
ww
Ra
ak
We
ol
id s
ac
e
Pur
ter
wa
Exchanges chloride,
sulfate, and alkaline ions
for hydroxide ions (OH-)
Replaces sodium, calcium,
magnesium and other cations
with hydrogen ions (H+)
Another misconception about DI/RO water is that its ion-hungry
nature causes metal corrosion, but while properly maintained highpurity water will take some ions from the metal it contacts, this
exchange process causes, at worst, only minimal corrosion.
DRI-STEEM Design Guide • Page 35
How water type affects humidifier performance
Isothermal systems — systems that boil water to make steam
(vapor) — typically maintain relative humidity (RH) levels within
1%-5% of an established set point, with the ability to maintain a
specific level of control directly dependent on the system's ability
to respond to changing environmental conditions. Responsiveness
is affected by two things: delivery of the energy source and the
amount of water discarded (through skim, drain, and flush cycles)
to remove minerals.
In combination with a programmable controller, using high quality
valves or substituting electronic heater controllers such as SSRs for
mechanical contactors allow responsive steam production.
Water hardness, however, plays a critical part in an isothermal
humidifier’s ability to maintain RH set point. As water hardness
increases, so does the need for skimming, draining, and flushing.
Skimming removes precipitated minerals before they attach to
humidifier tank walls and elements as scale. As water is skimmed
off, cold water is introduced into the tank. In some cases, this
introduction of cold water causes a delay in steam output until the
cold water is heated to boiling. Drain and flush cycles, automated
on most systems, completely drain the humidifier and then
typically flush the tank with cold water. In this situation, not only
is the humidifier off-line for a period of time, but the tank needs
to be filled and heated to boiling before it can produce steam.
In the meantime, the RH level can drop 5% or more until the
humidifier is producing steam again. In certain applications, such
as office buildings or other environments humidified to improve
comfort, RH fluctuation is not a major issue. In process-critical
environments, however, a 5% RH fluctuation can affect processes.
Humidifiers in these environments typically use softened or DI/RO
water, depending on the level of control required. The fewer the
minerals in the water, the better the control capability.
Low mineral content means low maintenance
From a maintenance point of view, the lower the mineral content
in the water, the less maintenance required. Mineral buildup in
improperly-maintained isothermal systems can cause humidifiers
to malfunction: heater coils can fail prematurely, heat exchanger
output is reduced by scale buildup, conductivity probe systems
that measure water levels quit working, and drain valves become
plugged. DI/RO water has the lowest mineral content, but its use
is cost-prohibitive unless needed for high purity humidification
or to meet very strict performance requirements (such as in
Page 36 • DRI-STEEM Design Guide
semiconductor manufacturing). Hard water can be used in
isothermal humidifiers with the understanding that these systems
require regular inspection and cleaning and that RH performance
will fluctuate. But the easiest and most cost-effective way to reduce
maintenance requirements is to soften the fill water.
Direct injection of boiler steam affects indoor air quality
Boiler steam is often directly injected into the air through steam
dispersion units to provide humidification. Owners of existing
boiler systems have found this a cost-effective, energy efficient, and
easily controllable way to add humidity without adding additional
equipment to make steam. However, boiler water is typically treated
with anticorrosion chemicals that, when directly injected into
the air as steam, negatively impact indoor air quality. Concerned
owners wishing to make use of an existing boiler for humidification
should consider a closed loop system such as our STS Steam-toSteam system that provides chemical-free steam for humidification
by running boiler steam through a heat exchanger.
Humidification as pure as the fill water
In general, the quality of humidification vapor is only as good as
the humidifier tank’s fill water. High purity water (DI/RO) provides
the purest humidification. Humidification produced through an
isothermal process (boiling) is a bit more pure than humidification
produced through an adiabatic process (unheated water turned
into vapor by evaporation, pressure and/or compressed air).
Some adiabatic systems using potable or softened water leave a
fine dust on area surfaces, and wetted-media or wick systems may
contaminate humidification vapor. Process-critical environments,
such as surgical suites, clean rooms, semiconductor manufacturing,
or museums requiring artifact preservation, use high purity water to
ensure very clean humidification vapor. Potable hard and softened
water in isothermal systems typically provide humidification vapor
that is adequately clean for comfort applications such as office or
residential buildings.
Hard water reduces energy efficiency
How water type affects energy efficiency is closely related to how
water type affects performance. Simply stated, the harder the
water, the more water wasted down the drain to remove minerals
and, therefore, the more water that will need to be replaced and
reheated, resulting in increased energy costs.
DRI-STEEM Design Guide • Page 37
Table 38-1:
How fill water type affects performance, maintenance, steam quality, and efficiency in isothermal humidification
systems
Fill
water type/
conductivity
Skimming
required?
(Y/N)
Potable
(minimum
conductivity
100 µS/cm)
Y
System with a
manual drain:
Humidifier typically
drains one time
per season, but
may need to
increase drain and
flush frequency
based on quarterly
inspections,
especially with
water over 12 gpg
(205 mg/L).
2-35 gpg
(35-600 mg/L)
±3% of set point
with service
interrupted by
draining and
flushing
Potable
(minimum
conductivity
100 µS/cm)
Y
System with auto
drain and flush:
Several times per
season.
2-35 gpg
(35-600 mg/L)
±3% of set point
with service
interrupted by
draining and
flushing
Softened
(minimum
conductivity
100 µS/cm)
Y
System with a
manual drain:
Humidifier typically
drains one time
per season, but
may need to
increase drain and
flush frequency
based on quarterly
inspections.
2-12 gpg
(35-205 mg/L)
±3% of set point
with no service
interruption
Softened
(minimum
conductivity
100 µS/cm)
Y
System with auto
drain and flush:
Several times per
season.
2-12 gpg
(35-205 mg/L)
±3% of set point
with no service
interruption
High purity
(DI/RO)
N
Typically need to
drain one time per
season.
0-2 gpg
(0-35 mg/L)
Boiler steam
(direct
injection)
N/A
N/A
Drain/flush
frequency
N/A
Page 38 • DRI-STEEM Design Guide
Hardness
RH
performance
(control range)
Water and
energy
efficiency
Maintenance
requirements
Humidification
steam quality
If water is harder
than 12 gpg
(205 mg/L), scale
buildup occurs
quickly. Increasing
skim and drain/flush
cycles helps reduce
scale, as does regular
cleaning. The key
is to skim or flush
minerals while they
are still in solution
and before they
attach to humidifier
components as scale.
As pure as the fill
water. Dissolved
solids may transfer
to the airstream with
humidity vapor.
As water hardness
increases so does the
need for skimming
and draining, thus
increasing water
and energy usage,
for makeup water
replacing water
lost to skim and
fill cycles must be
heated. In addition,
performance
degradation can
occur in heat
exchanger-based
systems if the heat
exchanger becomes
coated with mineral
scale.
Can go up to two
years without
cleaning, but
quarterly inspections
are encouraged
to verify softener
operation. Drain,
flush and skim
frequency/duration
affect maintenance
requirements.
As pure as the fill
water. Dissolved
solids may transfer
to the airstream with
humidity vapor.
As water hardness
increases so does the
need for skimming
and draining, thus
increasing water
and energy usage,
for makeup water
replacing water lost
to skim and fill cycles
must be heated.
±1% of set point
Cleaning typically
not required, but
quarterly inspections
are encouraged
to verify filtration
operation.
Pure humidification
steam. Steam
generated by an
isothermal process
is more pure than
humidification
produced by an
adiabatic process.
Efficient, because
there is no water
used for skimming
or drain/flush cycles.
However, a very
small amount of
water regularly
overflows to keep
the P-trap filled.
±1% of set point
Yearly inspection.
Typically, no other
regular maintenance
is required.
Efficient, because an
existing boiler can
be used.
Evaporative system components
and operation
Components are part of a humidification system
1. Create steam (STS humidifier)
Creating humidity with a DRI-STEEM evaporative humidification
system is a three-step process:
1. Create steam.
A DRI-STEEM humidifier with an evaporating chamber (such as
VAPORSTREAM or GTS) boils water to create steam.
2. Control.
DRI-STEEM controllers (such as VAPOR-LOGIC3), humidity
sensors, humidistats, water level sensors, and/or a building
management system control water levels and humidifier steam
output.
3. Disperse.
Dispersion units disperse steam created in the evaporating
chamber into the airstream through either a tube assembly such
as an ULTRA-SORB installed in a duct or AHU, or by using
DRI-STEEM’s AREA-TYPE fan to disperse steam directly into
a space.
2. Control (VAPOR-LOGIC3 keypad)
The components of this three-step process work together as an
engineered system, configured for each particular application.
This section of the Design Guide focuses on evaporating chamber
components and operation.
3. Disperse (ULTRA-SORB dispersion)
DRI-STEEM Design Guide • Page 39
Typical evaporative system configurations
Figure 40-1:
Multiple evaporating chambers and an ULTRA-SORB dispersion
panel installed in an AHU
Figure 40-2:
Evaporating chamber and a RAPID-SORB dispersion unit
installed in a duct
Figure 40-3:
Evaporating chamber and a single dispersion tube installed
in a duct
Page 40 • DRI-STEEM Design Guide
Typical evaporative system configurations (continued)
Figure 41-1:
Evaporating chamber and a Space Distribution Unit installed in a
finished space
Figure 41-2:
Evaporating chamber with a Space Distribution Unit installed
directly above
Space Distribution Unit (SDU)
Evaporating chamber
Figure 41-3:
Evaporating chamber and an AREA-TYPE fan
DRI-STEEM Design Guide • Page 41
Evaporative system components
Figure 42-1:
VAPORSTREAM electric system
8
1. Control cabinet
9
If a humidifier has a separate control cabinet, it can be mounted
either on the humidifier or remotely. Some humidifiers, like
the VAPORMIST, have control components integrated into the
humidifier cabinet. Systems using VAPOR-LOGIC control also
have a keypad (see Figure 42-2).
7
4
5
3
1
8
2
Figure 42-2:
VAPOR-LOGIC3 keypad
2. Water level control
Potable or softened water systems control water level
electronically using a three-rod probe. DI/RO water systems
control water levels using a float valve. Electric systems also have
a low-water cutoff float switch for heater protection (see detail
drawings on Pages 44 and 45).
3. Drain
DRI-STEEM offers a variety of drain types. Standard water
systems have electric drains that open for drain or drain/flush
cycles. Some standard water systems automatically drain when
there has been no call for humidity for 72 hours (“end-ofseason draining”). DI/RO water systems do not cycle through
regular drain or drain/flush cycles because DI/RO water does not
cause scale buildup. For this reason, most DI/RO systems have
a manual drain, although an electric drain can be ordered for
automated draining at end of season or when the humidifier is
idle for a defined period of time. Some systems allow the user to
adjust drain duration and interval either through a keypad or by
changing switches on the control board.
4. Water skimmer/overflow port
The water skimmer reduces minerals in the evaporating chamber
of standard water systems. Skimming occurs each time the
humidifier fills. The skim time duration is user adjustable on all
DRI-STEEM humidifiers by either using the keypad or setting
a switch on the control board. In DI/RO water models, the
skimmer port serves as an overflow port.
5. Heating elements/heat exchanger
Electric systems: Low-watt-density INCOLOY-sheathed
heating elements ensure operation for many seasons. Constant
expansion and contraction of heating elements sheds mineral
scale. In the unlikely event of heater failure, heating elements can
be replaced easily.
Heat exchanger systems: The heat exchanger transfers energy
from boiler steam (STS), hot water (LTS) or gas-fired burners
(GTS) to water in the evaporating chamber, generating steam.
Page 42 • DRI-STEEM Design Guide
6. Valve (heat exchanger systems)
Upon a call for humidity, valves allow steam (STS), hot water
(LTS), or an air/gas mixture (GTS) to enter the heat exchanger.
Figure 43-1:
STS Steam-to-Steam system
2
8
9
7. Temperature sensor
Systems with VAPOR-LOGIC3 have a temperature sensor
mounted on the evaporating chamber enabling:
• Over-temperature protection (electric systems)
• Freeze protection
• Preheating, allowing rapid response to a call for humidity
7
5
6
4
3
8. Service access
Access cover and cleanout plates allow periodic inspection and
servicing of the evaporating chamber.
9. Steam outlet
Steam generated in the evaporating chamber rises and exits
through the steam outlet and travels to the dispersion unit
through either vapor hose or piping. See Page 46 for steam
outlets available on DRI-STEEM humidifiers.
DRI-STEEM Design Guide • Page 43
Evaporative system principle of operation
Figure 44-1:
Standard water systems
Conductivity
probe detects
water level
1. When the system is first activated, the fill valve opens and the
evaporating chamber fills with water to the operating level.
1
4
3
2
2. On a call for humidity, the heating elements are energized,
causing the water to boil. The fill valve opens and closes as
needed to maintain the operating water level.
3. During refill, a portion of the surface water is skimmed off,
carrying away precipitated minerals (standard water systems
only; DI/RO systems don’t require skimming).
4. Steam created in the evaporating chamber flows through vapor
hose or piping to the dispersion assembly, where it is discharged
into the airstream.
Figure 44-2: 2
DI/RO water systems
4
1
Lowwater
cutoff
switch
Float
ball
2
Manual
drain valve
Page 44 • DRI-STEEM Design Guide
Evaporative system water level control
Figure 45-1:
Standard water systems
Standard water systems require conductive water
DRI-STEEM’s standard water evaporating chambers (found in
DRI-STEEM evaporative humidifiers with model numbers that do
not end in “DI”) require fill (makeup) water to have conductivity
of at least 100 µS/cm (2 grains/gallon). These systems use a
conductivity probe to measure water levels and, therefore, will
not operate with DI/RO water (which is demineralized and not
conductive).
Fill valve closes
Important note about chloride corrosion
Corrosion can occur in evaporating chambers when chloride levels
are unusually high in the supply water. This is usually caused
by improperly maintained DI treatment beds, but has occurred
with potable water supplies. If you see stainless steel pitting, call
DRI-STEEM technical support.
Fill valve opens
Low-water cutoff
Systems using tap or softened water control water
levels electronically using a three-rod probe. The
controller responds with the above actions when the
water level reaches each rod.
Figure 45-2:
DI/RO water systems
Fill valve
Float rod
Float ball
DRI-STEEM Design Guide • Page 45
Figure 46-1:
Hose connection
Figure 46-2:
Threaded pipe connection
Figure 46-3:
Flange connection
Page 46 • DRI-STEEM Design Guide
Evaporative system steam outlet connections
Outlet sizes and connections vary by model. See product catalogs
for availability. See also Table 65-1: Maximum steam carrying
capacity and length of interconnecting vapor hose, tubing, and pipe
on Page 65 of this document.
Steam injection system components
and operation
Direct injection of boiler steam
DRI-STEEM’s steam injection humidifiers use steam from an
external source, such as an in-house boiler, an unfired steam
generator, or a district steam system. Basic operation and
components are described in this section. For more complete
information, see the steam injection catalog.
Steam injection components
The drawings and text on the next two pages show a steam
injection model in its most elemental form — the Single-Tube
Humidifier. Each single- or multiple-tube model has the same basic
components: a stainless steel separator, a steam valve, and one or
more jacketed dispersion tubes. For ductless spaces, boiler steam
can be dispersed by the fan of an AREA-TYPE model.
Figure 47-1:
Steam injection humidifiers
MAXI-BANK
AREA-TYPE
MINI-BANK
Single-Tube
CLEAN-STEEM™
Single-Tube
DRI-STEEM Design Guide • Page 47
Steam injection components
1. Steam jacket
The steam jacket is a steam-filled chamber surrounding the inner
dispersion tube to keep it warm and eliminate condensation and
dripping.
2. Steam separator
The steam separator removes entrained water droplets and slugs
of condensation.
3. Deflector plate
The deflector plate directs water inside the separator toward the
drain.
4. Multi-baffle plate
The multi-baffle plate allows only steam to rise into the upper
region of the separator.
Figure 48-1:
Steam injection components
6
1
7
Y
Section Y-Y
5
8
X
Y
X
4
3
9
Page 48 • DRI-STEEM Design Guide
2
Section X-X
Condensate
Steam
5. Internal drying tube
The internal drying tube excludes any remaining moisture
particles, allowing only dry steam to leave the separator.
6. Steam valve
The steam valve controls the amount of steam allowed into the
dispersion tube.
7. Dispersion tube
The dispersion tube provides uniform steam dispersion across
the duct width.
8. Thermal-resin tubelet
Unique tubelets extend into the center of the dispersion tube so
only the driest steam is discharged into the air. These tubelets
also have an exceptional ability to trap noise generated by the
valve, making DRI-STEEM’s Steam Injection humidifiers the
quietest in the industry.
9. Steam trap
The steam trap allows only condensate to pass to the condensate
return system.
DRI-STEEM Design Guide • Page 49
Steam injection principle of operation
1. Boiler steam with entrained water enters the humidifier and
flows through a chamber surrounding the inner dispersion tube,
jacketing it with steam to eliminate condensation and dripping.
2. The steam with entrained water slows from entering the larger
space of the separator and from hitting the perimeter deflector
plate, and then begins to spin and separate.
3. The separated steam rises through the slots of the multi-baffle
plate to the upper region of the separator and enters the internal
drying tube that excludes any remaining moisture particles,
allowing only dry steam to leave the separator.
4. Separated condensate drains from the separator to the
steam trap.
5. The steam valve controls the amount of steam allowed into the
preheated dispersion tube. The steam valve is typically controlled
in one of three ways:
• By a humidistat connected to the steam valve
• By another signal, such as a building management system
• By one of DRI-STEEM’s controllers, such as VAPOR-LOGIC3.
6. Steam is discharged uniformly through the tubelets into the
airstream. Any condensate formed while passing through the
steam valve is re-evaporated in the inner tube because of heat
supplied by the outer steam jacket.
Figure 50-1:
Steam injection principle of operation
1
5
6
3
2
4
Page 50 • DRI-STEEM Design Guide
Humidifier maintenance considerations
Water hardness determines maintenance requirements
Softened water reduces maintenance
When choosing a humidification system, keep in mind that the
more minerals in your supply water, the more maintenance your
system will require.
The easiest way to avoid maintenance in
a standard water system is to use water
with low levels of hardness. Keep in mind
that standard water systems require water
to have conductivity of at least 100 µS/cm
(2 gpg hardness) for the conductivity probe
to measure water levels accurately.
Maintenance requirements for systems using DI/RO water
Humidification systems using DI/RO water require minimal
maintenance. Properly processed DI/RO water has no minerals or
other contaminants in the water that cause scale buildup. Therefore,
maintenance requirements for this type of system are:
• No regular cleaning (although regular inspections are
recommended)
• No skimming or drain and flush cycles (although end-of-season
draining is recommended)
• Regular inspections to verify that water processing equipment
is operating correctly. The presence of chlorides in improperly
processed DI water eventually causes pitting and failure of the
tank and its components.
Also, most DRI-STEEM humidifiers have
adjustable skim durations. Increasing skim
time will often substitute for periodic drain
and flush sequences.
Maintenance requirements for systems using potable water
The best way to determine how often your particular system needs
maintenance is to remove the tank cover and inspect it for mineral
deposits after three months of duty. Potable water carries a variety
of minerals and other materials in a mix that varies from location
to location. This variation in water quality, combined with the
hours of operation and duty cycle, will determine your own unique
maintenance schedule. Use the following maintenance schedules as
guidelines.
• Hard water (more than 12 gpg [more than 205 mg/L] hardness):
– Cleaning frequency determined by use and water quality; the
harder the water, the more cleaning required; inspect at least
every three months
– Regular skimming
– Regular drain and flush cycles; end-of season draining
• Naturally soft (2-12 gpg [35-205 mg/L] hardness) or softened
water:
– Annual cleaning
– Regular skimming
– Drain and flush cycles only as needed; end-of season draining
DRI-STEEM Design Guide • Page 51
Controlling DRI-STEEM humidifiers
Application determines acceptable RH control range
Controlling relative humidity (RH) in commercial and industrial
environments can be easy or challenging, depending on the level
of control required. RH fluctuations of 5% to 7% are common in
commercial or office building environments where the purpose
of providing humidification is primarily to improve occupant
comfort and health. Humans are quite forgiving when it comes to
RH fluctuations, and most would not notice a 5% change in RH.
Materials used in industrial processes, however, are much more
particular about humidity fluctuations. Since most materials are
hygroscopic in nature — they absorb and release moisture — many
processes, such as printing or food processing, require humidity to
be within a set range and to not fluctuate more than ±3%. ASHRAE
publishes tables listing the ideal RH for materials used in industrial
applications ranging from 80% RH for grinding optical lenses to
50% RH for manufacturing abrasives.1 The closer to set point that
RH levels track, the more processing productivity improves.
Control the variables to control the humidity
Some process environments require extremely tight RH control,
and are the most challenging environments to humidify properly.
Semiconductor and pharmaceutical manufacturing facilities,
cleanrooms, laboratories, and testing facilities typically require RH
control within 1% of set point. To achieve such tight control many
variables must be managed.
The most important variable to control is dry bulb temperature,
for as dry bulb fluctuates so does RH. (A 1 °F drop in temperature
causes a 2-3% increase in RH, and a 1 °C drop in temperature
causes a 3-4% increase in RH.) Key to controlling temperature
is careful attention to air handling system design. Moisture
containment, accomplished with vapor barriers and proper
pressurization, is also important, as are the number of air changes
per hour. As the number of air changes increases, humidifier output
fluctuations become more apparent in the humidified space. Other
variables affecting RH control are controller capabilities, sensor type
and placement, dispersion assembly placement, location of duct
components, and varying duct temperatures. This section of the
Design Guide explains how water type, water replenishment, and
energy source control affect RH control.
Notes
1
1995 ASHRAE Handbook, HVAC
Applications, I-P Edition, pages 11-2, 11-3.
Page 52 • DRI-STEEM Design Guide
Isothermal humidifier basics
Isothermal humidifiers use an energy source to boil water into
steam for dispersion either directly into an occupied space or
through an HVAC system. All isothermal humidifiers have a
makeup water fill valve, a drain valve for periodic and/or end-ofseason draining, and a water level control mechanism. Our systems
also have a water surface skimmer for reducing particulates at the
high-water level. Isothermal humidifiers use a variety of water
types, from purified water such as deionized (DI) or water filtered
by reverse osmosis (RO), to softened or tap water. DRI-STEEM
humidifiers can use any type of water.
Float-fill valve allows best water control
As a humidifier boils off water to supply humidification steam,
that water must be replaced. When makeup water is introduced
into the tank, it stops the boil, and steam output ceases until the
makeup water reaches boiling temperature. However, if water
replenishment modulates to match the rate that steam boils off,
there is no interruption in steam production, and no fluctuation
in steam output. Float-fill valves are currently the only humidifier
water level control mechanisms that provide fully modulated water
replenishment (see Figure 53-1).
Float-fill valves are not effective in tap or softened water systems
because precipitated minerals collect on the float-fill assembly and
interrupt float movement. Float-fill valves, therefore, are used only
with DI or RO filtered water systems.
Figure 53-1:
Humidifier with float-fill valve
Vapor hose
or pipe to
dispersion
assembly
Fill valve
Float
ball
Lowwater
cutoff
float
switch
Heating
element
Drain
valve
Figure 53-2:
Humidifier with conductivity probe
Fill valve
Vapor hose
or pipe
Conductivity
probe
Skimmer
port
Heating
element
Drain
Replenishing water levels using conductivity probes
Conductivity probe systems (used in our standard-water
models) replace boiled-off water periodically and therefore cause
interruption in steam output (see Figures 53-2 and 53-3).
In these systems, a probe with three rods of three lengths detects
water levels. When water reaches the top rod, the fill valve stops
filling; when water reaches the middle rod, the fill valve starts
filling. Once water no longer touches the bottom rod, heaters
are de-energized for low-water protection. The vertical distance
between the ends of the top and middle rods defines how much
water is replaced when the fill valve is on, which corresponds to the
time period of reduced or no steam output. Conductivity probe
systems require a minimum level of minerals in the water to operate
and therefore do not work with DI or RO water.
An advantage of this type of water level control is that it provides
accurate water level readings, allowing a predictable skim cycle
for removing precipitated minerals by water surface skimming
with each fill cycle. Skimming flushes floating precipitates to drain
Figure 53-3:
Detail of conductivity probe
Fill valve closes
Fill valve opens
Low-water cutoff
DRI-STEEM Design Guide • Page 53
Output control basics
On-off control
On-off control is the simplest control scheme
and does exactly what its name implies: the
output device turns fully on, then fully off.
Residential furnaces and air conditioners
often use this type of control.
In a humidification system, an on-off
humidistat has a differential between the
on and off switch points. The differential is
established at a range sufficient to prevent
output short cycling. In other words, the
humidity level has to fall a little below
set point before the humidistat closes and
energizes the humidifier. Once the humidifier
is energized, the humidistat stays closed
until the humidity is a little above set
point. This creates an operating range that
prevents the humidifier from running for
very short periods of time.
and dilutes the mineral concentration in the tank water while
causing a minimal reduction in steam output. Surface skimming
systems produce a negligible interruption to steam output because
heaters remain on during skimming, and because tanks that are
regularly skimmed require minimal or no tank draining and
flushing. Draining and flushing a tank causes steam output to
stop for the entire drain duration, which in some systems can be
as long as 60 minutes. All DRI-STEEM skim durations are useradjustable, allowing operators to change the length of time the tank
skims, as well as the frequency, often eliminating drain and flush
requirements.
Energy modulation also key to maintaining consistent RH
The other key mechanical aspect of maintaining RH output within
a specified range is to provide consistent energy to the heating
components. There are two ways to modulate energy delivery to
an isothermal humidifier: full, analog modulation, such as with
a steam or gas valve, or on-off modulation such as with a timeproportioning electric element system.
Modulating demand signal control
Valve systems falter at low end
With modulating demand signal control,
a modulating humidistat or a building
management system sends a signal to the
humidifier, which then produces a directly
proportional output. For example, if a
humidistat operating between 4 mA and
20 mA sends a 4 mA signal, the humidifier
produces no output. A 12 mA signal causes
the humidifier to operate at 50% of capacity,
and a 20 mA signal causes the humidifier
to run at 100% capacity. Humidity set point
is adjusted at the humidistat from within a
building management system, or by using
the humidifier controller keypad.
Steam valves, such as those used in a steam-to-steam humidification
system, modulate steam flow to heat exchangers in direct
proportion to demand signals. Theoretically, if the system demand
is 25%, the valve opens 25%. However, steam delivery is part of a
mechanical system that includes a boiler, valve, actuator, and steam
trap. So while in theory it would seem that a valve system would
provide the most directly responsive energy metering, it does not
due to mechanical limitations of the system’s components.
To provide peak performance, steam valves require supply steam
to be at a consistent pressure. Supply steam can be controlled with
a pressure reducing valve, which converts an inconsistent supply
pressure to a steady, lower pressure, eliminating one source for
steam fluctuation. Steam pressures may drop when a bucket steam
trap empties, reducing steam output. But the main issue with
valves is low-end controllability. If very tight RH control is essential
with a steam valve system, specify a valve with a high turndown
ratio (50:1).
Systems using gas valves cannot burn efficiently when demand
is low. This is why many gas valve systems switch to on-off
modulating control below a certain demand point. For example,
a gas system may be fully modulating until demand reaches 25%,
Page 54 • DRI-STEEM Design Guide
where it begins time-proportioning modulation control – that is,
the burner system turns on for a period of time and then turns
off for a period of time. With a high quality valve and responsive
control at low demand, a gas humidifier should be able to provide
steam output rangeability at a ratio of 40 to 1 and, especially in a
large capacity system, can yield RH control to ±1%.
SSRs deliver energy most consistently
Electric resistive heating elements are controlled using on-off
time proportioning modulation control. Heaters cycle on and
off for durations ranging from one second, using electronic
controllers such as solid state relays (SSRs) or silicon controlled
rectifiers (SCRs), to 100 seconds using mechanical contactors.
Every time the heaters are off, there is an interruption to steam
production. However, when cycle times are at or near one second,
steam interruption is unnoticeable. So, while at first it may seem
counterintuitive that an on-off modulating system provides tighter
control than a modulating valve system, an electronic system
can cycle heaters at such a rapid rate that the steam interruption
does not impact controllability. In addition, electronic controllers
operate as accurately at low demand as at high demand.
Float-fill valve with SSRs provides tightest RH control
In conclusion, there are many variables that affect isothermal
humidity control, and the tighter the control required, the more
variables that must be carefully managed. There are two main
humidifier mechanical issues that affect RH control: replenishing
water and modulating energy. The humidification system type
you choose will be defined by the requirements of your particular
application. But if your goal is to achieve the tightest RH control
possible, then for most applications, the preferred humidification
system will replenish water levels using a float-fill valve and will
have electronically controlled electric resistive heating elements.
Output control basics
Time-proportioning modulation control
of electric heaters
Humidifiers with electric heaters responding
to a modulating demand signal use timeproportioning (TP) modulation control.
With TP modulation, outputs cycle on and
off at a rate corresponding to the demand
signal. Cycle times range from 1 second to
100 seconds. Mechanical contactors are
typically used when cycle times are above
60 seconds; electronic controllers such as
solid-state relays (SSRs) or silicon-controlled
rectifiers (SCRs) are used for rapid cycling,
tight control and quiet operation. The faster
the heaters cycle on and off, the closer the
humidifier output tracks humidity set point.
When a humidifier has more than one
heater, heater duty time is shared. For
example, if a humidifier has four output
stages controlled by four contactors, to
achieve a 55% system demand using a
60-second cycle time, two contactors are
on (each providing 25% of the output)
and a third contactor is on for 5/25 of 60
seconds, or 12 seconds on and 48 seconds
off. On-off cycling duty is typically rotated
to reduce contactor wear. To increase
the cycling rate (up to 1 second), a single
SSR or SCR can be added and do all the
cycling (this is called SSR modulation with
contactors). Or, all heat stages can be
controlled by SSRs or SCRs (called 100%
SSR or SCR modulation), allowing the
tightest possible control because all heat
stages can cycle rapidly.
DRI-STEEM Design Guide • Page 55
Achieving RH control with
DRI-STEEM equipment
Table 56-1:
RH control comparison
RH control
capability*
Application
Energy
source
DRI-STEEM
product
Energy
modulation
Water type
Steam Injection:
ULTRA-SORB
MINI-BANK
MAXI-BANK
Multiple-Tube
Single-Tube
Industrialgrade control
valve
Pressurized steam
Electricity
VAPORSTREAM
SSR
modulation
with PID
control
DI/RO
Hot water
LTS
Industrialgrade control
valve
DI/RO
Gas
GTS
Valve
with high
turndown
ratio
DI/RO
Pressurized
steam
STS
Industrialgrade control
valve
DI/RO
VAPORMIST
TP or SSR
modulation
DI/RO
HUMIDI-TECH
TP or SSR
modulation
DI/RO
CRUV
TP or SSR
modulation
DI/RO
Pressurized
steam
Steam Injection:
AREA-TYPE
Commercialgrade valve
Pressurized steam
Any
All DRI-STEEM
products
Any
Any
Pressurized
steam
±1%
±3%
Critical processes;
preservation
General
manufacturing;
static electricity
control
Electricity
±5%
Comfort; health
Note:
* Many variables affect RH control capability. See Pages 52-55 for more information about the factors that affect humidifier controllability.
Page 56 • DRI-STEEM Design Guide
How to design for proper
humidification steam absorption
Drip-free dispersion is possible
HVAC engineers often express concerns about steam condensation
on internal duct elements when specifying humidification
systems. And these concerns are valid, for if severe enough, water
accumulation from condensation can leak through ducts to cause
damage below. This is an immediate — and easily noticeable
— problem. A less visible and potentially more harmful situation
is condensation causing standing water on duct floors. A warm air
handling system containing moist dust is an ideal breeding ground
for microorganisms.
But these harmful situations do not need to occur. Understanding
the factors that affect absorption, and selecting and maintaining
the proper equipment, will eliminate moisture problems caused by
humidification.
Factors that affect absorption
Absorption is affected primarily by three things:
1. Duct or AHU temperature. Cool air absorbs less than warm air
and requires a longer absorption distance.
When equal amounts of steam are introduced into equivalent
ducts but with different air temperatures, the lower temperature
systems of 50 °F to 55 °F (10 °C to 13 °C) are more challenging
to ensure absorption than systems with higher temperatures.
Multiple tubes increase
air and steam mixing
A bank of closely spaced multiple dispersion
tubes is far superior to a single duct tube.
In the example shown on the next page,
the absorption distance of 48"(1.2 m) can
be reduced to less than 6" (15 cm) by
adding dispersion tubes and a condensate
header. With multiple tubes, steam is
more evenly distributed into the airstream.
This causes a rapid homogenization of
the steam/air mixture, which results in a
faster re-evaporation or second change
of state. Adding a condensate header
allows increased capacity. DRI-STEEM has
a variety of steam dispersion devices that
accommodate absorption requirements
ranging from the simplest application to the
most difficult.
Determine the absorption distance
Use the graphs in our catalogs or use
DRI-CALC to calculate absorption distances
by product for your particular application.
These published absorption distances are
guaranteed so that you can be confident of
complete absorption.
2. ∆ RH (the difference between entering and leaving RH). The
more vapor that needs to be dispersed into the airstream, the
longer the absorption distance.
Generally speaking, the higher the relative humidity that must
be produced in the airstream the more challenging the task. The
desired room or space RH enters into this discussion as well.
3. Mixing of air and steam. Uneven airflow, non-uniform mixing
of steam with air, and the number of steam discharge points on
a dispersion assembly affect absorption distance. Also important
is the percentage of the airstream covered by the dispersion
assembly (see Figure 58-1).
Placement in airstream critical
Absorption or nonwetting distance is the dimension downstream
from the leaving side of the steam dispersion assembly to the
point where wetting will not occur, although wisps of steam may
DRI-STEEM Design Guide • Page 57
be present. Solid objects at duct air temperature, such as coils,
dampers, fans, etc., downstream of this dimension will remain dry.
When installing upstream of high-efficiency filters, visible
condensed steam wisps entering the filter bank can result in a
wetted filter. If you need to install upstream of high-efficiency
filters, consult your representative or DRI-STEEM directly for
special recommendations.
Figure 58-1:
Evaporative steam absorption comparison
The drawings below show how increasing the number of steam discharge
points and/or number of dispersion tubes shortens absorption distance.
Single-tube dispersion
Of the three examples shown here,
the single-tube covers the smallest
percentage of the airstream and has
the longest absorption distance.
Typical absorption distance
approximately 48" (1.2 m)
RAPID-SORB dispersion
With the same conditions, absorption
occurs in a shorter distance with a
multiple-tube dispersion assembly
because it has more steam discharge
points and it covers almost all of the
airstream.
Typical absorption distance
approximately 18"– 48" (0.46 m – 1.2 m)
ULTRA-SORB dispersion
With the same conditions, this
dispersion assembly provides the
shortest absorption distance. It
has multiple tubes, two rows of
discharge points on each tube, and
an additional header for managing
condensate, allowing increased
capacity.
Page 58 • DRI-STEEM Design Guide
Typical absorption distance
approximately 6"– 24" (0.15 m – 0.60 m)
Humidification system components
placement
Determine humidifier placement
A humidification system generally consists of a vapor or steam
generator and a dispersion assembly. The proper placement of
these two components is crucial for successful system operation.
Usually, there is no single correct placement for a humidifier. Much
depends on system design and application. However, the following
paragraphs and dispersion assembly placement examples are
presented as guidelines for common situations.
First, check available absorption distance
Available absorption distance affects system choice. Dispersed
steam must be absorbed into the airflow before it comes in contact
with any duct elbows, fans, vanes, filters, or any object that can
cause condensation and dripping. Not all humidification systems
guarantee absorption within a short distance, so it is important to
be aware of the available absorption distance early in your design
process.
Placing a dispersion assembly in an AHU
(see Figure 59-1)
• Location A is the best choice. Installing
downstream of heating and cooling
coils provides laminar flow through
the dispersion unit; plus, the heated
air provides an environment for best
absorption. Use a multiple tube dispersion
unit to ensure complete absorption of
steam vapor before fan entry.
• Location B is the second-best choice.
However, in change-over periods, the
cooling coil will eliminate some moisture
for humidification.
• Location C is the third-best choice. Air
leaving a fan is usually very turbulent
and may cause vapor to not absorb at
the expected absorption distance. Allow
for more absorption distance if installing
downstream of a fan.
• Location D is the poorest choice. The
cooler air at this location requires an
increased absorption distance.
Figure 59-1:
Placing a dispersion assembly in an AHU
Filters
Economizer
control device
Cooling coil
Heating coil
8' to 12' (2.4 m to 3.7 m)
Duct high limit humidity control
for dispersion locations A, B
Airflow proving switch
Outside air
Fan
Exterior
building wall
Preheat coil
D
B
A
Dispersion discharges against
airflow
3' to 5'
(1 m to 1.5 m)
Motorized
air dampers
C
8' to 12'
(2.4 m to 3.7 m)
Relief air
Airflow proving
switch
Duct high limit humidity
control for dispersion location C
Return airflow
Supply airflow
DRI-STEEM Design Guide • Page 59
Placing a dispersion assembly near an elbow (see Figure 60-1)
• Location A is the best choice. Better absorption occurs on the
downstream side of an elbow than on the upstream side.
• Location B is the second-best choice. Installing upstream of an
elbow can cause wetting at the turning vanes. In cases where it is
structurally impossible to avoid Location B, use a multiple tube
dispersion unit to ensure complete absorption. Also, since more
air flows along the outside of a turn, better absorption occurs if
the humidifier discharges proportionately more steam in that part
of the airstream.
• At both locations, discharging steam against or perpendicular to
the airstream gives slightly better mixing and absorption than
discharging with the airstream.
Figure 60-1:
Placing a dispersion assembly near an elbow
Duct
Airflow
Mist can collect
on vanes
B
3' to 5'
(1 m to 1.5 m)
Less airflow on
this side of elbow
A
8' to 12'
(2.4 m to 3.7 m)
Duct high limit humidistat
Airflow
Page 60 • DRI-STEEM Design Guide
Placing a dispersion assembly in a primary/secondary system
(see Figure 61-1)
This type of system is commonly applied to facilities where most
of the building requires one level of humidity (typically to meet
comfort requirements) and part of the building requires additional
humidity. In Figure 61-1, the primary humidification system is
within the main air handling unit. The secondary humidification
system is located close to the point of steam discharge into the
secondary area.
Sensor and transmitter locations are critical (see Figure 62-1 on
next page)
Sensor or transmitter location has a significant impact on
humidifier performance. In most cases, we recommend that you do
not interchange duct and room humidity devices. Room humidity
devices are calibrated with zero or little airflow; whereas duct
humidity devices require air passing across them. Recommended
sensor locations (next page):
Figure 61-1:
Placing a dispersion assembly in a primary/secondary system
Outside air
Exhaust air
Filter mixing box
Before humidifier:
50 °F (10 °C), 47% RH
70 °F (21 °C), 30% RH
Secondary
humidifier
dispersion
assembly
Primary humidifier
dispersion assembly
After humidifier:
50 °F (10 °C), 60% RH
50 °F (10 °C)
60% RH
VAV
box
Primary area:
70 °F (21 °C),
30% RH
50 °F (10 °C), 60% RH
Secondary
humidified
area
Secondary
humidifier
evaporating
chamber
Room transmitter:
65 °F (18 °C),
50% RH
DRI-STEEM Design Guide • Page 61
A This is the ideal sensing location because this placement
ensures the best uniform mix of dry and moist air with stable
temperature control.
B This location is acceptable, but the room environment may
affect controllability such as when the sensor is too close to air
grilles, registers, or heat radiation from room lighting.
C This location is acceptable because it provides a good uniform
mixture of dry and moist air, but if an extended time lag exists
between moisture generation and sensing, make sure the control
contractor extends the sampling time.
D This location behind a wall or partition is acceptable for
sampling the entire room if the sensor is near an air exhaust
return outlet. This location is also typical of sensor placement
for sampling a critical area.
E These locations are not acceptable because they may not
represent actual overall conditions in the space.
F These locations are not acceptable. Do not place sensors near
windows, door passageways, or areas of stagnant airflow.
G This is the best location for a duct high limit humidistat or
humidity sensor.
Figure 62-1:
Recommended sensor locations
8' to 12'
(2.4 m to 3.7 m)
minimum
Outside air
Damper control
Relief air
Return air
AHU
C
G
High limit humidistat or
high limit transmitter (set at
90% RH maximum) for VAV
applications
Airflow switch (sail type)
or differential pressure
switch recommended for
VAV applications)
Vapor absorption has taken
place
Window
Point of vapor absorption
D
E
F
Humidifier dispersion
assembly
Turning vanes
B
A
F
E
Doorway
Page 62 • DRI-STEEM Design Guide
Window
F
% RH offset option: Place a temperature compensation
transmitter on the lower corner of the inside surface of doublepane window glass on north or northeast facing window
Piping an evaporative
humidification system
The drawing below shows a typical piping configuration for an
evaporative system. For detailed information about how to pipe a
specific DRI-STEEM evaporative humidifier, see the Installation
Guides available by product in DRI-CALC.
Figure 63-1:
Fill, drain and condensate return piping for a typical evaporative humidifier
all
Optional
condensate
return
piping from
dispersion
unit
t
Ins
el
lev
Steam vapor outlet
Shock arrester recommended to eliminate water hammer, by installer
Water supply line; water pressure range 25 psi to
80 psi (172 kPa to 582 kPa); water conductivity
minimum 100 µS/cm (2 gpg)
Air vent
tube
6"
(152 mm)
Ins
H2: Air vent
height must
be equal to or
greater than
H2 (see table
below)
tall
3⁄4" (DN20) min. drain, skim and overflow
piping rated for 212 °F (100 °C)
lev
If run is over 10' (3 m), increase pipe to 11⁄4"
(DN32)
el
H1 Pitch
1
(1% /8"/f
) t
3⁄4" (DN20) pipe
thread dispersion
unit condensate
return inlet
Flow line of drain piping after the water
seal must be below the drain valve to
ensure that humidifier drains correctly
1" (25 mm) air gap
Open floor drain. Refer to
governing codes for drain
pipe size and maximum
temperature requirements.
3⁄4" (DN20) minimum
condensate drain piping
rated for 212 °F (100 °C)
Table 63-1:
Heights required to overcome humidifier internal pressure
(H1 and H2)
Unit output
Water seal height (H1)
Air vent height (H2)
kW
lbs/hr
kg/h
inches
mm
inches
mm
≤ 48
≤ 138
≤ 62
12
305
22.5
572
49-64
139-183
63-83
15
381
27.5
699
> 64
> 183
> 84
18
457
30.5
775
DRI-STEEM Design Guide • Page 63
Table 64-1:
Pitch of dispersion tube(s) and interconnecting piping for Single- or Multiple-Tube evaporative dispersion units
Condensate drain
Diameter of
dispersion tube and
interconnecting piping
Type of
interconnecting piping
11⁄2" (DN40)
Vapor hose
2" (DN50)
Pitch of
interconnecting piping
Tubing or pipe
2" (DN50)
11⁄2" (DN40)
Vapor hose
2" (DN50)
With drain
2"/ft (15%)
toward humidifier
No drain
1/8"/ft (1%)
toward
condensate
drain
1⁄4"/ft (2%)
toward floor drain or
toward humidifier if
humidifier is below
dispersion unit
1/8"/ft (1%)
toward
humidifier
2"/ft (15%)
toward
humidifier
11⁄2" (DN40)
1⁄2"/ft (5%)
toward
humidifier
2" (DN50)
1⁄4"/ft (2%)
toward
humidifier
Tubing or pipe
Pitch of
condensate drain
2"/ft (15%)
toward
humidifier
Without drain
11⁄2" (DN40)
Pitch of
dispersion tube(s)
Table 64-2:
Pitch of interconnecting piping, dispersion tubes, and headers for RAPID-SORB evaporative dispersion units
Airflow
Type of
interconnecting piping
Diameter of
interconnecting piping
Pitch of
interconnecting piping
Vapor hose
11⁄2" (DN40), 2" (DN50)
2"/ft (15%)
toward
RAPID-SORB
Horizontal
Tubing or pipe
11⁄2" (DN40), 2" (DN50),
3" (DN80), 4" (DN100),
5" (DN125), 6" (DN150)
1/8"/ft (1%)
toward
RAPID-SORB
Vapor hose
11⁄2" (DN40), 2" (DN50)
2"/ft (15%)
toward
RAPID-SORB
Tubing or pipe
11⁄2" (DN40), 2" (DN50),
3" (DN80), 4" (DN100),
5" (DN125), 6" (DN150)
1/8"/ft (1%)
toward
RAPID-SORB
Vertical
Page 64 • DRI-STEEM Design Guide
Pitch of
dispersion tubes
Pitch of
header
Vertically
plumb
1/8"/ft (1%)
toward
condensate
drain
2"/ft
toward
header
1/8"/ft (1%)
toward
condensate
drain
Table 65-1:
Maximum steam carrying capacity and length of interconnecting vapor hose, tubing, and pipe*
Copper or stainless steel tubing
and Schedule 40 steel pipe
Vapor hose†††
Hose I.D.
Maximum capacity
Maximum length**
Tube or pipe size***
Maximum capacity
Maximum developed
length†
inches
DN
lbs/hr
kg/h
ft
m
inches
DN
lbs/hr
kg/h
ft
m
11⁄2
40
150
68
10
3
11⁄2
40
150
68
20
6
2
50
250
113
10
3
2
50
220
100
30
9
3††
80††
450
204
80
24
4††
100††
750
340
100
30
5††
125††
1400
635
100
30
6††
150††
2300
1043
100
30
*
Based on total maximum pressure drop in hose, tubing, or piping of 5" wc (1244 Pa)
** Maximum recommended length for vapor hose is 10' (3 m). Longer distances can cause kinking or low spots.
*** To minimize loss of capacity and efficiency, insulate tubing and piping.
†
Developed length equals measured length plus 50% of measured length to account for pipe fittings.
††
Requires flange connection
†††
When using vapor hose, use DRI-STEEM vapor hose for best results. Field-supplied hose may have shorter life and may cause foaming in the evaporating
chamber resulting in condensate discharge at the dispersion assembly. Do not use vapor hose for outdoor applications.
DRI-STEEM Design Guide • Page 65
Piping a steam injection system
Pressurized steam piping guidelines
• Size piping in accordance with ASHRAE recommendations.
• The humidifier’s steam supply should be taken off the top of the
steam main (not the side or bottom) to ensure the driest steam.
The main should be dripped and trapped (in accordance with
ASHRAE recommendations).
• The humidifier steam trap(s) must drain by gravity to the return
main having little or no back pressure. If condensate cannot drain
by gravity, then it must be elevated to the return main (see the
next page for instructions).
• If steam pressure is < 15 psi (103.4 kPa), use float and
thermostatic (F&T) traps for the humidifier.
• If steam pressure is >15 psi (103.4 kPa), use inverted bucket traps
for the humidifier.
• If lifting condensate, use an inverted bucket trap. See drawings
and instructions on the next page.
• Condensate from unavoidable heat loss in the distribution
system must be removed promptly to eliminate water hammer,
Figure 66-1:
Piping from boiler to humidifier
Take off branch lines from the top of the
steam main, preferably at a 45° angle,
although vertical 90° connections are
acceptable
45°
Insulate piping
End of main
steam trap
by installer
Condensate return
Blowdown valve
by installer
Automatic
warm-up:
28" (711 mm) minimum.
Supervised warm-up:
1.5 × pipe diameter,
8" (203 mm) minimum.
If pipe is 4" (DN100)
or larger, size drip for
50% of the condensate
load at start-up. If pipe
is less than 4" (DN100),
size drip for 25% of
the condensate load at
start-up.
"
in 1⁄4 )
ma (0.2%
h
c
Pit r 10'
pe
Pit
c
per h hum
fro 10' idifi
m
(0 e
les main .4%) r bran
s th to if ch
an hum dist 1/2
10' id anc "
(3. ifier e
3 m is
)
Bra
nch
t
ra
m if d p r
gre ain t istan ecom
ate o h ce f me
r th um rom nde
an idifi
d
10' er
(3.3 is
m)
To humidifier.
Inlet strainer must
be within 3' (1 m)
of humidifier
Humidifier isolation valve
Insulate piping
Branch
steam
trap
by installer
Condensate return
Blowdown valve by installer
Page 66 • DRI-STEEM Design Guide
Piping same size as
humidifier inlet strainer
12" (305 mm) minimum
4" (100 mm) minimum
degradation of steam quality, and heat transfer capability. Install
drip legs at all low points and natural drainage points in the
system, such as at the ends of mains and at the bottoms of risers,
and ahead of pressure regulators, control valves, isolation valves,
pipe bends, and expansion joints. On straight horizontal runs
with no natural drainage points, space drip legs at intervals not
exceeding 300' (91.4 m) when the pipe is pitched down in the
direction of the steam flow and at a maximum of 150' (45.7 m)
when the pipe is pitched up, so that condensate flow is opposite
of steam flow. These distances apply to systems where valves are
opened manually to remove air and excess condensate that forms
during warm-up conditions. Reduce these distances by about half
in systems that are warmed up automatically.
• Insulate piping well to avoid unnecessary heat loss.
• Pitch return lines downward in the direction of the condensate
flow at 1⁄2" per 10' (0.4%).
Elevating condensate from a pressurized steam humidifier
In certain installations, it is not possible to drain the humidifier
steam trap by gravity. The condensate must be lifted. Generally,
lifting condensate is not recommended, but it can be done
successfully by observing the following rules:
• Steam pressure. Theoretically, 1 psi (6.9 kPa) of steam pressure
lifts condensate about 2' (0.6 m). But in practice, because of pipe
friction, pressure drop through a steam trap, and back pressure
in a return line, we recommend that you consider the maximum
lift to be 6" per psi (0.2 m per 6.9 kPa) of steam pressure at the
trap. For example, a steam pressure of 5 psi (34.5 kPa) provides a
Figure 67-1:
Elevating condensate
Pitch 1⁄2" per 10' (0.4%)
Elevated condensate return main
1⁄2" (DN15) threaded
Maximum lift = 6" per psi
(0.2 m per 6.9 kPa) of steam
pressure at the trap, lifting up
to 5' (1.5 m) maximum
Condensate return flow
Inverted bucket steam trap
Check valve
(swing type)
DRI-STEEM Design Guide • Page 67
maximum lift of 2.5' (0.76 m). Do not attempt lifts in excess of 5'
(1.5 m).
• Steam trap. When lifting condensate, use an inverted bucket type
steam trap. Float and thermostatic (F&T) traps are more prone
to water hammer damage with a flooded trap, which may occur
when lifting condensate.
• Pipe size. The size of the vertical portion of the piping should be
1⁄2" (DN15) pipe thread.
• Check valve (swing type). Install a low-pressure differential swing
check-valve adjacent to the trap. This will prevent backflow of
condensate into the humidifier during periods of little or no
steam pressure. Failure to do so could result in the accumulated
backflow discharging from the humidifier when steam pressure is
resumed. Spring type check-valves are not recommended as they
can reduce pressure available for condensate lifts.
Eliminating excess heat from pressurized steam-jacketed
humidifiers
In some applications with steam-jacketed humidifiers, the heat
given off by the steam-heated tube (not the sensible heat of the
steam) may be undesirable. While relatively insignificant in a singletube unit (usually a rise of less than 2 °F [1 °C]), it can be much
greater in a closely-spaced, multiple-tube installation. This can be
dealt with in several ways:
1. Manually turn off the steam supply valve during nonhumidifying
periods.
2. Insulate the tube exterior. (Note that this enlarges the tube
profile, causing additional resistance to airflow.)
3. Provide an automatic shut-off valve for the jacketing steam
circuit in addition to the modulating control valve. This
Figure 68-1:
Single humidifying steam path
Humidifier isolation valve
Modulating control valve
Page 68 • DRI-STEEM Design Guide
eliminates heat gain during the “off” humidification periods only
(see Figures 68-1 and 69-1). The jacketing steam valve should be
a two-position type, with a minimum Cv of 5, and set to the fullopen position prior to opening the modulating valve.
In Figure 68-1, all of the steam (for jacketing and humidification)
must pass through the jacket steam valve, and it must do so with
very little or no pressure drop across the valve, or maximum
capacity will be reduced. More importantly, with just one supply
source for jacket and humidification steam, the temperature of the
jacket steam may drop below the temperature required to eliminate
dripping. Therefore, the valve must be adequately sized. This is
not significant in a small capacity humidifier. However, in a large
capacity humidifier, the valve of the size required may be quite
expensive. Another option is to install two valves: one sized for
jacket steam and one sized for humidification steam.
Figure 69-1 shows a steam flow that has been divided into two
paths: a humidifying steam path (which passes through the
separator valve assembly) and a jacket steam path. When dividing
the steam path, install a temperature switch as shown in the
drawing to ensure that condensate is not present when the control
valve opens. Install a header trap, as shown, to collect condensation
when the jacket steam is off.
Figure 69-1:
Divided humidifying steam path
Jacketing steam on-off valve
Modulating control valve
Temperature switch
Header
trap
Drain
Note: Due to the pressure drop across the
valve, the steam pressure at the header
trap is minimal; therefore, you cannot
lift condensate or return condensate to a
pressurized return from this trap.
DRI-STEEM Design Guide • Page 69
Summary
Designing a humidification system is a straightforward process of:
•
•
•
•
•
•
•
•
Calculating load
Selecting the energy source
Choosing a water type
Understanding humidifier maintenance requirements
Defining control requirements
Selecting humidification equipment
Placing dispersion assemblies to ensure complete absorption
Piping the humidification system
In tandem with a product catalog, this Design Guide has hopefully
given you the information you need to design a DRI-STEEM
humidification system. If you need more information, your
DRI-STEEM representative is always available to help you (you can
find your local representative by going to www.dristeem.com). Also,
keep in mind that DRI-STEEM provides many educational tools to
help you understand humidification issues. Those tools are listed
on Pages 2 and 3 of this document, and many can be found on our
web site, www.dristeem.com.
Page 70 • DRI-STEEM Design Guide
Glossary of humidification terms
Numbers and symbols
3PDT — three-pole, double throw
µS/cm — microSiemens per centimeter, a measure of conductivity
A
A — ampere, amps, amp
ac — alternating current
adiabatic humidifier — uses heat from air to convert water into
vapor
AGA — American Gas Association
AHU — air-handling unit
ANSI — American National Standards Institute
aquastat — thermostat designed for use in water
ASCII — American Standard Code for Information Interchange
ASHRAE — American Society of Heating, Refrigerating, and Air-
Conditioning Engineers
ASTM — American Society for Testing and Materials
atomizer — device that creates a fine spray from a liquid
B
ball valve — valve consisting of a ball resting on a spherical seat
BOM — bill of material
BSP — British standard pipe
BSPT — British standard pipe tapered
Btu — British thermal unit
C
°C — degrees Celsius
CE — Conformité Européen — required marking for selling our
products in Europe
C-ETL — Electrical Testing Laboratory, Canada
cfh — cubic feet per hour
cfm — cubic feet per minute
cfs — cubic feet per second
DRI-STEEM Design Guide • Page 71
check valve — a valve allowing fluid flow in one direction only
cold-snap offset RH transmitter — during periods of very cold
weather, this window-mounted temperature transmitter lowers
the RH control point to permit maximum room RH without
condensation on windows
condensate — in humidification, water condensed from steam
condensation — change of state of a vapor into a liquid by
extracting heat from vapor
conductivity — ability to carry electrical current
contactor — electromagnetic switching device
controller — device that regulates the humidification system
CPVC — chlorinated polyvinyl chloride
CSA — Canadian Standards Association
CSI — Construction Specifications Institute
C-UL — Certified by UL in both Canada and the U.S.
Cv — valve flow coefficient
D
dB — decibel
dBA — decibel, weighted
dc — direct current
DEAE — diethylamino ethanol
dia. — diameter
DIN standard — Deutsches Institut für Normung (German Institute
for Standardization)
DI/RO — deionized/reverse osmosis (water)
DK — DRANE-KOOLER
DN — diameter nominal — used to describe pipe sizes in metric
literature
DPDT — double pole, double throw
Page 72 • DRI-STEEM Design Guide
E
EEPROM — electrically erasable programmable read-only memory
EMI — electromagnetic interference
entrained condensate — water droplets transported by steam flow
EOS — end of season
EPDM — ethylene propylene dienemonomer
ETL — Electrical Testing Laboratory
F
°F — degrees Fahrenheit
F&T trap — float and thermostatic trap
flue piping —
Type B: Double-wall construction with aluminum inner wall
and galvanized steel outer wall
Type B-W: Same as Type B except fabricated in an oval shape
Type L: Same as Type B except inner wall is stainless steel
ft — foot, feet
ft2 — square foot, feet
fpm — feet per minute
fps — feet per second
G
gpg — grains per gallon
gph — gallons per hour
gpm — gallons per minute
GTS humidifier — Gas-to-Steam humidifier
H
heat exchanger — a device specifically designed to transfer heat
between physically separated fluids or gasses
HEPA — high-efficiency particle arrestor
hp — horsepower
hr — hour, hours
DRI-STEEM Design Guide • Page 73
humidistat — a regulatory device, actuated by changes in humidity;
used for automatic control of relative humidity
humidity transmitter — a monitoring device that senses humidity
level and provides an output signal based on humidity level
HVAC — heating, ventilation, air conditioning
hygrometer — an instrument responsive to humidity conditions of
the atmosphere
Hz — hertz
I
IAQ — indoor air quality
ID — inside diameter
in — inch, inches
in2 — square inch(es)
in3 — cubic inch(es)
IOM — Installation, Operation and Maintenance manual
I-P units — inch-pound units
J
J — joule
JIC — Joint Industrial Council
K
kW — kilowatt
kWh — kilowatt-hour
KVS — valve flow coefficient, Europe
L
L — litre
lb — pound
lbs/hr — pounds per hour
lbs/hr/ft — pounds per hour per foot (as in vapor hose capacity)
lbs/hr/ft2 — pounds per hour per square foot
LON — local operating network
Page 74 • DRI-STEEM Design Guide
LP — liquefied petroleum
LTS humidifier — Liquid-to-Steam humidifier
M
mA — milliampere
max — maximum
MB — megabyte
mb — millibar
MBh — one thousand Btu per hour
micromho — one-millionth of a mho. The micromho is the
practical unit of measurement for conductivity, and is used to
approximate the total dissolved solids content of water. The
preferred term for conductivity is µS/cm
microSiemens/cm — microSiemens per centimeter (abbreviated
µS/cm); a measure of conductance; see also micromho
N
NEMA — National Electrical Manufacturing Association
NIST — National Institute of Standards and Technology
No. — number
NOx — nitrogen oxide
NPT — National Pipe Thread
O
oc — on center
OD — outside diameter
P
PID — proportional, integral, derivative
ppm — parts per million
psi — pounds per square inch
PVC — polyvinyl chloride
DRI-STEEM Design Guide • Page 75
R
RFI — radio frequency interference
RH — relative humidity
S
SCR — silicon-controlled rectifier
SDU — space distribution unit
SI — Système International D’unités (International system of units
based on the meter, kilogram, second, ampere, Kelvin, candela,
and mole)
SSR — solid state relay
SST — stainless steel
STS humidifier — Steam-to-Steam humidifier
T
T — temperature
TDS — total dissolved solids
TP — time-proportioning
U
UL — Underwriters’ Laboratories
V
VA — volt-ampere
Vac — volts alternating current
Vdc — volts direct current
VL3 — VAPOR-LOGIC3 controller
VLC — VAPORSTREAM’s standard-water model
VLDI — VAPORSTREAM’s DI/RO-water model
VM — VAPORMIST
W
W — watt
wc — water column
wt — weight
Page 76 • DRI-STEEM Design Guide
Form No. DG-0403-global