1
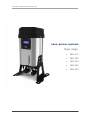
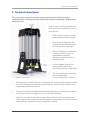
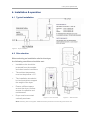
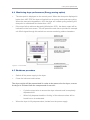
Heatless Desiccant Air Dryer
User guide
User Guide - Heatless Desiccant Air Dryer
nano–porous systems
Dryer range:
2
NDL 010
NDL 020
NDL 030
NDL 040
NDL 050
17-100-0100
nano-porous systems Ltd
Contents
Title
Page
1. General information ....................................................................................... 4
1.1
Document introduction
4
1.2
Manufacturers details
5
1.3
Warranty guidelines
5
1.4
Packaging
5
1.5
Dryer contents
6
2. Technical description .................................................................................... 7
3. General safety ................................................................................................
8
3.1
Intended use of the dryer
8
3.2
Personnel
8
3.3
Safe handling
8
4. Installation & operation ................................................................................. 9
4.1
Typical Installation
9
4.2
Site selection
9
4.3
Dryer start-up
10
4.4
Monitoring dryer performance (Energy saving option)
11
4.5
Shutdown procedure
11
5. Maintenance ................................................................................................... 12
5.1
Maintenance guidelines
12
5.2
Daily checks
12
5.3
Dryer Service
12
6. Troubleshooting ............................................................................................ 13
7. Technical specification ................................................................................. 14
17-100-0100
3
User Guide - Heatless Desiccant Air Dryer
1. General information
Copyright
This manual is copyrighted, all rights reserved. It may not, in whole or in part, be
copied, photocopied, reproduced, translated, or reduced to any electronic medium or
machine readable form without prior consent in writing from nano-porous systems
limited. It may not be distributed through the internet or computer bulletin board
systems without prior consent from nano-porous systems limited.
©2010 nano-porous systems limited
Heatless Desiccant Air Dryer - User Guide
17-100-0100 / Issue Number: 001
1.1 Document introduction
This guide provides factory prescribed procedures for the installation, operation and
maintenance of a nano-porous systems compressed air dryer. The procedures
illustrated in this document are only to be performed by authorised personnel. For
further information regarding the procedures outlined in this document contact nanoporous systems limited before proceeding.
Read this document carefully before attempting to install, operate or maintain the
dryer. This document should be permanently available at the dryer installation site
and be kept in an easily accessible place alongside the dryer.
Annotations
CAUTIONS: indicate any situation or operation that may result
in potential damage to the product/user, or render the product
unsafe.
NOTES: highlight important sections of information where
particular care and attention should be paid.
4
17-100-0100
nano-porous systems Ltd
1.2 Manufacturer’s details
For all enquiries please contact our Head Office:
1.3 Warranty guidelines
All dryers are supplied with a 12 month manufacturer’s warranty from the date
of purchase.
For further information please refer to the ‘warranty guidelines’ section on our
website: www.ctarefrigeracion.com
1.4 Packaging
All dryers are securely packaged in a bespoke moulded packing system. The dryer will
be secured in a horizontal position using two specifically moulded support cushions.
The support cushions within the package permits longitudinal
stacking; however the central section of the packing box is not load
bearing.
Damage to the packaging
•
Check immediately to establish whether damage has occurred to the external
packaging and if the damage extends to the product inside.
•
If there is damage to the dryer, contact the relevant supplier immediately.
In no circumstances must a damaged dryer be used in
operation. Using damaged products can lead to irreparable
functional faults or cause serious physical harm.
17-100-0100
5
User Guide - Heatless Desiccant Air Dryer
1.5 Dryer contents
1.
1 x Heatless desiccant-air dryer
2.
Packaging:
o
3.
3 x power IEC cables:
o
o
o
4.
2 x Packing support cushions
1 x UK
1 x Europe
1 x North America
Dryer stand components:
o
o
o
2 x Brackets*
8 x M4 socket button head screws*
1 x Allen key
* Note: Models 040 & 050 supplied with: 4 x Brackets &
16 x M4 hex socket button head screws for wall mounting.
5.
Documentation:
o
1 x User guide
Figure 1: Contents layout
6
17-100-0100
nano-porous systems Ltd
2. Technical description
The n-psl dryer uses the pressure swing adsorption principle of drying
compressed air, utilising two identical columns each containing a hygroscopic
desiccant bed.
Wet air enters the dryer through the
inlet valve and is directed into one of
the columns.
Figure 2: Dryer section
•
Each column contains a unique
(patented) desiccant cartridge.
•
Bulk liquids and particles are
removed by the filtration stage
on the inlet to the cartridge.
•
Water is retained in a collection
chamber until the column is
regenerated (Vented to
atmosphere as the column is
depressurised).
•
Air then passes through the
desiccant bed where any
remaining moisture is adsorbed.
•
The dry air passes out through
the final particulate
(<1micron/ISO8573.1 Class 2).
•
Simultaneously, a small amount of dry filtered air is counter flowed down through
the other cartridge and exhausted to atmosphere. Removing the moisture and
regenerating the desiccant bed.
•
The dryer controller periodically switches columns after top end repressurisation;
ensuring a continuous supply of dry air at constant pressure.
The dryer can also be controlled using a Zero Volt signal from the compressor.
This energy saving mode (eco) senses when the compressor is switched off and
stops the dryer operation until the compressor restarts.
17-100-0100
7
User Guide - Heatless Desiccant Air Dryer
3. General safety
For your own safety, when carrying out work on the dryer, please comply with
all relevant national safety regulations relating to pressurised systems.
3.1 Intended use of the dryer
The dryer is exclusively intended for drying compressed air, which is free from bulk
water, oil and solid matter constituents.
The dryer should be sited within a building and protected against the weather. The
dryer must be operated only in accordance with the data on the rating plate and in
accordance with the contractual conditions. Any operations that do not comply with
those stated on the product rating plate will render the warranty void.
This dryer is only designed to operate at pressures of between
4 barg and 12 barg. It is not suitable for pressures in excess of
12 barg.
No modifications must be made to the dryer. Any modifications may reduce the
operational safety of the dryer and invalidate the manufacturer’s warranty, potentially
resulting in damage to the product or cause serious personal injury
3.2 Personnel
Only authorised and qualified personnel are permitted to work on the dryer. This
operating manual is intended solely for such personnel and is to be used only as a
reference; it should not be used to replace conventional training.
3.3 Safe handling
Please ensure the relevant national safe handling procedures are employed when
lifting or moving the dryer.
Where possible use a suitable lifting aid to minimise the risk of
physical injury or damage to the product.
8
17-100-0100
nano-porous systems Ltd
4. Installation & operation
4.1 Typical installation
Figure 3: Dryer installation
4.2 Site selection
When selecting an installation site for the dryer,
the following conditions should be met:
•
Installation site should be
protected from the weather
and other harmful conditions.
•
The ambient temperature
must not drop below +1°C.
•
The installation site should
be level and able to support
the weight of the dryer.
•
Ensure sufficient space
around the dryer, to allow
access for operation and
maintenance.
•
Dryer must be mounted
vertically as shown.
Figure 4: Floor mounted
Figure 5: Wall mounted
* Note: Mounting bolts not supplied. Additional bracket provided for wall mounting sizes 040 & 050.
17-100-0100
9
User Guide - Heatless Desiccant Air Dryer
4.3 Dryer start-up
•
Electrical connections.
o
To set up for compressor eco mode. Remove the link between pins 1
and 4 in the Hirschman connector, located underneath the dryer. A
zero volt switching signal from the compressor needs to connect
between pins 1 and 4.
o
When the connection is made, the dryer will operate normally. If the
connection is broken, i.e. the compressor has achieved maximum
operating pressure and has switched off; the dryer will also stop cycling
and go into standby mode, displaying “compressor off” on the display.
Under no circumstances should external voltage / current be applied to
pins 1 and 4, damage to the controller will occur, negating the warranty.
•
o
The signal could also be from dryer specific point of use equipment.
o
Pins 2&3 on the Hirschman connector provide a zero volt alarm output
for customer control panel indication. These pins are connected to a
relay within the controller which will close when the service or dewpoint conditions arise.
Connect the IEC power supply underneath the dryer using the retaining clip to
secure in position.
Do not allow the dryer to flow air unless powered up, switched
on and cycling. Resulting effect could be cartridge
contamination; requiring replacement cartridges.
•
Connect all pipe work.
o
Ensure the inlet operating pressure parameters are between 4-12 barg.
o
Ensure the inlet air temperature is between 1.5°C-50°C.
•
Open the inlet and outlet valves.
•
Turn on the dryer using the switch located underneath the front of dryer body.
•
The dryer will display its status and commence normal operation. When the dryer
is powered up the display will show “initialising dryer” for approximately 20
seconds, ensuring the dryer is in equilibrium state before commencing operation.
10
17-100-0100
nano-porous systems Ltd
4.4 Monitoring dryer performance (Energy saving option)
•
The dew-point is displayed on the control panel. When the dew-point displayed is
better than -48°C PDP the dryer will switch into ec onomy mode and stop cycling.
When the dew-point degrades to -42°C the dryer will restart cycling ensuring the
dew-point is maintained at or better than -40°C.
•
If the dryer fails to achieve dew-point (falls below -30°C), the alarm output will be
indicated on the front screen. This will permit the end user to provide for example
a 4-20mA signal through this switch to a remote monitoring station elsewhere.
Figure 6: Control Panel
4.5 Shutdown procedure
•
Switch off the power supply to the dryer.
•
Close the inlet and outlet valves.
The dryer might still be pressurised! In order to de-pressurise the dryer; ensure
the dryer is isolated from the compressed air source:
•
o
Cycle the dryer twice to ensure the dryer exhausts and is completely
depressurised.
o
When fully depressurised the ‘clicking’ of the exhaust valves will be
heard but no air exhausted.
When the dryer is fully depressurised, isolate from the power supply.
17-100-0100
11
User Guide - Heatless Desiccant Air Dryer
5. Maintenance
Maintenance operations should only be carried out by authorised personnel.
5.1 Maintenance guidelines
•
Maintenance operations only to be conducted when the system has been shut
down and fully depressurised.
•
All connections must be undone with care, paying particular attention to the
areas that become pressurised.
•
Do not modify or adjust the control settings.
•
Only certified n-psl approved replacement parts to be used.
•
Always check all connections for leakage and secure seating.
•
Ensure all loose parts are removed or secured to the dryer before operation.
5.2 Daily checks
Visual and functional check of the dryer should be carried out daily:
•
Check the dryer for any external damage.
Assess and eliminate any defects found.
•
If the red service light appears, the dryer must be serviced.
Contact the service department and request a dryer service kit.
•
Remove any loose dust or dirt from the dryer; clean all surfaces that appear to
have attracted unwanted contaminants.
•
Check the dewpoint sensor display (where applicable). If the dew point is not
achieved the dewpoint reading on the display will alternate with “dewpoint alarm”
every 5 seconds. The no-volt alarm will also activate.
Contact the service department and request a product service.
5.3 Dryer service
A full product service is advised to take place every 2 years or 12,000 hours of
operation (whichever occurs first). A dryer specific service kit is available,
including all of the necessary replaceable components and servicing
equipment.
12
17-100-0100
nano-porous systems Ltd
6. Troubleshooting
Problem
Probable Cause
1. Insufficient inlet pressure
2. Electrical Fault
Poor Dew point
Performance
3. Moist or contaminated desiccant
4. Too high air consumption
5. Excessive inlet air temperature
6. Insufficient purge air
3. Eliminate the cause of contamination. Change cartridges
– do not re-use.
4. Ensure the performance of the dryer matches the
required air consumption.
5. Check against technical specification.
6. Purge incorrectly adjusted. Consult service personnel to
adjust settings (Factory pre-set).
7. Exhaust silencer blocked
7. Consult service personnel.
8. Controller not functioning correctly
8. Ensure the controller is powered; check the on screen
column status to ensure it is powering the exhaust valves
during normal cyclic operation.
9. Inlet pressure = min 4 bar. If not adjust inlet pressure
settings.
9. insufficient inlet pressure
Failure of Dryer
to cycle
Solution
1. Inlet pressure = min 4 bar. If not adjust inlet pressure
settings.
2. Ensure the power is on and the dryer front panel is
illuminated; check the dryer is cycling correctly.
10. Failure to de-pressurise when
cycling
11. Outlet flow stops
12. Failure to initialise dryer
Constant depressurisation
13. Erratic air flow from exhaust
10. Solenoid valve not functioning correctly; if there is
power to the coil, replace valve. A correctly working valve
outputs an audible click when it energises. .
11. Check inlet air supply.
12. Switch off and restart dryer. Ensure air supply is on
before powering dryer to allow dryer to initialise before
commencing operation.
13. Faulty or damaged valve; service required.
Reference to known misuse
•
Opening the inlet valve too quickly.
Valve should be opened slowly allowing the pressure to build up gradually.
•
Inlet/outlet head pipe
Diameter too small.
Pipework unsupported.
Inlet pipework from low point in system, allowing bulk water to collect and enter the dryer.
•
Electrical controller
Incorrect fuse fitted or fuse blown. Check the plug and fuse located underneath the dryer.
•
Additional Items
Use of non-authorised components.
Untrained / unauthorised maintenance / installation personnel used.
Increase in air consumption without relation to the flow capacity of the dryer.
Purging the dryer with cleaning agents that could damage the components or the desiccant.
Covers removed or loose during operation.
Failure to carry out a service when indicated by the dryer.
Do not allow the dryer to flow air unless powered up, switched on and cycling. Resulting
effect could be cartridge contamination; requiring replacement cartridges.
17-100-0100
13
User Guide - Heatless Desiccant Air Dryer
7. Technical specification
•
Flow rates are based on air inlet pressure of 7.0 barg (100 psig) and temperature
of 37.7C (100F).
•
For dryer performance at other inlet conditions or -70C (-100F) dewpoint
requirements, Please see www.compressedairtreatment.com.
•
Where the air source is from an oil lubricated compressor, we recommend that a
0.1µm or better coalescing filter be installed on the inlet to the dryer.
* Dimension taken from top of manifold
Figure 7: Dryer size guide
14
17-100-0100
nano-porous systems Ltd
Notes:
17-100-0100
15
User Guide - Heatless Desiccant Air Dryer
16
17-100-0100