1
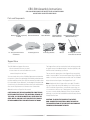
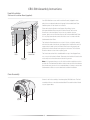
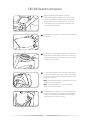
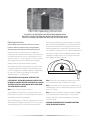
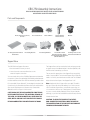
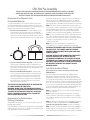
CBO-500 Pre-Assembly
INSTALL AND USE ONLY IN ACCORDANCE WITH CHICAGO BRICK OVEN’S INSTALLATION AND
OPERATING INSTRUCTIONS (OR EQUIVALENT). CONTACT LOCAL BUILDING OFFICIALS OR FIRE
OFFICIALS ABOUT RESTRICTIONS AND INSTALLATION INSPECTION IN YOUR AREA.
Requirements for Clearance from
Combustible Materials
A minimum 24" pipe section is required. If you are assembling your
Chimney at 90,° you can add additional 24" sections as required.
(The Chimney Pipe cannot have a total bend of more than 30.°) The
taller the Flue Stack is, the further away the exhaust is from the cook!
Note: The Chimney Connector shall not pass through an attic, roof
space, closet or similar concealed space, or a floor or ceiling. Where
passage through a wall or partition of combustible construction
is desired, the installation must conform to the CAN/CSA-B365
installation code for Solid-Fuel-Burning Appliances and Equipment.
Note: For indoor installations that utilize a combustible enclosure,
only a Class A Chimney should be used from the Anchor Plate on
the Oven to the termination point outside of the building/structure.
For outdoor non-combustible enclosures, a stainless steel
connector can be used.
Note: Please refer to the Exhaust Hood manufacturer’s
recommendations for inspection, maintenance and cleaning.
To avoid the possibility of a fire, when installing your Chicago
Brick Oven wood burning oven (either outdoors or indoors), you
must adhere to the following requirements for minimum clearance
between your Oven and any combustible materials.
•Clearance around the Oven: The sides and back of the
Oven must be at least 10 inches away from combustible
materials (See Aerial View below). The top of the Oven must
have at least an 18-inch clearance and the bottom a 30-inch
clearance from combustible materials (See Front View below).
18"
WARNING: THE CHIMNEY MUST BE OF A TYPE SUITABLE
FOR SOLID FUEL. THE CHIMNEY AND THE REQUIRED
CHIMNEY CONNECTOR MUST BE IN GOOD CONDITION
AND KEPT CLEAN.
CAUTION: NEVER USE ANY COMBUSTIBLE MATERIALS
NEAR THE ANCHOR PLATE OR FLUE STACK. WE
RECOMMEND A MINIMUM 6" OF AIR SPACE BETWEEN
THE ANCHOR PLATE AND FLUE AND ANY COMBUSTIBLE
MATERIAL. AGAIN, CHECK WITH YOUR LOCAL BUILDING
DEPARTMENT TO ENSURE YOU ADHERE TO LOCAL
BUILDING CODES!
10"
10"
10"
Aerial View
30"
Front View
•Clearance around the Door Opening: A minimum 30-inch
clearance from combustible materials is required on each
side of the Door opening and 36 inches from the front of the
Door opening. (A Hearth extension may be required to meet
these clearance requirements.)
•Clearance from Wood Storage Area: There must be
a 7-inch clearance between the bottom Insulating Boards
of the Oven and any wood storage areas that are under
the Oven installation. To ensure the 7-inch clearance, it
is recommended that you incorporate a non-combustible
physical barrier or some other indicator of the distance
within the wood storage area.
Arch Dome Insulation Blanket
Very important for correct functioning and life of the
CBO-500 Oven!
The Oven Dome must be covered with the supplied Ceramic
Fiber Insulation Blanket. The Blanket, which withstands high
temperatures, should cover the entire surface area of the Dome.
You can cut the Ceramic Fiber to insulate around the Metal Anchor
Plate. Since most heat loss will occur at the Metal Anchor Plate and
top of the Oven, you should ensure these spots are well-insulated.
You can choose to insulate the Oven further by packing Vermiculite
or other non-flammable insulating material above the Blanket. The
better you insulate your Oven, the better it will perform!
Note: It is important that you use all of the Insulation supplied to
avoid a possible fire.
Note: All orders are FOB. Inspect all components for damage
at time of delivery. Reject delivery if damaged or not on packing
slip. If damages are discovered after delivery, contact your carrier
for recourse.
Note: Any variance from the Chicago Brick Oven installation instructions
or alterations made to prefabricated Ovens without written
approval from Chicago Brick Oven, will void your warranty.
Note: Your Oven is designed for burning solid, dried wood only. Do
not burn scrap wood, compressed logs or other materials. Failure to
follow this instruction may damage your Oven and void your warranty.
THE FACE OF THE ENCLOSURE MUST BE CONSTRUCTED
OF A NON-COMBUSTIBLE MATERIAL.
WARNING: DO NOT PACK THE REQUIRED CLEARANCE
AREAS WITH INSULATION OR OTHER MATERIALS. WHEN
THIS OVEN IS NOT PROPERLY INSTALLED, A FIRE MAY
RESULT. TO REDUCE THE RISK OF FIRE, FOLLOW THE
INSTALLATION INSTRUCTIONS.
Requirements for Outdoor/Indoor
Chimney Installations
When building the Chimney, it is important to refer to your local
building code standards.
Every CBO-500 Oven comes with a DuraVent Anchor Plate (Model
# 9441) that works with a Class “A” 6" Pipe. You can buy this pipe
from any building or hearth manufacturer.
6
CBO-500 Assembly Instructions
CBO-500 OVENS SHOULD BE INSTALLED BY A PROFESSIONAL
OR SUITABLY-QUALIFIED INDIVIDUAL.
Parts and Components
Dome, Hearth (2 pieces)
& Arch
18" Gauge Galvannealed
Steel Plate
Decorative Door
Nuts & Bolts
Insulating Boards
ThermoWorks
Thermometer
Insulating Blanket
DuraVent Anchor Plate
(Model #9441, 6")
Mortar
Cooking Accessories:
Pizza Peel and Brush
Support Base
The CBO-500 Oven Support Base must:
The Support Base surface must be flat, level and strong enough
to support the total combined weight of the Oven (350 lbs.) and
the Decorative Cover design you choose.
•be constructed of masonry or metal
•have at least the same area dimensions as the
external footprint of the Oven
The two vertical support feet of the Support Base are typically
made of concrete block. The horizontal Support Base is typically
made of a 4"-thick, steel-reinforced concrete slab. The standard
height of the horizontal part of the Support Base is 42."
You must check with your local Building Department to determine
the amount of clearance required by local building codes between
the Oven and Decorative Cover. CBO recommends you add at least
8" for the width (4" per side) and 5" for the depth (on the back side
of the Oven) to accommodate the Decorative Cover and Insulation.
Also see the Requirements for Clearance from Combustible
Materials section on Page 5 of this manual.
Note: Imagine the Oven’s Support Base as a table. The table’s
legs are concrete blocks and the tabletop is a 4"-thick concrete
slab. To build the Support Base, you build the support legs out
of concrete block, then on top of that leg base, you build a frame
to pour a concrete slab (the tabletop). On the concrete slab (the
tabletop), you position the Sub-hearth Insulation Boards, then the
Hearth, then the Oven.
CAUTION: DO NOT USE ANY COMBUSTIBLE MATERIALS
IN THE CONSTRUCTION OF THE COVERING (SHROUD) OF
THE OVEN. ALL BUILDING MATERIALS USED NEAR THE
OVEN, METAL ANCHOR PLATE AND FLUE PIPE SHOULD
BE NON-COMBUSTIBLE AND NEVER MADE OF WOOD.
CAUTION: TO AVOID THE POSSIBILITY OF A FIRE,
NON-COMBUSTIBLE MATERIALS MUST BE USED IN
THE CONSTRUCTION OF THE SUPPORT BASE AND ANY
FRAMING USED AROUND THE OVEN.
7
CBO-500 Assembly Instructions
Hearth Insulation
Sub-hearth Insulation Board (supplied)
Your CBO-500 Oven comes with Insulation Boards (shipped in three
pieces) that are placed under the 18-guage Galvannealed Steel Plate
and both pieces of the Hearth for insulation.
Place the Insulation Board on the Support Base. Next, lay the
Galvannealed Steel Plate over the Insulation Board. Then set the
Oven Base on the steel plate. Do not use any materials (mortar,
cement, glue) to attach the Oven Base to the Galvannealed Steel Plate.
It is very important that the entire Oven Base come in contact with the
Galvannealed Steel Plate.
The Insulation Board must be cut so that it is flush, or slightly set back,
with the front end of the Hearth, the Support Base and the two vertical
support feet in order for the final Decorative Cover to fit properly and
protect the Insulation Board from exposure to moisture. The Insulation
Board can be cut-to-size with a regular jigsaw.
Galvannealed
Steel Plate
Support
Base
Insulating
Boards
The Oven’s decorative finish should be built on top of the Support Base,
not on top of the Insulation Board. Remember, the Insulation Board should
not be exposed to the elements and should not get wet.
Note: It is important that you use all of the Insulation supplied to avoid a
possible fire. The Sub-hearth Insulation should not be exposed to the elements
and should never get wet. It is recommended that you sweep or vacuum the
Galvannealed surface to remove debris before hearth installation.
Oven Assembly
Shown is the final assembly of the three-piece CBO-500 oven. The final
assembly will rest on the Galvannealed Steel Plate and Insulation Board
on your support base.
Hearth
(2 pieces)
Arch
Dome
8
CBO-500 Assembly Instructions
1
After the Insulation Board has been set and the
Galvannealed Steel Plate placed on top of it, you are now
ready to set the Hearth into place. Line the Front Hearth
piece up with the front of the Oven base. As you can see,
the Insulation Board is not exposed to the elements and
covers the entire Main Hearth.
2
Push the Main Hearth in place so there is a tight fit with the
Front Hearth.
3
Remove the Front Hearth piece and place the Dome over the
top of the Main Hearth. Make certain the front of the Oven
is lined up, then replace the Front Hearth. Attach the Anchor
Plate to the top of the Oven.
4
Lay the Insulating Blanket over the top of the Oven. Cut out
a hole for the Flue Pipe, and cut the Insulation to line up with
the front of the Oven. If you have any extra Insulation, put it
on the top of the Oven.
Note: Industrial-grade aluminum foil may be placed over the
Insulation for moisture protection.
Note: It is important that you use all of the Insulation
supplied to avoid a possible fire.
5
Cut the back of the Insulation with a razor blade and tuck it
into place. Pull the sides of the Insulation around the back
of the Oven. You can tie the Insulation with metal straps, or
aluminum tape, or just leave it in place.
9
CBO-500 Assembly Instructions
6
In this picture, you will see we have a Metal Shroud. If you
are building a Stone or Brick Shroud, it should follow the
contour of the Oven, but not rest on the Arch. Now slide
the Front Hearth into place and abut up against the Middle
Hearth as close as possible.
7
You are now ready to mortar the Arch to the Dome. Use the refractory
mortar provided to completely seal the space between the Arch and Dome.
You will also put some mortar on the Front Hearth under the Arch.
You don’t need a lot of mortar; just enough to make a seal. Place the mortar
all the way around the Arch and on the Hearth on both sides under the Arch.
Note: Be very careful to not get any mortar in the mounting holes for the
Arch and Door. If you do get mortar in the holes, attempt to clean it out
immediately; the bolts will not go in all the way if mortar is present.
8
Line up the Arch and put the two top bolts in place. Tighten
the bolts to hand-tight. Upon completion of the install, you
will tighten the bolts more; at this time you just want to hold
the Arch in place.
Note: Do not over-torque bolts or you may dislodge the
threaded inserts!
9
Attach the Metal Door and insert the bolts to hold it in place.
Once you have all four bolts in place, you should tighten
them, but do not force it. You should create a nice seal
between the Arch and the Dome with the mortar you used.
Note: Do not over-torque bolts or you may dislodge the
threaded inserts!
10
Use some mortar to finish off the install. If the Shroud is brick
or stone, you should also use mortar around the top of the
Arch. If you are using a Metal Shroud, use a high-temp silicone
on the top of the Arch to seal the joint with the Shroud.
Note: Each year you will need to touch-up the mortar and/or
silicone for cosmetic reasons.
10
CBO-500 Operating Instructions
TO PROTECT THE INTERIOR OF YOUR OVEN FROM RAIN AND OTHER
MOISTURE, A PROTECTIVE RAIN CAP MUST BE INSTALLED ON TOP OF THE
FLUE PIPE TO ENSURE THAT MOISTURE DOES NOT GET INTO YOUR OVEN.
Operating Instructions
After you have cured your Oven and are ready to start cooking,
light a small fire and slowly build it up. The interior Dome of the
Oven will at first turn black from the fire smoke. You will know
the Oven temperature has reached 700°F when the inner walls
turn from black to a whitish grey. This is a perfect temperature for
many types of cooking. Use the included thermometer to check
temperatures inside your Oven. You can just point and shoot to
get a reading in any place in the Oven.
Please follow these instructions exactly as written.
Failure to follow instructions may cause permanent
damage to your Oven and your warranty may be void.
Although your Oven may seem dry once you complete the
installation process, there are small amounts of moisture pockets
that need to work their way out. If you build a large fire in your
Oven from the onset, you could compromise your Oven’s longevity
and cooking efficiency, and can ultimately cause permanent
damage, which may void the manufacturer’s warranty.
When lighting the first fire, keep the flames low so the moisture
can be slowly released from the Oven and surrounding masonry
work. This curing process should be conducted at a temperature
as close to 212°F (100°C) as possible (do not exceed that
temperature) over a 2- to 3-day period.
700°
CAUTION: NEVER USE GASOLINE, GASOLINE-TYPE
LANTERN FUEL, KEROSENE, CHARCOAL LIGHTER FLUID,
OR SIMILAR LIQUIDS TO START OR FRESHEN UP A FIRE IN
THIS OVEN. KEEP ALL SUCH LIQUIDS WELL AWAY FROM
THE OVEN WHEN IT IS IN USE.
Note: Refer to “Curing Your Oven” on Page 21
Note: Please refer to the manufacturer’s instructions for proper
use of the thermometer that is included with your Oven.
Note: You should re-cure your Oven if it has not been used for an
extended period of time or if Oven has been exposed to excessive
amounts of moisture.
.
Note: Your Oven is designed for burning solid, dried wood only.
Do not burn scrap wood, compressed logs or other materials.
Failure to follow this instruction may damage your Oven and
void your warranty.
A good suggestion is to build a fire in a separate location and
place the coals into the Oven. You will generate heat without the
flame and the Oven will cure as required.
Due to thermal expansion, small cracks will appear in the Dome or
Hearth during the curing and cooking process. Do not worry; this is
normal and the quality of your Oven will not be compromised.
CAUTION: NEVER OBSTRUCT THE DAMPER OPENING
WHILE OPERATING THE OVEN.
11
CBO-500 Best Practices
Other Precautions and Instructions
•A protective rain cap must be installed on top of the Flue Pipe
to ensure that moisture does not get into your Oven.
•Ash Disposal: Brush out the ashes after each use with your
CBO Wire Brush. Ashes should be placed in a metal container
with a tight-fitting lid. The closed container of ashes should
be placed on a non-combustible floor or on the ground, well
away from all combustible materials, pending final disposal.
When the ashes are disposed of by burial in soil or otherwise
locally dispersed, they should be kept in the closed container
until all cinders have thoroughly cooled.
•LOCAL REGULATIONS ABOUT WOOD-BURNING
EQUIPMENT SHOULD BE CONSULTED.
•CBO-500 OVENS SHOULD BE INSTALLED BY A
PROFESSIONAL OR SUITABLY QUALIFIED INDIVIDUAL.
•FOR INDOOR INSTALLATIONS, A SOURCE OF FRESH
AIR INTO THE ROOM SHALL BE PROVIDED WHEN
REQUIRED. CHECK WITH LOCAL BUILDING OFFICIALS
REGARDING VENTILATION REQUIREMENTS.
•DO NOT USE PRODUCTS NOT SPECIFIED FOR USE
WITH THIS OVEN.
•DO NOT INSTALL IN A MOBILE HOME.
•DO NOT CONNECT TO OR USE IN CONJUNCTION
WITH ANY AIR DISTRIBUTION DUCTWORK. UNLESS
SPECIFICALLY APPROVED FOR SUCH INSTALLATIONS.
•DO NOT USE CHEMICALS OR FLUIDS TO START THE FIRE.
•DO NOT BURN GARBAGE OR FLAMMABLE FLUIDS,
SUCH AS GASOLINE, NAPHTHA OR ENGINE OIL.
•PLEASE USE EXTREME CAUTION AROUND THE OVEN.
THE OVEN DOME, HEARTH, ARCH AND DOOR WILL BE
EXTREMELY HOT WHEN IN USE AND FOR HOURS AFTER
USE. KEEP CHILDREN, CLOTHING AND FURNITURE
AWAY. CONTACT MAY CAUSE SKIN BURNS.
•NEVER ALLOW ANYONE UNDER THE AGE OF 18 TO
OPERATE THE OVEN.
•Do not throw chunks of wood violently into the Oven.
•Each time you light a fire, make sure the fire covers as
much of the Hearth surface as possible.
•Always use dry hard woods (dried for at least two years)! If you
see moisture coming from the logs while they are on the fire, the
wood is not dry. Using wood that is not dry will cause the Oven
to throw off a considerable amount of smoke and can also cause
damage to the Oven because of the high moisture content.
•The first two times you cook in your new Oven, cook something
simple (for example, a pizza shell) then throw it away without
actually eating what you have cooked. The third time, you
can begin enjoying what you have cooked in your new Oven.
•Always pre-warm any cooking accessory (the CBO Grill, a
cast iron pot, etc.) before you put it in the Oven. If you place
a cold accessory on a hot Hearth, the thermal shock may
cause the Hearth to crack. You can also add an Oven Rack so
the pot or pan doesn’t sit directly on the Hearth.
•The manufacturer is not responsible for eventual environment
damages, nuisance or smoke and carbon particles.
•You should recure your Oven if it has not been used for an
extended period of time or if Oven has been exposed to
excessive amounts of moisture.
•In cold temperatures, bring your Oven up to temperature slowly.
•Never use frozen foods directly on the Hearth.
•Never use water, marinades or other liquids directly on the Hearth.
•DO NOT OVER-FIRE! When flame spills out of the Oven,
you are over-firing.
Regular Maintenance
Your CBO-500 Oven will last years if you follow these
simple, regular maintenance tips:
•Never use any cleaning products inside the Oven! Heat the
Oven properly to clean it.
•The Decorative Door will occasionally show wear. Take a piece
of steel wool to the Door, lightly, and repaint the Door with black
Stove Pipe Spray Paint available at your local hardware store.
•Lubricate the Decorative Door hinges on a regular basis.
•Creosote-Formation and the Need for Removal. When
wood is burned slowly, it produces tar and other organic
vapors that combine with expelled moisture to form creosote.
The creosote vapors condense in a relatively cool Oven Flue
and Exhaust Hood of a slow-burning fire. As a result, creosote
residue accumulates on the Flue Lining and Exhaust Hood.
When ignited, this creosote makes an extremely hot fire. To
reduce the risk of a creosote fire, inspect the Flue Connection/
Anchor Plate on a regular basis. Make sure it is free from
any buildup. If you have buildup, use a wire brush to clean it.
Contact your local municipal or provincial fire authority for
information about how to handle a chimney fire. Have a clearly
understood plan for how to handle a chimney fire.
•Inspect the Flue Pipe on a regular basis. Make sure it is in
good repair and is seated securely into the Flue Connection/
Anchor Plate. If you are using a Single-Wall Pipe, check for
rust. If rust is found, replace the Flue Pipe.
•Inspect your Flue Cap to ensure there is no buildup blocking
the flow of air. If you have any buildup, you can use a wire
brush to clean it.
•Touch-up the mortar around the Arch to maintain a nice
finished look. You can use any refractory mortar found at
your local hardware store.
•If you use the CBO Metal Shroud in your install, cover the
Shroud with an inexpensive grill cover to help protect the
Oven from the elements when not in use. The Oven must be
cool to the touch before it can be covered.
•When using any CBO accessory, please do not allow any type of
liquid to touch the Hearth or Dome. For example: When cooking
steak on the Grill Grate, you need to create a bed of coals
underneath the Grill Grate to “catch” the drippings. You could also
use the Griddle as a “catch basin” underneath the Grill Grate.
If you have any questions about the use and care of your CBO-500
Oven, please send us an email to [email protected].
12
CBO-750 Pre-Assembly
INSTALL AND USE ONLY IN ACCORDANCE WITH CHICAGO BRICK OVEN’S INSTALLATION AND
OPERATING INSTRUCTIONS (OR EQUIVALENT). CONTACT LOCAL BUILDING OFFICIALS OR FIRE
OFFICIALS ABOUT RESTRICTIONS AND INSTALLATION INSPECTION IN YOUR AREA.
Requirements for Clearance from
Combustible Materials
A minimum 24" pipe section is required. If you are assembling
your Chimney at 90,° you can add additional 24" sections as required.
(The Chimney Pipe cannot have a total bend of more than 30.°) The
taller the Flue Stack is, the further away the exhaust is from the cook!
Note: The Chimney Connector shall not pass through an attic, roof
space, closet or similar concealed space, or a floor or ceiling. Where
passage through a wall or partition of combustible construction
is desired, the installation must conform to the CAN/CSA-B365
installation code for Solid-Fuel-Burning Appliances and Equipment.
Note: For indoor installations that utilize a combustible enclosure,
only a Class A Chimney should be used from the Anchor Plate on
the Oven to the termination point outside of the building/structure.
For outdoor non-combustible enclosures, a stainless steel
connector can be used.
Note: Please refer to the Exhaust Hood manufacturer’s
recommendations for inspection, maintenance and cleaning.
To avoid the possibility of a fire, when installing your Chicago
Brick Oven wood burning oven (either outdoors or indoors), you
must adhere to the following requirements for minimum clearance
between your Oven and any combustible materials.
•Clearance around the Oven: The sides and back of the
Oven must be at least 10 inches away from combustible
materials (See Aerial View below). The top of the Oven must
have at least an 18-inch clearance and the bottom a 30-inch
clearance from combustible materials (See Front View below).
18"
WARNING: THE CHIMNEY MUST BE OF A TYPE SUITABLE
FOR SOLID FUEL. THE CHIMNEY AND THE REQUIRED
CHIMNEY CONNECTOR MUST BE IN GOOD CONDITION
AND KEPT CLEAN.
CAUTION: NEVER USE ANY COMBUSTIBLE MATERIALS
NEAR THE ANCHOR PLATE OR FLUE STACK. WE
RECOMMEND A MINIMUM 6" OF AIR SPACE BETWEEN
THE ANCHOR PLATE AND FLUE AND ANY COMBUSTIBLE
MATERIAL. AGAIN, CHECK WITH YOUR LOCAL BUILDING
DEPARTMENT TO ENSURE YOU ADHERE TO LOCAL
BUILDING CODES!
10"
10"
10"
Aerial View
30"
Front View
•Clearance around the Door Opening: A minimum 30-inch
clearance from combustible materials is required on each
side of the Door opening and 36 inches from the front of the
Door opening. (A Hearth extension may be required to meet
these clearance requirements.)
•Clearance from Wood Storage Area: There must be
a 7-inch clearance between the bottom Insulating Boards
of the Oven and any wood storage areas that are under
the Oven installation. To ensure the 7-inch clearance, it
is recommended that you incorporate a non-combustible
physical barrier or some other indicator of the distance
within the wood storage area.
Arch Dome Insulation Blanket
Very important for correct functioning and life of the
CBO-750 Oven!
The Oven Dome must be covered with the supplied Ceramic
Fiber Insulation Blanket. The Blanket, which withstands high
temperatures, should cover the entire surface area of the Dome.
You can cut the Ceramic Fiber to insulate around the Metal Anchor
Plate. Since most heat loss will occur at the Metal Anchor Plate and
top of the Oven, you should ensure these spots are well-insulated.
You can choose to insulate the Oven further by packing Vermiculite
or other non-flammable insulating material above the Blanket. The
better you insulate your Oven, the better it will perform!
Note: It is important that you use all of the Insulation supplied to
avoid a possible fire.
Note: All orders are FOB. Inspect all components for damage
at time of delivery. Reject delivery if damaged or not on packing slip. If
damages are discovered after delivery, contact your carrier for recourse.
Note: Any variance from the Chicago Brick Oven installation instructions
or alterations made to prefabricated Ovens without written approval
from Chicago Brick Oven, will void your warranty.
Note: Your Oven is designed for burning solid, dried wood only.
Do not burn scrap wood, compressed logs or other materials.
Failure to follow this instruction may damage your Oven and
void your warranty.
THE FACE OF THE ENCLOSURE MUST BE CONSTRUCTED
OF A NON-COMBUSTIBLE MATERIAL.
WARNING: DO NOT PACK THE REQUIRED CLEARANCE
AREAS WITH INSULATION OR OTHER MATERIALS. WHEN
THIS OVEN IS NOT PROPERLY INSTALLED, A FIRE MAY
RESULT. TO REDUCE THE RISK OF FIRE, FOLLOW THE
INSTALLATION INSTRUCTIONS.
Requirements for Outdoor/Indoor
Chimney Installations
When building the Chimney, it is important to refer to your local
building code standards.
Every CBO-750 Oven comes with a CBO standard Anchor Plate
that works with a Class “A” 6" Pipe. You can buy this pipe from
any building or hearth manufacturer.
13
CBO-750 Assembly Instructions
CBO-750 OVENS SHOULD BE INSTALLED BY A PROFESSIONAL
OR SUITABLY-QUALIFIED INDIVIDUAL.
Parts and Components
Dome, Hearth (3 pieces)
& Arch
18" Gauge Galvannealed
Steel Plate
Decorative Door
Insulating Boards
Nuts & Bolts
Insulating Blanket
ThermoWorks
Thermometer
Mortar
Anchor Box with
Cooking Accessories:
DuraVent Anchor Plate— Pizza Peel and Brush
For UL-Required Installations
(Model #9441, 6")
Support Base
The CBO-750 Oven Support Base must:
The Support Base surface must be flat, level and strong enough
to support the total combined weight of the Oven (500 lbs.) and
the Decorative Cover design you choose.
•be constructed of masonry or metal
•have at least the same area dimensions as the
external footprint of the Oven
The two vertical support feet of the Support Base are typically
made of concrete block. The horizontal Support Base is typically
made of a 4"-thick, steel-reinforced concrete slab. The standard
height of the horizontal part of the Support Base is 42."
You must check with your local Building Department to determine
the amount of clearance required by local building codes between
the Oven and Decorative Cover. CBO recommends you add at least
8" for the width (4" per side) and 5" for the depth (on the back side
of the Oven) to accommodate the Decorative Cover and Insulation.
Also see the Requirements for Clearance from Combustible
Materials section on Page 12 of this manual.
Note: Imagine the Oven’s Support Base as a table. The table’s
legs are concrete blocks and the tabletop is a 4"-thick concrete
slab. To build the Support Base, you build the support legs out
of concrete block, then on top of that leg base, you build a frame
to pour a concrete slab (the tabletop). On the concrete slab (the
tabletop), you position the Sub-hearth Insulation Boards, then the
Hearth, then the Oven.
CAUTION: DO NOT USE ANY COMBUSTIBLE MATERIALS
IN THE CONSTRUCTION OF THE COVERING (SHROUD) OF
THE OVEN. ALL BUILDING MATERIALS USED NEAR THE
OVEN, METAL ANCHOR PLATE AND FLUE PIPE SHOULD
BE NON-COMBUSTIBLE AND NEVER MADE OF WOOD.
CAUTION: TO AVOID THE POSSIBILITY OF A FIRE,
NON-COMBUSTIBLE MATERIALS MUST BE USED IN
THE CONSTRUCTION OF THE SUPPORT BASE AND ANY
FRAMING USED AROUND THE OVEN.
14
CBO-750 Assembly Instructions
Hearth Insulation
Sub-hearth Insulation Board (supplied)
Your CBO-750 Oven comes with Insulation Boards (shipped in three
pieces) that are placed under the 18-guage Galvannealed Steel Plate
and both pieces of the Hearth for insulation.
Place the Insulation Board on the Support Base. Next, lay the
Galvannealed Steel Plate over the Insulation Board. Then set the
Oven Base on the steel plate. Do not use any materials (mortar,
cement, glue) to attach the Oven Base to the Galvannealed Steel Plate.
It is very important that the entire Oven Base come in contact with the
Galvannealed Steel Plate.
Galvannealed
Steel Plate
Support
Base
Insulating
Boards
The Insulation Board must be cut so that it is flush, or slightly set back,
with the front end of the Hearth, the Support Base and the two vertical
support feet in order for the final Decorative Cover to fit properly and
protect the Insulation Board from exposure to moisture. The Insulation
Board can be cut-to-size with a regular jigsaw.
The Oven's decorative finish should be built on top of the Support Base,
not on top of the Insulation Board. Remember, the Insulation Board should
not be exposed to the elements and should not get wet.
Note: It is important that you use all of the Insulation supplied to avoid a
possible fire. The sub-hearth insulation should not be exposed to the elements
and should never get wet. It is recommended that you sweep or vacuum
the Galvannealed surface to remove debris before hearth installation.
Oven Assembly
Shown is the final assembly of the three-piece CBO-750 oven. The final
assembly will rest on the Galvannealed Steel Plate and Insulation Board
on your support base.
Hearth
(3 pieces)
Dome
Arch
15
CBO-750 Assembly Instructions
1
After you have built the Support Base and positioned the
Insulating Boards and Galvannealed Steel Plate as shown,
you are ready to place the Dome assembly on the Galvannealed
Steel Plate. You have two Dome assembly placement options:
•You can align the front of the Dome assembly with the edge
of the Galvannealed Steel Plate and your 2" Arch Assembly
and Door will overhang.
•You can recess the Dome approximately 2" from the edge of the
Galvannealed Steel Plate to accommodate the Arch and Door Assembly.
2
Place the two “wing” hearth pieces inside the Dome. The
pieces should fit snug against the walls of the Dome. A
Chicago Brick Oven is a custom-manufactured product
so some variances may occur, but will not affect the
performance of your Oven.
3
Finally, place the center Hearth piece into position.
DO NOT DROP the center Hearth piece into position.
The recommended approach is to gently slide the
centerpiece into position. Align the edges of wing pieces
to the edges of the centerpiece. A Chicago Brick Oven is a
custom-manufactured product so some variances may occur,
but will not affect the performance of your Oven.
4
Attach Anchor Box to the Dome assembly aligning the
pre-drilled holes and included bolts. Install Anchor Box
before attaching the Insulating Blanket to the Oven.
5
Lay the Insulating Blanket over the top of the Oven. Cut out
a hole for the Flue Pipe, and cut the Insulation to line up with
the front of the Oven. If you have any extra Insulation, put it
on the top of the Oven.
Note: Industrial-grade aluminum foil may be placed over the
Insulation for moisture protection.
Note: It is important that you use all of the Insulation
supplied to avoid a possible fire.
16
CBO-750 Assembly Instructions
6
Cut the back of the Insulation with a razor blade and tuck it
into place. Pull the sides of the Insulation around the back
of the Oven. You can tie the Insulation with metal straps, or
aluminum tape, or just leave it in place.
7
You are now ready to mortar the Arch to the Dome. Use the
refractory mortar provided to completely seal the space
between the Arch and Dome. You will also put some mortar
on the Front Hearth under the Arch.
You don’t need a lot of mortar; just enough to make a seal.
Place the mortar all the way around the Arch and on the
Hearth on both sides under the Arch.
8
Note: Be very careful to not get any mortar in the mounting
holes for the Arch and Door. If you do get mortar in the holes,
attempt to clean it out immediately; the bolts will not go in all
the way if mortar is present.
9
Line up the Arch and put the two top bolts in place. Tighten
the bolts to hand-tight. Upon completion of the install, you
will tighten the bolts more; at this time you just want to hold
the Arch in place.
Note: Do not over-torque bolts or you may dislodge the
threaded inserts!
10
Attach the Metal Door and insert the bolts to hold it in place.
Once you have all four bolts in place, you should tighten
them, but do not force it. You should create a nice seal
between the Arch and the Dome with the mortar you used.
Note: Do not over-torque bolts or you may dislodge the
threaded inserts!
11
Use some mortar to finish off the install. If the Shroud is brick
or stone, you should also use mortar around the top of the
Arch. If you are using a Metal Shroud, use a high-temp silicone
on the top of the Arch to seal the joint with the Shroud.
Note: Each year you will need to touch-up the mortar and/or
silicone for cosmetic reasons.
17
CBO-750 Operating Instructions
TO PROTECT THE INTERIOR OF YOUR OVEN FROM RAIN AND OTHER
MOISTURE, A PROTECTIVE RAIN CAP MUST BE INSTALLED ON TOP OF THE
FLUE PIPE TO ENSURE THAT MOISTURE DOES NOT GET INTO YOUR OVEN.
Operating Instructions
After you have cured your Oven and are ready to start cooking,
light a small fire and slowly build it up. The interior Dome of the
Oven will at first turn black from the fire smoke. You will know
the Oven temperature has reached 700°F when the inner walls
turn from black to a whitish grey. This is a perfect temperature for
many types of cooking. Use the included thermometer to check
temperatures inside your Oven. You can just point and shoot to
get a reading in any place in the Oven.
Please follow these instructions exactly as written.
Failure to follow instructions may cause permanent
damage to your Oven and your warranty may be void.
Although your Oven may seem dry once you complete the
installation process, there are small amounts of moisture pockets
that need to work their way out. If you build a large fire in your
Oven from the onset, you could compromise your Oven’s longevity
and cooking efficiency, and can ultimately cause permanent
damage, which may void the manufacturer’s warranty.
When lighting the first fire, keep the flames low so the moisture
can be slowly released from the Oven and surrounding masonry
work. This curing process should be conducted at a temperature
as close to 212°F (100°C) as possible (do not exceed that
temperature) over a 2- to 3-day period.
700°
CAUTION: NEVER USE GASOLINE, GASOLINE-TYPE
LANTERN FUEL, KEROSENE, CHARCOAL LIGHTER FLUID,
OR SIMILAR LIQUIDS TO START OR FRESHEN UP A FIRE IN
THIS OVEN. KEEP ALL SUCH LIQUIDS WELL AWAY FROM
THE OVEN WHEN IT IS IN USE.
Note: Please refer to the manufacturer’s instructions for proper
use of the thermometer that is included with your Oven.
Note: You should re-cure your Oven if it has not been used for an
extended period of time or if Oven has been exposed to excessive
amounts of moisture.
Note: Refer to “Curing Your Oven” on page 21.
Note: Your Oven is designed for burning solid, dried wood only.
Do not burn scrap wood, compressed logs or other materials.
Failure to follow this instruction may damage your Oven and
void your warranty.
A good suggestion is to build a fire in a separate location and
place the coals into the Oven. You will generate heat without the
flame and the Oven will cure as required.
Due to thermal expansion, small cracks will appear in the Dome or
Hearth during the curing and cooking process. Do not worry; this is
normal and the quality of your Oven will not be compromised.
CAUTION: NEVER OBSTRUCT THE DAMPER OPENING
WHILE OPERATING THE OVEN.
18
CBO-750 Best Practices
Other Precautions and Instructions
•A protective rain cap must be installed on top of the Flue Pipe
to ensure that moisture does not get into your Oven.
•Ash Disposal: Brush out the ashes after each use with your
CBO Wire Brush. Ashes should be placed in a metal container
with a tight-fitting lid. The closed container of ashes should
be placed on a non-combustible floor or on the ground, well
away from all combustible materials, pending final disposal.
When the ashes are disposed of by burial in soil or otherwise
locally dispersed, they should be kept in the closed container
until all cinders have thoroughly cooled.
•LOCAL REGULATIONS ABOUT WOOD-BURNING
EQUIPMENT SHOULD BE CONSULTED.
•CBO-750 OVENS SHOULD BE INSTALLED BY A
PROFESSIONAL OR SUITABLY QUALIFIED INDIVIDUAL.
•FOR INDOOR INSTALLATIONS, A SOURCE OF FRESH
AIR INTO THE ROOM SHALL BE PROVIDED WHEN
REQUIRED. CHECK WITH LOCAL BUILDING OFFICIALS
REGARDING VENTILATION REQUIREMENTS.
•DO NOT USE PRODUCTS NOT SPECIFIED FOR USE
WITH THIS OVEN.
•DO NOT INSTALL IN A MOBILE HOME.
•DO NOT CONNECT TO OR USE IN CONJUNCTION
WITH ANY AIR DISTRIBUTION DUCTWORK. UNLESS
SPECIFICALLY APPROVED FOR SUCH INSTALLATIONS.
•DO NOT USE CHEMICALS OR FLUIDS TO START THE FIRE.
•DO NOT BURN GARBAGE OR FLAMMABLE FLUIDS,
SUCH AS GASOLINE, NAPHTHA OR ENGINE OIL.
•PLEASE USE EXTREME CAUTION AROUND THE OVEN.
THE OVEN DOME, HEARTH, ARCH AND DOOR WILL BE
EXTREMELY HOT WHEN IN USE AND FOR HOURS AFTER
USE. KEEP CHILDREN, CLOTHING AND FURNITURE
AWAY. CONTACT MAY CAUSE SKIN BURNS.
•NEVER ALLOW ANYONE UNDER THE AGE OF 18 TO
OPERATE THE OVEN.
•Do not throw chunks of wood violently into the Oven.
•Each time you light a fire, make sure the fire covers as
much of the Hearth surface as possible.
•Always use dry hard woods (dried for at least two years)! If you
see moisture coming from the logs while they are on the fire, the
wood is not dry. Using wood that is not dry will cause the Oven
to throw off a considerable amount of smoke and can also cause
damage to the Oven because of the high moisture content.
•The first two times you cook in your new Oven, cook something
simple (for example, a pizza shell) then throw it away without
actually eating what you have cooked. The third time, you
can begin enjoying what you have cooked in your new Oven.
•Always pre-warm any cooking accessory (the CBO Grill, a
cast iron pot, etc.) before you put it in the Oven. If you place
a cold accessory on a hot Hearth, the thermal shock may
cause the Hearth to crack. You can also add an Oven Rack so
the pot or pan doesn’t sit directly on the Hearth.
•The manufacturer is not responsible for eventual environment
damages, nuisance or smoke and carbon particles.
•You should re-cure your Oven if it has not been used for
an extended period of time or if Oven has been exposed to
excessive amounts of moisture.
•In cold temperatures, bring your Oven up to temperature slowly.
•Never use frozen foods directly on the Hearth.
•Never use water, marinades or other liquids directly on the Hearth.
•DO NOT OVER-FIRE! When flame spills out of the Oven,
you are over-firing.
Regular Maintenance
Your CBO-750 Oven will last years if you follow these
simple, regular maintenance tips:
•Never use any cleaning products inside the Oven! Heat the
Oven properly to clean it.
•The Decorative Door will occasionally show wear. Take a piece
of steel wool to the Door, lightly, and repaint the Door with black
Stove Pipe Spray Paint available at your local hardware store.
•Lubricate the Decorative Door hinges on a regular basis.
•Creosote-Formation and the Need for Removal. When
wood is burned slowly, it produces tar and other organic
vapors that combine with expelled moisture to form creosote.
The creosote vapors condense in a relatively cool Oven Flue
and Exhaust Hood of a slow-burning fire. As a result, creosote
residue accumulates on the Flue Lining and Exhaust Hood.
When ignited, this creosote makes an extremely hot fire. To
reduce the risk of a creosote fire, inspect the Flue Connection/
Anchor Plate on a regular basis. Make sure it is free from
any buildup. If you have buildup, use a wire brush to clean it.
Contact your local municipal or provincial fire authority for
information about how to handle a chimney fire. Have a clearly
understood plan for how to handle a chimney fire.
•Inspect the Flue Pipe on a regular basis. Make sure it is in
good repair and is seated securely into the Flue Connection/
Anchor Plate. If you are using a Single-Wall Pipe, check for
rust. If rust is found, replace the Flue Pipe.
•Inspect your Flue Cap to ensure there is no buildup blocking
the flow of air. If you have any buildup, you can use a wire
brush to clean it.
•Touch-up the mortar around the Arch to maintain a nice
finished look. You can use any refractory mortar found at
your local hardware store.
•If you use the CBO Metal Shroud in your install, cover the
Shroud with an inexpensive grill cover to help protect the
Oven from the elements when not in use. The Oven must be
cool to the touch before it can be covered.
•When using any CBO accessory, please do not allow any type of
liquid to touch the Hearth or Dome. For example: When cooking
steak on the Grill Grate, you need to create a bed of coals
underneath the Grill Grate to “catch” the drippings. You could also
use the Griddle as a “catch basin” underneath the Grill Grate.
If you have any questions about the use and care of your CBO-750
Oven, please send us an email to [email protected].
19