1
User Manual
DTR PC Software
CONTENTS
introduction4
to install the DTR PC software
4
general tab
6
device6
settings6
status6
ticket preview
6
layout7
selecting a DTR
7
getting settings from the device
7
configuring the DTR
8
modifying ticket layout
8
selecting an image
8
editing user fields
9
changing the date/time format
9
defining the labels & limits
10
changing the temperature units
10
saving the ticket layout & settings to the PC
11
loading the ticket layout & settings to the PC
12
deleting saved ticket layout & settings
12
retrieving stored readings from the device
13
data tab
13
readings13
download readings from the DTR
13
erasing readings from the devise
14
exporting readings to excel file
15
2
advanced tab
16
operation of the probe button
16
auto-off16
ticket headings
16
messages on the DTR display
17
configuring the DTR with advanced settings
17
changing the delay time for remote button printing 17
changing the number of copies to be printed 18
enabling/disabling the auto-off
18
setting the auto-off time
18
defining the text to be displayed on the ticket
19
defining the text to be displayed on the DTR display19
resetting the advanced settings to default values
19
notes20
3
INTRODUCTION
The DTR printing thermometer PC software is used to configure the
thermometer and retrieve stored readings from it.
The DTR can store up to 4 labels (user selectable). Each label has an
assigned high and low limit (user selectable). When a temperature is
taken the label and limits will be printed on the ticket and stored with the
readings.
The following pages explain how to adjust the user selectable information
shown on the DTR display and the printed ticket and retrieve the stored
readings. Place the CD in the CD drive.
TO INSTALL THE DTR PC SOFTWARE
The CD will auto-run. (If it does not, click 'Start', 'Run...', browse to the CD
drive and click ‘Setup.exe’
or double click the 'My Computer' icon on the Desktop and double click
the CD drive.
When the 'Delivery Temperature Recorder Setup Wizard' box appears
click the next button.
The program files will be installed by default to...
''C:\Program Files\ETI Ltd\Delivery Temperature Recorder\''
(Recommended).
4
The 'Browse' button can be used to install to an alternate location
(Advanced Users).
The 'Disk Cost' button will show the space on available drives and the
amount required.
The software may be installed for the current user or all users of the PC.
The default installation is 'Everyone'. Select the alternate button for 'Just
me' (Advanced Users).
The final installation dialogue box gives a last opportunity to go back
and revise the installation settings. Click the 'Next' button to install the
software. A moving bar will show the installation progress.
Click the 'Close' button to exit the installation procedure.
An icon for the Delivery Temperature Recorder will be placed on the
desktop.
A Data Temperature Recorder shortcut will be placed in 'Start menu' 'Programs' - 'ETI Ltd'.
5
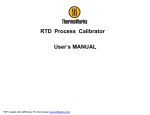
GENERAL TAB
DEVICE
Lists all DTR's currently plugged into the PC.
SETTINGS
GET - retrieves current settings and ticket layout from the DTR.
SET - configures the DTR with selected settings and ticket layout.
STATUS
Displays the number of readings stored in DTR memory and the time the
DTR was synchronised.
TICKET PREVIEW
Allows the 'Ticket layout' to be modified in 'what you see is what you get
(WYSIWYG)' style. Edit mode is entered by hovering the mouse cursor
over the fields within the ticket area. All user-selectable fields and their
descriptions appear. Leaving the ticket area, disables the edit mode and
the actual ticket layout is shown.
6
LAYOUT
SAVE – saves the current ticket layout to the PC.
LOAD – loads saved ticket layout from the PC.
DELETE – deletes a saved ticket layout.
CLOSE – closes the software.
SELECTING A DTR
If more than one DTR device is plugged into the PC, use this drop-down
list to select the appropriate one.
When a DTR is selected, the settings stored in it will be downloaded
automatically.
WARNING: any changes made to the currently displayed ticket layout
or settings will be overwritten.
GETTING SETTINGS FROM THE DEVICE
To retrieve the ticket layout and settings stored on the DTR device, click
the 'Get' button in the 'Settings' section.
Do not disconnect device from the PC until operation complete.
7
CONFIGURING THE DTR
To configure the DTR with the current ticket layout and settings, click the
'Set' button in the 'Settings' section.
Do not disconnect device from the PC until operation complete.
MODIFYING THE TICKET LAYOUT
SELECTING AN IMAGE
To select an image to be displayed on the ticket, hover the mouse cursor
over the image area or existing image in the 'Ticket layout' section. The
cursor will change to a hand shape and clicking on the area or image
will show the 'Select image' dialogue box.
Select an image file from the PC and click 'Open'.
The DTR can only print black and white so the image will be converted to
black and white. If contrast adjustment is needed, use the slide control.
To make the image lighter slide the control to the left. To make the image
darker slide the control to the right.
8
To erase the existing image, click the 'X' button at the top right corner of
the image area.
EDITING USER FIELDS
There are eight user selectable fields on the ticket layout: 'Header', 'User
Fields 1-3' and 'Footers 1-4'.
Hover the mouse cursor over the corresponding field to highlight and
click on it to modify.
If a field is left empty, it will not be displayed on the 'Ticket layout' when
the edit mode is exited (and therefore, will not be printed).
CHANGING THE DATE/TIME FORMAT
To change the Date/Time format to either UK (dd/mm/yy hh:mm:ss) or US
(mm/dd/yy hh:mm:ss), hover the mouse cursor over the 'Date/Time' field
in the 'Ticket layout' area. The cursor will change to a hand shape and
clicking on the area shows the format pop-up box. Select the required
format from the pop-up box.
9
DEFINING THE LABELS AND LIMITS
Up to four labels can be defined for use in the DTR. To define labels and
their high and low limits simply hover the mouse cursor over the 'Labels'
field on the 'Ticket layout' area. Clicking on it will show the 'Labels' popup box. Edit the label name and select the high and low limits from the
appropriate scroll lists.
CHANGING THE TEMPERATURE UNITS
To change temperature units to either °C or °F, hover the mouse cursor
over the 'Actual Temperature' field on the 'Ticket layout' area. The cursor
will change to a hand shape and clicking on it will show the measurement
pop-up box. Select the required measurement units from the pop-up box.
10
SAVING THE TICKET LAYOUT AND SETTINGS TO THE PC
To save the current 'Ticket layout' to the PC, along with the selected settings,
click the 'Save' button in the 'Layout' section.
To save the settings to a new name type the name in the 'Save settings as'
dialogue box. To overwrite settings that have already been saved, select
a name from the list below the 'Save settings as' dialogue box.
11
LOADING THE TICKET LAYOUT AND SETTINGS FROM THE PC
To load previously saved settings from the PC, click the 'Load' button in
the 'Layout' section and select the settings from the list in the 'Load' settings
dialogue box.
DELETING SAVED TICKET LAYOUT AND SETTINGS
To delete previously saved settings click on the 'Delete' button in the
'Layout' section and select the settings from the list in the 'Delete' settings
dialogue box.
12
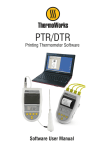
DATA TAB
RETRIEVING STORED READINGS FROM THE DTR
To sort the readings by heading, click on a column header.
READINGS:
GET – retrieves all readings stored in the DTR.
ERASE – erases all readings stored in the DTR.
EXPORT– export downloaded readings to Excel format.
CLOSE – closes the software.
DOWNLOAD READINGS FROM THE DTR
Click the 'Get' button in the 'Readings' section.
WARNING: Previously downloaded readings will be overwritten.
WARNING: Do not disconnect the DTR while readings are being transferred from it.
13
Information displayed in the list are Reading Number (#), Date/Time,
Reading, High Limit, Low Limit and Label. Readings can be sorted in
ascending or descending order by clicking the appropriate column header.
ERASING READINGS FROM THE DTR
To clear all readings, click on 'Erase' button in 'Readings' section.
WARNING: once erased, readings cannot be restored.
14
EXPORTING READINGS TO EXCEL FILE
Downloaded readings can be exported to an 'Excel' file. To do so, click
on the 'Export' button in 'Readings' section.
In the open dialogue box, select appropriate format, click 'OK' and then
type the file name or select an 'Excel' file to overwrite in the 'Save' file
dialogue box.
15
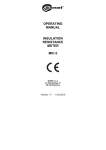
ADVANCED TAB
OPERATION OF THE PROBE BUTTON
Printing delay in seconds – sets the time delay between pressing the
remote button on the probe and the print-out.
Number of copies to be printed – sets the number of copies to be
printed continuously by pressing the remote button.
AUTO-OFF
Sets the auto-off time in minutes after which the DTR switches off
automatically when idle.
TICKET HEADINGS
The headings printed on the ticket can be changed to suit the user requirements (changes made will be reflected on ticket layout immediately).
16
MESSAGES ON THE DTR DISPLAY
The messages shown on the DTR display can be changed to suit the
user requirements.
ADVANCED SETTINGS
UPDATE – configures the DTR with the advanced settings.
DEFAULT – resets advanced settings back to default values.
CONFIGURING DTR WITH THE ADVANCED SETTINGS
To configure the DTR with the advanced settings (operation of the remote button, Auto-off, Ticket headings and Messages on the DTR display) change the settings on the 'Advanced tab' page and click the 'set
button on the 'General tab' page to update the settings in the DTR. (see
page 8).
WARNING: Do not disconnect the DTR while advanced settings are
being transferred to it.
CHANGING THE DELAY TIME FOR REMOTE BUTTON PRINTING
To increase or decrease the printing delay time for the remote button,
(on the probe handle), click the '+' or '-' boxes respectively. The boxes
are located next to 'Printing delay in seconds' text in the 'Operation of
the probe button' section. The minimum value is 0 seconds (printing
starts immediately) and the maximum value is 30 seconds (default = 10
seconds).
17
CHANGING THE NUMBER OF COPIES TO BE PRINTED WHEN
REMOTE BUTTON IS PRESSED
To increase or decrease the number of copies to be printed when pressing the remote button, click the '+' or '-' boxes respectively. The boxes
are located next to 'Number of copies to be printed' text in the 'Operation
of the probe button' section. The minimum number is 0 (no copies to
be printed, just the original ticket) and the maximum is 3 (default = 0).
ENABLING/DISABLING THE AUTO-OFF
To maximise battery life, the DTR can be set up to switch off automatically after given period of time. To enable this feature, tick the 'Auto-off'
checkbox in the 'Auto-off' section. To disable 'Auto-off', de-select the
checkbox.
SETTING THE AUTO-OFF TIME
To increase or decrease the time period after which the DTR is automatically switched off when idle (no buttons being pressed), click the '+' or '-'
boxes respectively. The boxes are located next to 'Auto-off after (value in
minutes)' text in the 'Auto-off' section. The minimum time is 1 minute and
the maximum time is 30 minutes (default = 10 minutes).
18
The value cannot be changed when the 'Auto-off' feature is disabled.
DEFINING THE HEADINGS TO BE DISPLAYED ON THE TICKET
To customise the headings to be displayed on the ticket, change the
respective fields in the 'Ticket headings' section. Changes made are reflected immediately on the 'Ticket layout' (General tab).
DEFINING THE MESSAGES TO BE DISPLAYED ON THE DTR
DISPLAY
To customise the messages to be displayed on the DTR display, change
the respective fields in the 'Messages on the DTR display' section.
RESETTING THE ADVANCED SETTINGS TO DEFAULT VALUES
To reset all advanced settings ('Operation of the remote button', 'Autooff', 'Ticket headings' and 'Messages on the DTR display'), click on the
'Default' button in the 'Advanced Settings'.
WARNING: resetting 'advanced settings' to default is an irreversible
action.
19
1762 W. 20 S. #100, Lindon, UT 84042
Ph: 801-756-7705 Fax: 801-756-8948
www.thermoworks.com