1
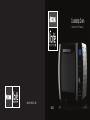
Countertop Oven
Instruction Manual
™
™
www.AromaCo.com
ABT-426D
Countertop Oven
™
Introducing the Aroma Forté™ Countertop Oven
Limited Warranty
Aroma Housewares Company warrants this product free from defects in material and
workmanship for one year from provable date of purchase in the continental United States.
Within this warranty period, Aroma Housewares Company will repair or replace, at its
option, defective parts at no charge, provided the product is returned, freight prepaid with
proof of purchase and U.S. $20.00 for shipping and handling charges payable to Aroma
Housewares Company. Before returning an item, please call the toll free number below for
a return authorization number. Allow 2-4 weeks for return shipping.
This warranty does not cover improper installation, misuse, abuse or neglect on the part of
the owner. Warranty is also invalid in any case that the product is taken apart or serviced
by an unauthorized service station.
This warranty gives you specific legal rights and which may vary from state to state and
does not cover areas outside the United States.
Published By:
1
Aroma Housewares Co.
6469 Flanders Drive
San Diego, CA 92121
U.S.A.
1-800-276-6286
www.AromaCo.com
© 2007 Aroma Housewares Company All rights reserved.
AROMA HOUSEWARES COMPANY
6469 Flanders Drive
San Diego, California 92121
1-800-276-6286
M-F, 8:30 AM - 5:00 PM, Pacific Time
www.AromaCo.com
10
How To Clean
™
1. Always unplug the appliance and allow it to cool completely before cleaning.
2. Remove the wire racks, bake pan and/or rotisserie attachment and wash in warm, soapy
water. Rinse and dry thoroughly.
3. Wipe out the nonstick interior of the oven with a damp cloth. Do not use harsh or abrasive
cleaners or scouring pads as they may damage the nonstick finish and create a risk of electric
shock.
4. Wipe down the exterior with a soft damp cloth.
5. Replace the wire racks and store the bake pan and rotisserie attachments in a separate
location.
DO NOT place the oven body in water or any other liquid.
DO NOT wipe the heating elements - they are self cleaning.
Important Safeguards
Basic safety precautions should always be followed when using electrical
appliances, including the following:
1.
2.
3.
4.
5.
6.
7.
8.
9.
10.
11.
12.
13.
14.
15.
9
Read all instructions.
Do not touch hot surfaces. Use handles or knobs.
To protect against electrical shock, do not immerse cord, plugs or whole appliance in water or
other liquid.
Close supervision is necessary when any appliance is use by or near children.
Unplug from outlet when not in use and before cleaning. Allow to cool before putting on or taking
off parts.
Do not operate any appliance with a damaged cord or plug or after the appliance malfunctions
or has been damaged in any manner. Return appliance to the nearest authorized service facility
for examination, repair, or adjustment.
The use of accessory attachments not recommended by the appliance manufacturer may cause
injuries.
Do not use outdoors. Household use only.
Do not let cord hang over the edge of table or counter, or touch hot surfaces.
Do not place on or near a hot gas or electric burner, or in a heated oven.
Extreme caution must be used when moving an appliance containing hot oil or other hot liquids.
To disconnect, turn any control to “off”, then remove plug from wall outlet.
Do not use appliance for other than intended use.
Oversize foods or metal utensils must not be inserted in the appliance as they may create a fire or
risk of electric shock.
A fire may occur if the appliance is covered or touching flammable material, including curtains,
draperies, walls, and the like, when in operation. Do not store any item on top of the appliance
when in operation.
S AV E T H E S E I N S T R U C T I O N S
2
Important Safeguards cont.
16.
™
17.
18.
19.
20.
21.
22.
1.
2.
Do not clean with metal scouring pads. Pieces can break off the pad and touch electrical parts,
creating a risk of electrical shock.
Extreme caution should be exercised when using containers constructed of materials other than
metal or glass.
Do not store any materials, other than the manufacturer's recommended accessories, in this
oven when not in use.
Do not place any of the following materials in the oven: paper, cardboard, plastic and the like.
Do not cover crumb tray or any part of the oven with metal foil. This will cause overheating of the
oven.
Any other servicing should be performed by an authorized service representative.
Press the “STOP” button twice, and then unplug the cord to turn off the appliance.
CAUTION:
Never operate the countertop oven with the oven door open.
The edges of the metal guard covering the lower heating element should never be touched
during cleaning. Always use a soft brush or other utensil to prevent injury.
Polarized Plug
S AV E T H E S E I N S T R U C T I O N S
This appliance has a polarized plug (one blade is wider than the other); follow the instructions below:
To reduce the risk of electric shock, this plug is intended to fit into a polarized outlet only one way. If
the plug does not fit fully into the outlet, reverse the plug. If it still does not fit, contact a qualified
electrician. Do not attempt to modify the plug in any way.
3
If the supply cord is damaged, it must be replaced by the manufacturer or its service agent or a
similarly qualified person in order to avoid a hazard.
THIS APPLIANCE IS FOR HOUSEHOLD USE ONLY.
Using the Countertop Oven cont.
Note: The temperature is only adjustable on the BAKE, PROGRAM 1 and PROGRAM 2 settings.
1. Place the oven on a sturdy, level surface in a well-ventilated area at least 10 inches away from
walls or cabinets.
2. Insert wire racks, bake pan, or rotisserie attachment as needed.
3. Insert food and close door.
4. Use the Program Selector Knob to choose your desired cooking method.
5. Adjust timer as needed. (Note: Timer is not adjustable with Toast function).
6. Press the Start button.
7. To pause the program, press the Stop button once. To stop the program and select another, hit
the stop button twice and repeat steps 4-6.
PERSONAL PROGRAMS
Personal Programs are user-defined cooking cycles that are stored in the oven’s memory. They
will remain in the memory until they are changed or deleted.
1. To set, turn the selector knob to Program 1 or Program 2.
To have the fan on (convection), press the Convection button. The
icon will appear.
To control the heating elements, press the Heater button.
Press once to use both the upper and lower heating elements.
Press twice to use only the upper heating element
To use the rotisserie function, press the Rotisserie button. The
icon will appear.
2. Press the temperature up or down buttons to select the temperature.
3. Press the timer up or down buttons to set the time.
4. Press Enter to commit the program settings to memory.
5. To cook, follow the instructions above, using Program 1 or Program 2.
CHANGING PERSONAL PROGRAMS:
1. To edit, turn the selector knob to Program 1 or Program 2.
2. Press the Delete button.
3. Follow instructions 1-5 above to re-program.
NOTE:
If the START key is
pressed before the
ENTER key after
setting Programs 1
or 2, the settings will
be erased.
8
Using the Countertop Oven
BEFORE FIRST USE:
™
1.
2.
3.
4.
5.
6.
Read all instructions and important safeguards.
Remove all packaging materials and make sure items are received in good condition.
Tear up all plastic bags as they can pose a risk to children.
Wash racks, bake pan, rack holder and rotisserie attachment in warm, soapy water. Rinse and dry
thoroughly.
Wipe out the nonstick interior with a soft, damp cloth. Do not use harsh or abrasive cleaners or
scouring pads as they may damage the nonstick finish. Metal scouring pads also create a risk of
electric shock.
Wipe down the exterior of the oven with a soft, damp cloth.
ACCESSORIES:
WIRE RACKS: Wire racks may be inserted in the oven in any of the three rack positions. Racks should be
removed when using the Rotisserie setting.
BAKE PAN: The enamel bake pan may be used for such things as baking cookies, french fries and other
small foods that would fall through the wire racks. If a recipe does not call for the use of the bake pan,
it should not be left in the oven during cooking as it may cause uneven heat distribution and slow the
cooking process. The bake pan should also not be used as a crumb tray, because it will block the heat
from the lower heating elements, resulting in uneven temperature distribution.
RACK HOLDER: The rack holder is provided for safety and convenience. Use it to grasp the bake pan
or rack when pulling it out of the oven. Do not pull bake pan or rack more than halfway out unless you
are using an oven mitt to support from underneath, otherwise hot foods may fall and cause injuries.
7
ROTISSERIE ATTACHMENT: Use the rotisserie attachment for chickens, gyro meat or any other rotisserie
meat. First, turn the hand screws (see Diagram) counter clockwise to loosen, then slide the metal forks
off of the skewer. Slide the skewer through the food to be cooked. Then, slide the metal forks back
onto the skewer (sharp sides facing in) and pierce either side of the food. When food is secure, turn the
hand screws clockwise to tighten. Insert into the oven by placing the pointed side of the skewer into
the square hold on the right-hand side of the oven, then sliding the square end through the opening on
the left hand side of the oven, making sure that it is securely locked into place. Always be sure to tie
poultry wings and legs with rotisserie twine for best results and to avoid damage to the oven.
Short Cord Instructions
1. A short power-supply cord is
provided to reduce risk resulting from
becoming entangled in or tripping
over a longer cord.
2. Longer extension cords are available
and may be used if care is exercised
in their use.
3. If a longer extension cord is used:
a. The marked electrical rating of the
extension cord should be at least
as great as the electrical rating of
the appliance.
b. The longer cord should be
arranged so that it will not drape
over the counter top or tabletop
where it can be pulled by children
or tripped over unintentionally.
4
Parts Identification
™
1. Dual-Pane Glass Door
2. Handle
3. Oven Exterior
4. LCD Display Screen
5. Program Settings Controls
6. Temperature Up/Down Controls
7. Program Selector Knob
8. Interior Light On/Off Button
3
9. Timer Controls
10. Start Button
11. Stop Button
12. Non-Slip Feet
13. Rotisserie Attachment
14. Wire Racks (2)
15. Tray Holder
16. Enamel Bake Pan
LCD DISPLAY:
14
A
C
PRE-SET FUNCTIONS:
D
The pre-programmed functions are selected using the knob on the
control panel. Available programs are: Bake, Broil, Toast, Rotisserie,
Keep Warm, Pizza, Defrost, Program 1, and Program 2. See the
Personal Programs section on page 8 for instructions on setting
Programs 1 & 2.
E
When the oven is first plugged in, the default mode is Bake. The table
below lists the settings of each of the seven pre-set programs.
B
4
FUNCTION
Racks must be inserted as shown
2
Bake
15
5
1
5
Using the Countertop Oven cont.
13
F
6
9
12
11
10
8
7
16
G
H
A. Only Upper Heating Element on
B. Upper & Lower Heating Elements on
C. Convection fan on
D. Heat On
E. Rotisserie
F. Time Display
G. Toast Browning Levels 1-7
H. Actual Temperature
I. Set Temperature
350 F
Broil
I
Toast*
Rotisserie
Keep Warm
Pizza
Defrost
UPPER
HEATING
ELEMENT
x
x
x
x
x
LOWER
HEATING
ELEMENT
CONVECTION ROTISSERIE
x
x
x
1
Level
1-7*
1-120
469
1-120
140
1-120
x
TOAST
LEVEL
TIME
(MINS)
400
Fixed
x
x
350-470
1-120
x
x
DEFAULT
TEMP
°F
1-120
x
x
*
DEFAULT
TIME
(MIN)
446
1-120
2
3
4
5
149
6
7
4:30 4:50 5:10 5:30 6:00 6:20 6:40
6
Using the Countertop Oven
BEFORE FIRST USE:
™
1.
2.
3.
4.
5.
6.
Read all instructions and important safeguards.
Remove all packaging materials and make sure items are received in good condition.
Tear up all plastic bags as they can pose a risk to children.
Wash racks, bake pan, rack holder and rotisserie attachment in warm, soapy water. Rinse and dry
thoroughly.
Wipe out the nonstick interior with a soft, damp cloth. Do not use harsh or abrasive cleaners or
scouring pads as they may damage the nonstick finish. Metal scouring pads also create a risk of
electric shock.
Wipe down the exterior of the oven with a soft, damp cloth.
ACCESSORIES:
WIRE RACKS: Wire racks may be inserted in the oven in any of the three rack positions. Racks should be
removed when using the Rotisserie setting.
BAKE PAN: The enamel bake pan may be used for such things as baking cookies, french fries and other
small foods that would fall through the wire racks. If a recipe does not call for the use of the bake pan,
it should not be left in the oven during cooking as it may cause uneven heat distribution and slow the
cooking process. The bake pan should also not be used as a crumb tray, because it will block the heat
from the lower heating elements, resulting in uneven temperature distribution.
RACK HOLDER: The rack holder is provided for safety and convenience. Use it to grasp the bake pan
or rack when pulling it out of the oven. Do not pull bake pan or rack more than halfway out unless you
are using an oven mitt to support from underneath, otherwise hot foods may fall and cause injuries.
7
ROTISSERIE ATTACHMENT: Use the rotisserie attachment for chickens, gyro meat or any other rotisserie
meat. First, turn the hand screws (see Diagram) counter clockwise to loosen, then slide the metal forks
off of the skewer. Slide the skewer through the food to be cooked. Then, slide the metal forks back
onto the skewer (sharp sides facing in) and pierce either side of the food. When food is secure, turn the
hand screws clockwise to tighten. Insert into the oven by placing the pointed side of the skewer into
the square hold on the right-hand side of the oven, then sliding the square end through the opening on
the left hand side of the oven, making sure that it is securely locked into place. Always be sure to tie
poultry wings and legs with rotisserie twine for best results and to avoid damage to the oven.
Short Cord Instructions
1. A short power-supply cord is
provided to reduce risk resulting from
becoming entangled in or tripping
over a longer cord.
2. Longer extension cords are available
and may be used if care is exercised
in their use.
3. If a longer extension cord is used:
a. The marked electrical rating of the
extension cord should be at least
as great as the electrical rating of
the appliance.
b. The longer cord should be
arranged so that it will not drape
over the counter top or tabletop
where it can be pulled by children
or tripped over unintentionally.
4
Important Safeguards cont.
16.
™
17.
18.
19.
20.
21.
22.
1.
2.
Do not clean with metal scouring pads. Pieces can break off the pad and touch electrical parts,
creating a risk of electrical shock.
Extreme caution should be exercised when using containers constructed of materials other than
metal or glass.
Do not store any materials, other than the manufacturer's recommended accessories, in this
oven when not in use.
Do not place any of the following materials in the oven: paper, cardboard, plastic and the like.
Do not cover crumb tray or any part of the oven with metal foil. This will cause overheating of the
oven.
Any other servicing should be performed by an authorized service representative.
Press the “STOP” button twice, and then unplug the cord to turn off the appliance.
CAUTION:
Never operate the countertop oven with the oven door open.
The edges of the metal guard covering the lower heating element should never be touched
during cleaning. Always use a soft brush or other utensil to prevent injury.
Polarized Plug
S AV E T H E S E I N S T R U C T I O N S
This appliance has a polarized plug (one blade is wider than the other); follow the instructions below:
To reduce the risk of electric shock, this plug is intended to fit into a polarized outlet only one way. If
the plug does not fit fully into the outlet, reverse the plug. If it still does not fit, contact a qualified
electrician. Do not attempt to modify the plug in any way.
3
If the supply cord is damaged, it must be replaced by the manufacturer or its service agent or a
similarly qualified person in order to avoid a hazard.
THIS APPLIANCE IS FOR HOUSEHOLD USE ONLY.
Using the Countertop Oven cont.
Note: The temperature is only adjustable on the BAKE, PROGRAM 1 and PROGRAM 2 settings.
1. Place the oven on a sturdy, level surface in a well-ventilated area at least 10 inches away from
walls or cabinets.
2. Insert wire racks, bake pan, or rotisserie attachment as needed.
3. Insert food and close door.
4. Use the Program Selector Knob to choose your desired cooking method.
5. Adjust timer as needed. (Note: Timer is not adjustable with Toast function).
6. Press the Start button.
7. To pause the program, press the Stop button once. To stop the program and select another, hit
the stop button twice and repeat steps 4-6.
PERSONAL PROGRAMS
Personal Programs are user-defined cooking cycles that are stored in the oven’s memory. They
will remain in the memory until they are changed or deleted.
1. To set, turn the selector knob to Program 1 or Program 2.
To have the fan on (convection), press the Convection button. The
icon will appear.
To control the heating elements, press the Heater button.
Press once to use both the upper and lower heating elements.
Press twice to use only the upper heating element
To use the rotisserie function, press the Rotisserie button. The
icon will appear.
2. Press the temperature up or down buttons to select the temperature.
3. Press the timer up or down buttons to set the time.
4. Press Enter to commit the program settings to memory.
5. To cook, follow the instructions above, using Program 1 or Program 2.
CHANGING PERSONAL PROGRAMS:
1. To edit, turn the selector knob to Program 1 or Program 2.
2. Press the Delete button.
3. Follow instructions 1-5 above to re-program.
NOTE:
If the START key is
pressed before the
ENTER key after
setting Programs 1
or 2, the settings will
be erased.
8
How To Clean
™
1. Always unplug the appliance and allow it to cool completely before cleaning.
2. Remove the wire racks, bake pan and/or rotisserie attachment and wash in warm, soapy
water. Rinse and dry thoroughly.
3. Wipe out the nonstick interior of the oven with a damp cloth. Do not use harsh or abrasive
cleaners or scouring pads as they may damage the nonstick finish and create a risk of electric
shock.
4. Wipe down the exterior with a soft damp cloth.
5. Replace the wire racks and store the bake pan and rotisserie attachments in a separate
location.
DO NOT place the oven body in water or any other liquid.
DO NOT wipe the heating elements - they are self cleaning.
Important Safeguards
Basic safety precautions should always be followed when using electrical
appliances, including the following:
1.
2.
3.
4.
5.
6.
7.
8.
9.
10.
11.
12.
13.
14.
15.
9
Read all instructions.
Do not touch hot surfaces. Use handles or knobs.
To protect against electrical shock, do not immerse cord, plugs or whole appliance in water or
other liquid.
Close supervision is necessary when any appliance is use by or near children.
Unplug from outlet when not in use and before cleaning. Allow to cool before putting on or taking
off parts.
Do not operate any appliance with a damaged cord or plug or after the appliance malfunctions
or has been damaged in any manner. Return appliance to the nearest authorized service facility
for examination, repair, or adjustment.
The use of accessory attachments not recommended by the appliance manufacturer may cause
injuries.
Do not use outdoors. Household use only.
Do not let cord hang over the edge of table or counter, or touch hot surfaces.
Do not place on or near a hot gas or electric burner, or in a heated oven.
Extreme caution must be used when moving an appliance containing hot oil or other hot liquids.
To disconnect, turn any control to “off”, then remove plug from wall outlet.
Do not use appliance for other than intended use.
Oversize foods or metal utensils must not be inserted in the appliance as they may create a fire or
risk of electric shock.
A fire may occur if the appliance is covered or touching flammable material, including curtains,
draperies, walls, and the like, when in operation. Do not store any item on top of the appliance
when in operation.
S AV E T H E S E I N S T R U C T I O N S
2
Countertop Oven
™
Introducing the Aroma Forté™ Countertop Oven
Limited Warranty
Aroma Housewares Company warrants this product free from defects in material and
workmanship for one year from provable date of purchase in the continental United States.
Within this warranty period, Aroma Housewares Company will repair or replace, at its
option, defective parts at no charge, provided the product is returned, freight prepaid with
proof of purchase and U.S. $20.00 for shipping and handling charges payable to Aroma
Housewares Company. Before returning an item, please call the toll free number below for
a return authorization number. Allow 2-4 weeks for return shipping.
This warranty does not cover improper installation, misuse, abuse or neglect on the part of
the owner. Warranty is also invalid in any case that the product is taken apart or serviced
by an unauthorized service station.
This warranty gives you specific legal rights and which may vary from state to state and
does not cover areas outside the United States.
Published By:
1
Aroma Housewares Co.
6469 Flanders Drive
San Diego, CA 92121
U.S.A.
1-800-276-6286
www.AromaCo.com
© 2007 Aroma Housewares Company All rights reserved.
AROMA HOUSEWARES COMPANY
6469 Flanders Drive
San Diego, California 92121
1-800-276-6286
M-F, 8:30 AM - 5:00 PM, Pacific Time
www.AromaCo.com
10
Countertop Oven
Instruction Manual
™
™
www.AromaCo.com
ABT-426D